

Frigidaire FPHT18D3RS2 Owner’s Manual

EN FREEZER /REFRIGERATOR USE AND CARE GUIDE
FR REFRIGERATEUR /CONGELATEUR GUIDE D:UTILISATIQN ET D'ENTRETIEN
iiiiiiiiiiiiiiiiiiiiiiiiiiiiiiiiiiiiiiiiiiiiiiiiiiiiiiiiiiiiiiiiiiiiiiiiiiiiiiiiiiiiiiiiii
809209301 October 2013
Finding information
::::::::::::::::::::::::::::::::::::::::::::::::::::::
iiiiiiiiiiiiiiiiiiiiiiiiiiiiiiiiiiiiiiiiiiiiiiiiiiiiiil
iiiiiiiiiiiiiiiiiiiiiiiiiiiiiiiiiiiiiiiiiiiiiiiiiiiiiil
iiiiiiiiiiiiiiiiiiiiiiiiiiiiiiiiiiiiiiiiiiiiiiiiiiiiiillPlease read and save this Table of contents
.......................................................guide
iiiiiiiiiiiiiiiiiiiiiiiiiiiiiiiiiiiiiiiiiiiiiiiiiiiiii!_Thankyouforchoosing Electrolux, ournew
iiiiiiiiiiiiiiiiiiiiiiiiiiiiiiiiiiiiiiiiiiiiiiiiiiiiii!_ premium brand in home appliances. This
iiiiiiiiiiiiiiiiiiiiiiiiiiiiiiiiiiiiiiiiiiiiiiiiiiiiiiilUse & Care Guide ispart of our commitment
iiiiiiiiiiiiiiiiiiiiiiiiiiiiiiiiiiiiiiiiiiiiiiiiiiiiii!ito customer satisfaction and product quality
_ throughout the service life ofyour new appliance
iiiiiiiiiiiiiiiiiiiiiiiiiiiiiiiiiiiiiiiiiiiiiiiiiiiiiiii
Keep a record for quick
Purchase date
Electrolux model number
Electrolux serial number
:iii i reference
iiiiiiiiiiiiiiiiiiiiiiiiiiiiiiiiiiiiiiiiiiiiiiiiiiiiiiiii
iiiiiiiiiiiiiiiiiiiiiiiiiiiiiiiiiiiiiiiiiiiiiiiiiiiiiiiii
iiiiiiiiiiiiiiiiiiiiiiiiiiiiiiiiiiiiiiiiiiiiiiiiiiiiiiiii
iiiiiiiiiiiiiiiiiiiiiiiiiiiiiiiiiiiiiiiiiiiiiiiiiiiiiiiii
iiiiiiiiiiiiiiiiiiiiiiiiiiiiiiiiiiiiiiiiiiiiiiiiiiiiiiiii
i
iiiiiiiiiiiiiiiiiiiiiiiiiiiiiiiiiiiiiiiiiiiiiiiiiiiiiiiiiQuestions?
iiiiiiiiiiiiiiiiiiiiiiiiiiiiiiiiiiiiiiiiiiiiiiiiiiiiiiiiiFortoll-freetelephonesupport inthe U.S. and
iiiiiiiiiiiiiiiiiiiiiiiiiiiiiiiiiiiiiiiiiiiiiiiiiiiiiiiiiCanada:1-877-4ELECTROLU×
iiiiiiiiiiiiiiiiiiiiiiiiiiiiiiiiiiiiiiiiiiiiiiiiiiiiiiiii(1-877-435-3287/
iiiiiiiiiiiiiiiiiiiiiiiiiiiiiiiiiiiiiiiiiiiiiiiiiiiiiiiiiFor online support and product information
iiiiiiiiiiiiiiiiiiiiiiiiiiiiiiiiiiiiiiiiiiiiiiiiiiiiiiiiivisit http://www.electroluxappliances.com
iiiiiiiiiiiiiiiiiiiiiiiiiiiiiiiiiiiiiiiiiiiiiiiiiiiiiiiii
iiiiiiiiiiiiiiiiiiiiiiiiiiiiiiiiiiiiiiiiiiiiiiiiiiiiiiiii
iiiiiiiiiiiiiiiiiiiiiiiiiiiiiiiiiiiiiiiiiiiiiiiiiiiiiiiii
iiiiiiiiiiiiiiiiiiiiiiiiiiiiiiiiiiiiiiiiiiiiiiiiiiiiiiiii
iiiiiiiiiiiiiiiiiiiiiiiiiiiiiiiiiiiiiiiiiiiiiiiiiiiiiiiii
iiiiiiiiiiiiiiiiiiiiiiiiiiiiiiiiiiiiiiiiiiiiiiiiiiiiiiiii
iiiiiiiiiiiiiiiiiiiiiiiiiiiiiiiiiiiiiiiiiiiiiiiiiiiiiiii_
Finding Information .................................... 2
Safety .......................................................... 3
Feature Overview ........................................ 5
Installation .................................................. 6
Removing the Doors ................................. 10
Installing Door Handles ............................ 12
Connecting the Water Supply .................. 13
Controls .................................................... 15
Automatic Ice Maker ................................ 17
Storage Features ...................................... 18
Storing Food and Saving Energy ............. 23
Normal Operating Sounds & Sights ......... 24
Changing the Water and Air Filters .......... 25
Care and Cleaning .................................... 27
Common Solutions for Concerns ............ 31
Warranty .................................................... 36
Safety
Important safety General Safety
instructions
Y
Do not attempt to nsta or operate your un t
until you have read the safety precautions mew el i_ _ r. ......................................................
in this manual. Safety items throughout this
manual are labeled with a Danger, Warning, or • Do not store or use gasoline or other
Cautionbasedontherisktype.
Definitions
_This is the safety alert symbol. It is
used to alert you to potential personal injury
hazards. Obey all safety messages that follow
this symbol to avoid possible injury or death.
i
flammable liquids near this or any other
appliance. Read product labels for
warnings regarding flammability and
other hazards.
• Do not operate the refrigerator in the
presence of explosive fumes.
• Avoid contact with any moving parts of
the automatic ice maker.
Remove all staples from the carton to
avoid injury. Staples can also damage
finishes if they come in contact with
other appliances or furniture.
Child Safety
Packing Materials:
= Packing cartons covered with rugs,
bedspreads, plastic sheets, or stretch
wrap may become airtight chambers and
can quickly cause suffocation.
• Destroy or recycle the product's carton,
plastic bags, and any other exterior
wrapping material immediately after the
refrigerator is unpacked. Children should
never play with these items.
Child Entrapment and Suffocation:
• These problems are not limited to the
past. Whether junked, abandoned, or
temporarily stored (even for a few hours),
unattended refrigerators and freezers are
dangerous. Please take the precautions
listed below.
Proper Disposal of Refrigerators/
Freezers
iiiiiiiiiiiiiiiiiiiiiiiiiiiiiiiiiiiiiiiiiiiiiiiiiiiiiii_
iiiiiiiiiiiiiiiiiiiiiiiiiiiiiiiiiiiiiiiiiiiiiiiiiiiiiiii
iiiiiiiiiiiiiiiiiiiiiiiiiiiiiiiiiiiiiiiiiiiiiiiiiiiiiii •
iiiiiiiiiiiiiiiiiiiiiiiiiiiiiiiiiiiiiiiiiiiiiiiiiiiiiiii
iiiiiiiiiiiiiiiiiiiiiiiiiiiiiiiiiiiiiiiiiiiiiiiiiiiiiiii
iiiiiiiiiiiiiiiiiiiiiiiiiiiiiiiiiiiiiiiiiiiiiiiiiiiiiil •
iiiiiiiiiiiiiiiiiiiiiiiiiiiiiiiiiiiiiiiiiiiiiiiiiiiiiiJ
iiiiiiiiiiiiiiiiiiiiiiiiiiiiiiiiiiiiiiiiiiiiiiiiiiiiiiii
Safety
Leave the shelves and baskets in place
so children may not easily climb inside.
Have refrigerant and compressor oil
removed by a qualified service technician.
* Performance may be affected if
the voltage varies by 10% or more.
Operating the refrigerator with insufficient
power can damage the compressor.
Such damage's no_ :overea unaer j _ur
ivarran_y.
* Do not plug _ne unE q_oar OU_le_
conl[rOlleCl Dy 9. Wall SWll[Cn _r ou .3orci
_c oreven_ _nerefrigerator from De,no
_urned off accidenta ,.
Grounding type wall receptacle
.._ FDo not, under _"_
,._J;_ I I any circumstances,_
I _I IJ_ I _ cut, remove, |
I i'_ I_ or bypass the |
3-'prong grounded ptug_
iiiiiiiiiiiiiiiiiiiiiiiiiiiiiiiiiiiiiiiiiiiiiiiiiiiiiiiii• The refrigerator must be plugged into
iiiiiiiiiiiiiiiiiiiiiiiiiiiiiiiiiiiiiiiiiiiiiiiiiiiiiiiiiitsowndedicated 115Volt, 60 Hz,
iiiiiiiiiiiiiiiiiiiiiiiiiiiiiiiiiiiiiiiiiiiiiiiiiiiiiiiiiAC-only non-GFCl electric outlet. The
iiiiiiiiiiiiiiiiiiiiiiiiiiiiiiiiiiiiiiiiiiiiiiiiiiiiiiiiipowercord oftheappliance is equipped
iiiiiiiiiiiiiiiiiiiiiiiiiiiiiiiiiiiiiiiiiiiiiiiiiiiiiiiiiwith athree-prong grounding plug for
iiiiiiiiiiiiiiiiiiiiiiiiiiiiiiiiiiiiiiiiiiiiiiiiiiiiiiiiiyourprotection againstelectrical shock
iiiiiiiiiiiiiiiiiiiiiiiiiiiiiiiiiiiiiiiiiiiiiiiiiiiiiiiiihazards. It must be plugged directly
iiiiiiiiiiiiiiiiiiiiiiiiiiiiiiiiiiiiiiiiiiiiiiiiiiiiiiiiiintoaproperlygroundedthree-prong
iiiiiiiiiiiiiiiiiiiiiiiiiiiiiiiiiiiiiiiiiiiiiiiiiiiiiiiiireceptacle. The receptacle must be
iiiiiiiiiiiiiiiiiiiiiiiiiiiiiiiiiiiiiiiiiiiiiiiiiiiiiiiiiinstalledinaccordancewithlocalcodes
iiiiiiiiiiiiiiiiiiiiiiiiiiiiiiiiiiiiiiiiiiiiiiiiiiiiiiiiiand ordinances. Consult a qualified
iiiiiiiiiiiiiiiiiiiiiiiiiiiiiiiiiiiiiiiiiiiiiiiiiiiiiiiiielectrician. Do not use an extension cord
iiiiiiiiiiiiiiiiiiiiiiiiiiiiiiiiiiiiiiiiiiiiiiiiiiiiiiiiioradapterplug.
iiiiiiiiiiiiiiiiiiiiiiiiiiiiiiiiiiiiiiiiiiiiiiiiiiiiiiiii" If the power cord is damaged, it should
_' be replaced by the manufacturer, service
i!i_i!_!___!!_i!_i!_i!_i!_i!_i!_i!_i!_i!_i!_i!_i!_i!_i!_i!_i!_i!_i!_i!_i!_i!_i!_i!_i!_i!_i!_i!_i!_i!_i!_i!_i!_i!_i!_i!_i!_i!_i!_i!_i!_i!_i!_i!_i!_i!_i!_i!_i!_i!_i!_i!technician, oraqualified person.
• Never unplug the refrigerator by pulling
on the powercord. Always gripthe
_i_i_i_i_i_i_i_i_i_i_i:iiii_iiiiiiiiiiiiiiiiiiiiiiiiiiiiiiiiiiiiiiiiiiiiiiiiiiiiiiiiiiiiiiiiiiiiiiiiiiiiiiiiiiiiiiiiiiiiiiiiiiiiiiiiiiiiiiiiiiiiiiiiiiplug firmly and pull straight out from
the receptacle to prevent damaging the
powercord.
iiiiiiiiiiiiiiiiiiiiiiiiiiiiiiiiiiiiiiii_i:i_i__i!iiiiiiiiiiiiiiiiiiiiiiiiiiiiiiiiiiiiiiiiiiiiiiiiiiiiiiiiiiiiiiiiiiiiiiiiiiiiiiiiiiiiiiiiii• Toavoidelectricalshock, unplugthe
refrigeratorbeforecleaning and before
replacing a light bulborLEU light.
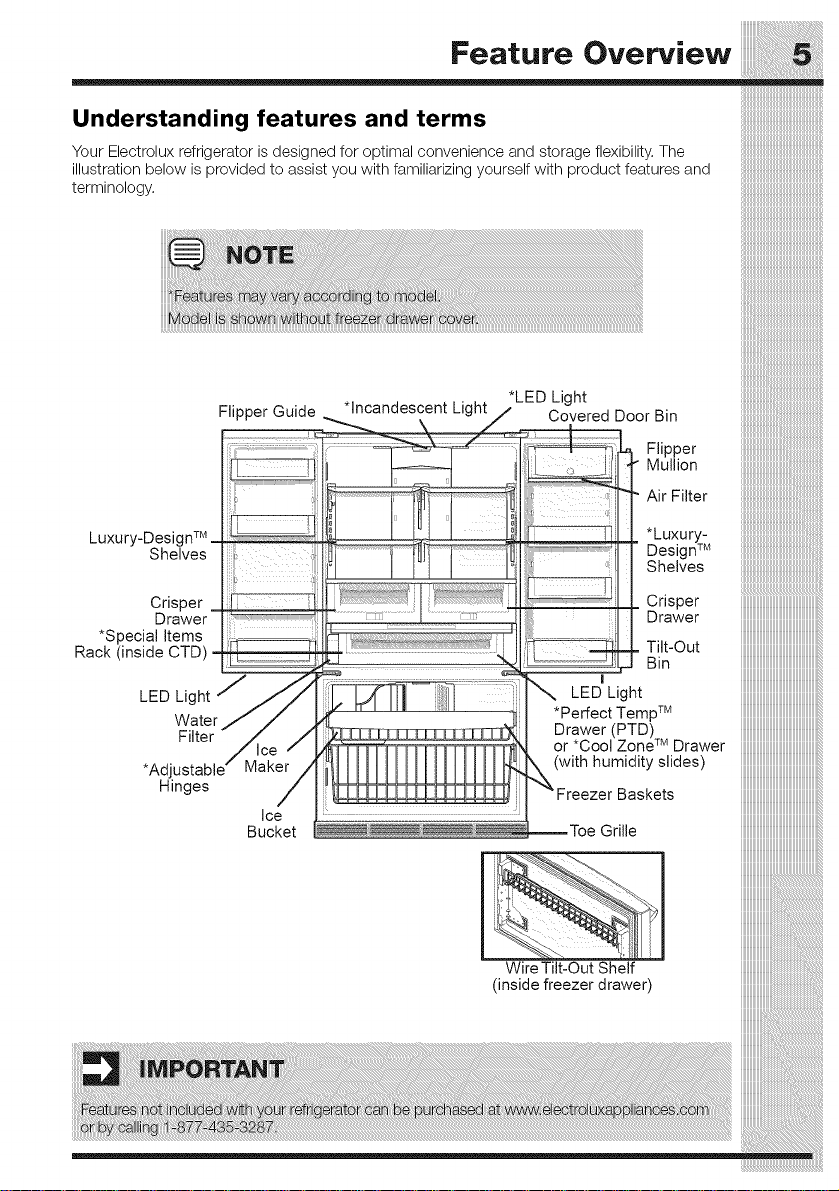
Feature Overview
Understanding features and terms
Your Electrolux refrigerator is designed for optimal convenience and storage flexibility. The
illustration below is provided to assist you with familiarizing yourself with product features and
terminology.
*LED Light
|nstallation
iiiiiiiiiiiiiiiiiiiiiiiiiiiiiiiiiiiiiiiiiiiiiiiiiiiiii__
iiiiiiiiiiiiiiiiiiiiiiiiiiiiiiiiiiiiiiiiiiiiiiiiiiiiii_i
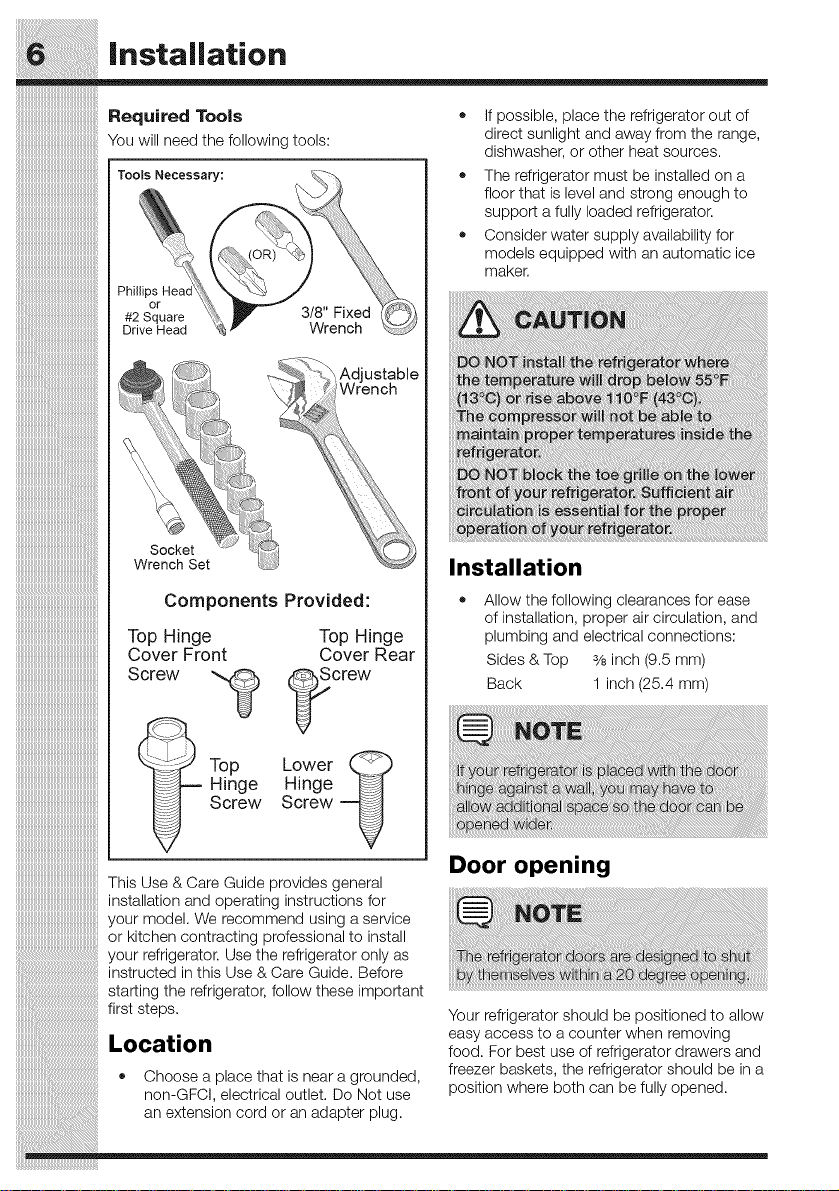
.......................................................Required Tools
:::::::::::::::::::::::::::::::::::::::::::::::::::::::
iiiiiiiiiiiiiiiiiiiiiiiiiiiiiiiiiiiiiiiiiiiiiiiiiiiiiiilYouwill needthefollowingtools:
iiiiiiiiiiiiiiiiiiiiiiiiiiiiiiiiiiiiiiiiiiiiiiiiiiiiii!_
iiiiiiiiiiiiiiiiiiiiiiiiiiiiiiiiiiiiiiiiiiiiiiiiiiiiiill
iiiiiiiiiiiiiiiiiiiiiiiiiiiiiiiiiiiiiiiiiiiiiiiiiiiiiiilT°°'sNecessary:
iiiiiiiiiiiiiiiiiiiiiiiiiiiiiiiiiiiiiiiiiiiiiiiiiiiiii_:,
iiiiiiiiiiiiiiiiiiiiiiiiiiiiiiiiiiiiiiiiiiiiiiiiiiiiii: _
iiiiiiiiiiiiiiiiiiiiiiiiiiiiiiiiiiiiiiiiiiiiiiiiiiiiii_:,_
> Adjustable
\ Wrench
iiiiiiiiiiiiiiiiiiiiiiiiiiiiiiiiiiiiiiiiiiiiiiii,,Socket
iiiiiiiiiiiiiiiiiiiiiiiiiiiiiiiiiiiiiiiiiiiiiiiiiiWrench Set
Components Provided:
iiiiiiiiiiiiiiiiiiiiiiiiiiiiiiiiiiiiiiiiiiiiiiiiiiiiiiiii
Top Hinge
Cover Front
Top Hinge
Cover Rear
iiiiiiiiiiiiiiiiiiiiiiiiiiiiiiiiiiiiiiiiiiiiiiiiiiiiiiiiiScrew
iiiiiiiiiiiiiiiiiiiiiiiiiiiiiiiiiiiiiiiiiiiiiiiiiiiiiiiii
crew
If possible, place the refrigerator out of
direct sunlight and away from the range,
dishwasher, or other heat sources.
The refrigerator must be installed on a
floor that is level and strong enough to
support a fully loaded refrigerator.
Consider water supply availability for
models equipped with an automatic ice
maker.
Installation
Allow the following clearances for ease
of installation, proper air circulation, and
plumbing and electrical connections:
Sides & Top 3/8inch (9.5 ram)
Back 1 inch (25.4 ram)
iiiiiiiiiiiiiiiiiiiiiiiiiiiiiiiiiiiiiiiiiiiiiiiiiiiiiiiii
iiiiiiiiiiiiiiiiiiiiiiiiiiiiiiiiiiiiiiiiiiiiiiiiiiiiiiiii
iiiiiiiiiiiiiiiiiiiiiiiiiiiiiiiiiiiiiiiiiiiiiiiiiiiiiiiii
iiiiiiiiiiiiiiiiiiiiiiiiiiiiiiiiiiiiiiiiiiiiiiiiiiiiiiiii
Top
Hinge
Screw
Hinge
Screw
Lower __
iiiiiiiiiiiiiiiiiiiiiiiiiiiiiiiiiiiiiiiiiiiiiiiiiiiiiiiii
iiiiiiiiiiiiiiiiiiiiiiiiiiiiiiiiiiiiiiiiiiiiiiiiiiiiiiiii
Door opening
Installation
Leveling Freezer Drawer Tolevelthecabinetusingt.e frontro,ers:
(if necessary) 1 Slightly open freezerdrawer. Liftthe toe
1 Check gasket seal around top, bottom, 2 You can raise or lower each door. Use
and sides of freezer drawer, a 3/8inch socket wrench to turn the
2 If gasket is not sealed, open drawer and adjustment screws (1 per side).
slightly loosen four drawer screws (two ......
on each side) to allow drawer to rotate.
3 Close drawer and recheck the seal
on the gasket (A). Open the drawer
grabbing by the sides in the center (B).
Be careful not to rotate the drawer.
Remove hex RemoVe hex
head drawer ys ... head drawer
screw _ J _ _--\._ screw
-i- _f _,-_.
/d'T'_.,P'R_qDo Not Remove I_P_
__11 |Remo've
_"a_d DrsHwex
Screw Screw
4
Tighten four drawer screws.
5 Recheck gasket seal.
grilleand gently pullforward (see illustration).
_Toe Grille Must_
/ ._I' \ Fit in Slot On / t,_,
I p"_ _} Anti-tiP Bracket L _!-I
\ f_'._',_ I_ ScrewRVasher _1;,,_¢_
_L___ (3) Retaining Clips
To raise: turn adjustment screw clockwise.
To lower: turn adjustment screw
counterclockwise.
3
Ensure both doors are bind-free with
their seals touching the cabinet on all
four sides and that cabinet is stable.
4
After unit is leveled, lower anti-tip leg
until it contacts the floor.
Assembly
iiiiiiiiiiiiiiiiiiiiiiiiiiiiiiiiiiiiiiiiiiiiiiiiiiiiiiiiii
t iiiiiiiiiiiiiiiiiiiiiiiiiiiiiiiiiiiiiiiiiiiiiiiiiiiiiiiiii
iiiiiiiiiiiiiiiiiiiiiiiiiiiiiiiiiiiiiiiiiiiiiiiiiiiiiiiii
iiiiiiiiiiiiiiiiiiiiiiiiiiiiiiiiiiiiiiiiiiiiiiiiiiiiiiiii
iiiiiiiiiiiiiiiiiiiiiiii
iiiiiiiiiiiiiiiiiiiiiiii
iiiiiiiiiiiiiiiiiiiiiiiiiii
i11111111111111111111111111111111111111111111111111111111
iiiiiiiiiiiiiiiiiiiiiiiiiiiiiiiiiiiiiiiiiiiiiiiiiiiiiiiii
iiiiiiiiiiiiiiiiiiiiiiiiiiiiiiiiiiiiiiiiiiiiiiiiiiiiiiiii
iiiiiiiiiiiiiiiiiiiiiiiiiiiiiiiiiiiiiiiiiiiiiiiiiiiiiiii
iiiiiiiiiiiiiiiiiiiiiiiiiiiiiiiiiiiiiiiiiiiiiiiiiiiH!!!
iiiiiiiiiiiiiiiiiiiiiiiiiiiiiiiiiiiiiiiiiiiiiiiiiii
iiiiiiiiiiiiiiiiiiiiiiiiiiiiiiiiiiiiiiiiiiiiiiiiiiiiii
Against
Freezer
Drawer
Grab
D rawer
at Center
Ili from Both
Sides
Then
° ' Door
Door'
=
=lli Drawer
Out
Level Refrigerator & Adjust
Doors (if necessary)
Guidelines for final positioning of your
refrigerator:
All four corners of the cabinet must rest
firmly on the floor.
The sides should tilt _Ainch (6 mm) from
front to back (to,ensure that doors close 5 Install the toe grille by fitting into place.
and seal propeny/.
Doors should align with each other and
be level.
Most of these conditions can be met by
raising or lowering the adjustable front rollers.
o

Installation
To adjust the door stop:
Door stop is adjustable between 85 to 145
degrees.
5 Retighten screw.
Stop
c DoOr
li top Re-tighten
_i screwS
in Retighten Screw
Den _ 6 Ensure door stops in desired location
Adjustable Door Stop 1 Remove all food items from door bins on
1 Open door to provide access to screw, door being adjusted.
2 Loosen screw. 2 Open doorsto 90 degrees.
3 Adjust door to desired location. 3 Loosen or remove screw.
before resuming normal use,
To level the doors using the adjustable
lower hinge (select models):
Loosen or Remove
screw j
Screw
O eo 1
Door 't
Rotate W_. 90 "__'iJ _ _1
\ Door to Des rec \ _ Jegrec _ ',il
_ Location _, _1_
\ _ [Bottom oiDoor
\ Loosen/Remove Screw (where applicable)
Adjusting Door
4 Rotate doorstop until it makes contact _ NOT_
with the lower hinge,
Adju_ab e hinge _hou d 0n y b_ used after
doGrs have been leveled wi'_hrollers.
|nstallation
Lift the door while adjusting the washer.
To raise the door, rotate washer clockwise
(when viewed from the bottom). To lower
door, rotate washer counterclockwise
(when viewed from the bottom).
Door
Hinc
Washer /S_
Raising/Lowering Door
Retighten the screw, where applicable,
ensuring it is between the spokes of the
set washer. Screw will not be tight, just
insert until it is flush with the hinge.
Re-tighten Screw
To adjust the flipper mullion:
1 Loosen the screw located on the flipper
mullion hinge.
_...Flipper
Mu on ........
Mullion
H!nge
Adjusting Flipper Mullion Screw
Adjust flipper mullion height. For proper
connection with the flipper mullion guide,
there should be a separation about the
thickness of a coin (0.060 inches, or
1.5 mm between the guide and flipper
muIIIOR
I
i
I
Flipper
Mullion
I
Screw (where applicable)
Adjusting Flipper Mullion Height
3 Retighten screw.
Removing the Doors
Getting through narrow s Unscrew the three lower hinge screws
spaces
if your refrigerator will not fit through an
entrance area, you can remove the doors. Lower Hinge Removal
To prepare for removing the doors:
1
Make sure the electrical power cord is
unplugged from the wall outlet,
2 Open the freezer drawer and remove the
Check first by measuring the entrance. __
toe grille (see "installation" section).
3 Remove any food from the door shelves
and close the doors.
To remove the refrigerator doors:
1 Trace lightlyaround the door's top hinges
with a pencil. This makes reinstallationeasier.
and hinge if necessary.
To reinstallthe rightdoor, reversethe above steps.
Once both doors are in place, ensure they are
aligned with each other and level (please see
the "installation" section for more details), and
replace the top hinge cover.
Front
Cover Screw,, Rear
To i e _ Cover
p H ng __ Screw
£;over
Hinge
Screws round
crew./
Multi-w
Cables _p
Leave _._,[ Hinge
Hinge/ | /ii |'_
With "_(f-_. °i
Removing Freezer Drawer
Ooen freezer drawer,
Remove arawer screws on rlgnt ana eft
slaes two screws on each slae..
Remove hex
head drawer
2 Disconnect the harness by grasping both
sides of the connector firmly, depress the
latch, and pull apart. Remove the two
screws from the top hinge. Lift the door
off of the bottom hinge and set it aside.
Do Not Remove
Remove
Hex Hex
HeadDrawer HeadDrawer
Screw Screw
3 Lift drawer up and out to remove.

Removing the Doors
Installing Freezer Drawer
1 With lower slides pulled out, hang
drawer onto slide brackets ensuring pins
on each side are fully inserted into slots
on each side.
2
Reinstall four drawer screws (two per
side), tighten down, and close drawer.
LII
Install
6 Tighten four drawer screws.
7 Recheck gasket seal.
8 Install the toe grille by fitting into place.
Cabinet
3 Check gasket seal around top, bottom,
and sides of freezer drawer.
4 If gasket is not sealed, open drawer and
slightly loosen four drawer screws (two
on each side) to allow drawer to rotate.
5 Close drawer and recheck the seal
on the gasket (A). Open the drawer
grabbing by the sides in the center (B).
Be careful not to rotate the drawer.
Posh
Against
Freeze[ =
Drawer
Grab
Drawer
at Center
from Both
_ Sides
, Then
Pull
Drawer
Out
 Loading...