


FREEZER
use
Introduction .......................................................2
Important Safety information.....................3
Features .............................................................5
Installation .........................................................7
Door Removal ...................................................9
Door Reversal .................................................10
Door Handle Installation .............................. 11
Water Supply Connection .......................... 12
&
Controls and Settings .................................. 15
Ice Maker .......................................................... 19
Storage Features ..........................................20
Filter Replacement ...................................... 22
Care and Cleaning ....................................... 23
Troubleshooting .......................................... 25
Limited Warranty ......................................... 28
care
A16366302 (April 2020)
Frigidaire.com USA 1-800-374-4432 Frigidaire.ca Canada 1-800-265-8352

2
INTRODUCTION
Welcome to our
Thank you for bringing Frigidaire into
your home! We see your purchase as the
beginning of a long relationship together.
This manual is your resource for the use
and care of your product. Please read
it before using your appliance. Keep it
handy for quick reference. If something
doesn’t seem right, the troubleshooting
section will help you with common issues.
FAQs, helpful tips and videos, cleaning
products, and kitchen and home accessories
are available at Frigidaire.com.
We are here for you! Visit our website,
chat with an agent, or call us if you need
help. We may be able to help you avoid
a service visit. If you do need service, we
can get that started for you.
Let’s make it ocial! Be sure to register
your product.
Keep your product info here so it’s easy
to find.
Model Number ____________________
Serial Number ____________________
Purchase Date ____________________
family
Installation Checklist
Doors
Handles are secure and tight
Door seals completely to cabinet on
all sides
Door is level from side to side across
the top
Leveling
Appliance is level, side to side and
front to back
Cabinet is setting solid on all corners
Anti-tip bracket set in front
Electrical Power
House power turned on
Appliance plugged in
Ice Maker
House water supply connected to
appliance
No water leaks present at all
connections - recheck in 24 hours
Ice maker is turned on
Final Checks
Shipping material removed
Registration card sent in

IMPORTANT SAFETY INFORMATION
3
WARNING
Please read all instructions before using
this appliance.
Safety Definitions
This is the safety alert symbol. It is used
to alert of potential personal injury hazards.
Obey all safety messages that follow this
symbol to avoid possible injury or death.
DANGER
DANGER indicates an imminently hazardous situation which, if not avoided,
will result in death or serious injury.
WARNING
WARNING indicates a potentially hazardous situation which, if not avoided,
could result in death or serious injury.
CAUTION
CAUTION indicates a potentially hazardous situation which, if not avoided,
may result in minor or moderate injury.
IMPORTANT
IMPORTANT indicates installation, operation or maintenance information which
is important but not hazard-related.
DANGER
DANGER Risk of fire or explosion.
Flammable refrigerant used. Do not use
mechanical devices to defrost refrigerator. Do not puncture refrigerant tubing.
DANGER Risk of fire or explosion.
Flammable refrigerant used. To be repaired only by trained service personnel. Use only manufacturer-authorized
service parts. Any repair equipment
used must be designed for flammable
refrigerants. Follow all manufacturer
repair instructions. Do not puncture
refrigerant tubing.
CAUTION
CAUTION Risk of fire or explosion.
Dispose of refrigerator properly
in accordance with the applicable
federal or local regulations. Flammable
refrigerant used.
CAUTION Risk of fire or explosion
due to puncture of refrigerant tubing.
Follow handling instructions carefully.
Flammable refrigerant used.
WARNING
WARNING! CALIFORNIA RESIDENTS
Cancer and Reproductive Harm
www.P65Warnings.ca.gov
Child Safety
This appliance is not intended for use by
persons (including children) with reduced
physical, sensory or mental capabilities, or
lack of experience and knowledge, unless
they have been given supervision or instruction concerning use of the appliance
by a person responsible for their safety.
Destroy or recycle the carton, plastic
bags, and any exterior wrapping material immediately after the refrigerator is
unpacked. Children should NEVER use
these items to play. Cartons covered with
rugs, bedspreads, plastic sheets or stretch
wrap may become airtight chambers, and
can quickly cause suocation.
Safety Instructions
• DO NOT store or use gasoline, or
other flammable liquid within or in the
vicinity of this appliance. Read Product
Label for warnings regarding flammability and other hazards.
• DO NOT store explosive substances
such as aerosol cans with a flammable
propellant in this appliance.
• DO NOT operate the refrigerator in the
presence of explosive fumes.
• Avoid contact with any moving parts
of automatic ice maker.
• Remove all staples from the carton.
Staples can cause severe cuts, and also
destroy finishes if they come in contact
with other appliances or furniture.
Proper Disposal of your Appliance
Risk of child entrapment
Child entrapment and suocation are not
problems of the past. Junked or aban-

4
Grounding type wall receptacle
Power cord with
3-prong grounded plug
Do not, under
any circumstances,
cut, remove,
or bypass the
grounding prong.
IMPORTANT SAFETY INFORMATION
doned appliances are still dangerous –
even if they will sit for “just a few days”. If
you are getting rid of your old appliance,
please follow the instructions below to
help prevent accidents.
We strongly encourage responsible
appliance recycling/disposal methods.
Check with your utility company or visit
energystar.gov/products/recycle for more
information on recycling your old appliance.
Before you throw away your
old appliance:
• Remove door.
• Leave shelves in place so
children may not easily
climb inside.
• Have refrigerant removed
by a qualified service technician.
WARNING
These guidelines must be followed to
ensure that safety mechanisms in this
appliance will operate properly.
Electrical information
• Plug the appliance into its own dedicated 115 Volt, 60 Hz., 15 Amp, AC
only electrical outlet. The power cord
of the appliance is equipped with a
3-prong grounding plug for your protection against electrical shock hazards. Plug it directly into a properly
grounded 3-prong receptacle. Install
the receptacle in accordance with
local codes and ordinances. Consult a
qualified electrician. Avoid connecting the appliance to a Ground Fault
Interrupter (GFI) circuit. Do not use
an extension cord or adapter plug.
• If the power cord is damaged, an
authorized service technician should
replace it to prevent any risk.
• Never unplug the appliance by pulling on the power cord. Always grip
the plug firmly, and pull straight out
from the receptacle to prevent damaging the power cord.
• Unplug the appliance before cleaning
to avoid electrical shock.
• Performance may be aected if the
voltage varies by 10% or more. Operating the appliance with insucient
power can damage the compressor.
Such damage is not covered under
your warranty.
• Do not plug the unit into an electrical
outlet controlled by a wall switch or
pull cord to prevent the appliance
from being turned o accidentally.
• WARNING: Do not use electrical appliances inside the food storage compartments of the appliance unless
they are recommended accessories
for use within this model.
IMPORTANT
To turn o power to your appliance you
must unplug the power cord from the
electrical outlet.
IMPORTANT
CFC/HCFC Disposal
Your old appliance may have a cooling
system that used CFCs or HCFCs (chlorofluorocarbons or hydrochlorofluorocarbons). CFCs and HCFCs are believed
to harm stratospheric ozone if released
to the atmosphere. Other refrigerants
may also cause harm to the environment if released to the atmosphere.
If you are throwing away your old
appliance, make sure the refrigerant
is removed for proper disposal by a
qualified technician. If you intentionally
release refrigerant, you may be subject
to fines and imprisonment under provisions of environmental legislation.

FEATURES
*Features may vary according to model
D
E
F
C
G
D D
G
5
C
B
A
A
A Adjustable Tall Item Door Bins
with Dividers
B Adjustable Gallon Door Bin
with Divider
C Adjustable Half-Gallon Door Bins
with Dividers
D LED Lighting
E Air Filter
F
G G
D D
F Adjustable Full Width Metal Shelves
G *Multi-Port Air Exhaust Ducts
H Soft Freeze Zone Drawer
I Appliance Control Display
J Ice Maker
K Slide-Out Shelf with Removable
Ice Storage Bins
L Lower Storage Drawer with Dividers
H
I
J
D
K
L
IMPORTANT
*Do not place items in front of the
Multi-Port Air Exhaust Ducts as this will
impact temperature performance.

6
FEATURES
IMPORTANT
Cleaning your Appliance
Remove tape and glue residue from surfaces before turning on the appliance. Rub
a small amount of liquid dish soap over any remaining adhesive with your fingers.
Rinse with warm water and dry with a soft cloth.
Do not use sharp instruments, rubbing alcohol, flammable fluids, or abrasive cleaners
to remove tape or glue. These products can damage the surface of your appliance.
After you remove all of the package materials, clean the inside of your appliance
before using it. See the CARE & CLEANING section in this manual.
See important information about cleaning glass shelves and covers in the STORAGE
FEATURES section of this manual.
IMPORTANT
Moving your Appliance
Your appliance is heavy. When moving the appliance for cleaning or service, raise
the anti-tip bracket (see “Setting the anti-tip bracket”). Be sure to cover the floor
with cardboard or hardboard to avoid floor damage. Always pull the appliance
straight out when moving it. Do not wiggle or “walk” the appliance when trying to
move it as floor damage could occur.
IMPORTANT
Accessories are available for your appliance and may be purchased at
Frigidaire.com or by calling 1-800-374-4432 (Frigidaire.ca or 1-800-265-8352 in
Canada) or from an authorized seller.
1”
INSTALLATION
7
This Use & Care Guide provides general
operating instructions for your model. Use
the appliance only as instructed in this
Use & Care Guide. Before starting the appliance, follow these important first steps.
Location
• Choose a place that is near a grounded electrical outlet. Do Not use an
extension cord or an adapter plug.
• If possible, place the appliance out of
direct sunlight and away from the range,
dishwasher or other heat sources.
• Install the appliance on a floor that is
level and strong enough to support a
fully loaded appliance.
WARNING
DO NOT install the appliance where
the temperature will drop below 0°F
(-18°C) or rise above 110°F (43°C). The
compressor will not be able to maintain
proper temperatures inside the unit.
CAUTION
Do not block the lower front of your appliance. Sucient air circulation is essential to operate your appliance properly.
Installation
Installation clearances
Allow the following clearances for ease
of installation, proper air circulation, and
plumbing and electrical connections:
Sides 3/16 in.
Top & Back 1 in.
(25 mm)
Freezer
1”
(25 mm)
NOTE
If your appliance is placed with the door
hinge side against a wall, you may have
to allow additional space for the handle
so the door can be opened wider.
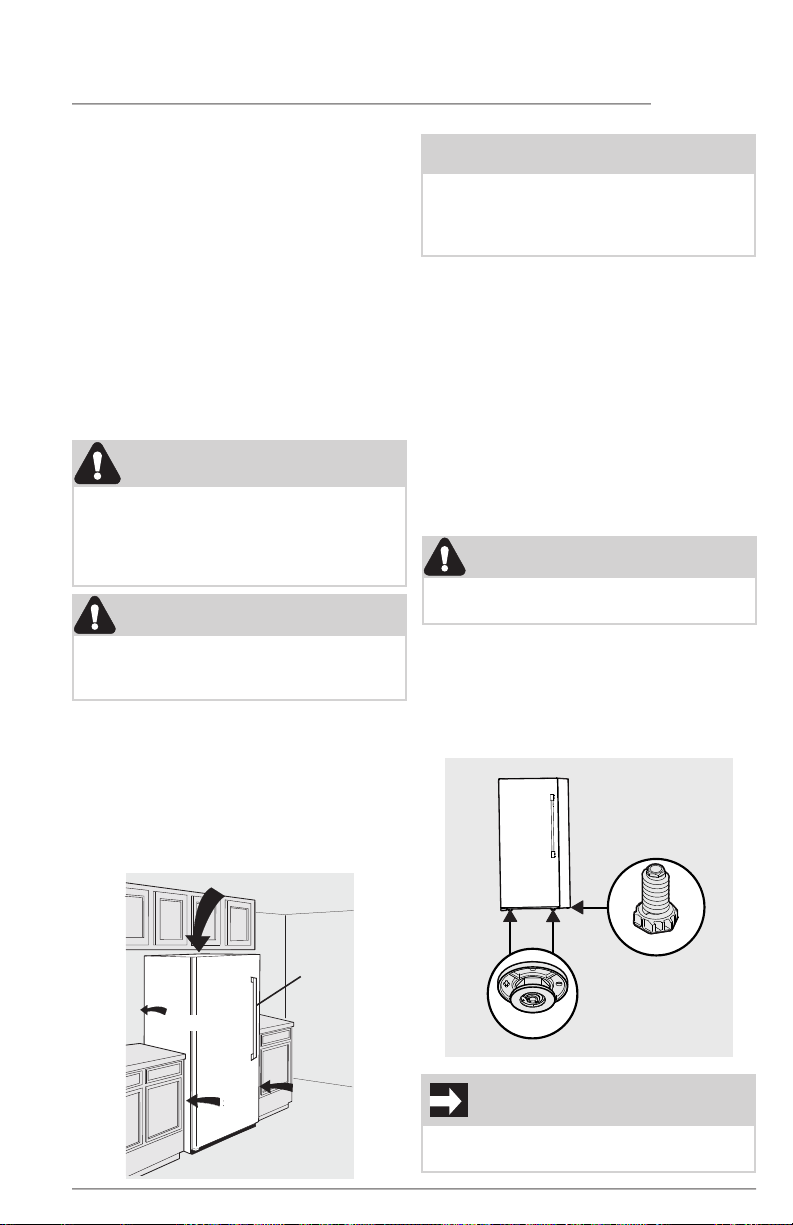
Leveling
Rest all bottom corners firmly on a
solid floor.
The floor must be strong enough to
support a fully loaded appliance.
It is VERY IMPORTANT for your unit to
be level in order to function properly.
If the appliance is not leveled during
installation, the door may be misaligned
and not close or seal properly, causing
cooling, frost or moisture problems.
To Level the Appliance:
CAUTION
The cabinet is heavy. Two people are
recommended to level the cabinet.
Level the unit using a carpenter’s level.
Adjust the leveling feet at the front making minor adjustments to the rear leveling
feet as needed. Level the unit front to
back and side to side. Make sure all 4 feet
fully touch the floor.
x2
x2
3/16”
(5 mm)
3/16”
3/8”
(5 mm)
(10mm)
IMPORTANT
Level the appliance to ensure optimal
performance of the ice maker.
8
INSTALLATION
Setting the anti-tip bracket:
Units are equipped with an anti-tip bracket. The anti-tip bracket is located on the
lower front corner of the cabinet, on the
lower hinge bracket. After fully leveling
the unit, lower the anti-tip foot by turning
it clockwise until is securely contacts the
floor. Do not raise the cabinet.
Lower
Anti-tip Bracket
WARNING
The anti-tip device must be
installed according to the
instructions in your Use &
Care Manual. Failure to do
so may result in injury.
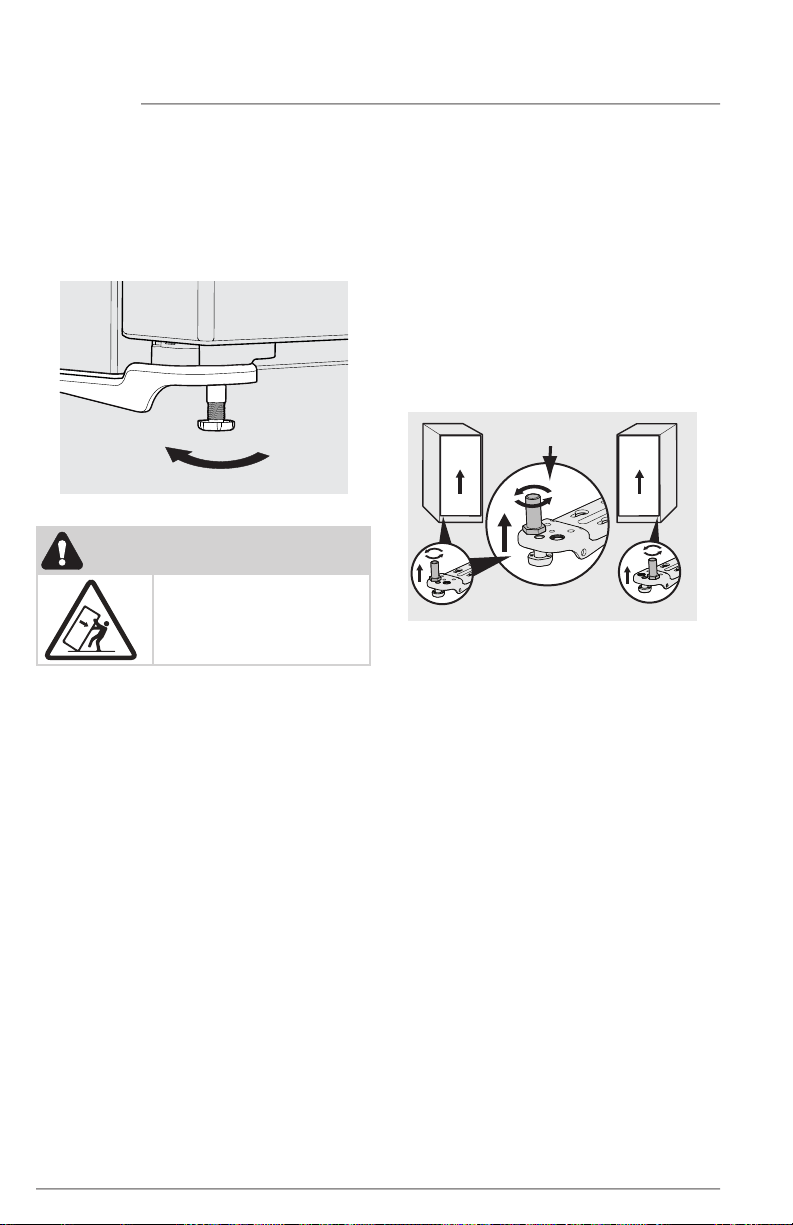
Lower Hinge Adjustment for Leveling
the Doors of the Matching Refrigerator /
Freezer Pair
To level the doors using the adjustable
lower hinge (some models):
If the refrigerator door is lower than the
freezer door, raise the refrigerator door
by turning the adjustment screw counterclockwise using a 19mm socket wrench.
(See illustration below.)
If the freezer door is lower than the
refrigerator door, raise the freezer door
by turning the adjustment screw counterclockwise using a 19mm socket wrench.
(See illustration below.)
Freezer Hinge
Door
Raise
Door
Freezer
Guidelines for final positioning of
your appliance:
• Rest all bottom leveling feet firmly on
a solid floor.
• The cabinet should be level on all sides.
• The door should be level.
Adjustment
Door
Raise
Door
Refrigerator

Tools Necessary:
and
TM
Phillips
Head or
#2 Square
Drive Head
or
DOOR REMOVAL
or
Adjustable
Wrench
9
Flathead
Screwdriver
or
5/16"
(8mm)
Fixed
Wrench
Socket
Wrench Set
8mm
(M5x16mm)
Hex head screw x3
x2
Door removal:
IMPORTANT
Before you begin, remove the electrical power cord from the wall outlet. Remove
any food from door shelves.
• Lift the door upwards and pull up
CAUTION
Doors are heavy. Two people are recommended to remove or replace the door
assembly from the cabinet.
and away from the cabinet until free
of the bottom hinge pin mounted on
the front of the cabinet.
• To replace the door, reverse the above
procedures and securely tighten all
screws to prevent hinge slippage.
CAUTION
The door should be closed prior to
removing or installing
• Unplug the unit or switch the breaker
that supplies power to the unit to the
o position.
• Remove the plastic top hinge cover.
• Hold the door in place while removing the top hinge from the cabinet.
• Remove the M5x16 mm hex head
screws from the top hinge with a
wrench or socket.
 Loading...