

Frigidaire FPF312ASA, FSF312ASA, FLF316ASA, FLF316AQA, FGF316ASA Installation Instructions Manual
...
INSTALLATION AND SERVICE MUST BE PERFORMED BY A QUALIFIED INSTALLER.
IMPORTANT: SAVE FOR LOCAL ELECTRICAL INSPECTOR'S USE.
READ AND SAVE THESE INSTRUCTIONS FOR FUTURE REFERENCE.
1_ If the information in this manual is not followed
exactly, a fire or explosion may result causing property
damage, personal injury or death.
FOR YOUR SAFETY:
-- Do not store or use gasoline or other flammable vapors
and liquids in the vicinity of this or any other appliance.
-- WHATTO DO IF YOU SMELL GAS:
• Do not try to light any appliance.
• Do not touch any electrical switch; do not use any phone
in your building.
• Immediately call your gas supplier from a neighbor's
phone. Follow the gas supplier's instructions.
• If you cannot reach your gas supplier, call the fire
department.
-- Installation and service must be performed by a qualified
installer, service agency or the gas supplier.
Refer to your serial plate for
applicable agency certification
ALL RANGES
CAN TIP.
INJURY TO
PERSONS
COULD
RESULT.
INSTALL
ANTI-TIP
DEVICE
PACKED
WITH RANGE.
SEE
INSTALLATION
INSTRUCTXDNS.
RANGE
1 \
TL
DoorOpen _ 29 7/8"'_ -_-_>
Wall on Either
Side of Range.
Above 36_
Height.
m
36"
Minimum
SIDE
VIEW
Minimumto <-13"-1
Cabinets on Maximum Depth
forCabinets
Above Range Top.
0' Clearance Below Cooking Top and at Rear of Range.
Clearances and Dimensions
1. Location--Check location where the ranae will be
installed. Check for proper electrical and gas supply,
and the stability of the floor.
2. Dimensions that ere shown must be used_ Given
dimensions provide minimum clearance. Contact
surface must be solid and level.
Important Notes to the Installer
1, Read all instructionscontained in these installation
instructionsbeforeinstalling range,
2, Removeallpackingmatedal fromtheovencompartments
before connecting the gas and electrical supplyto the
range.
3, Observe allgoverningcodesandordinances.
4, Be sure to leave these instructionswiththe consumer,
Important Noteto theConsumer: Keep these instructions
with your owner's guide for future reference.
EspaSol - Pages 11-20
P/N 316259312 (0112)
1
IMPORTANT SAFETY
INSTRUCTIONS
Installation ofthis range must conform with local codes or, in
the absence of local codes, with the National Fuel Gas Code
ANSI Z223.1--1atest edition when installed in the United
States. When installed in Canada, installation must conform
with CAN/CGA-B149.1 and CAN/CGA-B 149.2.
This range has been design certifiedby CSA International. As
with any appliance using gas and generating heat, there are
certain safety precautions you should follow. You will find
them in the Owner's Gui_, read itcarefully.
• Besure your range isinstalled and grounded properly
by a qualified installer or service technician.
• This rangemustbeelectricallygrounded inaccordance
with local codes or, intheir absence, with the National
Electrical Code ANSI/NFPA No.70_latest edition
when installed in the United States. When installed in
Canada, this range must be electrically grounded in
accordance withCSA StandardC22.1,Canadian Electrical
Code, Part1. See Grounding Instructionson page5 and
6.
The installationofappliancesdesignedformanufactured
(mobile)homeinstallationmustconformwithManufactured
Home Constructionand Safety Standard, title 24CFR,
part 3280 [Formerly the Federal Standard for Mobile
Home Constructionand Safety, title24, HUD (part280)]
orwhensuchstandard isnetapplicable,theStandardfor
Manufactured Home Installation 1982 (Manufcatured
Home Sites, Communities and Set-ups), ANSI Z225,1/
NFPA 501A--latest edition, or with local codes when
installedinthe UnitedStates. When installedinCanada,
installationmustconform withCAN/CSA-Z240 MH,
Before installing the range in an area covered with
linoleum or any other synthetic floor covering, make
sure the floor covering can withstand heat at least
90°F above room temperature without shrinking,
warping or discoloring. Do not installthe range over
carpetingunlessyou placean insulatingpad or sheetof
1/4-inchthickplywoodbetweenthe range andcarpeting,
• Make sure the wall coverings around the range can
withstand the heat generated by the range.
• Do not obstruct the flowof combustion air at the oven
vent nor around the base or beneath the lower front
panel of the range. Avoid touchingtheventopeningsor
nearby surfaces as they may become hot while the oven
is in operation. This range requires fresh air for proper
burner combustion.
Stepping, leaning or sitting on the doors or
drawers of this range can result in serious injuries and
can also cause damage to the range.
teach themtheproper, safe useofall appliances. Never leave
the oven door open when the range isunattended.
Do not store items of interest to children in the
cabinets above the range. Children couldbe seriously
burnedclimbing on the rangeto reach items.
• To eliminate the need to reach over the surface
burners, cabinet storage space above the burners
should be avoided.
• Adjust surface burner flame sizesoit does notextend
beyond the edge of the cooking utensil. Excessive
flame ishazardous.
Do not use the oven as a storage space. This creates
a potentiallyhazardous situation.
Never use your range for warming or heating the
room. Prolonged use of the range without adequate
ventilation can be dangerous.
• Do not store or use gasoline or other flammable
vapors and liquids near this or any other appliance.
Explosions or fires could result.
• Reset all controls to the "off" position after using a
programmable timing operation.
FOR MODELS WITH SELF-CLEAN FEATURE:
Remove broiler pan, food and other utensils before
self-cleaning the oven. Wipe upexcessspillage.Follow
theprecleaninginstructionsintheOwner'sGuide.
Before Proceeding:
Your rangehas been presetatthefactoryforusewithNatural
orLP/Propane gas. The factoryorificesettingisindicatedon
theserialplate. Besurethe rangeis adjusted forpropertype
gasbeforecontinuing.See instructionsfor"GasConversion"
ifadjustmentsare necessary.
DO NOT MAKE ANY ATTEMPT TO
OPERATETHE ELECTRIC IGNITION OVEN DURINGAN
ELECTRICAL POWER FAILURE. RESET ALL OVEN
CONTROLS TO "OFF" iN THE EVENT OF A POWER
FAILURE.
The electric ignitor will automatically re-ignite the oven
burner when power resumes ifthe oven thermostat control
was left inthe "ON" position.
When an electrical power failure occurs during use, the
surface burners will continue to operate.
During a power outage, the surface burners can be litwith
amatch. Holda lighted match to the burner,then slowlyturn
the knob to the LITE position. Use extreme caution when
lighting burners this way.
Note: On pilot models, the surface and oven burners will
operate normally during a power outage.
Never leave children alone or unattended in
the area where an appliance is in use. As children grow,
2
Before Starting
Tools You Will Need
For leveling legs and Anti-Tip Bracket:
• Adjustable wrench or channel lock pliers
/
• 5/16" Nutdriver or Flat Head Screw Driver
Electric Drill & 1/8" Diameter Drill Bit (5/32" Masonry Drill
Bit if installing in concrete)
For gassupply connection:
Pipe wrench
For burner flame adjustment:
• Phillipshead _ and
blade-type screwdrivers
For gas conversion (LP/Propane or Natural):
Open endwrench - 1/2"
Additional Materials You Will Need
• Gas lineshut-offvalve L_
• Pipejoint sealant that resistsaction of LP/Propane gas
A new flexible metal applianceconduit(1/2" NPT x 3/4"
or1/2"I.D.) mustbedesigncertifiedby CSA International.
Because solid pipe restricts moving the range we
recommend using a new flexible conduit (4 to 5 foot
length) for each new installation and additional
reinstallations.
_B a_B
• Always usethe (2) new flare union adapters (1/2" NPT x
3/4" or 1/2" I.D.) supplied withthe new flexible appliance
conduit for connection of the range.
Normal Installation Steps
1. Anti-Tip Bracket Installation Instructions
Important Safety Warning
To reducethe riskof tippingofthe range, the rangemust be
securedto the floorby properlyinstalledanti-tipbracketand
screwspacked with the range. Failure to installthe anti-tip
bracketwillallowthe rangetotip over ifexcessiveweightis
placedon an open door or if a child climbsupon it. Serious
injurymight result from spilled hot liquids orfrom the range
itself.
If range is ever moved to a different location, the anti-tip
brackets must also be moved and installed with the range.
Instructionsare provided for installation in woodor cement
fastened toeitherthe floororwall. When installedtothe wall,
make surethat screwscompletelypenetratedrywalland are
securedinwood ormetal. Whenfastening tothefloor orwall,
be sure that screws do not penetrate electrical wiring or
plumbing.
A.
B,
3
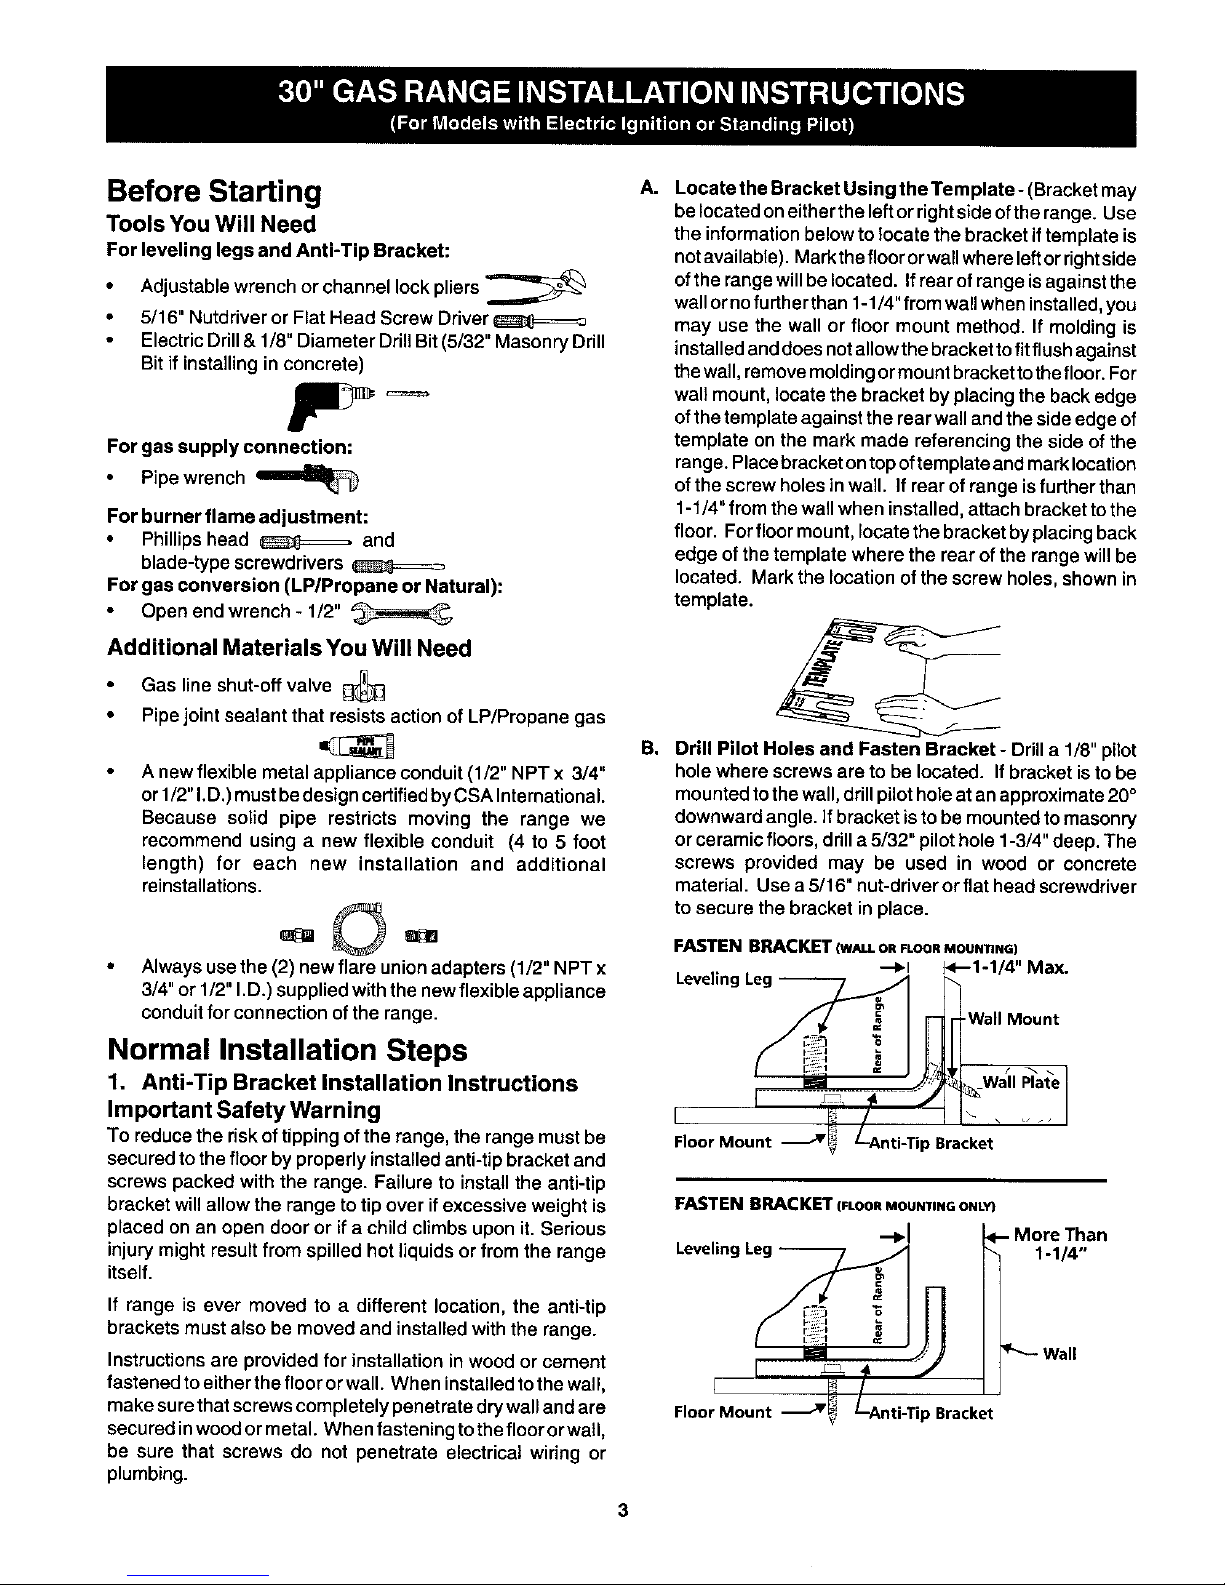
Locate the Bracket Using the Template- (Bracketmay
belocated oneithertheleftorrightsideofthe range. Use
the informationbelowtolocate thebracket if templateis
notavailable). Markthefloororwallwhereleftorrightside
ofthe range willbelocated. Ifrear ofrangeisagainstthe
wallornofurther than1-1/4"from wallwheninstalled,you
may use the wall or floor mount method. If moldingis
installedanddoes notallowthe bracketto fitflush against
thewall,removemoldingormount brackettithe floor. For
wall mount,locate the bracket byplacingthe backedge
ofthe templateagainst the rearwallandthe side edgeof
template on the mark made referencingthe sideof the
range.Placebracket ontopoftemplateandmarklocation
ofthe screwholesin wall. If rearof range isfurther than
1-1/4"fromthe wallwhen installed,attach bracketto the
floor. Forfloor mount,locate the bracketby placingback
edge of the template where the rear of the range will be
located. Markthe location of the screw holes,shownin
template.
Drill Pilot Holes and Fasten Bracket - Drilla 1/8" pilot
holewhere screws are to be located. Ifbracket isto be
mountedtothe wall, drillpilotholeat an approximate20°
downwardangle. Ifbracket istobe mountedtomasonry
orceramicfloors,drilla5/32" pilothole1-3/4"deep. The
screws provided may be used in wood or concrete
material. Use a 5/16" nut-driverorflat head screwdriver
tosecure the bracket in place.
FASTEN BRACKET (WALLORFLOORMOUNTING)
--I_1 1<--1-1/4" Max.
Levelinc
-Wall Mount
[
Floor Moun _Bracket
FASTEN BRACKET (FLOOR MOUNTING ONLY
Leveling Leg
I _ _ /
FIoorl Mount j_F_ Lnti-Tip Bracket
More Than
1-1/4"
"'-- Wall
 Loading...