

FNG576CFSWB
FNG576CFSSB
User Manual
TABLE OF CONTENTS
www.frigidaire-intl.com
Safety information ...............................2
Safety instructions ...............................3
Daily use .......................................7
Maintenance .....................................16
Troubleshooting ....................................18
Instal lation Instructions .....................21
Environment concerns .....................29
222D5749P024
Care and cleaning .................................12
2
IMPORTANT SAFETY INFORMATION.
READ ALL ISTRUCTIONS BEFORE USING.
WARNING
If the information in this manual is not followed exactly, a fire or explosion
may result, causing property damage, personal injury or death.
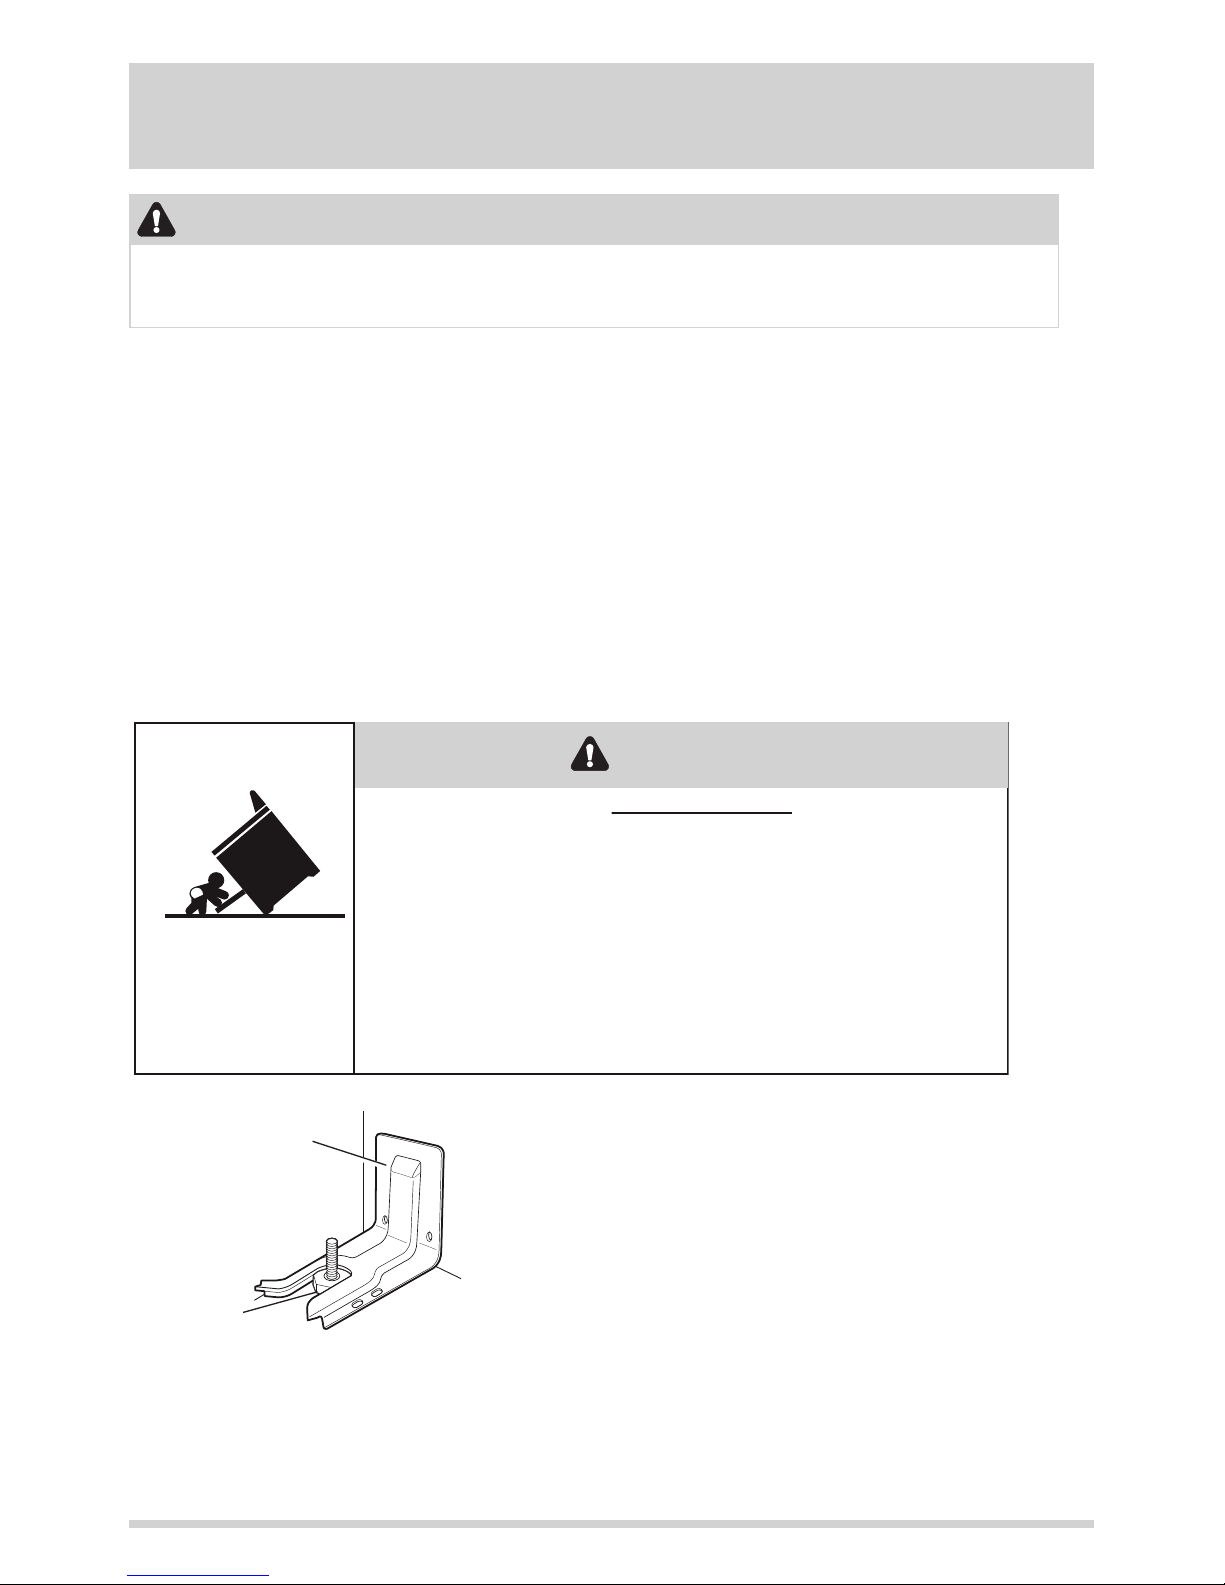
ANTI-TIP DEVICE.
For Freestanding and Slide-In Cookers. To
check if the bracket is installed and engaged
properly, loo
k underneath the cooker to see
that the rear leveling leg is engaged in the
bracket. On some models, the storage drawer
or kick panel can be removed for easy inspection.
If visual inspection is not possible, slide the
cooker forward, confirm the anti-tip bracket is
securely attached to the floor or wall, and slide
the cooked back so the rear leveling leg is under
the anti-tip bracket.
Freestanding and Slide-In Cookers
Anti-Tip
Bracket
Leveling Leg
A child or adult can tip the cooker and be killed.
Verify the anti-tip bracket has been properly installed
and engaged.
Ensure the anti-tip bracket is re-engaged when the cooker
is moved.
Do not operate the cooker without the anti-tip bracket in
place and engaged.
Failure to follow these instructions can result in death or
serious burns to children or adults.
Tip-Over Hazard
- Do not store or use gasoline or other flammable vapors and liquids in the
vicinity of this or any other appliance.
- WHAT TO DO IF YOU SMELL GAS
• Do not try to light any appliance.
• Do not touch any electrical switch; do not use any phone in your building.
• Immediately call your gas supplier from a neighbor’s phone. Follow the gas
supplier’s instructions.
• If you cannot reach your gas supplier, call the fire department.
- Installation and service must be performed by a qualified installer, service
agency or the gas supplier.
WARNING
3
I
f the cooker is pulled from the wall for any reason, always repeat this procedure
to verify the cooker is properly secured by the anti-tip bracket.
Never completely remove the leveling legs or the cooker will not be secured
to the anti-tip device properly.
GENERAL SAFETY INSTRUCTIONS
NEVER use this appliance as
a space heater to heat or warm
the room. Doing so may result in
carbon monoxide poisoning and
overheating of the oven.
WARNING
CAUTION
with broken glass. Shock, fire or cuts
may occur.
• Do not leave children alone—children
should not be left alone or unattended
in an area where an appliance is in use.
They should never be allowed to climb,
sit or stand on any part of the appliance.
• Do not store items of
interest to children in cabinets above
an oven-children climbing on the oven
to reach items could be seriously injured.
• Do not allow anyone to climb, stand or
hang on the oven door, drawer or
hob. They could damage the cooker
or tip it over causing severe injury or death.
• Never block the vents (air openings) of
the cooker. They provide the air inlets and
outlets that are necessary for the cooker
to operate properly with correct combustion.
Air openings are located at the rear of
the hob, at the top and bottom of the oven
door, and at the bottom of the cooker
under the warming drawer, lower oven
drawer or kick panel.
• Use only dry pot holders—moist or damp
pot holders on hot surfaces may result
in burns from steam. Do not let pot
holders touch surface burners, burner
grate, or oven heating element. Do not
use a towel or other bulky cloth in place
of pot holders.
• Do not touch the heating elements or
the interior surface of the oven. These
surfaces may be hot enough to burn
even though they are dark in color.
During and after use, do not touch, or
let clothing or other flammable materials
contact any interior area of the oven;
allow sufficient time for cooling first.
• Use this appliance for its intended purpose
as described in this owner’s manual.
• Have your cooker installed and properly
grounded by a qualified installer in
accordance with the provided installation
instructions. Any adjustment and service
should be performed only by a qualified
gas cooker installers or service technicians.
Do not attempt to repair or replace any
part of your cooker unless it is specifically
recommended in this manual.
• Your coo
ker is shipped from the factory set
for use with natural gas. It can be converted
for use with LP gas. If required, these
adjustments must be made by a qualified
technician in accordance with the installation
instructions and local codes. The agency
performing this work assumes responsibility
for the conversion.
• Have the installer show you the location of
the cooker gas shut-off valve and how to
turn it off if necessary.
• Before performing any service, unplug the
cooker or disconnect the power supply at the
household distribution panel by removing
the fuse or switching off the circuit breaker.
• Be sure all packing materials are removed
from the cooker before operating to prevent
ignition of these materials.
• Avoid scratching or impacting glass doors,
hob or control panels. Doing so may lead
to glass breakage. Do not cook on a product
4
KEEP FLAMMABLE MATERIALS AWAY FROM THE OVEN
Failure to do so may result in fire or personal injury.
Other surfaces of the appliance may become
hot enough to cause burns. Potentially hot
surfaces include the burners, grates, oven
vent opening, surfaces near the opening
and crevices around the oven door.
• Do not heat unopened food containers.
Pressure could build up and the container
could burst, causing an injury.
WARNING
• Do not store or use flammable materials
in an oven or near the hob, including
paper, plastic, pot holders, linens, wall
coverings, curtains, drapes and gasoline
or other flammable vapors and liquids.
• Never wear loose-fitting or hanging
garments while using the appliance. Avoid
storing commonly used items in cabinets
above the cooker and be careful when
reaching over the cooker. Clothing in
close proximity to burners or hot surfaces
may ignite causing severe burns.
• Do not let cooking grease or other flammable
materials accumulate in or near the cooker.
Grease in the oven or on the hob may ignite.
• Clean ventilating hoods frequently. Grease
should not be allowed to accumulate on
the hood or filter.
IN THE EVENT OF A FIRE, TAKE THE FOLLOWING
STEPS TO PREVENT INJURY AND FIRE SPREADING
WARNING
• Do not use water on grease fires. Never
pick up a flaming pan. Turn the controls
off. Smother a flaming pan on a surface
burner by covering the pan completely
with a well-fitting lid, cookie sheet or flat
tray. If necessary, use a multi-purpose dry
chemical or foam-type fire extinguisher.
• If there is a fire in the oven during baking,
turn the oven off and keep the door closed
until the fire goes out. If necessary, use
a multi-purpose dry chemical or foam
type fire extinguisher.
• If there is a fire in the oven during self
-clean, turn the oven off and wait for
the fire to go out. Do not force the door
open. Introduction of fresh air at self-clean
temperatures may lead to a burst of flame
from the oven. Failure to follow this
instruction may result in severe burns.
• Do not use any type of foil or liner to
cover the oven bottom, drip pans or
anywhere in the oven, except as described
in this manual. Oven liners can trap heat
or melt, resulting in damage to the product
and risk of shock, smoke or fire.
5
HOB SAFETY INSTRUCTIONS
WARNING
• Never leave the surface burners unattended
at medium or high heat settings. Foods,
especially oily foods, may ignite resulting
in fire that could spread to surrounding
cabinets.
• Never leave oil unattended while frying.
If allowed to heat beyond its smoking point,
oil may ignite resulting in fire that may
spread to surrounding cabinets. Use a deep
fat thermometer whenever possible to
monitor oil temperature.
• To avoid oil spillover and fire, use a minimum
amount of oil when shallow pan-frying and
avoid cooking frozen foods with excessive
amounts of ice.
• Use proper pan size and avoid pans that
are unstable or easily tipped. Select
cookware that is matched to the size of
the burner. Burner flames should be adjusted
so that they do not extend beyond the
bottom of the pan. Excessive flame may
be hazardous.
• Always use the LITE position when igniting
the top burners and make sure the burners
have ignited.
• When using glass/ceramic cookware, make
sure it is suitable for hob service; others may
break because of sudden change in
temperature.
• To minimize the possibility of burns, ignition
of flammable materials and spillage, the
handle of a container should be turned
toward the center of the cooker without
extending over nearby burners.
• When preparing flaming foods under a
hood, turn the fan on.
• Do not use a wok with a round metal
support ring. The ring may trap heat and
block air to the burner resulting in a carbon
monoxide hazard.
• Do not attempt to lift the hob. Doing
so may damage the gas tubing to the
surface burners resulting in a gas leak and
risk of fire.
• When disabling Lock Control (on some
models), make sure the surface controls
are set to the OFF position. This will prevent
unintended gas flow from the burners.
• Do not use aluminum foil to cover the
grates or line any part of the hob.
Doing so may result in carbon monoxide
poisoning, overheating of the hob
surfaces, or a potential fire hazard.
OVEN SAFETY INSTRUCTIONS
WARNING
escapes can cause burns to hands, face
and/or eyes.
• Keep the oven free from grease buildup.
Grease in the oven may ignite.
• Place oven racks in desired location while
oven is cool. If rack must be moved while
oven is hot, be careful to avoid touching
hot surfaces.
• Pull the oven rack to the stop-lock position
when loading and unloading food from the
oven. This helps prevent burns from touching
hot surfaces of the door and oven walls.
• Do not leave items such as paper, cooking
utensils or food in the oven when not in
use. Items stored in an oven can ignite.
NEVER cover any slots, holes, or
passages in the oven bottom or cover
an entire rack with materials such as
aluminum foil or oven liners. Doing
so blocks air flow through the oven
and may cause carbon monoxide
poisoning. Never place foil or oven liners
on the oven bottom. They can trap heat
causing risk of smoke or fire.
WARNING
• Use this appliance for its intended purpose
as described in this owner’s manual.
• Stand away from the cooker when opening
the oven door. Hot air or steam which
SELF-CLEANING OVEN SAFETY INSTRUCTIONS
WARNING
The self-cleaning feature
operates the oven at temperatures high
enough to burn away food soils in the oven.
Follow these instructions for safe operation.
• Do not touch oven surfaces during self-clean
operation. Keep children away from the
oven during self-cleaning. Failure to follow
these instructions may cause burns.
• Before operating the self-clean cycle,
remove pans, shiny metal oven racks and
other utensils from the oven. Only porcelain
-coated oven racks may be left in the oven.
Do not use self-clean to clean other parts,
such as grates.
• Before operating the self-clean cycle, wipe
grease and food soils from the oven.
Excessive amount of grease may ignite
leading to smoke damage to your home.
• If the self-cleaning mode malfunctions, turn
the oven off and disconnect the power
supply. Have it serviced by a qualified
technician.
• Do not use oven cleaners. No commercial
oven cleaner or oven liner protective coating
of any kind should be used in or around any
part of the oven.
6
IMPORTANT SAFETY INFORMATION.
READ ALL INSTRUCTIONS BEFORE USING.
• Do not leave items on the hob near the
oven vent which is in the center of
the backguard. Items may overheat
resulting in a risk of fire or burns.
• When using cooking or roasting bags in the
oven, follow the manufacturer’s directions.
• Never broil with door open. Open-door
broiling is not permitted due to overheating
of control knobs.
How to Remove Protective Shipping Film and Packaging Tape
Carefully grasp a corner of the protective
shipping film with your fingers and slowly
peel it from the appliance surface. Do not
use any sharp items to remove the film.
Remove all of the film before using the
appliance for the first time.
To assure no damage is done to the
finish of the product, the safest way to
remove the adhesive from packaging
tape on new appliances is an application
of a household liquid dishwashing detergent.
Apply with a soft cloth and allow to soak.
NOTE: The adhesive must be removed
from all parts. It cannot be removed if
it is baked on.
7
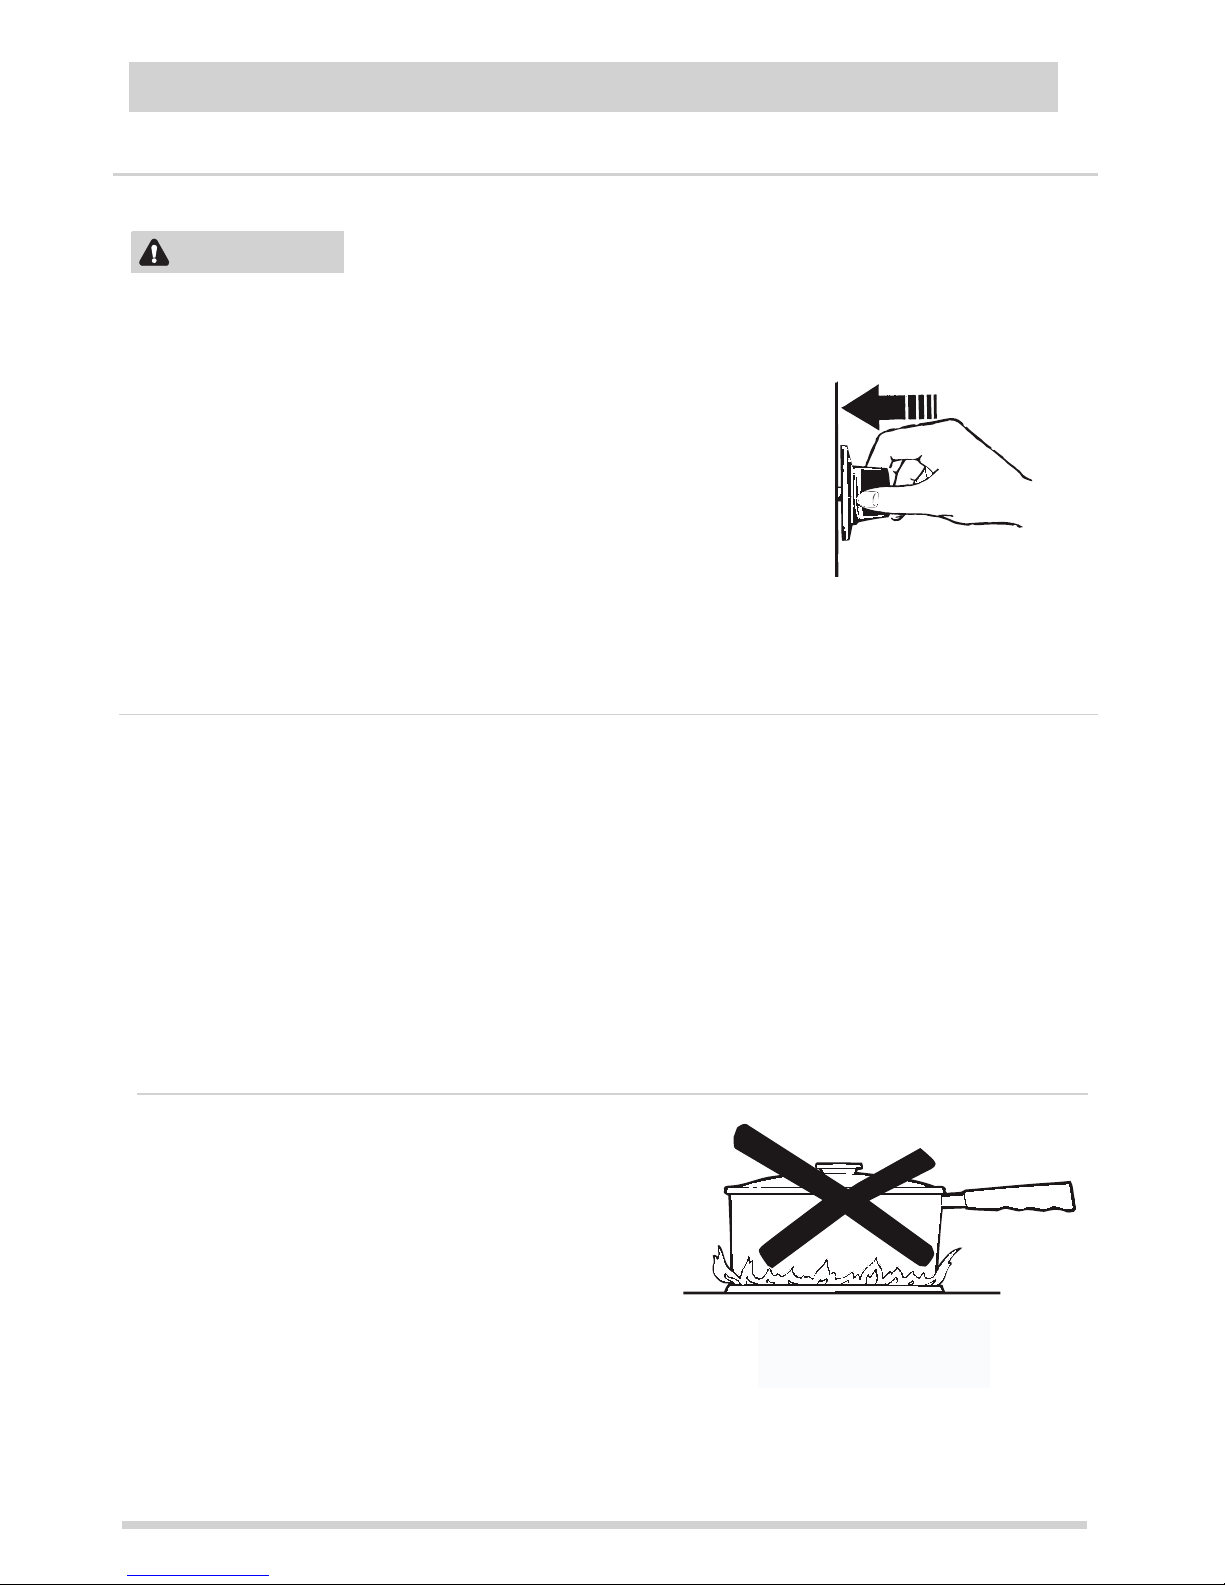
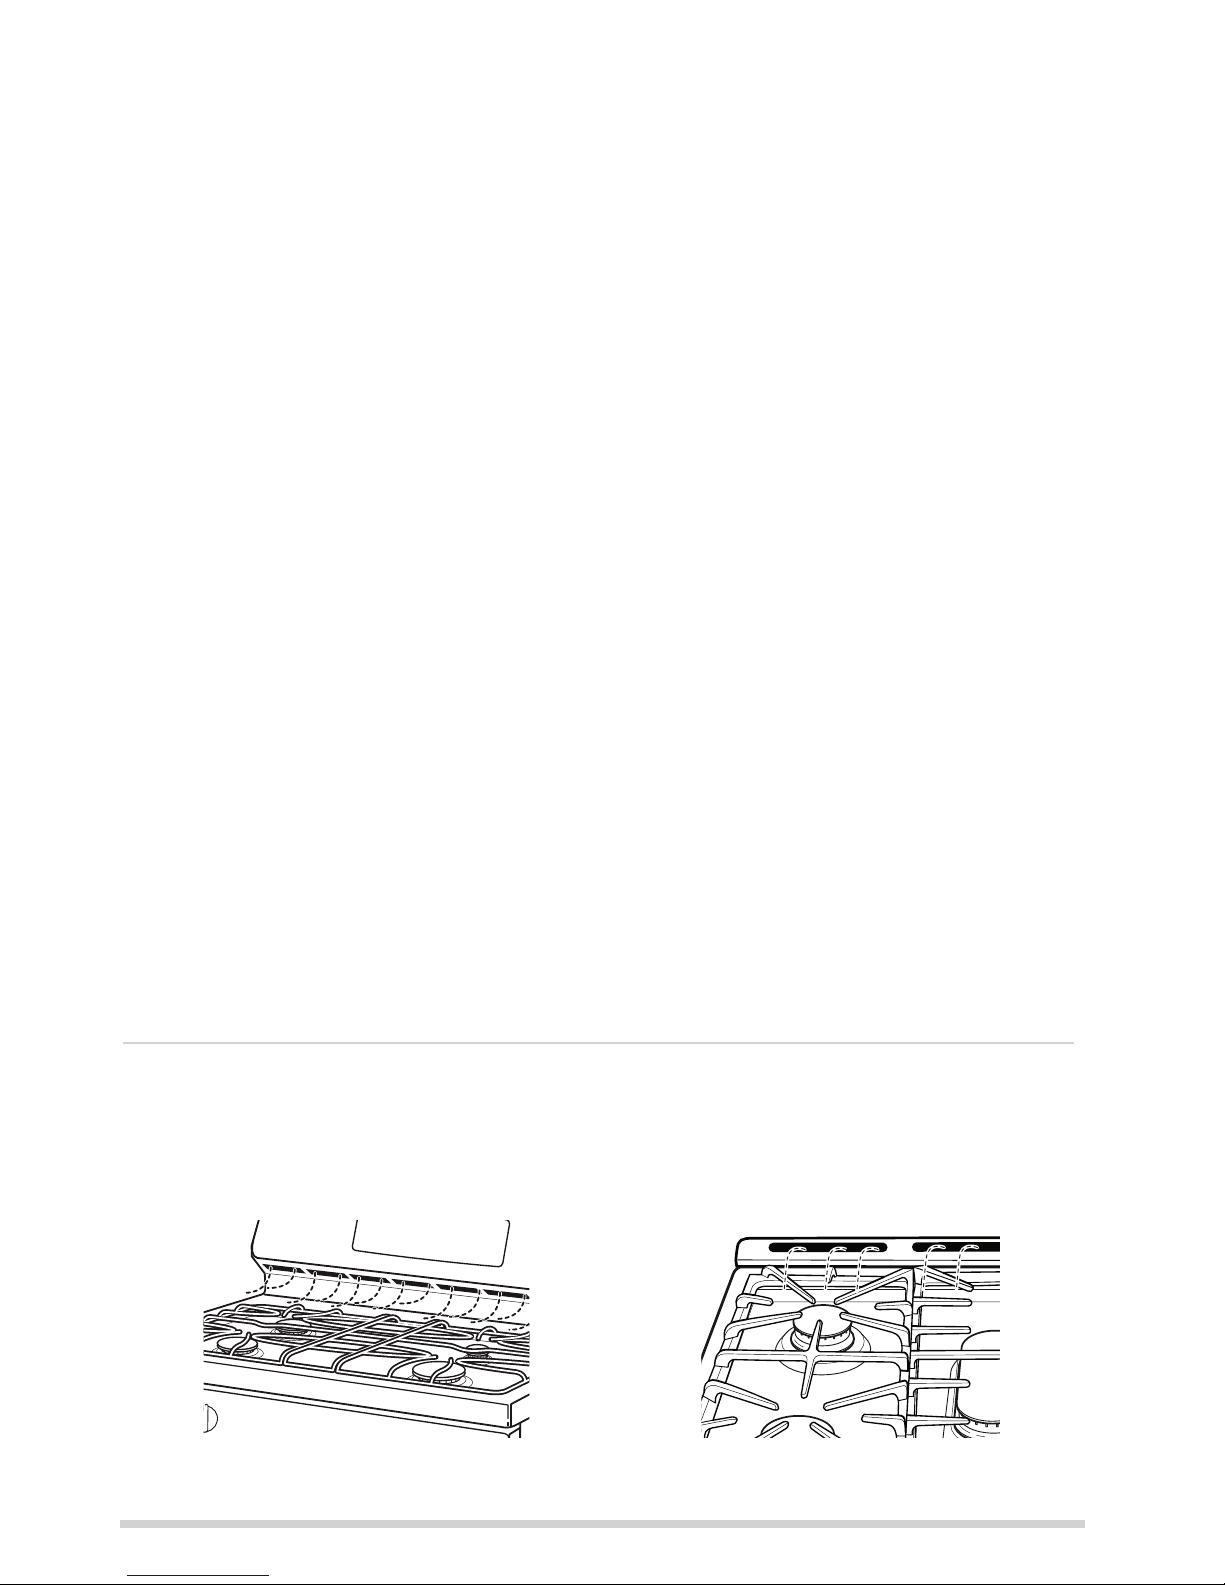
These flames are too
large for the pot
Burners should be
Push the control knob in and
turn it to the LITE position.
Surface Burners
DAILY USE
How to Light a Surface Burner
WARNING
operated only when covered by
cookware. Burner flames not covered
by cookware present a risk of fire or
clothing ignition. Never let flames
extend beyond the sides of the
cookware. Failure to comply may result
in serious injury.
Make sure all burners are in their correct
locations and
fully assembled before
attempting to operate any burner. Select
a burner and find its control knob. Push
the knob in and turn it to the LITE position.
You will hear a clicking noise—the sound
of the electric spark igniting the burner.
When one burner is turned to LITE, all
burners will spark.
Sparking will
continue as
long as the
knob remains
at LITE. Once
gas is ignited,
turn the knob
to adjust the
flame size.
After Lighting a Burner
• Do not operate the burner for an extended
period of time without cookware on the
grate. The finish on the grate may discolor
or chip without cookware to absorb the
heat.
• Do not attempt to disassemble any burner
while another burner is on. An electric
shock may result, which could cause
you to knock over hot cookware.
• Be sure the burners and grates are cool
before you place your hand, a pot holder
or cleaning materials on them.
How to Select Flame Size
Watch the flame, not the knob, as you adjust
heat. When rapid heating is desired, the
flame size on a burner should match the
size of the cookware you are using. Flames
larger than the bottom of the cookware will
not heat faster and may be hazardous.
8
Top-of-Cooker Cookware
Aluminum: Medium-weight cookware is
recommended because it heats quickly and
evenly. Most foods brown evenly in an
aluminum skillet. Use saucepans with tightfitting lids when cooking with minimum
amounts of water.
Stainless Steel: This metal alone has poor
heating properties and is usually combined
with copper, aluminum or other metals for
improved heat distribution. Combination
metal skillets usually work satisfactorily if
they are used with medium heat as the
manufacturer recommends.
Cast-Iron: If heated slowly, most skillets
will give satisfactory results.
Enamelware: Under some conditions,
the enamel of some cookware may melt.
Follow cookware manufacturer’s
recommendations for cooking methods.
Glass: There are two types of glass
cookware—those for oven use only and
those for top-of-cooker cooking (saucepans,
coffee and teapots). Glass conducts heat
very slowly.
Heatproof Glass Ceramic: Can be used
for either surface or oven cooking. It
conducts heat very slowly and cools very
slowly. Check cookware manufacturer’s
directions to be sure it can be used on
gas cooker.
(on some models)
1 3 7 6
4 852
10
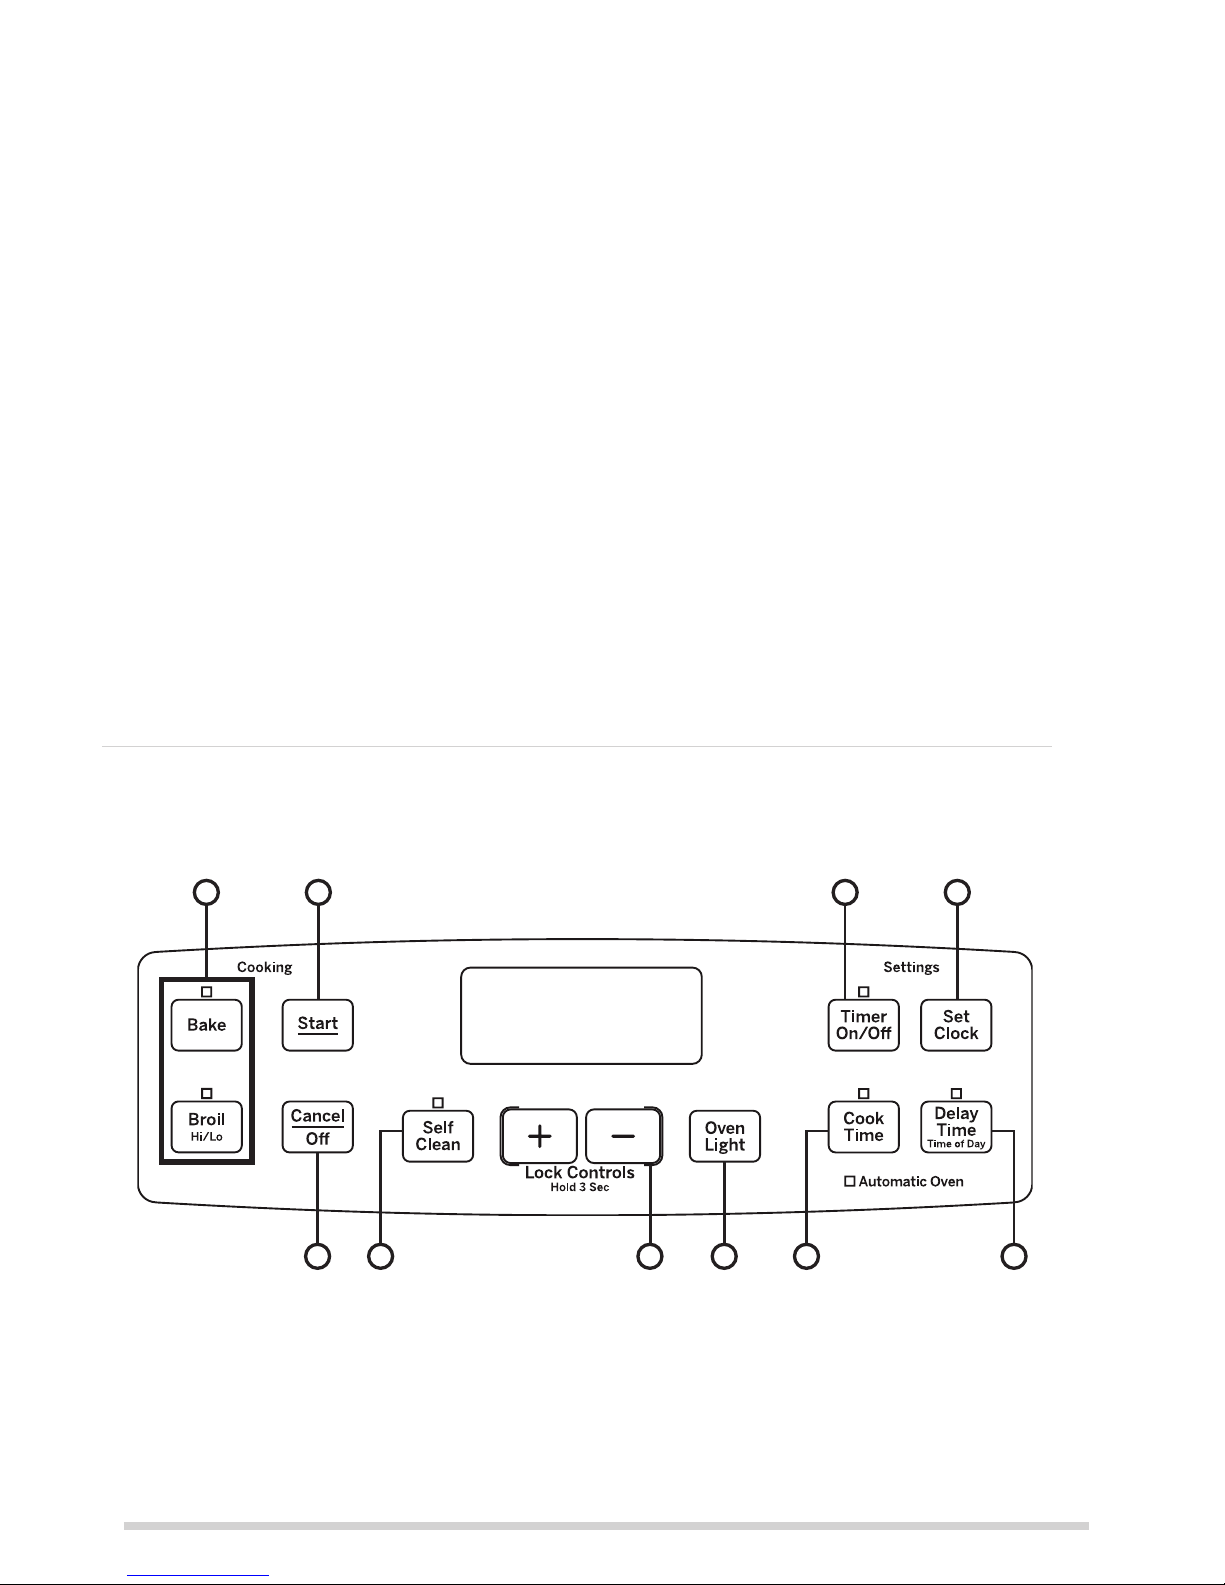
Non Convection
Oven Controls
9
Oven Air Vents
Vent appearance and location vary.
9
Oven Controls
1. Traditional Cooking Modes: Your
oven has the following traditional cooking
modes: Bake, Broil Hi and Broil Lo. See the
Cooking Modes section for more information.
2. Clean See the Cleaning the Oven section
for important information about using these modes.
3. Start: Must be pressed to start any
cooking, cleaning, or timed function.
4. Cancel/Off: Cancels ALL oven operations
except the clock and timer.
5. Cook Time: Counts down cooking time
and turns off the oven when the cooking
time is complete. Press the Cook Time pad,
use the number pads to program a cooking
time in hours and minutes, then press Start.
This can only be used with Traditional Bake,
Convection Bake, Convection Bake Multi,
and Convection Roast.
6. Clock: Sets the oven clock time. Press
the + and - pads and hold for 3 seconds or
press Set Clock pad (on some models). Use
the + and - pads to program the clock. Press
Start to save the time.
7. Timer: Works as a countdown timer.
Press the Timer pad and the + and - pads
to program the time in hours and minutes.
Press the Start pad. The oven will continue
to operate when the timer countdown is
complete. To turn the timer off press the
Timer pad.
8. Delay Time: Delays when the oven
will turn on. Use this to set a time when
you want the oven to start. Press the
Delay
Time pad and use the + and - pads
to program the time of day for the oven
to turn on. Press the desired cooking mode
and temperature then press Start. A cook
time may also be programmed if desired.
This can only be used with Traditional Bake,
and Self-Clean
9. Oven Light(s): (on some models)
Turns the oven light(s) on or off.
10. Lock Controls: (on some models)
Locks out the control so that pressing
the pads does not activate the controls.
Press and hold the Lock Controls pad or
press + and - pads and hold for 3 seconds
to lock or unlock the control. Cancel/Off
is always active, even when the control
is locked.
Never block the vents (air openings) of the
cooker. They provide the air inlet and outlet
that are necessary for the cooker to keep cool
and operate properly with correct combustion.
Air openings are located at the rear of
the hob, at the top and bottom of the oven
door, and at the bottom of the cooker.
Special Features
Adjust the Oven Temperature
This feature allows the oven baking temperature to be adjusted up to 35ºF hotter or down
to 35ºF cooler. Use this feature if you believe your oven temperature is too hot or too cold
and wish to change it. Press the Bake pad, then use the + and - pad to increase or decrease
your oven temperature. Press the Start pad to save the change.
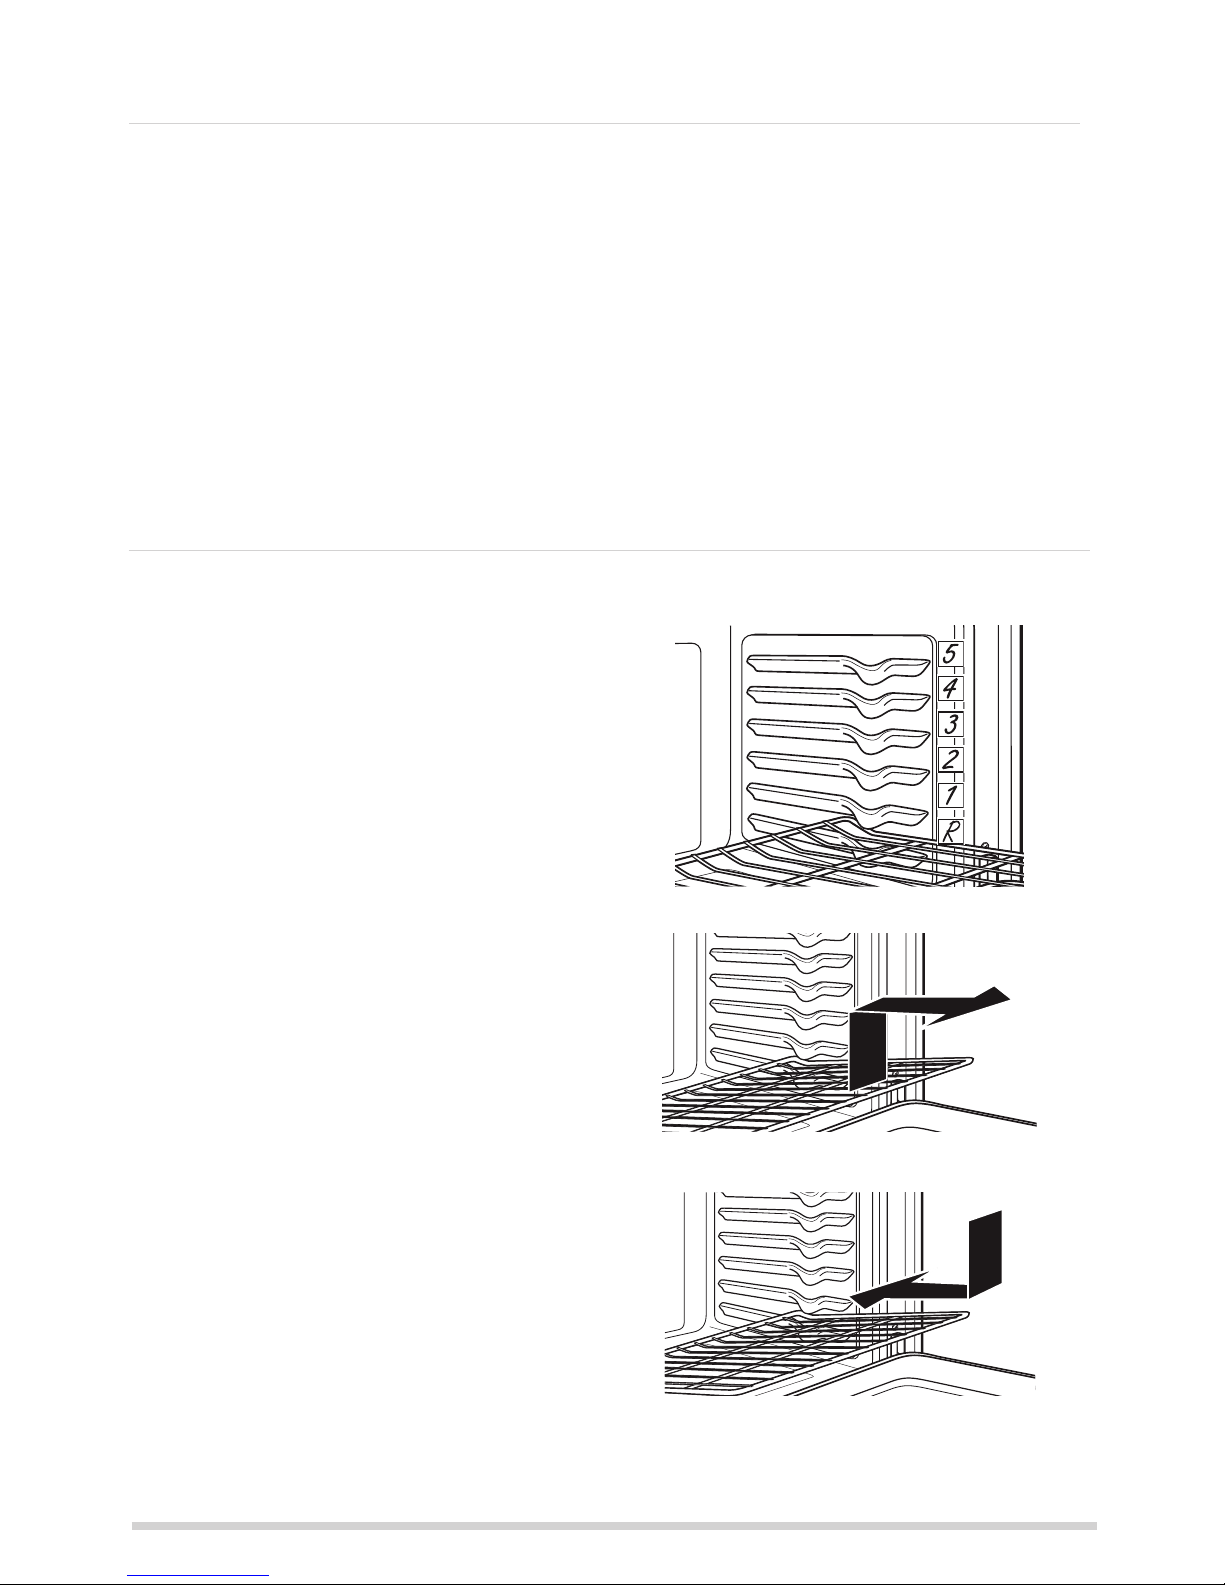
Oven Racks
Main Oven
Your oven has six rack positions in the
main oven. Adjusting rack position is one
way to impact cooking results. For example,
if you would prefer darker tops on cakes,
muffins, or cookies, try moving food one rack
position higher. If you find foods are too
brown on top try moving them down next time.
When baking with multiple pans and on
multiple racks, ensure there is sufficient space
between pans to allow air to flow.
Oven Racks
When placing and removing cookware, pull
the rack out to the bump (stop position) on
the rack support. To remove a rack, pull it
toward you, tilt the front end up and pull it out.
To replace, place the curved end of the rack
(stop-locks) onto the oven supports, tilt up
the front of the rack and push the rack in.
Racks may become difficult to slide, especially
after a self-clean. Put some vegetable oil on
a soft cloth or paper towel and rub onto the
left and right edges.
10
There are special features on your oven. To change the settings of these special features,
press the BAKE and BROIL pads at the same time and hold for three seconds. "SF" will
appear in the display. Select the feature you want to change. When the change has been
made, press the START key to save the change and return to the time of day.

Your new oven has a variety of cooking modes to help you get the best results. These
modes are described below. Remember, your new oven may perform differently than the
oven it is replacing.
Bake
The bake mode is for baking and roasting.
This mode uses heat only from the lower
burner. Follow recipe recommendations for
food placement. If no guidelines are provided
center food in the oven. To use this mode
press the Bake pad, enter a temperature,
and then press Start.
Broiling Modes
Always broil with the main oven and broil
drawer doors closed. Monitor food closely
while broiling. Use caution when broiling on
upper rack positions as placing food closer to
the broil burner increases smoking, spattering,
and the possibility of fats igniting.
Try broiling foods that you would normally
grill. Adjust rack positions to adjust the
intensity of the heat to the food. Place foods
closer to the broil burner when a seared
Broil Hi
The Broil Hi mode uses intense heat from the
upper burner to sear foods. Use Broil Hi for
thinner cuts of foods you prefer less done on
the interior. To use this mode press the Broil
pad once and then press Start. It s not
necessary to preheat when using this mode.
Broil Lo
The Broil Lo mode
uses less intense heat from
the upper burner to cook food thoroughly
while also browning the surface. Use Broil Lo
for thicker cuts foods that you would like
cooked all the way through. To use this mode
press the Broil pad twice and then press Start.
It is not necessary to preheat when using
this mode.
Cookware
Cookware Guidelines
The material, finish, and size of cookware
affect baking performance.
Dark, coated and dull pans absorb heat more
readily than light, shiny pans. Pans that absorb
heat more readily can result in a browner,
crisper, and thicker crust. If using dark and
coated cookware check food earlier than
minimum cook time. If undesirable results
are obtained with this type of cookware
consider reducing oven temperature by 25º F
next time.
Shiny pans can produce more evenly cooked
baked goods such as cakes and cookies.
Glass and ceramic pans heat slowly but retain
heat well. These types of pans work well for
dishes such as pies and custards.
Air insulated pans heat slowly and can reduce
bottom browning.
Keep cookware clean to promote even heating.
Cooking Modes
11
surface and rare interior is desired. Thicker
foods and foods that need to be cooked
through should be broiled on a rack position
farther from the burner or by using Broil Lo.

CAUTION: Do not use any type of foil or oven liner to cover the oven bottom.
Aluminum Foil and Oven Liners
Be sure electrical power is off and all surfaces are cool before cleaning any part of the oven.
Control Panel and Knobs
Wipe the control panel after each use of the
oven with a damp cloth. For cleaning, use
mild soap and water or a 50/50 solution of
vinegar and water. Rinse with clean water.
Polish dry with a soft cloth.
Do not use abrasive cleansers, strong liquid
cleansers, plastic scouring pads or oven
cleaners on the control panel—they will
damage the finish.
Do not try to bend knobs by pulling them up
or down or by hanging a towel or other such
loads. This can damage the gas valve shaft.
The control knobs may be removed for easier
cleaning.
With knobs in the OFF position pull them
straight off the stems.
The knobs can be washed by hand with
soap and water or in a dishwasher.
Surface burner knob
CARE AND CLEANING
12
These items can block airflow or melt, resulting in damage to the product and
risk of carbon monoxide poisoning, smoke or fire. Damage from improper use
of these items is not covered by the product warranty.
Foil may be used to catch spills by placing a sheet on a lower rack, several inches below
the food. Do not use more foil than necessary and never entirely cover an oven rack with
aluminum foil. Keep foil at least 1-1/2” from oven walls to prevent poor heat circulation.
Oven Exterior and Hob Surface
Do not use oven cleaners, abrasive cleansers,
strong liquid cleansers, steel wool, plastic
scouring pads, or cleaning powders on the
interior or exterior of the oven. Clean with
a mild soap and water or a 50/50 solution
of vinegar and water. Rinse with clean water
and dry with a soft cloth. When cleaning
surfaces, make sure that they are at room
temperature and not in direct sunlight.
If a stain on the door vent trim is persistent,
use a mild abrasive cleaner and a spongescrubber for best results.
Spillage of marinades, fruit juices, tomato
sauces and basting liquids containing acids
may cause discoloration and should be wiped
up immediately. Let hot surfaces cool, then
clean and rinse.

Oven Interior
The interior of your new oven can be cleaned
manually or by using the Self Clean modes.
Spillage of marinades, fruit juices, tomato
sauces and basting liquids containing acids
may cause discoloration and should be
wiped up as soon as hot surfaces cool, then
clean and rinse.
Manual Cleaning
Do not use oven cleaners, abrasive cleaners,
strong liquid cleansers, steel wool, scouring
pads, or cleaning powders on the interior of
the oven. Clean with a mild soap and water
or 50/50 solution of vinegar and water. Rinse
with clean water and dry with a soft cloth.
When cleaning surfaces, make sure that
they are at room temperature and not in
direct sunlight.
Self Clean Mode
Read Self-Cleaning Oven Safety Instructions
at the beginning of this manual before using
Self Clean Mode. Self clean uses very high
temperatures to clean the oven interior. Wipe
Stainless Steel Surfaces (on some models)
Do not use a steel wool pad; it will scratch
the surface.
To clean the stainless steel surface, use
warm sudsy water or a stainless steel
cleaner or polish. Always wipe the surface
inner black door before self clean. Remove
all items from the oven other than enameled
(dark color) racks. Shiny or silver racks, and
any cookware before initiating a self-clean
cycle. Close the door. Latch the door. If the
oven is too hot, you will not be able to slide
the latch. Wait until the oven is cool to slide
the latch. Press the Clean pad once and a
default self-clean time is displayed. Press the
START pad or use the number pads to enter
any clean time between 3 and 5 hours and
press start. For heavily soiled ovens 5 hours is
recommended. The oven will turn off automatically
when the self-clean cycle is complete. The
door will stay locked until the oven has cooled
down. After the oven has cooled down wipe
any ash out of the oven.
IMPORTANT: The health of some birds
is extremely sensitive to the fumes given
off during the self-cleaning cycle of any
cooker. Move birds to another well-
ventilated room.
13
in the direction of the grain. Follow the
cleaner instructions for cleaning the stainless
steel surface.
All oven racks may be cleaned by hand with an abrasive cleaner or steel wool. Black
porcelain-coated oven racks may remain in the oven during the self-cleaning cycle without
being damaged. If nickel-plated oven racks remain in the oven during the self-cleaning
cycle, they will lose their luster and become hard to slide. It will be necessary to grease
all oven rack side edges with a light coating of vegetable oil after cleaning them by hand
or in the oven. This will help maintain the ease of sliding the racks in and out of the oven.
Oven Racks

Removal of Surface Burners for Cleaning
Turn all controls OFF.Allow hob to cool before removing grates and burner parts.
When removing the burner caps and heads, remember their size and location. Replace
them in the same location after cleaning.
Cleaning The Hob
Round Burner
The burner caps and burner heads can be
lifted off the hob.
Round Burner Cap
(Removable)
Cleaning The Burners
Burner Caps
Wash burner caps in hot, soapy water and
rinse with clean water. You may scour with
a plastic scouring pad to remove burned-on
food particles. The round caps may also be
cleaned in your dishwasher.
Burner Heads
Wash the burner heads routinely, especially
after bad spillovers, which could clog the
openings. Lift burners off when cool. Use
hot, soapy water. Rinse with clean water.
For more stubborn stains, use a brush
with plastic bristles.
NOTE: Do not use steel wool or scouring
powders to clean the burner parts as these
may clog the parts. Never wash burner heads
in your dishwasher as dishwasher detergents
will discolor your burners. The ports in the
burner heads must be kept clean at all times
for an even, unhampered flame. Clogged or
dirty burner ports or electrodes will not allow
the burner to operate properly.
For proper ignition, make sure the small hole
in the notch that fits over the electrode is
kept open. A sewing needle or wire twist-tie
works well to unclog it
After cleaning
Before putting the burner caps, shake out
excess water and allow them to dry thoroughly.
Replacing Burner Heads
Replace burner heads in the correct locations
according to size.
Burner Caps
Replace burner caps on burner heads. Make
sure each cap fits securely and sits flat on
its corresponding burner head.
Round hole in
burner head must
be kept clear
14

Burner cap is
properly seated.
Burner cap is
NOT properly seated.
Burner cap is
NOT properly seated.
Any spill on or around an electrode must be
carefully cleaned. Take care to not hit an
electrode with anything hard or it could be
damaged.
Electrode
The electrode of the spark igniter is
exposed when the burner head is removed.
When one burner is turned to LITE, all
the burners spark. Do not attempt to
disassemble or clean around any burner
while another burner is on. An electric
shock may result, which could cause
you to knock over hot cookware.
Burner Grates
Grates should be washed in hot, soapy water
and rinsed with clean water. To soften
burned-on food, place grates in a plastic
bag containing ¼-cup of household ammonia
for several hours. Afterward, scrub grates
with a plastic scouring pad soaked in hot,
soapy water. Rinse well and dry.
15
CAUTION
Do not operate the
hob without all burner parts and
grates in place.
When replacing the grates, be sure to locate
them correctly on the hob. Grate should fit
securely into the hob. Grates will gradually
lose their shine due to their continual
exposure to high temperatures.
Cleaning The Door and Drawer
The gasket is designed with a gap at the bottom to
allow for proper air circulation.
extremely low resistance to abrasion.
If you notice the gasket becoming worn, frayed or
damaged in any way or if it has become displaced on
the door, you should have it replaced.
To clean the inside of the door
Do not allow excess water to run into any
holes or slots in the door. Wipe dishwashing
detergent over any baked-on spatters on
the glass. Use a single sided safety razor
blade to clean it off. Then wipe over the
glass with a soapy cloth to remove any
residue and dry off.
The area outside the gasket can be cleaned
with a soap-filled plastic scouring pad.

Removable Storage Drawer (on some models)
The storage drawer is a good place to store
cookware and bakeware. Do not store plastics
and flammable material in the drawer.
The storage drawer may be removed for
cleaning under the cooker. Clean the storage
drawer with a damp cloth or sponge. Never
use harsh abrasives or scouring pads.
To remove storage drawer:
1. Pull drawer straight out until it stops.
2. Tilt the front of the drawer up and free
of the cooker.
To replace storage drawer:
1. Set the stops on the back of the drawer
over the stops in the cooker.
2. Slide drawer evenly and straight back, so
that the rails
The storage drawer may be removed for cleaning
under the cooker.
16
MAINTENANCE
SHOCK OR BURN HAZARD: Before replacing oven light bulb,
disconnect the electrical power to the oven at the main fuse or circuit
breaker panel. Failure to do so may result in electric shock or burn.
BURN HAZARD: The glass cover and bulb should be removed when cool.
Touching hot glass with bare hands or a damp cloth can cause burns.
Oven Light Replacement
WARNING
CAUTION

Oven Light Bulb
NOTE: The glass cover should be removed
only when cold. Wearing latex gloves may
offer a better grip.
Before replacing the bulb, disconnect electrical
power to the oven at the main fuse or circuit
breaker panel. Let the bulb cool completely
before removing it. For your safety do not
touch a hot bulb with a damp cloth. If you
do the bulb may break.
To remove:
Turn the glass cover counterclockwise 1/4
turn until the tabs of the glass cover clear
the grooves of the socket. Remove the bulb.
To replace:
Put in a new 40-watt appliance bulb. Place
the tabs of the glass cover into the grooves
of the socket. Turn the glass cover clockwise
1/4 turn.
NOTE:
A 40-watt appliance bulb is smaller than a
standard 40-watt household bulb.
Reconnect electrical power to the oven once
the new bulb is installed.
For improved lighting inside the oven, clean
the glass cover frequently using a wet cloth.
This should be done when the oven is
completely cool.
Bulb
Socket
Tab
3
1
2”
Max
length
Glass cover
To Remove the Door:
1. Fully open the oven door.
2. On each hinge, slide the hinge lock up,
making sure it snaps into its fully raised
position.
3. Firmly grasp both sides of the door at
near the top.
4. Close door until the top of the door is
approximately 3” from the cooker frame.
5. Lift door up and away from the cooker until
both hinge arms are clear of the slots in
the cooker frame.
Pull hinge locks up to unlock
Notch
Push hinge locks down to lock
Removal position
Lift-Off Oven Door
The door is very heavy. Be careful when removing and lifting the door. Do not lift door by
the handle.
If improperly removed, oven door hinges may suddenly open and can
17
WARNING
cause personal injury to appendages near the hinge. Follow instructions below to avoid a
risk of injury when removing and re-installing the oven door.

To Replace the Door:
1. Firmly grasp both sides of the door near
the top.
2. With the door at the same angle as the
removal position, rest the notch in the
bottom of the left hinge arm on the
bottom edge of the left hinge slot. The
notch in the hinge arm must be fully
seated onto the bottom of the slot.
Repeat for the right side.
Save time and money! Review the charts on the following pages first and you may not
need to call for service.
oD oT tahWesuaC elbissoPmelborP
My new oven doesn't
cook like my old one.
Is something wrong
with the temperature
settings?
Your new oven has a different cooking system
from your old oven and therefore may cook
differently than your old oven.
For the first few uses, follow your recipe times
and temperatures carefully. If you still think
your new oven is too hot or too cold, you can
adjust the temperature yourself to meet your
specific cooking preference.
Food does not bake
properly
Oven controls improperly set. See the Cooking Modes section.
Rack position is incorrect or rack is not level. See the Cooking Modes section.
Incorrect cookware or cookware of improper
size being used.
See the Cookware section.
Oven temperature needs adjustment. See the Special Features section.
Ingredient substitution Substituting ingredients can change the recipe
outcome.
Food does not broil
properly
Oven controls improperly set. Make sure you select the appropriate broil
mode.
Improper rack position being used. See Oven Racks / Main Oven section for
rack location suggestions.
Food being cooked in a hot pan. Make sure cookware is cool.
Cookware not suited for broiling. Use a pan specifically designed for broiling.
Aluminum foil used on the broiling pan and
grid has not been fitted properly and slit as
recommended.
If using
aluminum foil conform to pan slits.
In some areas the power (voltage) may be low. Preheat the broil element for 10 minutes.
Oven temperature too
hot or too cold
Oven temperature needs adjustment. See the Special Features section.
Oven does not work or
appears not to work
A fuse in your home may be blown or the
circuit breaker tripped.
Replace the fuse or reset the circuit breaker.
Oven controls improperly set. See the Using the Oven section.
“Crackling” or
“popping” sound
This is the sound of the metal heating and
cooling during both the cooking and cleaning
functions.
This is normal.
TROUBLESHOOTING TIPS ... Before you call for service
18
3. Fully open the door. If the door will not
fully open, the notches in the bottoms
of the hinge arms are not seated correctly
onto the bottom edge of the slot. Lift the
door off the cooker and repeat Step 2.
4. Push the hinge locks down to the locked
position.
5. Close the oven door.

19
oD oT tahWesuaC elbissoPmelborP
Why is my cooker
making a "clicking"
noise when using my
oven?
Your cooker has been designed to maintain
a tighter control over your oven's temperature.
You may hear your oven's heating elements
"click" on and off more frequently than in
older ovens to achieve better results during
baking, broiling, and self-clean cycles.
This is normal.
Clock and timer do not
work
A fuse in your home may be blown or the
circuit breaker tripped.
Replace the fuse or reset the circuit breaker.
Sometimes the
oven takes longer to
preheat to the same
temperature
Cookware or food in oven The cookware or food in the oven will cause
the oven to take longer to preheat. Remove
items to reduce preheat time.
Number of racks in oven Adding more racks to the oven will cause the
oven to take longer to preheat. Remove some
racks.
Oven light does not
work
Light bulb is loose or defective. Tighten or replace bulb.
Pad operating light is broken. Call for service.
Oven will not self-clean The temperature is too high to set
a self-clean operation.
Allow the oven to cool and reset the controls.
Oven controls improperly set. See the Cleaning the Oven section.
Excessive smoking
during clean cycle
Excessive soil or grease. Press the Cancel/Off pad. Open the windows
to rid the room of smoke. Wait until the LOCKED
light goes off. Wipe up the excess soil and
reset the clean cycle.
Excessive smoking
during broiling
Food too close to burner element. Lower the rack position of the food.
Oven door will not
open after a clean cycle
Oven too hot. Allow the oven to cool below locking
temperature.
Oven not clean after a
clean cycle
Oven controls improperly set. See the Cleaning the Oven section.
Oven was heavily soiled. Clean up heavy spillovers before starting the
clean cycle. Heavily soiled ovens may need to
self-clean again or for a longer period of time.
"LOCK DOOR" flashes
in the display
The self-clean cycle has been
selected but the door is not closed.
Close the oven door.
LOCKED light is on
when you want to cook
The oven door is locked because
the temperature inside the oven
has not dropped below the locking
temperature.
Press the Cancel/Off pad. Allow the oven
“F— and a number
or letter” flash in the
display
You have a function error code. Press the Cancel/Off pad. Allow the oven to
cool for one hour. Put the oven back into operation.
If the function code repeats. Disconnect all power to the oven for at least
30 seconds and then reconnect power. If the
function error code repeats, call for service.
to cool.
Display goes blank A fuse in your home may be blown
or the circuit breaker tripped.
Replace the fuse or reset the circuit breaker.
The clock is turned off. See the Special features section.
Power outage, clock
flashes
Power outage or surge Reset the clock. If the oven was in use, you
must reset it by pressing the Cancel/Off pad,
setting the clock and resetting any cooking
function.
“Burning” or “oily”
odor emitting from the
vent
This is normal in a new oven and
will disappear in time.
To speed the process, set a self-clean cycle
for a minimum of 3 hours. See the Cleaning
the Oven section. This is temporary.

Lock Controls or
Control Lockout
feature is activated
If LOC ON appears in the display, the cooker
control is locked. Turn this feature off to use
the cooker. See the Lock Control feature in the
Oven Controls section.
Lever is
shown closed.
PULL TO OPEN.
Sealed burner models
Thumb screws
Lower oven drawer models
20
oD oT tahWesuaC elbissoPmelborP
Strong odor An odor from the oven insulation
is normal for the first few times the
oven is used.
This is temporary and will go away after
several uses or a self-clean cycle.
My oven door glass
appears to be "tinted"
or have a "rainbow"
color. Is this defective?
No. The inner oven glass is coated
with a heat barrier to reflect the
heat back into the oven to prevent
heat loss and keep the outer door
cool while baking.
This is normal. Under certain light or angles,
you may see this tint or rainbow color.
Top burners do
not light or do not
burn evenly. (The
front right burner
is designed to have
slightly smaller
flames between
the 6 and 9 o’clock
positions. This is
normal.)
Plug on cooker is not completely
inserted in the electrical outlet.
Make sure electrical plug is plugged into a live,
properly grounded outlet.
Burner slits on the side of the burner
may be clogged.
Remove the burners and clean them. Check
the electrode area for burned-on food or grease.
See the Care and cleaning of the cooker section.
Improper burner assembly. Make sure the burner parts are installed correctly.
See the Care and cleaning of the coocker section.
Burner flames very
large or yellow
Improper air to gas ratio. If cooker is connected to LP gas, contact the
person who installed your cooker or made the
conversion.
Surface burners
light but oven does
not
The oven gas shut-off valve may
have accidentally been moved
during cleaning or moving.
To check the oven gas shut-off valve, remove
the drawer (see the Care and cleaning of the
cooker section). For lower oven drawer models,
remove the rear access panel by unscrewing
the thumb screws in the upper left and right
corners. Look for the gas shut-off lever at the
back of the cooker.
Burners do not
light
Lock Controls feature is activated. Allow the cooker to cool down and touch and
hold the Lock Controls pad (on some models)
for 3 seconds until the display shows LOC OFF.
Plug on cooker is not completely
inserted in the electrical outlet.
Make sure electrical plug is plugged into a live,
properly grounded outlet.
Gas supply not connected or
turned on.
See the Installation Instructions.
A fuse in your home may be blown
or the circuit breaker tripped.
Replace the fuse or reset the circuit breaker.
Burner parts not replaced correctly. See the Care and Cleaning of the cooker section.
Drawer does not slide
smoothly or drags
The drawer is out of alignment. Fully extend the drawer and push it all the
way in. See the Care and cleaning of the
cooker section.
Drawer is over-loaded or load is
unbalanced.
Reduce weight. Redistribute drawer contents.

INSTALLATION INSTRUCTIONS
FIRE OR EXPLOSION HAZARD
If the information in this manual is not
followed exactly, a fire or explosion may
result causing property damage, personal
injury or death.
Installation must be performed by a
qualified installer.
Read these instructions completely and
carefully.
Installation of this cooker must conform
with local codes, or in the absence of local
codes, with the National Fuel Gas Code,
ANSI Z223.1/ NFPA.54, latest edition.
When installing a gas appliance the use of
old flexible connectors can cause gas leaks
and personal injury. Always use a NEW
flexible connector.
Leak testing of the appliance shall be conducted
according to the manufacturer instructions.
The cooker must be electrically grounded in
accordance with local codes or, in the absence
of local codes, in accordance with the National
Electrical Code (ANSI/NFPA 70, latest edition).
See Electrical Connections in this section.
Do not install this product with an air curtain
hood or other cooker hood that operates by
blowing air down on the hob. This airflow may
interfere with operation of the gas burners
resulting in fire or explosion hazard.
FOR YOUR SAFETY:
• A child or adult can tip the cooker and be killed.
• Install the anti-tip bracket to the wall or floor .
• Engage the cooker to the anti-tip bracket by sliding
the cooker back such that the foot is engaged.
• Re-engage the anti-tip bracket if the cooker is moved.
• Failure to do so can result in death or serious burns
to child ren or adults.
Tip-Over Hazard
WARNING
Before beginning
the installation, switch power off at
service panel and lock the service
disconnecting means to prevent power
from being switched on accidentally.
When the service disconnecting means
cannot be locked, securely fasten a
prominent warning device, such as a
tag, to the service panel.
Anti-Tip Bracket
Kit Included
21
WARNING
WARNING

TOOLS YOU WILL NEED
MATERIALS YOU MAY NEED
Gas line shut-off valve
Pipe joint sealant or UL-approved pipe thread
tape with Teflon* that resists action of natural
and LP gases
Flexible metal appliance connector (1/2” I.D.).
A 5-foot length is recommended for ease of
installation but other lengths are acceptable.
Never use an old connector when installing a
new cooker.
Flare union adapter for connection to gas
supply line (3/4” or 1/2” NPT x 1/2” I.D.)
Flare union adapter for connection to pressure
regulator on cooker (1/2” NPT x 1/2” I.D.)
Liquid leak detector or soapy water.
*Teflon: Registered trademark of DuPont
Flat-blade
screwdriver
Pipe wrenches (2)
(one for backup)
Phillips
screwdriver
Open-end or
adjustable wrench
Pencil and ruler
Level
Drill, awl or nail
IMPORTANT — Save these instructions for
local inspector’s use.
IMPORTANT — Observe all governing
codes and ordinances.
IMPORTANT — Remove all packing
material and literature from oven before
connecting gas and electrical supply to cooker.
IMPORTANT — To avoid damage to your
cabinets, check with your builder or cabinet
supplier to make sure that the materials used will
not discolor, delaminate or sustain other damage.
This oven has been designed in accordance with
the requirements of UL and CSA International
and complies with the maximum allowable wood
cabinet temperatures of 194°F (90°C).
Note to Installer – Be sure to leave these
instructions with consumer.
Note to consumer – Keep these instructions for
future reference.
Servicer – The electrical diagram is in an
envelope attached to the back of the cooker.
Proper installation is the responsibility of the
installer.
Product failure due to improper installation is not
covered under warranty.
Before installing your cooker on linoleum or any
other synthetic floor covering, make sure the
floor covering can withstand 180°F without
shrinking, warping or discoloring. Do not install
the cooker over carpeting unless a sheet of 1/4”
thick plywood or similar insulator is placed
between the cooker and carpeting.
22
BEFORE YOU BEGIN

Provide adequate clearances between the
cooker and adjacent combustible surfaces. These
dimensions must be met for safe use of your
cooker.
Allow 30” (76.2 cm) minimum clearance between
burners and bottom of unprotected wood or
metal cabinet, or allow a 24” (61 cm) minimum
when bottom of wood or metal cabinet is
protected by no less than 1/4” (6.4 mm) thick
flame-retardant millboard covered with no less
than No. 28 MSG sheet metal (.015” [.38 mm]
thick), .015” (.38 mm) thick stainless steel, .025”
(0.64 mm) aluminum or .020” (0.5 mm) copper.
Installation of a listed microwave oven or
cooking appliance over the hob shall conform
to the installation instructions packed with
that appliance.
For island installation, maintain 2-1/2” minimum
from cutout to back edge of countertop and
3” minimum from cutout to side edges of
countertop.
To cabinets
below hob
and at the
cooker back
Minimum to
cabinets on
either side
of the cooker
30”
30”
Minimum
15”
3”
Minimum
clearance to
right wall
Maximum
depth for
cabinets above
countertops
Front edge
of the cooker
side panel
forward from
cabinet
0”
To cabinets
below hob
and at the
cooker back
1/4”
3”
Minimum
clearance
to left
wall
0”
18”
30"
46 3/8 "
28 3/4 "
w/ handle
26 1/4 "
w/o handle
10 7/8 "
36 1/4 " ± 1/4
23
DIMENSIONS AND CLEARANCES

CONVERTING TO LP GAS
(OR CONVERTING BACK TO
NATURAL GAS FROM LP)
This cooker leaves the factory set for use with
natural gas. If you want to convert to LP
gas, the conversion must be performed by a
qualified LP gas installer.
The conversion orifices and instructions can be
found on back of the cooker.
Keep these instructions and all orifices in case
you want to convert back to natural gas.
GAS PIPE AND ELECTRICAL OUTLET LOCATIONS
Rear of Cooker
Orifice Strip
(location
may vary)
Recommended area for
220-240V outlet on rear wall and
area for through-the-wall
connection of pipe stub and
shut-off valve.
Recommended area
for through-the-floor
connection of pipe stub
and shut-off valve.
CAUTION To prevent drafts
from affecting burner operation, seal
all openings in floor under appliance
and behind appliance wall.
24

CONNECTOR HOOKUP
Pressure
regulator
Gas Flow into Cooker Gas Flow into Cooker
Flex
connector
(6 ft. max.)
Adapter
Installer: Inform the consumer of the location of the gas shut-off valve.
1/2” or 3/4”
Gas pipe
Adapter
Gas
shut-off
valve
Pressure
regulator
Elbow
Elbow
Nipple
Union
Nipple
Gas
shut-off
valve
1/2” or 3/4”
Gas pipe
Flexible
Option
Rigid Pipe
Option
1
GAS SUPPLY
Fire Hazard: Do not use a
flame to check for gas leaks.
Explosion Hazard: Do not
exceed 25 ft-lbs of torque when making gas
line connections. Overtightening may crack
the pressure regulator resulting in fire or
explosion hazard.
Gas Pressure Regulator
You must use the gas pressure regulator supplied
with this cooker. For proper operations the inlet
pressure to the regulator should be as follows:
Natural Gas:
Minimum pressure: 6” of Water Column
Maximum pressure: 13” of Water Column
LP Gas:
Minimum pressure: 11” of Water Column
Maximum pressure: 13” of Water Column
If you are not sure about the inlet pressure
contact local gas supplier.
Shut off the main gas supply valve before
disconnecting the old cooker and leave it off
until the new hook-up has been completed.
Don’t forget to relight the pilot on other gas
appliances when you turn the gas back on.
Because hard piping restricts movement of
the cooker, the use of a CSA Internationalcertified flexible metal appliance connector is
recommended unless local codes require a hardpiped connection.
If the hard piping method is used, you must
carefully align the pipe; the cooker cannot be
moved after the connection is made.
To prevent gas leaks, put pipe joint compound on,
or wrap pipe thread tape with Teflon* around, all
male (external) pipe threads.
A. Install a manual shut-off valve in the gas line
in an easily accessed location outside of the
cooker. Make sure everyone operating the
cooker knows where and how to shut off the
gas supply to the cooker.
B. Install male 1/2” flare union adapter to the 1/2”
NPT internal thread at inlet of regulator. Use a
backup wrench on the regulator fitting to avoid
damage.
C. Install male 1/2” or 3/4” flare union adapter to
the NPT internal thread of the manual shut-off
valve, taking care to back-up the shut-off valve
to keep it from turning.
D. Connect flexible metal appliance connector
to the adapter on the cooker. Position cooker to
permit connection at the shut-off valve.
E. When all connections have been made, make
sure all cooker controls are in the off position
and turn on the main gas supply valve.
Use a liquid leak detector at all joints and
connections to check for leaks in the system.
When using pressures greater than 1/2 psig
to pressure test the gas supply system of the
residence, disconnect the cooker and individual
shut-off valve from the gas supply piping. When
using pressures of 1/2 psig or less to pressure
test the gas supply system, simply isolate the
cooker from the gas supply system by closing the
individual shut-off valve.
When checking for proper operation of the
regulator, the inlet pressure must be at least 1”
greater than the operating (manifold) pressure as
given on rating label of product.
*Teflon: Registered trademark of DuPont
25
WARNING
WARNING

2
ELECTRICAL CONNECTIONS
Shock Hazard: This
appliance must be properly grounded.
Failure to do so can result in electric shock.
Electrical Requirements - 220-240 V, 50/60 Hz.
properly grounded dedicated circuit protected by a
15-amp or 20-amp circuit breaker or time delay fuse.
Note: Use of automatic, wireless, or wired external
switches that shut off power to the appliance are
not recommended for this product.
Grounding
The power cord of this appliance is equipped with
a three-prong (grounding) plug which plugs into a
standard three-prong grounding wall receptacle
to minimize the possibility of electric shock hazard
from this appliance.
The customer should have the wall receptacle
and circuit checked by a qualified electrician to
make sure the receptacle is properly grounded.
Where a standard two-prong wall receptacle is
encountered, it is the personal responsibility and
obligation of the customer to have it replaced with
a properly grounded three-prong wall receptacle.
DO NOT, UNDER ANY CIRCUMSTANCES, CUT OR
REMOVE THE THIRD (GROUND) PRONG FROM
THE POWER CORD. DO NOT USE AN ADAPTER.
DO NOT USE AN EXTENSION CORD.
3
SURFACE BURNERS
Fire or Explosion Hazard:
Do not operate the burner without all burner
parts in place.
A.
Burners - Place surface burners into
corresponding positions on hob.
B.
Caps - Place caps on proper size burner..
C.
Single Grates - Place the oval (center) head/
cap assembly over the electrode on the hob.
Make sure the notch in the
burner head is positioned
over the electrode.
Electrode
Notch
Cap
Burner
Locator Bumps
26
WARNING
WARNING

4
CHECK SURFACE BURNERS
Push and turn knob to LITE position. You will hear
a clicking sound indicating proper operation of
the spark module. Once the air has been purged
from the supply lines, burners should light within
4 seconds. After burner lights, rotate knob out of
the LITE position. Try each burner in succession
until all burners have been checked.
Quality of Flames
The flame quality of the burners needs to be
determined visually.
If burner flames look like (A), call for service.
Normal burner flames should look like (B)
or (C), depending on the type of gas you use
With LP gas, some yellow tipping on outer cones
is normal.
5
CHECK BAKE AND BROIL
BURNERS
To remove the oven bottom:
A. Remove the screws holding down rear of the
oven bottom.
B. Grasp the oven bottom at rear slots on each
side.
C. Lift the rear of the oven bottom and slide it
back until it clears the lip of the cooker frame
at the front. Then lift bottom up and out.
Set Bake function to 350°F. Burner should
light in 30 to 90 seconds.
Check Flame Quality.
•
Flames should have approximately 1” blue
cones.
• Natural gas should burn with no yellow
flames.
• LP gas flames have slight yellow tips
• After warming up, the flame should not lift
off the burner.
Check broil burner using the same method
as the bake burner.
6
ADJUST BAKE AND BROIL
AIR SHUTTER IF NECESSARY
To adjust the flow of air to either burner, loosen
the Phillips head screw and rotate the shutter
as needed.
A. If the flames are yellow, open shutter more
than the original setting.
B. If the flames lift off the burner, close the air
shutter more than the original setting.
Check flames again and adjust further if
necessary. Replace oven bottom.
Loosen
Air
shutter
Air
shutter
Loosen
Oven bottom
Slots
Broil BurnerBake Burner
27
(C) Soft blue flames—
Normal for natural gas
(B) Yellow tips on
outer cones—
Normal for LP gas
(A) Yellow flames—
Call for service

WHEN ALL HOOKUPS ARE
COMPLETED
Make sure all controls are left in the off position.
Make sure the flow of combustion and ventilation
air to the cooker is unobstructed.
Check that all packing materials and tape have
been removed. This will include tape on metal
panel under control knobs (if applicable), adhesive
tape, wire ties, cardboard and protective plastic.
Failure to remove these materials could result in
damage to the appliance once the appliance has
been turned on and surfaces have heated.
7
INSTALL AND CHECK
ANTI-TIP DEVICE
Never completely remove
the leveling leg as the cooker will not be
secured to the anti-tip device properly.
Follow instructions supplied with ANTI-TIP bracket
8
LEVEL THE COOKER
Never completely remove the
leveling leg as the cooker will not be secured to
the anti-tip device properly.
A. Plug in the unit.
B. Measure the height of your countertop at the
rear of the opening (X).
C. Adjust two rear leveling legs so that the rear of
hob is at the same height as the counter (Y).
D. Slide unit into place.
E. Install oven shelves in the oven and position the
cooker where it will be installed.
F. Check for levelness by placing a spirit level on
one of the oven shelves. Take two readings—with
the level placed diagonally first in one direction
and then the other.
G. Adjust front leveling legs until the cooker is level.
H. Look under the unit and verify that the rear leg
is fully engaged with the anti-tip device. If not,
remove the unit and adjust the height of the
rear leg so that it is properly engaged.
Anti-Tip Bracket
Kit Included
Spirit level
X
Y
28
WARNING
WARNING

29
Recycle the materials with the symbol .
Put the packaging in applicable containers
to recycle it.
Help protect the environment and human
health and to recycle waste of electrical
and electronic appliances. Do not dispose
appliances marked with the symbol
with
the household waste. Return the product to
your local recycling facility or contact your
municipal
ENVIRONMENT CONCERNS

NOTES
30

NOTES
31
 Loading...