

Frigidaire FGHF2366PF2, FPHF2399PF3, DGHF2360PF0, FGHB2866PF2, FGHF2366PF1 Installation Instructions Manual
...
FRIGID®IRE®
Installation Instructions* for French Door Bottom Freezer/Refrigerator
*Please refer to your Use & Care Guide for more details.
To avoid electric shock, which can cause death or severe personal injury,
do not connect your refrigerator to an electrical power source until you
have completed Step 2 of these instructions.
If you needto remove the doors to get your refrigerator into the house, please refer.to .
"Kemoving uoors" in the use & Care bulae. These installation instructions are proviaea only as
a pgssible customer option. Frigidaire recommends that you use a service or kitchen contracting
professional to install your refrigerator.
If you are installingyour refrigerator
without connecting itto a water • Shifting the refrigerator from side to side
supply, make sure the ice maker's may damage flooring.
power switcn is turned Off (see the • Do not block the toe grille on the lower
use & Care Guide Tor more detai s), front of your refrigerator. Sufficient air cir-
culation is essential for proper operation.
Pre arin For Installation
Room temperatures
below 55°F (13°C)
or above 110°F
(43°C) will impair
cooling ability of
your refrigerator's
Be sure to coordinate site preparation and installation
with your kitchen contractor.
Include these minimum guidelines in your site preparation:
* Choose a place near a grounded electrical outlet.
Do not use an extension cord or an adapter plug.
* Avoid direct sunlight and close proximity to a range, Please call 1-800-944-9044 if you
need assistance with this installation.
aisnwasner or ott_er neat source. ...........................................................................................
* Floor should be level and able to
support a fully loaded refrigerator.
* The refrigerator's Ice Dispenser
requires water supply access.
* Plan for easy access to counter tops
when removing food.
* For complete access to drawers and
_reezer DasKets, aoors must be able to
fully open.
* Load refrigerator from side of cabinet
only.
, Do not run retaining straps over handles nor overtighten straps, compressor,
, Never use refrigerator handles to move the refrigerator.
Allow the followiqg clearances for ease of installation, proper air
circulation, ana plumbing ana electrical connections: Sides & Top: 3/s inch / Rear: 1 inch
Connect Water Su I
To avoid electric shock,
which can cause death
or severe personal
iniun/, disconnect the
refrklerator from elec-
trica| power before con-
nectincj a water supply
line to-the refrigerator.
Before Installing The Water Supply Line, You Will Need:
• Basic Tools: adjustable wrench, fiat-blade screwdriver, and
TH
Phillips screwdriver
• Access to a household cold water line with water pressure
between 30 and 100psi.
• A water supply line made of 1/4inch (6 mm) OD, copper
or stainless steel tubing. Todetermine the length of tubing
neeoeo, measure the distance from the ice maker inlet
valve at the back of the refrigerator to your cold water
pipe: Then add approximately 7 feet, so the refrigerator
can De moveo out for cleaning.
• A shutoff valve to connect the water supply line to your
nousenold water system. DO NOT use a self-piercing type
shutoff valve.
• A compression nut and ferrule (sleeve)for cpnnecting a
copper water supply line to the ice maker inlet valve.
To Avoid Property Damage:
• Copper or Stainless Steel braided tubing is recommended for the wa-
ter supply line..Water supply tubing ma_le of 1/4 inch (6 mm) plastic is
not recommenoed to De used. Plastic tuoing greatly increases the po-
tential for water leaks, and the manufacturer will not be responsible
for any damage if plastic tubing is used for the supply line.
• Do not reuse compression fitting or use thread seal tape.
• DO NOT install water supply tubing in areas where temperatures fall
below freezing.
• Chemicals from a malfunctioning softener can damage the ice maker.
If the ice maker is connected to soft water, ensure that the softener is
maintained and working properly.
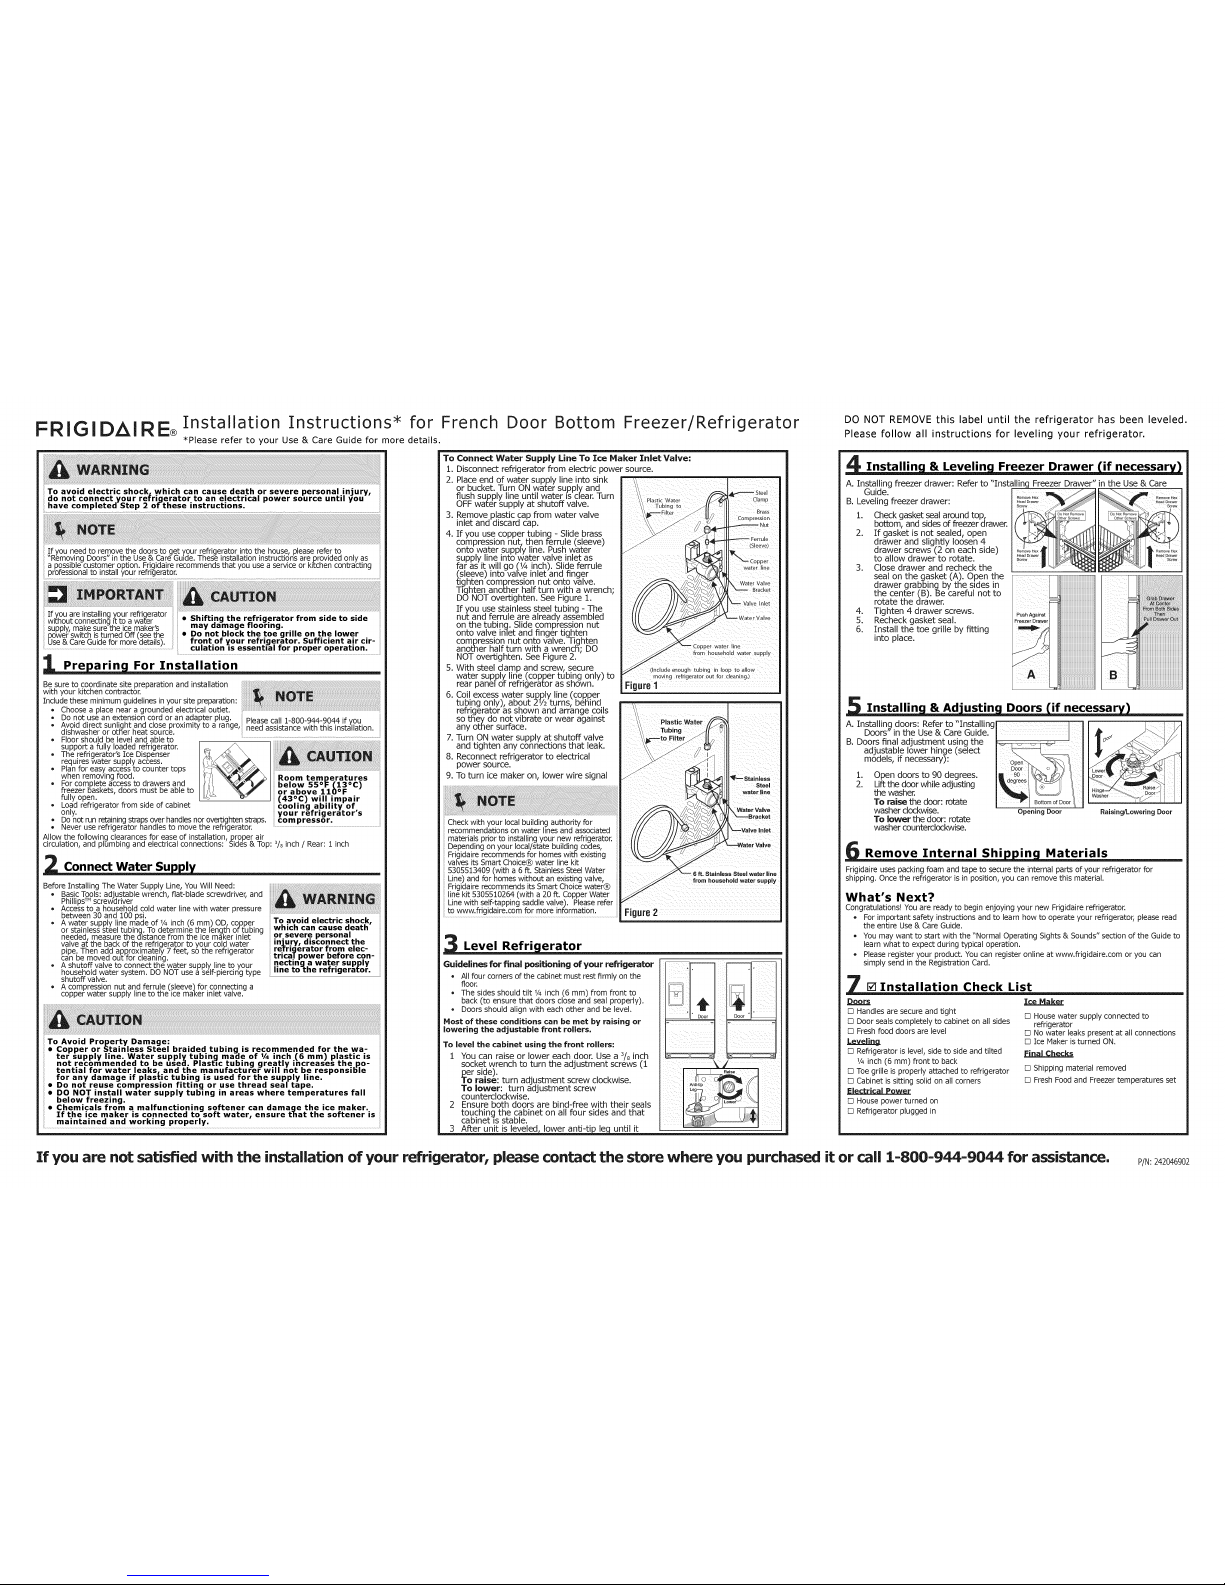
To Connect Water Supply Line To Tce Maker Tnlet Valve:
1. Disconnect refrigerator from electric power source.
2. Place end of water supply line into sink
or bucket. Turn ON water sujoply and
flush supply line until water B clear. Turn ' _stee]
Plastic Water Clamp
OFF water supply at shutoff valve. Tub,_gto
3. Remove plastic cap from water valve
inlet and discard cap.
4. If you use copper tubing - Slide brass
compression nut, then ferrule (sleeve)
onto water supply line. Push water
supply line into water valve inlet as
far as it will go (1/4 inch). Slide ferrule
(sleeve) into valve inlet and finger
tighten compression nut onto valve.
Tighten another half turn with a wrench;
DO NOT overtighten. See Figure 1.
If you use stainless steel tubing - The
nut and ferrule are already assembled
on the tubing. Slide compression nut
onto valve inlet and finger tighten
compression nut onto valve. Tighten
another half turn with a wrencE; DO
NOT overtighten. See Figure 2.
5. With steel clamp and screw, secure nough tubing in loop to allow
water supply line (copper tubing only) to moving refrigerator butfor cleaning.)
rear panel of refrigerator as shown. Figure 1
6. Coil excess water supply line (copper
tubing only), about 2V2 turns, behind
refrigerator as shown and arrange coils
so they do not vibrate or wear against
any other surface.
7. Turn ON water supply at shutoff valve
and tighten any connections that leak.
8. Reconnect refrigerator to electrical
power source.
9. To turn ice maker on, lower wire signal
Check with your local building authority for
recommendations on water lines and associated
materials prior to installing your new refrigerator.
Depending on your local/state building codes,
Frigidaire recommends for homes with existing
valves its Smart Choice® water line kit
5305513409 (with a 6 ft. Stainless Steel Water
Line) and for homes without an existing valve,
Frigidaire recommends its Smart Choice water®
line kit 5305510264 (with a 20 ft. Copper Water
Line with self-tapping saddle valve). Please refer
to www.frigidaire.com for more information.
t Plastic Water
Tubing
Brass
Compression
Nut
_ Ferrule
(Sleeve)
!
_ valve inlet
_ Wate r Valve
Copper water line
from household water SUpply
Water Valve
_---Bracket
Stainless Steel water line
from household water supply
Figure2
Level Refri erator
Guidelines for final positioning of your refrigerator
* All four corners of the cabinet must rest firmly on the
floor.
The sides should tilt 1/4inch (6 mm) from front to
back (to ensure that doors close and seal properly).
Doors should align with each other and be level.
Most of these conditions can be met by raising or
lowering the adjustable front rollers,
To level the cabinet using the front rollers:
2
3
pier side).
raise: turn adjustment screw clockwise.
To lower: turn adjustment screw
counterclockwise.
Ensure both doors are bind-free with their seals
touching the cabinet on all four sides and that
cabinet Jsstable.
After unit is leveled lower until it
DO NOT REMOVE this label until the refrigerator has been leveled.
Please follow all instructions for leveling your refrigerator.
, Installin & Levelin Freezer Drawer if necessar
A. Installing freezer drawer: Refer to "Installing Freezer Drawer" in the Use & Care
Guide. L _
Remove HeX Remove HeX
B. Leveling freezer drawer: , ..................
screw Screw
2.
Remove HeX Remove Hex
Head Dr_er Heed D_wer
3.
4.
5.
6.
Check gasket seal around top,
bottom, and sides of freezer drawer.
If gasket is not sealed, open
drawer and slightly loosen 4
drawer screws (2 on each side)
to allow drawer to rotate.
Close drawer and recheck the
seal on the gasket (A). Open the
drawer grabbing by the sides in
the center(B). Be careful not to
rotate the drawer.
Tighten 4 drawer screws.
Recheck gasket seal.
Install the toe grille by fitting
into place.
iiiiiiiiiiiiiiiiiiiiiiiiiiiiiiiiiiiiiiiiiiiiiiiiiiiiiii
iiiiiiiiiiiiiiiiiiiiiiiiiiiiiiiiiiiiiiiiiiiiiiiiiiiiiiii
iiiiiiiiiiiiiiiiiiiiiiiiiiiiiiiiiiiiiiiiiiiiiiiiiiiiiiii
iiiiiiiiiiiiiiiiiiiiiiiiiiiiiiiiiiiiiiiiiiiiiiiiiiiiiiii
Installin & Ad'ustin Doors if necessa
A. Installing doors: Refer to "Installing
Doors" in the Use & Care Guide.
B. Doors final adjustment using the
adjustable lower hinge (select
models, if necessary):
1.
2.
Open doors to 90 degrees.
Uft the door while adjusting
the washer.
To raise the door: rotate
washer clockwise.
To lower the door: rotate
washer counterclockwise.
Opening Door
.ower
}oor
Raising/Lowering Door
Remove Internal Shi in Materials
Frigidaire uses packing foam and tape to secure the internal parts of your refrigerator for
shipping. Once the refrigerator is in position, you can remove this material.
What's Next?
Congratulations! You are ready to begin enjoying your new Frigidaire refrigerator.
For important safety instructions and to learn how to operate your refrigerator, please read
the entire Use & Care Guide.
You may want to start with the "Normal Operating Sights & Sounds" section of the Guide to
learn what to expect during typical operation.
Please register your product. You can register online at www.frigidaire.com or you can
simply send in the Registration Card.
7 _ Installation Check List
Doors
[] Handles are secure and tight
[] Door seals completely to cabinet on all sides
[] Fresh food doors are level
[] Refrigerator is level, side to side and tilted
1/4inch (6 mm) front to back
[] Toe grille is properly attached to refrigerator
[] Cabinet is sitting solid on all corners
[] House power turned on
[] Refrigerator plugged in
[] House water supply connected to
refrigerator
[] No water leaks present at all connections
[] Ice Maker isturned ON.
[] Shipping material removed
[] Fresh Food and Freezer temperatures set
If you are not satisfied with the installation of your refrigerator, please contact the store where you purchased it or call 1-800-944-9044 for assistance.
 Loading...