

Frigidaire FGHD2465NB0A, FGHD2465NF0A, FPHD2485NF0A, FGHD2465NW0A, FGHD2485NF0A Use & Care Manual
...
FRIGIDAIRE
Important Safety Instructions .............................. 2
Product Registration ........................................... 3
Dishwasher Features ......................................... 4
Operating Instructions ..................................... 5-8
Preparing and Loading Dishes ........................ 9-12
www.frigidaire.com USA 1-800-944-9044 www.frigidaire.ca
TABLE OF CONTENTS
Dishwasher Dispenser and Detergents ............... 13
Factors Affecting Performance .......................... 14
Care and Cleaning ........................................... 15
Solutions to Common Dishwashing Problems ..16-18
Warranty ........................................................ 19
Canada 1-800-265-8352
j_
CO
co
o
z
DJ
O
v
Read all instructions before using this appliance.
Save these instructions for future reference,
This symbol will help alert you to such dangers as
personal injury, burns, fire, and electrical shock.
To reduce the risk of fire, electrical shock, or injury
when using your dishwasher, follow basic
precautions including the following:
Useyour dishwasher only as instructed inthis Use and
Care Manual.
• This Manual does not cover every possible condition and
situation that mayoccur. Use common sense and
caution when installing, operating and maintaining any
appliance.
° NSFcertified residential dishwashers are not intended
for licensed food establishments.
DISHWASHERMUSTBEELECTRICALLYGROUNDED.
Readthe Installation Instructions for details.
• This dishwasher is designed to operate on regular
house current (120 V, 60 Hz). Use a circuit equipped
with a 15 ampere fuse or circuit breaker. Use a20
ampere fuse if dishwasher isconnected with a food
waste disposer.
° Do not operate dishwasher unless all enclosure panels
are in their proper place.
° Toavoid entrapment and/or suffocation, remove door or
door latch mechanism from any dishwasher that is
discarded or not in use.
• Keepyoung children and infants away from dishwasher
when it isoperating.
• Donot let children abuse, sit, stand or play on door or
racks of a dishwasher.
Useonly detergents and rinse agents recommended for
use in a dishwasher.
Do not wash plastic items unless marked "dishwasher
safe" or the equivalent. Check with manufacturer for
recommendations, if not marked. Items that are not
dishwasher safe may melt and create a potential fire
hazard.
• Disconnect electrical power to dishwasher before
servicing.
• If the dishwasher drains into afood disposer, make sure
disposer is completely empty before running dishwasher.
• Repairsshould be done by aqualified technician.
• Donot tamper with controls.
• Donot touch the heating element during or immediately
after use.
Usecare unloading the dishware when the SANITIZE
option has been selected. Contents may be hot to the
touch immediately after the end of cycle.
When loading items to be washed:
Locate sharp items and knives sothat they
are not likely to damage the door seal or
tub.
Load sharp items and knives with the
handles up to reduce the risk of cut-type
injuries.
• Undercertain conditions, hydrogen gas may be
produced in a hot water system that has not been used
for 2 weeks or more. HYDROGENGASIS EXPLOSIVE.If
hot water system has not been used for such a period,
before using dishwasher, turn on all hot water faucets
and let water flow from each for several minutes. This
will release any accumulated hydrogen gas. HYDROGEN
GASIS FLAMMABLE.Do not smoke or use an open
flame during this time.
• Donot store or usecombustible materials, gasoline or
other flammable vapors and liquids in the vicinity of this
or any other appliance.
Store dishwasher detergent and rinse agents out of the
reach of children.
@2009 Electrolux Home Products, Inc. All rights reserved. Printed in the USA
ThankyouforchoosingFrigidaire
This Use & Care Guide is part of our commitment to customer
satisfaction and product quality throughout the service life of
your new appliance.
Weview your purchase as the beginning of a relationship. To
ensure our ability to continue serving you, please use this page
to record important product information.
Purchase date
Model number
Serial number
Very Important Information--
Read Before Operating Your
Dishwasher!
Normal Operating Sounds
This dishwasher does not sound like most
dishwashers--IT'S QUIETER.
Your Precision Direct Wash System® dishwasher uses
energy efficient motors for the wash and drain
portions of the cycle you select. Each cycle has a
series of water fills and drains for washing and rinsing
dishes. As each cycle begins, you may-or may not-
hear the drain motor.
Registering your product with Frigidaire enhances our ability
to serve you. YOUcan regls[er online a[
www.frigidaire.com or by dropping your Product
Registration Card in the mail.
The next sound you will hear is the splashing water as
it enters the tub. Then the lower arm rotates and
circulates water. This is followed by a pause and a
slightly different sound as the upper arms spray water.
If you listen closely, you will hear the change in sound
as the wash action switches from one arm to the
other.
PLEASE BE ADVISED: If you compare this
dishwasher to previous models, you may be
surprised at what you DON'T hear!
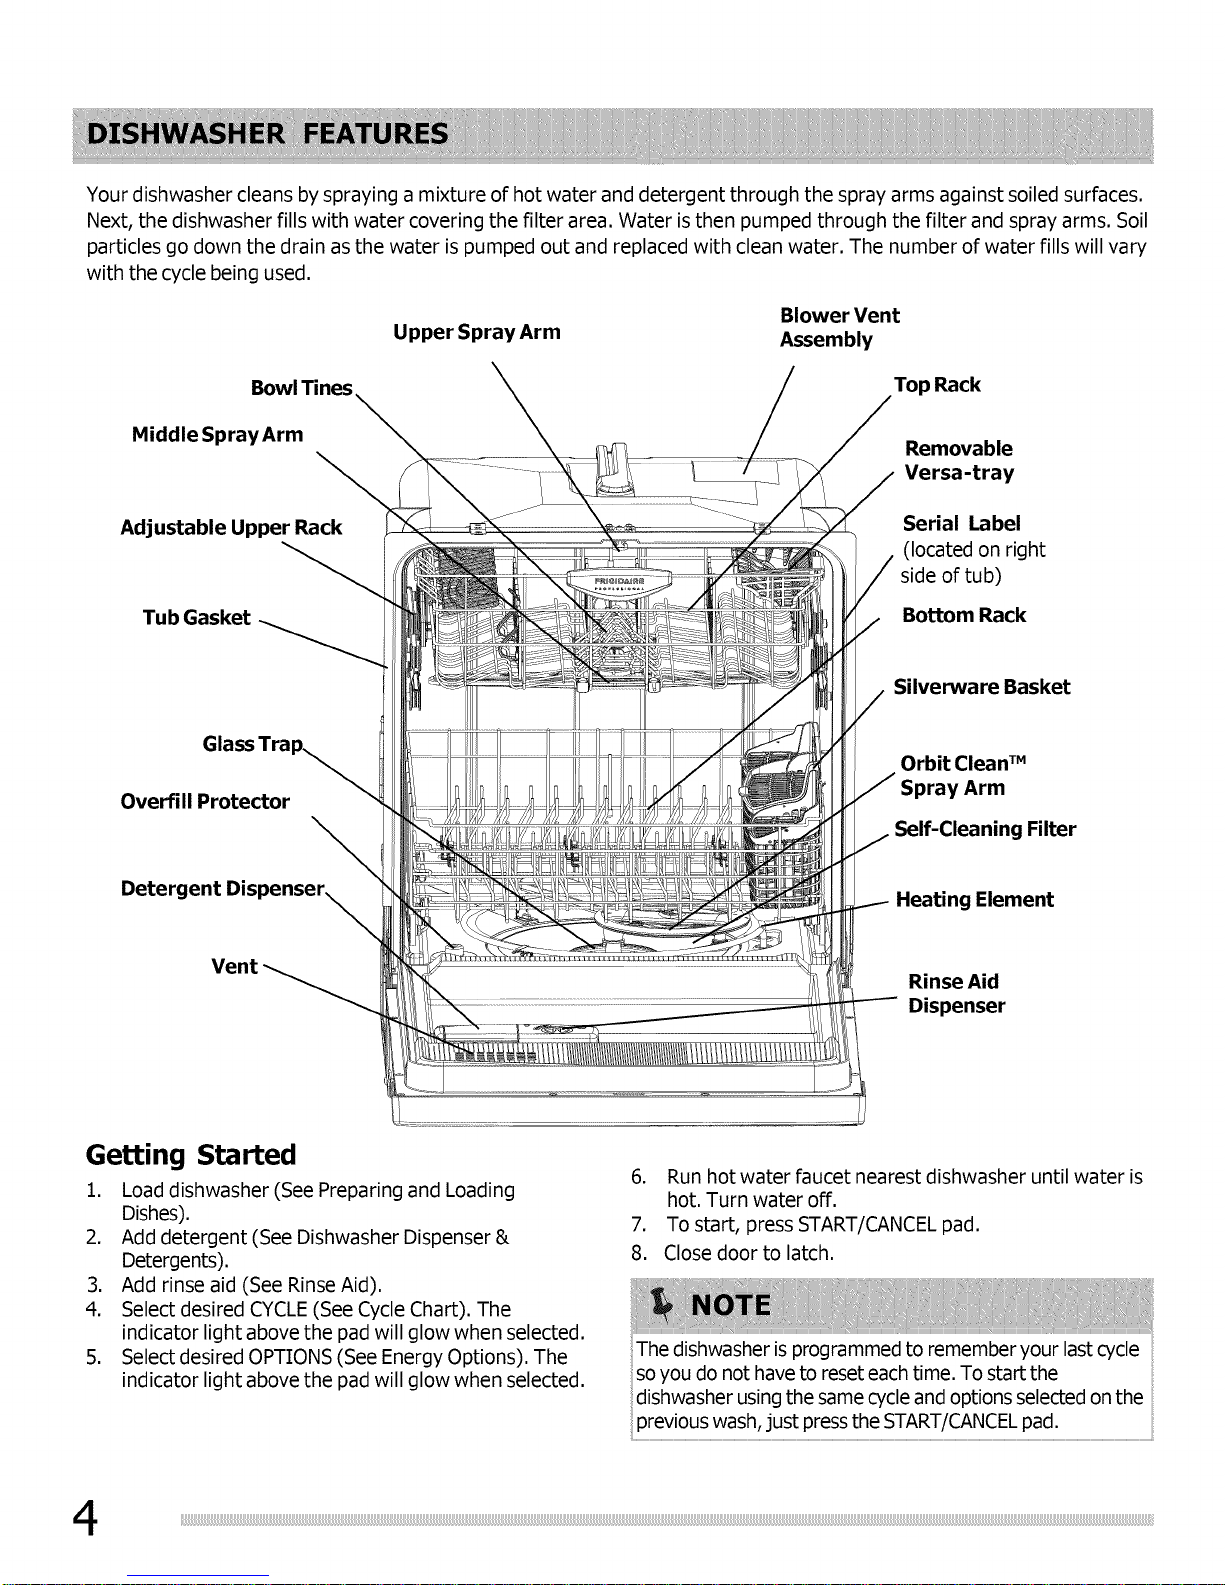
Your dishwasher cleans by spraying a mixture of hot water and detergent through the spray arms against soiled surfaces.
Next, the dishwasher fills with water covering the filter area. Water is then pumped through the filter and spray arms. Soil
particles go down the drain as the water is pumped out and replaced with clean water. The number of water fills will vary
with the cycle being used.
Bowl Tines
Middle SprayArm
Adjustable Upper Rack
Tub Gasket
Glass Tra
Overfill Protector
\
Upper Spray Arm
Blower Vent
Assembly
Detergent Dispenser_
Vent
Getting Started
1. Load dishwasher (See Preparing and Loading
Dishes).
2. Add detergent (See Dishwasher Dispenser &
Detergents).
3. Add rinse aid (See Rinse Aid).
4. Select desired CYCLE(See Cycle Chart). The
indicator light above the pad will glow when selected.
5. Select desired OPTIONS (See Energy Options). The
indicator light above the pad will glow when selected.
6. Run hot water faucet nearest dishwasher until water is
hot. Turn water off.
7. To start, press START/CANCEL pad.
8. Close door to latch.
The dishwasher is programmed to remember your last cycle
soyou do not have to reset each time. To start the
dishwasher using the same cycle and options selected on the
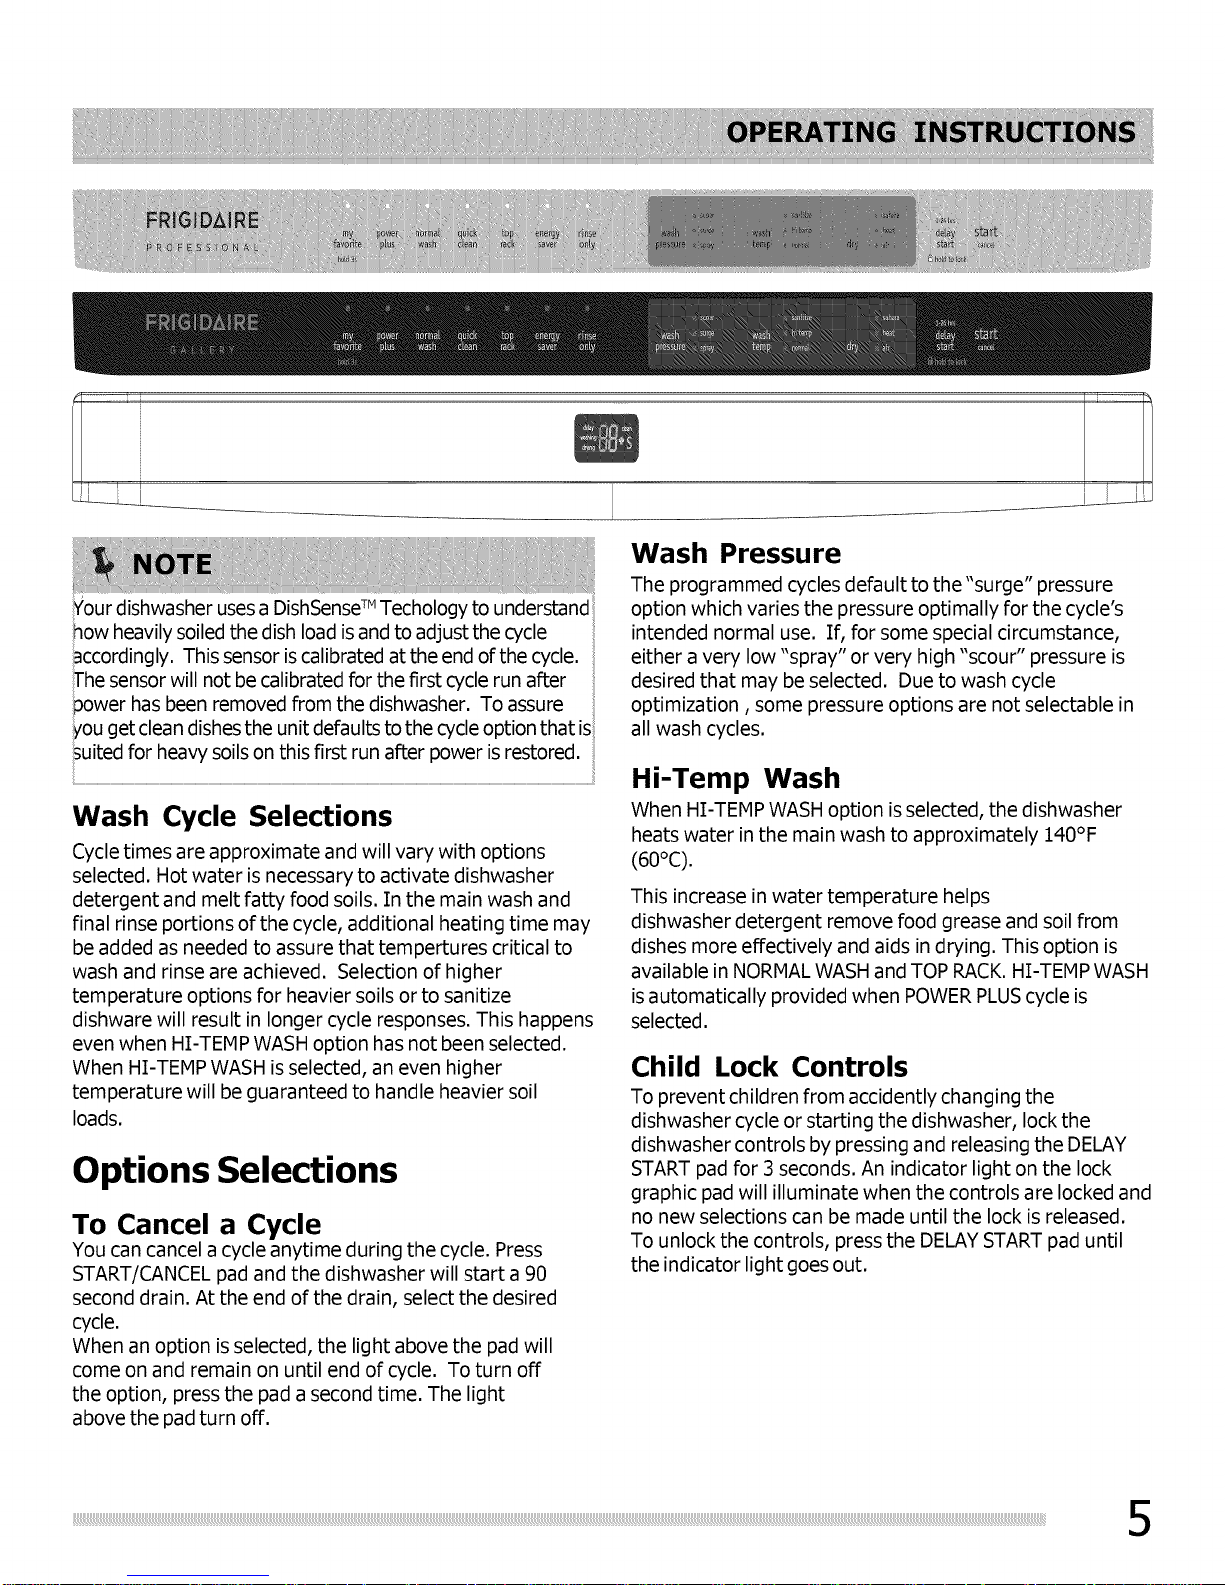
iYourdishwasherusesaDishSenseT"Techologytounderstand
howheavilysoiledthedishloadisandtoadjustthecycle
iaccordingly.Thissensoriscalibratedattheendofthecycle.
The sensor will not be calibrated for the first cycle run after
power has been removed from the dishwasher. To assure
you get clean dishes the unit defaults to the cycle option that is
Suitedfor heavy soilson this first run after power is restored.
Wash Cycle Selections
Cycle times are approximate and will vary with options
selected. Hot water is necessary to activate dishwasher
detergent and melt fatty food soils. In the main wash and
final rinse portions of the cycle, additional heating time may
be added as needed to assure that tempertures critical to
wash and rinse are achieved. Selection of higher
temperature options for heavier soils or to sanitize
dishware will result in longer cycle responses. This happens
even when HI-TEMP WASH option has not been selected.
When HI-TEMP WASH is selected, an even higher
temperature will be guaranteed to handle heavier soil
loads.
Options Selections
To Cancel a Cycle
You can cancel a cycle anytime during the cycle. Press
START/CANCEL pad and the dishwasher will start a 90
second drain. At the end of the drain, select the desired
cycle.
When an option isselected, the light above the pad will
come on and remain on until end of cycle. To turn off
the option, press the pad a second time. The light
above the pad turn off.
Wash Pressure
The programmed cycles default to the "surge" pressure
option which varies the pressure optimally for the cycle's
intended normal use. If, for some special circumstance,
either a very low "spray" or very high "scour" pressure is
desired that may be selected. Due to wash cycle
optimization, some pressure options are not selectable in
all wash cycles.
Hi-Temp Wash
When HI-TEMP WASH option isselected, the dishwasher
heats water in the main wash to approximately 140°F
(60°C).
This increase in water temperature helps
dishwasher detergent remove food grease and soil from
dishes more effectively and aids in drying. This option is
available in NORMAL WASH and TOP RACK.HI-TEMP WASH
is automatically provided when POWER PLUScycle is
selected.
Child Lock Controls
To prevent children from accidently changing the
dishwasher cycle or starting the dishwasher, lock the
dishwasher controls by pressing and releasing the DELAY
START pad for 3 seconds. An indicator light on the lock
graphic pad will illuminate when the controls are locked and
no new selections can be made until the lock is released.
To unlock the controls, press the DELAYSTART pad until
the indicator light goes out.
Favorite Cycle
The FAVORITE CYCLEoption allows you to program your
preferred cycle and options into one button. Once
Programmed, simply press the FAVORITE CYCLEbutton
followed by the START/CANCEL pad.
To Program the FAVORITE CYCLEbutton:
1) Select your preferred cycle and options
2) Hold the FAVORITE CYCLEbutton for 3 seconds.
Sahara Dry TM
When the SAHARA DRYTMoption is selected, the
dishwasher increases the temperature of the final rinse
and extends drying time by approximately twenty
minutes. The SAHARA DRYTMoption can be used with all
cycles except ENERGYSAVER AND RINSE ONLY. For
best drying performance, select Hi-Temp Wash and/or
sanitize. This will increase the temperture during the
wash cycle to improve drying.
The display will flash for 2 seconds indicating the
FAVORITE CYCLEoption has been programmed. To
change the FAVORITE CYCLEoption simple repeat steps
one and two above.
Sanitize Option
To sanitize your dishes and glassware, select the
SANITIZE option. When selected, the light above the pad
will come on and remain on until end of cycle. The water
temperature in the final rinse will be raised to 155°F
(68°C) assuring bacteria is destroyed. This option is
available in NORMAL WASH and TOP RACK. SANITIZE is
automatically provided when POWER PLUSis selected.
Only these sanitization cycles have been designed to
meet NSF requirements.
The cycle time will be extended until the proper water
temperature is reached. Washing action will continue
during the water heating delay. For best results, the
incoming water temperature should be at least 120°F
(49°C).
The sanitize criteria may not be satisfied if there is an
interruption of the cycle, power failure or if the incoming
water temperature is below 120°F (49°C).
To turn off the SANITIZE option, press the pad a second
time. The light above the pad will turn off.
The energy required to use the SAHARA DRYTMoption
costs pennies per cycle. You may choose not to select
the SAHARA DRYTMoption; however you may have items
in your dish load that will not be completely dry at the
end of the cycle.
Heat Dry
The HEATED DRY option in combination with rinse aid will
enhance drying performance. HEATED DRYoption is
available on all cycles except ENERGYSAVER& RINSE
ONLY.
The drying option may be changed at any time during the
cycle and affects only the drying period.
Air Dry
The AIR DRY option is used to de-activate the heating
element during the drying phase of the selected wash cycle.
This option will slightly decrease energy usage but will
increase the likelihood that dishware will not be dry.
Delay Start
The DELAY STARToption allows you to automatically delay
starting your dishwasher from 1-24 hours.
To activate press the DELAYSTART pad until the desired
delay time shows inthe STATUS window. The word "delay"
will show in the status window next to the remaining delay
time until the cycle starts.
To cancel the DELAY STARToption and begin the cycle
before the delay period is over, press the START/CANCEL
pad.
Why Energy Efficient Units run long cycles: Several factors are important to washing dishware. The energy use of your
dishwasher was reduced by applying more of the factors that don't useso much energy adn less of the ones that use more.
As a result, you will see that the wash cycles take longer.
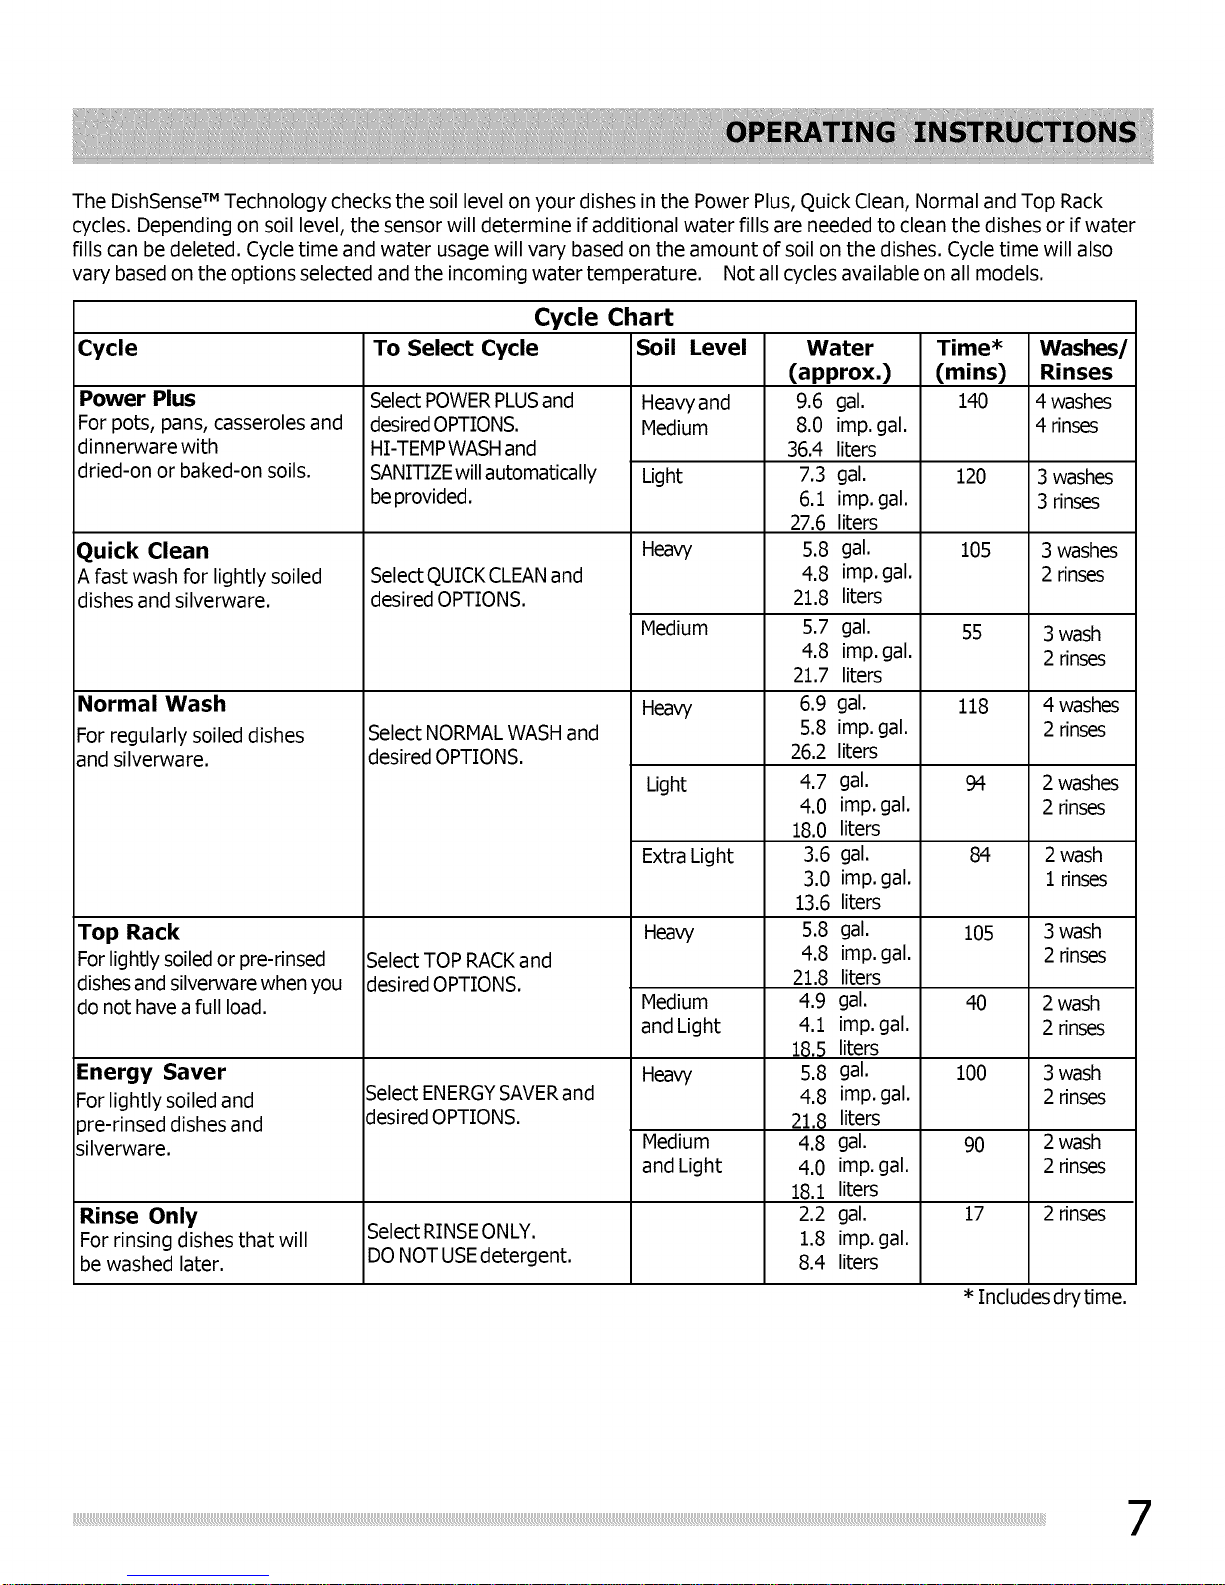
TheDishSense*MTechnology checks the soil level on your dishes in the Power Plus, Quick Clean, Normal and Top Rack
cycles. Depending on soil level, the sensor will determine if additional water fills are needed to clean the dishes or if water
fills can be deleted. Cycle time and water usage will vary based on the amount of soil on the dishes. Cycle time will also
vary based on the options selected and the incoming water temperature. Not all cycles available on all models.
Cycle Chart
Cycle To Select Cycle Time*
Power Plus
For pots, pans, casseroles and
dinnerware with
dried-on or baked-on soils.
Quick Clean
A fast wash for lightly soiled
dishes and silverware.
Normal Wash
For regularly soiled dishes
and silverware.
Top Rack
Forlightly soiled or pre-rinsed
dishes and silverware when you
do not have a full load.
Energy Saver
For lightly soiled and
)re-rinsed dishes and
silverware.
Rinse Only
For rinsing dishes that will
be washed later.
Select POWERPLUSand
desiredOPTIONS.
HI-TEMPWASH and
SANITIZEwill automatically
be provided.
Select QUICK CLEANand
desired OPTIONS.
Select NORMAL WASH and
desired OPTIONS.
Select TOP RACKand
desired OPTIONS.
Select ENERGYSAVERand
desired OPTIONS.
Select RINSE ONLY.
DONOT USEdetergent.
Soil Level
Heavy and
Medium
Light
Heaw
Medium
Heaw
Light
Extra Light
Heaw
Medium
and Light
Heaw
Medium
and Light
Water
(approx.)
9.6 gal.
8.0 imp. gal.
36.4 liters
7.3 gal.
6.1 imp.gal.
27.6 liters
5.8 gal.
4.8 imp. gal.
21.8 liters
5.7 gal.
4.8 imp. gal.
21.7 liters
6.9 gal.
5.8 imp. gal.
26.2 liters
4.7 gal.
4.0 imp. gal.
18.0 liters
3.6 gal.
3.0 imp. gal.
13.6 liters
5.8 gal.
4.8 imp. gal.
21.8 liters
4.9 gal.
4.1 imp. gal.
18.5 liters
5.8 gal.
4.8 imp. gal.
21.8 liters
4.8 gal.
4.0 imp. gal.
18.1 liters
2.2 gal.
1.8 imp. gal.
8.4 liters
Washes/
(mins)
140
120
105
55
118
94
84
105
4O
100
9O
17
* Includes dry time.
Rinses
4 washes
4 rinses
3 washes
3 rinses
3 washes
2 rinses
3 wash
2 rinses
4 washes
2 rinses
2 washes
2 rinses
2 wash
1 rinses
3 wash
2 rinses
2 wash
2 rinses
3 wash
2 rinses
2 wash
2 rinses
2 rinses
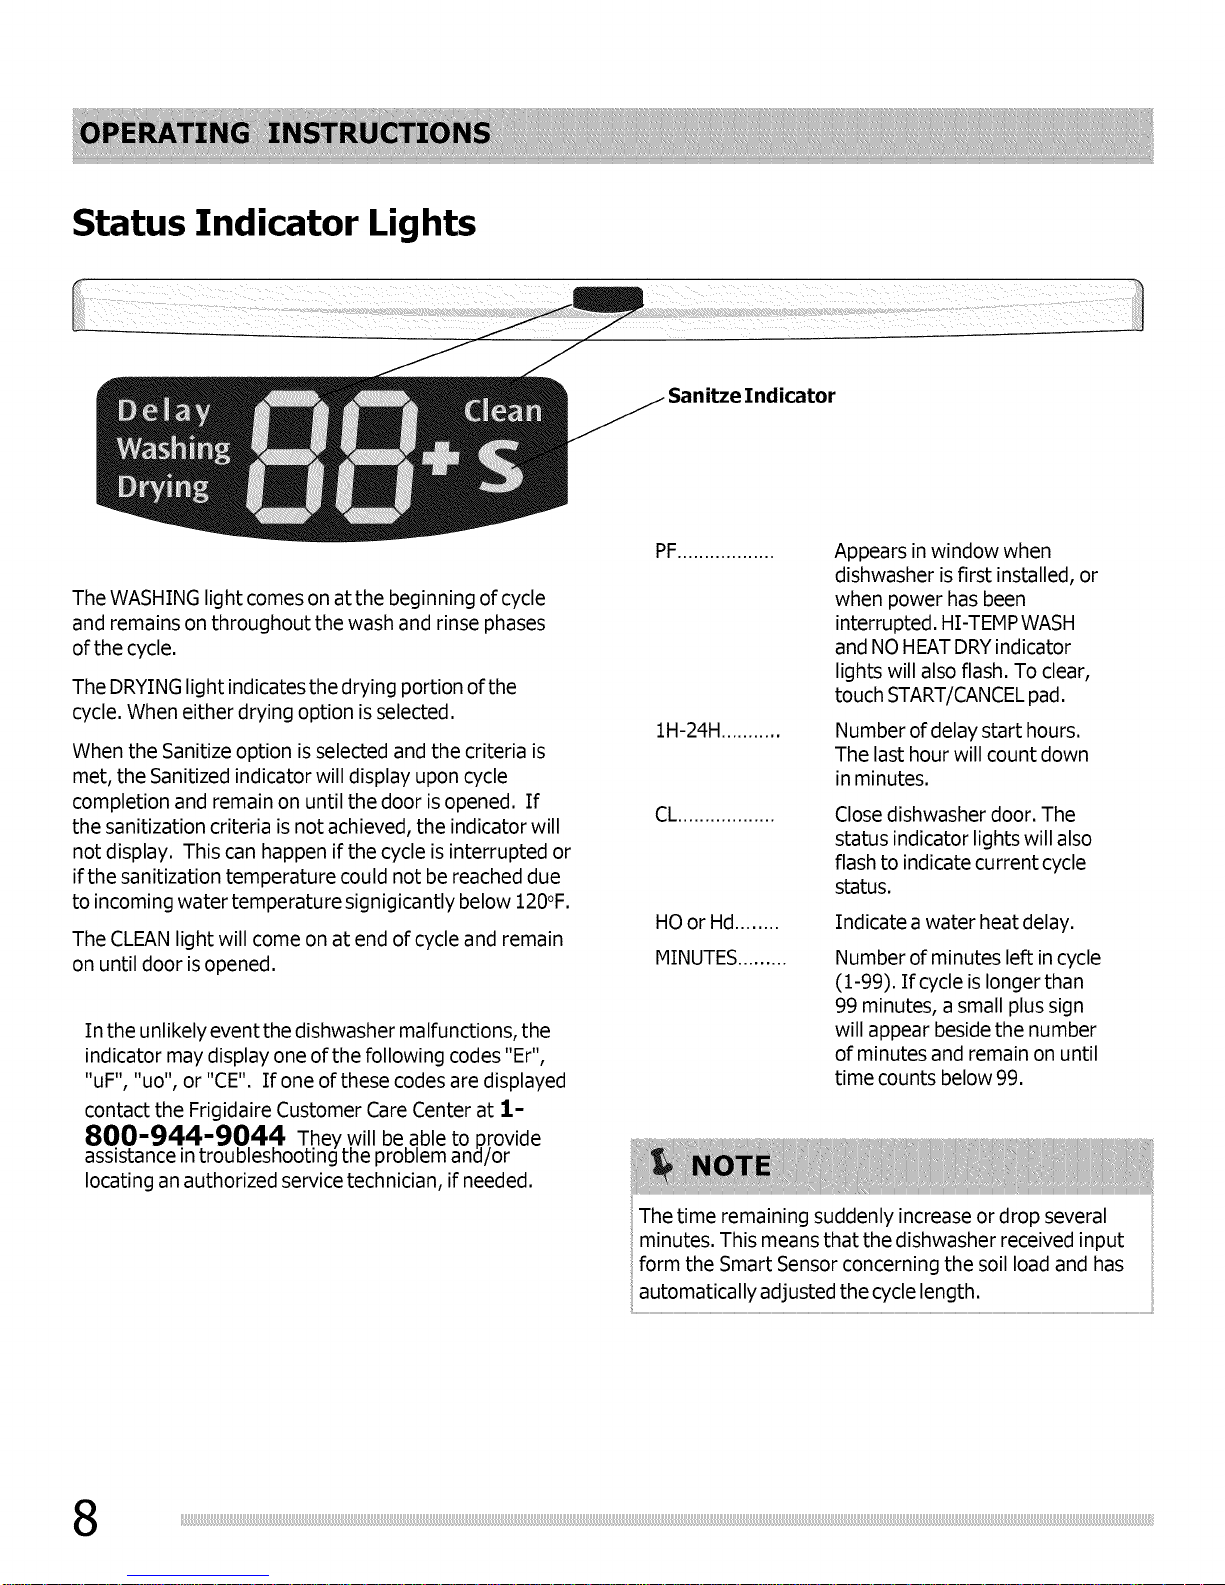
Status Indicator Lights
Sanitze Indicator
The WASHING light comes on atthe beginning of cycle
and remains on throughout the wash and rinse phases
of the cycle.
The DRYING light indicates the drying portion of the
cycle. When either drying option is selected.
When the Sanitize option isselected and the criteria is
met, the Sanitized indicator will display upon cycle
completion and remain on until the door is opened. If
the sanitization criteria is not achieved, the indicator will
not display. This can happen if the cycle is interrupted or
if the sanitization temperature could not be reached due
to incoming water temperature signigicantly below 120°F.
The CLEAN light will come on at end of cycle and remain
on until door is opened.
In the unlikely event the dishwasher malfunctions, the
indicator may display one of the following codes "Er",
"uF", "uo", or "CE". If one of these codes are displayed
contact the Frigidaire Customer Care Center at 1-
800-944-9044 They will be able to provide
assistance in troubleshooting the problem and/or
locating an authorized service technician, if needed.
RE ..................
1H-24H...........
CL ..................
HO or Hd........
MINUTES.........
Appears in window when
dishwasher is first installed, or
when power has been
interrupted. HI-TEMP WASH
and NO HEAT DRYindicator
lights will also flash. To clear,
touch START/CANCEL pad.
Number of delay start hours.
The last hour will count down
in minutes.
Close dishwasher door. The
status indicator lights will also
flash to indicate current cycle
status.
Indicate a water heat delay.
Number of minutes left in cycle
(1-99). If cycle is longer than
99 minutes, a small plus sign
will appear beside the number
of minutes and remain on until
time counts below 99.
The time remaining suddenly increase or drop several
minutes. This means that the dishwasher received input
form the Smart Sensor concerning the soil load and has
automatically adjusted the cycle length.
Dish Preparation
Scrape away large pieces of food, bones, pits,
toothpicks, etc. The continuous filtered wash system will
remove remaining food particles. Burned-on foods
should be loosened before loading. Empty liquids from
glasses and cups before loading them in the dishwasher.
Foods such as mustard, mayonnaise, vinegar, lemon
juice and tomato based products may cause
discoloration of stainless steel and plastics if allowed to
sit for a long period of time. Unless the dishwasher is to
be operated at once, it is best to rinse off these food
soils using the Rinse Only cycle.
• Load racks so that large items do not preventthe
detergent dispenser from opening.
• Check manufacturer's recommendations before
washing items in question.
If the dishwasher
drains into a food
disposer, be sure
disposeris
completely
empty before
starting
dishwasher.
" _i '_!i il ii /! /!
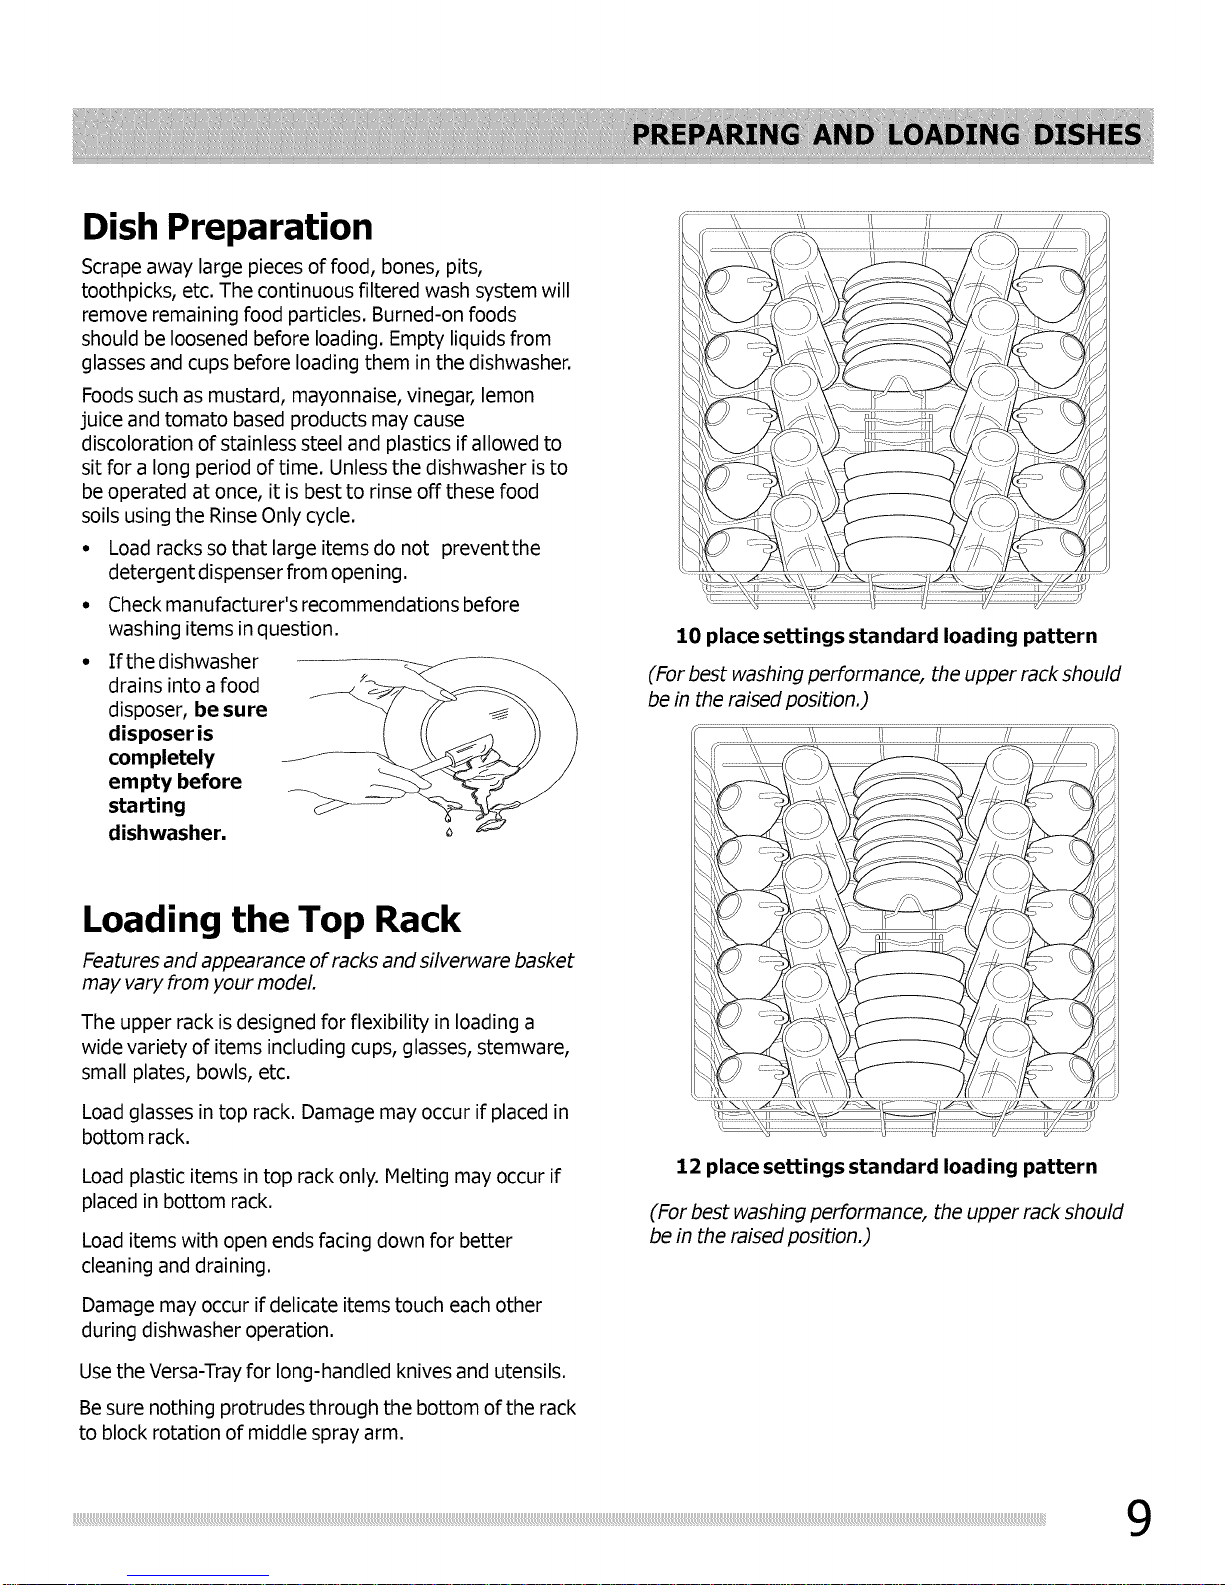
10 place settings standard loading pattern
(For best washing performance, the upper rack should
be in the raised position.)
' " <;;7.' ?
Loading the Top Rack
Features and appearance of racks and silverware basket
may vary from your model.
The upper rack is designed for flexibility in loading a
wide variety of items including cups, glasses, stemware,
small plates, bowls, etc.
Load glasses in top rack. Damage may occur if placed in
bottom rack.
Load plastic items in top rack only. Melting may occur if
placed in bottom rack.
Load items with open ends facing down for better
cleaning and draining.
Damage may occur if delicate items touch each other
during dishwasher operation.
Use the Versa-Tray for long-handled knives and utensils.
Be sure nothing protrudes through the bottom of the rack
to block rotation of middle spray arm.
12 place settings standard loading pattern
(For best washing performance, the upper rack should
be in the raised position.)
_____________{77ii 9

Bowl Tines
The bowl tines offer the ultimate in flexibility. When
closed, load with saucers or small dishes. Open halfway
and it is perfect for small casseroles. Open completely
for those hard to fit items, such as coffee pots, food
processors, etc. As you load your dishwasher, you will
find many other ways to use this unique feature.
Upper Rack Option
LIGHT WASH--UPPER RACKoption can be used to wash
a wide assortment of items when you don't have a full
load. Also, when the upper rack fills up with glasses and
the lower rack is still empty, you don't have to wait
anymore for clean glasses.
Adjustable Upper Rack
To raise the upper rack, refer to the figure below.
Press the Lever toward the center of the rack and pull
straight up on the rack.
Lever
Tolowerthe upperrack, presstheleverand push down on
the rack.
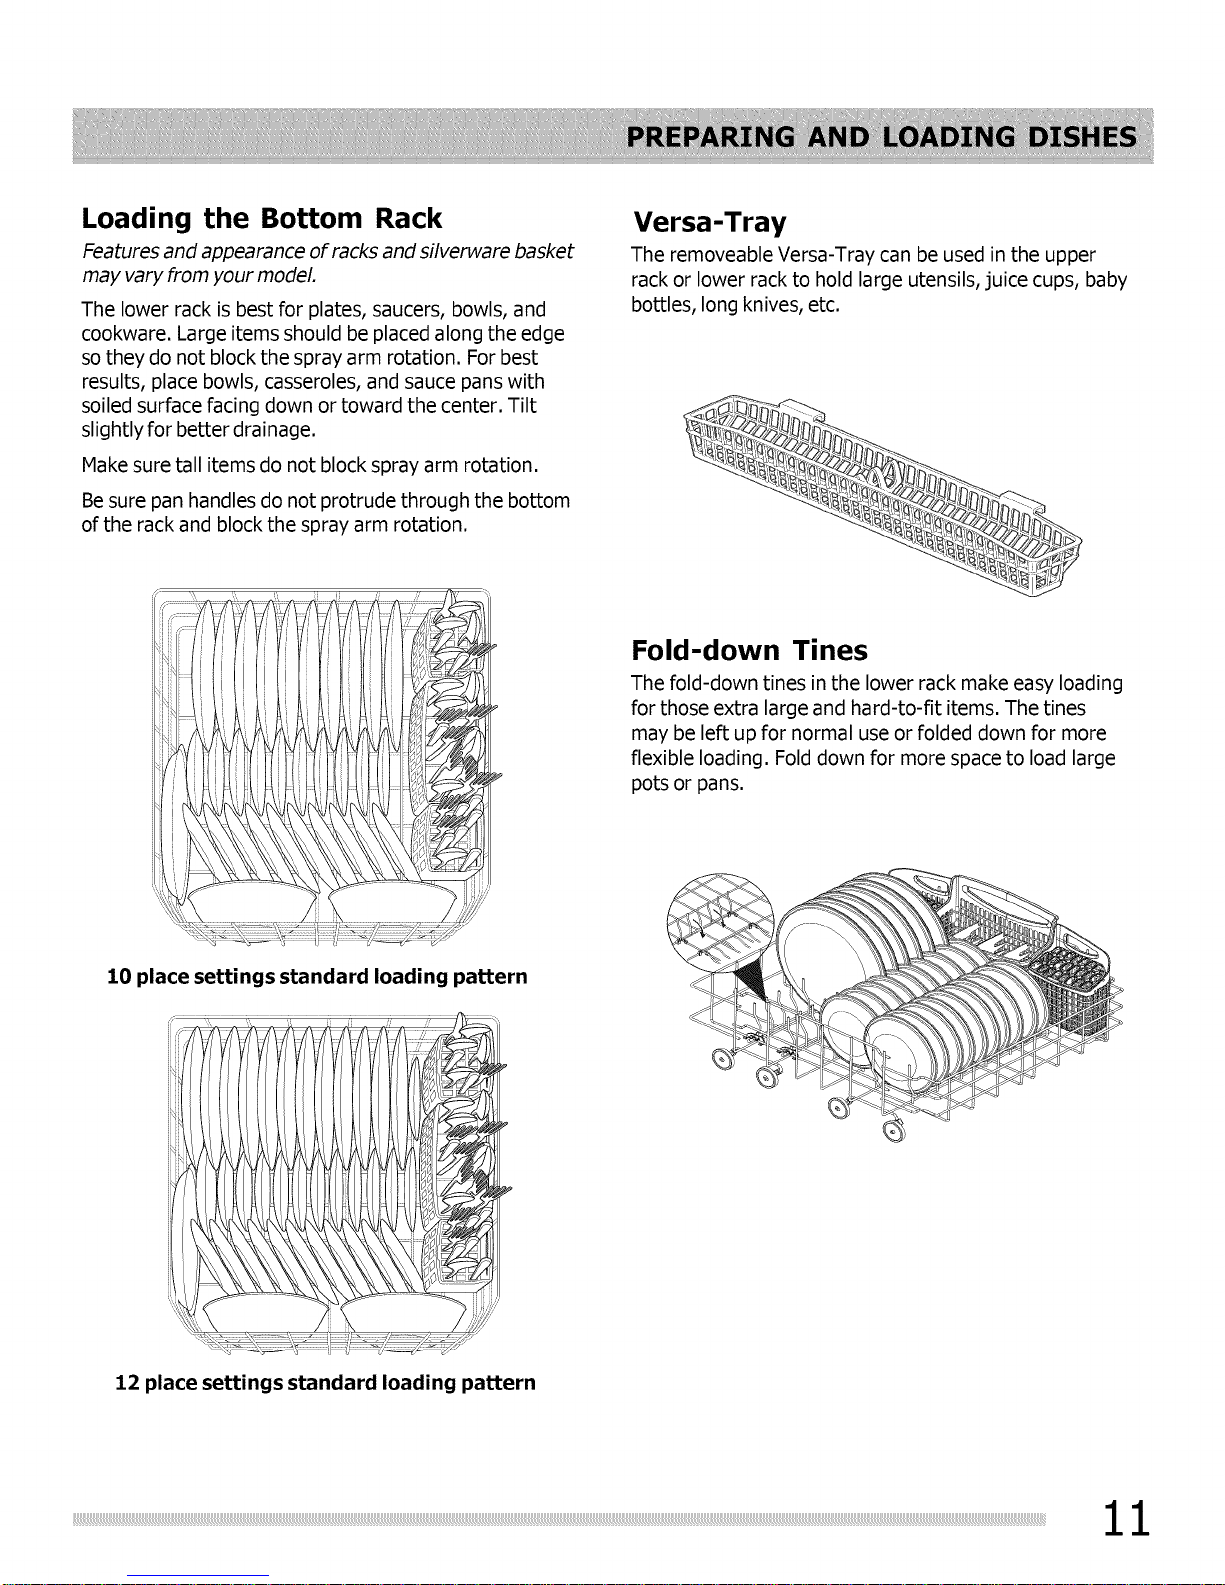
Loading the Bottom Rack
Features and appearance of racks and silverware basket
may vary from your model.
The lower rack is best for plates, saucers, bowls, and
cookware. Large items should be placed along the edge
so they do not block the spray arm rotation. For best
results, place bowls, casseroles, and sauce pans with
soiled surface facing down or toward the center. Tilt
slightly for better drainage.
Make sure tall items do not block spray arm rotation.
Be sure pan handles do not protrude through the bottom
of the rack and block the spray arm rotation.
Versa -Tray
The removeable Versa-Tray can be used in the upper
rack or lower rack to hold large utensils, juice cups, baby
bottles, long knives, etc.
Fold-down Tines
The fold-down tines in the lower rack make easy loading
for those extra large and hard-to-fit items. The tines
may be left up for normal use or folded down for more
flexible loading. Fold down for more space to load large
pots or pans.
10 place settings standard loading pattern
12 place settings standard loading pattern
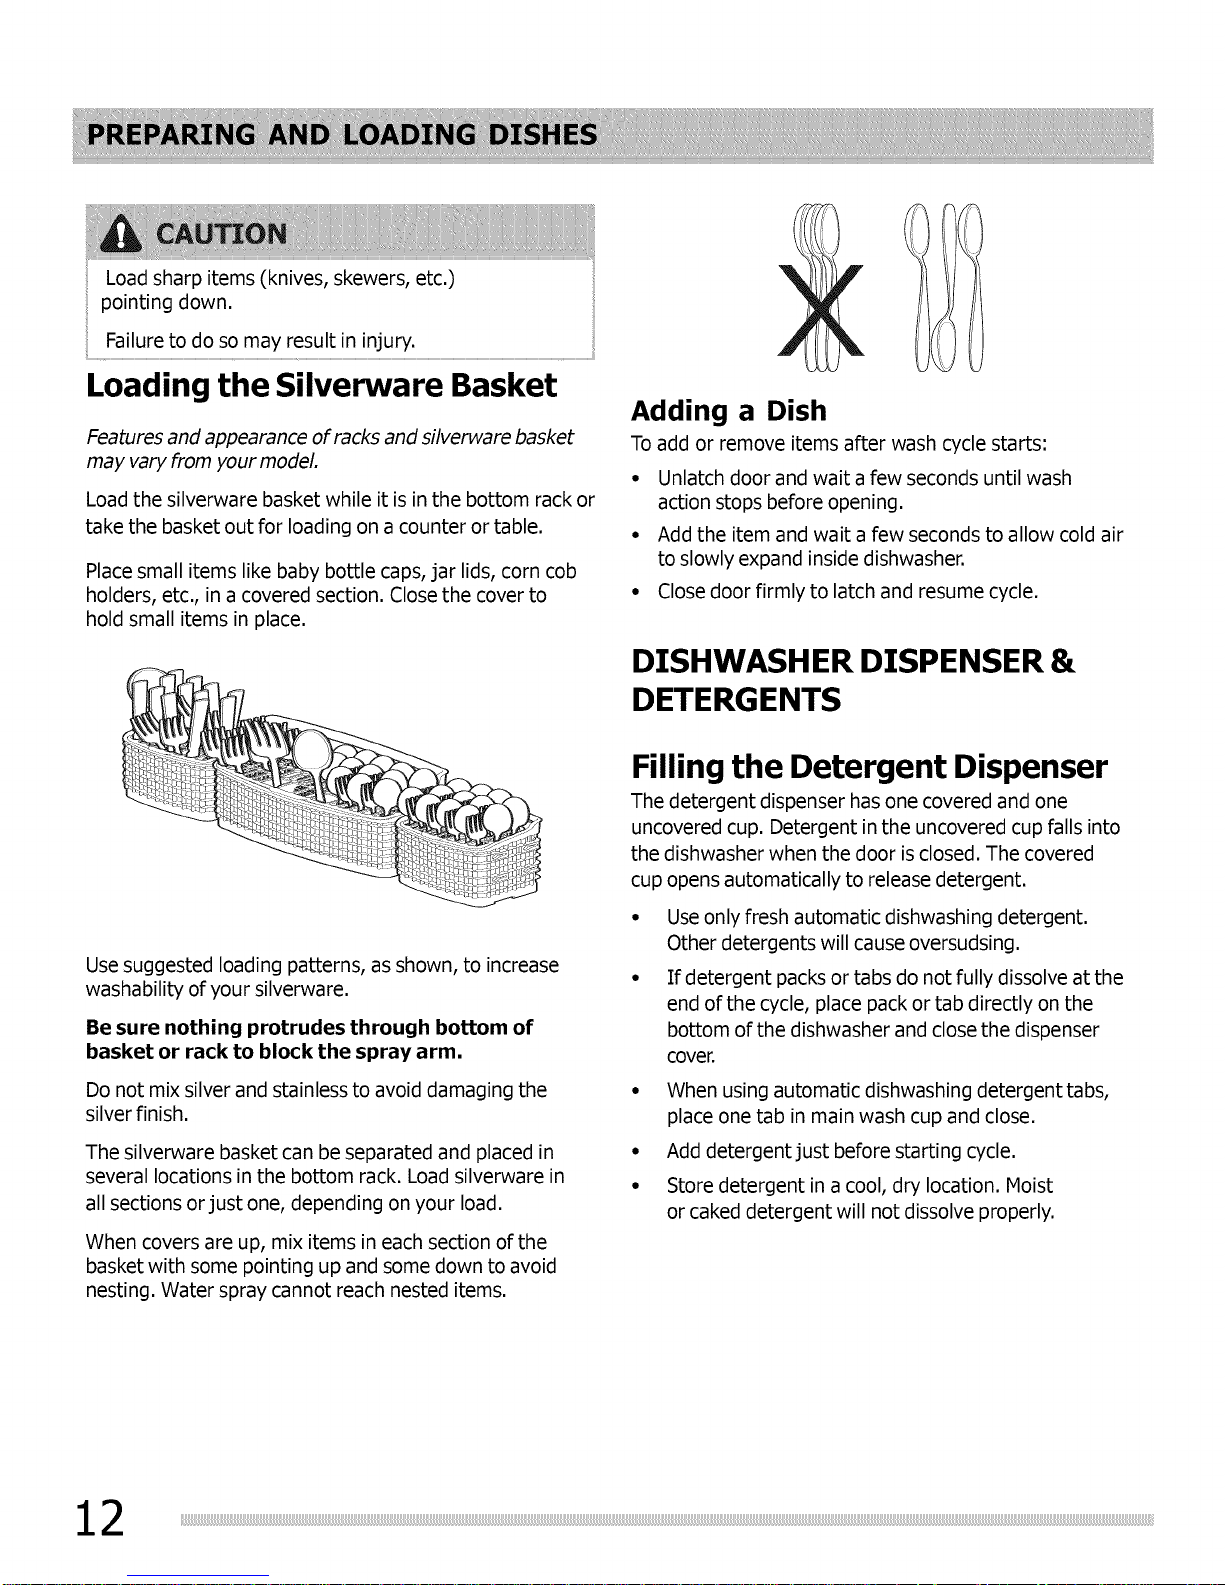
Load sharp items (knives, skewers, etc.)
pointing down.
Failure to do so may result in injury.
Loading the Silverware Basket
Features and appearance of racks and silverware basket
may vary from your model.
Load the silverware basket while it is in the bottom rack or
take the basket out for loading on a counter or table.
Place small items like baby bottle caps, jar lids, corn cob
holders, etc., in a covered section. Close the cover to
hold small items in place.
Adding a Dish
To add or remove items after wash cycle starts:
° Unlatch door and wait a few seconds until wash
action stops before opening.
• Add the item and wait a few seconds to allow cold air
to slowly expand inside dishwasher.
• Close door firmly to latch and resume cycle.
DISHWASHER DISPENSER &
DETERGENTS
Filling the Detergent Dispenser
The detergent dispenser has one covered and one
uncovered cup. Detergent in the uncovered cup falls into
the dishwasher when the door is closed. The covered
cup opens automatically to release detergent.
Use suggested loading patterns, as shown, to increase
washability of your silverware.
Be sure nothing protrudes through bottom of
basket or rack to block the spray arm.
Do not mix silver and stainless to avoid damaging the
silver finish.
The silverware basket can be separated and placed in
several locations in the bottom rack. Load silverware in
all sections or just one, depending on your load.
When covers are up, mix items in each section of the
basket with some pointing up and some down to avoid
nesting. Water spray cannot reach nested items.
• Use only fresh automaticdishwashing detergent.
Other detergents will cause oversudsing.
• If detergent packs or tabs do not fully dissolve at the
end of the cycle, place pack or tab directly on the
bottom of the dishwasher and close the dispenser
cover.
• When using automaticdishwashing detergent tabs,
place one tab in main wash cup and close.
° Add detergent just before starting cycle.
° Store detergent in a cool, dry location. Moist
or caked detergent will not dissolve properly.
 Loading...