How it Works
Log In / Sign Up
Buy Points
How it Works
FAQ
Contact Us
Questions and Suggestions
Users
Frigidaire
Loading...
F
FFQE5100PW
3
FFQE5100PW0
2
FFQE5100PW1
2
FFQG5000QW
3
FFQG5000QW0
2
FFQG5000QW1
2
FFQG5000QW2
2
FFQG5000QW3
2
FFQG5100PW
2
FFQG5100PW0
2
FFRA0511Q1
7
FFRA0511Q10
2
FFRA0511Q11
2
FFRA0511Q112
2
FFRA0511Q113
2
FFRA0511Q14
2
FFRA0511Q15
2
FFRA0511Q18
2
FFRA0511Q19
2
FFRA0511R1
9
FFRA0511R10
2
FFRA0511R11
2
FFRA0511R12
2
FFRA0511R13
2
FFRA0511R14
2
FFRA0511R15
2
FFRA0511R16
2
FFRA0511R17
2
FFRA0511R18
2
FFRA0511R1C
2
FFRA0511R1D
2
FFRA0511R1E0
2
FFRA0511R1E1
2
FFRA0511U1
3
FFRA0511U10
2
FFRA0511U1E0
2
FFRA0511UE0
2
FFRA051WA1
2
FFRA051WAE
FFRA051ZA1
3
FFRA051ZA10
2
FFRA0522Q1
6
FFRA0522Q10
2
FFRA0522Q11
2
FFRA0522Q112
2
FFRA0522Q113
2
FFRA0522Q14
2
FFRA0522Q15
2
FFRA0522Q18
2
FFRA0522Q19
2
FFRA0522R1
8
FFRA0522R10
2
FFRA0522R11
2
FFRA0522R12
2
FFRA0522R13
2
FFRA0522R14
2
FFRA0522R15
2
FFRA0522R16
2
FFRA0522R17
2
FFRA0522R1C
2
FFRA0522R1D
2
FFRA0522U1
FFRA0522U10
FFRA0522U1E0
FFRA052ZA1
FFRA052ZA10
FFRA05C1Q114
2
FFRA05C1Q115
2
FFRA05L1R10
2
FFRA05L1R11
2
FFRA05L1R12
2
FFRA05L1R13
2
FFRA05L1R14
2
FFRA05L1R15
2
FFRA05L1R16
2
FFRA05L1R17
2
FFRA0611Q1
6
FFRA0611Q10
2
FFRA0611Q11
2
FFRA0611Q12
2
FFRA0611Q13
2
FFRA0611R1
9
FFRA0611R14
2
FFRA0611R1E0
2
FFRA0611U1
3
FFRA0611U10
2
FFRA0611U1E0
2
FFRA061ZAE
3
FFRA061ZAE0
2
FFRA0622S1
3
FFRA0622S10
2
FFRA0622S11
2
FFRA0622S12
2
FFRA0622S13
2
FFRA0622S14
2
FFRA0622S15
2
FFRA0622U1
FFRA0622U10
2
FFRA0622U1E0
2
FFRA062WA1
Loading...
Loading...
Nothing found
FFRA0522R1
Energy Guide
1 pgs
162.58 Kb
0
Energy Guide
1 pgs
352.61 Kb
0
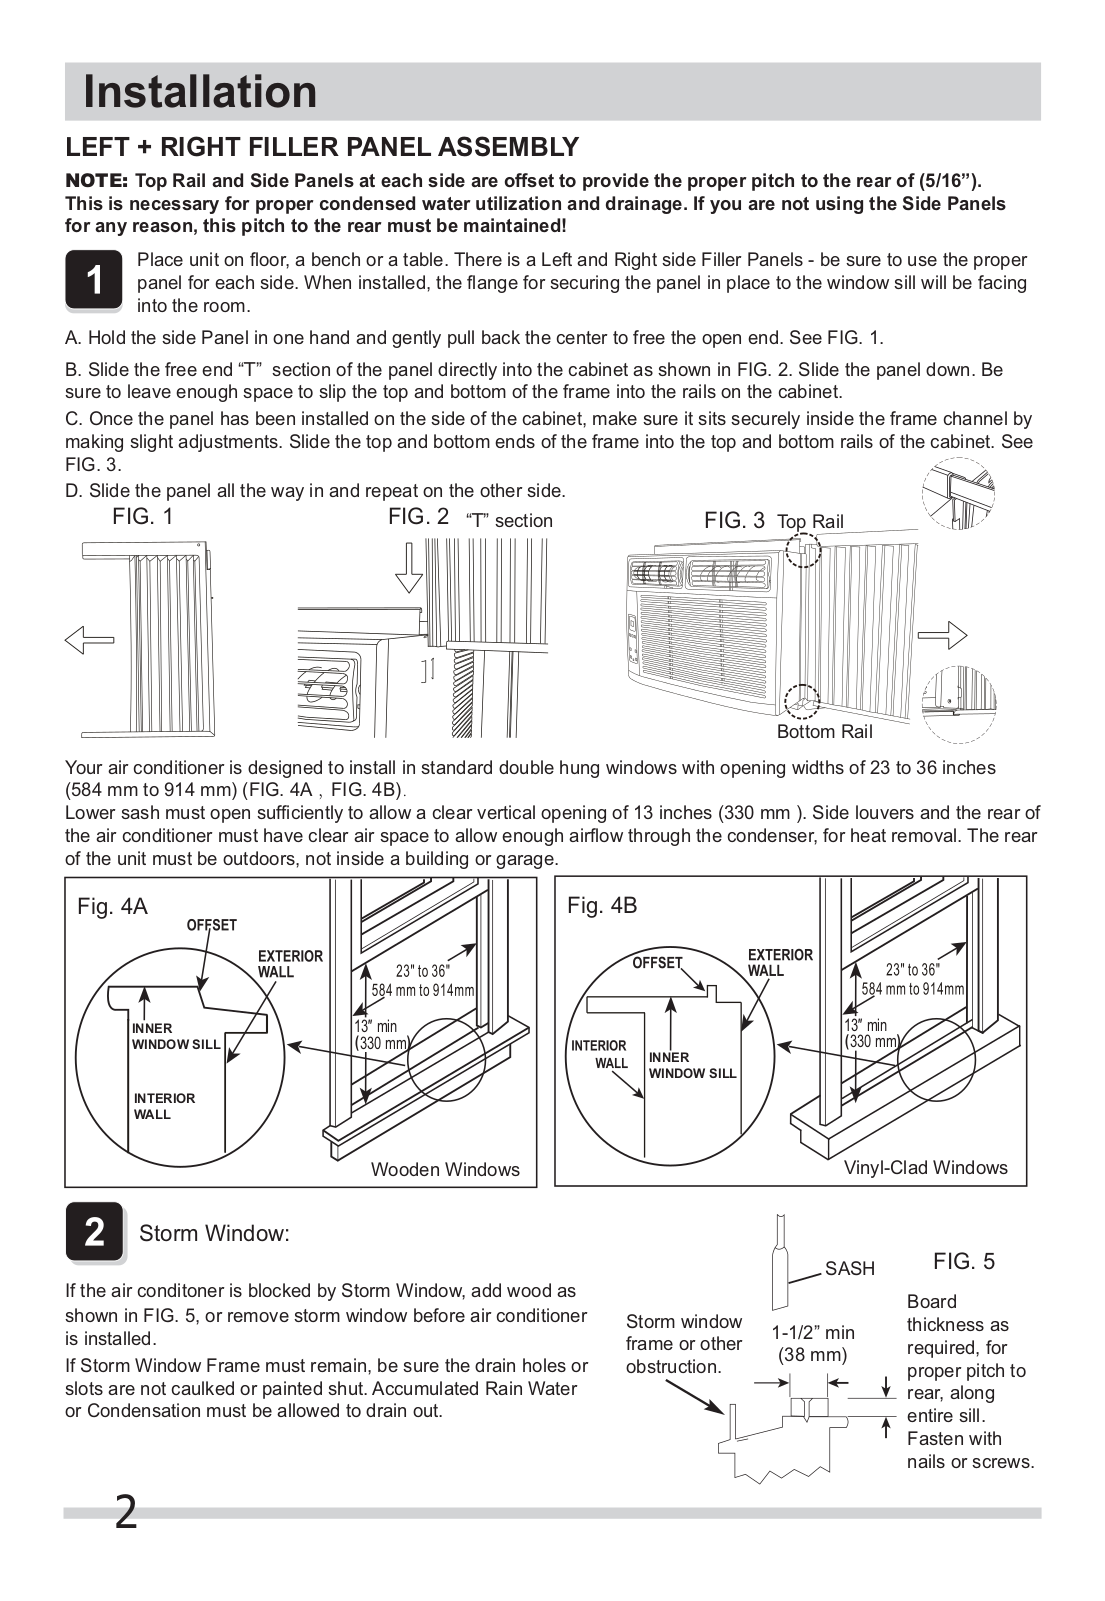
Installation
11 pgs
918.42 Kb
0
Installation Manual
4 pgs
463.02 Kb
0
Owner's Guide
11 pgs
899.73 Kb
0
Owner's Guide
12 pgs
902.82 Kb
0
Specifications
2 pgs
305.88 Kb
0
Wiring Diagram
1 pgs
160.07 Kb
0
Table of contents
Loading...
Frigidaire FFRA0522R1 Installation Manual
...
Frigidaire Installation Manual
Download
Specifications and Main Features
Frequently Asked Questions
User Manual
Download
Loading...
+
2
hidden pages
Unhide
You need points to download manuals.
1 point = 1 manual.
You can buy points or you can get point for every manual you upload.
Buy points
Upload your manuals