

Page 1
All about the
Use & Care
of your Top Mount Refrigerator
TABLE OF CONTENTS
Important Safety Instructions .................................2
Installation ...........................................................4
Energy Saving Tips ................................................4
Door Reversal .......................................................5
Temperature Controls ............................................7
www.frigidaire.com USA 1-800-944-9044 www.frigidaire.ca Canada 1-800-265-8352
Features ...............................................................7
Care and Cleaning ................................................ 8
Before you Call ..................................................... 9
Major Appliance Warranty ....................................11
242137000 (Sept 2010)
Page 2
SERIAL/MODEL #’S - IMpORtAnt SAfEty InStRuctIOnS
Read and Save These Instructions
This Owner’s Guide provides specic operating
instructions for your model. Use your refrigerator only
as instructed in this guide. These instructions are not
meant to cover every possible condition and situation
that may occur. Common sense and caution must be
practiced when installing, operating, and maintaining any
appliance.
Record Your Model and Serial Numbers
Record the model and serial numbers in the space
provided below. The serial plate is located on the upper
left wall inside the refrigerator.
Denitions
This is the safety alert symbol. It is used to alert
you to potential personal injury hazards. Obey all safety
messages that follow this symbol to avoid possible injury
or death.
WARnInG
Please read all instructions before using this
refrigerator.
DAnGER
Model Number:
Serial Number:
Purchase Date:
DANGER indicates an imminently hazardous situation
which, if not avoided, will result in death or serious
injury.
WARnInG
WARNING indicates a potentially hazardous situation
which, if not avoided, could result in death or serious
injury.
cAutIOn
CAUTION indicates a potentially hazardous situation
which, if not avoided, may result in minor or moderate
injury.
IMpORtAnt
IMPORTANT indicates installation, operation or
maintenance information which is important but not
hazard-related.
2
WARnInG
For Your Safety
Do not store or use gasoline, or other ammable
vapors and liquids in the vicinity of this or any other
appliance. Read product labels for ammability and
other warnings.
Page 3
IMpORtAnt SAfEty InStRuctIOnS
WARnInG
Electrical Information
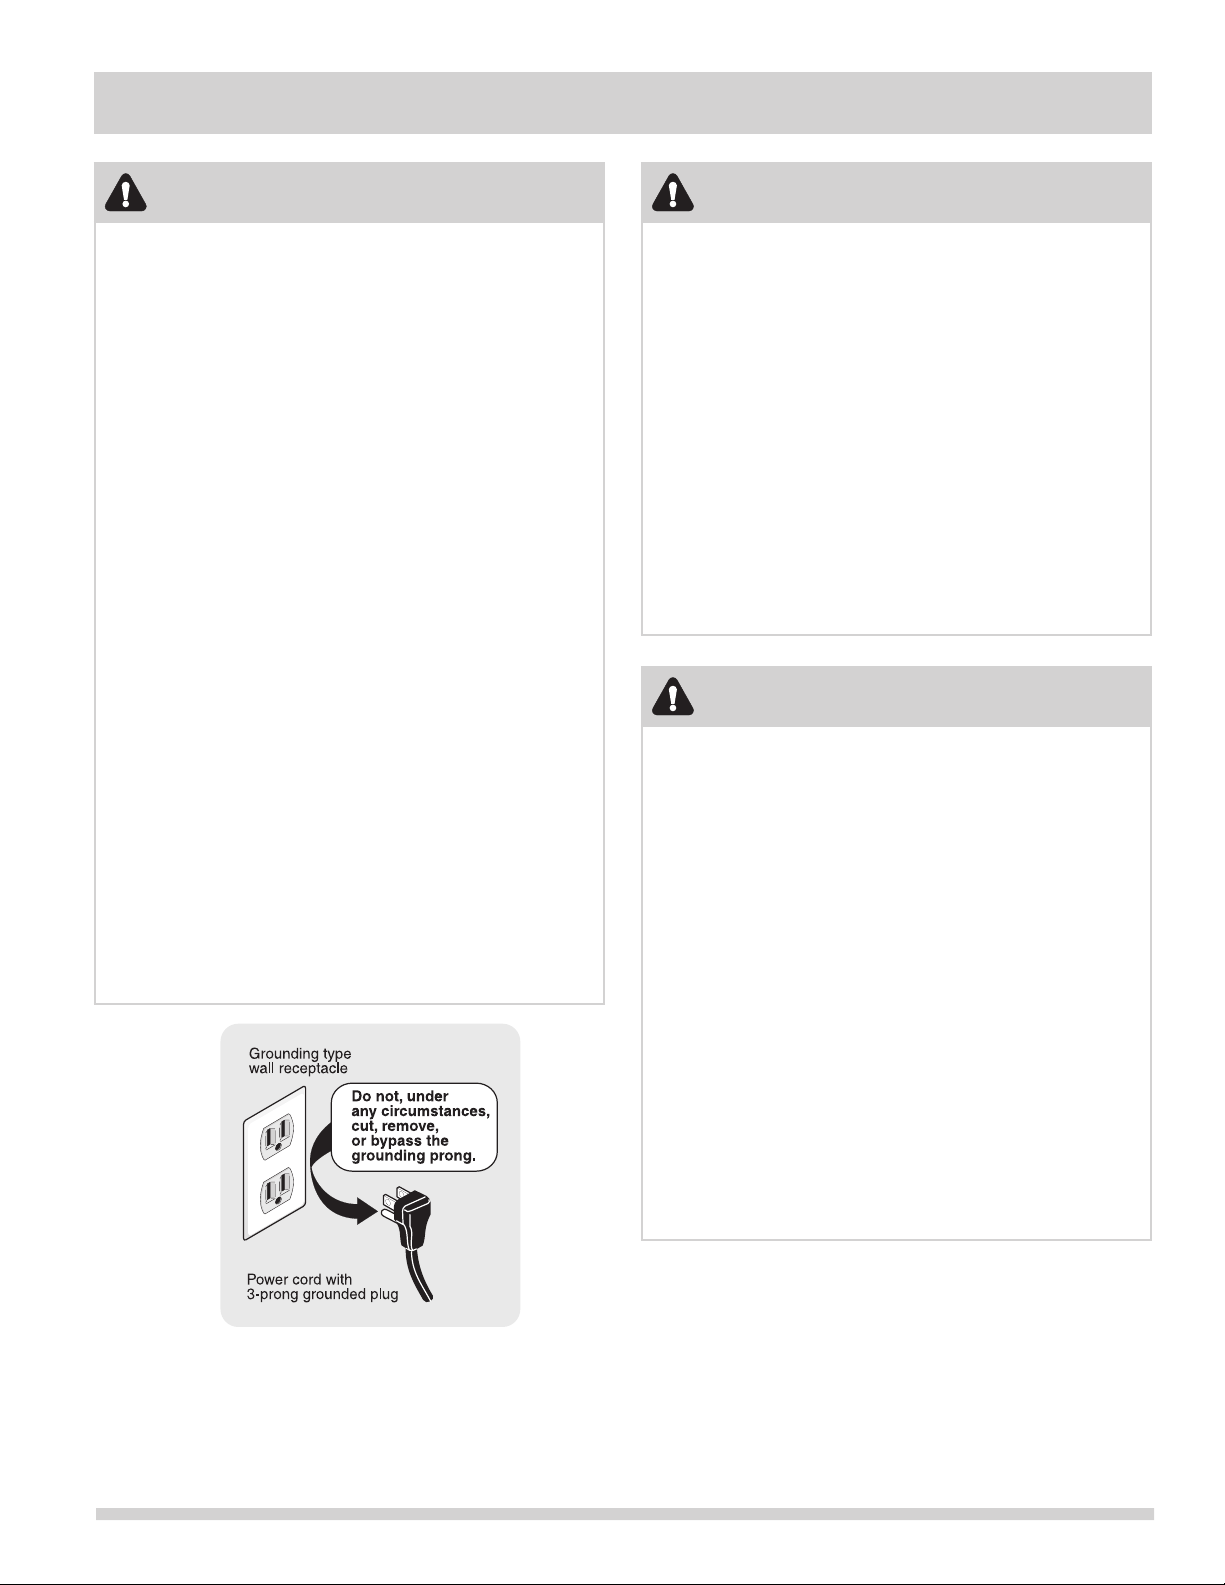
• The refrigerator must be plugged into its
own dedicated 115 Volt, 60 Hz., 15 Amp,
AC only electrical outlet. The power cord of
the appliance is equipped with a three-prong
grounding plug for your protection against
electrical shock hazards. It must be plugged
directly into a properly grounded three prong
receptacle. The receptacle must be installed in
accordance with local codes and ordinances.
Consult a qualied electrician. Avoid connecting
refrigerator to a Ground Fault Interruptor (GFI)
circuit. Do not use an extension cord or
adapter plug.
If the power cord is damaged, it should be •
replaced by an authorized service technician to
prevent any risk.
Never unplug the refrigerator by pulling on the •
power cord. Always grip the plug rmly, and
pull straight out from the receptacle to prevent
damaging the power cord.
Unplug the refrigerator before cleaning and before •
replacing a light bulb to avoid electrical shock.
Performance may be affected if the voltage varies •
by 10% or more. Operating the refrigerator with
insufcient power can damage the compressor.
Such damage is not covered under your warranty.
Do not plug the unit into an electrical outlet •
controlled by a wall switch or pull cord to prevent
the refrigerator from being turned off accidentally.
WARnInG
Child Safety
Destroy carton, plastic bags, and any exterior •
wrapping material immediately after the
refrigerator is unpacked. Children should never use
these items to play. Cartons covered with rugs,
bedspreads, plastic sheets or stretch wrap may
become airtight chambers, and can quickly cause
suffocation.
Remove all staples from the carton. Staples can •
cause severe cuts, and destroy nishes if they
come in contact with other appliances or furniture.
An empty, discarded refrigerator is a very •
dangerous attraction to children.
Remove the door(s) of any appliance that is not in •
use, even if it is being discarded.
WARnInG
Proper Disposal of your Refrigerator
Risk of child entrapment
Child entrapment and suffocation are not problems of
the past. Junked or abandoned refrigerators are still
dangerous – even if they will sit for “just a few days”.
If you are getting rid of your old refrigerator, please
follow the instructions below to help prevent accidents.
We strongly encourage responsible appliance recycling/
disposal methods. Check with your utility company or
visit www.recyclemyoldfridge.com for more information
on recycling your old refrigerator.
Before you throw away your old refrigerator:
Remove doors.•
Leave shelves in place so children may not easily •
climb inside.
Have refrigerant removed by a qualied service •
technician.
3
Page 4
InStALLAtIOn
ENERGY SAVING TIPS
This Use & Care Guide provides general operating
instructions for your model. Use the refrigerator only as
instructed in this Use & Care Guide. Before starting the
refrigerator, follow these important rst steps.
Location
Choose a place that is near a grounded electrical •
outlet. Do Not use an extension cord or an adapter
plug.
For the most efcient operation, the refrigerator •
should be located where surrounding temperatures
will not drop below 10° F (-12° C) or exceed 110°
F (43° C). The Freeze Control Feature is designed
to automatically maintain the selected interior
refrigerator temperature within these boundaries.
Allow space around the unit for good air circulation. •
Leave a 5 inch (50 mm) space on the back and
the sides, and 12 inches (300 mm) above the
refrigerator for adequate circulation.
nOtE
The exterior walls of the refrigerator may become quite
warm as the compressor works to transfer heat from
the inside. Temperatures as much as 30° F warmer
than room temperature can be expected. For this
reason it is particularly important in hotter climates
to allow enough space for air circulation around your
refrigerator.
Wash any removable parts of the refrigerator •
interior, and exterior with mild detergent and warm
water. Wipe dry. Do not use harsh cleaners on these
surfaces.
Do not use razor blades or other sharp instruments, •
which can scratch the appliance surface when
removing adhesive labels. Any glue left from the tape
can be removed with a mixture of warm water and
mild detergent, or touch the residue with the sticky
side of tape already removed. Do not remove the
serial plate.
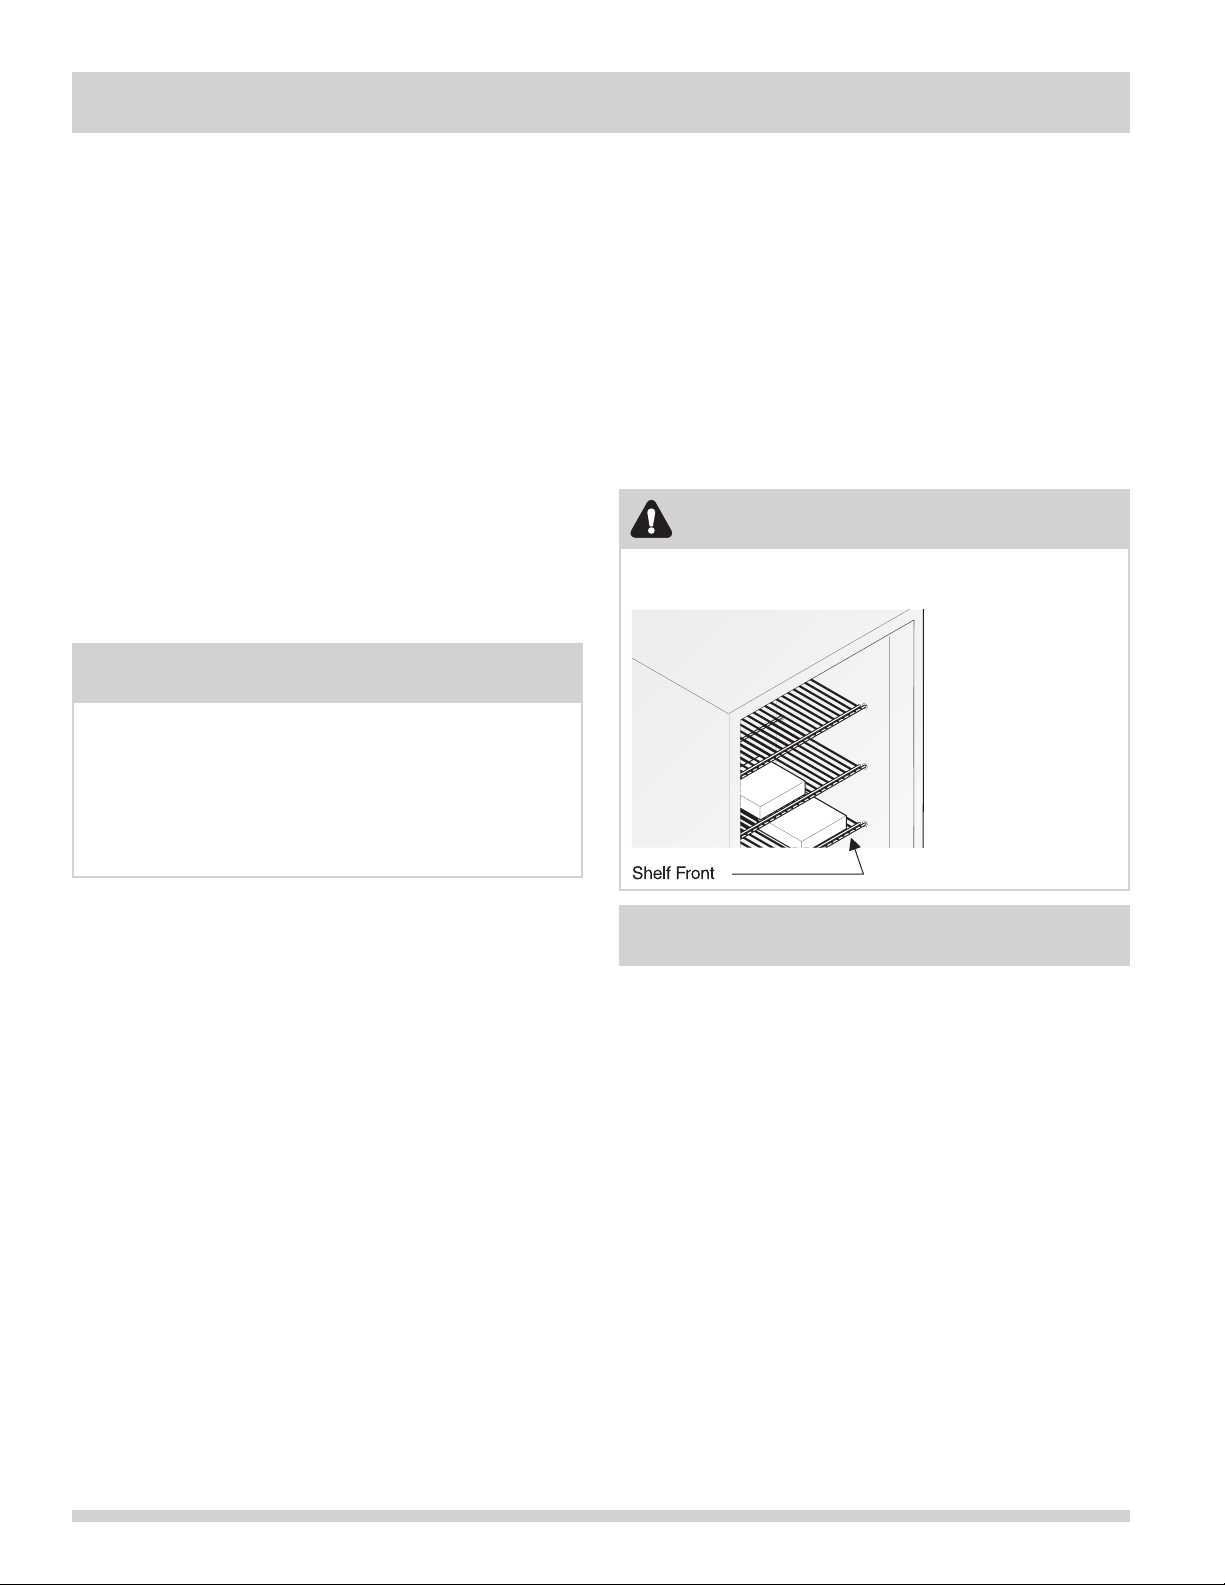
cAutIOn
To allow door to close and seal properly, DO NOT let
food packages extend past the front of shelves.
Leveling
The refrigerator must have all bottom corners resting
rmly on solid oor. The oor must be strong enough
to support a fully loaded refrigerator. NOTE: It is Very
Important for your refrigerator to be level in order to
function properly. If the refrigerator is not leveled during
installation, the door may be misaligned and not close
or seal properly, causing cooling, frost, or moisture
problems.
To Level Your Refrigerator:
After removing all interior and exterior packaging
materials, and after discarding crating screws and wood
base, use a carpenter’s level to level the refrigerator from
front-to-back. Adjust the plastic leveling feet in front, ½
bubble higher, so that the door closes easily when left
halfway open. from front-to-back. Adjust the leveling
legs in front, ½ bubble higher, so that the door closes
easily when left halfway open.
Cleaning
ENERGY SAVING TIPS
Install the refrigerator in the coolest part of a dry •
and ventilated room, out of direct sunlight and away
from heating ducts or registers. Do not place the
refrigerator next to heat-producing appliances such
as a range, oven or dishwasher.
Level the refrigerator so the door close tightly.•
Do not overcrowd the refrigerator or block cold air •
vents. Doing so causes the refrigerator to run longer
and use more energy. Shelves should not be lined
with aluminum foil, wax paper or paper toweling.
Liners interfere with cold air circulation, making the
wine cooler less efcient.
Wipe bottles and containers dry before placing them •
in the refrigerator. This cuts down on moisture buildup inside the unit.
Organize the refrigerator to reduce door openings. •
Remove as many items as needed at one time and
close the door as soon as possible.
4
Page 5
DOOR REVERSAL INSTRUCTIONS
nOtE
The direction in which your refrigerator doors open (door swing) can be reversed, from left to right or right to left, by
moving the door hinges from one side to the other. Reversing the door swing should be performed by a qualied person.
IMpORtAnt
Before you begin, remove the electrical power cord from the wall outlet. Remove any food from door bins.
nOtE
Provide additional support for the doors while the hingesa re being moved. Do not depend on the door magnets to hold
the doors in place while you are working.
Door and Hinge Removal
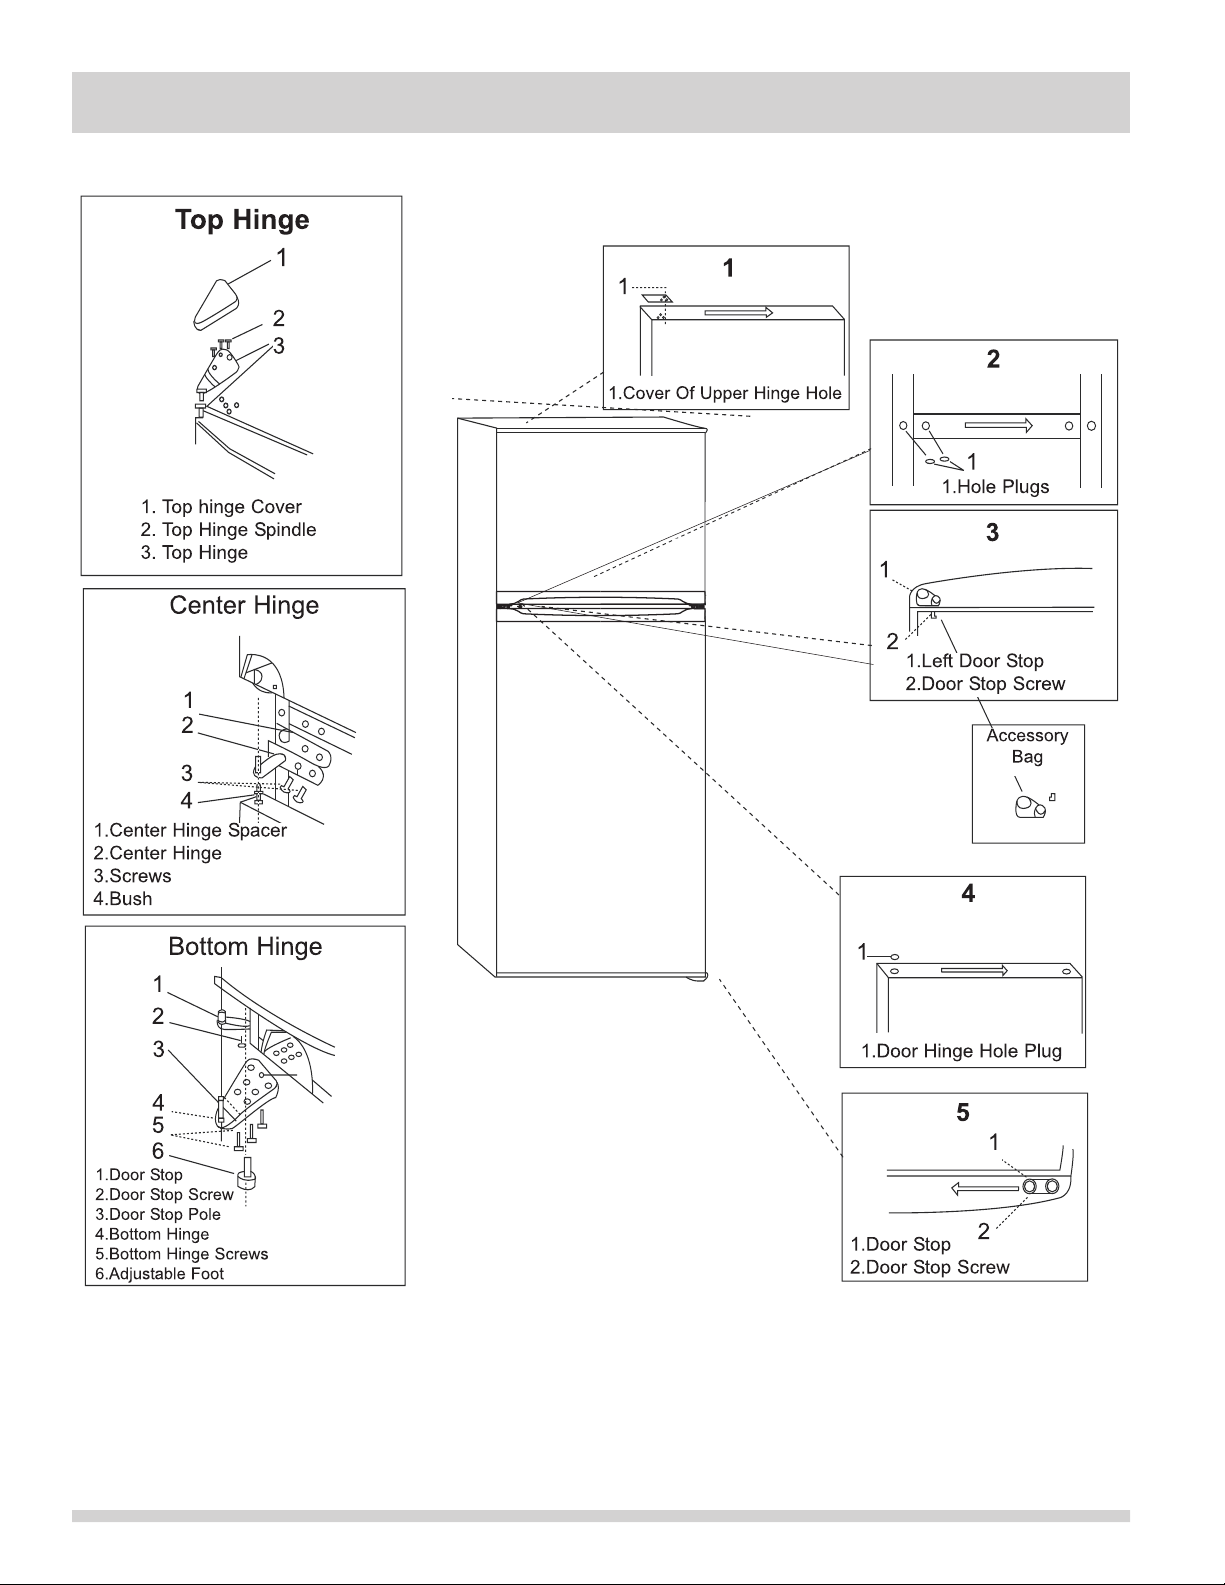
Keep both doors closed until you are ready to lift them free from the cabinet.1.
Remove top hinge as shown in Top Hinge graphic. Lift freezer door from cabinet.2.
Remove center hinge as shown in Center Hinge graphic. Lift refrigerator door from cabinet.3.
Remove bottom hinge as shown in Bottom Hinge graphic.4.
Door Reversal Cabinet
Remove upper hinge hole cover from left side and move to opposite side. (See Figure 1.)1.
Remove hole plugs from left side and mve them to opposite side. (See Figure 2.)2.
Doors
Remove hinge hole plugs from top of freezer and refrigerator doors. (See Figure 4.)1.
Remove door stop from refrigerator door and move to other side. (See Figure 5.)2.
Remove freezer door left door stop and screw from accessory bag and mount it on the handle. (See Figure 4.)3.
nOtE
The freezer door left and right door stops are different. They cannot replace each other.
Door and Hinge Replacement
Replace parts for bottom hinge as shown in Bottom Hinge graphic. Tighten screws. Replace refrigerator door.1.
Replace parts for center hinge as shown in Center Hinge graphic. Tighten screws. Replace freezer door.2.
Replace parts for top hinge as shown in Top Hinge graphic. Do not tighten screws completely.3.
Line up doors so bottom of freezer door aligns evenly with top of refrigerator door. Tighten all screws.4.
Final Steps
Check all holes to make sure that hole plugs and screws are in place.1.
Plug in refrigerator or reconnect power.2.
Reset temperature controls. See TEMPERATURE CONTROLS section.3.
Return food to refrigerator. 4.
5
Page 6
DOOR REVERSAL INSTRUCTIONS
6
Page 7
tEMpERAtuRE cOntROLS fEAtuRES
1
2
3
4
7
5
6
8
9
10
11
12
IMPORTANT
• Do not set the FREEZER temperature control
to the COLDEST setting as this will cause the
refrigerator to cease cooling.
If the unit is unplugged, has lost power, or •
is turned off, you must wait 3 to 5 minutes
before restarting the unit. If you attempt to
restart before this time delay, the refrigerator
will not start.
Turning the REFRIGERATOR temperature •
control to the “OFF” position stops the cooling
cycle but does not shut off the power to the
unit.”
Cool Down Period
For best performance, allow 4 hours for the refrigerator
to cool down completely. The refrigerator will run
continuously for the rst several hours.
Temperature Control
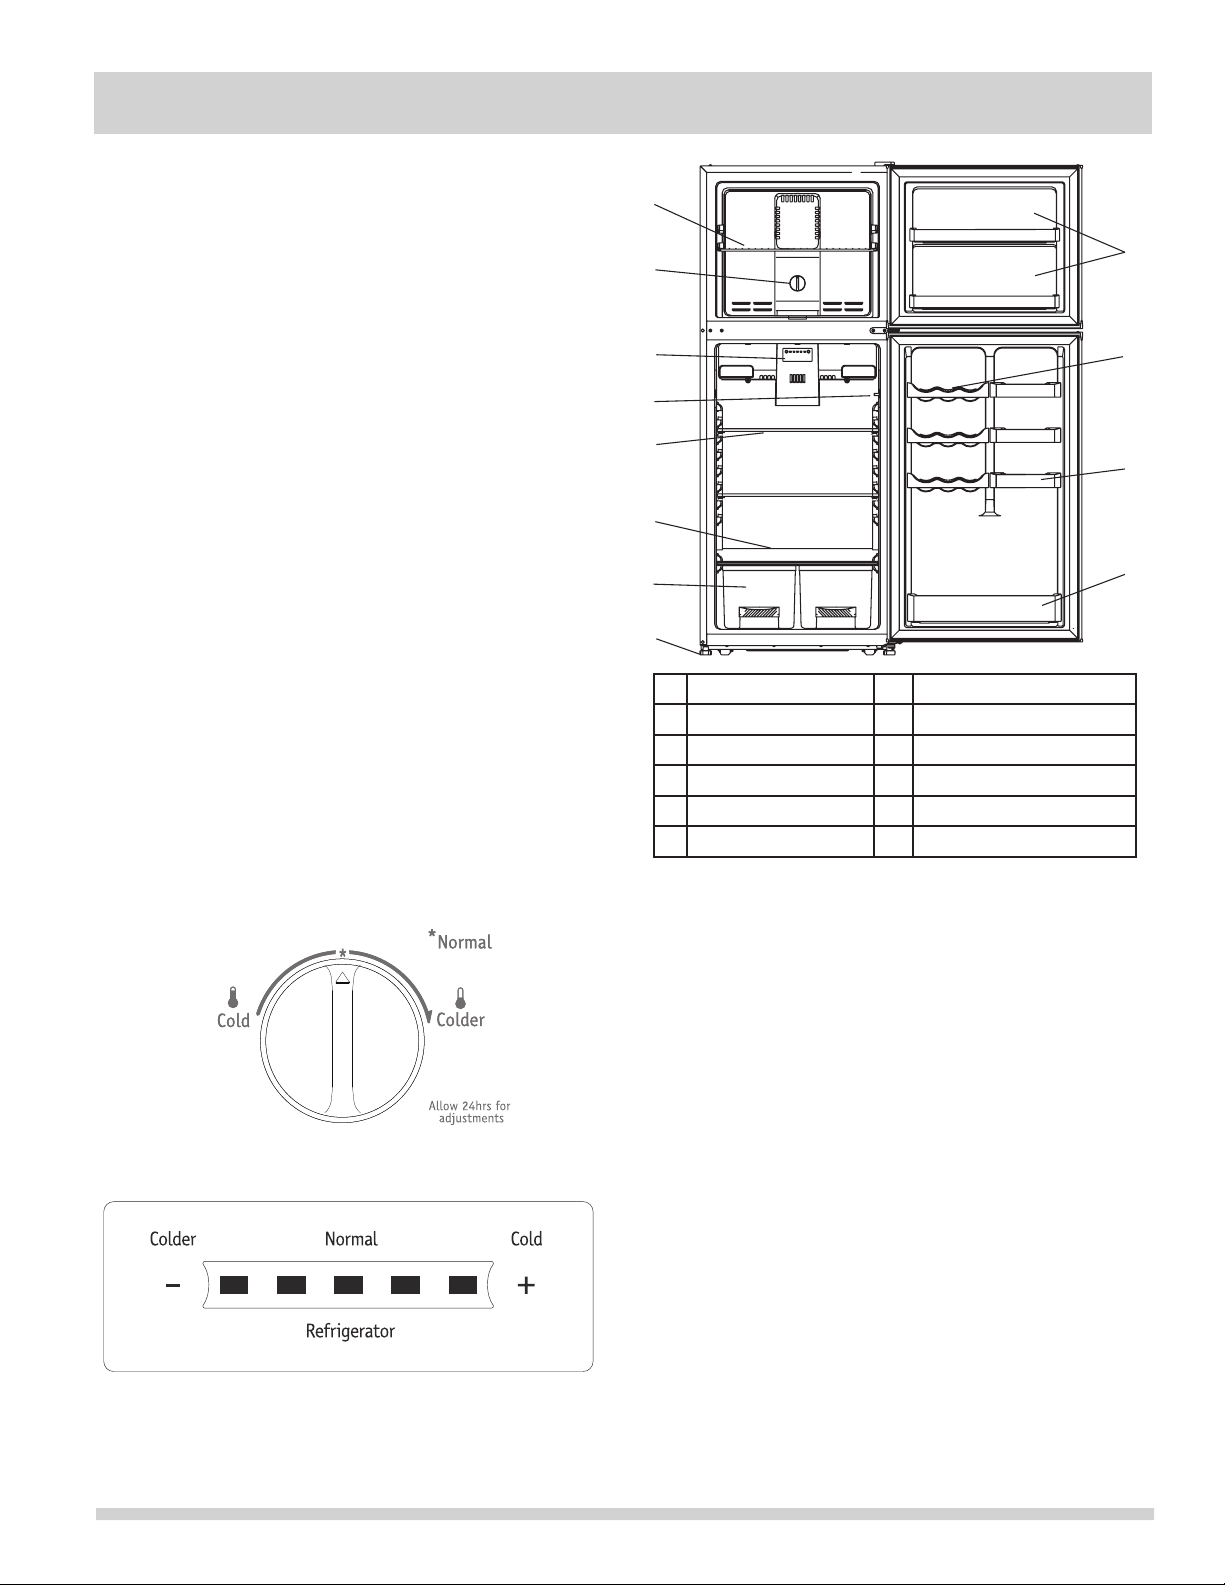
The temperature control is located inside the refrigerator
and in the freezer compartment on some models. The
temperature is factory preset to provide satisfactory food
storage temperatures. However, the temperature control
is adjustable to provide a range of temperatures for your
personal satisfaction.
To adjust the temperature colder in the refrigerator
compartment, press the (-) on the Refrigerator Control
panel towards a lower temperature. To adjust the
temperature colder in the freezer compartment, move
the Freezer Control knob towards COLDER. After each
movement, allow 24 hours for the unit to adjust. If
the unit is still not cold enough, repeat until desired
temperature is achieved. After each movement of the
control knob, allow the unit to adjust for 24 hours.
To adjust the temperature warmer in the refrigerator
compartment, press the (+) on the Refrigerator Control
panel. To adjust the temperature warmer in the freezer
compartment, move the Freezer Control knob towards
COLD. After each movement, allow 24 hours for the unit
to adjust. If the unit is still not warm enough, repeat until
desired temperature is achieved. After each movement of
the control knob, allow the unit to adjust for 24 hours.
1 Freezer Shelf 7 Crisper
2 Freezer Control 8 Leveling Leg
3 Refrigerator Control 9 Freezer Bins
4 Lamp Switch 10 Can Dispenser
5 Refrigerator Shelf 11 Refrigerator Bin (upper)
6 Crisper Cover 12 Refrigerator Bin (lower)
Adjustable Interior Shelves
Freezer Control (some models)
Refrigerator Control (some models)
Multi-position adjustable interior shelves can be moved
to any position for larger or smaller bottles. The shipping
spacers that stabilize the shelves for shipping should be
removed and discarded.
Slide-Out Crisper (Some Models)
A Slide-Out Basket (some models) located at the bottom
of the refrigerator, provides separate storage space for
items that are difcult to store on refrigerator shelves. To
remove the basket, pull out and lift up.
Automatic Freeze Control (Some Models)
The Freeze Control Feature will maintain proper interior
refrigerator temperature even when the refrigerator is
placed in an area where the surrounding temperature
drops down to 10° F (-12° C).
Interior Light (Some models)
The light comes on automatically when the door is
opened. To replace the light bulb, turn the temperature
control to OFF and unplug the electrical cord. Replace the
old bulb with a bulb of the same wattage.
7
Page 8
cARE AnD cLEAnInG
Cleaning the Inside
Wash inside surfaces of the refrigerator with a solution
of two tablespoons of baking soda in one quart (1.136
litres) warm water. Rinse and dry. Wring excess water out
of the sponge or cloth when cleaning in the area of the
controls, or any electrical parts.
Wash the removable parts with the baking soda solution
mentioned above, or mild detergent and warm water.
Rinse and dry. Never use metallic scouring pads,
brushes, abrasive cleaners, or alkaline solutions on any
surface. Do not wash removable parts in a dishwasher.
Cleaning the Outside
Wash the cabinet with warm water and mild liquid
detergent. Rinse well and wipe dry with a clean soft
cloth.
WARnInG
If leaving the refrigerator door open while on vacation,
make certain that children cannot get into the wine
cooler and become entrapped.
Vacation and Moving Tips
Vacations:
If the refrigerator will not be used for several months:
Remove all food and unplug the power cord. •
Clean and dry the interior thoroughly. •
Leave the refrigerator door open slightly, blocking it •
open if necessary, to prevent odor and mold growth.
Moving: When moving the refrigerator, follow these
guidelines to prevent damage:
Disconnect the power cord plug from the wall outlet.•
Remove food and clean the refrigerator.•
Secure all loose items by taping them securely in •
place to prevent damage.
In a moving vehicle, secure the refrigerator in an •
upright position to prevent movement. Also, protect
the outside of the refrigerator with a blanket or
similar item.
8
Page 9
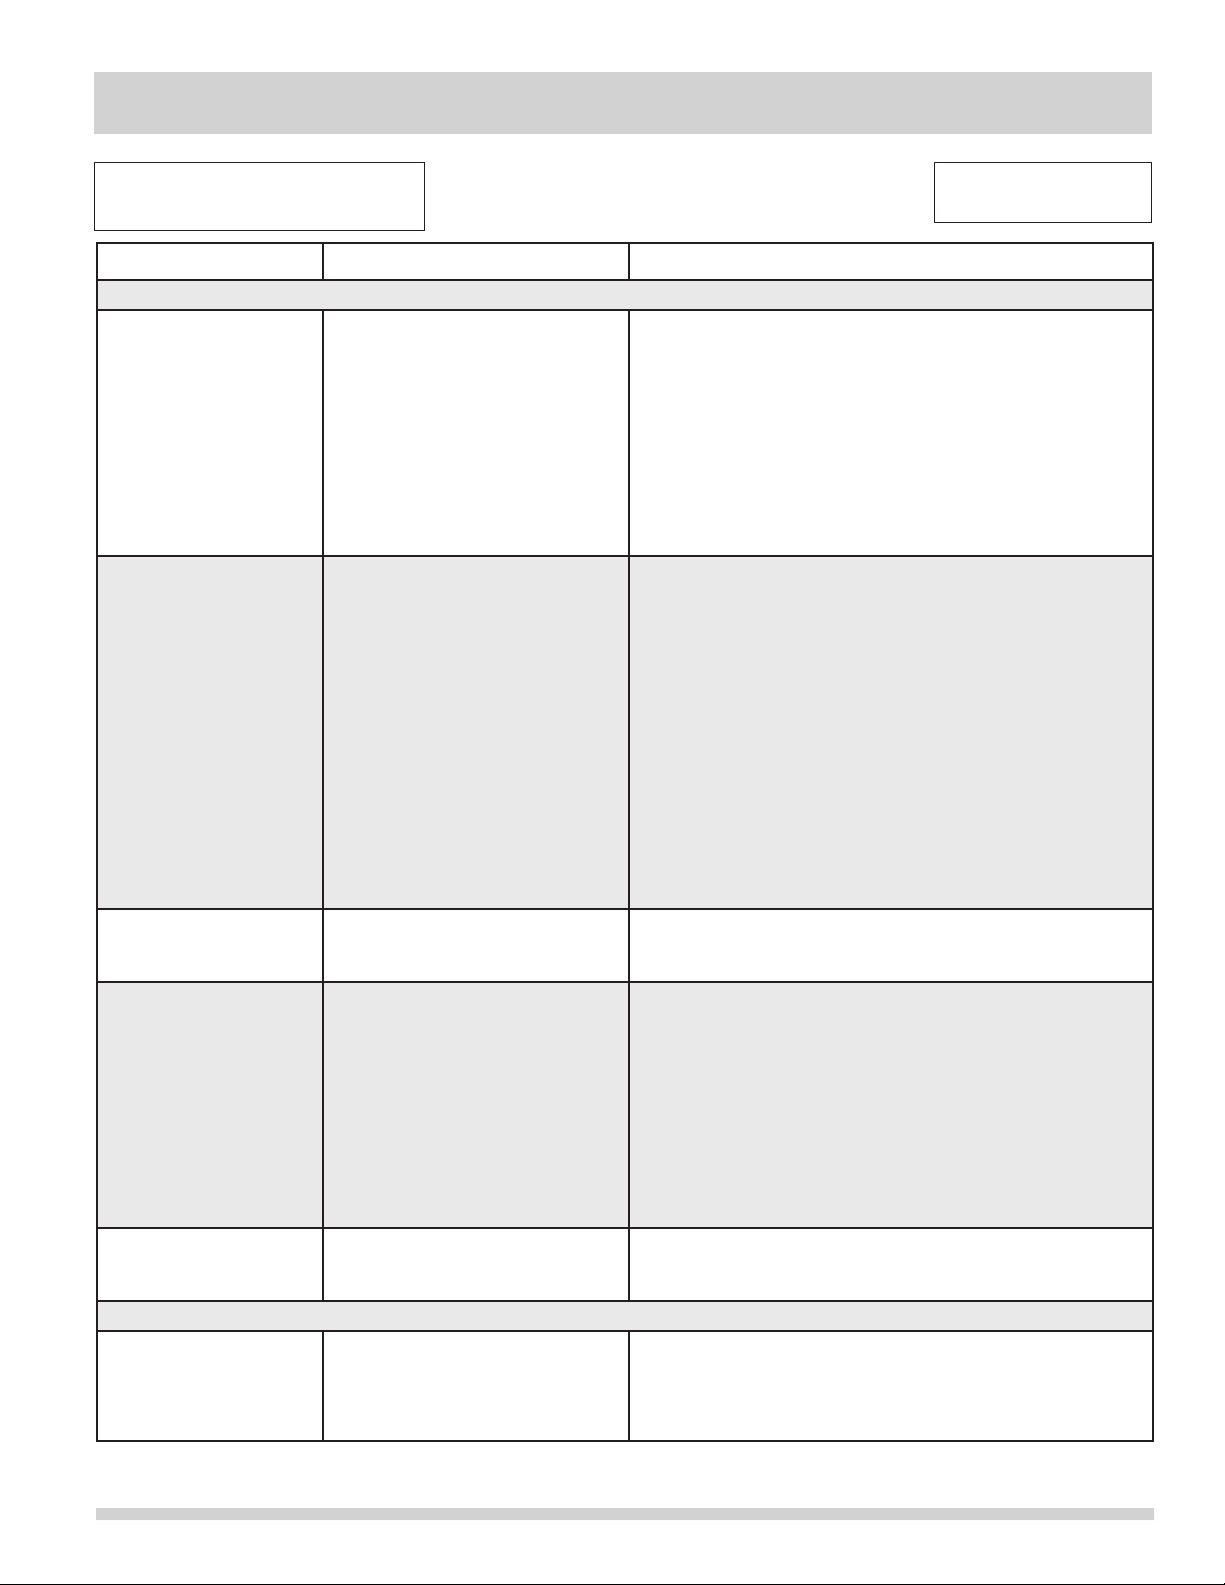
BEfORE yOu cALL
1-800-944-9044 (United States)
1-800-265-8352 (Canada)
pROBLEM cAuSE cORREctIOn
REfRIGERAtOR OpERAtIOn
Refrigerator does not
run.
Refrigerator runs too
much or too long.
Interior Refrigerator
temperature is too
cold.
Interior Refrigerator
temperature is too
warm.
Refrigerator external
surface temperature is
warm.
SOunD AnD nOISE
Louder sound levels
when Refrigerator is
on.
Refrigerator is plugged into a •
circuit that has a ground fault
interrupt.
Temperature control is in the •
OFF position.
Refrigerator may not be •
plugged in, or plug may be
loose.
House fuse blown or tripped •
circuit breaker.
Power outage.•
Room or outside weather is •
hot.
Refrigerator has recently been •
disconnected for a period of
time.
Large amounts of warm or hot •
food has been stored recently.
Door is opened too frequently •
or too long.
Refrigerator door may be •
slightly open.
Temperature control is set too •
low.
Refrigerator gasket is dirty, •
worn, cracked, or poorly tted.
Temperature control is set too •
low.
Temperature contril is set too •
warm.
Door is opened too frequently •
or too long.
Door may not be seating •
properly.
Large amounts of warm or hot •
food has been stored recently.
Refrigerator has recently been •
disconnected for a period of
time.
The external Refrigerator walls •
can be as much as 30°F warmer than room temperature.
Modern • refrigerators have
increased storage capacity and
more stable temperatures.
They require a high efciency
compressor
Use another circuit. If you are unsure about the outlet, •
have it checked by a certied technician.
See • Setting the Temperature Control section.
Ensure plug is tightly pushed into outlet.•
Check/replace fuse with a 15 amp time-delay fuse. Reser •
circuit breaker.
Check house lights. Call local Electric Company.•
It’s normal for the Refrigerator to work harder under these •
conditions.
It takes 4 hours for the Refrigerator to cool down •
completely.
Warm food will cause Refrigerator to run more until the •
desired temperature is reached.
Warm air entering the Refrigerator causes it to run more. •
Open doors less often.
See • “DOOR pROBLEMS” section.
Turn control knob to a warmer setting. Allow several hours •
for the temperature to stabilize.
Clean or change gasket. Leaks in the door seal will cause •
Refrigerator to run longer in order to maintain desired
temperature.
Turn the control to a warmer setting. Allow several hours •
for the temperature to stabilize.
Turn control to a colder setting. Allow several hours for the •
temperature to stabilize.
Warm air entering the Refrigerator causes it to run more. •
Open doors less often.
See • “DOOR pROBLEMS” section.
Warm food will cause Refrigerator to run more until the •
desired temperature is reached.
It takes 4 hours for the Refrigerator to cool down •
completely.
This is normal while the compressor works to transfer heat •
from inside the Refrigerator cabinet.
This is normal. When the surrounding noise level is low, •
you might hear the compressor running while it cools the
interior.
Visit our web site at
www.frigidaire.com.
9
Page 10
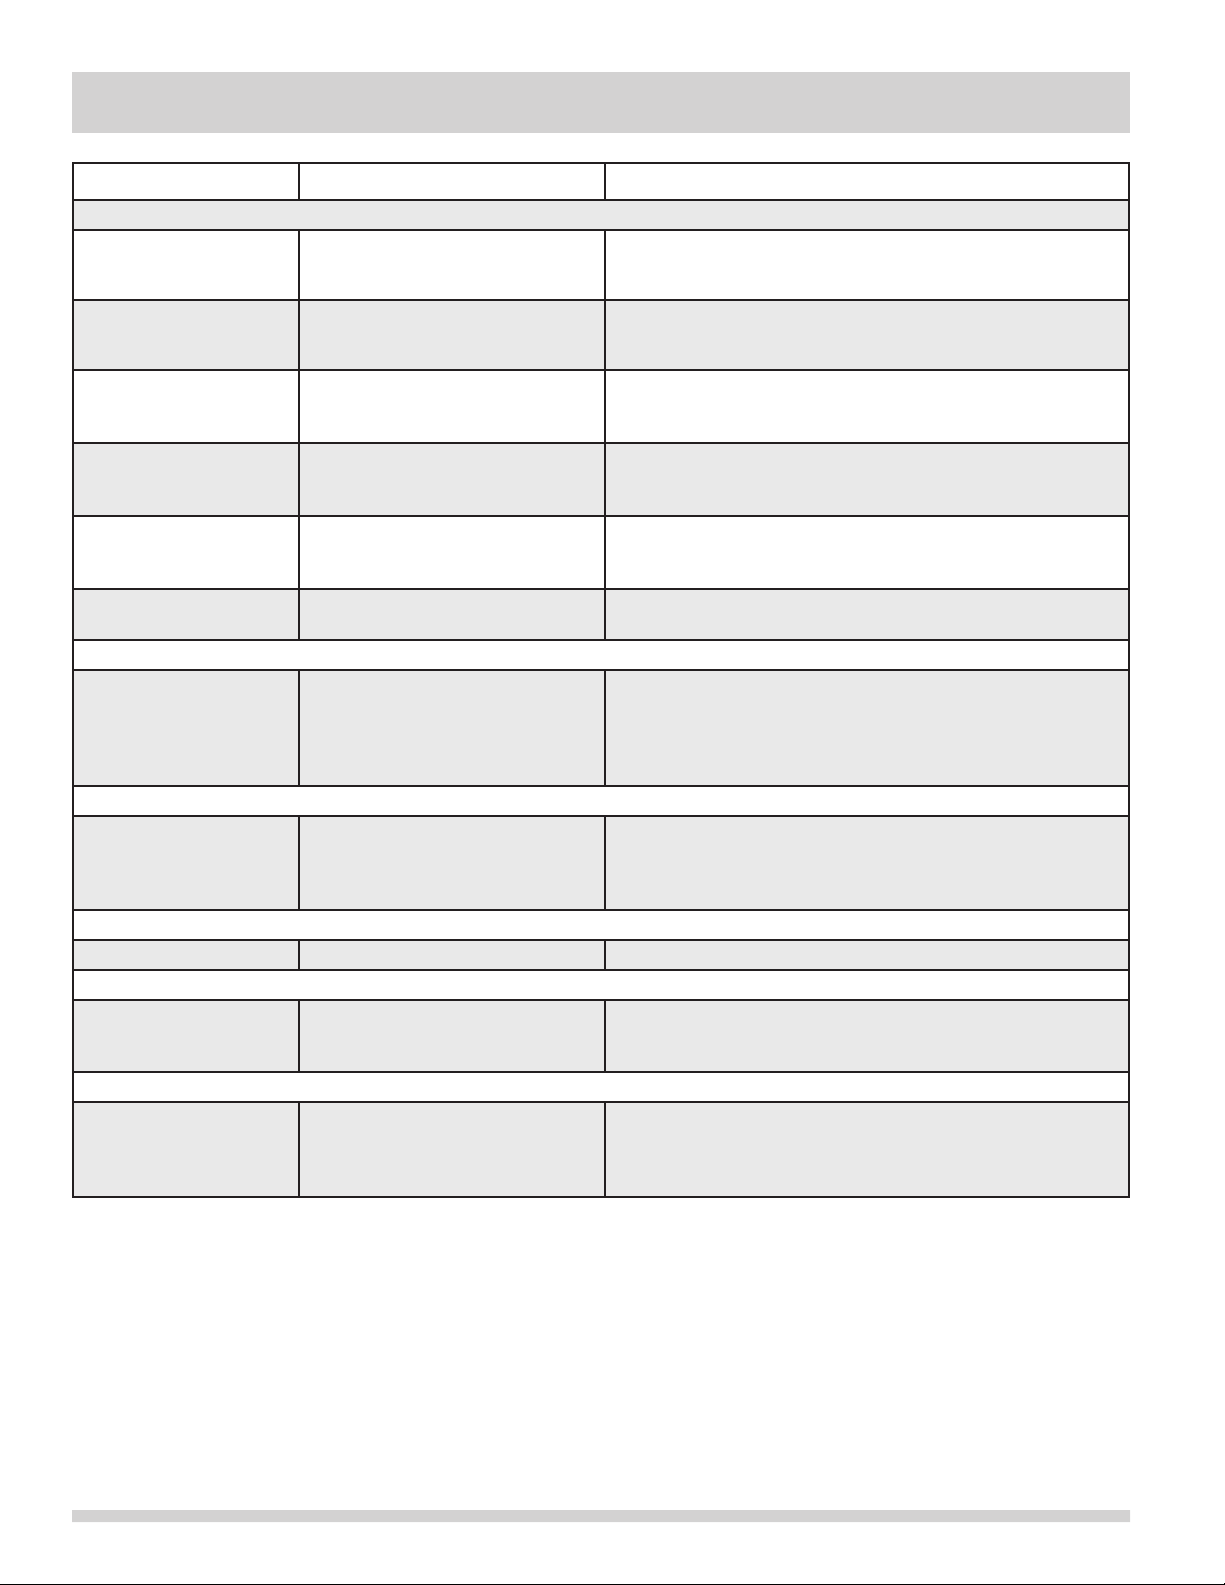
BEFORE YOU CALL (continued)
pROBLEM cAuSE cORREctIOn
SOUND AND NOISE (continued)
Longer sound levels
when compressor
comes on.
Fan runs when room
temperature is below
45°.
Popping or cracking
sound when compressor comes on.
Boiling or gurgling
sound, like water boiling.
Vibrating or rattling
noise.
Snapping sound. Cold control turning the Refrig-•
WAtER/MOIStuRE/fROSt InSIDE REfRIGERAtOR
Moisture forms on
inside of Refrigerator
walls.
WAtER/MOIStuRE/fROSt OutSIDE REfRIGERAtOR
Moisture forms on outside of Refrigerator.
ODOR In REfRIGERAtOR
Odors in Refrigerator. Interior needs to be cleaned.• Clean interior with sponge, warm water, and baking soda.•
DOOR pROBLEMS
Door will not close. Refrigerator is not level. It •
LIGHT BULB IS NOT ON
Light bulb is not on. Light bulb is burnt out.•
Refrigerator• operates at higher
pressures during the start of the
ON cycle.
Exterior thermostat has acti-•
vated the heater or fan.
Metal parts undergo expansion •
and contraction, as in hot water
pipes.
Refrigerant (used to cool •
Refrigerator) is circulating
throughout the system.
Refrigerator is not level. It •
rocks on the oor when it is
moved slightly.
erator OFF and ON.
Weather is hot and humid.•
Door may not be seating •
properly.
Door is kept open too long, or •
opened too frequently.
Door may not be seating prop-•
erly, causing the cold air from
inside the refrigerator to meet
warm moist air from outside.
rocks on the oor when it is
moved slightly.
No electric current is reaching •
the refrigerator.
This is normal. Sound will level off or disappear as • Refrig-
erator continues to run.
This is normal.•
This is normal. Sound will level off or disappear as Refrig-•
erator continues to run.
This is normal.•
Level the unit. Refer to leveling instructions in the •
“Installation” section.
This is normal.•
This is normal.•
See • “DOOR pROBLEMS” section.
Open the door less often.•
See • “DOOR pROBLEMS” section.
This condition may force the cabinet out of square and •
misalign the door. Refer to “Leveling’ in the “Installation”
section.
Follow instructions under “Interior Light” in the •
“fEAtuRES” section.
See • “Installation” section.
10
Page 11
MAjOR AppLIAncE WARRAnty
Your appliance is covered by a one year limited warranty. For one year from your original date of
purchase, Electrolux will pay all costs for repairing or replacing any parts of this appliance that prove
to be defective in materials or workmanship when such appliance is installed, used and maintained in
accordance with the provided instructions.
This warranty does not cover the following:
1. Products with original serial numbers that have been removed, altered or cannot be readily determined.
2. Product that has been transferred from its original owner to another party or removed outside the USA or
Canada.
3. Rust on the interior or exterior of the unit.
4. Products purchased “as-is” are not covered by this warranty.
5. Food loss due to any refrigerator or freezer failures.
6. Products used in a commercial setting.
7. Service calls which do not involve malfunction or defects in materials or workmanship, or for appliances
not in ordinary household use or used other than in accordance with the provided instructions.
8. Service calls to correct the installation of your appliance or to instruct you how to use your appliance.
9. Expenses for making the appliance accessible for servicing, such as removal of trim, cupboards, shelves,
etc.,which are not a part of the appliance when it is shipped from the factory.
10. Service calls to repair or replace appliance light bulbs, air filters, water filters, other consumables, or
knobs, handles, or other cosmetic parts.
11. Surcharges including, but not limited to, any after hour, weekend, or holiday service calls, tolls, ferry trip
charges, or mileage expense for service calls to remote areas, including the state of Alaska.
12. Damages to the finish of appliance or home incurred during installation, including but not limited to floors,
cabinets, walls, etc.
13. Damages caused by: services performed by unauthorized service companies; use of parts other than
genuine Electrolux parts or parts obtained from persons other than authorized service companies; or
external causes such as abuse, misuse, inadequate power supply, accidents, fires, or acts of God.
DISCLAIMER OF IMPLIED WARRANTIES; LIMITATION OF REMEDIES
CUSTOMER’S SOLE AND EXCLUSIVE REMEDY UNDER THIS LIMITED WARRANTY SHALL BE PRODUCT
REPAIR OR REPLACEMENT AS PROVIDED HEREIN. CLAIMS BASED ON IMPLIED WARRANTIES, INCLUDING
WARRANTIES OF MERCHANTABILITY OR FITNESS FOR A PARTICULAR PURPOSE, ARE LIMITED TO ONE YEAR
OR THE SHORTEST PERIOD ALLOWED BY LAW, BUT NOT LESS THAN ONE YEAR. ELECTROLUX SHALL NOT
BE LIABLE FOR CONSEQUENTIAL OR INCIDENTAL DAMAGES SUCH AS PROPERTY DAMAGE AND INCIDENTAL
EXPENSES RESULTING FROM ANY BREACH OF THIS WRITTEN LIMITED WARRANTY OR ANY IMPLIED
WARRANTY. SOME STATES AND PROVINCES DO NOT ALLOW THE EXCLUSION OR LIMITATION OF INCIDENTAL
OR CONSEQUENTIAL DAMAGES, OR LIMITATIONS ON THE DURATION OF IMPLIED WARRANTIES, SO THESE
LIMITATIONS OR EXCLUSIONS MAY NOT APPLY TO YOU. THIS WRITTEN WARRANTY GIVES YOU SPECIFIC
LEGAL RIGHTS. YOU MAY ALSO HAVE OTHER RIGHTS THAT VARY FROM STATE TO STATE.
Keep your receipt, delivery slip, or some other appropriate payment record to establish the warranty period
should service be required. If service is performed, it is in your best interest to obtain and keep all receipts.
Service under this warranty must be obtained by contacting Electrolux at the addresses or phone
numbers below.
Exclusions
If You Need
Service
This warranty only applies in the USA and Canada. In the USA, your appliance is warranted by Electrolux Major Appliances
North America, a division of Electrolux Home Products, Inc. In Canada, your appliance is warranted by Electrolux Canada Corp.
Electrolux authorizes no person to change or add to any obligations under this warranty. Obligations for service and parts under
this warranty must be performed by Electrolux or an authorized service company. Product features or specifications as described
or illustrated are subject to change without notice.
Major Appliance Warranty Information
uSA
1.800.944.9044
Electrolux Major Appliances
North America
10200 David Taylor Drive
Charlotte, NC 28262
1.800.265.8352
Electrolux Canada Corp.
5855 Terry Fox Way
Mississauga, Ontario, Canada
Canada
L5V 3E4
11
Page 12

 Loading...