

Frigidaire FES300ASC, FES300ASB, FES300ASA, FED300ASC, FED300ASB Owner’s Manual
...
OVEN CONTROL GUIDE
Models Without Timer / Models with Time of Day Timer / Models with Electronic Timer
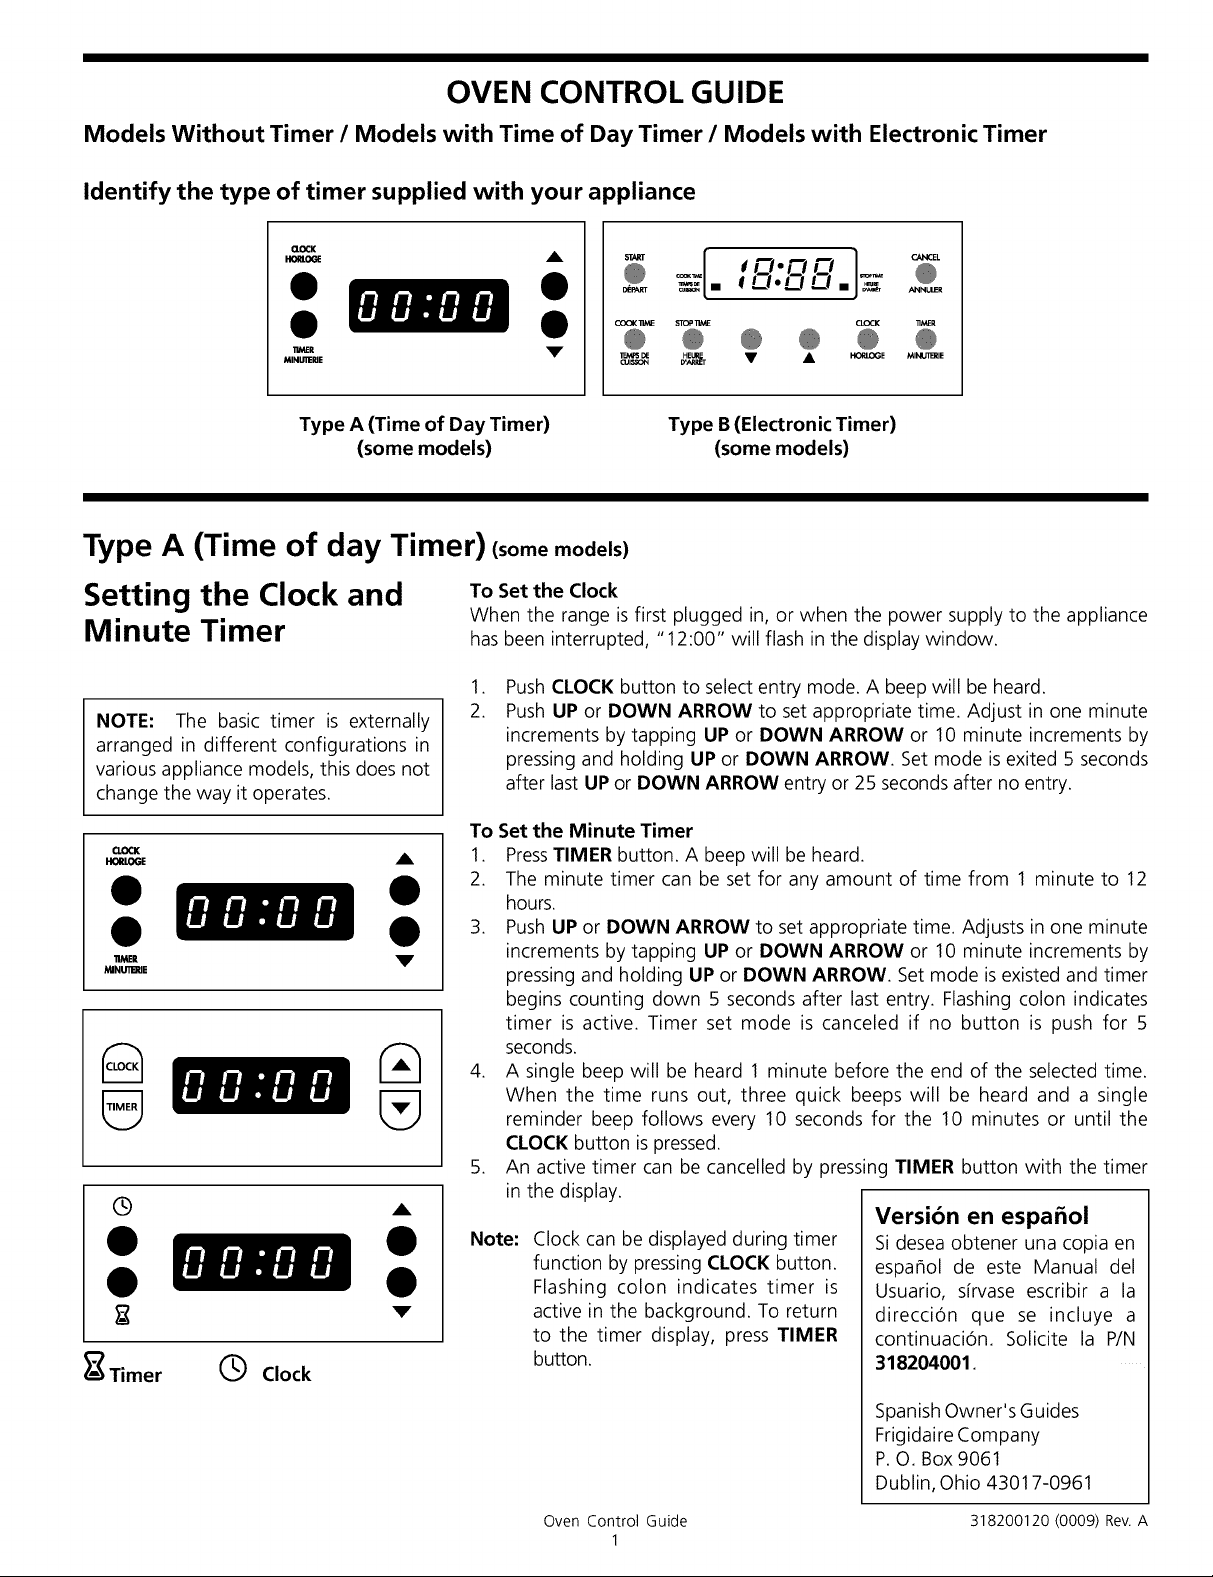
Identify the type of timer supplied with your appliance
QOCK
HORtOGE
COOK 11ME STOP _ME CLOCK 11MER
_R V
MINU11ERIE
@ @ @ @
l_d_ DECUISS(_ DH_._ • • HORIJC_GE MINU11E_JE
Type A (Time of Day Timer)
(some models)
Type A (Time of day Timer)(somemodels)
Setting the Clock and
Minute Timer
NOTE: The basic timer is externally
arranged in different configurations in
various appliance models, this does not
change the way it operates.
CLOCK
HORLOGE
i= V
MINU11_IE
Q A
II
Timer ®
Clock
V
To Set the Clock
When the range is first plugged in, or when the power supply to the appliance
has been interrupted, "12:00" will flash in the display window.
.
Push CLOCK button to select entry mode. A beep will be heard.
2.
Push UP or DOWN ARROW to set appropriate time. Adjust in one minute
increments by tapping UP or DOWN ARROW or 10 minute increments by
pressing and holding UP or DOWN ARROW. Set mode isexited 5 seconds
after last UP or DOWN ARROW entry or 25 seconds after no entry.
To Set the Minute Timer
1. PressTIMER button. A beep will be heard.
2. The minute timer can be set for any amount of time from 1 minute to 12
hours.
3. Push UP or DOWN ARROW to set appropriate time. Adjusts in one minute
increments by tapping UP or DOWN ARROW or 10 minute increments by
pressing and holding UP or DOWN ARROW. Set mode is existed and timer
begins counting down 5 seconds after last entry. Flashing colon indicates
timer is active. Timer set mode is canceled if no button is push for 5
seconds.
4. A single beep will be heard 1 minute before the end of the selected time.
When the time runs out, three quick beeps will be heard and a single
reminder beep follows every 10 seconds for the 10 minutes or until the
CLOCK button is pressed.
5. An active timer can be cancelled by pressing TIMER button with the timer
in the display.
Note:
Clock can be displayed during timer
function by pressing CLOCK button.
Flashing colon indicates timer is
active in the background. To return
to the timer display, press TIMER
button.
Type B (Electronic Timer)
(some models)
Versibn en espafiol
Si desea obtener una copia en
espanol de este Manual del
Usuario, s[rvase escribir a la
direcci6n que se incluye a
continuaci6n. Solicite la P/N
318204001.
Spanish Owner's Guides
Frigidaire Company
P.O. Box 9061
Dublin, Ohio 43017-0961
Oven Control Guide 318200120 (0009) Rev. A
1
Type A (Time of Day Timer) and Model without Timer (somemodels)
Setting Oven Controls
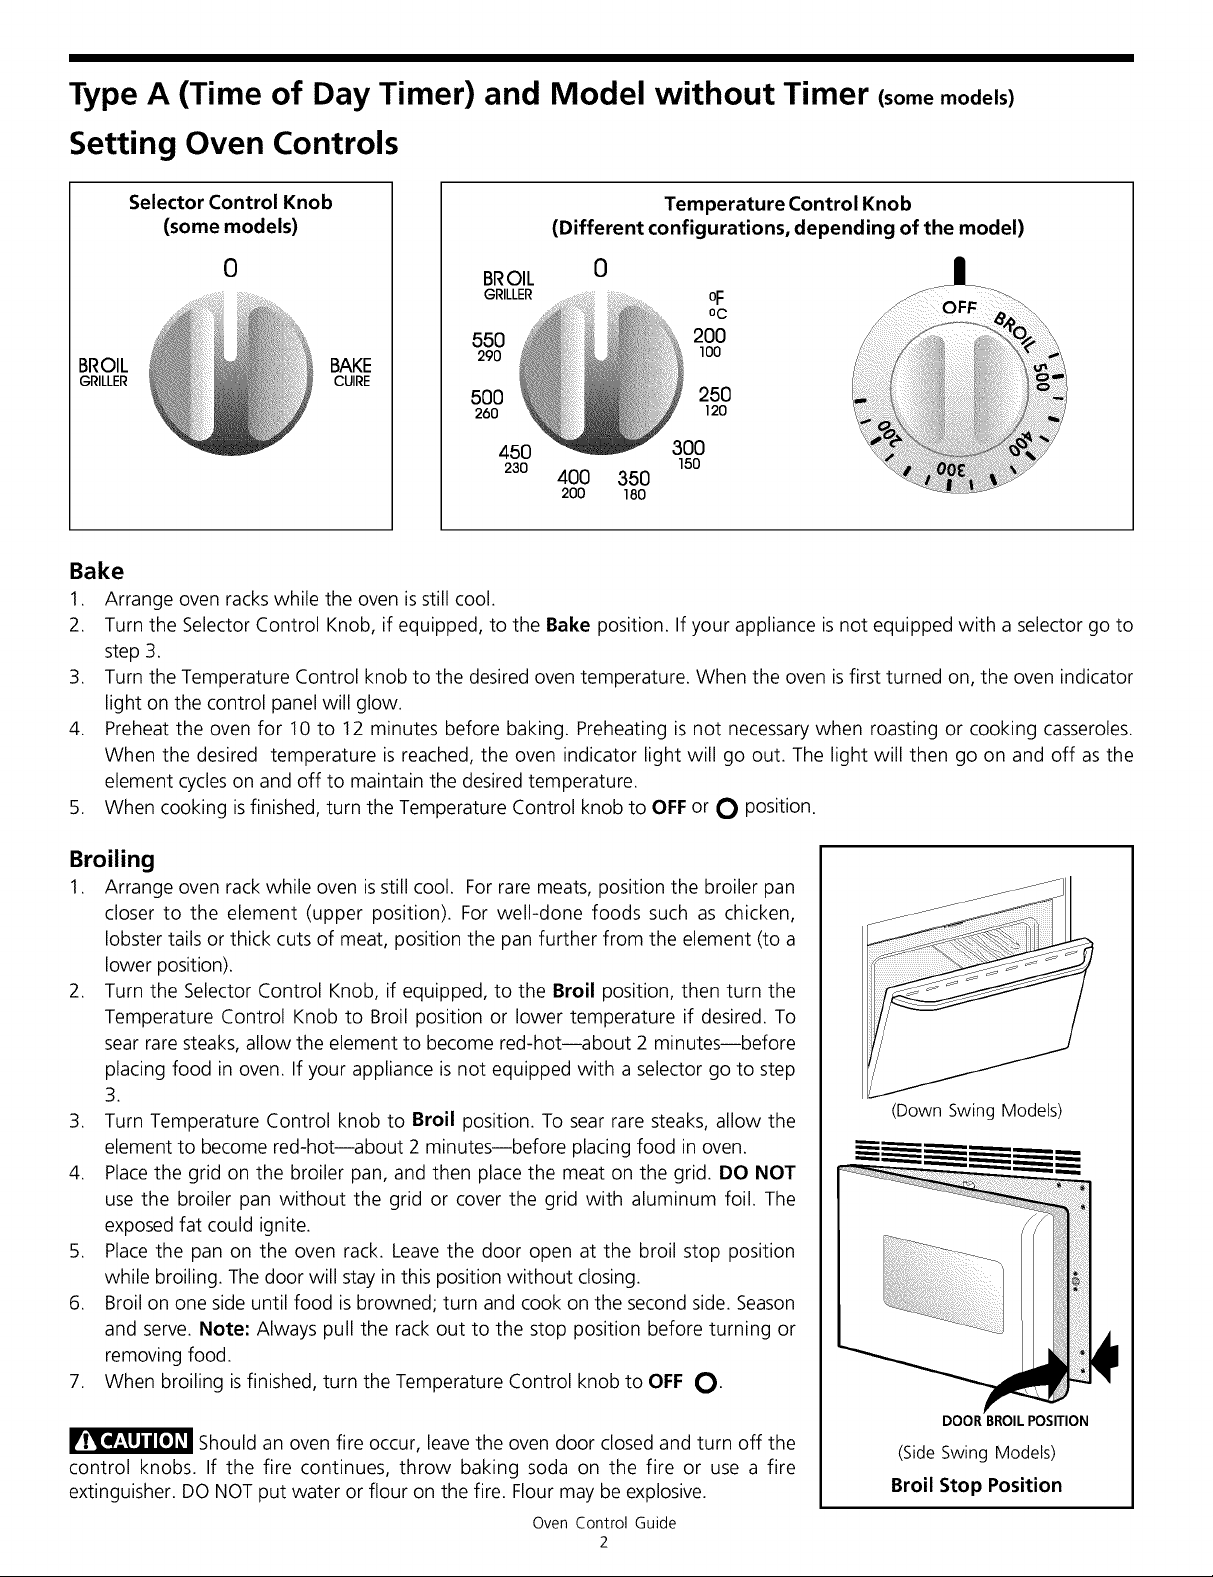
Selector Control Knob
(some models)
BROIL
GRILLER ..........
(Different configurations, depending of the model)
0
BROIL
0
BAKE
CUIRE
i:
230 400 350
200 180
Temperature Control Knob
150
Bake
1. Arrange oven racks while the oven is still cool.
2. Turn the Selector Control Knob, if equipped, to the Bake position. If your appliance is not equipped with a selector go to
step 3.
3. Turn the Temperature Control knob to the desired oven temperature. When the oven is first turned on, the oven indicator
light on the control panel will glow.
4. Preheat the oven for 10 to 12 minutes before baking. Preheating is not necessary when roasting or cooking casseroles.
When the desired temperature is reached, the oven indicator light will go out. The light will then go on and off as the
element cycles on and off to maintain the desired temperature.
5. When cooking isfinished, turn the Temperature Control knob to OFF or O position.
Broiling
1. Arrange oven rack while oven isstill cool. For rare meats, position the broiler pan
closer to the element (upper position). For well-done foods such as chicken,
lobster tails or thick cuts of meat, position the pan further from the element (to a
lower position).
2. Turn the Selector Control Knob, if equipped, to the Broil position, then turn the
Temperature Control Knob to Broil position or lower temperature if desired. To
sear rare steaks, allow the element to become red-hotiabout 2 minutesibefore
placing food in oven. If your appliance is not equipped with a selector go to step
3.
3. Turn Temperature Control knob to Broil position. To sear rare steaks, allow the
element to become red-hotiabout 2 minutesibefore placing food in oven.
4. Place the grid on the broiler pan, and then place the meat on the grid. DO NOT
use the broiler pan without the grid or cover the grid with aluminum foil. The
exposed fat could ignite.
5. Placethe pan on the oven rack. Leave the door open at the broil stop position
while broiling. The door will stay in this position without closing.
6. Broil on one side until food is browned; turn and cook on the second side. Season
and serve. Note: Always pull the rack out to the stop position before turning or
removing food.
7. When broiling isfinished, turn the Temperature Control knob to OFF O.
Should an oven fire occur, leave the oven door closed and turn off the
control knobs. If the fire continues, throw baking soda on the fire or use a fire
extinguisher. DO NOT put water or flour on the fire. Flour may be explosive.
Oven Control Guide
2
(Down Swing Models)
DOOR BROIL POSITION
(SideSwing Models)
Broil Stop Position
Type A (Time of Day Timer) and Model without Timer (somemodels)(continued)
Adjusting Oven Temperature (someModels)
Thetemperature inthe oven hasbeen setat the factory. When first using the oven, besureto follow recipetimes and temperatures.
If you think the oven is too hot or too cool, the temperature in the oven can beadjusted. Before adjusting, test a recipe by using
a higher or lower temperature than the recommended temperature. The baking results should help you to decide how much of
an adjustment is needed.
To Adj ust Oven Tempe ratu re:
1. Check to be sure the Temperature control knob is in the OFFposition.
2. PullTemperature control knob straight off the shaft.
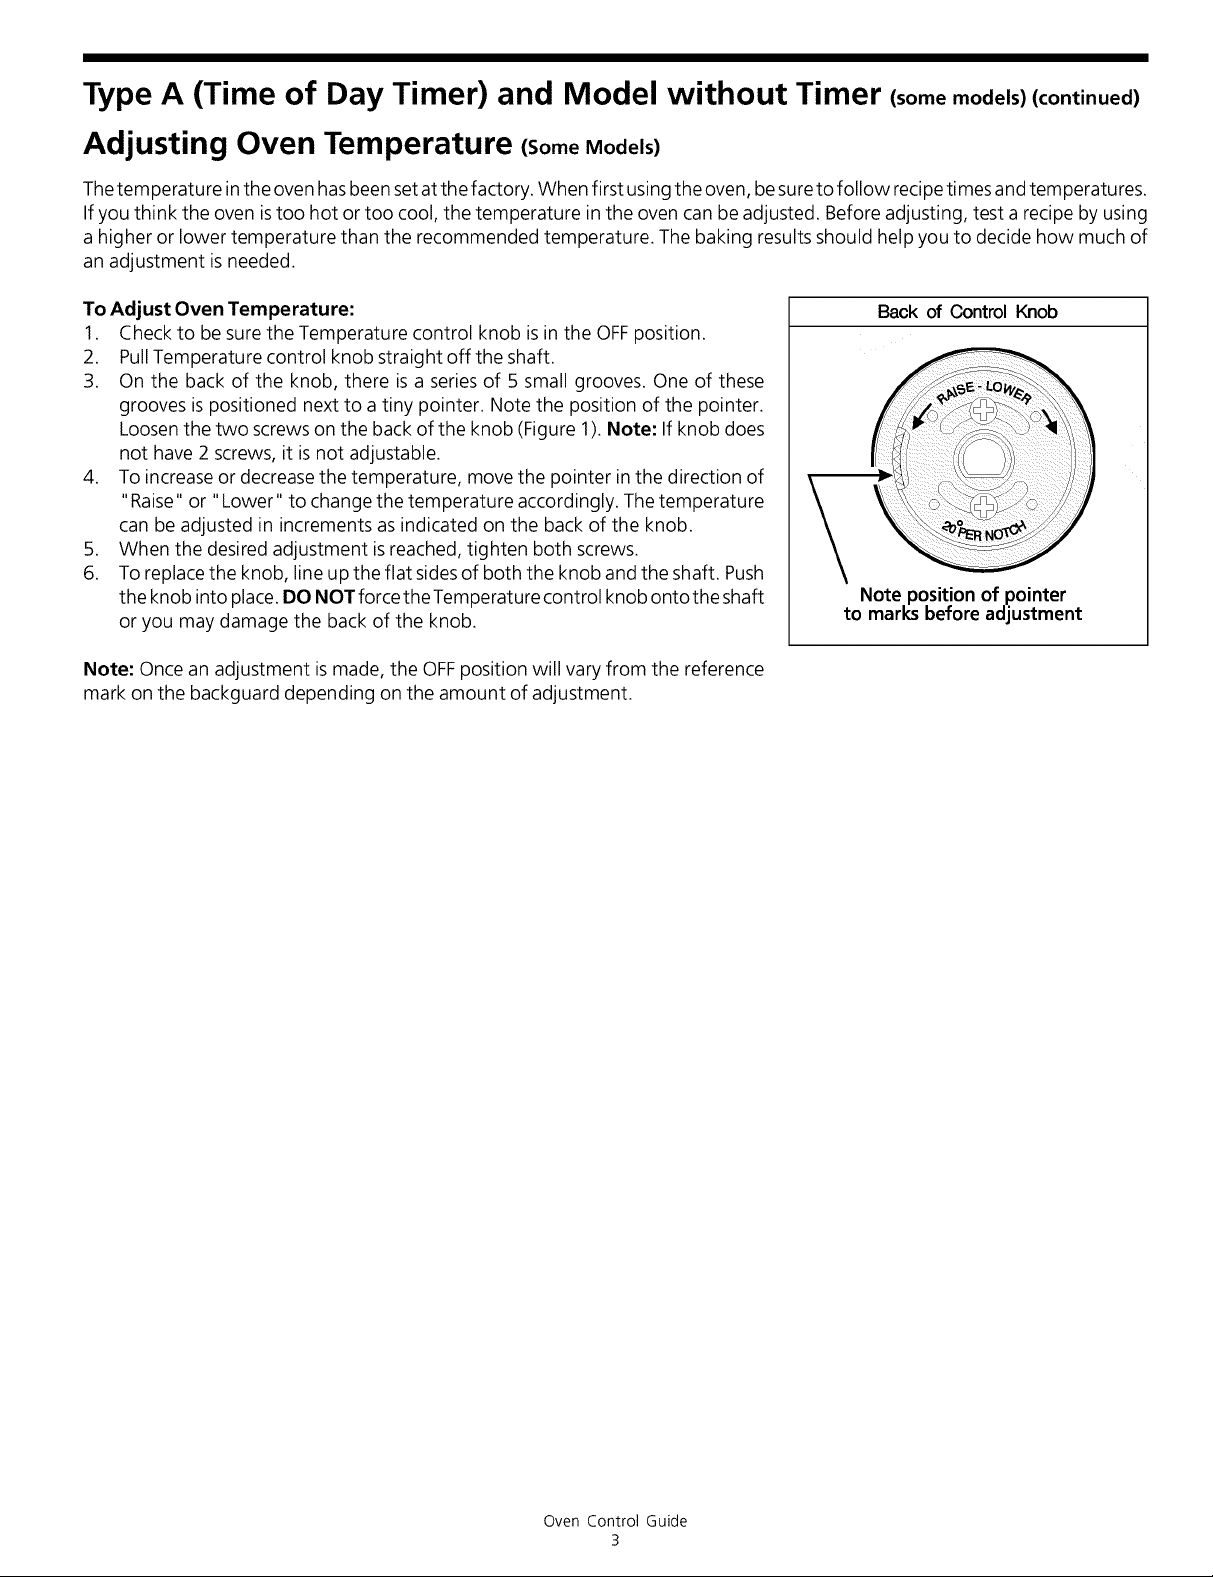
3. On the back of the knob, there is a series of 5 small grooves. One of these
grooves ispositioned next to a tiny pointer. Note the position of the pointer.
Loosenthe two screws on the back of the knob (Figure 1). Note: If knob does
not have 2 screws, it is not adjustable.
4. To increase or decreasethe temperature, move the pointer in the direction of
"Raise" or "Lower" to change the temperature accordingly. Thetemperature
can be adjusted in increments as indicated on the back of the knob.
5. When the desired adjustment is reached, tighten both screws.
6. To replace the knob, line up the flat sidesof both the knob and the shaft. Push
the knob into place. DO NOT force the Temperature control knob ontothe shaft
or you may damage the back of the knob.
Note: Once an adjustment ismade, the OFFposition will vary from the reference
mark on the backguard depending on the amount of adjustment.
Back of Control Knob
Note position of pointer
to marks before adjustment
Oven Control Guide
3
Type B (Electronic Timer)(some models)
NOTE: The basictimer is externally arranged in different configurations in various appliance models. Some timers are equipped
with push-buttons identified byword(s), while others have padsidentified by symbols orwords. Seefigures below for example of
timers used in different models.
Selector Control Knob
COOK TIME STOP 11ME CLOCK "nME_
CUBSON
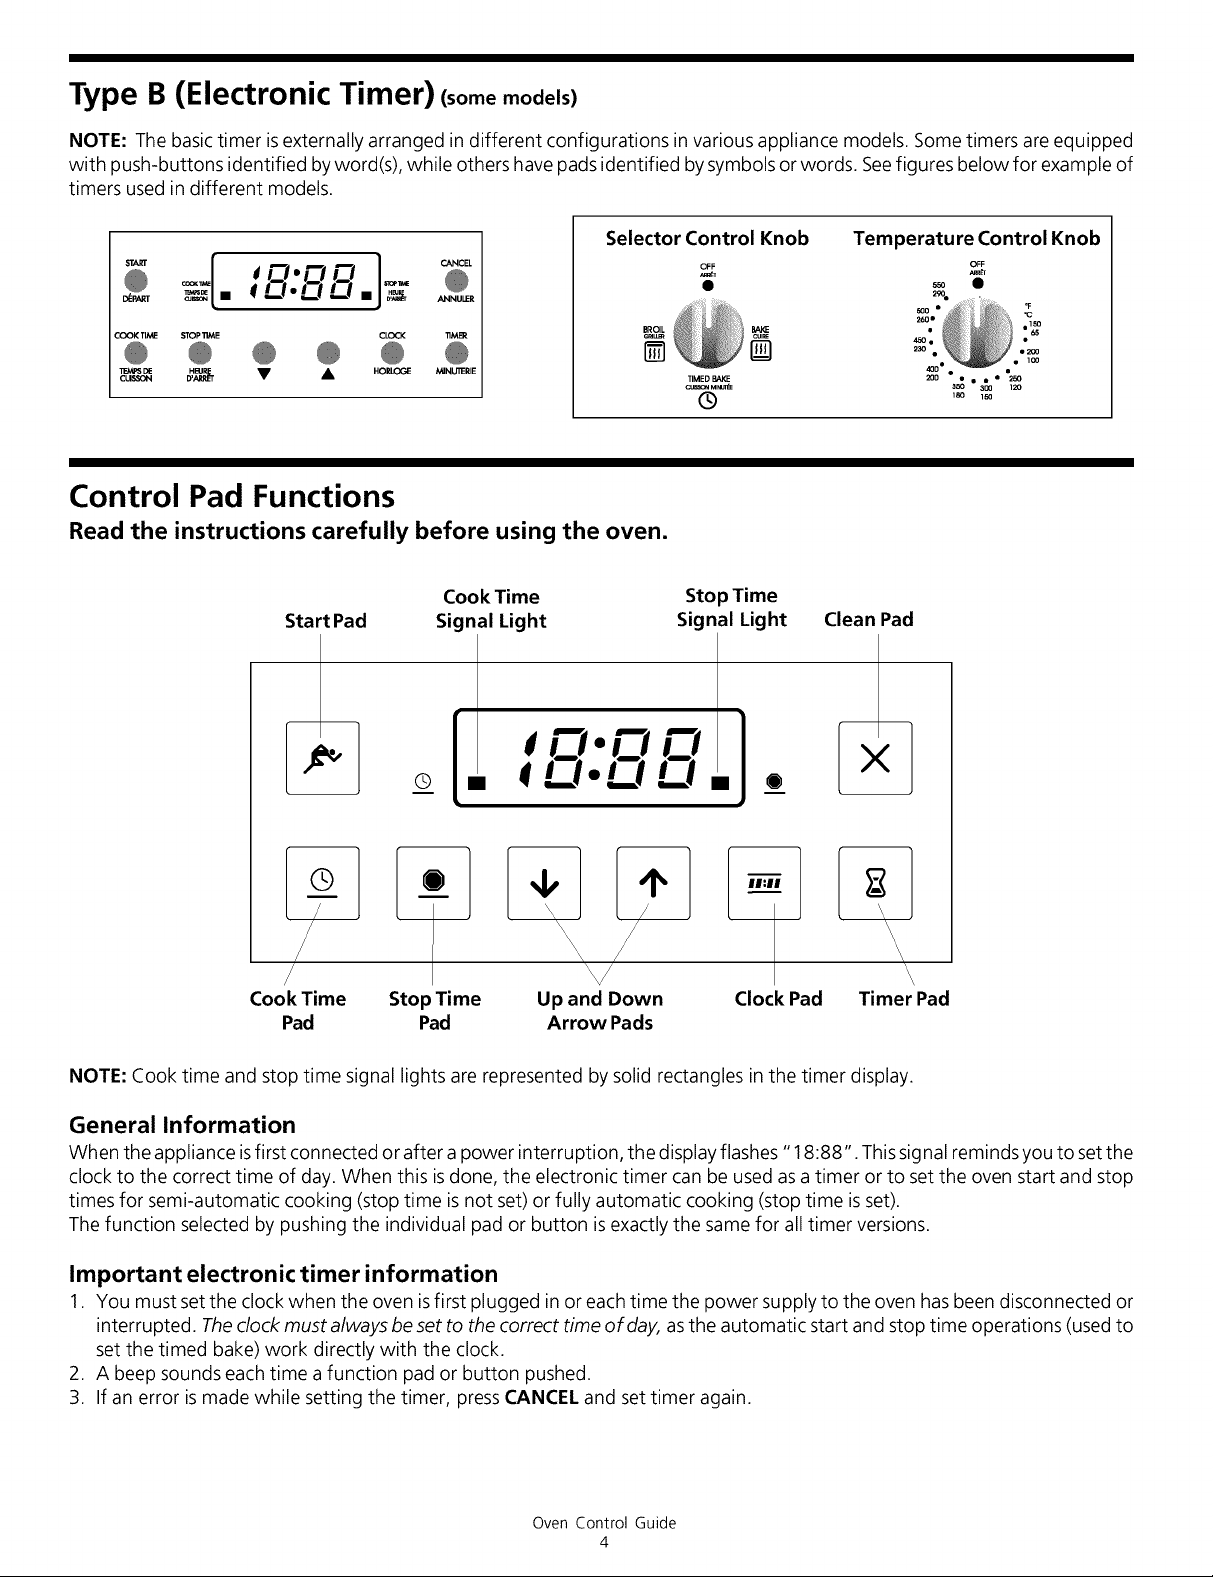
Control Pad Functions
Read the instructions carefully before using the oven.
Cook Time
sta rt Pad
Signal Light
OFF
[]
TIMED
cuss_ MINLr_
®
Stop Time
Signal Light
Temperature Control Knob
Clean Pad
Cook Time Stop Time Up and Down Clock Pad Timer Pad
Pad Pad Arrow Pads
NOTE: Cook time and stop time signal lights are represented by solid rectangles in the timer display.
General Information
When the appliance isfirst connected or after a power interruption, the display flashes "18:88". This signal reminds you to setthe
clock to the correct time of day. When this is done, the electronic timer can be used asa timer or to set the oven start and stop
times for semi-automatic cooking (stop time isnot set) or fully automatic cooking (stop time isset).
The function selected by pushing the individual pad or button is exactly the same for all timer versions.
Important electronic timer information
1. You must set the clock when the oven is first plugged inor each time the power supply to the oven has been disconnected or
interrupted. The clock must always beset to the correct time of day, asthe automatic start and stop time operations (used to
set the timed bake) work directly with the clock.
2. A beep sounds each time afunction pad or button pushed.
3. If an error is made while setting the timer, press CANCEL and set timer again.
Oven Control Guide
4
 Loading...