

Page 1
2. Check that lint screen is clean and in
place.
3. Load the dryer. If desired, add a dryer
fabric softener sheet.
4. Close the dryer door.
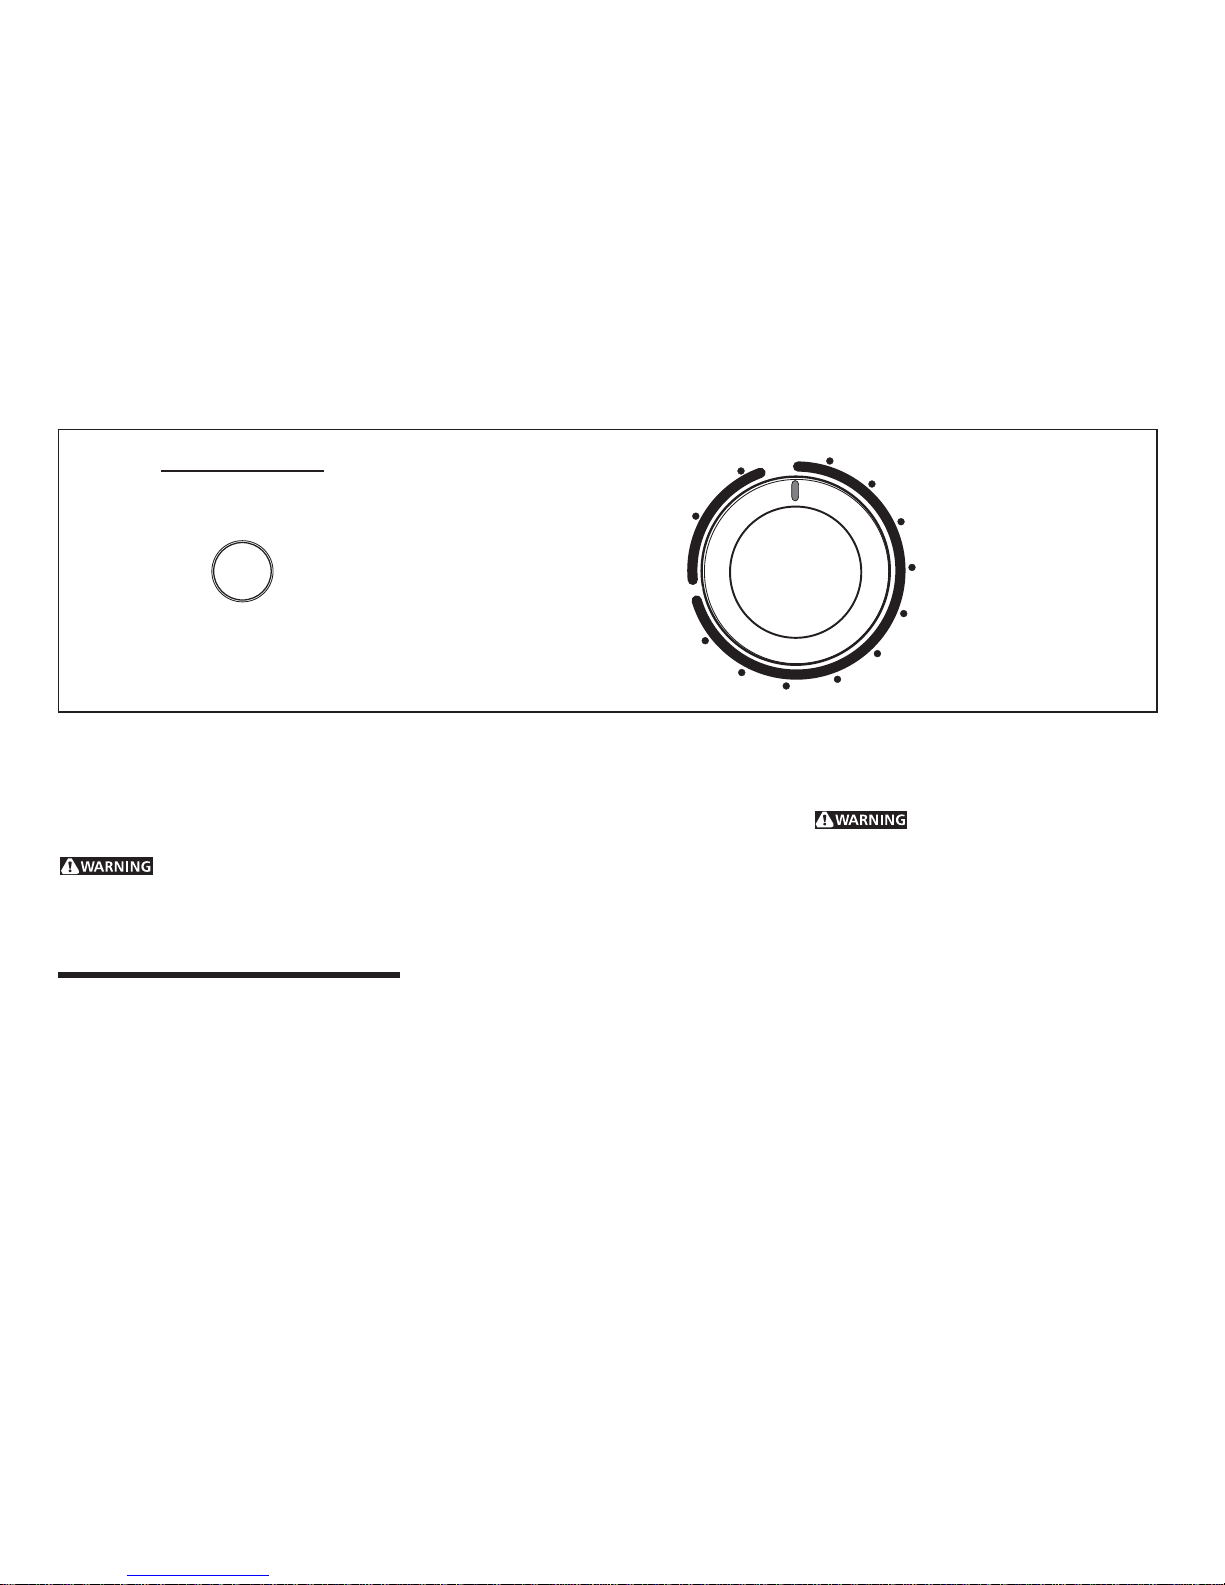
5. Turn cycle selector clockwise to
desired setting.
6. Start dryer. Push the Push to Start button
for 2 seconds, or turn the Turn to Start
control clockwise to ON. Hold for 1-2
seconds and release.
7. At end of cycle, remove items immediately and hang or fold.
8. Clean lint screen after every load.
Cycle Selection
Always follow directions on fabric care labels.
To avoid fire hazard, do not use
heat to dry items containing feathers or down,
foam rubber, plastics, or similarly textured,
rubber-like materials. Use Cool Down (no heat)
setting only.
Turn cycle selector clockwise to desired cycle
and setting. Each cycle ends with a cool down
period. The heat automatically turns off and the
load continues to tumble for 5-10 minutes. This
reduces wrinkling and makes items easier to
handle during unloading.
Drying time varies depending on size and
dampness of load, weight and fabric type. Room
temperature and humidity, type of installation
and electrical voltage or gas pressure can also
affect drying time.
Before Operating Your Dryer
Read your dryer Owner's Guide. It has
important safety and warranty information. It
also has many suggestions for best drying results.
To reduce the risk of fire, electric
shock, or injury to persons, read the IMPORTANT
SAFETY INSTRUCTIONS in your dryer owner's
guide before operating this appliance.
Operating Steps
Read Drying Procedures in your Owner's
Guide. It explains these operating steps in
detail.
1. Prepare items for drying.
P/N 134516800 (0412)
OPERAOPERA
OPERAOPERA
OPERA
TING INSTRUCTIONSTING INSTRUCTIONS
TING INSTRUCTIONSTING INSTRUCTIONS
TING INSTRUCTIONS
Printed in U.S.A.
LESS
MORE
COOL DOWN
20
30
40
50
60
70
80
90
100
AUTO DRY
TIMED DRY
COOL DOWN
START
10
Page 2
P/N 134516800 (0412)
Cycle Selection (continued)
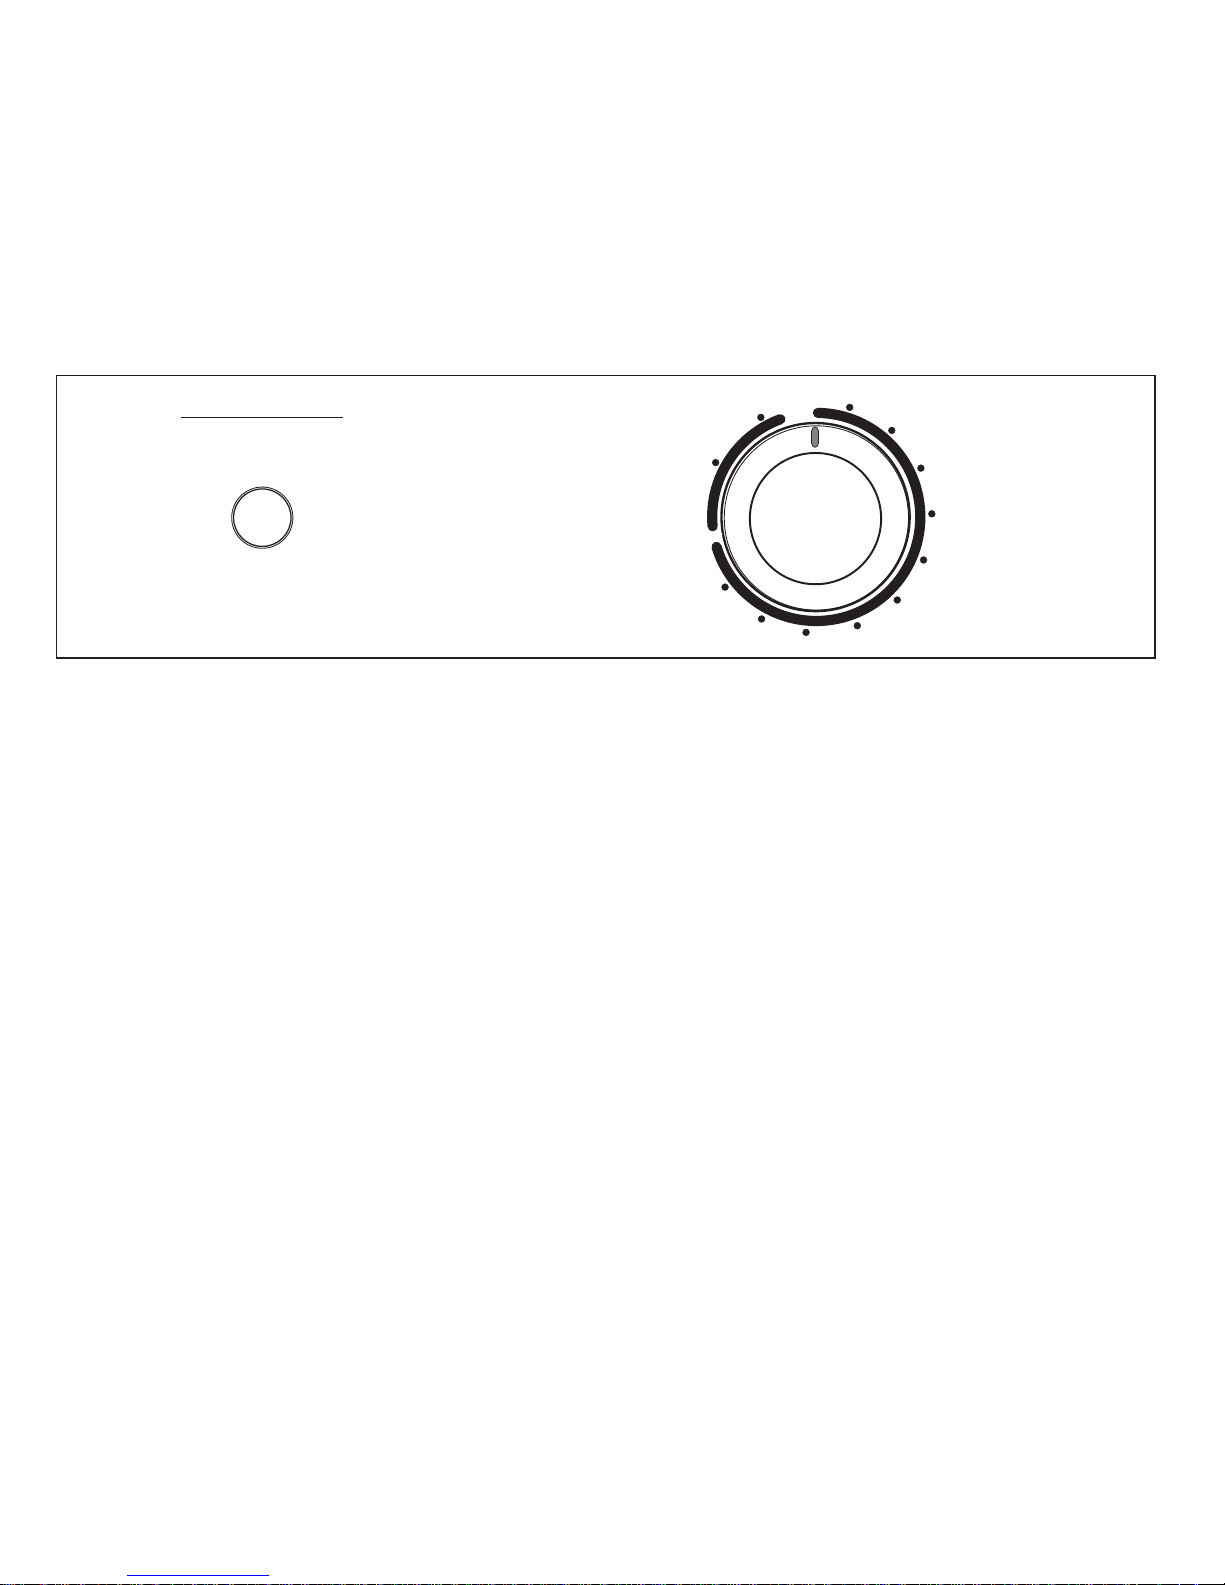
Timed Dry
This cycle provides up to 100 minutes of drying
time at high heat for regular and permanent
press items.
When drying permanent press items, turn the
cycle selector to 40-50 minutes. This is the
average time needed to dry most loads of
permanent press items.
The load tumbles without heat during the last 10
minutes of the Timed Dry cycle. Use this setting
to freshen clothing, pillows or blankets or to dust
draperies. Heat-sensitive items such as plastics,
foam rubber or similarly textured rubber-like
materials or items containing feathers or down
should be dried only with this setting.
Auto Dry
This cycle is best for regular and permanent
press items that can be tumble dried at high
heat. Drying time is determined automatically.
This cycle is best for items of similar fabric,
weight and construction.
• For items requiring more drying time, set cycle
selector on MORE DRY.
• For items requiring less drying time, set cycle
selector on LESS DRY.
When the items are dry, the heat automatically
turns off and the load is tumbled for approximately
5 minutes without heat.
Energy Saving Tips
• Keep the lint screen clean and exhaust the
dryer correctly.
• Sort laundry properly and select proper
temperature and cycle settings. Choose an
automatic dry cycle whenever possible for
accurate drying time.
• Dry only full loads. Single items and small loads
usually take longer to dry.
• Avoid overloading, adding wet items to a
partially dry load, and overdrying.
• Dry one load after another to take advantage
of a warm dryer.
• Opening the door needlessly causes warm air
to escape, which prolongs drying time.
• If possible, use the dryer on low humidity days.
• Install the dryer in an area where the room
temperature is at least 45°F (7°C).
LESS
MORE
COOL DOWN
20
30
40
50
60
70
80
90
100
AUTO DRY
TIMED DRY
COOL DOWN
START
10
Page 3
Impreso en los EE.UU.
P/N 134516800 (0412)
Antes de Utilizar su Secadora
Lea el Manual del Usuario de esta secadora.
Contiene información de garantía y seguridad
importante. También contiene sugerencias para
obtener mejores resultados en el secado.
Para reducir el riesgo de
incendio, choque eléctrico o lesiones personales,
lea las INSTRUCCIONES IMPORTANTES DE
SEGURIDAD indicadas en el Manual del Usuario
antes de usar este artefacto.
3. Cargue la secadora. Si desea, agregue una
hoja de papel suavizante.
4. Cierre la puerta de la secadora.
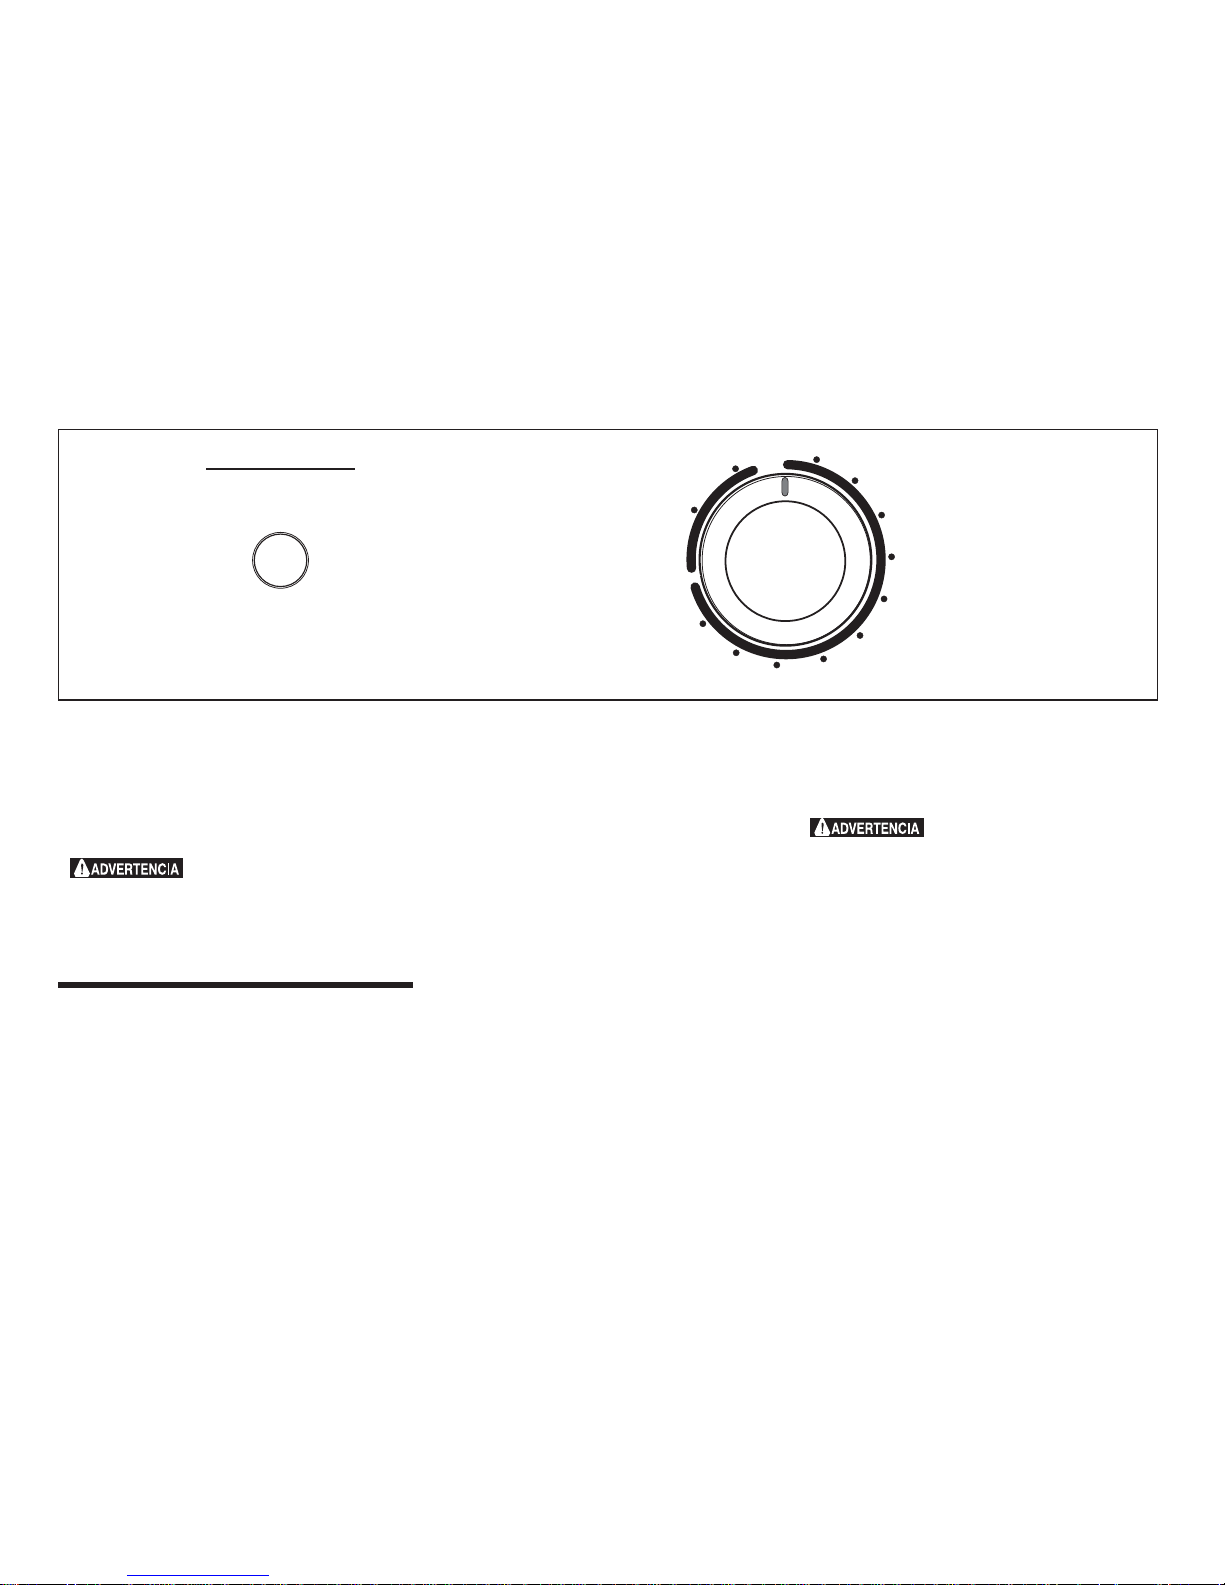
5. Gire el selector de ciclo en el sentido de
las agujas del reloj hasta llegar a la
posición deseada.
6. Arranque la secadora. Oprima el botón
PUSH TO START (arranque) por 2 segundos,
ó gire la perilla de TURN TO START (Gire
para poner en marcha) en el sentido de las
agujas del reloj hosta la posición de
encendido (ON). Mantenga durante 1 ó 2
segundos y suelte.
7. Al terminar el ciclo, quite las prendas
inmediatamente y cuélguelas o dóblelas.
8. Limpie el filtro de pelusa después de
cada carga.
Selección de Ciclo
Siempre observe las indicaciones en la etiqueta
de cada prenda.
Para evitar peligro de incendio, no
use calor para secar artículos que contienen plumas
o plumón, espuma de goma, plástico, o con textura
semejante, materiales parecidos a la goma. Use el
ajuste Período de Enfriado (Cool Down) solamente.
Gire el selector en el sentido de las agujas del reloj
hasta la posición deseada. Cada ciclo termina con
un período de enfriamiento. El calor se apaga
automáticamente y la carga continúa dando vueltas
por 5-10 minutos. Esto reduce las arrugas y facilita
la descarga de la secadora.
El tiempo de secado varia con el grado de humedad
de la carga, peso y tipo de telas, temperatura
ambiental y humedad, tipo de instalación, voltaje
eléctrico o presión de gas.
(continuación en el reverso)
INSTRUCCIONES DE FUNCIONAMIENTOINSTRUCCIONES DE FUNCIONAMIENTO
INSTRUCCIONES DE FUNCIONAMIENTOINSTRUCCIONES DE FUNCIONAMIENTO
INSTRUCCIONES DE FUNCIONAMIENTO
Pasos de Funcionamiento
Lea los Procedimientos de secado en su
Manual del Usuario. Allí encontrará explicados
los pasos de funcionamiento en más detalle.
1. Prepare la ropa para el secado.
2. Controle que el filtro de pelusa esté limpio
y en su lugar.
LESS DRY
MORE DRY
COOL DOWN
20
30
40
50
60
70
80
90
100
AUTO DRY
TIMED DRY
COOL DOWN
START
10
Page 4
P/N 134516800 (0412)
Consejos para Conservar Energía
• Mantenga el filtro de pelusa limpio y provea un
escape correcto para la secadora.
• Clasifique el lavado correctamente y seleccione
la temperatura y el ciclo apropiado. Siempre
que sea posible, elija el ciclo automático de
secado, para obtener el tiempo de secado
justo.
• Seque solamente cargas completas. Prendas
sueltas y cargas pequeñas toman más tiempo
para secar.
• Evite sobrecargar la secadora, agregar prendas
húmedas a una carga a medio secar o secar
por demás.
• Abrir la puerta sin necesidad deja escapar el
aire caliente, lo cual prolonga el tiempo de
secado.
• Seque una carga inmediatamente después de
la anterior para aprovechar la secadora
caliente.
• Si es posible use la secadora en días de poca
humedad.
• Instale la secadora en un ambiente donde la
temperatura sea de por lo menos 45°F (7°C).
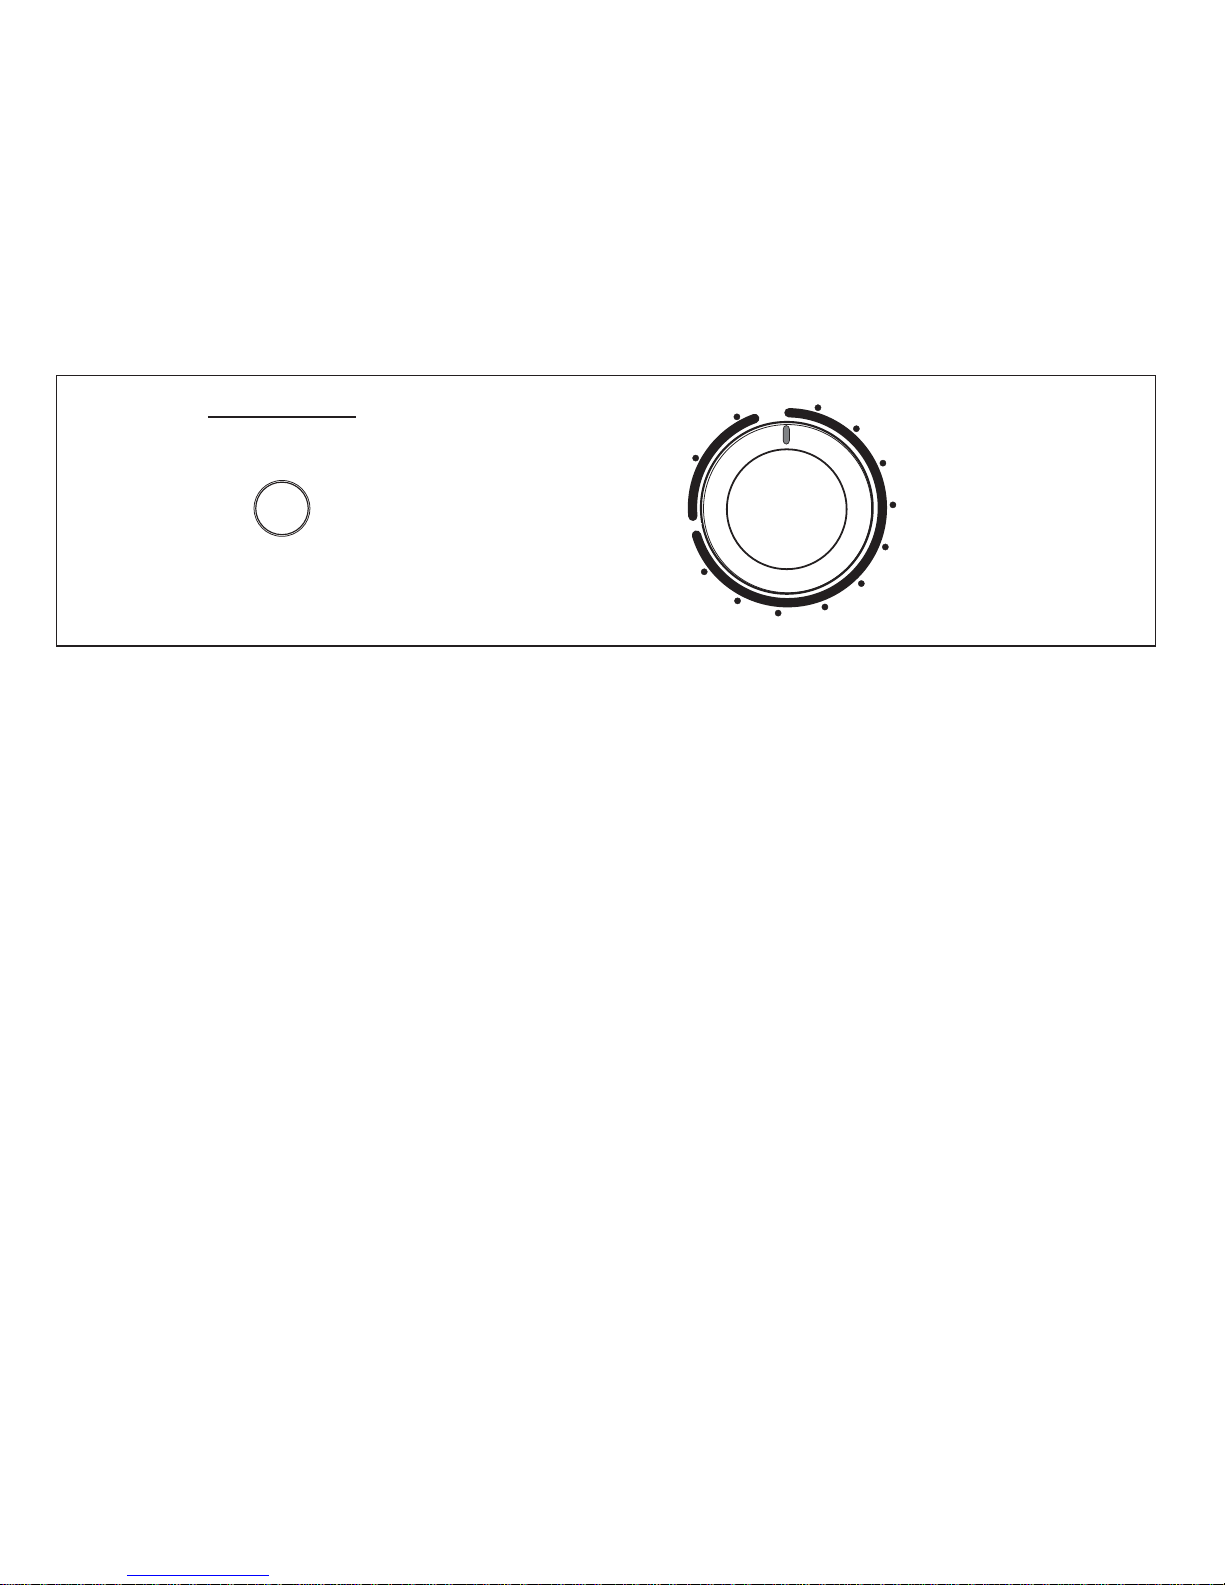
Timed Dry (Tiempo de secado)
Este ciclo ofrece hasta 100 minutos de tiempo
de secado a calor alto para prendas normales
y de planchado permanente.
Cuando se secan artículos de planchado
permanente, gire el selector de ciclos entre
40-50 minutos. Este es el tiempo promedio
necesario para secar la mayoría de las cargas
con artículos de planchado permanente.
La carga cae sin calor durante los 10
minutos pasados de Ciclo Tiempo de
Secado. Utilice este ajuste para refrescar la
ropa, las almohadillas o las mantas o para
sacar el polvo de los draperies. Los artículos
sensibles al calor tales como plásticos,
caucho de la espuma o materiales o
artículos parecidos a la goma
semejantemente textured conteniendo
plumas o abajo se deben secar solamente
con este ajuste.
Selección de Ciclo (continuación)
Auto Dry (Automático secado)
Este es el mejor ciclo para prendas de regular
ó planchado permanente que pueden secarse
a calor alto. El tiempo de secado es
determinado automáticamente.
• Para artículos que requieren mayor tiempo
de secado, coloque el selector en MORE
DRY (MAS SECO/BLANCO O COLORES).
• Para artículos que requieren menos tiempo
de secado, coloque el selector en LESS DRY
(MENOS SECO/PUNTOS O ROPA
DELICADA).
LESS DRY
MORE DRY
COOL DOWN
20
30
40
50
60
70
80
90
100
AUTO DRY
TIMED DRY
COOL DOWN
START
Cuando las prendas están secas, el calor
automáticamente se apaga y la carga sigue
dando vueltas por aproximadamente 5
minutos sin calor.
10
 Loading...