

Page 1
Contents
Product Registration
2
Versión en español
2
IMPORTANT SAFETY INSTRUCTIONS
3
IMPORTANT SAFETY INSTRUCTIONS
4
Setting the Clock and Minute
Timer
5
Setting Surface Controls
6
Before Setting Oven Controls
7
Setting Oven Controls
8
Setting Oven Controls
8
Oven Cleaning
9
Oven Cleaning
10
General Cleaning
11
General Cleaning
12
General Cleaning
13
Changing Oven Light
13
Avoid Service Checklist
14
P/N 316000289 (9902)
Page 2
Product Registration
Register Your Product
The self-addressed PRODUCT
REGISTRATION CARD should be filled
in completely, signed and returned to
Frigidaire Home Products.
Thank you for choosing this appliance. The information contained within
this Owner's Guide will instruct you on how to properly operate and care for
your range. Please read through the information contained in your literature
pack to learn more about your new appliance.
Record Your Model and Serial Numbers
Record in the space provided below the model and serial numbers found on the
serial plate located under the lift-up cooktop.
Model Number: _____________________________________________________
Serial Number: ______________________________________________________
Date of Purchase: ___________________________________________________
Versión en español
Si desea obtener una copia en español
de este Manual del Usuario, sírvase
escribir a la dirección que se incluye a
continuación. Solicite la P/N
316000289S.
Spanish Owner's Guides
Frigidaire Company
P. O. Box 9061
Dublin, Ohio 43017-0961
This Owner's Guide contains general operating instructions for your range
and feature information for several models. Your range may not have all the
described features.
Note: The instructions appearing in this Owner's Guide are not meant to
cover every possible condition and situation that may occur. Common sense
and caution must be practiced when installing, operating and maintaining
any appliance.
© 1998 White Consolidated Industries
All rights reserved
2
Page 3
IMPORTANT SAFETY INSTRUCTIONS
Read all instructions before using this appliance.
Save these instructions for future reference.
This guide contains important safety symbols and instructions. Please pay attention to these symbols and follow all instructions given.
Here is a brief explanation of the use of these symbols.
This symbol will help alert you to situations that may cause serious bodily harm, death or property damage.
This symbol will help alert you to situations that may cause bodily injury or property damage.
Remove all tape and packaging before using the range.
Destroy the carton and plastic bags after unpacking the range.
Never allow children to play with packaging material.
Proper InstallationBe sure your appliance is properly
installed and grounded by a qualified technician in accordance
with the National Electrical Code ANSI/NFPA No. 70 latest
edition and local electrical code requirements. Install only per
installation instructions provided in the literature package for
this range.
Ask your dealer to recommend a qualified technician and an
authorized repair service. Know how to disconnect the power to
the range at the circuit breaker or fuse box in case of an
emergency.
User servicingDo not repair or replace any part of the
appliance unless specifically recommended in the manuals.
All other servicing should be done only by a qualified technician,
This may reduce the risk of personal injury and damage to the
range.
Never modify or alter the construction of a range by removing
leveling legs, panels, wire covers, anti-tip brackets/screws, or
any other part of the product.
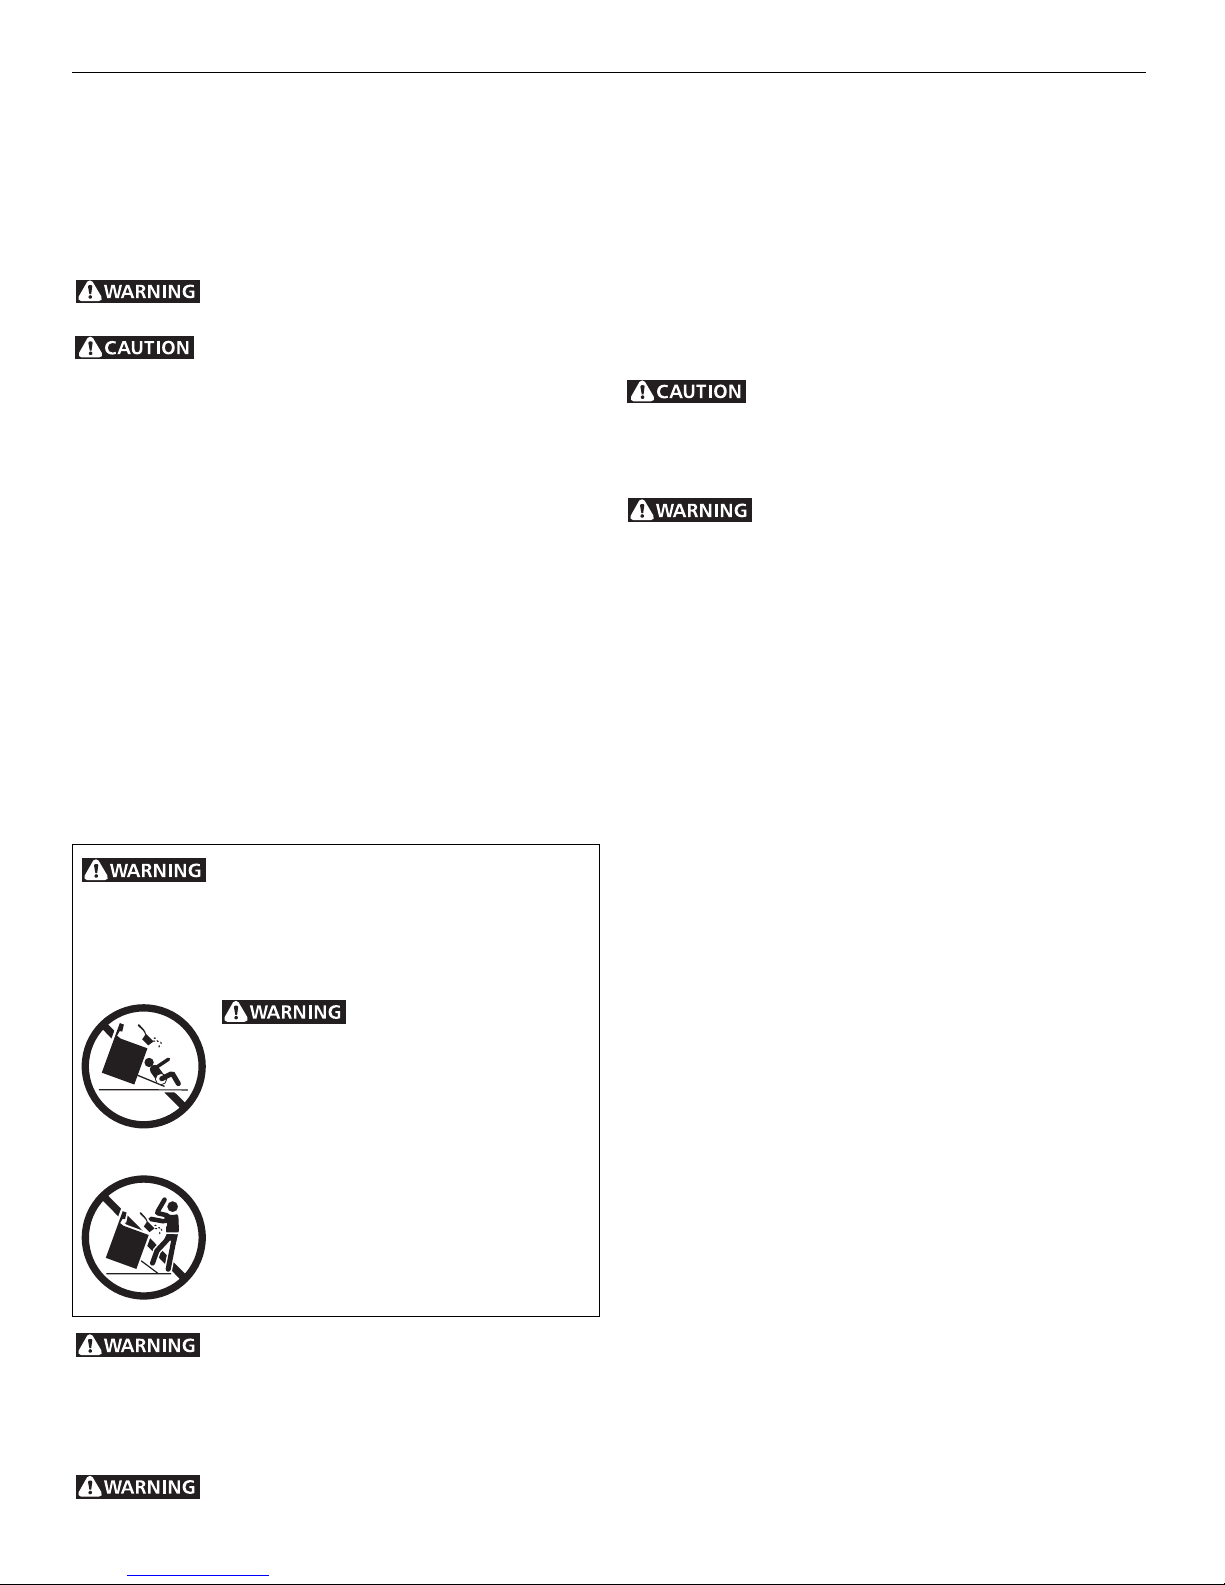
All ranges can tip.
Injury to persons could result.
Install anti-tip device packed with range.
See Installation Instructions.
To reduce the risk of tipping,
the range must be secured by properly installed
anti-tip bracket provide with the range. To
check if the bracket is installed properly, visually
check that rear leveling leg is inserted into and
fully secured by the anti-tip bracket by removing
lower panel or storage drawer. For models
with a warmer drawer, grasp the top rear edge
of the range and carefully attempt to tilt it
forward. Refer to the Installation Instructions
for proper anti-tip bracket installation.
Stepping, leaning or sitting on the doors or
drawers of this range can result in serious injuries and also
cause damage to the range. Do not allow children to climb or
play around the range. The weight of a child on an open door may
cause the range to tip, resulting in serious burns or other injury.
Do not use the oven or warmer drawer for
storage.
Do not store items of interest to children in the
cabinets above a range or on the backguard of a range.
Children climbing on the range to reach items could be seriously
injured.
Never Use Your Appliance for Warming or
Heating the Room.
Storage in or on ApplianceFlammable materials should not
be stored in an oven, warmer drawer, broiler compartment,
near surface units or in the storage drawer. This includes
paper, plastic and cloth items, such as cookbooks, plasticware
and towels, as well as flammable liquids. Do not store explosives,
such as aerosol cans, on or near the range.
Do Not Leave Children AloneChildren should not be left
alone or unattended in the area where appliance is in use.
They should never be allowed to sit or stand on any part of the
appliance.
DO NOT TOUCH SURFACE UNITS, AREAS NEAR THESE UNITS,
HEATING ELEMENTS OR INTERIOR SURFACES OF THE OVEN.
Both surface units and oven heating elements may be hot even
though they are dark in color. Areas near surface units may
become hot enough to cause burns. During and after use, do not
touch, or let clothing or other flammable materials touch these
areas until they have had sufficient time to cool. Among these
areas are the cooktop, surfaces facing the cooktop, the oven
vent openings and surfaces near these openings, oven door and
window.
Wear Proper ApparelLoose-fitting or hanging garments
should never be worn while using the appliance. Do not let
clothing or other flammable materials contact hot surfaces.
Do Not Use Water or Flour on Grease FiresSmother the fire
with a pan lid, or use baking soda, a dry chemical or foamtype extinguisher.
When heating fat or grease, watch it closely. Fat or grease
may catch fire if allowed to become too hot.
Use Only Dry PotholdersMoist or damp potholders on hot
surfaces may result in burns from steam. Do not let potholders
touch hot heating elements. Do not use a towel or other bulky
cloth instead of a potholder.
Do Not Heat Unopened Food ContainersBuildup of pressure
may cause container to burst and result in injury.
Remove the oven door from any unused range if it is to be
stored or discarded.
IMPORTANTDo not attempt to operate the range during a
power failure. If the power fails, always turn off the range. If the
range is not turned off and the power resumes, the range will
begin to operate again. Once the power resumes, reset the clock
and oven function.
3
Page 4

IMPORTANT SAFETY INSTRUCTIONS
IMPORTANT INSTRUCTIONS FOR USING YOUR
COOKTOP
Know which knob controls each surface heating unit. Place
a pan of food on the unit before turning it on, and turn the unit
off before removing the pan.
Use Proper Pan SizeThis appliance is equipped with one or
more surface units of different sizes. Select utensils having flat
bottoms large enough to cover the surface unit heating element.
The use of undersized utensils will expose a portion of the
heating element to direct contact and may result in ignition of
clothing. Proper relationship of utensil to element will also
improve efficiency.
Utensil Handles Should Be Turned Inward and Not Extend
Over Adjacent Surface UnitsTo reduce the risk of burns,
ignition of flammable materials, and spillage due to unintentional
contact with the utensil, the handle of the utensil should be
positioned so that it is turned inward, and does not extend over
adjacent surface units.
Never Leave Surface Units Unattended at High Heat Settings
Boilovers cause smoking and greasy spillovers that may ignite, or
a pan that has boiled dry may melt.
Do Not Immerse or Soak Removable Heating Elements
Heating elements should never be immersed in water. Heating
elements clean themselves during normal operation.
Make Sure Reflector Pans or Drip Bowls Are in PlaceAbsence
of these pans or bowls during cooking may subject wiring or
components underneath to damage.
Protective LinersDo not use aluminum foil to line surface unit
drip bowls, reflector pans, or oven bottom. Only use aluminum
foil as recommended in this manual. Improper installation of
these liners may result in risk of electric shock, or fire. Improper
installation of these liners may result in risk of electric shock, or
fire.
Glazed Cooking UtensilsOnly certain types of glass, glass/
ceramic, ceramic, earthenware, or other glazed utensils are
suitable for cooktop service without breaking due to the sudden
change in temperature. Check the manufacturers
recommendations for cooktop use.
When flaming foods under a ventilating hood, turn the fan
on.
IMPORTANT INSTRUCTIONS FOR USING YOUR
OVEN
Use Care When Opening Oven Door or Warmer Drawer (if
equipped)Stand to the side of the range when opening the
door of a hot oven. Let hot air or steam escape before you
remove or replace food in the oven.
Keep Oven Vent Ducts Unobstructed. The oven vent is located
under the right rear surface element. Touching the surfaces in
this area when the oven is operating may cause severe burns.
Also, do not place plastic or heat-sensitive items on or near the
oven vent. These items could melt or ignite.
Placement of Oven Racks. Always place oven racks in desired
location while oven is cool. If rack must be moved while oven is
hot use extreme caution. Use potholders and grasp the rack with
both hands to reposition. Do not let potholders contact the hot
heating elements in the oven. Remove all utensils from the rack
before moving.
Do not use the broiler pan without its insert. The broiler pan
and its insert allow dripping fat to drain and be kept away from
the high heat of the broiler.
Do not cover the broiler insert with aluminum foil. Exposed
fat and grease could ignite.
IMPORTANT INSTRUCTIONS FOR CLEANING YOUR
RANGE
Clean the range regularly to keep all parts free of grease that
could catch fire. Pay particular attention to the area underneath
each surface element. Do not allow grease to accumulate. Refer
to the hood manufacturers instructions for cleaning.
Kitchen cleaners and aerosolsAlways follow the
manufacturers recommended directions for use. Be aware
that excess residue from cleaners and aerosols may ignite
causing damage and injury.
Clean Ventilating Hoods FrequentlyGrease should not be
allowed to accumulate on the hood or filter. Follow
manufacturers instructions for cleaning.
CONTINUOUS CLEANING OVENS
Do Not Use Oven Cleaners on the oven liner or any of the
continuous cleaning surfaces. Continuous cleaning surfaces
can be identified by their rough surface finish.
SAVE THESE INSTRUCTIONS
4
Page 5
Setting the Clock and
Minute Timer
(some models)
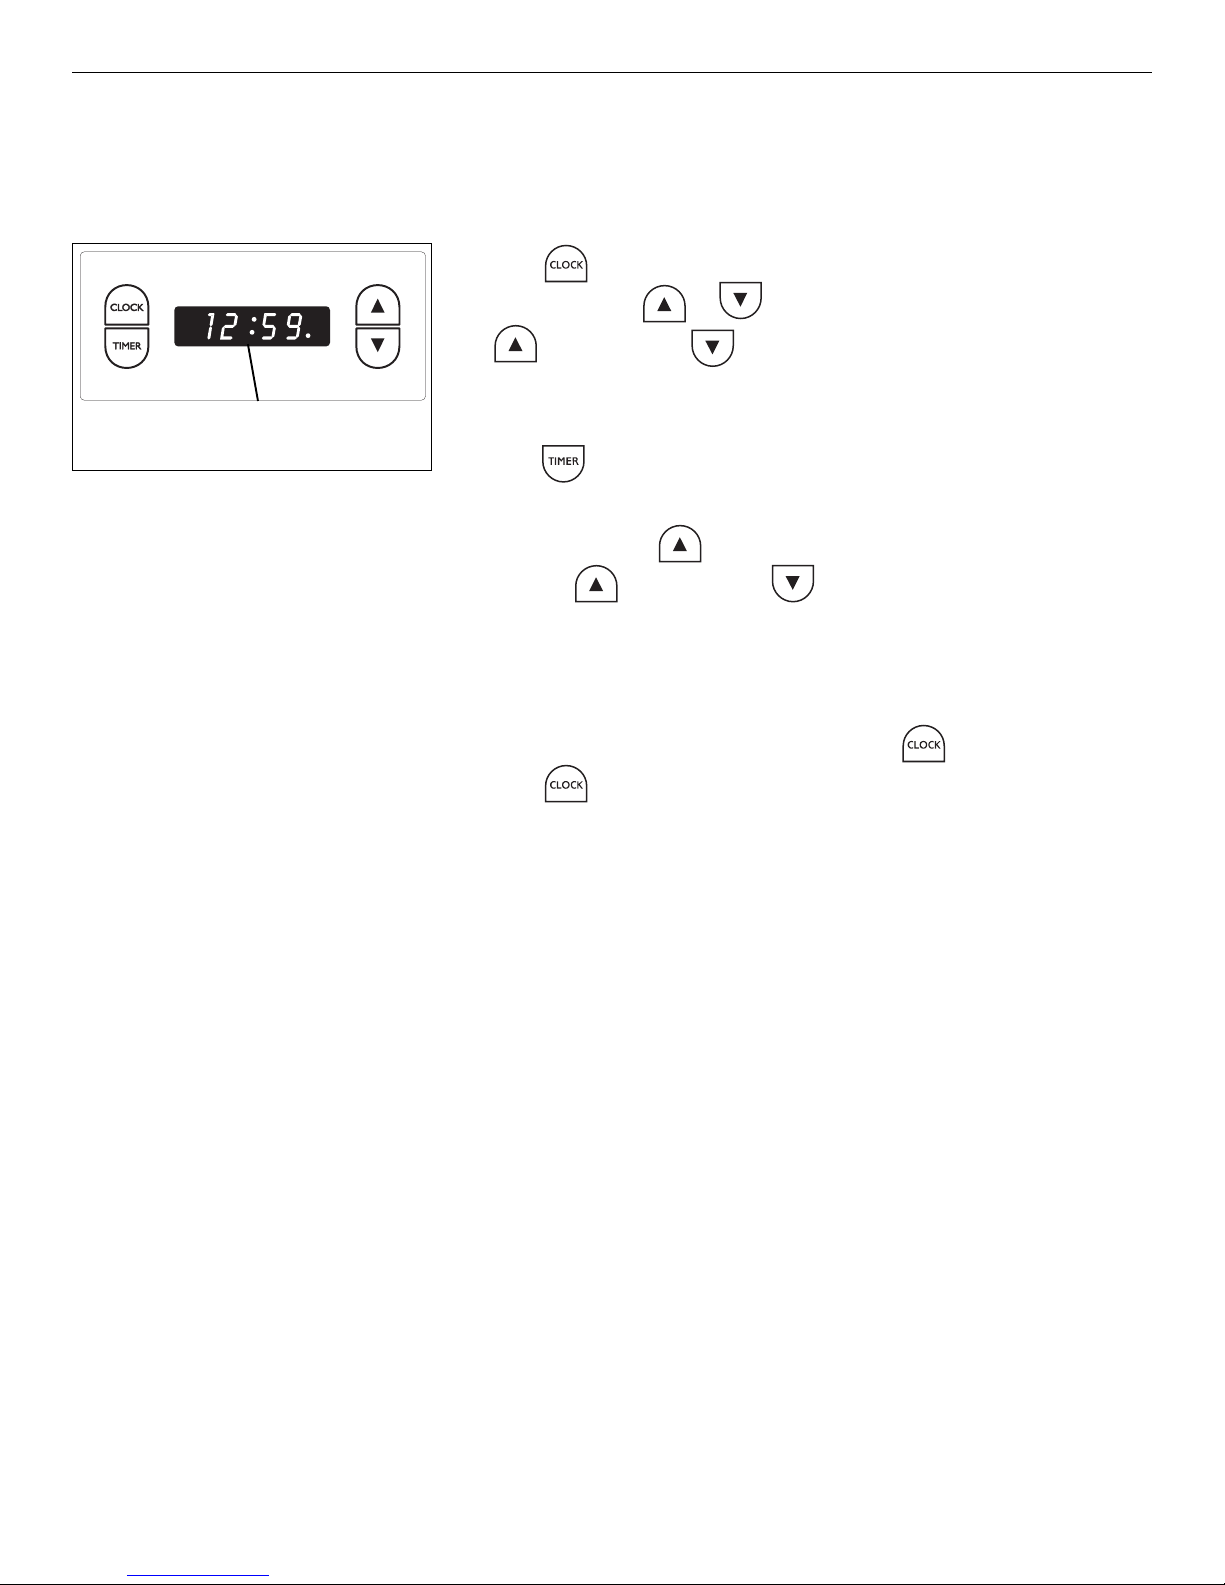
Your model may be equipped with the clock shown below. Follow the
instructions to set the clock and minute timer on your range.
To Set the Clock
When the range is first plugged in, or when the power supply to the range has
been interrupted, "12:00" will flash in the display window.
1. Push .
2. Push in and hold or until the correct time appears in the display.
Advances time, reverses time.
: Flashing indicates
Minute Timer mode
To Set the Minute Timer
1. Push , "0:00" will appear in the display window. The timer can be set
for any amount of time from 00:01 minute to 12:00 hours.
2. Push in and hold until the correct amount of time appears in the
display. Advances time, reverses time. The minute timer will
automatically start when the button is released. The : will flash to
indicate Minute Timer mode.
3. When the set time has passed, the control will display "0:00" and beep three
times. The timer will continue to beep until is pressed.
4. Push to cancel the timer and return to the clock mode.
5
Page 6
Setting Surface
Controls
To Operate the Surface Element
1. Place cooking utensil on the surface element.
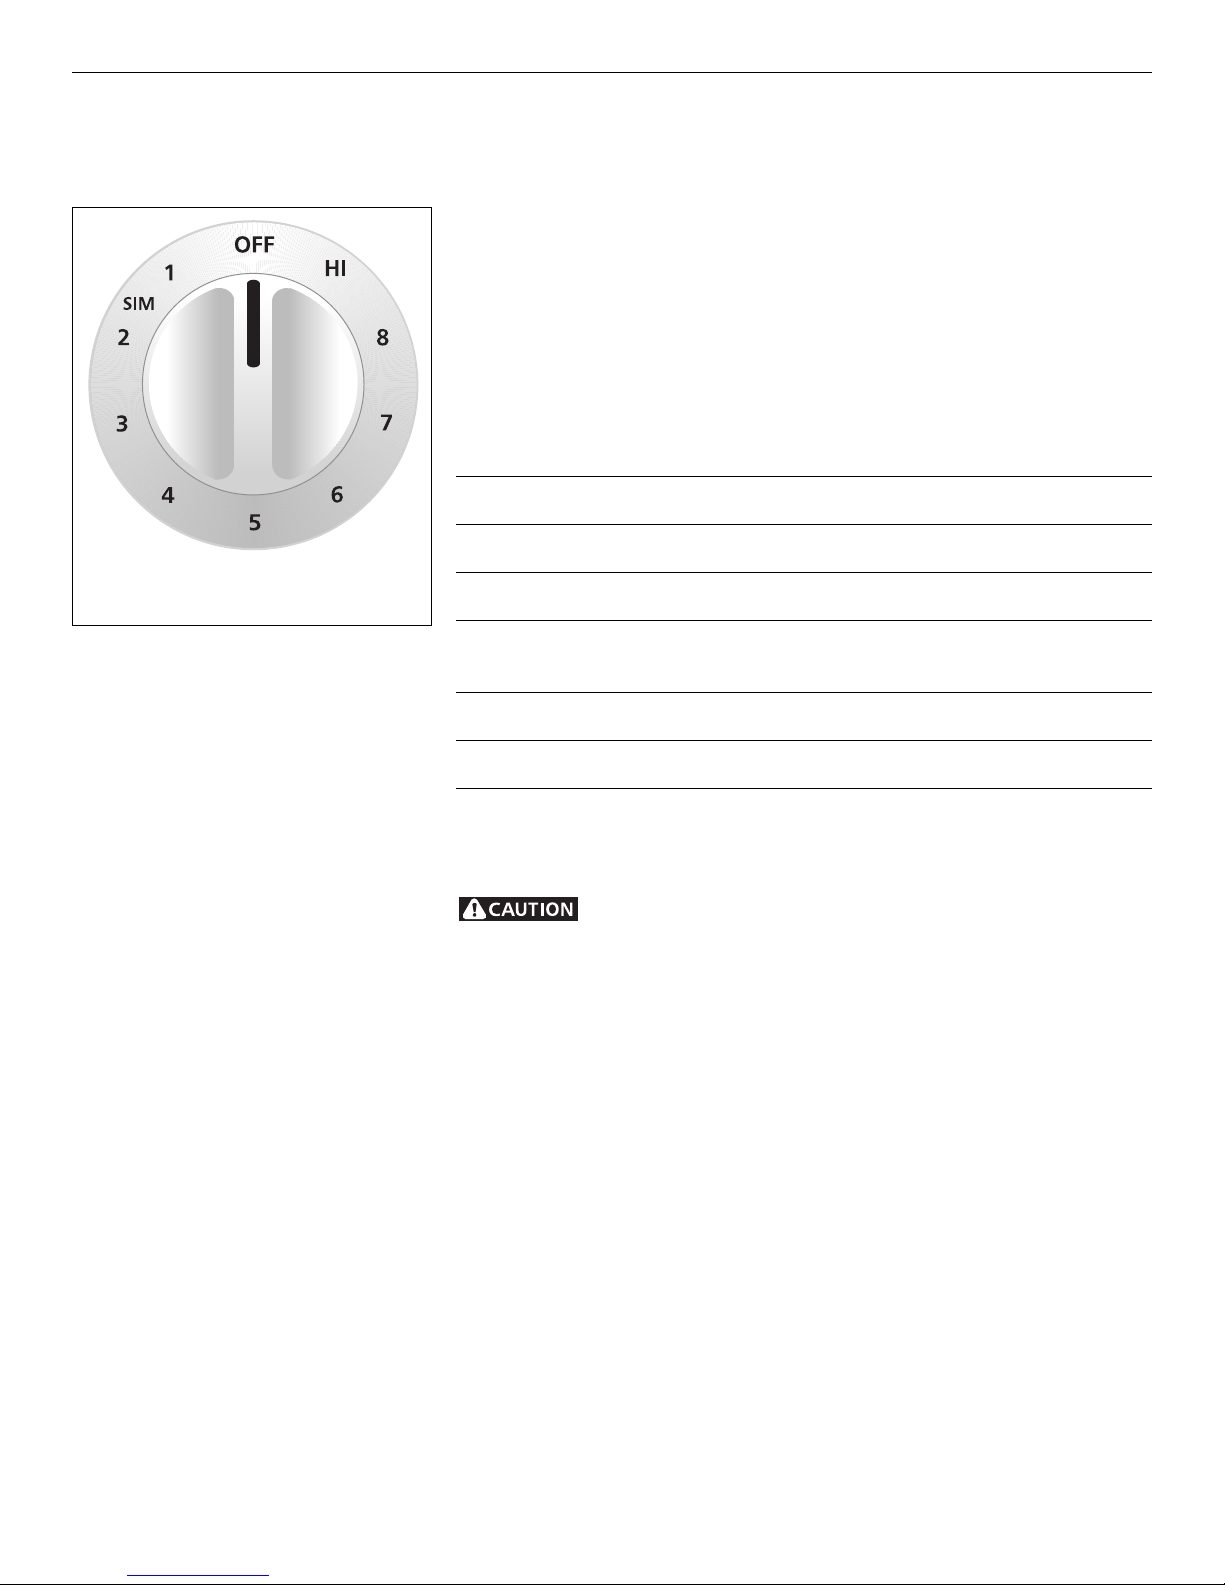
2. Push in and turn the Surface Control knob in either direction to the desired
setting. Start most cooking operations on a higher setting and then turn
to a lower setting to finish cooking. The control knobs do not have to be
set exactly on a particular mark. Use the marks as a guide and adjust the
control knob as needed.
3. When cooking is completed, turn the surface element off before removing
the pan. Note: The surface signal light will glow when one or more
elements are turned on. A quick glance at the signal light(s) when cooking
is finished is an easy check to be sure all control knobs are turned off.
The suggested settings found in the chart below are based on cooking in
medium-weight aluminum pans with lids. Settings may vary when using other
types of pans.
Setting Type of Cooking
HIGH (HI) Start most foods, bring water to a boil, pan broiling
Typical Knob
MEDIUM HIGH (7-8) Continue a rapid boil, fry, deep fat fry
MEDIUM (4-6) Maintain a slow boil, thicken sauces and gravies,
steam vegetables
MEDIUM LOW (2-3) Keep foods cooking, poach, stew
SIMMER (1-SIM) Keep warm, melt, simmer
Note: The size and type of utensil used, and the amount and type of food being
cooked will influence the setting needed for best cooking results.
Do not place plastic items such as salt and pepper shakers, spoon
holders or plastic wrappings on top of the range when it is in use. These items
could melt or ignite. Potholders, towels or wooden spoons could catch fire if
placed too close to the element.
6
Page 7
Before Setting Oven
Controls
Arranging Oven Racks
ALWAYS ARRANGE OVEN RACKS WHEN THE OVEN IS COOL (PRIOR TO
OPERATING THE OVEN). Always use oven mitts when using the oven.
Oven Vent Location
The oven vent is located under the left rear surface element. When the oven
is on, warm air is released through the vents. This venting is necessary for
proper air circulation in the oven and good baking results.
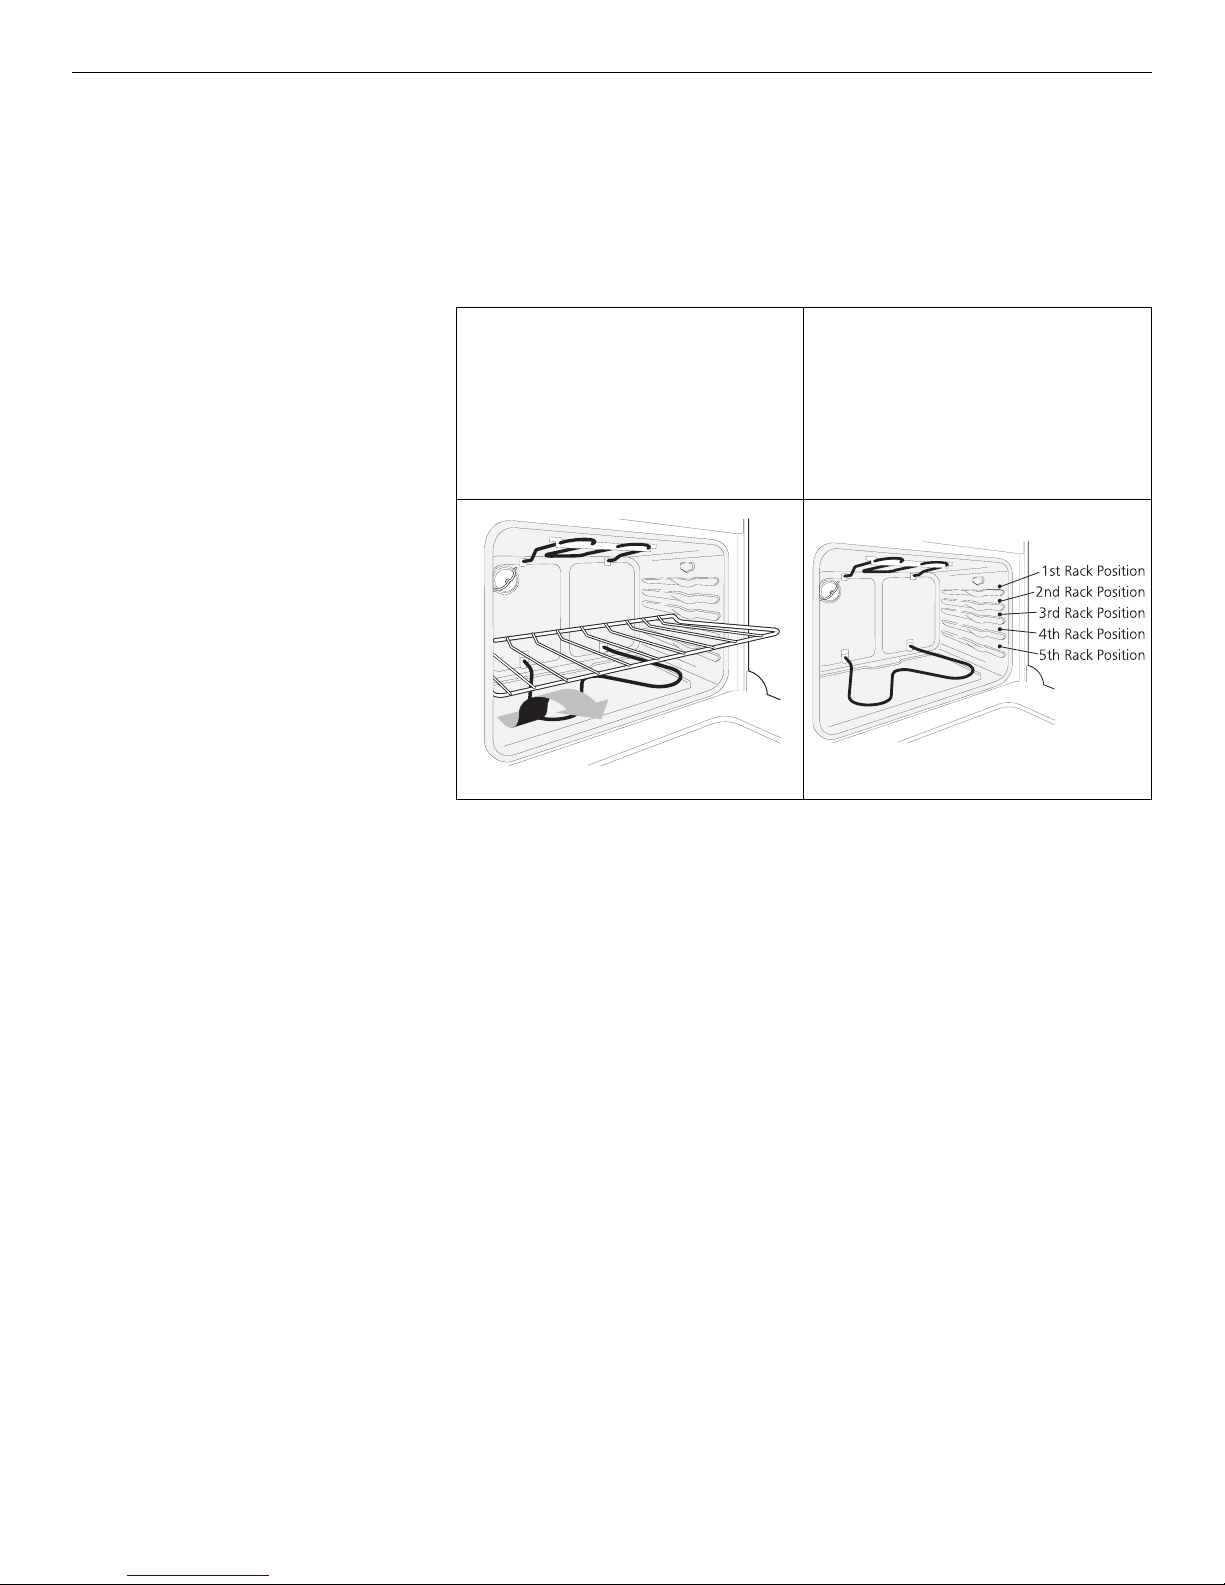
REMOVING & REPLACING OVEN
RACKS
To remove, pull the rack forward until
it stops. Lift up front of rack and slide
out. To replace, fit the rack onto the
guides on the oven walls. Tilt the front
of the rack upward and slide the rack
back into place.
ARRANGING OVEN RACKS WITH 5
RACK POSITIONS
To bake on 1 rack, place the rack on
position 3 or 4. To bake on 2 racks,
place the racks on positions 2 and 4.
7
Page 8
Setting Oven Controls
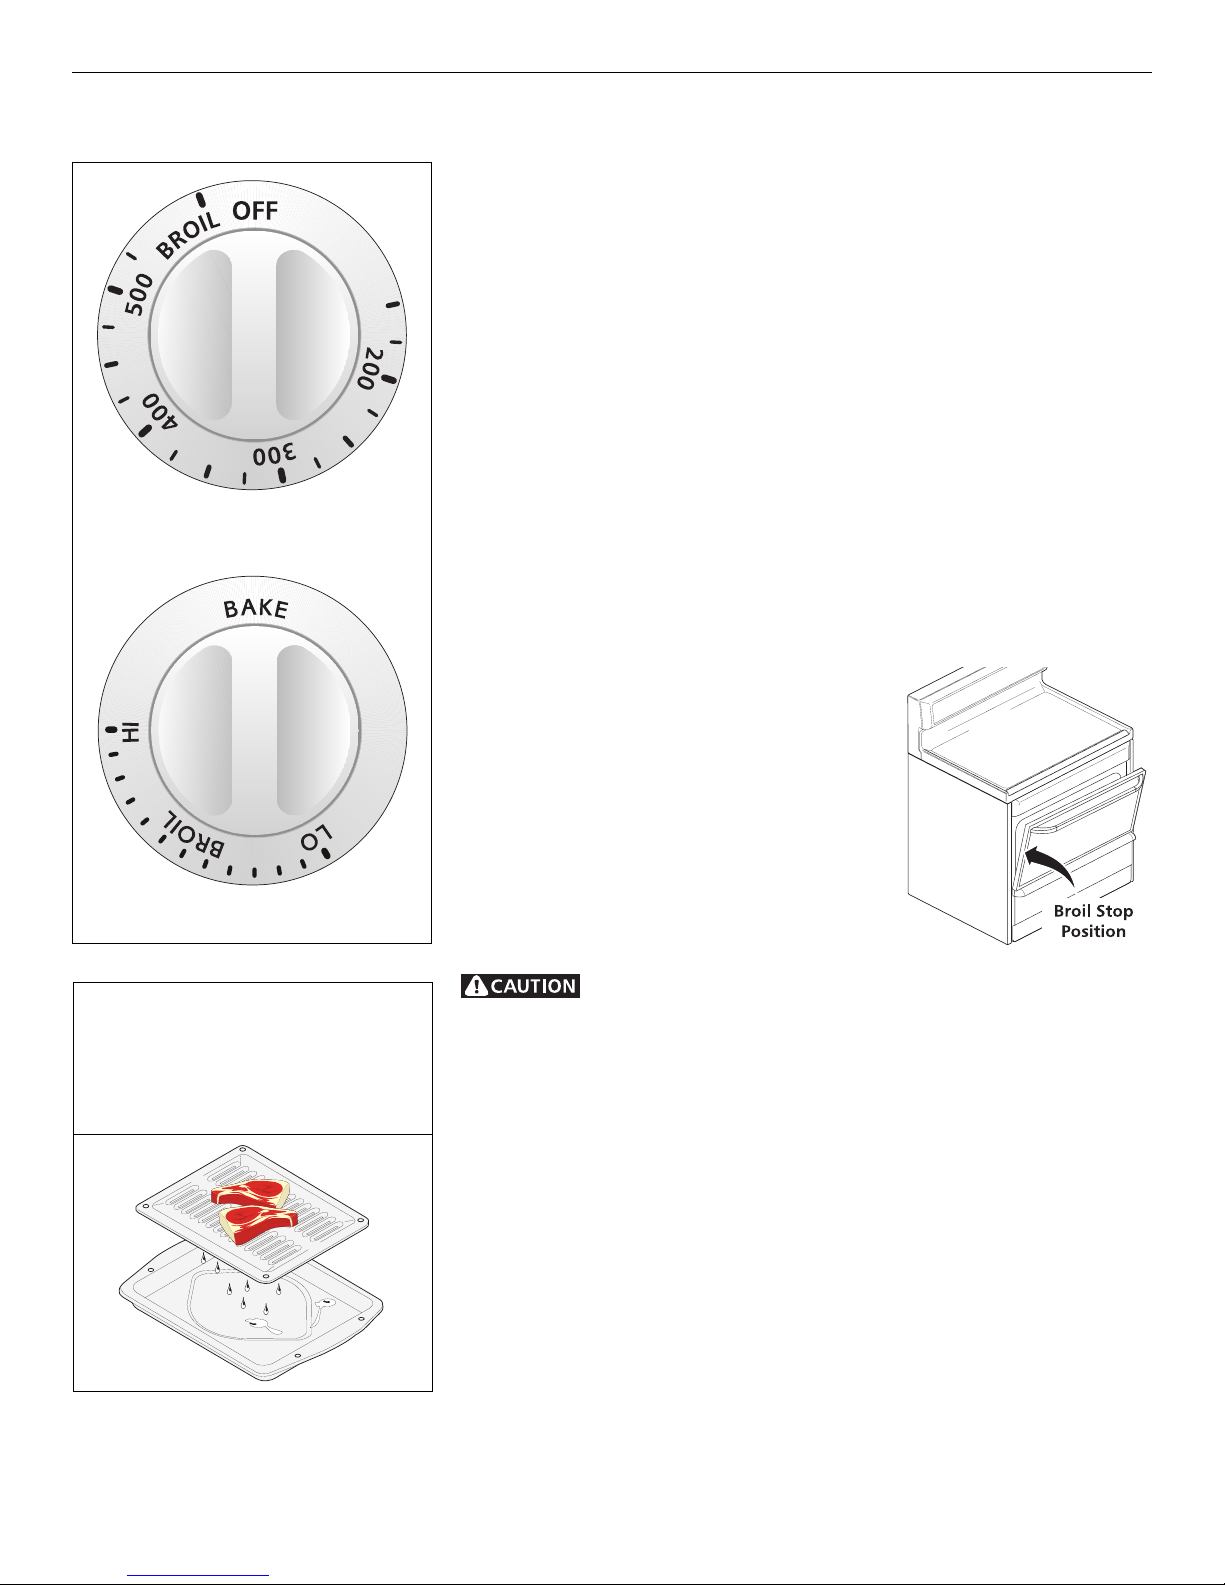
Temperature Control Knob
Selector Knob
To Bake
1. Arrange oven racks while the oven is still cool. See "Arranging Oven Racks'
under Before Setting Oven Controls.
2. Turn the Temperature Control knob to the desired temperature.
3. Turn the Selector knob (if equipped) to BAKE.
4. Preheat the oven for 10 to 12 minutes before baking. Preheating is not
necessary when roasting, cooking casseroles or broiling most foods.
5. When cooking is finished, turn the Temperature Control knob to OFF.
To Broil
1. Arrange oven rack while oven is still cool. For rare meats, position the
broiler pan closer to the element (upper position). For well-cone foods
such as chicken, lobster tails or thick cuts of meat, position the pan further
from the element (lower position).
2. Turn the Temperature Control knob to Broil and the Selector Control knob
to any position between HI Broil and LO Broil. Most foods can be broiled
at the HI Broil Setting. Select a lower broil setting to avoid excess
browning or drying of foods that should be cooked to the well-done
stage. To sear rare steaks, allow the element to become red-hotabout
2 minutesbefore placing food in the oven.
3. Place the grid on the broiler pan, then place the food on the grid. DO NOT
use the broiler pan without the grid or cover the grid with aluminum foil.
The exposed fat could ignite.
4. Place the pan on the oven rack. Leave the
door open at the broil stop position while
broiling. The door will stay in this position
without closing.
5. Broil on one side until food is browned; turn
and cook on the second side. Season and
serve. Note: Always pull the rack out to the
stop position before turning or removing
food.
6. When broiling is finished, turn the
Temperature Control and Selector Control
knobs to OFF.
The broiler pan and its grid allow
dripping grease to drain and be kept
away from the high heat of the broiler.
DO NOT use the pan without its grid.
DO NOT cover the grid with foil. The
exposed grease could ignite.
Should an oven fire occur, close the oven door and turn off the
oven. If the fire continues, throw baking soda on the fire or use a fire
extinguisher. DO NOT put water or flour on the fire. Flour may be explosive.
8
Page 9
Oven Cleaning
Follow these cleaning precautions:
Allow the oven to cool before
cleaning.
Wear rubber gloves when cleaning
the appliance manually.
Porcelain Enamel Oven
Porcelain has a smooth finish and is a type of glass fused to metal. Oven
cleaners can be used on all interior oven surfaces.
General Cleaning
Remove soils using hot, soapy water. Do not allow food spills with a high sugar
or acid content (such as milk, tomatoes, saukerkraut, fruit juices or pie filling)
to remain on the surface as they may cause a dull spot even after cleaning.
REMOVE SPILLOVERS AND HEAVY
SOILING AS SOON AS POSSIBLE.
REGULAR CLEANINGS WILL REDUCE
THE NUMBER OF MAJOR CLEANINGS
LATER.
Ammonia must be rinsed
before operating the oven. Provide
adequate ventilation.
DO NOT line the oven
walls, bottom, racks or any other
part of the appliance with aluminum
foil. Doing so will destroy heat
distribution, produce poor baking
results and cause permanent damage
to the oven interior (aluminum foil
will melt to the interior surface of the
oven).
To Remove Heavy Soil
1. Allow a dish of ammonia to sit in the oven overnight or for several hours
with the oven door closed. Clean softened spots using hot, soapy water.
Rinse well with water and a clean cloth.
2. If soil remains, use a soap-filled scouring pad or a nonabrasive cleaner. If
necessary, use an oven cleaner following manufacturer's instructions. DO
NOT mix ammonia with other cleaners.
3. Clean any soil from the oven frame, the door liner outside the oven door
gasket and the small area at the front center of the oven bottom. Clean
with hot, soapy water. Rinse well using clean water and a cloth.
Adhere to the following precautions when using oven cleaners:
1. DO NOT spray on the electrical controls or switches because it could cause
a short circuit and result in sparking or fire.
2. DO NOT allow a film from the cleaner to build up on the temperature
sensing bulb; it could cause the oven to heat improperly. (The bulb is
located in the rear of the oven.) Carefully wipe the bulb clean after each
oven cleaning, being careful not to move the bulb. A change in its position
could affect how the oven bakes. Avoid bending the bulb and capillary
tube.
3. DO NOT spray any cleaner on the oven door trim or gasket, broiler drawer
glides, handles or any exterior surfaces of the range, plastic or painted
surfaces. The cleaner can damage these surfaces.
9
Page 10
Oven Cleaning
(continued)
Adhere to the following cleaning
precautions:
Allow the oven to cool before
cleaning.
Wear rubber gloves when cleaning
the appliance manually.
REMOVE SPILLOVERS AND HEAVY
SOILING AS SOON AS POSSIBLE.
REGULAR CLEANINGS WILL REDUCE
THE NUMBER OF MAJOR CLEANINGS
LATER.
Ammonia must be rinsed
before operating the oven. Provide
adequate ventilation.
DO NOT use oven
cleaners, gritty cleansers, coarse
abrasive pads or brushes, silicone sprays
or metal scrapers on the interior walls,
oven frame or ceiling of a continuous
cleaning oven. Permanent damage to
the oven may result.
Continuous Cleaning Oven (some models)
Continuous cleaning ovens have a special coating which is a porous ceramic
material. This rough coating tends to prevent grease spatters from forming
little beads which run down the side walls leaving streaks that require hand
cleaning. Instead, when spatter hits the porous coating, it disperses and is
partially absorbed. This spreading action increases the exposure of oven soil to
heated air, making it less noticeable.
Soil may not disappear completely. Remaining soil will gradually fade with
continued oven use. The special coating works best on small amounts of
spatter. Larger spills, or spills generating from sugar, egg and dairy mixtures,
do not clean as well.
If difficult soils occur:
1. Remove the oven racks and cookware.
2. Remove soils by completing steps a or b below:
a) Use hot, soapy water and wash soils using a nylon-bristly brush or a nylon
mesh scouring pad. DO NOT rub or scrub with paper towels, cloths or
sponges. They will leave lint on the oven coating.
b) Apply ammonia with a sponge and dab it into the porous coating. Leave
the ammonia on the soiled area for 30 minutes.
3. Rinse with clear water.
4. Close the oven door and push in and turn the Temperature Control knob
to 450°F (230°C).
5. Operate oven for 15 minutes.
6. Remaining soil will fade with continued oven use.
DO NOT line the oven
walls, bottom, racks or any other part
of the appliance with aluminum
foil. Doing so will destroy heat
distribution, produce poor baking
results and cause permanent damage
to the oven interior (aluminum foil will
melt to the interior surface of the oven).
10
Page 11
General Cleaning
Cleaning Various Parts of Your Range
Before cleaning any part of the range, be sure all controls are turned OFF and
the range is cool. Remove spillovers and heavy soiling as soon as possible.
Regular cleanings will reduce the effort required for major cleanings later.
Surfaces
Aluminum (Trim Pieces) & Vinyl
Glass, Painted and Plastic Control
Knobs, Body Parts, and Decorative
Trim
Stainless Steel, Chrome Control Panel,
Decorative Trim
How to Clean
Use hot, soapy water and a cloth. Dry with a clean cloth.
For general cleaning, use hot, soapy water and a cloth. For more difficult soils
and built-up grease, apply a liquid detergent directly onto the soil. Leave on
soil for 30 to 60 minutes. Rinse with a damp cloth and dry. DO NOT use
abrasive cleaners on any of these materials; they can scratch. To remove
control knobs, turn to the OFF position; grasp firmly and pull straight off the
shaft. To replace knobs after cleaning, line up the flat sides of both the knob
and the shaft; then push the knob into place.
Before cleaning the control panel, turn all controls to OFF and remove the
control knobs. To remove, pull each knob straight off the shaft. Clean using
hot, soapy water and a dishcloth. Rinse with a clean water and a dishcloth.
Cover stubborn spots with an ammonia-soaked paper towel for 30 to 40
minutes. Rinse. Be sure to squeeze excess water from the cloth before wiping
the panel; especially when wiping around the controls. Excess water in or
around the controls may cause damage to the appliance. Cleaners made
especially for stainless steel such as Stainless Steel Magic, trademark of Magic
American Corp., or similar products are recommended. Always follow the
manufacturer's instructions. Be sure to rinse the cleaners as bluish stains may
occur during heating and cannot be removed. To replace knobs after cleaning,
line up the flat sides of both the knob and the shaft; then push the knob into
place.
Porcelain Enamel Broiler Pan and
Insert, Door Liner, Body Parts, Warmer
Drawer (if equipped)
Oven Racks
Oven Door
Gentle scouring with a soapy scouring pad will remove most spots. Rinse with
a 1:1 solution of clear water and ammonia. If necessary, cover difficult spots
with an ammonia-soaked paper towel for 30 to 40 minutes. Rinse with clean
water and a damp cloth, and then scrub with a soap-filled scouring pad. Rinse
and wipe dry with a clean cloth. Remove all cleaners or the porcelain may
become damaged during future heating. DO NOT use spray oven cleaners on
the cooktop.
Oven racks may be removed or left in the oven during the self-clean cycle for
cleaning. If removed, clean by using a mild, abrasive cleaner following
manufacturer's instructions. Rinse with clean water and dry.
If the racks are cleaned in the self-clean cycle, their color will turn slightly blue
and the finish will be dull. After the self-clean cycle is complete, and the oven
has cooled, rub the sides of the racks with wax paper or a cloth containing a
small amount of baby oil or salad oil (this will make the racks glide easier into
the rack positions).
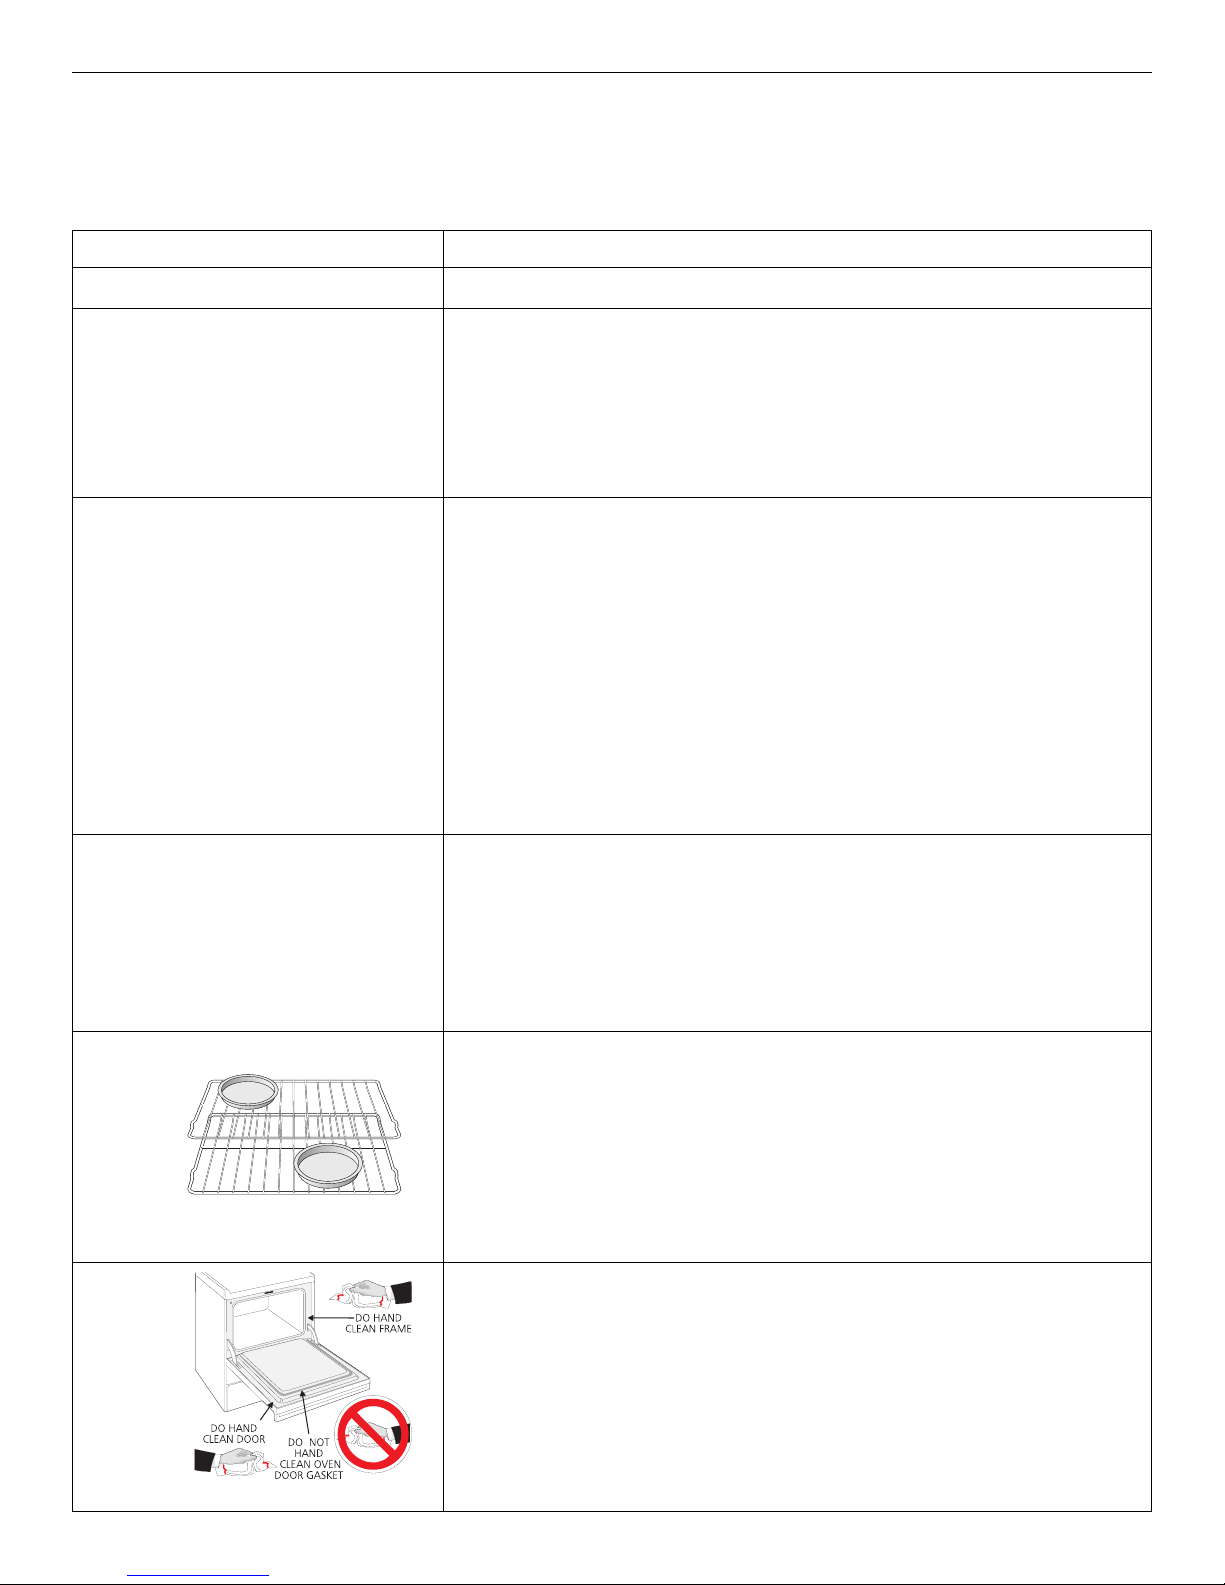
To clean oven door, wash with hot, soapy water and a clean cloth. DO NOT
immerse the door in water.
DO NOT clean the oven door gasket. The oven door gasket is made of a silicone
rubber material which is essential for a good seal. Care should be taken not
to rub, damage or remove the gasket.
11
Page 12
General Cleaning
(continued)
Be sure the range is cool
before removing elements or drip bowls.
Be careful not to bend terminal ends
when replacing elements after cleaning.
Surface Elements and Drip Bowls
Surface elements can be unplugged and removed to make cleaning the drip
pans easier. The surface elements clean themselves when they are turned on.
Food spilled on a hot element will burn off. Food spilled on a cool element may
be cleaned with a damp clothany remaining soil will burn off the next time
the element is used.
Never immerse a surface element in water.
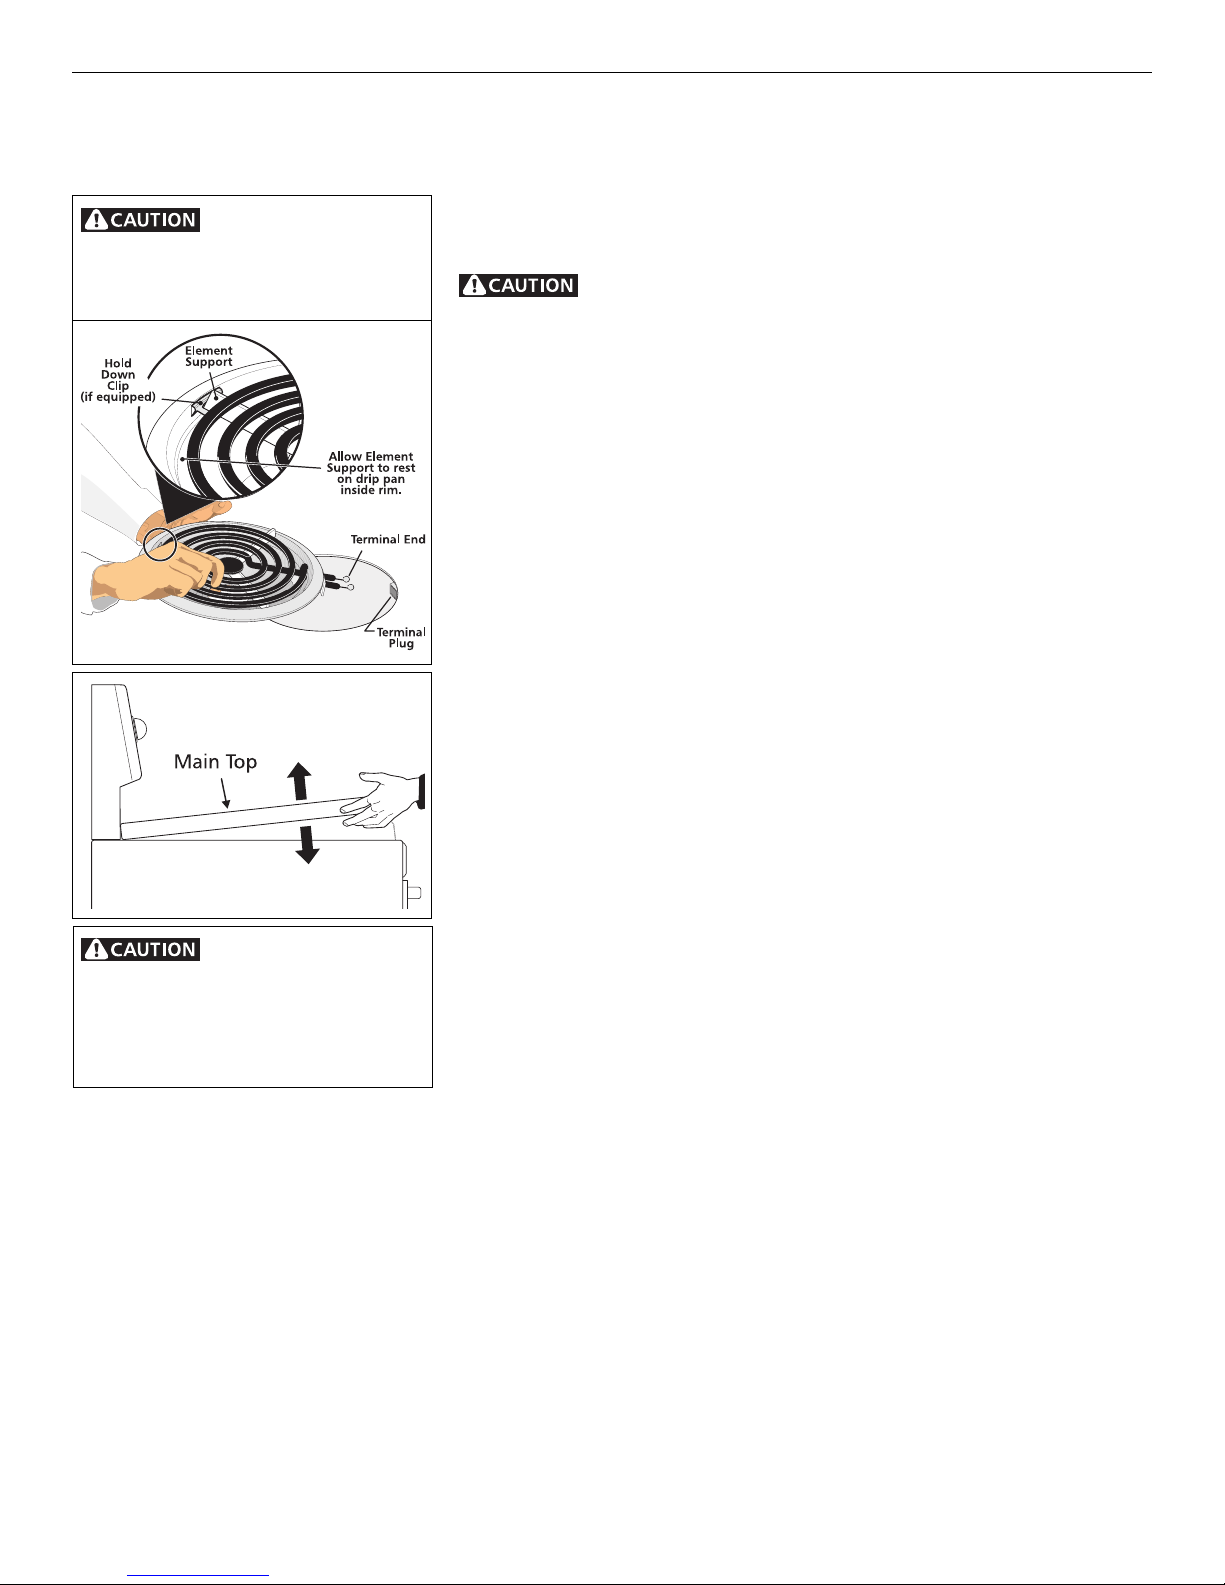
To Remove the Surface Elements and Drip Bowls
1. Lift the edge of the drip bowl across from the terminal end. Lift the surface
element and drip bowl together just enough to clear the cooktop.
2. While holding the drip bowl and surface element, gently pull the terminal
end out from the terminal plug. If equipped, DO NOT remove the hold
down clip from the drip bowl.
To Clean Drip Bowls
Wash in hot, soapy water or in the dishwasher. Rinse and dry while still warm.
Hard to remove, burned on soil can be removed by soaking the drip bowls for
about 20 minutes in a lightly diluted liquid cleanser or a solution of ammonia
and water (1/2 cup ammonia to 1 gallon of water). A nylon scrubber may be
used after soaking. DO NOT use abrasive cleaners or steel wool, as they will
scratch the surface. Always rinse with clean water and polish dry with a soft
cloth.
When lowering the liftup range top, grasp the sides with
finger-tips only. Be careful not to pinch
fingers. DO NOT drop or bend the
range top when raising or lowering.
This could damage the surface.
To Replace Drip Bowls and Surface Elements
1. Slide the terminal end on the element through the opening in the drip
bowl.
2. Align the element support to rest on the rim inside the drip bowl. If your
drip bowl is equipped with a hold down clip, align the element support
opposite the terminal end with the slot in the hold down clip, and snap into
place.
3. After the element is positioned in the drip bowl, line up the terminal end
with the terminal plug as shown.
4. Hold the surface element and drip bowl together as level as possible and
firmly push the terminal end into the terminal plug. Make sure element
terminal is seated properly into terminal plug. Make sure the surface
element is level to reduce the hazard of pans sliding off the element.
To Raise the Top for Cleaning
1. Grasp the sides and lift from the front. Lift-up rods will support the top in
its raised position. Only lift the top high enough to allow the support rods
to snap into place.
2. Clean underneath using a clean cloth and hot, soapy water.
3. To lower the top, gently push back on each rod to release the notched
support. Hold the range top and slide the range top down into the range
frame.
12
Page 13
General Cleaning
(continued)
The door is heavy. For
safe, temporary storage, lay the door
flat with the inside of the door facing
down.
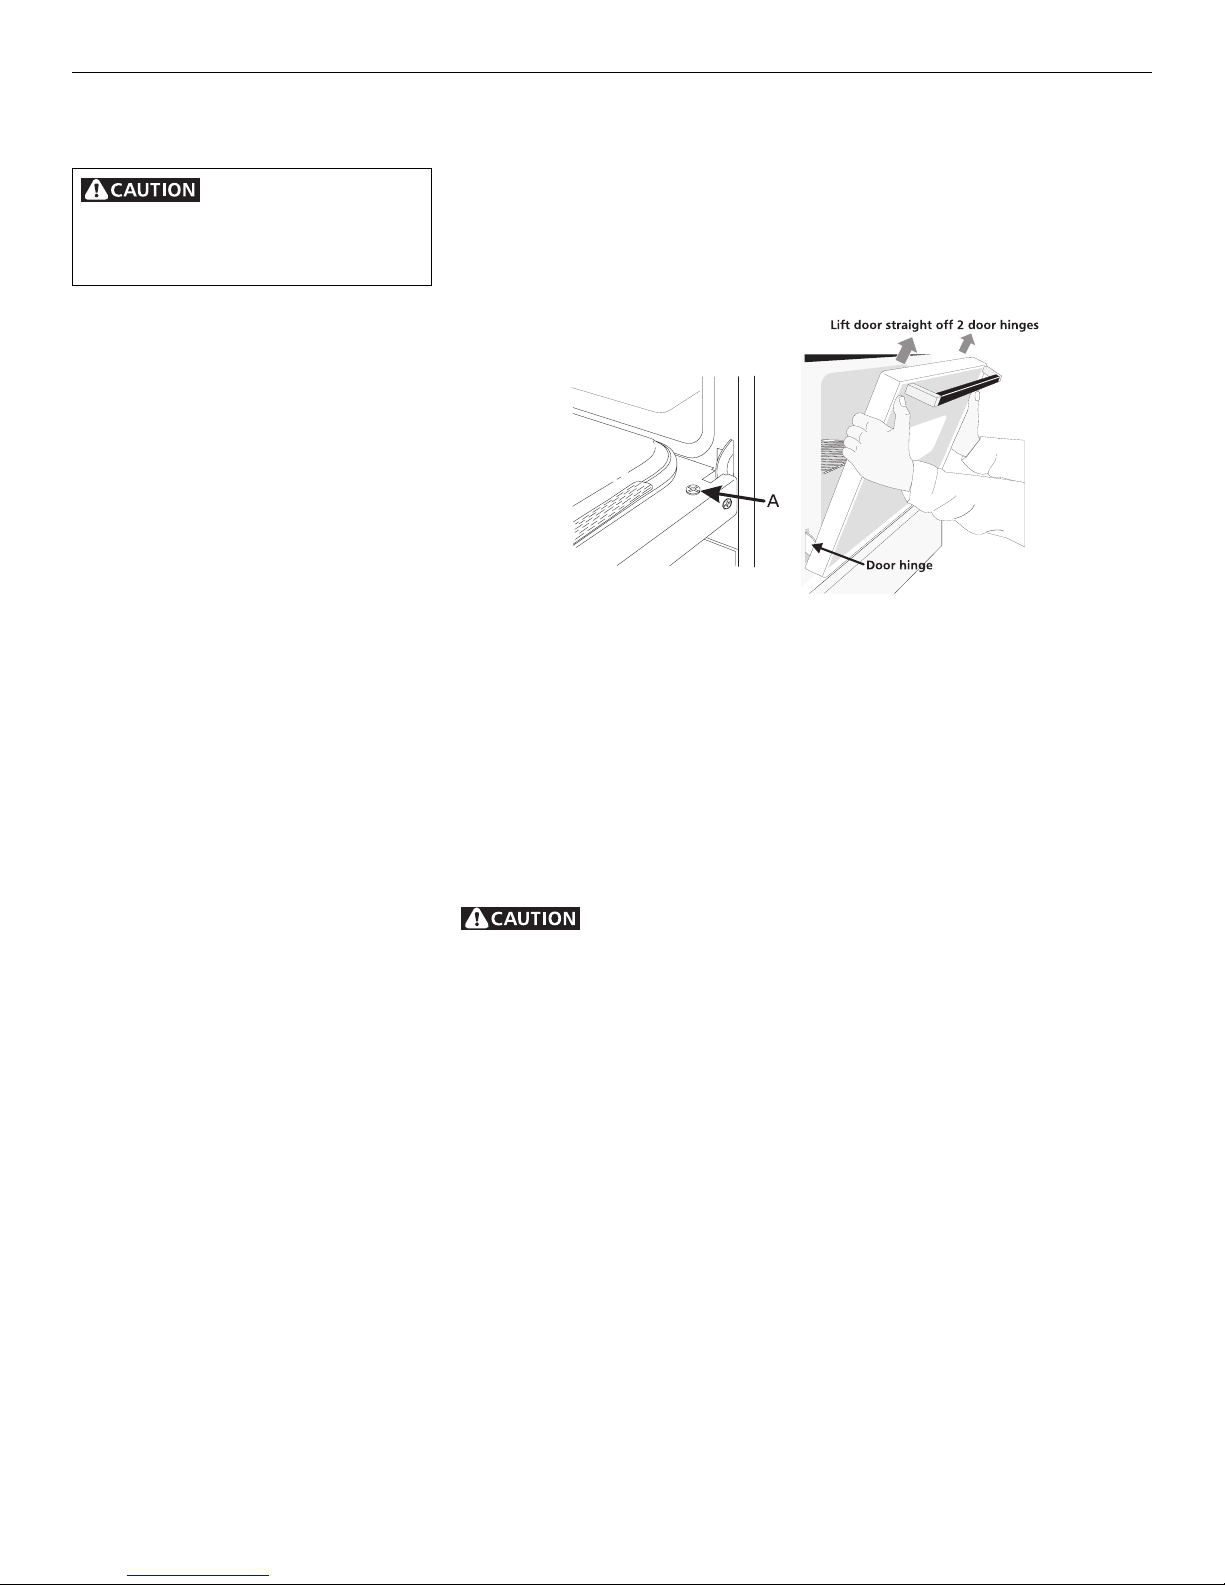
To Remove and Replace Oven Door
To Remove Oven Door:
1. Open the door.
2. Remove screws located on the inside of the oven door near the hinges A
(one on each side.)
3. Close the door to the quarter-open position. Grasp the door firmly on both
sides and lift up and off the hinges.
4. To clean oven door, follow the instructions provided in the cleaning chart
under General Cleaning
To Replace Oven Door:
1. Be sure the hinge arms are in the quarter-open position. Be careful if pulling
the hinges open by hand. The hinges may snap back against the oven frame
and could pinch fingers.
2. Hold the door at the sides near the top. Insert the hinge arms into slots at
the bottom of the door.
3. Hinge arms must go into the range slots evenly. The hinge arms should be
inserted into the bottom corners of the door as far as they can go.
4. If the door is not in line with the oven frame, remove it and repeat the above
steps.
Changing Oven Light
(some models)
Be sure the range is unplugged and all parts are COOL before
replacing the surface or oven lights. Wear a leather-faced glove for protection
against possible broken glass.
To Change the Oven Light (some models)
On some models, the oven light automatically turns on when the door is
opened. Some models have a switch located on the control panel to turn on
the light. The oven light is located at the rear of the oven.
To replace the oven light:
1. Turn electrical power off at the main source or unplug the range.
2. Replace bulb with a new 40 watt appliance bulb.
3. Turn power back on again at the main source (or plug the range back in).
4. The clock(if equipped) will then need to be reset. To reset, see Setting the
Clock and Minute Timer in this Owner's Guide.
13
Page 14

Avoid Service Checklist
Before you call for service, review this list. It may save you time and expense.
The list includes common occurrences that are not the result of defective
workmanship or materials in this appliance.
OCCURRENCE
Range is not level.
Cannot move appliance easily.
Appliance must be accessible for
service.
Surface element too hot or not hot
enough.
POSSIBLE CAUSE/SOLUTION
Poor installation. Place oven rack in center of oven. Place a level on the oven
rack. Adjust leveling legs at base of range until the oven rack is level.
Be sure floor is level and is strong and stable enough to adequately support
range.
If floor is sagging or sloping, contact a carpenter to correct the situation.
Kitchen cabinet alignment may make range appear unlevel. Be sure cabinets
are square and have sufficient room for range clearance.
Cabinets not square or are built in too tightly. Contact builder or installer to
make appliance accessible.
Carpet interferes with range. Provide sufficient space so range can be lifted
over carpet.
Incorrect control setting. Make sure the correct control is on for the surface
element to be used.
Lightweight or warped pans used. Use only flat, evenly balanced, medium or
heavyweight cookware. Flat pans heat better than warped pans. Cookware
materials and weight of the material affect heating. Heavy- and mediumweight pans heat evenly. Because lightweight pans heat unevenly, foods may
burn easily.
Surface element does not heat.
Entire appliance does not operate.
Cooktop and/or oven light (some
models) does not work.
No power to the appliance. Check steps under "Entire Appliance Does Not
Operate" in this Avoid Service Checklist.
Incorrect control setting. Make sure the correct control is on for the surface
element to be used.
Element not making contact in block. Follow instructions under "Surface
Elements and Drip Bowls" in the General Cleaning section.
Make sure cord/plug is plugged tightly into outlet.
Service wiring is not complete. Contact your dealer, installing agent or
authorized servicer.
Power outage. Check house lights to be sure. Call your local electric company
for service.
Replace or tighten bulb. See Changing Cooktop and/or Oven Lights (some
models) in this Owner's Guide for instructions.
14
Page 15

Oven smokes excessively during
broiling.
Control(s) not set properly. Follow instructions under Setting Oven Controls.
Make sure oven door is opened to broil stop position.
Meat too close to the element. Reposition the rack to provide proper clearance
between the meat and the element. Preheat broil element for searing.
Meat not properly prepared. Remove excess fat from meat. Cut remaining fatty
edges to prevent curling, but do not cut into lean.
Grid on broiler pan wrong side up and grease not draining. Always place grid
on the broiler pan with ribs up and slots down to allow grease to drip into pan.
Grease has built up on oven surfaces. Regular cleaning is necessary when
broiling frequently. Old grease or food spatters cause excessive smoking.
Poor baking results.
Drip bowls are pitting or rusting.
Drip bowls turning color or distorted.
Many factors affect baking results. Make sure the proper rack position is used.
Center food in the oven and space pans to allow air to circulate. Allow the oven
to preheat to the set temperature before placing food in the oven. Try adjusting
the recipe's recommended temperature or baking time. If you feel the oven is
too hot or cool, see Adjusting Oven Temperature in this Owner's Guide.
Foods with acids, such as tomatoes, if allowed to stand in/on bowls will cause
corrosion. Remove and wash drip bowls as soon as possible after a spillover
Normal environment. Houses along sea coast are exposed to salt air. Protect
bowls as much as possible from direct exposure to salt air.
Bottom surface of cookware extends beyond surface elements and touches
cooktop surface. This can cause high enough temperatures to discolor the drip
bowls. DO NOT use cookware of this type. Pan sizes should be matched to the
size of the element. Replacement drip bowls may be purchased from your
dealer.
15
Page 16
FRIGIDAIRE RANGE WARRANTY
Your Frigidaire product is protected by this warranty
THE CONSUMER WILL BE
RESPONSIBLE FOR:
FULL ONE-YEAR
WARRANTY
LIMITED WARRANTY
(Applicable to the
State of Alaska)
WARRANTY
PERIOD
One year from original
purchase date.
Time period listed above.
FRIGIDAIRE, THROUGH ITS AUTHORIZED
SERVICERS, WILL:
Pay all costs for repairing or replacing any parts of this
appliance which prove to be defective in materials or
workmanship.
All of the provisions of the full warranty above and the
exclusions listed below apply.
Costs of service calls that are listed under NORMAL
RESPONSIBILITIES OF THE CONSUMER.*
Costs of the technician's travel to the home and any
costs for pick up and delivery of the appliance
required because of service.
Your appliance is warranted by Frigidaire Home Products, a division of White Consolidated Industries, Inc. We authorize no person to change or add to
any of our obligations under this warranty. Our obligations for service and parts under this warranty must be performed by Frigidaire Home Products
Consumer Services or an authorized Frigidaire servicer.
*NORMAL
RESPONSIBILITIES
OF THE CONSUMER
This warranty applies only to products in ordinary household use, and the consumer is responsible for the items listed
below:
1. Proper use of the appliance in accordance with instructions provided with the product.
2. Proper installation by an authorized servicer in accordance with instructions provided with the appliance and in accordance
with all local plumbing, electrical and/or gas codes.
3. Proper connection to a grounded power supply of sufficient voltage, replacement of blown fuses, repair of loose connections
or defects in house wiring.
4. Expenses for making the appliance accessible for servicing, such as removal of trim, cupboards, shelves, etc., which are not
a part of the appliance when it was shipped from the factory.
5. Damages to finish after installation.
6. Replacement of light bulbs and/or fluorescent tubes (on models with these features).
EXCLUSIONS
This warranty does not cover the following:
1. CONSEQUENTIAL OR INCIDENTAL DAMAGES SUCH AS PROPERTY DAMAGE AND INCIDENTAL EXPENSES RESULTING FROM
ANY BREACH OF THIS WRITTEN OR ANY IMPLIED WARRANTY.
Note: Some states do not allow the exclusion or limitation of incidental or consequential damages, so this limitation or
exclusion may not apply to you.
2. Service calls which do not involve malfunction or defects in workmanship or material, or for appliances not in ordinary
household use. The consumer shall pay for such service calls.
3. Damages caused by services performed by persons other than authorized Frigidaire servicers; use of parts other than
Frigidaire Home Products Genuine Renewal Parts; obtained from persons other than such servicers; or external causes such
as abuse, misuse, inadequate power supply or acts of God.
4. Products with original serial numbers that have been removed or altered and cannot be readily determined.
IF YOU NEED
SERVICE
Keep your bill of sale, delivery slip, or some other appropriate payment record. The date on the bill establishes the warranty period
should service be required. If service is performed, it is in your best interest to obtain and keep all receipts. This written warranty
gives you specific legal rights. You may also have other rights that vary from state to state. Service under this warranty must be
obtained by following these steps, in order:
1. Contact Frigidaire Home Products Consumer Services or an authorized Frigidaire servicer.
2. If there is a question as to where to obtain service, call or write our Consumer Relations Department at:
Frigidaire Home Products Consumer Relations
P.O. Box 212378
Augusta, Georgia 30917-2378
(800) 944-9044
Product features or specifications as described or illustrated are subject to change without notice. All warranties are made by
White Consolidated Industries, Inc. This warranty applies only in the 50 states of the U.S.A. and Puerto Rico.
16
 Loading...