

Frigidaire FDB641RAS2 Owner's Guide
Dishwasher
Product Registration Card
Please fill in completely, sign and return promptly!
Use & Care Manual
640 Series
Safety
Instructions......................... 2
Features .............................. 3
Normal Operating
Sounds ................................ 4
Operating
Instructions....................... 4-5
Preparing and
Loading Dishes................. 6-7
Dishwasher Dispenser
and Detergents ................. 8-9
Record All Information For
Future Reference
Brand: Purchase Date:
Model #:
Serial #:
(see Features page f or location)
Questions?
1-800-944-9044
(United States)
1-866-213-9397
(Canada)
Visit our W eb Site at
www.frigidaire.com
Factors Affecting
Performance .......................
9
Care and
Cleaning .............................10
Connecting Portable
Dishwasher .................... 11-12
Solutions to Common
Dishwashing Problems...13-15
Consumer Services
Warranty & Service..............................16
Versión en español
Si desea obtener una copia en español de este Manual del
Usuario, sírvase escribir a la dirección que se incluye a
continuación. Solicite la P/N 154403701, Spanish Use & Care
Manual, Electrolux Home Products North America,
P.O. Box 212378, Augusta, GA 30917.
READ AND SAVE THESE INSTRUCTIONS
1
P/N 154427901 (0203)

Important Safety Instructions
This symbol will help alert you to such
dangers as personal injury, burns, fire and
electrical shock.
To reduce the risk of fire, electrical shock, or
injury when using your dishwasher, follow
basic precautions including the following:
• Read all instructions before using your
dishwasher.
• Use your dishwasher only as instructed in
this Use and Care Manual.
• This Manual does not cover every possible
condition and situation that may occur. Use
common sense and caution when installing,
operating and maintaining any appliance.
• DISHWASHER MUST BE ELECTRICALLY
GROUNDED. Read the Installation
Instructions for details.
• This dishwasher is designed to operate on
regular house current (120 V, 60 Hz). Use a
circuit equipped with a 15 ampere fuse or
circuit breaker. Use a 20 ampere fuse if
dishwasher is connected with a food waste
disposer.
• Do not operate dishwasher unless all
enclosure panels are in their proper place.
• To avoid entrapment and/or suffocation,
remove door or door latch mechanism from
any dishwasher that is discarded or not in
use.
• Keep young children and infants away from
dishwasher when it is operating.
• Do not let children abuse, sit, stand or play
on door or racks of a dishwasher.
• Use only detergents and rinse agents
recommended for use in a dishwasher.
• Store dishwasher detergent and rinse
agents out of the reach of children.
• Do not wash plastic items unless marked
“dishwasher safe” or the equivalent. Check
with manufacturer for recommendations, if
not marked. Items that are not dishwasher
safe may melt and create a potential fire
hazard.
• If the dishwasher drains into a food
disposer, make sure disposer is completely
empty before running dishwasher.
• Disconnect electrical power to dishwasher
before servicing.
• Repairs should be done by a qualified
technician.
• Do not tamper with controls.
• Do not touch the heating element during or
immediately after use.
• Use care unloading the dishware when the
SANITIZE option has been selected.
Contents may be hot to the touch
immediately after the end of cycle.
• Water vapor from the vent may be hot to
the touch when the SANITIZE option has
been selected. Use care and do not let
small children play around or touch the vent
area of the dishwasher.
• When loading items to be washed:
- Locate sharp items and knives so that
they are not likely to damage the door
seal or tub.
- Load sharp items and knives with the
handles up to reduce the risk of cut-type
injuries.
• Under certain conditions, hydrogen gas
may be produced in a hot water system that
has not been used for 2 weeks or more.
HYDROGEN GAS IS EXPLOSIVE. If hot
water system has not been used for such a
period, before using dishwasher, turn on all
hot water faucets and let water flow from
each for several minutes. This will release
any accumulated hydrogen gas.
HYDROGEN GAS IS FLAMMABLE. Do not
smoke or use an open flame during this
time.
• Do not store or use combustible materials,
gasoline or other flammable vapors and
liquids in the vicinity of this or any other
appliance.
SA VE THESE
©2002 Electrolux Home Products, Inc.
All rights reserved.
INSTRUCTIONS
2
Printed in U.S.A.
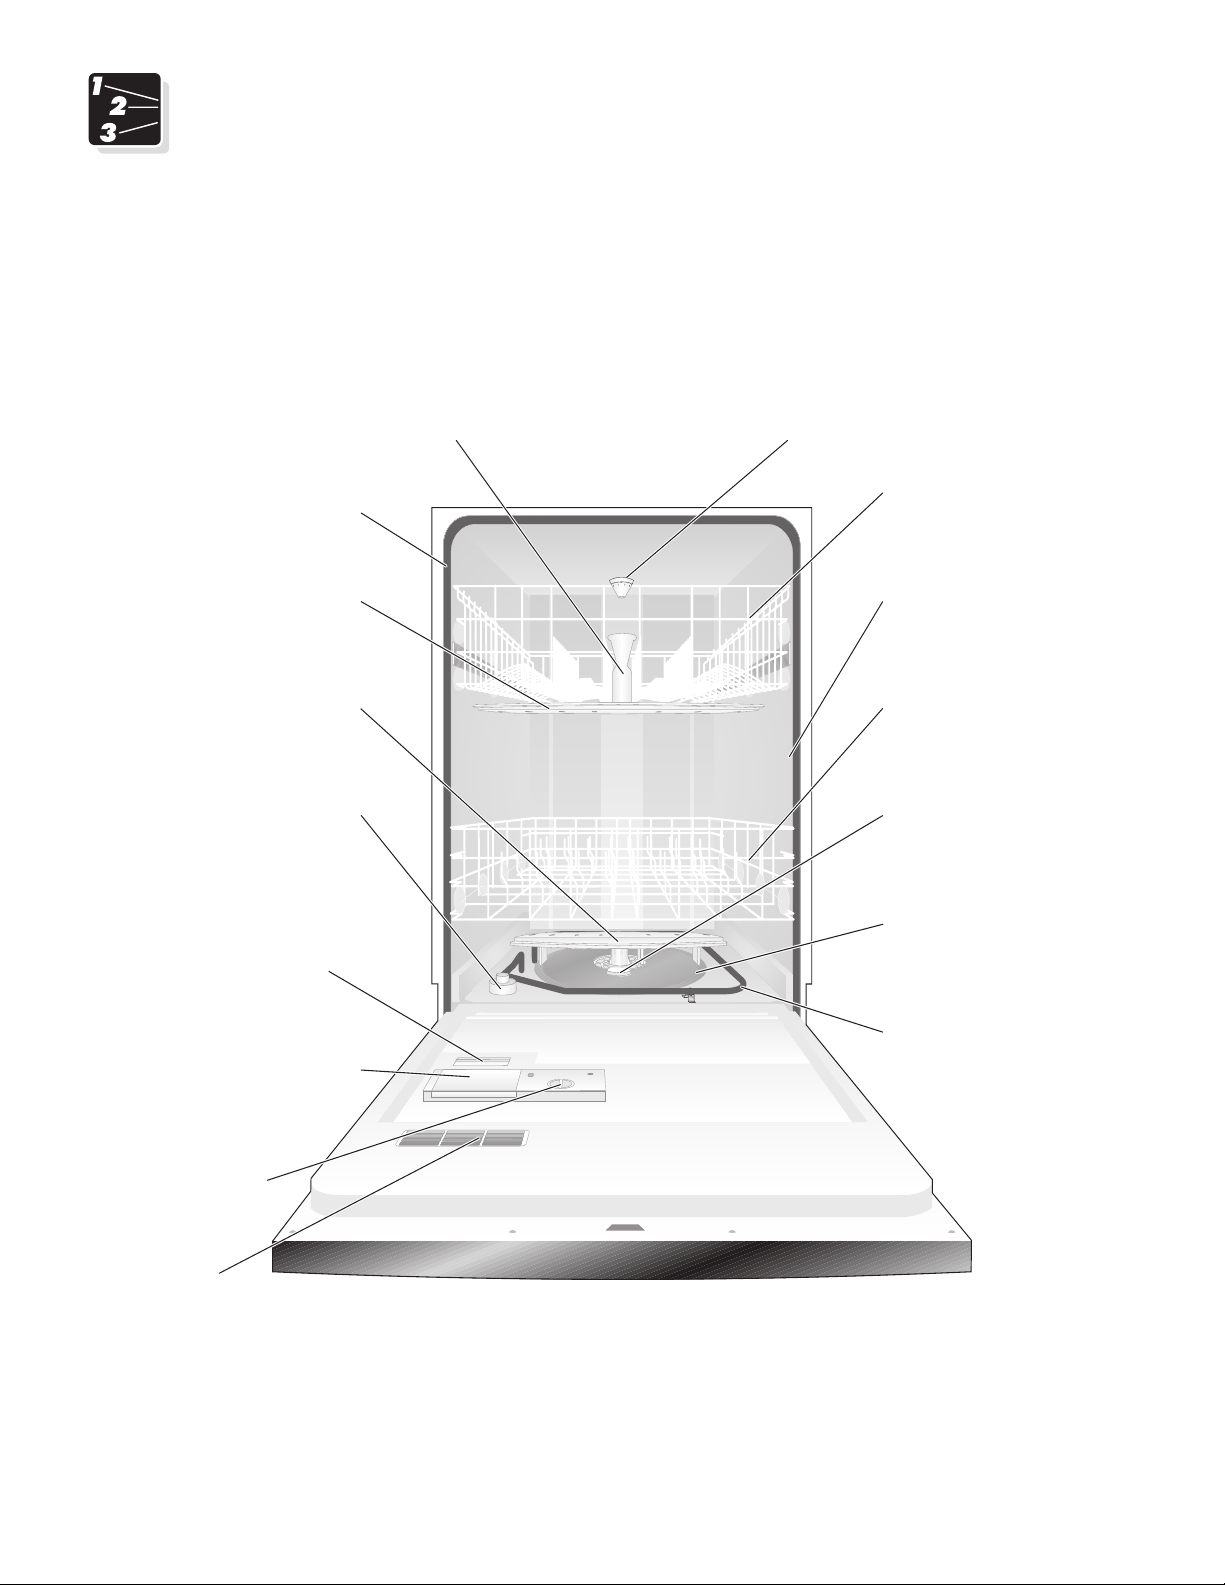
Dishwasher Features
Your dishwasher cleans by spraying a mixture of hot water and detergent through the spray arms
against soiled surfaces. Each cycle begins with a pre-drain. Next, the dishwasher fills with water
covering the filter area. Water is then pumped through the filter and spray arms. Soil particles go
down the drain as the water is pumped out and replaced with clean water. The number of water fills
will vary with the cycle being used.
Tub Gasket
page 10
Middle Spray Arm
pages 6,13
Lower Spray Arm
pages 7,13
Overfill Protector
page 10
Prewash
Detergent Cup
page 8
Funnel
pages
6,13
Nozzle
Top Rack
page 6
Serial Label
(located on right
side of tub)
Bottom Rack
page 7
Glass Trap
page 10
Self-Cleaning Filter
page 10
Detergent Dispenser
page 8
Rinse Aid
Dispenser
page 9
Vent
pages
4,14
Heating Element
page 10
3
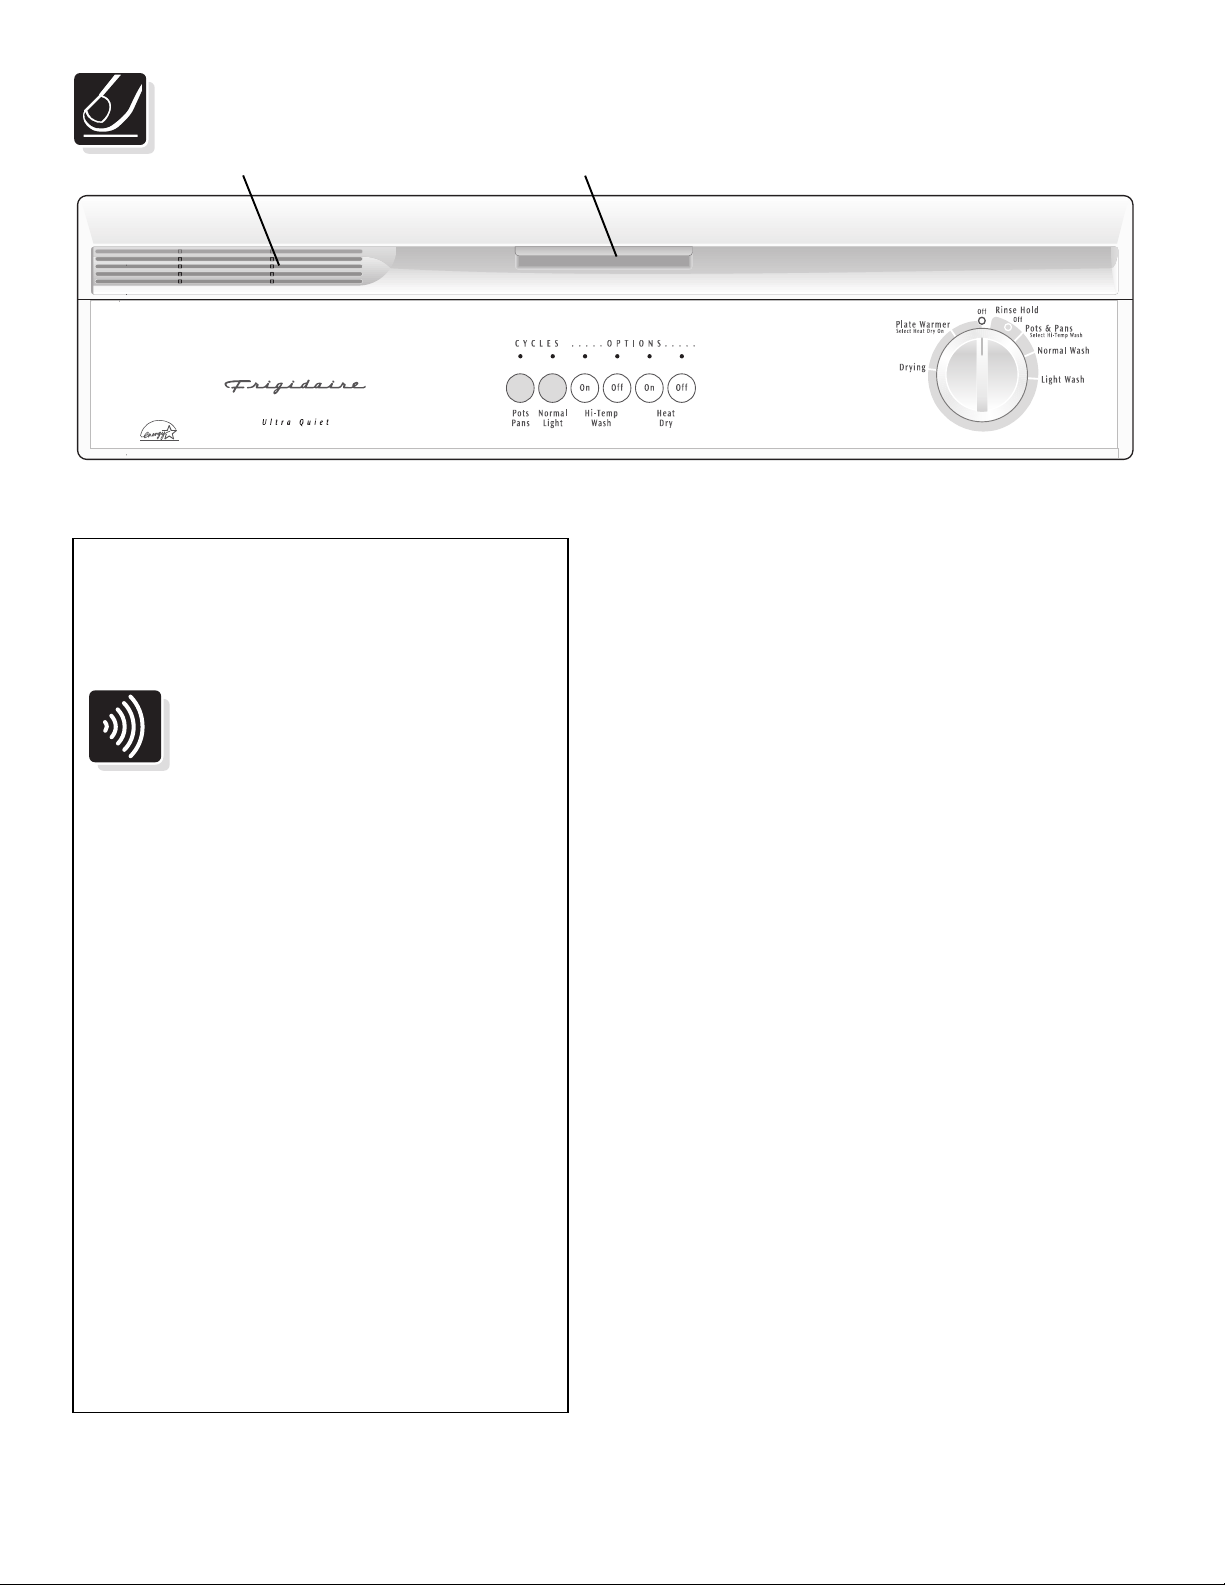
Operating Instructions
Vent Latch
Appearance may vary from your model.
Very Important
Information— Read Before
Operating Y our Dishwasher!
Normal Operating
Sounds
This dishwasher does not sound like most
dishwashers—IT’S QUIETER!
Your Precision Wash System® dishwasher
uses energy efficient motors for the wash
and drain portions of the cycle you select.
Each cycle has a series of water fills and
drains for washing and rinsing dishes. As
each cycle begins, you may–or may not–
hear the drain motor.
The next sound you will hear is the splashing
water as it enters the tub. Then the lower arm
rotates and circulates water. This is followed
by a pause and a slightly different sound as
the upper arm sprays water. If you listen
closely, you will hear the change in sound as
the wash action switches from one arm to
the other.
Getting Started
1. Load dishwasher (See Preparing and
Loading Dishes).
2. Add detergent (See Dishwasher Dispenser
& Detergents).
3. Add rinse aid, if needed (See Rinse Aid).
4. Select desired cycle (See Cycle Chart).
The indicator will show red when selected.
5. Select desired energy OPTIONS (See
Energy Options). The indicator will show
red when selected.
6. Turn dial clockwise to selected cycle.
7. For instructions on connecting the portable
dishwasher, see “Connecting and
Disconnecting the Por table/Convertible
Dishwasher.”
8. Run hot water faucet nearest dishwasher
until water is hot. Turn water off.
9. To start, close door to latch.
Status Indicator Light
(available on select models)
The HEATING DELAY light means the cycle is
being extended to heat water to proper
temperature in the main wash.
PLEASE BE ADVISED: If you compare
this dishwasher to previous models, you
may be surprised at what you DON’T
hear!
Plate Warmer
For warming dishes and serving plates before
serving hot foods:
• Load clean plates and dishes to be
warmed.
• Turn dial to PLATE WARMER.
• Select HEAT DRY ON option.
4

Operating Instructions (continued)
W ash Cycle Selections
Note: Cycle times are approximate and will vary with options selected.
Cycle Chart
Cycle
Pots &
Pans
Normal
Wash
Light
Wash
Rinse
Hold
Description Time*
For pots, pans,
casseroles, and
dinnerware with
dried-on or bakedon soils.
For regularly soiled
dishes and
silverware.
For lightly soiled or
pre-rinsed dishes
and silverware.
For rinsing dishes
that will be washed
later.
Energy Options
Hi-T emp W ash Option
To Select
Cycle
• Press POTS & PANS pad.
• Select HI-TEMP WASH ON option.
• Select other desired OPTIONS.
• Turn dial to POTS & PANS.
• Press NORMAL/LIGHT pad.
• Select desired OPTIONS.
• Turn dial to NORMAL WASH.
• Press NORMAL/LIGHT pad.
• Select desired OPTIONS.
• Turn dial to LIGHT WASH.
• DO NOT USE detergent.
• Turn dial to RINSE HOLD.
Water
(approx.)
6.0
27.3
5.0
22.7
4.0
18.2
1.2
1.0
4.5
gal.
imp. gal.
liters
gal.
imp. gal.
liters
gal.
imp. gal.
liters
imp. gal.
liters
Washes/
(approx.)
85 min.7.2
78 min.6.0
71 min.4.8
* Includes dry time.
Rinses
2 washes
4 rinses
2 washes
3 rinses
1 wash
3 rinses
1 rinse6 min.gal.
When HI-TEMP WASH ON option is selected,
the dishwasher heats the water in the main
wash to approximately 140°F (60°C). Wash
action will continue but timer will not advance
until proper temperature is reached. The hotter
water provided by this option helps activate
dishwasher detergent to clean food grease
and soil from dishes. HI-TEMP WASH ON
option can be used with any cycle except
RINSE HOLD.
To turn off option, select HI-TEMP WASH OFF.
Heat Dry Option
The HEAT DRY ON option will provide faster
drying since the heating element is on during
the drying portion of cycle.
HEAT DRY OFF option saves electricity since
the heating element is off during the drying
portion of cycle. To speed the drying process,
open the door slightly after the cycle is
complete. Some water droplets may remain on
door and tub and in areas where dishes touch
silverware basket or rack.
With either option, you may see water vapor
coming from the vent during the washing and/
or drying portion of the cycle. On some
models, the vent is closed during washing to
hold moisture and sound inside and then
opens for drying.
The drying option may be changed at any time
during the cycle and affects only the drying
period.
5
 Loading...