

Page 1
OPERATING AND INSTALLATION MANUAL
EN
FC 225 C
FC 280 C
FC 425 C
CHEST FREEZER
Page 2
2
EN
Technical Data
Contents
Technical Data . . . . . . . . . . . . . . . . . . . . . . . . . . . . . . . . . . . . . . . . . . . . . . . . . . . . . . . . . . . . . . . . . . . . . . . . . . . . .2
Safety Information . . . . . . . . . . . . . . . . . . . . . . . . . . . . . . . . . . . . . . . . . . . . . . . . . . . . . . . . . . . . . . . . . . . . . . . . . . .3
Product Description . . . . . . . . . . . . . . . . . . . . . . . . . . . . . . . . . . . . . . . . . . . . . . . . . . . . . . . . . . . . . . . . . . . . . . . . .3
Control panel . . . . . . . . . . . . . . . . . . . . . . . . . . . . . . . . . . . . . . . . . . . . . . . . . . . . . . . . . . . . . . . . . . . . . . . . . . . . . .3
Installation . . . . . . . . . . . . . . . . . . . . . . . . . . . . . . . . . . . . . . . . . . . . . . . . . . . . . . . . . . . . . . . . . . . . . . . . . . . . . . . .3
Electrical connection . . . . . . . . . . . . . . . . . . . . . . . . . . . . . . . . . . . . . . . . . . . . . . . . . . . . . . . . . . . . . . . . . . . . . . . . .3
First use . . . . . . . . . . . . . . . . . . . . . . . . . . . . . . . . . . . . . . . . . . . . . . . . . . . . . . . . . . . . . . . . . . . . . . . . . . . . . . . . . .4
Switch on-off . . . . . . . . . . . . . . . . . . . . . . . . . . . . . . . . . . . . . . . . . . . . . . . . . . . . . . . . . . . . . . . . . . . . . . . . . . . . . .4
Daily use . . . . . . . . . . . . . . . . . . . . . . . . . . . . . . . . . . . . . . . . . . . . . . . . . . . . . . . . . . . . . . . . . . . . . . . . . . . . . . . . . .4
Care and Cleaning . . . . . . . . . . . . . . . . . . . . . . . . . . . . . . . . . . . . . . . . . . . . . . . . . . . . . . . . . . . . . . . . . . . . . . . . . .5
Helpful hints and tips . . . . . . . . . . . . . . . . . . . . . . . . . . . . . . . . . . . . . . . . . . . . . . . . . . . . . . . . . . . . . . . . . . . . . . . . .5
What to do if... . . . . . . . . . . . . . . . . . . . . . . . . . . . . . . . . . . . . . . . . . . . . . . . . . . . . . . . . . . . . . . . . . . . . . . . . . . . . .6
Service or repair . . . . . . . . . . . . . . . . . . . . . . . . . . . . . . . . . . . . . . . . . . . . . . . . . . . . . . . . . . . . . . . . . . . . . . . . . . . .6
Guarantee/Customer Service . . . . . . . . . . . . . . . . . . . . . . . . . . . . . . . . . . . . . . . . . . . . . . . . . . . . . . . . . . . . . . . . . .7
Model BNI 225 BNI 280 BNI 425
FC 225 C FC 280 C FC 425 C
Volume (gross) Litre 213 263 404
Volume (net) Litre 210 260 400
Height without/with roller Cm 87,6 87,6 87,6
Width Cm 79,5 93,5 132,5
Depth Cm 66,5 66,5 66,5
Weight Kg 39 44 56
Energy consumption/24h kWh/24h 0,938 1,055 1,384
Freezing capacity kg/24h 14 16 19
Hold-over time Hours 26 27 32
Rated power Watt 90 110 110
Voltage Volts 230 230 230
Climatic class SN SN SN
Page 3
3
EN
Safety Information
Before installing and using the appliance read this user's
instruction book carefully. It contains safety precautions,
hints, information and ideas. If the freezer is used in
compliance with the instructions written, it will operate
properly and provide you with greatest satisfaction.
These warnings are provided in the interest of safety. You
must read them carefully before installing or using the
appliance.
Use the freezer only for storing frozen food, freezing
fresh food and making ice cubes.
Do not eat ice cubes or ice lollies immediately after
taking them out of the freezer, since they may cause
frost burns.
Do not allow children to play or hide inside the freezer,
since they may become trapped inside and suffocate.
Do not store glass containers with liguids in the freezer,
since they may burst.
Ensure that the freezer is not resting on the power
supply cable.
Before servicing or cleaning, always unplug the
appliance or disconnect the power supply.
Do not use other electrical appliances (such as ice
cream makers) inside the appliance.
Your appliance contains an environmentally friendly
natural gas, isobuthane (R600a). Caution is required
however, since isobuthane is flammable. Therefore it is
essential to ensure that the refrigerant pipelines are not
damaged.
It is most important that this instruction book should be
retained with the appliance for future reference.
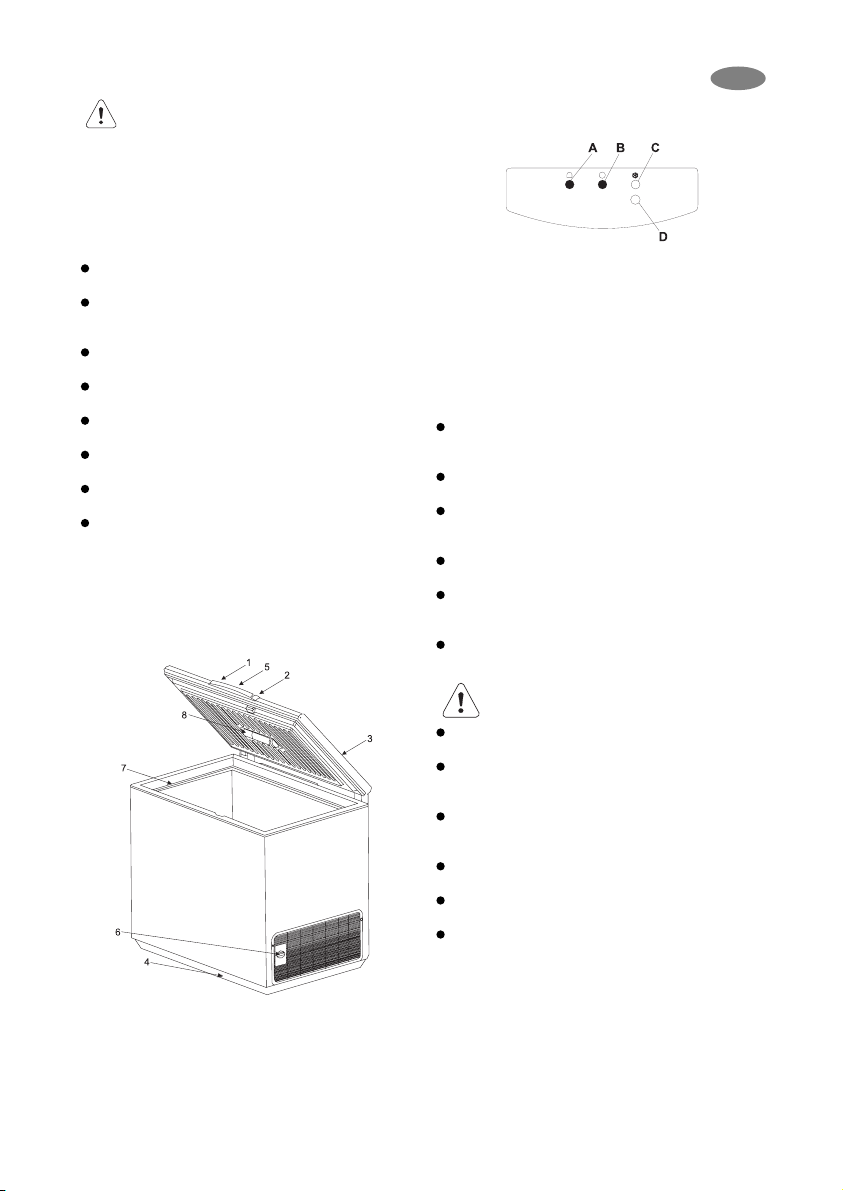
Product Description
1. Lid handle
2. Security lock
3. Seal
4. Defrost water drain
5. Control panel
6. Thermostat knob: temperature adjustment
7. Upper edge
8. Light
Control panel
A. Red light: Illuminates when the freezer temperature is
not sufficiently low.
B. Green light: Illuminates when the appliance is on.
C. Yellow light: Illuminates when the Super Freeze
function is activated.
D. Super Freeze button: Activates/de-activates the Super
Freeze function for large quantities for fresh food and
switches off the beeping alarm.
Installation
Wait at least 2 hours before connecting the freezer to
the power supply to ensure the refrigerant circuit is fully
efficient.
Install the freezer in a dry, well ventilated room. Avoid
locations near a source of heat or in direct sunlight.
The room temperature should correspond to the
climatic classification for which the freezer was
designed, see chapter "Technical data".
Place the freezer horizontally on a firm surface, resting
on all four feet.
For optimum operation and in order to avoid damage
when the lid is opened, leave a space of at least 5 cm
from the rear wall and 5 cm at the sides.
Before connecting the freezer to the power supply,
ensure that the voltage corresponds to that indicated in
chapter "Technical data" under "Voltage".
Danger!
Ensure that the freezer is not resting on the power
supply cable.
Do not remove the power supply cable by pulling on its
lead, particularly when the freezer is being pulled out
of its niche.
If the supply cord is damaged it must be replaced by
the manufacturer, its service agent, or similarly
qualified persons in order to avoid a hazard.
Ensure that the power plug is not squashed or
damaged by the back of the freezer.
There must be adequate ventilation around the
appliance.
Any electrical work required to install this appliance
should be carried out by an authorised engineer.
Electrical connection
The appliance is supplied with a 13amp plug fitted. In the
event of having to change the fuse in the plug supplied, a
13amp ASTA approved (BS1362) fuse must be used.
Should the plug need to be replaced for any reason. The
wires in the power supply cable are coloured in
accordance with the following code:
Page 4

4
Green and Yellow - Earth: must be connected to the
terminal marked with the letter "E" or by the earth
symbol or coloured green and yellow.
Blue - Neutral: must be connected to the terminal "N"
or coloured black.
Brown - Live: must be connected to the terminal
marked "L" or coloured red.
Upon completion there must be no cut, or stray strands of
wire present and the cord clamp must be secure over the
outer sheath.
Warning! This appliance must be earthed.
Never insert a discarded plug into a socket.
First use
Before first use, the freezer should be cleaned inside,
see chapter "Care and cleaning".
Plug in the appliance.
The green light will come on.
The red light will also switch on and the alarm will beep,
since the temperature inside the freezer is not yet
sufficiently low for food storage.
Press button (D) to switch the alarm off. The red light
will normally switch off after several hours.
Only place food inside the freezer once the red light
has switched off.
Switch on-off
Switch on the freezer
Turn the thermostat knob to a postion between
and .
Switch off the freezer
Turn the thermostat knob to the Off position.
Daily use
Temperature adjustment
To adjust the temperature of the freezer, proceed as
follows:
Turn the thermostat knob clockwise towards for a
colder storage temperature.
Turn the thermostat knob counter-clockwise towards
for a less cold storage temperature.
Super Freeze function
If more than 3-4 kg of fresh food is to be frozen, the freezer
needs to be pre-cooled.
At least 24 hours before placing fresh food in the
freezer, press button (D).
The yellow light comes on.
Place the food in the freezer. After 52 hours this
function will automatically switch off and the freezer will
return to normal storage temperature. This function
can be de-activated any time by pressing button (D)
again.
Alarm
If the freezer temperature is not sufficiently low, the alarm
will beep and the red light will come on.
Press button (D) to switch the sound off. The red light
remains on as long as the temperature in the freezer is
higher than the thermostat setting.
The alarm can be due to:
Insertion of a large amount of fresh food.
Opening the lid too long.
A defect in the system, see chapter "What to do if...".
Storage baskets
Hang the baskets on the upper edge (X) or place the
stackable baskets inside the freezer (Y).
Turn and fix the handles for these two positions, as
shown in the drawings.
Spare baskets can be obtained from Frigidaire. The
illustrations on this page show how many baskets can be
placed in the various freezer models.
Security lock
Push the key in the lock while turning.
Spare keys can be obtained from Frigidaire.
Important! Keep the keys out of reach of children. Before
disposing of an old freezer remove the keys.
EN
Page 5

5
EN
Opening and closing the lid
As the lid is fitted with a tightly closing seal, it will not reopen easily immediatedly after closing.
Wait a few minutes before re-opening the lid. Never pull
the handle with immense force.
Care and Cleaning
Defrosting the freezer
When the ice layer is 10-15 mm thick, the freezer should be
defrosted. We suggest that you defrost your freezer when
there is little or no food inside.
Disconnect the appliance from the power supply.
Remove the contents of the freezer, wrap them in
newspapers, and keep them in a cold place.
Leave the appliance lid open.
Remove the plug from the water drain.
The defrost water can be collected in a tray as shown
in the drawing. If available, use the divider.
Speed up defrosting by using the enclosed scraper to
detach the ice from the appliance walls.
Dry the interior of the appliance thoroughly.
Remember to replace the plug in the water drain.
Important! Never use a knife or any other sharp implement
to remove frost or ice.
Cleaning
The best time to clean your freezer is after defrosting.
Disconnect the appliance from the power supply and
remove all loose accessories.
Use a damp cloth to clean your freezer. Use hot water
and a mild, non-aromatic detergent.
Clean the loose accessories, before replacing them
again.
Important! Never use strong detergents, scouring powder
or aromatic detergents to clean your freezer.
When not in use
Disconnect the appliance from the power supply.
Remove all food from the freezer.
Clean the freezer as described above.
Leave the lid slightly open.
Changing the light bulb
Disconnect the appliance from the power supply.
Unscrew the bulb, and replace it with a new bulb (max.
15W).
Plug in the appliance.
Helpful hints and tips
Freezing food
Before freezing, fresh food must be packed in airtight
and moisture-proof packaging to prevent it from drying
out.
Only use fresh food of the best quality.
Always leave hot food to cool to room termperature
before placing in the freezer.
Divide food into small portions before freezing; this
ensures that freezing is more rapid, and that you only
need to defrost the amount needed for immediate
consumption.
Mark the freezer packaging with the date of freezing.
Place fresh food for freezing close to the cold sides of
the freezer, making sure that it is not in contact with the
frozen food already in the freezer.
Frozen food can be stored anywhere inside the freezer,
but should be kept at least 5 mm below the upper
edge.
If freezing is too slow, the quality of the food being frozen
deteriorates. The amount of fresh food (expressed in kg)
that can be frozen in 24 hours is indicated in the chapter
"Technical data" under "Freezing capacity".
Food storage
For fresh frozen food, please refer to the storage
period table underneath.
For purchased frozen food, never exceed the expiry
date.
When you buy frozen food, make sure that it has been
stored at the correct temperature. Do not buy products
which have wet or damaged packaging. Place
purchased products in your freezer as quickly as
possible. We recommend using an insulated bag to
bring such products home with you.
Important! Remember that fully or par tially defrosted food
must not be re-frozen. However, dishes which have been
cooked using defrosted food may be frozen.
In the case of a power failure or
breakdown
Do not open the lid.
Important! If the power has been off for longer that the
value shown in the chapter "Technical data" under "Holdover time", the defrosted food must be consumed quickly
or cooked immediately and then refrozen (after cooling).
Page 6

6
EN
What to do if...
Try the solutions suggested here first to avoid the cost of an
unnecessary service call.
Your freezer will not operate
Is the power supply cord unplugged?
Has a household fuse blown?
Is there a power failure?
Is the temperature control set to the Off position?
The alarm remains audible and/or the red
light/symbol ( ) is on
Is the lid not closed completely? See underneath for
any obstructions.
Is the temperature control set correctly for the
surrounding conditions?
Is the freezer too close to a source of heat?
The inside light does not work
Is the power supply cord unplugged?
The motor seems to run too much
Is the lid not closed completely? See underneath for
any obstructions.
Is the room temperature hotter than normal?
Has a large amount of fresh food just been added to
the freezer?
Is the lid opened often?
Is the temperature control set correctly for the
surrounding conditions?
Is the lid seal damaged or deformed?
Is there enough air circulation space around the
freezer?
Is the Super Freeze function activated accidentally?
Temperature is too warm
Has a large amount of food just been added to the
freezer?
Is the lid opened often?
Is the temperature control set correctly for the
surrounding conditions?
The lid will not close completely
Is there excessive frost or a package preventing the lid
from closing?
Are food packages blocking the lid?
Is the lid seal dirty or sticky?
Does the freezer wobble or seem unstable?
The lid is difficult to open
Is the lid seal dirty or sticky?
If you still need help, please contact Frigidaire Service.
Tel: 0845 050 8537.
Service or repair
In cases of breakdown or faults, your freezer must be
serviced by an authorized service technician.
Important! Under no circumstances should you attempt to
repair the appliance yourself
Climatic classification Ambient temperature limits
SN from +10°C to +32°C
N from +16°C to +32°C
ST from +18°C to +38°C
T from +18°C to +43°C
This appliance complies with the following EC Directives:
73/23/EEC of 19. 02. 1973 Low-Voltage Directive
89/336/EEC of 03. 05. 1989 (including Amendment Directive 92/31/EEC - EMC Directive)
Page 7

7
Standard guarantee conditions
We, Frigidaire, undertake that if within 12 months of the
date of the purchase this Frigidaire appliance or any part
there of is proved to be defective by reason only of faulty
workmanship or materials, we will, at our option repair or
replace the same FREE OF CHARGE for labour, materials
or carriage on condition that:
The appliance has been correctly installed and used
only on the electricity supply stated on the rating plate.
The appliance has been used for normal domestic
purposes only, and in accordance with the
manufacturer’s instructions.
The appliance has not been serviced, maintained,
repaired, taken apart or tampered with by any person
not authorised by us.
Electrolux Service Force Centre must undertake all
service work under this guarantee
Any appliance or defective part replaced shall become
the Company’s property.
This guarantee is in addition to your statutory and other
legal rights.
Exclusions
Damage or calls resulting from transportation,
improper use or neglect, the replacement of any light
bulbs or removable parts of glass or plastic.
Costs incurred for calls to put right an appliance which
is improperly installed or calls to appliances outside the
United Kingdom.
Appliances found to be in use within a commercial
environment, plus those which are subject to rental
agreements.
Products of Frigidaire manufacturer that are not
marketed by Frigidaire.
Service and Spare Parts
In the event of your appliance requiring service, or if you
wish to purchase spare
parts, please contact Frigidaire Service by telephoning
0845 050 8537
Frigidaire Consolidated Ltd.
Tuscany Way
Normanton
WF6 2UA
Tel: 0845 052 9005 Fax: 0845 052 9002
Website www.frigidaire.co.uk
Before calling out an engineer, please ensure you have
read the details under the heading “Something not
working” When you contact the Service Centre you will
need to give the following
details:
1. Your name, address and postcode.
2. Your telephone number.
3. Clear concise details of the fault.
4. The model and Serial number of the appliance (found
on the rating plate).
5. The purchase date.
Please note a valid purchase receipt or guarantee
documentation is required for in guarantee service calls.
Guarantee/Customer Service
EN
Page 8

820 418 889 - 01 - 25102007
 Loading...