

Page 1
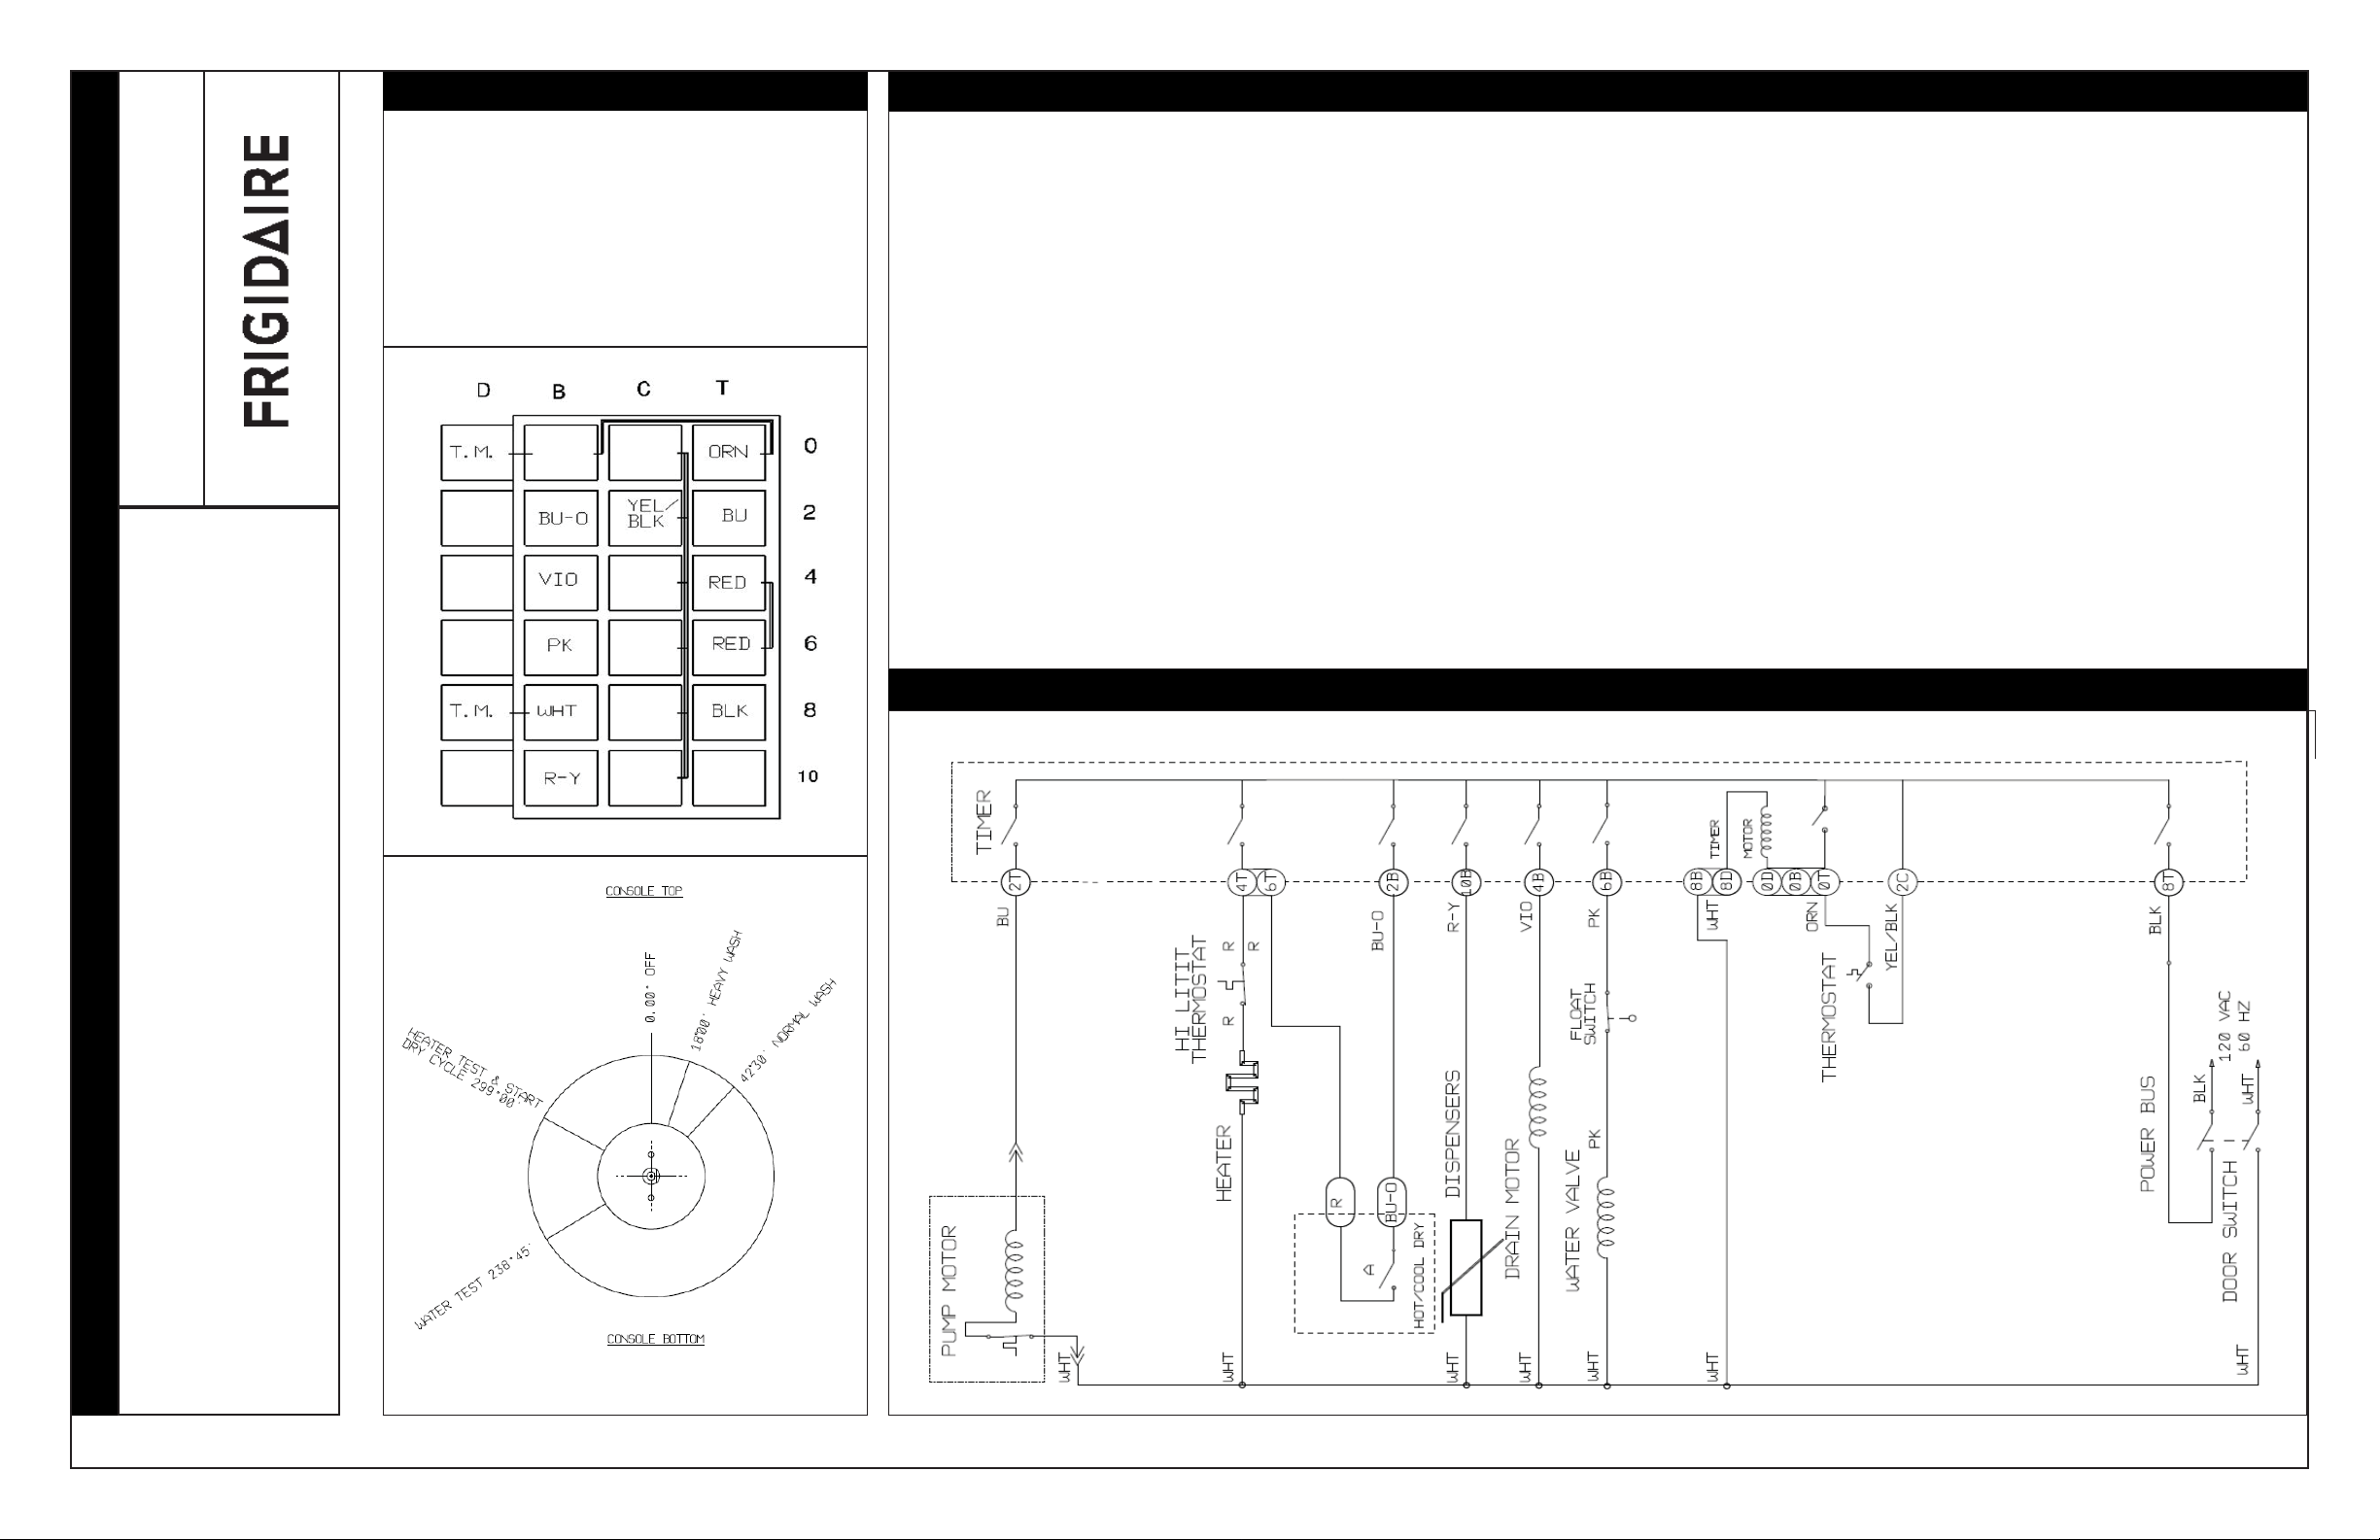
COLOR CODE
BU-O......Blue/Orange R.............Red
R-Y.........Red/Yellow BU...........Blue
BLK........Black PK...........Pink
VIO........Violet ORN........Orange
WHT.......White YEL/BLK...Yellow/Black
P/N: 808376801RevD
Artwork: 808376801 Rev.004
COMPONENT CHECKCING
Notes: 1) Always turn the timer knob clockwise. Make adjustments when the door is ajar.
2) Possible overshooting of the detent and gear/cam position from previous operation can aff ect the duration of the fi rst interval - small
overshoots are not a problem.
Drain Pump: To energize, turn the timer to the detent labeled Heavy Wash. Two back-to-back drain intervals provide about 2 minutes of pump out at the
start of this cycle.
0
Fill Valve: Turn the timer to the unlabeled detent at about the 8 o’clock (239
there for testing of the fi ll valve during production. The w ash segment begins with a 63 second fi ll.
Float: While the fi ll valve is energized (see above), raising the fl oat should result in power being removed from the fi ll valve causing it to close.
Detergent
Dispenser: Follow instructions f or energizing the Fill V alve. Following the initial 63 second fi ll there is a short (9 second) pause f ollowed by 130 seconds
with both the detergent dispenser and the circulation pump energized. The detergent door can be expected to open with 40 to 90 seconds of
dispenser power up time.
Circ Pump: Turn the timer to the Normal Wash detent. Left to run the cycle will drain (62 seconds), pause (3 seconds), fi ll (65 seconds) and then run
the circ pump for about 190 seconds. To energize the circ pump without adding water move originally to the normal wash detent and then
advance the dial by 100 to reach the start of the circ pump operation. The approximate 190 seconds of pump operation will correspond
to about 160 of dial rotation.
Heater: WARNING! When checking that the element is giving off heat be careful not to touch the heating element inside the tub - it will burn.
To check for a failed heater remove power and check the resistance between the two connections. Probes can be inserted in to the back side
of the connectors. The heating element changes resistance with temperature but should always be between 12 and 21 ohms. To check
that it is being energized by the timer, apply power to the unit and turn the timer to the detent labeled Drying/Plate Warmer. The detent
is located at the beginning of a 130 seconds heating interval at the start of the drying portion of the cycle. It is followed by several alternating
periods of pause (about 75 seconds each) and heating (ranging from 65 to 130 seconds in duration). In all, 5 heating interv als f ollow
the detent.
) position. This detent coincides with the start of the fi nal rinse and was put
SERVICE DATA SHEET
WIRING DIAGRAM
This information is intended for use by persons having electrical and mechanical
training and a level of knowledge of these subjects generally considered
acceptable in the appliance repair trade. The manufacturer or seller cannot be
responsible, nor assume any liability, for injury or damage of any kind arising
from the use of this Service Data Sheet.
Page 2
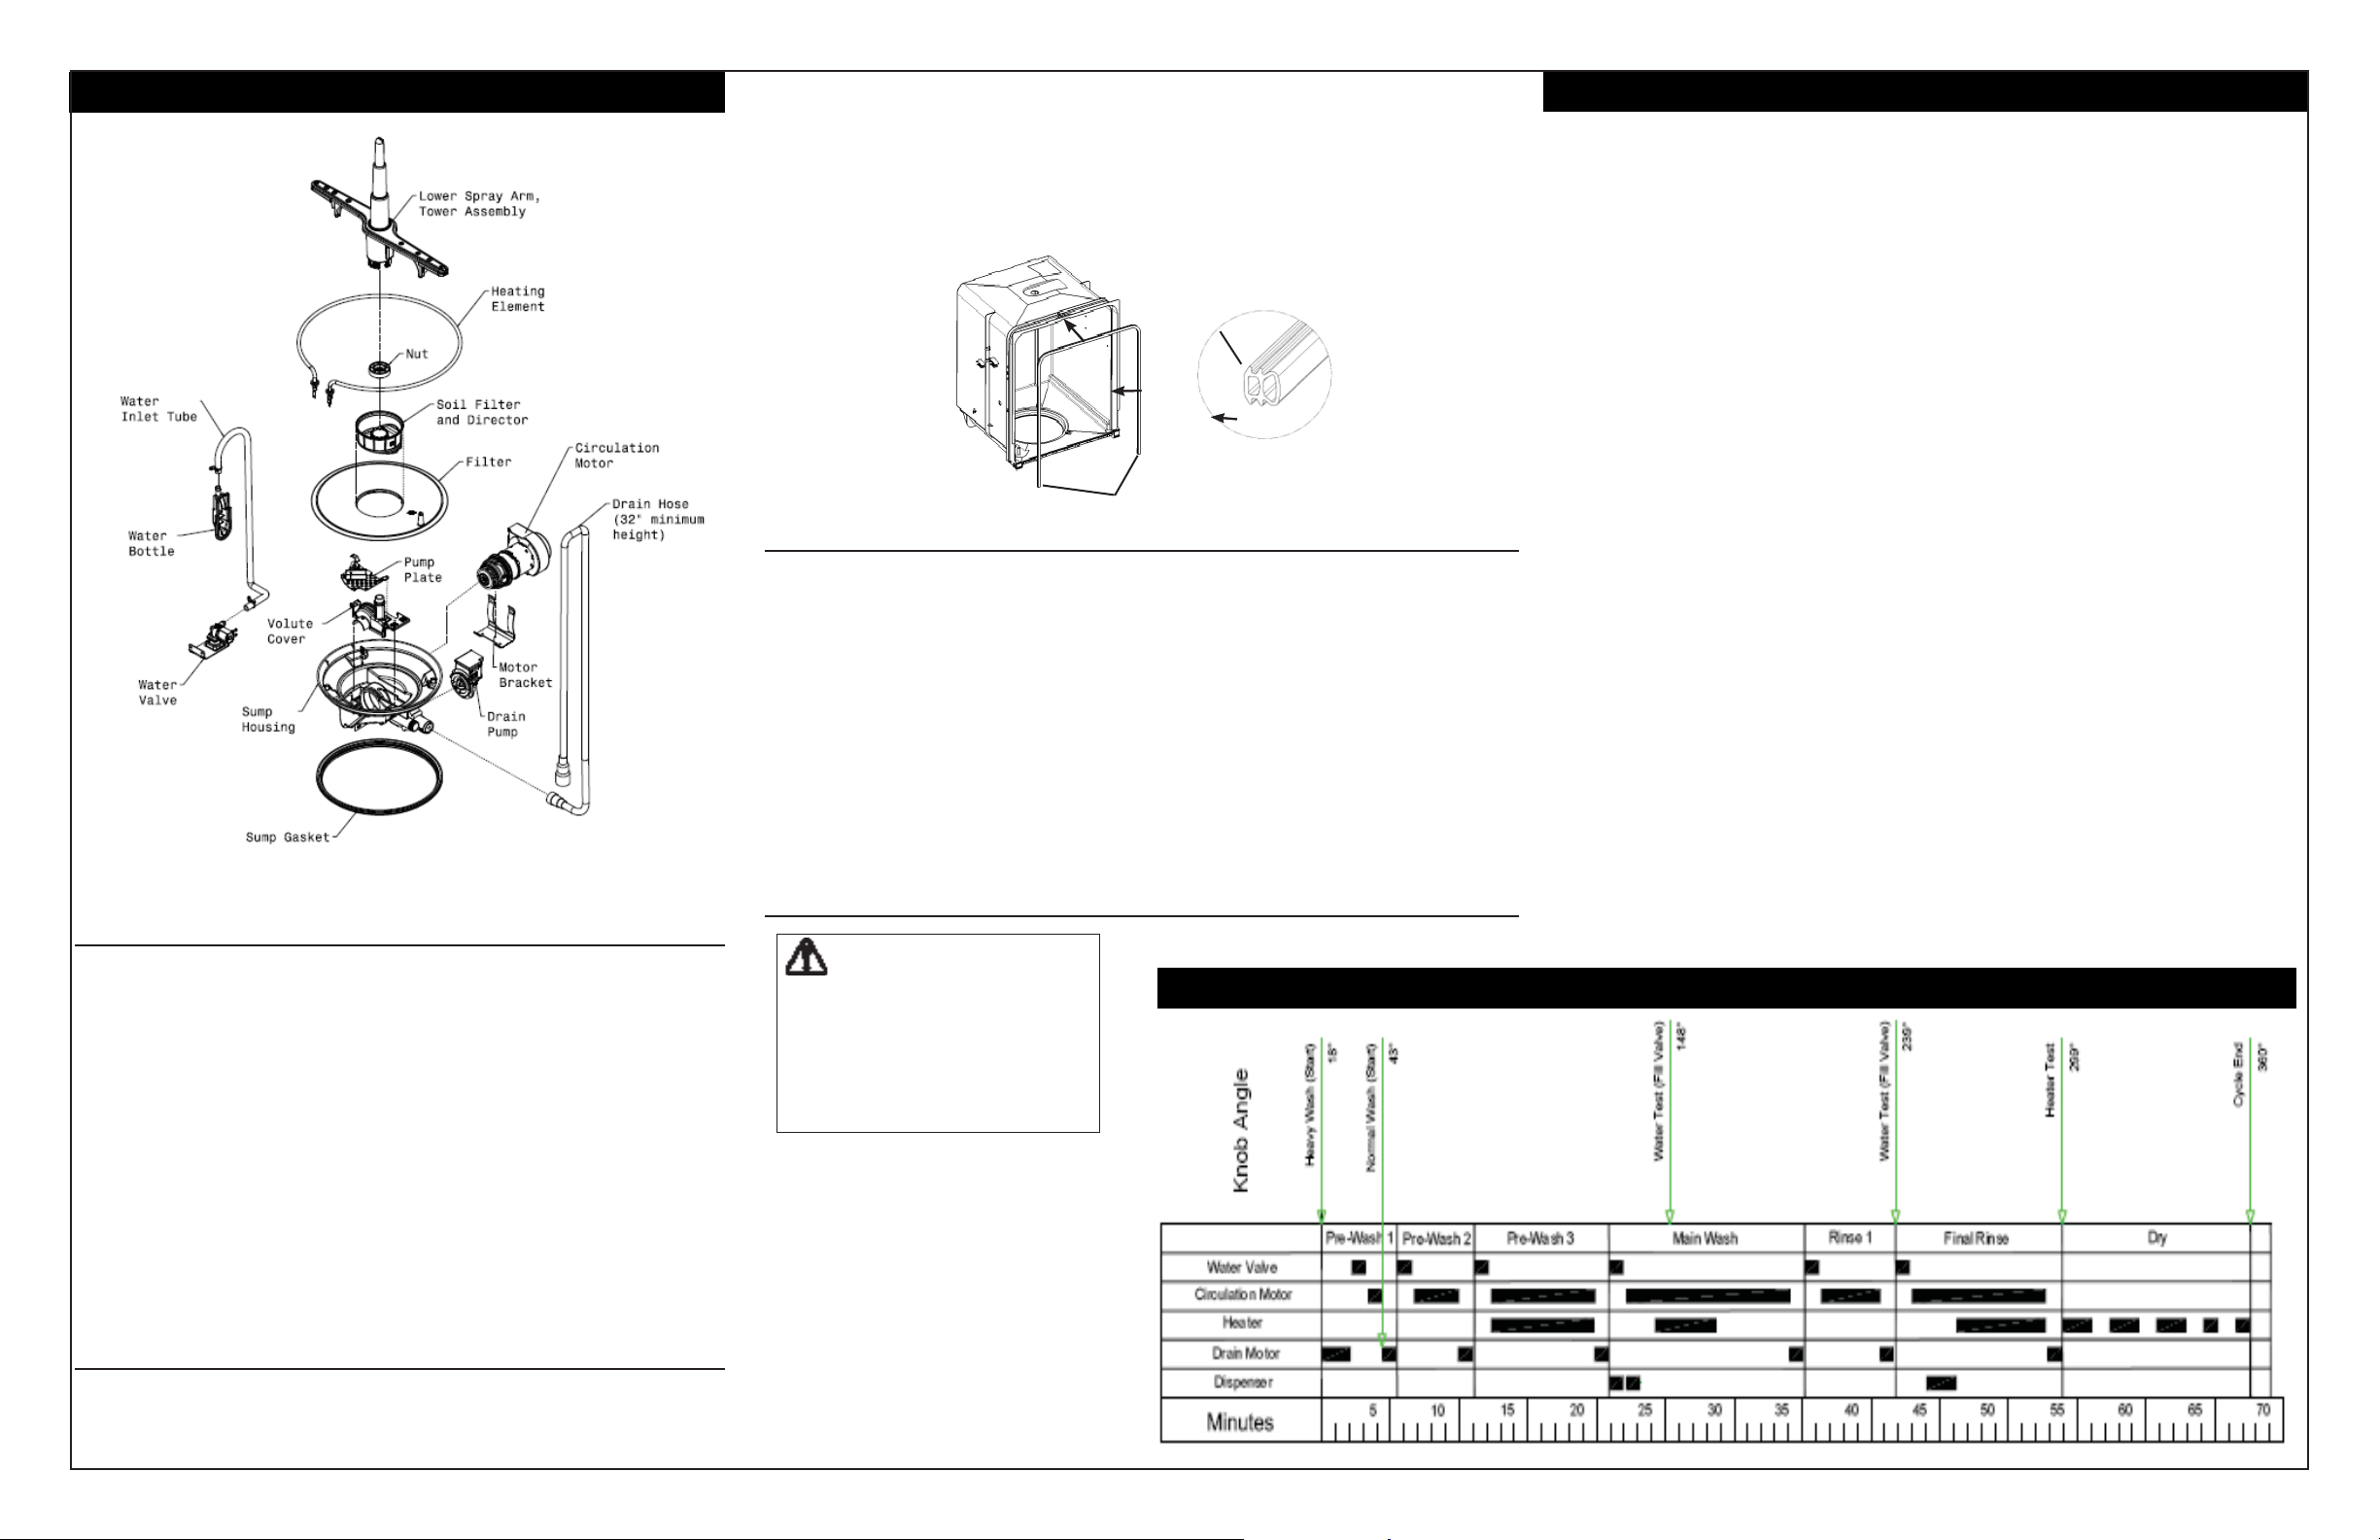
Pump Assembly
The pump assembly is driven by a synchronous motor. Rotation is
in the counterclockwise direction at up to 3100 RPM. The motor
drives a pump which supplies 100 percent fi ltered water at a rate of
approximately 9.2 GPM.
Draining is accomplished by using a small seperate synchronous
drain pump mounted to the side of the sump. The drain check
valve is located at the discharge end of the drain pump. The drain
hose is attached by a worm gear clamp to the discharge end of the
drain pump.
The drain hose must have a loop at a minimum height of 32 inches
in order to insure proper drainage.
To remove the main circulation (circ) pump fi rst disconnect the
wiring harness connections located at the circ pump’s motor. Next,
remove the two screws that hold the motor bracket and slide the
motor bracket away from the sump. The motor and pump can then
slide out of the sump.
Tub and Door Seal EXPLODED VIEW OF WASH SYSTEM
The door seal is pressed into the tub channel for an interference fi t. Center
the gasket (marked on back) at the tub top center and press in place without
stretching or bunching. The gasket takes a short turn at the bottom of the
tub channel before ending at the channel end wall.
Mounting Rib
Tub Interior
Product Specifi cations
Rating...........................120 Volts,
60Hz
Separate Circuit..15 amp min.
- 20 amp max.
Motor (Amps).........................1.1
Heater Wattage......................900
Total Amps (load rated)..........10.0
Water Supply Electrical
Suggested minimum incoming
water temperature..120
Pressure (PSI) min/max. 20/120
Connection (NPT)...............3/8”
Consumption (Normal Cycle)...4.4
U.S Gal., 19.8 liters
0
F (490C)
WARNING
Personal Injury Hazard
Always disconnect the
dishwasher from the electrical
power source before adjusting
or replacing components.
TROUBLE SHOOTING TIPS
Check the list below each sympton. Repair or replace defective components as
encountered.
Sympton..Dishwasher will not operate
when turned on (wait at least 90
seconds).
1. Fuse (blown or tripped)
2. 120 VAC supply wiring connection
faulty.
3. Timer (contacts open or defective)
4. Motor (inoperative)
5. Door Switch (open contacts)
6. Door latch not making contact with
door switch.
Sympton..Motor Hums but will not start
or run.
1. Motor (bad bearings and locked
rotor)
2. Motor stuck due to prolonged nonuse.
3. Debris in pump impeller preventing
Sympton..Dishwasher will not pump
out.
1. Drain restricted.
2. Timer contact defective.
3. Defective drain pump.
4. Air lock in drain hose.
5. Blocked impeller.
6. Open windings.
Sympton..Dishwasher will not fi ll with
water.
1. Water supply turned off .
2. Defective water inlet fi ll valve.
3. Check fi ll valve screen for
obstructions.
4. Defective fl oat switch.
5. Timer contact defective.
6. Wiring defective.
7. Float stuck in “UP” postion.
rotation
Sympton..Timer does not advance.
Sympton..Motor trips out on internal
thermal overload protector.
1. Improper voltage.
2. Motor shaft binding.
3. Motor windings shorted.
4. Glass or foreign items in pump.
1. Timer motor (stalled or open)
2. Check timer for power to timer
motor.
3. Timer shaft or knob interference
with console.
4. If dial is pointing to “water
heating” then thermostat may be
Sympton..Dishwasher runs but will not
defective.
heat.
1. Heater element (open).
2. Timer defective.
3. Wiring or terminal defective.
Sympton..Dishwasher water siphons
out.
1. Drain hose (high) loop too low must be a minimum height of 32
inches.
2. Drain line connected to a fl oor
drain not vented. (install air gap
at counter top).
CYCLE SELECTION OPTIONS
 Loading...