

Page 1
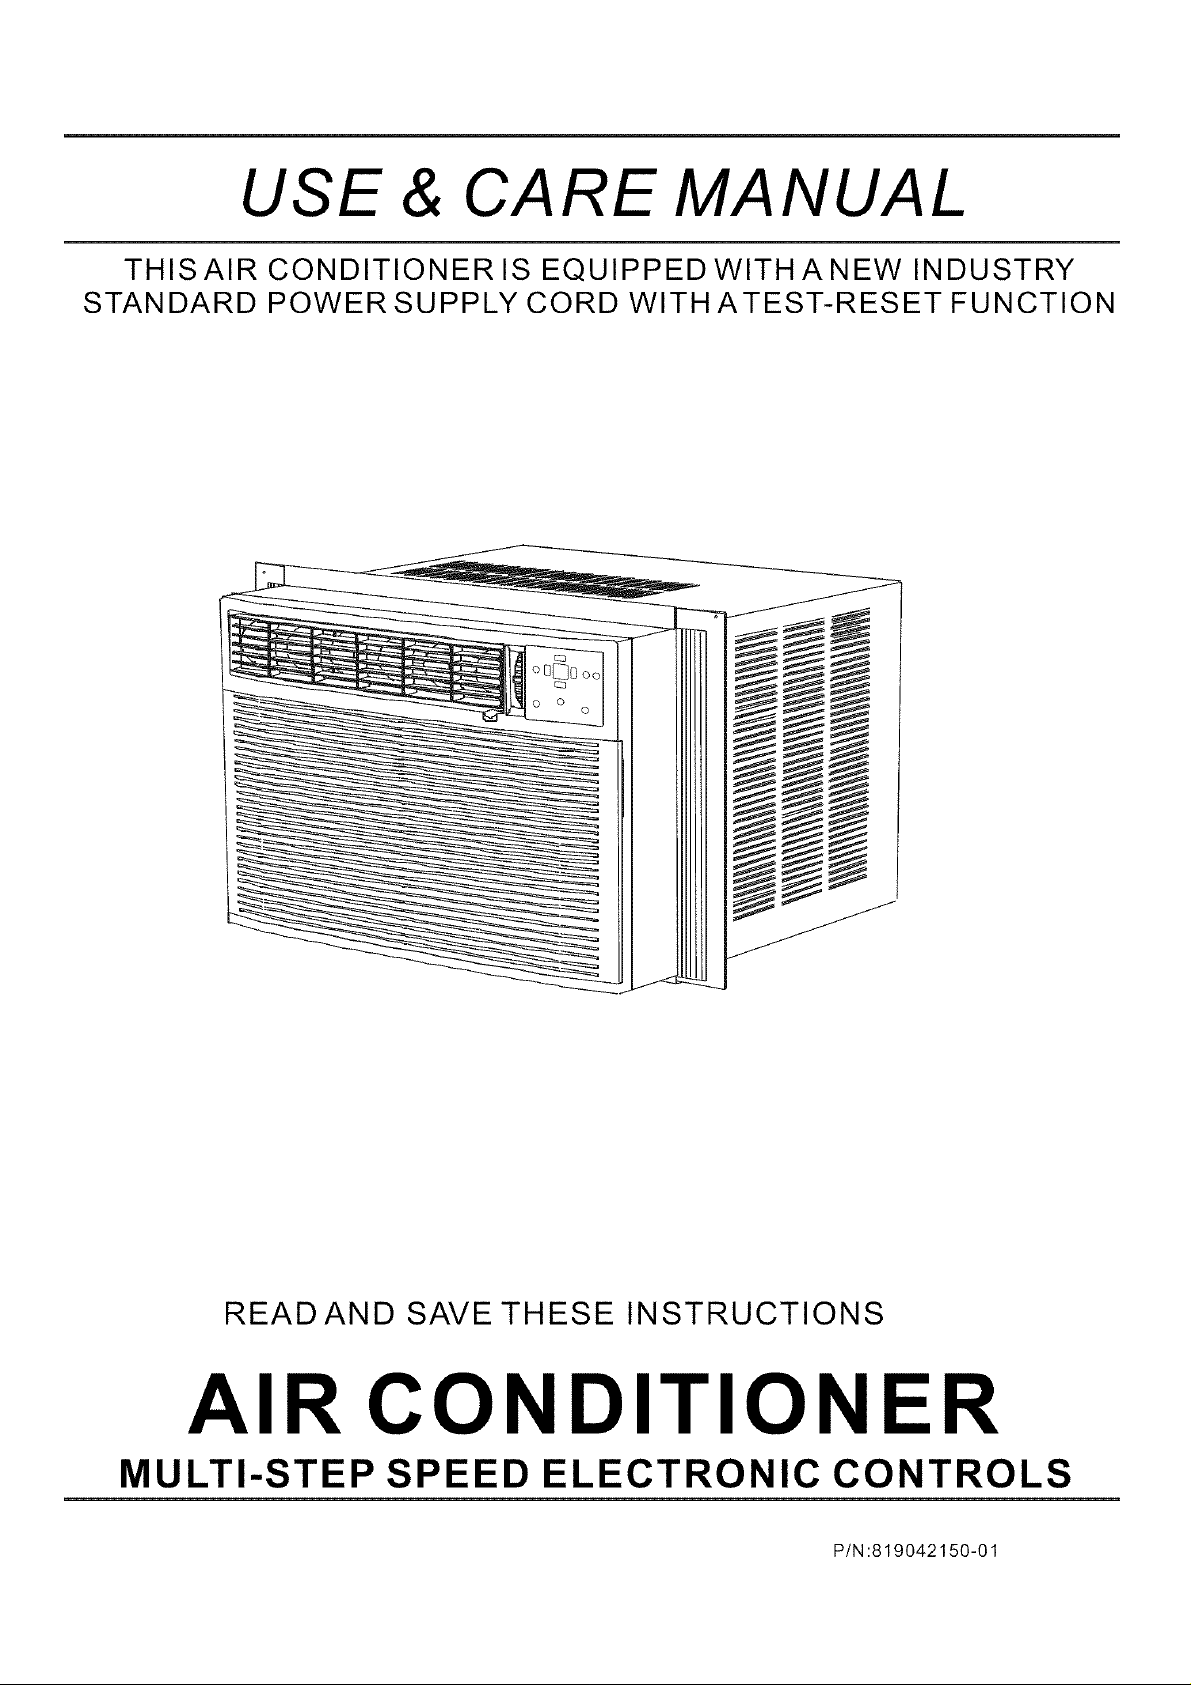
USE & CARE MANUAL
THISAIR CONDITIONER IS EQUIPPED WITH A NEW INDUSTRY
STANDARD POWER SUPPLY CORD WITHATEST-RESET FUNCTION
READ AND SAVE THESE INSTRUCTIONS
AIR CONDITIONER
MULTI-STEP SPEED ELECTRONIC CONTROLS
P/N:819042150-01
Page 2
ROOM AIR CONDITIONER WARRANTY
Your product is protected by this warranty
Yourappliance is warranted by Electrolux, Electroluxhas authorized FrigidaireConsumer Services andtheir authorized servicersto
perform service under this warranty. Electrolux authorizes no one else to change or add to any of these obligations under this
warranty. Any obligations for service and parts under this warranty must be performed by Frigidaire Consumer Services or an
authorized Frigidaire servicer.
WARRANTY FRIGIDAIRE, THROUGH ITS THE CONSUMERWILLBE
FULLfiveyearsin Five years from Pay all costsfor repairing and replacing Costs of service calls which are listed
home warranty, original purchase 3artsofthisappliancewhich proveto be under Normal Responsibilitiesofthe
*NORMAL
RESPONSIBILITIES
OF THE CONSUMER
EXCLUSIONS
date. defective in materials or workmanship. Consumer.
This warranty applies only to products in ordinary household use, and the consumer is
responsible for the items listed below.
1. Proper use of the appliance in accordance with instructions provided with the product.
2. Proper installation by an authorized servicer in accordance with instructions provided with the
appliance and inaccordancewithalllocalplumbing, electricaland/or gas codes.
3. Proper connection to a grounded power supply ofsufficient voltage, replacement of blownfuses,
repair of loose connections or defectsin house wiring.
4. Expenses for making the appliance accessible for servicing, such as removalof trim, cupboards,
shelves, etc., which are notapartoftheappliancewhen itwasshipped from the factory.
5. Damages tofinish after installation.
6. Expenses associated with removal and reinstallationof the product.
This warranty does not cover the following:
1. CONSEQUENTIALOR INCIDENTAL DAMAGESSUCH ASPROPERTY DAMAGEAND INCIDENTAL
EXPENSES RESULTING FROMANYBREACHOFTHISWRITTEN ORANYIMPLIEDWARRANTY.
Note: Some statesdo not allowthe exclusion orlimitation of incidentalor consequential damages,so
this limitationorexclusion may notapply to you,
2. Service callswhich do notinvolve malfunction ordefects in workmanshipor material, orfor appliances
not in ordinaryhousehold use. The consumer shall pay for such service calls.
3. Damages caused by services performed by persons other than authorized Frigidaire servicers; use
of parts other than Frigidaire Genuine Renewal Parts; obtained from persons other than such
servicers; orexternalcauses such asabuse, misuse, inadequatepowersupplyoractsofGod.
4. Products with original serial numbers that have been removed or altered and cannot bereadily
determined.
AUTHORIZED SERVICERS,WILL RESPONSIBLE FOR:
IF YOU NEED SERVICE Keep your bill of sale, delivery slip, or some other appropriate paymentrecord. Thedateonthebill
establishes the warranty period should service be required. Ifservice is performed,it isinyour best
interest to obtain and keep allreceipts. This written warrantygivesyouspecificlegalrights. You may
also have other rights that vary from state tostate. Service underthiswarrantymustbeobtained by
following these steps, in order:
1. Contact FrigidaireConsumer Services oran authorized Frigidaireservicer.
2. If thereis a questionas to whereto obtain service,contact our Consumer Relations Department at::
Frigidaire
P.O. Box 212378
Augusta, GA30917
800-444-4944
Product features orspecifications as described or illustrated aresubject to changewithout notice.All warranties aremade by Electrolux.
This warranty appliesonly in the50 states ofthe U.S.A., Puerto Rico and Canada.
Page 3
Product Registration Record Your Modeland Serial Numbers
Record in thespace provided belowthe model andserial numbers. Onall models, theserial
plate is Iocatedon the outsideof the interior bulkhead left side.
Model Number
Serial Number
Register Your Product
The self-addressed PRODUCT REGISTRATION CARD should be filled in completely,
signed and returnedto the FrigidaireCompany.
Contents 2
NOTE: This USE & CARE MANUAL
provides specific operating instructions
for your model. Use the room air
conditioner only as instructed in this
USE & CARE MANUAL. These
instructions are not meant to cover
every possible condition and situation
that may occur. Common sense and
caution must be practiced when
installing, operating, and maintainin_
any appliance.
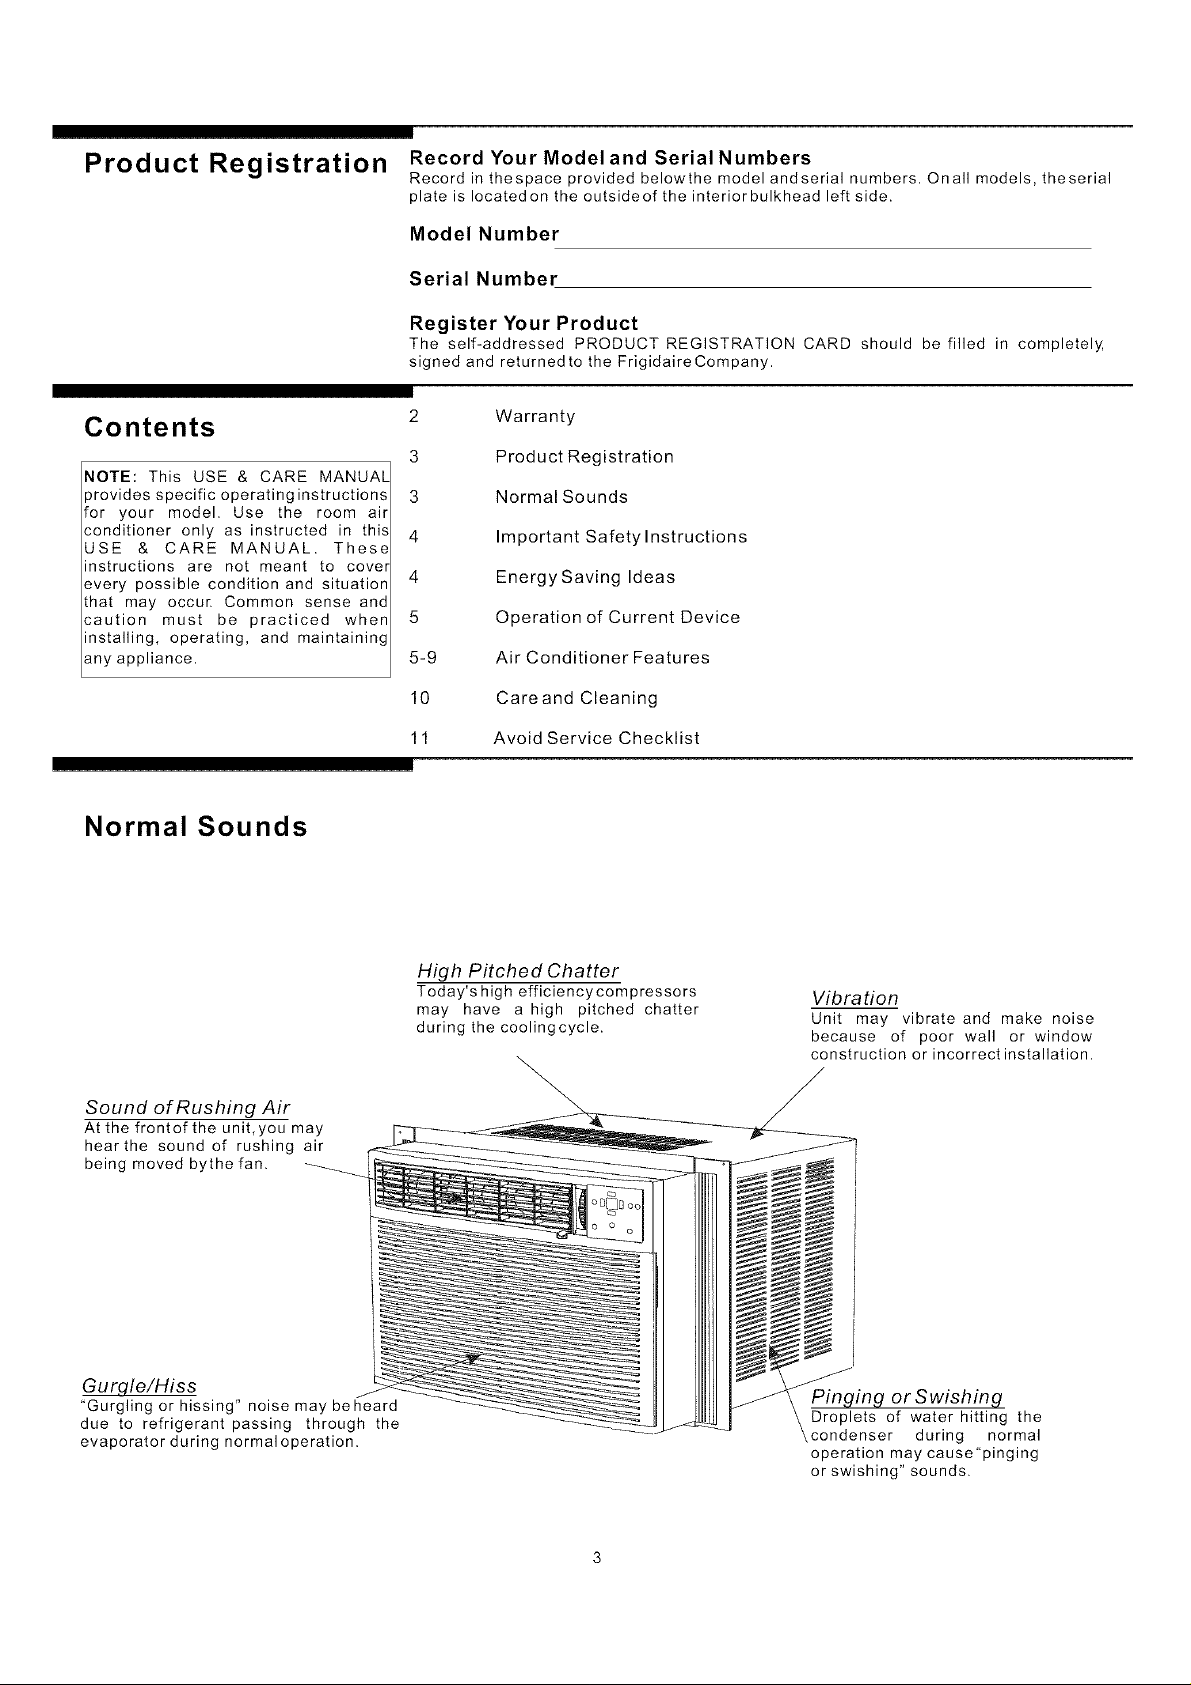
Normal Sounds
Warranty
3
3
4
4
5
5-9
Product Registration
Normal Sounds
Important Safety Instructions
Energy Saving Ideas
Operation of Current Device
Air Conditioner Features
10 Care and Cleaning
11 Avoid Service Checklist
High Pitched Chatter
Today's high efficiencycompressors
may have a high pitched chatter
during the coolingcycle.
Vibration
Unit may vibrate and make noise
because of poor wall or window
construction or incorrect installation.
Sound of Rushing Air
Atthefrontofthe unit,you may
hearthe sound of rushing air
being moved bythefan.
Gurgle/Hiss
"Gurgling or hissing" noise may beheard
due to refrigerant passing through the
evaporator during normal operation.
Pinging or Swishing
Droplets of water hitting the
condenser during normal
operation may cause "pinging
or swishing" sounds.
Page 4
Important Safety
Instructions
The power supplycord with
this air conditioner contains a current
detection device designed to reduce the
risk offire.
Please referto the section 'Operation of
Current Device'for details.
Intheeventthatthe power supply cord is
damaged, itcannot be repaired it must be
replaced with a cord from the Product
Manufacturer.
Avoid fire hazard or
electric shock. Do not use an extension
cord or an adaptor plug. Do not remove
any prong from the power cord.
Grounding type wall
receptacle
_DDo not, under an_y
circumstances, cut,
/ remove, or bypass /
_he gr°unding Pr°_
Power supply cord
with 3-prong grounding
plug and current
detection device
Read all instructions before using thisair conditioner.
For Your Safety
Do not store or use gasoline or otherflammable vapors and liquids in
the vicinityof this or any other appliance. Read product labels for
flammability and otherwarnings.
Prevent Accidents
To reduce the risk of fire, electrical shock, or injury to persons when
using your air conditioner, follow basic precautions, including the
following:
• Be sure the electrical service is adequate for the model you have
chosen. This information can be found on the serial plate, which is
located on the side of the cabinet and behind the grille.
• If theair conditioneris to be installed in a window, you will probably
want to clean both sides of the glass first. If the window is atriple-track
type with a screen panel included, remove the screen completely
before installation.
• Be sure the airconditioner has been securelyand correctly installed
according to the separate installation instructions provided with this
manual. Save this manual and the installation instructions for
possible futureusein removing orreinstalling this unit.
• When handling theair conditioner, be careful toavoid cuts fromsharp
metal fins onfront and rearcoils.
Electrical Information
The complete electrical rating of yournew room airconditioner is stated
on the serial plate. Refer to the rating when checking the electrical
requirements.
• Be sure the air conditioneris properly grounded. To minimize shock
and fire hazards, proper grounding is important. The power cord is
equipped with athree-prong grounding plug and acurrentleakage
detection device forprotection against shock& firehazards.
• Your air conditioner must be used in a properly grounded wall
receptacle. If thewall receptacleyouintendtouseisnotadequately
grounded or protected by a time delay fuseor circuit breaker, havea
qualified electrician install the proper receptacle.
• Do notrun air conditioner with outside protective cover in place. This
could result in mechanical damage within the airconditioner.
• Do not usean extension cordor an adapterplug.
Energy Saving Ideas
EN
• Donot block inside air flowwith blinds, curtainsor furniture; or
outside with shrubs, enclosures, or other buildings.
• The capacity of the room air conditioner must fittheroomsizefor
efficient and satisfactory operation.
• Install the room air conditioner on the shady side ofyourhome. A
window that faces north is best because it is shaded most of the day.
• Close the fireplace damper, floorandwallregisterssocoolairdoes
not escape upthe chimney andinto the ductwork.
• Keep blinds and drapes in otherwindows closed duringthe sunniest
part of the day.
• Clean the air filteras recommended in the section "Care and Cleaning"
• Proper insulation and weatherstrippingin your homewillhelpkeep
warm airout and cool airin.
• External house shadingwith trees, plants or awningswill help reduce
the airconditioner work load.
• Operate heat producingappliancessuchasranges, washers, dryers
and dishwashers during the coolest part of the day.
Page 5

To reduce the risk of fire, electric shock, orinjury to persons, read the
IMPORTANTSAFETY INSTRUCTIONS before operating thisappliance.
Operation of Current
Device
Air Conditioner
Features
The power supplycord contains acurrent device thatsenses damage tothe power cord. To
test your powersupply cord dothe following:
1. Plug intheAirConditioner.
2. The power supply cord will have TWO buttons on the plug head. Press the TEST button.
Youwill notice aclick as theRESET button pops out.
3. Press theRESET button. Again youwill notice aclick as thebutton engages.
4. The power supply cord is now supplying electricity to the unit. (On some products this is
also indicated bya light onthe plug head).
NOTES:
• Do not usethis device toturn the unit on oroff.
• Always make surethe RESET button is pushed in for correctoperation.
The power supplycord must be replaced if itfails to resetwhen either the TEST button is
pushed, or itcannot be reset.Anew one can be obtained fromthe product manufacturer.
olfpowersupply cord is damaged, it CANNOT be repaired. It MUST be replaced by one
obtained from theproduct manufacturer.
ELECTRONIC CONTROL OPERATING INSTRUCTIONS
Before you begin, thoroughly familiarize yourself with the controlpaneland remoteas
shown below and all its functions, then follow the symbol for thefunctions you desire.
The unit can be controlled bythe control panelalone or withthe remote.
CONTROLPANEL REMOTE CONTROL
AUTO COOL SETS FAN SLEEP CHECK FILTER
FEATURE SPEEDS MODE RESET BUTTON
TURNS UNIT
ON
LIGHT
FAN
Auto
Cool
Slower
Cool
£norgy Savor
Fan
Mo@o
/
SETS MODE ADJUSTS
TEMPERATURE
OR TIME
TemplTlmer
ACTIVATES
TIMER
Fan Moo Check
Faster
P Filter
TURNS UNIT
ON OR OFF
ADJUSTS
OR TIME
SETS
ACTIVATES
TIMER
Battery Size: AA
WARNING: Do Not MixOIdAndNewBatteries.
Do Not MixAIkaline, Standard (Carbon-Zinc),
Or Rechargeable (Nickel-Cadmium) Batteries.
Page 6

Air Conditioner Features
(continued)
TO TURN UNiT ON:
DO THIS: ]
PRESS ON/
OFF PAD
NOTE: The following instructions represent the Control Panel, thesarne
instructions can beused for theRernote Control.
YOU WiLL SEE:
ENBRGYSTAR
TO CHANGE TEMPERATURE
SETTING:
TOAD JUST FAN SPEEDS:
DO THIS:
PRESS TO
RAISE
PRESS TO
LOWER
YOU WiLL SEE:
NOTE: Tap or hold either up( & ) or down ( _ ) button until the
desired temperature is seen on the display. This temperature
will be automatically maintained anywhere between 60°F(15°C)
and 90°F(32°C). If you want the display to read the actual room
temperature. See " To Operate on Fan Only" section on Page
7.
YOU WiLL SEE:
DO THIS:
PRESS TO
SELECT:
FASTER
SLOWER
A 2Digit Displayis used to indicate the Fan Speed setting,from
10 through 99. When the " SLOW" button is pressed, the motor
speed will slowdown at multipleintervals (90 distinctsettings),
to aminimum setting of 10. To speed the motor up, press the
" FASTER" button. Thespeed will increase at multiple intervals
to a maximum setting of 99. After 5 seconds the control will
automatically change back to displaying the set temperature.
Page 7

Air Conditioner Features
(continued)
TO USE AUTO COOL FEATURE:
DO THIS: ]
PRESSAUTO
COOL
TO OPERATE ON FAN ONLY:
YOU WILLSEE:
NOTE: Fan starts at High Speed and adjusts to a slower speed
as the room temperature dictates, For example if the room does
not get too warm, it will stay at the slowest speed, If the room
temperature rises quickly, such as a door being opened, it will
automatically go to the highest speed, The fan speeds will
re-adjust back to the slowest speed as the room returns to the
original set temperature, Press either the fan slower or fan
faster button to adjust the fan speed manually,
YOU WILL SEE:
DO THIS:
PRESS
MODE
BUTTON,
CHOOSE
FAN
TO USETHE ENERGYSAVERFEATURE:
LIGHT ON
NOTE: Use this functiononly when coolingis not desired,such
as for roomair circulation orto exhaust staleair. (Remember to
open vent during this function, but keep it closed during cooling
for maximum cooling efficiency.) You can choose anyfan speed
you prefer.
During this function, the display will show the actual room
temperature, notthe set temperature asin the cooling mode.
YOU WILLSEE:
LIGHT
ON
DO THIS:
PRESS MODE BUTTON
CHOOSE ENERGY SAVER
NOTE: In this mode, the fan will continuetorunfor3minutes
after the compressor shuts off. The fan then cycles on for 2
minutes at 10 minute intervals until the room temperature is
above the set temperature, at which time the compressor
turns back onand cooling starts.
7
Page 8

Air Conditioner Features
(continued)
TIMER: BELAY STOP/START FEATURE: YOU WILL SEE:
NOTE: For Delay Stop, the unit must be in the ON position.
NOTE: For Delay Start, the unit must be in the OFF position. To adjust
DO THIS: THEN DOTHIS:
PRESS TIMER PRESS UP(_) OR
BUTTON DOWN (v)BUTTON
SLEEP FEATURE:
timer setting, tapor hold theUP arrow(A ) orthe DOWN arrow(_ ) to
change delay timer at .5 hour increments, up to 10 hours, then at 1 hour
increments up to 24 hours. The control will count down the time
remaining until start (8, 7.5, 7,etc.). The Delay Start mode automatically
selects cooling at High Fan Speed. The temperature maintained will be
the same as previously set. To change the set temperature, press
"COOL " then Up or Down arrows until the desired temperature is
indicated on the display. After 5 seconds, the control will automatically
change the displayback to thehours remaining untilthe unit willstart/stop.
Turning the unit "ON" or "OFF" at any time will cancel the Delay Start/Stop
function.
YOU WILLSEE:
ON
i
DO THIS:
PRESS
SLEEP
BUTTON
CHECK FILTER FEATURE:
Auto s,.,p c.+.
+0,+,+,++,,+, ,+_ , _;:_ \
\
MGHT ON
Mode
NOTE: In this" MODE " the selected temperature will increase by 2°F 30
minutes after the mode is selected. The temperature will then increase by
another 2°F after an additional 30 minutes. This new temperature will be
maintained for 7 hours before it returns to the originally selected
temperature. This ends the " Sleep " MODE and the unit will continue to
operate as originally programmed. The " Sleep" MODE program can be
cancelled at any time during operation by again pressing the " Sleep"
button.
YOU WILLSEE:
MGHT ON
NOTE: This feature is a reminder to clean the Air Filter (See Care and
Cleaning) for moreefficient operation. The LED (light) will illuminateafter
250 hours ofoperation. To reset aftercleaning the filter, press the"Check
Filter" button and the lightwill go off.
8
Page 9

Air Conditioner Features
(continued)
TO TURN UNIT OFF:
DO THIS:
PRESS ON/
OFF BUTTON
YOU WILL SEE:
ADDITIONAL THINGS YOU SHOULD KNOW
Now that you have mastered the operating procedure, herearemorefeaturesinyourcontrolthatyoushould become
familiar with.
• The "Cool'' circuit hasanautomatic3minutetimedelayedstartiftheunitis turned offand on quickly. This prevents
overheating of the compressor and possible circuit breaker tripping. The fan will continue to run during this time.
. The control willmaintain the settemperature within ZF, between 60°Fand 90°Fdegrees.
• The control iscapable of displaying temperature indegreesFahrenheitordegreesCelsius. To convert from one to the
other and back, press and hold the " TEMP/TIMER" Up (_)and Down (v) buttons together for 3seconds.
Fresh AirVent Control
Fresh Air Vent Control
The Fresh Air Vent allows the air conditioner to:
1.Recirculate inside air -VentCIosed (See Fig.l)
2.Draw fresh air into the room- Vent Open(See Fig.2)
3.Exchange airfrom the room and draws fresh air into the room- Vent
and Exhaust Open (See Fig.3)
-- -- 0
C
Figure 1 (VENT CLOSED)
Figure 2 (VENT OPEN)
Figure 3 (VENT &
EXHAUST OPEN)
Page 10

4-WayLouvers
Air Filter
The 4-Way air directional louvers allow youtodirectairflowupor
down, left or right throughout the room as needed. Rotate the auger
wheel until the desired left/right direction is obtained. Pivot
horizontal louvers until the desired up/down direction is obtained.
Care and Cleaning
Clean your air conditioner occasionally to keep it looking new. Be
sure tounplugthe unit beforecleaning to preventshock or fire
hazards:
Air Filter Cleaning
The air filter should be checked at least once a month to see if
cleaning is necessary.
Trapped particlesin thefilter can build upand causean accumulation
of froston the coolingcoils.
• Open thefront panel.
• Grasp the filterby the centerand pull upand out.
• Wash the filter using liquid dishwashing detergent and warm
water. Rinse filter thoroughly. Gently shake excess waterfromthe
filter. Be sure filteris thoroughly drybefore replacing.
• Or, instead ofwashing you may vacuum the filter clean.
Cabinet Cleaning
• Be sure to unplug the air conditioner to prevent shock or fire
hazard. Thecabinetandfrontmay bedustedwith an oil-free cloth
or washed with a cloth dampened in a solution ofwarm water and
mild liquid dishwashingdetergent. Rinse thoroughlyand wipe dry.
• Never use harshcleaner, waxor polish onthe cabinet front.
oBe sure to wring excess water from the cloth before wiping
around the controls. Excess water in or around the controls may
cause damage to the air conditioner.
• Plug in air conditioner.
Winter Storage
If you plan to store the air conditioner during the winter, remove
it carefully from the window according to the installation
instructions. Coveritwith plasticorreturn it tothe original carton.
NOTE: To prevent rust or electrical connections from being
damaged, store air conditioner in an upright positionandina
dry place.
10
Page 11

Avoid Service Checklist Before calling forservice, review this list. It may save you timeand expense. This list
includes common occurrences that are not the result of defective workmanship or
materials in thisappliance
OCCURRENCE SOLUTION
Air conditionerwill notoperate.
Airfromunitdoes notfeelcold
enough.
Air conditioner cooling, but
room is toowarm- ice forming
on cooling coilbehind
decorative front.
Air conditioner cooling, but
room is too warm-NO ice
forming on coolingcoil
behind decorative front.
Room too cold
Air conditioner turnson and
off rapidly.
Noise when unitis cooling
Water dripping iNSIDE when
unit is cooling.
Wall plugdisconnected. Push plugfirmly into walloutlet.
Current device tripped. Preset RESET button.
House fuse blown or circuit breaker tripped. Replace fusewith time delaytype or reset
circuit breaker.
Control is OFR Turn control On andset to desired FAN orCOOL setting.
Room temperaturebelow60°F(15°C).Coolingmaynotoccuruntilroom temperature
rises above 60°F (15°C).
Temperature sensor touchingcoldcoil, located behind air filter. Straighten away
from coil
Reset to a lower temperature.
Compressor shut-off by changing modes. Wait approximately3minutes, andlistenfor
compressor to restartwhen set in the COOL mode.
Outdoor temperature below 60°F(15°C). To defrost thecoil, set selector to FAN
position.
Air filter may be dirty. Clean filter. Refer to Care and Cleaning section. To defrost, set
selector to FAN ONLY mode..
Temperature is too low for night-time cooling. To defrost thecoil, settoFAN ONLY
mode. Then, set temperature to a higher number.
Dirty air filter-air restricted. Clean airfilter. Referto Care and Cleaning section.
Temperature is too high. Set temperature to alower number.
Ventset at OPEN position. Set vent at CLOSED position for maximum cooling.
Air direction louvers positioned improperly. Position Iouversfor better airdistribution.
Front of unitis blocked bydrapes, blinds, furniture,etc.-restricts air distribution.Clear
blockage in frontof unit.
Doors, windows, registers, etc, open-cold air escapes. Close doors, windows,
registers, etc.
Unit recently turned on in hot room, allow additionaltimetoremove"stored heat"
from walls, ceiling, fioorand furniture.
Setting too low. Increase temperaturesetting.
Dirty air filter-air restricted. Clean air filter.
Outside temperature extremely hot. Set FAN speed toafastersettingtobringair
past cooling coils morefrequently.
Air movement sound. This is normal. If tooloud, set toa slower FAN setting.
Sound of fan hitting water-moisture removalsystem. Thisisnormalwhenhumidity
is high. CIosedoors windows and registers.
Window vibration- poor installation. Refer to installation instructions orcheck with
installer.
Improper installation. Tilt air conditioner slightly to the outside to allow water
drainage. Refer toinstallation instructions -checkwith installer.
WaterdrippingOUTSiDEwhen Unit removing large quantity of moisture from humid room. This is normal during
unit is cooling, excessively humid days.
 Loading...