

Page 1
OWNER'SGUIDE
READ AND SAVE THESE INSTRUCTIONS
AIRCONDITIONER
ELECTRONICCONTROL
P/N 309000848(08/02)
Page 2
ROOM AIR CONDITIONER WARRANTY
Your product is protected by this warranty
Your appliance is warranted by White Consolidated industries, Inc WCI has authorized Frigidaire Consumer Services and their authorized servicers to perform
service under this warranty WCI authorizes no one else to change or add to any of these obligations under this warranty Any obligations for service and parts
under this warranty must be performed by Frigidaire Consumer Services or an authorized Frigidaire servicer
WARRANTY FRIGIDAIRE, THROUGH ITS AUTHORIZED THE CONSUMER WILL BE
PERIOD SERVICERS, WILL: RESPONSIBLE FOR:
FULL ONE-YEAR One year from odgklal Pay all costs for repairing or rep[adng parts of this Costs of service calls that ale listed under NOR-
WARRANTY surchase date. appliance which prove to be defective in materials or MAL RESPONSiBILITiES OF THE CONSUMER.*
LIMITED 2ND-STH Secondthrough fifth years Repair or replace any parts in the Sealed Refrigeration Diagnostic costs and any removal, transportation
YEAR WARRANTY from original purchase System (compressor, condenser, evaporator and tubing) and reinsta[[ation costs which are required because
(Sealed System) date. proves to be defective in materials or workmanship of service. Costs for labor, parts and transportation
LIMITED Time peRods listed above AH of the provisions of the furl and limited warranties above Costs of the technician's travel to the home and
WARRANTY and the exclusions listed below apply any costs for pick up and delivery of the appliance
(Applicable to the required because of service
State of Alaska)
workmanship
other than with respect to the Sealed Refrigeration
System
*NORMAL
RESPONSIBILITIES
OF THE CONSUMER
EXCLUSIONS
IF YOU NEED SERVICE
This warranty applies only to products in ordinary household use, and the consumer is responsible for the
items listed below.
I. Proper use of the appliance in accordance with instructions provided with the product
2. Proper installation by an authorized servicer in accordance with instructions provided with the appliance and in accordance
with all local plumbing, electrical and/or gas codes
3. Proper connection to a grounded power supply of sufficient voltage, replacement of blown fuses, repair of loose connections
or defects in house wiring
4. Expenses for making the appliance accessible for servicing, such as removal of trim, cupboards, shelves, etc, which are not a
part of the appliance when it was shipped from the factory
5. Damages to finish after installation
6. Replacement of light bulbs and/or fluorescent tubes (on models with these features)
This warranty does not cover the following:
I. CONSEQUENTIAL OR INCIDENTAL DAMAGES SUCH AS PROPERTYDAMAGE AND INCIDENTAL EXPENSESRESULTINGFROM
ANY BREACH OF THISWRITTEN OR ANY IMPLIED WARRANTY
Note: Some states do not allow the exclusion or limitation of incidental or consequential damages, so this limitation or
exclusion may not apply to you
2. Service calls which do not involve maffunct[on or defects in workmanship or material, or for appliances not in ordinary
household use The consumer shall pay for such service calls
3. Damages caused by services performed by persons other than authorized Frigidaire servicers; use of parts other than Frigidaire
Genuine Renewal Parts; obtained from persons other than such servicers; or external causes such as abuse, misuse, inadequate
power supply or acts of God
4. Products with original serial numbers that have been removed or altered and cannot be readily determined
Keep your bill of sale, delivery slip, or some other appropriate payment record. The date on the bill establishes the warranty period
should service be required If service is performed, it is in your best interest to obtain and keep all receipts This written warranty
gives you specific legal rights. You may also have other rights that vary from state to state Service under this warranty must be
obtained by following these steps, in order:
I Contact Frigidaire Consumer Servicesor an authorized Frigidaire servicer
2 If there is a question as to where to obtain service, contact our Consumer Relations Department at:
Frigidaire Company
RO Box 212378
Augusta, GA 30917
800-444-4944
Product features or specifications as described or illustrated aresubject to change without notice All warranties are made by White
Consolidated industries, Inc This warranty applies only in the 50 states of the USA., Puerto Rico and Canada.
EFRIG!DAIRE
Page 3
Product Registration
Record Your Model and Serial Numbers
Record in the space provided below the model and serial numbers. On most
models, the serial plate is located on the outside of the cabinet. On some models,
remove the filter and look at the bottom edge of the air conditioner behind the
front grille for the model and serial numbers. Reading these numbers may be easier
by using a flashlight or by removing the cabinet front as instructed under "Care
and Cleaning."
Model No.
Serial No.
Register Your Product
The self-addressed PRODUCT REGISTRATIONCARD should be filled in completely,
signed and returned to the Frigidaire Company.
Contents
NOTE: This Owner's Guide provides
specific operating instructions for your
model. Usethe room air conditioner only
as instructed in this Owner's Guide.
These instructions are not meant to
cover every possible condition and
situation that may occur. Common sense
and caution must be practiced when
installing, operating, and maintaining
any appliance.
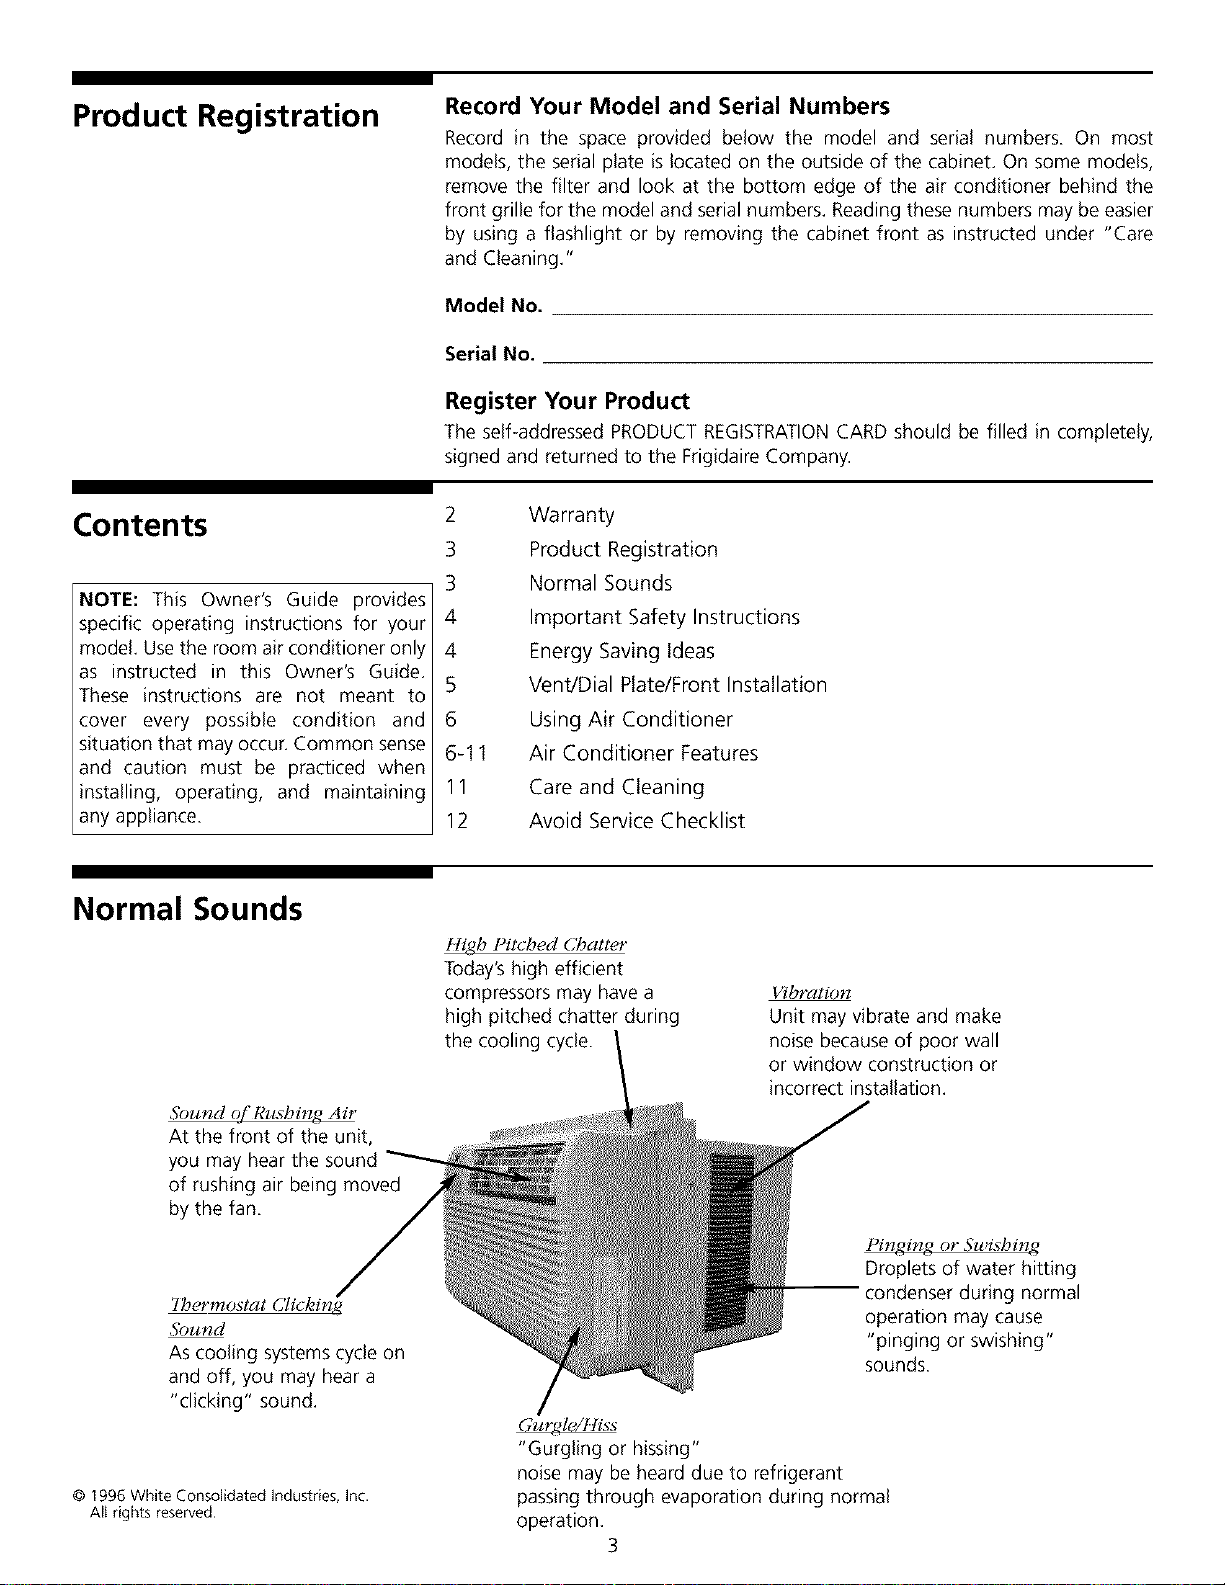
Normal Sounds
5bund (_ Rushing Air
At the front of the unit,
you may hear the sound
of rushing air being moved
by the fan.
2
3
3
4
4
5
6
6-11
11
12
High Pilclaed Cbat&,r
Today's high efficient
compressors may have a
high pitched chatter during
the cooling cycle.
Warranty
Product Registration
Normal Sounds
Important Safety Instructions
Energy Saving Ideas
Vent/Dial Plate/Front Installation
Using Air Conditioner
Air Conditioner Features
Care and Cleaning
Avoid Service Checklist
Vibration
Unit may vibrate and make
noise because of poor wall
or window construction or
incorrect installation.
2bermostat Clichin,_
5bund
As cooling systems cycle on
and off, you may hear a
"clicking" sound.
© 1996 White Consolidated Industries, Inc.
All rights reserved
Pinging or 3u;islaing
Droplets of water hitting
-- condenser during normal
operation may cause
"pinging or swishing"
sounds.
"Gurgling or hissing"
noise may be heard due to refrigerant
passing through evaporation during normal
operation.
3
Page 4

Important Safety
Instructions
Avoid fire hazard or
electric shock. Do not use an extension
cord or an adaptor plug. Do not remove
any prong from the power cord.
Grounding type
wall receptacle
under
Power supply
cord with 3-prong
grounding plug
Read all instructions before using this air conditioner.
For Your Safety
Do not store or use gasoline or other flammable vapors and liquids in the vicinity of
this or any other appliance. Readproduct labels for flammability and other warnings.
Prevent Accidents
To reduce the risk of fire, electrical shock, or injury to persons when using your air
conditioner, follow basic precautions, including the following:
• Be sure the electrical service is adequate for the model you have chosen. This
information can be found on the serial plate, which is located either on the side
of the cabinet or behind the grille.
• If the air conditioner is to be installed in a window, you will probably want to
clean both sides of the glass first. If the window is a triple-track type with a
screen panel included, remove the screen completely before installation.
• Be sure the air conditioner has been securely and correctly installed according to
the separate installation instructions provided with this manual. Save this manual
and the installation instructions for possible future use in removing or reinstalling
this unit.
• When handling the air conditioner, be careful to avoid cuts from sharp metal fins
on front and rear coils.
Electrical Information
The complete electrical rating of your new room air conditioner is stated on the
serial plate. Refer to the rating when checking the electrical requirements.
• Be sure the air conditioner is properly grounded. To minimize shock and fire
hazards, proper grounding is important. The power cord is equipped with a
three-prong grounding plug for protection against shock hazards.
• Your air conditioner must be used in a properly grounded wall receptacle. If the
wall receptacle you intend to use is not adequately grounded or protected by a
time delay fuse or circuit breaker, have a qualified electrician install the proper
receptacle.
• Do not run air conditioner with outside protective cover in place. This could result
in mechanical damage within the air conditioner.
• Do not use an extension cord or an adapter plug.
Energy Saving Ideas
• Do not block air flow inside with blinds, curtains or furniture; or
outside with shrubs, enclosures, or other buildings.
• The capacity of the room air conditioner must fit the room size for efficient and
satisfactory operation.
• Install the room air conditioner on the shady side of your home. A window that
faces north is best because it is shaded most of the day.
• Close the fireplace damper, floor and wall registers so cool air does not escape
up the chimney and into the duct work.
• Keep blinds and drapes in other windows closed during the sunniest part of the
day.
• Clean the air filter as recommended in the section "Care and Cleaning."
• Proper insulation and water stripping in your home will help keep warm air out
and cool air in.
• External house shading with trees, plants or awnings will help reduce the air
conditioner's work load.
• Operate heat producing appliances such as ranges, washers, dryers and
dishwashers during the coolest part of the day.
4
Page 5
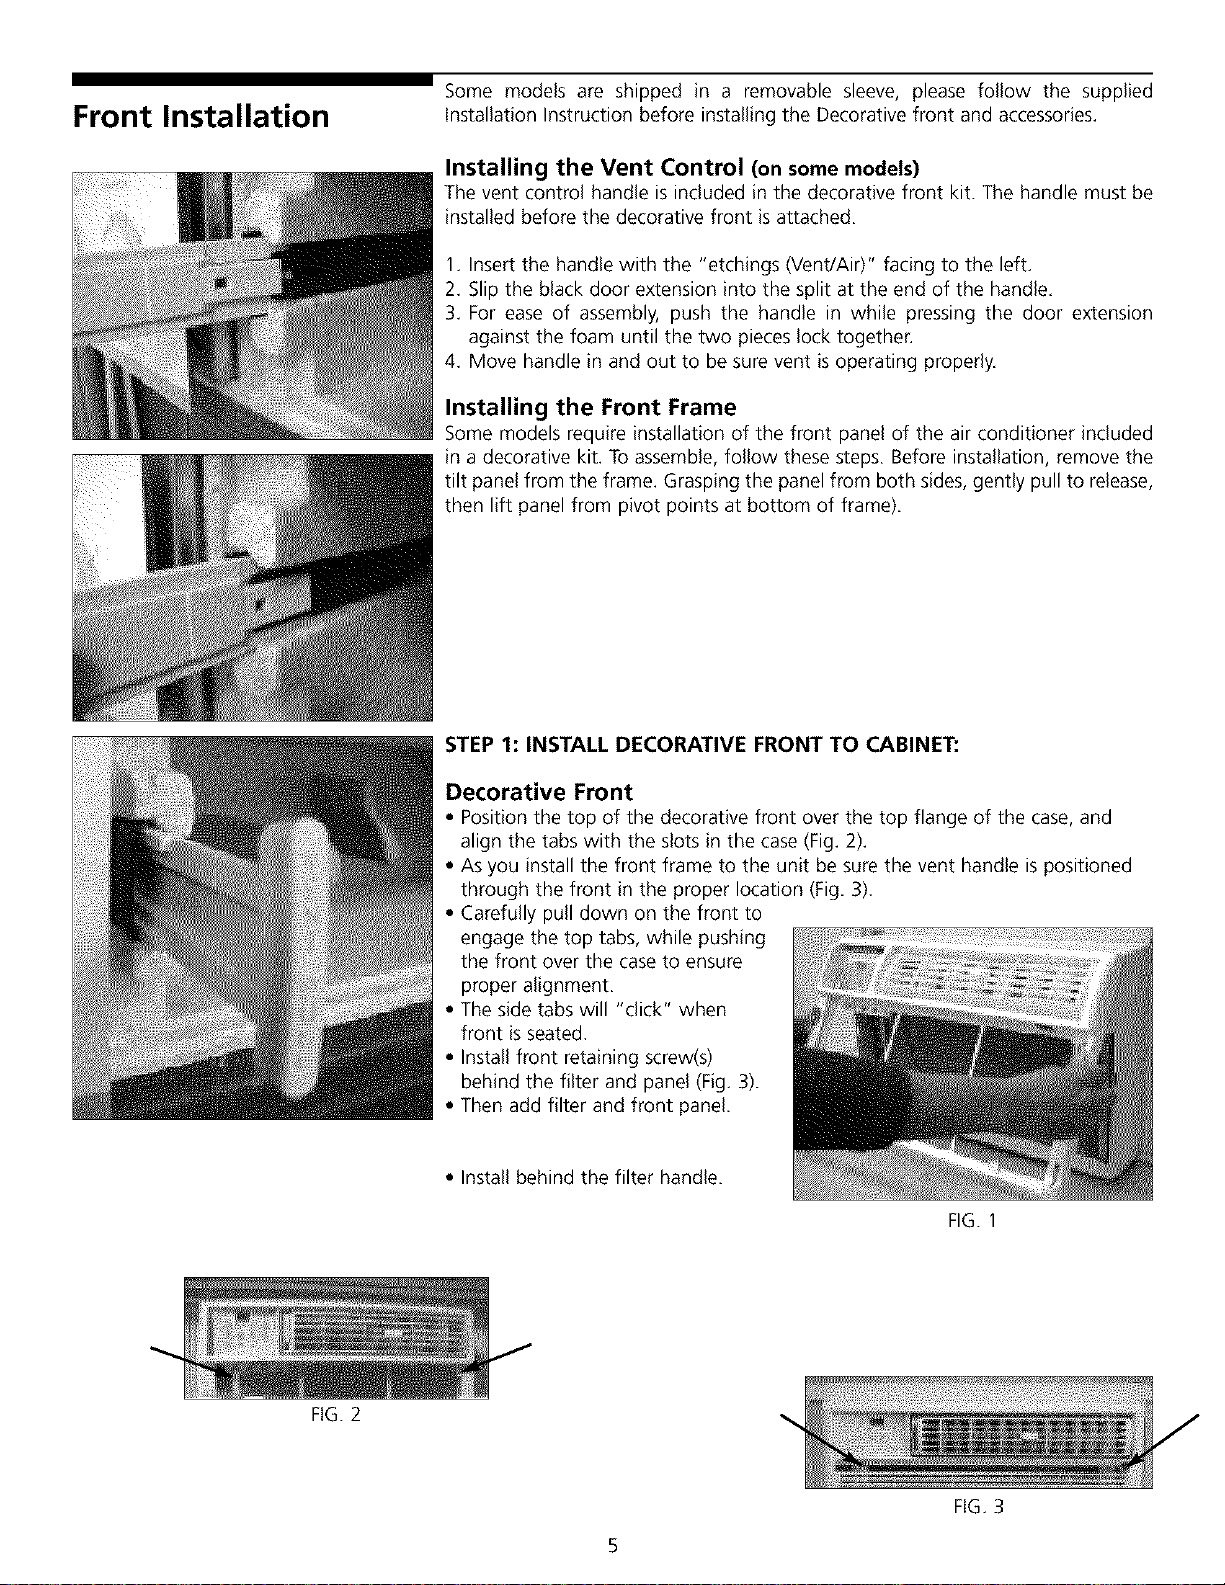
Front Installation
Some models are shipped in a removable sleeve, please follow the supplied
Installation Instruction before installing the Decorative front and accessories.
Installing the Vent Control (on some models)
The vent control handle is included in the decorative front kit. The handle must be
installed before the decorative front is attached.
1. Insert the handle with the "etchings (Vent/Air)" facing to the left,
2. Slip the black door extension into the split at the end of the handle,
3. For ease of assembly, push the handle in while pressing the door extension
against the foam until the two pieces lock together.
4. Move handle in and out to be sure vent is operating properly.
Installing the Front Frame
Some models require installation of the front panel of the air conditioner included
in a decorative kit. To assemble, follow these steps. Before installation, remove the
tilt panel from the frame. Grasping the panel from both sides, gently pull to release,
then lift panel from pivot points at bottom of frame).
STEP 1: INSTALL DECORATIVE FRONT TO CABINET:
Decorative Front
Position the top of the decorative front over the top flange of the case, and
align the tabs with the slots in the case (Fig. 2).
• As you install the front frame to the unit be sure the vent handle is positioned
through the front in the proper location (Fig, 3).
• Carefully pull down on the front to
engage the top tabs, while pushing
the front over the case to ensure
proper alignment.
• The side tabs will "click" when
front is seated.
• Install front retaining screw(s)
behind the filter and panel (Fig. 3).
• Then add filter and front panel.
Install behind the filter handle.
FIG. 1
FIG. 2
FIG.3
Page 6
Toreducetheriskoffire,electricshock,orinjuryto persons,read
H_vSmm,MAir Conditioner the IMPORTANT SAFETYINSTRUCTIONSbefore operating this appliance.
NOTE: If the air conditioner is turned off
or the temperature is changed to a lower
setting then back to a higher setting the
compressor will shut off. Wait 3 minutes
before the compressor will restart, this
allows for the pressure inside the
compressor to equalize.. Failureto wait 3
minutes may cause inefficient operation.
When adjusting the temperature the fan
will continue to run.
To begin operating the air conditioner, follow these steps:
1. Plug in the air conditioner. (Toprevent electrical hazards, do not use an extension
cord or an adapter plug.)
2. Set the exhaust vent to the CLOSED position.
3. Press "On/Off" button to turn unit on.
4. PressFan Speed "HI"
5. PressMode "COOL"
6. Press "TEMP/TIME" down v to the lowest setting "60 degrees"
7. Adjust the louvers for comfortable air flow.
8. Once the room has cooled, adjust the "TEMP/TIME" and Fan Speed to desired
temperature.
Review the "Air Conditioner Features" section for other settings.
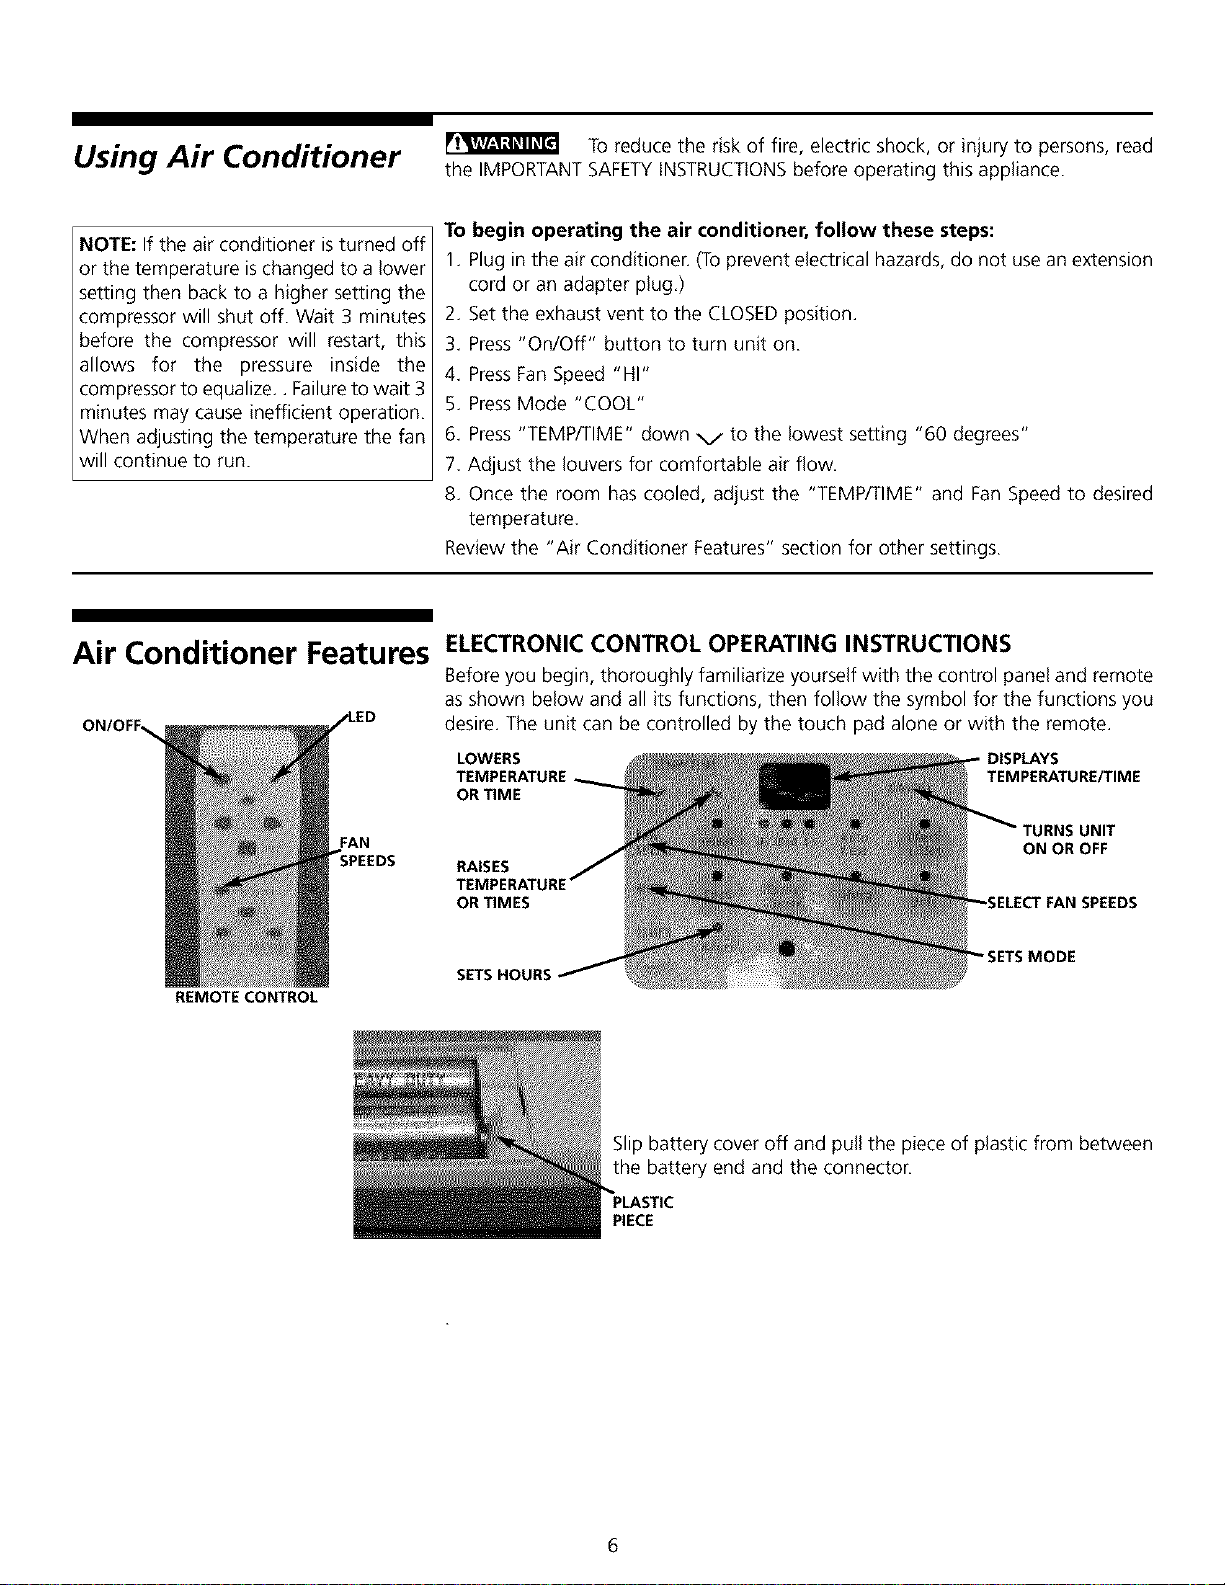
Air Conditioner Features ELECTRONIC CONTROL OPERATING INSTRUCTIONS
Before you begin, thoroughly familiarize yourself with the control panel and remote
as shown below and all its functions, then follow the symbol for the functions you
desire. The unit can be controlled by the touch pad alone or with the remote.
LOWERS DISPLAYS
OR TIME
TEMPERATURE/TIME
REMOTE CONTROL
FAN
RAISES
ON OR OFF
OR TIMES
SETS HOUR_
Slip battery cover off and pull the piece of plastic from between
the battery end and the connector.
PIECE
6
Page 7
Air Conditioner Features
(continued)
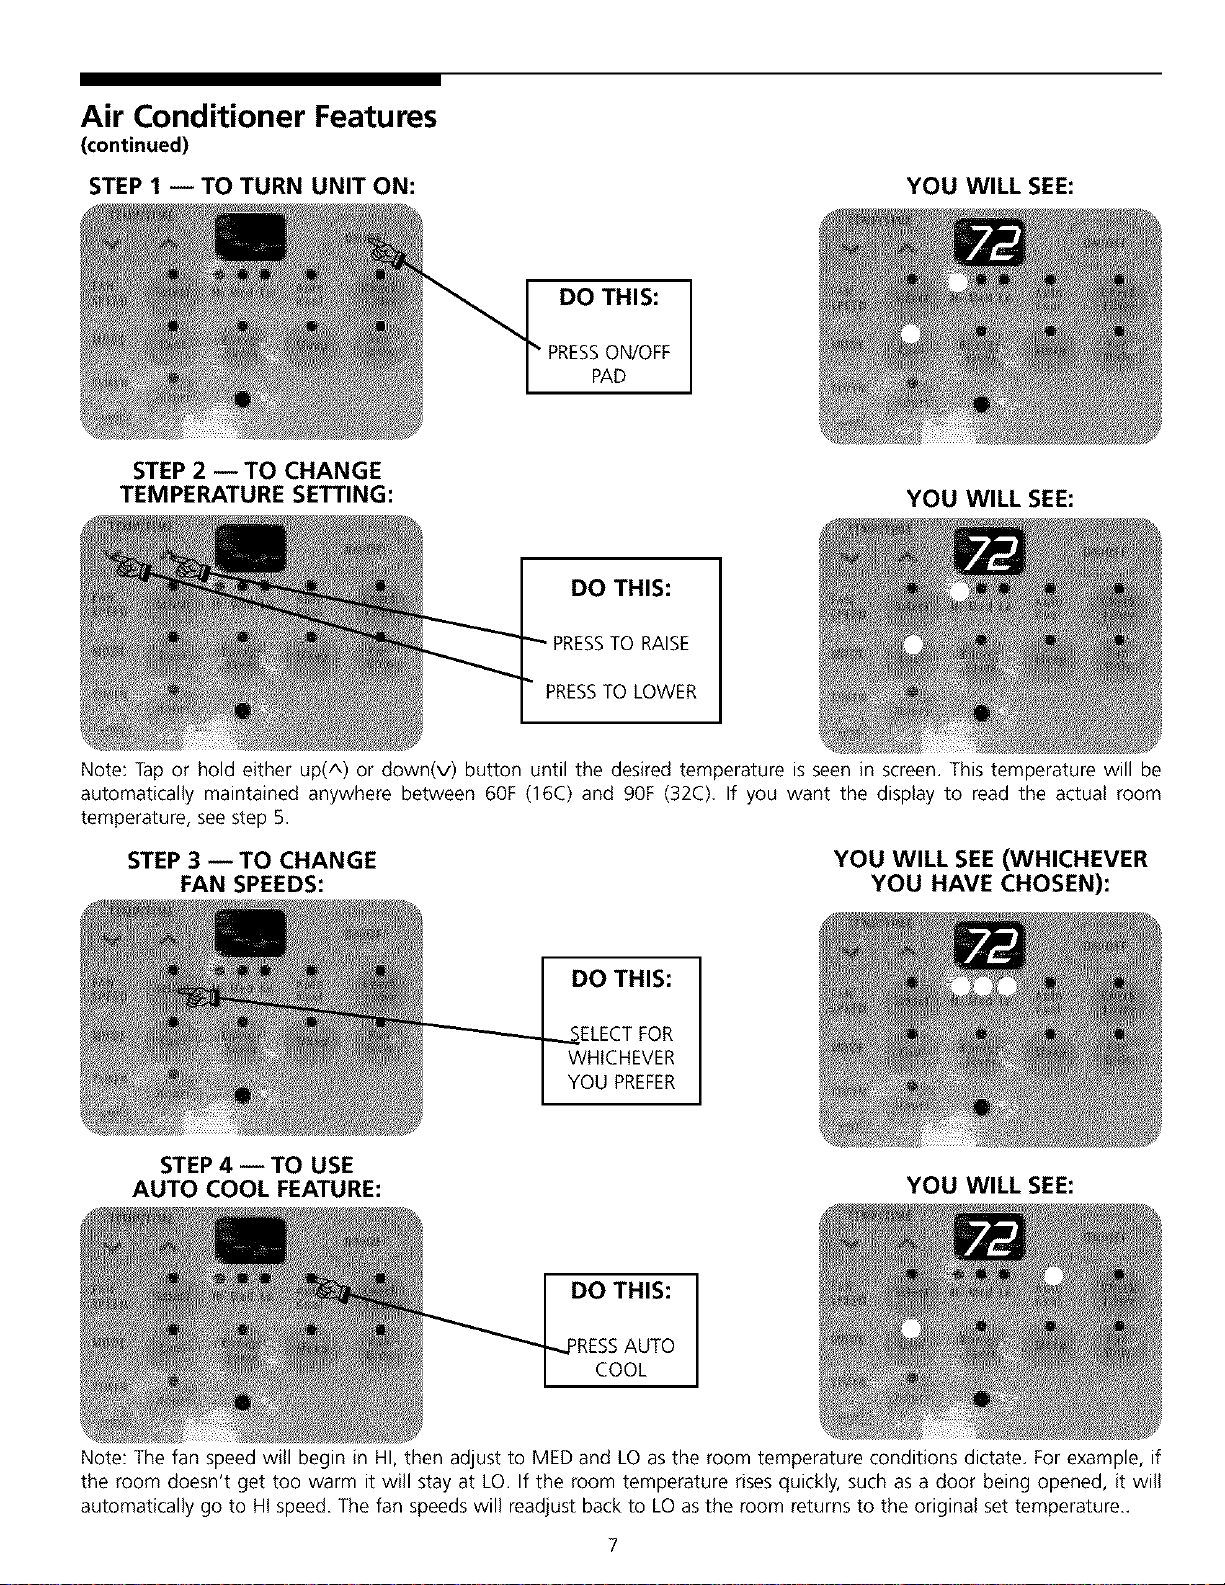
STEP 1 -- TO TURN UNIT ON: YOU WILL SEE:
DO THIS:
PRESSON/OFF
PAD
STEP 2 -- TO CHANGE
TEMPERATURE SETTING:
DO THIS:
PRESSTO RAISE
PRESSTO LOWER
YOU WILL SEE:
Note: Tap or hold either up(A) or down(v) button until the desired temperature is seen in screen. This temperature will be
automatically maintained anywhere between 60F (16C) and 90F (32C). If you want the display to read the actual room
temperature, see step 5.
STEP 3 -- TO CHANGE
FAN SPEEDS:
DO THIS:
;ELECTFOR
WHICHEVER
YOU PREFER
YOU WILL SEE (WHICHEVER
YOU HAVE CHOSEN):
STEP 4 -- TO USE
AUTO COOL FEATURE:
_RESSAUTO
DO THIS: I
COOL
YOU WILL SEE:
Note: The fan speed will begin in HI, then adjust to MED and LO as the room temperature conditions dictate. For example, if
the room doesn't get too warm it will stay at LO. If the room temperature rises quickly, such as a door being opened, it will
automatically go to HI speed. The fan speeds will readjust back to LOas the room returns to the original set temperature..
Page 8
Air Conditioner Features
(continued)
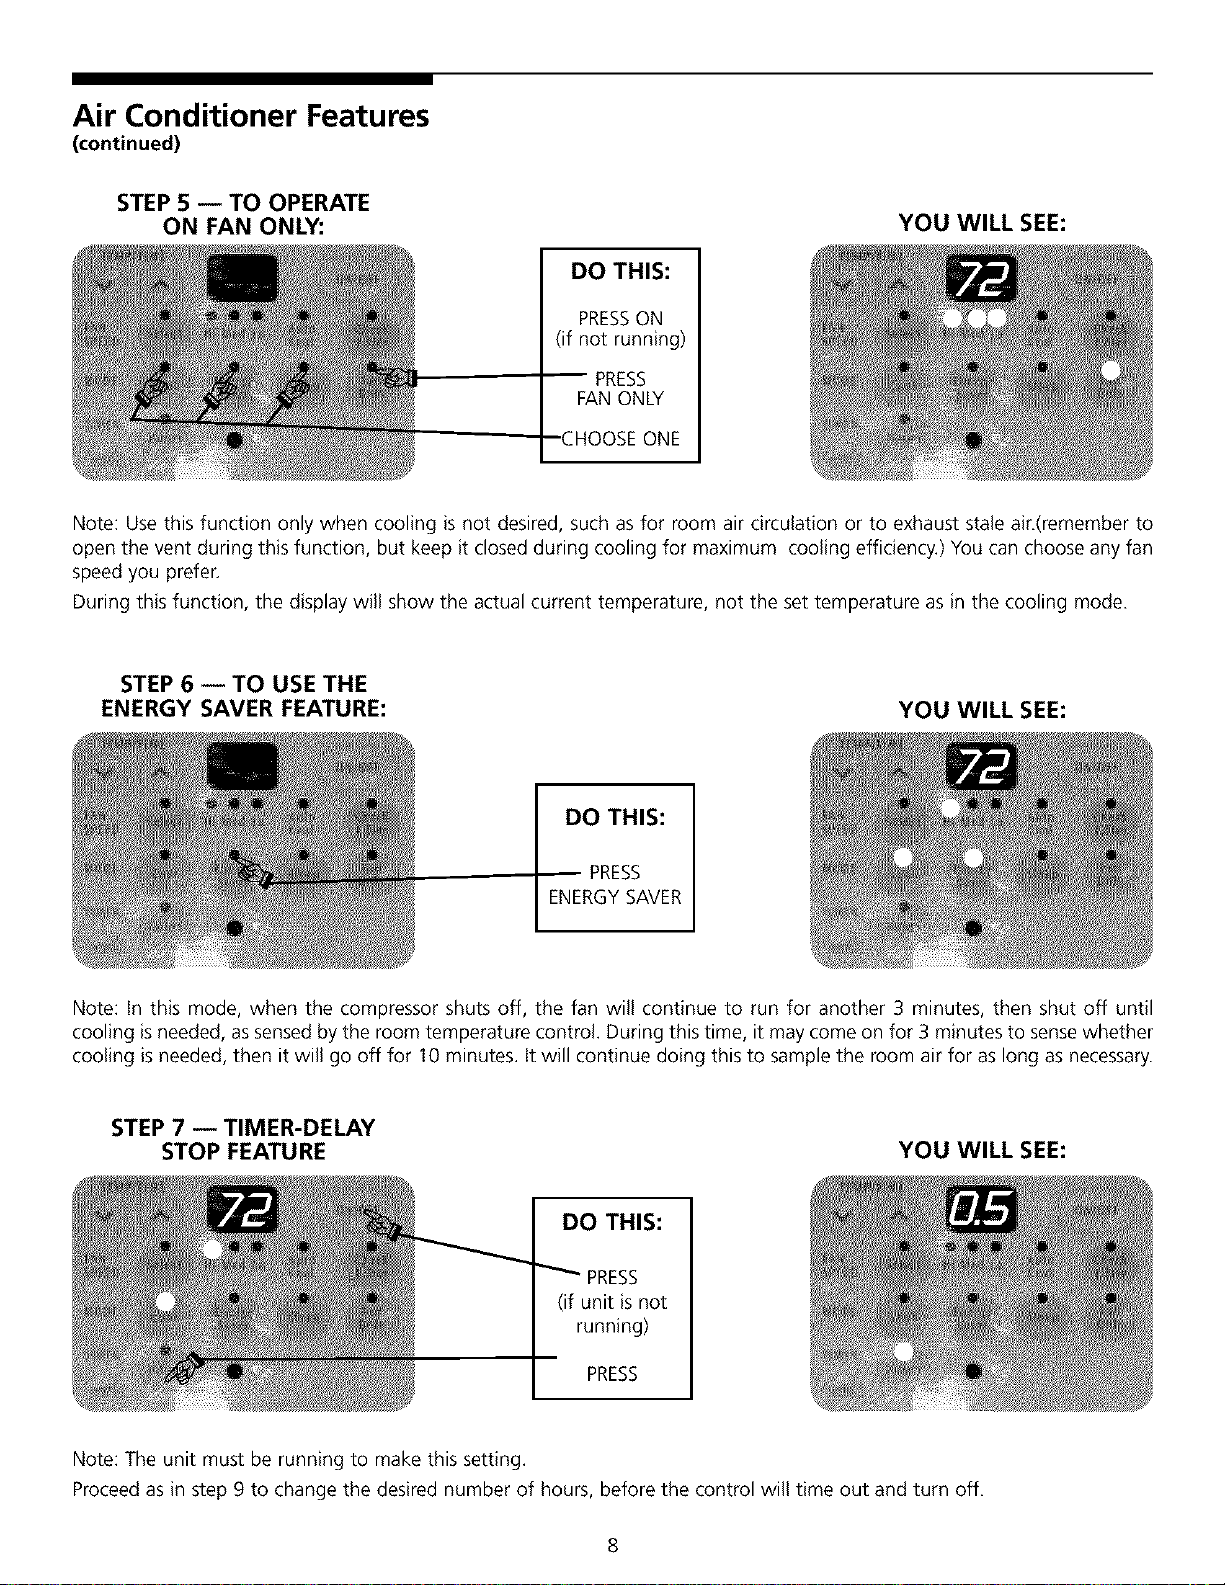
STEP 5 -- TO OPERATE
ON FAN ONLY:
DO THIS:
PRESSON
(if not running)
PRESS
FAN ONLY
Note: Usethis function only when cooling is not desired, such as for room air circulation or to exhaust stale air.(remember to
open the vent during this function, but keep it closed during cooling for maximum cooling efficiency.) You can choose any fan
speed you prefen
During this function, the display will show the actual current temperature, not the set temperature as in the cooling mode.
STEP 6 -- TO USE THE
ENERGY SAVER FEATURE: YOU WILL SEE:
YOU WILL SEE:
DO THIS:
PRESS
ENERGYSAVER
Note: In this mode, when the compressor shuts off, the fan will continue to run for another 3 minutes, then shut off until
cooling isneeded, as sensed by the room temperature control. During this time, it may come on for 3 minutes to sense whether
cooling is needed, then it will go off for 10 minutes. It will continue doing this to sample the room air for as long as necessary.
STEP 7 -- TIMER-DELAY
STOP FEATURE
DO THIS:
PRESS
(if unit is not
running)
PRESS
YOU WILL SEE:
Note: The unit must be running to make this setting.
Proceed as in step 9 to change the desired number of hours, before the control will time out and turn off.
8
Page 9
Air Conditioner Features
(continued)
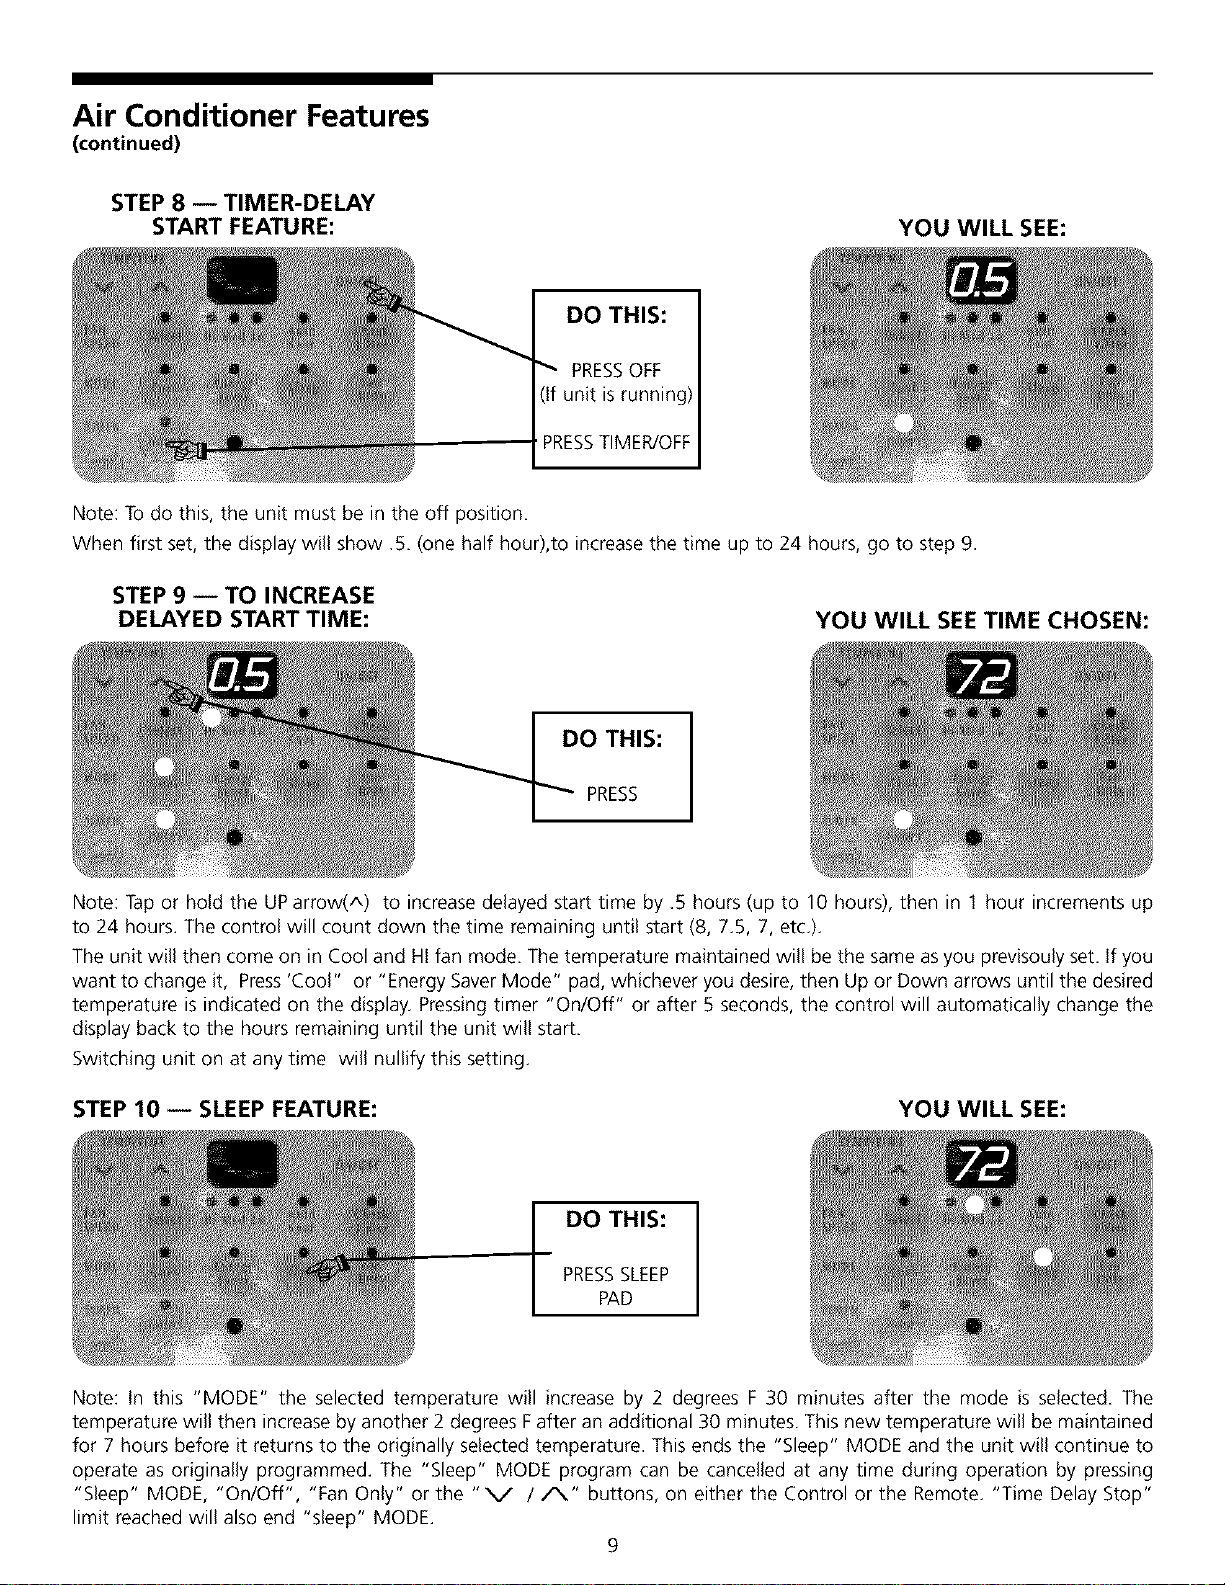
STEP 8 -- TIMER-DELAY
START FEATURE: YOU WILL SEE:
DO THIS:
PRESSOFF
f unit is running)
_RESSTIMER/OFF
Note: To do this, the unit must be in the off position.
When first set, the display will show .5. (one half hour),to increase the time up to 24 hours, go to step 9.
STEP 9 -- TO INCREASE
DELAYED START TIME:
YOU WILL SEE TIME CHOSEN:
DO THIS: I
PRESS
Note: Tap or hold the UParrow(A) to increase delayed start time by .5 hours (up to 10 hours), then in 1 hour increments up
to 24 hours. The control will count down the time remaining until start (8, 7.5, 7, etc.).
The unit will then come on in Cool and HI fan mode. The temperature maintained will be the same asyou previsouly set. If you
want to change it, Press'Cool" or "Energy SaverMode" pad, whichever you desire, then Up or Down arrows until the desired
temperature is indicated on the display. Pressing timer "On/Off" or after 5 seconds, the control will automatically change the
display back to the hours remaining until the unit will start.
Switching unit on at any time will nullify this setting.
STEP 10 -- SLEEP FEATURE: YOU WILL SEE:
PRESSSLEEP
DO THIS: J
PAD
Note: In this "MODE" the selected temperature will increase by 2 degrees F 30 minutes after the mode is selected. The
temperature will then increase by another 2 degrees F after an additional 30 minutes. This new temperature will be maintained
for 7 hours before it returns to the originally selected temperature. This ends the "Sleep" MODE and the unit will continue to
operate as originally programmed. The "Sleep" MODE program can be cancelled at any time during operation by pressing
"Sleep" MODE, "On/Off", "Fan Only" or the "V / A" buttons, on either the Control or the Remote. "Time Delay Stop"
limit reached will also end "sleep" MODE.
9
Page 10

Air Conditioner Features
(continued)
STEP 11 -- CHECK FILTER
FEATURE:
DO THIS:
PRESSTO LOWER
Note: This feature is a reminder to clean the Air Filter (See Care and Cleaning) for more efficient operation and cooling. The
LED(light) will illuminate after 250 hours of operation, whether in cooling or fan only. To reset after cleaning the filter, press
the "Check Filter" button and the light will go off. This will restart the 250 hours, this timing cannot be reset unless the LED
(light) is on. This feature cannot be reset with the remote.
STEP 12 --TO TURN UNIT OFF: YOU WILL SEE:
YOU WILL SEE:
PRESSON/OFF
DO THIS: I
PAD
10
Page 11

Air Conditioner Features
(continued)
ADDITIONAL THINGS YOU SHOULD KNOW
Now that you have mastered the operating procedure, here are more features in your control that you should become familiar
with.
• Remote control works exactly like the control panel, follow the same instructions.
• The "Cool " circuit has an automatic 3 minute time delayed start if the unit is turned off and on quickly. This prevents
overheating of the compressor and possible circuit breaker tripping. The fan will continue to run during this time.
• The control will maintain the set temperature within 2 degrees Fahrenheit, between 60F and 90F degrees.
• The control iscapable of displaying temperature in degrees Fahrenheit or degrees Celsius. To convert from one to the other
and back, press and hold filter check and fan selector together for 3 seconds.
Figure 1 (OFF)
Figure 2 (FRESHAIR)
Fresh Air Vent Control
The FreshAir Vent allows the air conditioner to recirculate inside air (OFF),draw
air into the room (FRESHAIR) or exhaust stale air to the outside (VENT).See Figures
1, 2 & 3 for this operation.
• The "OFF" position is used when MAXIMUM cooling is desired. It may also be
for room air re-circulation without cooling when the selector switch is set to the
FAN position, this will also filter the room ain
• The FRESHAIR position allows outside air to be drawn into the room to refresh
the inside room ain
• The VENT position removes stale air from the room and exhausts it to the
outside.
• Any vent position can be used with any fan selection.
Figure 3 (VENT)
11
Page 12

Air Conditioner Features Air Directional Louvers
(continued) louver types described below.
(4-WAY)
Air directional louvers control air flow direction. Your air conditioner has one of the
4-Way Louvers
The 4_Way air directional louvers allow you to direct air flow up or down, left or
right throughout the room as needed. To adjust the air directional louvers side-to-
side, use the center handle as you move it side-to-side.
Care and Cleaning
Clean your air conditioner occasionally to keep it looking new. Be sure to unplug
the unit before cleaning to prevent shock or fire hazards.
Air Filter Cleaning
The air filter should be checked at leastonce a month to see if cleaning is necessary.
Trapped particles in the filter can build up and cause an accumulation of frost on
the cooling coils.
• Push the vent handle to the OFF position.
• Tilt the Horizontal Louvers in the UP position, before pulling the filter out.
• Grasp the filter by the center and pull up and out.
• On some models, first tilt the panel out by grasping the panel from both sides
just below the air directional louvers and gently pull to release. Gently pivot the
panel on its hinge, and remove the filter.
• Wash the filter using liquid dishwashing detergent and warm water. Rinse filter
thoroughly. Gently shake excesswater from the filter. Be sure filter isthoroughly
dry before replacing.
• Or, instead of washing you may vacuum the filter clean.
Cabinet Cleaning
• Besureto unplug the air conditioner to prevent shock or fire hazard. The cabinet and
front may be dusted with an oil-free cloth or washed with a cloth dampened in a
solution of warm water and mild liquid dishwashing detergent. Rinsethoroughly and
wipe dry.
• Never use harsh cleaners,wax or polish on the cabinet front.
• Be sure to wring excess water from the cloth before wiping around the controls.
Excesswater in or around the controls may cause damage to the air conditioner.
• The cabinet front can be removed for more thorough cleaning. Refer to "Front
Installation" in this manual.
• Clean the front in a sink using liquid dishwashing detergent and warm water. Rinse
thoroughly and dry.
• Replacecabinet front. Replacethe screws.
• Replacefront panel(if applicable) and filter. Plug in air conditioner.
Winter Storage
If you plan to store the air conditioner during the winter, remove it carefully from the
window according to the installation instructions. Cover it with plastic or return it to the
original carton.
NOTE: To prevent rust or electrical connections from being damaged, store air
conditioner in an upright position and a dry place. A winter cover can be
purchased from your dealer.The cover will protect the air conditioner when it is left in
place through the winter.
12
Page 13

Avoid Service Checklist
OCCURRENCE
Air conditioner will not operate.
Before calling for service, review this list. It may save you time and expense. This
list includes common occurrences that are not the result of defective workman-
ship or materials in this appliance.
SOLUTION
Wallplug disconnected.Pushplug firmly into wall outlet.
Housefuse blown or circuit breaker tripped. Replacefuse with time delay type or resetcircuit
breaker.
Selector Control in OFF position. Turn selector to ON (some models) or the desired FAN or COOL
setting.
Unit turned off by moving thermostat to a higher number and then immediately turning back to
a colder numben Wait approximately 3 minutes. Listen for compressor to start.
Unit turned off and then on too quickly Turn unit off and wait 3 minutes before restarting.
Thermostat set too low. Adjust thermostat to higher number for cooling.
Air from unit does not feel cold
enough.
Air conditioner cooling, but room is
too warm -- ice forming on cooling
coil behind decorative front.
Air conditioner cooling, but room is
too warm -- NO ice forming on
cooling coil behind decorative front.
Turn selector to a higher FAN or COOL position
Thermostat set too warm. Setthermostat to colder temperature.
Room temperature below 70°F (21°C). Cooling may not occur until room temperature rises above
70°F (21 °C).
Temperature sensing tube touching cold coil, located behind air fllten Straighten tube away from coil.
Outdoor temperature below 70°F (21°C). Todefrost the coil, set selector to FAN position. Then,
set thermostat to warmer position.
Air filter may be dirty. Clean filten Refer to Care and Cleaning section. To defrost, set selector to
FAN.
Thermostat set too cold for night4ime cooling. Todefrost the coil, set selector to a FAN position.
Then, set thermostat to a warmer position.
Dirty air filter -- air restricted. Clean air filten Refer to Care and Cleaning section.
Thermostat set too warm. Turn thermostat clockwise to a colder setting.
Thermostat set on low number. Turn thermostat to higher numben
Vent set at OPENposition. Set vent at CLOSEDposition for maximum cooling.
Air directional Iouvres positioned improperly Position Iouvres for better air distribution.
Front of unit isblocked by drapes, blinds, furniture, etc. -- restricts air distribution. Clear blockage
in front of unit.
Doors, windows, registers, etc. open -- cold air escapes. Close doors, windows, registers, etc.
Unit recently turned on in hot room. Allow additional time to remove "stored heat" from walls,
ceiling, floor and furniture.
Air conditioner turns on and off
rapidly.
Noise when unit is cooling.
Water dripping INSIDE when unit is
cooling.
Water dripping OUTSIDE when unit is Unit removing large quantity of moisture from humid room. This is normal during excessively
cooling, humid days.
Dirty air filter -- air restricted. Clean air filten
Outside temperature extremely hot. Set FAN on high speed to bring air past cooling coils more
frequently
Air movement sound. This is normal. If too loud, turn selector to lower FAN setting.
Sound of fan hitting water-moisture removal system. This is normal when humidity is high. Close
doors, windows and registers.
Window vibration -- poor installation. Refer to installation instructions or check with installen
Improper installation. Tilt air conditioner slightly to the outside to allow water drainage. Refer to
installation instructions -- check with installer.
13
Page 14

MANUAL DELPROPIETARIO
LEA Y GUARDE ESTAS INSTRUCCIONES
APARATODEAIREACONDICIONADO
CONTROLELECTRONICO
P/N 309000848 (08/02)
Page 15

GARAN#A DEL APARATO DE AIRE ACONDICIONADO PARA HABITACIONES
Su producto estb protegido por esta garantia
Suaparato esta garantizado por White Consolidated industries,Inc (WCI). WCI ha autorizado a los Servidos al consumidor de Frigidaire y a sus proveedores de
servido autorizados a Ilevar a cabo los servicios autorizados bajo esta garantia. WCI no autoriza a nadie m_s a cambiar o agregar n_nguna obligacbn bajo esta
garant[a Todas1asobligadones de servicio y piezas cubiertas por esta garant[a lasdeben atender los Servicios al consumidor de Frigidaire o un proveedor de ser-
vlcio autorizado por Frigidaire
PERIODO DE FRIGIDAIRE, A TRAV_S DE SUS El. CONSUMIDOR SEI_
GARANTIA PROVEEDORES DE SERVICIO, HARA: RESPONSABLE DE:
GARANTiA Una_oapaftirdelafecha Elpagodetodosloscostosdereparack_no_eemplazodelas Elcostodelasllarnadasdeservidosqueest_nen
COMPLETA DE de compra original. )iezas de este aparato que se compruebe son defectuosas la lista de RESPONSABILIDADES NORMALES
UN AI_IO debido a los materiales o la mano de obla DEL CONSUMIDOR.*
GARANTiA Dd segundo al quinto La reparacbn o el reemphzo de cualquier pieza en elsistema Los costos de diagn6stico y retiro, transporte y
[IMITADA DE[ a_o, a partir de h fecha sellado de _efrigeraci(_n (compresor, condensador, evapo_ _einstahci6n que sean necesa_ios para el servido.
2_ AL 5" AI_IO de compra original. _ador y tubeda) que se compruebe es defectuosa debido a LOS costos de mano de obra, p_ezas y transpo_te
(Sistema sellado) los materiales o h mano de obra que no se refieran al sistema sellado de refli-
geracbn
GARANTiA Periodos de tiempo lista- Rigen todas las disposidones de las garantlas completas y LOScostos de viaje del t_cnico a la casa y cualquier
t.IMITADA dos anteriormente, limitadas que se describen anteriormente y las exdusiones costo asodado con _ecoger y entregar el aparato
(Aplicable al que se listan posteriormente que se deban al servicio
estado de Alaska}
*RESPONSABIUDADES
NORMALES
DEL CONSUMIDOR
EXCLUSIONES
SI NECESITA SERVICIO
Esta garantia solamente cubre los procluctos de uso habitual en casa, y el consumidor es responsable de Io siguiente.
I Uso adecuado del aparato de acuerdo con las instrucciones que vienen con el mismo
2 Instalaci6n adecuada hecha por un proveedor de servidos autorizado de acuerdo con las instrucciones que vienen con el
aparato y los c6digos locales de plomeria, electricidad y/o uso de gas
3 Conexbn adecuada a una toma de corriente el_ctrica con conexi6n a tierra y suficiente voltaje, cambio de los fusibles
quemados, reparaci6n de las conexiones flo/as y los defectos en el cableado el_ctrico de la casa.
4 Los gastos de hacer accesible el aparato para el mantenimiento, como retirar las mdduras, armar_os, repisas, etc.. que no eran
parte del aparato cuando se despach6 de la f_brica
5 Da_os al acabado despu_s de la instalaci6n.
6 Reemplazo de las bombillas y/o los tubos fluorescentes (en los modelos en que sea aplicable)
Esta garantia no cubre Io siguiente:
I DAI_OS EMERGENTESO tNCIDENTALESTALESCOMO DAnOS MATERIALESY GASTOS INCIDENTALESQUE RESULTENDE
CUALQUIERINCUMPLIMtENTO DEESTAGARANTiA ESCRITAO DE CUALQUIER GARANTIA IMPLICITA.
Nota: AIgunos estados no permlten la exclusi6n ni limitacbn de los da_os inddentales o emergentes, por cons[gu[ente esta
limitacbn o exclusion puede no ser aplicable a su caso
2 Llamadas de servicio que no involucren el mal fundonamiento o defectos en la mano de obra o materiales o para aparatos
que no se usen en casa en laforma habitual. Elconsumidor deber_ pagar por tales Ilamadas de servicio
3 Los da_os debidos a servicios Ilevados a cabo por personas no autorizadas por Frigidaire; uso de piezas de repuesto que no
sean las genuinas de Frigidaire; uso de piezas obtenidas de personas que no sean dichos proveedores de servido; o causas
extemas como uso excesivo, uso ,_apropiado. corriente el_ctrica inadecuada o actos de la naturaleza
4 Productos cuyos nOmeros de serie originales se ban sacado o alterado y no se pueden determinar f_dlmente
Guarde su factura, boleta de entrega u otra constanda adecuada de pago En caso de que se necesite servido, la fecha del redbo
determina el periodo de garantia Si se le da el servicio, es convenlente para usted pedir y guardar todos los recibos Esta garantia
escrita le concede derechos legales especificos. Usted puede tener adem_s otros derechos que varian de un estado a otro Los
servicios cubiertos por esta garantia se pueden obtener siguiendo estos pasos en orden:
I Contacte los Servicios al consumidor de Frigidaire o a un proveedor de servicio autorizado por Frigidaire
2 Si tiene dudas sobre ddnde obtener servicio, comuniquese con nuestro Departamento de reladones con el consumidor:
Frigidaire Company
RO Box 212378
Augusta, GA 30917, EEUU
800-444-4944
lllFRIGIDAIRE
COMPANY
Lascaracteristicas o espedficadones del producto descritas o ilustradas est_n sujetas a cambios sin previo aviso Todas las garantias las
hate White Consolidated Industries. Inc Estagarantia solamente tiene vigencia en los 50 estados de los Estados Unidos, Puerto Rico
y el Canad&
Page 16

Registro del producto
Registre los n_meros de modelo y serie
En el espacio en blanco de aba}o, registre los n0rneros de modelo y serie. En la mayor/a de
modelos, la plata con el n0mero de serie se encuentra en la parte de afuera del gabinete. En
algunos modelos, para encontrar losn0meros de modelo y serie, debe sacar el filtro y buscar
en el borde inferior del aire acondicionado detrks de la rejilla delantera. Lalectura de dichos
n0meros se facilita usando una linterna o quitando la parte frontal del gabinete como se
indica en la seccidn "Cuidado y limpieza".
No. de rnodelo
No. de serie
Registre su producto
La TARJETADE REGISTRODELPRODUCTO,que contiene la direcci6n de la empresa,
se debe rellenar completamente, firmar y devolver a Frigidaire Company.
Indlce
NOTA: EsteManual del propietario proporciona
instrucciones de operaci6n especificas para su
modelo. Useel aparato de aire acondicionado
s61o como se indica en este manual del
propietario. Las instrucciones no tienen como
fin cubrir todas las posibles condiciones y
situacionesque pudieran ocurrir. Siempre debe
emplearse el sentido com0n y tomarse las
precauciones deI caso at instalar, operar y
mantener cualquier aparato electrodom#stico.
Sonidos normales
Sonido d# *df_a de aire
En la parte frontal de la
unidad, podrk
de r_faga de aire desplazado
pot el ventilador.
2
3
3
4
4
5
Garantia
Registro del producto
Sonidos normales
Instrucciones importantes de seguridad
Sugerencias para ahorrar energia
Instalaci6n del control de la ventilaci6n, la placa de controles y la
parte frontal
6
6-11
11
12
C_ir*_do de alta flrecuencia
LOScompresores modernos de gran
eficiencia de hoy en d/a pueden
tenet un chirrido de alta frecuencia
durante el ciclo de
enfriamiento.
Uso del aparato de aire acondicionado
Caracteristicas del aparato de aire acondicionado
Cuidado y limpieza
Lista para evitar la necesidad de servicio
1iibracidn
ka unidad puede vibrar y hater ruido
debido a la construcci6n defectuosa
de la pared o ventana, o debido a la
instalaci6n incorrect&
CJaasq_ido del t_,rmostato
Durante el encendido y apagado del
sistema de enfriamiento, se podra
escuchar un chasquido "clic".
© White Consolidated industries,Inc, 1996
Reservados todos los derechos
,S'ilbido/9olpeteo
El sonido de silbido/golpeteo se debe
alas gotas de agua que golpean el
condensador durante el
funcionamiento normal.
l_orboteo/zismbido
El sonido de borboteo o zumbido se debe al paso
del refrigerante a travc%de la fase de evaporaci6n
durante el funcionamiento normal.
Page 17

Instrucciones
Antes de usar este aparato de aire acondicionado, lea bien todas las instrucciones.
importantes de
seguridad
Evite el peligro de incendio
o electrocuci6n. No use extensiones ni
adaptadores para enchufar. No quite
ninguno de los polos del cable de corriente.
Toma de corriente el_ctrica de
pared con conexi6n a tierra.
con conector de
enchufe tripolar con
conexi6n a tierra
Para su seguridad
No guarde ni usegasolina ni otros l/quidos y vapores inflarnables cerca de este u otto aparato
electrodom_stico. Lea lasadvertencias sobre la inflamabilidady de otra [ndole en las etiquetas
de los productos.
Evite accidentes
Para reducir el riesgo de incendio, electrocuci6n o lesiones personales al usar su aparato de
aire acondicionado, siga las precauciones b_sicas, incluyendolassiguientes:
• Aseg0rese que el servicio el_ctrico sea adecuado para el modelo seleccionado. Esta
informaci6n la puede encontrar en la placa de serie ubicada yasea al costado del gabinete
o detr_s de la rejilla.
• Siva a instalar el aparato de aire acondicionado en una ventana, es bueno que limpie
antes ambos lados del vidrio. Si la ventana es del tipo de hoja triple con mosquitero
integrado, quite el mosquitero completamente antes de instalar.
• Compruebe que el aparato de aire acondicionado haya sido instalado segura y
correctamente de acuerdo con las instrucciones separadas de instalaci6n que se adjuntan
a este manual. Guarde el manual y las instrucciones de instalaci6n para su futuro uso al
quitar o reinstalar esta unidad.
• AI manipular el aparato de aire acondicionado, evite cortarse con el filo de las aletas
met_licas de los serpentines delanteros y posteriores.
Informaci6n eldctrica
La capacidad el_ctrica nominal de su nuevo aparato de aire acondicionado de habitaci6n se
indica en la placa de serie. Consulte dicho valor al revisar los requisitos el_ctricos.
• Compruebe que el aparato de aire acondicionado est_ correctamente conectado a tierra.
Para minimizar los peligros de electrocuci6n e incendio, es fundamental tener una buena
conexi6n a tierra. El cable de corriente viene equipado con un conector de enchufe
tripolar con conexi6n a tierra para proteger contra los peligros de electrocuci6n.
• Su aparato de aire acondicionado debe conectarse a una toma de corriente el_ctrica de
pared con la debida conexi6n a tierra. Si la toma de corriente electrica de pared que
piensa utilizar no est_ correctamente conectada atierra o no est_ protegida con un fusible
de demora de tiempo o interruptor de circuito, encargue a un electricista calificado que
instale la toma de corriente electrica apropiada.
• No haga funcionar el aparato de aire acondicionado con la cubierta protectora exterior
instalada. Esto podr/a ocasionar da_os mec_nicos dentro del aparato de aire
acondicionado.
NO use una extensi6n ni adaptadores para enchufar.
Sugerencias para
ahorrar energia
\
\
\
No obstruya el flujo de aire en el interior con persianas, cortinas ni muebles; o en
el exterior con arbustos, cercas ni otras construcciones.
Para obtener una operaci6n eficiente y satisfactoria, la capacidad del aparato de aire
acondicionado de habitaci6n debe corresponder al tama_o de la habitaci6n.
Instale el aparato de aire acondicionado de habitaci6n en el lado sombreado de su casa.
Esmejor una ventana con vista al norte porque tiene sombra casi todo el dia.
• Cierre el tiro de la chimenea y las rejillas de la pared y el piso para evitar que el aire fresco
seescape pot la chimenea y los ductos.
• Mantenga cerradas las persianas y cortinas de lasotras ventanas durante las horas del d/a
en que hate m_s sol.
• Limpie el filtro de aire como se recomienda en la secci6n "Cuidado y limpieza'L
• El aislamiento y burlete adecuados en su casa ayudar_n a que el aire fresco se mantenga
adentro, y el caliente afuera.
• El sombreado exterior de la casa con _rboles, plantas o toldos ayudar_ a reducir la carga
de trabajo del aparato de aire acondicionado.
• Procure usar los aparatos electrodomesticos productores de calor como la estufa, la
lavadora, la secadora y el lavavajillas durante las horas m_s frescas del dia.
4
Page 18

L
Instalaci6n de la parte
delantera
Algunos modelos vienen embalados dentro de una funda que se puede sacar; antes de
instalar la parte delantera decorativa y los accesorios, s/rvase seguir las instrucdones de
instalaci6n adjuntas.
Instalaci6n del control de la ventilaci6n (en algunos modelos)
La manija del control de la ventilad6n se incluyeen el cornponente de la parte delantera
decorativa. La manija debe instalarse antes de la parte delantera decorativa.
1. Inserte la manija con el grabado "Vent/Air" odentado hada la izquierda.
2. Deslice la extensi6n de la puerta negra en la divisi6n al final de la manija.
3. Para facilitar el ensamblado, empuje la manija hada adentro, al mismo tiempo que
presiona la extensi6n de la puerta contra la espuma pl4stica, hasta que las dos piezas
encajen.
4. Mueva la manija hada adentro y hacia afuera para comprobar que la ventilaci6n fundona
adecuadamente.
Instalaci6n del marco frontal
Algunos modelos requieren la instalaci6n del panel frontal del aparato de aire acondicionado
que se incluye en un componente decorativo. Para armarlo, siga estos pasos: Antes de
instalar, quite del marco el panel inclinado. Sujete el panel por los dos lados y j41elo
suavemente para que se suelte; luego levante el panel de los puntos de pivote de la parte
inferior del marco.
PASO 1: INSTALE LA PARTE DELANTERA DECORATIVA EN EL GABINETE:
Parte delantera decorativa
• Coloque la secci6n superior de la parte delantera decorativa sobre la brida superior de la
caja, y alinee laspesta_as con las ranuras de la caja (Figura 2).
• AI instalar el marco frontal en la unidad, aseg0rese de que la manija de ventilaci6n pasea
travL%de la parte delantera pot el sitio que le corresponde (Figura 3).
• Jale con cuidado hacia abajo en la parte
delantera para embonar las pesta_as
supedores mientras empuja la parte
delantera sobre la caja para asegurar
una alinead6n correcta.
• Laspesta_as laterales hacen "clio"
cuando la parte delantera se asienta.
• Coloque el tornillo o los tornillos
frontales de sujed6n detr_s del filtro y
el panel (Figura 3).
• Coloque luego el filtro y el panel
frontal.
FIGURA 1
• Instale detr_is de la manija del filtro.
FIGURA2
FIGURA 3
Page 19
Uso del aparato de
aire acondicionado
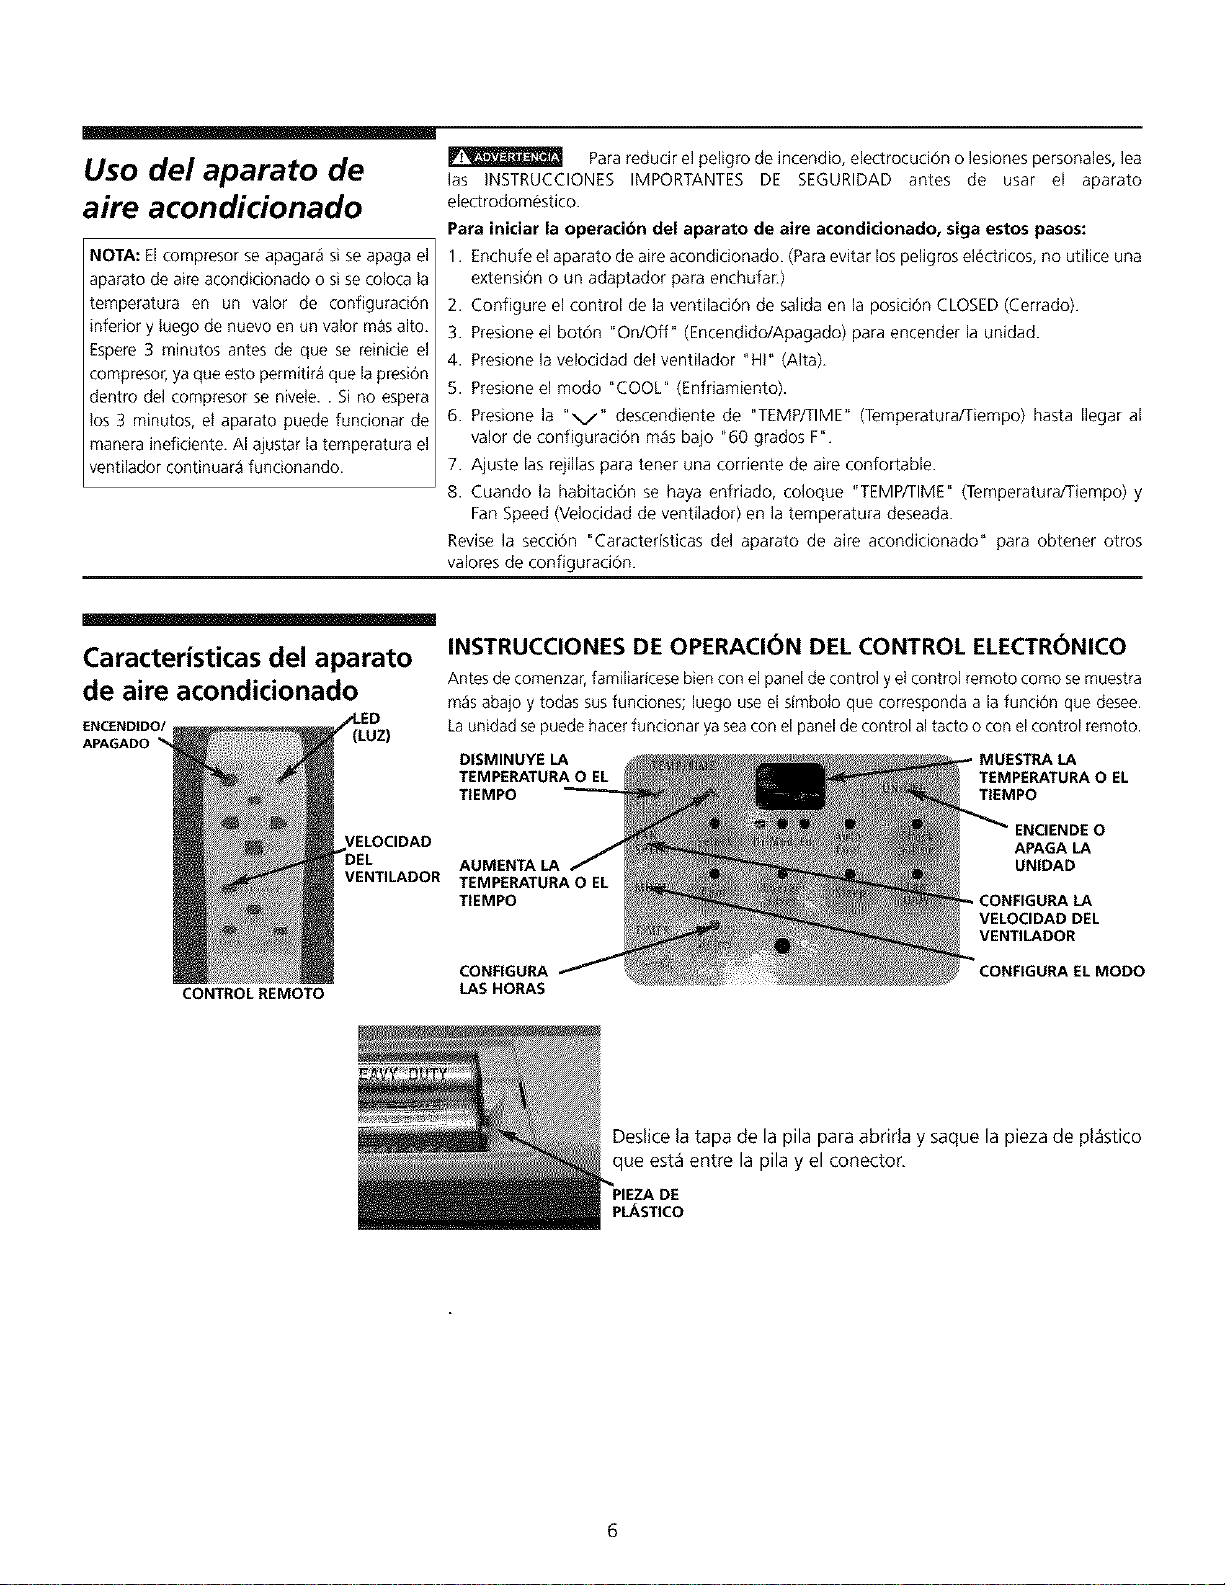
NOTA: El compresor se apagar_ si se apaga el
aparato de aire acondicionado o si se coloca la
temperatura en un valor de configuraci6n
inferior y luego de nuevo en un valor m_s alto.
Espere3 minutos antes de que se reinide el
compresor, yaque esto permitir_ que la presi6n
dentro del compresor se nivele.. Si no espera
los 3 minutos, et aparato puede funcionar de
manera inefidente. AI ajustar latemperatura el
ventilador continuar_ funcionando.
Pararedudr el peligro de incendio, electrocud6n o lesiones personales, lea
las INSTRUCCIONES IMPORTANTES DE SEGURIDAD antes de usar el aparato
electrodomestico.
Para iniciar la operaci6n del aparato de aire acondicionado, siga estos pasos:
1. Enchufe el aparato de aire acondidonado. (Paraevitar los peligros el_ctricos, no utilice una
extensi6n o un adaptador para enchufar.)
2. Configure el control de la ventilaci6n de salida en la posid6n CLOSED(Cerrado).
3. Presione el bot6n "On/Off" (Encendido/Apagado) para encender la unidad.
4. Presione la veloddad del ventilador "HI" (Alta).
5. Presione el modo "COOL" (Enfdamiento).
6. Presione la "v" descendiente de "TEMPf[IME" (Temperatura/Tiempo) hasta Ilegar al
valor de configurad6n m_isbajo "60 grados F".
7. Ajuste las rejillas para tener una corriente de aire confortable.
8. Cuando la habitaci6n se haya enfriado, coloque "TEMPfrlME" (Temperatura/Tiempo) y
Fan Speed (Veloddad de ventilador) en la temperatura deseada.
Revise la secci6n "Caractedsticas del aparato de aire acondicionado" para obtener otros
valores de configuraci6n.
Caracteristicas del aparato
de aire acondicionado
ENCENDIDO/
APAGADO (LUZ)
DEL AUMENTA LA
VENTILADOR TEMPERATURA O EL
CONTROL REMOTO
INSTRUCCIONES DE OPERACI(_N DEL CONTROL ELECTR(_NICO
Antes de comenzar,familiaricesebien con el panel de control y et control remoto como se muestra
m_s abajo y todas sus funciones; luego use el slmbolo que corresponda a la funci6n que desee.
La unidad se puede hater fundonar ya seacon el panelde control al tacto o con el control remoto.
DISMINUYE LA
TEMPERATURA O EL
TIEMPO TIEMPO
ENCIENDE O
APAGA LA
UNIDAD
TIEMPO
CONFIGURA
LAS HORAS
VELOCIDAD DEL
VENTILADOR
CONFIGURA EL MODO
IRA LA
EL
Deslicela tapa de la pila para abrida y saque la piezade pl_stico
que est_ entre la pila y el conector.
PLASTICO
Page 20

Caracteristicas del aparato de aire acondicionado
(continuaci6n)
PASO 1 -- PARA ENCENDER LA UN|DAD:
USTED VERA:
HAGA ESTO:
PRESIONEEL
PASO 2 -- PARA CAMB|AR EL VALOR DE
CONF|GURAC|ON DE LA TEMPERATURA:
USTED VERA:
HAGA ESTO:
PRESIONEPARA
AUMENTAR
PRESIONEPARA
DISMINUIR
Nota: D_le un golpecito o mantenga presionado el bot6n paraaumentar (,_) o disminuir (v) la temperatura hasta que aparezca en la pantalla
la temperatura que desee. La temperatura se mantendr_ autom_ticamente entre 16° C (60° F) y 32° C (90° F). Si desea que aparezca en la
pantalla la temperatura actual de la habitacidn, vea el paso 5.
PASO 3 -- PARA CAMBIAR LA
VELOC|DAD DEL VENTILADOR:
PASO 4 -- PAPA UTILIZAR LA CARACTERJSTICA
DE ENFRIAMIENTO AUTOMATICO:
USTED VERA (LA QUE HAYA
ESCOGIDO):
HAGA ESTO:
PRESIONE
PARA
SELECCIONAR
USTED VERA:
HAGA ESTO:
PRESIONEAUTO
COOL
iNFRIAMIENTO
AUTOM_,TICO)
Nota: La velocidad del ventilador empezar_ en HI (Alta), luego pasar_ a MED (Mediana) y LO (Baja) seg0n Io requiera la temperatura de la
habitacidn. Pot ejemplo, si no hace mucho calor en la habitacidn, se mantendr_ en LO. Si la temperatura sube muy r_pido, como cuando se
abre una puerta, pasar_autom_ticamente a la velocidad HI. Lavelocidad del ventilador regresar_ a LO cuando la temperatura de la habitaci6n
vuelva a set la que seconfigur6 originalmente.
7
Page 21

Caracteristicas del aparato de aire acondicionado
(continuacibn)
PASO 5 -- PARA HACER FUNCIONAR
S(_LO EL VENTILADOR:
HAGA ESTO:
PRESIONEON
(ENCENDIDO)(si no
est_encendido)
PRESiONEFAN ONLY
SELECCIONEUNO
Nota: Use esta funci6n solamente cuando no deseeenfriar; pot ejemplo, para hater circular el aire de la habitaci6n o extraer el aire estancado
(recuerde abrir el control de la ventilaci6n para esta funci6n y cerrarlo durante el enfriamiento si desea tenet la m_xima eficacia de
enfriamiento). Usted puede escoger cualquier velocidad para el ventiladon
Durante esta funci6n, la pantalla mostrar_ la temperatura actual y no la temperatura conflgurada a la que se debe Ilegar, como es el caso en
el modo de enfriamiento.
PASO 6 --PARA USAR LA CARACTERISTICA
DE AHORRAR ENERGJA:
USTED VERA:
USTED VERA:
HAGA ESTO:
PRESIONE
ENERGYSAVER
(Ahorrarenerg/a)
Nota: En este modo, cuando el compresor se apaga, el ventilador seguir_ funcionando durante 3 minutos y luego se apagar_ hasta que se
necesite enfriamiento, seg0n Io detecte el control de temperatura de la habitaci6n. Durante este tiempo, puede funcionar durante 3 minutos
para detectar si se necesita enfriamiento, y luego se apagar_ durante 10 minutos. Continuar_ haciendo esto para realizar un muestreo de la
temperatura de la habitaci6n durante todo el tiempo que sea necesario.
PASO 7 -- CARACTERiSTICA PARA DETENER
LA DEMORA POR TEMPORIZADOR
USTED VERA:
HAGA ESTO:
PRESIONE
(Sila unidad no est_
funcionando)
PRESIONE
Nota: Parausar esta configuraci6n, la unidad debe estar funcionando.
Paracambiar eI n0mero de horas que desea, prosiga como se indica en eI paso 9, antes de que el control entre en tiempo de espera y se apague.
Page 22

Caracteristicas del aparato de aire acondicionado
(continuacibn)
PASO 8 -- CARACTERISTICA PARA INICIAR LA
DEMORA POR TEMPORIZADOR:
HAGA ESTO:
PRESIONEOFF(APAGADO)
si la u_idadest_
fundonando)
Nota: Parahater esto, la unidad debe estar apagada.
Cuando se configure pot primera vez, la pantalla mostrar_ 0.5 (media hora); si desea aumentar el tiempo hasta 24 horas, vaya al paso 9.
USTED VERA:
PASO9 -- PARAAUMENTAR LA DEMORA DEL
TIEMPO DE INIClO DEFUNCIONAMIENTO:
USTED VERA EL TIEMPO
SELECCIONADO:
HAGA ESTO:
Nota: D61e un golpecito o sostenga la flecha UP [Aumentar] (A) para aumentar la demora del tiempo de inicio de funcionamiento en
incrementos de 0.5 de hora (hasta Ilegar a 10 horas), y luego en incrementos de 1 hora hasta Ilegar a 24 horas. El control Ilevar_ la cuenta
regresiva hasta el inicio del funcionamiento (8, 7.5, 7, etc.).
Entonces, la unidad empezar_ a funcionar en el modo Cool (Enfriamiento) y el ventilador en velocidad HI (Alta). La temperatura que se
mantenga ser_ la misma que usted configur6 anteriormente. Si desea cambiarla, presione "Cool '_(Enfriamiento) o "Energy Saver Mode"
(Modo de ahorrar energ/a), seg0n su elecci6n, y luego use las flechas Up (Aumentar) o Down (Disminuir) hasta que aparezca en la pantalla
la temperatura que desee. Si se enciende o apaga "On/Off" el temporizador, o se espera 5 segundos, el control cambiar_ autom_ticamente
para mostrar las horas que faltan para el inicio del funcionamiento de la unidad.
Si se enciende la unidad en cualquier momento, esta configuraci6n seanula.
PASO 10- CARACTERISTICA DE HIBERNAR:
USTED VERA:
HAGA ESTO:
PRESIONEELCONTROL
DE NIBERNAR
Nota: En este modo, la temperatura seleccionada aumentar_ 2° F, 30 minutos despu6s de seleccionarlo. La temperatura aumentar_ 2 o F
adicionales despu6s de otros 30 minutos. Esta nueva temperatura se mantendr_ durante 7 horas antes de regresar a la temperatura
seleccionada originalmente. Esto termina el modo "Sleep '_(Nibernar) y la unidad contin0a funcionando seg0n la programaci6n original. El
programa del modo "Sleep '_(Hibernar) se puede cancelar en cualquier momento durante el funcionamiento, presionando el bot6n de modo
"Sleep", "On/Off", "Fan Only" o "v / A", en el panel de control o en el control remoto. Ellimite de "Time Delay Stop" (Detener demora
de tiempo) tambien termina el modo "Sleep '_(Hibernar).
Page 23

Caracteristicas del aparato de aire acondicionado
(continuacibn)
PASO 11 -- CARACTERISTICADE REVISAR
EL FILTRO:
HAGA ESTO:
_RESIONE PARA SUBIR
PRESIONE PARA BAJAR
Nota: Esta caractedstica recuerda al usuario que debe limpiar el filtro de aire (vea la secci6n Cuidado y limpieza) para obtener el
funcionamiento y enfriamiento m_s eficientes. ElLED (luz) se enciende despu_s de 250 horas de funcionamiento, bien seaque la unidad est_
en enfriamiento o en s01oventilador. Para reiniciar esta caracter/stica despu_s de limpiar el filtro, presione el bot6n "Check Filter" (Revisar el
filtro) y la luz se apagar_. De esta manera, se reiniciar_ el conteo de las 250 horas y s61ose puede restablecer si el LED(luz) est_ encendido.
Esta caractedstica no sepuede reiniciar mediante el control remoto.
PASO 12 -- PARAAPAGAR (OFF) LA
UNIDAD: USTED VERA:
USTED VERA:
HAGA ESTO: l
PRESIONEEL
CONTROLON/OFFJ
10
Page 24

Caracteristicas del aparato de aire acondicionado
(continuacibn)
OTRAS COSAS QUE DEBE SABER
Ahora que ya sabe bien c6mo hacer funcionar la unidad, le presentamos otras caracteristicas de su control que tambi_n debe conocer.
• El control remoto funciona exactamente como el panel de control; siga las mismas instrucdones.
• El drcuito de "Cool" (Enfriamiento) tiene una demora autom_tica de 3 minutos si la unidad seapaga y enciende muy rapido. Esto evita
el sobrecalentamiento del compresor y posiblemente que se dispare el interruptor de drcuito. Durante este tiempo, el ventilador seguir_
fundonando.
• El control mantendr_ la temperatura configurada con una aproximad6n de 2° Fahrenheit (-16 ° C), entre 60° Fy 90° F (16 ° C y 32° C).
• El control puede mostrar la temperatura en grados Fahrenheit o en centigrados. Para convertir entre un sistema y el otro, presione y
mantenga presionado "Check Filter" (Revisarel filtro) y el selector del ventilador al mismo tiempo durante 3 segundos.
Figura 1 [APAGADO (OFF)]
Figura 2 [AIRE FRESCO (FRESHAIR)]
Control de la ventilaci6n con aire fresco
La ventilaci6n con aire fresco, permite que el aparato deaire acondicionado recircule el aire
interior (posici6n OFF), traiga aire a la habitaci6n (posici6n FRESHAIR), o extraiga el aire
estancado y Io envie al exterior (posid6n VENT). Para realizar estas operadones, vea las
figuras 1, 2 y 3.
• La posici6n "OFF" se usa cuando se desea el MAXlMO de enfriamiento. Tambien puede
servir para recircular el aire de lahabitad6n sin enfriarlo cuando elinterruptor de selecd6n
est4 configurado en FAN (Ventilador); esto tambi6n filtrar_ el aire de la habitaci6n.
• La posici6n FRESHAIR (Aire fresco) permite traer el aire exterior a la habitad6n para
refrescar el aire interior.
• La posici6n VENT (Ventilador) elimina el aire estancado en la habitad6n y Io extrae al
exterion
• Cualquiera de las posiciones de ventilaci6n se puede usar con cualquier selecd6n del
ventilador.
Figura 3 [VENTILADOR(VENT)]
11
Page 25

Caracteristicas del
aparato de aire
acondicionado
(continuacibn)
(CUATRO SENTIDOS)
Rejillas direccionales de aire
Estas rejillas controlan la direcci6n del flujo de aire. Su aparato de aire acondicionado tiene
el tipo de rejillas que se describe m4s abajo.
Rejillas direccionales de cuatro sentidos
Las rejillas direccionales de cuatro sentidos permiten dirigir el flujo de aire hacia arriba o
abajo, hacia la izquierda o la derecha a traves de la habitaci6n seg0n sea necesario. Para
graduar lasrejillas direcdonales a los lados, use la manija central, movi_ndola de un lado al
otro.
Cuidado y limpieza Aseg_rese de desenchufar la unidad antes de limpiarla para evitar peligros de
Paramantener suaparato de aire acondicionado como nuevo, Iimpielo de cuando en cuando.
electrocuci6n o incendio.
Limpieza del filtro de aire
Elfiltro de aire se debe exarninar por Io rnenos una vez al rnes para saber si necesita limpieza.
Lasparticulas atrapadas en el filtro se pueden acumular y, a su vez, causar una acumulaci6n
de escarcha en los serpentines de enfriamiento.
• Lleve la manija de ventilaci6n a la posici6n OFF(Apagado).
• Incline las rejillas horizontales hacia arriba antes de sacar el filtro.
• Sostenga el filtro por el centro, j_lelo y saquelo.
• En algunos modelos, sujete el panel por ambos lados, justo por debajo de las rejillas de
aire direccionales, e inclinelo primero hacia afuera, y luego j41elo suavemente para que se
suelte. Gire el panel suavemente sobre su bisagra y saque el filtro.
• Lave el filtro con detergente para lavar vajilla y agua tibia. Enju&guelo bien. Sacuda
suavemente el exceso de agua del filtro. Compruebe que est_ bien seco antes de volver a
colocarlo.
• O bien, en vez de lavarlo, Io puede limpiar con la aspiradora.
Limpieza del gabinete
• AsegOrese de desenchufar el aparato de aire acondicionado para evitar los peligros de
electrocud6n e incendio. El gabinete y la parte delantera pueden desempolvarse con un
paso sin aceite o lavarse con un paso humedeado en una soluci6n de agua tibia y
detergente suave para lavar vajilla. Enjuague bien y seque con paso.
• Jam_s use limpiadores fuertes, cera ni preparados para sacar lustre en la parte delantera
del gabinete.
• Antes de limpiar alrededor de los controles, exprima elexceso de agua del paso. Elexceso
de agua cerca o alrededor de los controles puede causar da_os al aparato de aire
acondidonado.
• Para limpiar mejor, puede quitarse la parte delantera del gabinete. Vea "lnstalad6n de la
parte delantera" en este manual.
• Limpie la parte delantera en un lavadero usando detergente Iiquido para lavar vajilla y
agua tibia. Enjuague y seque bien.
• Vuelva a colocar la parte delantera del gabinete. Vuelva a colocar los tornillos.
• Vuelva a instalar el panel delantero (sifuera el caso)y el filtro. Enchufe el aparato de aire
acondidonado.
Almacenamiento durante el invierno
Si piensa guardar su aparato de aire acondiaonado durante el invierno, quitelo con cuidado
de la ventana siguiendo las instrucciones de instalaci6n. C0bralo con pl4stico o col6quelo
nuevamente en su caja original.
NOTA: Para evitar que se oxide o que se da_en las conexiones el_ctricas, guarde el
aparato de aire acondicionado en posici6n vertical y en un sitio seco. Puede comprar
una cubierta de invierno de su distribuidor. La cubierta proteger_ el aparato de aire
acondidonado cuando Io deje instalado durante el invierno.
12
Page 26

Lista para evitar la se incluyen sucesos comunes que no se deben a defectos en los materiales ni a la mano de
Antes de Ilamar para pedir servicio, revise esta lista. Hacerlo puede ahorrarle tiempo y dinero.
necesidad de servicio obra de este aparato.
SUCESO
Elaire acondicionadono funciona.
El aire de la unidad no se siente Io
suficientemente frio.
SOLUCION
No est_ enchufado en la pared. Empu)e el conector firmemente en la toma de corriente el6ctrica de la pared
Se ha quemado el fusible de la casa o ha saltado el interruptor de drcuito Cambie el fusible pot uno de
tiempo o vuelva a conectar el interruptor de drcuito
Elcontrol de selecci6n est_ en la posid6n OFF(Apagado) Col6quelo en ON (Encendido) (en algunos modelos)
o en la posici6n deseada de FAN (Ventilador) o COOL (Enfriar)
La unidad se apag6 al colocar el termostato en un n0mero m_s alto e inmediatamente despu_s de colocarlo
en un n0mero m_s frio Espere aproximadamente 3 minutos Escuche que el compresor arranque
La unidad se apag6 y se encendi6 muy rgpido. Apague la unidad y espere 3 minutos antes de encenderla
Eltermostato est_ fiiado muy ba]o. Coloque el termostato en un n0mero m_s alto para que la unidad enfrie
Coloque el selector en una posici6n m_s alta de FAN (Ventilador) o COOL (Enfriar).
Eltermostato estgen una posici6n muy tibia Col6quelo en una temperatura m_s fria
La temperatura de la habitaci6n esinferior a 21° C (70° F).No habrg enfriamiento hasta que la temperatura
de la habitaci6n sea superior a 21° C (70° E)
Eltubo sensorde temperatura estg tocando el serpent[n frio detr_s del filtro de aire. Aleje eltubo del serpentin
El aire acondicionado est_ enfriando, pero
la habitaci6n est_ demasiado caliente; se
est_ formando hielo en el serpentin de
enfriamiento detr6s de la parte frontal
decorativa.
El aire acondicionado est_ enfriando, pero
la habitaci6n est_ demasiado caliente, NO
hay formaci6n de hielo en el serpentin de
enfriamiento detr6s de la parte frontal
decorativa.
El aire acondicionado se enciende y se
apaga r6piclamente.
La uniclad hace ruiclo cuando est_
enfriando.
Latemperatura exterior es inferior a 21 ° C (70° F) Para descongelar el serpentFn, Ileve el selector a la posici6n
FAN(Ventilador) Luego, fije el termostato en una poslci6n mgs tibia.
El filtro de aire puede estar sucio. Limpie el filtro de aire Consulte la secci6n sobre Cuidado y Iimpieza Para
descongelal; Ileve el selector a FAN (Ventilador).
Eltermostato est_ fijado demasiado frio para el enfriamiento noctumo Para descongelar el serpentFn, Ileve el
selector a FAN (Ventilador) Luego, coloque el termostato en una posid6n m_stibia
Elfiltro de aire est_ sucioy restringe el fluio de aire Limpieel filtro de aire Consulte la secci6nsobreCuidado yIimpieza
Eltermostato est_en una posid6n muy tibia Gire el termostato hada la derechapara fljarlo en una posici6n m_sfria
Eltermostato est_en un nOmero bajo Coloque el termostato en un nOmero m_s alto.
La ventilaci6n est_ en la posici6n OPEN (Abierta) Ponga la ventilaci6n en la posici6n CLOSED(Cerrada) para
obtener el m_ximo enfriamiento
Las rejillas de aire direccionales de aire no est_n bien orientadas Oriente las rejillas direccionales para tener
una me/or distribuci6n del aire
El frente de [a unidad est_ bloqueado por cortinas, persianas, muebles, etc, Io que restringe la distribuci6n
del aire Elimine el bloqueo que est6 delante de la unidad
Laspuertas, ventanas, rejillas, etc est_n abiertas yel aire fr[o seescapa. Cierre las puertas, ventanas, rejillas, etc
La unidad se acaba de encender en una habitaci6n caliente. Permita tiempo adiaonal para eliminar el "calor
almacenado" de las paredes, techo, p_soy muebles.
Elfiltro de aire est_ sucio y restringe el flujo de aire Limpie el filtro de aire
Latemperatura externa es demasiado alta. Ponga el FAN(Ventilador) a alta velocidad para traer a_re que haya
pasado por los serpentines de enfriamiento rags frecuentemente.
Sonldo de movimiento de aire Esto es normal pero, si es muy alto, Ileve el selector a una posici6n m&s baia
del FAN (Ventilador)
Sonldo de que el ventilador est_ golpeando el sistema de extracci6n de agua y humedad Esto es normal
cuando la humedad esalta Cierre las puertas ventanas y reiillas
La ventana vibra; Jnstalaci6n deficiente Consulte las instrucciones de instalaci6n o hable con la persona que
Io instalO
Hay agua goteando ADENTRO cuando la Instalad6n defectuosa. Incline el aire acondicionado ligeramente hada afuera para dejar que el agua drene
unidad est_ enfriando, hada afuera. Consulte lasinstrucciones de instalaci6n o hable con la persona que Io instal6
Hay agua goteando AFUERA cuanclo la La unidad est_ extrayendo una gran cantidad de humedad de la habitad6n Esto es normal en los dias
unidad est_ enfriando, excesivamente hOmedos
13
 Loading...