

Frigidaire FAR105S1A11, FAR105S1A12, FAR105S1A13, FAR125S1A11, FAR125S1A12 Installation Guide
...Page 1
INSTALLATIONINSTRUCTIONS
_J_,_;i_ %_ _ _ _ _i_ _D _
Gathertherequiredtoolsandpartsbeforeste_ng installation.
Readand Iollowtheinstructionsprovidedwithanytools listed
here.
Tools Needed
• Flat-bladeandPhillips • Tapemeasure
screwdrivers • Drmlland_a="orsmaller bit
• Level
Through-the,Wall Installation:
In addition to the tools listed above, the Iollowing tools are
needed Ior through-the-wall installation.
• ,Saw • 1"(2,5 cm)orthicker
• Wood preservative
• Caulk • #10 x 1"wood screws(7)
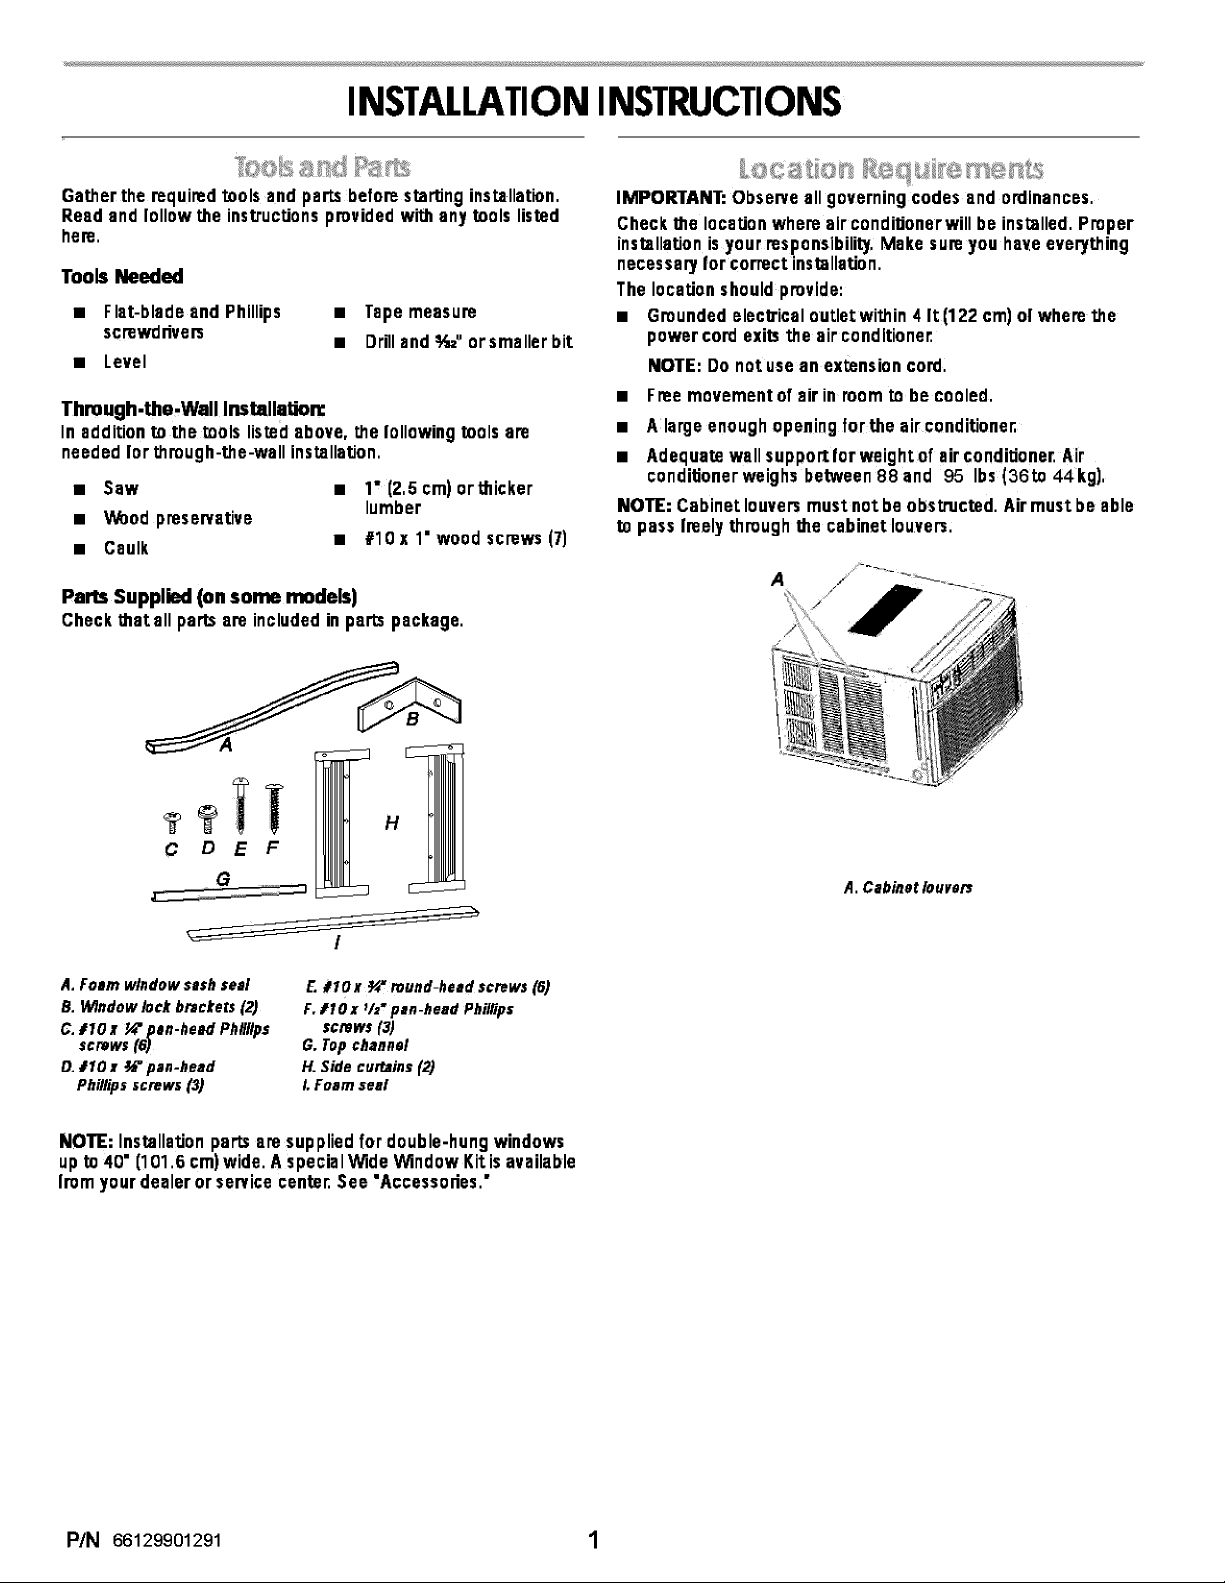
Parts Supplied (on some models)
Checkthatall partsareincludedinpartspackage.
lumber
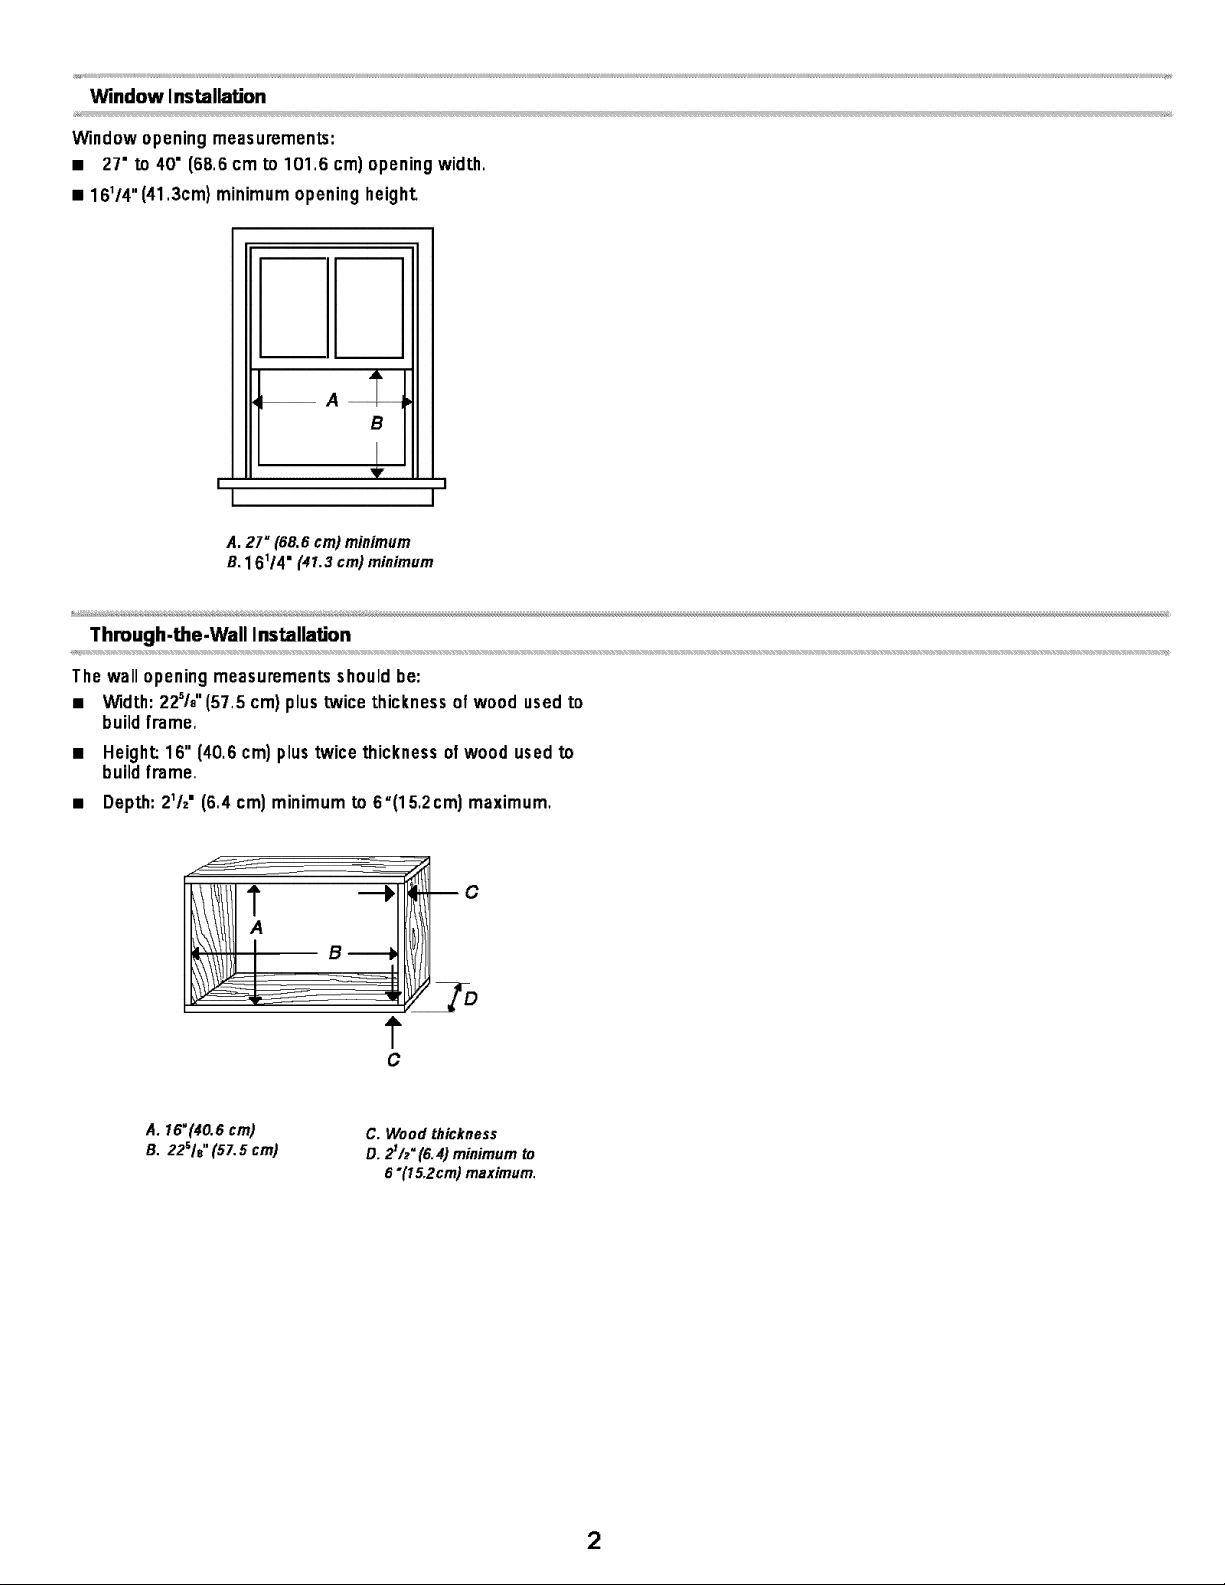
IMPORTANT:Observeall governingcodesand ordinances.
Checkthe locationwhereair condiUonerwillbeinstalled.Proper
installationis yourresponsibility. Makesure you ha_eeverything
necessaryfor correct installation.
Thelocationshouldprovide:
• Groundedelec_'icaloutle(within 4 It(122 cm)ol wherethe
powercord exitsthe airconditioner.
NOTE:Do not useanextensioncord,
• Freemovementofair inroomtobe cooled.
• A largeenoughopeningforthe airconditionen
• Adequatewallsupportforweightof airconditioner.Air
conditionerweighsbetween99 and 95 Ibs(36to 44kg).
NOTE: Cabinetlouversmustnot be obstructed.Air mustbe able
passIreelythrough the cabinetlouvers,
C O E F
A. Foam window sash seal
B. t&qndowlock brecke(s (2)
C. #10x (_'pan-head Ph#/tps
screws (6)
O. 110 x _" pan-head
Philflps screws (3)
E.#lO x _/4"round-head screws (6)
F, llOx tla" pan-head Phil#ps
SCreWS(3)
G. Topchannel
H. SMe curtains (2)
I.Foam seal
NOTE: Installation partsaresuppliedfordouble-hungwindows
upto40" (101.6cm)wide.A special Wide WindowKitis available
Immyour dealeror servicecenter.See"Accessories."
A. Cabinet louvers
P/N 66129901291 1
Page 2
I- --1
l 1
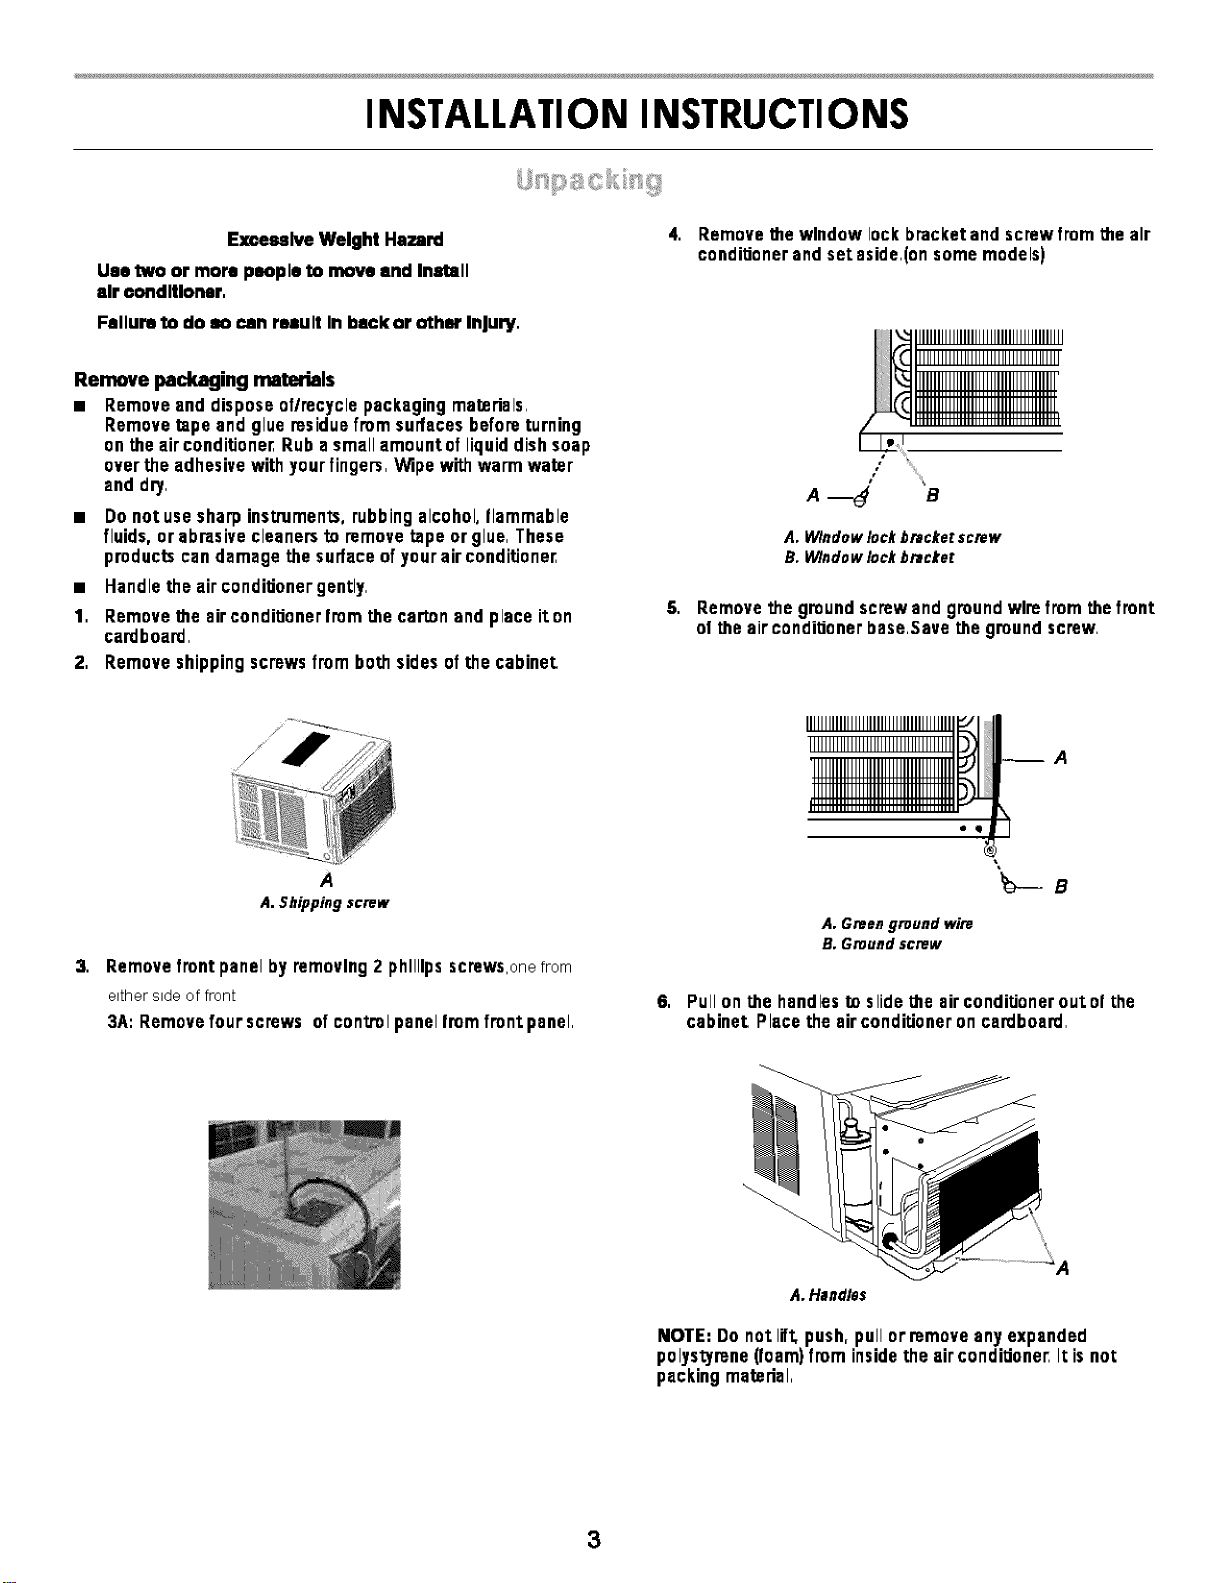
A.27" (68.6cm) minimum
B.16114"(41.3 cm)minimum
• Height: 16" (40,6 cm) plus twice thickness of wood used to
build frame.
• Depth: 21tz"(6,4 cm) minimum to 6"(15,2cm) maximum,
C
A._6"(4o.ecm)
B. 22sis" (57. 5 cm)
C. Wood thickness
!
D. 2 h" (6.4) minimum to
6 "(15.2cm) maximum.
2
Page 3
INSTALLATION INSTRUCTIONS
E]messlveWeight Hazard
Uee two or more poopleto move end Install
air conditioner,
Failure to do so can rneult In beck or othor Injury.
Remove packaging materials
• Removeand disposeoflmcycle packagingmatarials,
Removetape andglueresidue from surfacesbeforeturning
on theairconditioner,Rub a smallamountof liquiddish soap
overtheadhesivewithyourfingers,Wipewithwarmwater
and dry,
• Do notuse sharpinstruments,rubbing alcohol,flammable
fluids, or abrasivecleanersto removetape orglue,These
productscandamage thesudace ofyourairconditioner
• Handlethe aircondidonergently,
1, Removethe aircondil_onerlromthe carton andplace iron
cardboard,
2. Removeshippingscrews frombothsidesof the cabinet.
x @
4. Removethewindowlock bracketand screwfromthe air
condil_onerandset aside,(onsomemodels)
A, WYndowlock breckez screw
B, Mflndow lock breckez
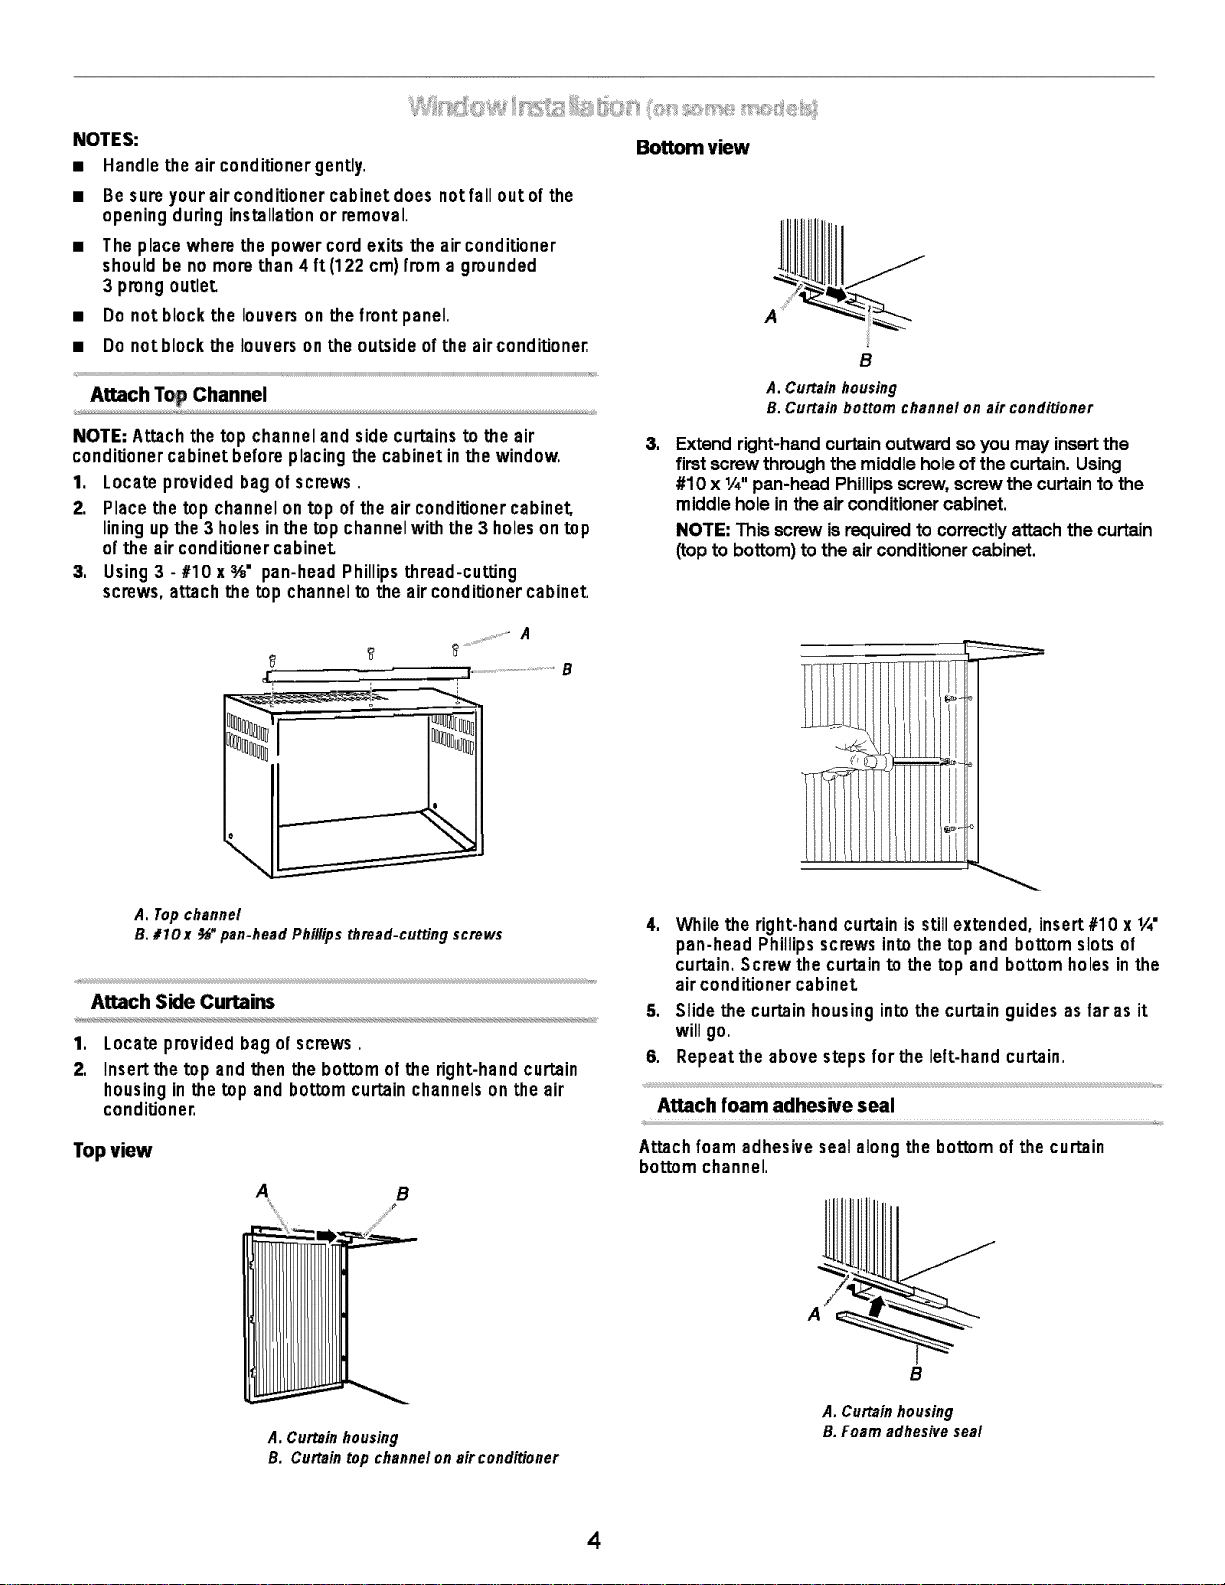
5. Remove the ground screw and ground wire from the front
ol the air condiUoner base,Save the ground screw,
IIIIIIIIIIIIIIIIIIIIIIIIIIIIIIIIIIIIIII1_1
IIIIIIIIIIIIIIIIIIIIIIIIIIIIIIIIIIIIIlib_
_A
!!!!!!!!!!!!!!!!!!!!!!!!!!!!!!!!!!!!!
IIIIIIIIIIIIIIIIIIIIIIIIIIIIIIIIIIIIIl_)J
A
A, Shipping screw
3,
Remove front panel by removln 9 2 phillips screws,one from
ettherstde of front
3A: Remove four screws of control panel from front.panel,
A, Green ground wiro
B, Ground screw
6,
Pullon the handlesIx)slidethe airconditionerout.ofthe
cabinet.Placethe airconditioneroncardboard,
A. Handles
NOTE: Do not.lift, push,pullor removeany expanded
polystyrene(foam)from insidethe aircondil_onerIt isno_
packingmaterial,
3
Page 4
NOTES:
• Handletheair conditionergently,
• Be sure your air conditioner cabinet does notfall outof the
opening during installation or removal.
The place where the power cord exits the air conditioner
should be no more than 4 ft(122 cm) from a grounded
3 prong outlet
• Do not blockthe louversonthe front panel,
• Do not block the louvers on the out.side of the airconditioner,
Attach T_ Channel
NOTE: Attachthe top channelandsidecurtainsto the air
conditionercabinetbeforeplacingthe cabinetinthewindow.
1, Locate providedbagof screws.
2, Place the top channelontop of theairconditionercabinet.
liningupthe3 holesinthe Lopchannelwiththe 3 holesontop
ofthe airconditionercabinet
3, Using3 - #10 x %" pan-headPhillips thread-cutting
screws,attachthe top channeltothe airconditionercabinet
_ _ .................A
Bottom view
A
B
A. Curtain housing
B. Curtain bottom channel on air conditioner
3.
Extend right-hand curtain outward so you may insert the
first screw through the middle hole of the curtain. Using
#10 x _A"pan-head Phillips screw, screw the curtain to the
middle hole in the air conditioner cabinet.
NOTE: Thisscrewis requiredto correctlyattachthecurtain
(topto bottom)to the air conditionercabinet.
A. Top channel
B. #lO x _" pan-head Phillips thread-cutting screws
Attach Side Curtains
1, LocaLe provided bag of screws.
2, Insert the top and then the bottom of the right-hand curtain
housing in the top and bottom curtain channels on the air
conditioner,
Topview
B
A. Curtain housing
B. Curtain top channel on air conditioner
.
Whilethe right-handcurtainisstillextended,insert#10 x _A"
pan-headPhillipsscrewsintothe top and bottomslotsof
curtain,Screwthecurtainto the Lopandbottomholes inthe
airconditionercabinet
5. Slide the curtainhousingintothecurtainguidesas faras it
willgo.
6. Repeatthe abovestepsforthe left-handcurtain,
Attach foam adhesive seal
Attachfoamadhesivesealalongthe bottomof the curtain
bottomchannel,
B
A. Curtain housing
B. Foam adhesive seal
4
Page 5

Install Cabin_ _to Wi_d_
Attach Side Curtains to Window Frame
• Handlethe air conditionergently.
• Be sureyourair conditionercabinetdoesnot{alloutof the
openingduringinstallationor removal.
• The placewherethe powercordexits theairconditioner
shouldbe nomore than 4 ft(122 cm)from a grounded
3 prongoutlet
Do notblockthe louversonthe frontpanel.
Do notblockthe louverson the outsideof theair conditioner.
1.
Centeremptycabinetinwindow.Checkthat lowerrailof air
conditionercabinetisbehindand againstback sideof
windowsill.Maintaina firmholdonthe airconditioner
cabinet.Lower windowsashto holdthecabinetinplace.
2,
Measurethe distancebetweenthe right-handsideofthe
cabinetandthe insideof the windowchannel.
3,
Repeatfor the leftside.Adjustthe cabinetuntilthe distance
on eachsideisthe same.
I
tl
1
A, Window sash
B. Empty cabinet
C. Window channel
Ilia
IH c
I
I
1. Pull theleft-handcurtainout untilitfits intothe window
channel.Use a s/=z"drillbitto drilla starterholethrough the
holeinthe curtainhousingandintothe lowerwindowsash.
Frant View
Top '_ew
A. Window channel
B. Left-hand curtain
C. #1o x _/_round-head screw
2,
Insertone ofthe #10 x sA"round-headscrews throughthe
threaded holeinthe top of the curtain.
A
4,
Usea 3/lS"drillbitto drill3 starterholes_" deepthrough the
3 holesin thecabinetand intothe windowsill,
5.
Attachcabinetto windowsillwith3 - #10 x 1/2"pan-head
Phillipsscrews,
A. #10 x _" pan-head Phillips screws
B. Windowsill
6,
Checkthatair conditionercabinetistilted tothe outside so
thatwater willrunto the outside.
A, #10 x ¾" round-head screw
B, Slotted hole in the bottom of the curtain
3. Repeatforthe right-handcurtain,
Attach S_ort Brackets
Attach the supportbracketto the cabinetbyaligningthe
holesinthe bracketwith the holesinthecabinet.
5
Page 6

Co_ta Installation
1. Insert seal behind the top of the lower window sash and
againstthe glass of the upperwindow.
2. Place one window-lock bracket on Lopof lower window
and against upper window sash on each side of the window.
3. Use a 3/_. drill bitto drill a starter holes through the holes in
each bracket into the window sash.
4. Attach both the window-lock brackets to the window sash
with #10 x ¾" round-head screws to secure window in place.
A A
A, Window lock brackets
B. Upper window glass
C,Foam window sash seal
S • " .......
NOTES:
• Handle airconditionergentiy,
• Be sure your air conditioner cabinet does notfall outof the
opening during installation or removal.
• The place where the power cord exits the air conditioner
should be no more than 4 ft(122 cm)from a grounded
3 prong outlet.
• Do not block the louvers on r.hefront panel.
• Do not block the louvers on the outside of the air conditioner.
• ILls the customer's responsibility and obligation to have this
product installed by a qualified technician familiar with
through-the-wall room air conditioner installations.
Option 1--Wood, metal or plastic molding
When using a wood, metal or plastic molding, the wood frame
should line up with the inside wall as shown.
ABC
<_
A. Molding C. Wood frame
B. Inside wall D. Louvers
OpUon 2_PlasWmd wall with no molding
If the plastered wall is to be flush with the cabinetand no molding
is used, the wood frame must be set 1,_"(13 ram) into the inside
wall.
AB C
D
A.Plasteredwaft Woodframe
B.Insidewatl D. Louvers
Install Wood Ftame
1. Constructthe wood frame. See "Location Requirements ° for
dimensions.
2. Measure the outside width and heightof frame to
determine wall opening dimensions.
3. Cutthe opening through 1he wall. Remove and save insulation.
NOTE S:
• Dimension for depth depends on wall thickness and
type of molding.
• Do not block louvers in air conditioner cabinet.
6
Page 7

• Use 1" (2.5cm) orthickerlumberIor woodIrame.
A. Outside width
8. Outside height
C. Depth
4. Applythe woodpreservaUvetothe outsideexposedsurlace.
5. InserttheIreme Inthe wallopening.Squareand levelIrame.
6. AttachIrame securelyto the wall.
Install Cabin_ _ _od Franm
1. Removetop channeland bothsidechannelsusinga 114nut
driveror socketwrench.Discardtop channeland both side
channels.
2,
Insertcabinet into the Iremed wall opening.The top of the
cabinetshuuld extend zf4(19.1 ram) into the room.If there is
trim,the cabinet should extend _/4(19.1 mm) past the trim.
B
A.3/4(19.1mm)extendingint_room
B. Ttfm
3,
LJsea levelto checkthatcabinetislevelsideto side.
A. Level
4.
Check that air conditJonercabinet istilted to the outside so
that water will run to the outside.The cabinet should slope
at least half-a-bubble towards the rear,
5.
Reusetheinsulationto sealopeningbetweencabinetand
hame.
6.
Useexistingholesinsidesand top of cabinetand 7 -#10 x
1"woodscrews(notprovided ) to attachcabinetto frame.
NOTE: Do notovertJghtonscrewsorthe cabinet willdistort
andprovideapoorairsealbetweencabinetandair condiUoner.
7. Caulkalloutsidewallopeningsaroundcabinet.
NOTE: Handlethe airconditionergently.
1. Make surethe free endof the groundwireIs outside of the
cabinet
_meulve Weight Hszsrd
Uee two or more people to move end Install
sir conditioner.
Failure to do so can result In beck or other Injury.
.......
2. Insert air conditioner Into cabinet
J
A
A. Make sure the line end of the ground wire Is ou_sMe o! the ceb/ne[
Page 8

! Electrical Shock Hazard !
Connect green ground wire to ground screw,
Failure to do so can result In death or electrical shock.
3. Connectgreengroundwireto cabinetbasewithgroundscrew,
Position groundwire pointingstraightup,Putexcess ground
wire betweencoilandair conditionercabinet,
A. Green ground wire
B. Ground screw
4.Installcontrolpanelbackto thefrontpanelandpushfront
panelstraight on and then lower it slightlyto lock it into place.
5. Insertfronttabs of frontpanel intotop of cabinetand swing
frontinto place,
6. AttachbottomIrontofpanelwithfrontpanelscrews,Replace
controlknobs{onsome models),
NOTE: Forthrough-the-wallinstallations,it needed,install
moldingaroundthe roomsideofcabinet
7, Plug into a grounded3 prongoutlet.
8, Press RESETon the powersupplycord,
8
 Loading...