

Frigidaire FAQ055S7A11, FAQ055S7A12, FAQ055S7A13, FAQ085S7A11, FAQ085S7A12 Installation Guide
...Page 1

iNSTALLATIONINSTRUCTIONS
Gatherthe requiredtoolsand partsbeforestartingInstallation. iMPORTANT:Observe all governingcodesand ordinances.
Readand followtheinstructionsprovidedwith any tools listed Checkthe locationwhereair conditJonerwlllbe nstelled.Proper
here. installat_onisyourresponsiblli_j.Make sure youhaveeverythin_
Took; Needed necessaryfor correct,installation.
The locationshould provide:
[] Flat-bladeand Phillips [] Tapemeasure [] Groundedelecl_icaloutietwithin 4 ft(122 cm)of where b_e
screwdrivers [] Drilland _" or smallerbit powercordexitsthe airconditioner.
[] Level NOTE: Donot usean extensioncord.
Through.the,Waft Instahtion:
In additionto thetools listed above,the followingtoolsare [] Alarge enoughopeninglor Lheair conditioner,
neededforthrough-the-wallInstalation. [] Adequatewallsupporr.forweight a!air conditioner.Air
[] Saw [] 1" (2,5cm) orthicker conditionerweighsbeLween50 and 60 Ibs[22to 28 kg),
[] Woadpreservative
[] Caulk
Parts SuppFmd(on some models)
Checkthat.all parts are includedinparis package,
lumber MOTE:Cabinetlouversmust_otbe obstructed.Airmust be able
[] #10 x 1"wood screws (7) to passfreelythrough thecabinet,louvers.
[] Freemovement of air inroomto becooled.
C D E F
screws _)
G.Topchannel
O.JlOx _" pan-head H,Sidecurtains(2J
Phillips screws _3) L Fo#m seal
NOTE: Installationpartsare suppliedlor double-hungwindows
upto 40 (101.6cm)wide, AspecialWideWindowKit.isavailable
from yourdealeror servicecenter.See "Accessories."
A. Cebtnet touvers
PIN 66129901290 1
Page 2
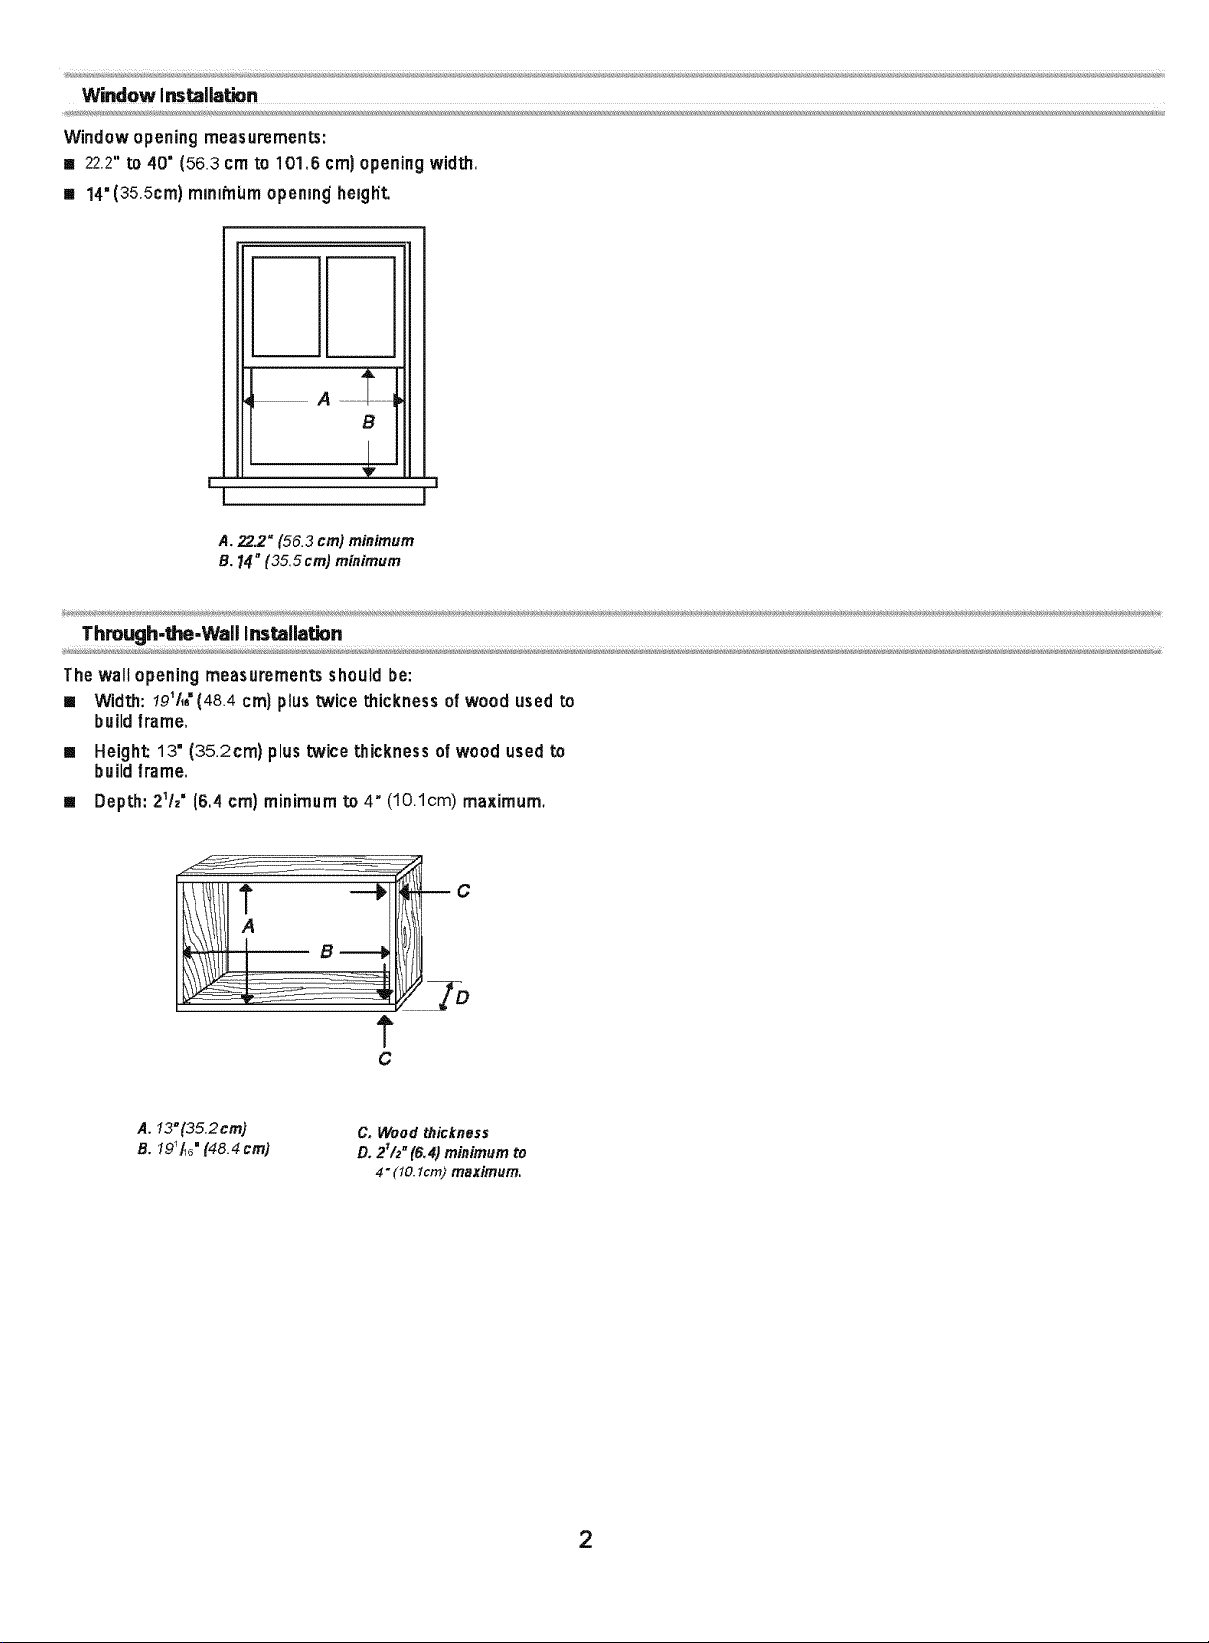
Window Installation
Window opening measurements:
m 22.2" to 40" (56.3 cm to 101.6 cm) opening width,
14"(35.5cm) mm#ni4mopeninghe_gl_L
B
!
A. 22.2" (56.3 cm) minimum
!
e.14"(355cm)minimum
Through,the.Waft lnstafia_n
The wall opening measurements should be:
[] Width: 19V_(48.4 cm) plus twice thickness of wood used to
build frame,
[] Height: 13" (35 2cm) plus twice thickness of wood used to
build frame.
[] Depth: 2_h" (6.4 cm) minimum to 4" (lO.lcm) maximum.
B
t
C
A. 13"(35.2cm)
B. 19_[_" H&4 cm)
C, Wood thickness
1
D, 2/z"(&4) minimum to
4" (10. lcm) maximum,
2
Page 3

iNSTALLATiON iNSTRUCTiONS
Ex_sslw Weight Hazard
Use two or mor_ people)to move)and Inee_ll
sir _orldltloner.
Fmilumto do so €_n result in back or o_herinjury.
Remove packagk_g mab_dels
[] Removeand disposeof/recyclepackagingmaterials.
Removetape andgl-e residuefromsurfacesbeforeturning
ontheairconditioner.Ruba smallamount-elliquiddishsoap
overthe adhesivewithyour lingers.Wipe withwarmwater
and dry,
[] Do not.useshaq_ins_umen_sorubbingalcohol, flammable
fluids, or abrasivecleanersto remove tape orglue.These
preducLscandamagethe surfaceo| yourairconditioner.
[] Handlethe air conditionergently.
1. Removethe air conditJonerfrurnthecar_n and place iton
cardboard.
2. Removeshippingscrews|rein bothsideso| the cabineL
4L Removethe windowlockbracket and screw |rein the air
conditJonerand setaside.(on some models)
A, Window Iocl_bracket screw
B. Window lock bracket
5. Removethe groundscrew and groundwirefromthe |ronL
of theair condi_Jonerbase.Savetheground screw,
,4
.........,:_a. _,_,!_4b._
A. Shipping screw
3.
Remove|rent panelbyremoving 2 phillipsscrews,onefrom
either side of front
3A: Remove 3 screws of control panel Item front panel.
A. Green ground wire
B. Ground screw
6. Pull on the handles to slide the air conditioner out of the
cabineL Place the air cendiLioner on cardboard,
A,H_d_s
NOTE: Do not II_t.push, pull or remove any expanded
polystyrene (foam} lrom inside the air conditioner. It is not
packing rnatarial,
3
Page 4

NOTES:
[] Handlethe air conditionergently,
[] Be sureyourair conditionercabinetdoes not fallout o( the
openingduring installationor removal.
[] The placewherethe powercord exits the air conditioner
shouldbe no more than 4 (t(122 cm)from a grounded
3 prongoutlet
[] Do not blockthe louvers on the front panel.
[] Do not blockthe louversonthe outsideof the air conditioner,
Attach T_ Channel
NOTE:Attachthe Lopchanneland sidecurtainsto the air
conditionercabinetbeforeplacingthe cabinetinthe window,
1. Locateprovidedbag ofscrews.
2. Placethe LOpchannelonLOpofthe airconditionercabinet,
lining up the 3 holesinthe topchannelwiththe 3 holesonLOp
of the air conditionercabinet,
3, Using3 - #10x %" pan-headPhillipsthread-cutting
screws, attach the top channelto the air conditionercabinet.
B
Bottom view
A
B
A. Curtainhousing
B. Curtain bottom channel on air conditioner
S_
Extend right-hand curtain outward so you may insert the
first screw through the middle hole of the curtain. Using
#10 x _A"pan-head Phillips screw, screw the curtain to the
middle hole inthe air conditioner cabinet.
NOTE: This screw is required to correctly attach the curtain
(top to bottom} to the air conditioner cabinet.
_D_D_UD
A. Top channel
B. #10 x _" p_n-head Phillips thread-cutting screws
Attach Side Curtains
1,
Locateprovidedbagof screws,
2.
Insert the top and then the bottomof the right-hand curtain
housinginthe top and bottomcurtainchannelson theair
conditioner,
Top view
B
4,
Whilethe right-hand curtainisstillextended,insert#10 x V_"
pan-head Phillipsscrews intothe top and bottom slots of
curtain,Screw thecurtainLOthe top and bottomholesinthe
airconditionercabinet
5. Slidethe curtainhousingintothe curtainguidesasfaras it
willgo,
6, Repeatthe abovestepsfor the left-hand curtain,
Attach foam adhesive seal
Attachfoamadhesivesealalongthe boLLomof the curtain
bottomchannel.
A. Curtain housing
B. Curtain top channel on air conditJoner
B
A. Curtainhousing
B.Foamadhesiveseal
4
Page 5

install_binet into Window
Attach Side Curtains to _ndow Frame
[] Handletheair conditionergently,
[]
Besureyour airconditionercabinetdoesnotfall outer the
openingduringinstallationorremoval.
[]
The placewherethe powercordexits the air conditioner
should be no morethan 4 rt (122 cro)froma grounded
3 prongoutlet.
[]
Donot blockthe louversonthe front panel,
Donot blockthe louvers onthe outsideofthe air conditioner,
[]
1.
CentereropLycabinetinwindow,Checkthat lower railof air
conditionercabinetis behindand againstbackside of
windowsill.Maintaina firm holdonthe airconditioner
cabinet,Lowerwindowsashto hold the cabinetinplace,
2_
Measurethe distancebetweenthe right-handside of the
cabinetand theinsideorthe windowchannel,
3,
Repeatfor the left side.Adjustthe cabinetuntilthe distance
on eachsideisthe same,
l
!!1
I
A, Window sash
B. Empty cabinet
C. Window channel
!
I
1, Pullthe left-hand curtainout untilitfits intothe window
channel,Use a %2"drillbitto drilla starterholethrough the
holeinthe curtainhousingand intothe lower windowsash,
Front V'mw
Top V'mw
L A
A. Window channel
B. Left-hand curtain
C, #70 x _# round-head screw
2_
Insert one ofthe #10 x %" round-headscrewsthrough the
threadedhole inthe top orthe curtain.
A
4,
Usea _hs"drillbit.Lodrill2starterholes %"deepthrough the
2 holes inthe cabinetand intothe windowsill,
5,
AttachcabinetLowindowsillwith 2 - #10 x 1/2"pan-head
Phillips screws,
A
A. #70 x g,_pan-head Phillips screws
B. Windowsill
6,
Checkthat airconditionercabinet.istilted Lothe outsideso
that water wi{Irunto the outside,
B
A, #10x _._ round-head screw
B. Slotted hole in the bottom el the curtain
3, Repeatrorthe right-hand curtain,
5
Page 6

Comp_te installation
1, Insert.sealbehindtheLopofthe towerwindowsashand
againstthe glassof the upperwindow,
2, Place the window-lockbracketon top of towerwindow
andagainstupperwindowsash.
3, Usea _/_"drillbitto drilla starterholesthroughthe holes in
each bracketintothe windowsash
4, Attachthewindow-lockbracket to thewindowsash
with#10 x s/4.round-headscrewsto securewindowin place.
A
A. Window lock brackets
BoUpper window glass
C, Foam window sash seal
NOTES:
[] Handleairconditionergently,
[] Be sureyourairconditionercabinetdoes notfalloutof the
openingduringinstallationorremoval.
[] The placewhomthe powercordexits the airconditioner
Option 2--Plastered wall with no molding
If theplasteredwallisto be flushwiththe cabinetand no molding
isused.the woodframe must be set ½" {13ram) intotheinside
wall.
AB C
shouldbe no morethan 4 ft(122 cm)froma grounded
3 prongoutlet
[] Do notblockthe louversonthe front panel,
[] Do notblockthe louverson theoutsideof the air conditioner,
®
[] It isthe customer'sresponsibility andobligation to have this
productinstalledbya qualifiedtechnician familiar with
through-the-walt roomair conditionerinstallations.
Option 1--Wood, metal or plastic molding
Whenusinga wood, metal orplasticmolding,the wood frame
shouldlineup withthe insidewall as shown, A.Plasteradwall
B. Inside wall D, Louvers
ABG
Install Wood Frame
D
1. Constructthe woodframe,See "LocationRequirements" for
dimensions,
2. Measurethe outsidewidthand heightof{tameto
determinewallopeningdimensions.
3. Cutthe openingthroughthewall,Removeandsaveinsulation,
NOTES:
A. Molding C. Woodframe
B.Insidewag D, Louvers
[] Dimensionfor depthdependson wallthicknessand
type of molding,
[] Do notblock louversin air conditionercabinet
1
D
Wood frame
6
Page 7

[] Use l" (2.5cm) orthicker lumberfor woodframe. 2. Usea levelto checkthatcabinetis levelsideto side.
B
:C
A. Outside width
B. Outside height
C. Depth
4. Applythe wood preservativeto the outsideexposedsurface,
5. tnsertthe frame inthe wa opening,Squareand levelframe.
6. Attachframe securelyto the wall
Install Cabinet into Wood Frame
1. InserLcabinetintothe framed wallopening,Thetopofthe
cabinetshould extend _/_(19.1 ram) intothe room.if there is
trim.the cebinetshould extend /4(19.1 ram) past the trim,
3
A--
A
A. Level
3. Checkthatairconditionercabinetis tilted to theoutside so
thatwater will runto the outside.Thecabinet shouldslope
at least half-a-bubble towards the rear.
4. Reusethe insulationto sealopeningbetweencabinetand
frame.
5. Useexistingholesinsidesand top ofcabinetand 7 -#10x
1" wood screws(notprovided)to aL_ch cabinetto frame.
NOTE: Donotovertightenscrews orthe cabinetwilldistort
andprovidea poorairsealbetweencabinetandairconditioner,
6. Caulkalloutsidewallopeningsaroundcabinet.
A. 3/4 (19.1 ram)extendingintomorn
B. Trim
NOTE: Handlethe air conditionergently.
1. Makesure the free endof the groundwire isoutsideof the
cabinet.
Excessive Weight Hazard
Usetwo or more people to moveend install
air conditioner.
Failure to do so can result in back or other injury.
2. Insert air conditioner into cabinet.
A. Make sure the free end of the ground wire is outside o!lthe cabinet
Page 8

! Electrical Shock Hazard J
Connect green ground wire to ground screw.
Failure to do so can result in death or electrical shock.
3. Connectgreengroundwireto cabinetbasewithgroundscrew,
Position groundwire pointingstraightup,Putexcess ground
wire betweencoilandair conditionercabinet,
A. Green ground wire
B. Ground screw
4.Installcontrolpanelbacktothe front panelandpushfront
panel straight on and then lower itslightly to lock it into place,
5. tnserttronttabs of frontpanel into top ofcabinetand swing
frontintoplace,
6. AttachbottomIrontof panelwithfrontpanelscrews, Replace
controlknobs{onsome models),
NOTE: Forthrough-the-wall installations,ifneeded,install
moldingaroundthe mornsideof cabinet
7. Plug intoa grounded3 prongoutlet
8. PressRESETon the powersupplycord,
8
 Loading...