

Frigidaire AGQ7000EE - 5.8 cu.ft. Affinity Gas Dryer, FAFW3511KB - Affinity Tumble Action Washer Datasheet

Washer Tech Data Sheet
This information is intended for Qualified T echnicians Only .
CAUTION: DISCONNECT ELECTRICAL CURRENT BEFORE SERVICING
Please Return This Sheet to its Envelope in the Product for Future Reference
Contents Page
Error code explanation..........................................1
Diagnostics...........................................................1
Error Code Chart...................................................2
Tests..................................................................3-4
Français.............................................................5-8
Español............................................................9-14
6000 Wiring Diagram...........................................15
READING ERROR CODES:
1. Wake the washer by pressing any button.
2. Wait 5 seconds.
3. Press and HOLD the Start/Pause and Cancel buttons simultaneously.
As long as the buttons are held, the failure code will appear in the display as an E followed by two numbers, a number and a letter or two letters. The
control will beep and the Door Lock, Wash, Rinse, and Final Spin indicator lights will flash.
Troubleshoot the problem by using charts on the pages 3-5.
Quick Check
f there is no error displayed and the washer momentarily starts then turns back off:
I
1. Listen for a relay closure inside the motor control shortly after the Start/Pause key is pressed. If this happens, the motor control has power.
2. Check the 5 pin connector wiring between the console control and the motor control.
NOTE: During normal operation, the display may show:
“cd” - cool down (Sanitary cycle)
“do” or “dr” - door problem.
“Err” - an error has been detected.
“LOC” - control lock is activated.
“PAU” - cycle has been interrupted.
7000 Wiring Diagram...........................................16
To clear latest stored error code:
• Turn the Program Knob to the start position, Spin Only.
• Press Start/Pause to start the cycle and save it.
• Press Cancel to stop the cycle and turn off the LEDs.
• Press Cancel again to turn on the LEDs.
• Within 5 seconds, press and hold the Option and Start/Pause buttons until LEDs start sequentially chasing, then release buttons.
• Turn the program knob clockwise 7 clicks from the Start Position. The control will signal the last error code.
• Press and hold the Options and Start/Pause buttons for 3 seconds. The code will be cleared.
• Exit Diagnostic Mode to return the washer to normal operation.
a) Unplug the power cord, wait 5-8 seconds, then reconnect the power cord OR
b) Turn the program knob clockwise 2 or 3 clicks after the Start Position. Press Options and Start/Pause buttons together for a few seconds
until wash cycle LEDs appear.
Diagnostic Test
The diagnostic test is used to check individual component function only.
TO START THE TEST:
• Turn the Program Knob to the start position, Spin Only.
• Press Start/Pause to start the cycle and save it.
• Press Cancel to stop the cycle and turn off the LEDs.
• Press Cancel again to turn on the LEDs.
• Within 5 seconds, press and hold the Options and Start/Pause buttons until LEDs start sequentially chasing, then release buttons.
1. All the LEDs will sequentially light. Pressing a button below a light cluster will light all the LEDs in that cluster at one time to confirm functionality.
2. Turn the program knob (1) click clockwise from the start position. The hot water solenoid will activate and hot water should enter through the
detergent compartment.
3. Turn the program knob (2) clicks from the start position. The bleach water solenoid will activate and cold water should enter through the bleach
compartment.
4. Turn the program knob (3) clicks from the start position. The bleach and the wash water solenoids will activate and cold water should enter
through the softener compartment.
5. Turn the program knob (4) clicks from the start position. The door lock solenoid will deactivate and the loading door can be opened. When the door
is opened, the drum light should turn on.
6. Turn the program knob (5) clicks from the start position. The washer will fill and tumble. Once tumbling has started, the Boost Heater (if so
equipped) will turn on.
7. Turn the program knob (6) clicks from the start position. The drain pump & door lock solenoid will activate and the washer will operate in high spin.
SAFETY WARNING: If power is removed during this test, the door can be opened. To prevent injury, DO NOT put your hands inside when the tub
is rotating.
8. Turn the program knob (7) clicks from the start position. The control will signal the last error code.
Exiting Diagnostic Mode
There are two options for exiting the Diagnostic Test mode and returning the washer to normal operation:
a) Unplug the power cord, wait 5-8 seconds, then reconnect the power cord OR
b) Turn the program knob clockwise 2 or 3 clicks after the start position. Press Options and Start/Pause buttons together for a few seconds until
wash cycle LEDs appear.
If a situation arises where you cannot exit the Diagnostic mode as described above and the bank of 5 LED’s on the right end remain ON
regardless of Program Knob position, a combination of pushed buttons may have caused the control to enter a special factory test
mode. Disconnect power to reset the control to return washer to normal operation is this occurs.
1
137063900C (1202)
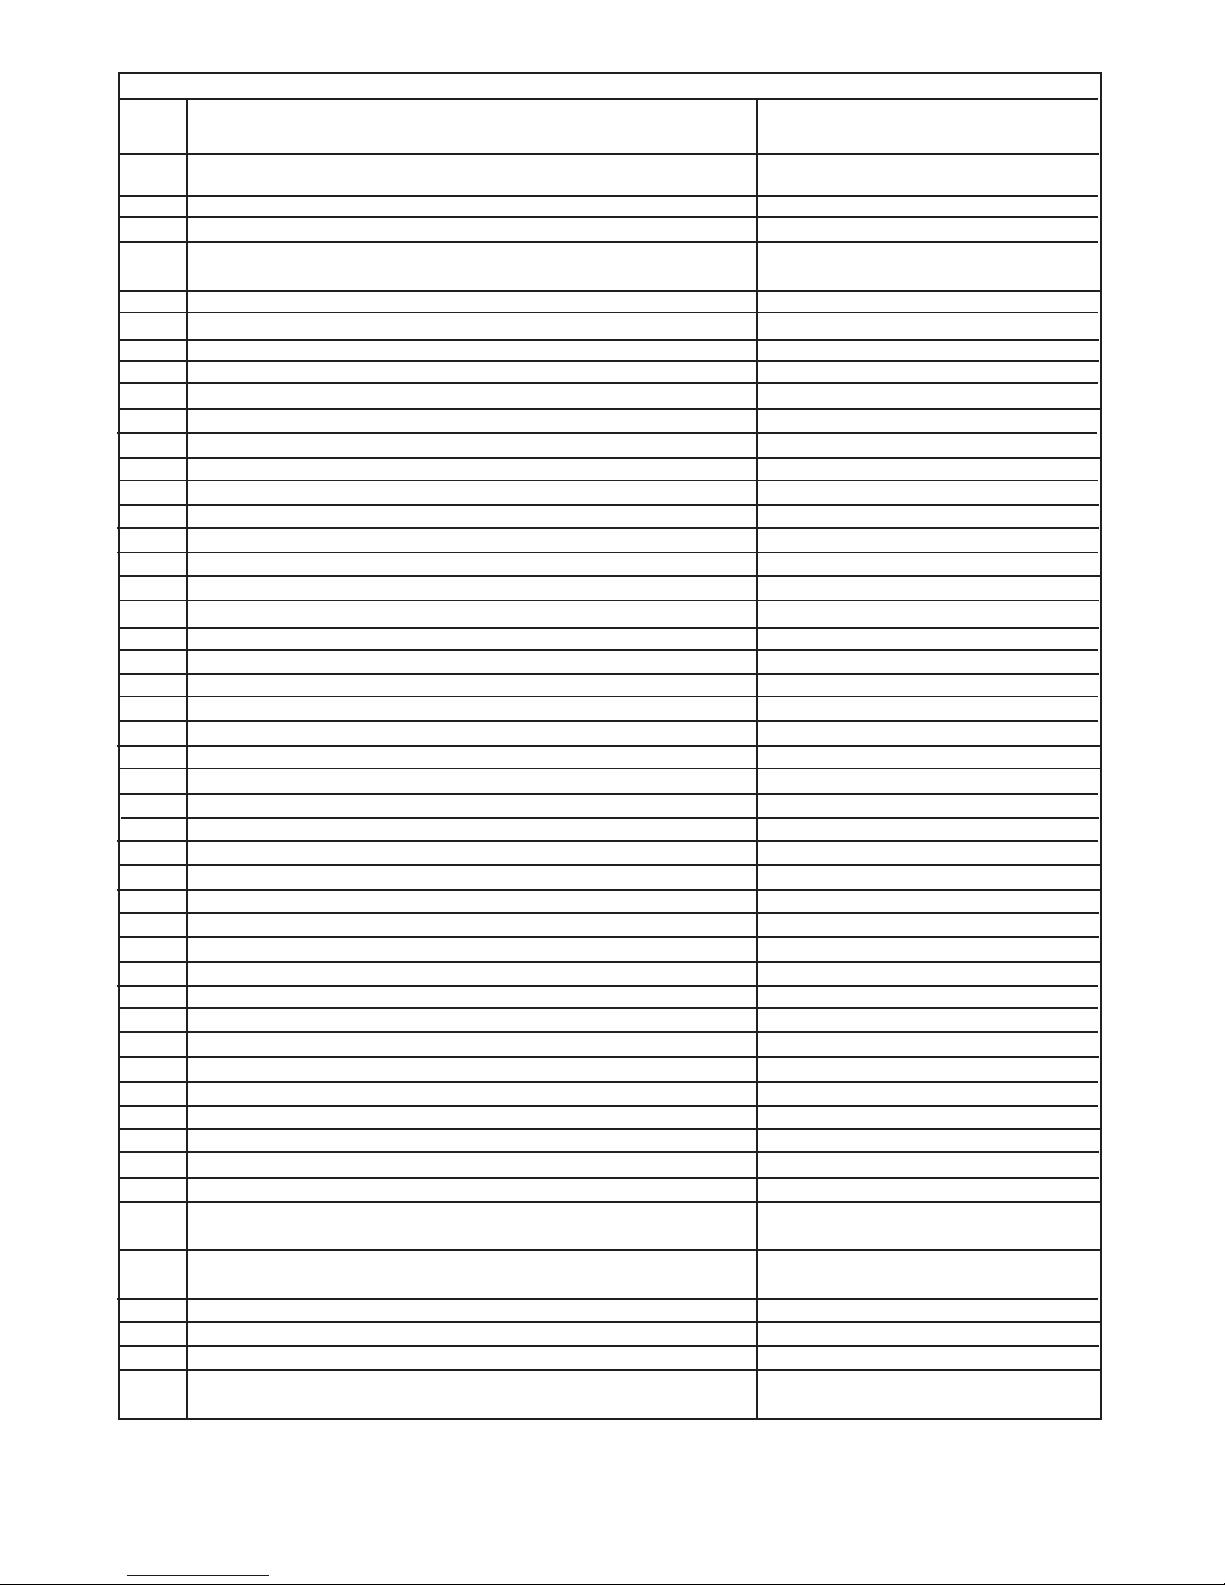
Error code chart
Error
code Fault condition Check
E11 Fill time too long. Refer to test (1).
E13 Water leak in tub or air leak in air bell. Refer to test (2).
E21 Water not pumping out fast enough. Refer to test (3).
E23 Drain pump relay on control board failed, wire off pump or pump Replace console control board, wire or
defective. pump.
E24 Drain pump relay on control board failed. Replace console control board.
E31 Pressure sensor not communicating with control board. Refer to test (4).
E35 Pressure sensor indicates water overfill. Refer to test (5).
E36 Console control board problem. Replace console control board.
E38 Air chamber clogged or pressure sensor defective. Check air chamber, rpl press. sensor .
E41 Control board thinks the door switch is open. Refer to test (6).
E43 Console control board thinks the door locking device has failed. Refer to test (7).
E44 Console control board problem. Replace console control board.
E45 Console control board problem. Replace console control board.
E46 Console control board problem. Replace console control board.
E47 Console control board thinks the door PTC circuit is open in spin. Refer to test (7).
E48 Console control board thinks the door PTC circuit is closed. Refer to test (7).
E52 Bad signal from tacho generator. Refer to test (8).
E56 High motor current. Refer to test (9).
E57 High current on inverter. Refer to test (9).
E58 High current on motor phase. Refer to test (9).
E59 No tacho signal for 3 seconds. Refer to test (10).
E5A High temperature on heat sink caused by overloading. Test first-if bad-rpl speed control brd.
E5B High temperature on heat sink. Replace speed control board.
E5 C High temperature on heat sink. Replace speed control board.
E5D Communication problem. Refer to test (1 1).
E5E Communication problem. Refer to test (11).
E5F Communication problem. Refer to test (1 1).
E66 Heating element relay failure. Refer to test (14).
E67 Input voltage on microprocessor incorrect. Refer to test (15).
E68 Current leakage to ground on heater or fuse opened. Refer to test (14 & 15).
E71 Wash NTC failure. Refer to test (15).
E74 Wash temperature does not increase. Wire off NTC - rpl water valve.
E75 Water temperature sensor circuit. Refer to test (12).
E82 Console control board problem. Replace console control board.
E83 Console control board problem. Replace console control board.
E91 Comunnication error between UI board and console control board. Refer to test (16).
E93 Console control board problem. Replace console control board.
E94 Console control board problem. Replace console control board.
E95 Communication error. Replace console control board.
E97 Console control board problem. Replace console control board.
E98 Console control board problem. Replace console control board.
EB1 Incoming power frequency out of limits. Refer to test (13).
EB2 Incoming line voltage above 130 V AC. Check voltage at outlet. If < 130V AC,
replace the console control board.
EB3 Incoming line voltage below 90 V AC. Check voltage at outlet. If > 90V AC,
replace the console control board.
EBE Console control board problem. Replace console control board.
EBF Console control board problem. Replace console control board.
EF1 Clogged drain pump. Unclog the drain pump.
EF2 Too much soap. Advise customer to reduce the amount
of soap they are using.
2
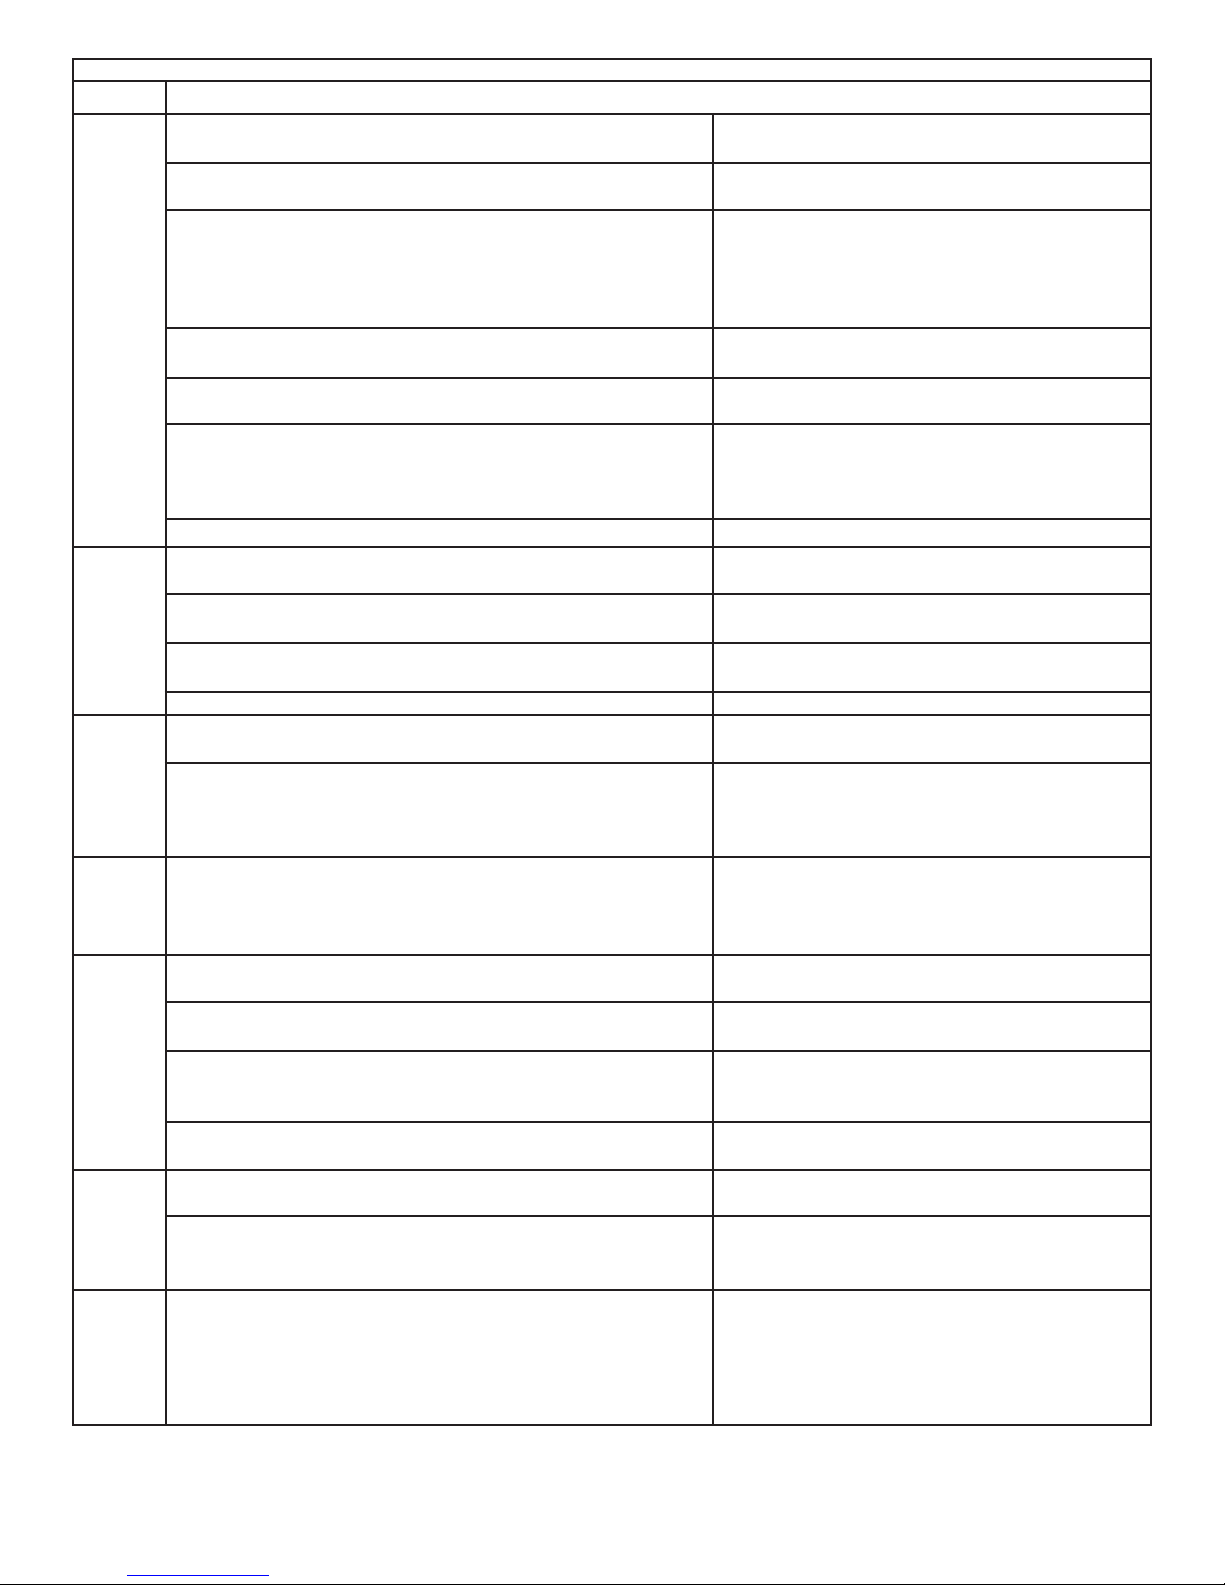
Test
T est Check Correction
Test 1:
Test 2:
Test 3:
Test 4:
Test 5:
Test 6:
1. Is the incoming water flow normal?
2. Are the incoming water faucets turned
3. Is the incoming water pressure above (30) psi.
4. Does the fill water continue to enter the washer?
5. Remove power from the washer. Did the water fill stop?
6. Check the pressure sensor.
7. Replace the control board.
1. Is the washer leaking water?
2. Is there an air leak in the air bell system?
3. Check the pressure sensor.
4. Replace the control board.
1. Check the drain hose for restrictions.
2. Start the washer and check for 120 VAC at the drain
pump.
Inspect the wiring between the pressure sensor and the
control board.
1. Is the water level above 4.5 inches?
2. Does water enter the washer continuously .
3. Remove power from washer. Does the water stop coming
in?
4. Replace the pressure sensor switch. Did this correct the
problem?
1. Is the loading door closed?
2. In the J2 plug on the console control, measure voltage
from the black wire to ground with power on.
Yes. Go to step (4).
No. Go to step (2)
No. Turn water faucets on.
Yes. Go to step (3).
No. Have customer correct pressure problem.
Y es. Check for kinked or blocked incoming water
hoses, clean the incoming water screens. If
problem still remains, replace the water inlet valve
assembly.
Yes. Go to step (5).
No. Go to step (6)
Yes. Go to step (6)
No. Replace the inlet valve assembly .
Pressure sensor checks good.
Go to step (7).
Pressure sensor checks bad. Replace pressure
sensor.
Y es. Correct water leak.
No. Go to step (2)
Y es. Correct the air leak problem.
No. Go to step (3)
Defective. Replace the pressure sensor.
Good. Go to step (4)
Restriction. Correct problem.
No restriction. Go to step (2).
Zero. Replace the control board.
120 V AC. Remove the pump and check for blockage.
If blocked, remove the restriction, if not, replace
the pump.
Defective wiring. Correct wiring.
Good wiring. Replace the pressure sensor . If this
does not correct the problem, replace the control
board.
Yes. Go to step (2).
No. Go to step (4).
Yes. Go to step (3).
No. Replace the control board.
No. Replace water valve assembly .
Y es. Check wiring to valve assembly for shorts. If
wiring is good, replace the control board.
Y es. Problem solved.
No. Replace the control board.
No. Close the door.
Yes. Go the step (2).
0 volts. Check the door strike. If good, replace the
door switch assembly .
120 volts. Replace the console control board.
Test 7:
1. S tart the diagnostic test. T urn the program knob 8
clicks clockwise from the start position.
Washer spins. Defective door lock assembly .
Washer does not spin. Defective control board.
3
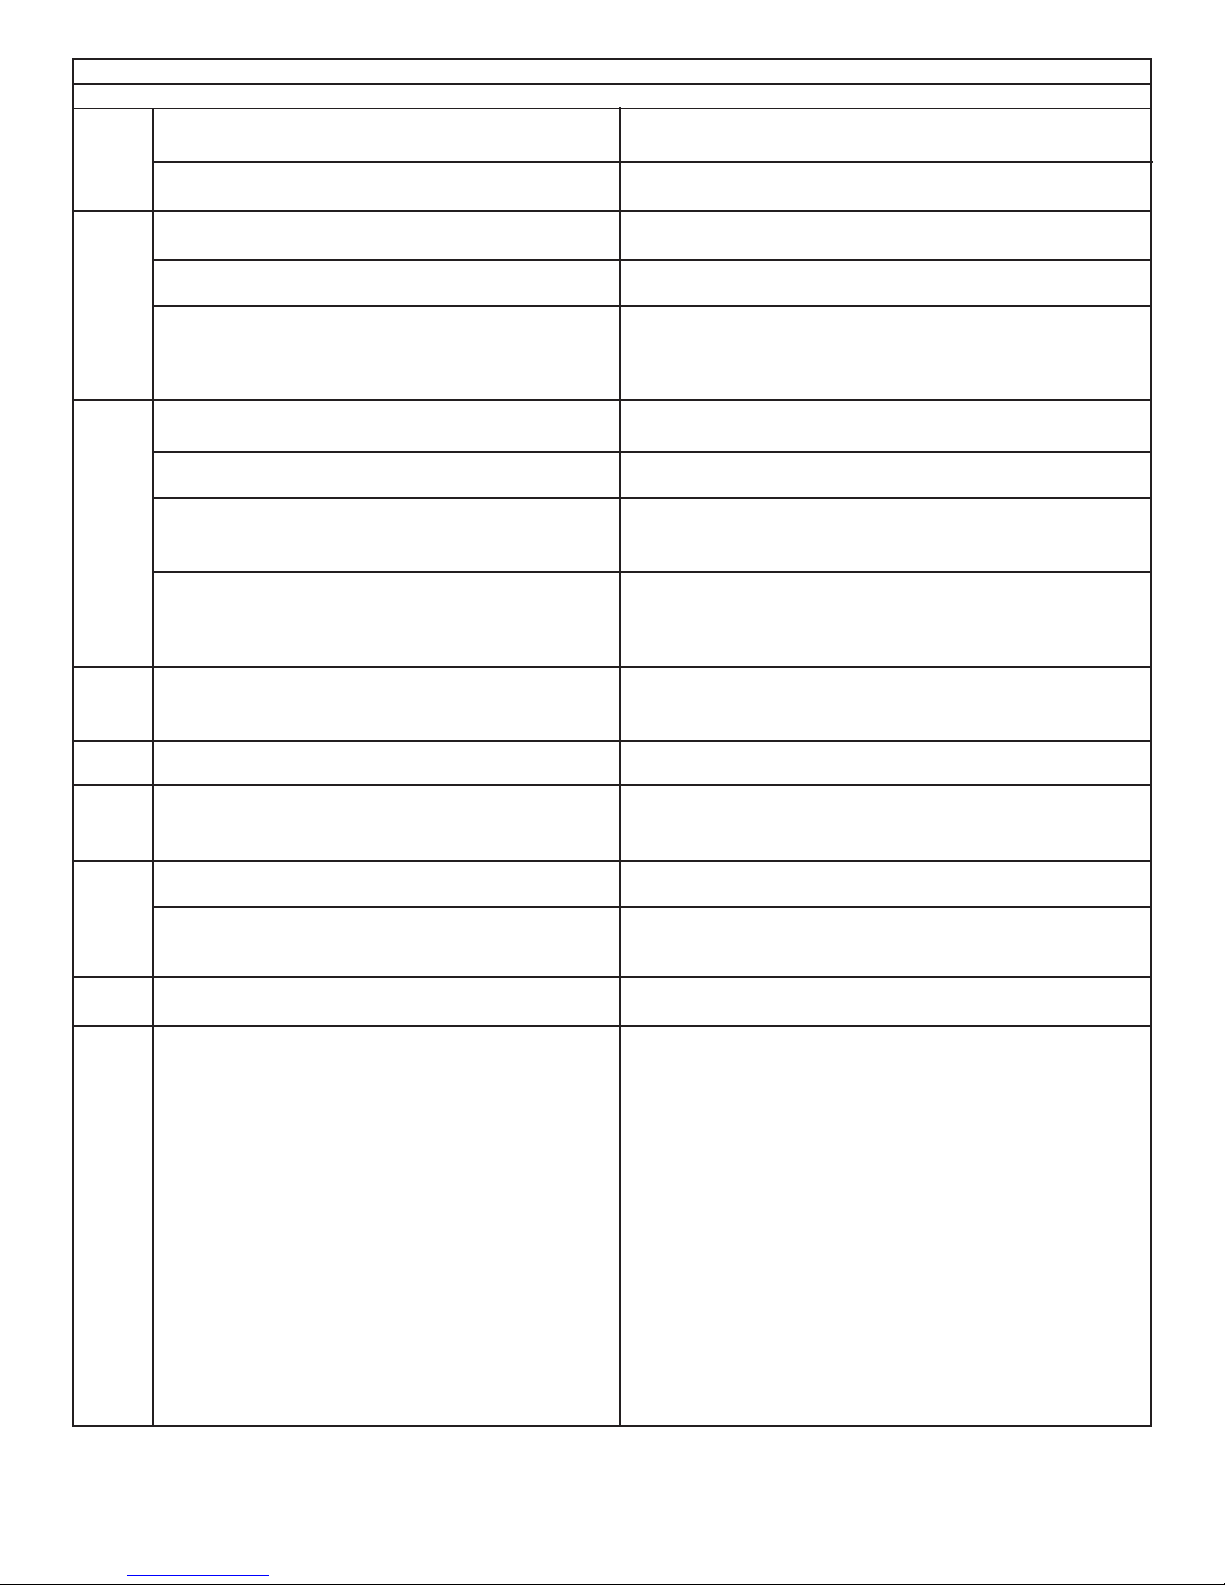
Test
Test Check Correction
Test 8:
Test 9:
T est 10:
T est 11:
T est 12:
T est 13:
T est 14:
T est 15:
T est 16:
1. Disconnect the plug from the drive motor and
measure the resistance pins 4 & 5 in the motor .
1. Remove the belt from the motor and spin the motor
pulley . Does the motor spin free?
2. S pin the tub pulley . Does the tub spin free?
3. Disconnect the plug from the motor and measure
the resistance of the windings (pin 1 to pin 2, pin 1
to pin 3, pin 2 to pin 3). All readings should be
between 4 and 6 Ohms.
1. Remove the belt from the motor and spin the motor
pulley . Does the motor spin free?
2. S pin the tub pulley . Does the tub spin free?
3. Disconnect the plug from the drive motor and
measure the resistance between pins 4 & 5 in the
motor .
4. Disconnect the plug from the motor and measure
the resistance of the windings (pin 1 to pin 2, pin 1
to pin 3, pin 2 to pin 3). All readings should be
between 4 and 6 Ohms.
1. Communication problem. Check the wiring between
the control board and the speed control board.
1. Check the resistance of the water valve NTC. Is it
around 50K ohms?
1. Have the power company check the frequency of
the incoming power . If correct,replace the control
board.
1. Check the resistance of the heating element. It
should be approximately 14 ohms.
2. Check the resistance between ground and both
heater terminals. It should be open when the heater
terminals are disconnected.
1. Check the resistance of the tub NTC. Is it around
4.8K ohms?
1. Check the wiring harness between the console
control board & the interface board.
If the reading is between 80 & 130 Ohms, replace the speed
control board.
If the meter reads other than between 80 & 130 Ohms,
replace the motor .
No. Replace the motor.
Yes. Go to step (3)
No. Check the tub bearings.
Yes. Go to step (3)
If the readings are correct, replace the speed control board.
If the readings are incorrect, replace the motor.
No. Replace the motor.
Yes. Go to step (3)
No. Check the tub bearings.
Yes. Go to step (3)
If the meter reads other than between 80 & 130 Ohms,
replace the motor .
If the reading is between 80 & 130 Ohms, Go to step (4)
If the readings are correct, replace the speed control board.
If the readings are incorrect, replace the motor.
Wiring bad. Correct wiring problem.
Wiring good. Replace the control board. If the problem is not
corrected, replace the speed control board.
No. Replace the water inlet valve assembly
Y es. Replace the control board.
If the readings are incorrect, replace the heating element.
No, replace the heater assembly .
Y es, check the wiring - if good, rpl console control board.
If defective, correct wiring problem.
If the harness is good and none of the LEDs light, replace the
interface board. If this does not correct the problem, replace
the console control board.
Note: If only one of the LEDs will not light, replace the interface
board.
4

Feuille de données techniques de machine à laver
Ces renseignements ne s’adressent qu’à des techniciens qualifiés
A TTENTION : DÉBRANCHEZ L’ALIMENT A TION ÉLECTRIQUE A V ANT D’EFFECTUER TOUT ENTRETIEN
Replacez cette feuille dans son enveloppe dans l’appareil pour référence ultérieure
Contenu Page
Explication des codes d’erreur..........................................5-6
Diagnostics.......................................................................6
Tableau des codes d’erreur..................................................7
Tests.................................................................……….. 8-9
LECTURE DES CODES D’ERREUR :
1. Activez la machine à laver en appuyant sur n’importe quel bouton.
2. Attendez 5 secondes.
3.Appuyez en même temps sur les boutons Démarrer/pause (Start/Pause) et Annuler (Cancel) et TENEZ-LES ENFONCÉS.
Tant et aussi longtemps que vous appuyez sur les boutons, le code d’erreur s’affiche à l’écran par un E suivi de deux
chiffres, d’un chiffre et d’une lettre ou de deux lettres. La commande retentit et les voyants lumineux Door Lock, Wash,
Rinse, et Final Spin clignotent.
Vérifier la source du problème en utilisant les tableaux des pages 3 à 5.
Vérification rapide
Si une erreur s’affiche et que l’appareil démarre momentanément et s’arrête de nouveau :
1. Écoutez si un relais dans la commande du moteur ferme peu de temps après avoir appuyé sur la touche Démarrer/
pause(St art/Pause). Si c’est le cas, l’aliment ation atteint la commande du moteur .
2. Vérifiez la connexion entre le connecteur à 5 branches de la commande de la console et de celle du moteur.
NOT A : Durant le fonctionnement normal, l’af fichage peut indiquer :
“cd” - refroidissement (cycle désinfection).
“do” ou “dr” - problème de porte.
“Err” - une erreur a été détectée.
“LOC” - commande de verrouillage activée.
“PAU” - cycle interrompu.
Pour annuler le dernier code d’erreur en mémoire :
• T ournez le bouton de programme à la position démarrer, Essorage uniquement.
• Appuyez sur Démarrer/pause pour démarrer le cycle et le sauvegarder.
• Appuyez sur Annuler (Cancel) pour arrêter le cycle et éteindre les voyants (LED)
• Appuyez sur Annuler de nouveau pour rallumer les voyants.
• Dans un délai de 5 secondes, appuyez sur les boutons Option et Démarrer/pause et tenez-les enfoncés jusqu’à ce
que les voyants démarrent leur processus de recherche séquentielle, ensuite lâchez les boutons.
• T ournez le bouton de programme dans le sens des aiguilles d’une montre pour 7 clics à partir de la position démarrer . La
commande signale le dernier code d’erreur.
• Appuyez sur les boutons Options et Démarrer/pause et tenez-les enfoncés durant 3 secondes. Le code d’erreur
s’annule.
• Sortez du mode diagnostic pour retourner la machine à laver en mode de fonctionnement normal.
a) Débranchez le cordon d’alimentation, attendez 5 à 8 secondes, ensuite rebranchez le cordon d’alimentation OU
b) Tournez le bouton de programme dans le sens des aiguilles d’une montre 2 ou 3 clics après la
position démarrer . Appuyez à la fois sur les boutons Options et Démarrer/pause durant quelques secondes
jusqu’à ce que le voyant du cycle de lavage apparaisse dans l’afficheur.
5
 Loading...