

Page 1
Gas Cooker Model
CPG54139
guidelines for use
Gas Cooker 4th.qxd 2/16/05 3:44 PM Page 2
Page 2

2
Gas Cooker 4th.qxd 2/16/05 3:44 PM Page 3
120 people every day lose their sight. Almost one person in sixty
in Britain is blind or partially sighted.
Coronation Street’s
‘Please help’
‘Please help’
Every year hundreds of babies are
found to have serious eye disease
Liz Dawn
Reg. Charity Nº: 294087
MBE
The battle against blindness
depends on scientific research
Please help, by using the donation form at the back of this booklet.
Page 3
GETTING TO KNOW YOUR ELECTRIC COOKER
Please read the following instructions and the Safety guidelines on page 12
carefully before using and installing your Gas Cooker.
The Gas Cooker is for indoor, domestic use only.
3
CONTENTS
Connection Guide Connecting to the gas 4
Installation Guide Location 5
Leelling the Cooker 5
Installing the Cooker 5
Control Panel 6
Before Use 7
The Oven 7
The Grill 8
The Burners 9
Tips for Cooking with Gas 10
Cleaning and Maintenance 11
Safety 12
Troubleshooting 13
Technical Specifications 14
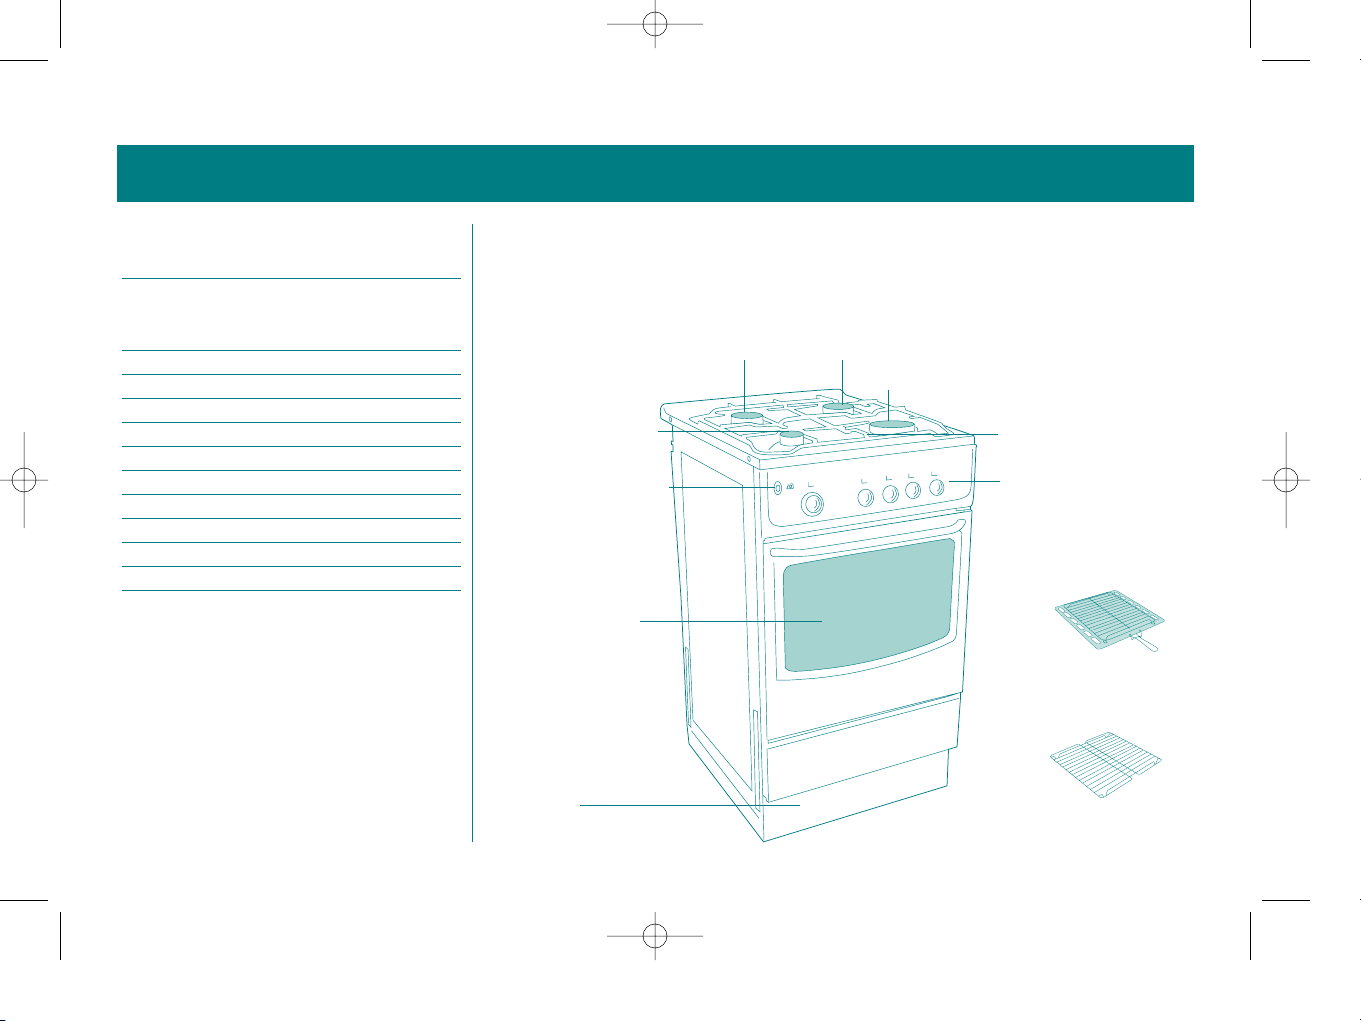
SMALL BURNER
MEDIUM BURNERS
LARGE BURNER
PAN SUPPORT
CONTROL PANEL
BAKING TRAY
BAKING GRID
BASE
IGNITION BUTTON
OVEN DOOR
Gas Cooker 4th.qxd 2/16/05 3:44 PM Page 4
Page 4
CONNECTION GUIDE
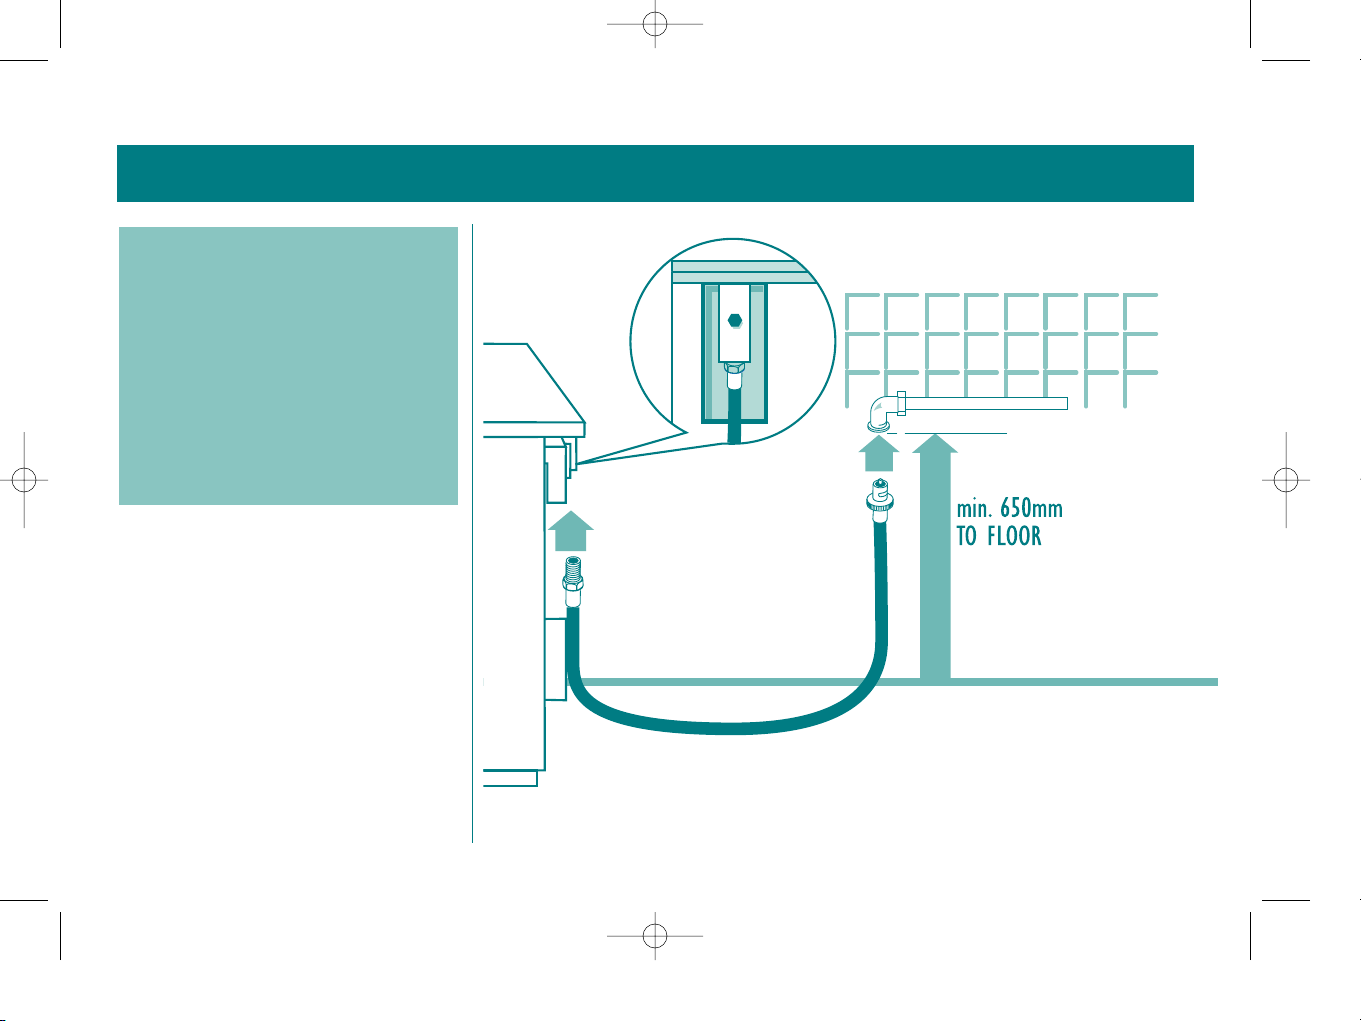
Connecting to the gas supply
• We recommend that a bayonet connection is
fitted to the wall.
• The inlet to the Cooker is a 1/2” BSP internal,
situated at the rear right corner.
• Connection to the Cooker should be made using
a length of flexible hose approx. 90-120 cm in
length and conforming to BS 669. The hose
should not touch the floor when the Cooker is
in its position for use. The rear panel of the oven
will not exceed 70°C when the Cooker is in use.
• After connecting the Cooker, make sure that all
connections are gas sound.
4
WARNING
Installation and fitting of this appliance must by
law be carried out by a Council Of Registered Gas
Installers (CORGI) gas fitter, according to the
instructions in this guide and in compliance with
the current regulations. Any alterations in the
type of gas to be used or other specifications of
the Gas Cooker should also be carried out by a
CORGI registered gas fitter.
In the event of any damage that occurs as a
result of improper connection or installation, the
warranty will not be valid.
Gas Cooker 4th.qxd 2/16/05 3:44 PM Page 5
Page 5
INSTALLATION GUIDE
5
Location
In order to achieve the best performance from your
Cooker you should make sure the room is dry and
draft free. The floor must be even and firm. The
Cooker must be kept away from walls which could
be damaged by heat, such as untreated wood, paper
and linoleum. The Cooker can either be free-standing
or placed between kitchen units. If the Cooker is
placed between kitchen units then there must be a
gap on both sides of at least 30mm, between the
sides of the Cooker and the kitchen units.
The burners must be level with the work surface.
To avoid the risk of fire make sure that the Cooker is
not placed under or near any blinds or curtains or
near any combustible material. It is advisable to have
a smoke detector fitted in your home, and have a
fire blanket or extinguisher close to the Cooker.
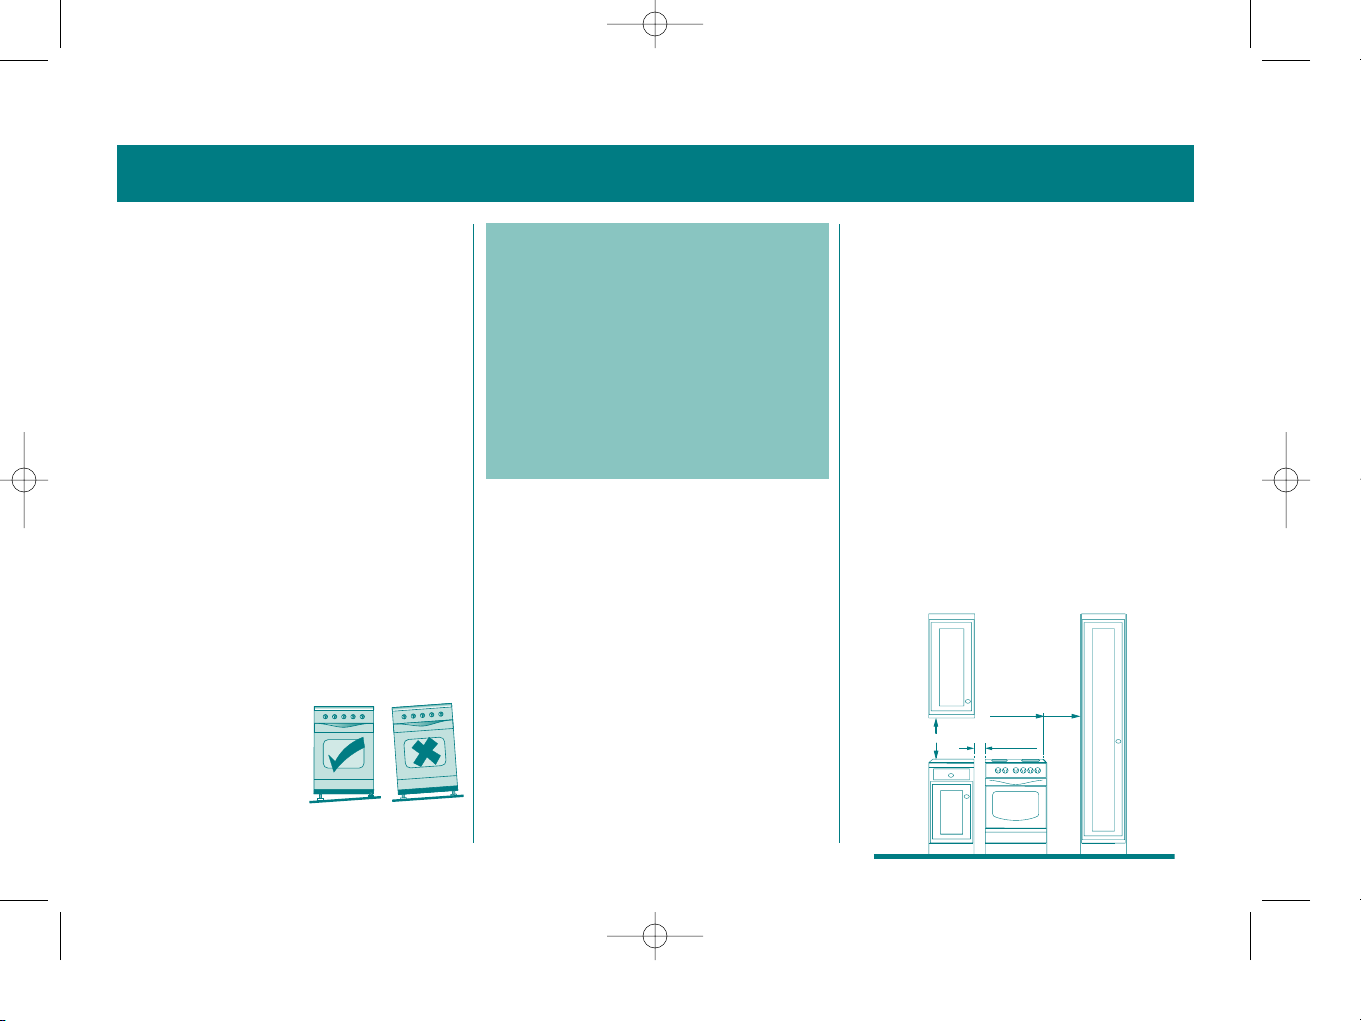
The Cooker can be installed next to cabinets
provided their height does not exceed that of the
burners. See the Installation Guide opposite.
Levelling the Cooker
The height and level of the
Cooker should be adjusted
using the adjustable feet so
that the burners of the
Cooker are at the same
height as the surrounding
kitchen units, or above. If the Cooker is not level the
cooking surface may make cookware unstable and
accidents could occur.
Installing the Cooker
The following guidelines must be followed after the
Cooker has been connected by a qualified gas fitter
to ensure that the cooker is installed safely.
The model number for your Cooker is shown on the
rating label which is at the back of the Cooker.
• Make sure all the packaging has been removed
from the oven section of your cooker. If your
Cooker has a stainless steel finish, ensure that
all the film which covers the chrome and
stainless steel parts has been removed.
• We recommend that you keep all packaging
until you are sure that the Cooker is operating
properly.
• The Cooker may be located in a kitchen,
kitchen/diner, or bed sitting room. It must not
be placed in a bathroom or shower room.
• Never install the cooker next to curtains or
other soft furnishings. Any overhanging
surface should be at least 650mm above the
cooker hob. We do not recommend positioning
the cooker below wall cupboards, as the heat
and steam from the cooker may cause damage
to the cupboard and its contents.
• Extractor fans must be fitted in accordance
with the manufacturer’s instructions.
• Wall cabinets may be fitted in line with the
sides of the floor units as long as they are heat
proofed and are fitted at least 420mm above
the worksurface. The minimum height for
kitchen units that are not heat proofed is
700mm above the worksurface.
• The wall in contact with the rear of the Cooker
must be made of flameproof material.
• Retain this user guide and your receipts for
future reference.
WARNING
Installation and fitting of this appliance must by
law be carried out by a Council Of Registered Gas
Installers (CORGI) gas fitter, according to the
instructions in this guide and in compliance with
the current regulations. Any alterations in the
type of gas to be used or other specifications of
the Gas Cooker should also be carried out by a
CORGI registered gas fitter.
In the event of any damage that occurs as a
result of improper connection or installation, the
warranty will not be valid.
Gas Cooker 4th.qxd 2/16/05 3:44 PM Page 6
420-700mm
min.110mm
min.30mm
Page 6

General Features
Oven/Grill Control Dial
The central Oven/Grill Control Dial has two functions,
turn anti-clockwise to use the Oven or clockwise to
use the Grill.
• Turn the dial to 0 for the off position..
Burner Dials
The gas burners are controlled by the four remaining
dials on the Control Panel. Each Dial has a symbol
next to it to indicate which Burner it controls. The
large flame icon represents the highest setting and
the small flame icon the lowest. The burners can be
controlled by placing the dial anywhere in between
these icons for a variable flame.
Control Panel Guard
The Control Panel Guard is used during grilling to
prevents heat rising from the oven and damaging
the dials on the control panel.
Grill Tray
The Grill Tray consists of a drip pan, a removable
chrome covered grill and a detachable handle.
The assembled Grill Tray should only be used when
the Control Panel Guard is in place and the oven is in
Grill mode.
CONTROL PANEL
6
IGNITION BUTTON
Lights the burners and oven.
BURNER DIALS
Controls the temperature of
the burners above. The
symbol above each burner
dial refers to the burner
which it operates.
OVEN/GRILL CONTROL DIAL
To turn the oven on and select
the temperature or to turn on
the grill.
Gas Cooker 4th.qxd 2/16/05 3:44 PM Page 7
1
0
Page 7

BEFORE USE
7
Before using the Cooker for
the first time
Before using either the oven or grill for the first
time they should be operated at maximum setting
for approximately 30 minutes. Make sure that the
room is well ventilated with the windows open if
possible.
Ignite all the burners on the hob and turn onto
maximum for about 10 minutes to burn off any
moisture or residues.
The smoke or smells that are detected during this
initial use are due to the evaporation of substances
used to protect the oven and hotplates during
storage and installation.
After this initial heating period, open the oven door
to allow any smells to escape.
Using the Oven
The Oven has 8 temperature settings, between 140°C
and 240°C. Don’t forget that because heat rises, the
top of the oven will always be hotter than the
bottom. You can use this to your advantage, by
cooking different items that requiring different
temperatures, in different levels of the oven.
Alternatively, if you are cooking lots of similar items
you can swap them around during the cooking
process so that they cook all at the same time.
Consult the cooking guidelines printed on pre-packed
food. To use the oven:
1 Open the oven door.
2 Press and turn the Control Dial clockwise to the
maximum heat setting, 8 (240°C).
3 While still pressing the Control Dial in, press
and hold the the Ignition button until the gas
has lit.. Alternatively, hold a lit match or oven
lighter to the ignition hole in the centre of the
oven floor. Check that the oven burners have lit
by looking in the ignition hole for a flame.
4 Once lit continue to press the Control Dial for
approximately 10 seconds then release the dial.
If the oven remains lit, turn the dial to the
required heat setting. If it fails to light turn the
dial to the off position and wait at least one
minute before relighting.
THE OVEN
5 Before placing food in the oven it may be
necessary to preheat it to the necessary
cooking temperature.
6 To switch the oven off turn the Oven/Grill
Control Dial clockwise to 0.
Note: Under no circumstances should the Oven be
lined with aluminium foil as overheating may
occur. Do not place dishes or baking trays directly
onto the base of the oven as it becomes very hot
and damage may occur.
Gas Cooker 4th.qxd 2/16/05 3:44 PM Page 8
Page 8

THE GRILL
8
Using the Grill
The Grill Tray pan collects any juice, fats or oils
from grilled food and should never be used as a
shelf for cookware or a surface for cooking on.
Place the wire grill into the pan.
Fitting the Control Panel Guard
Before using the Grill you should fit the Control
Panel Guard.
1 Open the oven door and look for the two pegs
which are fitted to the underside of the
Control Panel, at the front.
2 Align the Control Panel Guard so that the raised
lip faces towards you and the two indents are
aligned with the pegs in the oven.
3 Push the Control Panel guard into position so
that it is locked firmly into the top of the oven.
After using the Grill allow the Control Panel Guard
to cool before removing.
Grilling
Cooking time will depend on the type of food
being grilled and it’s thickness.
1 Open the oven door.
2 Press and turn the Control Dial clockwise to
the grill position.
3 While still pressing the Control Dial in, press
and hold the the Ignition button until the gas
has lit. Continue to press the Control Dial for a
approximately 10 seconds then release the dial.
If it fails to light turn the Control Dial to the
off position and wait at least one minute
before relighting.
4 Attach the Handle onto the Grill Tray.
5 Place the food to be grilled onto the centre of
the Grill Tray.
6 Insert the Grill Tray onto the top shelf runner
in the oven. You can then remove the handle.
7 Gently close the oven door so that it is resting
against the Control Panel Guard.
8 After a minute or so check the food and turn
it over to allow the other side to cook. Always
use oven gloves when reaching under the grill
or touching the handle. Continue checking and
turning the food until it is cooked thoroughly.
9 To switch the grill off turn the Oven/Grill Control
Dial clockwise to 0.
WARNING
Accessible parts may be very hot during
and after the grill has been used.
Keep children well away from the Cooker.
Gas Cooker 4th.qxd 2/16/05 3:44 PM Page 9
Page 9

Using the Burners
1 Prepare the food before using the burners to
prevent accidents and to conserve energy.
2 Use cookware with lids as this will keep the
heat in and reduce cooking times.
3 The symbol above the dial will indicate the
Burner that it controls.
There are three main settings for each dial;
0is the off position.,
is the minimum setting
is the maximum heat setting.
4 To ignite the burner turn the dial anti-clockwise
to the maximum setting
.
5 Press and hold the ignition button on the
Control Panel, it should light in a couple of
seconds. If it fails to light turn the dial to the
off position and wait at least one minute
before relighting.
6 Turn the dial to a suitable setting.
7 Once boiling point has been reached turn the
dial down to the minimum setting to simmer,
this conserves energy.
8 To switch the burner off turn the dial clockwise
to the off position 0.
THE BURNERS
9
When using the burners:
• Use only stable flat based cookware and select
a Burner that is a similar size. Never place a
pan with a diameter smaller than the burner
flame as you may damage the pan handles and
waste energy.
• Turn the pan handles to the side, out of reach
of small children.
• Never leave a burner lit without a pan.
• Never leave the burners unattended when
cooking with fat or oil. It can rapidly catch fire
if overheated.
• Do not drop frozen or wet food into hot fat, as
spitting may occur. This can be dangerous.
What to do if a pan of oil or fat
catches fire.
1 Leave the pan where it is, do not move it.
2 Turn all the dials to the off position.
3 Carefully cover the pan with a lid, damp cloth
or a fire blanket to smother the flames.
4 DO NOT USE WATER.
5 Call the fire brigade if you cannot control the fire
immediately, close all doors to contain
the fire.
WARNING
After use, the burners can remain hot for
some time. Care must be taken when
touching or cleaning the burners.
Gas Cooker 4th.qxd 2/16/05 3:44 PM Page 10
Page 10

TIPS FOR COOKING WITH GAS
Baking Tips
• Always place baking tins in the centre of the
wire shelf.
• If the cake bottom gets too dark:
- Check the shelf level, shorten the baking time
or possibly use a lower baking temperature.
• If the cake bottom is too light:
- Check the shelf level, increase the baking time
or use a dark metal baking tin.
• Make sure you use bakeware that is oven proof.
• Do not place bakeware too close to the rear of
the oven wall.
• You can influence the degree of browning by
changing the temperature setting.
• If a cake collapses after removing it from the
oven:
- Use less liquid on your next attempt.
- Consider using a longer baking time or use a
slightly lower temperature setting.
Grilling Tips
• Always use the Grill Tray pan and wire grill
together.
• Lightly brush the wire grill with oil and baste
the food if desired.
• Always place the food to be grilled in the centre
of the wire grill.
10
Roasting Tips
• Only use ovenproof cookware.
• Cover large roasts with foil during cooking.
Remove the foil during the last hour.
• Casserole less tender cuts of meat.
It is important when cooking to ensure that food,
especially meat, has been cooked thoroughly. You can
test this by inserting a skewer into the meat as close
as possible to the bone. If the juices that are released
run clear then the meat is cooked properly. If the
juices that run from the meat are cloudy or red then
it is underdone and should be cooked longer. If the
meat is beef the juices can run slightly pink as beef
should generally be left slightly underdone.
Energy Saving Tips
• Preheat the oven only if expressly required by
the recipe or guidelines.
• Dark baking tins have a higher degree of heat
absorption.
• In the case of longer baking times, you can
switch off the oven 5 - 10 minutes before the
full baking time and use the residual heat.
Gas Cooker 4th.qxd 2/16/05 3:44 PM Page 11
Page 11

CLEANING AND MAINTENANCE
Cleaning inside the Oven
• Always wait until the Oven has cooled before
cleaning, as surfaces become very hot.
• Remove the shelves and wash separately in
warm soapy water, dry thoroughly before
replacing.
• Wash the interior of the oven with hot soapy
water and wipe down.
• Leave the door open until the interior has
dried.
• Clean the oven after each use, especially after
roasting or grilling, this will prevent spilt or
splattered food debris burning on.
• Do not use abrasive pads to clean the interior
of the oven as this may remove the enamel
which will affect the efficiency of your Oven.
Cleaning Tips
• Do not use abrasive pads, corrosive cleaners,
aerosol cleaners or sharp objects to clean the
surfaces of the oven.
• To remove burnt on food soak off with a damp
cloth and washing-up liquid.
• Do not use too much water when cleaning the
Cooker as this may enter the body of the
cooker, which could be hazardous.
• Do not clean the oven with steam or high
pressure cleaners.
• When baking cakes, place the baking tin on a
baking tray to catch any cake mixture that may
spill over the top of the tin during baking.
Cleaning the burners
• To clean the burners, remove the caps and rings
and leave them to soak in warm soapy water,
before washing each part separately.
• Clean the nozzle using a brush soaked in
solvent.
• Carefully dry all the elements of the burner and
replace them.
11
Removing the oven door
To do this you first need to remove the oven door
by fixing a clip onto the bow of the hindges on
either side of the door, then pulling the hinges out
of their seats.
Gas Cooker 4th.qxd 2/16/05 3:44 PM Page 12
Page 12

SAFETY
12
• Never leave the Cooker unattended when
cooking with fat or oil. They can rapidly catch
fire if overheated.
• This Cooker must only be used for the purpose
of heating or cooking food, any other use, for
example heating rooms, are dangerous. The
manufacturer cannot be liable for damages
resulting from improper, incorrect or negligent
use.
• Do not store combustible items in the oven,
they could ignite if the oven is switched on
accidentally.
• Never stand or sit on the open oven door. The
oven door must close evenly, keep the door
sealing surfaces clean.
• Close supervision is necessary when the Cooker
is used near or by children or a person suffering
from any physical impairment.
• Always disconnect the plug from the mains
supply before cleaning the Cooker or carrying
out maintenance work.
• Use only stable flat based pans. They should be
placed on the hob with handles turned inwards
so that they are not accidentally knocked or
pulled over.
• Some parts of the Cooker remain hot for a long
time after use. Be careful when touching them.
• Do not use flammable liquids (alcohol, petrol)
near the Cooker when it is in use.
• The appliance must be installed according to
the manufacturer’s instructions by a qualified
CORGI gas fitter. Improper installation may
result in injury or damage, for which the
manufacturer cannot be held responsible.
• The electrical safety of this appliance is
guaranteed only if it is connected to a
properly earthed system which complies with
the electrical safety standards in force. If you
cannot verify that this fundamental safety
requirement is in place, consult a qualified
electrician. The manufacturer cannot be held
responsible for an appliance which has not
been correctly earthed.
• Check that the voltage (230 Volts AC) printed
on the rating label at the back of the cooker
corresponds to the mains voltage in your
home. If in doubt call a qualified electrician.
• Never replace the power supply cable yourself.
Damaged cables must only be replaced by an
authorised service centre.
• Adaptors, multiple sockets and/or extension
leads must not be used.
• To avoid electrical shock, never touch the
Cooker or plug with wet hands.
• Ventilation and heat dispersion outlets on the
Cooker should never be covered, as
obstructions may cause overheating or fire.
WARNING
IT IS HAZARDOUS FOR ANYONE
OTHER THAN AUTHORISED
SERVICE PERSONNEL TO
CARRY OUT SERVICING OR
REPAIRS WHICH INVOLVE THE
REMOVAL OF COVERS.
TO AVOID THE RISK OF AN
ELECTRIC SHOCK DO NOT
ATTEMPT REPAIRS YOURSELF.
Gas Cooker 4th.qxd 2/16/05 3:44 PM Page 13
Page 13

SAFETY Cont... TROUBLESHOOTING
13
The Ignition does not work
• Check that the Cooker plug is switched on at
the wall switch.
• If the electricity has failed, all burners may be
lit with a match.
• If one burner fails to ignite, check that the
burner and ignitor is clean and dry. Clean away
the nozzle with a thin copper wire and check if
the burner ports are clear.
The Cooker is not working
• Check that the Cooker plug is switched on at
the wall switch.
• Check that the fuse in the wall switch has not
blown and that the mains lead is undamaged.
If the above connections are OK please call the
Frigidaire helpline on 01977 665588.
The Oven door window fogs up
• This occurs normally with moist cakes or with
very large roasts. During baking or roasting
open the the door briefly several times and
carefully wipe up any condensation.
Uneven cake thickness
• Check the level of the Cooker with a spirit level,
it may have been installed unevenly. See
‘Levelling the Cooker’.
• Be careful when using small household
appliances, such as irons, near the burners and
make sure the power cable is kept well away
from hot surfaces.
• Make sure all the controls are in the off
position when not in use.
Disposal
Old appliances still have some residual value.
An environmentally friendly method of disposal
will ensure that valuable raw materials can be
recovered and used again. Up to date information
concerning options for disposing of your old
appliance and packaging from the new one can be
obtained from your retailer or local council office.
It is recommended that any supply cable is cut
and that all removable parts of the appliance are
taken out.
Gas Cooker 4th.qxd 2/16/05 3:44 PM Page 14
Page 14

TECHNICAL SPECIFICATIONS
14
Model CPG54139
Rated Voltage (V) 230
AC 230 V ~ 50Hz AC mains
Rated Frequency (Hz) 50
Heat Input (kW)
small burner 1.1kW ± 8.0% 1
medium burner 2.0kW ± 8.0% 2
large burner 3.1kW ± 5.6% 1
oven burner 4.0kW ± 5.0% 1
gas grill 2.7kW ± 5.0% 1
Weight (Kg) 77
Product Dimension (mm) 900x500x600
height to hob 900
width 500
depth with door closed 600
depth with door open 1030
Oven Usable Dimension (mm) 310x400x440
The policy of Frigidaire Consolidated Ltd is one of
continuously seeking new ways of improving its
products. Therefore the Company reserves the right
to change the specification of items illustrated and
described, at any time.
Gas Cooker 4th.qxd 2/16/05 3:44 PM Page 15
Page 15

15
Gas Cooker 4th.qxd 2/16/05 3:44 PM Page 16
Donation Form
YES I would like to support eye research to save sight. Here is my Cheque/Postal Order for
£ made payable to National Eye Research Centre
If you wish to make a donation by Credit Card: Amount donated £
Card Nº: Expiry Date:
Cardholder’s Name:
Address:
So that we can claim back the tax on your donation, please sign below:
My donation is paid from taxed income.
Signature:
Please return to Giving For Sight, Eye Department, Clarendon Wing
FREEPOST NEA 10577, Leeds LS2 3YY.
Reg. Charity Nº: 294087
Page 16

FRIGIDAIRE CONSOLIDATED LIMITED
Express Way, Whitwood,
Wakefield, WF
10 5QJ
Tel: 01977 603111 Fax: 01977 603159
For further information please
contact the Frigidaire Technical
Helpline on: 01977 665588.
Gas Cooker 4th.qxd 2/16/05 3:44 PM Page 1
 Loading...