

Frigidaire CFES366FC5, CFES355ES6, CGLES385FS5, CGLES389FS5, CGLES389FS3 Owner’s Manual
...
Welcome .................................. 2
portant Safety instructions .. 3-5
Features at a Glance ............. 6
Setting Surface Controls .... 7-13
Surface Cooking .................. 14
Before Setting
Oven Controns ................. 14=15
Setting Oven Controls ......... 15
Setting Warmer Drawer Control ... 1 6-1 7
Cooking Jnformations ..... 18-19
Questions?
1-800-944-9044
(United States)
1o866-294-9911
(Canadat
Please attach saHesreceipt
here forfuture reference,
CongratuHations on your purchase of a new applianc!! At Electrolux Home
Products, we are very proud of our product and are compHeteHycommitted to
providing you with the best service possibHe,Your satisfaction is our number one
priority
We kno_ you'HHenjoy your new appliance and ThankYou for choosing our product,
We hope you consider us for future purchases,
PLEASE CAREFULLY READ AND SAVE THESE INSTRUCTmONS
This Use & Care ManuaHcontains generaHoperating instructions for your appliance
and feature information for severaHmodems,Your product may not have aHHthe
described features, The graphics shown are representative, The graphics on your
appliance may not HookexactHy Hikethose shown, These instructions are not
meant to cover every possibHecondition and situation that may occur, Common
sense and caution must be practiced when instaHHing,operating and maintaining
any appHiance,
Ptease record your modet and seriaJ numbers betow for future reference,
ModemNumber:
SeriaHNumber:
Purchase Date:
Product Registration
Register Your Product
The PRODUCT REGISTRATION CARD shouHd
be fiHHedin compHeteHy,signed and returned to
EHectroHuxHome Products,
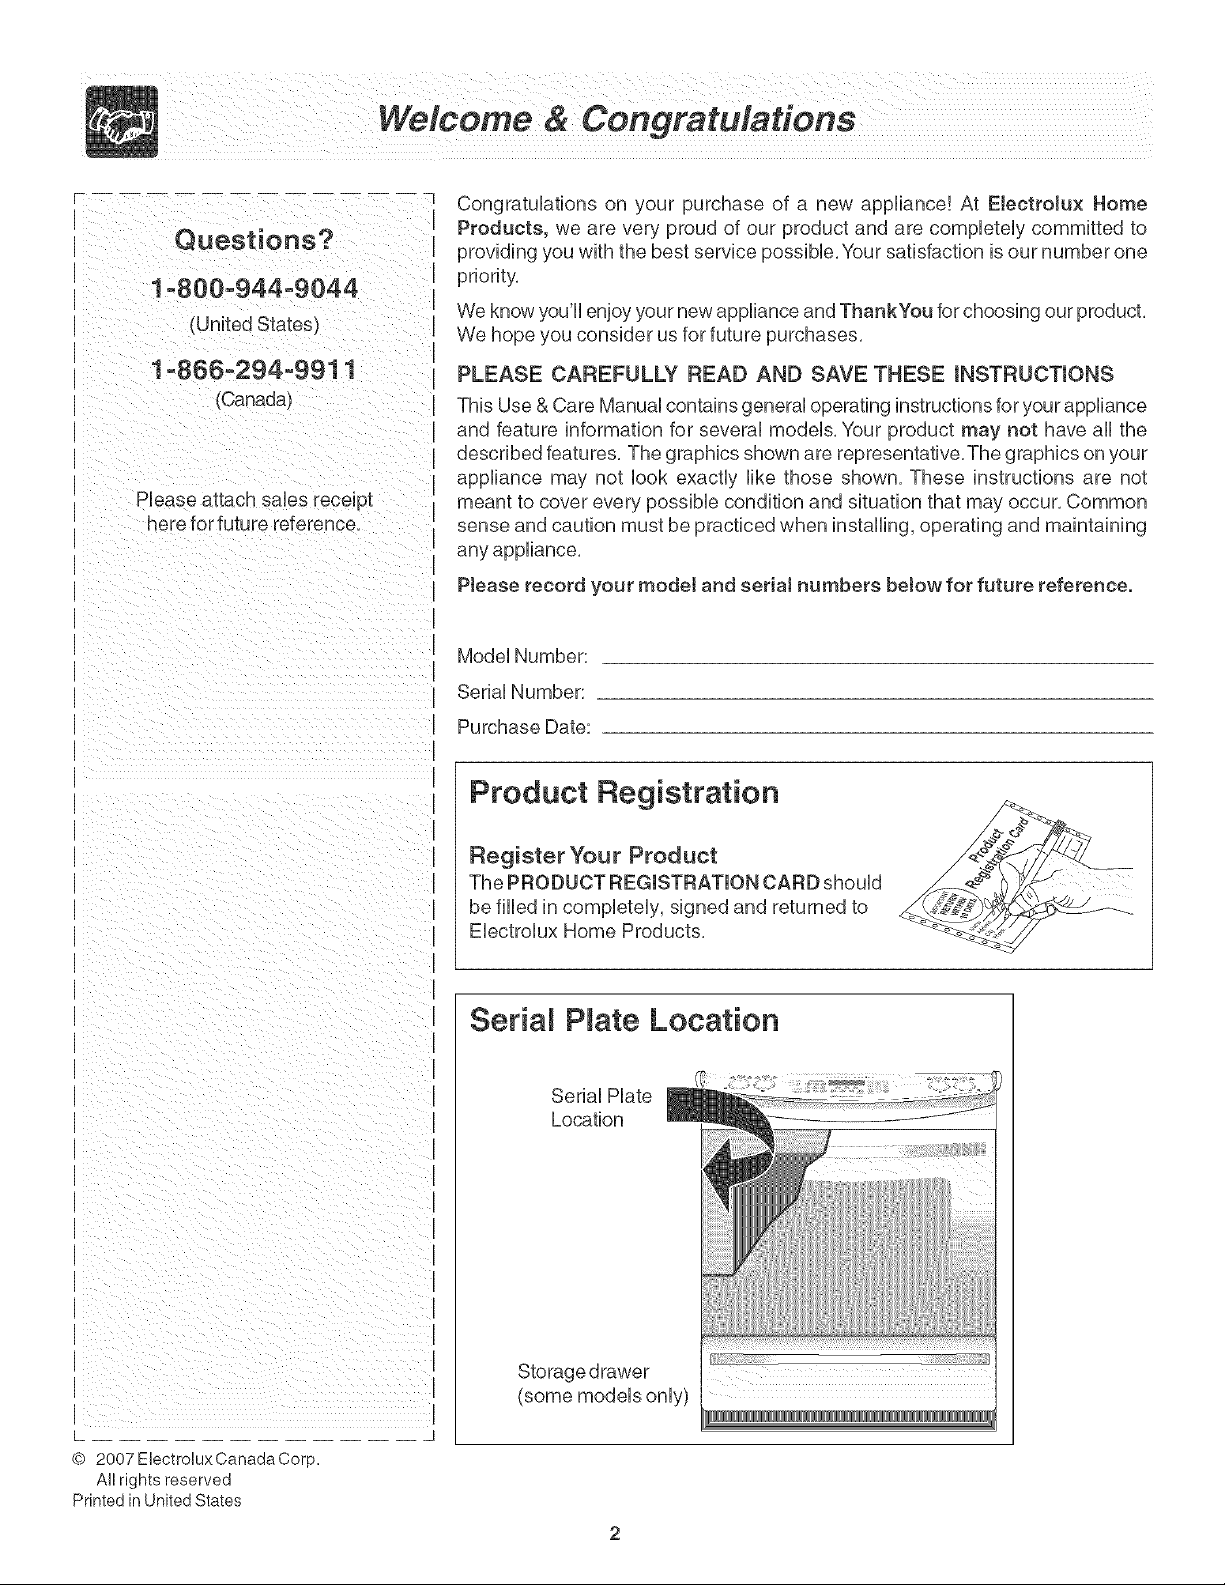
Seria P ate Location
SeriaHPHate
Location
Storage drawer
(some modeHsonHy)
Q 2007 Electrolux Canada Corp,
All rights reserved
Printed in United States
Read all instructions before using this appliance.
Save these instructions for future reference.
This guide contains important safety symboUsand instructions, PUeasepay speciaUattention to these symboUsand foUUow
ai] instructions given, Here is a brief explanation of these symbols,
This symbol WiHhe!p alert y°u to s!tuati0ns that may cause b0di!y !njury or property damage.
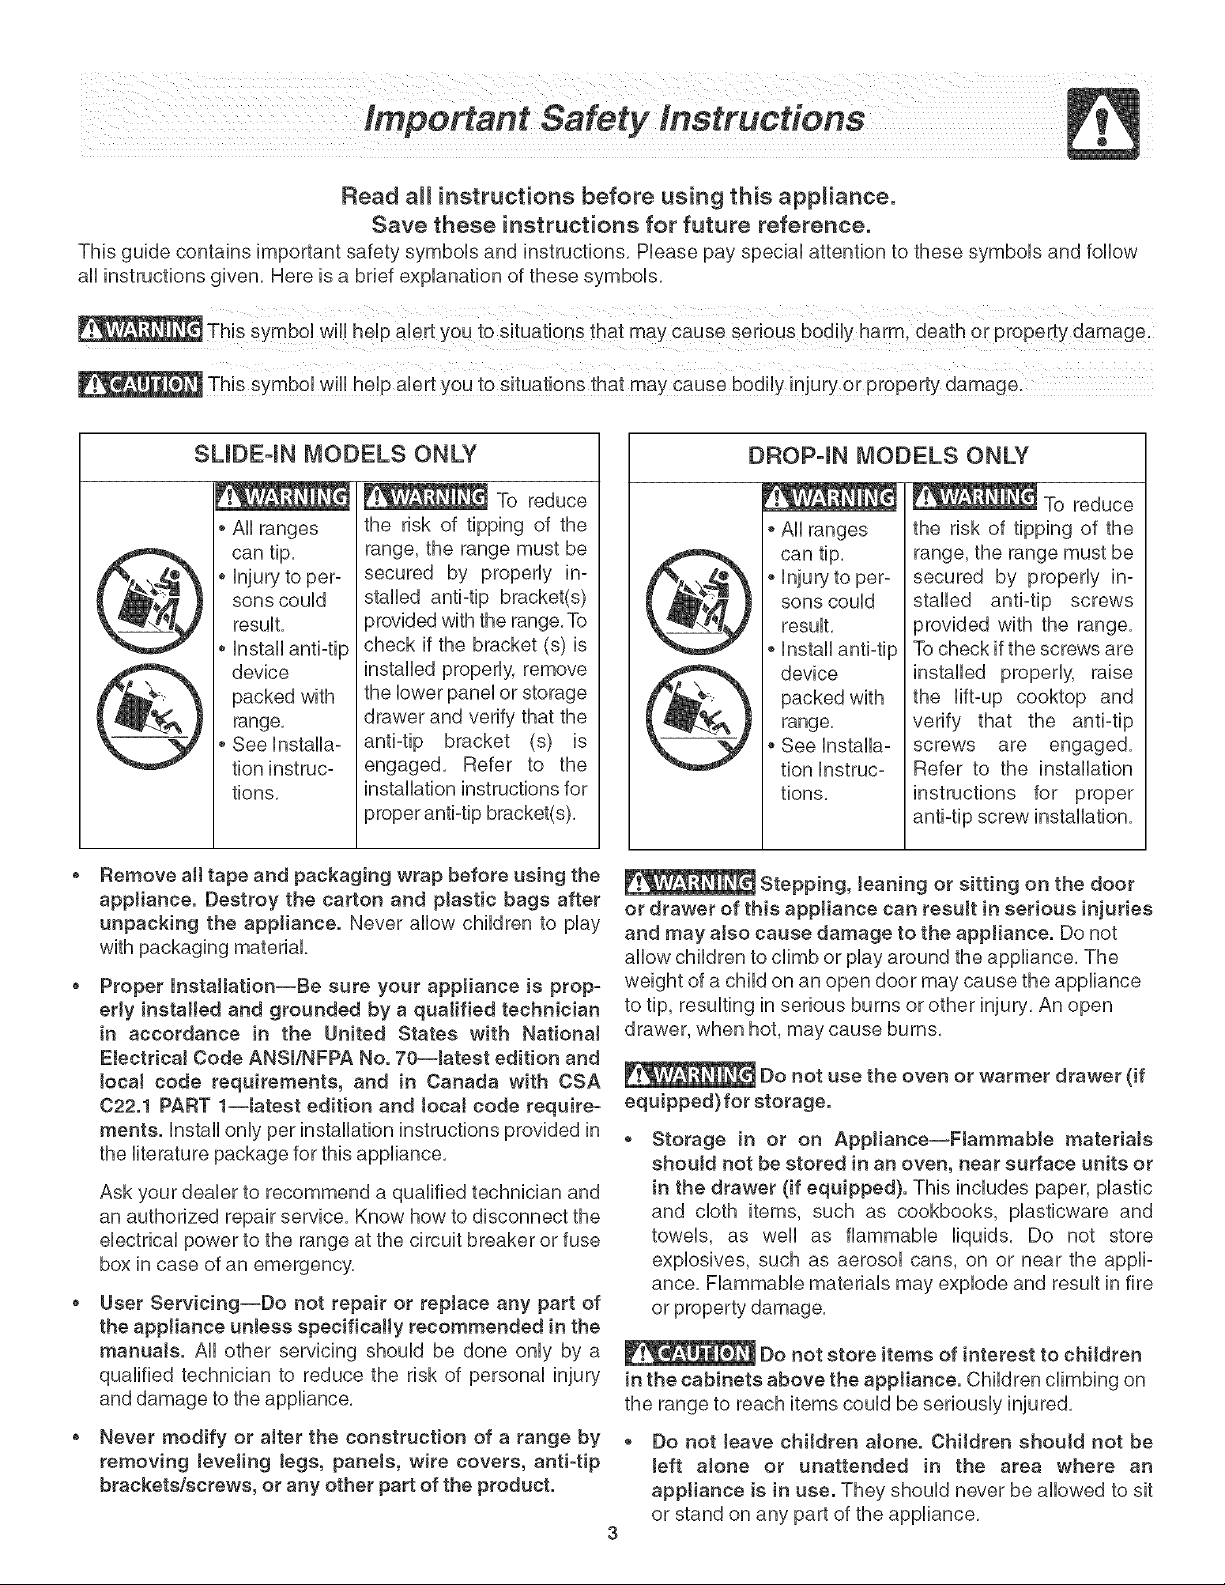
SUDE4N MODELS ONLY
To reduce
o All ranges
can tip.
o Injury to per-
sons could
result.
Install anti-tip
device
packed with
range.
See Installa-
tion instruc-
tions.
Remove aI[ tape and packaging wrap before using the
appliance. Destroy the carton and plastic bags after
unpacking the appliance. Never allow children to play
with packaging material.
Proper Installation--Be sure your appliance is prop-
edy installed and grounded by a quaJified technician
in accordance in the United States with National
EJectdcaJ Code ANSl/NFPA No. 70--Jateet edition and
JocaJ code requirements, and in Canada with CSA
022.1 PART 1--Jateet edition and Jocat code require-
ments. Install only per installation instructions provided in
the literature package for this appliance.
Ask your dealer to recommend a qualified technician and
an authorized repair service, Know how to disconnect the
electrical power to the range at the circuit breaker or fuse
box in case of an emergency,
User Servicing--Do not repair or reptace any part of
theapplianceunlessspecificallyrecommended inthe
manuals. Alletherservicingshouldbe done only by a
qualifiedtechniciantoreduce the riskofpersonalinjury
and damage totheappliance.
Never modify or alter the construction of a range by
removing teveiing Jegs, pane!s, wire covers, anti-tip
brackets/screws, or any other part of the product.
the risk of tipping of the
range, the range must be
secured by properly in-
stalled anti-tip bracket(s)
provided with the range. To
check if the bracket (s) is
installed properly, remove
the lower panel or storage
drawer and verify that the
anti-tip bracket (s) is
engaged. Refer to the
installation instructions for
DROPqN MODELS ONLY
To reduce
All ranges
can tip.
sons could
result.
device
packed with
range,
See Installa-
tion instruc-
tions,
Stepping, teaning or sitting on the door
or drawer of this appliance can result in serious injuries
and may also cause damage to the appliance. Do not
allow children to climb or play around the appliance. The
weight of a child on an open door may cause the appliance
to tip, resulting in serious burns or other injury. An open
drawer, when hot, may cause burns.
Do not use the oven or warmer drawer (if
equipped) for storage.
Storage in or on Appliance--Flammable materiaJs
should not be stored in an oven, near surface units or
in the drawer (if equipped). This includes paper, plastic
and cloth items, such as cookbooks, plasticware and
towels, as well as flammable liquids. Do not store
explosives, such as aerosol cans, on or near the appli-
ance. Flammable materials may explode and result in fire
or property damage.
Do not store items of interest to children
in the cabinets above the appliance. Children climbing on
the range to reach items could be seriously injured.
Do not Jeave children aJone. Children shoutd not be
teft alone or unattended in the area where an
appliance is in use. They should never be allowed to sit
or stand on any part of the appliance.
the risk of tipping of the
range, the range must be
secured by properly in-
stalled anti-tip screws
}rovided with the range.
Tocheck if the screws are
installed properly, raise
the lift-up cooktop and
verify that the anti-tip
screws are engaged.
Refer to the installation
instructions for proper
anti-tip screw installation.
Important Safety instructions
DO NOT TOUCH SURFACE UNmTS, AREAS NEAR
THESE UNmTS,OVEN HEATING ELEMENTS OR mNTE-
RmOR SURFACES OF THE OVEN OR WARMER
DRAWER (if equipped}. Both surface units and oven
heating elements may be hot even though they are dark in
color, Areas near surface units may become hot enough
to cause burns, During and after use, do not touch, or let
clothing or other flammable materials touch these areas
until they have had sufficient time to cool, Among these
areas are the cooktop, surfaces facing the cooktop, the
oven vent openings and surfaces near these openings,
oven door and window,
Wear Proper Appare!--Loose-fitting or banging gar-
ments should never be worn while using the appIF
ance. Do not let clothing or other flammable materials
contact hot surfaces,
Never use your appliance for warming or
heating the room.
o Do Not Use Water or Ftour on Grease Fires--Smother
the fire with a pan Jid, or use baking soda, a dry
chemicaJ or foam-type extinguisher.
o When heating fat or grease, watch it cJosely. Fat or
grease may catch fire if allowed to become too hot,
Use OnJy Dry PothoJders--Moist or damp pothoJders
on hot surfaces may result in burns from steam. Do
not let the potholders touch hot heating surface units or
interior oven elements, Do not use a towel or other bulky
cloth instead of a potholder,
o Do Not Heat Unopened Food Containers--Build up of
pressure may cause the container to burst and result
in injury.
o Remove the oven door from any unused appliance if
it is to be stored or discarded.
IMPORTANT--Do not attempt to operate the oven
during a power failure, if the power fails, aJways turn
the oven off. If the oven is not turned off and the power
resumes, the oven may begin to operate again, Food left
unattended could catch fire or spoil,
Electronic controllers can be damaged by
cold temperatures. When you use your appliance for the
first time, or if it has not been used for a Jong period of
time, make sure that it has been exposed to a tempera-
ture above 0°C/32°F for at teast 3 hours before
connecting it to the power suppty.
mMPORTANT mNSTRUCTmONS FOR USmNG
YOUR COOKTOP
o Know which knob controls each surface heating unit.
Use Proper Pan Size--This appliance is equipped with
one or more surface units of different sizes, Select
utensils having fiat bottoms large enough to cover the
surface unit, The use of undersized utensils will expose a
portion of the surface heating unit to direct contact and
may result in ignition of clothing, Proper relationship of
utensil to the surface unit will also improve efficiency,
Utensil HandJes ShouJd BeTurned Inward and ShouJd
Not Extend Over Adjacent Surface Units--To reduce
the risk of burns, ignition of flammable materials, and
spillage due to unintentional contact with the utensil, The
handle of the utensil should be positioned so that it is
turned inward, and does not extend over adjacent surface
unit,
o Never Leave Surface Units Unattended--Boilovers
cause smoking and greasy spillovers that may ignite, or a
pan that has boiled dry may melt,
Protective liners-- Do not use aluminum foil to line oven
bottom or any other part of the appliance, Only use
aluminum foil as recommended for baking if used as a
cover placed on the food, Any other used of protective
liners or aluminum foil may result in a risk of electric
shock or fire or a short circuit,
Glazed Cooking Utensils--Only certain types of glass,
glass/ceramic, ceramic, earthenware, or other glazed
utensils are suitable for rangetop service without breaking
due to the sudden change in temperature, Check the
manufacturer's recommendations for rangetop use,
Do Not Use Decorative Surface Element Covers, If an
element is accidentally turned on, the decorative cover
will become hot and possibly melt, Burns will occur if the
hot covers are touched, Damage may also be done to the
cooktop,
FOR GLASS COOKTOPS ONLY
o Do Not Ctean or Operate a Broken Cooktop --If
cooktop should break, cleaning solutions and spillovers
may penetrate the broken cooktop and create a risk of
electric shock, Contact a qualified technician
immediately,
Ctean Cooktop GJass with Caution--if a wet sponge or
cloth is used to wipe spills on a hot cooking area, be
careful to avoid a steam burn, Some cleaners can
produce harmful fumes if applied to a hot surface,
o AvoidscratchingthecooktopgJaeewithsharpob-
jects.
mMPORTANT mNSTRUCTmONS FOR USmNG
YOUR OVEN
, Use Care When Opening Door or Warmer Drawer (if
equipped)--Stand to the side of the appliance when
opening the door of a hot oven, Let hot air or steam
escape before you remove or repUace food in the oven/
warmer drawer,
Keep Oven Vent Ducts Unobstructed. The oven is
vented at the front above the oven door, Touching the
surfaces in this area when the oven is operating may
cause severe burns, Also, do not place plastic or heat-
sensitive items on or near the oven vent, These items
could melt or ignite,
PJacement of Oven/Warmer Drawer (if equipped)
Racks. AUwayspUaceoven racks in desired Uocationwhile
oven/drawer (if equipped) is cool Remove aH utensils
from the rack before removing rack, ff rack must be
moved while oven is hot, use extreme caution, Use
pothoUders and grasp the rack with both hands to
reposition, Do not let potholders contact the hot oven
element or interior of the oven/warmer drawer (if
equipped),
SELF-CLEANmNG OVENS:
, CJean in the serf-cleaning cycte onty the parts of the
oven listed in this owner's guide. Before self-cleaning
the oven, remove all utensils stored in the oven,
o Do not ctean the oven door gasket. The door gasket is
essential for a good seal, Care should be taken not to rub,
damage or move the gasket,
o Oven racks. Oven racks color will change if left in the oven
during a self-cleaning cycle,
o Do not use oven cleaners. No oven cleaner or oven liner
protective coating of any kind should be used in or around
any part of the oven,
o Remove oven racks. Oven racks color will change if left in
the oven during a self-cleaning cycle,
The heaJth of some birds is e×tremeJy
sensitive to the fumes given off during the serf-clean
cycJe of any range. Move birds to another wett ventilated
room.
SAVE THESE INSTRUCTmONS
o Do not use a broiler pan without its insert. The broiler
pan and grid allow dripping fat to drain and be kept away
from the high heat of the broiler,
o Do not cover your broiler or warmer drawer (if
equipped} grid with aJuminum foit. Exposed fat and
grease could ignite,
Do not touch a hot tight buJb with a damp ctoth. Doing
so could cause the bulb to break, Disconnect the
appliance or turn off the power to the appliance before
removing and replacing light bulb,
mMPORTANT mNSTRUCTmONS FOR CLEANmNG
YOUR RANGE
o CJean the range reguJarly to keep aH parts free of
grease that could catch fire. Exhaust fan ventilation
hoods and grease filters should be kept clean, Do not
allow grease to accumulate, Greasy deposits in the fan
could catch fire, Refer to the hood manufacturer's instruc=
tions for cleaning,
Cleaners/aerosols--Always follow the manufacturer's
recommended directions for use, Be aware that excess
residue from cleaners and aerosols may ignite causing
damage and/or injury.
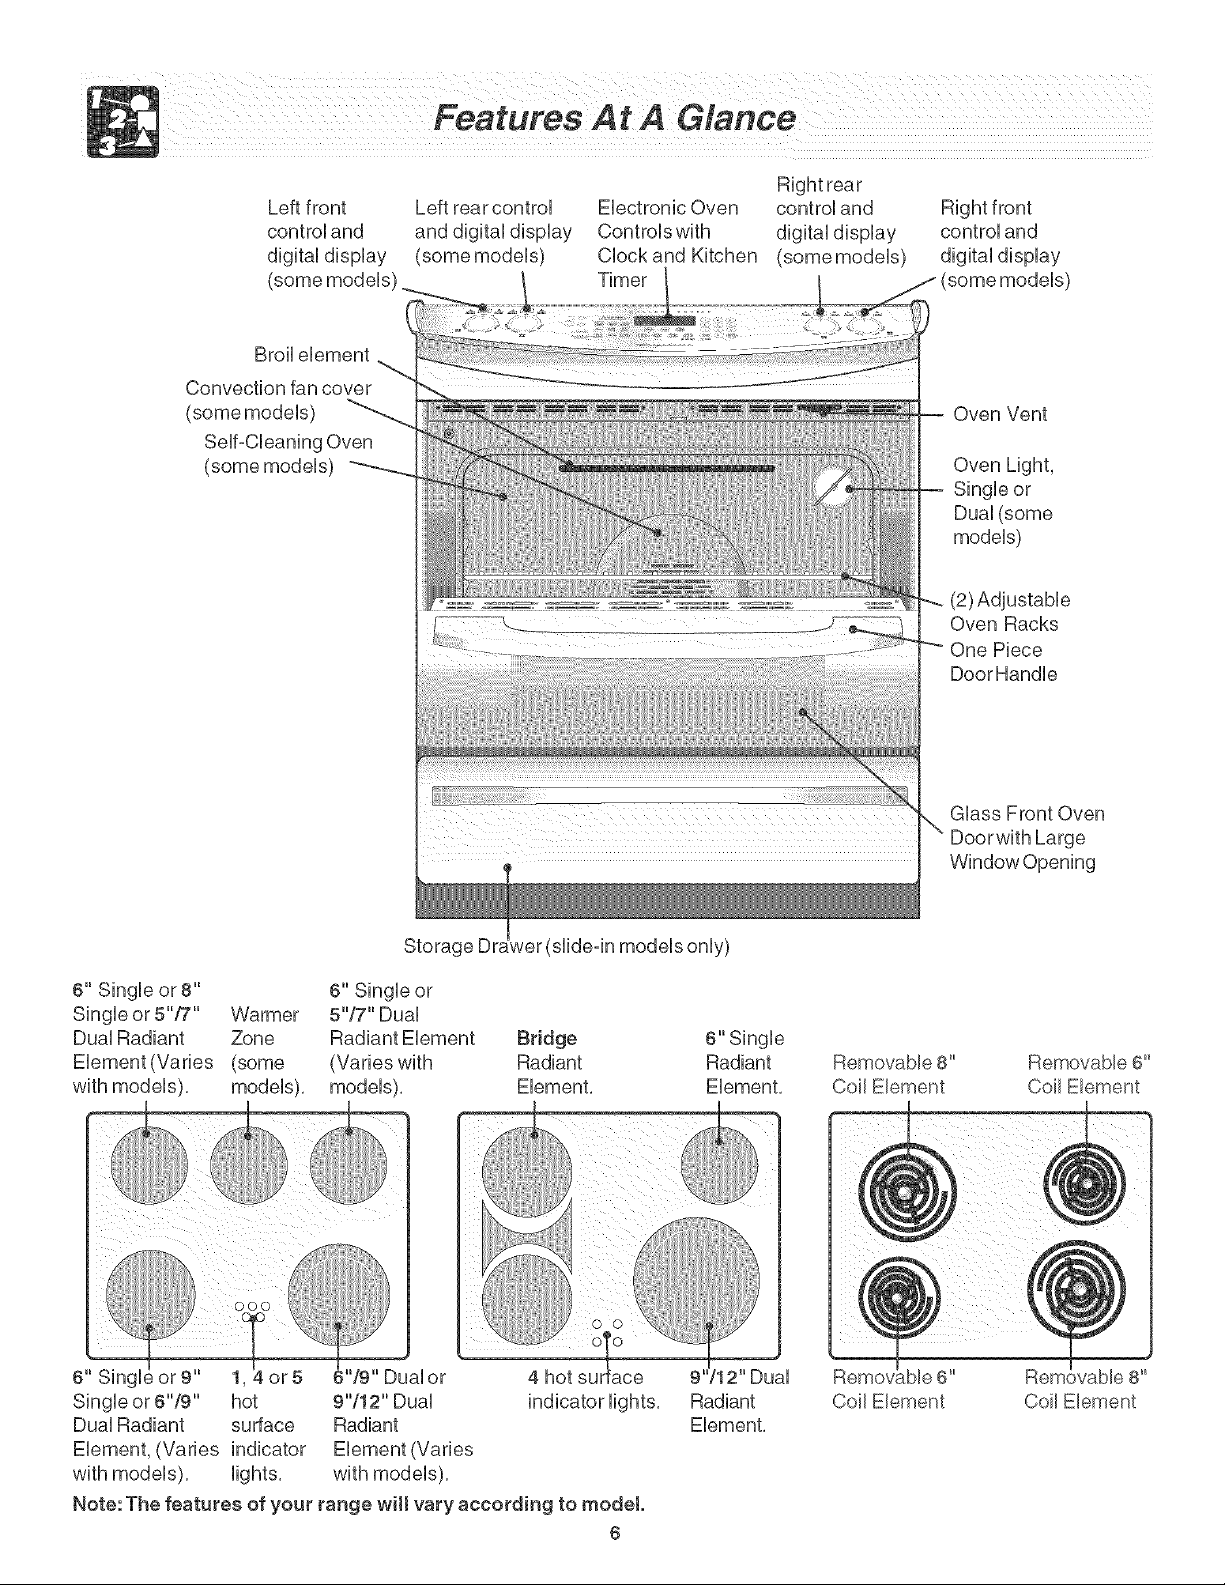
Left front Left rear controU Ebctronb Oven controUand Right front
controUand and digitaUdispUay ControUswith digitaUdispUay controUand
digitaUdispUay Cbck and Kitchen digitaUdispUay
(some models) Timer (some models)
Broil element
Convection fan cover
(some models)
Self-Cleaning Oven
(some models)
Oven Vent
Oven Light,
Single or
Dual (some
models)
(2) Adjustable
Oven Racks
One Piece
DoorHandle
Storag (slide°in models only)
6" Single orS" 6" Single or
Single or 5"/7" Warmer 5"/7" Dual
Dual Radiant Zone Radiant Element Bridge 6" Single
Element(Varies (some (Varies with Radiant Radiant
models), models), Element, Element,
6" Singl or 9" 1, or 5 6"/9" Dualor 4 hot surtace 9'
Single or 6"/9" hot 9"/12" Dual indicator lights, Radiant
Dual Radiant surface Radiant Element,
Element, (Varies indicator Element (Varies
with models), lights, with models),
Note: The features of your range wilt vary according to model.
6
RemovaMe 8"
Coil Ebment
_ble6"
Coil Element
Glass Front Oven
Doorwith Large
Window Opening
Removable 6"
Coil Ebment
vabb 8"
Coil Element
Models with Colt Surface Elements
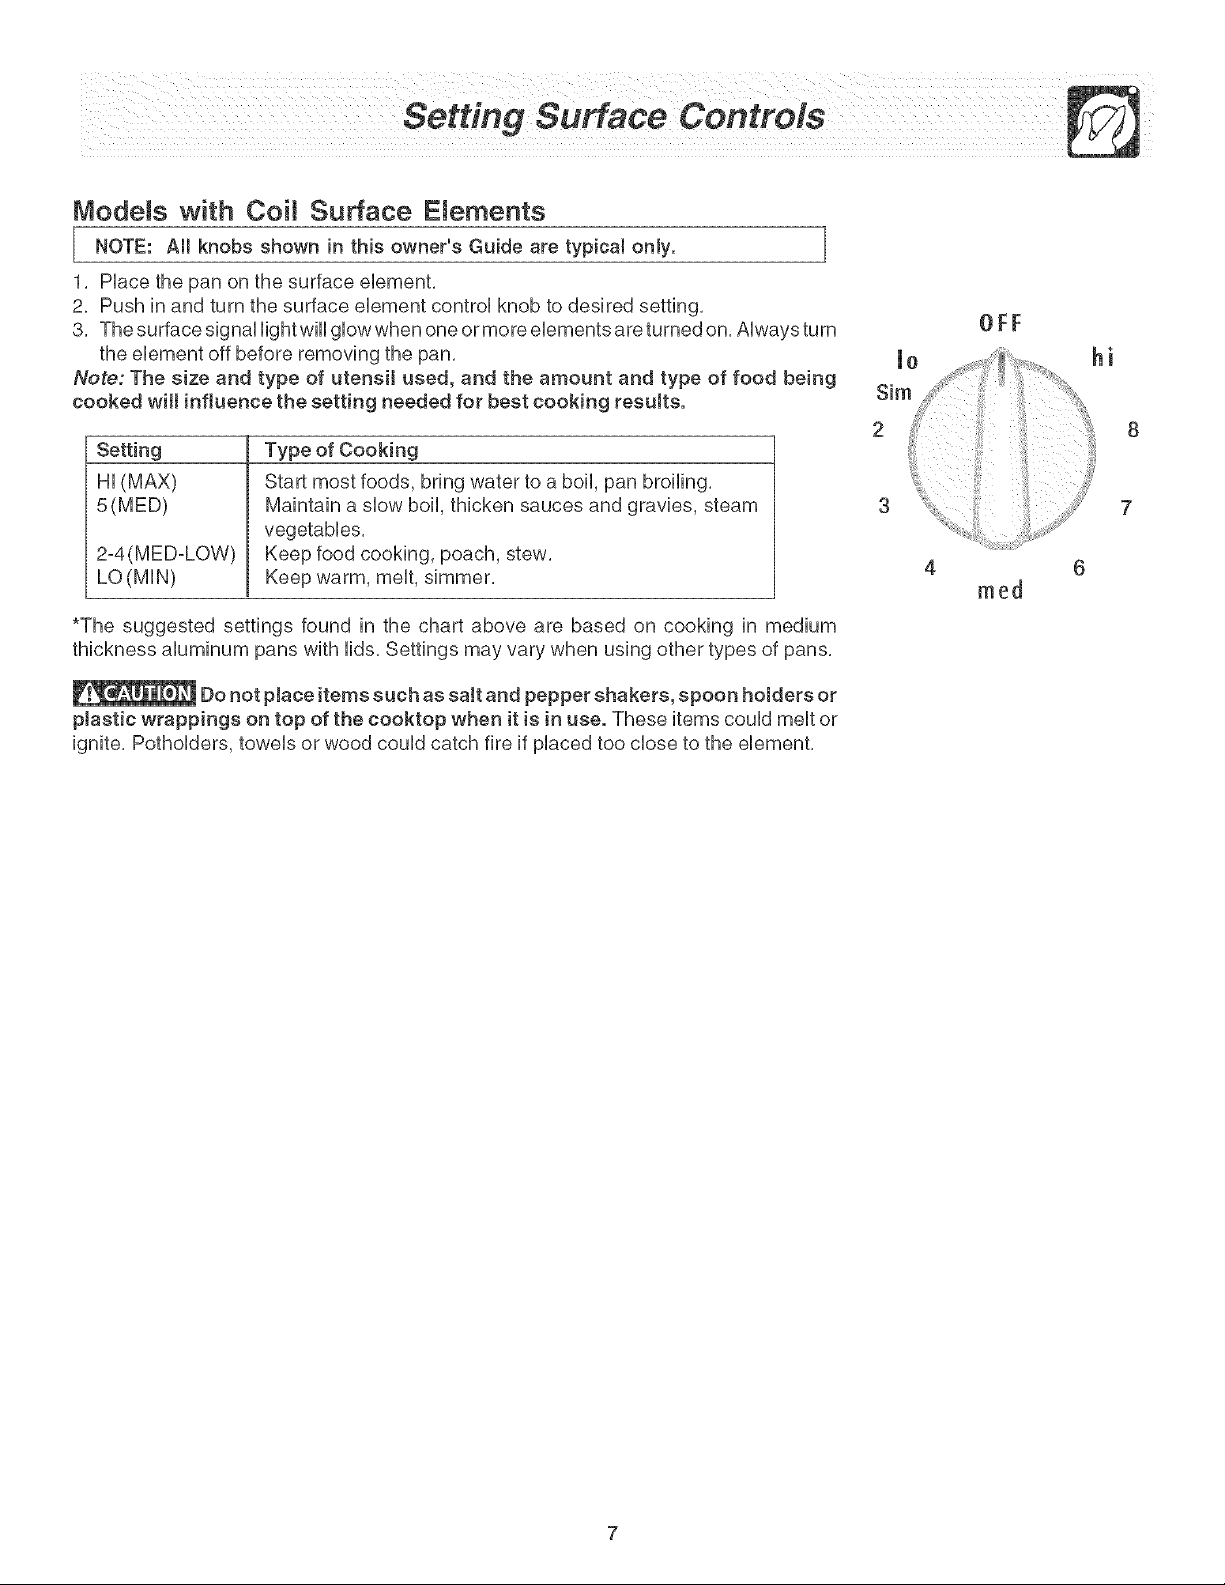
I NOTE: All knobs shown in this owneCs Guide are typical only, I
1. PUacethe pan on the surface eUement.
2. Push in and turn the surface eUementcontroUknob to desired setting.
3. The surface signaUHghtwHUgUowwhen one or more eUementsare turned on. AUwaysturn
the eUementoff before removing the pan.
Note: The size and type of utensil used, and the amount and type of food being
cooked wilt influence the setting needed for best cooking results.
Setting
HU(MAX)
5(MED)
2-4(MED°LOW)
LO(MUN)
*The suggested settings found in the chart above are based on cooking in medium
thickness aluminum pans with lids. Settings may vary when using other types of pans.
Do not pJace items such as salt and pepper shakers, spoon holders or
plastic wrappings on top of the cooktop when it is in use. These items could melt or
ignite. Potholders, towels or wood could catch fire if placed too close to the element.
Type of Cooking
Start most foods, bring water to a boll, pan broiling.
Maintain a sUowboll, thicken sauces and gravies, steam
vegstaMes.
Keep food cooking, poach, stew.
Keep warm, meUt,simmer.
E
OFF
lo
Sire
2
4
med
6
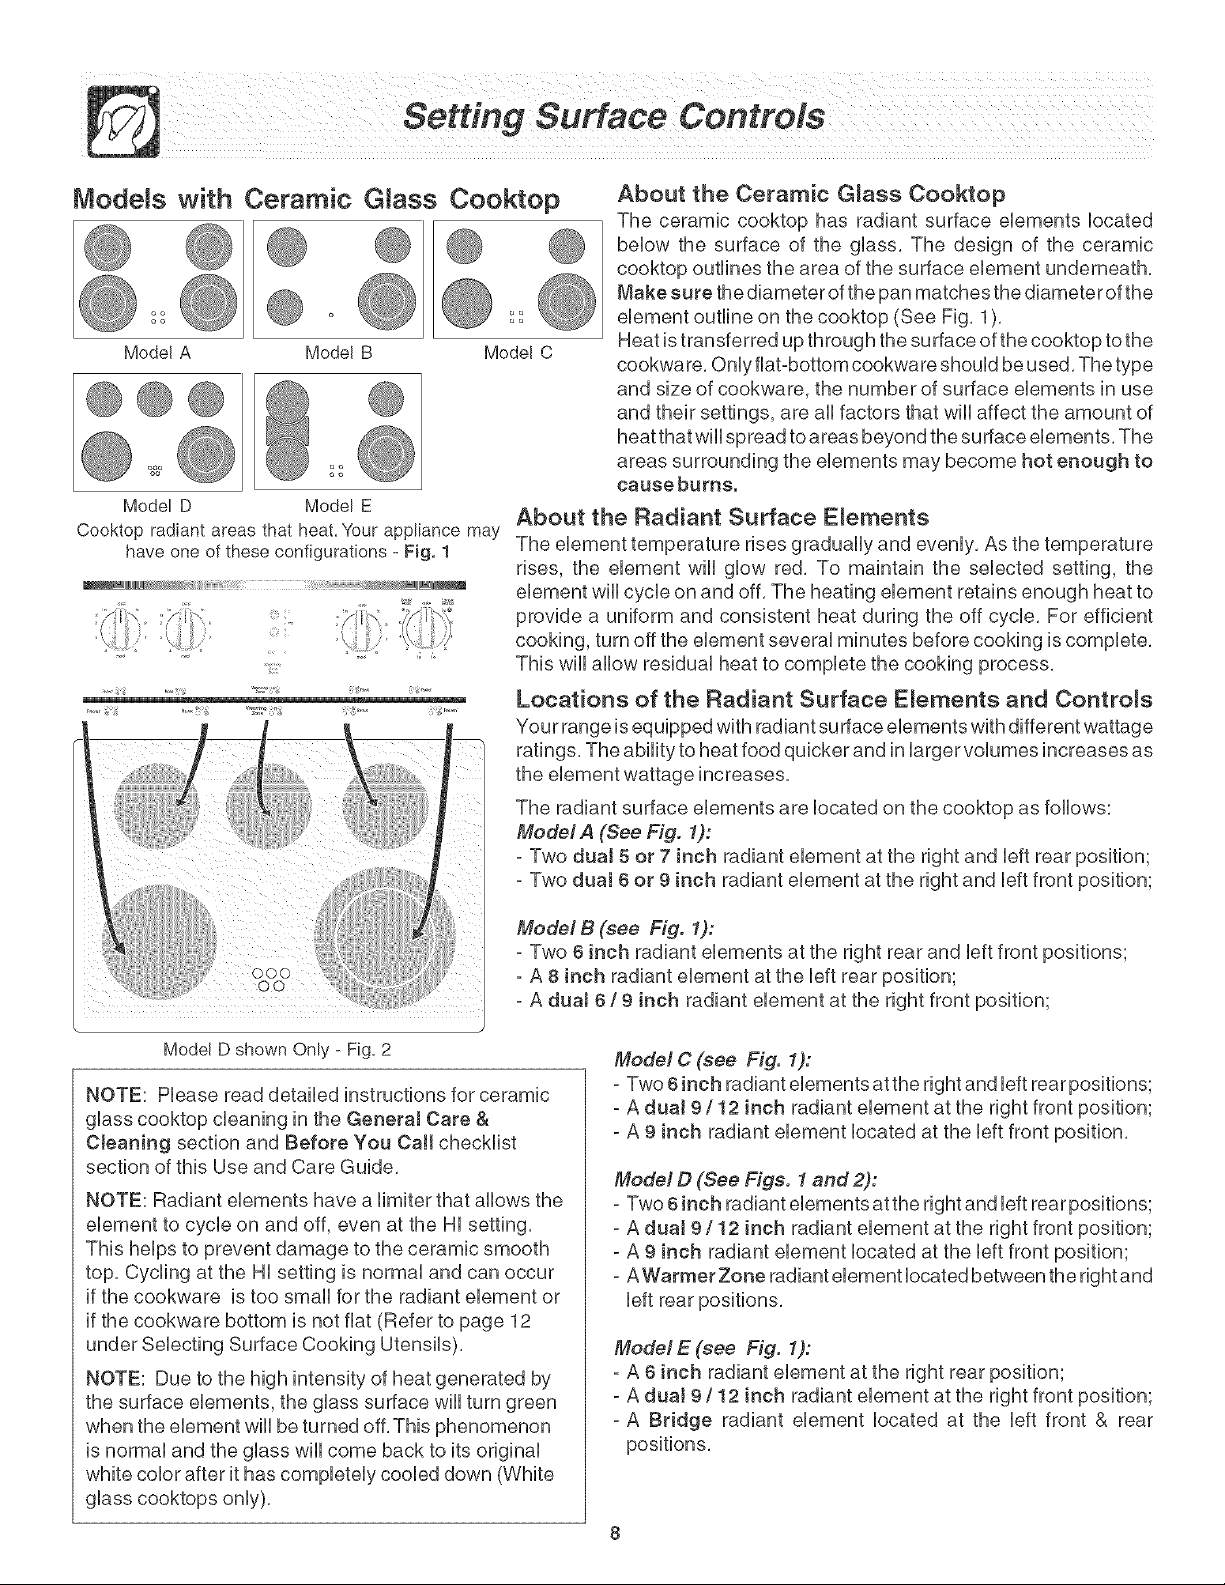
Models with Ceramic Glass Cooktop
Model A Model B Model C
®®®
Model D Model E
Cooktop radiant areas that heat. Your appliance may
have one of these configurations - Fig. 1
About the Radiant Surface E_ements
The element temperature rises gradually and evenly. As the temperature
rises, the element will glow red. To maintain the selected setting, the
element will cycle on and off. The heating element retains enough heat to
provide a uniform and consistent heat during the off cycle. For efficient
cooking, turn off the element several minutes before cooking is complete.
This will allow residual heat to complete the cooking process.
Locations of the Radiant Surface E_ements and Controls
Your range is equipped with radiant surface elements with different wattage
ratings. The ability to heat food quicker and in larger volumes increases as
the element wattage increases.
The radiant surface elements are located on the cooktop as follows:
Mode! A (See Fig. 1):
- Two rfual 5 or 7 inch radiant element at the right and left rear position;
- Two rfual 6 or 9 inch radiant element at the right and left front position;
About the Ceramic G_ass Cooktop
The ceramic cooktop has radiant surface eUements Uocated
beUow the surface of the gUass. The design of the ceramic
cooktop outlines the area of the surface eUementunderneath.
Make sure the diameter of the pan matches the diameter of the
eUementoutline on the cooktop (See Fig. 1).
Heat is transferred up through the surface of the cooktop to the
cookware. OnUyflat-bottom cookware shouUdbe used. The type
and size of cookware, the number of surface eUements in use
and their settings, are aHfactors that wHUaffect the amount of
heat that wHUspread to areas beyond the surface eUements.The
areas surrounding the eUements may become hot enough to
cause burns.
Mode/B (see Fig. 1):
- Two 6 inch radiant elements at the right rear and left front positions;
- A 8 inch radiant element at the left rear position;
- A rfuaJ 6 / 9 inch radiant element at the right front position;
Model D shown Only - Fig. 2
NOTE: Please read detailed instructions for ceramic
glass cooktop cleaning in the GeneraJ Care &
Cleaning section and Before You Calt checklist
section of this Use and Care Guide.
NOTE: Radiant elements have a limiter that allows the
element to cycle on and off, even at the HI setting.
This helps to prevent damage to the ceramic smooth
top. Cycling at the HI setting is normal and can occur
if the cookware is too small for the radiant element or
if the cookware bottom is not flat (Refer to page 12
under Selecting Surface Cooking Utensils).
NOTE: Due to the high intensity of heat generated by
the surface elements, the glass surface will turn green
when the element will be turned off. This phenomenon
is normal and the glass will come back to its original
white color after it has completely cooled down (White
glass cooktops only).
Model C (see Fig. 1):
- Two 6 inch radiant elements at the right and left rear positions;
- A rfual 9/12 inch radiant element at the right front position;
- A 9 inch radiant element located at the left front position.
Model D (See Figs. 1 and 2):
- Two 6 inch radiant elements at the right and left rear positions;
- A rfuaJ 9/12 inch radiant element at the right front position;
- A 9 inch radiant element located at the left front position;
- AWarmer Zone radiant element located between the right and
left rear positions.
Model E (see Fig. 1):
- A 6 inch radiant element at the right rear position;
- A rfuaJ 9/12 inch radiant element at the right front position;
- A Brirfge radiant element located at the left front & rear
positions.
Models with Ceramic Glass Ceektop (continued)
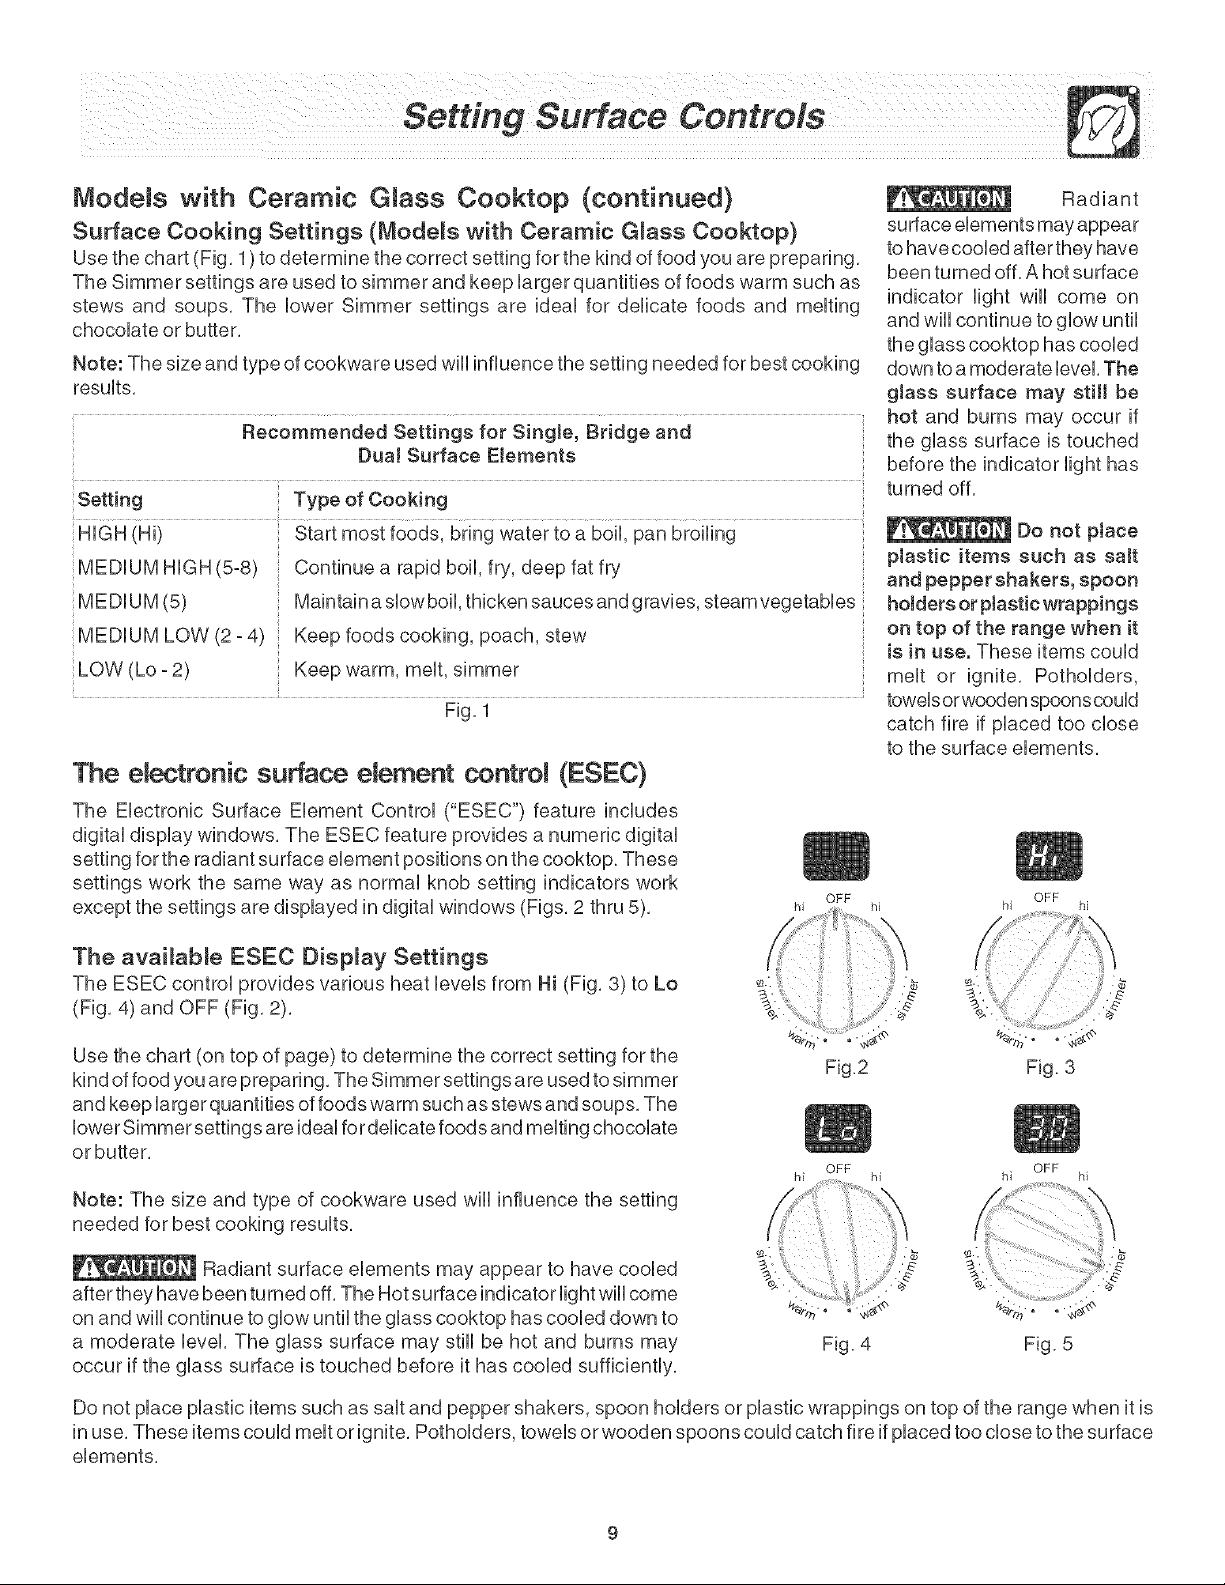
Surface Cooking Settings (Mode_s with Ceramic G_ass Cooktop)
Use the chart (Fig. 1) to determine the correct setting for the kind of food you are preparing.
The Simmer settings are used to simmer and keep Uargerquantities of foods warm such as
stews and soups. The Uower Simmer settings are ideaUfor delicate foods and meUting
chocoUate or butter.
Note: The size and type of cookware used wiii influence the setting needed for best cooking
results.
Recommended Settings for Single, Bridge and
DuaJ Surface Elements
Setting
HUGH_Hi_
MEDUUMHUGHf5°8/
MEDUUM(5}
MEDUUM LOW_2 -41
LOW (Lo - 2}
Type of Cooking
Start most foods, bring water to a boil. pan broiling
Continue a rapid boil, fry, deep fat fry
Maintain a slow boil thicken sauces andgravies, steam vegetables
Keep foods cooking, poach, stew
Keep warm melt, simmer
Fig. 1
The electronic surface element control (ESEC)
Radiant
surface elements may appear
to have cooled after they have
been turned off. Ahot surface
indicator light will come on
and will continue to glow until
the glass cooktop has cooled
down to a moderate level, The
glass surface may still be
hot and burns may occur if
the glass surface is touched
before the indicator light has
turned off
Do not pJace
plastic items such as saJt
and pepper shakers, spoon
hotders or plastic wrappings
on top of the range when it
is in use. These items could
melt or ignite Potholders,
towelsorwooden spoonscould
catch fire if placed too close
to the surface elements,
The EUectronic Surface EUement Control ("ESEC") feature includes
digital display windows, The ESEC feature provides a numeric digital
setting for the radiant surface element positions on the cooktop. These
settings work the same way as normal knob setting indicators work
except the settings are displayed in digital windows (Figs, 2 thru 5).
The available ESEC Display Settings
The ESEC control provides various heat levels from Hi (Fig, 3) to Lo
(Fig, 4) and OFF (Fig, 2).
Use the chart (on top of page) to determine the correct setting for the
kind of food you are preparing. The Simmer settings are used to simmer
and keep larger quantities of foods warm such as stews and soups. The
lower Simmer settings are ideal for delicate foods and melting chocolate
or butter.
Note: The size and type of cookware used wiii influence the setting
needed for best cooking results.
Radiant surface elements may appear to have cooled
after they have been turned off. The Hot surface indicator light will come
on and will continue to glow until the glass cooktop has cooled down to
a moderate level. The glass surface may still be hot and burns may
occur if the glass surface is touched before it has cooled sufficiently.
OFF
hi hi
OFF
hi hi
Do not place plastic items such as salt and pepper shakers, spoon holders or plastic wrappings on top of the range when it is
in use. These items could melt or ignite. Potholders, towels or wooden spoons could catch fire ifplaced too close to the surface
elements.
Models with Ceramic Glass Cooktop (continued)
Hot Surface indicator Lights
After using any of the radiant ebment positions the cooktop wifl become very hot. After turning
any of these ebments OFF, the cooktop wifl remain HOT for some time. The "Hot Surface"
indicator fight wiflglow whenever any of the ebment positions becomes HOT. The Hot Surface
indicator light wifl remain ON whib hot and turn OFF once the cooktop has coobd sufficbntly.
ESEC Error indicator Message (Er)
An error message wifl be displayed (flashing "E¢') at power up (or after apower failure) ifANY
of the surface control knobs were left in the ON positions (See Fig.l). If a power failure should
occur, be sure to set all of the surface control knobs to the OFF position. This will reset the
surface controls.
Once the sutrace controls have been set to the OFF positions, the surface controls should return
to normal operation. If the surface controls do not function and the"Er" message remains in any
display after following these procedures, contact an authorized servicer for assistance.
ESEC Lockout Feature ( - - )
The ESEC feature will not operate during a Self-Cban cycle. Whenever the ESEC Lockout
feature is active, " - - " will appear in any display window (See Fig. 2).
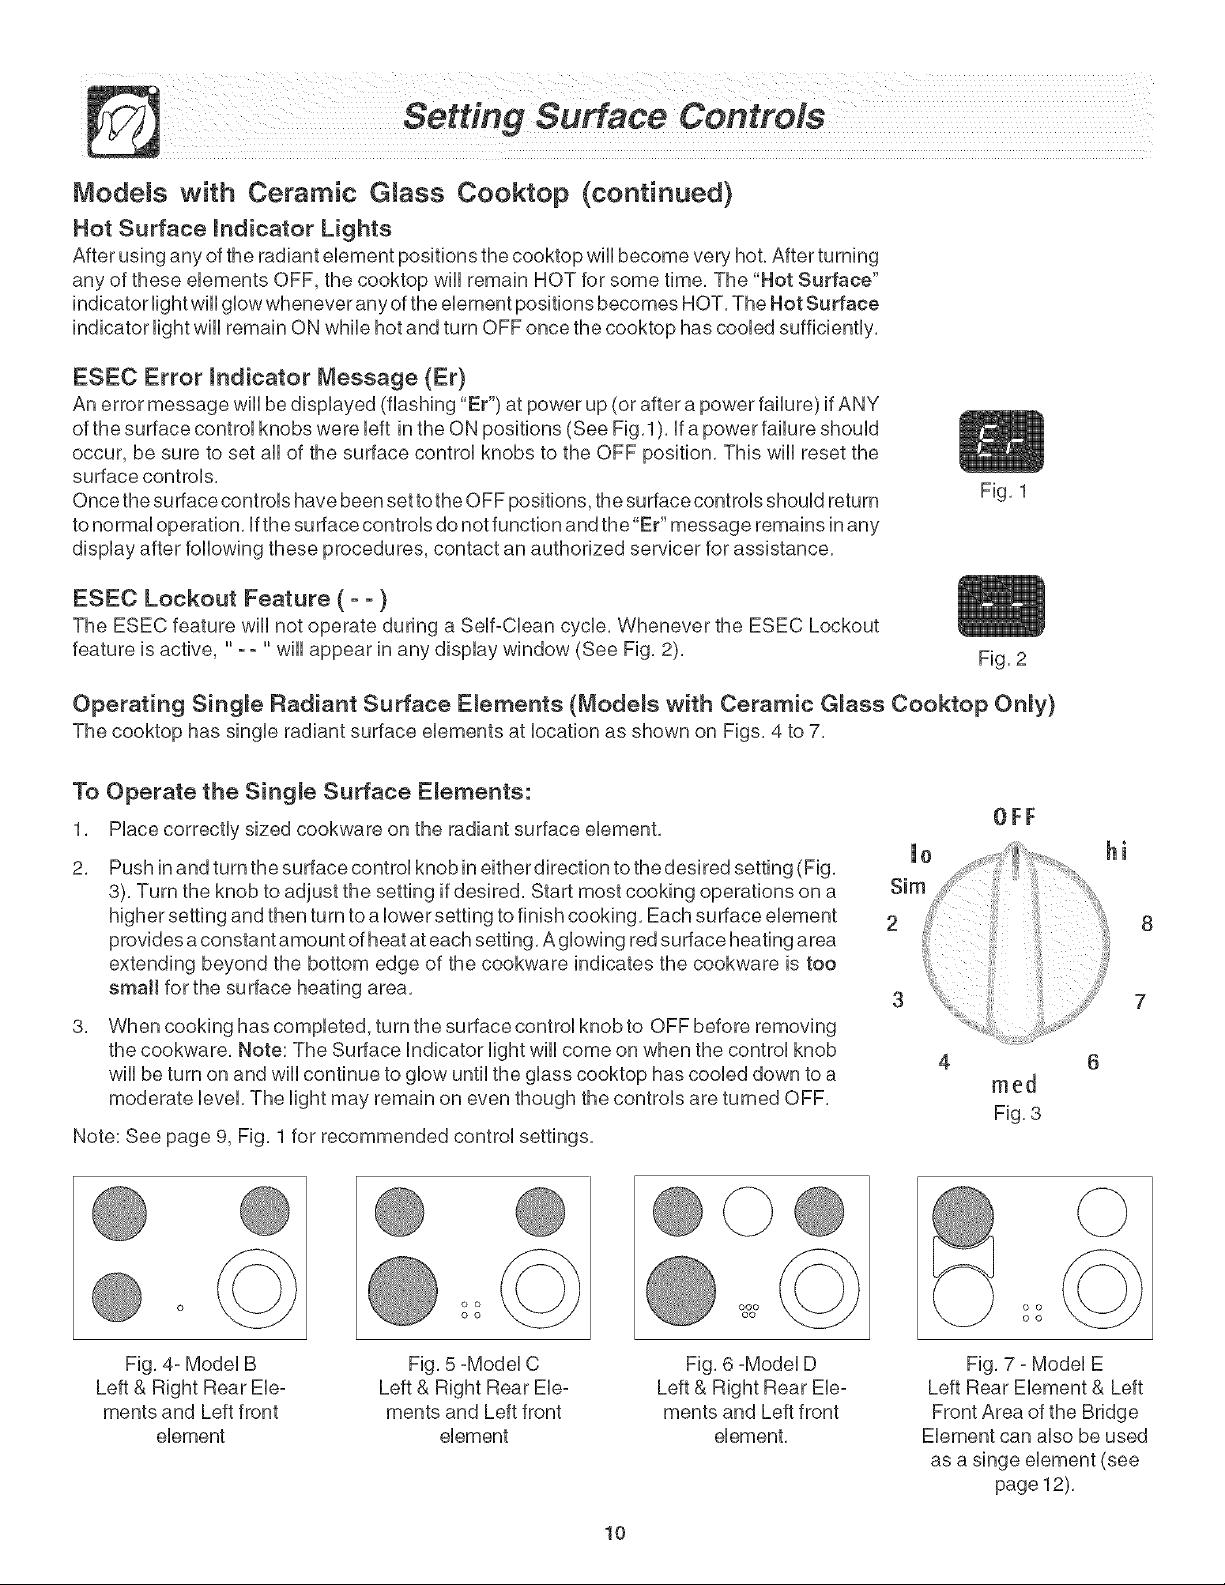
Operating Single Radiant Surface E_ements (Mode_s with Ceramic G_ass Cooktop On_y)
The cooktop has single radiant surface elements at location as shown on Figs, 4 to 7,
Fig. 1
Fig. 2
To Operate the Single Surface Emements:
1, Place correctly sized cookware on the radiant surface element,
2.
Push in and turn the surface control knob in either direction to the desired setting (Fig.
3). Turn the knob to adjust the setting ifdesired. Start most cooking operations on a Sirn
higher setting and then turn to a lower setting to finish cooking. Each surface element 2
provides a constant amount of heat at each setting. A glowing red su trace heating area
extending beyond the bottom edge of the cookware indicates the cookware is too
smaJl for the surface heating area.
3.
When cooking has completed, turn the surface control knob to OFF before removing
the cookware, Note: The Surface indicator light will come on when the control knob
wiii be turn on and wiii continue to glow until the glass cooktop has cooled down to a
moderate level, The light may remain on even though the controls are turned OFF,
Note: See page 9, Fig. 1for recommended control settings.
Fig. 4- Model B
Left & Right Rear Ele-
ments and Left front
element
Fig. 5 -Model C
Left & Right Rear Ele-
ments and Left front
element
Fig. 6 -Model D
Left & Right Rear Ele-
ments and Left front
element.
OFF
4
reed
Fig, 3
o o
oo
Fig. 7 - Model E
Left Rear Element & Left
Front Area of the Bridge
Element can also be used
as a singe element (see
page 12).
6
10

Models with Ceramic Glass Cooktop
(continued)
Operating the Dua_ Surface Radiant E_ement
(Mode_s with Ceramic G_ass Cooktop On_y)
ModeUA is equipped with DuaUradiant surface ebments at
aHpositions (See Figs, 5 & 6), ModeUs B, C, D & E are
equipped with a duaUradiant surface eUement bcated at the
right front (See Figs, 7 to 14) position, SymboUson the
controUpaneUare used to indicate which coil of the duaU
radiant eUement wHUheat, The 0 symboUindicates that onUy
the inner coil wHUheat (Figs, 1,3, 5, 7, 9, 11 & 13), The @
symbol indicates that both inner and outer coils will heat
(Figs, 2, 4, 6, 8, 10, 12 & 14), You may switch from either
coil setting at any time during cooking,
To Operate the Dua_ Surface E_ement:
1, Place correctly sized cookware on the dual surface
element,
2,
Push in and turn the control knob counterclockwise
(See Fig. 3) for smaller cookware or clockwise (See
Fig. 4) for larger cookware.
3,
Turn the knob to adjust the setting if needed, Start
most cooking operations on a higher setting and then
turn to a lower setting to finish cooking, Each surface
element provides a constant amount of heat at each
setting, A glowing red surface heating area extending
beyond the bottom edge of the cookware indicates the
cookware is too small for the surface heating area,
o @
Small Large
Element Element
Fig, 1 Fig, 2
0 hi hi _' o hi hi
2 2
Io
Fig, 3
o o
Fig, 5 - Model A
o
Fig, 7 - Model B
Fig, 6 - Model A
Fig, 8 - Model B
4,
When cooking has completed, turn the surface control
knob to OFF before removing the cookware. Note: The
Surface Indicator light will come on when the control
knob will be turn on and will continue to glow until the
glass cooktop has cooled down to a moderate level.
The light may remain on even though the controls are
turned OFF.
Note: See page 9, Fig. 1for recommended control settings.
Radiant surface elements may appear to
have cooled after they have been turned off, A hot surface
indicator light will come on and will continue to glow until
the glass cooktop has cooled down to a moderate level,
The gJass surface may stitt be hot and burns may occur
if the glass surface is touched before the indicator light
has turned off,
©
o o
Fig, 9 - Model C
%%
Fig, 11 - Model D
o o
11 Fig, 13 - Model E Fig, 14 - Model E
@oo
Fig, 10 ° Model C
o o

Models with Ceramic Glass Cooktop (continued)
Operating the Bridge Surface Radiant Element
(Model E)
Mode[ E (See Page 8) is equipped with a "BRIDGE" surface
ebment bcated at the [eft front and middb (See Fig, 6)
positions, The Bridge can beused when cooking with rectangular
(fike a griddb) or ova[ shaped cookware, The ebment wH[
maintain an even temperature setting across both portions of the
Front Bridge
Ebraent OFF Ebment
Bridge, if needed for normal cookware, the Bridge ebment can
work fike a singb ebment without the Bridge (See Fig, 3),
Bridge element operation symbols are located on the control
panel on each side of the Bridge element control knob, These
symbols indicate the direction to turn the control knob when
operating the Bridge element, The symbol in Figure 1 indicates
that only the single portion of the Bridge element will heat (Fig,
3), The symbol in Figure 4 indicates that both the single and
Bridge portions of the element will heat together (Fig, 6), You
may switch from either of these settings at any time during
cooking with the Bridge element,
To Operate the Bridge Surface Element:
1, Place correctly sized cookware on the Bridge surface ff_X"_
element,
2, Push in and turn the control knob counterclockwise (See _ o
Figs, 2 and 3) to heat the portion of the Bridge element for
normal shaped cookware or clockwise (See Figs, 5 and 6) Fig, 3
for larger or rectangular shaped cookware,
3, Turn the knob to adjust the setting if needed, Start most Bridge portion,
cooking operations on a higher setting and then turn to a
lower setting to finish cooking, Each surface element provides a constant amount of heat at
each setting, A glowing red surface heating area extending beyond the bottom edge of the
cookware indicates the cookware is too smaJ[, Please note that not all cookware will fit the
Bridge element correctly,
4, When cooking has completed, turn the surface control knob to OFF before removing the
cookware, Note: The Surface Indicator light will come on when the control knob will be turn
on and will continue to glow until the glass cooktop has cooled down to a moderate level, The
light may remain on even though the controls are turned OFF,
The BRIDGE element may also be used in combination with the [eft rear single element, Because
these elements have 2 different controls, one element can be used to cook while the other element
may be used to keep food warm (See Fig, 7),
Front
Element
Fig, 1
Sire%... _,o,'tSim Sire%..,,"* _,.," Sire
LO LO LO LO
Fig, 2 Fig, 5
Bridge
Element
Hi
Fig, 4
Front Bridge
Element OFF Emement
Fig, 6
Bridge element with Bridge
portion,
o o
o o
Fig, 7
Note: See page 9, Fig, 1for recommended control settings,
Radiant surface elements may appear to have cooled after they have been turned off, A hot surface indicator
fight will come on and will continue to glow until the glass cooktop has cooled down to a moderate level, The glass surface
may still be hot and burns may occur if the glass surface is touched before the indicator fight has turned off,
12

Models with Ceramic @ass Cooktop (continued)
Operating the Warmer (Warm & Ready TM) Zone (Mode_ D):
The purpose of the Warmer Zone is to keep hot cooked foods at serving
temperature. Use the Warmer Zone to keep cooked foods hot such as:
vegetaNes, gravies, casserobs, soups, stews, breads, pastries and oven-
safe dinner @ates. AUwaysstart with hot food. it is not recommended to heat
coUdfood on the Warmer Zone.
AHfood @aced on the warmer zone shoed be covered with a Hdto maintain
quality. For best resets, when warming pastries or breads, the cover shoed
have an opening to allow moisture to escape, Do not use plastic wrap or
aluminum foit to cover food. Plastic or aluminum may melt onto the
surface.
Use onUy@ates, utensils and cookware recommended for oven and cooktop
useonthe Warmer Zone,
Warmer Zone Temperature SeJection
Refer to the Warmer Zone table for recommended heating levels (Fig, 1), If a
partic@ar food is not listed, start with the medium level, and adjust as needed,
Most foods can be kept at sewing temperatures by using the medium level,
Warmer Zone Recommended Food
Settings Table
Food Item Heating Levet
Hot Beverages HI
Fried Foods HI
Vegetables MED
Soups (Cream) MED
Stews MED
Sauces MED
Meats MED
Gravies LO
Eggs LO
Dinner Plates with Food LO
Casseroles LO
Breads/Pasteries LO
Fig, 1
To Set the Warmer Zone Control:
@i4 .... .... hi
Touch the pad at the Warmer Zone control position. The Warmer Zone
indicator light will flash. Note: Ifno further pads are touched within 25 seconds the
request to power the Warmer Zone ON will clear.
2. Atthe WarmerZone controb position touch :/, : once to turn ON the power bvel
for HI (see Fig. 2) or to turn ON the power level for LO (see Fig. 5). The
Warmer Zone Indicator light located above the ON/OFF pad will turn on steady and
the Hot Surface indicator light located on the cooktop will turn ON when the
Warmer Zone becomes hot.
3, Eachtouch _ :or k/ willincreaseordecreasethepowerlevels, TheWarmer
Zone has 5 power levels from HI (see Fig, 2) through MED (see Fig, 4) to LO (see
Fig, 5), The power level may be adjusted at any time while the Warmer Zone is
ON,
4 Whonthofeed,sroadytesorvo,teuchtho{!}ppadencotetumthoWarmorZeno
OFF, The Warmer Zone indicator light will turn OFF,
Note: The Hot Surface indicator light located on the cooktop wiii remain ON if the
cooktop is still hot and wiii remain ON until the heating surface area has cooled
sufficiently,
,_x_,,x, ,xS,%',,.
iiiiiiii_iiiiiii:i_ ....................
@
O:O" 0
Zoe
,_%( R_ic a d
:}@o o@d
{} @ Q @
0/¢ P
Zoe R_;c b _:
Fig. 2 Fig. 3
0 T%_d Ft%!od
@
@ o @ o
Fig, 4 Fig, 5
Radiant surface elements may appear to have cooled after they have been turned off, The glass surface may
stitt be hot and burns may occur if the @ass surface is touched before it has cooled sufficiently,
Do not pJace aluminum foit or pJastic items such as saJt and pepper shakers, spoon hotders or pJastic
wrappings on top of the range when it is in use. These items could melt or ignite, Potholders, towels or wooden spoons could
catch fire if placed too close to the surface elements or burners,
The Warmer Zone will not glow red when it is hot, but becomes hot enough tocause burns, Avoid @acing hands
on or near the Warmer Zone until the Warmer Zone Hot Surface indicator light isOFF, Always use potholders or oven mitts when
removing food from the warmer zone as cookware and plates will be hot,
13

Selecting Surface Cooking
Cookware
Cookware shouUd have fiat bottoms that
make good contact with the entire surface
heating eUement, Check for flatness by
rotating a ruUeracross the bottom of the
cookwa re (See Fig, 1), Besure tofoUUowthe
recommendations for using cookware as
shown in Fig. 2.
Note: The size and type of cookware used
will influence the setting needed for best
cooking results.
Fig. 1
Cookware Material types
The cookware material determines how evenly and quickly heat is
transferred from the surface element to the pan bottom. The most
popular materials available are:
¢ t
• Fiat bottom and straight
sides.
o Tight fitting lids.
® Weight of handle does not
tilt pan. Pan is weml
bamanced°
® Pan sizes match the
amount of food to be
prepared and the size of
the surface ebment.
® Made of a material that
conducts heat well
® Easy to clean.
o Always match pot diameter
to element surface
diameter.
® Curved and warped pan
bottoms.
® Pan overhangs element by
more than oneohamf inch.
÷1 I<_
® Pan is smamler than
element°
® Heavy handle timtspan.
Fig, 2
t
ALUMINUM - Excellent heat conductor. Some types of food wiii cause it to darken (Anodized aluminum cookware resists
staining & pitting), if aluminum pans slide across the ceramic glass cooktop, they may leave metal marks which will resemble
scratches. Remove these marks immediately.
COPPER - Excellent heat conductor but discolors easily. May leave metal marks on ceramic glass (see Aluminum above).
STAINLESS STEEL - Slow heat conductor with uneven cooking results, is durable, easy to clean and resists staining.
CAST IRON - A poor heat conductor however wiii retain heat very well. Cooks evenly once cooking temperature is reached.
Not recommended for use on ceramic cooktops.
PORCELAIN-ENAMEL on METAL - Heating characteristics will vary depending on base material. Porcelain-enamel coating
must be smooth to avoid scratching ceramic cooktops.
GLASS ° Slow heat conductor. Not recommended for ceramic cooktop surfaces because it may scratch the glass.
Air Circulation in the Oven
For best air circulation and baking results allow 2-4" (5-10 cm) around the
cookware for properaircirculation and be sure pans and cookware do not
touch each other, the oven door, sides or back of the oven cavity. The hot
air must circulate around the pans and cookware inthe oven for even heat
to reach around the food.
14
1 Oven Rack
Multiple Oven Racks

_This rangehasafanthat wiltturn"ON"and"OFF"byitselfto keeptheelectronics cool. it may
continue to run after the range has been turned "OFF", but may aJso stop immediately and then turn"ON" after a
wHle.
Oven Vent Location -ModeJs
with Coil EJements
The oven is vented through the
right rear coil eJement, When
theoven is on, warm aids released
through the vent, This venting is
necessary for properair circulation
in the oven and good baking
results, DO NOT block the vent,
Doing so may cause cooking
failures, fire or damage to the
appliance,
Oven Vent Location -ModeJs with
Ceramic GJass Cooktop
The oven vent is located at right side of the
front paneJ and visible when the oven door
is open, When the oven is on, hot air is
released through the vents, This venting is
necessary for proper air circulation in the
oven and good baking results,
Removing and RepJacing Oven
Racks
To remove, pull the rack forward until it
stops, Lift up front of rack and slide out,
To replace, fit the rack onto the guides
on the oven walls, Tilt the front of the
rack upward and slide the rack back into
place,
J
Arranging Oven Racks
ALWAYS ARRANGE OVEN RACKS WHEN THE OVEN IS COOL (PRIOR TO OPERATING THE OVEN), Always use oven
mitts when the oven is hot,
RECOMMENDED RACK POSITIONS FOR
BROILING, BAKING & ROASTING
® Food Rack position
Broiling meats, chicken or fish 3or4
Cookies, cakes, pies, biscuits & muffins
1 rack 2 or 3
Multiple racks 2 & 4
Frozen pies, angel food cake, yeast, bread, 1 or 2
casseroles, small cuts of meat or poultry
Rack
positions
Turkey, roast or ham 1
Note: Always use caution when removing food,
Refer to the Electronic Oven Control Guide for oven settings,
15

Setting Warmer Dmwer Control (If Equipped)
Arranging Warmer (Warm & Ready TM) Drawer Rack Positions
The rack can be used in 2 ways:
Hnthe upright position to aHHowHowprofiHefood items to be pHacedboth under
and on top of the rack (for exampHe, roHHsor biscuits on top of the rack and
a casseroHe dish underneath),
o Hnthe downward position to aHHowyou to pHaceHightweight food items and
empty dishware (for exampHe,forthsor pastries and dinn er pHates)on the rack,
Set the Warmer Drawer Rack in either position as shown bellow (Fig,1),
Operating the Warmer Drawer
The purpose of the Warmer Drawer is to keep hot cooked foods at serving
temperature, AHwaysstart with hot food, Htis not recommended to heat coHdfood
in the Warmer Drawer, AHHfood pHacedin the Warmer Drawer shouHdbe covered
with a HidoraHuminum foiHto maintain quaHity, Do not use plastic wrap to cover
food. Plastic may melt onto the drawer and be very difficult to clean. Use
onHyutensiHsand cookware recommended for oven use in the Warmer Drawer,
Warmer Drawer
_Back in upward
position
AHwaysuse pothoHders or oven mitts when removing food from
the Warmer Drawer as cookware and pHateswiHHbe hot and you can be burned,
Warmer Drawer Temperature Selection
Recommended Warmer Drawer settings tame is shown in Fig, 2, Hfa particuHar
food is not Histed,start with the MED setting, Hfmore crispness isdesired, remove
the Hidor aHuminum foiHfrom the food, Most foods can be kept at serving
temperatures on the MED setting, When a combination of foods are to be kept
warm (for instance, meat with 2 vegetabHesand roHHs),use the HI setting, To avoid
heat Hoss,do not open the Warmer Drawer whiHein use,
Warmer_Drawer
Rack in downward
Fig,1 Jposition
Warmer Drawer
recommended Food Settings
TaMe
Food item Setting
Bacon HH
HH
PouHtry HH
HH
Fried Foods HH
Pizza HH
Gravies MED
CasseroHes MED
Eggs MED
Roasts (Beef, Pork, Lamb) MED
VegetabHes
Biscuits
Pastries
RoHHs(soft)
Empty Dinner PHates
MED
MED
MED
MED
LO
LO
16
Fig, 2

To Set the Warmer Drawer Controls:
The controUand indicator Hghts for the Warmer Drawer features are Uocated on the controU panek The temperatures are
approximate, and are designated by HI (high), MED (medium) and LO (Uow),
1, Touch the o_0f_(see Fig, 4) pad at the Warmer Drawer controUposition, The Warmer Drawer indicator Hght wHUflash, Note:
Ufno further pads are touched within 25 seconds the request to power the Warmer Drawer ON will clear,
2, Set the desired power leveI, Touch /k once to turn ON the power level for Hl (see Fig, 1)or V to tum ON the power
level for LO (see Fig, 3). The Warmer Drawer indicator light located beside the _ pad will turn ON steady.
3. Each touch of the V or A padswilldecreaseorincreasethrough5powerlevelsfromHl(seeFig. 1)toMED(seeFig.
2) to LO (see Fig. 3). Note: For best results, preheat the Warmer Drawer before adding the food. An empty drawer will preheat
in approximately 15 minutes,
4, When the food is ready for removal, touch the 0_/0_pad once to turn the Warmer Drawer OFF,
The Warmer Drawer indicator light will turn OFF,
Note: The Warmer Drawer is inoperable during the self-clean cycle.
Note: The warmer drawer is equipped with
a latch which may require extra force when
opening and closing the drawer.
h_¢ hiO hiO
@ © ©
rned @ reed @ reed Q
@ @ ©
Jo@ Jo@ JoO
Fig,1 Fig, 2 Fig, 3
i!ili !!ii¸
Fig, 4
17

Oven Baking
For best cooking resuUts,heat the oven before baking cookies, breads, cakes, pies or pastries, etc,_ There is no need to
preheat the oven for roasting meat or baking casserobs,
The cooking times and temperatures needed to bake a product may vary sHghtUyfrom your previousUyowned appliance,
Baking ProMems and Solutions Chart
Baking ProMems Causes Corrections
Cookies and
biscuits burn on
the bottom.
Cakes too dark
on top or bottom.
Cakes not done
in the center.
Cakes not tevel.
Cookies and biscuits put into
the oven before the preheating
time is completed,
Oven rack overcrowded,
* Dark pan absorbs heattoo fast,
o Cakes put into the oven before
preheating time is completed,
o Rack position too high or low,
Oven too hot,
Oven too hot,
o Pan not centered in oven,
o Range not level,
Pan too close to oven wall or
rack overcrowded,
Pan warped,
Allow oven to preheat to the selected temperature
before placing food in oven,
o Choose pan sizes that wiii permit 5,1 cm to 10,2 cm (2"
to 4") of air space on all sides when placed in the oven,
Use a medium-weight aluminum baking sheet,
o Allow oven to preheat to the selected temperature
before placing food inthe oven,
o Use proper rack position for baking needs,
Set oven temperature 25°F/12°C lower than recom-
mended,
Set oven temperature 25°F/12°C lower than
recommended,
o Use pan size suggested in recipe,
o Use proper rack position and place pan so there is 5,1
cm to 10,2 cm (2" to 4") of space on all sides of pan,
o Place a marked glass measuring cup filled with water
on the center of the oven rack, if the water level is
uneven, refer to the installation instructions for leveling
the range,
Be sure to allow 5,1 cm to 10,2 cm (2" to 4") of
clearance on all sides of each pan in the oven,
o Do not use pans that are dented or warped,
Foods not done
when cooking
time is up.
o Oven too cool,
Oven overcrowded,
o Oven dooropened too
frequently,
Set oven temperature 25°F/12°C higher than suggested
and bake for the recommended time,
o Be sure to remove all pans from the oven except the
ones to be used for baking,
Open oven door only after shortest recommended
18

Broiling
Broiling is a method of cooking
Cooking reformations
tender cuts of meat by direct heat under the broi] eUementof the oven,
Preheating
Preheating is suggested when searing rare steaks, (Remove aU]utensiUsbefore preheating
the oven, Foods wH]stick if pUacedon hot metaL) Topreheat, set the oven controU(s)to BROIL
as instructed in the EUectronicOven Contro] Guide, Wait for the eUementto become red-hot,
usuaUUyabout 2 minutes, Preheating is not necessary when broiling meats welPdone,
Open door
to the "Broil Stop"
positionwhen broiling.
ABways pull oven rack out
to the "stop" position be-
fore turning or removing
food.
Broiting Tips (some modets)
The broiler pan and its grid allow dripping grease to drain and be kept away from the
high heat of the broiler,
DO NOT use your pan without its grid. DO NOT cover the grid with foit. The
exposed grease could ignite.
Should an oven fire occur, close the oven door and turn off the oven,
if the fire continues, throw baking soda on the fire or use a fire extinguisher, DO NOT
put water or flour on the fire, Flour may be explosive,
To Broit
Broil on one side until the food is browned; turn and cook on the second side, Season and
serve, Always pull rack out to the "stop" position before turning or removing food,
Determining Broiling Times
Broiling times var},; so watch the food closely, Time not only depends on the distance from
the element, but on the thickness and aging of meat, fat content and doneness preferred, The
first side usually requires a few minutes longer than the second, Frozen meats also require
additional time,
Grid
\
Broiler Pan
Broiler Chart-Up Tips (some models):
To make cleaning easier, line the bottom of the broiler pan with aluminum foil, DO NOT cover the broiler grid with foil,
To prevent grease from baking on, remove the broiler pan from the oven as soon as cooking is completed, Use hot pads
because the broiler pan is extremely hot, Pour off grease, Soak the pan in HOT, soapy water,
Clean the broiler pan as soon as possible after each use, if necessary, use soap-filled steel wool pads, Heavy scouring
may scratch the grid,
19

Cleaning Various Parts of Your Range
Before cUeaningany part of the range, be sure aHcontroUs are turned OFF and the range is COOL, REMOVE SPULLOVERS
AND HEAVY SOUUNG AS SOON AS POSSUBLE, REGULAR CLEANUNGWULLREDUCE THE NUMBER OF MAJOR
CLEANUNG LATER,
Surfaces How to C_ean
Amuminum&Vinyl Use hot, soapy water and a cloth, Dry with a clean cloth,
PaiHted and Plastic Control
Knobs, Body Parts, and
Decorative Trim
Using a soft cloth, clean with mild dish detergent and water or a 50/50 solution of vinegar
and water, Follow by rinsing the area with clean water; dry and polish with a soft cloth,
Glass cleaners may be used if sprayed on a soft cloth first, DO NOT spray liquids directly
on the control pad and display area, Do not use large amounts of water on the control panel
- excess water on the control area may cause damage to the appliance, Do not use other
liquid cleaners, abrasive cleaners, scouring pads, or paper towels- they will damage the
finish, To remove control knobs, turn to the OFF position; grasp firmly and pull straight
off the shaft, To replace knobs after cleaning, line up the flat sides of both the knob and
the shaft; then push the knob into place,
Stainless Steel (some
mode_s) Oven Door & Drawer
Front Panel and Decorative
Trim
Surface E{ements and Drip
Bowms (some models)
Porcelain Enamel
Broiler Pan and Insert (some
models), Door Liner, Body
Parts and Warmer Drawer and
Drawer Cavity
Clean stairdess steeJ with hot, soapy water and a dishcloth, Rinse with clean water and a
cloth, Do not use cteaners with high concentrations of cHorides or cHorines. Do not
use harsh scrubbing cleaners. Only use kitchen cleaners that are especially made for
cleaning stainless steel. Always be sure to rinse the cleaners from the surface as bluish
stains may occur during heating that cannot be removed.
Surface elements can be unplugged and removed to make cleaning the drip bowls easier,
The surface elements clean themselves when they are turned on, Food spilled on a hot
element will burn off, Food spilled on a cold element can be cleaned with a damp cloth any
remaining soil will burn off the next time element is used, NEVER IMMERSE A
SURFACE ELEMENT INWATER, To remove surface element and drip bowls, follow the
instructions under GeneraJ Cleaning,
Toclean drip bowls, wash in hot, soapy water or in the dishwasher, Rinse and dry while
still warm, Hard4o-remove, burned-on soils can be removed by soaking the drip bowls for
about 20 minute in a slightly diluted liquid cleanser or solution made of equal parts
ammonia and water, A nylon scrubber may be used after soaking, DO NOT use abrasive
cleanser or steel wool, as they will scratch the surface, Always rinse with clean water and
polish, and dry with a soft cloth, To replace drip bowls and surface elements, follow the
instructions under Genera! Cleaning,
Gentle scouring with a soapy scouring pad will remove most spots, Rinse with a 1:1
solution of clear water and ammonia, If necessary, cover difficult spots with an ammonia-
soaked paper towel for 30 to 40 minutes, Rinse with clean water and a damp cloth, and
then scrub with a soap-filled scouring pad, Rinse and wipe dry with a clean cloth, Remove
all cleaners or the porcelain may become damaged during future heating, DO NOT use
spray oven cleaners on the cooktop,
2O

Oven Racks
Oven racks should be removed, or else their finish will dull and their color turn slightly
blue, if they do go through the self=clean cycle, wait until the oven has cooled, then remove
the oven racks and rub their sides with wax paper or a cloth containing a small amount of
baby or salad oil; this wiii make the oven racks glide easier back in and out of their
positions,
Oven door
Clean Seal
Do Hand Clean Door
To clean oven door, wash with hot, soapy water and a clean cloth, DO NOT immerse the
door in water,
DO NOT clean the oven door gasket, The oven door gasket is made of a woven material,
on self cleaning models, which is essential for a good seal, Care should be taken not to
rub, damage or remove the gasket,
Cooktop Cleaning - Coil Surface Element Models Only
To Remove and Replace Surface E_ements and Drip Bow_s (some models)
ATTENTION: Never have covers on the coil ebments as they couUdbe permanentUy dam-
Be careful
not to bend terminal ends
when replacing elements
after cleaning.
aged if the coil is turned on by accident,
Pdor to cleaning the colt elements make sure they are cold and that control knobs are
turned to OFF
Coil elements clean themselves when they are turned on,
Coil elements and drip bowls are removable and allow to clean the drip bowls,
To remove a coil element, push against the front edge and lift element up and out,
To clean by hand, wash the drip bowls in hot sudsy water, For hard to remove spots, use ny=
ion scrubber with soap, Rinse and dry will still warm,
Never immerse coil elements in water,
SURFACES CLEANING AGENTS INSTRUCTIONS
Porcelain ename! Use a damp sponge or dampened soap pad, rinse
(cooktop, surface under steel wool pads, and dry,
cooktop)
Insert - Control Panet Hot, soapy water or cleaner Use a clean soapy, dampened cloth or paper towel,
cream, remove soil and dry, Do not use abrasive products,
21

Cooktop Cleaning- Coil Surface Element Models Only (Continued)
To Raise theTop for Cleaning (some morfels)
1, Grasp the sides and Hft from the front, A Hft=uprod wHUsupport the top in its raised
position, OnUyHftthe top high enough to allow the support rod to rest in pUaceunder the
2, CUeanunderneath using a dean cloth and hot, soapy water,
3, To Uowerthe top, Hftthe top sHghtUyand Uowerthe rod, Lower the range top down into the
range frame,
A rod swings up to support the
top for cleaning underneath.
When lowering the lift-up range top, grasp the sides with fingertips only, Be careful not to
pinch fingers, DO NOT drop or bend the range top when raising or lowering, This could
damage the surface,
Cooktop Cleaning - Porcelain enamel Cooktop Models
Porcelain enarne_ cooktop cmeaning instructions (some rootlets)
Do not use a cooktop cleaner on a hot cooktop, The fumes can be hazardous to your health, and can
chemically damage the cooking surface,
Before cleaning the surface cooktop, be sure the controls are turned to OFF and the cooktop is cool,
DO NOT use commerciaJ oven cleaners on the exterior surfaces including rangetop and door frame,
Correct and consistent cleaning is essential to maintaining your porcelain enamel cooktop, If food spills and grease spatters
are not removed, they may burn onto the surface of the cooktop and cause permanent discoloration,
Daily Cleaning
For normal soil:
1, Allow cooktop surface to cool,
2, Wipe off spills and spatters using a clean paper towel or a clean cloth with warm, soapy water,
3, If needed, use a soapy steel wool pad or other mild household cleaners,
4, Be sure to rinse off the cleaners or the porcelain may become damaged during future heating,
For heavy, burnerf-on soit:
1, Allow cooktop surface to cool,
2, Use a soap filled scouring pad with warm water or cover heavily soiled spots with a solution of clear water and ammonia,
Scour gently, Rinse and wipe dry with a clean cloth,
3, If any soil remains, apply a few drops of a recommended cooktop cleaning cream on the spots and rub gently using a clean
damp cloth or scouring pad, Buff with a dry cloth until all soil and cream are removed, Frequent cleaning with the cooktop
cleaning cream leaves a protective coating which helps in preventing scratches and abrasions,
For sugary spiHovers:
Sugary spills can chemically damage your cooktop surface, Therefore, you must begin cleaning the spills while the cooktop
is still hot, Use caution when following the steps below,
1, Turn off all surface units and remove all pans
2, Wearing an oven mitt, wipe up carefully or move hot spills away from the element area with a clean damp cloth,
3, Allow the cooktop to cool, Follow the instructions above for heavy, burned-on soil,
COOKTOP CLEANING / POLISHING CREAM can be purchased through authorized service centers or major department
stores,
22

Models with Ceramic Glass Cooktop
Ceramic Glass Cooktop Cmeaning & Maintenance
Consistent and proper clea"ing is essential to maintaining y0ur ceramic g_ass cooktop
Prior to using your cooktop for the first time, apply the recommended CERAMA BRYTE@ Cleaning Creme to the ceramic
surface, Clean and buff with a non abrasive cloth or pad, This will make cleaning easier when soiled from cooking, The
special cooktop cleaning cream leaves a protective finish on the glass to help prevent scratches and abrasions,
Sliding aluminum or copper clad bottom pans on the cooktop can cause metal
markings on the cooktop surface, These marks should be removed immediateJy after
the cooktop has cooled using the cooktop cleaning cream, Metal marks can become
permanent if not removed prior to future use,
Cookware (cast iron, metal, ceramic or glass) with rough bottoms can mark or scratch
the cooktop surface, Do not slide anything metal or gJass across the cooktop, Do
not use your cooktop as a cutting board or work surface in the kitchen, Do not cook
foods directly on the cooktop surface without a pan, Do not drop heavy or hard
objects on the glass cooktop, or they may crack it,
Before cleaning the cooktop, be sure the controls are turned to OFF and the cooktop is COOL,
DO NOT use acooktop cleaner on a hot cooktop, The fumes can be hazardous to your health, and can
chemically damage the ceramic glass surface,
C_eaning Recommendations for the Ceramic G_ass Cooktop
For Jight to moderate soiJ:
Apply a few drops of CERAblA BRYTE@ Cleaning Creme directly to the cooktop, Use a paper towel or a blulti=Purpose No
Scratch Scrub Sponge to clean the entire cooktop surface, Make sure the cooktop is cleaned thoroughly, leaving no
residue, Do not use the sponge you use to clean the cooktop for any other purpose,
For heavy, burned on soiJ:
First, clean the surface as described above, Then, if soils remain, carefully scrape soils with a metal razor blade scraper,
holding scraper at a 30 degree angle to the surface, Remove loosened soils with cooktop cleaning cream and buff surface
clean,
Damage to the ceramic glass cooktop may occur if you use any scrub pad
other than a Multi-Purpose No Scratch Scrub Sponge,
Ptastic or foods with a high sugar content:
These types of soils need be removed immediately if spilled or melted onto the ceramic
cooktop surface, Permanent damage (such as pitting of the cooktop surface) may occur if
not removed immediately, After turning the surface elements OFR use a razor blade ....
scraper or a metal spatula with a mitt and scrape the soil from the hot surface (as illus°
trated), Allow the cooktop to cool, and use the same method for heavy or burned on soils,
23

Models with Ceramic Glass Cooktop (Continued)
Do not use the following on the ceramic gJass cooktop:
, Do not use abrasive cJeanere and scouring pads, such as metal and some
nylon pads. They may scratch the cooktop, making it more difficult to clean.
, Do not use harsh cJeanere, such as cHorine bleach, ammonia or oven
cleaners, as they may etch or discolor the cooktop.
, Do not use dirty sponges, clothe or paper towels, as they can leave soil or tint
on the cooktop which can burn and cause discoloration.
SpeciaJ Caution for Aluminum Foit and Atuminum Cooking Utensils
o Atuminum foit
Use of aluminum foil will damage the cooktop, Do not use under any circum=
stances,
o AJuminum utensils
Since the melting point of aluminum is much lower than that of other metals, care must be taken when aluminum pots
or pans are used, Pans that boil dry may permanently damage cooktop by breaking, fusing to, or marking it,
Care and Cleaning of Stainless Steel (StainlessSteel models only)
Some models are equipped with stainless steel exterior parts, Special care and cleaning are required for maintaining the
appearance of stainless parts, Please refer to the table provided at the beginning of the ¢eneraJ Care & Cteaning section
in this Use & Care Guide,
}(
Ove_
Cleaning
CJeaning the Regular Oven (non seff-cNean oven, some mode_s)
Make sure the oven is cool and that all control knobs are et OFF position, Cleaning the
oven is a lot easier when the door is removed,
1, Remove the oven door; see under To Remove and Replace the Oven Door in this Owner's
Guide,
2, Empty the oven including the racks,
3, You can wash your broiler pan, grid and racks in the kitchen sink,
4, Clean oven lining thoroughly with soap and a wet cloth and wipe with a dry cloth,
To remove burned-on fat on oven walls, moisten soiled parts with household ammonia,
using a wet cloth, Follow suggested manufacturer's cleaning method, (Do not remove the
oven door when using ammonia,)
Complete cleaning with a damp cloth and use a fine steel wool scouring agent if necessary,
The lower element can be moved up for cleaning purposes,
5, Replace racks in the oven, Reinstall oven door,
24

Oven Cteaning (Continued)
C_eaning the Seff-C_ean Oven (some mode_s)
Adhere to the following cleaning precautions:
- AUUowthe oven to coo] before cUeaning,
- Wear rubber gbves when cbaning any exterior parts of the oven manually.
During the serf-dean cycb, the outside of the wall oven can become very hot to the touch. DO NOT have
small children unattended near the appliance.
The health of some birds is extremely sensitive to the fumes given off during the self-cleaning cycle of any
range, Move birds to another well ventilated room,
Before cleaning any part of the oven, be sure the electronic oven control is turned off or else push CANCEL
pad, Wait until the oven is cook
DO NOT use commercial oven cleaners or oven protective coatings in or around any art of the self-cleaning oven, DO NOT
clean the oven door gasket, The gasket on the oven door is essential for a good seal, Care should be taken not to rub, damage
or move the gasket, DO NOT cooking or foil could melt and damage the oven surface,
A self-cleaning oven cleans itself with high temperatures (well above cooking temperatures) which eliminate soil completely
or reduce it to a fin powdered ash you can which away with damp cloth,
Preparing the Oven for Self-Cleaning
1. Remove all excess spillovers in the oven cavity before starting the self-
cleaning cycle. Toclean, use hot soapy water and a cloth. Large spillovers can
cause heavy smoke or fire when subjected to high temperatures. DO NOT
allow food spills with a high sugar or acid content (such as tomatoes, sauerkraut,
Do Hand
Clean
Frame
Do Hand
Clean Door Clean Seal
fruit juices or pie filling) to remain on the surface as they may cause a dull
spot even after cleaning.
2. Clean any soil from the oven frame and the door liner (see illustration).
These areas heat sufficiently during self-cleaning cycle to burn soil on. Clean
with soap and water.
3. Remove all utensils and any foil. These items do not withstand high clean-
ing temperatures
4. Oven racks may be left in the oven or may be removed, if they go through
the clean cycle, their color will turn slightly dull. After the cycle is completed
and the oven has cooled, rub the sides of the racks with wax paper or a cloth
containing a small amount of baby oil or salad oil. This will make the racks
glide easier.
What to Expect During CJeaning
While the oven is in operation, the oven heats to temperatures much higher than those used in normal cooking. Sounds of
metal expansion and contraction are normal. Odor is also normal as the food soil is being removed. Smoke may appear
through the oven vent, located on the top of the control panel.
if heavy spillovers are not wiped up before cleaning, they may flame and cause more smoke and odor than usual, This is
normal and safe and should not cause alarm, if available, use an exhaust fan during the self-cleaning cycle,
NOTE: A smoke eliminator in the oven vent converts most of the soil into a colorless vapor,
Setting the Controts for Self-Clean Cycb
For the setting of the clean cycle, refer to Timer or Electronic Oven Control Guide.
25

°°k
Lock engaged for door removal 1,
Fig°1 2,
i__. Door
removed from the oven
Fig. 2
bver
Removing and RepJacing the Oven Door
The door isheavy, For safe, temporary storage, Uaythe door fiat with the inside
of the door facing down,
To Remove Oven Door:
Open the door to the fully opened position,
Pull up the lock located on both hinge supports and engage it in the hinge lever hooks
(Fig, 1),You may have to apply a little downward pressure on the door to pull the locks
fully over the hinge lever hooks,
3, Grab the door by the sides and pull the bottom of the door up and toward you to disen-
gage the hinge supports, Keep pulling the bottom of the door toward you while rotating
the top of the door toward the range to completely disengage the hinge levers (Fig, 2),
4, Toclean oven door, follow the instructions provided in the Genera! Care & Cteaning table,
To Reptace Oven Door:
1, Grab the door by the sides; place the hinge supports in the hinge slots, Open the door to
the fully opened position,
2, Disengage the lock from the hinge lever hooks on both sides (Fig, 3),
Note: Make sure the hinge supports are fully engaged before unlocking the hinge levers,
3, Close the oven door,
SpeciaJ Door Care instructions - Most oven doors contain glass that can break,
Read the following recommendations:
................._ 1, Do not close the oven door until all the oven racks are fully in place,
in normal position 3, Scratching, hitting, jarring or stressing the glass may weaken its structure causing an
2, Do not hit the glass with pots, pans, or any other object,
To Remove the "Hidden Bake" Cover (somemodete)
1, in order to remove the "hidden bake" cover, pull the back edge with one hand
about 1/2" inch and lift up the "hidden bake" cover with both hands, (See picture)
2, When re-installing the "hidden bake" cover, be sure to put it all the way to the
back of the oven and lay it down on the 2 shoulder screws, Then push the front
edge of the cover in its place below the front bracket,
To have easier access to the "hidden bake" cover, you can remove the oven door by
following the instructions on previous page,
IMPORTANT." Always replace the "hidden bake" cover before the next use,
Changing Oven Light
Be sure the oven is unplugged and all parts are COOL before replacing the oven light bulb, Do not turn the
oven light on during the self-cleaning cycle, High temperature wiii reduce lamp life,
On some models an interior oven light will turn on automatically when the oven door is opened,
The oven light may be turned on when the door is closed by using the oven light switch located on the control panel,
On a self clean oven the lamp is covered with a glass shield held in place by a wire holder,
THIS GLASS SHIELD MUST BE IN PLACE WHENEVER THE OVEN IS IN USE.
To replace the Hght buJb:
CAUTION: BE SURE OVEN IS COOL
1, Turn the power off at the main source,
2, Wear a bather-faced glove for protection against possible broken glass,
3, Replace bulb with a 40 watt appliance bulb only,
4, For self-cleaning oven, press wire holder to one side to release glass shield,
change bulb and be sure to replace glass shield,
26

To Remove and
Left Glide
Replace Warmer Drawer (some models}
To remove Warmer Drawer:
1, Turn poweroff before removing the warmerdraweL
2, Open the drawer to the fully opened position,
3, Locate the latches on both sides of the warmer drawer,
Pull up latch 4, Pull up on the left glide latch and push down on the right glide latch,
with finger 5, Pull the drawer away from the range,
6, Todean warmer drawer, gently scour with a soapy scouring pad, this will
remove most spots, Rinse with a 1:1 solution of dear water and ammonia,
if necessary, cover difficult spots with an ammonia-soaked paper towel for
30 to 40 minutes, Rinse with dean water and a damp cloth, Remove all
cleaners or the porcelain may become damaged during future heating, DO
NOT use spray oven cleaners on the cooktop,
To Replace Warmer Drawer:
1, Align the glide latches on both sides of the drawer with the slots on the drawer,
2, Push the drawer back into the range,
Pull down latch ........................................
with finger Fig, 1
l_i_ _ EJectricaJ Shock Hazard can occur and result
in serious injury or death, Disconnect appliance from electric
power before cleaning and sewicing the warmer drawer,
Storage Drawer with extendible glides (some models}
To remove Warmer Drawer:
1, Open the drawer to the fully opened position,
2, Locate the latches on both sides of the warmer drawer, (See Fig, 1)
3, Pull up on the left glide latch and push down on the right glide latch, (See Fig, 1)
4, Pull the drawer away from the range,
5, To clean warmer drawer, gently scour with a soapy scouring pad, this will remove most spots, Rinse with a 1:1 solution of
clear water and ammonia, If necessary, cover difficult spots with an ammonia°soaked paper towel for 30 to 40 minutes,
Rinse with clean water and a damp cloth, Remove all cleaners or the porcelain may become damaged during future
heating, DO NOT use spray oven cleaners on the cooktop,
To ReplaceWarmer Drawer:
1, Align the glide latches on both sides of the drawer with the slots on the drawer,
2, Push the drawer back into the range,
Storage Drawer (some models}
Use the storage drawer for storing cooking utensils, The drawer can de removed to
facilitate cleaning under the range, Use care when handling the drawer,
Removing and Replacing Storage Drawer
To remove the drawer:
1, Pull empty drawer out to the roller guide stop,
2, Tilt the drawer up and pull it out over the rollers,
To repJace the drawer:
1. insert the rear end of the drawer into the opening. Front
2. Fit the drawer end rollers onto the guide rails. Frame
3. Push the drawer in until it stops, then lift to allow the rollers to clear the roller guide
stop, and push in. Fig. 2
Rolter Storage
Drawer
For instructions on how to adjust the oven temperature refer to the electronic oven control guide.
27

Before you call for service, review this list, it may save you time and expense, The list includes common occurrences that
are not the result of defective workmanship or materials in this appliance, You will be charged for a service call while the
appliance is in warranty if the problem is not caused by defective product workmanship or materials,
Your new appliance is a carefully engineered product, Many times, what appears to be a reason to call for service requires
nothing more than a simple adjustment you can easily make in your own home or is normal operating characteristic of
appliance under certain conditions,
This list is applicable to a variety of models; some of the items will not necessarily apply to your appliance,
OCCURRENCE POSSIBLE CAUSE"SOLUTION
Range is not level,
Cannot move appliance easily,
Appliance must be accessible
for service,
Entire range or oven does not
operate,
Oven control beeps and
displays an F error code,
Oven light does not work,
Surface unit does not heat,
Surface units too hot or not hot
enough.
Drip bowls are pitting or
rusting,
distorted out of shape,
Scratches or abrasions on
cooktop sutrace,
(1) Poor installation, Place oven rack in center of oven, Place a level on the oven rack,
Adjust leveling legs at base of range until the rack is level, When range is level, cooktop
may appear out of alignment if countertop is not level, (2)Weak, unstable floor, Be sure
floor is level and can adequately support range, Contact a carpenter to correct sagging or
sloping floor, (3)Kitchen cabinet misalignment may make range appear to be unlevel, Be
sure cabinets are square and have sufficient room for range clearance,
(1) Cabinets not square or are built in too tight, Contact a cabinet maker to correct the
problem, (2) Contact builder or installer to make appliance accessible, (3) Carpeting
interferes with range, Provide sufficient space so range can be lifted over carpet,
(1) Make sure cord/plug is tightly into outlet, (2) Service wiring is not complete, (3) Power
outage, Check house lights to be sure, Call your local electric company for service,
(1) This oven is equipped with a state of the art electronic oven controller, Among the many
features is a fuji time oven circuit diagnostics system, The controller
constantly monitors the internal circuitry as well as several crucial oven circuits to insure
they are all operating correctly, if at any time one of these systems fails, the controller will
immediately stop the current operation and beep continuously (flashing an F error code in
the controller display window), (2) Electronic control has detected a fault condition, Press
STOP/CLEAR to clear the display and stop the beeping, Reprogram oven, if fault remains,
record fault number, Press STOP/CLEAR and contact authorized servicer,
(1) Replace or tighten bulb, See Changing Oven Light in this owner's Guide for instructions,
(1) No power to the appliance, Check steps under "Entire Range or Oven Does Not Oper-
ate" in this Before you Call checklist, (2) incorrect control setting, Make sure the correct
control is on for the surface unit to be used,
(1) incorrect control setting, Make sure the correct control is on for the surface unit to be
used, (2) Lightweight or warped pans used, Use only fiat, evenly balanced, medium or
heavyweight cookware, Fiat pans heat better than warped pans, Cookware materials and
weight of the material affect heating, Heavy-and medium- weight pans heat evenly, Be-
cause lightweight pans heat unevenly, foods may burn easily,
(1) Foods with acids, such as tomatoes, if allowed to stand in/on bowls will cause corrosion,
Remove and wash drip bowls as soon as possible after spillover, (2) Normal environment,
Houses along sea coast are exposed to salt air, Protect bowls as much as possible from
direct exposure to salt air,
(1) Bottom surface of cookware extends beyond surface elements and touches cooktop
surface, This can cause high enough temperatures to discolor the drip bowls, DO NOT use
cookware of this type, Pan sizes should be matched to the size of the element, Replacement
drip bowls may be purchased from your dealer,
(1) Coarse particles such as salt or sand between cooktop and utensils can cause scratches,
Be sure cooktop surface and bottoms of utensils are clean before usage, Small scratches do
not affect cooking and will become less visible with time, (2) Cleaning materials not recom-
mended for ceramic-glass cooktop have been used, See "Cooktop Cleaning - Ceramic Glass
Cooktop Models" section under General Cleaning, (3) Cookware with rough bottom has been
used, Use smooth, fiat-bottomed cookware,
28

OCCURRENCE POSSmBLECAUSE/SOLUTmON
Metalmarks,
Brownstreaksorspecks,
Areasofdiscolorationwith
metallicsheen,
Poorbakingresults,
operation,
Flamesinsideovenorsmok-
ingfromvent,
Ovensmokesexcessively
duringbroiling,
Self-cleaningcycledoesnot
work,
Soilnotcompletelyremoved
afterself-cleaningcycle,
(1}Slidingorscrapingofmetalutensilsoncooktopsurface,Donotslidemetalutensilson
cooktopsurface,Useaceramic-glasscooktopcleaningcreamtoremovethemarks,"Cooktop
Cleaning-CeramicGlassCooktopModels"sectionunderGeneralCleaning,
(1}Boiloversarecookedontosurface,Userazorbladescrapertoremovesoil,"Cooktop
Cleaning - Ceramic Glass Cooktop Models" section under General Cleaning,
(1} Mineral deposits from water and food, Remove using a ceramic-glass cooktop cleaning
cream, Use cookware with clean, dry bottoms,
(1} Many factors affect baking results, Make sure the proper rack position is used, Center
food inthe oven and space pans to allow air to circulate, Allow the oven to preheat to the set
temperature before placing food in the oven, Try adjusting the recipe's recommended tem-
perature or baking time, if you feel the oven is too hot or cool, see "Adjusting Oven Tem-
perature" in the Electronic Oven Control guide,
(1} A cooling fan may automatically turn on and off to cool internal parts, it is normal, and the
fan may continue to run even after oven is turned off,
(1} Excessive spillovers in oven, Set self-clean cycle for a longer cleaning time, (2} Exces-
sive spillovers in oven, This is normal, especially for pie spillovers or large amounts of grease
on the oven bottom, Wipe up excessive spillovers before starting the self-clean cycle, if
flames or excessive smoke are present, stop the self-clean cycle and follow the steps under
"Stopping or interrupting the Self-Cleaning Cycle" in the Electronic Oven Control guide,
(1} Make sure oven is opened to BroiJ Stop Position. (2} Meat too close to the element,
Reposition the rack to provide proper clearance between the meat and the element, Preheat
broil element, Preheat broil element for searing, (3} Grid on broiler pan wrong side up and
grease not draining, Always place grid on your broiler pan with ribs up and slots down to allow
grease to drip into pan, (4} Grease has built up on oven surfaces, Regular cleaning is neces-
sary when broiling frequently, Old grease or food spatters cause excessive smoking,
(1} Self-cleaning cycle was interrupted, Follow steps under"Stopping or interrupting the Self-
Cleaning Cycle" in the Electronic Oven Control Guide, (2} Control(s) not set properly, Follow
instructions under"Oven Cleaning" in the Electronic Oven Control Guide,
(1} Failure to clean bottom, front, top or oven, frame or door area outside oven seal, These
areas are not in the self-cleaning area, but get hot enough to burn on residue, Clean these
areas before the self-cleaning cycle is started, Burned-on residue can be cleaned with a stiff
nylon brush and water or nylon scrubber, Be careful not to damage the oven seal,
Avoid Transportation Damage to your Range
if you have to move your range into/out of your residence or when moving to a new home, it is suggested that you take the
following precautions:
1, Screw in the levelling legs under the range,
2, Remove the racks and other utensils from the oven, and from the lower drawer,
8, Use adhesive tape to firmly secure the door and the drawer to the side panels, Also attach the electric power cord in the
same manner,
4, Use a two-wheeled trolley with strap and fasten the range to it, Cover the appliance with a heavy blanket to prevent
scratches and dents,
5, Avoid pulling or pushing the control panel when moving the appliance,
29

Your appliance is covered by a one year limited warranty. For one year from your original date of
purchase, Electrolux will pay all costs for repairing or replacing any parts of this appliance that prove to be
defective in materials or workmanship when such appliance is installed, used and maintained in
accordance with the provided instructions.
Exclusions
This warranty does not cover the following:
1. Products with original serial numbers that have been removed, altered or cannot be readily determined.
2. Product that has been transferred from its original owner to another party or removed outside the USA or
Canada.
3. Rust on the interior or exterior of the unit.
4. Products purchased "as-is" are not covered by this warranty.
5. Food loss due to any refrigerator or freezer failures.
6. Products used in a commercial setting.
7. Service calls which do not involve malfunction or defects in materials or workmanship, or for appliances
not in ordinary household use or used other than in accordance with the provided instructions.
8. Service calls to correct the installation of your appliance or to instruct you how to use your appliance.
9. Expenses for making the appliance accessible for servicing, such as removal of trim, cupboards,
shelves, etc., which are not a part of the appliance when it is shipped from the factory.
10. Service calls to repair or replace appliance light bulbs, air filters, water filters, other consumables, or
knobs, handles, or other cosmetic parts.
11. Surcharges including, but not limited to, any after hour, weekend, or holiday service calls, tolls, ferry trip
charges, or mileage expense for service calls to remote areas, including the state of Alaska.
12. Damages to the finish of appliance or home incurred during installation, including but not limited to
floors, cabinets, walls, etc.
13. Damages caused by: services performed by unauthorized service companies; use of parts other than
genuine Electrolux parts or parts obtained from persons other than authorized service companies; or
external causes such as abuse, misuse, inadequate power supply, accidents, fires, or acts of God.
DISCLAIMER OF IMPLIED WARRANTIES; LIMITATION OF REMEDIES
CUSTOMER'S SOLE AND EXCLUSIVE REMEDY UNDER THIS LIMITED WARRANTY SHALL BE PRODUCT
REPAIR OR REPLACEMENTAS PROVIDED HEREIN. CLAIMS BASED ON IMPLIED WARRANTIES,
INCLUDING WARRANTIES OF MERCHANTABILITY OR FITNESS FOR A PARTICULAR PURPOSE, ARE
LIMITED TO ONE YEAR OR THE SHORTEST PERIOD ALLOWED BY LAW, BUT NOT LESS THAN ONE
YEAR. ELECTROLUX SHALL NOT BE LIABLE FOR CONSEQUENTIAL OR INCIDENTAL DAMAGES SUCH
AS PROPERTY DAMAGE AND INCIDENTAL EXPENSES RESULTING FROM ANY BREACH OF THIS
WRITTEN LIMITED WARRANTY OR ANY IMPLIED WARRANTY. SOME STATES AND PROVINCES DO NOT
ALLOW THE EXCLUSION OR LIMITATION OF INCIDENTAL OR CONSEQUENTIAL DAMAGES, OR
LIMITATIONS ON THE DURATION OF IMPLIED WARRANTIES, SO THESE LIMITATIONS OR EXCLUSIONS
MAY NOT APPLY TO YOU. THIS WRITTEN WARRANTY GIVES YOU SPECIFIC LEGAL RIGHTS. YOU MAY
ALSO HAVE OTHER RIGHTS THAT VARY FROM STATE TO STATE.
tf You Need Keep your receipt, delivery slip, or some other appropriate payment record to establish the warranty period
Service should service be required. If service is performed, it is in your best interest to obtain and keep all receipts.
Service under this warranty must be obtained by contacting Electrolux at the addresses or phone
numbers below.
This warranty only applies in the USA and Canada. In the USA, your appliance is warranted by Electrolux Major Appliances
North America, a division of Electrolux Home Products, Inc. In Canada, your appliance is warranted by Electrolux Canada Corp.
Electrolux authorizes no person to change or add to any obligations under this warranty. Obligations for service and parts under
this warranty must be performed by Electrolux or an authorized service company. Product features or specifications as
described or illustrated are subject to change without notice.
USA
1.800.944.9044
Electrolux Major Appliances
North America
P.O. Box 212378
Augusta, GA 30907
Electro,u×
Electrolux Canada Corp.
5855 Terry Fox Way
Mississauga, Ontario, Canada
Canada
1.800.668.4606
LSV 3E4
 Loading...