

Page 1

Electric
Visit the Frigidaire Web Site at:
http://www, frigidaire,com
CONTENTS Page
Product Registration 2
In_aortant Safety Instructions 3-4
Installation nstructions 5-6
Oven L gnt 6
Surface _ ght ..................................................................6
Circuit Protection ............................................................ 7
Indicator Light................................................................ 7
Models with Touch PadControl...................................... 7
Selecting SurfaceCooking Utensils ................................ 7
Setting Surface Controls (modelswithout ESEC)...........7
Specialty Pans& Trivets.................................................. 8
Canning Tips & Information ........................................... 8
OvenBaking.................................................................... 9
Air Circulation ..................................................................9
Convection Cooking...................................................... 10
Convection Roasting ....................................................10
SpeedBakeCooking System (somemodels) ................11
Broiling ..........................................................................12
Oven Settings................................................................ 12
CeramicGlass Cooktop - heatingunits (without ESEC)13
CeramicGlassCooktop - ESECcontrols ................. 14-17
CeramicGlassCooktop -useand care.................... 18-19
Setting Warm Zone Control .......................................... 20
Cleaningthe appliance............................................ 21-24
ToRemove/Replacethe Oven Door .............................. 24
RemovableOuter Door Glass Panel..............................25
ToRemove/ReplaceStorageDrawer .............................25
Warmer Drawer (some models)............................... 26-27
Avoid ServiceChecklist ........................................... 28-31
Warranty........................................................................32
READ AND SAVE THESE INSTRUCTIONS 318200427 (0211) Rev. A
Page 2
Product Registration
Register Your Product
The self-addressed PRODUCT
REGISTRATION CARD should be filled in
completely, signed and returned to
Electrolux Home Products North America.
Thankyou for choosing this appliance. The information contained within this
Owner's Guide will instruct you on how to properly operate and care for your
range. Pleaseread through the information contained in your literature pack to
learn more about your new appliance.
Record Your Model and Serial Numbers
Record in the spaceprovided belowthe model and serial numbers. The numbers
are found on theserial plate located at the right of the range frame and arevisible
when the drawer isopen.
Model Number:
Serial Number:
Date of Purchase:
This Owner's Guide contains general operating instructions for your range and
feature information for several models. Your range may not have all the
described features. The graphics shown are representational. The graphics on
your range may not look exactly like those shown.
Note: The instructions appearing inthis Owner's Guide are not meant to cover
every possible condition and situation that may occur. Common sense and
caution must be practiced when installing, operating and maintaining any
appliance.
Important: Keep acopy of your bill of sale.
The date on the bill establishes the warranty period service berequired. Place it
where it can be easily retrieved. If service is performed while the appliance is
under warranty, you may have to show your bill of sale.
(_; 2001 ElectroluxCanada Corp.
All rights reserved
2
Page 3

IMPORTANT SAFETY INSTRUCTIONS
Read all instructions before using this appliance.
Save these instructions for future reference.
This guide contains important safety symbols and instructions. Please pay special attention to these symbols and follow all
instructions given. Here isa brief explanation of these symbols.
This symbol will help you to situations that may cause serious bodily harm, death or property damage.
This symbol will help you to situations that may cause bodily injury or property damage.
• Remove all tape and packaging wrap before using the range.
Destroy the carton and plastic bags after unpacking the
range. Never allow children to play with packaging material.
• Proper Installation--Be sure your appliance is properly in-
stalled and grounded by a qualified technician in accordance
with CSA C22.1 PART 1 -- latest edition and local code
requirements. Install only per installation instructions provided
in the literature package for this range.
Ask your dealer to recommend a qualified technician and an
authorized repair service. Know how to disconnect the electrical
power to the range at the circuit breaker or fuse box in case of an
emergency.
• User Servicing -- Do not repair or replace any part of the
appliance unless specifically recommended in the manuals.
All other servicing should be done only by a qualified technician
to reduce the risk of personal injury and damage to the range.
• Never modify or alter the construction of a range by remov-
ing panels, wire covers or any other part of the product.
Stepping, leaning or sitting on the door or
drawer of this range can result in serious injuries and may also
cause damage to the range. Do not allow children to climb or play
around the range. The weight of a child on an open door may cause
the range to tip, resulting in serious burns or other injury.
_Do not use the oven for storage.
DO NOT TOUCH SURFACE UNITS, AREAS NEAR THESE
UNITS, OVEN HEATING ELEMENTS OR INTERIOR SURFACES
OF THE OVEN. Both surface units and oven heating elements
may be hot even though they are dark in color. Areas near surface
units may become hot enough to cause burns. During and after
use, do not touch, or let clothing or other flammable materials
touch these areas until they have had sufficient time to cool.
Among these areas are the cooktop, surfaces facing the cooktop,
the oven vent openings arrd surfaces near these openings, oven
door and window.
• Wear Proper Apparel -- Loose-fitting or hanging garments
should never be worn while using the appliance. Do not let
clothing or other flammable materials contact hot surfaces.
Never use your appliance for warming or
heating the room.
• Do Not Use Water or Flour on Grease Fires--Smother the
fire with a pan lid, or use baking soda, a dry chemical or
foam-type extinguisher.
• When heating fat or grease, watch it closely. Fat or grease may
catch fire if allowed to become too hot.
Use Only Dry Potholders -- Moist or damp potholders on hot
surfaces may result in burns from steam. Do not let the
potholders touch hot heating surface units or interior oven
elements. Do not use a towel or other bulky cloth instead of a
potholder.
• Storage in or on Appliance -- Flammable materials should
not be stored in an oven, near surface units or in the storage
drawer. This includes paper, plastic and cloth items, such as
cookbooks, plasticware arrd towels, as well as flammable liquids.
Do not store explosives, such as aerosol cans, on or near the
range. Flammable materials may explode and result in fire or
property damage.
_Do not store items of interest to children in the
cabinets above a range or on the backguard of a range.
Children climbing on the range to reach items could be seriously
injured.
• Do not leave children alone. Children should not be left alone
or unattended in the area where an appliance is in use. They
should never be allowed to sit or stand on any part of the
appliance.
• Do Not Heat Unopened Food Containers--Build-up of pres-
sure may cause the container to burst and result in injury.
• Remove the oven door from any unused range if it is to be
stored or discarded.
IMPORTANT--Do not attempt to operate the oven during a
power failure. If the power fails, always turn the oven off. If
the oven is not turned off arrd the power resumes, the oven will
begin to operate again. Food leR unattended could catch fire or
spoil.
_ Electronic controllers can be damaged by cold
temperatures. When you use your range for the first time, or if
it has not been used for a long period of time, make sure that it
has been exposed to a temperature above 0°C/32°F for at
least 3 hours before connecting it to the power supply.
Page 4
IMPORTANT SAFETY INSTRUCTIONS continued
IMPORTANT INSTRUCTIONS FOR USING
YOUR COOKTOP
• Know which knob controls each surface heating unit.
• Use Proper Pan Size i This applianceisequipped with one or
more surface units of differentsizes.Selectutensilshaving flat
bottoms large enough to cover the surface unit. The use of
undersized utensilswillexpose a portion of the surface heating
unitto directcontactand may resultinignitionof clothing.Proper
relationshipof utensilto the surface unit will also improve
efficiency.
• Utensil Handles Should Be Turned Inward and Should Not
Extend Over Adjacent Surface Units -- To reduce the risk of
burns, ignition of flammable materials, and spillage due to
unintentional contact with the utensil.
• Never Leave Surface Units Unattended -- Boilovers cause
smoking and greasy spillovers that may ignite, or a pan that has
boiled dry may melt.
• Protective Liners -- Do not use aluminum foil to line oven
bottom or any other part of the range. Only use aluminum foil as
recommended for baking if used as a cover placed on the food.
Any other use of protective liners or aluminum foil may result in a
risk of electric shock or fire or a short circuit.
• Glazed Cooking Utensils -- Only certain types of glass, glass/
ceramic, ceramic, earthenware, or other glazed utensils are suit-
able for rangetop service without breaking due to the sudden
change in temperature. Check the manufacturer's recommenda-
tions for rangetop use.
FOR GLASS COOKTOPS ONLY
• Do Not Cook on Broken Cooktop -- If cooktop should break,
cleaning solutions and spillovers may penetrate the broken
cooktop and create a risk of electric shock. Contact a qualified
technician immediately.
• Clean Cooktop with Caution -- If a wet sponge or cloth is used
to wipe spills on a hot cooking area, be careful to avoid a steam
burn. Some cleaners can produce harmful fumes if applied to a
hot surface.
• Keep Oven Vent Ducts Unobstructed. The oven is vented
between the cooktop and the backguard. Touching the surfaces
in this area when the oven is operating may cause severe burns.
Also, do not place plastic or heat-sensitive items on or near the
oven vent. These items could melt or ignite.
• Placement of Oven Racks. Always place oven racks in desired
location while oven is cool. Remove all utensils from the rack
before removing rack. If rack must be moved while oven is hot, use
extreme caution. Use potholders and grasp the rack with both
hands to reposition. Do not let potholders contact the hot oven
element or interior of the oven.
• Do not use the broiler pan without its insert. The broiler pan
and grid allow dripping fat to drain and be kept away from the
high heat of the broiler.
• Do not cover the broiler grid with aluminum foil. Exposed fat
and grease could ignite.
• Do not touch a hot light bulb with a damp cloth. Doing so
could cause the bulb to break. Disconnect the range or turn off
the power to the range before removing and replacing light bulb.
IMPORTANT INSTRUCTIONS FOR
CLEANING YOUR RANGE
• Clean the range regularly to keep all parts free of grease
that could catch fire. Exhaust fan ventilation hoods and grease
filters should be kept (;lean Do not allow grease to accumulate
Greasy deposits in the fan could catr:h fire. Refer to the hood
manufacturer's instructions for cleaning.
• Cleaners/Aerosols-- Alwaysfollow the manufacturer's recom-
mended directions for use. Be aware that excess residue from
cleaners and aerosols may ignite causing damage and/or injury.
SELF-CLEANING OVENS:
• Clean in the self-cleaning cycle only the parts of the oven
listed in this owner's guide. Before self-cleaning the oven,
remove the broiler pan and any utensils stored in the oven.
• Do not clean the oven door gasket. Care should be taken not to
rub, damage or move the gasket.
IMPORTANT INSTRUCTIONS FOR USING YOUR
OVEN
• Use Care When Opening Door -- Stand to the side of the range
when opening the door of a hot oven. Let hot air or steam escape
before you remove or replace food in the oven.
SAVE THESE INSTRUCTIONS
• Do not use oven cleaners. No oven cleaner or oven liner
protective coating of any kind should be used in or around any
part of the oven.
• Remove oven racks. Oven racks colour will change if left in the
oven during a self-cleaning cycle.
_:_ The health of some birds is extremely sensitive
to the fumes given off during the self-clean cycle of any range.
Move birds to another well ventilated room.
Page 5
Installation Instructions
Installation and service must be performed by a qualified technician.
IMPORTANT: Save for the local electrical inspector's use.
Read and save these instructions for future reference.
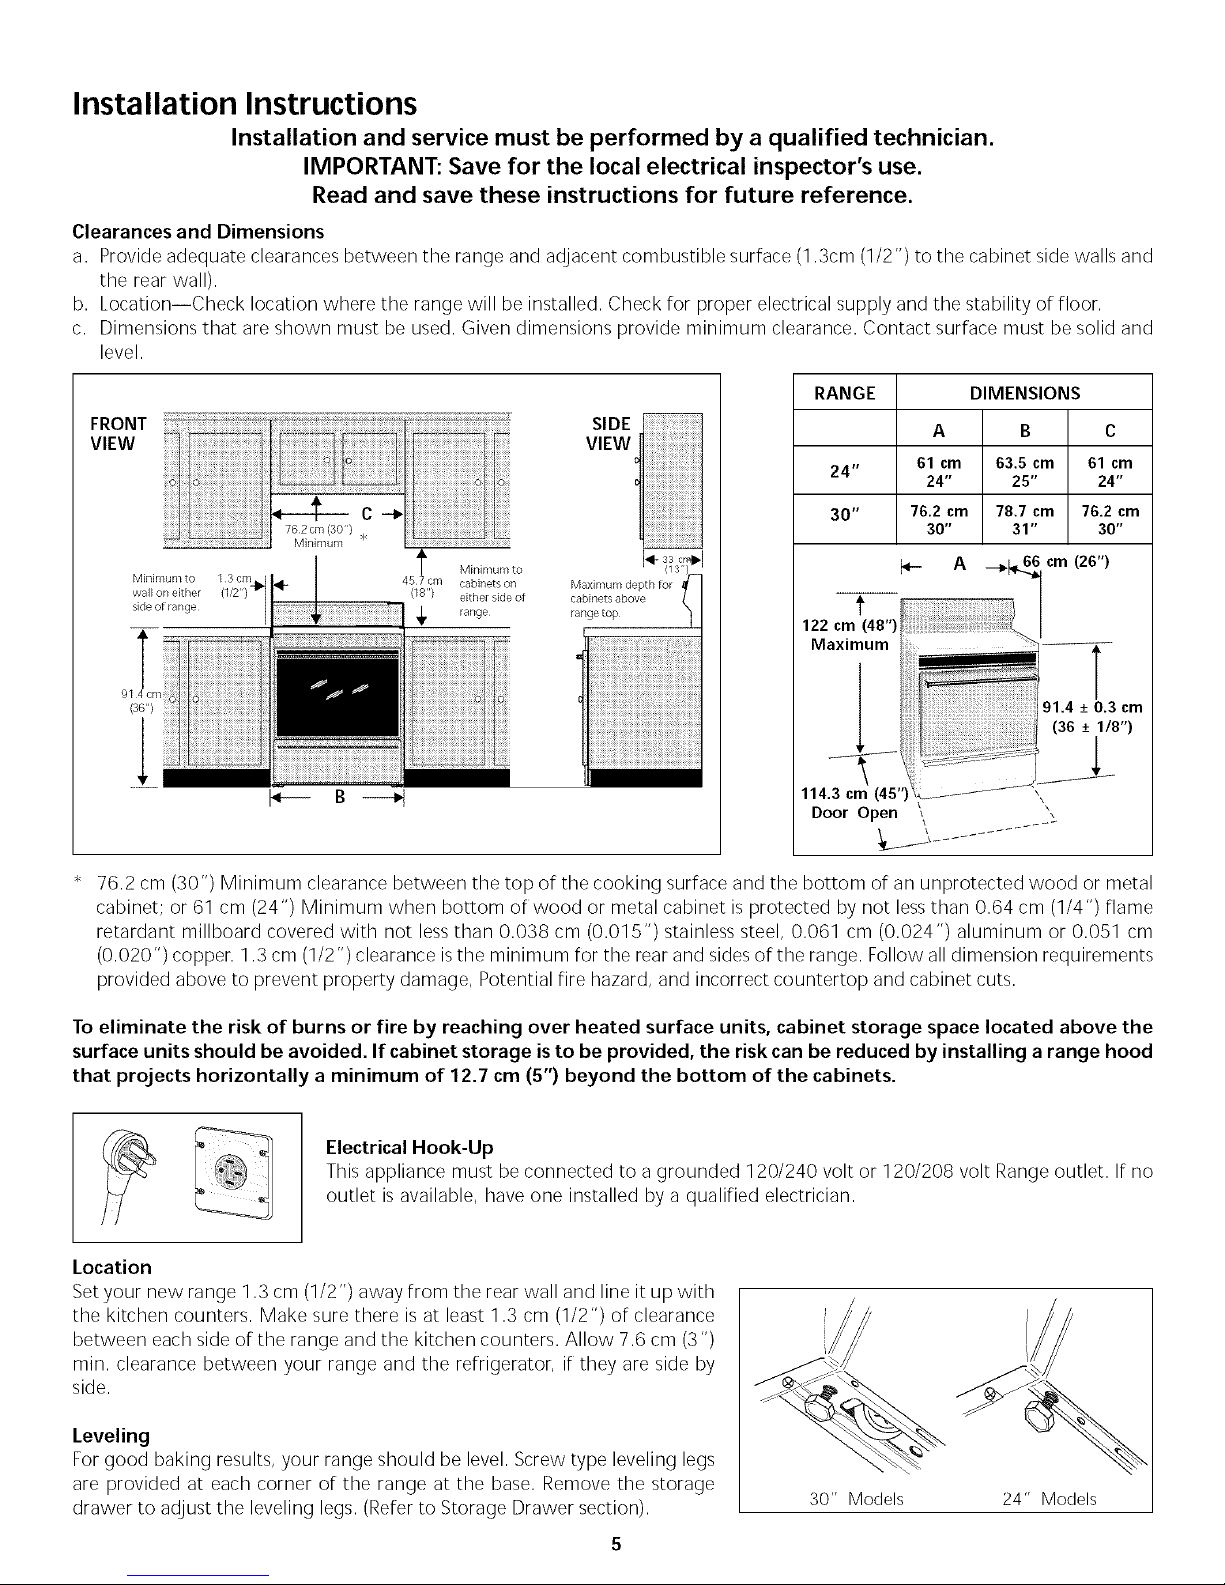
Clearances and Dimensions
a. Provide adequate clearances between the range and adjacent combustible surface (1.3cm (1/2") to the cabinet side walls and
the rear wall).
b. Location--Check location where the range will be installed. Check for proper electrical supply and the stability of floor.
c. Dimensions that are shown must be used. Given dimensions provide minimum clearance. Contact surface must be solid and
level.
RANGE DIMENSIONS
FRONT ;::::: SIDE
VIEW VIEW
24"
30"
A
61 cm
24"
76.2 cm
30"
B C
63.5 cm 61 cm
25" 24"
78.7 cm 76.2 cm
31" 30"
Minimum to 13cm
walE on either (18") either side of
side of range /
range
_- A
range top
___ cm (26")
(36 + 1/8")
L
76.2 cm (30") Minimum clearance between the top of the cooking surface and the bottom of an unprotected wood or metal
cabinet; or 61 cm (24") Minimum when bottom of wood or metal cabinet is protected by not lessthan 0.64 cm (1/4") flame
retardant millboard covered with not lessthan 0.038 cm (0.015") stainless steel, 0.061 cm (0.024") aluminum or 0.051 cm
(0.020") copper. 1.3 cm (1/2") clearance is the minimum for the rear and sides of the range. Follow all dimension requirements
provided above to prevent property damage, Potential fire hazard, and incorrect countertop and cabinet cuts.
To eliminate the risk of burns or fire by reaching over heated surface units, cabinet storage space located above the
surface units should be avoided. If cabinet storage isto be provided, the risk can be reduced by installing a range hood
that projects horizontally a minimum of 12.7 cm (5") beyond the bottom of the cabinets.
Electrical Hook-Up
This appliance must be connected to a grounded 120/240 volt or 120/208 volt Range outlet. If no
outlet is available, have one installed by a qualified electrician.
location
Setyour new range 1.3 cm (1/2") away from the rear wall and line it up with
the kitchen counters. Make sure there is at least 1.3 cm (1/2") of clearance
between each side of the range and the kitchen counters. Allow 7.6 cm (3")
min. clearance between your range and the refrigerator, if they are side by
side.
Leveling
For good baking results, your range should be level. Screw type leveling legs
are provided at each corner of the range at the base. Remove the storage
drawer to adjust the leveling legs. (Refer to Storage Drawer section).
30" Models 24" Models
Page 6

Installation Instructions (continued)
To level the range:
1. Usea 1-1/4" open end key or an adjustable wrench to equally unscrew the four leveling legs
two to three turns each.
2. Install an oven rack in the center of the oven.
3. Move the range to its final position, then put a spirit levelon the rack to check for levelness.
Take two readings, one with the level placed diagonally first in one direction, and then the
othen
4. Usethe 1-1/4" key or wrench to adjust the leveling legs. Turn each one until the range stands
firm without wobbling.
5. Some models are supported by smooth glide rollers to facilitate moving.
UNLOCK
LOCK
LOCKING THE FRONT ROLLERS
(some of the 30" models only)
If floor is flat and level, open the drawer and lower the front roller locking levers (some
models) to prevent the range from moving.
If floor isnot flat or level or if this model has rollers without locking levers, usethe 4 leveling
legsto level, support and prevent the range from moving.
Oven Light
Do not turn the oven light on during the self-cleaning cycle. High
temperature will reduce lamp life.
On some models an interior oven light will turn on automatically when the oven door isopened.
The oven light may be turned on when the door isclosed by using the oven light switch located on
or underneath the control panel.
On a self clean oven the lamp iscovered with a glass shield held in place by a wire holder.
THIS GLASSSHIELD MUST BE IN PLACEWHENEVER THE OVEN IS IN USE.
To replace the light bulb:
BE SUREOVEN IS COOL.
1. Turn the power off at the main source.
2. Wear a leather-faced glove for protection against possible broken glass.
3. Replace bulb with a 40 watt appliance bulb only.
4. Forself-cleaning oven, presswire holder to one side to release glass shield, change bulb and be sure to replace glass shield.
Surface Light
(some models)
elements are cool.
Be sure all surface element control knobs are turned off "O" and
Use switch located on or underneath the control panel to turn the surface light ON/OFF.
Replace the surface light, if after repeated attempts to turn it on you are not successful.
30" RANGE SURFACELIGHT REPLACEMENT (some models)
To remove and replace the fluorescent light:
1. Placeyour fingers under the tube at approximately 20.3 cm (8") from each end.
2. Toremove, turn the tube 90° then pull it down and out of its sockets.
3. To replace the tube, engage the new tube into the sockets, then rotate and snap the tube in
30" Models
place. Turn on the surface light to make sure it will lit.
24" RANGE SURFACE LIGHT REPLACEMENT(Some models)
To remove and replace the fluorescent light:
1. Lift up the control panel cover.
2. Placeyour fingers on the tube at approximately 20.3 cm (8") from each end.
3. Toremove, turn the tube 90° then pull it out of its sockets.
4. Toreplace the tube, engage the new tube into the sockets, then rotate and snap the tube in
place light to make it sure it will lit.
24" Models
Page 7

Circuit Protection
As a protection against surcharge, a 15amp, 12(9volt fuse is provided for each of the electric outlet(s) (2 max.) located on top of
the control panel. Toaccessthe fuse(s) raise the control panel cover. Models with no electric outlet have no fuse.
Indicator Light
Some models have an indicator light for each heating unit, other models have an indicator light for each pair of heating units. Some
models have indicator lights only with the warmer zone and warmer drawer.
The indicator light glows assoon as a heating unit is turned on. Check if the indicator light glows when the control knob of the
individual heating unit isturned on. If the knob isset to a verylow temperature setting, the indicator may glow and yet, the heating
unit may not be heating at all. If this happens, turn the knob to a higher setting until the heating unit comes on.
When cooking isfinished, a glance at the indicator lights is an easycheck to be sure allthe control knobs have been turned to OFF.
Models with Touch Pad Control (only)
NOTE: When the oven is in a baking, convection baking, broiling or self-cleaning operation, a cooling fan may automatically
turn on and off to cool internal parts. It is normal and the fan may continue to run even after oven isturned off.
Selecting Surface Cooking Utensils
For best results and energy conservation, choose cooking utensils that have these characteristics:
*GOOD
W
POOR
• Curved and warped pan bottoms.
w
¸ ii!i!i!ii!!i!iiii!
t t
• Flat bottom and straight sides.
• Tight fitting lids.
Pans should have flat bottoms that make
good contact with the entire surface ele-
ment. Check for flatness by rotating a ruler
across the bottom. There should be no
gaps between the pan and ruler.
Note: Always use a utensil for its intended
purpose. Follow manufacturer's instruc-
tions. Some utensils were not made to be
used in the oven or on the cooktop.
Setting Surface Controls (somemodels)
1. Placethe pan on the surface element.
2. Pushin and turn the surface element control knob to desired setting.
3. Thesurface signal light will glow when one or more elements are turned on.
Always turn the element off before removing the pan.
The suggested settings found inthe chart below are based on cooking inmedium-
weight aluminum pans with lids. Settings may vary when using other types of pans.
Setting Type of Cooking
MAX Start most foods, bring water to a boil, pan broiling.
• Weight of handle doesnot tilt pan. Pan
iswell balanced.
• Pansizesmatchthe amount of food to
be prepared and the sizeof the surface
element.
• Made of materialthat conducts heat
well.
• Easyto clean.
Specialty pans such as lobster pots, griddles
and pressure cookers may be used but must
conform to the above recommended cook-
ware requirements.
• Pan overhangs unit by more than 2.5
cm (1 ").
• Heavy handle tilts pan.
• Pan is smaller than element.
OFF
LO
HI
1
2
3
4
8
7
6
5
MEDIUM Maintain a slow boil, thicken sauces and gravies,
steam vegetables.
MEDIUM LOW Keep foods cooking, poach, stew.
MIN Keep warm, melt, simmer.
Note: The size and type of utensil
used, and the amount and type of
food being cooked will influence the
setting needed for best cooking re-
Page 8

Specialty Pans & Trivets
Wokswith flat bottoms suitable for
use on your cooktop are available in
most cookshop or hardware stores.
Round-bottomed woks (with a sup-
port ring that does not extend be-
yond the heating element) may also
be used. The metal ring was de-
signed to support the wok safely
when it isfilled with large amounts
of liquids (soup making) or fat (fry-
ing).
DO NOT usetwo
elements (if the cooktop is not
equipped with bridge element) to
heat one large pan such asa roaster
or griddle, or allow cooking utensils
to boil dry. The bottom surface of
the pan in either of these situations
could cause discoloring or crazing of
the porcelain enamel range surface,
and damage to the surface elements
and/or damage to the drip pans (if
equipped).
DO NOT usea wok if it isequipped with
a metal ring that extends beyond the
surface element. Because this ring traps
heat, the surface element and cooktop
surface could be damaged.
For glass smoothtop models, only flat
bottomed woks (without support rings)
may be used.
Canning Tips & Infor-
mation
Canning can generate
large amounts of steam. Use extreme
caution to prevent burns. Always raise
the lid to vent steam away from you.
(i:,
Wire trivets: Do not usewire triv-
ets. Cookware bottoms must be in
direct contact with the surface ele-
ments.
1. Use tested recipes and follow instructions carefully. Check with your local
Cooperative Agricultural ExtensionService or a manufacturer of glassjars for the
latest canning information.
2. Use flat-bottomed canners only. Heat is spread more evenly when the bottom
surface is flat.
3. Center canner on the surface element.
4. Start with hot water and a high heat setting to reduce the time it takes to bring
the water to a boil; then reduce the heat setting as low as possible to maintain a
constant boil.
5. It isbest to can small amounts and light loads.
Prevent damage to cooktop:
1. Do not use water bath or pressure canners that extend more than one inch
beyond the edge of the surface element.
2. Do not leave water bath or pressure canners on high heat for an extended
amount of time.
3. Alternate surface elements between each batch to allow the units and
surrounding surfaces to cool down. Tryto avoid canning on the same element all
day.
Safecanning requires that harmful micro-organisms are destroyed
and the jars are sealed completely. When canning in a water bath canner, a gentle
but steady boil must be maintained continuously for the required time.
Page 9

Oven Baking
For best cooking results, heat the oven before baking cookies, breads, cakes, piesor pastries, etc There isno need to preheat the
oven for roasting meat or baking casseroles
The cooking times and temperatures needed to bake a product may vary slightly from your previously owned appliance.
Baking Problems and Solutions Chart
Baking Causes Corrections
Problems
Cookies and biscuits
burn on the bottom.
Cakes too dark on
top or bottom.
Cakes not done in the
center.
Cakes not level.
Foods not done when
cooking time isup.
Cookies and biscuits put into the
oven before the preheating time is
completed.
Oven rack overcrowded.
Dark pan absorbs heat to() fast.
Cakes put into the oven before pre-
heating time is completed.
Rack position to() high or low.
Oven too hot.
Oven too hot.
Incorrect pan size.
Pan not centered in oven.
Range not level.
Pan to() close to oven wall or rack
overcrowded.
Pan warped.
Oven too cool.
Oven overcrowded.
Oven door opened to() frequently.
• Allow oven to preheat to the selected temperature before
placing food in oven.
Choose pan sizes that will permit 5.1 cm to 10.2 cm (2" to 4")
of air space on all sides when placed in the oven.
Use a medium-weight aluminum baking sheet.
• Allow oven to preheat to the selected temperature before
placing food in the oven.
Use proper rack position for baking needs.
• Set oven temperature 25°F/12°C lower than recommended.
Set oven temperature 25°F/12°C lower than recommended.
Use pan size suggested in recipe.
Use proper rack position and place pan so there is 5.1 cm to
10.2 cm (2" to 4") of space on all sides of pan.
Place a marked glass measuring cup filled with water on the
center of the oven rack. If the water level is uneven, refer to
the installation instructions for leveling the range.
Be sure to allow 5.1 cm to 10.2 cm (2" to 4") of clearance on
all sides of each pan in the oven.
Do not use pans that are dented or warped.
• Set oven temperature 25°F/12°C higher than suggested and
bake for the recommended time.
Be sure to remove all pans from the oven except the ones to
be used for baking.
• Open oven door only after shortest recommended baking
time.
Air Circulation in the Oven
Forgood air circulation in the oven and best baking results, center pans as much aspossible. Allow 5.1 to 10.2 cm (2" to 4") around
the utensil(s) for proper air circulation and be sure pans do not touch each other, the door, sides or back of oven. The hot air must
circulate around the pans for even heat to reach all parts of the oven.
If using multiple pans, stagger asshown.
If using one pan, place in center of oven.
Page 10
Convection Cooking (some models)
NOTE: The convection fan automatically turns off when the oven door is opened while oven is in a convection
mode and resumes when the door is closed again.
The convection oven uses a fan located in the rear wall of the oven to circulate heated air around the food to be cooked. The
controlled air flow pattern quickly sealsthe food surface retaining the naturaljuices and flavour. This method of cooking enables
you to obtain the best culinary results when baking, thawing, dehydrating and roasting foods.
Convection notes:
1. Most recipes can be made with temperatures set at 13°C (25°F) lower than temperatures required for normal radiant cooking
methods. Referto the electronic oven control operating instructions included in section "Electronic Oven Control Guide" of this
Use & Care Guide. This can result in considerable reduction of food shrinkage and more tender meats.
2. Batch cooking is more convenient with better results.
3. Defrosting isquicker in convection mode when compared to regular radiant cooking.
4. Remember to use tested recipes with times adjusted for convection baking/roasting when using the convection mode. Times
may be reduced by asmuch as 30% when using the convection feature.
Convection
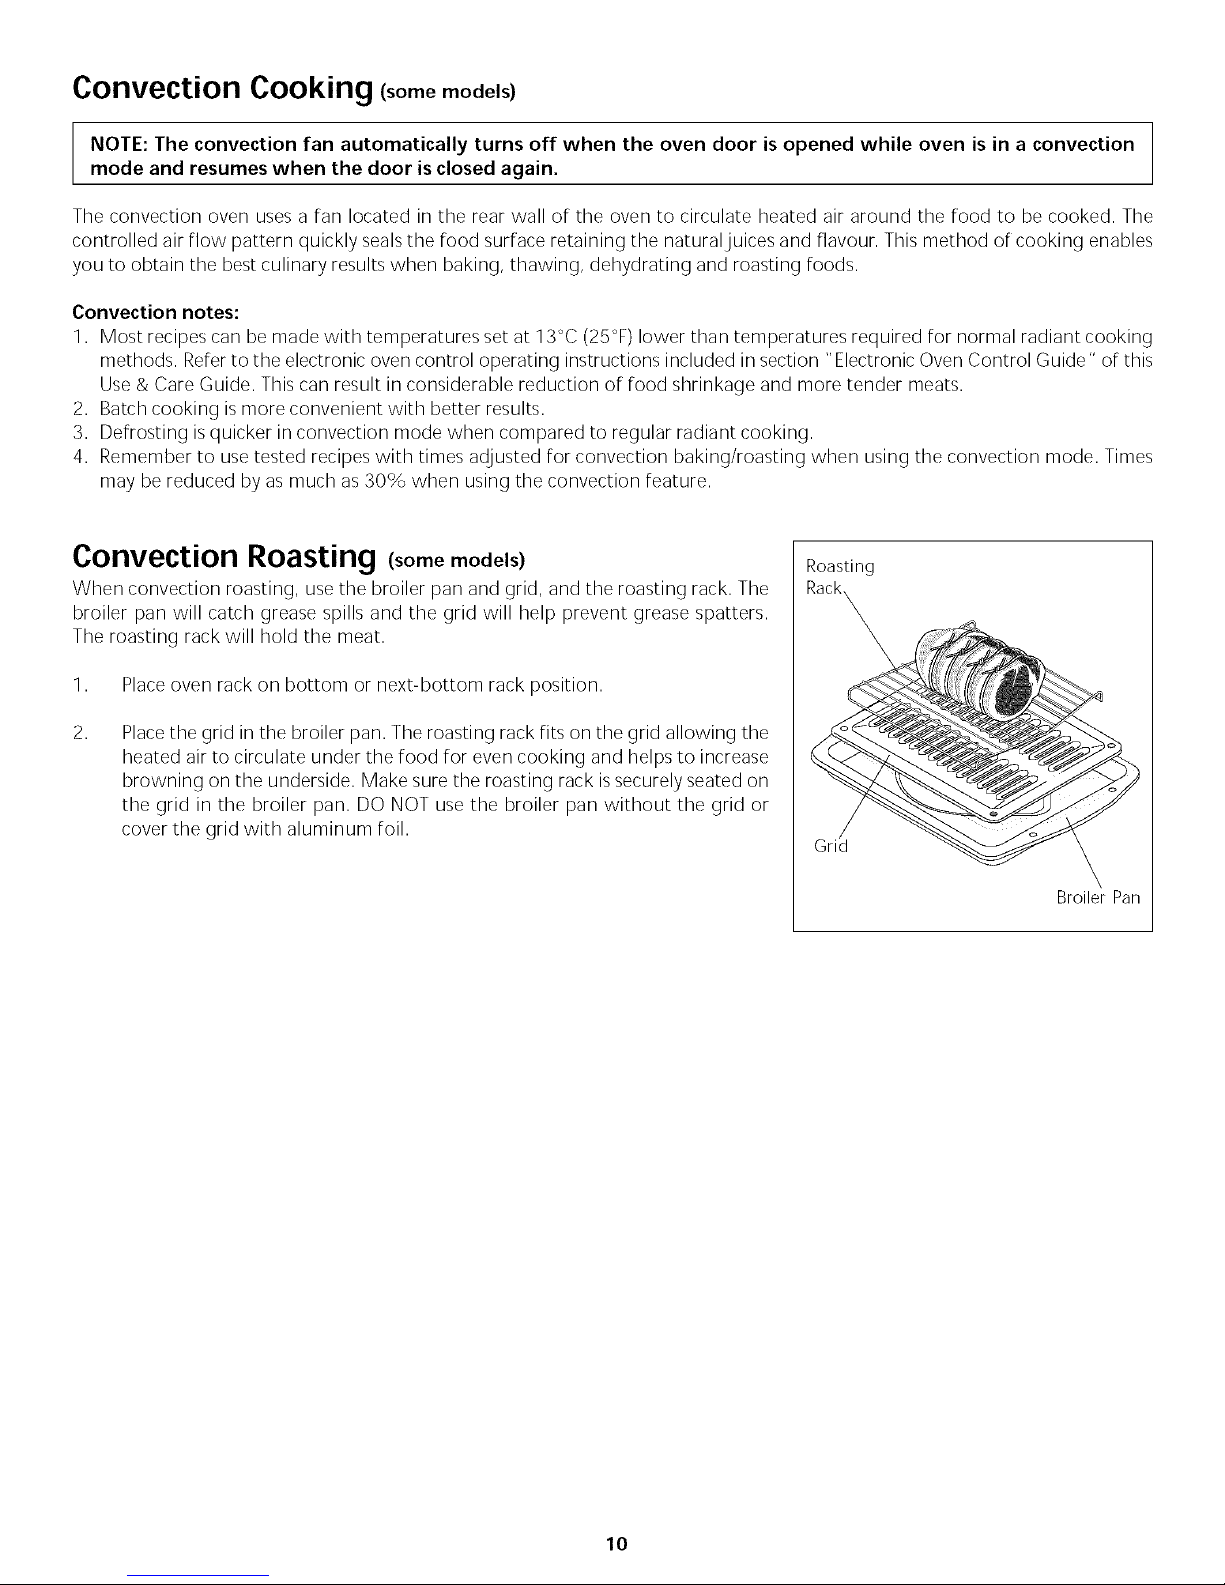
When convection roasting, use the broiler pan and grid, and the roasting rack. The
broiler pan will catch grease spills and the grid will help prevent grease spatters.
The roasting rack will hold the meat.
1. Placeoven rack on bottom or next-bottom rack position.
Placethe grid in the broiler pan. The roasting rack fits on the grid allowing the
heated air to circulate under the food for even cooking and helps to increase
browning on the underside. Make sure the roasting rack issecurely seated on
the grid in the broiler pan. DO NOT use the broiler pan without the grid or
cover the grid with aluminum foil.
Roasting (some models)
Roasting
rid
Broiler Pan
10
Page 11
Speed Bake TMCooking System (some models)
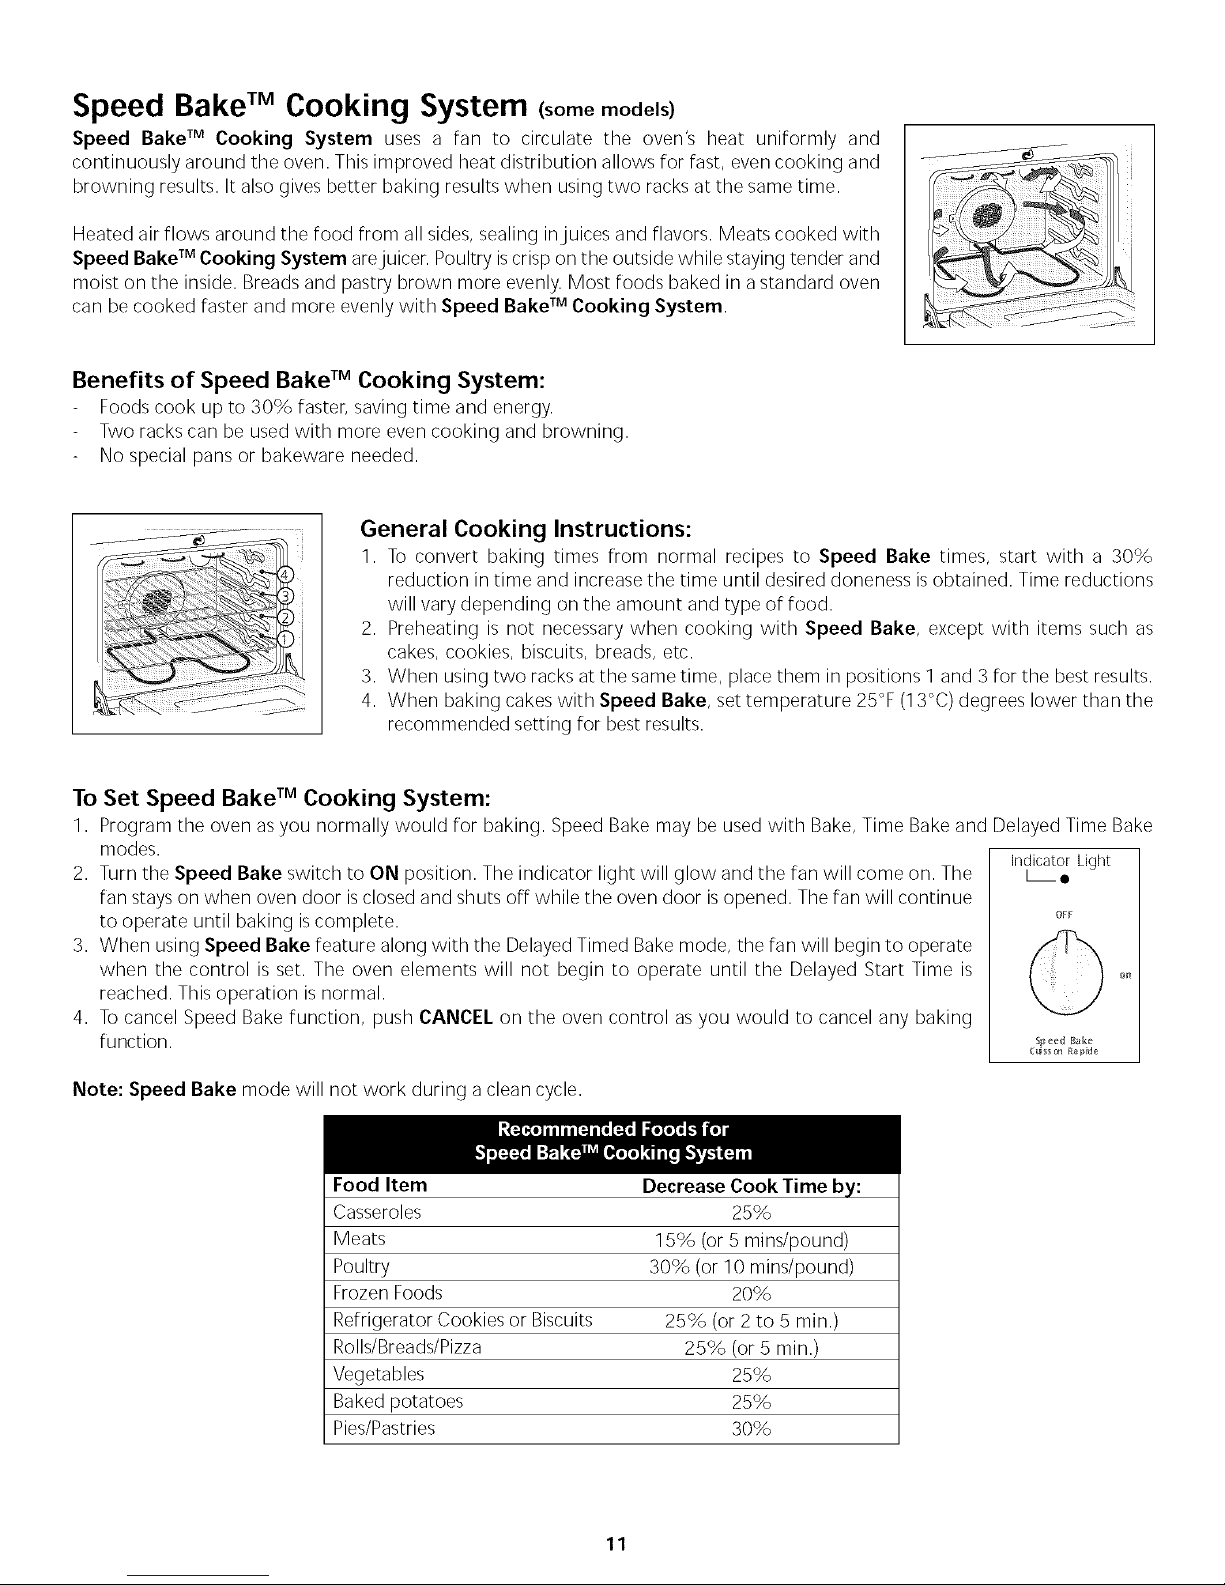
Speed BakeTM Cooking System uses a fan to circulate the oven's heat uniformly and
continuously around the oven. This improved heat distribution allows for fast, even cooking and
browning results. It also gives better baking results when using two racks at the same time.
Heated air flows around the food from all sides, sealing injuices and flavors. Meats cooked with
Speed BakeTM Cooking System arejuicer. Poultry iscrisp on the outside while staying tender and
moist on the inside. Breads and pastry brown more evenly. Most foods baked in a standard oven
can be cooked faster and more evenly with Speed BakeTM Cooking System.
Benefits of Speed Bake TM Cooking System:
Foods cook up to 30% faster, saving time and energy.
Two racks can be used with more even cooking and browning.
No special pans or bakeware needed.
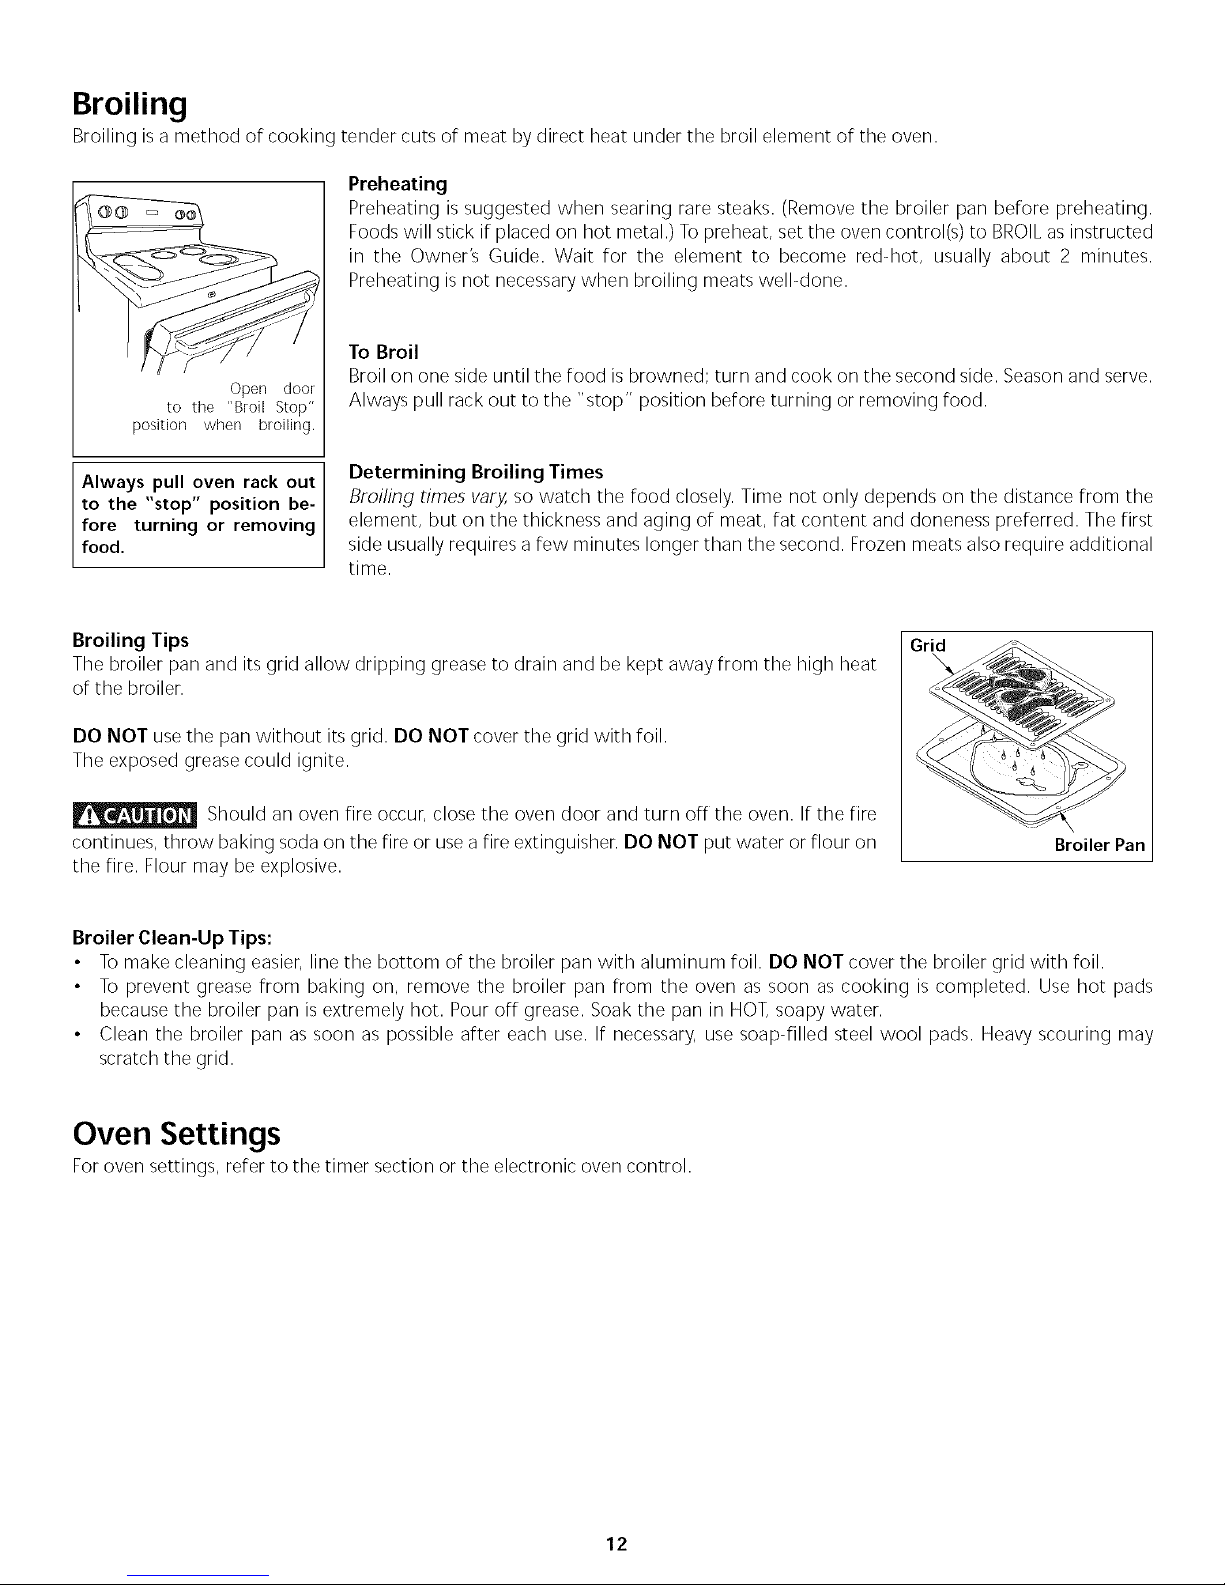
General Cooking Instructions:
1. To convert baking times from normal recipes to Speed Bake times, start with a 30%
reduction in time and increase the time until desired doneness is obtained. Time reductions
will vary depending on the amount and type of food.
2. Preheating is not necessary when cooking with Speed Bake, except with items such as
cakes, cookies, biscuits, breads, etc.
3. When using two racks at the same time, place them in positions 1 and 3 for the best results.
4. When baking cakes with Speed Bake, set temperature 25°F (13°C) degrees lower than the
recommended setting for best results.
To Set Speed Bake TM Cooking System:
1. Program the oven asyou normally would for baking. Speed Bake may be used with Bake, Time Bake and Delayed Time Bake
modes. Indicator Light
2. Turn the Speed Bake switch to ON position. The indicator light will glow and the fan will come on. The Le
fan stays on when oven door isclosed and shuts off while the oven door isopened. The fan will continue
to operate until baking iscomplete, or_
3. When using Speed Bake feature along with the Delayed Timed Bake mode, the fan will begin to operate
when the control is set. The oven elements will not begin to operate until the Delayed Start Time is ,_,,
reached. This operation isnormal.
4. To cancel Speed Bake function, push CANCEL on the oven control as you would to cancel any baking
function. _ee_ Bake
Note: Speed Bake mode will not work during a clean cycle.
Food Item Decrease Cook Time by:
Casseroles 25%
Meats 15% (or 5 mins/pound)
Poultry 30% (or 10 mins/pound)
Frozen Foods 20%
Refrigerator Cookies or Biscuits 25% (or 2 to 5 min.)
Rolls/Breads/Pizza 25% (or 5 min.)
Vegetables 25%
Baked potatoes 25%
Pies/Pastries 30%
11
Page 12
Broiling
Broiling isa method of cooking
Open door
to the "Broil Stop"
position when broiling.
tender cuts of meat by direct heat under the broil element of the oven.
Preheating
Preheating is suggested when searing rare steaks. (Remove the broiler pan before preheating.
Foods will stick if placed on hot metal.) Topreheat, set the oven control(s) to BROILas instructed
in the Owner_ Guide. Wait for the element to become red-hot, usually about 2 minutes.
Preheating is not necessary when broiling meats well-done.
To Broil
Broil on one side until the food is browned; turn and cook on the second side. Seasonand serve.
Always pull rack out to the "stop" position before turning or removing food.
Always pull oven rack out
to the "stop" position be-
fore turning or removing
food.
Determining Broiling Times
Broiling times vary,so watch the food closely. Time not only depends on the distance from the
element, but on the thickness and aging of meat, fat content and doneness preferred. The first
side usually requires a few minutes longer than the second. Frozen meats also require additional
time.
Broiling Tips
Grid
The broiler pan and its grid allow dripping grease to drain and be kept away from the high heat
of the broiler.
DO NOT use the pan without its grid. DO NOT cover the grid with foil.
The exposed grease could ignite.
Should an oven fire occur, close the oven door and turn off the oven. If the fire
continues, throw baking soda on the fire or use a fire extinguisher. DO NOT put water or flour on
Broiler Pan
the fire. Flour may be explosive.
Broiler Clean-Up Tips:
• To make cleaning easier, line the bottom of the broiler pan with aluminum foil. DO NOT cover the broiler grid with foil.
• To prevent grease from baking on, remove the broiler pan from the oven as soon as cooking is completed. Use hot pads
because the broiler pan is extremely hot. Pour off grease. Soak the pan in HOT,soapy water.
• Clean the broiler pan as soon as possible after each use. If necessary, use soap-filled steel wool pads. Heavy scouring may
scratch the grid.
Oven Settings
For oven settings, refer to the timer section or the electronic oven control
12
Page 13
Ceramic Glass
Cooktop (somemode,s)
The ceramic-glass cooktop has electric heating coils located below the ceramic glass surface. The design of the glass cooktop
outlines the area of the surface heating unit below. Most importantly, make sure the diameter of the pan matches the diameter of
the surface unit. Heat istransferred up through the surface of the cooktop. Only fiat-bottomed pans should be used. The type and
size of the cookware, number of surface units in use and the settings of the surface units are Factorsthat will affect the amount of
heat that will spread to areas surrounding the units. The areassurrounding the units may become hot enough to cause burns.
The cooktop should not be used asa cutting board or work surface. Dropping heavy or hard objects on the cooktop may crack it.
Panswith rough bottoms may scratch the cooktop surface. Placing Foods directly on the smoothtop surface (without cooking
utensils) isnot recommended as difficult cleaning will result and Foodsmay smoke and cause apotential Firehazard. Never usethe
griddle or similar cooking sheet on the ceramic glasscooktop.
Types of heating units used (some models)
Depending on model, three types of heating units may be Found under the ceramic glasscooktop:
- Regular (single coil) radiant elements of various diameters or shapes.
- Expandable type (double circuits) radiants elements of various diameters or shapes.
- Bridge Expandable type (triple circuits) radiants elements of various diameters or shapes.
O_F
rain max
4 6
reed
OF_:
OFF
o
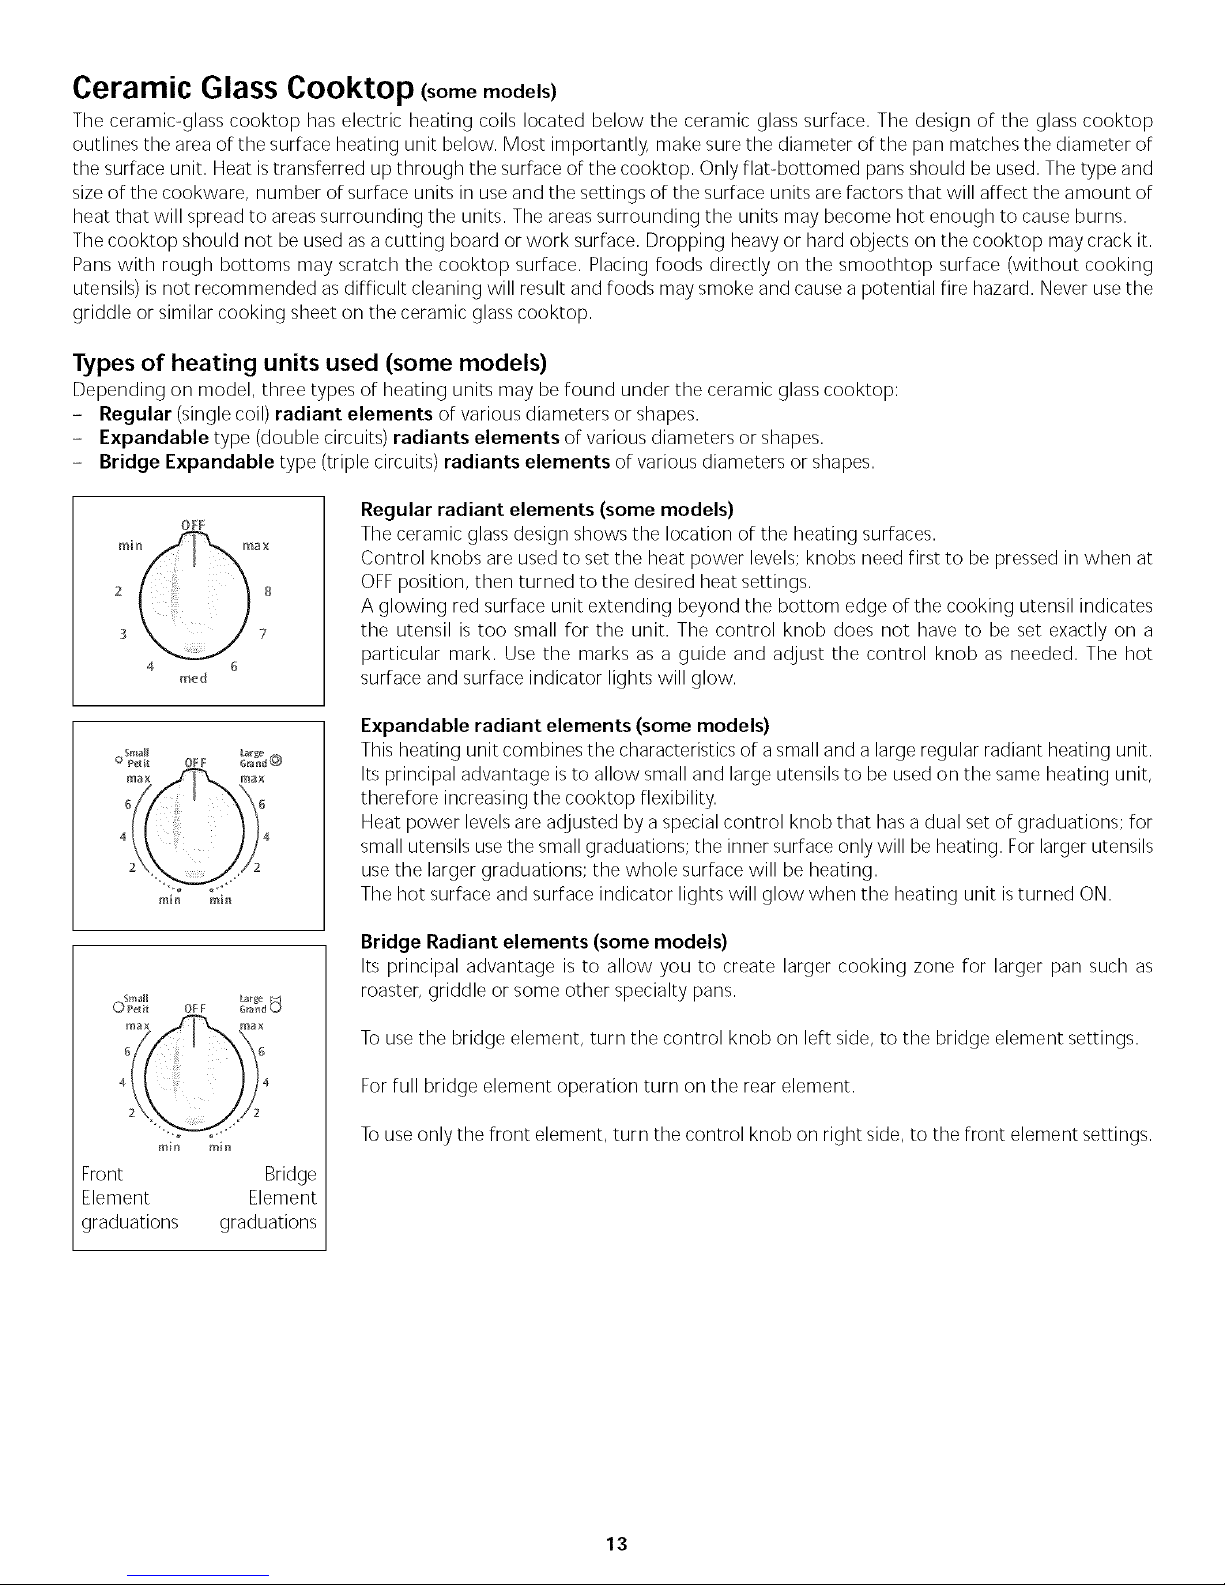
regular radiant elements (some models)
The ceramic glass design shows the location of the heating surfaces.
Control knobs are used to set the heat power levels; knobs need Firstto be pressed in when at
OFFposition, then turned to the desired heat settings.
A glowing red surface unit extending beyond the bottom edge of the cooking utensil indicates
the utensil is too small Forthe unit. The control knob does not have to be set exactly on a
particular mark. Use the marks as a guide and adjust the control knob as needed. The hot
surface and surface indicator lights will glow.
Expandable radiant elements (some models)
This heating unit combines the characteristics of asmall and a large regular radiant heating unit.
Its principal advantage isto allow small and large utensils to be used on the same heating unit,
therefore increasing the cooktop Flexibility.
Heat power levels are adjusted by a special control knob that hasa dual set of graduations; for
small utensils use the small graduations; the inner surface only will be heating. Forlarger utensils
use the larger graduations; the whole surface will be heating.
The hot surface and surface indicator lights will glow when the heating unit isturned ON.
Bridge radiant elements (some models)
Its principal advantage is to allow you to create larger cooking zone for larger pan such as
roaster, griddle or some other specialty pans.
Touse the bridge element, turn the control knob on left side, to the bridge element settings.
For full bridge element operation turn on the rear element.
Touseonly the Front element, turn the control knob on right side, to the Front element settings.
Front
Element
graduations
Bridge
Element
graduations
13
Page 14
Ceramic Glass Cooktop (some models)(continued)
ESEC Models Controls (some models)
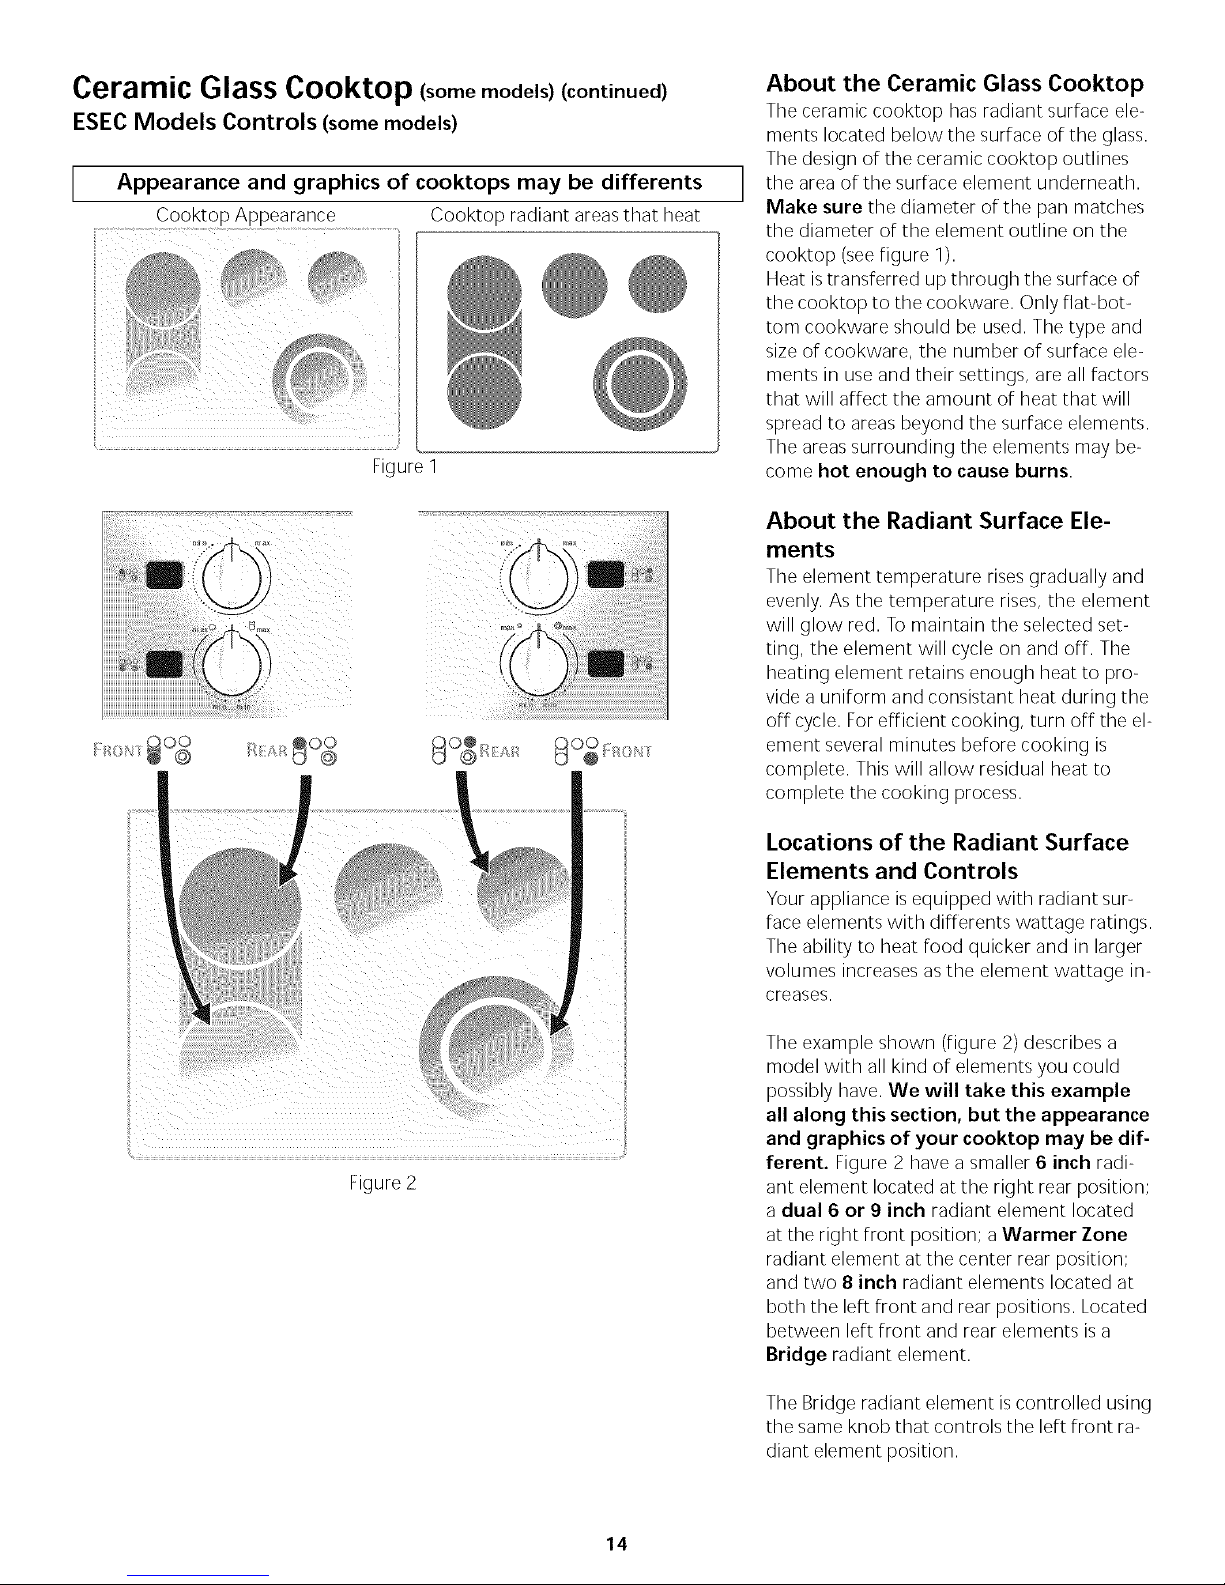
Appearance and graphics of cooktops may be differents
I I
Cooktop Appearance Cooktop radiant areasthat heat
@÷
i
Figure 1
About the Ceramic Glass Cooktop
The ceramic cooktop has radiant surface ele-
ments located below the surface of the glass.
The design of the ceramic cooktop outlines
the area of the surface element underneath.
Make sure the diameter of the pan matches
the diameter of the element outline on the
cooktop (seefigure 1).
Heat is transferred up through the surface of
the cooktop to the cookware. Only flat-bot-
tom cookware should be used. The type and
size of cookware, the number of surface ele-
ments in useand their settings, are all factors
that will affect the amount of heat that will
spread to areas beyond the surface elements.
The areassurrounding the elements may be-
come hot enough to cause burns.
About the Radiant Surface Ele-
ments
The element temperature rises gradually and
evenly. As the temperature rises, the element
will glow red. To maintain the selected set-
ting, the element will cycle on and off. The
heating element retains enough heat to pro-
vide a uniform and consistant heat during the
off cycle. For efficient cooking, turn off the el-
ement several minutes before cooking is
complete. This will allow residual heat to
complete the cooking process.
Figure 2
Locations of the Radiant Surface
Elements and Controls
Your appliance isequipped with radiant sur-
face elements with differents wattage ratings.
The ability to heat food quicker and in larger
volumes increasesasthe element wattage in-
creases.
The example shown (figure 2) describes a
model with all kind of elements you could
possibly have. We will take this example
all along this section, but the appearance
and graphics of I/our cooktop may be dif-
ferent. Figure 2 have a smaller 6 inch radi-
ant element located at the right rear position;
a dual 6 or 9 inch radiant element located
at the right front position; a Warmer Zone
radiant element at the center rear position;
and two 8 inch radiant elements located at
both the left front and rear positions. Located
between left front and rear elements is a
Bridge radiant element.
The Bridge radiant element iscontrolled using
the same knob that controls the left front ra-
diant element position.
14
Page 15
Ceramic Glass Cooktop (some models)(continued)
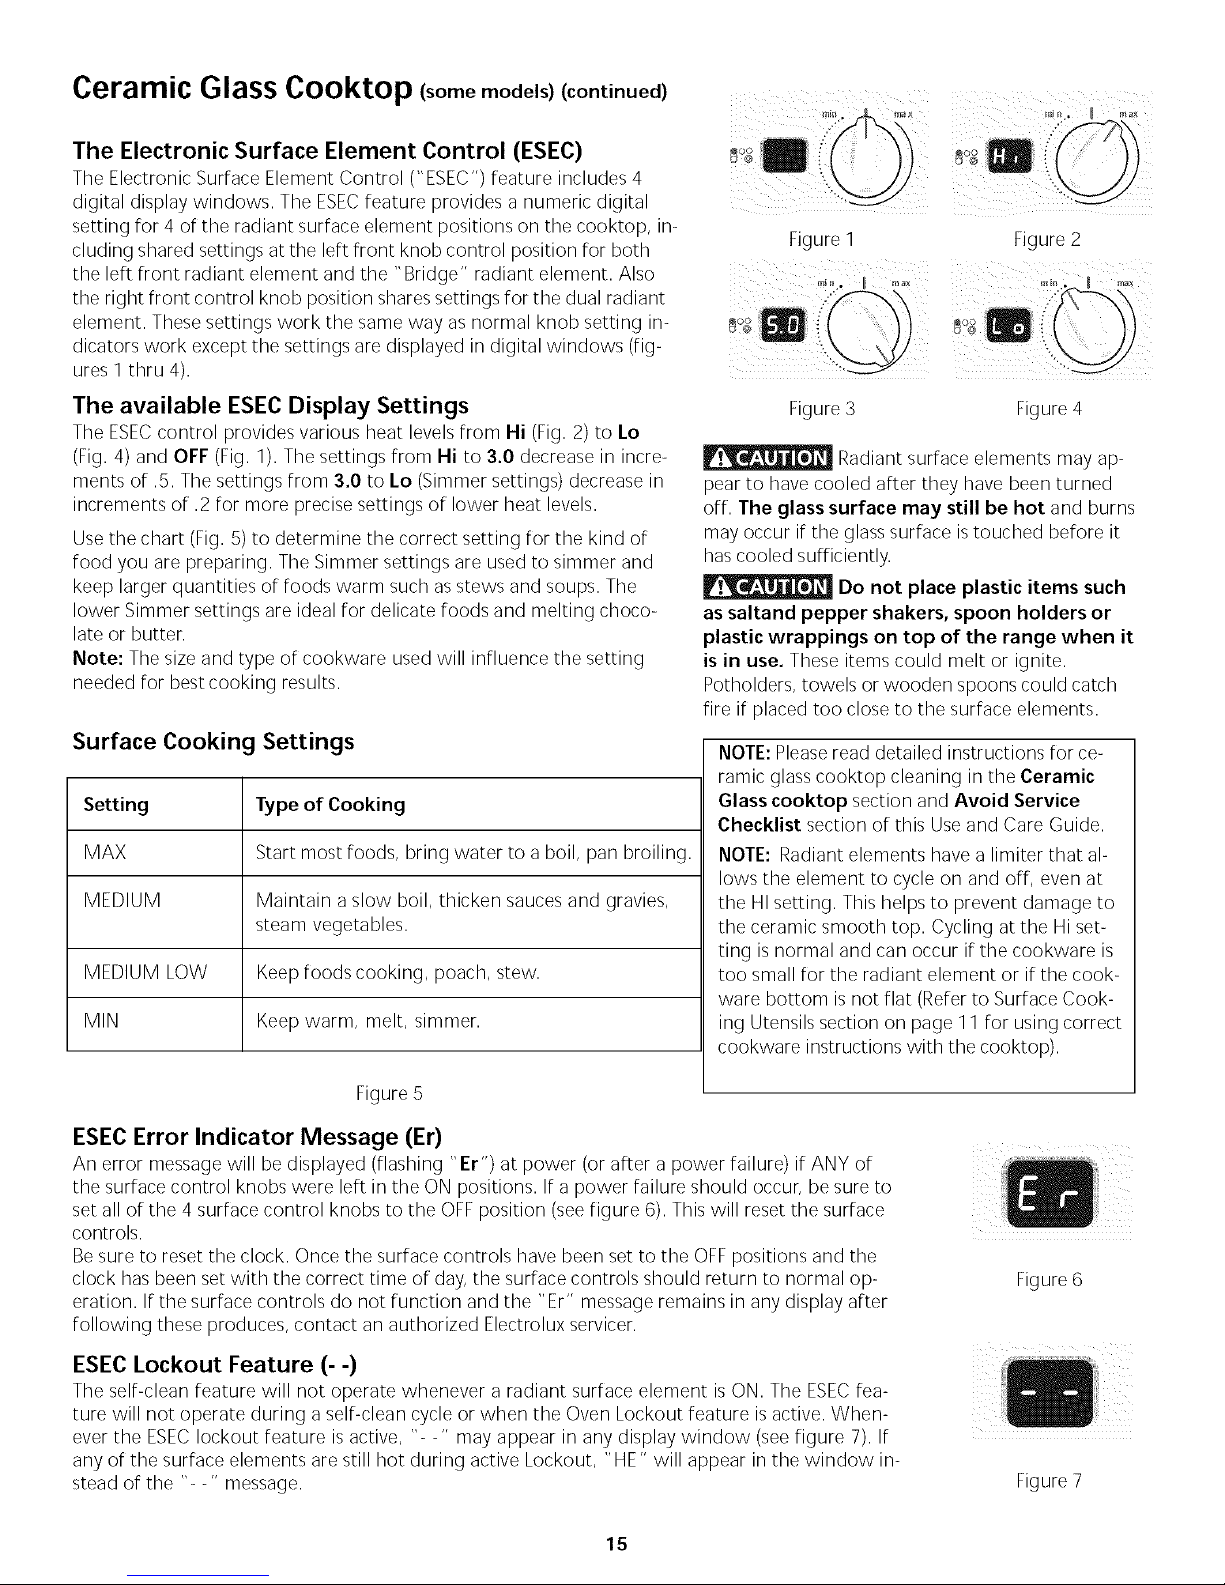
The Electronic Surface Element Control (ESEC)
The Electronic Surface Element Control ("ESEC") feature includes 4
digital display windows. The ESECfeature provides a numeric digital
setting for 4 of the radiant surface element positions on the cooktop, in-
cluding shared settings at the left front knob control position for both
the left front radiant element and the "Bridge" radiant element. Also
the right front control knob position shares settings for the dual radiant
element. These settings work the same way asnormal knob setting in-
dicators work except the settings are displayed in digital windows (fig-
ures 1 thru 4).
.X,,. JJ
Figure 1 Figure 2
8"8
The available ESEC Display Settings
The ESECcontrol provides various heat levels from Hi (Fig. 2) to Lo
(Fig. 4) and OFF (Fig. 1). The settings from Hi to 3.0 decrease in incre-
ments of .5. The settings from 3.0 to [o (Simmersettings) decrease in
increments of .2 for more precise settings of lower heat levels.
Use the chart (Fig. 5)to determine the correct setting for the kind of
food you are preparing. The Simmer settings are used to simmer and
keep larger quantities of foods warm such asstews and soups. The
lower Simmer settings are ideal for delicate foods and melting choco-
late or butter.
Note: The size and type of cookware used will influence the setting
needed for best cooking results.
Surface Cooking Settings
Setting Type of Cooking
MAX Start most foods, bring water to a boil, pan broiling.
MEDIUM Maintain a slow boil, thicken sauces and gravies,
steam vegetables.
MEDIUM LOW Keep foods cooking, poach, stew.
MIN Keep warm, melt, simmer.
Figure 3 Figure4
Radiant surface elements may ap-
pear to have cooled after they have been turned
off. The glass surface may still be hot and burns
may occur if the glass surface is touched before it
has cooled sufficiently.
Do not place plastic items such
as saltand pepper shakers, spoon holders or
plastic wrappings on top of the range when it
is in use. These items could melt or ignite.
Potholders, towels or wooden spoons could catch
fire if placed too close to the surface elements.
NOTE:Please read detailed instructions for ce-
ramic glasscooktop cleaning in the Ceramic
Glass cooktop section and Avoid Service
Checklist section of this Useand Care Guide.
NOTE: Radiant elements have a limiter that al-
lows the element to cycle on and off, even at
the HI setting. This helps to prevent damage to
the ceramic smooth top. Cycling at the Hi set-
ting is normal and can occur if the cookware is
too small for the radiant element or if the cook-
ware bottom is not flat (Refer to Surface Cook-
ing Utensils section on page 11 for using correct
cookware instructions with the cooktop).
Figure 5
ESEC Error Indicator Message (Er)
An error message will be displayed (flashing "Er") at power (or after a power failure) if ANY of
the surface control knobs were left in the ON positions. If a power failure should occur, be sure to
set all of the 4 surface control knobs to the OFFposition (see figure 6). This will reset the surface
controls.
Be sure to reset the clock. Once the surface controls have been set to the OFFpositions and the
clock has been set with the correct time of day, the surface controls should return to normal op- Figure6
eration. If the surface controls do not function and the "Er" message remains in any display after
following these produces, contact an authorized Electrolux servicer.
ESEC Lockout Feature (- -)
The self-clean feature will not operate whenever a radiant surface element isON. The ESECfea-
ture will not operate during a self-clean cycle or when the Oven Lockout feature isactive. When-
ever the ESEClockout feature isactive, "- -" may appear in any display window (seefigure 7). If
any of the surface elements are still hot during active Lockout, "HE" will appear in the window in-
stead of the "- -" message. Figure 7
777
15
Page 16

Ceramic Glass
Cooktop (somemodels)(continued)
ESEC Hot Element Indicator Message (HE)
After using any of the single, dual or bridge radiant element positions
the cooktop will become very hot. Evenafter turning the control knob
to OFF,the cooktop will remain hot for some time. The ESECcontrol
monitors the temperature of the cooktop and displays the message
"HE" (hot element) warning when the cooktop isstill too hot to touch
(Fig. 1). If the HE message appears in the window, the control can be
turned on again for use.
Operating ESEC Surface Elements
Operating ESECSingle Radiant Surface Elements
The cooktop hassingle radiant surface elements at 2 locations; the
right rear (Fig. 3) and left rear (Fig. 4) element positions. The BRIDGE
element position can also be used as a single element.
To Operate the Single Surface Elements:
1. Placecorrectly sized cookware on the radiant surface element.
2. Pushin and turn the surface control knob in either direction to the
desired setting using the ESECdigital display window for the desired
setting (Fig. 2). Turn the knob to adjust the setting if desired. Start
most cooking operations on a higher setting and then turn to a
lower setting to finish cooking. Eachsurface element provides a
constant amount of heat at each setting. A glowing red surface
heating area extending beyond the bottom edge of the cookware
indicates the cookware istoo small for the surface heating area.
3. When cooking has completed, turn the surface control knob to OFF
before removing the cookware. Note: The HE message will appear
after turning the control knob to OFFif the cooktop is still hot and
will remain on until heating surface area has cooled sufficiently.
Figure 1
Figure 2
Appearanceand graphics of cooktops
may be differents
i i
Figure 3 Figure 4
Right Rear Element Left RearElement
Operating the ESEC Dual Surface Radiant Elements
(some models)
The cooktop isequipped with a dual radiant surface element located at
the right front (Fig. 8) position. The size of graduations on control
panel indicate which coil of the dual radiant element will heat. The
small graduations indicates that only the inner coil will heat (Fig. 5 &
7). The large graduations indicates that both inner and outer coils will
heat (Fig. 6 & 8). You may switch from either coil setting at anytime
during cooking.
To Operate the Dual Surface Elements:
1. Placecorrectly sized cookware on the radiant surface element.
2. Pushin and turn the control knob counterclockwise (Fig.5) for
smaller cookware and clockwise (Fig. 6) for larger cookware.
3. Usethe ESECdigital display window for the desired setting. Turn
the knob to adjust the setting if needed. Start most cooking opera-
tions on ahigher setting and then turn to a lower setting to finish
cooking. Eachsurface element provides a constant amount of heat
at each setting. A glowing red surface heating area extending be-
yond the bottom edge of the cookware indicates the cookware is
too small for the surface heating area.
4. When cooking has completed, turn the surface control knob to OFF
before removing the cookware. Note: The HE message will appear
after turning the control knob to OFF if the cooktop isstill hot and
will remain on until the radiant surface area hascooled sufficiently.
Figure 5 Figure 6
Appearence and graphics of cooktops
may be differents
i
Figure 7 Figure 8
Radiant surface elements may appear to have cooled
after they have been turned off. The glass surface may still be hot
and burns may occur if the glasssurface istouched before it hascooled
sufficiently.
16
Page 17

Ceramic Glass
Cooktop (somemode s)(continued)
Operating ESEC Surface Elements (continued)
Operating the ESEC Bridge Surface Radiant Element (some models)
The cooktop isequipped with a "Bridge" surface element located at the left front and
middle positions. The Bridge can be used when cooking with rectangular (like a griddle) or
oval shaped cookware. The element will maintain an even temperature setting across both
portions of the Bridge. If needed for normal cookware, the Bridge element can work like a
single element without the Bridge.
Bridge element operation symbols are located on the control panel on each side of the
Bridge element control knob. These symbols indicate the direction to turn the control knob
when operating the Bridge element. The symbol in figure 1 indicates that only the single
portion of the Bridge element will heat (see figure 3). The symbol in figure 2 indicates
that both the single and Bridge portions of the element will heat together (see figure 4).
You may switch from either of these settings at anytime during cooking with the Bridge el-
ement.
To Operate the Bridge Surface Elements:
1. Placecorrectly sized cookware on the radiant surface element.
2. Pushin and turn the surface control knob counterclockwise to heat the portion of the
Bridge element for normal shaped cookware or clockwise for larger or rectangular
shaped cookware.
3. Usethe ESECdigital display window for the desired setting. Turn the knob to adjust the
setting if needed. Start most cooking operations on a higher setting and then turn to a
lower setting to finish cooking. Eachsurface element provides a constant amount of
heat at each setting. A glowing red surface heating area extending beyond the bottom
edge of the cookware indicates the cookware istoo small. Pleasenote that not all cook-
ware will fit the Bridge element correctly.
3. When cooking has completed, turn the surface control knob to OFFbefore removing the
cookware. Note: The HE message will appear after turning the control knob to OFFif
the cooktop isstill hot and will remain on until heating surface area hascooled suffi-
ciently.
The BRIDGEelement may also be used in combination with the left rear single element
(see figure 5). Becausethese element have 2 different controls, one element can be used
to cook while the other element may be used to keep food warm.
Figure 1
Figure 2
Appearance and graphics of
cooktops may be differents
Figure 3
i
Figure 4
Radiant surface elements may appear to have cooled after they have been
turned off. The glass surface may still be hot and burns may occur if the glass surface is
touched before it has cooled sufficiently.
Figure 5
17
Page 18

Ceramic Glass
Cooktop (somemode s)(continued)
Special Caution for Aluminum Foil and Aluminum Cooking Utensils
1) Aluminum foil
Use of aluminum foil will damage the cooktop. Do not use under any circumstances.
2) Aluminum utensils
The melting point of aluminum being much lower than that of other metals, care must be taken when aluminum pots or pans
are used. If allowed to boil dry, not only will the utensil be ruined, but also permanent damage in the form of breakage, fusing
or marking may affect the ceramic glasssurface.
__ Sliding aluminum or copper clad bottom panson the cooktop can cause metal markings
on the cooktop surface. These marks should be removed immediately after the
cooktop has cooled using the cooktop cleaning cream. Metal marks can become
permanent if not removed prior to future use.
Cookware (cast iron, metal, ceramic or glass)with rough bottoms can mark or scratch
the cooktop surface. Do not slide anything metal or glass across the cooktop. Do
not useyour cooktop as a cutting board or work surface in the kitchen. Do not cook
foods directly on the cooktop surface without a pan.
Do not drop heavy or hard objects on the glass cooktop, they may cause it to crack.
Appearanceand graphics of
cooktops may be differents
Things to Remember
1. AVOID using bleach and don't use ammonia to clean the ceramic surface.
2. Do not put plastic items on warm cooking areas.
3. Never slide oven racks acrosscooktop surface. They may scratch or metalmark the cooktop.
4. If cooktop should break, do not use cooktop or attempt to clean it. Call your authorized
service technician immediately.
5. Never use a trivet or metal stand between the cooking utensil and the ceramic cooktop. The
ceramic surface may be scratched, metal marked or etched by such items.
6. Sugaryspills can cause pitting of your cooktop surface. Therefore, you must begin cleaning the spills
while the cooktop is still hot. Usecaution when following the steps below.
a) Turn off all surface units and remove all pans immediately.
b) Wearing an oven mitt, use a razor blade scraper to scrape the hot spill out of the cooking zone to a cooler area on the
cooktop.
c) Allow the cooktop to cool.
Use and Care of Glass Surface
Problem Cause To Remove
Fine "brown
lines" (tiny
scratches or
abrasions which
have collected
soil)
Metal marking
(mark or black
marks).
Brown streaks
and specks.
NOTE:
Due to the high intensity of heat generated bythe surface elements, the glass surface will turn green when the element
Coarse particles (salt,
sand, sugar or grit)
between bottom of
cookware and cooktop
that are not removed
before cooking.
Using incorrect cleaning
materials.
Sliding or scraping
metal utensils or oven
shelves across cooktop.
Cleaning with a
sponge or dishcloth
that has been used
for other kitchen tasks.
will be turned off. This phenomenon is normal and the glass will come back to its original white color after it has
completely cooled down. (White glass cooktops only).
To Prevent
Clean cooktop after
every use.
Daily use of cleaner
cream.
Do not slide cookware
across cooktop.
Use cleaner cream
with clean, damp paper
towel.
18
Tiny scratches are not removable.
They can be minimized by
continual use of cleaner cream.
Such scratches do not affect
cooking.
Apply cleaner cream
with dampened paper
towel to a cooled surface.
Use a small amount of cleaner
cream with clean, damp paper
towel.
Page 19
Ceramic Glass
Cooktop (somemode s)(continued)
Use and Care of Glass Surface (continued)
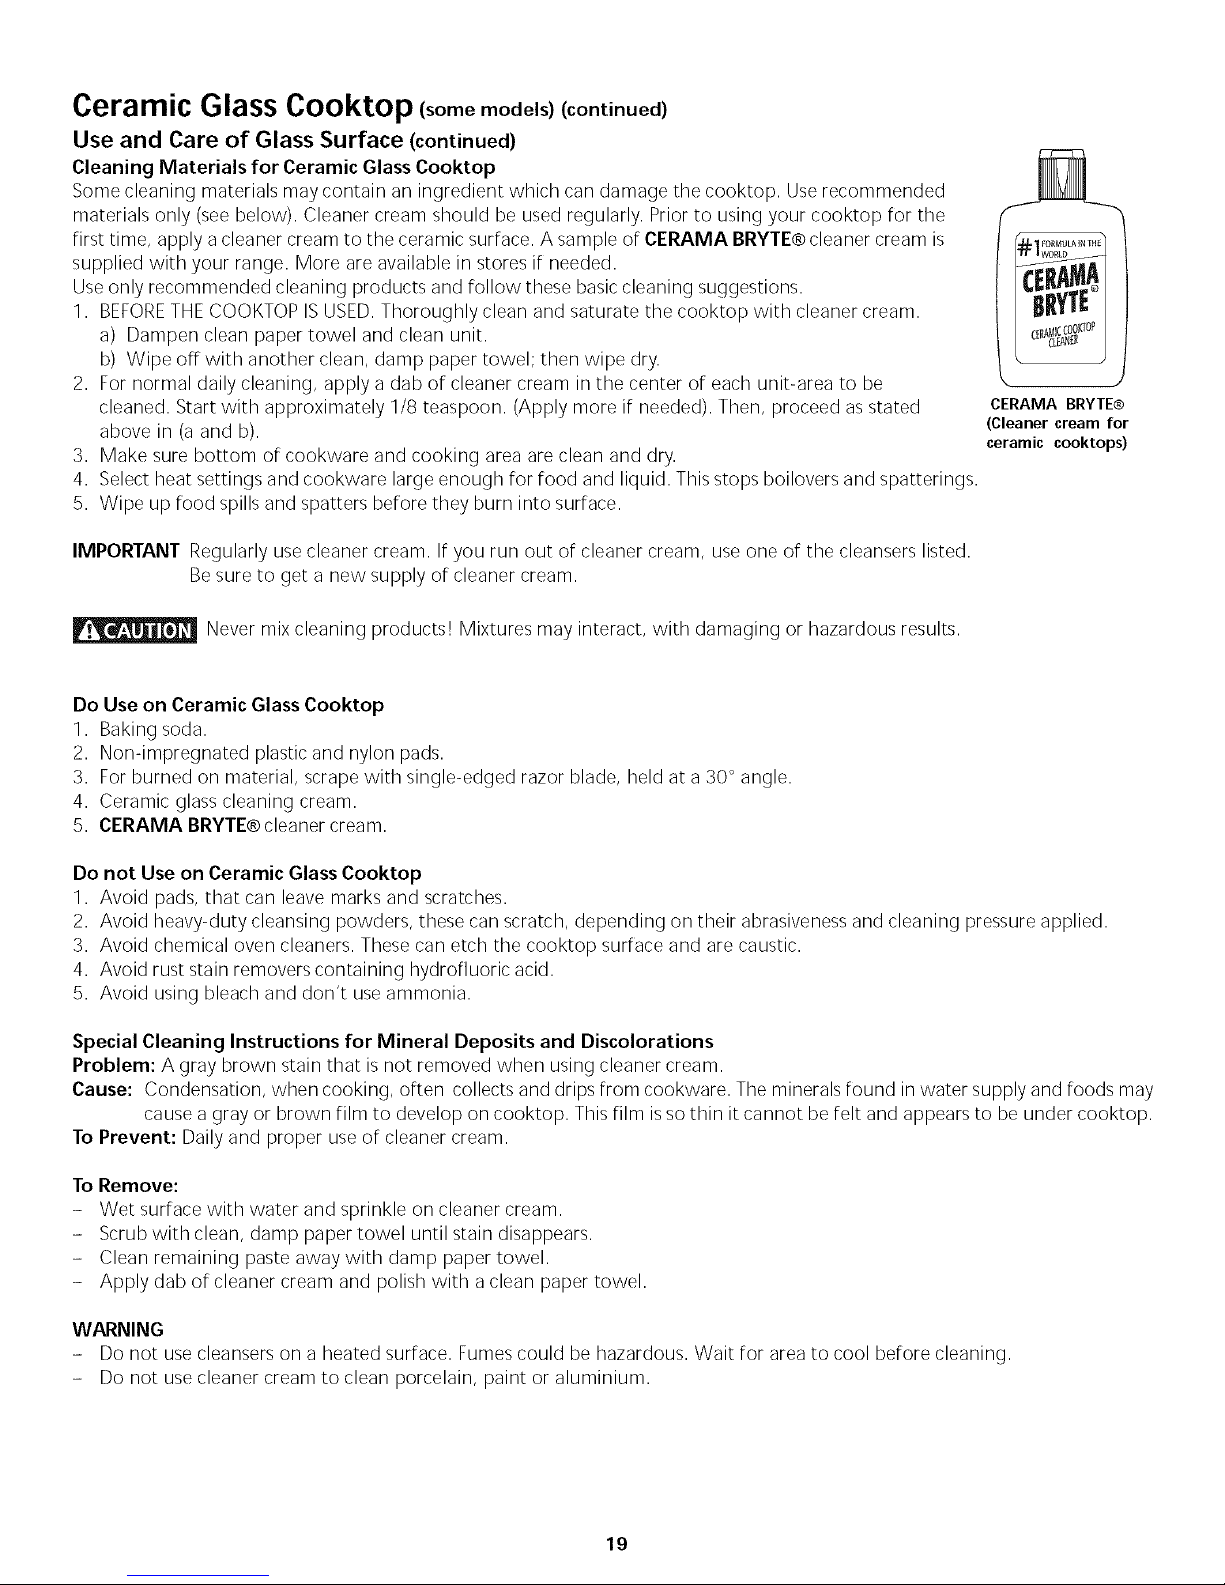
Cleaning Materials for Ceramic Glass Cooktop
Some cleaning materials may contain an ingredient which carl damage the cooktop. Userecommended
materials only (see below). Cleaner cream should be used regularly. Prior to using your cooktop for the
first time, apply a cleaner cream to the ceramic surface. A sample of CERAMA BRYTE®cleaner cream is
supplied with your range. More are available in stores if needed.
Use only recommended cleaning products and follow these basic cleaning suggestions.
1. BEFORETHECOOKTOP IS USED.Thoroughly clean and saturate the cooktop with cleaner cream.
a) Dampen clean paper towel and clean unit.
b) Wipe off with another clean, damp paper towel; then wipe dry.
2. For normal daily cleaning, apply a dab of cleaner cream in the center of each unibarea to be
cleaned. Start with approximately 1/8 teaspoon. (Apply more if needed). Then, proceed as stated
above in (a and b).
3. Make sure bottom of cookware and cooking area are clean and dry.
4. Select heat settings and cookware large enough for food and liquid. This stops boilovers and spatterings.
5. Wipe up food spills and spatters before they burn into surface.
IMPORTANT Regularly usecleaner cream. If you run out of cleaner cream, use one of the cleansers listed.
Besure to get a new supply of cleaner cream.
Never mix cleaning products! Mixtures may interact, with damaging or hazardous results.
CERAMA BRYTE®
(Cleaner cream for
ceramic cooktops)
Do Use on Ceramic Glass Cooktop
1. Baking soda.
2. Non-impregnated plastic and nylon pads.
3. For burned on material, scrape with single-edged razor blade, held at a 30 ° angle.
4. Ceramic glass cleaning cream.
5. CERAMA BRYTE®cleaner cream.
Do not Use on Ceramic Glass Cooktop
1. Avoid pads, that can leave marks and scratches.
2. Avoid heavy-duty cleansing powders, these can scratch, depending on their abrasiveness and cleaning pressure applied.
3. Avoid chemical oven cleaners. These can etch the cooktop surface and are caustic.
4. Avoid rust stain removers containing hydrofluoric acid.
5. Avoid using bleach and don't use ammonia.
Special Cleaning Instructions for Mineral Deposits and Discolorations
Problem: A gray brown stain that is not removed when using cleaner cream.
Cause: Condensation, when cooking, often collects and drips from cookware. The minerals found in water supply and foods may
cause a gray or brown film to develop on cooktop. This film isso thin it cannot be felt and appears to be under cooktop.
To Prevent: Daily and proper use of cleaner cream.
To Remove:
- Wet surface with water and sprinkle on cleaner cream.
- Scrub with clean, damp paper towel until stain disappears.
- Clean remaining paste away with damp paper towel.
- Apply dab of cleaner cream and polish with a clean paper towel.
WARNING
- Do not use cleansers on a heated surface. Fumescould be hazardous. Wait for area to cool before cleaning.
- Do not use cleaner cream to clean porcelain, paint or aluminium.
19
Page 20
Setting Warm Zone Controls (some models)
To Operate the warm zone
Your appliance isequipped with a warm zone. The purpose of the warm zone isto keep hot cooked foods at serving temperature.
Always start with hot food. It is not recommended to heat cold food on the warm zone.
Use the warm zone to keep cooked foods hot such as: vegetables, gravies, casseroles, soups, stews, breads, pastries and
oven-safe dinner
All food placed on the warm zone should be covered with a lid or aluminum foil to maintain quality. For best results,when warming
pastries or breads, the cover should have an opening to allow moisture to escape. Do not use plastic warp to cover food.
Plastic may melt onto the surface and be very difficult to clean.
Use only dishware, utensils and cookware recommended for oven and cooktop useon the warm zone.
Unlike the surface elements, the warm zone will not glow red when it ishot. Always use potholders or oven mitts
when removing food from the warm zone as cookware and plates will not be hot.
FI_ Su_ace
$_face Chat_
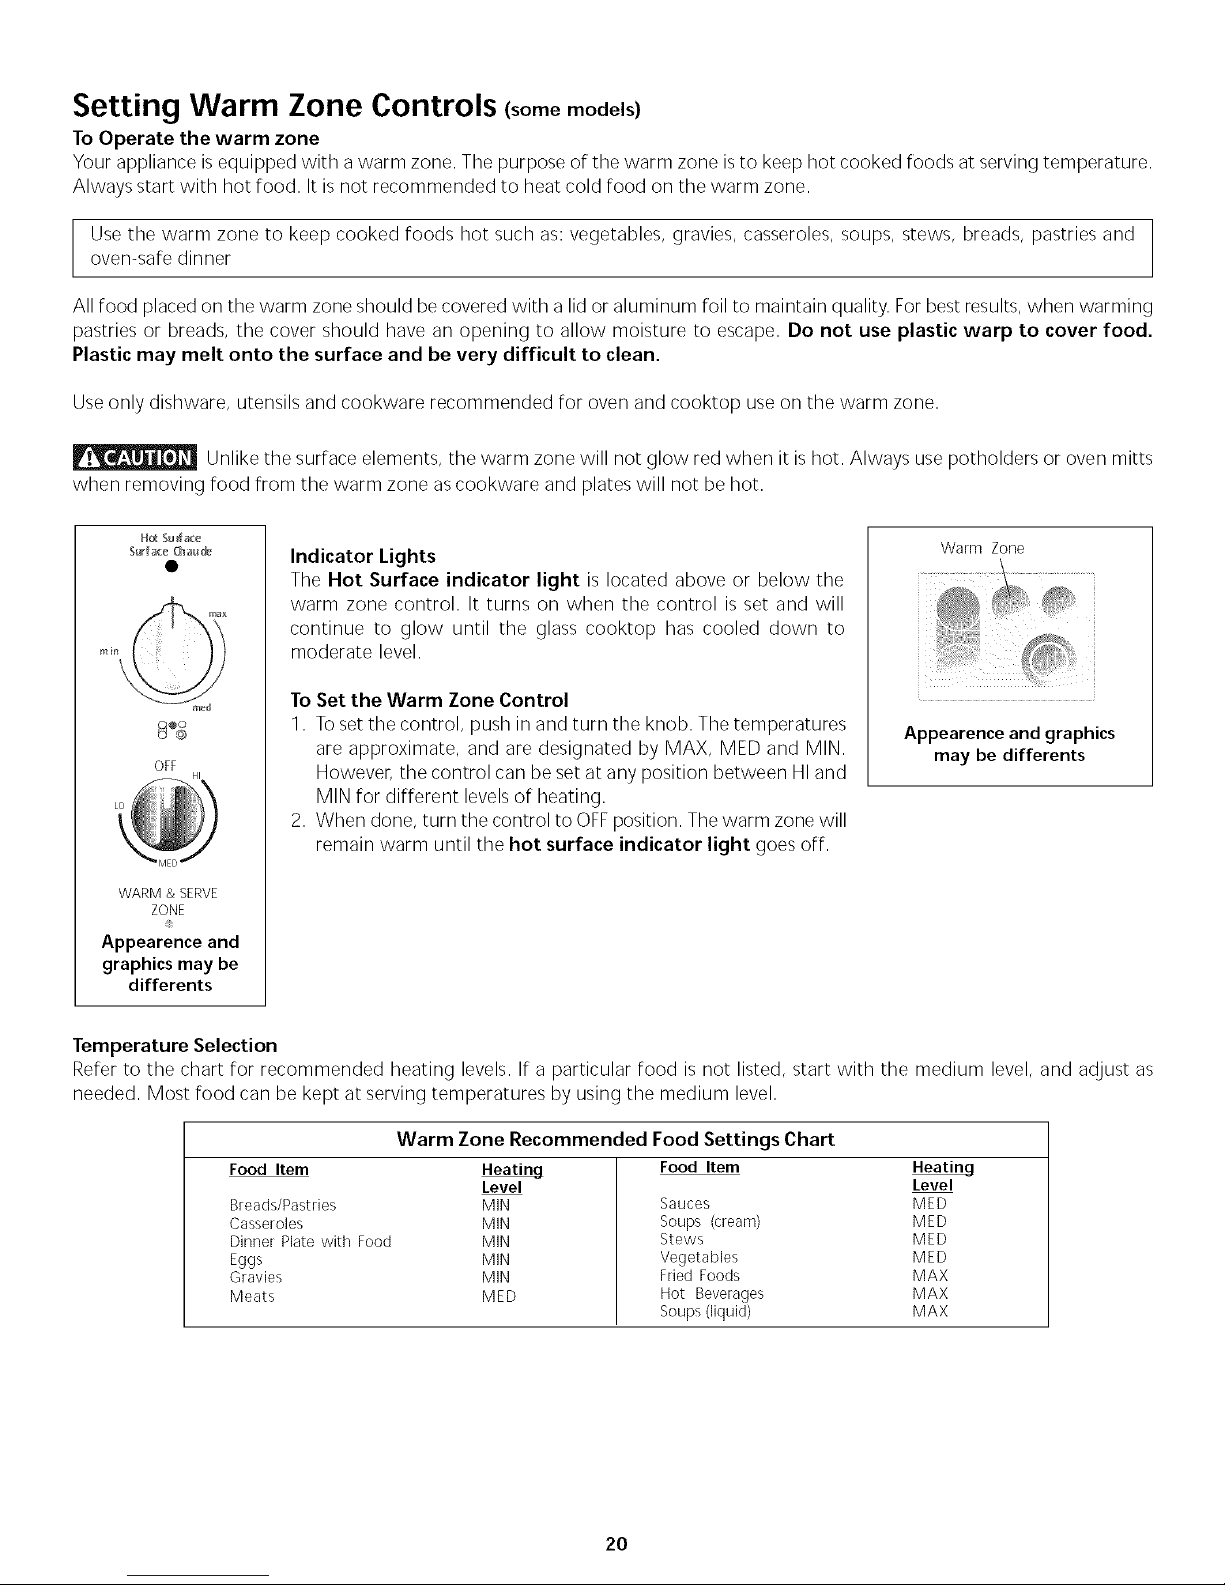
Indicator Lights
Warm Zone
The Hot Surface indicator light is located above or below the
warm zone control. It turns on when the control is set and will
continue to glow until the glass cooktop has cooled down to
moderate level.
To Set the Warm Zone Control
OFF
1. To set the control, push in and turn the knob. The temperatures
are approximate, and are designated by MAX, MED and MIN.
However, the control can be set at any position between HI and
Appearence and graphics
may be differents
MIN for different levelsof heating.
2. When done, turn the control to OFFposition. Thewarm zone will
remain warm until the hot surface indicator light goes off.
WARM & SERVE
ZONE
Appearence and
graphics may be
differents
Temperature Selection
Refer to the chart for recommended heating levels. If a particular food is not listed, start with the medium level, and adjust as
needed. Most food can be kept at serving temperatures by using the medium level.
Warm Zone Recommended Food Settings Chart
Food Item Food Item
Breads/Pastries MIN
Casseroles MIN
Dinner Plate with Food MIN
Eggs MIN
Gravies MIN
Meats MED
Heating
Level
Sauces MED
Soups (cream) MED
Stews MED
Vegetables MED
Fried Foods MAX
Hot Beverages MAX
Soups (liquid) MAX
2O
Heating
Level
Page 21

L, eanmy pp.ance Before cleaning any part of the range, make sure all heating
the
Exterior Cleaning elements are turned to OFF and are cool.
Clean range after each use to prevent sticky
grease built-up and spills from cooking on. Wash with hot, soapy water and a clean cloth. Wipe with a soft cloth or paper towel.
Do not use abrasives, steel wool, cleaners containing ammonia, acids or commercial oven cleaners on any exterior parts of the
range, except the porcelain enamel cooktop. If a metal cleaner or polish is used on metal trim, be sure the label specifies that it is
safe for useon chrome and aluminium.
Steel/Aluminum Control Panel
Control knobs (some models)
If the control panel needscleaning turn the control knobs to OFF,then pull knobs straight off the
shafts.
Most cleaning of yoursteel/aluminum control panel can be done using a clean cloth with warm
soapy water or other mild household cleaners.
Sometimes, applying few drops of a recommended cooktop cleaning/polishing cream (with
silicone) will remove any remaining soil and will leave a protective coating which will keep your
range looking like new.
Cooktop cleaning/polishing cream can be purchased through authorized service centers or major
department stores.
Glass Control Panel:
Use a clean cloth or a sponge with warm, soapy water or paper towel and spray glass cleaner to clean the glass panel. Be careful
not to let water/cleaner go behind the glass or near the knob activated controls.
Replace knobs; engage the flat surface inside the knob cavity with the flat on the shaft. Pushknobs onto the shaRs.
Coil Surface Elements (some models)
Prior to cleaning the coil elements make
sure they are cold and that control knobs
are turned to OFF "0".
Never leave covers on the
coil elements as they could be permanently
damaged if the coil is turned on by accident.
Coil Elements and Drip Bowls
Coil elements clean themselves when they are turned on.
Coil elements and drip bowls are removable and
allow to clean the drip bowls.
To remove a coil element, push against the front
edge and lift element up and out.
Toclean by hand, wash the drip bowls in hot sudsy
water. For hard to remove spots, use a nylon
scrubber with soap. Rinseand dry while still warm.
Never immerse coil elements in water.
SURFACES CLEANING AGENTS INSTRUCTIONS
Porcelain Enamel Mild Cleaners or soap-filled steel Use a damp sponge or dampened soap pad,
(Cooktop, wool pads rinse and dry
Surface under cooktop)
Insert - Control panel Hot, soapy water or cleaner Use a clean, soapy, dampened cloth or paper towel,
cream remove soil and dry. Do not use abrasive products.
21
Page 22

Cleaning the Appliance (continued)
Porcelain Enamel Cooktop Cleaning Instructions.
Porcelain Enamel Cooktop Cleaning
DO NOT use a cooktop Correct and consistent cleaning is essential to maintaining your porcelain enamel
cleaner on a hot cooktop. The fumes can cooktop. If food spills and grease spatters are not removed, they may burn onto the
be hazardous to your health, and can surface of the cooktop and cause permanent discoloration.
chemically damage the cooking surface.
Before Cleaning the
surface cooktop, be sure the controls are
turned to OFFand the cooktop is cool.
DO NOT use commer-
cial oven cleaners on the exterior
surfaces including rangetop and door
frame.
Daily Cleaning
Fornormal soil:
1. Allow cooktop surface to cool.
2. Wipe off spills and spatters using aclean paper towel or a clean cloth with warm,
soapy water.
3. If needed, use a soapy steel wool pad or other mild household cleaners.
4. Be sure to rinse off the cleaners or the porcelain may become damaged during
future heating.
For heavy, burned-on soil:
1. Allow cooktop surface to cool.
2. Use asoap filled scouring pad with warm water or cover heavily soiled spots with
a solution of clear water and ammonia. Scour gently. Rinse and wipe dry with a
clean cloth.
3. If any soil remains, apply a few drops of a recommended cooktop cleaning
cream on the spots and rub gently using a clean damp cloth or scouring pad. Buff
with a dry cloth until all soil and cream are removed. Frequent cleaning with the
cooktop cleaning cream leaves a protective coating which helps in preventing
scratches and abrasions.
For sugar]/spillovers:
Sugary spills can chemically damage your cooktop surface. Therefore you must
begin cleaning the spills while the cooktop is still hot. Usecaution when following
the steps below.
1. Turn off all surface units and remove all pans immediately.
2. Wearing an oven mitt, wipe up carefully or move hot spills away from the
element area with a clean damp cloth.
3. Allow the cooktop to cool. Follow the instructions above for heavy, burned-on
soil.
COOKTOP CLEANING/POLISHINGCREAM can be purchased through authorized
service centers or major department stores.
22
Page 23

Cleaning the Appliance (continued)
Cleaning the Regular Oven (Non self-clean oven)
Make sure the oven iscool and that all control knobs are at OFF position. Cleaning the oven is
a lot easier when the door is removed.
1. Removethe oven door; see" To Remove and Replace Oven Door" section in this manual.
2. Empty the oven including the racks.
3. You can wash the broiler pan, grid and racks in the kitchen sink.
4. Clean oven lining thoroughly with soap and a wet cloth and wipe with a dry cloth.
Toremove burned-on fat on oven walls, moisten soiled parts with household ammonia, using a
wet cloth. Follow suggested manufacturer's cleaning method. (Do not remove the oven door
when using ammonia.)
Complete cleaning with a damp cloth and use a fine steel wool or scouring agent if necessary.
The lower element can be moved up for cleaning purposes.
5. Replace racks in the oven. Reinstall oven door.
Cleaning the Self-Clean Oven (some models)
Adhere to the following cleaning precautions:
• AIIowthe oven to cool before cleaning.
• Wear rubber gloves when cleaning any exterior parts of the oven manually.
During the self-cleaning cycle, the outside of the wall oven can become very hot to the touch. DO NOT leavesmall
children unattended near the appliance.
The health of some birds is extremely sensitive to the fumes given off during the self-cleaning cycle of
any range.
Move birds to another well ventilated room.
Before cleaning any part of the oven, be sure the electronic oven control isturned off or else push CANCEL pad.
Wait until the oven iscool.
DO NOT usecommercial oven cleaners or oven protective coatings in or around any part of the self-cleaning oven. DO NOT clean
the oven door gasket. The gasket on the oven door is essential for a good seal. Care should be taken not to rub, damage or move
the gasket. DO NOT use any cleaning materials on the gasket. Doing so could damage it. DO NOT usealuminum foil to line the
oven bottom. This may affect cooking or foil could melt and damage the oven surface.
A self-cleaning oven cleans itself with high temperatures (well above cooking temperatures) which eliminate soil completely or
reduce it to a fine powdered ashyou can whisk away with a damp cloth.
Preparing the Oven for Self-Cleaning
1. Remove any excess spillovers in the oven cavity before starting the self-cleaning
Hand
cycle. Toclean, use hot soapy water and a cloth. Large spillovers can cause heavy
smoke or fire when subjected to high temperatures. DO NOT allow food spills with
a high sugar or acid content (such as tomatoes, sauerkraut, fruit juices or pie filling)
to remain on the surface asthey may cause a dull spot even after cleaning.
2. Clean any soil from the oven frame and the door liner (seeillustration). These areas
heat sufficiently during a self-clean cycle to burn soil on. Clean with soap and
water.
3. Remove the broiler pan and insert, all utensils and any foil. These items do not
withstand high cleaning temperatures.
4. Oven racks may be left in the oven or may be removed. Ifthey go through the clean
cycle, their colour will turn slightly dull. After the cycle is completed and the oven
Do Hand Do Not Hand
Clean Door Clean Seal
hascooled, rub the sides of the racks with wax paper or a cloth containing a small
amount of baby oil or salad oil. This will make the racks glide easier.
23
Page 24

Cleaning the Appliance (Continued)
AUTOMATIC LOCK OFF OF THESURFACEELEMENTS (30" models with a self-cleaning oven only)
Duringtheself-cleancycle,the surfaceelements,whenused,aresubjectedto highheat.Toensuremaximumelementlife,a safeguard
locksoff theuseofthe surfaceelementsduringtheself-cleancycle.Oncetheovencleaningcycleiscompleteandthe ovendoorcanbe
opened,the surfaceelementscan beutilized.
What to Expect During Cleaning
While the oven is in operation, the oven heats to temperatures much higher than those used in normal cooking. Sounds of metal
expansion and contraction are normal. Odor isalso normal as the food soil is being removed. Smoke may appear through the oven
venL located on the top of the control panel.
If heavy spillovers are not wiped up before cleaning, they may flame and cause more smoke and odor than usual. This is normal
and safe and should not cause alarm. If available, use an exhaust fan during the self-cleaning cycle.
NOTE: A smoke eliminator in the oven vent converts most of the soil into a colourless vapor.
Setting the Controls for a Clean Cycle
For the setting of the clean cycle, refer to the section on the timer or Electronic oven control.
Upswept lift cooktop (some models)
On some models, the cooktop, when equipped with coil elements, carl be raised to facilitate
cleaning of the panel.
Toraise the cooktop, grab the sides and lift from the front. Use the two sliding wire supports
located on each side of the cooktop and pull them toward you, to the lock position, in order to
maintain the cooktop in the raised position while cleaning the panel.
Lower the cooktop slowly; be careful not to pinch fingers. Do not let the
cooktop fall freely, asthis may damage the porcelain finish.
To Remove and Replace the Oven Door
1. Open the door fully.
2. Pull up the lock located on both hinge supports and engage them in the hook of the hinge levers. You may have to apply a
little downward pressureon the door to pull the locks fully over the hooks.
3. Grab the door bythe sides, pull the bottom of the door up and toward you to disengage the hinge supports.
Keep pulling the bottom of the door toward you while rotating the top of the door toward the range to completely disengage
the hinge levers.
4. Proceed in reverse to reinstall the door.
Make sure the hinge supports are fully engaged before unlocking the hinge levers.
o
Lock in normal
position
Lock engaged
for door removal
24
HINGE SLOT
Door removed from
the range
Page 25

Removable Outer Door Glass Panel (somemodels)
Applicable only to models with an external glasspanel not held with a frame. This design allows you to clean the insideface of the
exterior door panel as well asthe hidden face of the door inner glass.There aretwo different kinds of glass panel; one with a lower
metal trim fixed on the underside of the glass panel and the other one with a lower metal support rail.
To remove the external door glass panel:
1. Pull the door off the range as per instructions under "To Remove and Replace Oven Door" in "Cleaning the Appliance"
section and lay the door flat.
2. Using a screwdriver, remove the screws fastening the glass lower metal trim or the glass assembly.
3. Grab both sidesof the glass panel and slowly pull it out of the door upper moulding. Laythe glass flat.
Handle the glass panelwith care. When dropped on a corner the glass panel may shatter in multiple fragments and
you could get hurt.
DO NOT remove the lower metal trim, which is fixed on the underside of the glass panel.
To replace the external door panel:
1. Grab the sides of the glass panel and carefully insert the glass into the door top moulding.
2. Replace the glass lower trim or the glass assembly using the locking screws.
3. Replacethe door onto the range as per "To Remove and Replace Oven Door" in "Cleaning the Appliance" section.
To Remove/Replace Storage Drawer
To remove the Drawer:
Push down the left latch
and pull up the right latches.
Pull drawer out
of range.
To Remove/Replace the Storage Drawer with Extendable Glides (some models)
Use the storage drawer for storing cooking utensils. The drawer carl be removed to facilitate
cleaning under the range. Usecare when handling the drawer.
To Remove the Drawer:
1. Pull out the empty drawer until it stops.
2. Pushdown the left glide latch and pull up the right glide latch.
3. Pull drawer out of the range.
_ROLLER
/
RAILS
To Replace the Drawer:
1. Slide the drawer rails over the glides.
2. Pushthe drawer back into the range.
To
Remove/Replace the Storage Drawer with Rollers (some models)
To Remove the Drawer:
1. Pull the empty drawer out to the roller guide stop.
2. Tilt the drawer up and pull it out over the rollers.
To Replace the Drawer:
1. Insert the rear end of the drawer into the opening.
2. Fit the drawer end rollers onto the guide rails.
3. Pushthe drawer in until it stops, then lift to allow the rollers to clear the roller guide stop,
and push in.
25
Page 26

Warmer Drawer (some models)
Setting Warmer Drawer Controls
To Operate the Warmer Drawer
Your range is equipped with a warmer drawer. The purpose of the warmer drawer is to keep hot cooked foods at serving
temperature. Always start with hot food. It is not recommended to heat cold food in the warmer drawer.
All food placed in the warmer drawer should be coveredwith a lid or aluminum foil to maintain quality. Do not cover crisp foods.
Do not use plastic wrap to cover food. Plastic may melt onto the drawer and be very difficult to clean.
Use only dishware, utensils and cookware recommended for oven use in the warmer drawer.
Always use potholders or oven mitts when removing food from the warmer drawer as cookware and plates are hot.
Note: Use the warmer drawer to keep hot foods hot such as:vegetables, gravies, meats, casseroles, biscuits and rolls, pastries and
heated dinner plates.
Note: The warmer drawer isequipped with a catch which may require extra force when opening and closing the drawer.
• Indicator Light
The indicator light islocated below the thermostat control. It turns on when the control isset, and stays on
until the control is turned off. The warmer drawer is inoperable during the self<lean cycle. The indicator
light will not come on during the self<lean cycle.
To Set the Thermostat Control
The thermostat control is usedto select the temperature of the warmer drawer. It islocated on the control
panel. To set the thermostat, push in and turn the knob to the desired setting. The temperatures are
OFF
approximate, and are designated by MAX, MED and MIN. The control can be set to the three settings, or
anywhere between.
1. Select the temperature setting.
2. For best results, preheat the drawer before adding food. An empty drawer will reach the HI
setting in about 18 minutes, the Med setting in about 15 minutes and the MIN setting in about
12 minutes.
WARM& SERVE
3. When done, turn the thermostat control to OFFposition.
DRAWER
iiiiii,
Appearence and graphics may be differents I
Temperature Selection
Refer to the chart in the side column for recommended settings. If a particular food
isnot listed, start with the medium setting. If more crispness is desired, remove the
lid or aluminum foil.
Most foods can be kept at serving temperatures by using the medium setting.
When a combination of foods are to be kept warm (for instance, a meat with 2
vegetables and rolls), use the high setting.
Refrain from opening the warmer drawer while in useto eliminate lossof heat from
the drawer.
To Warm Serving Bowls and Plates
Heat bowls and plates on the MIN setting. Place empty dishes on the rack to raise
them off drawer bottom. Tofurther heat dishes or to heat fine china, check with the
manufacturer for maximum heat tolerance.
IMPORTANT: The warmer drawer will be turned off automatically when the oven is
in a self<leaning mode. The warmer drawer can be used immediately after the
clean cycle is ended.
Warmer Drawer Recommended
Food Settings Chart
Food Item Setting
Bacon MAX
Biscuits MED
Casseroles MED
Eggs MED
Empty Dinner Plates MIN
Fish, Seafood MED
Fried Foods MAX
Gravies MED
Ham MED
Hamburger Patties MAX
Pancakes,Waffles MAX
Pastries MED
Pies MED
Pizza MAX
Pork Chops MAX
Potatoes (baked) MAX
Potatoes (mashed) MED
Poultry MAX
Roasts (Beef, Pork, Lamb) MED
Rolls, soft MIN
Rolls, hard MED
Vegetables MED
26
Page 27

Warmer Drawer (some models)
Arranging Warmer Drawer Rack Positions
Set the warmer drawer rack in the vertical position asshown below.
The rack can be used in 2 ways:
• In the upright position to allow low profile food items to be placed both under and on top of the rack (for example, rolls or
biscuits on top of the rack and a casserole dish under).
• In the downward position to allow you to place light weight food items and empty dishware (for example, rolls or pastries and
dinner plates).
Upright Position
Downward Position
Warmer Drawer General Cleaning
To Remove and Replace Warmer Drawer
To Remove Warmer Drawer:
1. _urn power off before removing the warmer drawer.
2. Open the drawer to the fully opened position.
3. Locate the latches on both sides of the warmer drawer. The left latch is visible. However, the right side is not and is located
inside the drawer glides.
4. Pull up on the left glide latch while inserting a screwdriver over the right latch and pushing down.
5. Pull the drawer away from the range.
6. Toclean warmer drawer, gently scoure with a soapy scouring pad, this will remove most spots. Rinsewith a 1:1 solution of clear
water and ammonia.
If necessary, cover difficult spots with an ammonia-soaked paper towel for 30 to 40 minutes. Rinsewith clean water and a damp
cloth, and then scrub with a soap-filled scouring pad. Rinseand wipe dry with a clean cloth. Remove all cleaners or the porcelain
may become damaged during future heating. DO NOT use spray oven cleaners on the cooktop.
To Replace Warmer Drawer:
1. Align the glide latches on both sides of the drawer with the slots on the drawer.
2. Pushthe drawer back into the range.
Electrical Shock Hazard can occur and result in
serious injury or death. Disconnect appliance from electric power
before cleaning and servicing the warmer drawer.
Pull up on left glide latch while
inserting a screwdriver over
the right latch and
pushing down.
27
Page 28

Avoid Service Checklist
Before you call for service - read this
You may save the cost and inconvenience of an unnecessary servicecall byfirst reviewing this easyto useAvoid-Service Check List
of the most frequently encountered situations that are not the result of defective workmanship of materials.
You will be charged for a service call while the appliance is in warranty if the problem is not caused by defective product
workmanship or materials.
Your new appliance is a carefully engineered product. Many times, what appears to be a reason to call for service requires nothing
more than a simple adjustment you can easily make in your own home or is normal operating characteristic of appliance under
certain conditions.
This list isapplicable to a variety of models; some of the items will not necessarily apply to your appliance.
PROBLEM POSSIBLECAUSE/SOLUTION
INSTALLATION
Range is not level. Poor installation. See the suggested levelling instruction in the "General Information"
section of this manual. When oven is level, cooktop may not appear to be level with
countertop if the latter is not level.
Be sure floor is level and can adequately support range. Contact carpenter to correct
sagging or sloping floor.
Kitchen cabinets misalignment may make range appear to be unlevel. Besure cabinets are
square and have sufficient room for range clearance (1.3 cm (1/2") each side).
RANGE DOESNOT OPERATE
Entire range does not operate. House fuse has blown or circuit breaker has tripped. Check and/or replace fuse or reset
circuit breaker.
Cord/plug not plugged into wall outlet. Make sure cord plug isplugged tightly into outlet
(Canada only).
Power outage. Check house lights to be sure.
Oven does not operate. No power to range. See steps "Entire range does not operate" above.
Oven selector control knob (some models) set between two positions. Turn selector control
knob to BAKE or BROIL,etc. and make sure surface signal lights turn on.
Make sure the oven temperature control knob isset to the desired temperature.
Oven control beeps and displays -El -, -F3- or -F9-. Electronic control has detected a fault
condition. Pushthe CANCEL pad to clear the display and stop the beeping. Reprogram the
oven. If fault recurs, record the fault number push the CANCEL pad and contact an
authorized servicer.
Oven timer set on "time bake" function. Cancel the time bake function.
28
Page 29

Avoid Service Checklist (continued)
PROBLEM POSSIBLECAUSE/SOLUTION
RANGE DOESNOT OPERATE
Surface elements do not heat.
Oven light does not work. Burned-out light bulb. See "Oven Lamp" in the "General Information" section.
Control panel light does not oper- Lamp loose in sockets or burned-out. See Fluorescent Lamp in General Information section.
ate (some models).
SURFACEUNITS
No power to range. Check steps "Entire range does not operate" above.
Control knobs set too low. At very low heat settings of the control knobs, the surface signal
light may come on; however, surface unit does not operate. Turn the control knob to a
slightly higher setting until the elements start heating.
Coil elements not seated properly in terminals. Turn temperature control knobs to OFF.Pull
out and lift up coil elements. Straighten terminals on end of coil element if necessary.
Replaceelements properly into the element block.
Incorrect surface control knob turned on. Make sure the correct surface control ison for the
surface unit to be used.
The automatic lock off of the surface element is on (models with self-cleaning oven only).
During the self-clean cycle, the surface elements, when used, are subjected to high heat. To
ensure maximum element life, a safeguard locks off the useof the surface element during
the self clean cycle. Once the oven cleaning cycle is complete and the oven door can be
opened, the surface elements can be utilized. Cancel the self clean cycle.
Surface elements too hot or too
cold.
Liquids boil at LOW setting of sur-
face units.
CERAMIC GLASS COOKTOP
(some models)
Scratches or abrasions on cooktop
surface.
NOTE: Clean sugary food spills on the heating surfaces as soon aspossible, as these can cause cratering of these surfaces when
hot.
Raiseor lower setting until proper amount of heat is obtained.
Useonly flat bottom, evenly balanced, medium or heavy-weight cookware. Panshaving a
flat bottom heat better than warped pans. Cookware material affects heating. Heavy and
medium weight pans heat evenly. Because lighbweight pans heat unevenly, foods may
burn easily.
Incorrect setting of the control knob. Turn control knob to a lower setting.
Cooking on right rear element. When the oven isoperating, heated air escapesthrough the
oven vent located directly under the right rear end coil element or little behind it. This will
increase the heat input.
See "Ceramic Glass Cooktop" section in "General Information" section.
29
Page 30

Avoid Service Checklist (continued)
PROBLEM POSSIBLECAUSE/SOLUTION
POOR BAKING RESULTS
Baked foods too done or not
done enough.
Baked foods not evenly browned
and/or raised.
Baking time too long. Frequently opening the oven door to check doneness. Oven temperature drops 10°C (18°F)
Actual oven temperature and cooking times may vary from recipe or box instruction. Ifthis
is a new range, temperatures may differ from your old range. Older ovens may drift in
temperature. You may have to adjust your favorite recipe times and temperatures.
Usethe pan size recommended in the recipe. Except when baking pies or breads, set the
oven temperature control 13°C (25°F) lower when using glass pans.
A covered pan should not be used for baking, unless s_ecified in the recipe. Foods baked in
covered pans do not brown well.
Useclean, shiny pans. Blackened pans may cause burning of bottom. Useflat bottom pans.
Warped pans may cause uneven baking.
If bottom of foods burns, raise the rack. If top of foods is too brown, lower the rack.
or more each time door is opened. Set for shortest baking time and check baking process
only at end of set time. Check baking progress through the window if available.
Placing a very large pan or several smaller pans very close together on one rack does not
allow proper circulation of the oven air around the pans.A cookie sheet or sheet pan should
not cover the entire oven rack. Allow at least 5.1 cm (2 in.) of space for air circulation on all
sides of baking pan(s) and between pans and sides of the oven. When two racksare used,
stagger pans so one is not directly above the other.
It will take approximately 10 minutes for the oven to reach the temperature setting. Better
results will be obtained by pre-heating the oven before placing foods to be baked.
Oven steaming. Moist foods may cause oven steaming. Cover the dish if appropriate for the food being
cooked.
BROILING
Oven smokes excessively during
broiling.
Open the door to the broil stop position.
Add 3 to 4 cups of water in the broiler pan to completely cover the bottom of the pan. Position
food on grid and broil. The water catches the greasefrom the broiling food, cools the grease
and reduces smoking.
Meat too close to the element. Lower the rack.
Removeexcessfat from the meat. Slashremaining fat edges to prevent curling; do not cut
into lean.
Always place the grid on the broiler pan with the slots down to allow grease to drip into the
pan.
Grease has built up on oven surfaces. Regular cleaning is mandatory when broiling
frequently. Old grease or food spatters cause excessivesmoking.
30
Page 31

Avoid Service Checklist (continued)
POSSIBLECAUSE/SOLUTIONPROBLEM
SELF-CLEANING OVEN
(SOME MODELS)
Self-clean cycle does not work.
Soil not completely removed after
self-cleaning cycle.
Follow steps specified in this manual for appropriate settings of controls.
Door was not closed properly. Close door and start appropriate clean cycle again.
Failureto clean the bottom or front top of oven or door area, these surfaces get hot enough
to burn on residue. Self cleaning of area underneath a closed door is not efficient. Clean
these areas before the self-cleaning cycle isstarted. Burned on residue may be cleaned with
a stiff nylon brush and water or nylon scrubber. Be careful not to damage the oven seal.
Clean cycle too short. Put oven through an additional cycle.
Check for temporary lossof power. Resetthe controls and put the oven through another
self-clean cycle.
Avoid Transportation Damage to your Range
If you have to move your range into/out of your residence or when moving to a new home, it is suggested that you take the
following precautions:
1. Screw in the levelling legs under the range.
2. Remove the racks and other utensils from the oven, and from the lower drawer.
3. Useadhesive tape to firmly secure the door and the drawer to the side panels. Also attach the electric power cord in the same
manner.
4. Usea two-wheeled dolly with strap and fasten the range to it. Cover the appliance with a heavy blanket to prevent scratches
and dents.
5. Avoid pulling or pushing the control panel when moving the appliance.
31
Page 32

Warranty Information
RANGE WARRANTY
Your range is protected by this warranty
FULL ONE-YEAR
WARRANTY
LIMITED 2_-5 TM
YEAR WARRANTY
(Glass Smoothtop,
Seal & Elements I
LIMITED
WARRANTY
(Applicable to the
State of Alaska)
WARRANTY
PERIOD
One year from original
purchase date
Second through fifth
years from original
purchase date
Time periods list ed Costs of the tec hnician's travel to the home and any costs for pck
above, up and del very of the appliance reqLJ red beta ose o _ ser vice.
TFR OUGH O UR AUTHORIZE D S ERVICER S,
Pay all costs for repair ng or replacing aW parts of this
appliance which prove to be defective in materials or
workmanship.
Provide a replacement for any defective surface heating
element, deleriorated rubber_ed-silicc_e seal (up6wept
mo_ls only), or glass smoothtop that cracks due to
t f_rmal breakage (not customer abuse).
All of tb_ provMonsof the fulland limitedwarranties
a bove and the exclusions I_ted below apply.
WE WILL:
THE CONSUMER WILL BE RESPONSIBLE FOR:
Costs of servTce calls that are Isted under NORMAl.
RESPO NSIBILIllES O F THE CO NSUMI_, *
Diagnostic and any transportation and labor costs which are
required because of service.
In the U.S.A., your appliance is warranted by Electrolux Home Products North America, a division of White Consolidated industries, Inc. We authorize
no person to change or add to any of our obligations under this warranty. Our obligations for service and parts under this warranty must be
performed by us or an authorized Electrolux Home Products North America servicei In Canada, your appliance is warranted by Electrolux Canada
Corp.
*NORMAL
RESPONSIBILITIES
OF THE CONSUMER
This warranty applies only to products in ordinary household use, and the consumer is responsible for the
items listed below:
1, Proper use of the appliance in accordance with instructions provided with the product,
2, Proper installation by an authorized servicer in accordance with instructions provided with the appliance and in
accordance with all local plumbing, electrical and/or gas codes.
3, Proper connection to a grounded power supply of sufficient voltage, replacement of blown fuses, repair of loose
connections or defects in house wiring.
4, Expenses for making the appliance accessible for servicing, such as removal of trim, cupboards, shelveSretC.,
which are not a part of the appliance when it was shipped from the factory.
5. Damages to finish after installation.
6, Replacement of light bulbs and/or fluorescent tubes (on models with these features),
EXCLUSIONS
This warranty does not cover the following:
1, CONSEQUENTIAL OR INCIDENTAL DAMAGES SUCH AS PROPERTYDAMAGE AND INCIDENTAL EXPENSES
RESULTINGFROM ANY BREACH OF THISWRITTEN OR ANY IMPLIED WARRANTY.
NOTE: Some states do not allow the exclusion or limitation of incidental or consequential damages, so this
limitation or exclusion may not apply to you.
2, Service calls which do not involve malfunction or defects in workmanship or material, or for appliances not in
ordinary household use. The consumer shall pay for such service calls.
3, Damages caused by services performed by servicers other than Electrolux Home Products North America or its
authorized servicers; use of parts other than genuine Electrolux Home Products parts; obtained from persons
other than such servicers; or external causes such as abuse, misuse, inadequate power supply or acts of God.
4. Products with original serial numbers that have been removed or altered and cannot be readily determined,
IF YOU NEED
SERVICE
Keep your bill of sale, delivery slip, or some other appropriate payment record, The date on the bill establishes the
warranty period should service be required, if service is performed, it is in your best interest to obtain and keep all
receipts. This written warranty gives you specific legal rights. You may also have other rights that vary from state to
state, Service under this warranty must be obtained by contacting Electrolux Home Products:
USA
1.800.944.9044
Electrolux Home Products
North America
RO. Box 212378
Augusta, GA 30917
Canada
1.866.294.9911
Electrolux Home Products
North America
802, boul. L'Ange-Gardien
L'Assomption, Quebec
JSW 1T6
This warranty only applies in the 50 states of the U.S.A., Puerto Rico, and
Canada. Product features or specifications as described or illustrated
are subject to change without notice. All warranties are made by
Electrolux Home Products North America, a division of White Consolidated
Industries, inc. In Canada, your appliance is warranted by Electrolux
Canada Corp,
Page 33

dleccriq u es
Consultez notre site web Frigidaire a:
http ://www.frig ida ire,corn
CONTENU Page
Enregistrement du produil 2
Mesuresde securite importantes 3-4
Instructions d'installation 5-6
Lampedu four 6
Lampede surface 6
Coupe-circuit de protection.............................................7
Reglagedes commandes desfoyers de surface .............7
Modeles avec minuterie a touches capacitives ...............7
Choix des ustensiles de cuisine
pour la cuisson sur lesfoyers .........................................7
Casseroleset sous-plats particuliers ............................... 8
Conseilset renseignementssur la mise en conserve ......8
Cuissonau four ............................................................... 9
Circulation d'air dans le four ...........................................9
Voyants lumineux ..........................................................10
Cuisson par convection.................................................10
Rotissage par convection ..............................................10
Systemede cuisson rapide (certains modoles) .............11
Cuissonau gril ..............................................................12
Reglagedu four ............................................................. 12
Surface decuisson vitroceramique-foyers sans ESEC,.13
Surface de cuisson vitroceramique-contrOlesESEC14-17
Surface de cuisson vitroceramique-entretien .......... 18-19
Reglagede la commandede la zonerechaud...............20
Nettoyagede I'appareil............................................ 21-24
Enleveret reinstaller la porte .........................................24
Porteavec vitre exterieuredemontable ......................... 25
Retirer/replacerle tiroir de rangement...........................25
Tiroir-Rechaud (certains modeles) .......................... 26-27
Liste des verifications preventives .......................... 28-31
Garantie.........................................................................32
LISEZ ET CONSERVEZ CES INSTRUCTIONS 318200427 (0211) Rev. A
Page 34

Enregistrement du
produit
Merci d'avoir choisi cet appareil. Lesrenseignements contenus dans ceGuide de
I'utilisateur expliquent comment utiliser et entretenir I'appareil. Lisezlesdocuments
qui accompagnent I'appareil pour en savoir davantage sur cet appareil.
Enregistrez votre appareil
LaCARTED'ENREGISTREMENTdoit etre
remplie avecsoin, puissigneeet retournee
a lacompagnie Produits Electrolux Nord-
Americains.
Enregistrez les numeros de modele et de serie de votre appareil
Ecrivezci-dessous ces numeros que vous trouverez sur la plaque signaletique qui se
trouve sur lecadre avant de la cuisiniere et qui est visible Iorsqueletiroir est ouvert.
Numero de modele:
Numero de serie:
Date d'achat:
Ce guide donne des instructions generales pour votre appareil et des renseignements
s'appliquant a plusieurs modeles. Votre appareil peut ne pas avoir toutes les
caracteristiques decrites. Lesfigures montrees dans cemanuel sont representatives
et peuvent ne pas illustrer identiquement lescaracteristiques de votre appareil.
Note: Lesinstructions donnees dans ceguide ne couvrent pastoutes lesconditions
et situations possibles. Faitespreuve de bon senset de prudence Iorsde I'installation,
de I'emploi et de I'entretien de tout appareil menager.
Important: Garder votre facture.
Laperiode de lagarantie debute ala date indiquee. Placez-ladans un endroit o0 vous
laretrouverez facilement. Sivous devezfaire reparer votre appareil alorsqu'il estsous
garantie, on pourrait exiger de voir votre facture.
_ 2001 Electrolux Canada Corp,
Tous droits reserves
Page 35

MESURES DE SleCURITle IMPORTANTES
Lisez ces instructions avant d'utiliser I'appareil.
Conservez ces instructions pour references futures.
Ce guide contient des instructions et symboles de securite importants. Veuillez faire particulierement attention a ces symboles
et suivre les instructions donnees. Voici une breve explication de ces symboles.
Ce symbole vous previent dessituations qui risquent d'entrainer de graves blessures, la mort ou des
dommages materiels.
Ce symbole vous previent des situations pouvant entrainer des blessures ou dommages materiels.
• Enlevez tout le ruban et le materiau d'emballage avant
d'utiliser la cuisiniere. Detruisez le cartonnage et les sacs en
plastique apres le deballage de I'appareil. Ne laissez]amais les
enfants]ouer avec les materiaux d'emballage.
• Installation - Assurez-vous que I'appareil est correctement
installe et mis a la terre par un technicien qualifie,
conformement a la derniere edition de la norme C22.1 de
I'ACNOR, code canadien de I'electricite, partie 1, ainsi qu'aux
codes de la region. N'installez I'appareil que selon les instructions
d'installation fournies dans la documentation.
Demandez a votre marchand de vous recommander un technicien
qualifie ainsi qu'un centre de reparation autorise. Sachez comment
couper le courant eJectrique de la cuisiniere a la boite de fusibles
ou au coupe<ircuit en cas d'urgence.
• Entretien par I'usager - Ne reparez pas ou ne remplacez pas
des pieces de I'appareil a moins d'une recommandation
precise darts les guides. Toutes les reparations doivent etre faites
par un technicien qualifie, afin de reduire les risques de blessure et
de dommage a I'appareil.
• Ne modifiez jamais I'appareil, que ce soit en enlevant des
panneaux, protege-fils, ou toute autre piece.
II peut _tre dangereux pour les
personnes ou dommageable pour I'appareil de monter,
s'appuyer, ou s'asseoir sur la porte ou le tiroir de la cuisiniere. Ne
permettez pas aux enfants de grimper ou de ]ouer autour de la
cuisiniere. Le poids d'un enfant sur une porte ouverte peut faire
basculer I'appareil et causer des brulures ou d'autres blessures.
N'utilisez pas la cuisiniere pour
entreposer des articles.
• Rangement dans ou sur I'appareil - Ne rangez pas dans le four,
ou pres des elements, ou dans le tiroir de I'appareil, des
materiaux inflammables. Ceci inclus des papiers, plastiques,
tissus, livres de cuisine, objets en plastique et torchons, ainsi que
des liquides inflammables. N'y posez pas ou ne rangez pas des
produits explosifs comme une bombe aerosol. Les produits
inflammables pourraient exploser et allumer un feu ou causer des
dommages materiels.
Ne rangez pas des articles pouvant interesser
les enfants dans les armoires au-dessus de la cuisiniere ou sur le
dosseret. Ne laissez pas les enfants grimper sur I'appareil pour saisir
des articles, ceci pourrait leur causer des blessures graves.
• Ne laissez pas les enfants seuls ou sans surveillance darts un
lieu ou un appareil fonctionne. Ne les laissez]amais s'asseoir ou
se tenir debout sur une piece quelconque de I'appareil.
NE TOUCHEZ PAS AUX ELEMENTS DE SURFACE, AUX ZONES
A PROXIMITE DE CEUX-CI, AUX ELEMENTS DU FOUR, OU AUX
SURFACES INTERIEURES DU FOUR. Les elements de surface et
ceux du four peuvent etre tres chauds, meme s'ils sont de couleur
foncee. Les zones pres des elements de surface peuvent devenir
suffisamment chaudes pour causer des brulures. Pendant et apres
toute utilisation, ne touchez pas et ne laissez pas vos vetements ou
d'autres produits inflammables venir en contact avec ces zones, a
moins qu'elles aient eu le temps de se refroidin Ces zones
comprennent la surface de cuisson, les surfaces orientees vers elle,
la sortie d'air chaud du four et les zones a proximite, la porte du
four et la fenetre.
Portez des v_tements appropries-Ne portez jamais de
v_tements amples ou flottants en utilisant cet appareil. Ne
laissez pas les materiaux inflammables et les vetements venir en
contact avec des surfaces chaudes.
N'utilisez jamais votre appareil pour
rechauffer ou chauffer une piece.
• N'eteignez pas les feux de friture avec de I'eau ou de la
farine--Etouffez les feux avec un couvercle ou du bicarbonate
de soude, ou avec un extincteur a poudre seche ou a mousse.
• En chauffant de I'huile ou de la graisse, restez pres de
I'appareil. La graisse ou I'huile peuvent prendre feu si elles
devenaient trop chaudes.
N'utilisez que des gants isolants secs-Des gants mouilles ou
humides en contact avec des surfaces chaudes peuvent causer
des brt_lures par la vapeur. Ne laissez pas les gants isolants
toucher les elements. Ne vous servez pas de torchon ni de chiffon
la place d'un gant.
• Ne rechauffez pas des contenants non ouverts-I'accumulation
de pression peut faire exploser le contenant et blesser.
• Enlevez la porte de toute cuisiniere inutilisee qui doit _tre
entreposee ou mise aux rebuts.
IMPORTANT-N'essayez pas de faire fonctionner la cuisiniere
pendant une panne de courant. Lorsqu'il se produit une panne
de courant, eteignez toujours le four. Sice dernier n'est pas
eteint, il recommencera a chauffer Iorsque le courant reviendra. Les
aliments laisses sans surveillance pourraient prendre feu ou se
deteriorer.
Les temperatures froides peuvent endom-
mager le contr61eur electronique. Si c'est la premiere fois que
vous faites fonctionner la cuisiniere, ou qu'elle n'a pas ete
utilisee depuis Iongtemps, assurez-vous que celle-ci a ere ex-
posee a une temperature au dessus de 0°C/32°F pendant au
moins 3 heures avant de mettre I'appareil sous tension elec-
trique.
3
Page 36

MESURES DE SI CURITI IMPORTANTES suite
INSTRUCTIONS DE SECURITE IMPORTANTES
POUR L'UTILISATION DE VOTRE SURFACE DE CUISSON
• Vous devez savoir quel bouton commande chacun des
elements de la surface de cuisson.
• Utilisez la grosseur de casserole appropriee -Get appareil
est equipe d'un ou de plusieurs elements de differentes
grosseurs. Choisissez les ustensiles ayant un dessous plat assez
large pour recouvrir I'element chauffant. Si vous utilisez des
ustensiles trop petits, une partie de I'element sera a decouvert,
et les vetements entrant directement en contact avec I'element
sont susceptibles de prendre feu. L'utilisation d'ustensiles d'une
taille proportionnelle a I'element ameliore aussi le rendement.
• Les poignees d'ustensiles doivent _tre tournees vers
I'interieur, sans surplomber les elements adjacents, afin de
reduire les risques de brulure, de combustion et de
renversements causes par le contact involontaire avec un
ustensile.
• Ne laissez jamais les elements sans surveillance. Les
debordements causent de la fumee, les eclaboussures de
graisse sont susceptibles de prendre feu et les ustensiles dont le
contenu s'est evapore peuvent fondre.
• Protecteurs - N'utilisez pas de papier d'aluminium pour
recouvrir le fond du four ou toute autre pattie de la cuisiniere.
Utilisez seulement le papier d'aluminium pour recouvrir la
nourriture durant la cuisson au four. Toute autre utilisation de
protecteurs ou de papier aluminium est susceptible de causer
un choc electrique, un feu ou un court-cir(:uit.
• Ustensiles vitrifies -En raison des brusques changements de
temperature, on ne peut utiliser avec la surface de cuisson que
certains ustensiles en verre, en vitroceramique, en ceramique ou
en terre cuite, ou autres ustensiles vitrifies, sans risquer qu'ils se
fendent. Verifiez les recommandations du fabricant quanta leur
utilisation sur une surface de cuisson.
POUR SURFACE DE CUISSON
VITROCERAMIQUE SEULEMENT
• Ne cuisinez pas sur une plaque de cuisson brisee. Sila plaque
se brise, les solutions nettoyantes et les eclaboussures peuvent
penetrer dans la plaque de cuisson brisee, et creer un risque de
choc electrique. Communiquez avec un technicien qualifie
immediatement.
• Nettoyez soigneusement la plaque de cuisson. Si une
eponge ou un chiffon humide est utilise pour essuyer des
renversements sur une surface chaude, faites attention afin
d'eviter de vous brL_ler par la vapeur. Certains nettoyeurs
peuvent produire de la fumee nocive s'ils sont appliques sur une
surface chaude.
INSTRUCTIONS IMPORTANTES
POUR L'UTILISATION DE VOTRE FOUR
• Soyez prudent en ouvrant la porte du four -Tenez-vous sur
le cote de I'appareil pour ouvrir la porte d'un four chaud. Laissez
d'abord I'air chaud ou la vapeur s'echapper avant de retirer ou
de placer des aliments dans le four.
• Ne bloquez pas les orifices d'aeration. La ventilation du four se
produit atravers la surface de cuisson. Toucher les surfaces de cette
zone pendant le fonctionnement du four peut causer de graves
brulures. Ne placez aucun objet en plastique ou conducteur de
chaleur a proximite de I'event. IIs risquent de fondre ou de prendre
feu.
• Installation des grilles du four. Disposez tOL_jours les grilles
I'emplacement desire Iorsque le four est froid. Enlevez tous les
ustensiles qui se trouvent sur la grille avant de la retirer. Pour
deplacer une grille Iorsque le four est chaud, soyez extremement
prudent. Utilisez des poignees et tenez la grille fermement avec les
deux mains pour la remettre en place. Ne touchez pas I'element
chaud ou I'interieur du four avec des poignees.
• Ne vous servez pas de la lechefrite sans utiliser le couvercle qui
I'accompagne. Le couvercle permet a la graisse de s'egoutter au
fond de la lechefrite, a I'abri de la chaleur intense du gril.
• Ne recouvrez pas le couvercle de la lechefrite de papier
d'aluminium. L'huile et la graisse qui s'y accumulent peuvent
prendre feu.
• Ne touchez pas I'ampoule du four avec un linge mouille pendant
qu'elle est chaude. Si vous le faites, elle risque de se briser.
Debranchez I'appareil ou coupez le courant avant d'enlever
I'ampoule et de la remplacer.
INSTRUCTIONS IMPORTANTES
POUR LE NETTOYAGE DE VOTRE CUISINIERE
• Nettoyez regulierement votre cuisiniere pour enlever la
graisse sur toutes ses parties, car cette graisse risque de pren-
dre feu. Le ventilateur d'evacuation des hottes et lesfiltres de graisse
doivent demeurer propres en tout temps. Ne laissezpas lagraisse s'y
accumuler. Les accumulations de graisse dans le ventilateur
pourraient prendre feu. Reportez-vous aux instructions du fabricant
sur le nettoyage de la hotte.
• Nettoyants/Aerosols -Suivez toujours les recommandations du
fabricant, quanta leur utilisation. Sachez que les residus excessifs de
nettoyeurs et d'aerosols risquent de prendre feu et de causer des
dommages et/ou des blessures.
FOURS AUTONETTOYANTS:
• Ne nettoyez dans le cycle autonettoyant que les parties du four
enumerees dans le present Guide de I'utilisateur. Avant d'utiliser
le cycle autonettoyant, enlevez la lechefrite et tout ustensile se
trouvant dans le four.
• Ne nettoyez pas lejoint d'etancheite de la porte. Faites attention
pour ne pas le frotter, I'endommager ou le deplacer.
• N'utilisez pas de nettoyeur commercial pour four. Vous ne devez
utiliser aucun nettoyeur commercial pour four, ni aucun enduit
protecteur a I'interieur ou sur toute partie du four.
• Retirez les grilles du four. Les grilles changeront de couleur si elles
sont laissees dans le four durant un cycle d'autonettoyage.
Certains oiseaux sont tres vulnerables aux gaz
degages Iors du nettoyage des fours auto-nettoyants; ils doivent
_tre places darts une autre piece, bien aeree.
CONSERVEZ CES INSTRUCTIONS
Page 37

Instructions d'installation
L'installation et le service doivent _tre executes par un technicien qualifie.
Important: conservez ce document pour le presenter a I'inspecteur local d'electricite s'il le
demande. Lisez et conservez ce document pour reference.
Espaces prevus et dimensions
a. Laissezsuffisamment d'espace entre la cuisiniere et les surfaces combustibles adjacentes (1.3cm (1/2') sur les cotes et a
I'arriere).
b. Endroit -Verifiez I'endroit ou la cuisiniere sera installee. Assurez-vous qu'il y a une source d'alimentation electrique
adequate et que le plancher est solide.
c. Lesdimensions qui sont donnees doivent etre respectees. Ces dimensions allouent un minimum dejeu. Lessurfaces en
contact doivent etre solides et de niveau.
VUE DE
L'AVANT
c
762 cm (30')
Minimum "_
Distance minimum (18'/ ducOtegaucheou
du mur de chaque droit
cote de la cuisiniere
91
(36'/
I_ B_
MODELES DIMENSIONS
A
24"
30"
122 cm (48")
Maximum ,,
114,3 cm (45" \_-J ...... X
Porte ouverte ',
61cm
24"
76.2 cm
30"
_- A
t
B C
63.5 crn 61 cm
25" 24"
78.7 crn 76.2 cm
31" 30"
__..=66 cm (26")
LJ_' .....
Espaceminimum de 76,2 cm (30') entre le dessusde la surface de cuissonet le dessousd'une armoire en bois ou en metal non
protegee, ou espaceminimum de 61 cm (24') si lefond de I'armoire en boisou en metal est protege par un panneau resistant au
feu d'au moins 0.64 cm (1/4') recouvert d'une feuille d'acier doux dont I'epaisseur est au moins de 0.038 cm (0.015') si en aci er
inoxidable, de 0.061 cm (0.024') si en aluminimum ou de 0.051cm (0.020') si en cuivre. Un espacede 1.3 cm (1/2') minimum
pour I'arriere et lescotes de la cuisiniereestrequis. Respecteztoutes lesdimensions indiqueesci dessusafin d'eviter desdommages
a la propriete, de creer un danger potentiel d'incendie et de faire desdecoupages incorrects du comptoir et de I'armoire.
I_vitez d'ajouter des espacesde rangement au-dessusde I'appareil pour eliminer tout risque de brulures ou de feu en vous
penchant au-dessus de surfaces chaudes pour prendre desobjets. Si des espacesde rangement doivent Ctre ajoutes, les
risques peuvent etre reduits en installant une hotte qui excede le devant de I'armoire d'au moins 12.7 cm (5").
Branchement
Cet appareil necessite une alimentation electrique de 120/240 ou 120/208 volts correctement mise
a la terre. Branchez le c_ble d'alimentation de la cuisiniere a une prise murale. S'il n'y en a pas,
faites-en installer une par un maitre electricien.
Emplacement
Installez votre nouvelle cuisiniere a 1.3 cm (1/2') du mur arriere et alignez-la
avec les comptoirs de la cuisine. Assurez-vous qu'un espace libre de 1.3 cm
(1/2') est conserve entre les cotes de la cuisiniere et les comptoirs. Espacez
votre cuisiniere d'au moins 7.6 cm (3') minimum de votre refrigerateur s'ils
sont cote a cote.
Nivellement
Pour obtenir de bons resultats de cuisson, votre cuisiniere doit etre de niveau.
Des vis de nivellement sont installees aux quatre coins inferieurs de la
cuisiniere. Pour lesajuster, retirez le tiroir de rangement. (Voir section Tiroir de
rangement).
Modeles 30" Modeles 24"
5
Page 38

Instructions d'installation (suite)
Pour rnettre la cuisiniere de niveau:
1. Utilisez une cle,ouverte de 1-1/4"ou une cle,a molette pour de,visserchacune des quatre vis
de nivellement de deux 8 trois tours.
2. Installez une des grilles dans le centre du four.
3. Installez la cuisinie,rea son emplacement final et de,posezle niveau a bulle sur la grille pour
ve,rifier si le niveau est acceptable. Prenez deux lectures, une avec le niveau place en
diagonale dans le four et I'autre lecture dans I'autre diagonale.
4. Utilisez la cle,1-1/4 "pour ajuster lesvis de nivellement. Tournez chacune d'ellesjusqu'a ce
que I'appareil soit assisfermement sur le plancher sans se balancer.
5. Certains appareils sont supporte,s pardes roulettes a roulement doux qui servent a en faciliter
le de,placement.
DBARRER Sile plancher est d'aplomb et de niveau, ouvrez le tiroir et abaissez lesleviers d'ancrage des
roulettes avants pour empe,cher la cuisinie,re de se de,placer (certains mode,les).
BARRER Sile plancher n'est pas plat ou de niveau, servez-vous des vis de nivellement pour mettre
ANCRAGEDESROULETTESAVANT I'appareil de niveau et le supporter.
(certains des modeles 30"seulement)
Lampe du four
d'autonettoyage. Les hautes temperatures reduiront sa Iongevite.
Pour certains mode,les,la lampe a I'inte,rieurdu four s'allume automatiquement en ouvrant la pore.
La lampe peut e,treallume,e,alorsque la porte estferme,e, grace a I'interrupteur situe,sur ou sous le
panneau de commandes.
Si le four est autonettoyant, la lampe est prote,ge,epar un prote,ge-lampe en verre retenu par une
broche.
CEPROTEGE-LAMPE DOlT ETREEN PLACELORS DEL'UTILISATION DU FOUR.
Pour remplacer la lampe:
ASSUREZ-VOUS QUE LEFOUR ESTSUFFISAMMENT REFROIDI.
1. Coupez la source d'alimentation e,lectrique de I'appareil.
2. Utilisez des gants avec face inte,rieure en cuir comme mesure de se,curite,au cas ou I'ampoule se briserait en la de,vissant.
3. Remplacez I'ampoule par une autre de 40 watts congue pour appareils e,lectrome,nagers.
4. Sile four est autonettoyant, poussez la broche de cote pour libe,rer le prote,ge-lampe, changez la lampe tel qu'explique, ci-haut
et assurez-vous que le prote,ge-lampe est remis en place.
Lampe de surface
(certain modeles)
surface de cuisson sont a la position ARRET "0" et froids.
Actionnez I'interrupteur situe,sur ou sous le panneau de commandes, du cote,droit, pour allumer
ou e,teindre la lampe de surface. Remplacez la lampe fluorescente si elle refuse de s'allumer apre,s
plusieurs essais.
Ne laissez pas la lampe du four allumee pendant le cycle
Assurez-vous que tous les boutons de commande des foyers de la
Lampe de surface installee sous le panneau de commande (certains modeles)
Pour la remplacer:
1. Placezvos doigts sous la lampe a environ 20.3 cm (8') des deux extre,mite,s.
/
Modeles 30"
Lampe de surface installee sur le panneau de commande (certains modeles)
Pour la remplacer:
1. Soulevez le panneau de commande.
2. Placezvos doigts sous la lampe a environ 20.3 cm (8') des deux extre,mite,s.
3. Faitestourner letube de 90° et le tirer vers le bas hors des re,ceptacles.
4. Installez le nouveau tube en I'inse,rant dans les guides des re,ceptacleset tournez-le pour
I'engager en position de fonctionnement; ve,rifiez sila lampe fonctionne correctement.
2. Faites tourner le tube de 90° et le tirer vers le bas hors des re,ceptacles.
3. Installez le nouveau tube en I'inse,rant dans les guides des re,ceptacles et tournez-le pour
I'engager en position de fonctionnement; ve,rifiezsi la lampe fonctionne correctement.
Modeles 24"
Page 39

Coupe-circuit de protection
Comme protection en cas de surcharge, chacune des prises de courant (2 max.) qui se trouvent au dessus du panneau de
commandes est protegee par un Fusible de 15 amperes, 120 volts. Pour les apercevoir, soulevez le couvercle qui se trouve au
dessusdu panneau de commandes. Aucun Fusible ne sera fourni si I'appareil ne comprend pasde prise de courant.
Reglage des commandes des foyers de surface (certains modeles)
OFF
1. Placez le plat sur le foyer.
2. Enfoncez et tournez le bouton de commande du Foyer au reglage desire.
3. La/les lampestemoins des Foyerss'allument Iorsqu'un ou plusieurs Foyerssont utilises. Eteignez
toujours le Foyer avant d'en retirer le plat.
Lesreglages suggeres dans le tableau ci-dessous ont ere obtenus en utilisant des plats en aluminium
d'epaisseur moyenne ou elevee pour la cuisson, avec leur couvercle en place. Cesreglages peuvent
etre differents Iorsque d'autres types de plats sont utilises.
Remarque: La grosseur et le type d'ustensile utilise, en plus de la quantite et du type d'aliment a
cuire influenceront le reglage necessaire pour obtenir de bons resultats culinaires.
Ne deposez pas d'objets en plastique tels que salieres et poivrieres, supports a cuilleres ou
emballages en plastique sur la surface de cuisson Iorsqu'elle est utilisee. Ces items peuvent prendre en ¢eu ou ¢ondre.
Lespoignees, serviettes ou cuilleres en bois peuvent prendre en feu s'ils sont trop pres des fo, ers.
Reglage Type de cuisson
Haul (MAX) Pour debuter la cuisson, pour faire bouillir
de I'eau, pour faire griller de la viande.
Moyen (MED) Pour garder I'eau en ebullition, epaissir les
sauces, cuire les legumes a la vapeur.
Moyen a faible Pour completer lacuisson, faire cuire des
oeufs poches ou du ragout.
Faible (MIN) Pour garder chaud, fondre ou faire mijoter.
Modeles avec minuterie a touches capacitives (seulement)
NOTE: Lorsque que le four est en fonction soiL: pour la cuisson au Four, la cuisson par convection, legrillage ou pour le cycle
autonettoyant, un ventilateur demarre et arrete automatiquement afin de refroidir des pisces internes de I'appareil. C'est
normal et il est possible que ce ventilateur continue de fonctionner meme si le four est a la position arret.
Choix des ustensiles de cuisine pour la cuisson sur les foyers
Pour obtenir de bons resultats et conserver I'energie, choisissezdes ustensiles de cuisine )ossedant les caracteristiques suivantes:
Le fond des casseroles doit 6tre plat. Verifiez
que le fond est plat en faisant tourner une
regle sur le fond de la casserole. II ne devrait
pas y avoir d'espace entre la casserole etla
regle.
Utilisez toujours les ustensiles pour I'usage
auquel ils ont ere consus. Suivez les instruc-
tions du fabricant. Certains ustensiles de
cuisine ne peuvent 6tre utilises au four ou
sur les foyers.
*BON
t t
• Fond plat et cotes droits.
• Couvercles qui ferment
hermetiquement.
• Le poids du manche ne fait pas
basculer la casserole. La casserole est
bien 6quilibree.
• Lestailles des casserolescorrespon-
dent a la quantite d'aliments a faire
cuire.
•Materiau qui conduit bien la chaleur.
• Facilea nettoyer.
II est possible d'utiliser des ustensilesde
cuisine speciaux comme les casserolesa
homard, les plaques chauffantes et les
autocuiseursen s'assuranttoutefois, qu'ils
sont conformes aux exigences ci-dessus.
7
MAUVAIS
•Fondsincurveset ddormes.
•Lacasseroledebordedu bruleurde plus
de 2.5 cm (1 ').
•Manche trop Iourd qui fait basculerla
casserole.
• Le foyer deborde des bords de la casse-
role.
Page 40

Casseroles et sous-plats
particuliers
La plupart des boutiques d'articles de
cuisine et des quincailleries offrent des
woks a fond plat qui conviennent a
cette surface de cuisson. Les woks a
fond rond (pourvus d'un anneau de
support qui ne de,passepas le contour
de I'e,le,ment chauffant) peuvent
e,galement e,tre utilise,s. L'anneau
me,tallique est conqu pour soutenir le
wok de fagon se,curitaire Iorsqu'il
contient une grande quantite, de liquide
(soupe) ou de graisse (friture).
r!_ NE PAS utiliser deux
e,le,ments(sauf si la table de cuisson est
munie d'un e,le,mentallonge,) a la fois
pour chauffer une grande casserole
comme une rotissoire ou une plaque
chauffante, ni laisser chauffer
I'ustensilejusqu'a ce que tout le liquide
s'e,vapore. Dans ces deux cas, le fond
de la casserole risquerait de de,colorer
ou de craqueler la surface e,maille,ede
I'appareil et d'endommager les
e,le,mentsde surface ou la cuvette de
I'e,le,ment(s'il y a lieu).
NE PAS utiliser un wok pourvu d'un
anneau me,tallique de support qui
de,passe le contour de I'e,le,mentde sur-
face. Etant donne, que cet anneau
retient la chaleur, il pourrait endom-
mager I'e,le,ment de surface ou la sur-
face de cuisson.
Dans le cas des surfaces lissesen verre,
seuls les woks a fond plat (sansanneau
de support) peuvent e,treutilise,s.
Conseils et
renseignements sur la
mise en conserve
La mise en conserve
peut ge,ne,rer une grande quantite, de
vapeur. Userd'une grande prudence pour
)re,venir les blessures. Toujours soulever
lecouvercle de faqon a diriger la vapeur a
I'oppose,despersonnes.
$ous-plats metalliques : Ne pas
utiliser de sous-plats me,talliques. Le
fond de la casserole doit e,tre en con-
tact direct avec les e,le,ments de sur-
face.
1. Utiliser des recettes e,prouve,eset suivre les directives attentivement. Consulter
un service de vulgarisation agricole ou un fabricant de bocaux en verre pour les
donne,eslesplus re,centessur lamise en conserve.
2. Utiliseruniquementdescasserolesde miseenconserveafond plat. Lachaleursere,partit
plusuniforme,mentIorsquelefond delacasserolest plat.
3. Centrer la casserole de mise en conserve sur I'e,le,mentde surface.
4. Verser de I'eau chaude dans la casserole et re,gler I'e,le,menta une tempe,rature
e,leve,epour acce,le,rerI'e,bullition; re,duire la tempe,rature le plus possible tout en
maintenant une e,bullition constante.
5. IIestprefe,rabledemettre de petitesquantite,sd'alimentsenconservea lafois.
Pour ne pas endommager la surface de cuisson :
1. Ne pas utiliser lesgrandes casserolesou lesautocuiseurs de mise en conservequi
de,passentde plusde 2,5cm (1") lecontour deI'e,le,mentdesurface.
2. Ne pas laisser les grandes casseroles ou les autocuiseurs de mise en conserve a
une tempe,rature e,leve,etrop Iongtemps.
3. Utiliser un e,le,mentdiffe,rent pour chaque nouvelle charge de mise en conserve
pour permettre a I'e,le,ment eta la surface avoisinante de refroidir. Eviter
d'utiliser le me,mee,le,mentpendant toute unejourne,e pour la mise en conserve.
V!_ Pour que la mise en conserve soit se,curitaire, les micro-organismes
dangereux doivent e,trede,truits et les pots bien scelle,s.Lorsqu'une grande casserole
de mise en conserve est utilise,e, il faut maintenir une e,bullition le,ge,re mais
constante pendant toute ladure,erequise.
Page 41

Cuisson au four
Afin d'obtenir de meilleurs resultats de cuisson, rechauffez le four avant d'y faire cuire des biscuits, pains, g_teaux, tartes ou
p_tisseries, etc. II n'est pas necessairede prechauffer le four pour cuire un roti ou pour cuire dans une casserole.
Lesdurees et temperatures de cuisson necessairespour faire cuire une denree au four peuvent varier legerement par rapport
aux temps requis avec votre ancienne cuisiniere.
Tableau des Problemes de cuisson au four et de leurs Solutions
Probleme de Causes Solutions
cuisson au four
Le fond des petits
g_teaux et biscuits
est brule.
Gbteaux trop dores
sur le dessus ou le
dessous.
• Petits gateaux et biscuits mis au four
avant la fin du prechauffage.
• Grille du four surchargee.
• Un moule fonce absorbe la chaleur
trop rapidement.
• GSteaux mis au four avant la fin du
prechauffage.
• Grille placee trop haute ou trop
basse dans le four.
• Four trop chaud.
• Laissez le four se rechauffer a la temperature voulue avant d'y
placer les aliments.
• Choisir des tallies de moule qui laisseront dans le four 5.1 a 10.2
cm (2"a 4') d'espace libre tout autour du moule.
• Utilisez une role a biscuit en aluminium d'epaisseur moyenne.
• Laissez le four prechauffer a la temperature voulue avant d'y
placer les aliments.
• Utilisez la position de grille appropriee pour la cuisson.
• Reglez la temperature du four a 25°F (12°C) de moins que
suggere.
G_teaux pas assez
cults au centre.
Les g_teaux ne sont
pas d'epaisseur
egale.
Les aliments ne sont
pas assez cuits a la
fin de la duree de
cuisson prevue.
• Four trop chaud.
• Taille de moule incorrecte.
• Moule non centre dans le four.
• La cuisiniere n'est pas de niveau.
• Moule trop pres de la paroi du four
ou grille surchargee.
• Moule deforme.
• Four pas assez chaud.
• Four surcharge.
• La porte du four a ere ouverte trop
frequemment
• Reglez la temperature du four a 25T (12°C) de moins que prevu.
• Utilisez la taille de moule suggeree dans la recette.
• Utilisez la position de grille appropriee et placez le moule pour
qu'il y air 5.1 a 10.2 cm (2"a 4') d'espace tout autour.
• Placezunetasseamesurerenverre,remplied'eau, aucentrede lagrilledu
four. Sile niveaud'eau est inegal, veuillez consulter les instructions
d'installation pour mettrelacuisinbre de niveau.
• Veillez a conserver dans le four 5.1 a 10.2 cm (2"8 4')
d'espace libre tout autour du moule.
• N'utilisez pas de moules bosseles ou deformes.
• Reglez la temperature du four a 25°F (12°0) de plus que prevu
et faites cuire pendant la duree recommandee.
• Veillez a retirer du four tous les plats ou moules saul ceux qui
sont necessaires a la cuisson.
• N'ouvrez pas la porte du four avant la fin de la duree minimum
de cuisson recommandee.
Circulation d'air dans le four
Pour une bonne circulation d'air et une cuisson satisfaisante, centrez les moules le mieux possible. AIIouez 5.1 a 10.2 cm (2" a 4') autour
des ustensiles pour permettre a I'air de circuler et veillez ace que les moules ne se touchent pas mutuellement, et qu'ils ne touchent pas la
porte, les cotes ou I'arriere du four. L'air chaud dolt pouvoir circuler autour des moules pour que la chaleur soit uniforme dans routes les
parties du four.
Si vous utilisez plusieurs moules, espacez-les tel que montre ci-dessous.
Avec un seul moule, placez-le au centre du four.
Page 42

Voyants lumineux
Certains modeles possedent un voyant pour chacun des foyers, d'autres en possede un pour chaque paire de foyers. D'autres
n'en ont que pour la zone de rechaud et le tiroir rechaud.
Le voyant devient lumineux aussitOt qu'un foyer est allume. Verifiez si le voyant devient lumineux aussitOt que vous tournez
chacun des boutons des commandes de foyer. Si le bouton est regis a un tres faible reglage de chaleur, le voyant peut
s'allumer m_me si aucune chaleur n'est produite par le foyer. Si cela se produit, tournez le bouton a un reglage plus eleve,
jusqu'a ce que le foyer commence a chauffer.
Quand la cuisson est terminee, jetez un coup d'oeil rapide aux voyants; c'est un moyen facile de vous assurer que tous les
boutons de commande ont ere tournes au repere ARR[_T"0".
Cuisson par convection (option disponible avec certains rnodeles)
NOTE: Le rnoteur de la turbine convection cesse autornatiquernent de tourner si la porte est ouverte alors que le
four fonctionne en mode convection. Elle recommence a tourner Iorsque la porte est referrnee.
En mode convection, un ventilateur au fond du four sert a faire circuler I'air chaud autour des aliments. Ce mouvement contrOle
d'air scelle rapidement la surface des aliments, retenant ainsi tous lesjus naturels et leur saveur. Cette methode de cuisson vous
permet d'obtenir lesmeilleurs resultats culinaires, c'est a dire pour la cuisson, decongeler, deshydrater et rotir des aliments.
Conseils sur la convection:
1. Pour la cuisson par convection, on peut reussir presque toutes lesrecettes en abaissant la temperature du four requise pour la
cuisson en mode normal par radiation de 13°C (25°F).Verifiez le mode de fonctionnement de la commande electronique qui se
trouve dans le feuillet 'Programmateur electronique du four'de ce guide de I'utilisateur. Ceci peut avoir comme resultat de
reduire considerablement la perte de volume des aliments, en plus de cuire les viandes plus tendres.
2. II est plus facile de cuire des lots d'aliments et d'obtenir de meilleurs resultats.
3. Decongeler les aliments par convection est plus rapide que par la methode normale de cuisson par radiation.
4. Souvenez-vous d'utiliser des recettes deja connues et essayees, dont la duree de cuisson aura ere ajustee pour le mode
convection. La duree de la cuisson peut-etre reduitejusqu'a 30% Iorsque I'option convection est utilisee.
ROtissage par convection (certainsrnodeles)
Pour le rOtissage par convection, servez-vous toujours de la lechefrite et de son
couvercle ainsi que de la grille de rOtissageconvection. Lagraisse s'ecoule dans la
lechefrite et son couvercle previent les eclaboussures de graisse. La grille de
rOtissagesupporte la viande.
1. Placezla grille du four sur le premier support ou le deuxieme support du bas.
2. Placez le couvercle sur la lechefrite. La grille de rOtissageconvection s'imbrique
dans la lechefrite. L'airchaud circule sous I'aliment afin de procurer une cuisson
uniforme. Ne vous servez pas de la lechefrite sans son couvercle ou ne la
recouvrez pas de papier d'aluminium.
Grille de
rotissage
Couvercle
Lechefrite
10
Page 43

Systeme de cuisson rapide (certains modeles)
En mode de cuisson rapide, un ventilateur a I'arriere du four fait circuler I'air chaud autour des
aliments. Cette circulation d'air scelle rapidement la surface des aliments, retenant ainsi lesjus et
leur saveur. Cette methode permet d'obtenir de meilleurs performances, aussi bien pour cuire,
decongeler, deshydrater que pour rotir lesaliments.
Lesviandes cuites a I'aide du systeme de cuisson rapide sont plus savoureuses. Le poulet est
croustillant a I'exterieur tout en etant tendre etjuteux a I'interieur. Lespains et patisseriescuisent
plus uniformement. La plupart des aliments peuvent etre preparee plus rapidement et plus
efficacement en mode de cuisson rapide.
Les avantages du systeme de cuisson rapide:
Economise du temps et de I'energie puisque les aliments cuisent de 15 a 30% plus rapidement.
Cuit et grille plus uniformement lesaliments Iorsque deux tablettes sont utilisees.
Ne requiert pas de casseroles ou d'ustensiles de cuisson speciaux.
_ Instructions de ¢uisson generales:
considerablement. Commencez par reduire le temps de 30% et augmentez graduellement
jusqu'a ce que lesaliments atteignent lacuisson desiree. Lareduction du temps de cuisson
variera selon la quantite et le type d'aliment a cuire.
2. A I'exception de la cuisson de pains, de g_teaux, de biscuits, etc., le prechauffage du four
1. Lorsque le mode de cuisson rapide est utilise, le temps de cuisson est reduit
n'est pas necessaire Iorsqu'il est utilise en cuisson rapide.
3. Lacuisson d'aliments en lots est amelioree en mode de cuisson rapide, Iorsque I'utilisation
de 2 tablettes est requise en meme temps pour la cuisson, placezdes en position 1 et 3 pour
obtenir de meilleurs resultats.
4. Lors de la cuisson de g_teaux en mode de cuisson rapide, reglez la temperature 25°F (13°C) degres plus basse que la
temperature recommandee pour lesmeilleurs resultats.
Voyant
Reglage du systeme de cuisson rapide
lumineux
1. Reglez le four comme pour une cuisson normale au four. Lesysteme de cuisson rapide peut etre utilise •
avec les fonctions suivantes: cuisson au four, cuisson au four chronometree et mise en marche differee.
2. Activez I'interrupteur a bascule du mode de cuisson rapide situe sur le panneau de commande. Le
voyant lumineux s'allume et le ventilateur demarre. Ce ventilateur est en fonction Iorsque la porte du
four est fermee et s'eteint quand on ouvre la pore. Leventilateur continue a fonctionnerjusqu'a ce que
la cuisson soit terminee.
3. Lorsque I'option cuisson rapide est utilisee avec le mode cuisson chronometree, le ventilateur du
four se met a fonctionner des que le programmateur est regle. Par contre, I'element du four ne _,_,,,,_,_o
Speed gake
commencera pas a chauffer avant que I'heure de depart programmee ne soit atteinte.
4. Pour annuler la cuisson rapide, procedez de la meme faqon que pour annuler toutes autres modes de cuisson.
Note: Le mode de cuisson rapide ne fonctionne pas
durant un cycle autonettoyant.
Nourriture
Plats en casserole
Viandes
Volailles
Aliments congeles
Biscuitsrefrigeres
Rouleaux/Pains/Pizza
Legumes
Pommes de terre au four
Tartes/P_tisseries
Reduction du temps de cuisson:
25%
15% (ou 5 minutes/Ib)
30% (ou 10 minutes/Ib)
20%
25% (ou 2 to 5 minutes)
25% (ou 5 minutes)
25%
25%
30%
O_F
11
Page 44

Cuisson au gril
La cuisson au gril est un procede de cuisson des coupes tendres de viande grace a la chaleur radiante emise par I'element
superieure du four.
Prechauffage
Le prechauffage est recommande pour saisir les biftecks saignants. (Retirez la lechefrite avant
le prechauffage. Lesaliments places sur le metal chaud collent). Pour le prechauffage, reglez
la commande du four a BROIL(GRIL)en suivant lesinstructions du Guide de I'utilisateur.
Attendez que I'element devienne rouge vif, cela prend environ 2 minutes. Le prechauffage
n'est pas necessaire pour les viandes bien cuites.
Ouvrez la porte a la position
grillage Iors de la
cuisson au gril,
Grillez la viande sur un cOtejusqu'a ce qu'elle soit doree; retournez et faites cuire le deuxieme
cote. Assaisonnez et servez. Tirez toujours la grille hors du fourjusqu'a la position d'arret avant
de retourner ou de retirer lesaliments.
Pour la cuisson au gril
Tirez toujours la grille du
four jusqu'a sa position
d'arr_t pour retourner ou
ret rer es a ments.
Calcul des durees de cuisson au gril
Lesdurees de cuisson au gril peuvent varier: surveillez attentivement la cuisson. Non
seulement la duree de cuisson depend-elle de la distance par rapport a I'element, mais
egalement de I'epaisseur et du vieillissement de la viande, de sateneur en matieres grasseset
du degre de cuisson prefere. Le premier cote necessite generalement quelques minutes de plus
que le deuxieme. Lesviandes surgelees prennent aussi plus de temps a cuire.
Conseils pour la cuisson au gril
La lechefrite et son couvercle permettent a la graisse de s'egoutter au fond de la lechefrite, a
I'abri de la chaleur intense du gril.
NE PASutiliser la lechefrite sans son couvercle qui I'accompagne. NE PASrecouvrir le
couvercle de papier aluminium. Le gras en surface pourrait s'enflammer.
Si un feu se produit a I'interieur du four, fermez la porte du four et
eteignez le four. Si le feu ne s'eteint pas, lancez dessusdu bicarbonate de soude ou utilisez un
extincteur. NE PAS mettre d'eau ou de farine sur le feu. Lafarine risque d'exploser.
Couvercle
Lechefrite
Conseils pour le nettoyage de la lechefrite:
• Pourfaciliter le nettoyage, couvrez le fond de la lechefrite d'un papier d'aluminium. NErecouvrez PASle couvercle de la
lechefrite de papier d'aluminium.
• Pourempecher la graisse de s'incruster, retirez la lechefrite du four des que la cuisson est terminee. Utilisez des mitaines car
la lechefrite est extremement chaude. Vidangez la graisse. Faitestremper la lechefrite dans I'eau CHAUDE et savonneuse.
• Nettoyez la lechefrite des que possible apres utilisation. S'il y a lieu, utilisez des tampons de laine d'acier saponifies. Un
recurage trop energique pourrait I'endommager.
Reglage du four
Pour le reglage du four, reportez-vous a lasection minuterie ou programmateur electronique.
12
Page 45

Surface de cuisson vitroceramique (certains modeles)
Des e,le,mentse,lectriques chauffants sont situe,ssous la surface de cuisson vitroce,ramique. L'emplacement des e,le,mentssur la
plaque de cuisson est clairement de,limite,par le design. Vous devez surtout vous assurer que le diame,tre de la casserole est de
dimension similaire au diame,tre des e,le,ments.Lachaleur est propage,e vers le haut, a travers la surface de la plaque de cuisson.
N'utilisez que des ustensiles afond plat. Letype et la grosseur des ustensiles de cuisine, le nombre d'e,le,mentsutilise,set le re,glage
dese,le,ments,sont desfacteurs qui influencent la quantite, de chaleur qui s'e,tend auxzones autour des e,le,ments.Celles-ci peuvent
devenir suffisamment chaudes pour causer des brolures.
Lasurface de cuisson vitroce,ramique nedoit pas e,treutilise,ecomme planche a de,couperou table de travail. Sivous laisseztomber
des objets durs ou Iourds sur la plaque de cuisson, vous risquez de la faire e,clater.Lescasseroles avec des fonds rugueux peuvent
e,gratigner la plaque de cuisson. II est recommande, de ne pasde,poser d'aliments directement sur la plaque de cuisson (sansles
mettre dans des ustensiles de cuisine), car le nettoyage sera plus difficile et lesaliments pourraient ge,ne,rerde lafume,e et entrainer
un risque potentiel d'incendie. N'utilisezjamais de plaque chauffante ou d'ustensiles similaires sur la surface en vitroce,ramique.
Types de foyers utilises (certains modeles)
Troistypes de foyers chauffants peuvent e,treutilise,stout de,pendant du mode,le; ce sont ceux qui ont:
- des elements radiants reguliers (a une seule zone) de divers diame,tres ou configurations.
- des elements radiants a surface variable (a deux zones) de divers diame,tres ou configurations.
- des elements radiants allonges (a trois zones) de divers diame,tres ou configurations.
OFF
4 6
reed
lelements radiants reguliers (certains modeles)
Un motif e,pousant la forme du foyer radiant apparait sur la surface vitroce,ramique et vous
permet de le situer.
Le niveau de chaleur est ajuste,a I'aide d'un bouton de commande que vous devez enfoncer a
fond en premier, s'il est a la position ARRET.Tournez ensuite le bouton au niveau de chaleur
de,sire,.
Si la surface chauffante de I'e,le,mentde,passe le contour de la casserole, I'ustensile est trop
petit pour I'e,le,ment.II n'est pas ne,cessaired'aligner le bouton de commande sur une marque
particulie,re. Servez-vous des marques comme points de repe,re, et ajustez le bouton de
commande en conse,quence. Les voyants lumineux de fonctionnement et de surface chaude
s'allumeront.
lelernents radiants a surface variable (certains modeles)
Ce foyer combine les caracte,ristiques d'un petit et d'un grand foyer radiant. Le principal
avantage de ce foyer c'est qu'il peut e,tre utilise, pour la cuisson avec de petits ou de grands
ustensiles, ce qui augmente I'utilite,de lasurface de cuisson.
Les niveaux de chaleur sont ajuste,s a I'aide d'un bouton de commande a deux se,ries de
graduations. Avec de petits ustensiles, utilisez les petits caracte,res; seule la petite surface
inte,rieure chauffera. Pour chauffer de grands ustensiles servez-vous des graduations a gros
caracte,res;toute la surface du foyer chauffera alors.
Lesvoyants lumineux de fonctionnement et de surface chaude s'allumeront Iorsque I'e,le,ment
chauffera.
lelernents radiants allonges (certains modeles)
Le principal avantage de ce type de foyer est qu'il permet de cre,erune zone de cuisson plus
grande pour lescasseroles de forme allonge,e comme les rotissoires oules plaques chauffantes.
Pour utiliser I'e,le,mentallonge,,tournez le bouton de commande vers la gauche, en direction des
graduations de I'e,le,mentallonge,.
Pour un e,le,mentallonge,complet, activez aussi I'e,le,mentarrie,re.
Graduations
de I'e,le,ment
avant.
Graduations
de I'e,le,ment
allonge,.
Et pour utiliser seulement I'e,le,mentavant, tournez le bouton de commande vers la droite, en
direction des graduations de I'e,le,mentavant.
13
Page 46

Surface de cuisson vitroceramique (certains modeles)(suite)
Modeles avec controles ESEC (certains modeles) Surface de cuisson vitroceramique
Dese,le,mentse,lectriqueschauffants sont
situe,ssous la surface de cuisson
I L'apparence et les graphiques peuvent _tre differents
Apparence de la table de cuisson
Figure 1
Emplacement des e,le,ments
chauffants
avant_o_ _O_avam
I vitroce,ramique. L'emplacement des e,le,ments
sur la plaque de cuisson est clairement
de,limite,par le design. Assurez-vous que le
diame,tre de la casserole est de dimension
similaire au diame,tre des e,le,ments(Figure 1).
La chaleur est propage,e vers le haut, a
travers la surface de la plaque de cuisson.
N'utilisez que des ustensiles a fond plat. Le
type et la grosseur des ustensiles de cuisine,
le nombre d'e,le,ments utilise,set le re,glage
des e,le,ments,sont des facteurs qui
influencent la quantite, de chaleur qui s'e,tend
aux zones autour des e,le,ments.Celles-ci
peuvent devenir suffisamment chaudes
pour causer des brulures.
Elements de surface radiants
Latempe,rature des e,le,mentsaugmente
graduellement et uniforme,ment. Lorsque
I'e,le,mentchauffe, ce dernier devient rouge.
Afin de maintenir la tempe,rature desire,e,
I'e,le,ments'allumera et s'e,teindra
automatiquement. L'e,le,mentretient assez de
chaleur pour continuer de fournir une
tempe,rature constante me,me Iorsque ce
dernier est e,teint. Pour une cuisson efficace,
e,teignez I'e,le,mentquelques minutes avant
que la cuisson soit comple,te,e.Ceci permet a
la chaleur re,siduelle de comple,ter le proces-
sus de cuisson.
Figure 2
Emplacement des elements et des
controles
Votre appareil posse,de des e,le,mentsradiants
de 6 diffe,rentes puissances. Plusla puissance
de I'e,le,ment est e,le,ve,eplus lesgrandes
quantite,s aliments chauffent rapidement.
L'exemple utilise,en Figure 2 montre un
mode,lesavec tousles sortes d'e,le,mentsque
vous pourriez avoir. Nous utiliserons cet
exernple dans cette section, mais
I'apparence et lesgraphiques peuvent
¢tre differents. Figure 2 posse,deun
e,le,mentre,gulier de 6 pouces, situe,a
I'arrie,rea droite; on retrouve un e,le,mentra-
diant a surface variable de 6 ou 9 pouces a
I'avant a droite; un e,le,mentradiant Zone
rechaud se situe a I'arrie,reau centre; et
deux e,le,mentsradiants de 8 pouces sont
situe,sa I'avant eta I'arrie,re du cote, gauche.
On retrouve entre I'e,le,mentavant et arrie,rea
gauche un e,le,mentradiant PONT.
L'e,le,mentPONT est contr01e,par le m_,me
bouton de contr01e que I'e,le,mentradiant
avant gauche.
14
Page 47

Surface de cuisson vitroceramique
(certains modeles) (suite)
Commandes electroniques des elements
de surface (ESEC)
Chaque commande e,lectronique ESECdes e,le,mentsde surface
posse,de un e,crandigital. La caracte,ristique ESECest munie de 4
e,cransdigitals nume,riques soil un e,cranpar e,le,mentde surface.
Une seule commande contrOle I'e,le,mentavant gauche et I'e,le,ment
pont. L'e,le,mentradiant double avant droit est aussicontrOle,par un
seul bouton de commande. Ce type de commande fonctionne de la
me,mefaqon qu'une commande normale mais il est posse,deun e,cran
digital permettant de visionner le re,glage (voir figures 1 a 4)
iii i i
Figure 1 Figure2
Reglages disponibles de la commande electronique
ESEC
La commande e,lectronique ESECpermet diffe,rents niveaux de
tempe,rature situe,sentre maximum Hi (Fig. 2), minimum Lo (Fig. 4) et
arre,t OFF (Fig. 1). Lesre,glagessitue,sentre Hi et 3.0 diminuent par
intervalle de .5. Lesre,glagessitue,sentre 3.0 et Lo (MUotant, position
indique, par les pointille,ssur le dossere0 diminuent par intervalle de .2
afin d'obtenir plus de pre,cisionaux niveaux les plus bas.
Utilisez le tableau (Fig. 5) pour de,terminer le re,glage le plus approprie,
de,pendamment des aliments a pre,parer.Lafonction 'M!jotant"est
utilise,eafin de conserver chaude une grande quantite, d'aliments tel
que lessoupes ou les ragouts. La plus bassetempe,rature de la fonction
mijotant est ide,alepour les aliments de,licatsou pour faire fondre le
W.t_J__ Les e,le,mentsradiants peuvent
sembler avoir refroidi apre,sleur utilisation. Lasur-
face de vitroce,ramique peut _tre encore chaude
et causer des brulures si elle est touche,e Iorsqu'elle
n'a pas assezrefroidi. Soyez prudent.
que salie,reset poivrie,res,supports a cuille,resou
emballage en plastique sur la surface de cuisson
Iorsqu'elle est utilisee. Ces items peuvent pren-
dre feu ou fondre. Les poigne,es,serviettes ou
cuille,resen bois peuvent prendre feu s'ils sont trop
pre,sdes e,le,ments.
Figure 3 Figure4
Ne deposez pas d'objets tels
chocolat ou le beurre.
Note: La grosseur ou le type d'ustensile utilise,sinfluenceront lere,glage
ne,cessairepour obtenir de bons re,sultats culinaires.
Reglages des elements de surface recommandes
Reglage Type de cuisson
Haul (MAX) Pourde,buter la cuisson, pour faire bouillir
de I'eau, pour faire griller de la viande.
Moyen (MED) Pour garder I'eau en e,bullition, e,paissirles
sauces, cuire les le,gumesa la vapeur.
Moyen a faible Pourcomple,ter la cuisson, faire cuire des
oeufs poche,sou du ragout.
NOTE: Veuillez lire les instructions de nettoyage de la
surface vitroceramique a la section nettoyage
general etla section avant d'appeler le service dans
ce manuel.
NOTE: Les elements radiants possedent un dispositif
permettant a I'element de passer d'allume a eteint
automatiquement, afin de fournir le degre de la
chaleur demandee. Ceci permet aussi de proteger la
vitre contre les dommages. Ce phenomene peut se
produire au reglage maximum (HI), ce qui peut signi-
fier que le diametre de I'ustensile est trop petit par
rapport au diametre de I'element ou bien que le fond
de I'ustensile n'est pas plat. (Referez-vous a la section
Ustensiles pour la cuisson sur les element en page 11).
Faible (MIN) Pour garder chaud, fondre ou faire mijoter.
Figure 5
Message d'erreur de la commande ESEC (Er)
Le message d'erreur s'affichera et clignotera ("Er",voir Figure 6) Iors du branchement (ou apre,s
un interruption decourant) si UNEcommande est a la position Marche (ON). Si une interruption
de courant survient, assurezwous que les 4 commandes sont a la position Arre,t. Ceci rede,marrera
les commandes des e,le,mentsde surface.
Assurez-vous de rede,marrer I'horloge. Apre,savoir place,les commandes a la position Arre,t (OFF)
et avoir re,glerI'horloge, les afficheurs devraient revenir a la normale. Si lescommandes ne
fonctionnent toujours paset que 'Fr"demeure affiche, dans un des afficheurs, contactez
re,parateur autorise, Sears.
Figure6
Verrouillage de la commande electronique ESEC (- -)
La fonction autonettoyante du flour ne fonctionnera pas si une descommandes dese,le,mentsde
surface n'est pasa la position arre,t (OFF).Lese,le,mentsde surface ne seront pas ope,rant durant
un cycle autonettoyant ou Iorsque la fonction verrouillage de la commande du four est en
fonction. Lorsque lafonction verrouillage est active,e, "--"apparaitra a I'e,cran.Si un des e,le,ments
de surface est encore chaud au moment ou la commande de verrouillage est mise en fonction, le
message 'HE"apparaitra a I'e,cran plutOt que "- -'i
Figure 7
15
Page 48

Surface de cuisson vitroceramique
(certains modeles) (suite)
Message indiquant que la surface est chaude (HE)
Lors de I'utilisation d'un ou I'autre des elements simples, doubles ou
pont la surface de cuisson devient tres chaude. Meme apres avoir
eteint les elements, la surface de cuisson demeure chaude pour une
certaine periode. La commande ESECdetecte la chaleur de la surface
de cuisson et affiche le message 'HE"(hot element) pour aviser que
la surface est encore trop chaude pour etre touche. Meme si le mes-
sage HEest affiche, I'element peut etre utilise a nouveau a ce mo-
ment.
Reglage d'un element radiant regulier
La table de cuisson possede des elements simples a 2 endroits; a
I'arriere a droite (Fig. 3) eta I'arriere a gauche (Fig. 4). L'element
PONT peut aussi etre utilise comme un element simple.
Pour regler les elements radiants simples:
1. Placez un plat de dimension approprie sur I'element radiant.
2. Enfoncez et tournez le bouton de commande d'un cote ou de
I'autre en vous referant a I'ecran ESEC(Fig. 2) pour obtenir le
reglage desire. Tournez le bouton de commande pour ajuster le
reglage si desire. Debutez la plupart des cuissons a la position la
plus eleve et ensuite continuez lacuisson en reglant le bouton a un
reglage plus faible. Chacun des elements de cuisson produit une
chaleur constante. Si un halo rouge deborde de I'ustensile de
cuisson ceci indique que le diametre de ce dernier est trop petit
pour I'element utilise.
3. Lorsque lacuisson est completee tournez le bouton de commande
a la position Arret avant de retirer I'ustensile de I'element. Note:
Le message HEapparaitra a ce moment et demeurera a I'ecran
jusqu'a ce que la surface ait suffisamment refroidi.
Figure 1
Figure 2
L'apparence et les graphiques peuvent
6tre differents
Reglage des elements radiants doubles
La table de cuisson possede un element radiant double situe a I'avant
a droite (Fig. 8). Ladimension des graduations sur le panneau de
commande indique quelle zone de I'element double fonctionne. Les
graduations a petits caracteres indiquent que seul la zone interne de
I'element fonctionne (Fig.5 & 7). Lesgraduations a gros caracteres
indiquent que lesdeux zones de I'element double fonctionnent (Fig. 6
& 8). Vous pouvez passerd'une zone a I'autre a tout moment durant
la cuisson.
Pour regler les elements doubles:
1. Placez un plat de dimension approprie sur I'element radiant.
2. Poussezet tournez le bouton de commande vers les graduations a
petits caracteres pour faire fonctionner lazone interne de I'element
double (Fig. 5) et en direction des graduations a gros caracteres
pour faire fonctionner I'element double au complet (Fig. 6).
3. Referez-vous aI'ecran ESECpour obtenir le reglage desire. Tournez
le bouton de commande pour ajuster le reglage si desire. Debutez
la plupart des cuissons a la position la plus evele et ensuite
continuez la cuisson en repositionnant le bouton a un reglage plus
faible. Chacun des elements de cuisson produit une chaleur
constante. Si un halo rouge deborde de I'ustensile de cuisson ceci
indique que le diametre de ce dernier est trop petit pour I'element
utilise.
4. Lorsque lacuisson est completee tournez le bouton de commande
a la position Arret avant de retirer I'ustensile de I'element. Note:
Le message HI: apparaitra ace moment et demeurera a I'ecran
jusqu'a ce que la surface ait suffisamment refroidi.
Figure 5
L'apparence et les graphiques peuvent
_tre differents
Figure 7 Figure 8
Leselements radiants peuvent
sembler avoir refroidi apres leur utilisation. Lasur-
face de vitroceramique peut Ctre encore chaude
et causer des brulures si elle est touchee
Iorsqu'elle n'est pasassezrefroidi. Soyez pru-
dent.
Figure 6
16
Page 49

Surface de cuisson vitroceramique
(certains modeles) (suite)
Reglage de I'element radiant PONT
La table de cuisson est munie d'un e,le,ment'PONT"situe, a avant et au centre a gauche.
L'e,le,mentpont peut e,tre utilise,pour cuire a I'aide d'ustensile rectangulaire (comme une
rotisserie) ou une casserolede forme ovale. L'e,le,mentmaitiendra la tempe,rature constante sur
tout I'e,le,ment.Si ne,cessaireafin d'utiliser un ustensile standard, I'e,le,mentPont peut
fonctionner comme un e,le,mentradiant simple sans utiliser la zone pont de I'e,le,ment.
Lessymboles de I'e,le,mentpont sont situe,ssur le panneau de commande de chaque cote,du
bouton de commande de I'e,le,ment.Ces symboles indiquent de quel cote, tourner le bouton
pour faire fonctionner I'e,le,ment.Un symbole indique que seule la zone avant de I'e,le,mentpont
est en fonction. Un symbole indique les deux zones de I'e,le,mentpont sont en fonction en
me,metemps. Vous pouvez changer d'un a I'autre a n'importe quel temps Iors de la cuisson.
Pour regler I'element radiant pont:
1. Placez un plat de dimension approprie, sur I'e,le,mentradiant.
2. Poussezet tournez le bouton de commande dans le sens inverse desaiguilles d'une montre
pour faire fonctionner la zone infe,rieure de I'e,le,mentdouble (Fig. 5) et dans le sens des
aiguilles d'une montre pour faire fonctionner les 2 zones de I'e,le,mentpont (Fig. 6).
3. Re,fe,rez-vousa I'e,cran ESECpour obtenir le re,glagede,sire,.Tournez le bouton de commande
pour ajuster le re,glagesi de,sire,.De,butezla plupart des cuissons a la position la plus e,leve,et
ensuite continuez lacuisson en repositionnant lebouton aun re,glageplus faible. Chacun
des e,le,mentsde cuisson produit une chaleur constante. Si un halo rouge de,borde de
I'ustensile de cuisson ceci indique que le diame,tre de ce dernier est trop petit pour I'e,le,ment
utilise,.Veuillez noter que pastousles ustensiles de cuisson ne peuvent e,treutilise,ssur
I'e,le,mentpont.
4. Lorsque lacuisson est comple,te,etournez le bouton de commande a la position Arre,t avant
de retirer I'ustensile de I'e,le,ment.Note: Le message HE apparaitra ace moment et
demeurera a I'e,cranjusqu'a ce que la surface ait suffisamment refroidi.
L'e,le,mentPONT peut aussi e,treutilise, en combinaison avec I'e,le,mentradiant simple situe,a
I'arrie,re agauche. Puisque cet e,le,mentposse,de 2 commandes diffe,rentes, un e,le,mentpeut
e,treutilise,pou la cuisson tandis que I'autre peut e,treutilise,pour garder les aliments chauds.
Lese,le,mentsradiants peuvent sembler avoir refroidi apre,sleur utilisation. La
surface de vitroce,ramique peut 6tre encore chaude et causer des brulures si elle est touche,e
Iorsqu'elle n'a pas assezrefroidi. Soyez prudent.
Figure 1
mn r_Jn
Figure 2
L'apparence et les graphiques
peuvent _tre differents
i
i
,i _ ii
Figure 3
Figure 4
Figure 5
17
Page 50

Surface de cuisson
vitroceramique (certains modeles) (suite)
Precautions a prendre avec I'emploi de papier d'aluminium et de recipients en aluminium
1) Papier d'aluminium
L'emploi de papier d'aluminium peut endommager la surface de cuisson; evitez de I'employer.
2) Recipients en aluminium
L'aluminium fond a une temperature plus basseque celle desautres metaux. Vous devez etre vigilant Iorsque vous employez de
tels recipients. Si toute I'eau du recipient s'evapore, des dommages permanents a la surface de cuisson peuvent en resulter;
egratignure, fusion et meme bris de la surface.
• Glisser des recipients avec des fonds en aluminium ou cuivre peut laisser des
marques. Ces marques doivent etre nettoyees avec une creme immediatement apres
que la surface aie refroidie. Ces marques peuvent devenir permanentes si elles ne
sont pas nettoyees.
Les ustensils (acier, metal, ceramique ou verre) avec des fonds rugueux peuvent
endommager lasurface de cuisson. Ne glissez aucun ustensils de metal ou verre
sur la surface. N'utilisez pas la surface comme comptoir de cuisine. Ne cuisinez
pas sur la surface directe sans recipients. N'echappez pas d'objets Iourds ou tres
L'apparence et les graphiques
peuvent _tre differents
Points a se rappeler
1. Ne glissez pas d'ustensiles sur la surface de cuisson vitroceramique, ceci pourrait
egratigner ou laisser des marques metalliques permanentes sur la surface de cuisson.
2. EVITEZd'utiliser des agents de blanchissage et ne vous servez pas d'ammoniaque pour nettoyer la
surface vitroceramique.
3. Ne placez pas d'articles en matiere plastique sur la surface de cuisson si elle est chaude.
4. Ne placez pas les grilles du four sur la surface de cuisson vitrifiee, car elles peuvent I'endommager.
5. Si la vitre venait a se briser, ne vous servez pas de la surface de cuisson et n'essayez pas de
la nettoyer. Appelez immediatement un technicien du service autorise.
6. Ne placez pas de supports metalliques entre les casseroles et la surface de cuisson vitrifiee. Ces supports risquent de tacher,
d'egratigner ou meme de marquer la surface de cuisson vitrifiee.
7. Lesrenversements sucres peuvent attaquer la surface de votre plaque de cuisson. Vous devez donc proceder au nettoyage de
ces renversements pendant que I'appareil est encore chaud. Suivez prudemment les Stapes qui suivent.
a) Eteignez tous lesfoyers et retirez immediatement toutes les casseroles.
b) Protegez votre main avec une moufle et grattez le debordement encore chaud de la surface du foyer a I'aide d'un grattoir
a lame de rasoir, en repoussant lesresidus vers la partie plus froide de la surface de cuisson.
c) Laissezrefroidir I'appareil.
Entretien de la surface de cuisson
Probleme Causes Pour enlever
durs sur la surface, ceci pourrait la faire craquer.
Pour prevenir
Lignes brunes tres
fines (legeres
egratignures,
dans lesquelles
se sont Iogees
des impuretes).
Marques
metalliques,
grises ou noires.
Rayures
brun_tres
et petites
taches.
NOTE : La vitre de la surface de cuisson deviendra verte Iorsque les elements de surface seront eteints ares avoir ete utilises
haute intensite. Ce phenomene est normal et la vitre redeviendra _ sa couleur blanche originale Iorsqu'elle sera
completement reffoidie. (Vitres blanches seulement).
Presence de grains de sel,
sucre, residus de
cuisson, ou meme sable
entre les recipients et
la surface de cuisson.
Utilisation d'agents de
nettoyage non recommandes.
Frottement de recipients de
metal ou tablettes du four
sur la surface de cuisson.
Nettoyage ave(" une
eponge ou un linge a
vaisselle destine a d'autres
t8ches dans la cuisine.
Essuyez la surface de
cuisson apres chaque
usage.
Utilisez quotidiennement
la creme nettoyante.
Evitez de deplacer les
recipients en les glissant
sur la surface de cuisson.
Utilisez la creme
nettoyante a I'aide
d'une serviette de papier
propre et humide.
18
Enlever les egratignures s'avere
impossible. Celles-ci peuvent
etre reduites au minimum en
vous servant regulierement d'une
creme nettoyante.
Ces egratignures n'affectent pas
pour autant la cuisson.
Appliquer sur la surface froide
une creme nettoyante a I'aide
d'une serviette de papier humide.
Appliquez une creme nettoyante
I'aide d'une serviette de papier
humide.
Page 51

Surface de cuisson
vitroceramique (certains modeles) (suite)
Entretien de la surface de cuisson (suite)
Comment nettoyer la surface de cuisson vitroceramique
Certains nettoyeurs a vitres contiennent des ingredients qui endommageront votre surface de cuisson.
Nous vous suggerons de vous servir de nettoyeurs approuves, enumeres plus loin dans le texte. Pour
nettoyer et proteger la surface de cuisson, une creme nettoyante devra etre utilisee regulierement. Avant
d'utiliser votre appareil pour la premiere lois, appliquez de la creme nettoyante sur lasurface de cuisson
ceramique. Un echantillon de creme nettoyante CERAMA BRYTE® est fourni avec votre appareil. Ce
produit est disponible en magasins.
Employez un des nettoyeurs recommandes et terminez avec la creme nettoyante. Suivez les
recommandations suivantes:
1. AVANT DEVOUS SERVIRDEL'APPAREIL,nettoyez a fond et saturez la surface de cuisson avec
une creme nettoyante. CERAMABRYTE®
a) Humectez une serviette de papier et nettoyez la surface souillee. (Cr_amenettoyantepour
b) Essuyezavec une autre serviette de papier imbibee d'eau; apres quoi polissez avec une serviette en c_ramique)
de papier seche.
2. Pour le nettoyage quotidien, appliquez un peu de creme nettoyante au centre de chaque foyer. Appliquez environ 1/8 de
cuilleree a the (appliquez-en plus si necessaire), puis procedez de la fagon specifiee plus haut pour le nettoyage (aet b).
3. Assurez-vous que le dessous du recipient et la surface de cuisson sont propres et secs.
4. Reglez le bouton de commandeet choisissez des recipients suffisamment grands pour eviter des renversements et
eclaboussures.
5. Essuyezlesaliments qui se sont renverses ainsi que les eclaboussures avant qu'ils ne brulent sur la surface.
IMPORTANT Utilisez la creme nettoyante a intervalles reguliers. Assurez-vous de toujours avoir de la creme nettoyante a la portee
de la main. Si vous ne disposez pas de creme nettoyante, utilisez un des nettoyeurs approuves.
les surfaces de cuisson
Ne melangezjamais lesagents nettoyeurs. Lesmelanges peuvent etre nocifs, dommageables, et possiblement
dangereux.
Nettoyeurs approuves pour la surface de cuisson vitroceramique
1. BICARBONATEDESOUDE (Soda a p_te).
2. Tampons de plastique et de nylon non-impregnes.
3. Dans le cas d'aliments br01essur la surface, grattez legerement a un angle de 30°avec une lame de rasoir a tranchant unique.
4. Creme pour nettoyer les vitres ceramique.
5. Creme nettoyante CERAMA BRYTE®.
A ne pas utiliser sur la surface de cuisson vitroceramique
1. Destampons qui peuvent egratigner et marquer la surface de cuisson.
2. Des poudres nettoyantes. Ellespeuvent egratigner, selon leur rugosite et la pression de frottage qui est appliquee.
3. Des nettoyeurs chimiques pour le four. IIspeuvent marquer la surface de cuisson et sont caustiques.
4. Tousles produits capables d'enlever lestaches de rouille qui contiennent de I'acide hydrofluorique.
5. Lesagents de blanchissage. Ne vous servez pas d'ammoniaque.
Instructions speciales pour le nettoyage des dep6ts mineraux et decoloration
Probleme: Une tache d'un gris brun_tre qui ne s'enleve pas avec la creme nettoyante.
Cause: Lacondensation, provenant de la cuisson, s'accumule et degoutte du couvercle du recipient. Les mineraux qui setrouvent
dans I'eau et dans les aliments peuvent causer la formation d'un depot gris_tre ou brun_tre sur la surface de cuisson. Ce depot
est si mince qu'il ne peut etre decele au toucher et semble etre situe sous la surface de cuisson.
Pour prevenir: Servez-vous chaquejour de la creme nettoyante.
Pour I'enlever:
- Humectez la tache avec de I'eau et appliquez une petite quantite de creme nettoyante.
- Frottez avec une serviette de papier propre et humide, jusqu'a ce que la tache disparaisse.
- Enlevezle residu avec une autre serviette de papier humide.
- Appliquez une petite quantite de creme nettoyante et polissez avec une serviette de papier propre.
AVERTISSEMENT
- N'appliquezjamais de detergent sur une surface de cuisson vitroceramique avant qu'elle ne soit completement refroidie, a
cause des vapeurs nocives qui seraient generees.
- N'utilisez pasde creme nettoyante pour le nettoyage et le polissage des surfaces en porcelaine, chromees ou en aluminium.
19
Page 52

Reglage de la commande de la zone rechaud (certains modeles)
Pour faire fonctionner la zone rechaud
La surface de cuisson de votre cuisiniere est munie d'une zone rechaud. Cette zone a pour fonction de conserver les aliments
chauds a la temperature de service. Commencez toujours par les mets chauds. II West pasrecommande de chauffer desaliments
froids sur la zone rechaud.
Utilisez la zone rechaud pour conserver chaud certains aliments qui sent cults tels que: les legumes, les sauces, les mets dans
une casserole, les soupes, les ragouts, les pains, les p_tisseries et les assiettes de service utilisables au four.
Tousles aliments places sur la zone rechaud doivent etre recouverts d'un couvercle ou d'une feuille de papier aluminium pour
conserver leur qualite. Pour les meilleurs resultats, laissezlecouvercle entrouvert Iorsque vous desirez garder chaud des p_tisseries
ou des pains. N'utilisez pas de plastique pour recouvrir les aliments. Le plastique peut fondre; il sera tres difficile de
I'enlever de la surface par la suite.
Utilisez seulement la vaisselle et les ustensiles de cuisine recommandes pour le four et la zone rechaud.
La zone rechaud ne devient pas rouge Iorsqu'elle est chaude contrairement aux elements de surface. Utilisez
toujours des poignees ou des mitaines pour fours pour retirer les aliments de la zone rechaud, car les ustensiles et plats qui s'y
trouvent sent chauds.
Hot Su dace
S_f ace Cha_i@
Temoin lumineux
La lampe temoin de surface chaude de la zone rechaud est
Warm Zone
situee sous ou dessusla commande thermostat de lazone rechaud.
Elle s'allume Iorsque le bouton de la commande est regis et et
continuera de briller tant que la vitre ne se sera pas refroidie a un
OFF
niveau acceptable.
Reglage de la zone rechaud
1. Pour regler le thermostat, enfoncez le bouton et tournez-le au
reglage desire. Les temperatures sent approximatives et
designees par HAUT (MAX), MOYEN (MED) et BAS (MIN).
i ¸ n_!_
L'apparence et les graphiques
peuvent _tre differents
Toutefois, le bouton peut etre positionne a tout endroit entre les
reperes HAUT (MAX) et BAS (MIN) pour des niveaux de chaleur differents.
2. Lorsque vous aurez termine, tournez la commande de thermostat a OFF(ARRET).La lampe temoin
surface chaude s'eteint Iorsque la zone rechaud s'est refroidie a un niveau securitaire.
WARM & SERVE
ZONE
_iiii
L'apparenee et les
graphiques peuvent
_tre differents
Selection de temperature
Referez-vous au tableau pour lesreglages recommandes. Si un aliment West pas enumere, commencez par le reglage moyen. La
plupart des aliments peuvent etre conserves aux temperatures de service en utilisant le reglage moyen.
Tableau des reglages recommandes pour la zone rechaud
Aliments R_
Pains / p_tisseries Bas (MIN)
Mets en casserole Bas (MIN)
Assiettes de service avec aliments Bas (MIN)
Oeufs Bas (MIN)
Jus de viande Bas (MIN)
Viandes Moyen (MED)
Aliments
Sauces Moyen (MED)
Soupes (creme) Moyen (MED)
RagotJts Moyen (MED)
Legumes Moyen (MED)
Aliments flits Haut (MAX)
Breuvages chauds Haut (MAX)
Soupes (liquides) Haut (MAX)
20
Page 53

_. ** ..n,.e..o]aue de , nni,,,av,v,are,, Avant de debuter le nettoyage de la cuisiniere, assurez-vous que
Nettoyage exterieur toutes les commandes des elements de chauffage sont bien a la posi-
Nettoyez la cuisinie,re apre,s chaque usage tion ARRET '_" et que les elements sont froids.
afin d'e,viter toute accumulation de salete,set
pre,venir ainsi qu'elles carbonisent et lavez avec de I'eau chaude et savonneuse. Essuyezavec un linge doux ou avec du papier
essuie-tout.
N'utilisez pas de produits abrasifs, de laine d'acier, de nettoyeurs a base d'ammoniaque ou d'acide, ou des nettoyeurs pour fours,
sur lessurfaces exte,rieuresde la cuisinie,re excepte,pour les surfaces e,maille,es.Avant d'utiliser un nettoyeur ou un poli pour me,tal
sur lesgarnitures me,talliques, assurez-vous que I'e,tiquette indique qu'il peut e,treemploye,sur le chrome ou I'aluminium.
Tableau des commandes
Boutons de commande
Si letableau de commandes a besoin d'e,tre nettoye,, tournez les boutons de commandes a ARR[_T
'_" eLretirezdes de I'axe des commandes.
L'utilisation d'un chiffon imbibe,d'eau chaude savonneuse ou d'un nettoyeur me,nagerdoux suffira
pour la plupart des travaux de nettoyage du tableau de commande en acier ou en aluminium.
Parfois, I'application de quelques gouttes d'une cre,me nettoyante ou cre,mede polissage (a base
de silicone) recommande,e viendra a bout des souillures persistantes, eL laissera une couche
protectrice aidant a conserver I'apparence original de votre cuisinie,re.
Vous pouvez vous procurez la cre,menettoyante/polissante recommande,e dans tousles centres de
services apre,s-vente autorise,set dans tousles grands magasins.
Modeles avec panneau de verre:
Nettoyez le panneau de verre aI'aide d'un chiffon/e,ponge imbibe, d'eau chaude savonneuse ou a I'aide d'un essuie-tout eLd'un
nettoyeur de vitre en ae,rosol. Prenezdes pre,cautions pour que I'eau ou le nettoyeur n'aille passe Ioger derrie,re le panneau de
verre ou a proximite, de commandes active,espar des boutons.
Replacez les boutons en prenant soin d'aligner le plat de I'axe avec le plat dans la cavite,du bouton. Enfoncez les boutons sur les
axes des commandes.
Avant de debuter le nettoyage des foyers
spirales, assurez-vous qu'ils sont ffoids et
que les commandes sont a la position
ARRET "O".
Ne laissez jamais de
couvercles sur les foyers spirales, ceux-ci
pourraient etre endommages en perma-
nence si les foyers etaient allumes
accidentellement.
%
SURFACES AGENTS DE NE'I-fOYAGE INSTRUCTIONS
Acier _maille (Table de Nettoyeurs doux Utilisez une eponge moullee ou un tampon saponifie et
cuisson; surface sous ou tampons en acier trempe, lavez et assechez,
la table de cuisson) saponifies
Surface de cuisson a foyers spirales (certains modeles)
Lesfoyers spirales et cuvettes de proprete
Lesfoyers spirale,sse nettoient d'eux-me,mes Iorsqu'ils fonctionnent.
Lesfoyers spirale,seLlescuvettes de proprete, sont
amovibles eL permettent ainsi de nettoyer les
cuvettes de proprete,.
Pour enlever un foyer spirale,, poussez sur sa
partie avant eL relevezda, puis tirez-le hors de sa
fiche.
Pour un lavage a la main, lavez les cuvettes de
proprete, dans de I'eau chaude savonneuse. Pour
faire disparaitre lesLachesre,sistantes, utilisez un tampon a re,curer en nylon eLdu
savon; rincez eLse,chezpendant que ces pie,cessont encore chaudes.
Ne faites jamais tremper les elements spirales dans de
I'eau.
Garniture - Panneau Eau chaude et savonneuse Utilisez un linge propre ou un papier essuie tout
de commandes ou creme nettoyante, savonneux et mouille, lavez et assechez. N'utilisez pas de
produits abrasifs
21
Page 54

Nettoyage de I'appareil (suite)
Instructions pour le nettoyage de la surface de cuisson en ernail vitrifie
NE PASutiliser de
nettoyeur a plaque de cuisson sur une
surface de cuisson chaude. Lese,manations
peuvent mettre votre sante, en danger, et
risquer d'endommager chimiquement la
surface e,maille,e.
Avantde nettoyerlasurface
emaille,e,assurez-vousque tousles boutonsdes
commandessont tourne,sa OFF(ARRET)et que
la table de cuissonest froide.
Nettoyage de la surface de cuisson en ernail vitrifie
Un nettoyage correct et consistant est essentiel au maintien de votre surface de
cuisson en e,mailvitrifie,. Si lesrenversements d'aliments et les e,claboussuresde
graissesne sont pas enleve,s,ils bruleront sur la surface de cuisson et causeront
une de,coloration permanente.
Nettoyage quotidien
Pour la salete normale:
1. Laissezrefroidir la surface de cuisson.
2. Nettoyez les renversements et les e,claboussuresa I'aide d'un chiffon et de
I'eau chaude savonneuse.
3. Au besoin, I'utilisation de,licate d'un tampon a re,curer ou d'un nettoyeur
me,nager doux permettront d'enlever lestaches rebelles.
4. Redrez toute trace du savon ou du nettoyeur sans quoi I'e,mail pourrait e,tre
endommage, par la chaleur.
NEPASutiliserde nettoyeurs
cornmerciaux pour les fours sur les surfaces
exterieures, ycomprislecadrede la porte et la
surfacede cuisson,
Pour la salete tenace et les taches calcinees:
1. Laissezrefroidir la surface de cuisson.
2. Utilisez un tampon de laine d'acier savonneux avec de I'eau chaude ou
humectez les taches d'un me,lange d'eau et d'ammoniaque. Frottez
de,licatement. Rincez et se,cheza I'aide d'un chiffon propre.
3. Si la salete, persiste (grosses souillures), appliquez quelques gouttes d'une
cre,me nettoyante RECOMMANDEE pour surface de cuisson (e,mail/
vitroce,ramique) eta I'aide d'un chiffon humide ou d'un tampon a re,curer,
frottez. Epongez et essuyezjusqu'a ce que toute la salete,et la cre,mesoient
enleve,es.Un nettoyage et polissage re,gulier avec la cre,me nettoyante laisse
une couche protectrice qui aide a pre,venirles e,gratignures et lesabrasions.
Pour les renversernents sucres:
Les renversements sucre,speuvent attaquer le fini de votre surface de cuisson.
Vous devez donc proce,der au nettoyage de ces renversements pendant que
I'appareil est encore chaud.
1. Eteignez tousles e,le,mentsde la surface de cuisson.
2. Prote,gez votre main avec une moufle et prudemment essuyez le
de,bordement encore chaud avec un chiffon sans toucher aux e,le,mentsde
cuisson.
3. Laissezrefroidir la surface de cuisson et suivez les instructions pre,cite,espour
enlever lessouillures restantes.
Vous pouvez vous procurer la CREME NETTOYANTE RECOMMANDEE pour
surface en e,mail vitrifie, ou vitroce,ramique chez tousles centres de services
autorise,sou grands magasins.
22
Page 55

Nettoyage de I'appareil (suite)
Nettoyage du four regulier (four non autonettoyant)
Assurez-vousd'abord que le four est froid et que toutes lescommandes sont a la position ARR_'T
"O". IIest plus facile de nettoyer le four Iorsque la porte est retire,e.
1. Enlevez la porte, voir la section "Enlevez et reinstallez la porte du four".
2. Videz le four de son contenu incluant les grilles.
3. La le,chefrite, le couvercle et les grilles peuvent e,tre lave,sdans I'e,vier.
4. Nettoyez I'inte,rieur du four a fond avec un linge humide et savonneux, puis essuyez a sec.
Pour faciliter le nettoyage des salete,s incruste,es difficiles a enlever, utilisez un produit pour
usage domestique a base d'ammoniaque. Suivez le mode d'emploi sugge,re,par le fabricant.
(Ne retirez pas la porte si vous utilisez de I'ammoniaque.)
Comple,tez le nettoyage avec un linge mouille,, aide, d'une laine d'acier fine ou d'un agent de
re,curage si ne,cessaire.
Vous pouvez faire pivoter I'e,le,mentinfe,rieur vers le haut pour faciliter le nettoyage du four.
5. Replacez lesgrilles dans le four. Re,installezla porte.
Nettoyage du four autonettoyant (certains modeles)
Prenez les pre,cautions de nettoyage qui suivent:
• Laissezle four refroidir avant le nettoyage.
• Portez des gants en caoutchouc Iorsque vous nettoyez toute partie exte,rieure du four a la main.
Pendant le cycle d'autonettoyage, I'exte,rieur du four peut devenir tre,schaud au toucher. NE laissez pas les
enfants sans surveillance pre,sde I'appareil.
Certains oiseaux sont tre,svulne,rablesaux gaz de,,gage,sIors du nettoyage desfours auto-nettoyants; ilsdoivent
e,tre place,sdans une autre pie,ce,bien ae,re,e.
Avant de de,buter le nettoyage, assurez-vous que la commande du four est tourne,e a arre,tou appuyez sur la
touche ARRET (OFF) ou ANNULATION. Attendez que le four se soit refroidi.
N'utilisez pas de nettoyeurs commerciaux ou d'enduits protecteurs sur ou autour d'aucune partie du four. NE nettoyez pas le
joint d'e,tanche,ite,.Lejoint d'e,tanche,ite,qui est installe,sur la porte du four est essentiel a une fermeture efficace du four. Faire
attention de ne pas le frotter ou le de,placer, car ceci pourrait I'endommager. N'utilisez pas de papier d'aluminium pour prote,ger
le fond du four car ceci pourrait nuire a la cuisson ou fondre et affecter le fini du four.
Un four autonettoyant se nettoie de lui-me,me a des tempe,ratures e,leve,es(bien au-dessus des tempe,ratures de cuisson), qui
e,liminent comple,tement ou re,duisent lessalete,sen fines cendres, que vous pouvez faire disparaitre tre,sfacilement avec un linge
humide.
Preparation du four avant I'autonettoyage
1. Retirez tout exce,sde renversements dans la cavite, du four avant de de,buter le cycle
d'autonettoyage. Utilisez un linge trempe, dans de I'eau chaude et savonneuse pour
le nettoyage. Lesgros renversements peuvent e,tre la cause de fume,es e,paissesou
d'un incendie s'ils sont expose,sa destempe,ratures e,leve,es.Ne pas permettre a des
renversements qui contiennent beaucoup de sucre ou qui ont un niveau d'acidite,
e,leve,(tels que tomates, choucroute, jus de fruits, ou garnitures de tarte) de
demeurer en surface, car ilspeuvent causer la formation de taches qui resteront sans
eclat me,meapre,s le nettoyage.
2. Nettoyez toute salete, pre,sente sur le cadre avant du four, ainsi que I'inte,rieur de la
porte (surfaces ombrage,es de I'illustration). Ces surfaces deviennent suffisamment
chaudes pendant le cycle d'autonettoyage pour cuire les e,claboussures sur les
NETfOYEZ NENETrOYEZ PAS
LAPORTE LEJOINTD'ETANCHEITEA3. Retirez la le,chefrite et son couvercle ainsi que tousles ustensiles et tout papier
ALAMAIN LAMAIN d'aluminium. Ces produits ne supportent pas les tempe,ratures e,leve,esde
4. Les grilles peuvent e,tre laisse,esdans le four ou e,tre enleve,es. Si elles subissent un cycle d'autonettoyage, leur couleur
deviendra terne. Quand le cyclede nettoyage seratermine, et que le four serarefroidi, frottez lesbroches sur lesc0te,sdes grilles
avec du papier cire, ou avec un peu d'huile pour be,,be,ou d'huile a salade. Ceci aidera les grilles a mieux glisser.
surfaces. Nettoyez avec de I'eau et du savon.
I'autonettoyage.
23
Page 56

Nettoyage de I'appareil (suite)
BLOCAGE AUTOMATIQUE DES ELEMENTS DE SURFACE (Modeles avec four autonettoyant seulement)
Les elements de surface sont exposes a des temperatures elevees s'ils sont utilises alors que le four fonctionne en mode
autonettoyant. Pour maximiser la duree de vie des elements de surface, un systeme de protection les rend hors d'usage
pendant le cycle d'autonettoyage du four. Les elements de surface redeviennent fonctionnels Iorsque le cycle de nettoyage est
complete et que la porte du four peut _tre ouverte.
Ce qui peut survenir durant I'autonettoyage
Lorsque lefour fonctionne, satemperature devient beaucoup plus eleveeque celle utilisee pour la cuisson. IIest normal d'entendre
des bruits de dilatation et de contraction du metal. IIy aura aussi des odeurs causees par I'elimination des souillures. II est meme
possible que de la fumee s'echappe par la sortie d'aeration qui debouche sur la table de cuisson.
Si les gros debordements ne sont pasessuyesavant I'autonettoyage, ils pourraient s'enflammer et causerencore plus de fumee et
d'odeurs que la normale. Cette situation est normale et sans danger et ne devrait pas vous alarmer. Si vous possedez une hotte,
utilisezda durant le cycle d'autonettoyage pour evacuer les odeurs et lesfumees.
REMARQUE: Un eliminateur de [umee est installs dans le conduit d'aeration; il transforme la presque totalite dessaletesen un gaz
invisible.
Reglage des commandes du four
Pour le reglage d'un cycle de nettoyage, referez-vous a lasection minuterie ou programmateur electronique.
Table de cuisson levable (certains modeles)
Avec certains modeles, la table de cuisson a foyers spirales peut etre soulevee pour faciliter le
nettoyage.
Pour soulever la table de cuisson, prenezda par les cotes vers I'avant et soulevezda. Utilisez les
deux broches supports et faites glisser le cran d'arret vers vous, pour que la table de cuisson
demeure en position elevee pendant le nettoyage.
Abaissez la table de cuisson lentement en prenant soin de ne pas vous faire
pincer les doigts. Ne la laisser passe refermer avec force, car ceci pourrait endommager le fini
emaille.
Enlever et reinstaller la porte
1. Ouvrez la porte completement.
2. Faitespivoter vers le haut lesdeux Ioquets mobiles setrouvant sur les supports des charnieres et engagez-les dans lescrochets
desbras descharnieres. IIse peut qu'il soit necessaire d'exercer une legere pression sur la porte pour que lesIoquets s'engagent
completement.
3. Avec une main de chaque cots de la porte, soulevez legerement la porte et tirezda vers vous pour degager les supports des
charnieres.
Continuez a tirer la porte vers vous tout en faisant pivoter le haut de la porte vers la cuisiniere de faqon a degager les bras des
charnieres.
4. Pour remettre la porte en place, procedez a I'inverse.
Assurez-vous que lessupports de la charniere sont bien engages avant de liberer les bras de charnieres.
__ _ _"FE:!! !ESIHA_ RNIIERES
Loquet en position
normale
Loqueten positionengagee
dans le brasde la chamiere
24
Porte completement
degag_e de la cuisiniere
Page 57

Porte avec vitre exterieure demontable (certains modeles)
Ces modeles n'ont pas la vitre exterieure de la porte retenue par un cadre enveloppant. Ce design vous permet de nettoyer la face
interne de la vitre exterieure, ainsi que la partie cachee de la vitre du hublot interieur de la pore. IIexiste deux types de porte avec
vitre exterieure demontable, soit: un modele avec moulure in[erieure collee sur la vitre et un autre modele avec moulure in[erieure
independante de la vitre.
Pour retirer la vitre exterieure de la porte:
1. Retirez la porte de la cuisiniere en se referant a "Enlevez et reinstallez la porte" a la section "Nettoyage de I'appareil" et
deposez-la a plat.
2. A I'aide d'un tournevis, retirez les vis retenant I'assemblage vitre et moulure inferieure pour les modeles avec moulure
inferieure collee sur la vitre; ou lesvis retenant la moulure inferieure pour lesmodeles avec moulure inferieure independante de
la vitre et retirez ensuite la moulure inferieure.
3. Tenez la vitre par les cotes et faites-la doucement glisser hors de la moulure superieure avant de la porte. Deposez la vitre a
plat.
Manipulez cette vitre avec precaution. Si la vitre est cognee sur un coin, elle peut eclater en petits morceaux et
vous blesser.
F_ Pour les modeles avec la moulure inferieure collee sur la vitre: NE decollez PAS la moulure de la vitre.
Pour reinstaller la vitre exterieure de la porte:
1. Soulevez la vitre par les cotes et inserez-la delicatement sous la moulure superieure de la porte.
2. Replacez I'assemblage vitre et moulure inferieure ou la moulure inferieure et lesvis qui le retiennent en place.
3. Replacez la porte sur la cuisiniere en referant a "Enlevez et reinstallez la porte" a la section "Nettoyage de I'appareil".
Retirer/replacer le tiroir de rangement
Pour retirer/replacer le tiroir avec glissieres extensibles (certains modeles)
Utilisez le tiroir de rangement pour entreposer des ustensiles de cuisine. Le tiroir peut etre enleve pour faciliter le nettoyage sous
I'appareil. Faites attention en manipulant letiroir.
Pour retirer le tiroir:
Abaissez le levierde gauche,
soulevez celui de droite et
sortez le tiroir.
i lette
Pour retirer le tiroir:
1. Tirez sur le tiroir videjusqu'a ce qu'il bloque.
2. Soulevez le levier de la barrure de la glissiere droite et abaissez celle de gauche.
3. Retirez letiroir de la cuisiniere.
Pour replacer le tiroir:
1. Faitesglisser lesguides du tiroir sur lesglissieres.
2. Poussezle tiroir a fond dans lacuisiniere.
Pour retirer/replacer le tiroir de rangement avec roulettes (certais modeles)
Pour retirer le tiroir:
1. Tirez le tiroir videjusqu'au butoir des roulettes.
2. Soulevez I'avant du tiroir vers le haut et faitesde passer par dessus lesroulettes.
Pour replacer le tiroir:
1. Inserez I'arriere du tiroir dans I'ouveRure.
2. Deposez les roulettes arrieres du tiroir sur lesguides des roulettes.
3. Poussezle tiroirjusqu'a ce qu'il bloque, puis soulevezde par dessusle butoir et glissezde au
fond.
Guide
25
Page 58

Tiroir-Rechaud (certains modeles)
Reglage des commandes du tiroir-rechaud
Pour faire fonctionner le tiroir-rechaud
Votre cuisinie,re est munie d'un tiroir-re,chaud. Ce tiroir a pour fonc%n de conserver les aliments chauds a la tempe,rature de
service. Commencez toujours par lesmets chauds. IIn'est pas recommande, de chauffer des aliments froids dans le tiroir-re,chaud.
Tousles aliments place,sdans le tiroir-re,chaud doivent e,trerecouverts d'un couvercle ou d'un papier en aluminum pour conserver
leur qualite,. Ne couvrez pas les aliments croustillants. N'utilisez pas de plastique pour recouvrir les aliments. Le
plastique risque de fondre dans le tiroir et d'etre tres difficile a nettoyer.
Utilisez seulement lavaisselle et lesustensiles de cuisine recommande,s pour le four dans le tiroir-re,chaud.
Utilisez toujours des poigne,es ou des mitaines pour four pour retirer les aliments du tiroir-re,chaud, car les
ustensiles et plats s'y trouvant sont chauds.
Note: Utilisez le tiroir-re,chaud pour garder les aliments chauds comme : les le,gumes, les sauces, les viandes, les casseroles, les
biscuits et les petits pains, les pStisseries et les assiettes a diner servies.
Note: Le tiroir-re,chaud est equipe, d'un Ioquet qui peut exiger assezd'effort pour ouvrir et fermer le tirol
Temoin lumineux
Le te,moin hmineux est situe, sous le bouton de la commande thermostat. II s'illumine Iorsque la
commande est re,,gle,eet reste allume,jusqu'a ce qu'on I'e,teigne. Le tiroir-re,chaud ne peut fonctionner
pendant le cycle auto-nettoyant. Lete,moin lumineux ne s'allumera pas pendant le cycle auto-nettoyant.
Reglage du bouton de la commande du thermostat
La commande thermostat est utilise,epour se,lectionner la tempe,rature du tiroir-re,chaud. Elle est situe,e
derrie,re la porte du tiroir-re,chaud. Pour re,gler le thermostat, appuyez sur le bouton et tournez-le au
re,glagede,sire,.Lestempe,ratures sont approximatives et de,signe,espar HAUT (HI), MOYEN (MED) et BAS
(LO). Le bouton peut aussi e,tre re,gle,aces trois niveaux de chaleur ou a n'importe quel autre niveau de
OFF
WARM & SERVE
DRAWER
@
Selection de temperature
%fe,rez-vous au tableau dans la colonne ci-contre pour lesre,glagesrecommande,s.
Si un aliment n'est pas e,nume,re,,commencez par le re,glage moyen. Si vous
pre,fe,rez que I'aliment soit plus croustillant, enlever le couvercle ou le papier
ahminium qui le recouvre.
La plupart des aliments peuvent e,tre conserve,s aux tempe,ratures de service en
utilisant le re,glage MOYEN(MED).
Lorsqu'une combinaison d'aliments doit e,tre garde,e au chaud, utilisez le re,glage
e,leve,(HI)(par exemple, une viande avec 2 le,gumes et petits pains).
Evitez d'ouvrir letiroir-re,chaud pendant qu'il est utilise,afin d'e,viter route perte de
chaleur.
Pour rechauffer les bols et assiettes de service
Re,glezle chauffage a BAS (LO) pour re,chauffer les bols et assiettes. Placezles plats
vides sur la grille pour qu'ils ne touchent pas le fond du tiroir. Ve,rifiez aupre,sdu
fabricant pour de,terminer le degre,de chaleur que peuvent tole,rer les articles en
porcelaine.
IMPORTANT: Le tiroir-re,chaud sera automatiquement mis hors de service pendant
que le four fonctionne en mode autonettoyant. II pourra e,tre utilise, a nouveau
Iorsque le cycle d'autonettoyage sera termine,.
chaleur compris entre ces re,glages.
1. Se,lectionnez le re,glagede tempe,rature.
2. Pour de meilleurs re,sultats, pre,chauffez le tiroir avant d'ajouter lesaliments. Un tiroir vide prend
environ 18 minutes a re,chauffer au re,glageMAX(Haut), 15 minutes au re,glageMED (MOYEN) et 12
minutes au re,glage MIN (BAS).
3. Lorsque vous aurez termine,, tournez la commande
thermostat a OFF(Arre,t).
L'apparence et graphiques peuvent ]
les _tre differents
26
Tableau des reglages recommandes
pour le tiroir-rechaud
Aliments
Bacon Haut (MAX)
Biscuits Moyen (MED)
Plats en Casserole Moyen (MED)
Oeufs Moyen (MED)
Assiettes vides Bas (MIN)
Poisson, fruits de mer Moyen (MED)
Aliments frits Haut (MAX)
Sauces Moyen (MED)
Jambon Moyen (MED)
Patesde viande Haut (MAX)
Crepes, gaufres Haut (MAX)
%tisserie Moyen (MED)
Tartes Moyen (MED)
Pizza Haut (MAX)
COtesde porc Haut (MAX)
Pommes de terre (au four) Haut (MAX)
Pommes de terre (en puree) Moyen (MED)
Poulet Haut (MAX)
Rotis (Boeuf, Porc, Agneau) Moyen (MED)
Petits pains (moux) Bas(MIN)
Petits pains (durs) Moyen (MED)
Legumes Moyen (MED)
Page 59

Tiroir-Rechaud (certains modeles) (suite)
Disposition de la grille du tiroir-rechaud
Disposez la grille du tiroir-re,chaud comme illustre,ci-dessous.
La grille peut e,treutilise,ede 2 faqons:
• Grille en U vers le bas pour permettre de disposer des aliments de moindre dimension sur et sous la grille (par exemple,
petits pains ou biscuits sur la grille et casserole en dessous).
• Grille a plat sur le fond pour permettre de disposer des aliments de moindre poids et la vaissellevide (par exemple, petits
pains ou p_tisseries et vaiselle pour le diner).
U vers le haut
A plat
Nettoyage general
Pour retirer et replacer le tiroir-rechaud
Pour enlever le tiroir-rechaud:
1. _ Interrompez le courant avant d'enlever le tiroir-re,chaud.
2. Ouvrez comple,tement le tiroir.
3. Localisez les Ioquets des deux cOte,sdu tiroir-re,chaud. Le Ioquet gauche est visible, mais celui du cote,droit ne I'est pas et est
situe,a I'inte,rieur des glissie,resdu tiroir.
4. Tirez vers le haut sur le Ioquet de la glissie,regauche en inse,rant un tournevis dans le Ioquet droit et poussez vers le bas.
5. Enlevez le tiroir de la cuisinie,re.
6. Pour nettoyer le tiroir-re,chaud, utilisez de,licatement un tampon a re,curer savonneux; ceci permet d'enlever la plupart des
taches. Rincez a I'aide d'une solution contenant des parts e,galesd'eau claire et d'ammoniaque. Au besoin, couvrez lestaches
tenaces d'un essuie-tout imbibe, d'ammoniaque pendant 30 a 40 minutes. Rincez avecde I'eau claire et un chiffon, puis frottez
de,licatement avec un tampon a re,curer savonneux. Rincez et se,cheza I'aide d'un chiffon propre. Retirez toute trace de
nettoyeur sans quoi I'e,mail pourrait e,treendommage, par la chaleur. NE PAS utiliser de nettoyeur en ae,rosol pour four sur la
surface de cuisson.
Pour replacer le tiroir-rechaud :
1. Alignez les Ioquets des glissie,resdesdeux cotes du tiroir avec lesguides du tiroir.
2. Poussezle tiroir dans la cuisinie,re.
Risque de choc e,lectrique pouvant
occasionner de blessures graves ou la mort. De,branchez
I'appareil du courant e,lectrique avant le service d'entretien ou
avant d'enlever ou de replacer le tiroir-re,chaud.
Tirez vers le haut sur le Ioquet de la
glissiere gauche en inserant un
tournevis sur le Ioquet
droit et en
poussant
vers le bas.
27
Page 60

Liste des verifications preventives
Avant d'appeler un technicien de service lisez ce qui suit:
Dans bien des cas, vous pouvez epargner le coot et les inconvenients causes par la visite d'un technicien de service en consult-
ant la liste desverifications preventives qui suit. Elle decriLlessituations les plus courantes n'ayant aucun rapport avec une piece
defectueuse ou un vice de construction.
Vous devrez deffayer les ffais pour toute visite d'un technicien de service durant la periode ou I'appareil est couvert par la
garantie si le probleme n'est pascause par un vice de construction ou une piece defectueuse.
Votre nouvel appareil menager a ete construit avec soin. IIest Frequent que ce qui semblait etre une raison valable pour justifier
la visite d'un technicien de service ne necessite en fait qu'un simple reglage de votre part ou n'est qu'une consequence
normale du fonctionnement de I'appareil en certaines circonstances.
Cette lisle couvre differents modeles de cuisinieres eLcertains items ne s'appliqueront pas necessairemenL a votre appareil.
PROBLEME CAUSEPOSSIBLE/ SOLUTION
INSTALLATION
La cuisiniere n'est pas de niveau. Referez-vous a la methode de nivellement suggeree dans la section "lnformations
generales". Apres avoir mis la cuisiniere de niveau, la surface de cuisson pourrait sembler
croche par rapport aucomptoir, si ce dernier n'est pas de niveau.
Assurez-vous que le plancher est de niveau et assezsolide pour supporter le poids de la
cuisiniere sans flechir. Adressez-vous a un menuisier pour corriger la pente ou
I'affaissement du plancher si necessaire.
Assurez-vous que lesarmoires sont bien alignees, de niveau eLqu'un degagemenL
suffisant a ere prevu pour la cuisiniere (1.3 cm (1/2") de chaque cOtS).
LA CUISINIE-RENE FONCTIONNE
PAS
Aucune partie de I'appareil ne
fonctionne.
LeFour ne fonctionne pas. Pasde courant electrique a la cuisiniere. Voir "Aucune partie de I'appareil ne fonctionne"
Verifiez lesfusibles de la maison et remplacez-les s'il y a lieu ou enclenchez le
disjoncteur automatique.
Assurez-vous que la Fichedu cordon d'alimentation de I'appareil est bien branchee a la
prise murale (Canada seulement).
Panne de courant. Verifiez le fonctionnement des ampoules de la maison.
ci-dessus.
Le bouton selecteur (certains modeles) est entre 2 reperes. Reglez le bouton selecteur sur
le repere CUISSONou CUIREou GRIL ou GRILLAGE, etc...jusqu'a ce que la lampe
temoin du Fours'allume.
Assurez-vous que le bouton de la commande de temperature soil regis a la temperature
desiree.
Le programmateur electronique emet dessignaux sonores et affiche le code -El -, -F3- ou
-F9-. Un vice de fonctionnement a ete detects. Poussez latouche ANNULER pour effacer
le message affiche eLfaire cesser les signaux sonores. Reprogrammez le Four.Si le meme
code defaut reapparaiL a I'affichage, note-le, poussez la touche ANNULER, et
communiquez avec un service d'entretien autorise.
La fonction TEMPS DE CUISSON (cuisson chronometree) est en marche. ANNULEZ la
fonction.
28
Page 61

Liste des verifications preventives (suite)
PROBLEME CAUSE POSSIBLE/ SOLUTION
LA CUISINIERENE FONCTIONNE
PAS (suite)
Leselements de la surface de
cuisson ne chauffent pas.
La lampe du four ne allume pas. L'ampoule est brulee; remplacezda. Voir "Lampe du four" dans la section "lnformations
L'appareil n'est pas sous tension electrique. Voir "Aucune partie de I'appareil ne
fonctionne" ci-dessus.
Lorsque le reglage de chaleur d'un foyer de surface est tres bas, son voyant lumineux peut
s'allumer meme si I'element ne chauffe pas. Tournez alors le bouton de commande a un
repere plus elevejusqu'a ce que I'element commence a chauffer.
Leselements spirales ne sont pas inseres correctement dans les receptacles. Tournez les
boutons de commande de temperature a ARRET. Retirez les elements, redressez les
terminaux si necessaire. Reinserezdesa nouveau dans leur receptacle respectif.
Vous aveztourne lemauvais bouton de commande de temperature. Assurez-vous d'utiliser
le bouton de commande qui correspond au foyer que vous desirez utiliser.
Le blocage automatique des elements est en fonction (modeles avec four autonettoyant
seulement). Les elements de surface sont exposes a des temperatures elevees s'ils sont
utilisesalors que le four fonctionne en mode autonettoyant. Pour maximiser la duree de vie
des elements de surface, un systeme de protection les rend hors d'usage pendant le cycle
d'autonettoyage du four. Les elements de surface redeviennent fonctionnels Iorsque le
cycle de nettoyage est complete et que la porte du four peut etre ouverte. Annulez le cycle
d'autonettoyage.
generales".
L'eclairage du tableau des
commandes ne fonctionne pas
(certains modeles).
SURFACEDE CUISSON
Foyerstrop chauds ou trop froids. Augmentez ou diminuez le reglage jusqu'a ce que vous obteniez le degre de chaleur
Lesliquides bouillent sur lesfoyers
alors que le reglage de chaleur
est has.
Letube fluorescent n'est pas bien fixe dans lesreceptacles ou est brule. Reportez-vous a
"Lampe de surface" dans la section "Informations generales"
desire.
Utilisez seulement descasserolesa fond plat, non bosselees, bien equilibrees et d'epaisseur
moyenne ou elevee. Lescasseroles dont le fond est plat chauffent plus rapidement que
celles dont le fond est bombS. Larapidite du chauffage depend des materiaux utiliseset du
poids des casseroles. Lescasseroles a paroi d'epaisseur moyenne ou elevee chauffent de
fagon uniforme. Lesaliments risquent de bruler plus facilement dans une casserole a paroi
mince.
Lereglage du bouton de commande du foyer est incorrect. Tournez le bouton de reglage de
la chaleur a un niveau plus faible.
Lorsque le four fonctionne, de I'air chaud s'echappe par le conduit d'aeration situs au
centre du foyer spirals arriere droit ce qui augmente I'apport de chaleur.
29
Page 62

Liste des verifications preventives (suite)
PROBLEME CAUSE POSSIBLE/ SOLUTION
SURFACEDE CUISSON
VITROCERAMIQUE (certains
modeles)
Egratignures ou abrasion de la
surface de cuisson.
NOTE: Essuyezle plus rapidement possible les de,bordements d'aliments sucre,ssur lessurfaces chauffantes vitroce,ramique, car
ceux-ci peuvent piquer ces surfaces s'ils sont chauds.
CUISSON AU FOUR
Lesaliments sont trop ou pas
assezcuits.
Lesplats mis au four ne sont pas
uniforme,ment dore,sou gonfle,s.
Reportezwous a "Surface de cuisson vitroce,ramique" qui se trouve dans la section
"Informations ge,ne,rales".
Lestempe,ratures de cuisson au four et la dure,ede cuisson peuvent varier par rapport a la
recette ou les instructions apparaissant sur I'emballage du produit. Pour un re,glage donne,,
la tempe,rature du four de votre nouvelle cuisinie,re peut e,tre diffe,rente de celle de votre
ancienne cuisinie,re.Avec votre ancienne cuisinie,re, le re,glage de tempe,rature e,tait moins
pre,cis. II est donc fort probable que vous ayez a modifier les dure,es de cuisson et les
tempe,ratures de vos recettes pre,fe,re,es.
Utilisez la grandeur de casserole recommande,e dans la recette. Sivous utilisez des plats en
verre, abaissez la tempe,rature du four de 13°C (25°F). Ceci ne s'applique pas si vous les
utilisez pour cuire des tartes ou du pain.
IIne faut pascuire des aliments dans un plat recouvert, a moins que ce ne soit indique, dans
la recette. Lesaliments cuits dans un plat recouvert ne dorent pas facilement.
Utilisez des plats propres et brillants. Lesplats noircis risquent de faire coller lesaliments au
fond. Utilisez des ustensiles a fond plat. Les ustensiles dont le fond est bombe, peuvent
causer une cuisson irre,gulie,re.
Si les aliments brulent au fond du plat, c'est que la grille du four est trop basse; de,placez-la
a un niveau plus e,leve,.Sic'est le dessus qui est trop grille,, abaissezda.
Dure,ede cuisson trop Iongue. Quand vous ouvrez la porte du four pour ve,rifier ledegre,de cuisson, la tempe,rature dufour
chute de 10°C (18°F) ou plus a chaque fois. Re,glezpour une dure,ede cuisson la plus courte
possible, et ve,rifiez le degre,de cuisson seulement Iorsque le temps de cuisson sera e,coule,.
Ve,rifiez la progression de la cuisson par le hublot de la porte s'il yen a un.
IIne faut pasqu'une plaque a biscuits ou de cuisson recouvre toute la surface de la grille.
Laissezun espace d'au moins 5.1 cm (2 po.) entre les ustensiles, les plats et les cOte,sdu
four, pour une bonne circulation d'air. Lorsque vous utilisez les deux grilles, disposez les
plats de sorte que I'un ne soit pasdirectement au-dessus d'un autre.
IIfaut environ 10 minutes pour que le four atteigne la tempe,rature de re,glage. La cuisson
sera mieux re,ussiesi le four est pre,chauffe,avant d'y de,poser des aliments.
Le four de,gage de la vapeur
d'eau.
Bruit de ventilateur Iorsque lefour
fonctionne.
Durant la cuisson, de la vapeur d'eau se de,gage des aliments qui contiennent beaucoup
d'eau. Couvrez le plat avec son couvercle si cela convient aux aliments que vous de,sirez
faire cuire.
Un ventilateur de,marrera et arre,tera automatiquement afin de refroidir des pie,cesinternes
de I'appareil. Ceci est normal et il est possible que ce ventilateur continue de fonctionner
me,mesi le four est a la position arre,t.
3O
Page 63

Liste des verifications preventives (suite)
PROBLEME CAUSE POSSIBLE/ SOLUTION
CUISSON AU GRIL
Beaucoup de fume,e se de,gage Entrouvrez la porte a la position grillage.
du four durant la cuisson au gril.
Versez 3 a 4 tasses d'eau dans la le,chefrite, afin d'en recouvrir entie,rement le fond.
De,posezla viande sur le couvercle de la le,chefrite et mettez le tout au four. Lagraisse
qui s'e,coulede la viande tombe sur I'eau dans la le,chefrite oo elle se refroidit; ceci re,duit
laformation de fume,e.
Abaissez la grille du four pour e,loigner la viande de I'e,le,mentde grillage.
Enlevez I'exce,dent de gras; faites des entailles dans le suif entourant la viande pour
qu'elle ne se recroqueville pas. Ne coupez pas dans le maigre.
Assurez-vous que le couvercle est toujours place,sur la le,chefrite, avec les encoches vers
le bas, pour que la graisse puisse s'e,couler dans la le,chefrite.
IIy a accumulation de graisse sur les parois du four. IIfaut nettoyer le four re,gulie,rement
si la cuisson au gril est souvent utilise,e. Lavieille graisse ou les e,claboussurespeuvent
de,gager beaucoup de fume,e.
AUTONETTOYAGE DU FOUR
(certains modeles)
Le cycle d'autonettoyage ne
fonctionne pas.
II y a encore de la salete,apre,s le
cycle d'autonettoyage.
Suivez les instructions donne,es dans ce guide pour bien programmer le cycle de
nettoyage.
La porte n'a pas e,te,bien ferme,e. Fermez la porte et re,glez le cycle de nettoyage a
nouveau.
Vous n'avez pas enleve,lessalete,sau fond du four, sur le bSti du four ou sur les surfaces
de la porte a I'exte,rieur dujoint d'e,tanche,ite,.La partie du four imme,diatement sous la
porte devrait e,tre lave,e.Le cycle d'autonettoyage n'agit pas sur ces surfaces, mais elles
deviennent assez chaudes pour cuire les e,claboussures. Nettoyez ces surfaces a la main
avant de de,buter le cycle de nettoyage. Lesre,siduscarbonise,s peuvent e,trenettoye,s
avec une brosse en nylon rigide et de I'eau ou avec un tampon a re,curer en nylon. Faites
attention de ne pasendommager lejoint du four.
Untemps de nettoyage trop court. Re,glezun cycle de nettoyage supple,mentaire.
Lecourant fut interrompu durant le cycle d'autonettoyage. Ve,rifiez quelle fut la cause de
cette panne. Re,glezun cycle additionnel d'autonettoyage.
Itvitez d'endommager I'appareil durant son transport
Pour e,viter d'endommager votre cuisinie,re durant son transport a I'inte,rieur oo a I'exte,rieur de votre demeure ou Iors d'un
de,me,nagement, prenez les pre,cautions suivantes '
1. Revisseza fond lesvis de nivellement de I'appareil.
2. Retirez les grilles du four ainsi que les ustensiles remise,sdans letiroir de rangement.
3. Utilisez du ruban adhe,sif pour attacher fermement la pore et le tiroir au chSssis.Attachez le cSble d'alimentation a la
cuisinie,re de la me,me faqon.
4. Utilisez un diable et attachez-y la cuisinie,re solidement a I'aide de courroies. Couvrez I'appareil avec une couverture e,paisse
afin d'e,viter tout risque d'e,gratignures ou de bosses a I'appareil.
5. Evitez de tirer ou de pousser sur le panneau de controle Iorsque vous bougez I'appareil.
31
Page 64

In forma tions sur la garantie
GARANTIE DE LA CUISINI LRE
Votre cuisiniere est protegee par cette garantie
PIeRIODEDE PAR UENTREMISE DE NOS PRIeFOSI_SA
GARANTIE L'ENTRETIEN AUTORISES : RESFONSABILITEDU CUENT :
GAP,AN'lIE Un an a partir de la Tousles frais de reparation ou de remplacement de Le coot des visites d'un reparateur pour les items classes sous la
COMPLETE DE UN AN date d'achat, toute p_ce de cet appareil pr_entant des defectuosites liste RESPONSABILH_SNO RMALES DU CLIEN].*
GARANllE LIMITEE Entre la deuxbme et Reparera ou remplacera gratu_ement (excluant les frais Les coots de transport de rappareil requis pour effectuer les
DE D_ DEUXI_ME A la dnquieme annee a de main-d'oeuvre pour le service et rinstallation) les reparations. Le coOt de la main-d'ceuvre, des pieces et les frais de
LACINQUII_ME partir de la date elements chautfants ddectueux et defraiera tousles transport pour les autres composants que ceux du revetement du
ANNIE d'achat, coOts(excluant lesfrais de main d'oeuvre pour b service bottler ou du systeme de refrigeration scelb.
(Table de cuisson et Ilnslallation) occasionnes par le remplacement de la
vitroc_ramique, joint surface de cuisson vitraceramique dent le bris est caLse
& _lements) par les tensionsthermiques.
GARAN]IE LIMITI_E Les p_riodesde Toutes les dispositions de la garantie corqol_te indiqu_es Les coots de dL_placement du r_parateur et detransport de
(Applicable a I'_at temps indquees ci-dessus eL les exclusions indiqubes ci-dessous I'appareil requispour effertuer les reparations.
de rAlaska o-dessus, s'applquent.
un iquement)
Aux Etats-Unisr votre appareil est garanti par Produits Electrolux Nord-Americains, une filiale de White Consolidated industries, Inc. Nous n'autorisons
aucune personne a modifier ou a ajouter quelle qu'obligation que ce soit acette garantie. Nos obligations concernant les reparations ou les pieces
couvertes par cette garantie doivent etre eftectuees par Produits Electrolux Nord-Americains ou par un depositaire de service autorise de Produits
Electrolux Nord-Americains, Au Canada, votre appareil est garanti par Electrolux Canada Corp,
de materiaux ou de fabrication.
RESPONSABILITES
NORMALES
DU CLIENT
EXCLUSIONS
SI VOUS
AVEZ BESOIN
DE SERVICE
Cette garantie s'applique uniquement aux produits utilis_s _ des fins domestiques et le client est responsable
pour les items inclus dans la liste ci-dessous :
1. Une utilisation appropriee de I'appareil conformement aux instructions fournies avec le produit.
2, Une installation appropriee par un depositaire de service autorise conformement aux instructions fournies avec
Irappareil eta tous les codes Iocaux de plomberie, d'electricite et/ou de gaz.
3, Un branchement approprie a une prise de courant avec raise a la terre eta une tension suffisanter ainsi que le
remplacement des fusibles grilles, la reparation des branchements defaits ou defectueux,
4, Les coots pour rendre Irappareil accessible pour les reparations, comme I'enlevement de garnitures, d'armoires,
d'etageres, etc., qui ne faisaient pas pattie de I'appareil a sa sortie de Irusine.
5. Les dommages au fini apres I'installation.
6. Le remplacement des ampoules electriques et/ou des tubes fluorescents (sur les modeies qui presentent ces
caracteristiques).
Cette garantie ne couvre pas :
1, LES DOMMAGES INDIRECTS OU CONSECUTIFS, COMME LES DOMMAGES A LA PROPRIETE OU LES FRAIS
CONSECUTIFS RESULTANTD'UN MANQUEMENT DEQUELLE QUE NATUREQUE CE SOIT DECETTE GARANTIE ECRITE
OU DE TOUTE AUTRE GARANTIE IMPLICITE.
REMARQUE : Certains etats ou provinces ne permettent pas Irexclusion ou la limitation des dommages indirects ou
consecutifs, il est donc possible que cette limitation ne srapplique pas a votre cas.
2, Les appels de service non relies a un mauvais fonctionnement ou a une defaillance de materiaux ou de fabrication ou
pour les appareils qui ne servent pas a des fins domestiques. Le client devra assumer les frais de ces appels de service.
3, Les dommages causes par un entretien effectue par un depositaire non autorise par Produits Electrolux Nord-
Americains; I'utilisation de pieces autres que les pieces authentiques de Produits Electrolux Nord-Americains ou
obtenues par une personne autre qu'un depositaire autorise ou encore des causes exterieures comme une utilisation
abusive, un mauvais usage, une alimentation electrique inadequate ou une catastrophe naturelle.
4. Les produits dent les numeros de serie d'origine ont ere enleves ou effaces et qui ne peuvent etre lus.
Garder votre facture, le bordereau de livraison ou route autre preuve de versement effectue, La date de la facture
indique le debut de la periode de garantie dans I'eventualite o8 une reparation serait requise. II est dans votre interet de
demander et de conserver tous les requs. Cette garantie ecrite vous donne des droits legaux specifiques. II est possible que
vous ayez egalement d'autres droits qui varient selon les regions, Les services couverts par cette garantie doivent etre
obtenus en contactant Produits Electrolux Nord-Americains:
USA
1.800.944.9044
Produits Electrolux
Nord-Americains
Re. Box 212378
Augusta, GA 30917
Canada
1.866.294.9911
Produits Electrolux
Nord-Americains
802r boul. L'Ange-Gardien
L'Assomption, Quebec
JSW 1T6
Cette garantie ne s'applique qu'aux 50 etats des Etats-Unis, Puerto
Rico, et Canada. Les caracteristiques du produit decrites ou illustrees
sent sujettes a des modifications sans preavis. Toutes les garanties sent
emises par Produits Electrolux Nord-AmericainSr une filiale de White
Consolidated industries, inc. Au Canada, votre appareil est garanti
par Electrolux Canada Corp,
 Loading...