

Page 1
PN 134598200 (0512)
DRYER OPERATING INSTRUCTIONS
The estimated drying time will be displayed for about
5 minutes. Then the display will change to “Ad” to
indicate drying time is automatically being determined
by the sensors. When the load has reached the
selected dryness level, it will continue to tumble,
unheated, during a Cool Down period. This helps reduce
wrinkling and makes items easier to handle during
unloading. The estimated Cool Down time will be
displayed. “dn” is displayed when the cycle is done.
Drying time varies depending on size and dampness of
load and fabric type. If the load is too small or almost
dry, the sensing bars may not detect enough moisture
to continue the cycle and the cycle may end after a few
minutes. Select a Timed Dry setting to dry such loads.
Room temperature and humidity, type of installation and
electrical voltage or gas pressure can also affect drying
time.
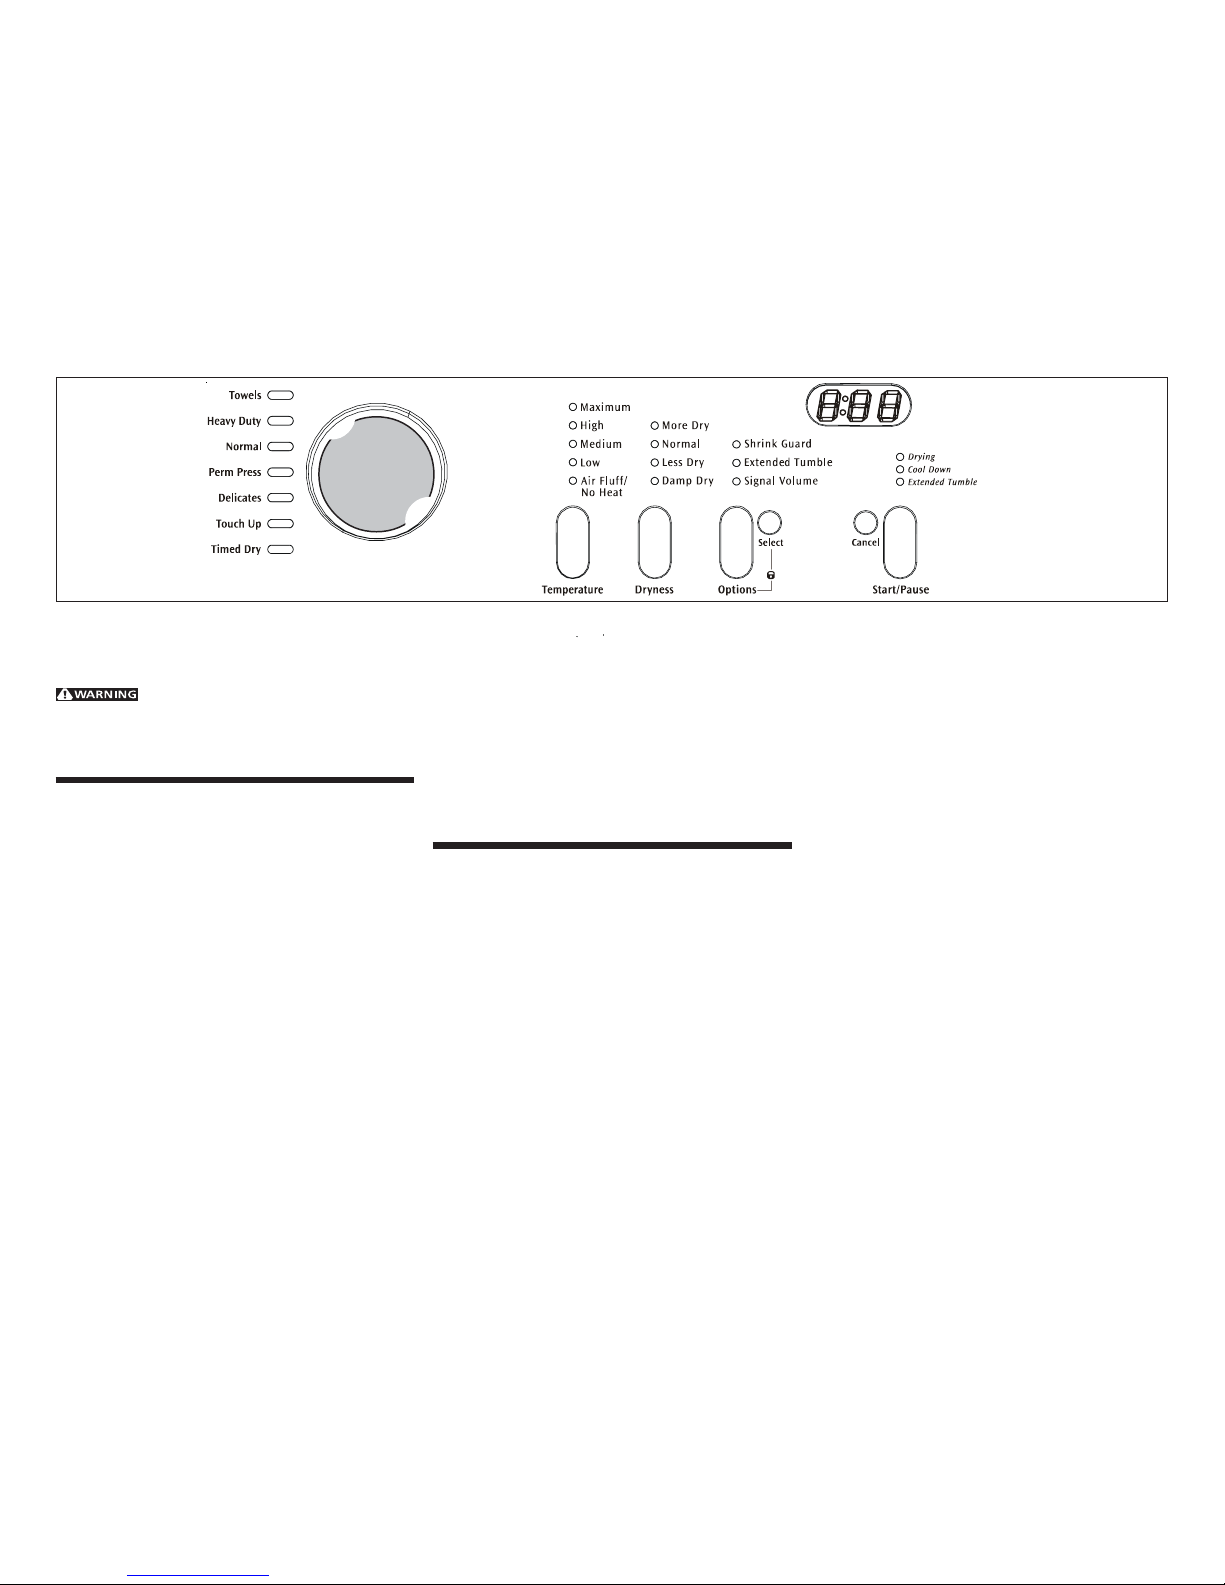
Towels
Select this Auto Dry cycle for towel loads.
Heavy Duty
Select this Auto Dry cycle for sturdy work clothes.
Normal
Select this Auto Dry cycle for cotton items.
Perm Press
Select this Auto Dry cycle for cottons and blends with
a no-iron finish.
Delicates
Select this Auto Dry cycle for knits and delicate items.
Before Operating Your Dryer
Read your dryer Owner’s Guide. It has important
safety and warranty information. It also has many
suggestions for best drying results.
To reduce the risk of fire, electric shock
or injury to persons, read the IMPORT ANT SAFETY
INSTRUCTIONS in your dryer Owner’s Guide before
operating this appliance.
Operating Steps
Read “Drying Procedures” in your Owner’s Guide. It
explains these operating steps in detail.
1. Prepare items for drying.
2. Check that lint filter is clean and in place.
3. Load the dryer. If desired, add a dryer fabric
softener sheet. Close the door.
4. Select the appropriate cycle and settings for
each load.
• Turn the Cycle Selector knob to select the cycle.
The estimated drying time will be displayed.
• A suitable drying temperature, dryness level and
options will automatically be indicated for each
cycle. See the “Dryer Setting Chart” for more
details.
• T o change the temperature and dryness level,
press T emperature or Dryness until the desired
selections are made.
• T o select or delete an option, press Options; then,
while the indicator is blinking, press Select. The
indicator will light when the option has been
selected. it will no longer be lighted when the option
has been deleted.
• If a temperature, dryness level or option is not
available for a cycle, it will not light.
• Adjustments to the cycle will be remembered
each time that cycle is selected in the future.
• To return to factory settings, press Start/Pause
and Select at the same time and hold until the
signal sounds.
5. Press Start/Pause to begin the cycle.
• To pause the cycle press Start/Pause. To
resume the cycle, press Start/Pause again.
• To stop or change the cycle, press Cancel.
6. A signal will sound at the end of the cycle and
periodically during Extended Tumble when the
Signal option is selected. When the cycle
ends, remove items immediately and hang or fold.
7. Clean the lint screen after every load.
Cycle Selection
Turn the Cycle Selector knob to the desired cycle. For
best results, follow the fabric care label instructions on
items to be dried. If the selection is changed after the
cycle starts, the indicator lights will blink, the signal
will beep and “ERR” will be displayed. T o change the
selection after the cycle has begun, press Cancel
before making another choice. Just turning the knob
to another selection will not change the cycle. The
signal will beep and the status lights will flash, but the
original cycle will continue.
Auto Dry
Auto Dry cycles take the guesswork out of drying time.
Loads dried using the T owels, Heavy Duty , Normal, Perm
Press, and Delicates cycles will dry automatically at
the selected temperature to the desired dryness level.
The dryer uses sensing bars to sense the moisture
level of the load as it tumbles through heated air. Auto
Dry cycles save time and energy and protect fabrics.
Page 2

PN 134598200 (0512)
Dryness Level
To change the dryness level, press Dryness until the
desired selection is made. Select Normal for most
loads.
Occasionally a load may seem too damp or over-dried
at the end of the cycle. To increase drying time for
similar loads in the future, select More Dry. For loads
requiring less drying time, select Less Dry.
Select Damp Dry for items you wish to partially dry
before hanging or ironing.
Note: T o prevent over-drying, not every dryness
level is available with every cycle.
Options
T o select an option, press Options until the indicator for
the desired option flashes, then press Select. If an
option is not available for a cycle, the indicator will not
light. Follow the same steps to delete an option.
A Signal will sound at the end of the cycle and
periodically during Extended Tumble. The signal has
an adjustable volume level or can be turned off.
Select Shrink Guard to lower the initial drying
temperature to protect fabrics from overdrying.
Select Extended Tumble if the dried load might not
be removed promptly at the end of the cycle. The dry
load will continue tumbling without heat for 30 minutes
to help reduce wrinkling. When the Signal is selected,
a beep will be heard periodically. The load may be
removed any time during Extended Tumble.
Dryer Features
Control Lock
T o avoid having someone accidentally start or stop the
dryer, press Options and Select at the same time and
hold for 10 seconds. “LOC” will be displayed. T o remove
the control lock, press Options and Select again.
Start/Pause
Press Start/Pause to start, pause or restart a cycle.
“PAU” will be displayed alternately with the estimated
time remaining when the cycle is paused.
Cancel
Press Cancel to stop the cycle.
Status Lights
The following indicators may be lighted during the cycle:
• Drying
• Cool Down
• Extended Tumble
Cycle Selection (Con’t)
Touch Up
Select Touch Up to help remove wrinkles from clean
dry items that may have been left in the dryer, have
been stored in crowded closets or drawers or unpacked
from luggage following a trip. The load will tumble for
15 minutes at low heat.
Timed Dry
To manually select the drying time for any load, turn
the knob to Timed Dry. Drying times from 15 to 90
minutes can be selected by continuing to turn the knob.
Drying time will be displayed. You will not be able to
select a dryness level. Timed Dry is recommended
when using the Air Fluff/No Heat setting.
Note: To change cycles, press Cancel.
T o avoid fire hazard, do not use heat to
dry items containing feathers or down, foam rubber,
plastic, or similarly textured, rubber-like materials. Use
the Air Fluff/No Heat setting only.
Cycle Settings
Appropriate drying Temperature, Dryness Level and
Options will automatically be displayed for each cycle.
The settings can be changed before the cycle is started.
Those adjustments will automatically be remembered
each time that cycle is selected. If a temperature,
dryness level or option is not recommened for a cycle,
the indicator will not light.
If changes are attempted after the cycle starts, the
lights will blink, the signal will beep and “Err” will be
displayed. To change a setting after the cycle starts,
press Start/Pause, adjust the setting and press S tart/
Pause to resume the cycle. See the “Dryer Settings
Chart” for more details.
Drying Temperature
For best results, follow the fabric care label instructions
on items to be dried. T o change the drying temperature,
press Temperature to scroll to the desired heat. To
protect your wardrobe, not all temperatures are available
with every cycle.
Maximim heat is recommended for sturdy fabrics.
High heat is recommended for most cotton fabrics.
Medium heat is recommended for wrinkle free,
permanent press and lightweight fabrics.
Low heat is recommended for delicate fabrics.
Air Fuff/No Heat should only be used with a Timed
Dry setting to dry items containing feathers, down,
foam rubber, plastics or rubber-like materials; to freshen
clothing, pillows or blankets; or to dust draperies.
Note: Using Air Fluff/No Heat in any Auto Dry
cycle will result in long drying times and /or
wet loads at the end of the cycle.
Page 3

PN 134598200 (0512)
Error Code
4 beeps / E4A
9 beeps / E9E
6 beeps / E68
Towels Heavy Duty Normal Perm Press Delicate Touch Up Timed Dry
Estimated
Dr
ying Time **
60 minutes 45 minutes 50 minutes 40 minutes 20 minutes 30 minutes
15 to 90
minutes
Temperatures
Maximum
* * *
High
*
Medium
*
Low
* *
Air Fluff/No Heat
Dryness Level
More Dry
*
Normal Dry
*
*
*
Less Dry
*
Damp Dry
Options
Shrink Guard
*
Extended Tumble
* *
Signal Volume
* * * * * * *
Line voltage problem Low voltage. Intermittent voltage. Press Cancel.
ERROR CODE CHART
Push button does not function
Error
Dryer ran too long
Possible Causes
Press buttons lightly and release.
Disengage button.
Lint filter blocked. Ventilation system clogged. Dryer overloaded.
Push button held too long or wedged in the control panel.
If the dryer stops, the status lights flash, the signal beeps and a code is displayed, an error has occured. Press CANCEL. Consult the Error Code Chart below or the "Avoid Service
Checklist" in the Owner's Guide for the possible cause and solution. Make necessary corrections, then select a cycle and press START. If the dryer stops, the status lights flash
again, the beeping continues and the code reappears, please contact service for assistance.
Solutions
Remove lint; wash lint filter to
remove softener sheet residue
Clean out ventilation system.
Reduce load size.
* Factory
Available
** Estimated cycle duration is based on normal
dryness level and factory settings.
setting settings
DRYER SETTINGS CHA RT
AVAILABLE CYCLE SETTINGS - These temperatures, dryness levels and options are available with the following cycles:
15
Page 4

• À l’avenir, chaque fois que le cycle est sélectionné,
l’appareil aura en mémoire les réglages du cycle.
• Pour revenir aux réglages en usine, appuyez sur
Démarrer/pause (Start/Pause) et Sélectionner (Select)
en même temps jusqu’à ce que le signal sonore
retentisse.
5. Appuyez sur Démarrer/pause pour démarrer le cycle.
• Pour arrêter le cycle ou faire une pause, appuyez
sur Démarrer/pause. Pour reprendre le cycle,
appuyez de nouveau sur Démarrer/pause.
• Pour annuler ou modifier le cycle, appuyez sur
Annuler (Cancel).
6. Un signal sonore retentit à la fin du cycle et
périodiquement durant le culbutage prolongé
lorsque l’option Signal est sélectionnée. À la fin du
cycle, retirez immédiatement les articles, suspendre
ou plier.
7. Nettoyez le filtre à charpie après chaque charge.
Sélection de cycle
T ournez le bouton Sélection de cycle au cycle désiré. Pour
de meilleurs résultats, suivez les instructions de soins
du tissu sur les articles à sécher. Si la sélection est
modifiée après le démarrage du cycle, les indicateurs
lumineux clignotent, le signal sonore retentit et « ERR »
(erreur) s’affiche. Pour modifier la sélection après le début
du cycle, appuyez sur Annuler avant d’effectuer un autre
choix. Le fait de tourner simplement le bouton à une
autre sélection ne modifie pas le cycle. Le signal sonore
retentit et les lumières d’état clignotent, mais la sélection
originale se poursuit.
Séchage automatique
Les cycles de Séchage automatique (Auto Dry) éliminent
les jugements approximatifs quant à la durée du séchage.
Les charges séchées à l’aide des cycles Serviettes (Towels), Haute performance (Heavy Duty), Normal (Normal),
Sans repassage (Perm Press) et Délicat (Delicates)
sèchent automatiquement à la température sélectionnée
au niveau de déshumidification désiré.
Avant de faire fonctionner votre sécheuse
Lisez votre Guide du propriétaire de sécheuse. Il contient
des informations importantes relatives à la sécurité et à
la garantie. Il comprend aussi de nombreuses
suggestions pour obtenir des résultats de séchage
optimums.
Pour réduire le risque d’incendie,
de choc électrique ou de blessure, lisez les INSTRUCTIONS IMPORTANTES DE SÉCURITÉ dans votre Guide
du propriétaire avant de faire fonctionner cet appareil.
Étapes de fonctionnement
Lisez les « procédures de séchage » dans votre Guide
du propriétaire. Il explique en détails ses étapes de
fonctionnement.
1. Préparez les articles à sécher.
2. Vérifiez que le filtre à charpie est propre et en place.
3. Chargez la sécheuse. Si désiré, ajoutez un
adoucisseur de tissu pour sécheuse. Fermez la porte.
4. Sélectionnez le cycle approprié et les réglages pour
chaque charge.
• Tournez le bouton de Sélection de cycle
(CyclSelector) pour sélectionner le cycle. La durée
estimée de séchage s’affiche.
• Une température appropriée de séchage, le
niveaude déshumidification et les options
s’affichent automatiquement pour chaque cycle.
Voir le Tableau de réglage de sécheuse pour
obtenir de plus amples détails.
• Pour modifier la température et le niveau de
déshumidification, appuyez sur Température ou
déshumidification (Dryness) jusqu’à ce que la
sélection désirée soit effectuée.
• Pour sélectionner ou annuler une option, appuyez
sur Options. Ensuite, alors que l’indicateur clignote,
appuyez sur Sélectionner (Select). L’indicateur
s’allume lorsque l’option est sélectionnée. Il s’éteint
lorsque l’option est annulée.
• Si la température, le niveau de déshumidification ou
l’option n’est pas disponible pour le cycle,
l’indicateur ne s’allume pas.
PN 134598200 (0512)
La sécheuse utilise des barres de captage pour capter le
niveau d’humidité de la charge pendant qu’elle bascule
dans l’air chaud. Les cycles de Séchage automatique
économisent du temps et de l’énergie et protègent les
tissus. La durée estimée de séchage s’affiche durant
environ 5 minutes. Ensuite, l’affichage passe à « Ad »
pour indiquer que la durée de séchage est
automatiquement déterminée par les capteurs. Lorsque
la charge a atteint le niveau de déshumidification
sélectionné, elle continue à culbuter, sans chaleur, durant
la période de refroidissement. Cette période aide à réduire
le froissement et rend les articles plus faciles à manipuler
durant le déchargement. La durée estimée de la période
de refroidissement s’affiche.
La durée de séchage varie en fonction de la taille et de
l’humidité de la charge et du type de tissu. Si la charge
est trop petite ou presque sèche, il est possible que les
barres de captage ne détectent pas suffisamment
d’humidité pour poursuivre le cycle et le cycle peut se
terminer après quelques minutes. Sélectionnez un
réglage Séchage chronométré (Time Dry) pour sécher
ces charges.
La température ambiante et l’humidité, le type
d’installation et la tension électrique ou la pression du
gaz peuvent aussi affecter la durée de séchage.
Serviettes
Sélectionnez ce cycle de Séchage automatique pour les
charges de serviettes ou ratines.
Haute performance
Sélectionnez ce cycle de Séchage automatique pour les
vêtements de travail résistants.
Normal
Sélectionnez le cycle Auto Dry pour les articles en coton.
Sans repassage
Sélectionnez ce cycle de Séchage automatique pour les
articles en coton et les mélanges repassage inutile.
Délicat
Sélectionner ce cycle de Séchage automatique pour les
articles délicats.
CONSIGNES D’UTILISATION DE SECHEUSE
Page 5

Options
Pour sélectionner une option, appuyez sur Options jusqu’à
ce que l’indicateur de l’option désirée clignote, ensuite
appuyez sur Sélectionner. Si une option n’est pas
disponible pour un cycle, l’indicateur ne s’allume pas.
Suivez les mêmes étapes pour annuler une option.
Un signal sonore retentit à la fin d’un cycle et
périodiquement durant le Basculage prolongé. Le signal
possède un volume réglable ou peut être fermé.
Sélectionnez Protéger du froissement (Shrink Guard) afin
d’abaisser la température initiale de séchage pour
protéger les tissus d’un séchage excessif.
Sélectionnez Basculage prolongé (Extended Tumble) si
la charge séchée ne peut être retirée rapidement à la fin
du cycle. La charge continue à basculer sans chaleur
durant 30 minutes afin d’aider à réduire le froissement.
Lorsque le signal sonore est sélectionné, il retentit
périodiquement. La charge peut être retirée en tout temps
durant le basculage prolongé.
Caractéristiques de la sécheuse
Verrouillage des commandes
Pour éviter que quelqu’un démarre ou arrête
accidentellement la sécheuse, appuyez sur Options et
Sélectionner en même temps durant 10 secondes jusqu’à
ce que « LOC » (verrouillé) s’affiche. Pour déverrouiller
les commandes, appuyez sur Options et Sélectionner de
nouveau.
Démarrer/pause
Appuyez sur Démarrer/pause pour démarrer, faire une
pause ou redémarrer un cycle. « PAU » (pause) s’affiche
en alternance avec la durée estimée restante lorsque le
cycle est en pause.
Annuler
Appuyez sur Annuler pour arrêter le cycle.
Lumières d’état
Les indicateurs suivants peuvent s’allumer durant le cycle
:
• Séchage (Drying)
• Refroidissement (Cool Down)
• Basculage prolongé (Extended Tumble)
Température de séchage
Pour obtenir de meilleurs résultats, suivez les étiquettes
d’instructions de soins de tissu sur les articles à sécher.
Pour modifier la température de séchage, appuyez sur
Température pour dérouler jusqu’à la chaleur désirée.
Pour protéger votre garde-robe, toutes les températures
ne sont pas disponibles pour chaque cycle.
Maximum Température recommandée pour les tissus
résistants.
Haute Température recommandée pour la plupart des
tissus en coton.
Moyenne Température recommandée pour les tissus
anti-froissement, sans repassage et légers.
Base Température recommandée pour les tissus délicats.
Air froid/sans chaleur Ce réglage ne devrait être utilisé
qu’avec le réglage de Séchage chronométré pour sécher
des articles contenant des plumes, du duvet, du caoutchouc mousse, du plastique ou des matières ressemblant
au caoutchouc ; pour rafraîchir les vêtements, les oreillers
ou couvertures ; ou dépoussiérer les draperies.
Nota : L’utilisation de l’option Air froid/sans chaleur avec
un cycle Séchage automatique entraîne une durée de
séchage plus longue et/ou une charge humide à la fin
du cycle.
Niveau de déshumidification
Pour modifier le niveau de déshumidification, appuyez
sur Déshumidification jusqu’à ce que la sélection désirée
soit effectuée. Sélectionnez Normal pour la plupart des
charges.
Il arrive qu’une charge apparaisse trop humide ou trop
sèche à la fin du cycle. Pour augmenter la durée de
séchage pour des charges semblables à l’avenir,
sélectionnez Plus sec (More Dry). Pour les charges demandant une plus courte durée de séchage, sélectionnez
Moins sec (Less Dry).
Sélectionnez Sec humide (Damp Dry) pour faire sécher
les articles que vous désirez sécher partiellement avant
de les suspendre ou de les repasser.
Nota : Afin de prévenir un niveau de déshumidification
excessif, tous les niveaux de déshumidification ne
sont pas disponibles pour chaque cycle.
Sélection de cycle (suite)
Retouche
Sélectionnez Retouche (Touch Up) pour retirer le
froissement d’articles secs propres qui ont pu être
laissés dans la sécheuse, entreposés dans des garderobes ou tiroirs surchargés ou retirés des bagages après
un voyage. La charge bascule durant 15 minutes à faible
chaleur.
Séchage chronométré
Pour sélectionner manuellement la durée de séchage
pour toute charge, tournez le bouton à Séchage
chronométré (Time Dry). Une durée de séchage de 15,
30, 60 ou 90 minutes peut être sélectionnée en continuant à tourner le bouton. La durée de séchage s’affiche. Il
est impossible de sélectionner le niveau de
déshumidification. Le Séchage chronométré est
recommandé lors de l’utilisation du réglage Air froid/sans
chaleur (Air Fluff/No Heat).
Nota : Pour modifier le cycle, appuyez sur Annuler.
Pour éviter les risques d’incendie,
n’utilisez pas la chaleur pour sécher des articles contenant
du cuir ou du duvet, du caoutchouc mousse, du plastique
ou des matières semblables ou des matières
ressemblant au caoutchouc. Utilisez uniquement le
réglage Air froid/Sans chaleur.
Réglage de cycles
La température de séchage, le niveau de
déshumidification et les options s’affichent
automatiquement pour chaque cycle. Les réglages
peuvent être modifiés avant le début du cycle. À l’avenir,
chaque fois que le cycle sera sélectionné, l’appareil aura
en mémoire les réglages du cycle. Si une température,
un niveau de déshumidification ou une option n’est pas
recommandé pour un cycle, l’indicateur ne s’allume pas.
Si vous essayez de faire des modifications après le
démarrage d’un cycle, les lumières clignotent, le signal
sonore retentit et « Err » s’affiche. Pour modifier un
réglage après le démarrage du cycle, appuyez sur
Démarrer/pause, sélectionnez le réglage désiré et
appuyez sur Démarrer/pause pour reprendre le cycle.
PN 134598200 (0512)
Page 6

PN 134598200 (0512)
Error Code
4 beeps / E4A
9 beeps / E9E
6 beeps / E68
Serviettes
(Towels)
Haute
Performance
(Heavy Duty)
Normal
Repassage
Permanente
(Perm Press)
Délicat
(Delicate)
Retoucher
(Touch Up)
Sécharge
Minuté
(Timed Dry)
Durée Estimée
de Cycle **
60 minutes 45 minutes 50 minutes 40 minutes 20 minutes 30 minutes
15 to 90
minutes
Temperatures
Maximum
*
*
*
La Haute (High)
*
Le Milieu (Medium)
*
Le Bas (Low)
*
*
A
ir froid/
sans chaleur
Niveau de Sécheresse
Plus Sec
(More Dry)
*
Normal Sèchent
(Normal Dry)
*
*
*
Moins Sec
(Less Dry)
*
Sec Humide
(Damp Dry)
Options
Garde de Rétrécissement
(Shrink Guard)
*
Basculage prolongé
(Extended Tumble)
*
*
Signal Volume
*
*
*
*
*
*
*
Problème de tension du circuit élec tri que.
Bass tension. Intermitt ent te ns ion . Appuyez sur Annuler
TABLEAU DE CODE D’ERREUR
Appuyez doucement sur les
boutons et relâchez-les.
Décoincez le bouton.
Le filtre à charpie est bloqué. Le circuit d’évac uati on es t bl oqué. La séc heus e es t
surchargée.
Le bouton poussoir a été enfoncé trop longtemps ou est coincé dans le panneau de
commande.
Si la sécheuse s’arrête, la lumière d’état clignote, le signal sonore retentit et un code s’affiche : une erreur s’est produite. Appuyez sur Annuler. Pour éviter de recourir à des appels
d’entretien, consultez le Tableau de code d’erreur ci-dessous ou la Liste de vérification dans le Guide du propriétaire afin d’identifier la cause et la solution possibles. Faites les
corrections nécessaires, sé lec t i onnez ensui te un c ycl e et appuyez sur Dém arrer . Si la s écheus e s’ arrête , la lu m i ère d’état clignote à nouveau, le signal sonore continue à retentir et
le code s’affiche une fois de plus . Com muniquez avec le fournisseur de service pour obtenir de l’aide.
Solutions
Retirez la charpie, lavez le filtre
à charpie pour y enlever tout
résidu de feuille d’adoucisseur.
Nettoyez le circuit d’évacuation.
Réduisez la taille de la charge.
Le bouton poussoir ne fonctionne pas.
Error
La sécheuse a fonctionné trop longtemps.
Possible Causes
Tableau de Réglage de Sécheuse
ARRANGEMENTS DISPONSIBLE DE CYCLE - les c es te m pératur es , niveaux de sécheres se et options sont disponibles avec les cycles suivants:
* Arrangement d'usine Cycles disponibles
***La durée estimée de cycle est basée s ur les arrangements
normaux de niveau et d'usine de sécheresse.
 Loading...