

Page 1
Installation Instructions
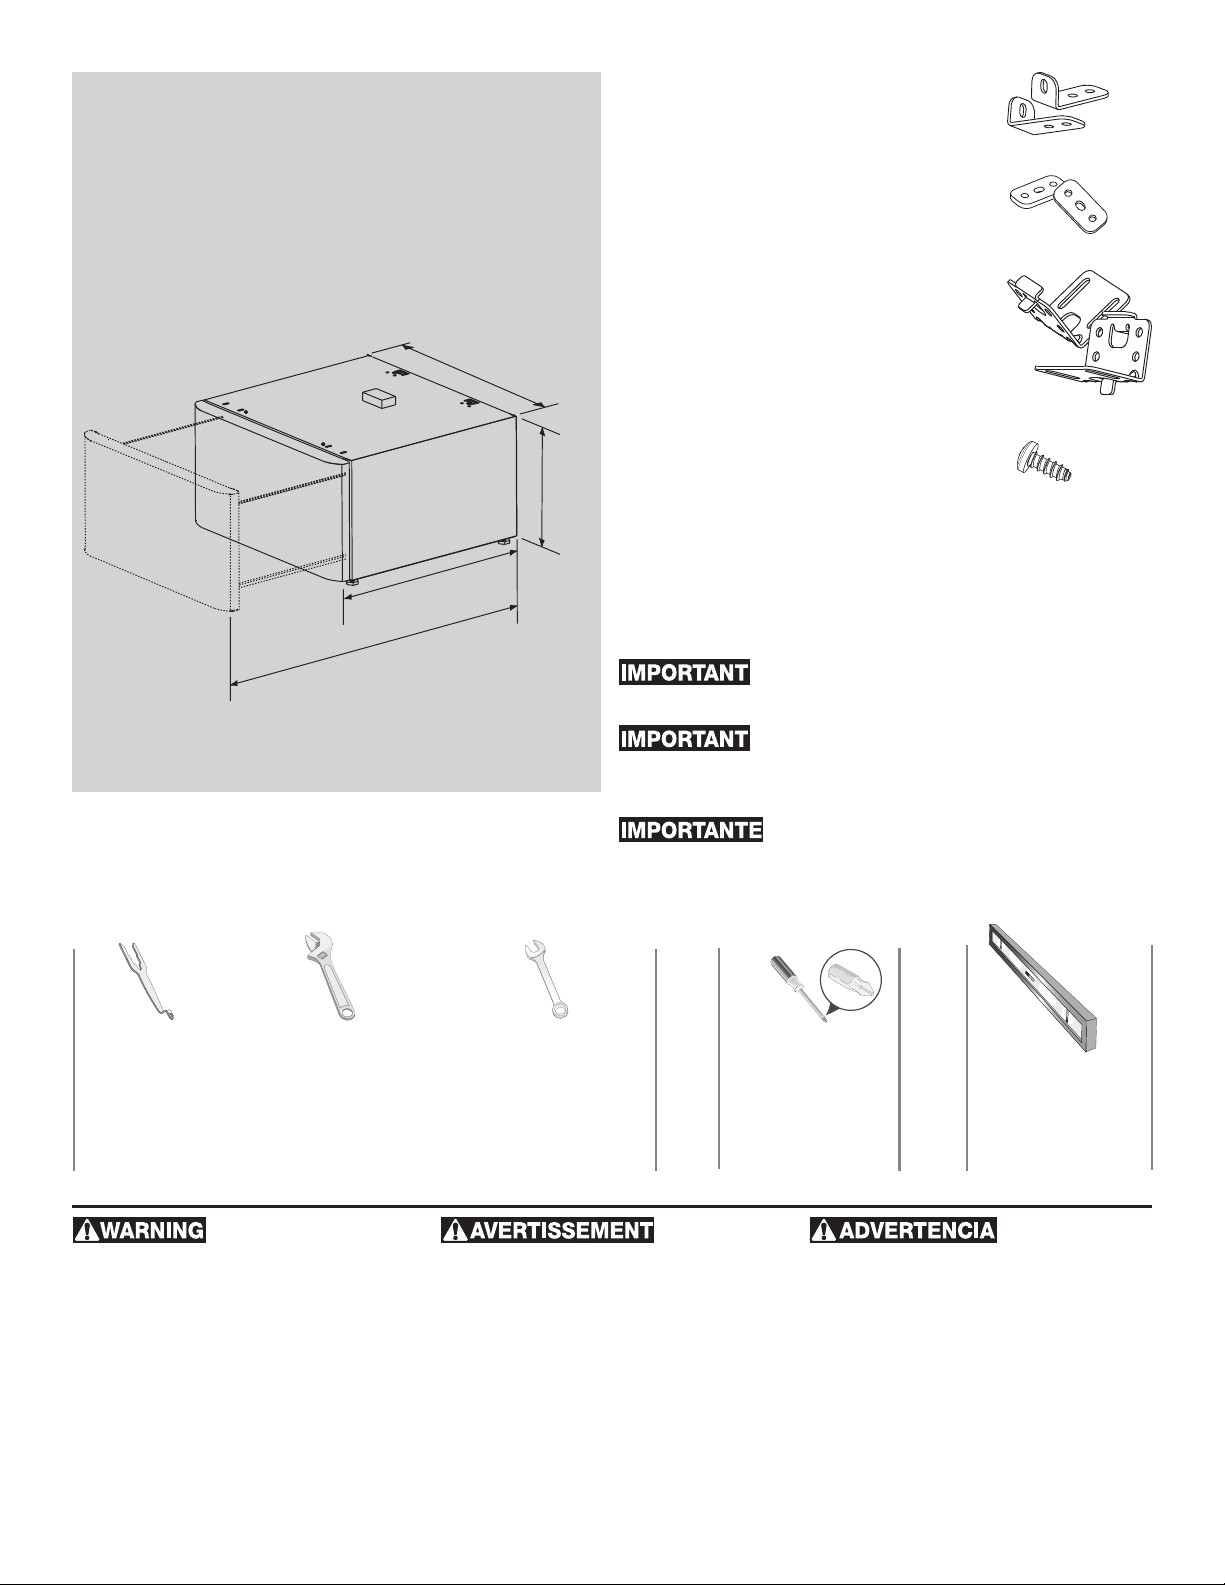
15” Pedestal
Instructions d’installation
Socle de 38 cm (15 po)
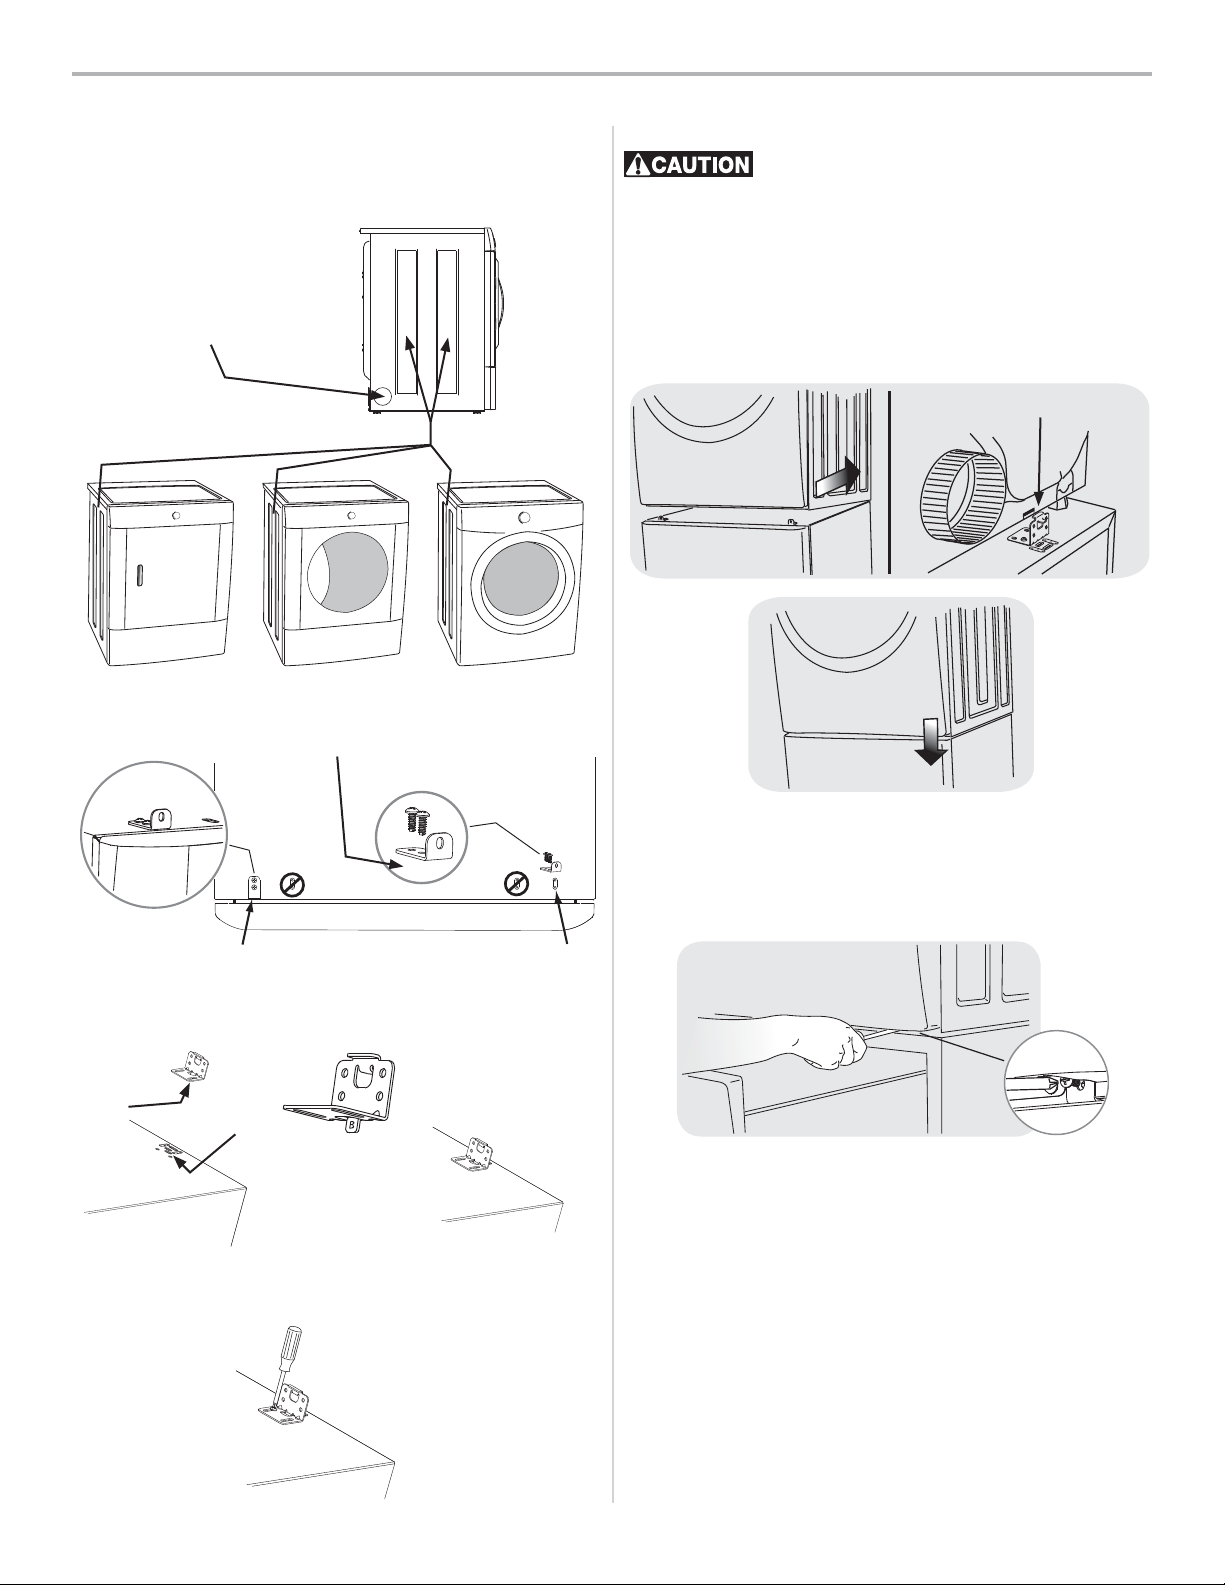
KIT COMPONENTS:
1 Pedestal Installation Instructions.•
2 Front brackets.A
2 Front bracket spacers.B
2 Rear brackets.C
14 #10 (16 x .500) screws.D
A
B
Instrucciones de Instalación
Pedestal de 15" (38,1 cm)
Tools needed:
Outils nécessaires:
Herramientas necesarias:
26.5”
(67 cm)
42.5”
(108 cm)
137147900 A (0904)
27”
(68.5 cm)
15”
(38 cm)
COMPOSANTS DU
NÉCESSAIRE:
1 instructions d’installation•
2 supports avant.A
2 espaceurs pour supports avant.B
2 supports arrières.C
14 vis n° 10 (16 x .500).D
COMPONENTES DEL KIT:
1 libro de instrucciones de instalación•
2 soportes delanteros.A
2 espaciadores para soportes delanteros.B
2 soportes traseros.C
14 tornillos n.º 10 (16 x .500).D
Total weight IN closed drawer or combination of IN
and ON TOP OF open drawer should not exceed 65 lb. (29.5 kg).
Le poids total DANS un tiroir fermé ou une combinaison du poids DANS et SUR le tiroir ouvert ne doit pas excéder
29,5 kg (65 lb).
El peso total DENTRO del cajón cerrado o el peso
combinado de los artículos que estén DENTRO y ENCIMA del cajón
abierto no debe exceder las 65 lb (29,5 kg).
C
D
OR
OU
O
Optional universal
wrench available
from dealer
Clé universelle
optionnelle (en vente
chez le détaillant)
Llave universal opcional
(disponible a través
de su distribuidor local)
Adjustable wrench
Clé à molette
Llave ajustable
Failure to disconnect from power source •
before stacking could result in personal
injury or even death.
Improper installation of dryer venting •
could result in personal injury or damage
to property.
To avoid back or other injury, have more •
than one person move or lift the washer
or dryer.
OR
OU
O
9/16” or 14 mm box wrench
Clé polygonale de
9/16 po ou de 14 mm
Llave de cubo de
9/16 po o 14 mm
Ne pas débrancher l’appareil de sa source •
d’alimentation en électricité avant de le
superposer peut causer des blessures,
voire la mort.
Une installation inappropriée du système •
de ventilation de la sécheuse peut causer
des blessures ou des dommages matériels.
Pour éviter les blessures au dos ou •
d’autres types de blessure, demandez
l’aide d’autres personnes pour déplacer
ou soulever la laveuse ou la sécheuse.
English continued on page 2. Pour la suite de la version française,
reportez-vous à la page 6.
AND
ET
Y
Phillips screwdriver
Tournevis Phillips
Destornillador Phillips
El no desconectar el suministro eléctrico •
antes de la instalación apilada puede
ocasionar lesiones personales o incluso la
muerte.
La instalación inadecuada de la ventilación •
de la secadora puede ocasionar lesiones
personales o daños a la propiedad.
Para evitar lesiones en la espalda u otro •
tipo de lesiones, procure levantar o mover
la lavadora o secadora con la ayuda de
más de una persona.
La versión en español continúa en la página 10.
AND
ET
Y
Carpenter’s level
Niveau de charpentier
Nivel de carpintero
Page 2
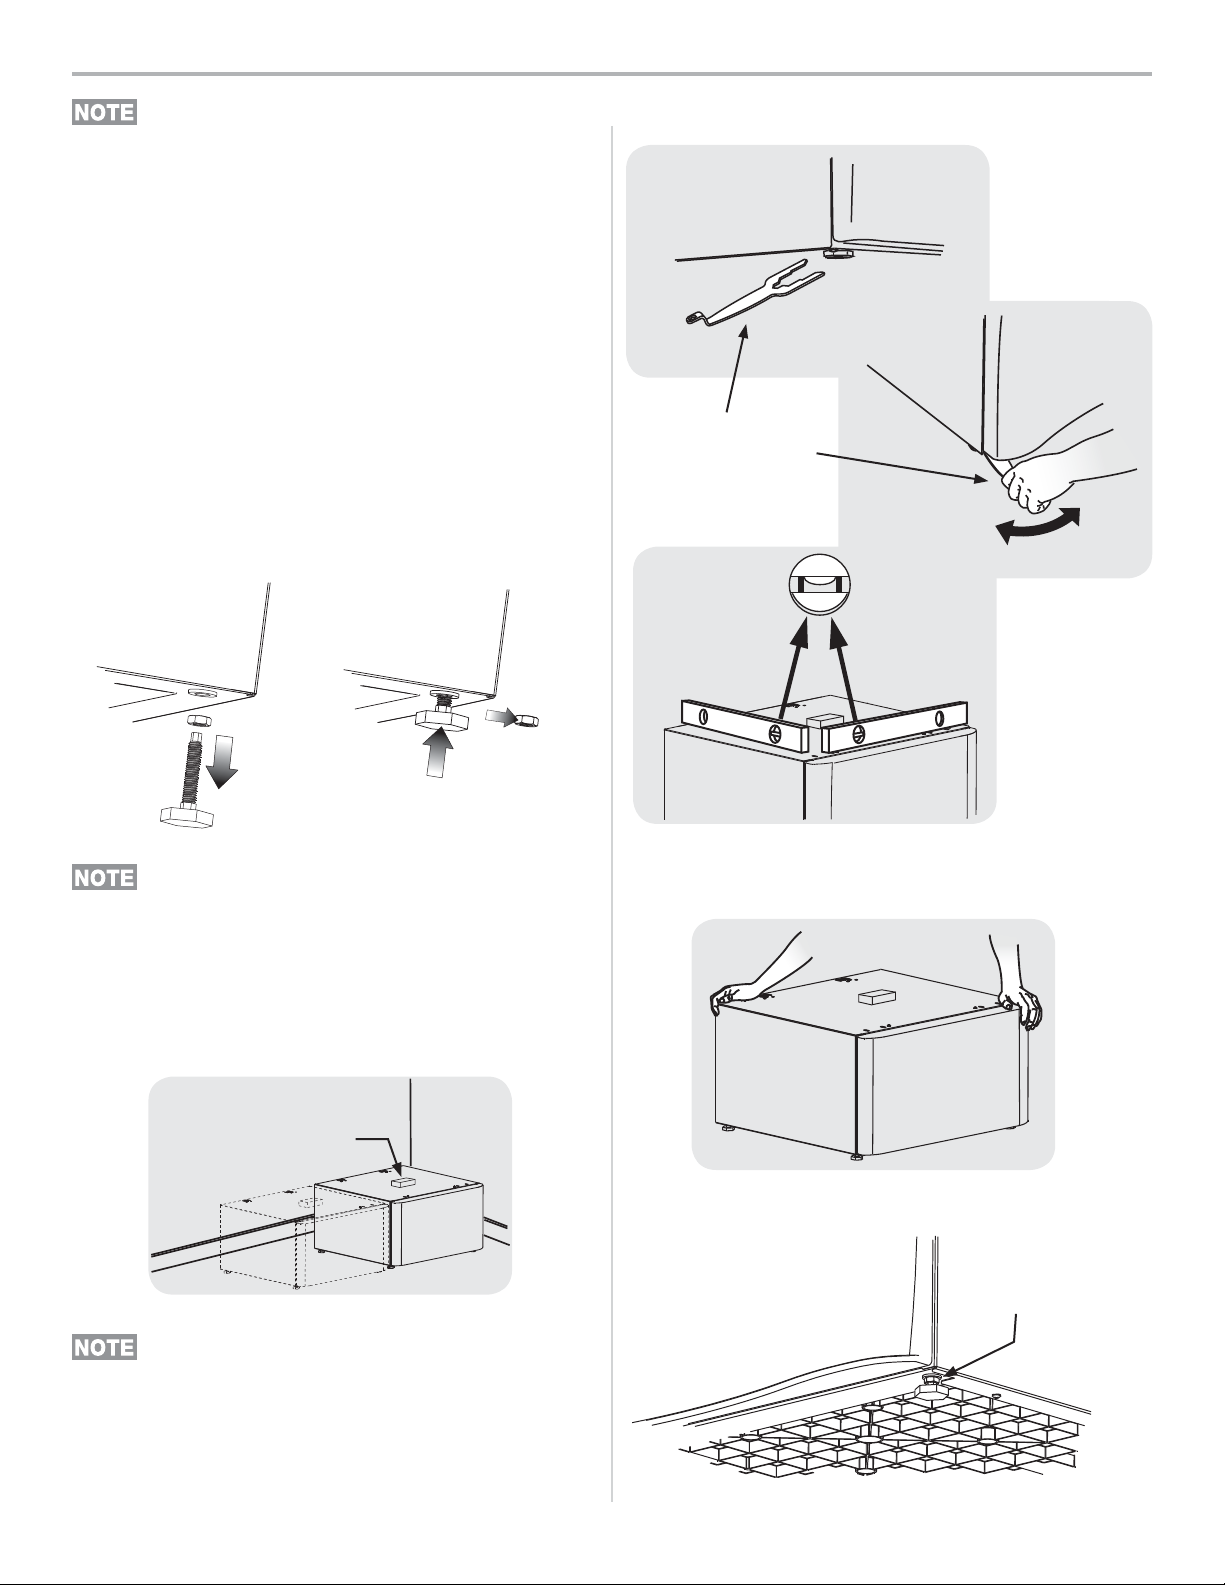
PREPARATION INSTRUCTIONS
Due to higher center of gravity of appliance on pedestals, some side-to-side rocking is normal during operation.
Vibration can be minimized by assuring appliance is installed
properly, including being level and solid on all four (4) legs by
following these directions.
A) Preparing washer or dryer for mount-
ing on pedestal
If washer or dryer is new and has not been installed yet, skip to 1.
step 4.
If dryer is already installed, disconnect dryer from electrical and 2.
gas connections and exhaust venting.
If washer is already installed, disconnect washer from electrical 3.
connection. Turn off hot and cold water supply and disconnect
hot and cold water supply hoses from water supply outlets.
Disconnect drain hose from drain pipe.
If appliance has plastic feet, screw each foot fl ush to the base.4.
If appliance has metal feet, unscrew them, remove the locking 5.
nut and reinstall the feet fl ush to the base.
Level the pedestal front-to-back and side-to-side by adjusting 2.
each leveling leg. Keep leg extension to a minimum.
Optional universal
wrench (or adjustable
pliers).
lower
raise
If locking nuts are not removed on units with metal
feet, mounting holes in appliance will not align to mounting
holes in brackets.
B) Preparing pedestal before mounting
washer or dryer
Locate pedestal to within a few inches of its fi nal location.1.
DO NOT remove foam!
Allow for approximately 5 in. (12.5 cm) behind the
pedestal for clearance of back of washer or dryer to the wall.
Allow additional space if venting dryer upward or downward.
Rock the pedestal from corner-to-corner to check for stability. 3.
Repeat leveling and rocking until all four (4) feet are sturdy on the
fl oor and pedestal is level.
Without turning the rubber foot, lock each pedestal leg in place 4.
by tightening its lock nut tight against the pedestal base.
lock nut
2
Page 3
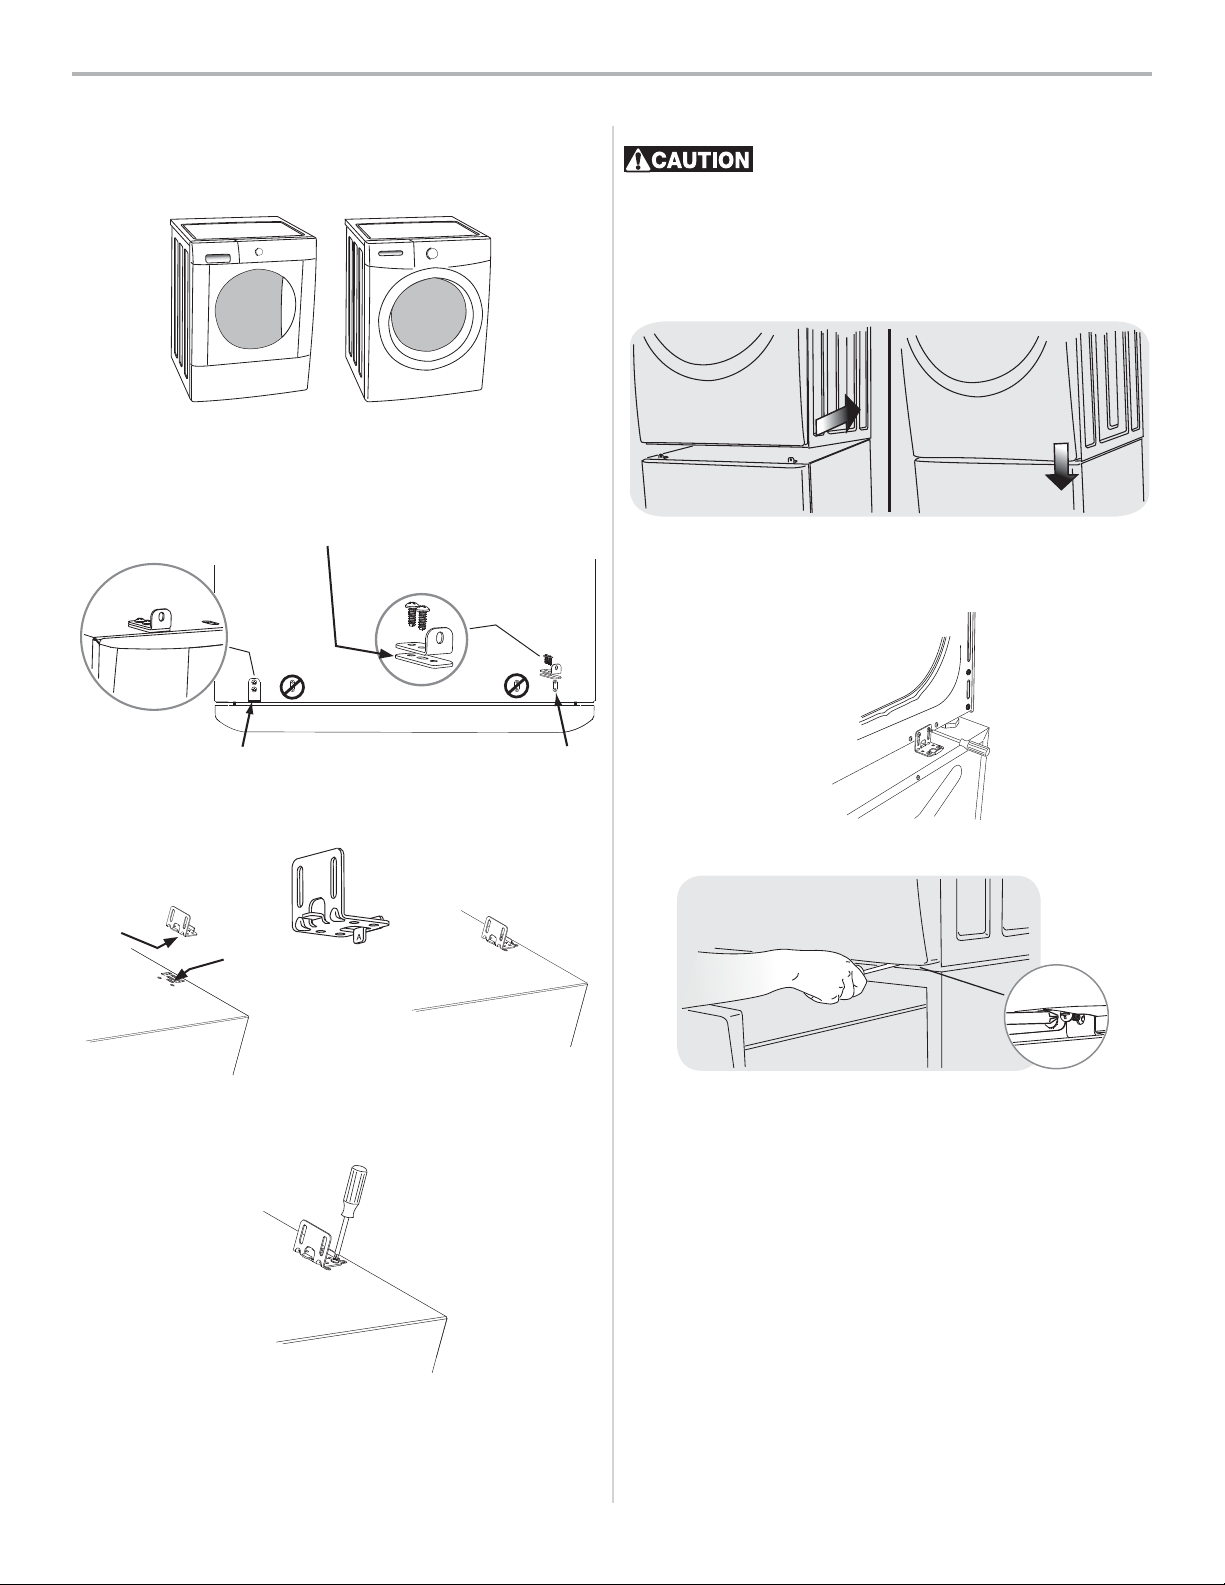
WASHER INSTRUCTIONS
C1)
Attaching washer mounting hardware
Use the following instructions for mounting either of these types 1.
of washers to the pedestal:
Attach each front clip to outer-most set of holes with 2 screws 2.
and supplied spacer.
D1) Mounting washer
- EXCESSIVE WEIGHT HAZARD - To avoid
back or other injury, have more than one person move or lift
the washer.
Using two or more persons, slightly tip the washer back and lift it 1.
onto the pedestal. Still tipped, slide the washer back against the
rear brackets and gently set down the front so the appliance is
between the front and rear brackets.
SLIDE BACK
TIP DOWN
Locate spacer under each front bracket.
Insert “A” tab of each rear bracket into the middle slots on rear 3.
of pedestal. Orient bracket inward for washer mounting.
“A”
tab
Install 2 screws through each rear bracket into aligning pedestal 4.
holes.
middle
slot
Adjust the appliance side-to-side to align its mounting holes with 2.
the pedestal’s bracket holes.
Install 2 screws through each rear bracket into the base of the 3.
washer.
With the pedestal drawer open for better access, install a screw 4.
through each front bracket into the base of the washer.
inward
E) Installing or re-installing washer
Slide appliance/pedestal into place.1.
Check for levelness and rock all four (4) legs again. Repeat until 2.
level and solid.
Refer to 3. Washer Installation Instructions for complete details
on installing water, drain, or electrical.
3
Page 4
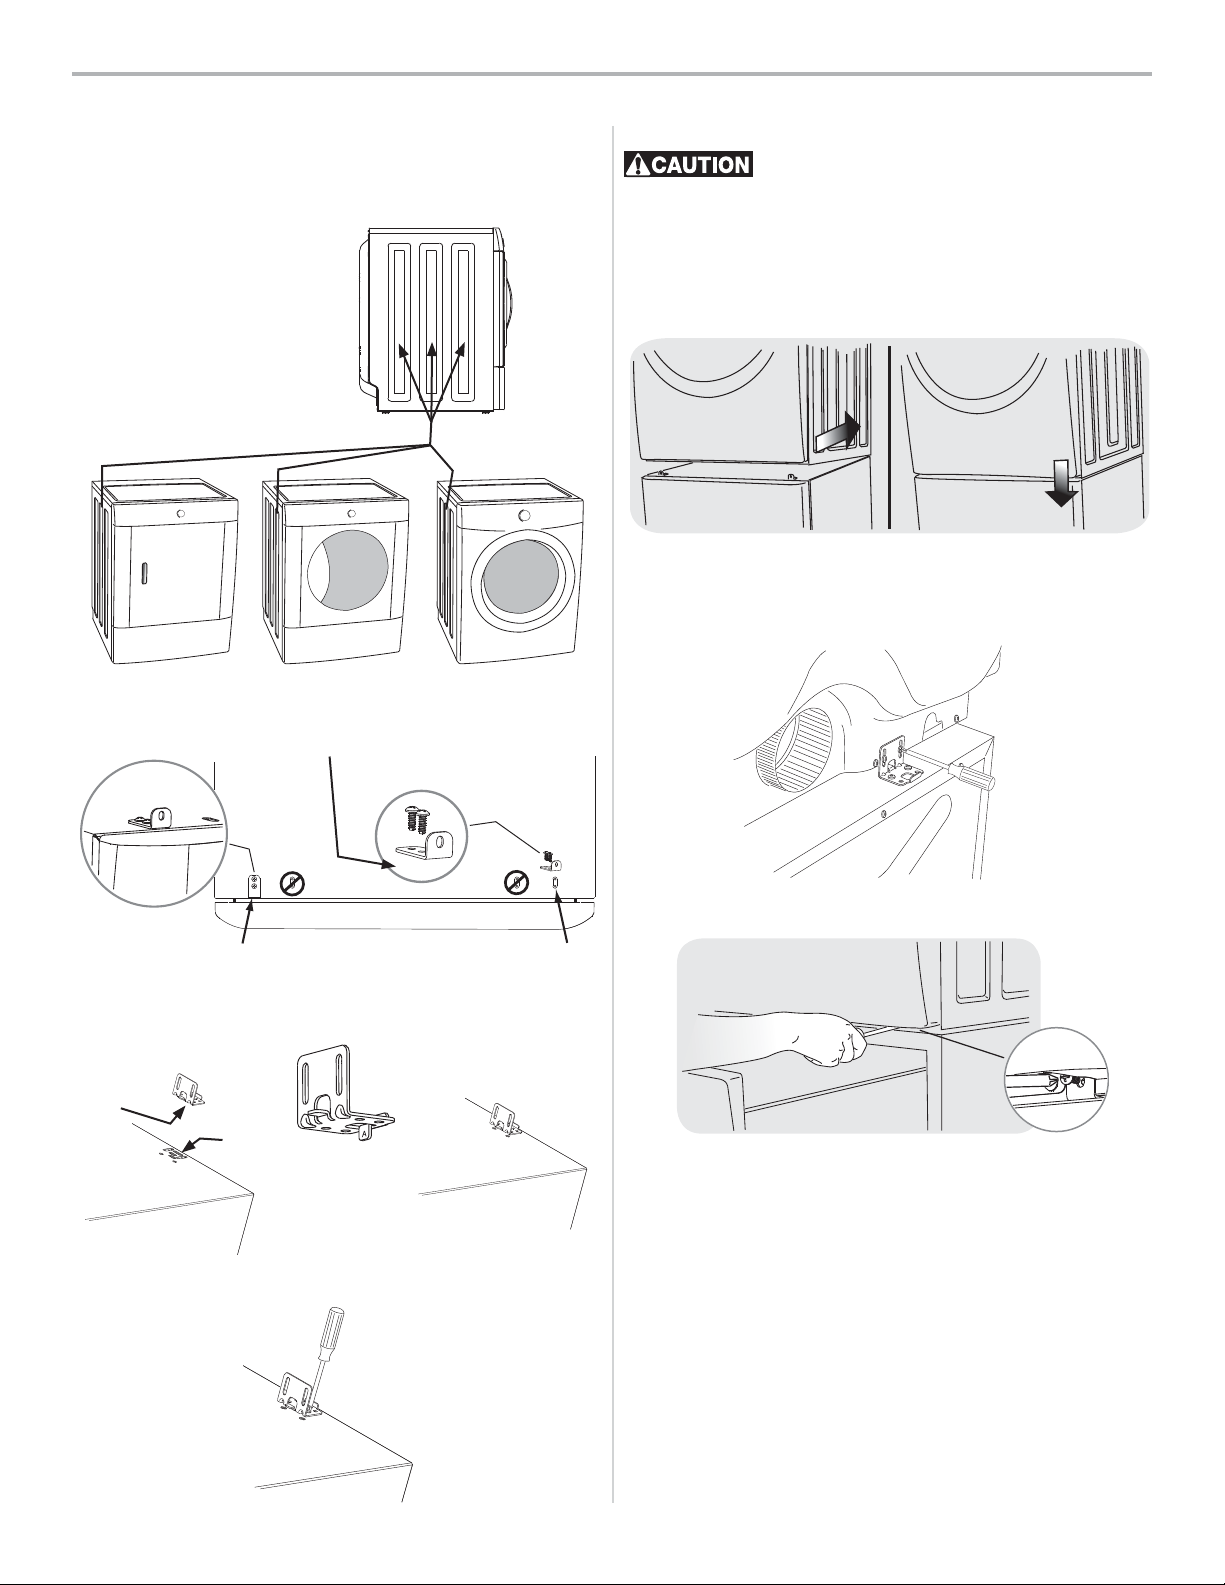
7.0 cu ft DRYER (STYLE 1) INSTRUCTIONS
C2) Attaching dryer (style 1) mounting
hardware
Use the following instructions for mounting any of these types of 1.
dryers to the pedestal:
Dryer cabinet (style 1)
with 3 indents on side.
Attach each front clip to outer-most set of holes with 2 screws.2.
D2) Mounting dryer (style 1)
- EXCESSIVE WEIGHT HAZARD - To avoid
back or other injury, have more than one person move or lift
the dryer.
Using two or more persons, slightly tip the dryer back and lift it 1.
onto the pedestal. Still tipped, slide the dryer back against the
rear brackets and gently set down the front so the appliance is
between the front and rear brackets.
SLIDE BACK
Adjust the appliance side-to-side to align its mounting holes with 2.
the pedestal’s bracket holes.
Install 2 screws through each rear bracket into the base of the 3.
dryer.
TIP DOWN
NO spacers under front brackets.
Insert “A” tab of each rear bracket into the rear slots on rear of 3.
pedestal using rear bracket spacers. Orient bracket inward for
“style 1” dryer mounting.
“A”
tab
rear
slot
Install 2 screws through each rear bracket into aligning pedestal 4.
holes.
inward
With the pedestal drawer open for better access, install a screw 4.
through each front bracket into the base of the dryer.
E) Installing or re-installing dryer (style 1)
Slide appliance/pedestal into place.1.
Check for levelness and rock all four (4) legs again. Repeat until 2.
level and solid.
Refer to 3. Dryer Installation Instructions for complete details on
installing electrical, gas, or exhaust venting.
4
Page 5
5.8 cu ft DRYER (STYLE 2) INSTRUCTIONS
C3) Attaching dryer (style 2) mounting
hardware
Use the following instructions for mounting any of these types of 1.
dryers to the pedestal:
Dryer cabinet (style 2)
with 2 indents on side
and 4 inch knockout for
side venting.
Attach each front clip to outer-most set of holes with 2 screws.2.
D3) Mounting dryer (style 2)
- EXCESSIVE WEIGHT HAZARD - To avoid
back or other injury, have more than one person move or lift
the dryer.
Using two or more persons, slightly tip the dryer back and lift it 1.
onto the pedestal. Still tipped, slide the dryer back against the
rear brackets so tabs on rear brackets engage the slots on the
back of the dryer. Gently set down the front so the appliance is
between the front and rear brackets.
ENGAGE REAR TABS
SLIDE BACK
NO spacers under front brackets.
Insert “B” tab of each rear bracket into the front slots on rear of 3.
pedestal. Orient bracket outward for “style 2” dryer mounting.
“B”
tab
Install 2 screws through each rear bracket into aligning pedestal 4.
holes.
front
slot
outward
TIP DOWN
Adjust the appliance side-to-side to align its mounting holes with 2.
the pedestal’s bracket holes.
With the pedestal drawer open for better access, install a screw 3.
through each front bracket into the base of the dryer.
E) Installing or re-installing dryer (style 2)
Slide appliance/pedestal into place.1.
Check for levelness and rock all four (4) legs again. Repeat until 2.
level and solid.
Refer to 3. Dryer Installation Instructions for complete details on
installing electrical, gas, or exhaust venting.
5
Page 6

INSTRUCTIONS DE PRÉPARATION
En raison du centre de gravité plus élevé des
électroménagers sur socles, il est normal qu’il y ait un balancement de va-et-vient latéral durant le fonctionnement. Il est
possible de réduire la vibration en s’assurant que l’électroménager est installé correctement, ce qui comprend une mise à
niveau solide de l’appareil sur ses quatre (4) pieds selon les
indications fournies dans le présent document.
A) Préparation de la laveuse ou de la sé-
cheuse pour son montage sur le socle
Si la laveuse ou la sécheuse est neuve et qu’elle n’a pas encore 1.
été installée, passez à l’étape 4.
Si la sécheuse est déjà installée, débranchez la sécheuse de l’alimen-2.
tation en électricité et en gaz, ainsi que le conduit d’évacuation.
Si la laveuse est déjà installée, débranchez la laveuse de la prise 3.
électrique. Coupez l’alimentation en eau chaude et froide, puis
débranchez les tuyaux d’alimentation en eau chaude et froide
des entrées d’alimentation en eau. Débranchez le tuyau de
vidange de sa prise.
Si l’appareil est muni de pieds en plastique, vissez chaque pied de 4.
sorte qu’il soit bien de niveau avec la base.
Si l’appareil est muni de pieds en métal, dévissez-les, retirez les 5.
contreécrous et réinstallez les pieds de sorte qu’ils soient de
niveau avec la base.
Mettez le socle à niveau (d’avant en arrière et côté à côté) en 2.
ajustant chaque pied de mise à niveau. Gardez l’extension des
pieds au minimum.
Clé universelle
optionnelle (ou pince
réglable)
abaisser
soulever
Si les contre-écrous ne sont pas retirés sur les
appareils munis de pieds en métal, les trous de montage de
l’appareil ne s’aligneront pas sur ceux des supports.
B) Préparation du socle avant le mon-
tage de la laveuse ou de la sécheuse
Placez le socle à quelques pouces de son emplacement fi nal.1.
N’ENLEVEZ PAS
la mousse!
Laissez environ 12,7 cm (5 po) derrière le socle
pour laisser un espace libre à l’arrière de la laveuse ou de la
sécheuse par rapport au mur. Prévoyez de l’espace supplémentaire si la ventilation de la sécheuse doit être effectuée vers le
haut ou vers le bas.
Balancez le socle d’un coin à l’autre pour en vérifi er la stabilité. 3.
Répétez la mise à niveau et le balancement jusqu’à ce que les
quatre (4) pieds soient posés solidement sur le plancher et que le
socle soit de niveau.
Sans tourner le pied en caoutchouc, verrouillez chaque pied du 4.
socle en serrant bien son contre-écrou contre la base du socle.
contre-écrou
6
Page 7

INSTRUCTIONS POUR LAVEUSES
C1) Fixation de la quincaillerie de mon-
tage de la laveuse
Utilisez les instructions suivantes pour monter l’un ou l’autre de 1.
ces modèles de laveuse sur le socle:
Fixez chaque attache avant à l’ensemble de trous le plus à l’exté-2.
rieur avec deux vis et un espaceur venant du matériel fourni.
Installez un espaceur sous chaque support avant.
D1) Montage de la laveuse
- DANGER DE POIDS EXCESSIF -
ter les blessures au dos ou d’autres types de blessure, demandez
l’aide d’autres personnes pour déplacer ou soulever la laveuse.
Avec l’aide de deux personnes ou plus, inclinez légèrement la la-1.
veuse vers l’arrière et soulevez-la pour la mettre sur le socle. En la
maintenant inclinée, glissez la laveuse contre les supports arrière
et déposez doucement le devant de l’appareil entre les supports
avant et arrière.
GLISSER VERS
L’ARRIÈRE
Ajustez l’électroménager d’un côté à l’autre afi n d’aligner ses 2.
trous de montage avec les trous des supports du socle.
Insérez 2 vis dans chaque support arrière et dans la base de la 3.
laveuse.
DÉPOSER
Pour évi-
Insérez la languette « A » de chaque support arrière dans les fen-3.
tes du milieu situées à l’arrière du socle. Positionnez le support
vers l’intérieur pour permettre le montage de la laveuse.
languette
« A »
Installez 2 vis dans chaque support arrière en alignant les trous 4.
du socle.
fente du
milieu
vers l’intérieur
Avec le tiroir du socle ouvert pour faciliter l’accès, installez une vis 4.
dans chacun des supports avant et dans la base de la laveuse.
E) Installation ou réinstallation de la
laveuse
Glissez l’électroménager/le socle en place.1.
Vérifi ez le niveau en faisant bouger l’appareil d’avant en arrière 2.
et de gauche à droite. Répétez cette vérifi cation jusqu’à ce que
l’appareil soit de niveau et stable.
Reportez-vous à la section 3. Instructions d’installation de la la-
veuse pour obtenir des instructions d’installations détaillées sur
l’alimentation en eau, le système de vidange et l’alimentation en
électricité.
7
Page 8

INSTRUCTIONS POUR LES SÉCHEUSES DE 7.0 pi³ DE TYPE 1
C2) Fixation de la quincaillerie de mon-
tage de la sécheuse (type 1)
Utilisez les instructions suivantes pour monter l’un ou l’autre de 1.
ces modèles de sécheuse sur le socle:
Caisse de sécheuse (type 1) munie
de 3 enfoncements sur le côté.
Fixez chaque attache avant avec 2 vis à l’ensemble de trous le 2.
plus à l’extérieur.
D2) Montage de la sécheuse (type 1)
- DANGER DE POIDS EXCESSIF -
ter les blessures au dos ou d’autres types de blessure, demandez
l’aide d’autres personnes pour déplacer ou soulever la
Avec l’aide de deux personnes ou plus, inclinez légèrement la 1.
sécheuse vers l’arrière et soulevez-la pour la mettre sur le socle.
En la maintenant inclinée, glissez la sécheuse contre les supports
arrière et déposez doucement le devant de l’appareil entre les
supports avant et arrière.
GLISSER VERS
L’ARRIÈRE
Ajustez l’électroménager d’un côté à l’autre afi n d’aligner ses 2.
trous de montage avec les trous des supports du socle.
Insérez 2 vis dans chaque support arrière et dans la base de la 3.
sécheuse.
DÉPOSER
Pour évi-
sécheuse
.
N’installez AUCUN espaceur sous les supports avant.
Insérez la languette « A » des supports arrière dans les fentes ar-3.
rière situées au dos du socle en installant également les espaceurs
des supports. Pour le montage des sécheuses de type 1, orientez
les supports vers l’intérieur.
languette
« A »
fente
arrière
Installez 2 vis dans chaque support arrière en alignant les trous 4.
du socle.
vers l’intérieur
Avec le tiroir du socle ouvert pour faciliter l’accès, installez une vis 4.
dans chacun des supports avant et dans la base de la sécheuse.
E)
Installation ou réinstallation de la
sécheuse (type 1)
Glissez l’électroménager/le socle en place.1.
Vérifi ez le niveau en faisant bouger l’appareil d’avant en arrière 2.
et de gauche à droite. Répétez cette vérifi cation jusqu’à ce que
l’appareil soit de niveau et stable.
Reportez-vous à la section 3. Instructions d’installation de la sécheuse
pour obtenir des instructions d’installation détaillées sur l’alimentation en électricité, l’alimentation en gaz ou le conduit d’évacuation.
8
Page 9

INSTRUCTIONS POUR LES SÉCHEUSES DE 5.8 pi³ DE TYPE 2
C3) Fixation de la quincaillerie de mon-
tage de la sécheuse (type 2)
Utilisez les instructions suivantes pour monter l’un ou l’autre de 1.
ces modèles de sécheuse sur le socle:
Caisse de sécheuse (type 2)
munie de 2 enfoncements
sur le côté et d’une alvéole
défonçable de 10,2 cm (4 po)
pour la ventilation latérale.
Fixez chaque attache avant avec 2 vis à l’ensemble de trous le 2.
plus à l’extérieur.
N’installez AUCUN espaceur sous les supports avant.
D3) Montage de la sécheuse (type 2)
- DANGER DE POIDS EXCESSIF -
ter les blessures au dos ou d’autres types de blessure, demandez
l’aide d’autres personnes pour déplacer ou soulever la
Avec l’aide de deux personnes ou plus, inclinez légèrement la 1.
sécheuse vers l’arrière et soulevez-la pour la mettre sur le socle.
En la maintenant inclinée, glissez la sécheuse contre les supports
arrière de sorte que les languettes des supports arrière s’engagent dans les fentes situées à l’arrière de la sécheuse. Déposez
doucement le devant de l’appareil de sorte que ce dernier se
trouve entre les supports avant et arrière.
ENGAGER LES
LANGUETTES ARRIÈRE
GLISSER VERS
L’ARRIÈRE
Pour évi-
sécheuse
.
Insérez la languette « B » de chaque support arrière dans les 3.
fentes avant situées à l’arrière du socle. Pour le montage des
sécheuses de type 2, orientez les supports vers l’extérieur.
languette
« B »
fente
avant
Installez 2 vis dans chaque support arrière en alignant les trous 4.
du socle.
vers l’extérieur
DÉPOSER
Ajustez l’électroménager d’un côté à l’autre afi n d’aligner ses 2.
trous de montage avec les trous des supports du socle.
Avec le tiroir du socle ouvert pour faciliter l’accès, installez une vis 3.
dans chacun des supports avant et dans la base de la sécheuse.
E) Installation ou réinstallation de la
sécheuse (type 2)
Glissez l’électroménager/le socle en place.1.
Vérifi ez le niveau en faisant bouger l’appareil d’avant en arrière 2.
et de gauche à droite. Répétez cette vérifi cation jusqu’à ce que
l’appareil soit de niveau et stable.
Reportez-vous à la section 3. Instructions d’installation de la sécheuse
pour obtenir des instructions d’installation détaillées sur l’alimentation en électricité, l’alimentation en gaz ou le conduit d’évacuation.
9
Page 10

INSTRUCCIONES DE PREPARACIÓN
Debido a que el centro de gravedad del electrodoméstico queda más elevado por la presencia del pedestal, es
normal observar balanceo de un lado a otro durante el funcionamiento del electrodoméstico. Puede minimizar la vibración
asegurándose de que el electrodoméstico esté debidamente
instalado de manera fi rme y nivelada sobre las cuatro (4) patas
siguiendo estas instrucciones.
A)
Preparación de la lavadora o secadora
para su instalación sobre el pedestal
Si la lavadora o secadora es nueva y no ha sido instalada todavía, 1.
vaya al paso 4.
Si la secadora ya se encuentra instalada, desconéctela del sumi-2.
nistro eléctrico y de gas, así como del conducto de ventilación.
Si la lavadora ya se encuentra instalada, desconéctela del su-3.
ministro eléctrico. Cierre el suministro de agua fría y caliente, y
desconecte las mangueras de admisión de agua de las tuberías
de agua. Desconecte la manguera de drenaje de la tubería de
desagüe.
Si el electrodoméstico tiene patas de plástico, ajuste cada pata 4.
para que quede al ras de la base.
Si el electrodoméstico tiene patas de metal, afl ójelas, retire las 5.
tuercas de bloqueo y vuelva a colocar las patas al ras de la base.
Nivele el pedestal de adelante hacia atrás y de lado a lado ajustando 2.
cada pata niveladora. Mantenga la extensión de las patas al mínimo.
Llave universal opcional
(o pinzas ajustables).
bajar
levantar
Si no se retiran las tuercas de bloqueo de las unidades
con patas de metal, los agujeros de instalación del electrodoméstico no quedarán alineados con los agujeros de instalación
de los soportes.
B) Preparación del pedestal antes de
instalar la lavadora o secadora
Coloque el pedestal a pocas pulgadas de su ubicación fi nal.1.
¡NO retire la espuma!
Deje aproximadamente 5” (12,5 cm) de espacio detrás
del pedestal para acomodar el despeje que se necesita entre
la lavadora o secadora y la pared. Deje un espacio adicional si
ventilará la secadora hacia arriba o hacia abajo.
Agite el pedestal de esquina a esquina para verifi car que esté estable. 3.
Repita la nivelación y la agitación hasta que las cuatro (4) patas estén
fi rmemente asentadas sobre el piso y el pedestal esté nivelado.
Sin girar la pata de goma, fi je cada pata del pedestal en su lugar 4.
apretando bien la tuerca de bloqueo contra la base del pedestal.
tuerca de
bloqueo
10
Page 11

INSTRUCCIONES DE INSTALACIÓN DE LA LAVADORA
C1) Fijación de los accesorios de instala-
ción de la lavadora
Lea las siguientes instrucciones para instalar cualquiera de estos 1.
tipos de lavadoras sobre el pedestal:
Fije cada sujetador delantero al juego más externo de agujeros 2.
mediante 2 tornillos y el espaciador suministrado.
Coloque un espaciador debajo de cada soporte delantero.
D1) Montaje de la lavadora
- PELIGRO DE EXCESO DE PESO - Para
evitar lesiones en la espalda u otro tipo de lesiones, más de
una persona deberá levantar o mover la lavadora.
Con la ayuda de una o más personas, incline la lavadora leve-1.
mente hacia atrás y levántela sobre el pedestal. Con la lavadora
aún inclinada, deslícela hacia atrás contra los soportes traseros
y asiente cuidadosamente la parte delantera de la unidad de
manera que quede entre los soportes delanteros y traseros.
DESLICE HACIA
ATRÁS
Ajuste el electrodoméstico de lado a lado para alinear sus aguje-2.
ros de instalación con los agujeros de los soportes del pedestal.
Instale 2 tornillos en cada soporte trasero para fi jarlo a la base de 3.
la lavadora.
INCLINE
Introduzca la lengüeta “A” de cada soporte trasero en las ranu-3.
ras centrales de la parte trasera del pedestal. Oriente el soporte
hacia la parte interior para instalar la lavadora.
lengüeta
“A”
Instale 2 tornillos en cada soporte trasero para alinear los aguje-4.
ros del pedestal.
ranura
central
hacia el interior
Con el cajón del pedestal abierto para tener mejor acceso, instale 4.
un tornillo en cada soporte delantero para fi jarlo a la base de la
lavadora.
Instalación o reinstalación de la lavadora
E)
Deslice el electrodoméstico y pedestal a su ubicación fi nal.1.
Verifi que que esté nivelado y agite las cuatro (4) patas nue-2.
vamente. Repita este paso hasta que la unidad quede fi rme y
nivelada.
Consulte las 3. Instrucciones de instalación de la lavadora para obtener detalles completos sobre la conexión del agua, del drenaje
o del suministro eléctrico.
11
Page 12

INSTRUCCIONES DE INSTALACIÓN DE LA SECADORA (TIPO 1) DE 7.0 pies cúbicos
C2) Fijación de los accesorios de instala-
ción de la secadora (tipo 1)
Lea las siguientes instrucciones para instalar cualquiera de estos 1.
tipos de secadoras sobre el pedestal:
Secadora estilo gabinete (tipo 1) con 3 hendiduras laterales.
Fije cada sujetador delantero al juego más externo de agujeros 2.
usando 2 tornillos.
D2) Montaje de la secadora (tipo 1)
- PELIGRO DE EXCESO DE PESO - Para
evitar lesiones en la espalda u otro tipo de lesiones, más de
una persona deberá levantar o mover la secadora.
Con la ayuda de una o más personas, incline la secadora leve-1.
mente hacia atrás y levántela sobre el pedestal. Con la secadora
aún inclinada, deslícela hacia atrás contra los soportes traseros
y asiente cuidadosamente la parte delantera de la unidad de
manera que quede entre los soportes delanteros y traseros.
DESLICE HACIA
ATRÁS
Ajuste el electrodoméstico de lado a lado para alinear sus aguje-2.
ros de instalación con los agujeros de los soportes del pedestal.
Instale 2 tornillos en cada soporte trasero para fi jarlo a la base de 3.
la secadora.
INCLINE
NO lleva espaciadores debajo de los soportes delanteros.
Introduzca la lengüeta “A” de cada soporte trasero en las ranuras 3.
de la parte trasera del pedestal; para ello, utilice espaciadores para
soportes traseros. Oriente el soporte hacia la parte interior para
instalar la secadora “tipo 1”.
lengüeta
“A”
ranura
trasera
Instale 2 tornillos en cada soporte trasero para alinear los aguje-4.
ros del pedestal.
hacia el interior
Con el cajón del pedestal abierto para tener mejor acceso, instale 4.
un tornillo en cada soporte delantero para fi jarlo a la base de la
secadora.
E) Instalación o reinstalación de la seca-
dora (tipo 1)
Deslice el electrodoméstico y pedestal a su ubicación fi nal.1.
Verifi que que esté nivelado y agite las cuatro (4) patas nue-2.
vamente. Repita este paso hasta que la unidad quede fi rme y
nivelada.
Consulte las 3. Instrucciones de instalación de la secadora para obtener
detalles completos sobre la conexión del suministro eléctrico y de
gas o de los conductos de ventilación.
12
Page 13

INSTRUCCIONES DE INSTALACIÓN DE LA SECADORA (TIPO 2) DE 5.8 pies cúbicos
C3) Fijación de los accesorios de instala-
ción de la secadora (tipo 2)
Lea las siguientes instrucciones para instalar cualquiera de estos 1.
tipos de secadoras sobre el pedestal:
Secadora estilo gabinete (tipo 2)
con 2 hendiduras laterales y un
disco removible de 4 pulgadas
(10,2 cm) para ventilación lateral.
Fije cada sujetador delantero al juego más externo de agujeros 2.
usando 2 tornillos.
D3) Montaje de la secadora (tipo 2)
- PELIGRO DE EXCESO DE PESO - Para
evitar lesiones en la espalda u otro tipo de lesiones, más de
una persona deberá levantar o mover la secadora.
Con la ayuda de una o más personas, incline la secadora leve-1.
mente hacia atrás y levántela sobre el pedestal. Con la secadora
aún inclinada, deslícela hacia atrás contra los soportes traseros
de modo que las lengüetas de dichos soportes encajen en las ranuras de la parte trasera de la secadora. Asiente cuidadosamente
la parte delantera de la unidad de manera que quede entre los
soportes delanteros y traseros.
COLOQUE LAS LENGÜETAS TRASERAS
DESLICE HACIA
ATRÁS
NO lleva espaciadores debajo de los soportes delanteros.
Introduzca la lengüeta “B” de cada soporte trasero en las ranuras 3.
delanteras de la parte trasera del pedestal. Oriente el soporte hacia
la parte exterior para instalar la secadora “tipo 2”.
lengüeta
“B”
ranura
delantera
Instale 2 tornillos en cada soporte trasero para alinear los aguje-4.
ros del pedestal.
hacia el exterior
INCLINE
Ajuste el electrodoméstico de lado a lado para alinear sus aguje-2.
ros de instalación con los agujeros de los soportes del pedestal.
Con el cajón del pedestal abierto para tener mejor acceso, instale 3.
un tornillo en cada soporte delantero para fi jarlo a la base de la
secadora.
E) Instalación o reinstalación de la seca-
dora (tipo 2)
Deslice el electrodoméstico y pedestal a su ubicación fi nal.1.
Verifi que que esté nivelado y agite las cuatro (4) patas nue-2.
vamente. Repita este paso hasta que la unidad quede fi rme y
nivelada.
Consulte las 3. Instrucciones de instalación de la secadora para
obtener detalles completos sobre la conexión del suministro
eléctrico y de gas o de los conductos de ventilación.
13
Page 14

NOTES: REMARQUES: NOTAS:
14
Page 15

NOTES: REMARQUES: NOTAS:
15
Page 16

WARRANTY
Full One Year Warranty on Mechanical Parts
For one year from date of purchase, when this pedestal is installed with the listed washer
or dryer (see owners manual for specifi c model) and operated according to the information
in the Use and Care Guide, Operating Instructions and Installation Instructions, the supplier
will repair or replace any of its mechanical parts if they are defective in workmanship or
material. Keep your bill of sale. The date of the bill establishes the warranty period should
parts be required. This written warranty gives you specifi c rights. You may also have other
rights which vary from state to state.
Warranty Restriction
If the pedestal is used for any other purpose than private family use or used with any product that requires modifi cation for installation, the warranty is null and void.
Warranty Parts
Warranty parts are available by contacting the supplier where the pedestal was purchased
or refer to the Use and Care Guide that came with the washer or dryer that is installed on
the pedestal for contact information.
PRODUCT RECORD
In the space below, record the date of purchase and model
number of the product.
Model No.:
Date of Purchase:
Save these instructions and your sales receipt for future
reference.
GARANTIE
Garantie complète d’un an sur les pièces mécaniques
Pendant un an à partir de la date d’achat, si ce socle a été installé avec une laveuse ou
sécheuse indiquée (consultez le guide de l’utilisateur pour les modèles spécifi ques) et utilisé
conformément à l’information contenue dans le guide d’utilisation et d’entretien, les instructions d’utilisation et les instructions d’installation, le fournisseur réparera ou remplacera
toute pièce mécanique présentant un vice de fabrication ou de matériau. Conservez votre
reçu. La date inscrite sur le reçu détermine la période de garantie dans le cas où des pièces
s’avèreraient nécessaires. Cette garantie vous donne des droits juridiques spécifi ques. Vous
pouvez aussi bénéfi cier d’autres droits qui varient d’un État à un autre ou d’une province à
une autre.
Restriction de garantie
Si le socle est utilisé à d’autres fi ns que l’usage familial privé ou avec tout produit qui
requiert une modifi cation de l’installation, la garantie est alors considérée comme nulle et
non avenue.
Pièces relatives à la garantie
Les pièces relatives à la garantie sont disponibles chez le fournisseur auprès duquel le
socle a été acheté. Sinon, reportez-vous au guide d’utilisation et d’entretien fourni avec la
laveuse ou la sécheuse installée sur le socle pour les personnes à joindre.
GARANTÍA
Garantía completa de un año para las piezas mecánicas
Durante un año a partir de la fecha de compra, cuando este pedestal se instala con las
lavadoras o secadoras indicadas (consulte el manual del propietario para conocer el modelo
específi co) y cuando se usa según la información proporcionada en la guía de uso y cuidado, las instrucciones de funcionamiento y las instrucciones de instalación, el proveedor
reparará o remplazará cualquiera de sus piezas mecánicas si se encontraran defectuosas en
materiales o mano de obra. Conserve su recibo de compra. La fecha del recibo establece
la duración de la garantía, en caso de que se requieran piezas de repuesto. Esta garantía le
otorga derechos legales específi cos. Usted puede tener además otros derechos que varían
de un estado a otro.
Restricción de la garantía
Si el pedestal se usa para cualquier propósito que no sea el de uso familiar privado o con
cualquier producto que requiera modifi cación para realizar la instalación, esta garantía
quedará nula y sin validez.
Piezas en garantía
Las piezas en garantía están disponibles a través del distribuidor donde adquirió el pedestal; también puede consultar la guía de uso y cuidado proporcionada con la lavadora o
secadora que se instale en el pedestal para obtener información de contacto.
ENREGISTREMENT DU PRODUIT
Notez ci-dessous la date d’achat et le numéro de modèle
de votre appareil.
No de modèle:
Date d’achat:
Conservez ces instructions et votre reçu pour vous y reporter
ultérieurement.
REGISTRO DEL PRODUCTO
En el espacio que se proporciona a continuación, registre la
fecha de compra y el número de modelo del producto.
N.º de modelo:
Fecha de compra:
Conserve estas instrucciones y su recibo de compra para
referencia futura.
 Loading...