

Fright Ideas PicoVolt Operating Manual
FWDREV
SPEED
0
FWDREV
SPEED
0
FWDREV
SPEED
0
Troubleshooting
Operating Manual
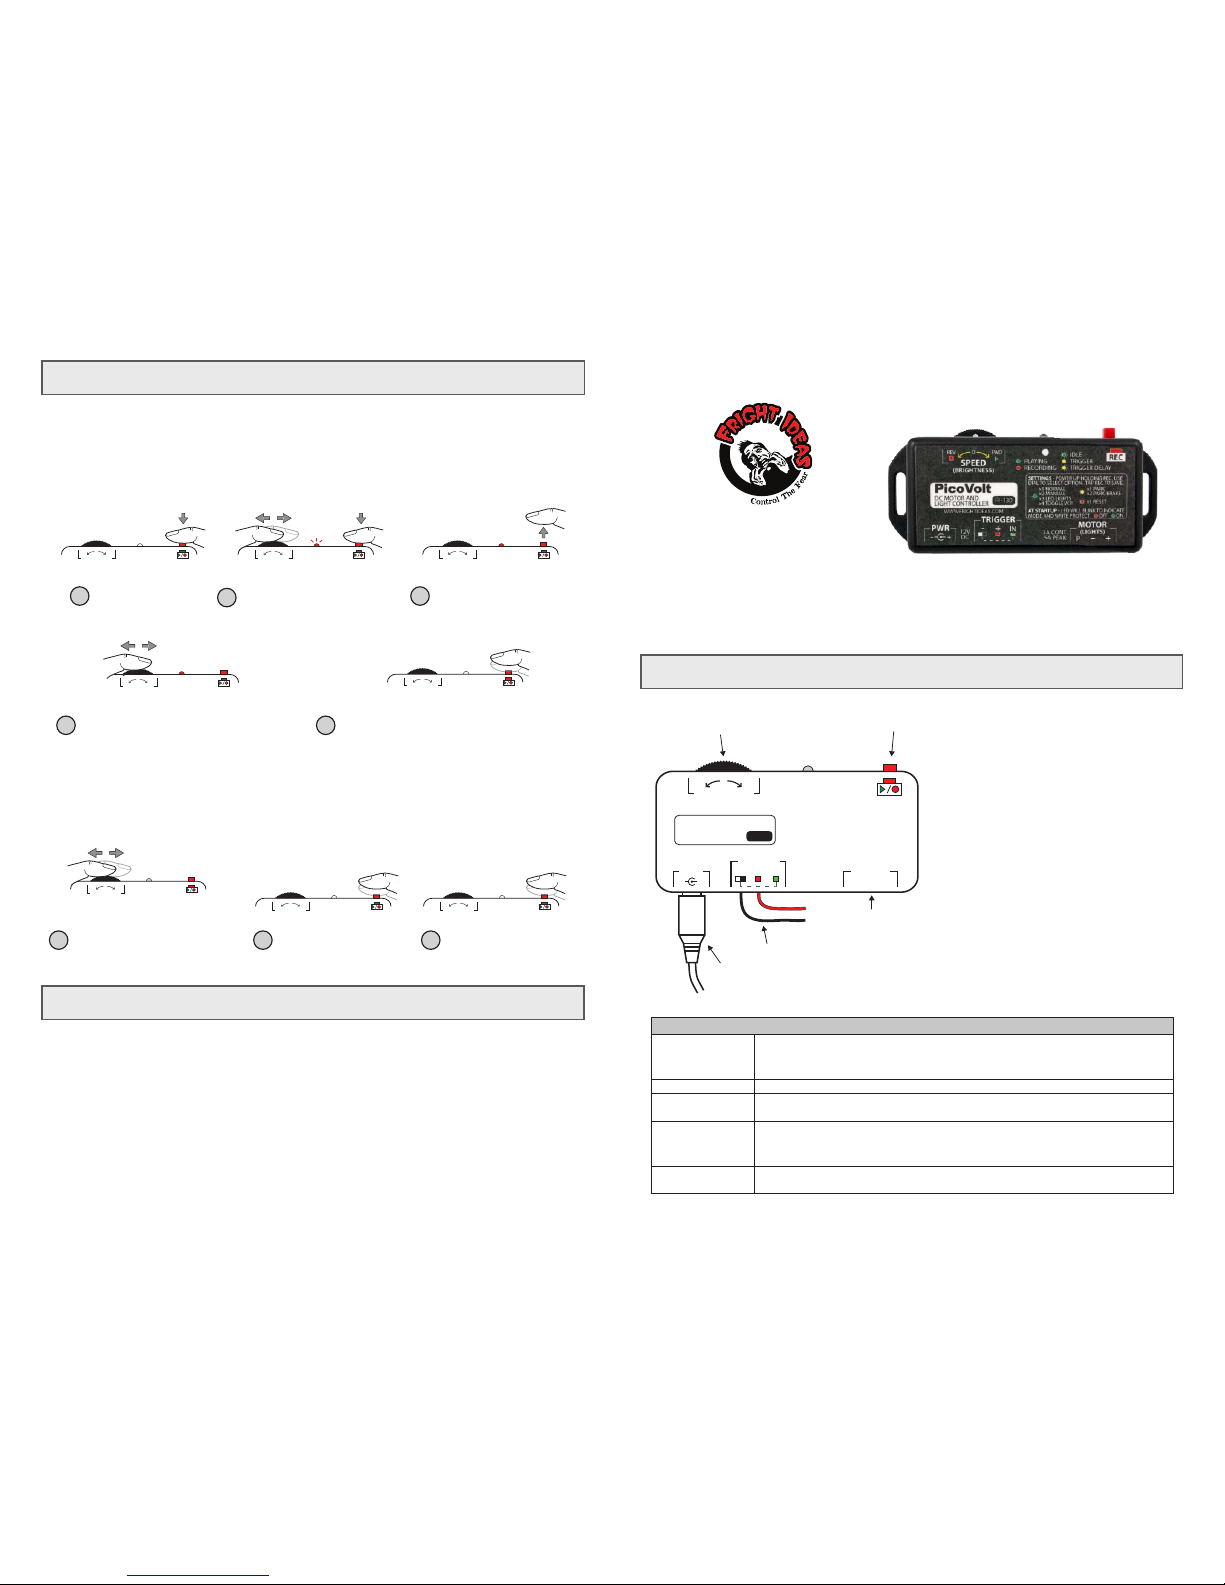
Getting Familiar
PicoVolt
Sizing your Power Supply
Your PicoVolt does not include a power supply as
the size required will vary depending on what it’s
used to control.
If you are using the PicoVolt with a motor, a 12V
5A power supply is generally used. If it’s used for
lighting, add up the current (or watts) required by
all the lights/LEDs and select a power supply that
can handle the load.
Power can be supplied via the barrel connector
or the terminal block. They are connected
internally.
Recording Animation
NOTE: If at any point you want to start from scratch, see Operating Modes for details on how to Factory Reset.
The LED is blinking yellow and the PicoVolt won’t trigger.
The PicoVolt is currently ignoring the trigger. It does this at startup to allow a PIR motion sensor to warm up, or
anytime a triggered scene is cancelled by pressing the button. It will resume normal operation shortly.
Recording won’t start.
Write protection is enabled. See Operating Modes for instructions on disabling the write-protect.
Motor stops for a few seconds and PicoVolt resets.
The power supply has likely seen a surge and reset. Try making smoother transitions from one direction to another.
Motor/Lights turn off, PicoVolt LED blinks red.
The PicoVolt overheated, the power supply voltage dropped too low (power supply might be too small), or the output
was shorted. The PicoVolt will automatically clear the fault within 15 seconds.
MOTOR SPEED / DIRECTION
OR LIGHT BRIGHTNESS WHEEL
DC MOTOR / LIGHT
TERMINAL BLOCK
REC / PLAY BUTTON
POWER
CONNECTOR
TRIGGER INPUTS
If you just need the PicoVolt to keep a motor running at a constant speed, or a light at a constant brightness, then
you don’t need to record animation. Simply move the wheel until your motor or light is where you want it and leave
it there. If you would like to record some motor animation or lighting effects that can be triggered by a sensor or
constantly looped, follow the steps below.
Recording Animation
Motor Speed /
Direction or
Brightness Wheel
CONNECTIONS AND CONTROLS
Power
Rec. / Play Button
Trigger
Terminal Block
Motor / Light
Terminal Block
When the PicoVolt is used with a DC motor, this wheel controls the speed and direction of
the Motor. When the PicoVolt is connected to DC Lights or LEDs, this wheel will control
the brightness.
If you’re using a trigger to start your animation, or a jumper to loop it, that will connect
here. Your power supply can be connected to the -/+ of this screw-down terminal block if
it’s more convenient than the barrel connector.
Your power supply should plug in here. The connector is a center-positive 2.1mm barrel
connector.
The motor or lights being controlled must connect to this screw-down terminal block.
Tap this button to play your animation, hold it to start recording.
SET STARTING
SPEED
Animate the Motor or Adjust Light Brightness
Use the wheel to animate the motor or create your
lighting effect. If you’re using a motor, any
combination of speed and direction can be recorded.
Avoid quick direction changes. This can overload the
power supply causing it to reset and interrupt
recording. You can record up to 66 seconds of
animation.
4
Stop Recording
Tap the button when you’re finished recording. If you’d like
to try again simply go back to step 1.
If you’re using one of the parking modes, do not try to stop
the motor at the park position. Set the motor at the speed
you’d like it to be at as it returns to the park position. Stop
recording BEFORE the motor reaches the park position.
The PicoVolt will keep the motor at the last set speed and
stop it automatically.
5
BLINKING
Set the Starting Speed/Brightness
Once the LED starts blinking red you
can set your motor’s starting speed or
starting brightness level. Note that if
you are in one of the Park modes there
will be no movement at this step.
2
Start Recording
Let go of the button, the LED
should stop flashing.
3
LET GO
Hold the Button
1
HOLD KEEP HOLDING
FWDREV
SPEED
0
SET AMBIENT SPEED
OR BRIGHTNESS
Set the Ambient Speed/Brightness
If before your animation starts you’d
like the motor to be moving at a
particular speed, or the lights to be at
a particular brightness, set that now
using the wheel.
FWDREV
SPEED
(BRIGHTNESS)
WWW.FRIGHTIDEAS.COM
PicoVolt
DC MOTOR AND
LIGHT CONTROLLER
FI-130
0
MOTOR
(LIGHTS)
IN
TRIGGER
+-
P
+-
PWR
+-
FWDREV
SPEED
0
FWDREV
SPEED
0
TAP
Start Playback
Tap the button or trigger the
input to start playback.
1 2 3
FWDREV
SPEED
0
TAP TO PLAY
Stop Playback
You can let the animation play
to the end, or stop it early by
tapping the button again.
FWDREV
SPEED
0
TAP TO STOP
ANIMATE
Playing the Animation
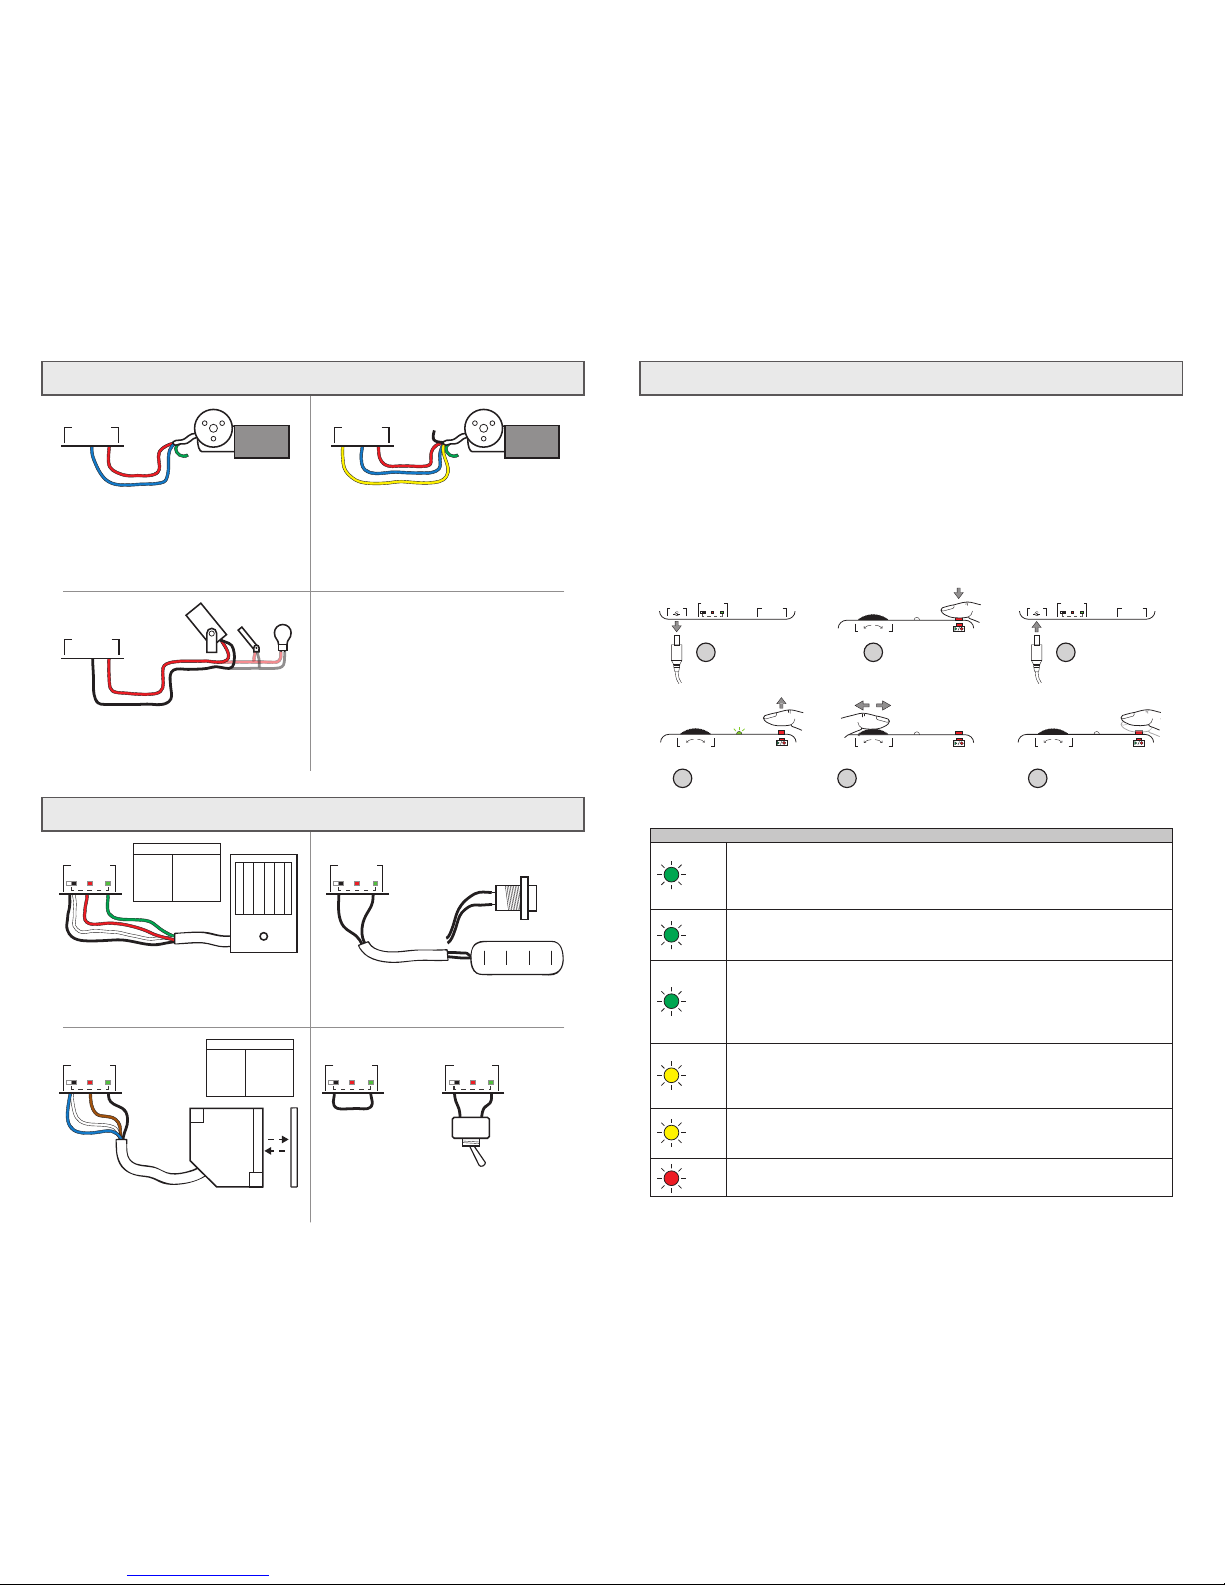
Operating Modes, Write-Protect, Factory Reset
Operating Modes
The PicoVolt has different operating modes that can be used to optimize its operation for different applications. The
default mode is great for creating simple motor animations by recording changes in motor speed and direction. If
you want to create lighting effects, use the Lighting mode. If you want to create a motor effect which requires the
motor to always start and stop in the same position, use a parking motor with one of the Park modes.
Write-Protection and Factory Reset
In the case you’d like to prevent inadvertent changes to your animation, the PicoVolt can be write-protected. It can
also be reset to factory defaults which clears all settings and animation so you can easily start from scratch.
Selecting an Operating Mode, Toggling Write-Protect, or performing a Factory Reset
Trigger Input Wiring
PRESSURE MAT
PUSH BUTTON
STANDARD MOTOR OR
PARKING MOTOR
PARKING MOTOR
LED
BLINKS
PIR MOTION SENSOR
BEAM SENSOR
PRESSURE MAT OR PUSH BUTTON
BLUE
BROWN
WHITE
BLACK
GND (-)
12VDC (+)
RELAY C
RELAY N.O.
SENSOR WIRES
BLACK
RED
WHITE
GREEN
GND (-)
12VDC (+)
RELAY C
RELAY N.O.
SENSOR WIRES
NOTE: PIR SENSORS CAN TAKE UP TO A MINUTE TO “WARM UP”.
DURING THIS TIME THE PICOVOLT’S LIGHT WILL BLINK YELLOW
AND THE SENSOR WILL BE IGNORED.
CONTINUOUS PLAY (LOOPED)
LOOPED
LOOPED WITH
ON/OFF OPTION
SWITCH
Motor / LED Wiring
FORWARD/REVERSE SPEED CONTROL
LED LIGHTING
FORWARD/REVERSE SPEED CONTROL
WITH PARK OPTION
MOST WIPER MOTORS HAVE TWO SPEED RANGES. USE THE BLUE
WIRE FOR THE FAST RANGE, OR THE GREEN WIRE FOR THE SLOW
RANGE. LEAVE THE UNUSED WIRE DISCONNECTED. COLORS
SHOWN ARE FOR THE MOST COMMON MOTORS, YOURS MAY BE
SLIGHTLY DIFFERENT.
SEE THE OPERATING MODES SECTION FOR INFORMATION ON
SWITCHING TO LIGHT MODE. ANY NUMBER OF LIGHTS CAN BE
CONNECTED AS LONG AS THE TOTAL CURRENT DOES NOT
EXCEED 2.5 AMPS (30 WATTS).
SEE THE OPERATING MODES SECTION FOR INFORMATION ON
SWITCHING TO THE PARK OR PARK/BRAKE MODES. SUBSTITUTE
THE BLUE WIRE FOR THE GREEN TO USE THE SLOW SPEED
RANGE.
IN
TRIGGER
+ -
IN
TRIGGER
+ -
IN
TRIGGER
+ -
IN
TRIGGER
+ -
IN
TRIGGER
+ -
MOTOR
(LIGHTS)
P
+-
MOTOR
(LIGHTS)
P
+-
LED LIGHTS OR 12V LAMPS
2.5 AMPS MAX
MOTOR
(LIGHTS)
P
+-
Normal - Default mode for controlling motors.
Use this mode to control the speed and direction of a 12 volt DC motor. Center the speed wheel
to stop the motor, move it left for reverse, right for forward. The farther you move the wheel the
faster the motor will go.
OPERATING MODES
x1
Factory Reset
Selecting this mode will reset all animation and settings to their factory defaults.
x1
Park - Use this mode with a parking motor to always start and stop in the same position.
This mode requires the motor’s park wire be connected to P so the PicoVolt can detect when the
motor reaches its park position. In this mode the PicoVolt will bring the motor back to the park
position after playing the recorded animation.
x1
Park / Brake - Parking with Brakes Enabled
This mode is the same as the one above except the motor will be stopped quickly, rather than
allowing it to coast, once it reaches the park position.
x2
Light Mode - For controlling 12 volt LEDs or small bulbs.
Since a reverse option is not necessary for controlling lights, this mode uses the entire range of
the wheel for brightness. All the way left will turn the lights off, all the way right is full brightness.
x2
Toggle Write-Protect - Use this to protect your animation.
Selecting this mode will toggle the write-protect state. With write-protect enabled, the animation
is protected from being erased or changed. At power-up, the PicoVolt will first blink the LED up
to three times to indicate the mode. Following that, it will blink once to indicate the write-protect
state, red if write-protect is disabled, green if it’s enabled.
x3
HOLD
LET GO
FWDREV
SPEED
0
FWDREV
SPEED
0
2 3
4
MOTOR
(LIGHTS)
IN
TRIGGER
+-
P
+-
PWR
+-
Hold the Button
FWDREV
SPEED
0
6
Tap the Button to Save
FWDREV
SPEED
0
5
Select a mode using the
wheel. Match the LED blinks
to your desired mode in
the table below.
Power Up
Let Go of the Button
when the LED Blinks
1
MOTOR
(LIGHTS)
IN
TRIGGER
+-
P
+-
PWR
+-
Power Down
SELECT MODE
TAP
 Loading...