

Fright Ideas PicoFX, PicoStorm Quick Start Manual
!
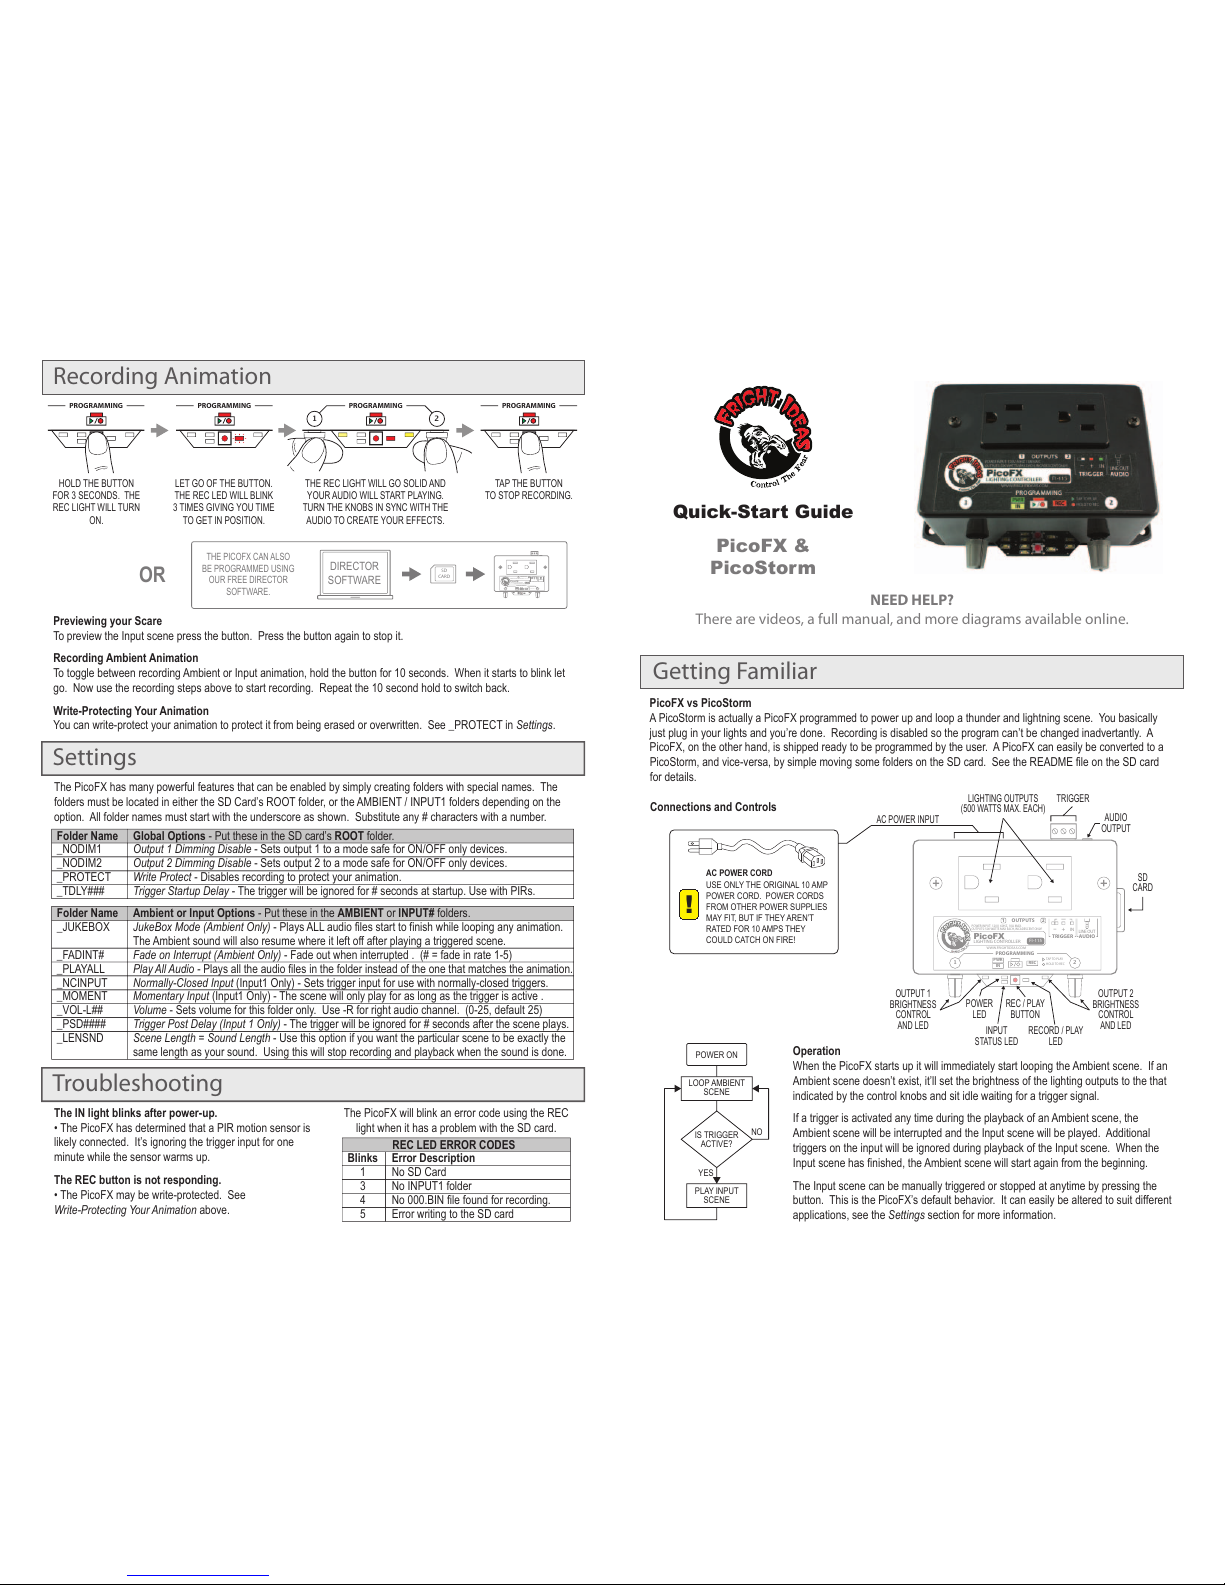
Recording Animation
Quick-Start Guide
Getting Familiar
PicoFX &
PicoStorm
NEED HELP?
There are videos, a full manual, and more diagrams available online.
HOLD THE BUTTON
FOR 3 SECONDS. THE
REC LIGHT WILL TURN
ON.
THE PICOFX CAN ALSO
BE PROGRAMMED USING
OUR FREE DIRECTOR
SOFTWARE.
TAP THE BUTTON
TO STOP RECORDING.
LET GO OF THE BUTTON.
THE REC LED WILL BLINK
3 TIMES GIVING YOU TIME
TO GET IN POSITION.
THE REC LIGHT WILL GO SOLID AND
YOUR AUDIO WILL START PLAYING.
TURN THE KNOBS IN SYNC WITH THE
AUDIO TO CREATE YOUR EFFECTS.
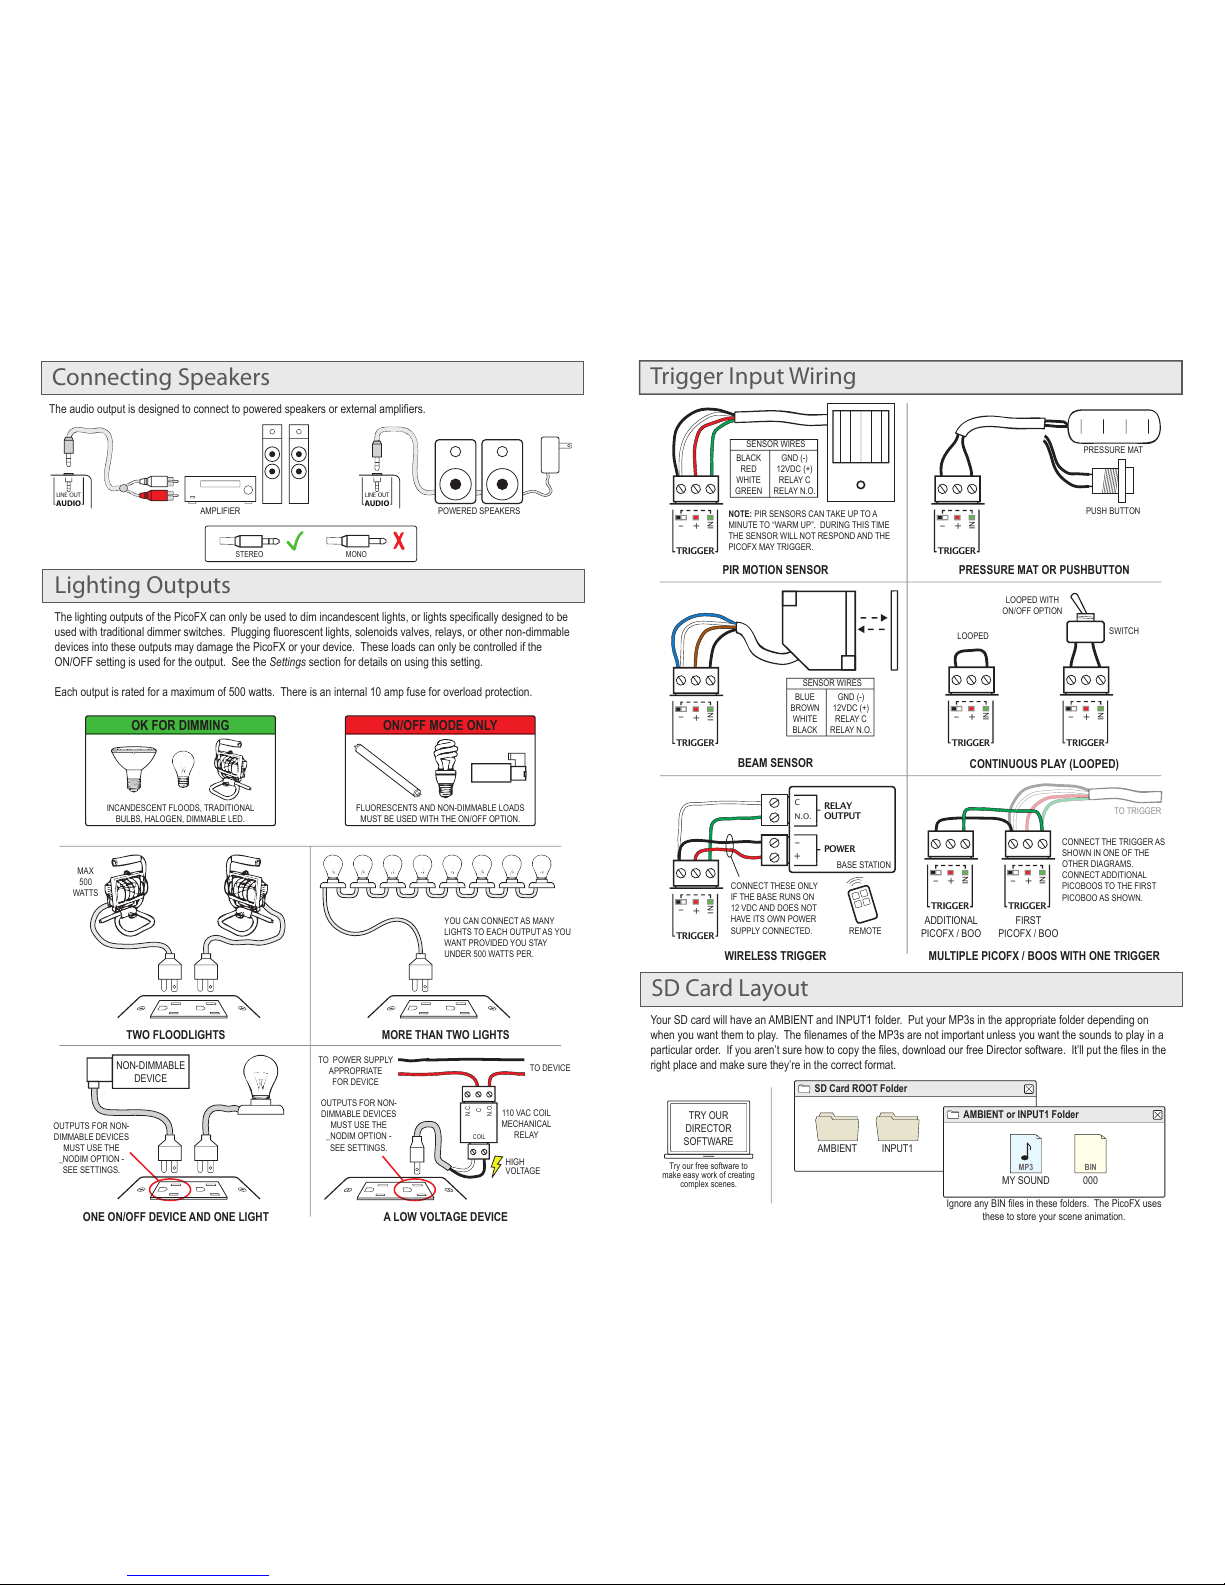
LIGHTING OUTPUTS
(500 WATTS MAX. EACH)
POWER
LED
INPUT
STATUS LED
REC / PLAY
BUTTON
OUTPUT 2
BRIGHTNESS
CONTROL
AND LED
RECORD / PLAY
LED
TRIGGER
AC POWER INPUT
AUDIO
OUTPUT
SD
CARD
AC POWER CORD
USE ONLY THE ORIGINAL 10 AMP
POWER CORD. POWER CORDS
FROM OTHER POWER SUPPLIES
MAY FIT, BUT IF THEY AREN’T
RATED FOR 10 AMPS THEY
COULD CATCH ON FIRE!
PWR
PROGRAMMING
IN
REC
1 2
LINE OUT
AUDIO
TAP TO PLAY
HOLD TO REC
IN
TRIGGER
POWER INPUT: 120V, 60HZ, 10A MAX.
OUTPUTS: 500 WATTS MAX EACH, INCADESCENT ONLY!
OUTPUTS
1 2
+
-
WWW.FRIGHTIDEAS.COM
PicoFX
LIGHTING CONTROLLER
FI-115
PWR
PROGRAMMING
IN
REC
1 2
LINE OUT
AUDIO
TAP TO PLAY
HOLD TO REC
IN
TRIGGER
POWER INPUT: 120V, 60HZ, 10A MAX.
OUTPUTS: 500 WATTS MAX EACH, INCADESCENT ONLY!
OUTPUTS
1 2
+
-
WWW.FRIGHTIDEAS.COM
PicoFX
LIGHTING CONTROLLER
FI-115
OUTPUT 1
BRIGHTNESS
CONTROL
AND LED
PROGRAMMING
1 2
PROGRAMMING PROGRAMMING PROGRAMMING
Troubleshooting
The IN light blinks after power-up.
• The PicoFX has determined that a PIR motion sensor is
likely connected. It’s ignoring the trigger input for one
minute while the sensor warms up.
The REC button is not responding.
• The PicoFX may be write-protected. See
Write-Protecting Your Animation above.
The PicoFX will blink an error code using the REC
light when it has a problem with the SD card.
Error Description
No SD Card
No INPUT1 folder
No 000.BIN file found for recording.
Error writing to the SD card
Blinks
1
3
4
5
REC LED ERROR CODES
Previewing your Scare
To preview the Input scene press the button. Press the button again to stop it.
Recording Ambient Animation
To toggle between recording Ambient or Input animation, hold the button for 10 seconds. When it starts to blink let
go. Now use the recording steps above to start recording. Repeat the 10 second hold to switch back.
Write-Protecting Your Animation
You can write-protect your animation to protect it from being erased or overwritten. See _PROTECT in Settings.
PicoFX vs PicoStorm
A PicoStorm is actually a PicoFX programmed to power up and loop a thunder and lightning scene. You basically
just plug in your lights and you’re done. Recording is disabled so the program can’t be changed inadvertantly. A
PicoFX, on the other hand, is shipped ready to be programmed by the user. A PicoFX can easily be converted to a
PicoStorm, and vice-versa, by simple moving some folders on the SD card. See the README file on the SD card
for details.
Connections and Controls
Operation
When the PicoFX starts up it will immediately start looping the Ambient scene. If an
Ambient scene doesn’t exist, it’ll set the brightness of the lighting outputs to the that
indicated by the control knobs and sit idle waiting for a trigger signal.
If a trigger is activated any time during the playback of an Ambient scene, the
Ambient scene will be interrupted and the Input scene will be played. Additional
triggers on the input will be ignored during playback of the Input scene. When the
Input scene has finished, the Ambient scene will start again from the beginning.
The Input scene can be manually triggered or stopped at anytime by pressing the
button. This is the PicoFX’s default behavior. It can easily be altered to suit different
applications, see the Settings section for more information.
POWER ON
LOOP AMBIENT
SCENE
IS TRIGGER
ACTIVE?
PLAY INPUT
SCENE
YES
NO
Settings
The PicoFX has many powerful features that can be enabled by simply creating folders with special names. The
folders must be located in either the SD Card’s ROOT folder, or the AMBIENT / INPUT1 folders depending on the
option. All folder names must start with the underscore as shown. Substitute any # characters with a number.
Global Options - Put these in the SD card’s ROOT folder.
Output 1 Dimming Disable - Sets output 1 to a mode safe for ON/OFF only devices.
Output 2 Dimming Disable - Sets output 2 to a mode safe for ON/OFF only devices.
Write Protect - Disables recording to protect your animation.
Trigger Startup Delay - The trigger will be ignored for # seconds at startup. Use with PIRs.
Folder Name
_NODIM1
_NODIM2
_PROTECT
_TDLY###
Ambient or Input Options - Put these in the AMBIENT or INPUT# folders.
JukeBox Mode (Ambient Only) - Plays ALL audio files start to finish while looping any animation.
The Ambient sound will also resume where it left off after playing a triggered scene.
Fade on Interrupt (Ambient Only) - Fade out when interrupted . (# = fade in rate 1-5)
Play All Audio - Plays all the audio files in the folder instead of the one that matches the animation.
Normally-Closed Input (Input1 Only) - Sets trigger input for use with normally-closed triggers.
Momentary Input (Input1 Only) - The scene will only play for as long as the trigger is active .
Volume - Sets volume for this folder only. Use -R for right audio channel. (0-25, default 25)
Trigger Post Delay (Input 1 Only) - The trigger will be ignored for # seconds after the scene plays.
Scene Length = Sound Length - Use this option if you want the particular scene to be exactly the
same length as your sound. Using this will stop recording and playback when the sound is done.
Folder Name
_JUKEBOX
_FADINT#
_PLAYALL
_NCINPUT
_MOMENT
_VOL-L##
_PSD####
_LENSND
SD
CARD
DIRECTOR
SOFTWARE
OR
TWO FLOODLIGHTS MORE THAN TWO LIGHTS
A LOW VOLTAGE DEVICE
TO POWER SUPPLY
APPROPRIATE
FOR DEVICE
OUTPUTS FOR NON-
DIMMABLE DEVICES
MUST USE THE
_NODIM OPTION -
SEE SETTINGS.
OUTPUTS FOR NON-
DIMMABLE DEVICES
MUST USE THE
_NODIM OPTION -
SEE SETTINGS.
TO DEVICE
110 VAC COIL
MECHANICAL
RELAY
ONE ON/OFF DEVICE AND ONE LIGHT
HIGH
VOLTAGE
Trigger Input Wiring
Connecting Speakers
PRESSURE MAT
PUSH BUTTON
SWITCH
TO TRIGGER
IN
TRIGGER
+
-
PIR MOTION SENSOR
IN
TRIGGER
+
-
BEAM SENSOR
IN
TRIGGER
+
-
PRESSURE MAT OR PUSHBUTTON
CONTINUOUS PLAY (LOOPED)
BLUE
BROWN
WHITE
BLACK
GND (-)
12VDC (+)
RELAY C
RELAY N.O.
SENSOR WIRES
BLACK
RED
WHITE
GREEN
GND (-)
12VDC (+)
RELAY C
RELAY N.O.
SENSOR WIRES
IN
C
N.O.
TRIGGER
+
+
-
-
WIRELESS TRIGGER
NOTE: PIR SENSORS CAN TAKE UP TO A
MINUTE TO “WARM UP”. DURING THIS TIME
THE SENSOR WILL NOT RESPOND AND THE
PICOFX MAY TRIGGER.
YOU CAN CONNECT AS MANY
LIGHTS TO EACH OUTPUT AS YOU
WANT PROVIDED YOU STAY
UNDER 500 WATTS PER.
IN
TRIGGER
+
-
RELAY
OUTPUT
IN
TRIGGER
+
-
IN
TRIGGER
+
-
IN
TRIGGER
+
-
MULTIPLE PICOFX / BOOS WITH ONE TRIGGER
CONNECT THE TRIGGER AS
SHOWN IN ONE OF THE
OTHER DIAGRAMS.
CONNECT ADDITIONAL
PICOBOOS TO THE FIRST
PICOBOO AS SHOWN.
ADDITIONAL
PICOFX / BOO
LOOPED
LOOPED WITH
ON/OFF OPTION
FIRST
PICOFX / BOO
Lighting Outputs
BASE STATION
REMOTE
CONNECT THESE ONLY
IF THE BASE RUNS ON
12 VDC AND DOES NOT
HAVE ITS OWN POWER
SUPPLY CONNECTED.
POWER
The lighting outputs of the PicoFX can only be used to dim incandescent lights, or lights specifically designed to be
used with traditional dimmer switches. Plugging fluorescent lights, solenoids valves, relays, or other non-dimmable
devices into these outputs may damage the PicoFX or your device. These loads can only be controlled if the
ON/OFF setting is used for the output. See the Settings section for details on using this setting.
Each output is rated for a maximum of 500 watts. There is an internal 10 amp fuse for overload protection.
MAX
500
WATTS
NON-DIMMABLE
DEVICE
N.C.
COIL
C
N.O.
SD Card ROOT Folder
AMBIENT or INPUT1 Folder
AMBIENT INPUT1
SD Card Layout
Your SD card will have an AMBIENT and INPUT1 folder. Put your MP3s in the appropriate folder depending on
when you want them to play. The filenames of the MP3s are not important unless you want the sounds to play in a
particular order. If you aren’t sure how to copy the files, download our free Director software. It’ll put the files in the
right place and make sure they’re in the correct format.
MY SOUND
MP3
000
BIN
Ignore any BIN files in these folders. The PicoFX uses
these to store your scene animation.
Try our free software to
make easy work of creating
complex scenes.
TRY OUR
DIRECTOR
SOFTWARE
ON/OFF MODE ONLYOK FOR DIMMING
INCANDESCENT FLOODS, TRADITIONAL
BULBS, HALOGEN, DIMMABLE LED.
FLUORESCENTS AND NON-DIMMABLE LOADS
MUST BE USED WITH THE ON/OFF OPTION.
POWERED SPEAKERSAMPLIFIER
The audio output is designed to connect to powered speakers or external amplifiers.
MONO
STEREO
LINE OUT
AUDIO
LINE OUT
AUDIO
 Loading...