

Fright Ideas PICOBOO FI-104 Operating Manual
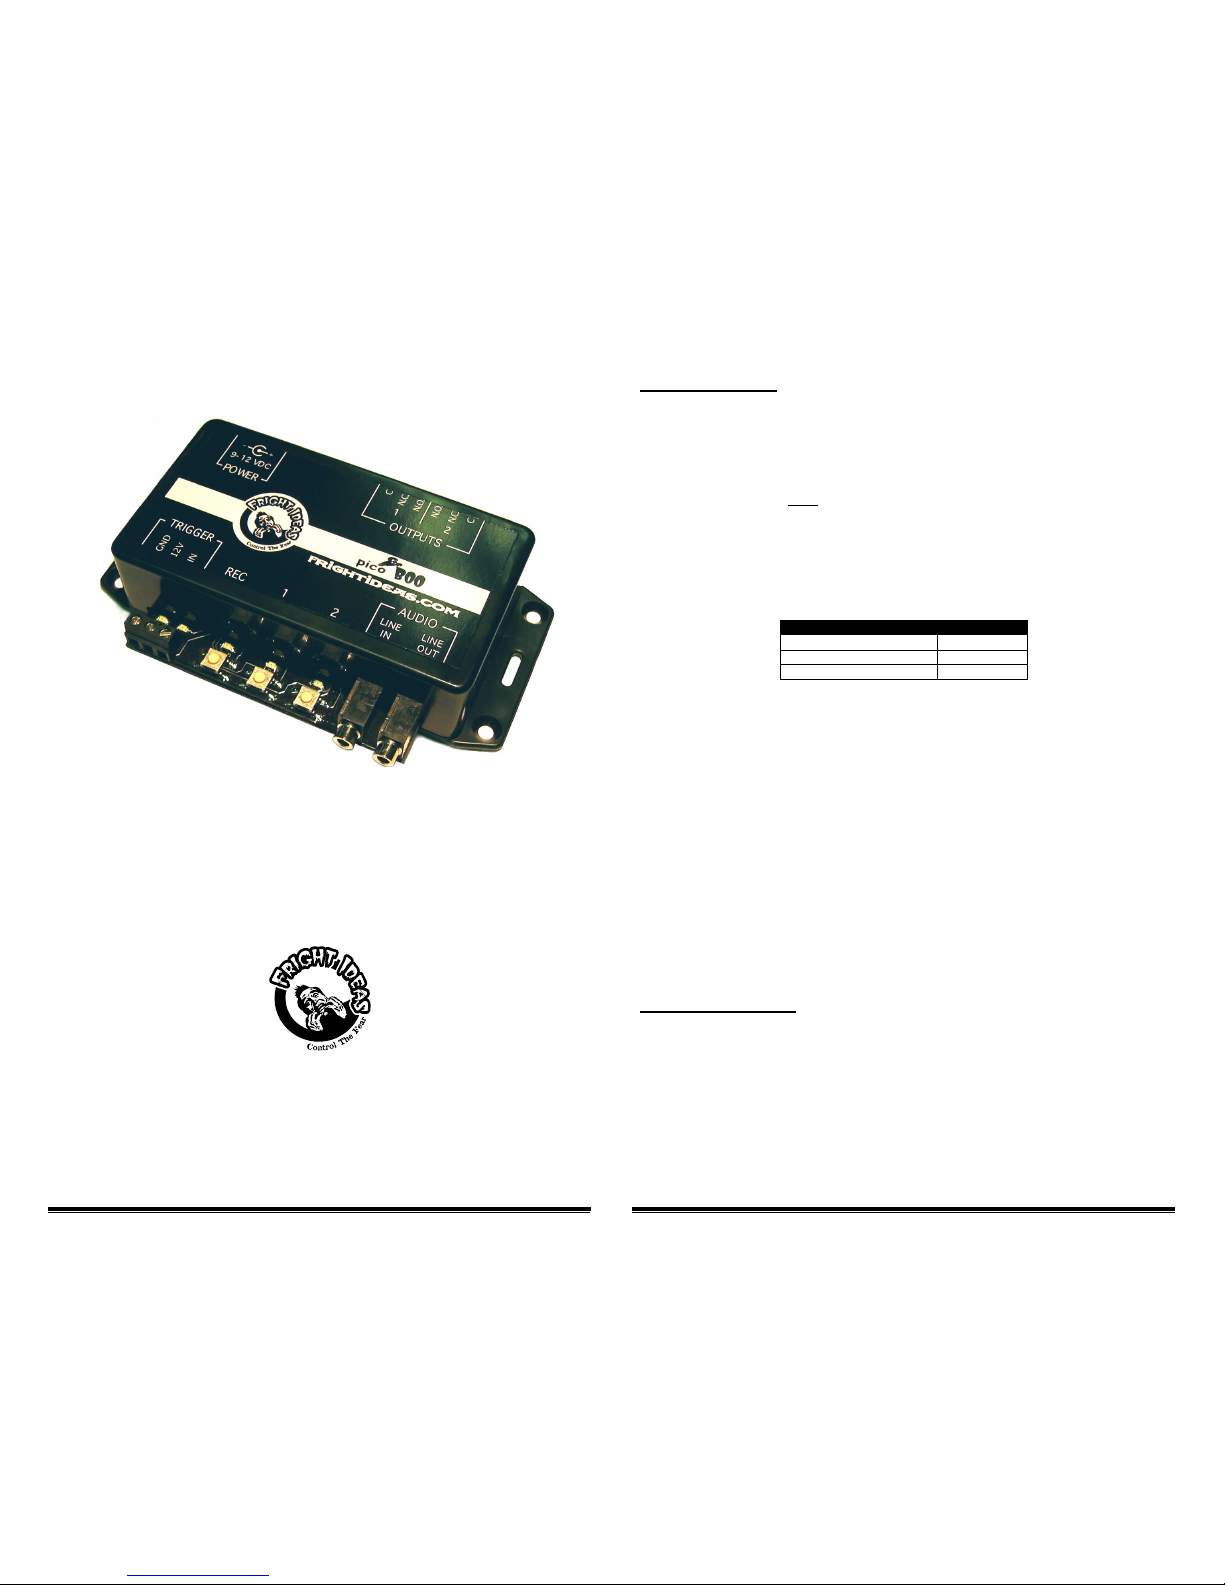
picoBoo FI-104 Operating Manual
picoBoo FI-104 Operating Manual
picoBoo FI-104
OPERATING MANUAL
471 Maybank Avenue
Toronto, Ontario M6N 3S7
Tel: 905-803-9274 Fax: 647-439-1470
www.frightideas.com
Recording Sounds
To begin recording you will need the following connected to the picoBoo:
• A powered speaker or speakers connected to the picoBoo’s Line-Out.
• An audio source such as a CD player or computer connected to Line-In. Make sure the source is not amplified.
• A stereo audio cable to connect your audio source to the picoBoo’s Audio Line-In
Once the above is connected try pressing play on the audio source, you should be able to hear the sound faintly
through the connected speaker. Do not turn up the source volume so your speakers are really loud! Use this sound
only as a guide so you know when to start and stop recording. Once the sound is recorded and the picoBoo plays it
back it will be much louder than it is now.
You will have to experiment with the volume of your sound source to see what gives you the best recorded sound
quality. If the source is too loud the recording will sound distorted, if it’s too low you may not be able to turn the sound
up loud enough even with your speakers at full volume. Do a few test recordings, keep adjusting the source volume
and then previewing the sound from the picoBoo until you’re happy with the quality and volume level.
Volume Levels for Common Sources
Source
Volume Level
Computer
20% to 40%
iPod or Portable CD Player
75%
The ambient sound must always be recorded first, once you are happy with how it sounds you can move on to
recording the scare sound. The scare sound can then be recorded and re-recorded as needed. If the ambient sound
is ever changed the scare sound will have to be re-recorded, ev en if it does not need to be changed.
Sound Length
Record as long an ambient sound as possible, this sound will be looped while the picoBoo waits to be triggered. The
looping point will be heard less often if this sound is long, just make sure you leave enough room f or your scare
sound, you have 2 minutes total space for your sounds. Your scare sound length is less critical, just make sure it’s
long enough to play for the entire length of the animation y ou want to record.
Recording and Previewing
To record the ambient sound hold “REC” and press “1”, press “REC” again to stop recording. To record the scare
sound hold “REC” and press “2”.
To preview the sound, make sure you stop the source if it is playing, then press either “1” to preview the ambient
sound, or “2” to preview the scare. Pressing “1” or “2” again while the sound is playing will stop it.
Turning Off Ambien t Sound
To turn off the ambient sound make sure an audio source is connected to the audio-in, hold “R EC” and press “1”.
Then within 3 seconds, press “REC” again.
Recording Animation
Once you have your sounds recorded you can begin recording the scare scene’s outputs. Make sure you
disconnect the audio source form the Audio Line-In b efore you start.
If you are having problems recording and are using a motion s ensor for a trigger, disconnect the motion sensor and
read ahead to learn how to c hange your input to normally-open. Change back to normally-closed when you’re done.
1. Press “REC”, the red light will turn on and the scare sound will start playing.
2. Press the “1” & “2” output buttons to turn on the outputs as you want them to turn on. Synchronize your
actions with the sound, You can press each button as many times as you want or hold them f or as long
as you want, whatever you do on those buttons will be recorded for up to 2 minutes.
3. Press “REC” again to stop recording, the scene is automatically saved. Press “2” or trigger the input to
preview the scene.
picoBoo FI-104 Operating Manual
picoBoo FI-104 Operating Manual
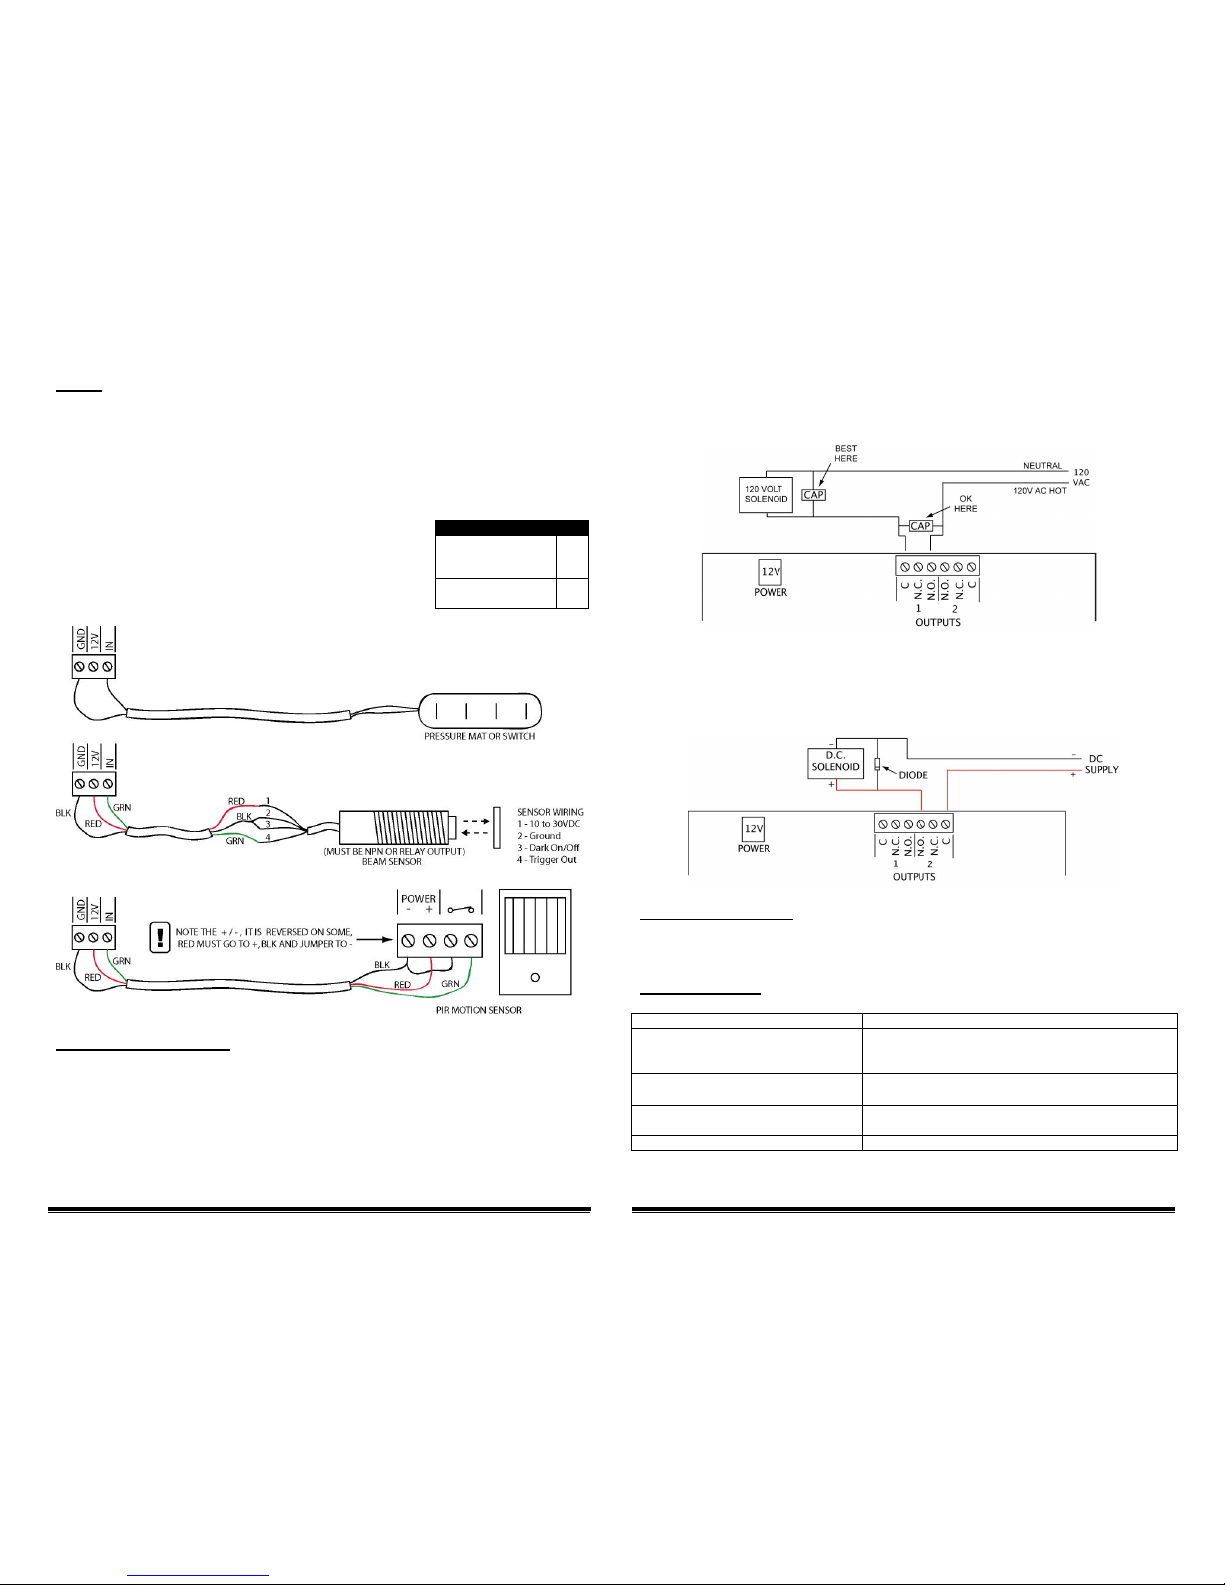
Inputs
In order for the picoBoo to be able to read your trigger properly you must set the contact type. If your trigger is
normally-open then you can s kip this step as it’s the default setting. If it’s normally-closed then you must program the
picoBoo accordingly. If you are unsure of your trigger’s contact-type use the test below to find out.
Determining your Trigger’s Contact-Type
Connect your trigger/sensor using the diagrams below. Power up the picoBoo, if it’s a motion sensor wait a few
minutes for it to warm up. Trip your sensor/trigger as you watch the yellow input light on the picoBoo, if the yellow
light turns ON it’s a N.O. contact, if it turns off it’s N.C., if it does nothing there is a wiring problem.
Common Contact Typ es
- Pressure Pad
- Push Button
- Cheap Motion Sensor
NO
Setting the input type to Normally Closed (N.C.) or Nor mally Open (N.O.)
1. Power down the picoBoo
2. Hold the “1” AND “2” buttons to set to N.C. or just “1” to set to N.O.
3. Power up the picoBoo while holding the button(s)
4. When the red light flashes twice you can let go of the buttons.
- Alarm-quality PIR
Motion Sensor
NC
Terminal Block Outputs
The outputs are simple contact closures, which can be wired N.O. or N.C. The outputs do not supply voltage, if you
would like them to you must wire voltage into one of the terminals. If you plan to use 120 volts then it is your
responsibility to take the appropriate safety precautions with wiring. Each relay can handle 10 amps @ 125 volts.
Controlling Solenoid s or Large Relays
Solenoids and Large Relays create a lot of interference, this can wreak havoc to nearby elec tronic devices. If you
notice the sound is stopping unexpectedly when controlling one of these devices this is most likely your problem. The
solution depends on whether y ou are using AC or DC solenoids.
AC Solenoids
A high voltage capacitor must be installed to absorb the feedback. The best place to install it is as close as possible
to the solenoid, if that’s not possible then across the terminal block may work as well.
Radio Shack part numbers: 272-1053 or 272-1051
DC Solenoids
A diode must be installed across the solenoid. Note the orientation of the diode, using the line on the one side as a
guide. Locate the diode as close to the solenoid as possible. A standard 1N4001 – 1N4004 diode will work fine,
available for less than a dollar at your local Radio Shack.
Radio Shack part number: 276-1103 or 276-1102
Setting Write-Protect
Once the picoBoo is programm ed to your liking you can write-protect it to make sure the “REC” button is not
accidentally pressed thus changing or deleting your program. The write-protect setting toggles on and off, change it
by powering down your picoBoo for a few seconds then powering it back up holding only the “2” button.
Troubleshooting
Problem
Solution
- “REC” light keeps flashing when powered up
- Motion sensor won’t trigger scare
- The motion sensor is warming up, wait 2 minutes
- Input is set to normally-closed when it should be normally-open,
read “Inputs”
- Scare loops after about 2 minutes
- Input is set to normally-open when it should be normally-closed,
read “Inputs”
- Can’t record animation
- picoBoo is write-protected
- Audio source still c onnected to Line-In, remove it
- Sound cuts out sometimes
- Put diodes/caps on your solenoids, read above
 Loading...