

Fright Ideas EscapeKeeper, EscapeKeeper JR Quick Start Manual
Adding Sounds
You can have sounds play for pretty much every situation. When an input turns on or off, when the puzzle is solved,
when time runs out, etc. When you first insert the SD card into the controller the mode light will turn red as it creates
the folder structure. When that’s done you can eject the card and put it in a computer. Inside the EK folder you’ll find
a large list of sound folders. Inside each folder is a README.TXT file explaining when sounds in that folder will play
and how the files should be named.
Recording
Recording the Puzzle Solution
If you selected the Input Sequence or Morse Code puzzle mode you need to teach the EscapeKeeper the solution to
the puzzle. Tap REC, then push the buttons or activate the sensors as the players would if they solved the puzzle
correctly, then tap REC again to save. If you selected Input State Match you just need to set your inputs to the
winning state and tap REC once to save that state as the solution. Tap button 3 after recording to start the puzzle.
Other modes not mentioned do not require a solution to be recorded.
Recording Output Animation
By default, outputs 2 and 3 indicate the pass / fail status of the puzzle. If you’d like you can customize what the
outputs do in most states of the puzzle. You must first select what scene you want to record, see below for the list.
Once selected, tap REC, if you have audio for this state it will start playing. As you listen to the audio you can use the
2 / 3 buttons to control the outputs. Tap REC when you’re done. To preview what you just recorded tap button 3.
NOTE: To exit record / preview mode and start the puzzle again you must hold button 3 for a few seconds.
A few notes:
- To erase the current state’s animation tap record twice quickly.
- If ANY of the states have custom animation in them outputs 2 & 3 will no longer indicate pass / fail status.
- If you’d like an output to remain on after the animation is played make sure you are still holding the output button
when you stop recording. This is useful if you want an output to stay on after the animation has finished playing.
Selecting what to Record
Hold the REC button for a few seconds until the light above it turns blue. While still holding the button, turn the
Volume knob to select what you’d like to record, then let go.
1 2 3 4 5 6 7 8
1 2 3 4 5 6 7 8
1 2 3 4 5 6 7 8
1 2 3 4 5 6 7 8
1 2 3 4 5 6 7 8
1 2 3 4 5 6 7 8
1 2 3 4 5 6 7 8
Puzzle Solution - The default at startup. Record the puzzle solution on the inputs.
Master Code - Master code for Input Sequence and Custom Keypad. (See full manual)
Game Start - Output 2 & 3 animation that is played when the game is started.
Game Loop - Output 2 & 3 animation that is looped while the game is active.
Miss - Output 2 & 3 animation that is played when an incorrect attempt is made.
Success - Output 2 & 3 animation that is played when the puzzle is solved.
Failed - Output 2 & 3 animation that is played when the game times out or tries run out.
Basic Operation
When the EscapeKeeper boots up it will sit idle, unless Auto-Reset is enabled in which case it will start the game
immediately. To start the game manually tap button 3 or pulse the reset input.
After a game completes, the pass or fail status will be indicated on the mode LED as green or red. At that point you
can tap button 3 or use the reset input to restart the game.
You can wire the reset input to a switch or button. When the reset input is ON the game is held in reset and any
maglocked door is kept locked. If the EscapeKeeper sees one of the inputs isn’t ready for the game to start it will
beep, NOT lock the door, blink the mode LED red and indicate which input is the problem. Once that issue is
resolved you can attempt the reset again. Turning the reset input OFF will allow the game to start.
Stopping the Game
During the game, the game can be stopped and the door unlocked by tapping button 3 once, or the reset input twice.
Quick-Start Guide
EscapeKeeper
NEED HELP?
There are tutorial videos and a complete manual available at
help.frightideas.com/504
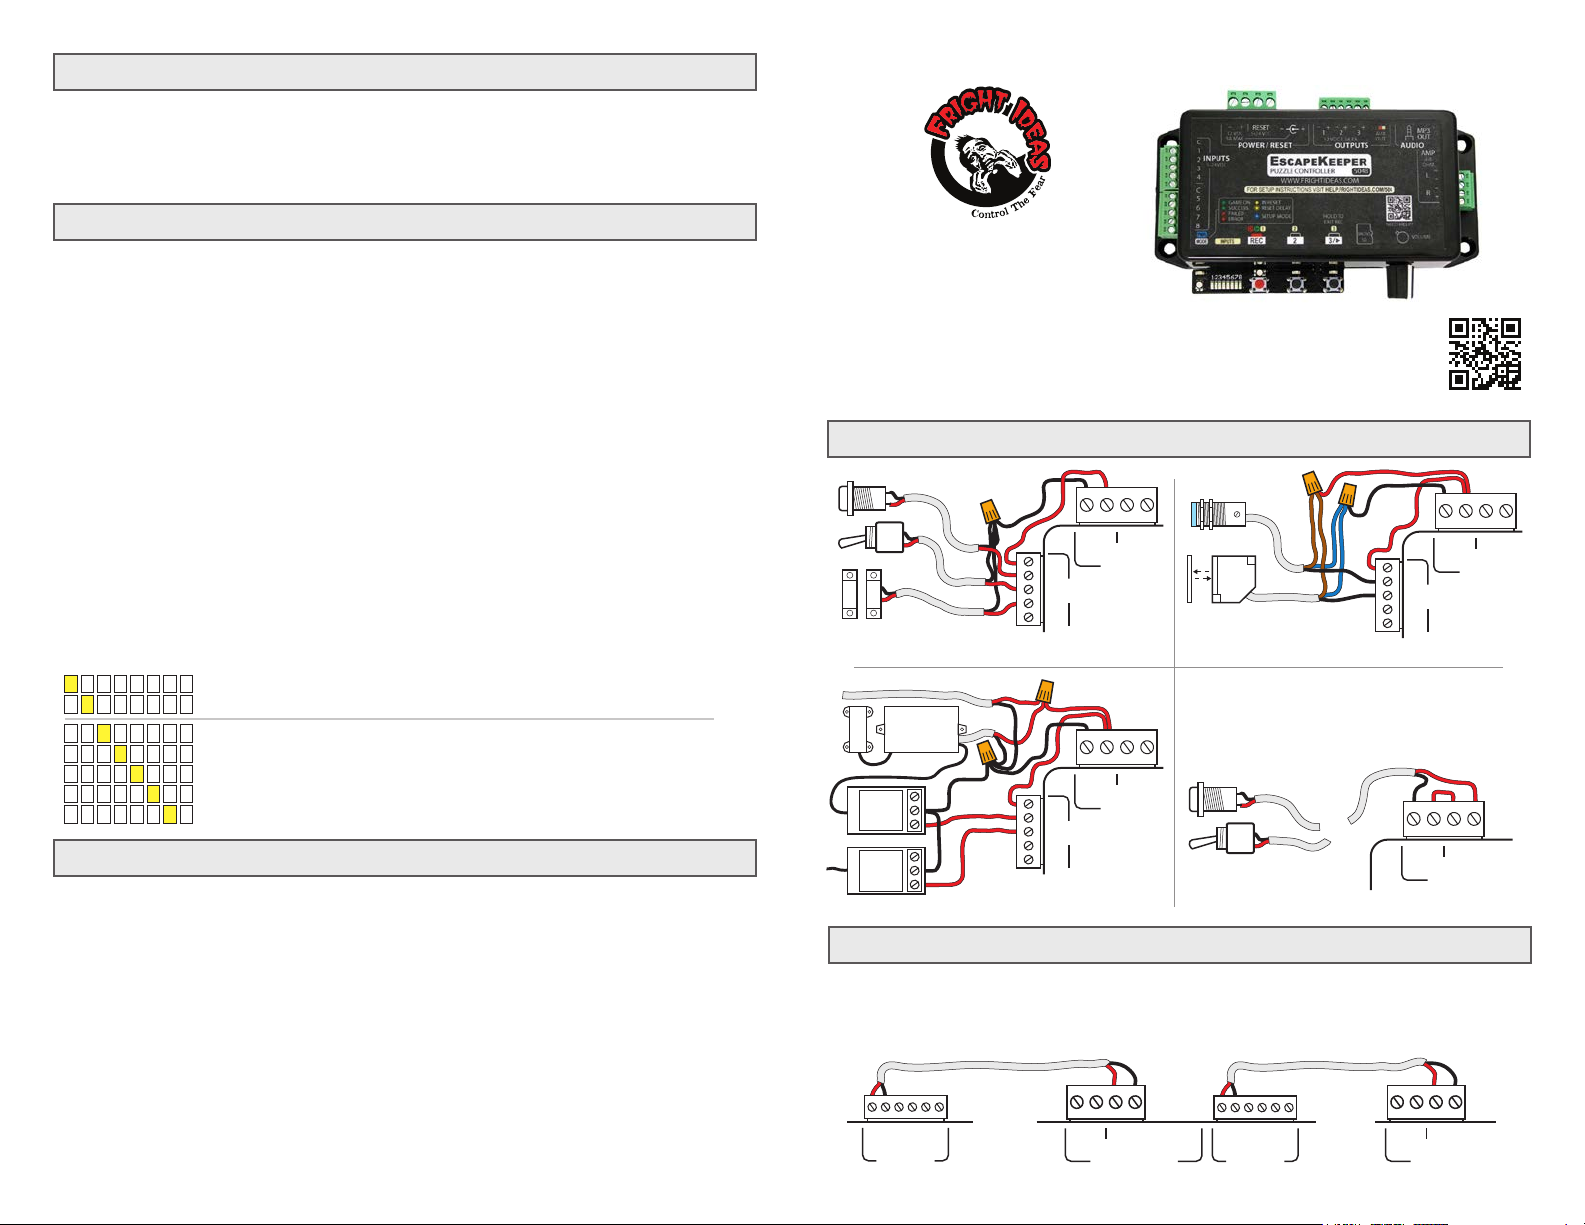
Input and Reset Wiring
+
-
C
1
INPUTS
2
5-24 VDC
3
4
12 VDC
5A MAX
RESET
5-24 VDC
POWER
C
1
INPUTS
2
5-24 VDC
3
4
-
12 VDC
5A MAX
+
POWER
BUTTONS, SWITCHES, MAGNETIC CONTACTS TYPICAL NPN OUTPUT SENSORS
← TO OTHER UNIT
If you are using a maglock your puzzle needs to be reset
manually so the controller knows when to lock the door.
This can be done with button 3 or the reset input. If you
are using the Game Timer and need the door to be
locked before you start the game you will need to use a
reset switch and not a button.
OR
-
12 VDC
5A MAX
+
RESET
5-24 VDC
POWER
C
1
INPUTS
2
5-24 VDC
3
4
-
12 VDC
5A MAX
+
RESET
5-24 VDC
POWER
RESET BUTTON OR SWITCHTYPICAL RFID SENSORS
Linking EscapeKeepers
EscapeKeepers can be linked together as shown below to force puzzles to be solved in order. Additional puzzles
remain in reset until the previous puzzle is solved, after which it comes to life and plays an optional startup sound.
NOTE: The Output 1 Mode of the EscapeKeepers holding additional units in reset must be set to 7.
PUZZLE 1 PUZZLE 2 PUZZLE 3
-
+-+-+
1 2 3
12 VDC 1.5A EA
OUTPUTS
+
-
RESET
12 VDC
5-24 VDC
5A MAX
POWER / RESET
+-+-+
1 2 3
12 VDC 1.5A EA
OUTPUTS
-
+
-
RESET
12 VDC
5-24 VDC
5A MAX
POWER / RESET
RESET
5-24 VDC
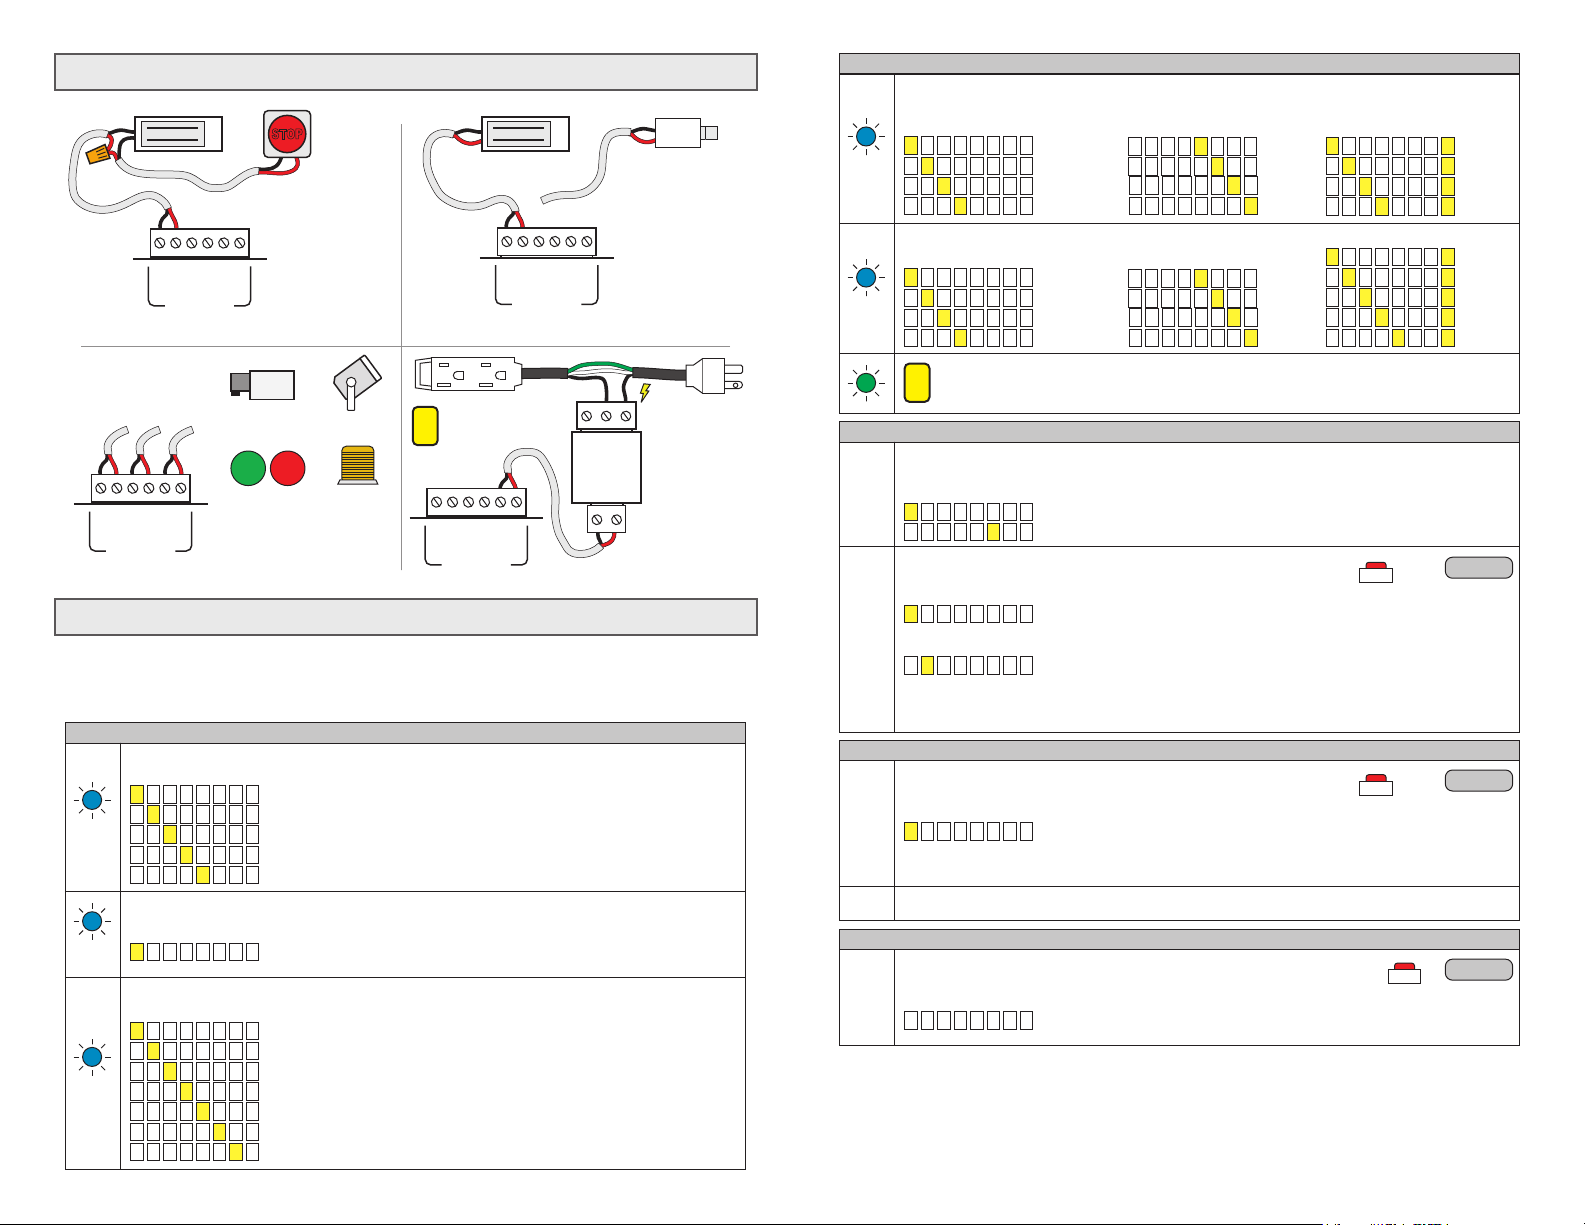
Output Wiring
12 VDC MAGLOCK
-
+-+-+
1 2 3
12 VDC 1.5A EA
OUTPUTS
MAGLOCK WITH E-STOP DETECTION
OUTPUTS CAN BE USED
TO CONTROL ANY 12 VDC
DEVICES UNDER 1.5
AMPS (18 WATTS).
+-+-+
1 2 3
12 VDC 1.5A EA
OUTPUTS
-
SOLENOID
PASS FAIL
INDICATOR LIGHTS
ANY 12 VDC DEVICE ANY 110 VOLT LOAD
E-STOP N.C.
STOP
CONTACT
NOTE: OUTPUT 1
MODE MUST BE
2 OR 4 FOR E-STOP
DETECTION.
LED LIGHT
BEACON
12 VDC MAGLOCK LATCH
NOTE: OUTPUT 1 MODE
MUST BE 1 OR 3.
OR
- -
+-+
1 2
12 VDC 1.5A EA
OUTPUTS
MAGLOCK OR SOLENOID LATCH
TAKE APPROPRIATE
SAFETY PRECAUTIONS
!
WHEN WIRING HIGH
VOLTAGES.
-
+-+-+
1 2 3
12 VDC 1.5A EA
OUTPUTS
+
3
N.C.
RELAY
-
NOTE: OUTPUT 1
MODE MUST BE 5 TO
PULSE THE LATCH
ON SUCCESS.
C
N.O.
12 VDC
COIL RELAY
+
TO WALL
OUTLET
Initial Setup and Factory Reset
Power up holding button 3 to enter setup mode. You can let go when the MODE light starts flashing blue. The
current setting will be shown on the yellow LEDs. For each step below, use the volume knob to adjust the setting,
then tap 3 to advance to the next step. You must advance through all the settings for any changes to be saved.
NOTE: If you get stuck you can visit help.frightideas.com/504 to see a video of the setup process.
Initial Setup Steps
Puzzle Mode
The puzzle mode defines how the EscapeKeeper operates.
1 2 3 4 5 6 7 8
1 2 3 4 5 6 7 8
1 2 3 4 5 6 7 8
x1
1 2 3 4 5 6 7 8
1 2 3 4 5 6 7 8
Number of Puzzle Inputs
Number of buttons, switches, or sensors used for the puzzle. Remaining inputs can play sounds or hints.
1 2 3 4 5 6 7 8
x2
Output 1 Mode
Output 1 is dedicated to lock control or success indication. Choose one of the modes below.
1 2 3 4 5 6 7 8
1 2 3 4 5 6 7 8
1 2 3 4 5 6 7 8
1 2 3 4 5 6 7 8
x3
1 2 3 4 5 6 7 8
1 2 3 4 5 6 7 8
1 2 3 4 5 6 7 8
Input Sequence - Players must activate the inputs in a specific sequence.
Morse Code - Players must match your sequence of short and long presses.
Input State Match - Players must match the inputs to a recorded input state.
Number of Inputs - Players must activate a certain number of inputs.
Mission Impossible - Players must activate win input without tripping others.
Puzzle Inputs - Select the number of inputs used in the puzzle. For Mission
Impossible mode see the full manual online for more information.
Maglock, NO E-Stop, Unlock - Maglock, unlocks on failure / timeout.
Maglock, E-Stop, Unlock - E-Stop detection on, unlock on failure / timeout.
Maglock, NO E-Stop - Maglock
Maglock, E-Stop - Maglock, E-Stop detection.
Pulse On - Output will turn on for 1 second if the puzzle is solved.
Turn On - Output will turn on and stay on if the puzzle is solved.
Link Mode - Use to link this unit to one that will turn on after this one is solved.
Initial Setup Steps (continued)
Auto-Reset Timer
This timer starts when the puzzle is solved or fails due to timeout or too many attempts. When it expires
it restarts the puzzle allowing it to be solved again.
x4
1 2 3 4 5 6 7 8
1 2 3 4 5 6 7 8
1 2 3 4 5 6 7 8
1 2 3 4 5 6 7 8
Off
After Sound
5 sec
15 sec
1 2 3 4 5 6 7 8
1 2 3 4 5 6 7 8
1 2 3 4 5 6 7 8
1 2 3 4 5 6 7 8
30 sec
1 min
2 min
5 min
1 2 3 4 5 6 7 8
1 2 3 4 5 6 7 8
1 2 3 4 5 6 7 8
1 2 3 4 5 6 7 8
10 min
15 min
30 min
60 min
Game Timer
Used to automatically fail the game if the players take too long.
x5
1 2 3 4 5 6 7 8
1 2 3 4 5 6 7 8
1 2 3 4 5 6 7 8
1 2 3 4 5 6 7 8
Off
1 min
2 min
3 min
1 2 3 4 5 6 7 8
1 2 3 4 5 6 7 8
1 2 3 4 5 6 7 8
1 2 3 4 5 6 7 8
4 min
5 min
10 min
15 min
1 2 3 4 5 6 7 8
1 2 3 4 5 6 7 8
1 2 3 4 5 6 7 8
1 2 3 4 5 6 7 8
1 2 3 4 5 6 7 8
20 min
30 min
40 min
50 min
60 min
Puzzle Mode Options
If the MODE light starts blinking green, select ONLY 1 of the tables below based on the Puzzle
!
Mode you selected in the first step. Once the MODE light turns off your setup is complete.
ONLY FOR Input Sequence & Morse Code Puzzle Modes
Miss on Input Timeout
Use this to limit the maximum number of seconds between inputs in the sequence. This option will fail
the current attempt and play any Miss sound if they take too long to activate the next input, button, etc.
x1
1 2 3 4 5 6 7 8
1 2 3 4 5 6 7 8
Options
Move the flashing cursor using the knob. Toggle options off and on by tapping REC. .
No Timeout - There’s no limit to how long they can take.
Timeout - Number of seconds until the current attempt times out. (6 shown)
REC
ON/OFF
Once your options are set, tap button 3 to complete the setup process.
x2
1 2 3 4 5 6 7 8
Miss at Code Length - The attempt will miss when the number of input entries
(usually button presses) in their attempt matches the amount in your solution.
This will tip them off to the length of the code if you have a Miss sound.
1 2 3 4 5 6 7 8
Miss on Bad Input - The current attempt will be declared a miss as soon as
they trigger the wrong input. If you have a Miss sound, this would allow the
players to slowly figure out the code by trial and error. (ignored for Morse Code)
Note: More options described in the Operating Manual online
ONLY FOR Input State Match Puzzle Mode
Options
Move the flashing cursor using the knob. Toggle options off and on by tapping REC. .
REC
ON/OFF
Once your options are set, tap button 3 to complete the setup process.
x1
1 2 3 4 5 6 7 8
Use Submit Button - Instead of having the puzzle succeed once they’ve
matched the input state, require them to also press a button. This submission
allows you to limit the number of tries they have, for example, to disarm a bomb,
launch a missle, etc. Connect button to input 8, or 7 if puzzle bypass is enabled.
Minimum Match Time - See Operating Manual online or leave at 3.
x2
ONLY FOR Number of Inputs Puzzle Mode
Latched Inputs
Move the flashing cursor using the knob. Toggle inputs to latched mode by tapping REC.
Once your inputs are set, tap button 3 to complete the setup process.
x1
1 2 3 4 5 6 7 8
If you are using buttons or momentary outputs that do not keep the input on until
the puzzle is finished then you need to enable latch mode for those inputs.
REC
ON/OFF
Advanced Options
See the Advanced Options section in the full manual if you’d like write-protection, a puzzle bypass, a limit on the
number of attempts, or an RFID chatter filter.
Factory Reset
Power up holding the black 2 & 3 buttons. Let go when the REC LED flashes red continuously. Sounds will NOT
be erased.
 Loading...