

Page 1
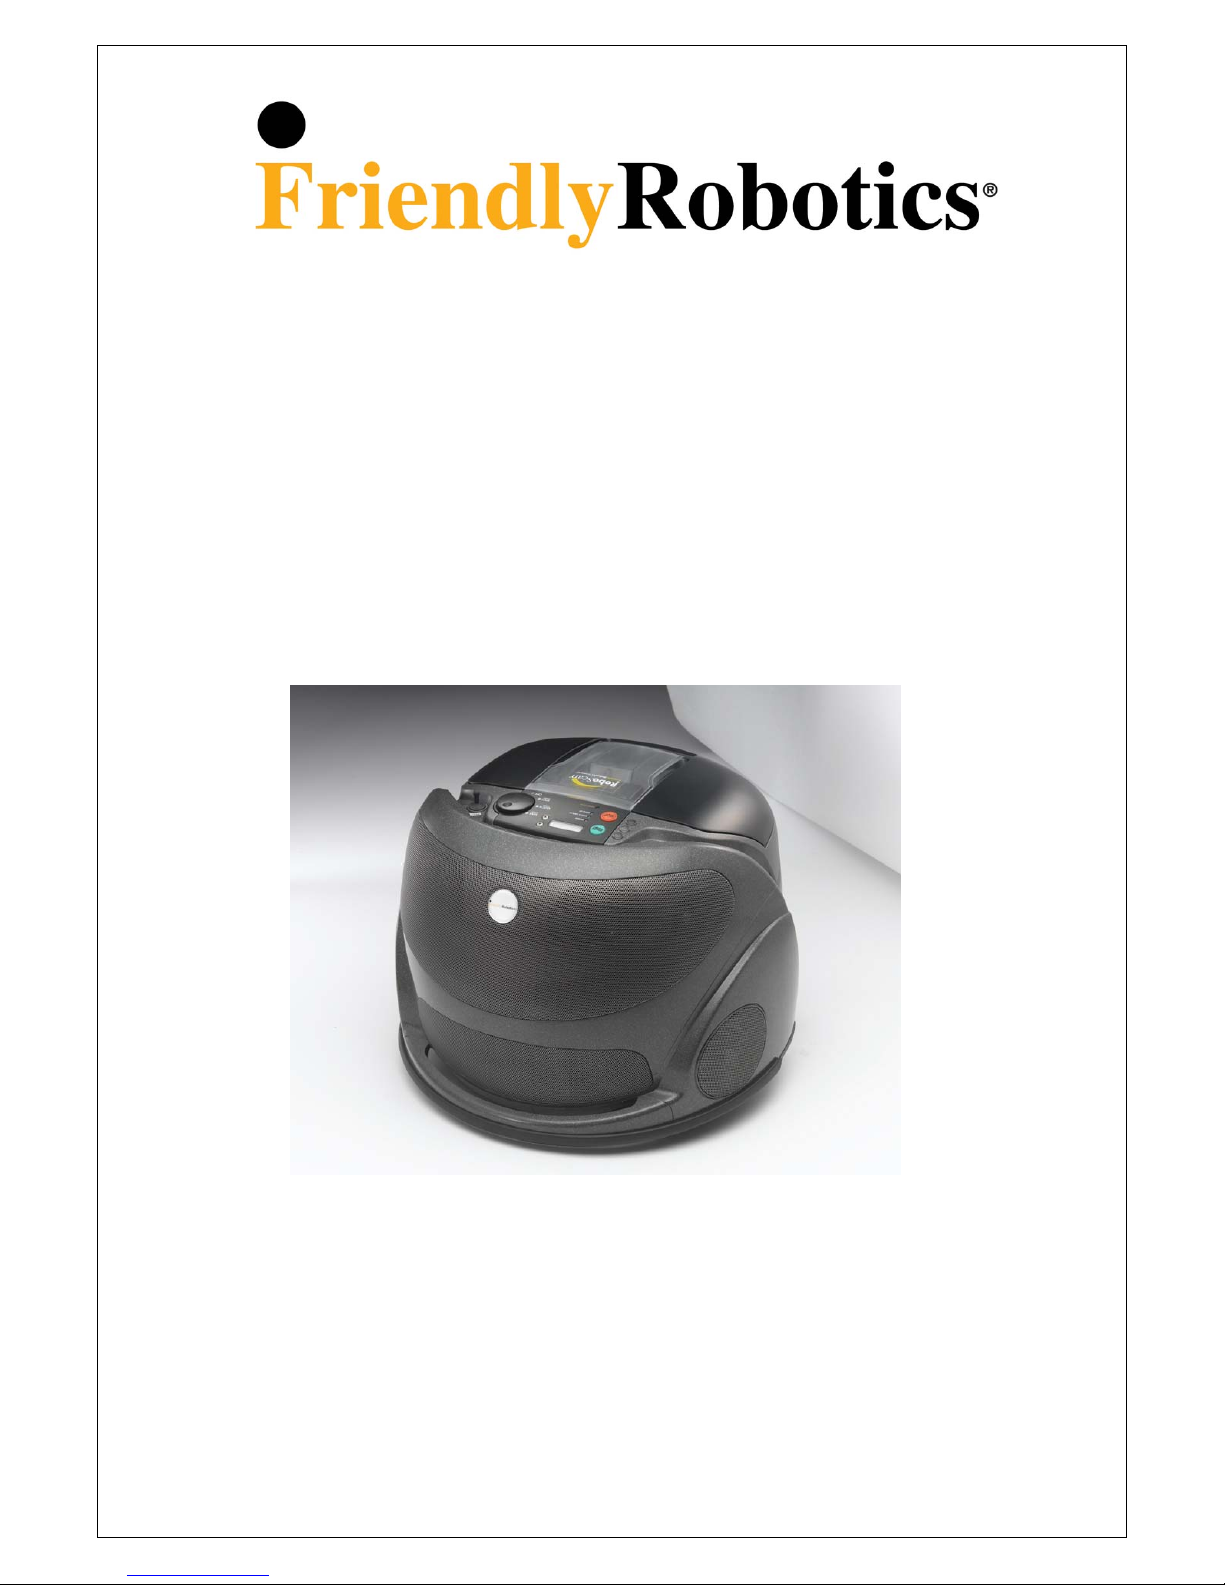
Friendly Vac
Operating & Safety Manual
www.friendlyrobotics.com
DOC4001B
Page 2
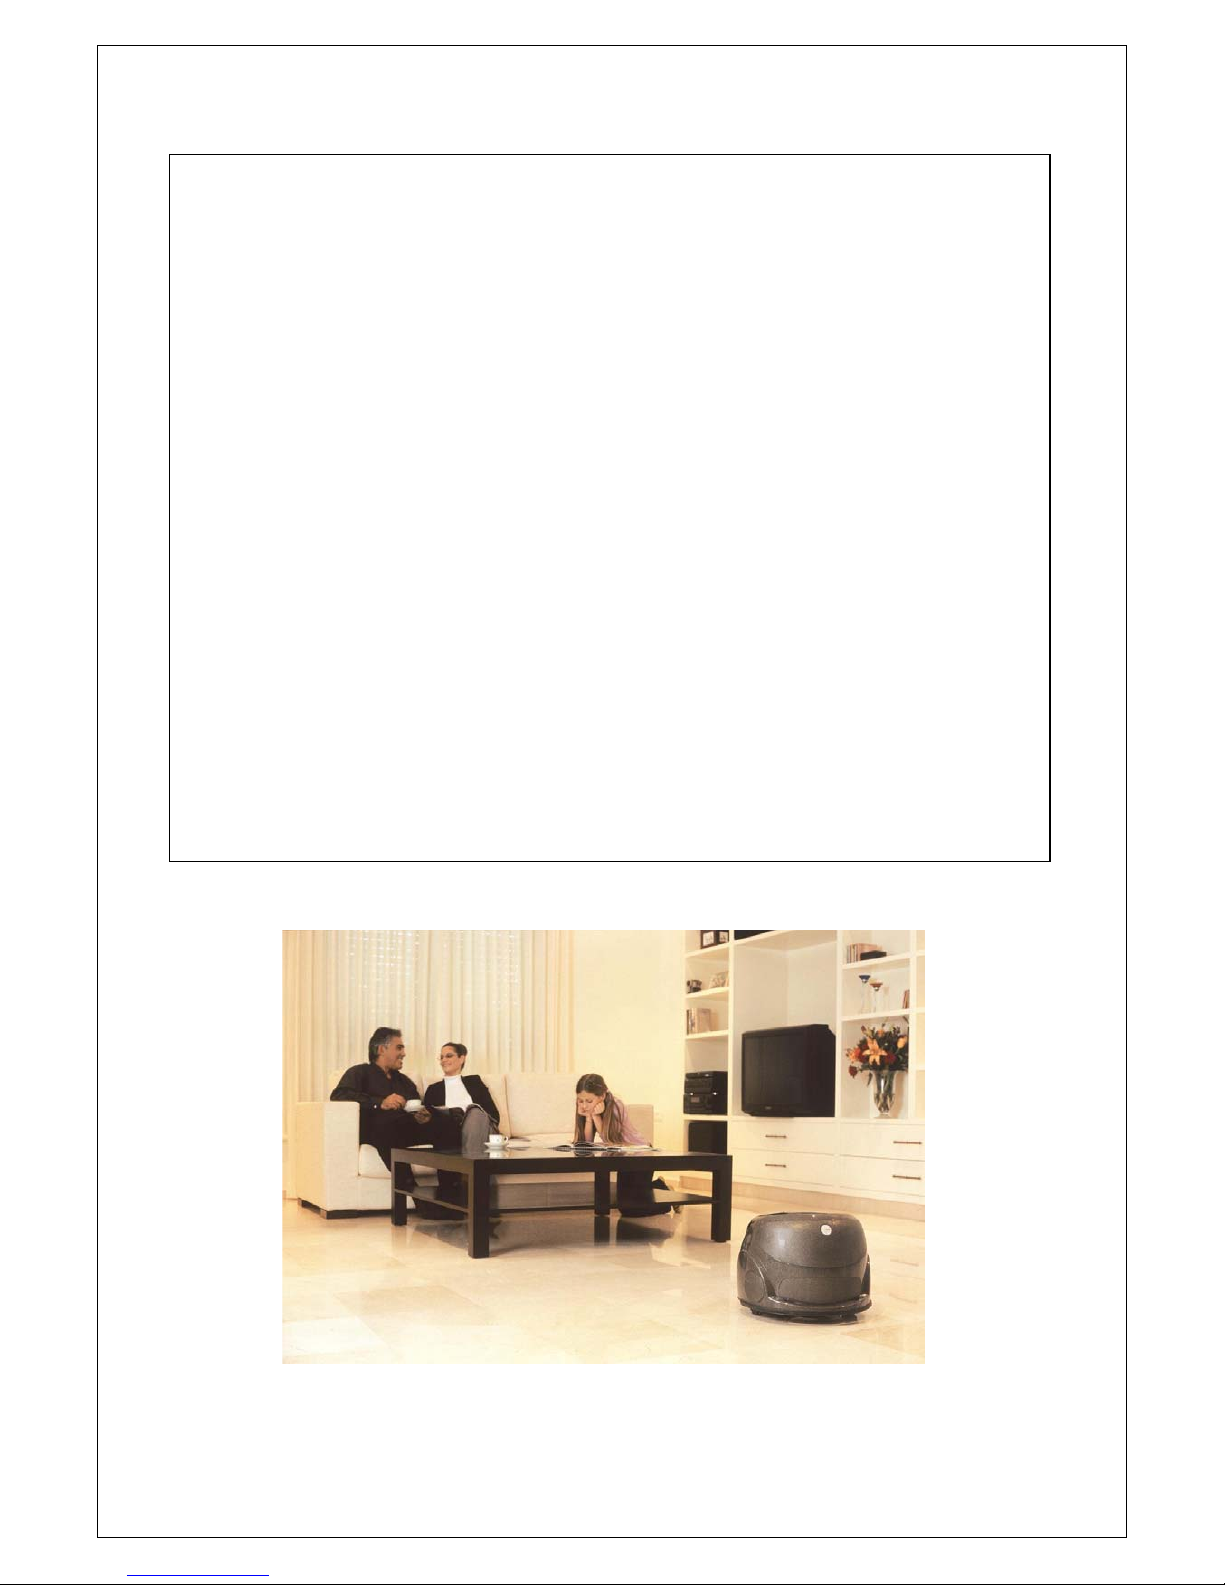
Congratulations on your purchase of the Friendly Vac!
This product will make your life easier by cleaning, while you enjoy other activities.
Use the Friendly Vac to keep your carpets and other surfaces clean and your home ready for
the family and guests at all times.
Model No.: __________________________________________________
Serial No.: _________________________________________________
Please attach your sales receipt to this manual and keep it in a safe place. Verification of date
of purchase may be required for warranty service of your Friendly Robotics product.
REVIEW THIS MANUAL BEFORE OPERATING YOUR FRIENDLY VAC!
If you need any assistance, please contact your dealer.
Page 3

Table of Contents:
2005-A Friendly Robotics®
www.friendlyrobotics.com
Important Safeguards
…………………………………….…….2-3
Getting Started
……………………………...…………………….4
Product Description
……….……………………………………...5
How to Use ……………………………………………………..6
Pull-Line
……………………..…………………..…………………6
Transporting
…………………………………………………...…..6
The Batteries …………………………………………………….7
First Use
…..…………………………………..…..…………..……7
How to Charge
……………….…………………..………………...7
Replacement/Recycling
……………….…………..……….……….7
Before Cleaning…………………………………………………8
Room Preparation
…….….
……………………………...…………8
Cleaning Modes……..
….…………………………………..………8
Cleaning & Advanced Features
……………………………...9-12
Sensors………..
…………………………………..……….….…....9
Auto Depart………
………………………………...………..……..10
Child Lock
……………………………………...…………..…....11
Sleep Mode
………………………...……………………….…..12
Maintenance………………………………………………..13-15
Emptying Dirt Cup
…………...……………….…………………..13
Cleaning Filter
……………………………………………………14
Storage
&
Brush Roll
………..…………………………….…....15
Display Messages
………………………………………………..16
Troubleshooting
……….…………………………………………18
Warranty
…………………………………………………………..20
Page 4
Important Safeguards
WARNING:
When using an electrical appliance, always follow basic precautions
to reduce the risk of fire, electric shock, or injury, including the following:
READ ALL SAFETY INSTRUCTIONS BEFORE USING FRIENDLY VAC
Training & Instructions
• Use Friendly Vac only for its intended use as described in the instructions.
• Use only attachments recommended by Friendly Robotics; others may cause hazards.
• Never allow children or people unfamiliar with these instructions to operate Friendly Vac.
•
The user is responsible for accidents or hazards occurring to other people or their property.
Preparations
• Keep hair, loose clothing, fingers, feet and all parts of body away from openings, rotating brush and any
other moving parts. Do not operate Friendly Vac in bare feet or when wearing open toe shoes or
sandals.
• Before using your Friendly Vac, remove objects like clothing, loose papers, pull cords for blinds or
curtains, electrical cords, toys, and any fragile objects from the floor surface.
• If the room to be cleaned contains a balcony, a physical barrier should be used to prevent access to the
balcony to ensure safe operation.
• Move and secure all electrical cords, wires and cables out of reach of your Friendly Vac. Do not run it
over electrical cords, wires or cables.
• Do not use without dirt cup or filters in place. Empty dirt cup and clean filter frequently when picking up
very fine materials such as powder.
• Do not use in a room with lit candles, burning fireplaces, lit oil lamps, and other such lit items.
• If Friendly Vac is not working as it should, has been dropped, damaged, left outdoors, or dropped into
water, take it to your dealer.
• Do not put any object into openings. Do not use with any opening blocked; keep free of dust, lint, hair,
or anything that may reduce airflow.
Operation
• Do not operate Friendly Vac if any safety feature or device is damaged or inoperable.
• Never pick up or carry Friendly Vac while motors are running.
• Do not use outdoors or on wet surfaces.
• Close supervision is necessary when any appliance is used by or near children.
• Do not allow Friendly Vac to be used as a toy or operated in an area with unattended children.
• Do not sit or stand on the Friendly Vac.
• Do not use to clean stairs.
• Do not use to pick up anything that is burning or smoking, such as cigarettes, matches, or hot ashes.
•
Do not use to pick up flammable or combustible materials such as gasoline, or fine wood sanding, or
use in areas where they may be present.
• Avoid picking up hard, sharp objects with this product. They may damage it and its filter.
2
Page 5
Important Safeguards
(continued)
Carrying & Transportation
• Hold the Pull-Line when rewinding. Do not allow the Pull-Line to whip when rewinding.
•
Do not lift Friendly Vac by the bump guard. Always use carry handle.
•
To safely move Friendly Vac in case of different height level or stairs, remove the power packs from
Friendly Vac and carry them separately.
Charging & Batteries
• The charger is for indoor use only. Do not use in areas where moisture or water is likely. It is required
placing it in a well-ventilated dry location and not exposed to direct sunlight.
• Do not unplug by pulling on charger cord. To unplug, grasp the plug, not the cord.
• Use only the charger supplied by the manufacturer to recharge this product.
• Use only the batteries supplied by the manufacturer to power this product.
• Do not use with damaged charger cord, plug or batteries.
Maintenance & Storage
• Maintain and store Friendly Vac according to the instructions in the ‘Maintenance’ chapter.
• Replace worn or damaged parts for safety.
• Do not get the filter wet. Do not operate Friendly Vac with wet filters.
• Always turn off all controls, disconnect the charger from the electrical outlet and Friendly Vac and
remove batteries before servicing it.
• Remove batteries from the Friendly Vac if it will not be used for periods of time greater than two
weeks. Keep batteries fully charged for storage.
• Keep the charger and batteries away from heated surfaces.
• This product contains sealed lead acid batteries. Batteries must be recycled.
• Do not incinerate Friendly Vac even if it is severely damaged. The batteries can explode in a fire.
• Never handle plug, batteries or Friendly Vac with wet hands.
• Do not open or mutilate the power pack. Released electrolyte is corrosive and may damage the eyes or
skin.
READ CAREFULLY AND SAVE
THESE SAFETY INSTRUCTIONS
Important safety warning to prevent possible damage or injury in case of
robot falling of stairs/edge: Although Friendly Vac is equipped with sensors
preventing its falling from stairs or any other edge, use extra caution when it is
operating near these areas, by making sure that nobody is present along the
stairway or nearby when Friendly Vac is in operation in such areas.
3
Page 6
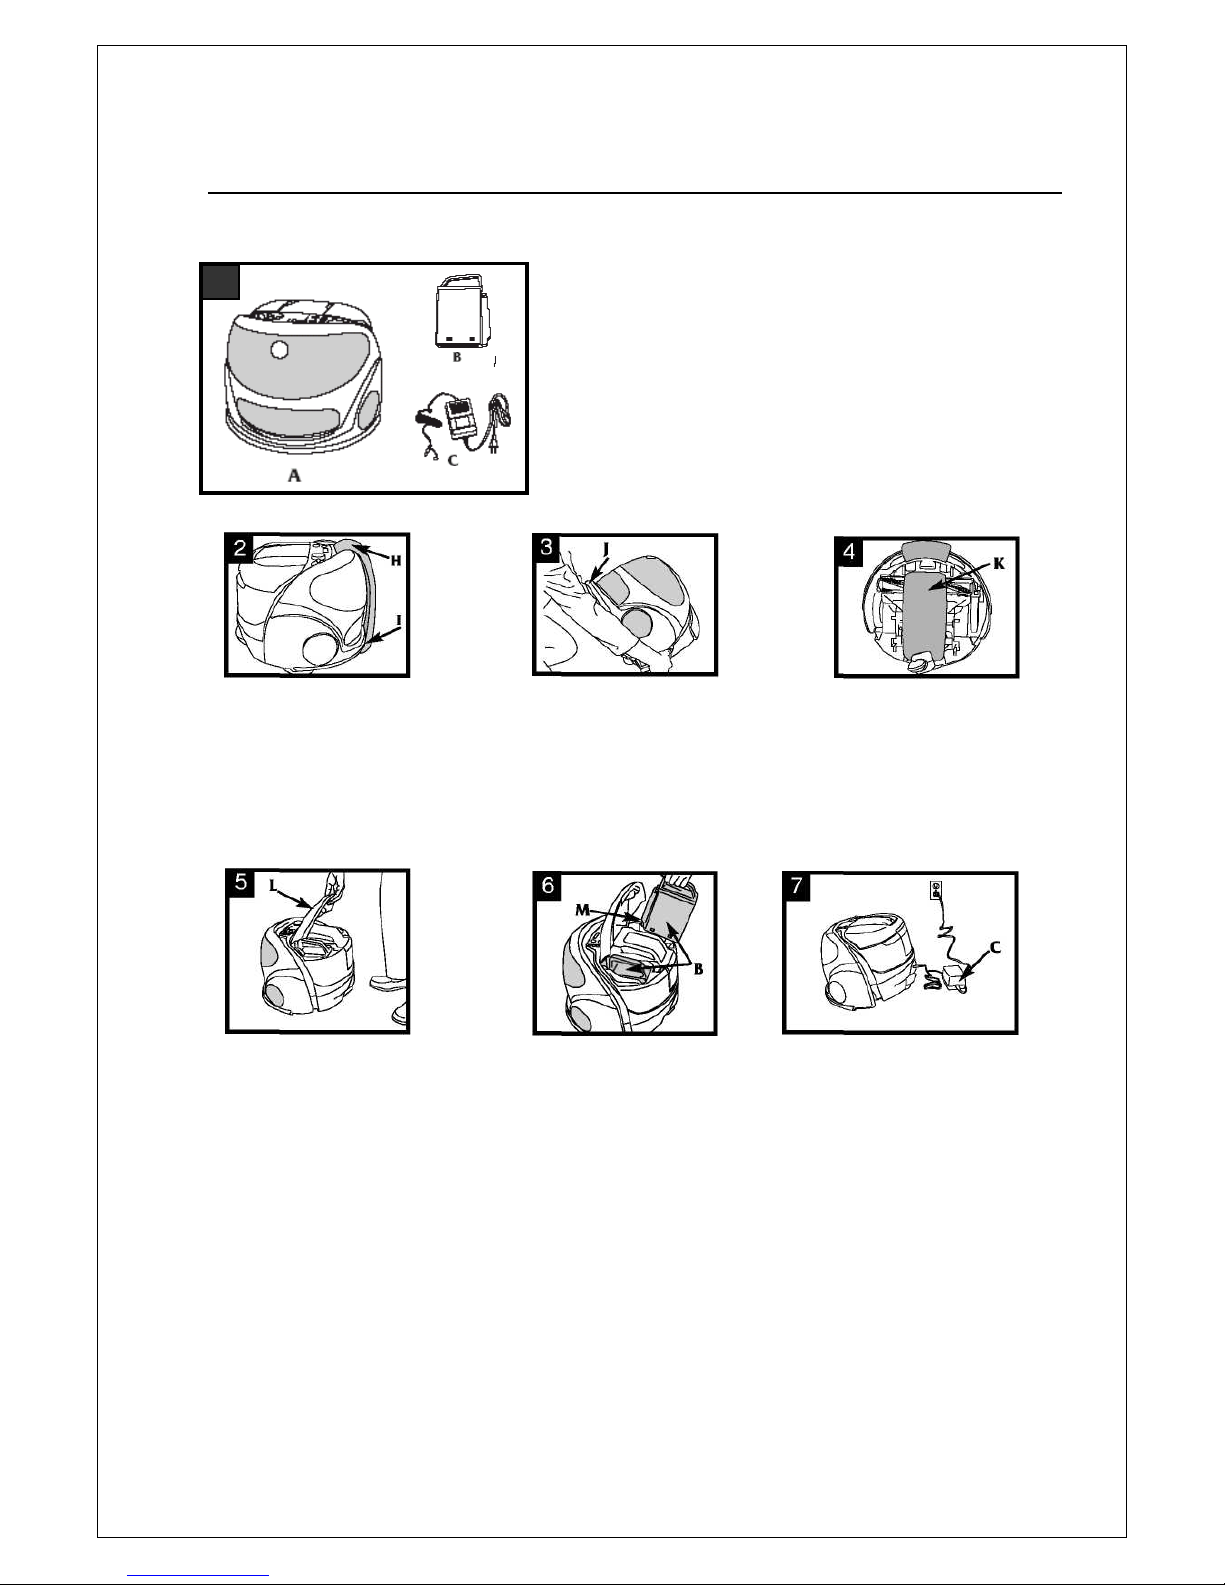
Getting Started
Carton Contents
A. Friendly Vac
B. Batteries (2)
C. Ch a r g e r
Friendly Vac is packed with
two foam strips securing it
during shipment. After
removing Friendly Vac from
the carton, first grasp the
foam at (H) and pull up,
then at (I) and pull down.
Using the rear portion of the unit,
tilt the it onto its back.
DO NOT LIFT FRIENDLY VAC
BY THE BUMP GUARD (J).
Pull up to remove the
foam strip (K). Discard
both foam pieces.
Lift handle (L).
With battery terminals (M) toward
handle, slide batteries (B) into
place. Lower handle.
Plug charger (C) into wall outlet,
then into Friendly Vac.
Charging the batteries to full
power will take approximately
8-12 hours (see
"The Batteries" section)
4
Page 7
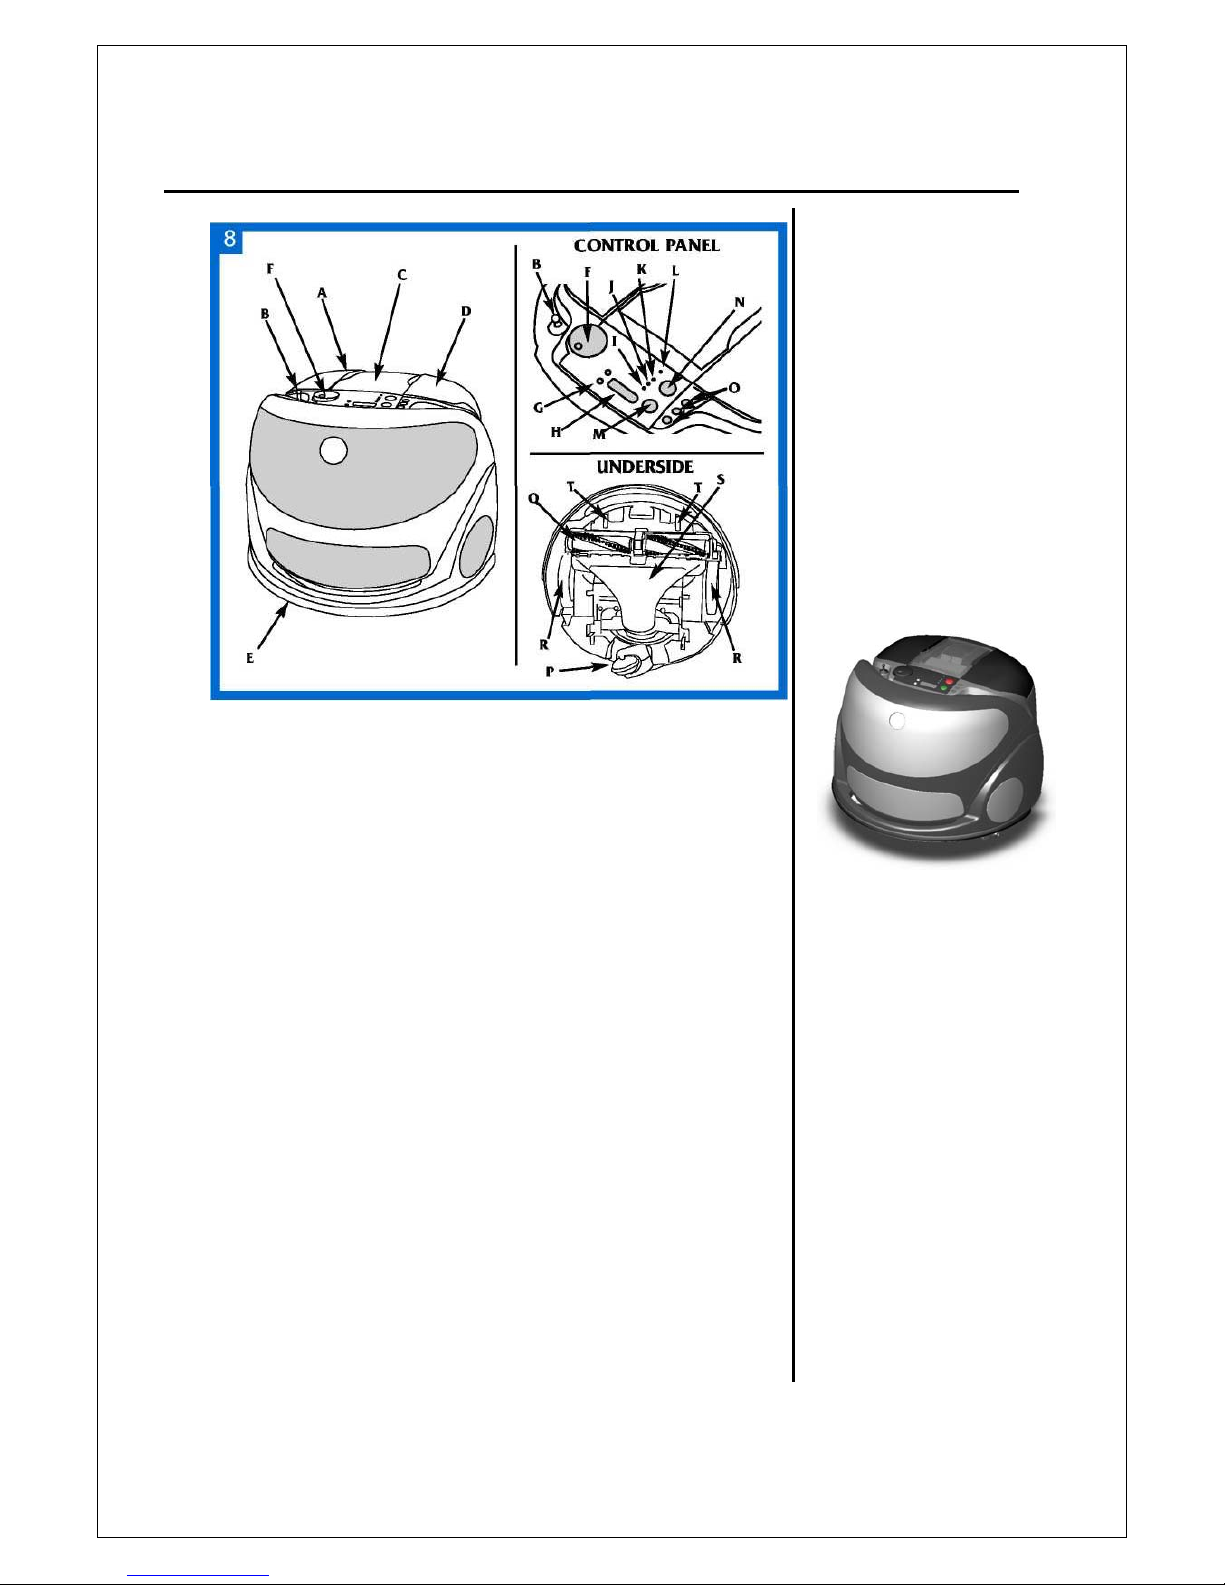
Product Description
A. Carry Handle
B. Pull-line feature
C. Di r t Cup
D. Battery Compartment
(under handle)
E. Bu m p Gua rd
F. Cleaning Mode Selector
G. Scroll Buttons
H. Display Window
I. Battery Indicator Light
J. Check Display Light
K. Stand-by Light
L. Child Lock Light
M. Start Button
N. Stop Button
P. Caster
Q. Brush Roll
R. Drive Wheels
S. Dirt Intake Nozzle
T. Stair Sensors
TIP
To reduce the
carrying weight of
your Friendly Vac,
the batteries can be
removed and carried
separately.
5
Page 8
How to use
The Pull-Line feature
Tip
Friendly Vac will reserve
enough power when it has
completed its cleaning to be
moved by the Pull-line to
the charging location.
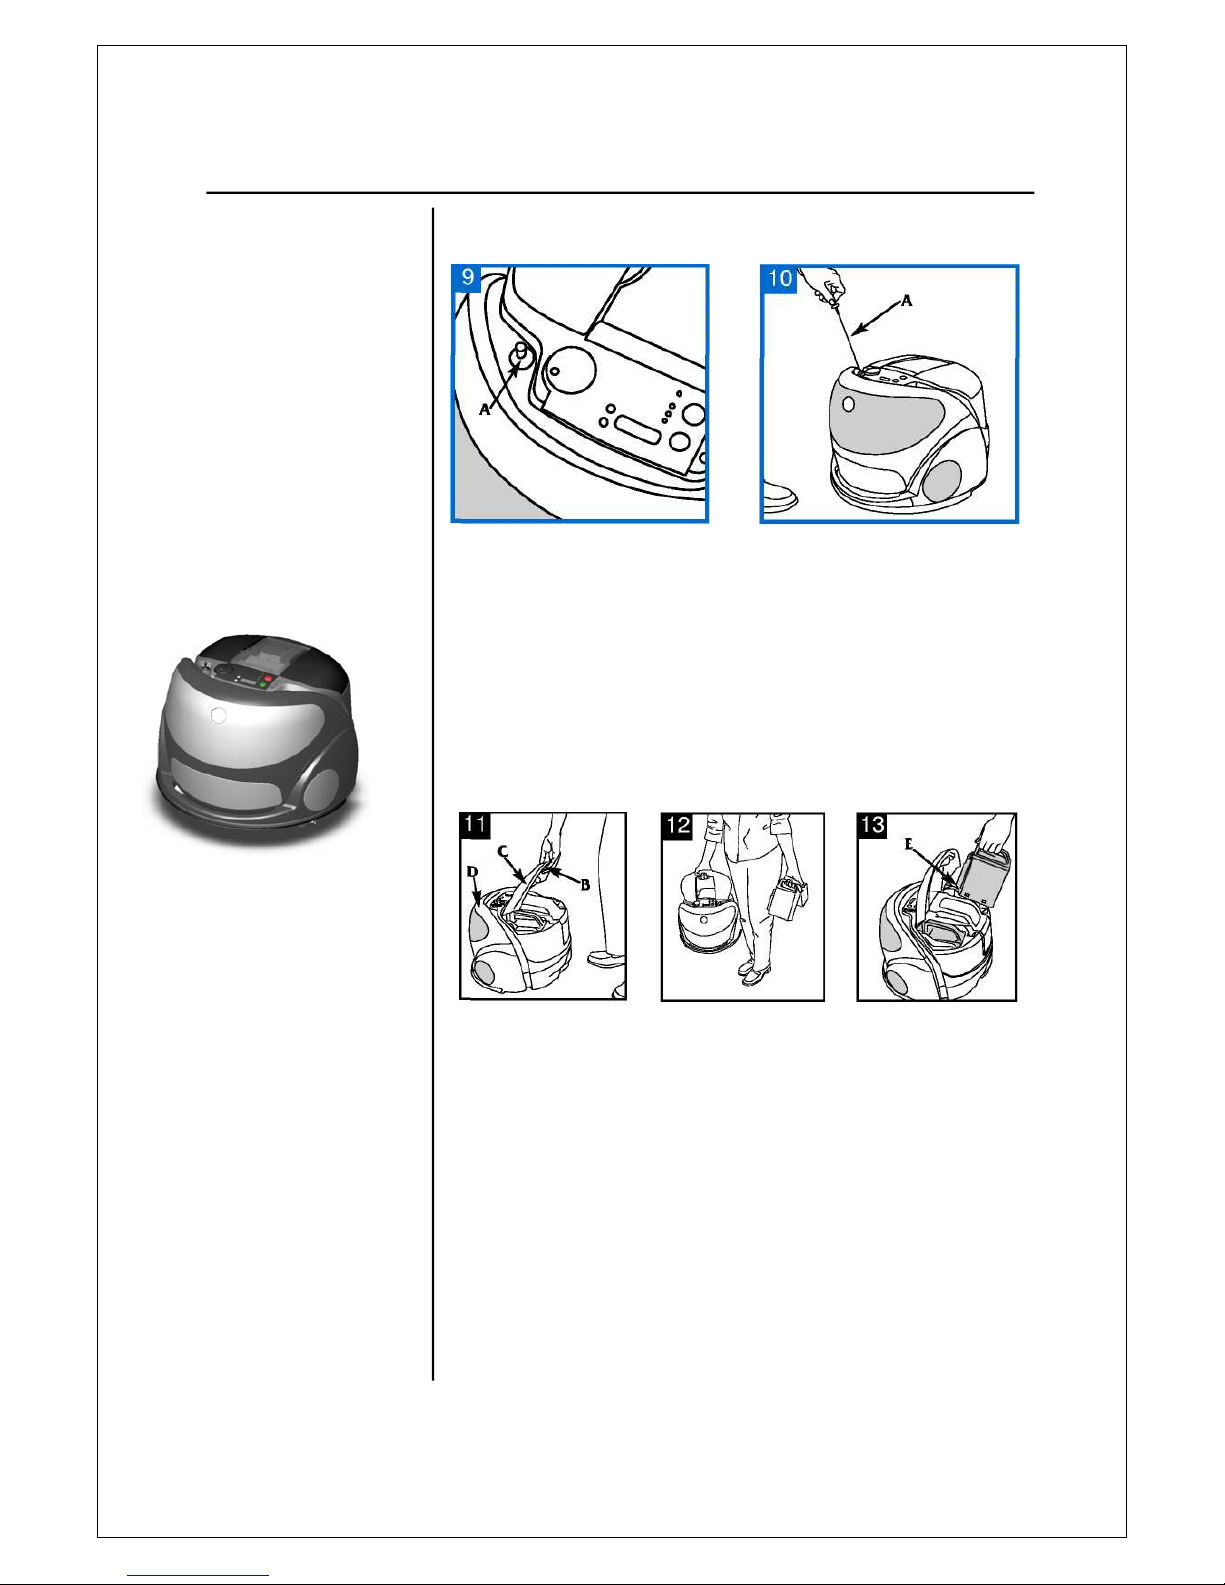
The Pull-line feature (A) is used
to move Friendly Vac forward and
steer it left or right without lifting it.
How to carry
Pull the Pull-line (A) out, and
pull it either forward, left or right in
the direction you want your
Friendly Vac to move.
The Pull-line automatically
retracts to its storage position when
it is not being pulled. Continue to
hold the line while it retracts.
Lift handle latch (B) to
release and raise carry
handle (C).
Friendly Vac should
never be carried by
the bump guard (D).
To reduce the carrying
weight of Friendly
Vac and prevent
possible injuries, the
batteries can be
removed and carried
separately.
To remove the batteries,
lift the handle and
lift out each battery.
Replace batteries with
terminals (E) toward the
cleaner. Lower handle
and press down until it
latches.
Proper carrying and
lifting of Friendly
Vac may prevent
injuries.
6
Page 9
The Batteries
First use
Before using your Friendly Vac for
the first time, the batteries will need
approximately 8-12 hours to achieve a
full charge.
During operation
Several events will indicate that the
batteries need to be charged:
• The Battery Light will glow red
and unit will stop cleaning.
• An "E1" error code is displayed
When the battery power is low, all
safety functions of the Friendly Vac
will be fully functional. The Pull-line
will also function unless an "E1" error
message is displayed. (See "Display
Messages" section)
How to charge
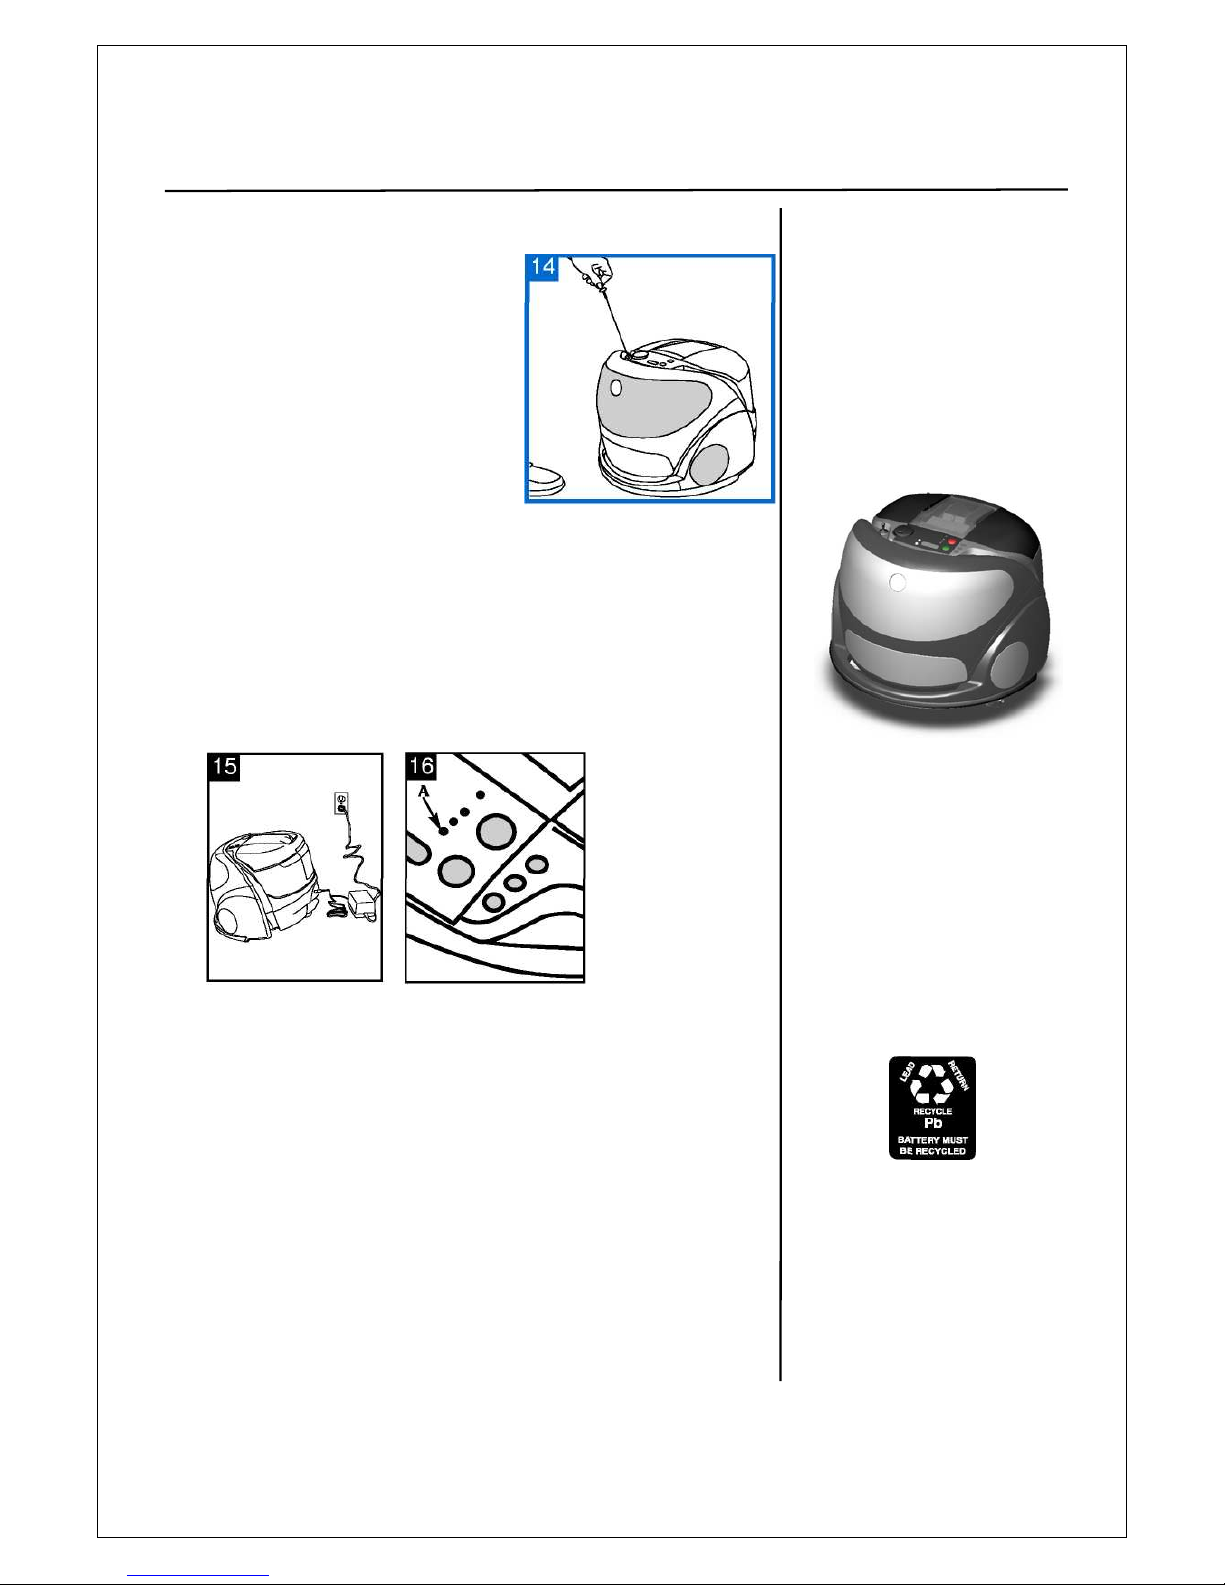
Take the unit near an electrical
outlet by using the Pull-line
feature or carrying handle.
Turn the Cleaning Mode
Selector to OFF
TIP
When the battery
power is low,
all safety functions
of Friendly Vac will be
fully functional.
Plug charger into
wall outlet, then into
your Friendly Vac.
While the batteries are
charging, the Battery
Light (A) will flash
green. When the
batteries are fully
charged, the Battery
Light will glow steady
green.
• Charging the batteries
to full power will take
approximately 8 to 12
hours.
•Friendly Vac
will clean for
approximately 1 hour
when fully charged.
• To maintain battery life,
charge batteries after
each use and keep fully
charged when Friendly
Vac is not in use.
• If storing Friendly Vac
for more than two
weeks, it is
recommended that the
batteries be fully
recharged and then
removed from the unit
to maintain battery life.
Battery Replacement/
Recycling
Your Friendly Vac contains sealed
lead acid batteries that must be
recycled.
When these batteries no longer
recharge, the batteries must be
removed and managed in
accordance with state
(province) laws. If you want to
replace the batteries,
contact your dealer.
7
Page 10
Before Cleaning
Tip
Remove obstacles,
such as toys, shoes,
magazines etc. from
the floor where
Friendly Vac will be
cleaning.
Room preparations
Review the Preparations Safeguards on page 2.
To maximize the cleaning potential, it is recommended that you:
• Remove objects like clothing, loose papers, pull cords for blinds or
curtains, electrical cords, toys and fragile objects from the floor surface.
• Move and secure all electrical cords, wires and cables out of the reach of
your
Friendly Vac
.
• Close exterior doors.
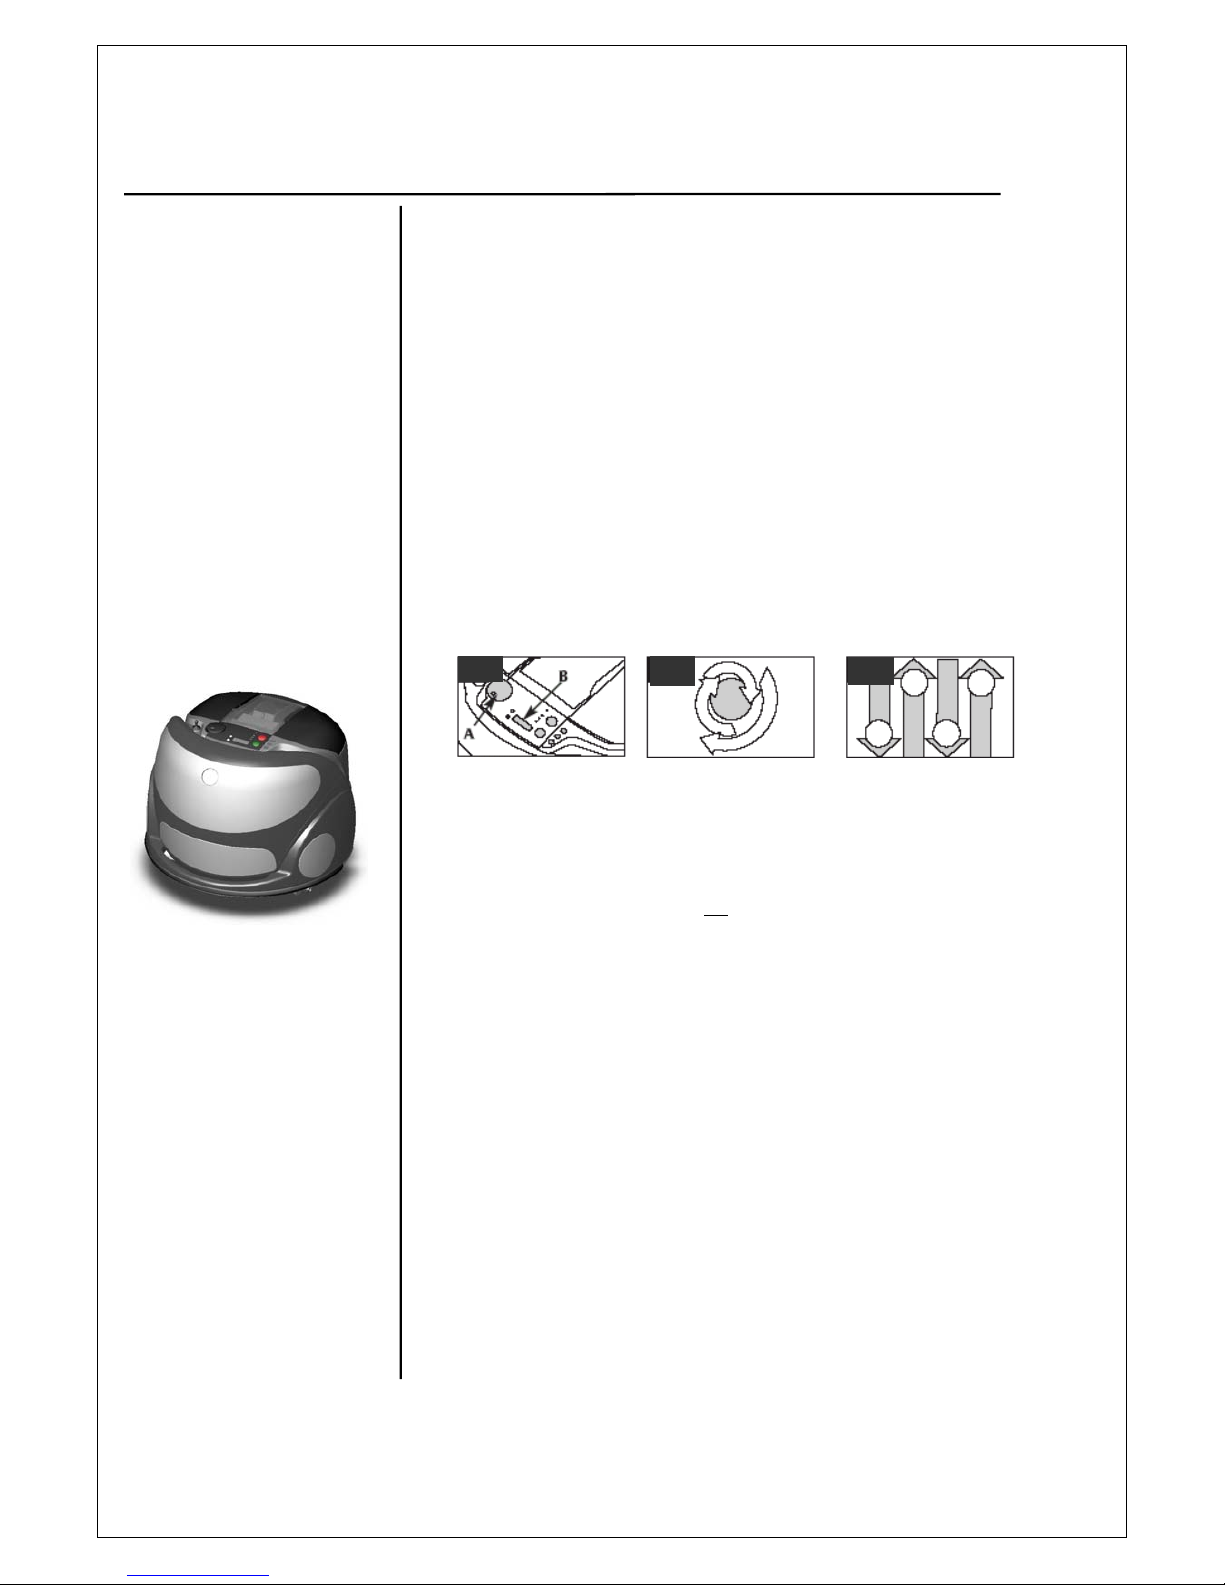
Friendly Vac Cleaning Modes
Cleaning Selector (A)
Friendly Vac
has
four settings.
OFF should be selected
when the unit
is charging or not
in use.
Spot Clean (shown in
display (B) as "CL 1")
cleans a small area in a
spiral motion.
Use this mode to clean
a small dry spill or
small area.
Friendly Vac
will spiral
outward to maximum
of 6 ft., or until it
encounters an object. It
will then travel back to
the center and stop.
Quick Clean (Display
"CL 2") cleans an aver-
age size room (up to
400 sq. ft., 37 m2) in
about 30 minutes,
making parallel passes.
If Friendly Vac
encounters an object, it
will either contour it or
turn around and
continue cleaning.
1
8
8
Page 11
• Use the pull-line feature or carrying
handle to move
Friendly Vac
into
the room to be cleaned.
• Close doors to limit
Friendly Vac
to the area you want to clean.
• Turn the Cleaning Selector to the
desired setting.
• Press the START button - Friendly
Vac will go through a self
diagnostic phase. If everything is
fine, it will begin cleaning.
If not, a message will be displayed
on the display window.
• When the cleaning program starts,
it will show a moving line
in the display window.
• To end cleaning, press the STOP
button or wait until it stops for a low
battery condition.
Advanced Features - Sensors
TIP
When Friendly Vac
detects any object on
its way, it will stop,
turn around and
continue cleaning in
the direction from
which it came.
Friendly Vac
is
equipped with multi-
directional sensors,
which help prevent it
from bumping into
walls and other
objects such as
furniture.
When
Friendly Vac
detects any object on
its way, it will stop,
turn around and
continue cleaning in
the direction from
which it came.
As a back-up,
Friendly
Vac
is also equipped
with a bump guard (A).
If it does bump into an
object, it will stop,
back up, turn around
and continue cleaning
in the direction in
which it came.
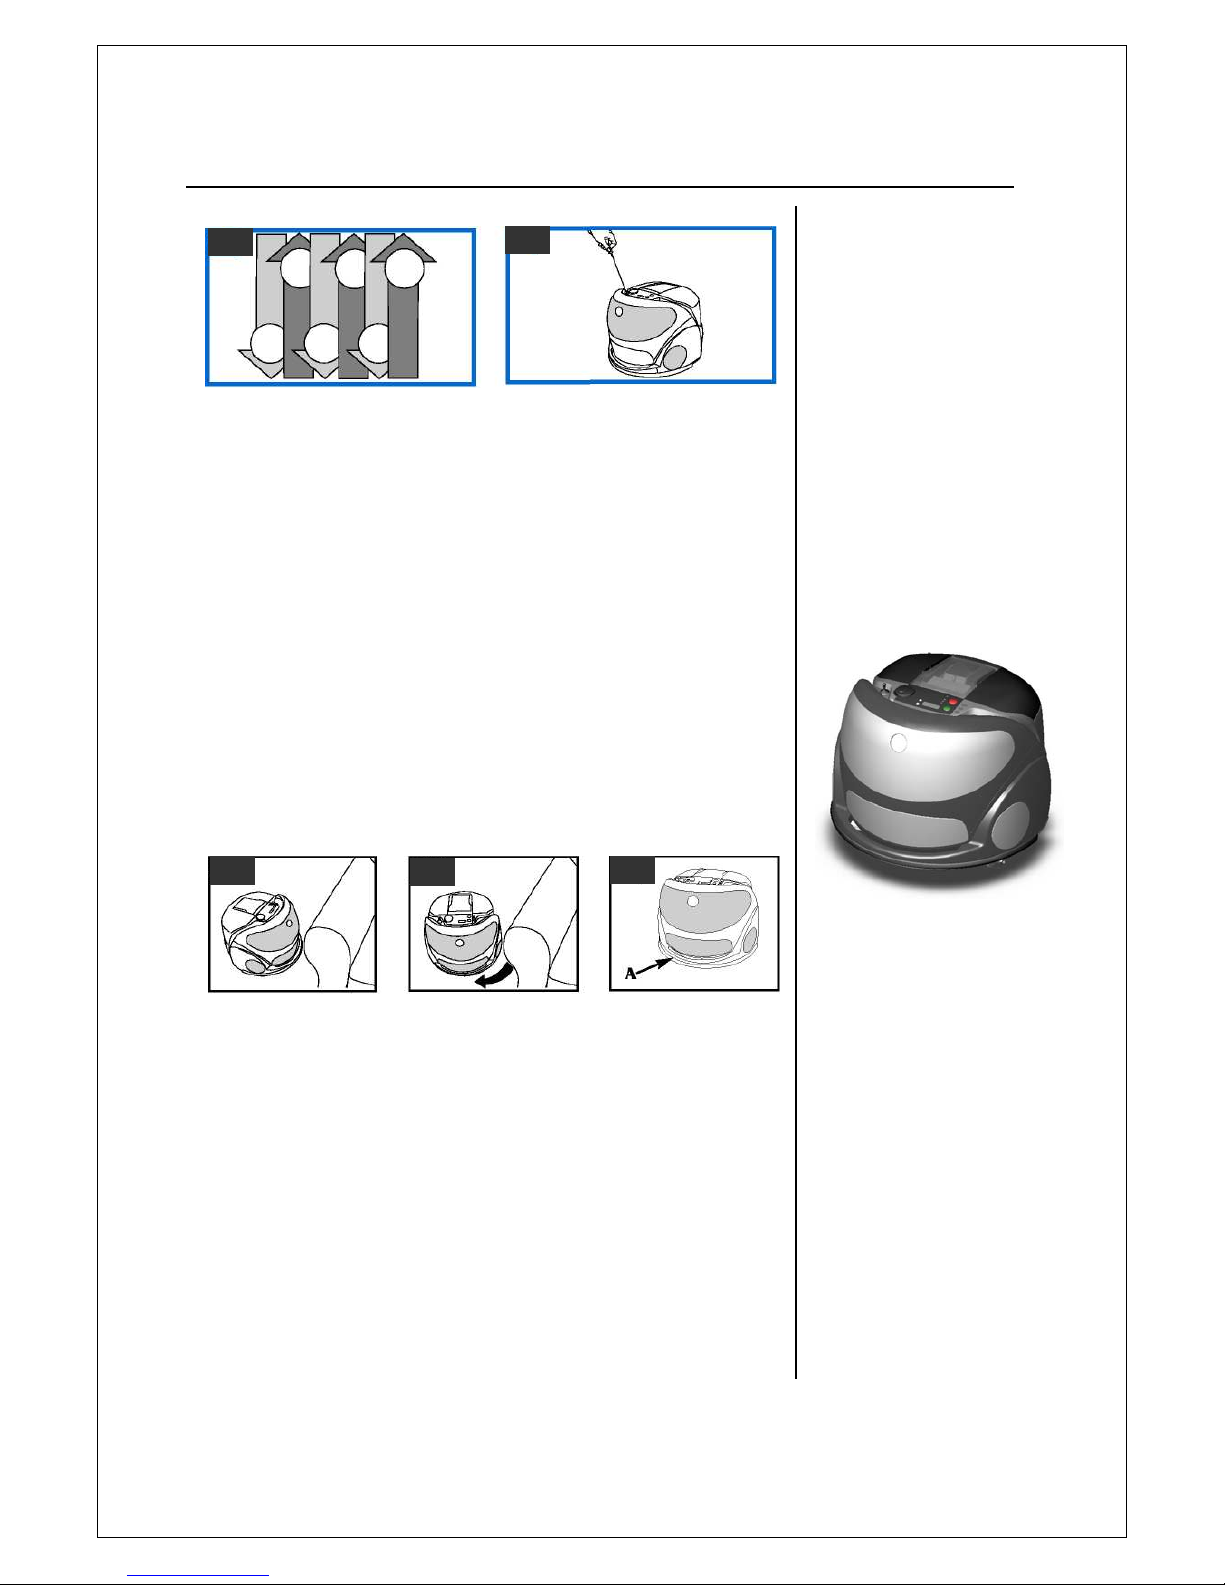
Max Clean (Display "CL 3") cleans an
average room (up to 400 sq. ft.,
37 m2) in about 1 hour.
Friendly Vac
makes overlapping passes to more
thoroughly clean the area.
In cleaning modes, Quick (CL 2)
and Max (CL 3),
Friendly Vac
will
continue to clean until either the
battery charge becomes too low or
the STOP button is pressed.
9
Cleanin
g
Page 12
Advanced Features
Sensors (continued)
TIP
Keep top stair
clear of clutter
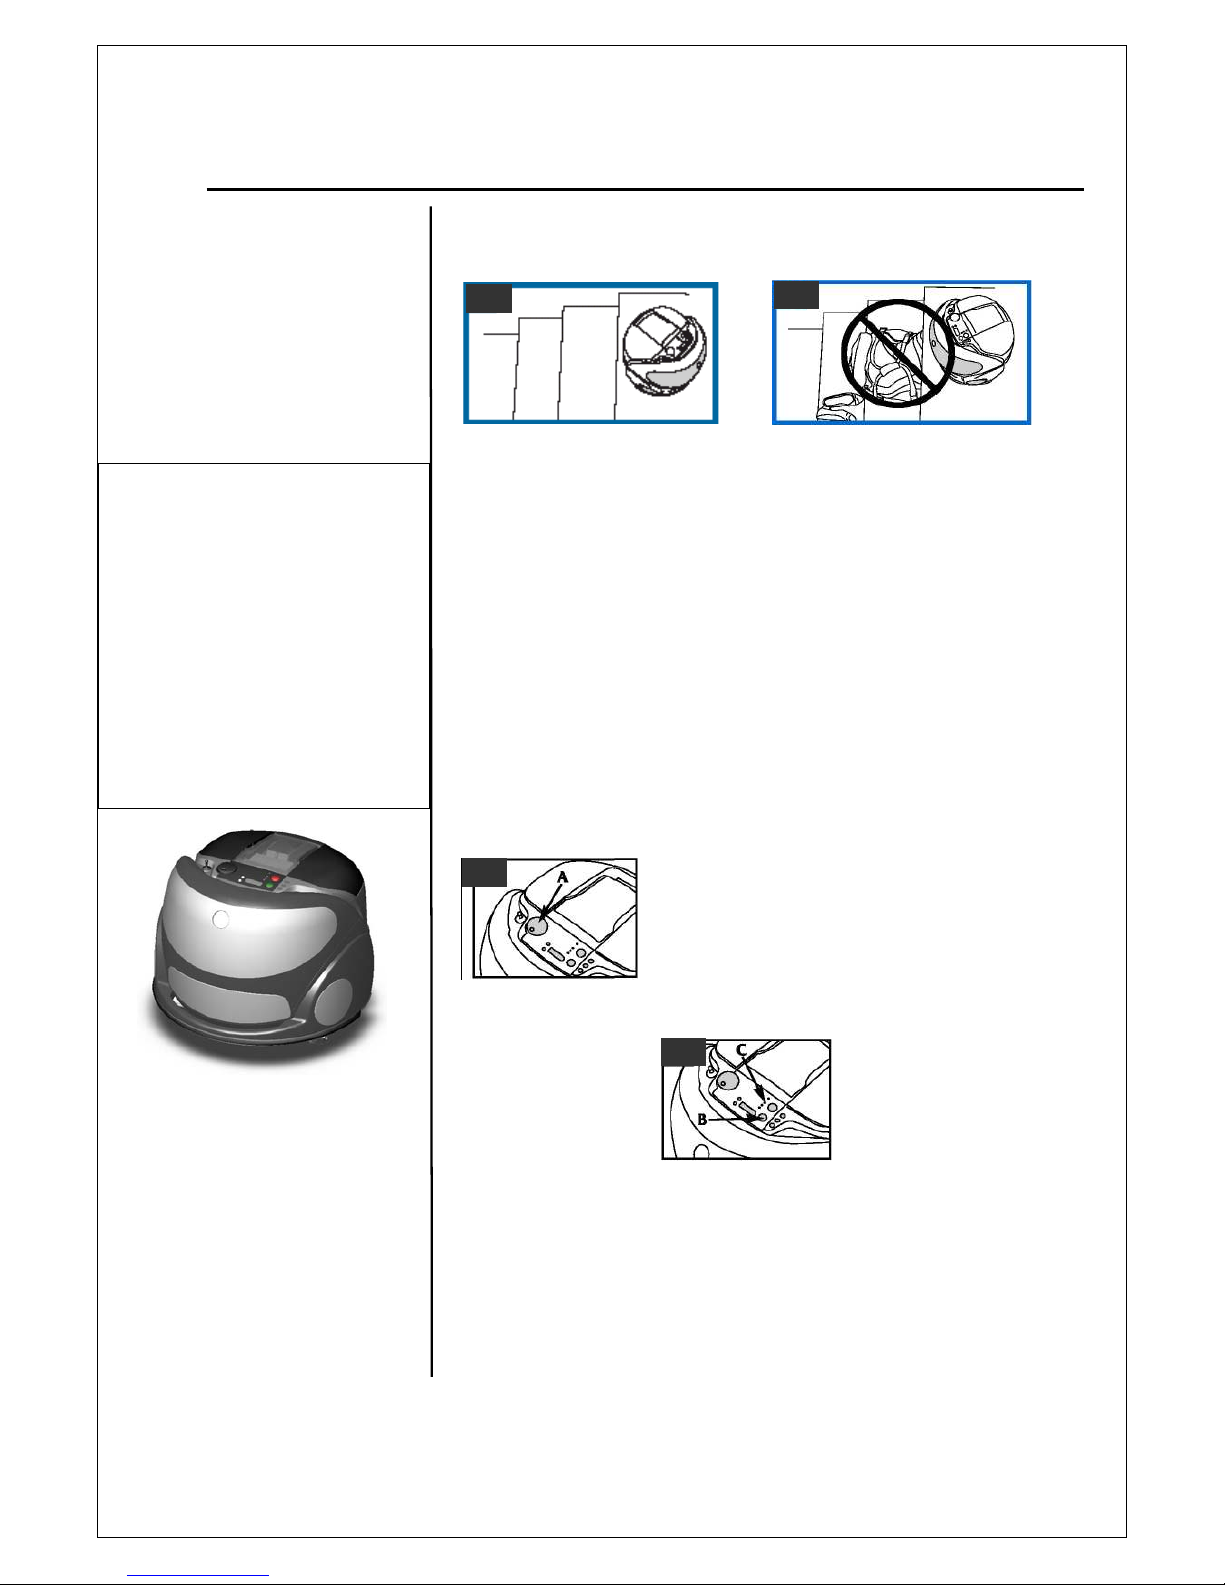
The stair sensor allows
Friendly
Vac
to detect a drop in the floor of
4 or more inches (10cm) and
prevents
Friendly Vac
from falling
down steps. When
Friendly Vac
senses a stair, it will stop, back up,
turn around and continue cleaning
in the direction from which it came.
Auto Depart
The Auto Depart feature
allows you to program
Friendly Vac
to start
cleaning on its own after a
designated amount of time.
To set the Auto
Depart timer:
• Position
Friendly Vac
in area to be cleaned.
• Set the Cleaning
Mode Selector (A) to
either Max or
Quick Clean.
• Press the up or
down scroll button
until desired amount
of time you want the
unit to wait shows in
the display window.
The timer can be set
in 15 minute incre-
ments, up to 12 hours
maximum. Each single
press of the scroll
button will
increase/decrease the
clock by 15 minute
increments. If a scroll
button is held down,
The Stand-by
Indicator Light (C)
will flash red.
The time remaining
on the countdown
will flash every 2 to
3 seconds. During
the final 15 minutes,
the time remaining
will be fully dis-
played and an audi-
ble signal will
sound every 5
minutes. An audible
signal will also
sound during the
final 15 seconds of
the countdown to
signal that
Friendly
Vac
is about to start
cleaning.
NOTE: Be sure chil-
dren and all objects
are clear of
operating path at
the time of its
delayed departure.
Press the START
button (B).
Cleanin
g
To ensure proper functioning of
the stair sensor, keep the top step
clear of clutter.
Periodically clean the stair sensors,
located on the underside of your
Friendly
Vac
, with a soft cloth
(see Fig. 8, callout "T").
* Important safety warning to
prevent possible damage or injury in
case of falling off stairs/edge:
Although the Friendly Vac is
equipped
with sensors
preventing its falling from
stairs or any other edge, use extra
caution when it is operating near these
areas, by making sure that nobody is
present along the stairway or nearby
when
Friendly Vac
is in operation in
such areas.
* Move and secure all electrical cords,
wires and cables out of reach of the
Friendly Vac
. Do not run it over
electrical cords, wires or cables.
10
Page 13
Cleaning
Auto Depart (continued)
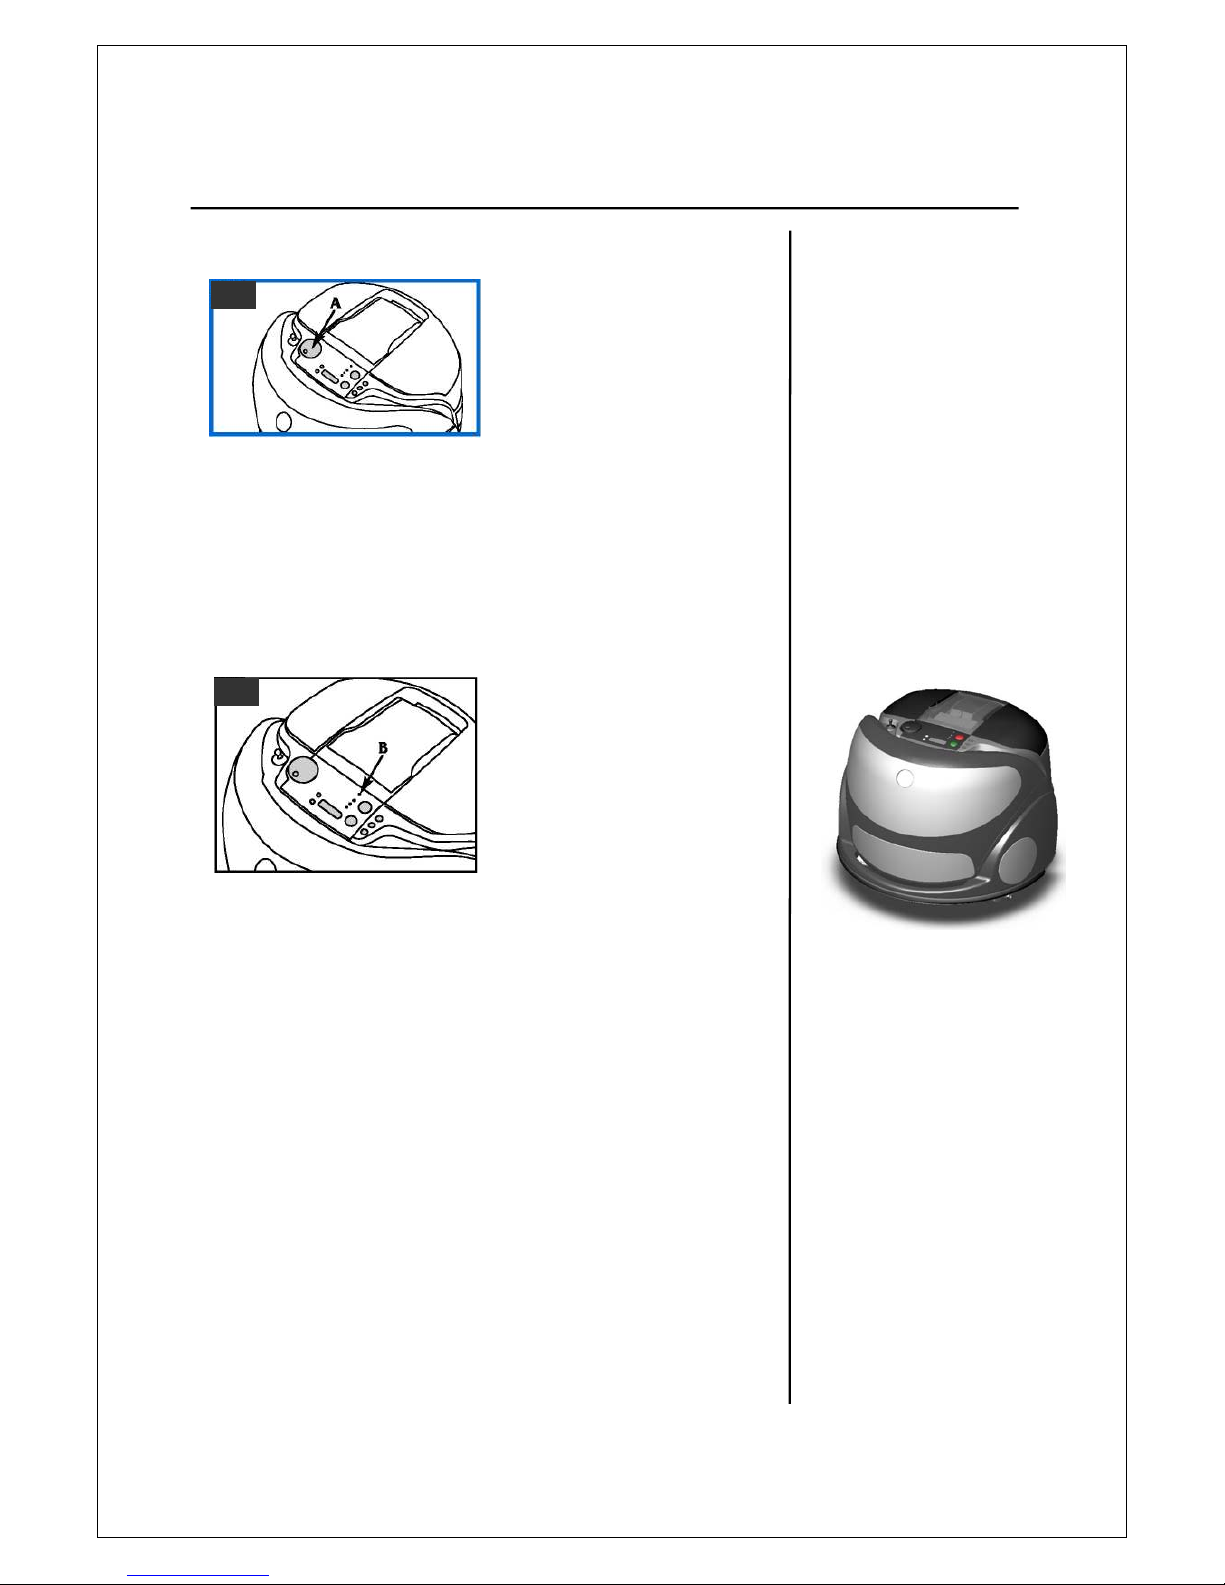
When the timer has completed the
countdown,
Friendly Vac
will
begin to clean the area where it is
located, using the mode selected.
The Auto Depart timer will need to
be reset each time Auto Depart
cleaning is desired.
To disable the Auto Depart during
the countdown, turn the Cleaning
Selector (A) to OFF.
TIP
To set Auto Depart
time: Press scroll
button once for 15
minute intervals -
hold button for 1
hour intervals.
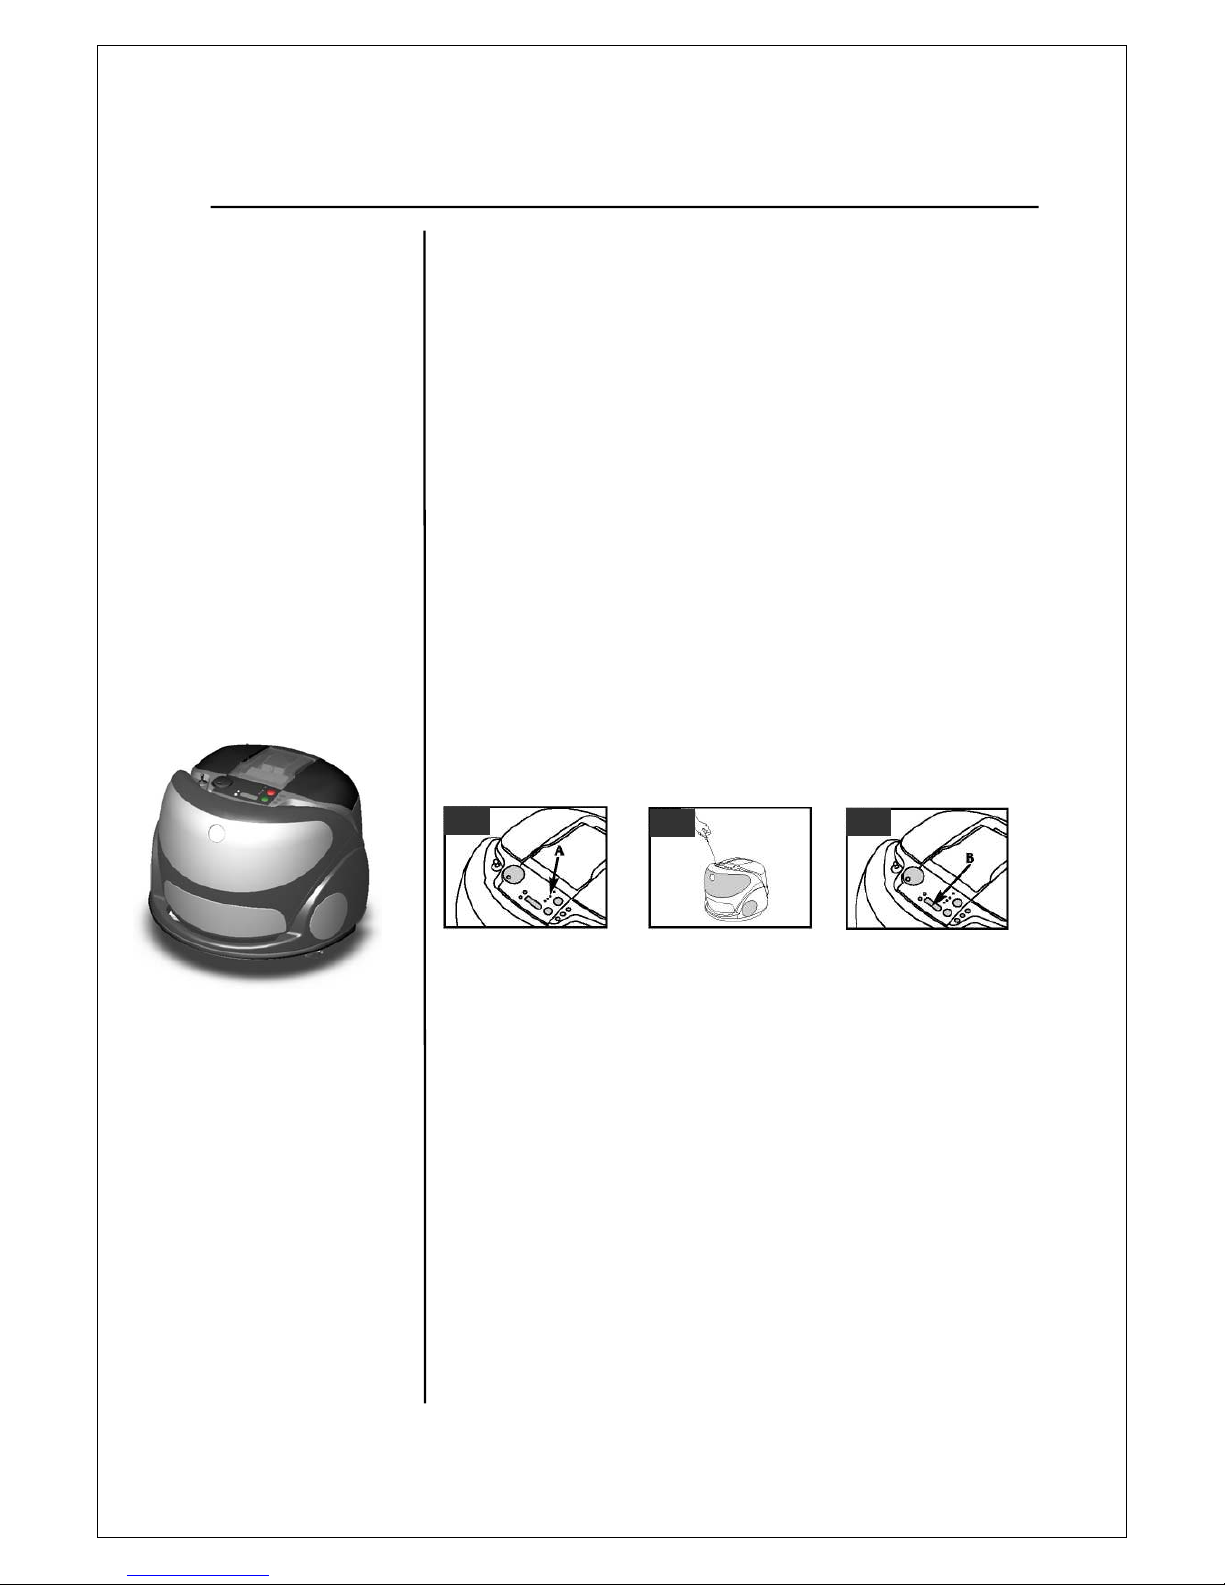
Child Lock
The Child Lock prevents t
Friendly Vac
from starting when the
START button is pressed.
To set the Child Lock:
• Set the Cleaning Selector to OFF
• Press STOP
• Press LOCK (UP arrow) TWICE
• All button presses must be
completed within 10 seconds
of each other.
The Child Lock indicator light (B)
will glow amber.
The display will show "Child Lock"
if a button is pressed while in the
Child Lock Mode.
11
Page 14
Cleaning
Child Lock
(continued)
TIP
The Sleep Mode
conserves battery life.
To "awaken" Friendly Vac,
press a button or pull out
the Pull-line cord.
To temporarily disable the Child Lock:
• Set the Cleaning Selector to SPOT,
QUICK or MAX
• Press STOP
• Press UNLOCK (DOWN arrow)
twice
NOTE: All button presses must be
completed within 10 seconds of
each other.
• Set cleaning mode selection and
press START within 15 seconds of
temporarily disabling Child Lock.
This will allow
Friendly Vac
to clean
an area upon demand.
When it is finished, the Child
Lock is automatically reset.
The Child Lock indicator light
will flash amber while the Child
Lock is temporarily disabled.
To completely disable the
Child Lock:
• Set the Cleaning Selector
to OFF
• Press STOP
• Press UNLOCK
(DOWN arrow) twice
The Child Lock indicator
light will turn off.
Sleep Mode
After a period of 60
seconds of inactivity,
Friendly Vac will
enter Sleep Mode to
conserve battery
power. When it
enters Sleep
Mode, the Stand-by
Indicator Light (A) will
flash red.
The display window
will be blank UNLESS
Auto Depart is set.
(see "Auto Depart"
section)
To "awaken" Friendly
Vac, press a button, or
pull out the Pull-line
cord.
Once it has
"awakened", the display
window (B) will show
the current selection
(CL1,CL2, CL3)or an
error code if a problem
has been encountered.
12
Page 15
Maintenance
TIP
DO NOT tap soft
pleated sides of filter
as this could damage
the filter.
DO NOT get the
filter wet. The filter
is not washable.
The dirt cup
When to empty
It is recommended to empty the
dirt cup before the dirt reaches
the dirt opening at the top of the
dirt cup, or after every use if
preferred.
• The "Check Display" indicator
light will flash red when the dirt
cup is full.
• If the display window reads "E4",
then the dirt cup and filter should
be emptied and cleaned. A clogged
nozzle or air path could also cause
the "E4" to be displayed.
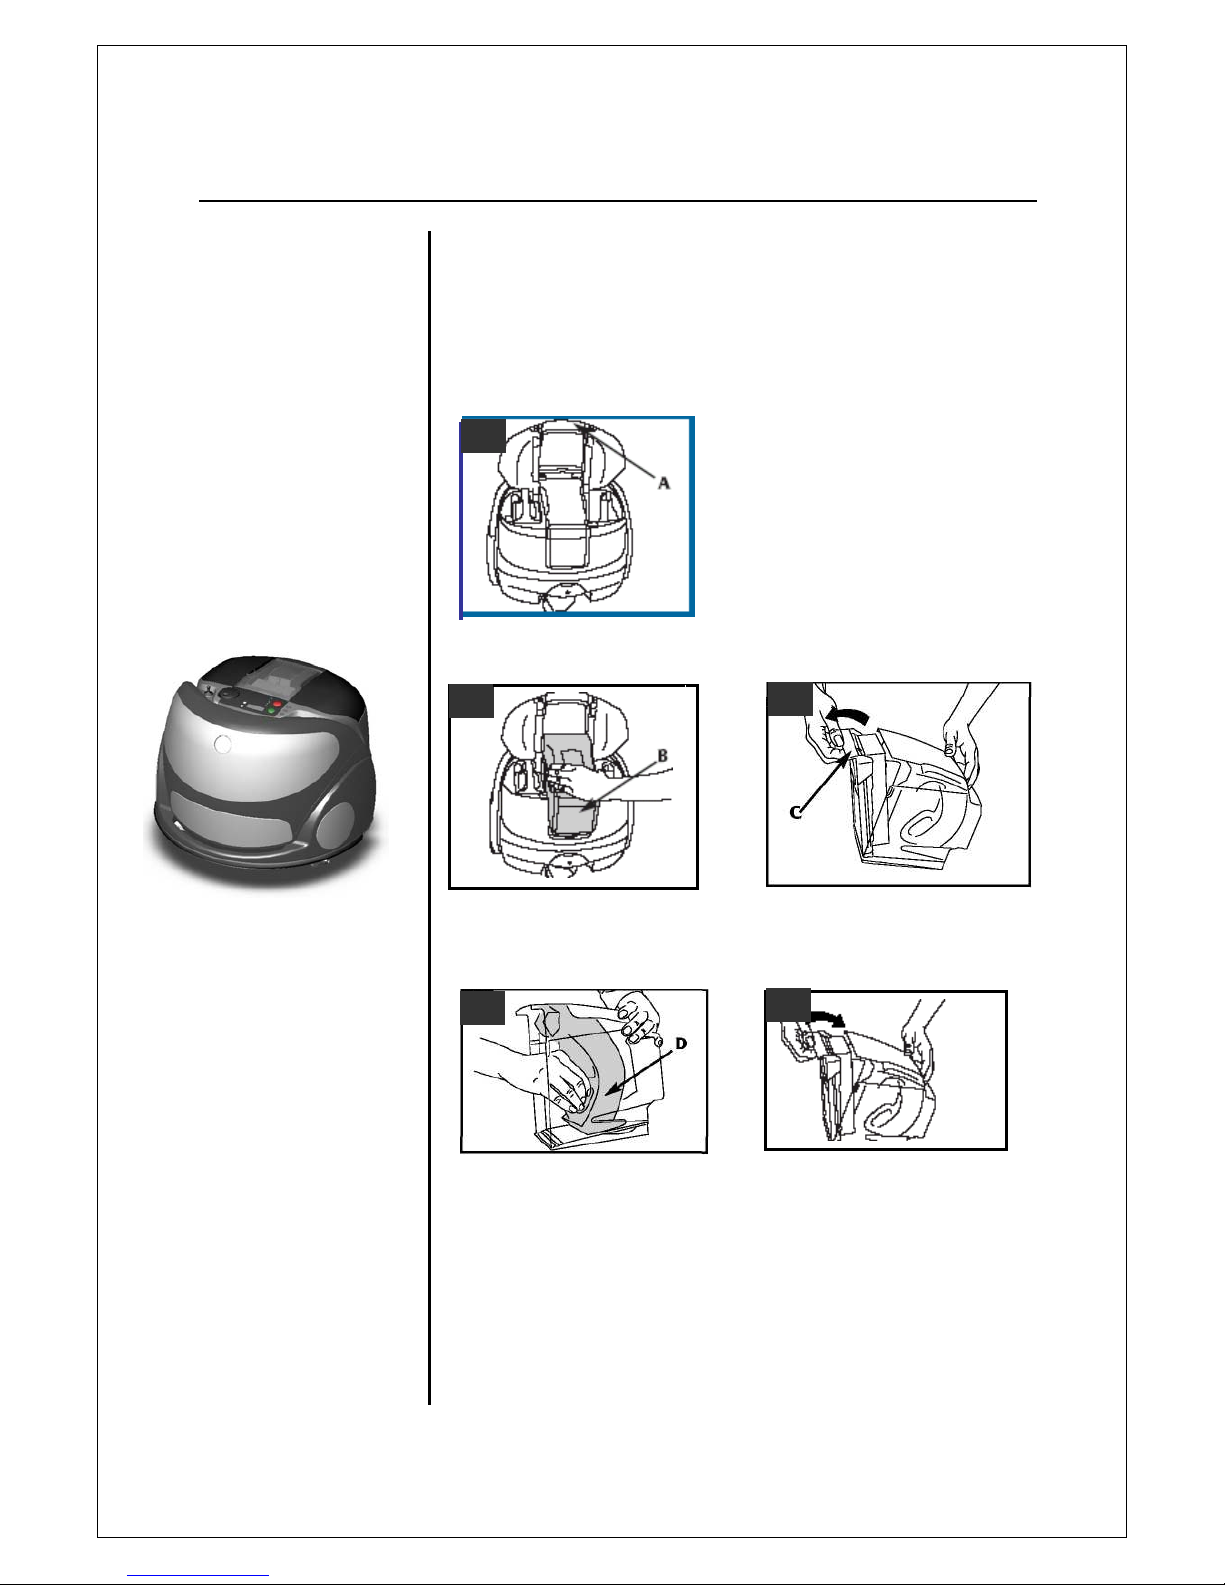
How to empty
Turn Cleaning Selector to the
OFF position. Lift up carrying
handle (A).
Note: Very fine materials, such
as face powder or cornstarch,
may seal the filter and cause
loss of suction. When using
the robot for this type of dust,
empty the cup and clean the
filters often.
Lift dirt cup (B) out.
Pull open dirt cup door (C). Empty
contents into a trash can.
If debris has collected in the dirt tube,
(D), it can be removed and emptied. Lift
up on tube handle and pull to remove
tube. To replace, snap into place.
34
35
36
Align tabs on bottom of dirt
cup door with slots in cup.
Snap dirt cup door closed. Slide
dirt cup back into Friendly Vac.
Lower carrying handle.
Do not use Friendly Vac
without the dirt cup or
filters in place.
37
38
13
Page 16
Maintenance
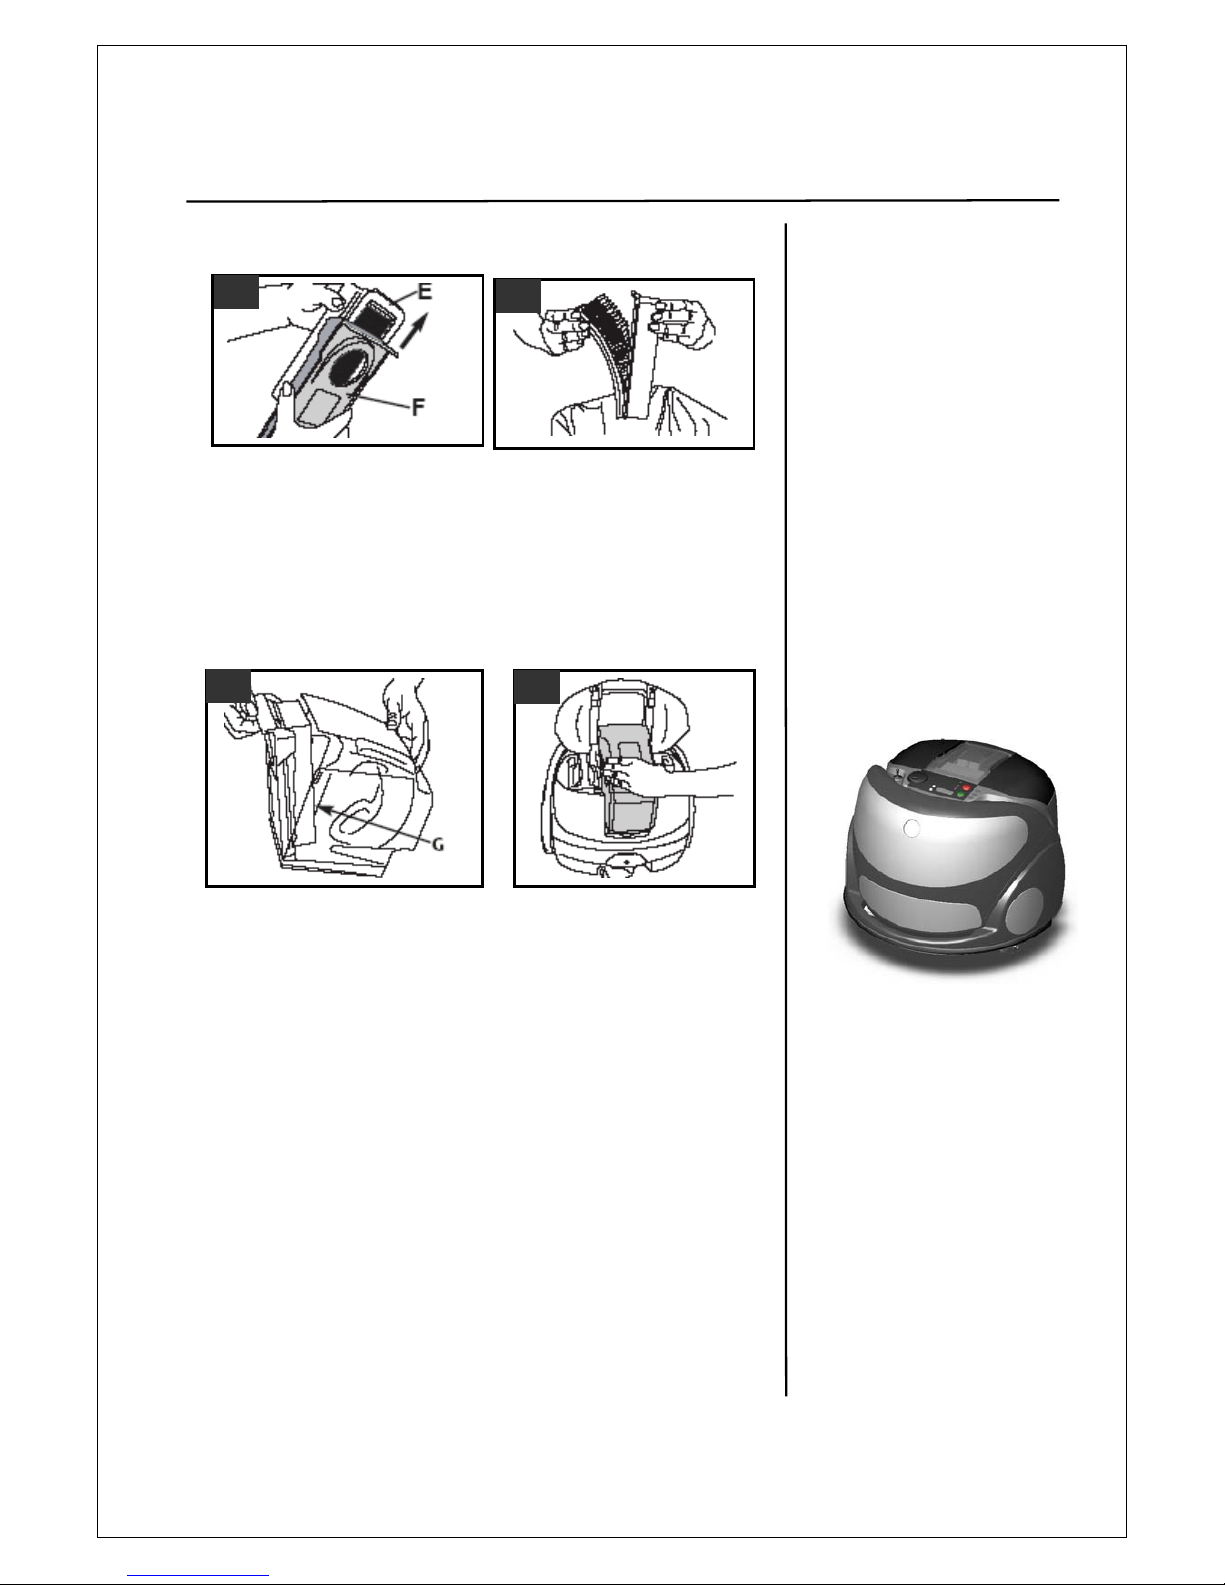
How to clean the filter
Remove dirt cup and open dirt cup
door as shown in Figs. 37 and 38.
Slide the filter assembly (E) out of the
door (F) as shown.
Remove filter from dirt cup door. Tap
end of filter against the side of a trash
can until no more dust particles fall
from the filter. DO
NOT
tap soft
pleated sides of filter as this could
damage the filter. DO NOT rinse or
wash the filter.
TIP
It is recommended
To fully charge Friendly
Vac before storing it, to
maximize battery life.
Wipe debris off pre-filter screen (G).
The pre-filter screen can be rinsed
with water. Allow pre filter to dry
thoroughly.
Press filter back into place.
Close dirt cup door and
replace dirt cup into place.
Should you want to replace this
filter, please contact your dealer.
Do not operate
Friendly Vac
without any of the filters in
place.
39
40
41
42
14
Page 17
Storage and Brush Roll
Storage
TIP
DO NOT lift
Friendly Vac by
the bump guard!
NOTE: New brushes can be
purchased and installed at
your dealer.
It is recommended to fully charge
Friendly Vac
before storing it.
Store
Friendly Vac
with Cleaning Selector in the OFF position.
If storing
Friendly Vac
for more than two weeks, it is recommended to first
fully charge the batteries, and then remove the batteries out of the unit
to maintain battery life.
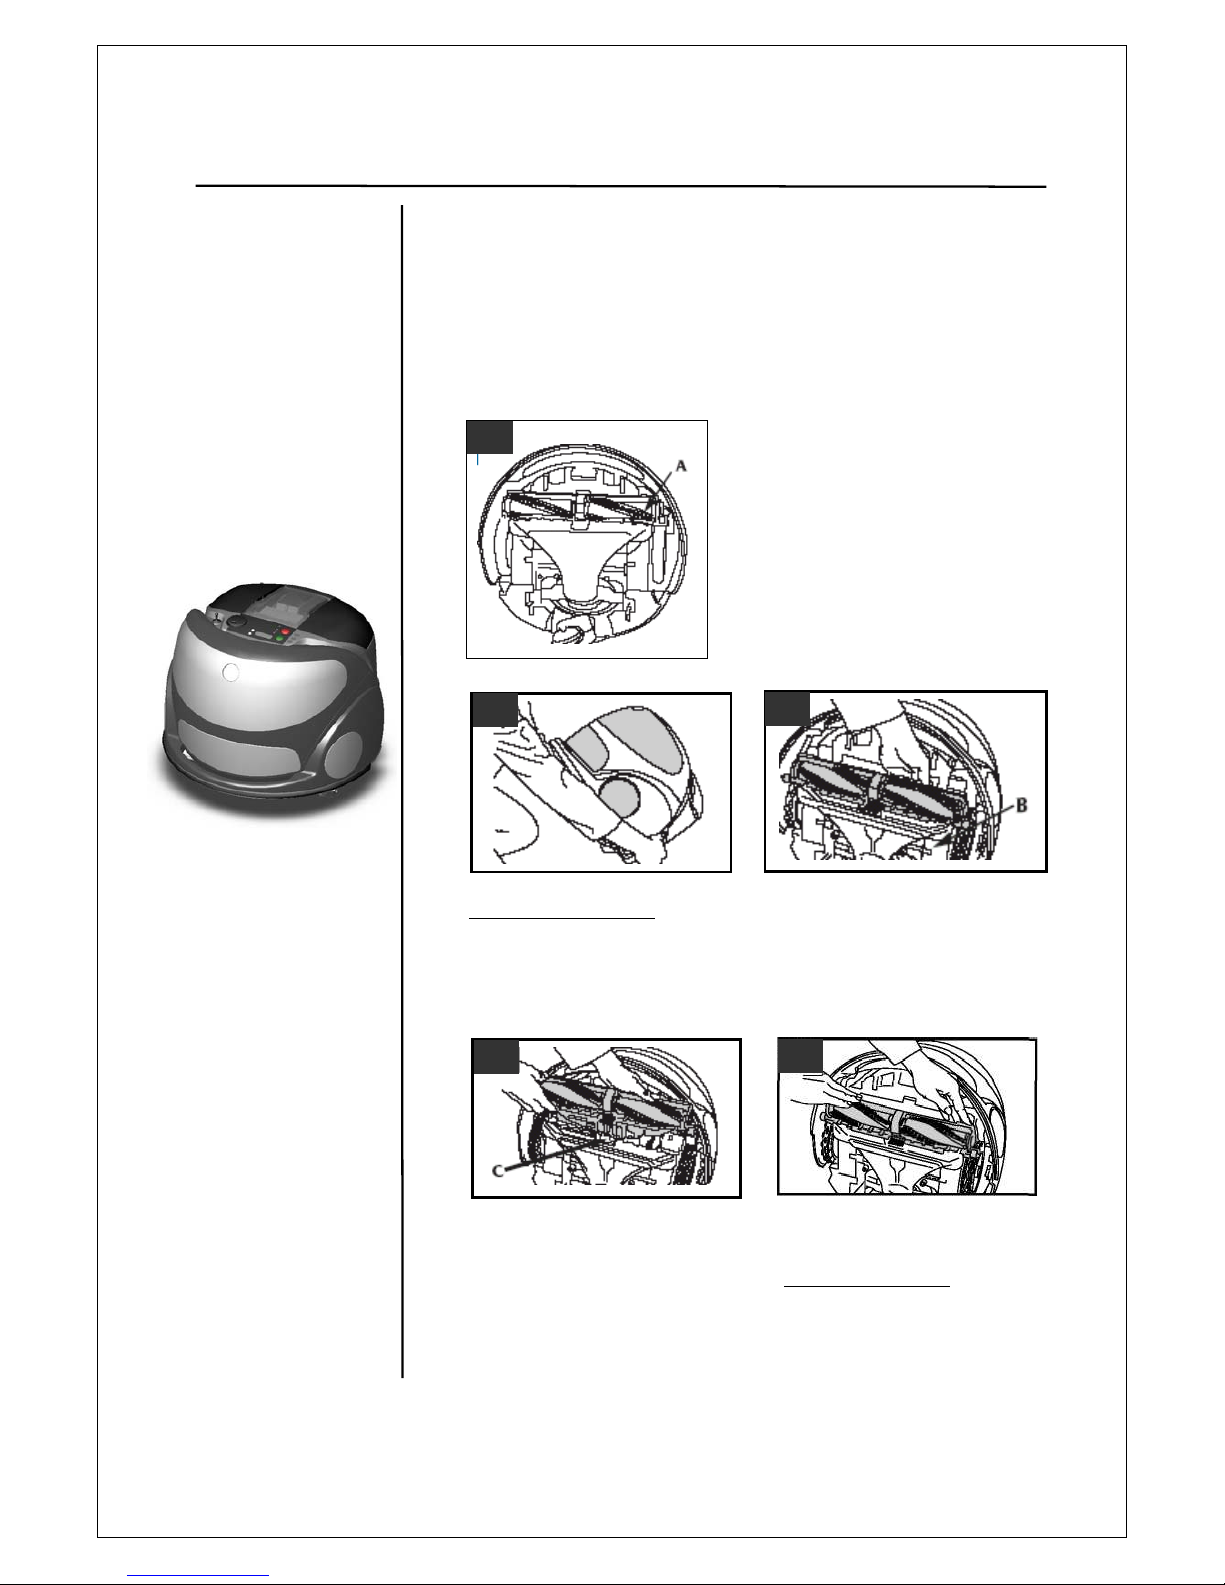
Cleaning the brush roll
The brush roll (A) can be removed
and cleaned if there is something
tangled or caught on it.
Turn selector to OFF.
Press and hold the UNLOCK (down
arrow) button until you hear a beep and
brush roll "click" down.
Remove the batteries as described in
Fig, 12.
Pull up on tab (B) behind brush roll and
remove the brush roll.
Remove tangled or caught
items from brush roll.
Press both ends of brush roll to make
sure it is secure.
Using the rear portion,
tilt it back into its wheels.
Do not lift Friendly Vac by the bump
guard. Re-insert batteries.
Using the rear portion, tilt your
Friendly Vac
onto its back.
DO NOT LIFT FRIENDLY VAC
BY THE BUMP GUARD.
To reposition the brush roll, align it
with the top of the nozzle opening (C)
and press to snap it in place.
43
44
45
47
46
15
Page 18
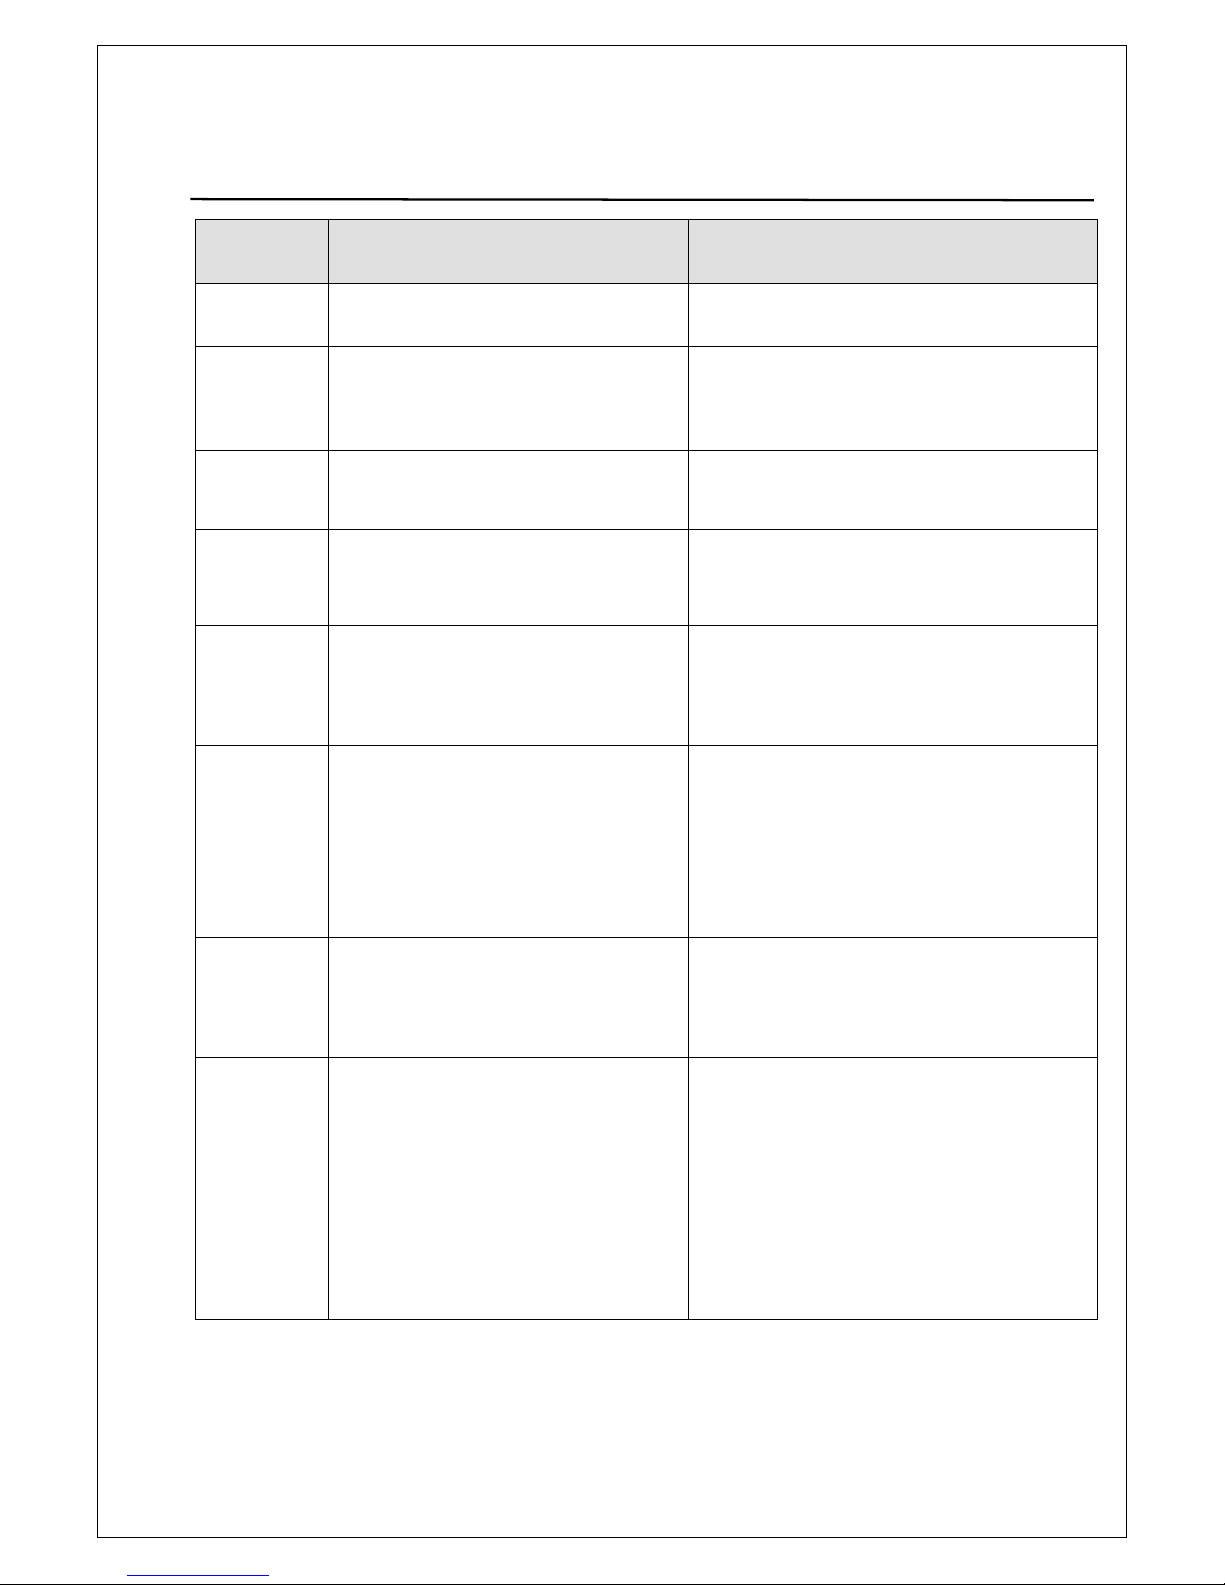
Display Messages
Display
Message
What it means What you should do
E1
The battery voltage has reached a
critically low level.
Completely charge the batteries immediately to
avoid permanent damage.
E2
(after
pressing
START)
You are trying to start it too close to a
stair.
Start it up in a location away from steps.
E2
(during
cleaning)
The Friendly Vac is trapped and can't
find its way out.
Brush rolls or drive wheels jammed.
- Remove Friendly Vac from its trapped
location.
- Clear brush rolls and drive wheels.
E3
The Bump Guard is caught or snagged
on something.
Friendly Vac is sitting on an uneven
surface.
Reposition Friendly Vac and make sure the
Bump Guard is free.
E4
The airflow is restricted in some way
(dirt filter, dirt cup full, blockage in
nozzle or air duct).
Dirt cup missing.
- Clean/empty dirt cup.
- Clean the Filter
- Check for blockages
- Perform ‘Clean bin calibration’
- Replace dirt cup
E5
Pull-Line problem
The Pull-Line cord is not fully retracted
(the message is received upon power up
or after disconnection of the charger)
- Make sure the Pull-Line cord is fully
retracted before the Power Pack is inserted
or before the charger is disconnected.
- Retract the Pull-Line cord, remove and reinsert the batteries.
- Pressing the STOP button clear the E5
message and enables the operation
although the Pull-Line is not retracted.
E6
The brush roll is jammed or missing.
- Remove any items that are caught in the
brush roll.
- Make sure brush roll is positioned properly
- Disconnection between brush motor and
Main Board
E7
-
Charging problem
.
- No power to receptacle or main power
is shut off.
- Power Supply/charger is not plugged
properly into the main power supply
- Charging plug is not fully inserted into
the charging socket of the Friendly
Vac
- The Power Supply is plugged into the
port, but no voltage is going to the
batteries.
- Turn power on to the main receptacle.
- Disconnect the charging plug from the
Friendly Vac, confirm power supply is
plugged into the main power receptacle
and re-connect the plug to the Friendly
Vac to resume charging.
- Replace power supply
16
Page 19
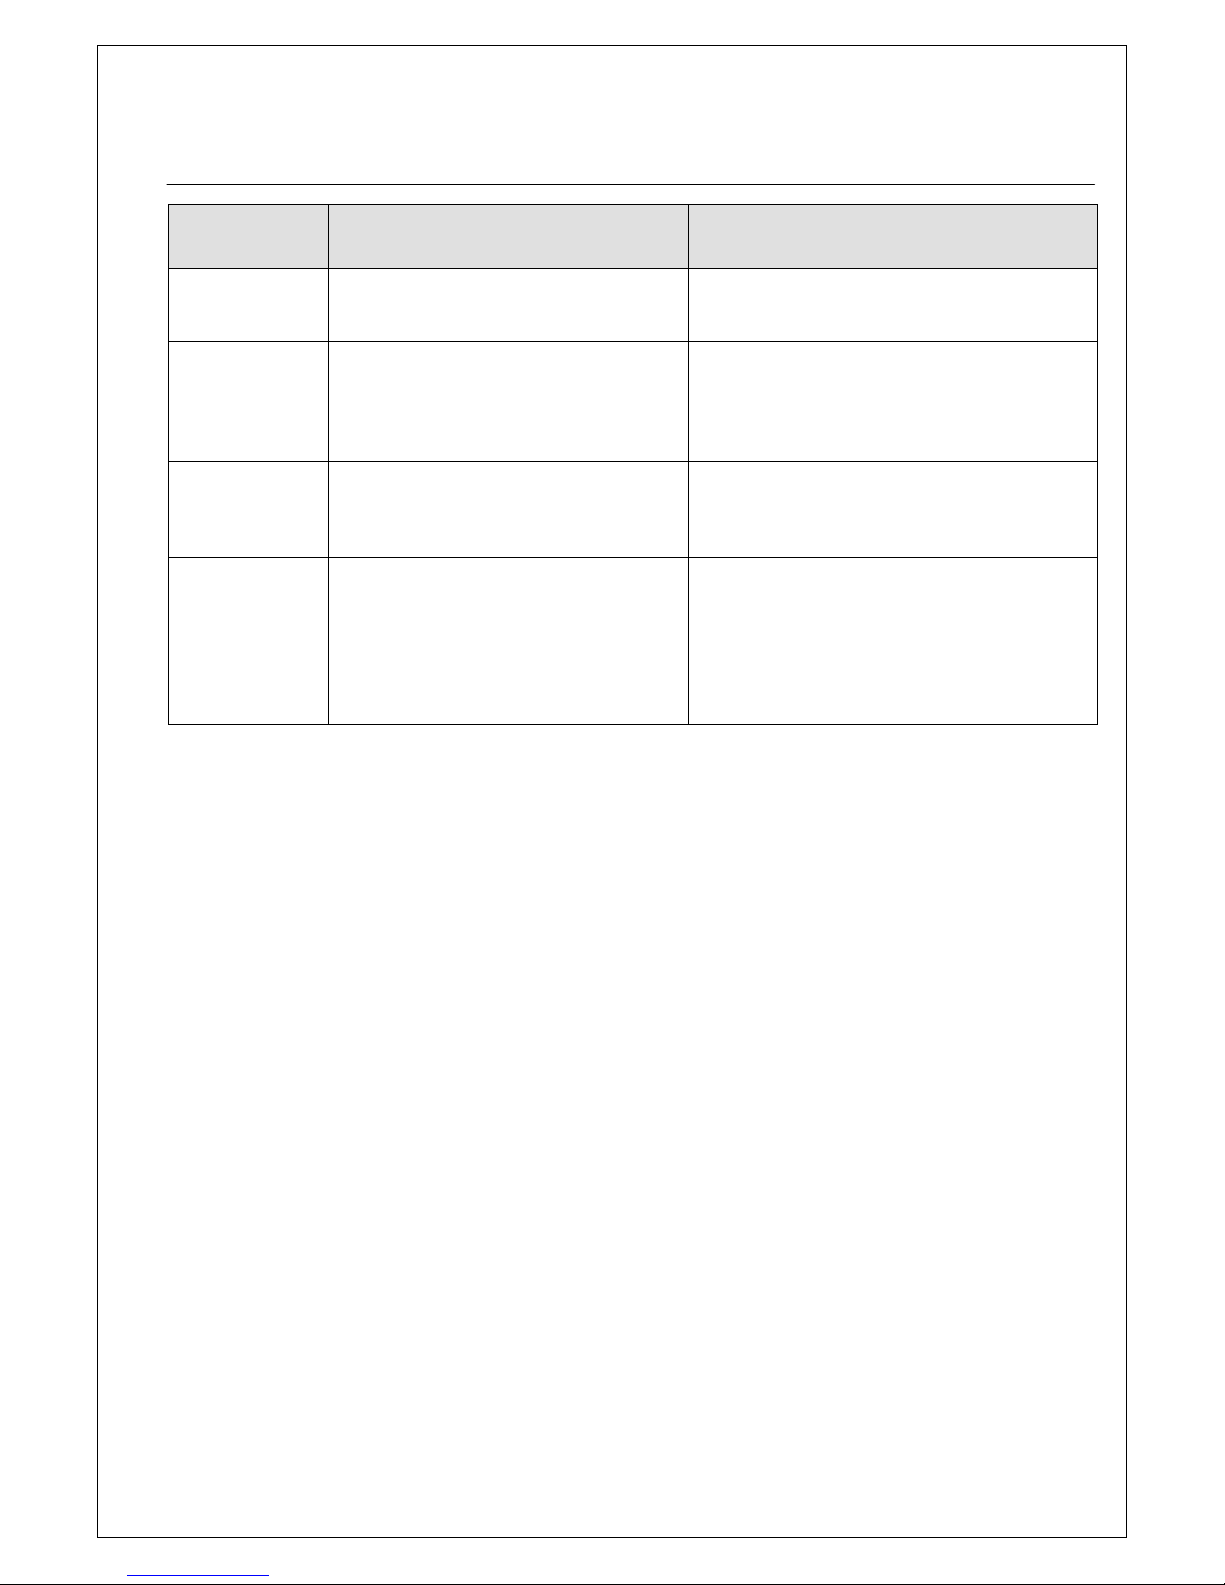
Display Messages
(continued)
Display
Message
What it means What you should do
E8
Moisture detected in air path.
- The Friendly Vac has picked up a liquid.
- Dry out Friendly Vac, including dirt cup and
filter, thoroughly.
E9
Elevation problem
Elevation motor is stuck in place
Using the rear portion of the Friendly Vac, tilt
the Friendly Vac onto its back and visually
check the elevation motor to see if there is
something stuck in the elevation which can be
removed
E10
Unauthorized version
This message is received when trying to
burnt/copy software version, which in not
released or not compatible to the Friendly
Vac.
E11
All other stuck reasons
This message is displayed in case, which
the failure is not identified as one of the
other error codes messages (E1 to E10)
In every stop of the Friendly Vac with error
message (E code) place the cleaning mode
selector to OFF and press and hold the two
scroll buttons for at least 3 seconds until the
‘Stop cause number’
is displayed.
Refer to paragraph 5 ‘
Diagnostics and
Settings’
for more details about the stop cause.
17
Page 20

Troubleshooting
If a problem is encountered that is not quickly resolved using the recommended solution,
please contact your dealer.
Problem Possible cause Solution
Short run time, operates less
time then normal
Batteries were not fully charged
prior to cleaning.
Friendly Vac has stopped with
error message.
Battery/batteries are damaged.
Vacuuming carpets takes more
energy comparing to hard
surface floor (battery run time
on hard surfaces may longer up
to 50% more then on carpets)
Fully charge the batteries.
Refer to the error message.
Replace both batteries. Contact
Service Center.
Friendly Vac not waking up
Friendly Vac is in a Deep Sleep
mode because of too long time,
which is not connected to the
charger.
Power Packs are not sitting well
in their place.
Battery fuse is missing/burnt.
Batteries are weak/dead.
Remove power pack and re-
insert after 10 seconds.
Confirm Power Packs are
properly inserted into their place.
Replace battery fuse (10A).
Replace both batteries. Contact
Service Center.
Friendly Vac stops and the
brush is going up/down
frequently
Height differences in floor
surface.
Passing between two surfaces,
which one of them is dark.
New Brush
There is nothing to do, when
Friendly Vac climbs on a higher
surface or when passes above
black surface it may stops and
raise the brush height.
Let Friendly Vac continue
cleaning, it will soften the static
brush during the first operation
Brush is hardly rotating or not
rotating at all and/or there is
noise from the brush
Debris stuck in brush.
Brush side covers not properly
assembled.
Check brush for stuck debris.
Check side covers and brushes
foe correct assembly.
Friendly Vac does not vacuum
well
Airflow is restricted
Dirt Filter
Dirt Cup full
Blockages in Nozzle or pipe
Dirt or stuck Brush
Brush rotates in low speed on
carpets or high speed on hard
surface floor
Confirm the Dirt Cup is placed
well and flushed with the Top
Carry Handle.
Clean the Dirt Cup and the Filter
Check for blockages in Nozzle
or Pipe
Check brush for stuck debris.
Call Service Center
18
Page 21

Troubleshooting
(continued)
Problem Possible cause Solution
Friendly Vac rotates and
changes direction in the
middle of the room, with no
reason
False detection of one of the
ultrasound sensors
False detection of stair
Over sensitive bumper guard
(especially when passing
between two surfaces with
height different)
Clean the bumper screen
Clean stair sensors windows
Call Service Center for
Ultrasound sensors calibration
Robot ignores area during the
cleaning
Short battery run time
Using the improper cleaning
mode in the specific cleaned
area
Narrow passes between
furniture and walls will cause
the robot to ignore area.
Confirm battery is fully charged
prior the operation.
Confirm choosing the proper
cleaning mode to the cleaned
area; the robot covers less area in
CL3 (Max Clean) as it makes
overlapping passes to more
thoroughly cleaning.
Remove furniture and prepare
the room to enable the robot to
clean all the area.
Robot does not climb on a
carpet / step or does not go
down from the carpet
The step is too high to climb
In different situations such as
passing between two surfaces
with height different or when
climbing on a carpet or black
surface, the robot may detect it
as stair.
Friendly Vac is able climbing
steps up to 2 - 2.5 cm (0.8 – 1”),
depends on the angle it reaches
the step and the step geometric
and the profile.
It is a normal behavior; the robot
will change direction and will
continue in cleaning.
Pull-Line cord does not retract
Faulty Pull-Line cord Contact your dealer to replace
Pull-Line cord does not
function
Pull-Line cord has been
disabled during startup
Faulty Pull-Line cord
Retract the Pull-line cord,
remove and re-install the Power
Pack and confirm E5 message is
not displayed.
Make sure the Pull-Line cord is
fully retracted before the Power
Pack is inserted or before the
charger is disconnected.
Contact your dealer to replace
19
Page 22
Friendly Vac Series Limited Warranty
Friendly Robotics warrants to the original purchaser that the RV series ‘Product’ is free from defects in materials and
workmanship when used under normal residential* purposes for a period of 12 months, beginning from the date of
purchase. Product accessories, including replacement batteries, are warranted for a period of ninety days from the date
of purchase. This warranty provides for the cost of parts and labor to repair covered defects when performed by an
authorized Friendly Robotics service and warranty facility. A valid proof of purchase is required for warranty repairs.
The limited warranty does not cover transportation costs of any kind. The owner bears all responsibility for
transportation costs to an authorized Friendly Robotics service and warranty facility.
*Normal residential purposes is defined as use of the product on the same lot as your primary home. Use at more than
one location is considered commercial use, and this warranty would not apply.
Items and Conditions Not Covered
This express warranty does not cover the following:
• Any product or part that has been altered, misused, abused or requires replacement or repair due to accidents or
lack of proper maintenance.
• Normal wear and tear, including brushes, filter and fading of paint or plastic parts.
• Any costs or damages associated with improper use of product.
• Any product that has been opened, repaired, modified or altered by anyone other than a Friendly Robotics
authorized repair facility.
• Repairs necessary due to improper battery care and/or improper charging process such as charging in wet
conditions, electrical supply irregularities, or failure to properly prepare the Friendly Vac or battery prior to any
period of non-use.
• Repairs necessary due to water damage or any acts of God.
Instructions for Obtaining Warranty Service
Should you feel your Friendly Robotics product contains a defect in materials or workmanship, contact the retailer
from whom you purchased the product.
Owner Responsibilities
You must maintain and care for your Friendly Robotics product by following the maintenance and care procedures
described in this manual. Routine maintenance, whether performed by a service provider or by you, is at your expense.
General Conditions
Repair by an authorized Friendly Robotics service and warranty repair facility is your sole remedy under this
warranty. There is no other express or implied warranty. All implied warranties of merchantability and fitness for use
are limited to the duration of this express warranty. Friendly Robotics is not liable for indirect, incidental or
consequential damages in connection with the use of the Friendly Robotics Product covered by this warranty,
including any cost or expense of providing substitute equipment or service during reasonable periods of malfunction
or non-use pending completion of repairs under this warranty. Some states do not allow exclusions of incidental or
consequential damages, or limitations on how long an implied warranty lasts, so the above exclusion and limitations
may not apply to you. This warranty gives you specific legal rights, and you may also have other rights, which vary
from state to state.
Friendly Robotics® products are manufactured by F. Robotics Acquisitions Ltd.
Always follow the safety instructions specified in this Manual
20
Page 23

Page 24

www.friendlyrobotics.com
 Loading...