


SPLIT TYPE
AIR CONDITIONER
CASSETTE
Models
Indoor unit Outdoor unit
type
MC24Y3F MR24UY3F
(60Hz)
CONTENTS
SPECIFICATIONS ...................... 1
DIMENSIONS .......................... 2
REFRIGERANT SYSTEM DIAGRAM ....... 4
CIRCUIT DIAGRAM ..................... 5
7INDOOR PCB CIRCUIT DIAGRAM ........
...... 8OUTDOOR PCB CIRCUIT DIAGRAM
ERROR CONTENTS ....................
DISASSEMBLY ILLUSTRATION ..........13
PARTS LIST .......................... 21
STANDARD ACCESSORIES ............. 23
11

SPECIFICATIONS
TYPE
INDOOR UNIT
OUTDOOR UNIT
COOLING CAPACITY
HEATING CAPACITY
COOLING & HEATING
MC24Y3F
MR24UY3F
22,200 / 22,200 BTU/h
24,200 / 24,200 BTU/h
NOISE LEVEL
INDOOR UNIT
OUTDOOR UNIT
HIGH-SPEED
MED-SPEED
LOW-SPEED
COOL
HEAT
45.0 dB
43.0 dB
38.0 dB
53.0 dB
55.0 dB
ELECTRICAL DATA
POWER SOURCE
COOLING
RUNNING CURRENT
HEATING
COOLING
INPUT WATTS
HEATING
COOLING
E.E.R.
HEATING
STARTING CURRENT
MOISTURE REMOVAL
AIRCIRCULATION -High
COMPRESSOR
TYPE
DISCRIMINATION
REFRIGERANT R410A
1 230 / 208 V 60Hz
9.2 / 10.1 A
10.4 / 11.4 A
2.10 / 2.10 kW
2.37 / 2.37 kW
3.10 / 3.10 kW/kW
3.00 / 3.00 kW/kW
9.5 A
3.0 l/hr
1,050 m
3
/hr
Total enclosed type, 4 poles,
Inverter, Twin Rotary
TNB220FPBM9
4 lb 3 oz, 1,900 g
REFRIGERANT CHARGE (R410A)
MAX PIPE LENGTH
MAX PIPE HEIGHT
Pipe Length
FULL CHARGE
AMOUNT
ADDITIONAL REFRIGERANT
49 ft. (15 m)
66 ft. (20 m)
98 ft. (30 m)
131 ft. (40 m)
164 ft. (50 m)
4 lb 3 oz (1,900 g)
4 lb 10 oz (2,100 g)
5 lb 8 oz (2,500 g)
6 lb 6 oz (2,900 g)
7 lb 5 oz (3,300 g)
0.424 oz / ft. (40g/m)
50 m
30 m
FAN MOTOR
DISCRIMINATION
HIGH-SPEED
INDOOR UNIT
( Cool / Heat )
OUTDOOR UNIT
( Cool / Heat )
MED-SPEED
LOW-SPEED
S-LOW-SPEED
DISCRIMINATION
HIGH-SPEED
DIMENSIONS
INDOOR UNIT HxWxD
HxWxDOUTDOOR UNIT
WEIGHT
INDOOR UNIT Gross / Net
Gross / NetOUTDOOR UNIT
MFA-24RPT
490 r.p.m. / 440 r.p.m.
430 r.p.m. / 380 r.p.m.
360 r.p.m. / 330 r.p.m.
- / 250 r.p.m.
MFE-45ROM
850 r.p.m. / 900 r.p.m.
9-3/4" x 32-3/4" x 32-3/4" inch
( 246 x 830 x 830 mm )
32-3/4" x 35-1/2" x 13" inch
( 830 x 900 x 330 mm )
44 kg / 34 kg
70 kg / 64 kg
2006.05.25 1
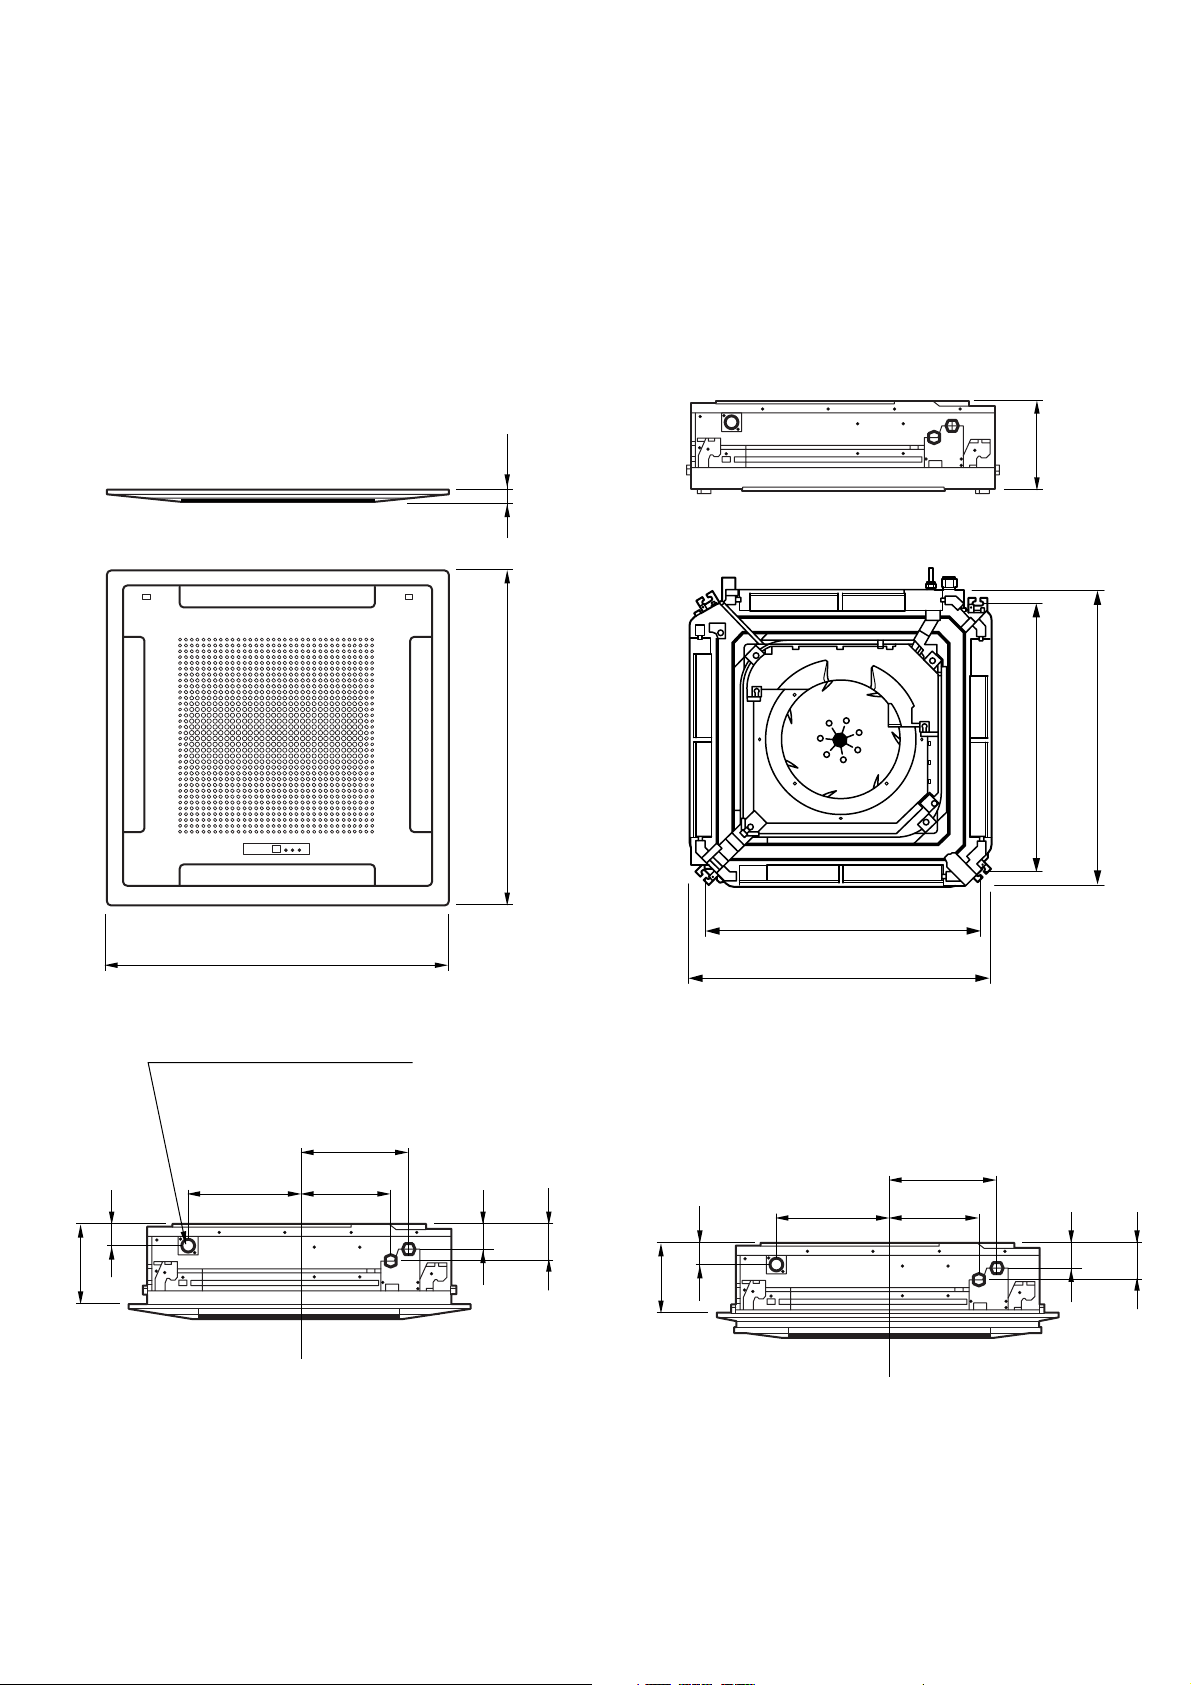
DIMENSIONS
INDOOR UNIT
unit : inch (mm)
1-3/16" (30)
9-3/4" (246)
9-1/4" (235)
37" (940)
Drain inside Dia. ø1-1/4" (ø32)
outside Dia. ø1-1/2" (ø37)
11-3/4" (298.5)
2-3/8" (60)
12" (305.5)
9-25/32"
(248.5)
2-3/4" (70)
37" (940)
3-15/16" (100)
7-7/8" (200)
2-3/8" (60)
29-17/32" (750)
32-3/4" (830)
11-3/4" (298.5)
12" (305.5)
9-25/32"
(248.5)
29-17/32" (750)
2-3/4" (70)
32-3/4" (830)
3-15/16" (100)
2006.05.18 2
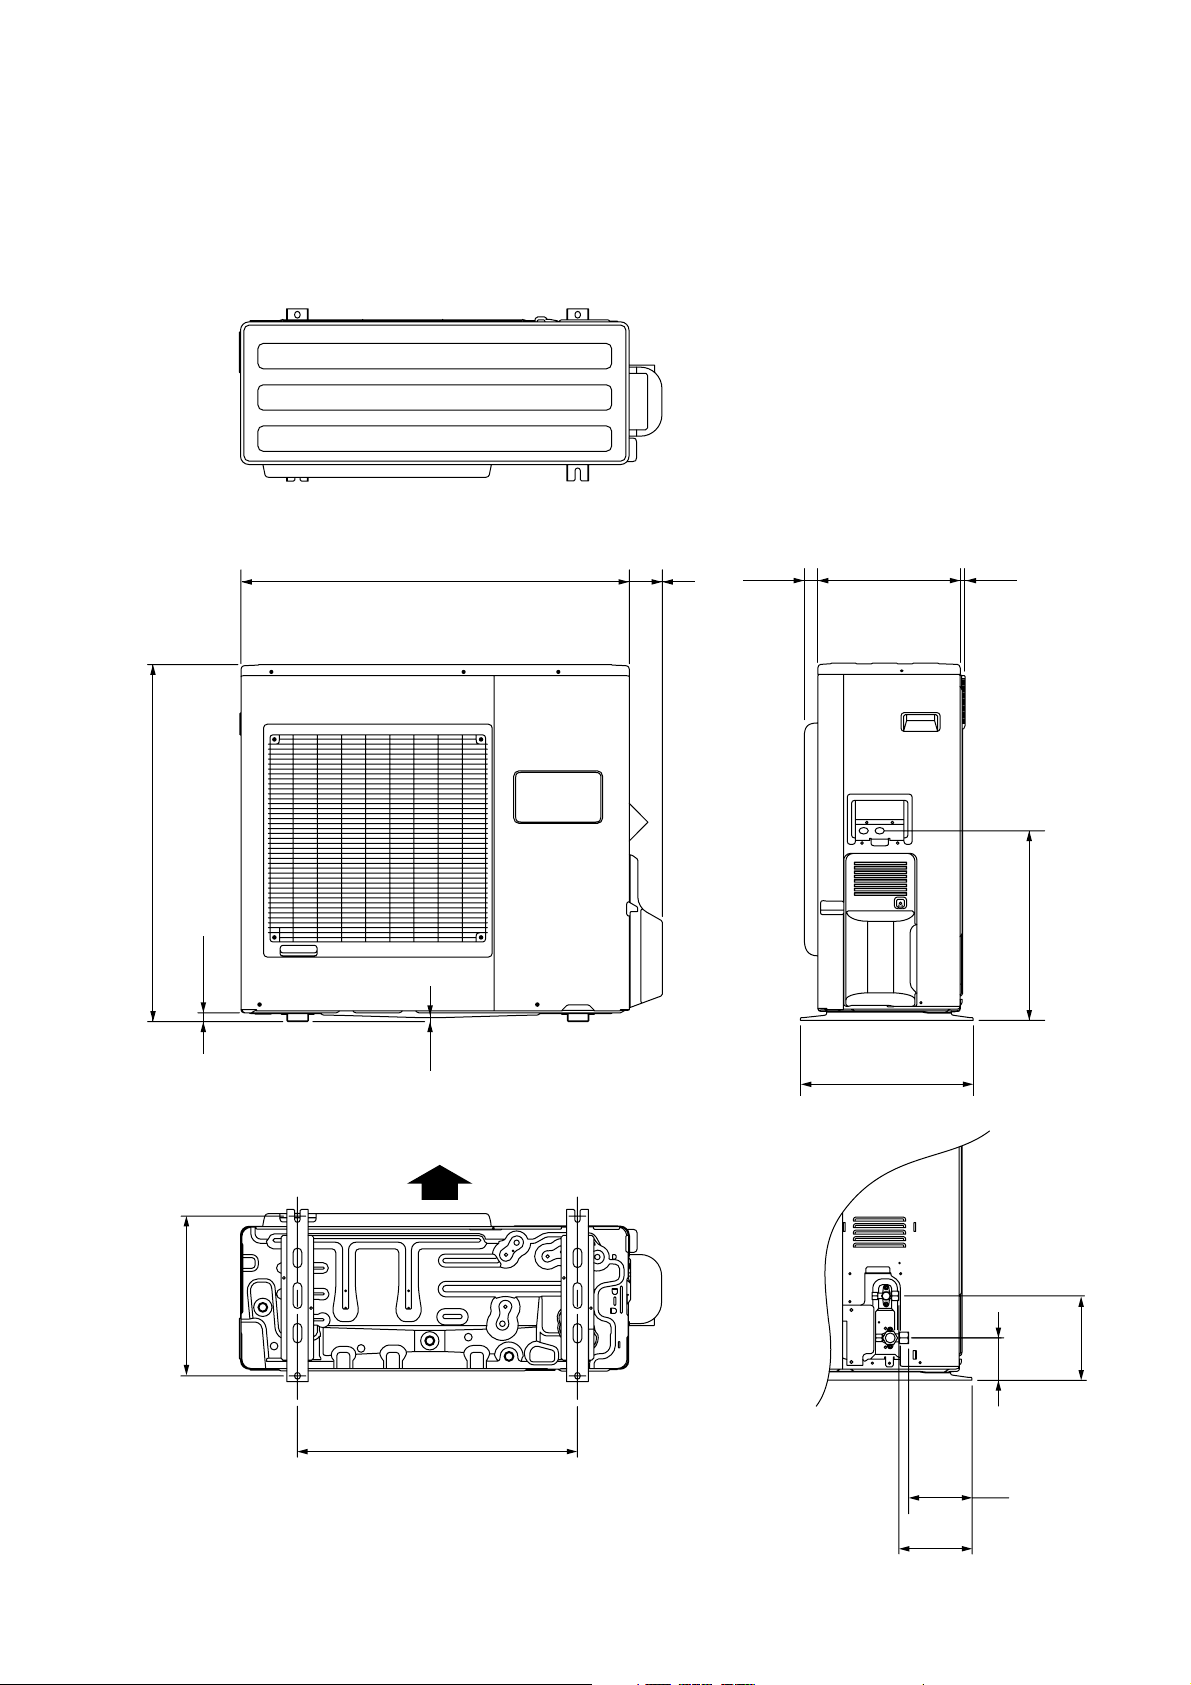
OUTDOOR UNIT
unit : inch (mm)
32-3/4" (830)
7/8" (21)
35-1/2" (900)
3/8"
(9)
3"(77)
1-1/4"
(31)
13" (330)
15-3/4" (400)
1/2"
(12)
17-3/8" (440)
Air Flow
14-5/8" (370)
25-5/8" (650)
2006.05.18 3
6-3/4" (170)
3-7/8"
(99)
5-3/4" (147)
7-3/4" (196)
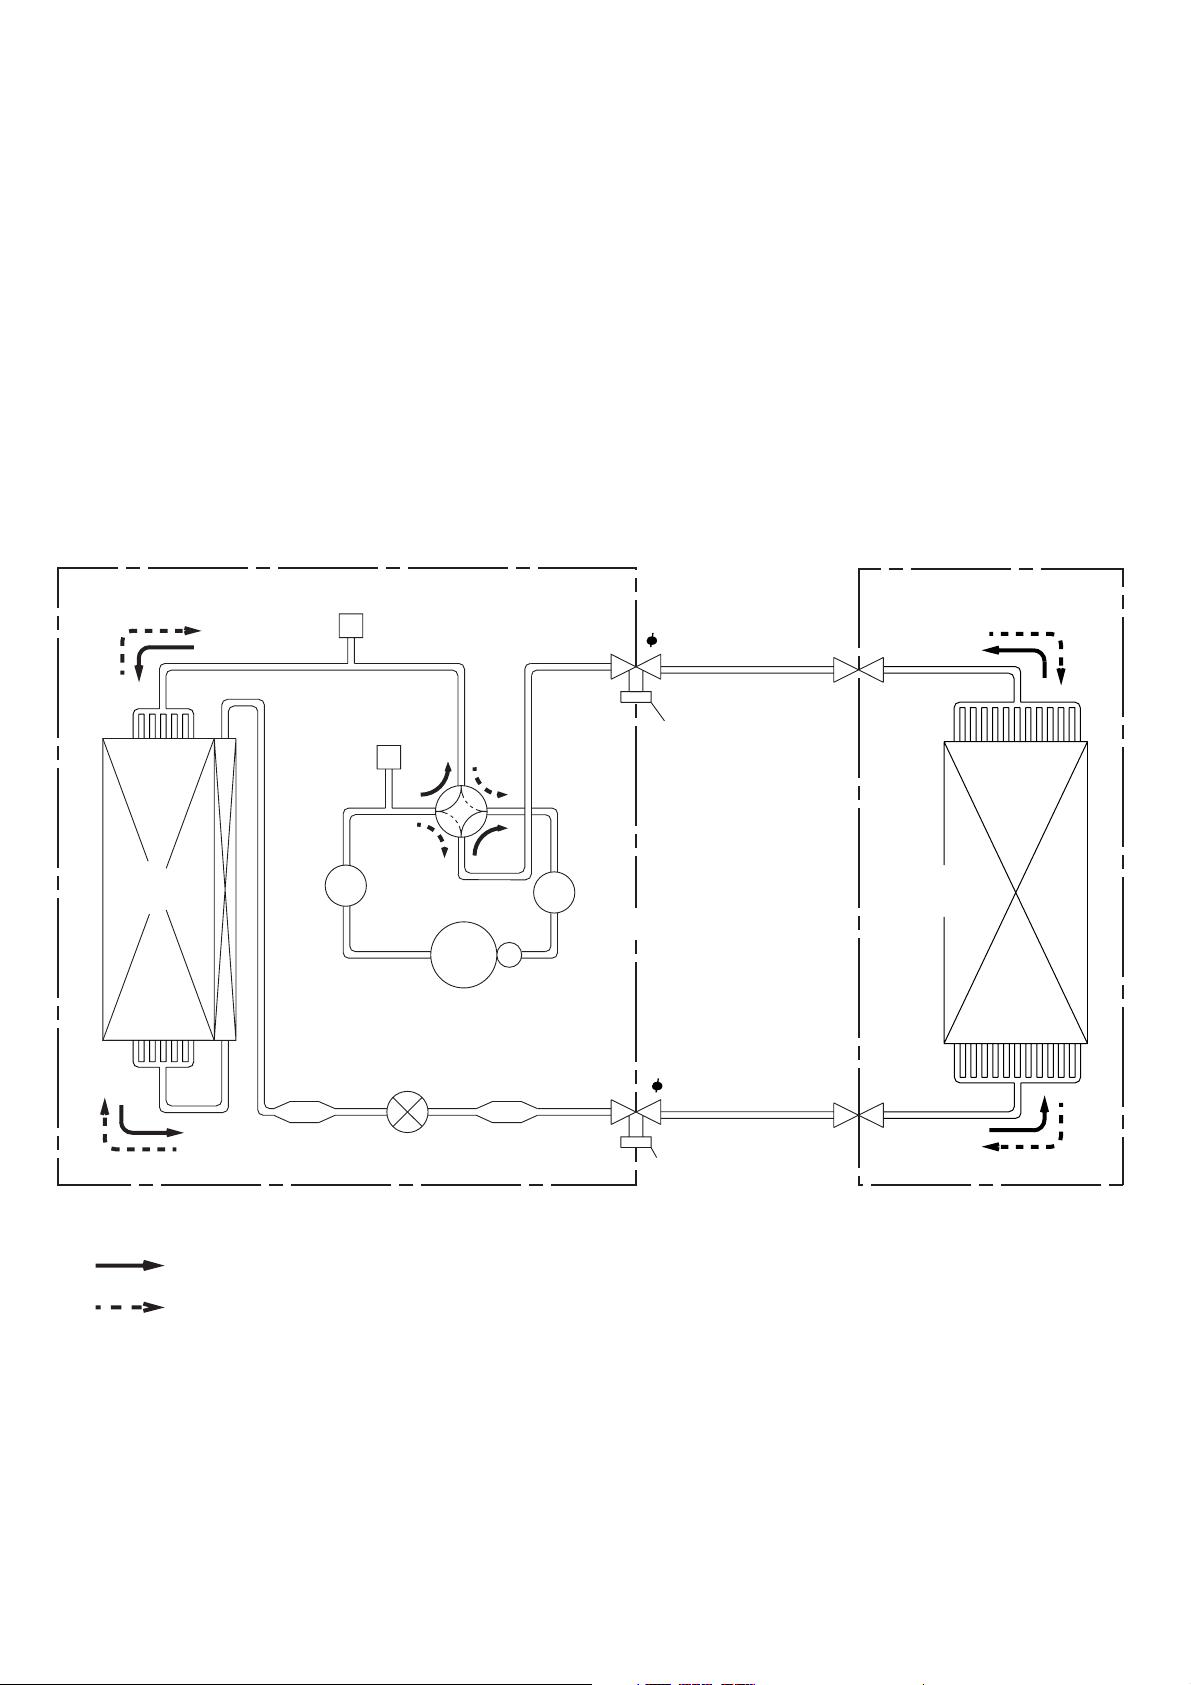
REFRIGERANT SYSTEM DIAGRAM
OUTDOOR UNIT
Condenser
Pressure
Check Valve
High Pressure
Switch
4-way
Muffler
Valve
Compressor
Expansion
Valve
INDOOR UNIT
Refrigerant Pipe
15.88mm (5/8")
Charging
Valve
Evaporator
Accumulator
Refrigerant Pipe
9.52mm (3/8")
Strainer
Strainer
: COOL
: HEAT
2006.05.18 4
Charging Valve
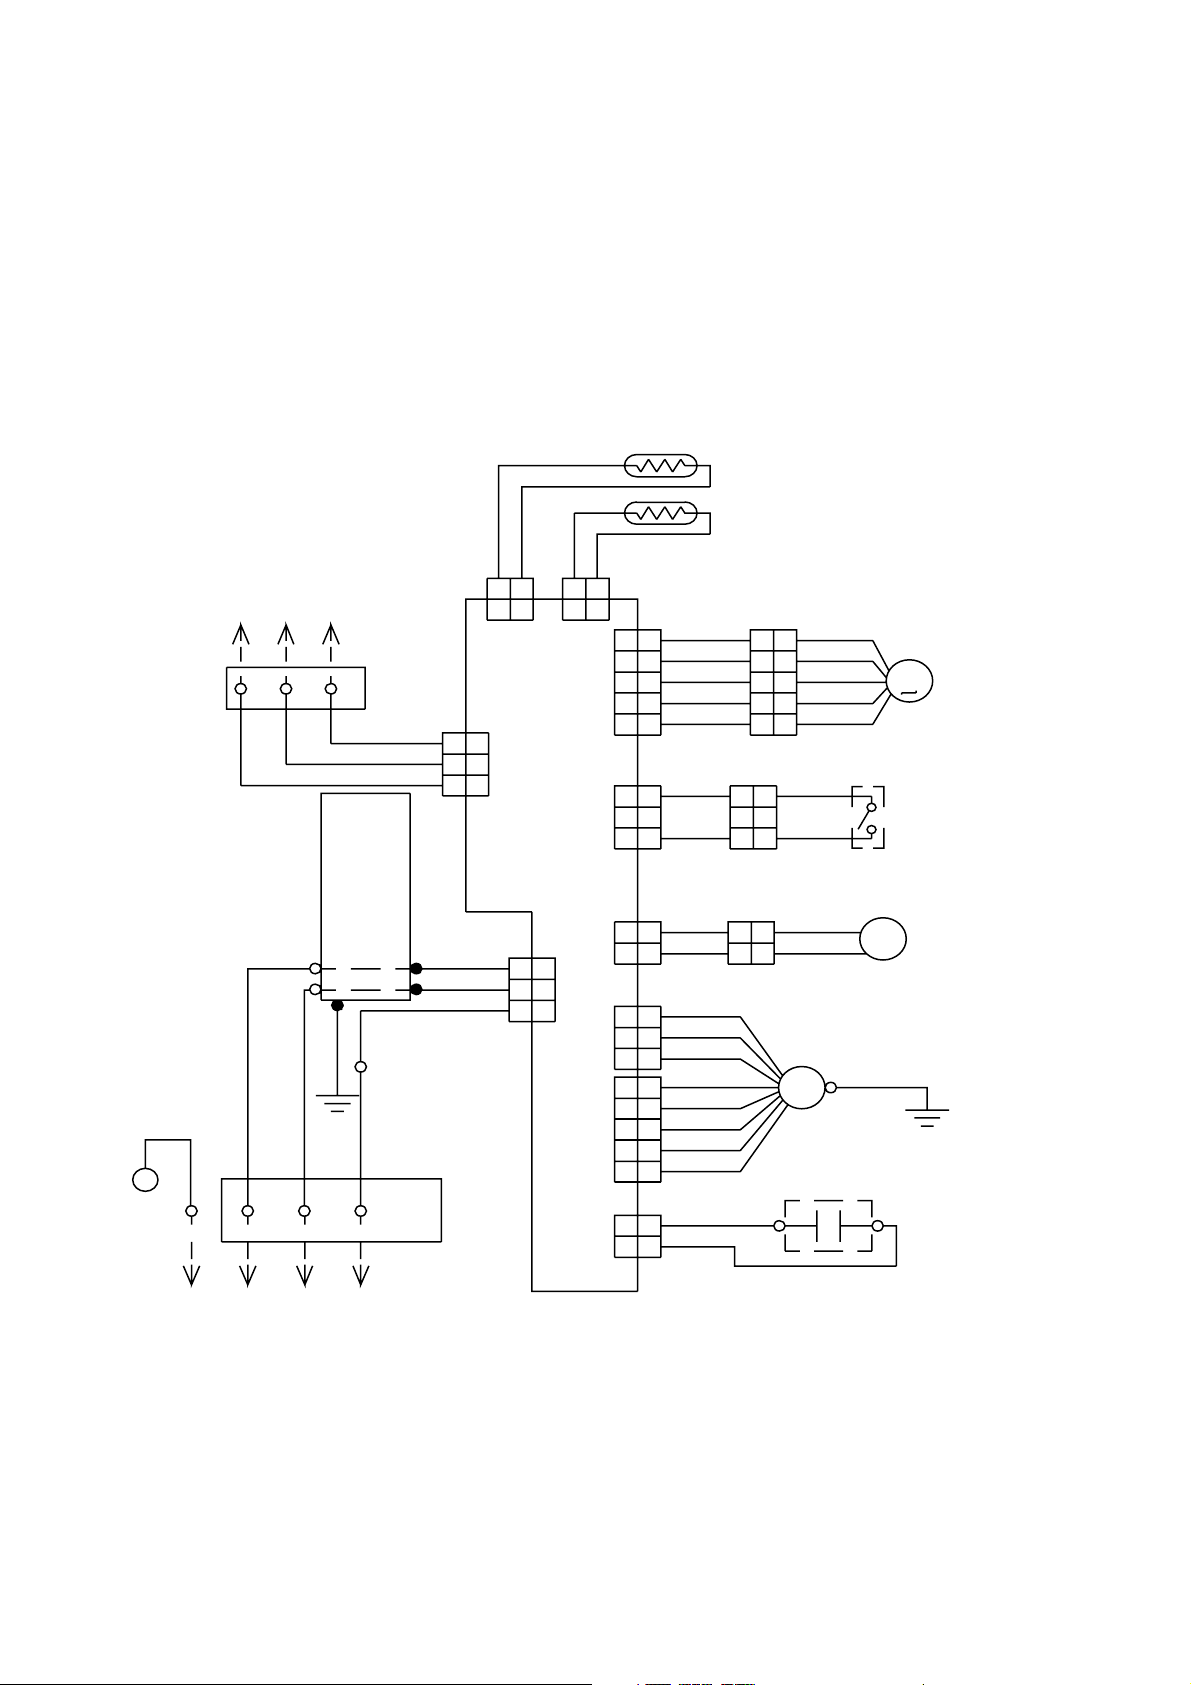
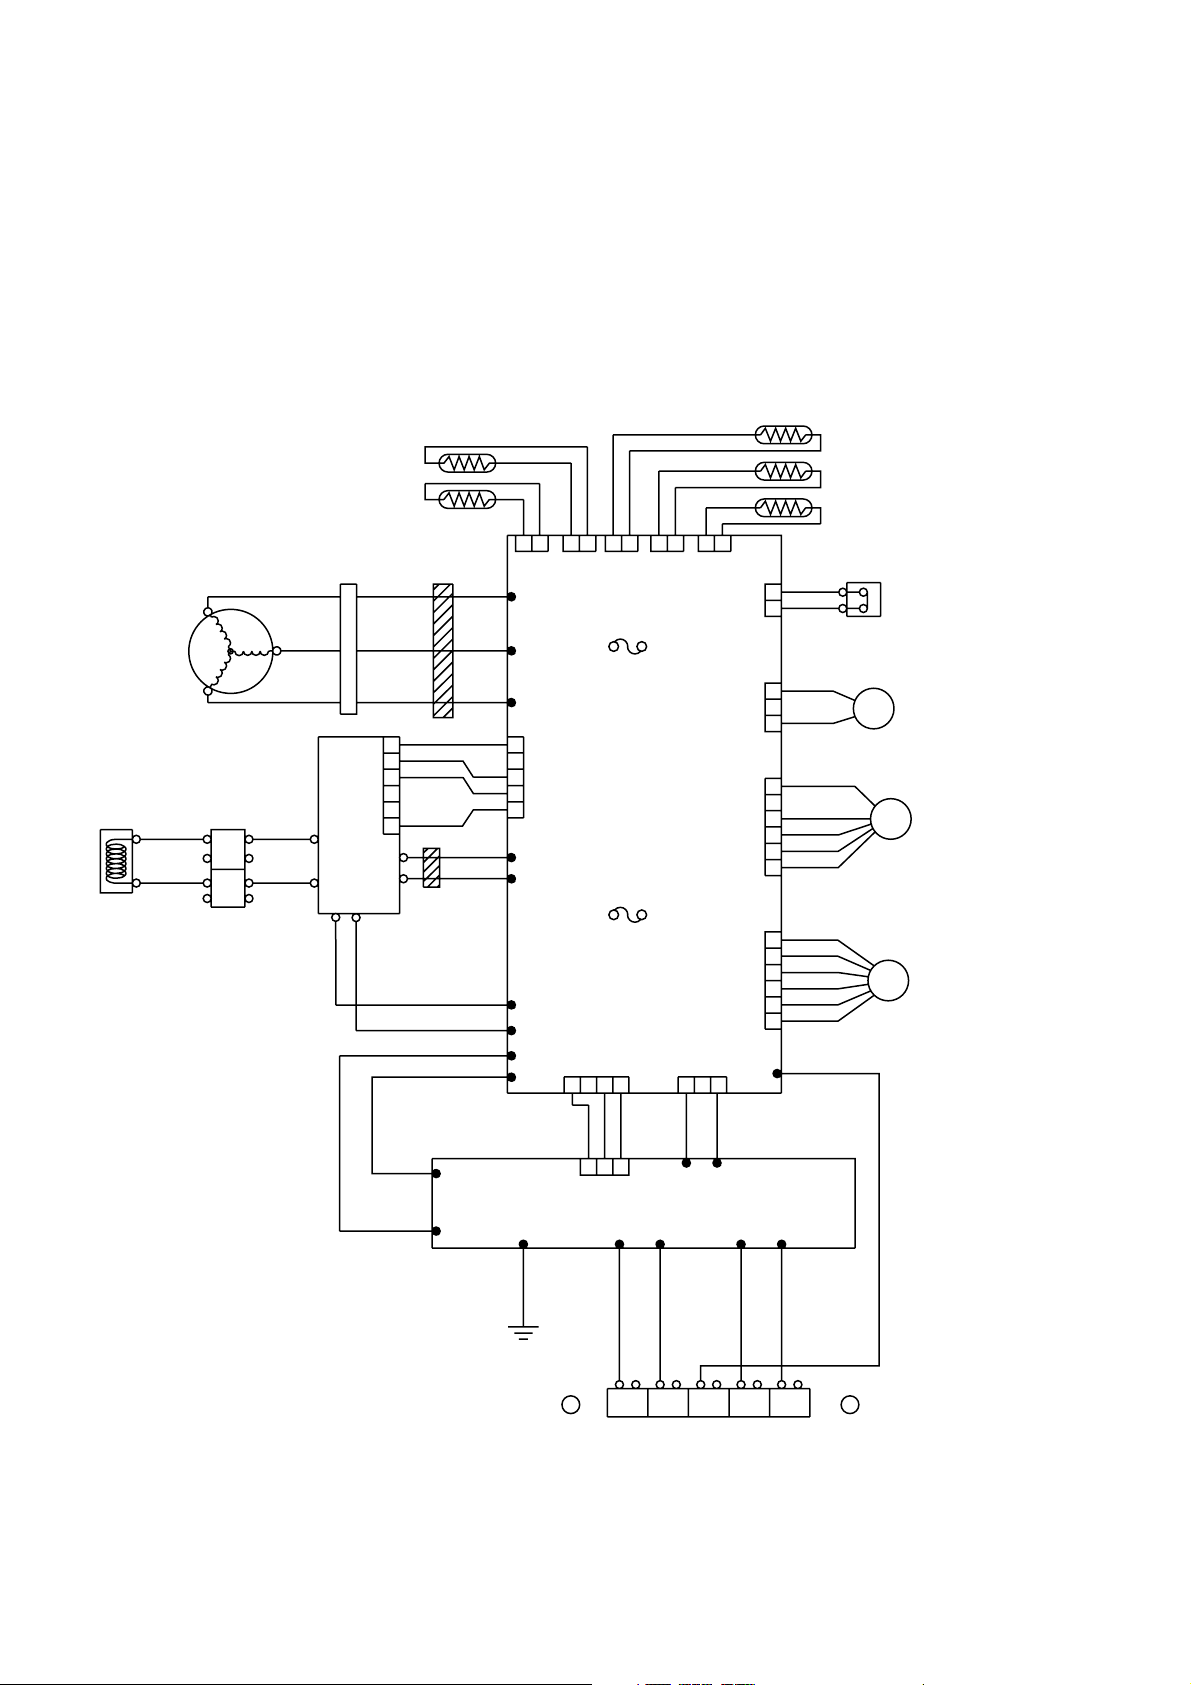
CIRCUIT DIAGRAM
INDOOR UNIT
PIPE TEMPERATURE THERMISTOR
ROOM TEMPERATURE THERMISTOR
TO REMOTE CONTROL UNIT
TERMINAL
3
1
2
POWER SUPPLY
PCB ASSY
L
N
GREEN
BLACK
WHITE
G
1
RED
2
(N)
RED
WHITE
BLACK
Use T3.15A-250V
Fuse on F101
1
2
3
BLACK
WHITE
RED
1
2
3
3
TERMINAL
GRAY
BLACK
GRAY
1212
12
CN7 CN8
CN17
12
CONTROLLER PCB ASSY
1
1
2
2
CN1
3
3
BLACK
1
2
3
4
5
1
2
CN15 CN10
3
1
2
1
2
CN16 CN6
3
1
2
3
5
6
121
CN4 CN5
BROWN BROWN
1
RED RED
2
ORANGE
3
4
WHITE WHITE
5
BLACK
1
2
BLACK
3
BLACK
1
BLACK
2
RED
1
WHITE
2
BLACK
3
BLACK
1
WHITE
2
RED
3
PURPLE
5
BLUE
6
WHITE
WHITE
2
1
1
2
2
3
3
4
4
5
5
BLACK
1
1
2
2
BLACK
3
3
YELLOW
121
YELLOW
2
FAN MOTOR
FM
ORANGE
YELLOWYELLOW
STEP MOTOR
M
FLOAT SWITCH
DRAIN PUMP MOTOR
M
GREEN /
YELLOW
FAN MOTOR
CAPACITOR
TO OUTDOOR UNIT
2006.05.18 5
OUTDOOR UNIT
COMPRESSOR
BLACK
BLACK
CHOKE COIL
PIPE TEMPERATURE
THERMISTOR
DISCHARG TEMPERATURE
THERMISTOR
CONNECTOR
RED RED
U
WHITE
V
W
BLACK
ACTIVE
FILTER
MODULE
TERMINAL
WHITE
BROWN
L1
L2
+
-
EMI FILTER
WHITE
BLACK
BROWN
1
RED
2
ORANGE
3
4
5
YELLOW
6
P
N
EMI FILTER
1T
YELLOW
2T
BLACK
BLACK
BROWN
12 12 12 12 12
CN21
CN22
CN23
U
W305
V
BLUE
W304
W
W303
1
CONTROLLER PCB ASSY
2
CN407
3
4
5
W12
W13
FUSE
F4 T 5A-250V
FUSE
F2 T 3.15A-250V
RED
W16
W17
W10
W11
CN1
1
BLUE
BROWN
BLACK
THERMISTOR
COMPRESSOR TEMPERATURE
THERMISTOR
HEAT SINK TEMPERATURE
THERMISTOR
CN25
CN26
RED
OUTDOOR TEMPERATURE
1
CN37
CN30
CN802
CN27
432
CN34
1
32
W200
RED
2
BLACK
1
2
BLACK
3
RED
1
2
BLACK
3
WHITE
4
YELLOW
5
BLUE
6
RED
1
BROWN
2
BLUE
3
ORANGE
4
YELLOW
5
WHITE
6
HIGH PRESSURE SWITCH
4WV
SOLENOID COIL
FM FANMOTOR
EXPANSION VALVE COIL
EV
WHITE
BLACK
TM102
POWER SUPPLY PCB ASSY
TM101
W3
GREEN
1
GG
EARTH EARTH
2006.05.18 6
BLACK
BROWN
RED
32
CN1
W6 W7
BLACK
13LN
WHITE
W9 W8
WHITE
2 (N)
BLACK
W4
BLACK
W5
WHITE
RED
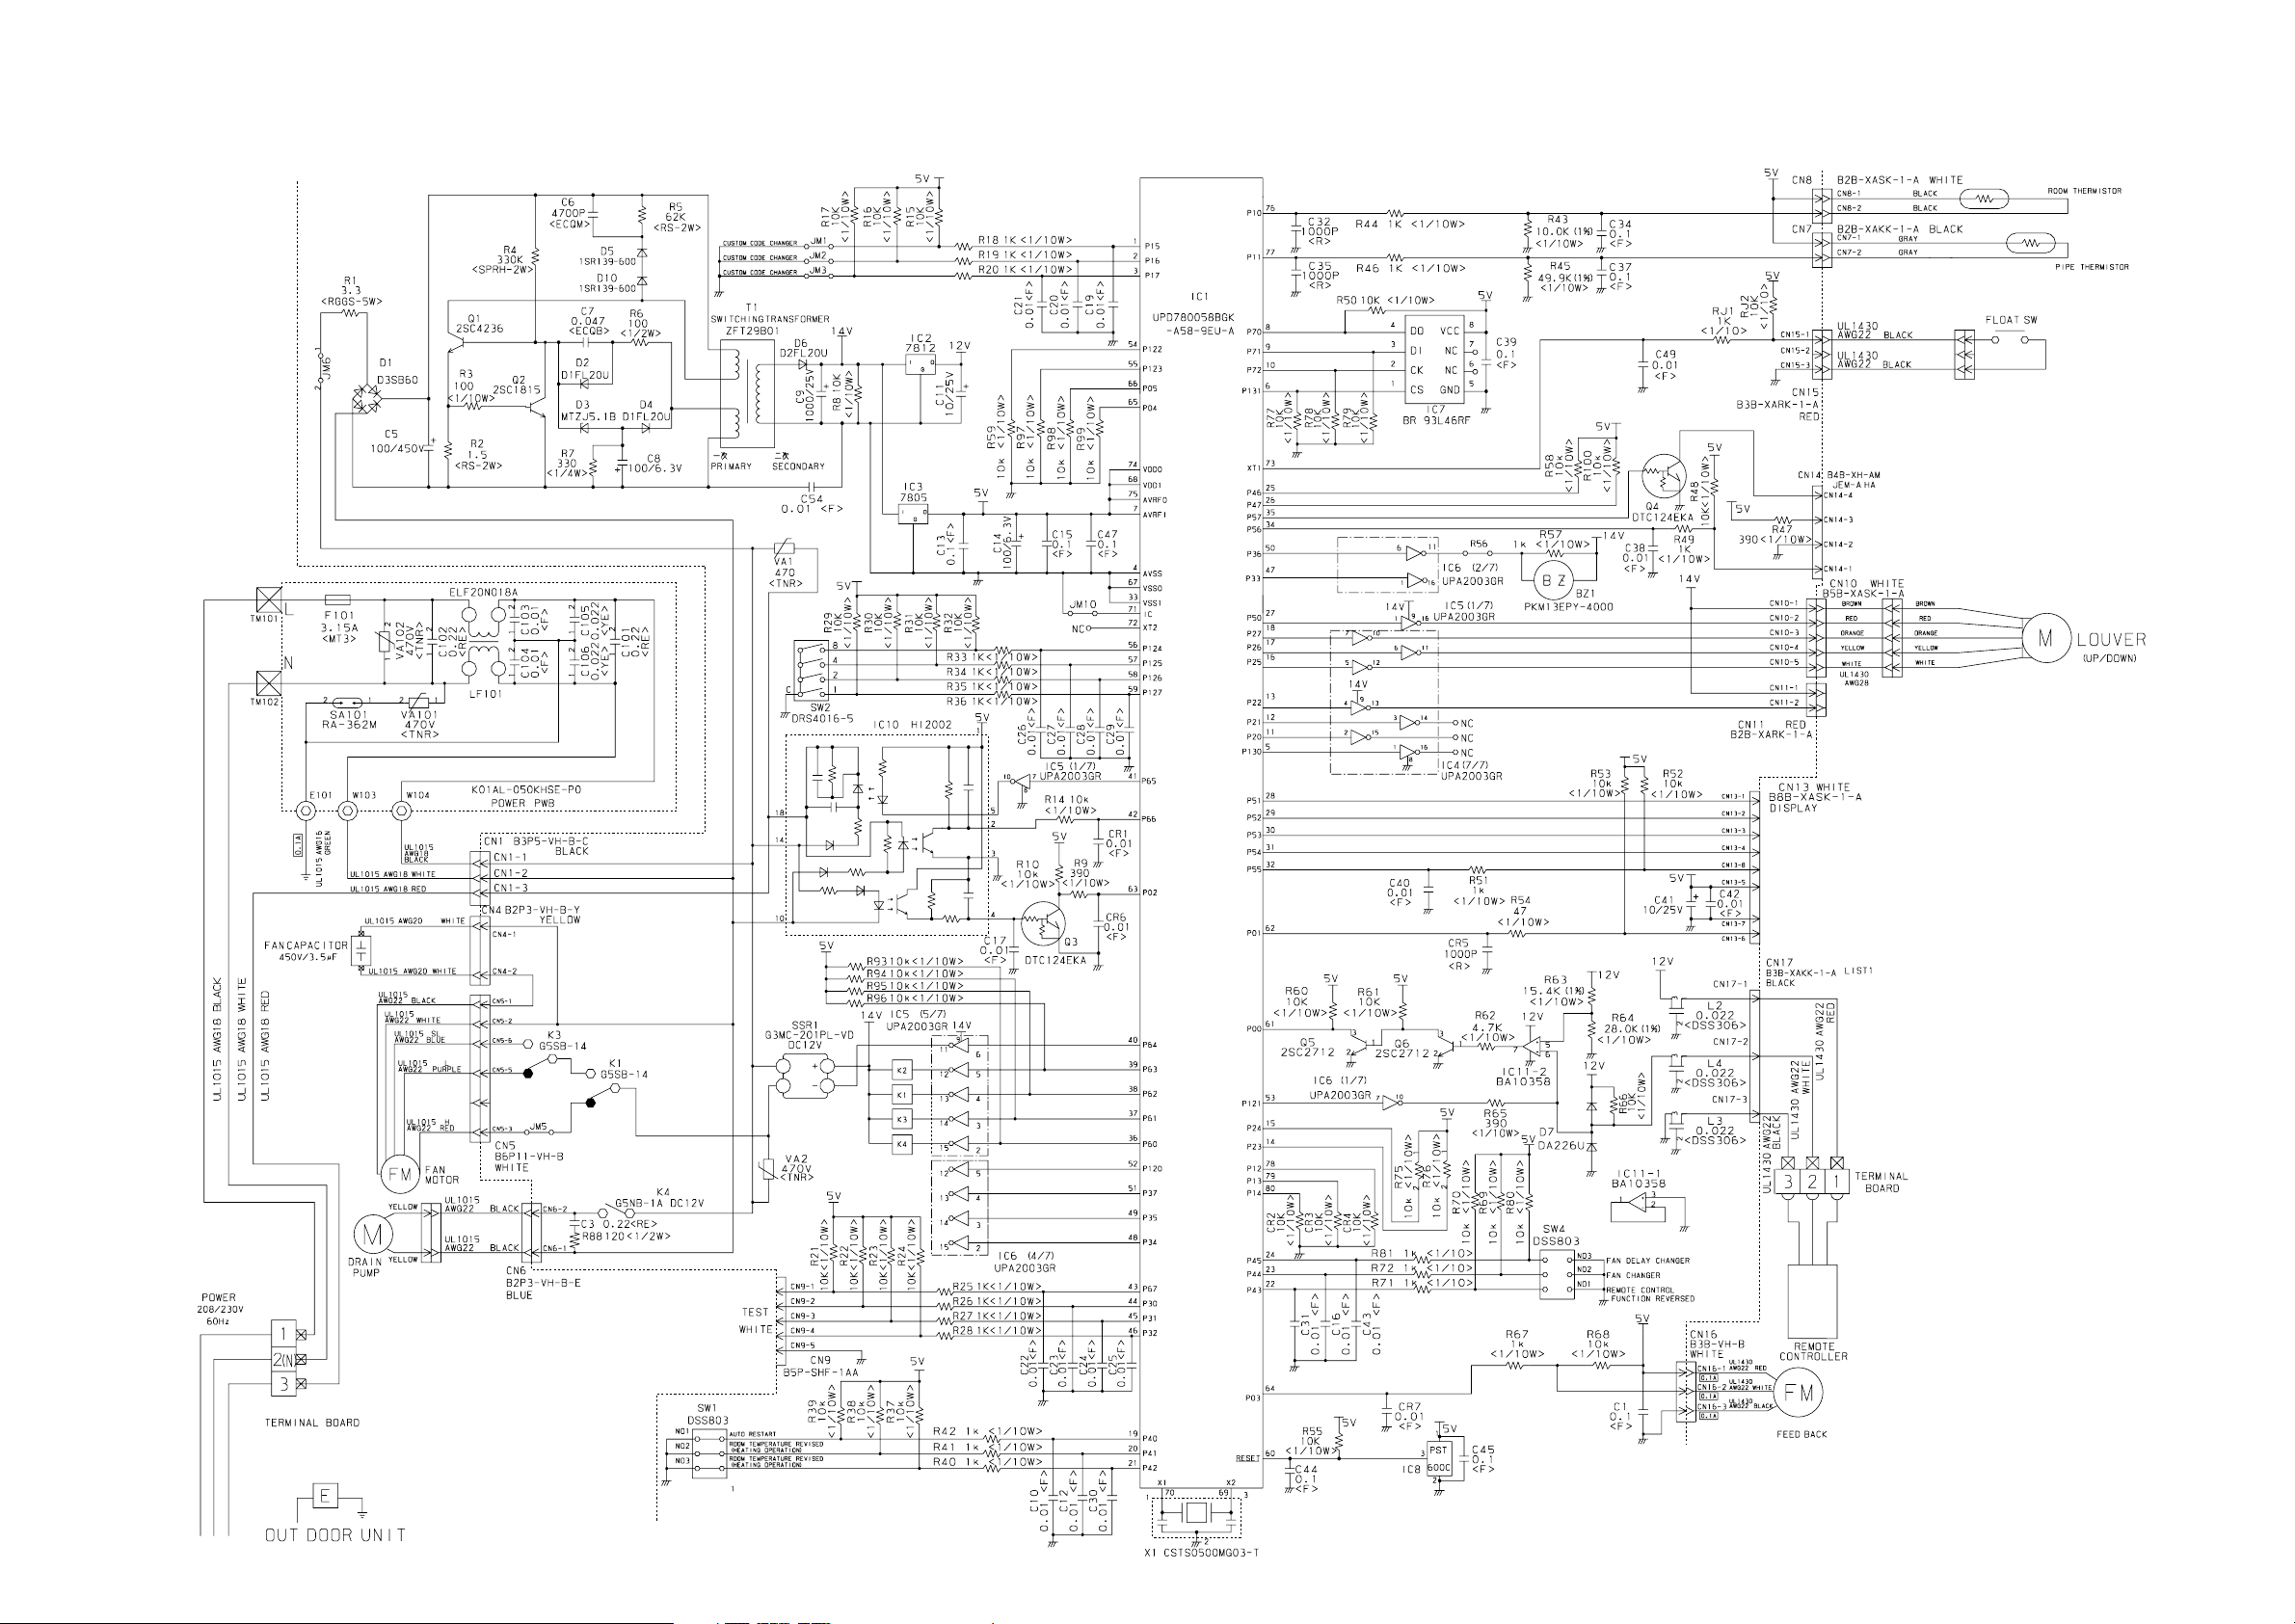
INDOOR PCB CIRCUIT DIAGRAM
Model : MC24Y3F
CONTROLLER PCB ASSEMBLY
K01AL-050LHSE-C1
2006.05.25 7

OUTDOOR PCB CIRCUIT DIAGRAM
Model : MR24UY3F
POWER SUPPLY PCB ASSY
K04BA-0500HUE-P0
INVERTER ASSEMBLY
EZ-005FHUE
CONTROLLER PCB ASSY
K04AW-0502HUE-C1
2006.05.25 8

Model : MR24UY3F
CONTROLLER PCB ASSEMBLY
K04AW-0502HUE-C1
600/450V x 4
2006.05.25 9

Model : MR24UY3F
POWER SUPPLY PCB ASSEMBLY
K04BA-0500HUE-P0
TM100
POWER SOURCE
230V
60Hz
TO INDOOR UNIT
EARTH
AC VOLT OUT
BLACK
WHITE
W4
W5
W6
BLACK
W7
WHITE
W3
GREEN
W8
BLACK
W9
WHITE
L1
RCH4730-021PF07
B
VA101
470V
<TNR>
VA102
470V
C101
3.3
<LE>
<TNR>
B
SA100
RA-302M
B
B
B
B
B
C104
0.033
<YE>
C105
0.033
<YE>
C106
3.3
<LE>
L2
N200500K1D7C
C107
3.3
<LE>
CT1
CT-1B
D60
5V
DAN217U
220/16V
R60 1.0K
<1/10W>
(1%)
C60
<PJ>
L4
RCH4730-021PF07
+
VR1
B2K
R61 3.74K
<1/10W>
(1%)
C111
3.3
<LE>
R68 22K
<1/10W>
C64
0.1
<F>
C112
0.015
<YE>
C113
0.015
<YE>
C65
0.1
<F>
5V
TM101
TM102
CN1
B3B-XASK-1-A
WHITE
1
2
3
CT OUT
2006.05.25
10

ERROR CONTENTS
(indoor unit)
(1) Stop the air conditioner operation.
(2) Press the master control button and the fan control button simultane-
ously for 2 seconds or more to start the test run.
Test run display
(3) Press the start/stop button to stop the test run.
[SELF-DIAGNOSIS]
When the error indication "E:EE" is displayed, follow the following items to
perform the self-diagnosis. "E:EE" indicates an error has occurred.
1. REMOTE CONTROLLER DISPLAY
(1) Stop the air conditioner operation.
(2) Press the set temperature buttons
onds or more to start the self-diagnosis.
Refer to the following tables for the description of each error code.
Unit number (usually 0)
SUMOTUWETH FR
simultaneously for 5 sec-
Error code
SA
Error code Error contents
13
14
15
16
17
18
19
1A
1b
1c
1d
1E
1F
Outdoor signal abnormal
Excessive outdoor pressure (permanent stop)
Compressor temperature sensor
Pressure switch error
IPM error
CT error
Active filter module (AFM) error
Compressor does not operate
Outdoor unit fan error
Communication error
(inverter multicontroller)
2 way valve sensor error
Expansion valve error
Connection indoor unit error
Ex. Self-diagnosis
(3) Press the set temperature buttons simultaneously for 5 sec-
onds or more to stop the self-diagnosis.
Error code Error contents
00
01
02
03
04
05
06
08
09
0A
0c
11
12
Communication error
(indoor unit remote controller)
Communication error
(indoor unit
Room temperature sensor open
Room temperature sensor short-circuited
Indoor heat exchanger temperature sensor open
Indoor heat exchanger temperature sensor shortcircuited
Outdoor heat exchanger temperature sensor
Power source connection error
Float switch operated
Outdoor temperature sensor
Discharge pipe temperature sensor
Model abnormal
Indoor fan abnormal
outdoor unit)
2. CHECKING DRAINAGE
To check the drain, remove the water cover and fill with 2 to 3 of water as
shown in figure.
The drain pump operates when operating in the cooling mode.
Drain pipe
Water cover
Watering pot
2006.05.25 11

ERROR CONTENTS
(outdoor unit)
1. Make a TEST RUN in accordance with the installation instruction sheet for the indoor unit.
2. OUTDOOR UNIT LEDS
When a malfunction occurs in the outdoor unit, the LED on
the circuit board lights to indicate the error. Refer to the following table for the description of each error according to the
LED.
LED
1 flash
2 flash
3 flash
4 flash
7 flash
8 flash
9 flash
12 flash
13 flash
14 flash
15 flash
16 flash
lighting
Communication error
(Indoor unit - Outdoor unit)
Discharg pipe temperature sensor
Outdoor heat exchanger temperature sensor
Outdoor temperature sensor
Compressor temperature sensor
Heat sink temperature sensor
Pressure switch abnormal
IPM error
Compressor rotor position cannot detect
Compressor cannot operate
Outdoor fan abnormal (upper fan)
Outdoor fan abnormal (lower fan)
No error
Error contents
2. When the product is operating:
1
Press the PUMP DOWN switch on the outdoor unit.
The LED on the outdoor unit circuit board lights, and
operation stops. At this point, recovery has not been
completed, so do not close the two- and three-way
valves.
The pump down operation (cooling operation) be-
2
gins after three minutes. Close the three-way valve
(liquid) after operation starts.
After2-3minutes, operation stops. Close the three-
3
way valve (gas) within one minute after operations
stops.
The LED will go out three minutes after it stops. Dis-
4
connect the power supply after confirming that the
LED has gone out.
*When the pump down operation is repeated, temporarily disconnect
the power supply after opening the closed valves (both liquid and gas).
Reconnect the power supply after2-3minutes and perform the pump
down operation.
*When the start of the operation after pump down operation has been
completed, temporarily disconnect the power supply after opening the
closed valves (both liquid and gas).
Reconnect the power supply after 2-3 minutes and be sure to perform
a test operation for cooling.
3-way valve
(Liquid)
SPECIAL INSTALLATION
SETTING
PUMP DOWN (Refrigerant collecting operation)
Perform the following procedures to collect the refrigerant
when moving the indoor unit or the outdoor unit.
1. When the product is stopped:
1
Press the PUMP DOWN switch on the outdoor unit.
(The LED on the outdoor unit circuit board lights.)
The pump down operation (cooling operation) be-
2
gins right away. After oparation starts, close the
three-way valve (liquid).
3
After2-3minutes, operation stops. Close the threeway valve (gas) within one minute after operations
stops.
4
The LED will go out three minutes after it stops.Disconnect the power supply after confirming that the
LED has gone out.
3-way valve
(Gas)
PUMP DOWN SW (SW2)
2006.05.18 12
DANGER
This part (Choke coil) generates high voltages.
Never touch this part.

847
692
690
692
847
543
692
122
847
122
690
543
544
847
122
522
544
122
543
692
847
876-2
122
543
338
226
692
692
847
847
690
DISASSEMBLY
ILLUSTRATION
INDOOR UNIT
705
834-2
240
544
253-A
472-4
544
481
705
545
472-2
542
858
71
777-2
93
481
472-1
487
469
468
472-5
61
2006.05.25 13
472-5
481-1
481
472-3
71
858
777-1
472-5
472-5
710

INDOOR UNIT
462
460-2
467
127
835
479
482
460-1
798
835
334
541-1
244
484
187
815-1
803
465
541
164
168
484
484
814
464
484
563
834-1
514
223
477
476-2
474
197
337-1
457
565
146-2
337-2
146-1
197
337-1
160
457
2006.05.18 14
488

INDOOR UNIT
195
625
815-2
320-1
212
32
380
381-4
34
234
875
236
380
320-1
380
381-4
731-2
2006.05.18 15

INDOOR UNIT
184-1
187
138
235
735
896
2006.05.18 16

OUTDOOR UNIT
1
6
3
4
2
2006.05.25 17
5

OUTDOOR UNIT
10
9
15
13
14
11
17
18
8
2006.05.25 18

OUTDOOR UNIT
26
23
19
22
31
24
25
27
29
20
28
12
12
30
2006.05.24 19

OUTDOOR UNIT
35
38
37
36
33 34
2006.05.18 20

PARTS LIST
INDOOR UNIT
Ref. Part No. Ord. Ref. Part No. Ord.
No MC24Y3F Q'ty No MC24Y3F Q'ty
32 Control Box Assy 67200589 472-3 RFM (Grille)-C 67200562
34 Capacitor (Fan Motor) 67220259 472-4 RFM (Grille)-D 67200563
61 Decoration Plate 67200591 472-5 RFM (Grille)-E 67200564
71 Holder (Hook) 67200557 474 Turbo Fan Assy 67200587
93 Filter 67200555 476-2 Washer(Turbo Fan) 67207465
122 Holder(LouverSupporter) 67200569 479 Float Switch 67200614
127 Drain Hose 67200548 481 Insulation (Grille)-A 67200615
138 Separate wall 67200600 481-1 Insulation (Grille)-B 67200616
146-1 Evaporator-A Assy 67200601 482 Pump Unit 67200617
146-2 Evaporator-B Assy 67200602 484 Hook 67200618
160 Kit (Drain Pan Sub Assy) 67200603 487 Hinge Wire (Grille) 67200619
164 Motor, Induction 67220260 488 Drain Pan Plug 67200550
168 Cabinet-E 67220210 514 ControlBox Cover 67200542
184-1 Thermistor Spring-A 67206400 522 Joint Gear 67200567
187 Clamp No. 1219 67220226 541 TerminalBase 67201709
195 Binder-C 67220227 541-1 TerminalCover 67201708
197 Wind Guide Board 67220261 542 PanelBase 67200575
212 Clamp NK-4N 67200453 543 Holder (Panel Frame) 67500576
223 Control Box 67200590 544 Holder (Panel Base) 67500574
226 Motor Gear 67200572 545 Panel Frame 67200577
234 Room Temp. Thermistor 67203505 563 InnerBox 67200620
235 Pipe Temp. Thermistor 67203506 565 EvaporatorHolderAssy 67200552
236 Controller PCB Assy 67203713 625 Cord Bushing 67230030
240 Remote Control Unit 67200604 692 Joint Shaft 67200622
244 Pipe CoverAssy
253-A Wire Assy 67200606 710 Intake Grille 67200623
320-1 Wire Clamp Metal 67200607 731-2 Holder 67200566
334 Wire Cover 67200608 735 Distributor Assy 67200595
337-1 RFM (Eva. )-A 67200609 777-1 Hook (Grille)-A 67200558
337-2 RFM (Eva. )-B 67200610 777-2 Hook (Grille)-B 67200559
338 Motor Holder 67200573 798 Drain Pump Holder 67200594
380 Locking Spacer 67207455 803 Cabinet-D 67220209
381-4 Spacer 67207464 814 Cabinet-C 67220208
457 RFM (Drain Pan) 67200503 815-1 Terminal-3P 67200585
460-1 Pump Cover-A 67200611 815-2 Terminal-3P 67200584
460-2 Pump Cover-B 67200612 834-1 Cover(Wire)-A 67200596
462 Panel(Top)Assy 67200592 834-2 Cover(Wire)-B 67200597
464 Cabinet-A Assy 67220206 835 Cushion (Pump) 67200545
465 Cabinet-B Assy 67220207 847 LouverSupporter 67200570
467 Drain Port 67200551 858 Spring (Grille) 67200565
468 M10 Nut-A (Large) 67207462 875 Power Supply PCB Assy 67200598
469 M10 Nut-B (Small) 67207463 876-2 Motor,Step 67200599
472-1 RFM (Grille)-A 67200560 896 Coupling Pipe Assy 67200613
472-2 RFM (Grille)-B 67200561
(K01AL-05L1HSE-C1)
67200605
690 Joint-A 67200621
705 LouverAssy 67200593
DescriptionDescription
2006.06.13 21

OUTDOOR UNIT
Ref. Part No. Ord.
No MR24UY3F Q'ty
1 Top Panel Sub Assy 67201640
2 Front Panel 67201601
3 Fan Guard 67201602
4 Grip Side 67201603
5 Service Panel Sub Assy 67201688
6 Right Panel 67201605
8 Propeller Fan Assy 67201607
9 Motor, Induction 67201608
10 Condenser-A Assy 67201609
11 CoilChoke 67201633
12 Strainer Assy 67201611
13 Separate Wall Assy 67201647
14 Cap Foot 67201650
15 Base Assy 67201648
17 3-Way Valve Assy (3/8) 67201614
18 3-Way Valve Assy (5/8) 67201615
19 Check Joint Assy 67201616
20 CompressorAssy 67201689
22 4-Way Valve 67201619
23 Solenoid 67201681
24 Pressure Switch 67201621
25 Inlet Pipe Cond A Assy 67201622
26 Inlet Pipe Cond B Assy 67201690
27 Outlet Pipe Cond A Assy 67201691
28 Expansion Valve Assy 67201692
29 Coil (Expansion Valve) 67201422
30 Distributor 67201693
31 Discharge Pipe A Assy 67201694
33 Terminal2P 67220181
34 Terminal5P 67201632
35 ACTPM 67201627
36 Holder Thermo 67201628
Description
37 Inverter PCB Assy 67201695
38 Power PCB Assy 67201696
---- Fuse 3.15A-250V 67201697
---- Thermistor (Outdoor Temp.) 67201686
---- Heat Exchanger Thermistor 67201698
---- Thermistor (Discharge) 67201635
---- Compressor Thermistor 67201637
---- Thermistor 67201430
---- Heatsink Thermistor 67201685
---- Transformer 67201699
---- Varistor 67201700
---- Arrester 67201701
---- Relay 67201702
---- Relay 67201703
---- Switch Push 67201704
---- Switch Slide 67201705
---- Drain Pipe Assy 67201706
---- Drain Cap 67201707
2006.05.25 22

STANDARD
ACCESSORIES
INDOOR UNIT ACCESSORIES
Name and Shape
Coupler heat
insulation
Q’ty
2
Application
For indoor side pipe joint
Tapping Screw
(flush heads)
Special nut A
(large flange)
Special nut B
(small flange)
Template
Binder
(small)
Blower cover insulation
Hook wire
For installing the remote
controller
2
For installing indoor unit
4
For installing indoor unit
4
For ceiling hole cutting
1
For fixing the remote
controller cord
1
For discharged air
2
For installing intake grille
2
Remote
controller
1
Remote controller cord
For connecting the remote
controller
1
OUTDOOR UNIT ACCESSORIES
Name and Shape Q'ty Application
Drain pipe
Drain cap
For outdoor unit drain
1
piping work (May not be
supplied, depending on
the model.)
5
2006.05.25 23

0605G3089
 Loading...