

FRIEDLAND MA6, Motion Alarm Plus Installation And Operating Instructions Manual

These instructions should be retained in
a safe place for future reference.
Kit Contents:
1 x Remote Control
1 x PIR Alarm Unit and Wall Mounting Bracket
4 x 1.5V A76 (LR44) Button Cells for
Remote Control (supplied fitted)
1 x Fixings Pack
1 x Instruction Leaflet
1 x Window Sticker
Tools and Equipment Required:
No.0 and No.1 Philips Screwdrivers
Drill and 6.5mm Masonry Drill Bit
3 x 1.5V AA (LR6) Alkaline Batteries for
PIR Alarm Unit
SAFETY
Always follow the manufacturers advice when
using power tools; steps, ladders etc. and wear
suitable protective equipment (e.g. safety
goggles) when drilling holes etc.
Before drilling holes in walls, check for hidden
cables and pipes, the use of a cable/pipe
locater may be advisable if in doubt.
The use of ear protection is advisable when
working in close proximity to the Siren due to
the high sound level produced by this device.
All components are suitable for mounting in dry
interior locations only.
INTRODUCTION
The Remote Control is used to ARM and
DISARM the system. The Remote Control
operates using Infra Red so it must be pointing
directly at the PIR Alarm Unit to function.
Passive Infra-Red (PIR) detectors are designed
to detect movement in an area by detecting
changes in infra-red radiation levels caused for
example when a person/animal moves within
the devices field of vision.
The system has 2 operating modes: ALARM
and CHIME. Chime Mode is a low security
feature that will produce a door-chime sound
when the alarm is triggered. In Alarm Mode the
device will produce a constant high volume
alarm sound when triggered.
POSITIONING THE PIR
ALARM UNIT
The recommended position for a PIR
Movement Detector is in the corner of a room
mounted at a height of approx. 2m. At this
height, the detector will have a range of up to
6m with a field of view of 110°.
When considering and deciding upon the
mounting position for the detector the following
points should be considered:
1) Where possible, mount the detector in the
corner of the room where the logical path
of an intruder would be across the device.
PIR detectors respond more effectively to
movement across the device than to
movement directly towards it
2) Do not position the unit facing a window or
where it is in direct sunlight. PIR Detectors
are not suitable for use in conservatories.
MA6 - Motion Alarm Plus
Installation and Operating Instructions
3) Do not position the unit where it is exposed
to draughts.
4) Do not position the unit directly above a
strong heat source.
5) Do not position the unit where it is subject
to excessive vibration.
INSTALLATION
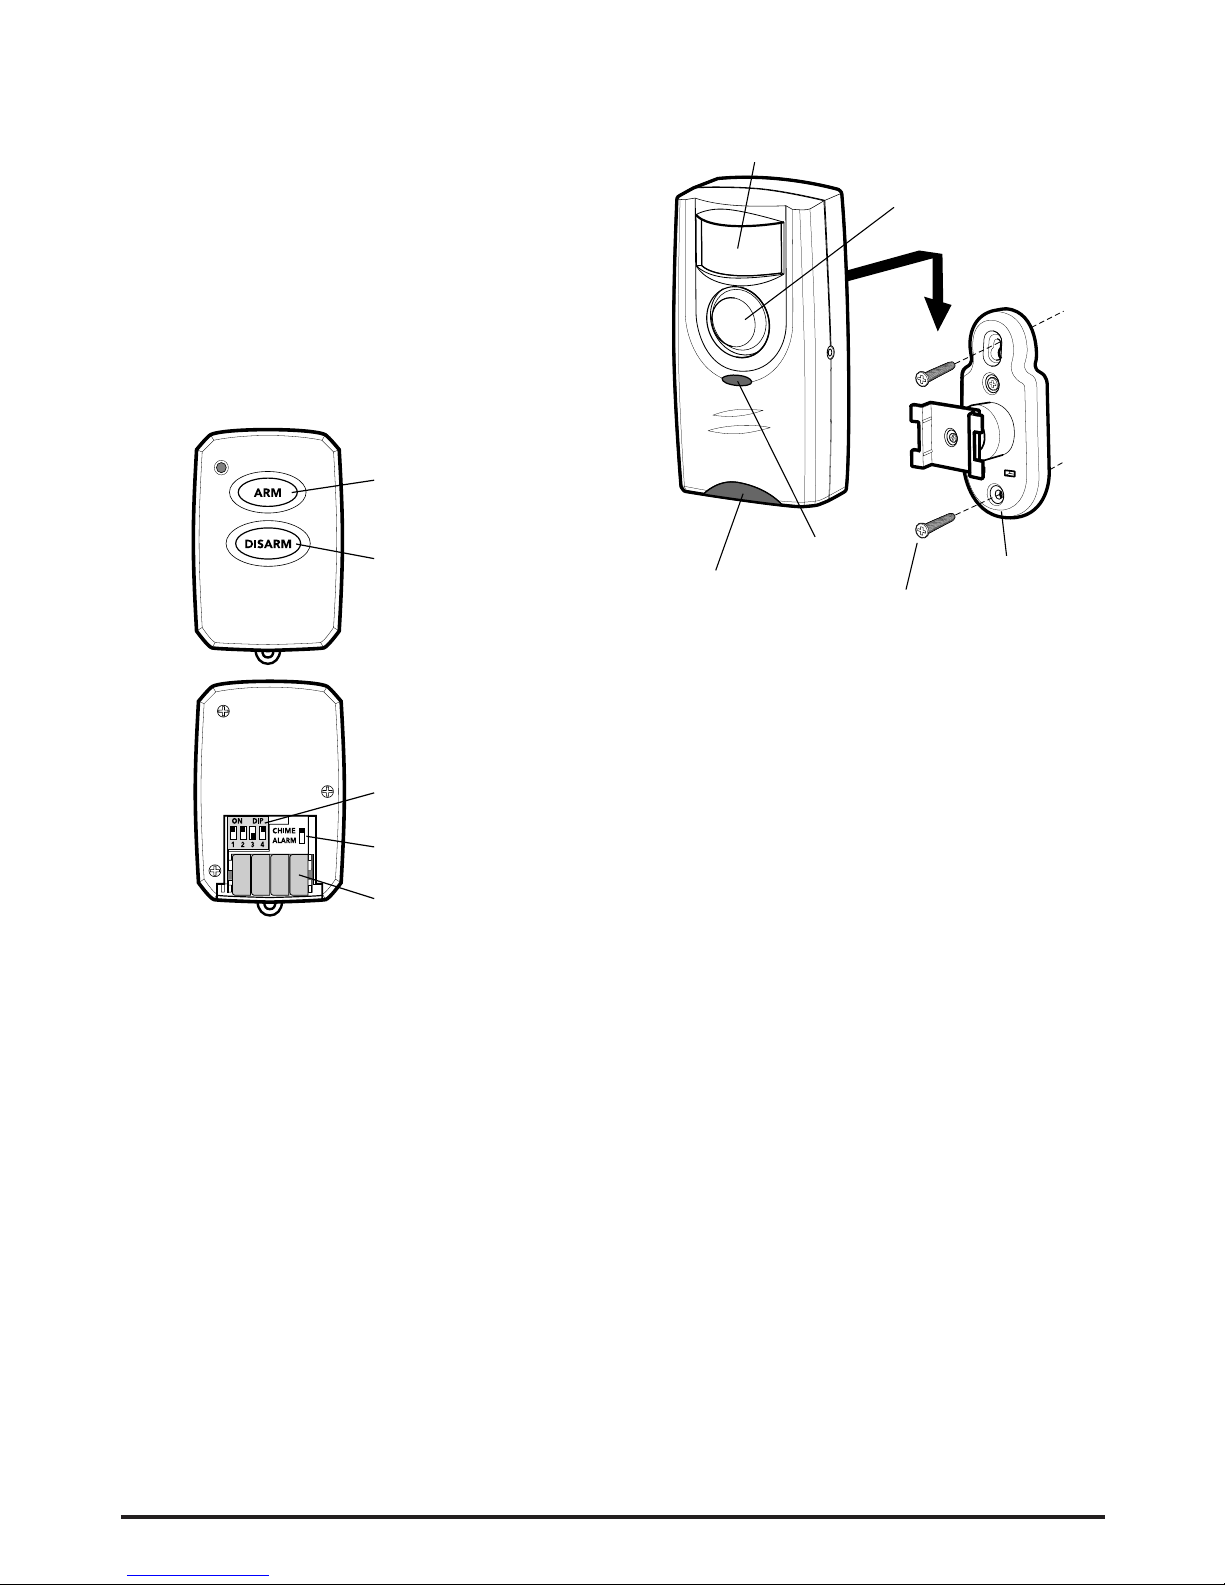
Configuring the Remote Control:
1) Slide off the battery cover.
2) Select a random ON/OFF combination for
the 4 DIP switches located in the battery
compartment. This is the House Code that
enables the Remote Control and PIR Alarm
Unit to communicate.
3) Set operating mode switch to ALARM or
CHIME according to the required operating
mode.
4) If fitted, carefully remove the battery
isolation tab from between the batteries. If
the batteries are dislodged replace them
noting the correct polarity shown inside the
battery compartment.
5) Replace the battery compartment cover.
PIR Alarm Unit:
6) Hold the mounting bracket in position on
the wall and mark the position of the two
fixing holes.
7) Fix the mounting bracket to the wall using
the fixing screws and wall plugs supplied,
(a 6.5mm hole will be required for the wall
plugs).
Note: The wall plugs supplied are not
suitable for use in plasterboard walls.
8) Undo the battery cover fixing screw and
remove the cover.
9) Insert 3 x AA (LR6) Alkaline batteries noting
the correct polarity shown inside the
battery compartment.
10) To program the house code on the PIR
Alarm Unit press the LEARN button located
in the battery compartment. The LED
indicator on the front will start flashing.
11) Point the Remote Control at the PIR Alarm
Unit and press the ARM button for 1s. The
Unit will beep and the LED will stop
flashing when the signal is received.
12) Replace the battery cover and fixing screw.
13) Clip the PIR Alarm Unit onto the mounting
bracket and adjust the unit until it is at the
required angle and direction.
House Code
Switches
Mode Selector
Switch
Batteries
ARM
Button
DISARM
Button
Fixing
Screw
PIR Movement
Sensor
Wall Mounting
Bracket
Siren
LED
Indicator
Infra-Red
Receiver
 Loading...