

FRIEDLAND D917S LIBRA+, D918S LIBRA+ User Manual

This product may be purchased from Connevans Limited secure online store
at www.DeafEquipment.co.uk
DeafEquipment.co.uk
Solutions to improve the quality of life
SSoolluuttiioonnss ttoo iimmpprroovvee tthhee qquuaalliittyy ooff lliiffee
Connevans

48333PL Ed1
Instruction Manual
D917S/D918S Libra+ 200m portable chime
Bedienungsanleitung
D917S/D918S Libra+ 200m Tragbare Klingel
Manuel d’utilisation
D917S/D918S Libra plus Carillon sans fil 200m
Instructie handleiding
D917S/D918S Libra+ 200m Draadloze deurbelset
Instruccione Manuel
D917S/D918S Libra+ Timbre portátil 200M
Manuel d’Instruzioni
D917S/D918S Libra+ 200mt argento
Manual de Instruções
D917S/D918S Libra+ 200m Carrilhão

1
ENGLISH
Checking pack contents........................................ Pg. 2
Safety.....................................................................
Quick start.............................................................
Fit the chime battery.............................................. Pg. 3
Switch positions.....................................................
Volume control ......................................................
Sliding window .....................................................
Use of icons ......................................................... Pg. 4
Programming procedure .......................................
Recall function ...................................................... Pg. 5
Chime sounds ......................................................
Chime position ......................................................
Troubleshooting.....................................................
Specifications........................................................ Pg. 7
Disposal and recycling..........................................
Guarantee..............................................................
Declaration............................................................
Installation and Use
Libra + 200m Portable chime

2
Libra + 200m Portable chime
Thank you for choosing this Friedland product. Please use the following instructions to
ensure correct installation and use. Keep these notes in a safe place for future reference.
Unpack your chime kit and identify the
following parts:
¬● Chime
● Chime bracket
● 2 x fixing screws for chime
● 2 x wall plugs
You will need:
● A 4mm cross-head screwdriver
● A 6mm masonry drill
● 4 x LR14 ’C’ Alkaline batteries
Checking pack contents
Before proceeding with the installation,
please note the following safety warnings:
¬● Always follow the manufacturer’s advice
when using power tools and wear suitable
protective equipment (e.g. safety goggles)
when drilling holes etc.
¬● Before drilling holes in walls, check for
hidden electricity cables and water pipes,
the use of a cable/pipe locater maybe
advisable if in doubt.
Safety
You need to do the following to get started:
● Fit the chime batteries
● Check the chime switch setting
● Check the volume setting
When you operate the bell push, the chime will sound and the 1st Icon will flash. If you have additional
pushes or you want to assign a different icon to your push, you will need to follow the programming procedure.
Quick start
3
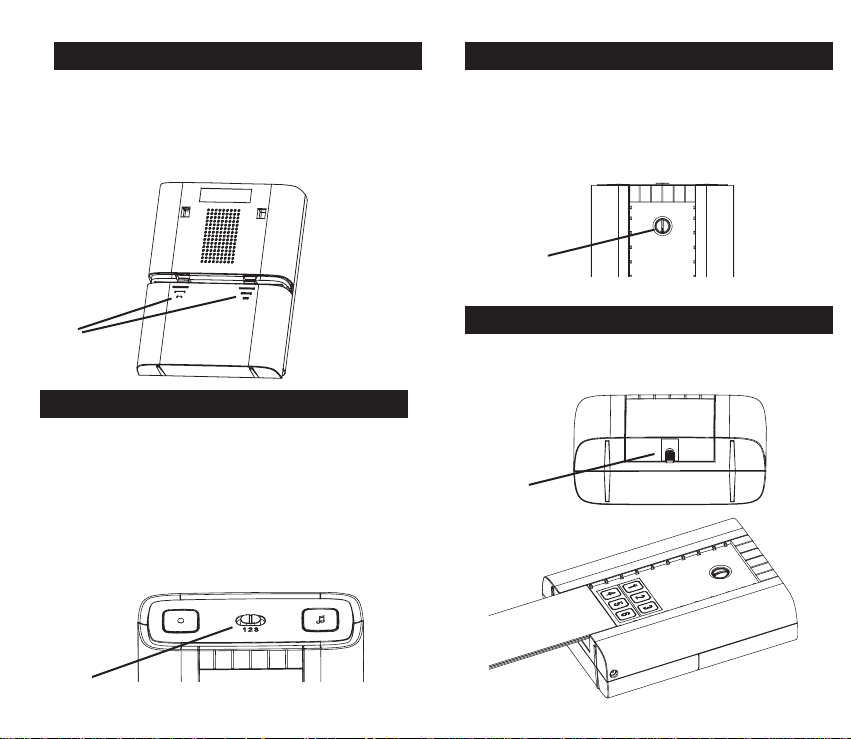
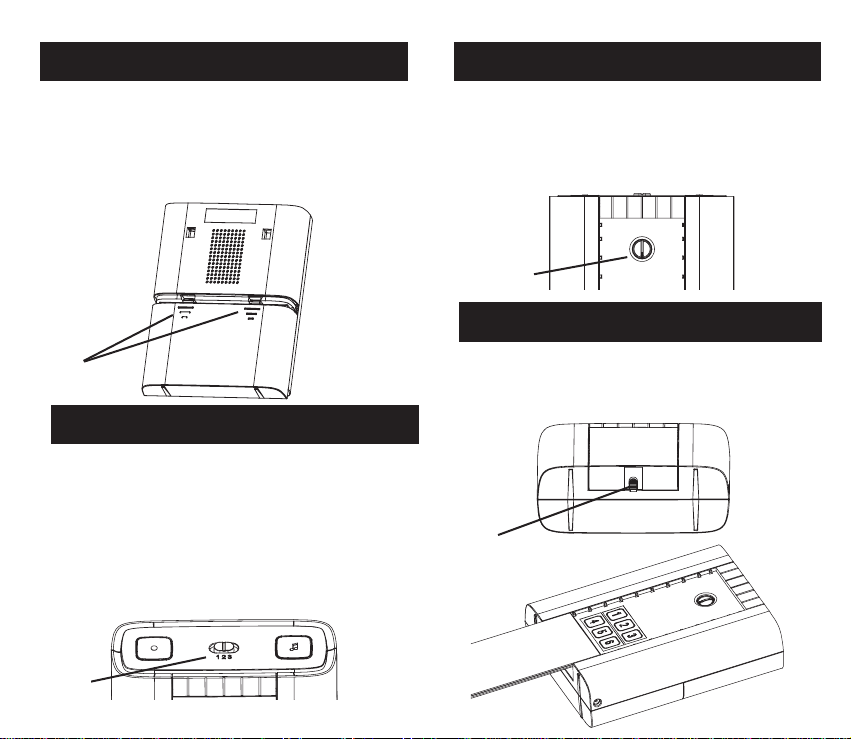
To remove the chime battery cover, press at point
A and slide the cover back 5mm, then lift off.
Insert 4 x LR14 ‘C’ alkaline batteries (not supplied).
Observe polarity as marked inside the
battery compartment (Fig. 1).
Fit the chime batteries
Fig. 1
A
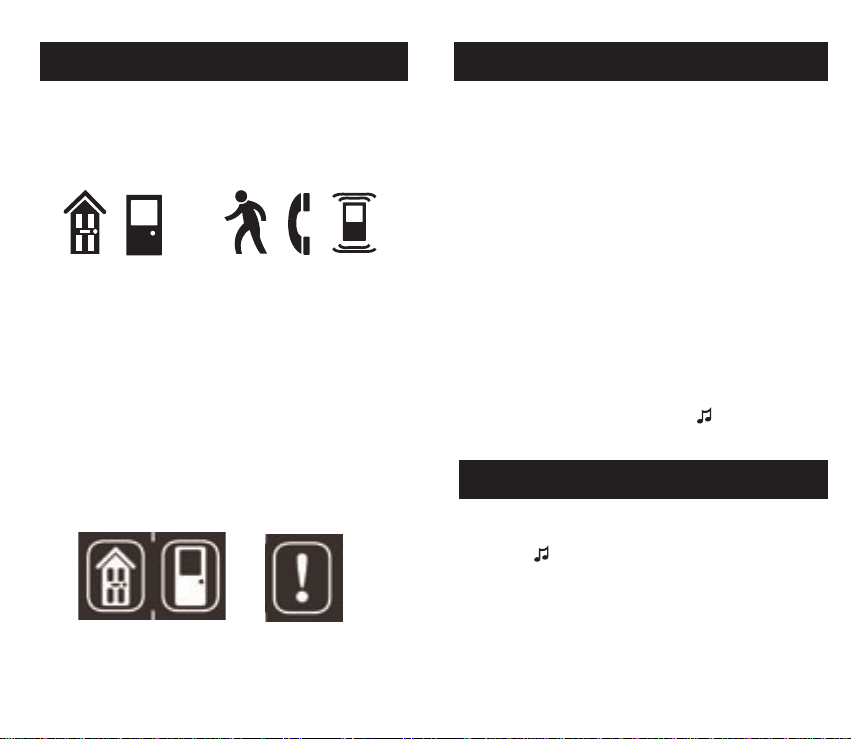
The volume control is behind the sliding window, on
the front of the chime. Initially, set the control to
mid-point. After you have tested your system, adjust
to the desired volume.
Volume
control
Fig. 3
Volume control
Mute
To turn the sound off, set switch (B) to position 1.
Flash off
To turn the blue flashing light off, set switch (B) to
position 3.
Normal operation
For normal operation (sound + flashing light), set
switch (B) to position 2.
Switch positions
B
Fig. 2
Sliding window
C
Fig. 4
Release the catch (C) and slide open the
window (Fig. 4).
4
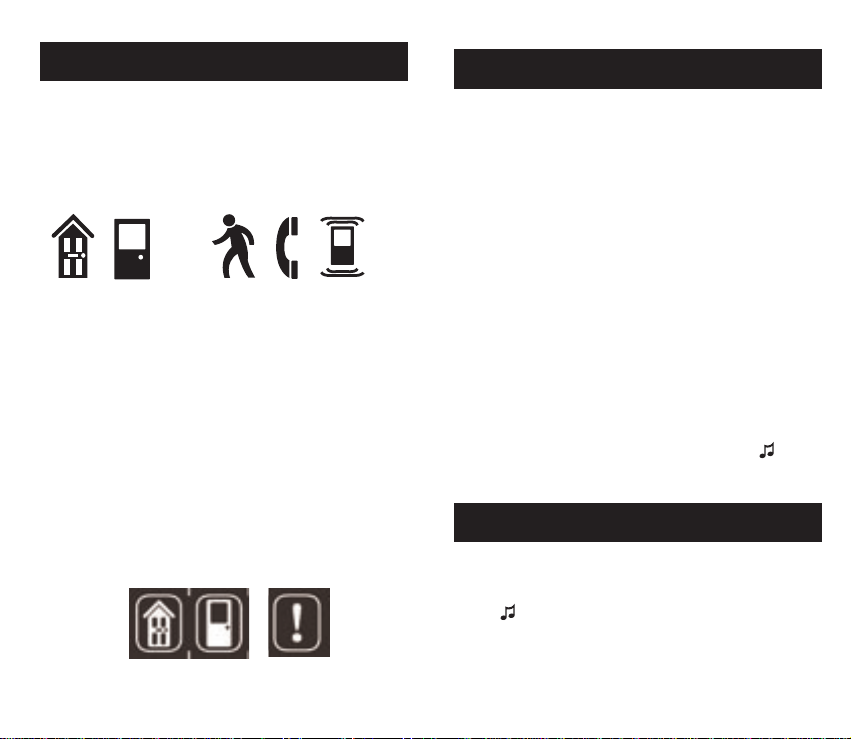
In addition to the chime sounds, your chime has a
visual indication to show which device has activated it.
An icon will illuminate when the chime is
activated by a bell push or another compatible
device. The chime supports six icons:
The ‘Main door’ and ‘Backdoor’ icons are usually
used for bell pushes. The other icons are intended for
use with other compatible devices, such as PIR
movement detectors and Telephone ring detector.
Icons numbered 1 to 6 are also included. The Icons
are self-adhesive, supplied in strips of 3. They can
be changed, if required, by opening the sliding
window of the chime and gently peeling off the
strips.
If desired, the strips can be cut into individual
icons and fixed to the chime in a different order.
Use the Programming procedure to change the
icon associated with a push.
Use of icons
!
Main
door
Back
door
Alert
symbol
Intruder
Telephone
Pager/
Key fob
✃
Programming procedure
Learn mode
To enable your chime to learn the identity of your
bell push:
¬● Press the ● button and keep it pressed. Each
Icon will light in turn. When the Icon you want is
lit, release the button.
¬● While the Icon you have selected is lit, operate
your push. The chime will sound. The Icon will flash.
Unlearn procedure
If you want to remove a push from the chime’s
memory:
¬● Press the ● button and keep it pressed.
Each Icon will light in turn. When the Icon
associated with the push to be un-learnt is
lit, release the button.
¬● Press and hold down both ● & buttons,
until a ‘beep’ sound is heard.
Changing the tune
Operate the push. While the icon is flashing,
press the button. Press the button again
and the tune will change. Repeat until the
tune you want plays.
Changing the tune
5
A ‘beep’ sound is heard in learn mode…
¬● The push you are programming has already been learnt by the chime.
¬● If you want to change the icon associated with the push, use the un-learn procedure, then
programme the push again.
Two ‘beep’ sounds are heard after the normal chime sound…
¬● This indicates a low battery in the bell push that activated the chime. Fit a new battery, type CR2032.
When the bell push is operated, the amber confidence light does not turn on, or is only
on for a short time…
¬● In normal operation, the amber light will turn on for 1 second. When the battery is weak,
the light will only turn on for a short time. Fit a new battery, type CR2032.
Troubleshooting
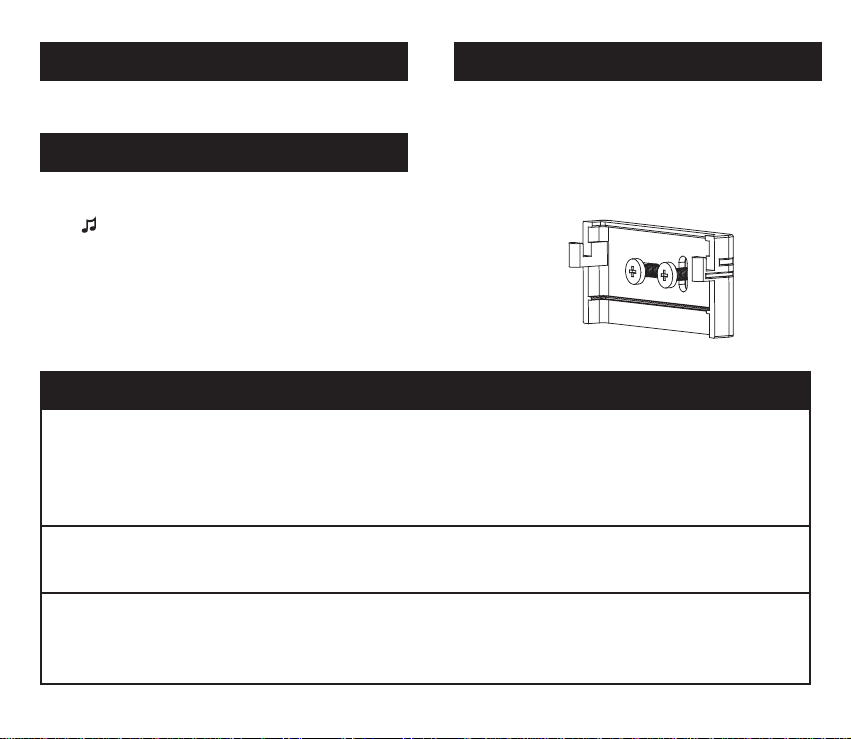
The Chime can be free standing or wall mounted
using the wall bracket provided. If wall mounting is
preferred, screw the bracket to the wall (see Fig 5).
The Chime hooks onto the wall bracket as illustrated.
Chime position
Fig. 5
Chime sounds
To hear the chime sounds without operating the
bell push, press the button. Press the button
again and the tune will change.
A short push of the ● button will flash the icon that
was last in use.
Recall function

6
The chime does not work…
● Check that the batteries are the correct type, LR14 ‘C’ cells. Only use alkaline batteries.
● Check that the batteries are fitted correctly.
● The chime could be out of range of the bell push. Try the chime in a different location.
● The chime might not have learnt the identity of the bell push. Follow the programming procedure.
The chime does not sound…
● Check the chime switch position.
● Check that the volume control is not at the minimum setting.
The flashing light does not work…
● Check the chime switch position.
Range is reduced…
● Metal structures, including uPVC door frames can reduce the range of the product.
Avoid mounting the push or chime on or near metal structures.
● Other equipment can cause radio interference that affects your chime.
● Walls and ceilings will reduce the range.
● Weak batteries will reduce range. Replace every 12 –18 months. In cold conditions (below 5ºC),
batteries may need to be replaced more often.
Amber light flashes…
● When the chime battery is low, an amber light will flash every 5 seconds. Fit new batteries in the
chime, type LR14 ‘C’ cells. Only use alkaline batteries.
Chime/Push does not work with my older Libra equipment…
● Libra + is not compatible with the earlier Libra system.
● Only use accessories marked Libra +.
7
Friedland, The Arnold Centre, Paycocke Road, Basildon, Essex, SS14 3EA
www.friedland.co.uk
Friedland guarantees this product
for 2 years from the date of purchase.
Proof of purchase is required; this
does not affect your statutory rights.
If you require further information
about our product,
call the Friedland helpline on
01268 563066.
Guarantee
Batteries and waste electrical products should not be disposed of with
household waste. Please recycle
where these facilities exist. Check
with your local authority or retailer
for recycling advice.
Disposal & Recycling
Novar ED&S hereby declares that this product is in compliance with the essential requirements and other relevant provisions of the Radio and Telecommunications Terminal Equipment (R&TTE) directive, 1999/5/EC.
Declaration
Specifications
Specification
Operating Temperature
Range (open field)
RF Frequency – UK/Europe
Sound Level (typical)
RF Power
Battery Type
Battery Life
(5 activations/day)
Maximum input voltage
(T1 - T5)
IP Rating
Power adaptor
Chime
0 to 40ºC
868 MHz
200 m
90dBA @ 1m
LR14
12 Months
-
IP3x
D935, D935E

Inbetriebnahme
Libra + 200M Tragbare Klingel
GERMAN
8
Packungsinhalt überprüfen.................................Pg. 9
Sicherheit............................................................
Schnellstart.........................................................
Klingelbatterien einlegen....................................Pg. 10
Schalterpositionen..............................................
Lautstärke .........................................................
Schiebefenster ..................................................
Symbol .............................................................. Pg. 11
Programmierung ...............................................
Wiederholung..................................................... Pg. 12
Klingeltöne ........................................................
Gongposition .....................................................
Störungssuche ..................................................
Spezifikationen................................................... Pg. 14
Entsorgung.........................................................
Garantie.............................................................
Erklärung............................................................

9
Libra + 200M Tragbare Klingel, mit Taster/Erweiterungssender
Vielen Dank, dass Sie sich für dieses Friedland-Produkt entschieden haben. Bitte befolgen Sie die
Anweisungen unten, um sicherzustellen, dass Sie die Klingel korrekt anbringen und verwenden.
Bewahren Sie diese Informationen sorgfältig auf.
Packen Sie Ihr Klingelset aus und identifizieren Sie
folgende Teile:
● Klingel
● Klingelhalterung
● 2 Befestigungsschrauben für Klingel
● 2 Wanddübel
Sie benötigen:
● 4 mm Kreuzschlitz-Schraubendreher
● 4 x LR14 ‘C’ Alkalibatterien, ein 6 mm
● Mauerwerkbohrer
Packungsinhalt überprüfen Sicherheit
Bitte lesen Sie sich vor der Montage folgende
Sicherheitshinweise durch:
● Beachten Sie beim Umgang mit Elektrowerkzeugen
stets die Anweisungen des Herstellers und
tragen Sie beim Bohren usw. geeignete
Schutzausrüstung (z. B. Schutzbrille).
● Bevor Sie in Wände bohren, prüfen Sie,
ob dort Stromkabel und Wasserleitungen
verdeckt verlaufen. Im Zweifelsfall ist die
Verwendung eines Kabel-
/Leitungssuchgeräts zu empfehlen
Beginnen Sie wie folgt:
● Klingelbatterien einlegen
● Einstellung des Klingelschalters überprüfen
● Lautstärkeregelung überprüfen
Bei Betätigen des Klingelknopfes ertönt die Klingel und das erste Symbol blinkt auf. Wenn Sie weitere Klingelknöpfe oder
kompatible Geräte haben oder dem Knopf ein anderes Symbol zuweisen möchten, befolgen Sie das Programmierverfahren.
Schnellstart
10
Zum Entfernen der Batterieabdeckung drücken Sie
auf Punkt Aund schieben Sie die Abdeckung 5
mm zurück. Heben Sie dann die Abdeckung ab.
Legen Sie 4 Alkalibatterien LR14 ‚C‘ ein (nicht im
Lieferumfang). Beachten Sie die Polausrichtung
(siehe Aufdruck im Batteriefach) (Abb. 1).
Klingelbatterien einlegen
Abb. 1
A
Stumm
Um das Klingelgeräusch abzuschalten, stellen Sie
den Schalter (B) auf Position 1.
Blinklicht
Zum Abschalten des blauen Blinklichts stellen Sie
den Schalter (B) auf Position 3.
Normaler Betrieb
Zum normalen Betrieb (Ton + Licht) stellen Sie
Schalter (B) auf Position 2.
Schalterpositionen
B
Abb. 2
Der Lautstärkeregler befindet sich hinter dem
Schiebefenster vorne an der Klingel. Wählen Sie
anfangs eine mittlere Lautstärke. Nachdem Sie die
Anlage getestet haben, stellen Sie die
gewünschte Lautstärke ein.
Lautstärke
Lautstärke
Abb. 3
Schiebefenster
C
Abb. 4
Lösen Sie den Riegel (C) und öffnen Sie das
Fenster durch Schieben (Abb. 4).
11
Neben dem Klingelgeräusch ist Ihre Klingel mit
visuellen Anzeigen versehen, die darauf hinweisen,
durch welches Gerät die Klingel aktiviert wurde.
Sobald die Klingel durch den Klingelknopf oder ein
anderes kompatibles Gerät aktiviert wird, leuchtet
eines von sechs möglichen Symbolen auf:
Die „Haustür“- und „Hintertür“-Symbole werden meist
für Klingelknöpfe verwendet. Die übrigen Symbole
können anderen kompatiblen Geräten wie einem
Funk-Bewegungsmelder und einem TelefonKlingeltonmelder zugeordnet werden. Darüber hinaus
gibt es von 1 bis 6 numerierte Symbole. Die
Symbole sind selbstklebend, 3 Symbolstreifen sind
in der Verpackung enthalten. Sie können bei Bedarf
ausgewechselt werden. Öffnen Sie dazu das
Schiebefenster an der Klingel und lösen Sie vorsichtig
die Klebestreifen. Auf Wunsch können auch die einzelnen
Symbole von den Streifen abgeschnitten und in
anderer Reihenfolge auf der Klingel angebracht werden.
Mithilfe der Programmierung ändern Sie, welches
Symbol jeweils durch ein Gerät aktiviert wird.
Symbole
!
Haustür Hintertür Alert
symbole
Intruder
Telefon
Pager/
Key fob
✃
Programmierung
Lernmodus
Aktivieren der Klingel zum Erkennen Ihres
Klingelknopfes:
¬● Halten Sie die Taste ● gedrückt. Die
Symbole leuchten nacheinander auf. Sobald
das gewünschte Symbol aufleuchtet, lassen
Sie die Taste los.
¬● Drücken Sie den Klingelknopf, während das
gewählte Symbol aufleuchtet. Die Klingel
ertönt, und das Symbol blinkt auf.
Programmierung rückgängig machen
Wenn Sie ein Gerät aus dem Klingelspeicher
entfernen möchten:
¬● Halten Sie die Taste ●gedrückt. Die Symbole
leuchten nacheinander auf. Sobald das Symbol,
das dem zu entfernenden Gerät zugeordnet
ist, aufleuchtet, lassen Sie die Taste los.
¬● Halten Sie sowohl die Taste ● als auch
gedrückt, bis ein Piepton ertönt.
Klingelton ändern
Betätigen Sie den Klingelknopf. Drücken Sie die
Taste , während das Symbol aufblinkt. Drücken
Sie die Taste erneut, um einen anderen Ton zu
hören. Wiederholen Sie dieses Verfahren, bis
Ihnen ein Klingelton gefällt.
Klingelton ändern
12
Wenn Sie kurz die Taste ● drücken, blinkt das
zuletzt benutzte Symbol auf.
Wiederholung
Klingeltöne
Wenn Sie die Klingeltöne hören möchten, ohne
den Klingelknopf zu betätigen, drücken Sie die
Taste . Drücken Sie die Taste erneut um einen
anderen Klingelton zu hören.
Die Klingel kann frei aufgestellt oder mithilfe der
mitgelieferten Wandhalterung an einer Wand
montiert werden. Schrauben Sie in diesem Fall
die Wandhalterung an der Wand fest (siehe Abb. 5)
und haken Sie die Klingel wie abgebildet in die
Halterung ein.
Gongposition
Abb. 5
Im Lernmodus ist ein Piepton hörbar …
¬● Der Klingelknopf, den Sie programmieren, wird bereits von der Klingel erkannt.
¬● Wenn Sie dem Klingelknopf ein anderes Symbol zuweisen möchten, Verfahren Sie wie unter
„Programmierung rückgängig machen“ beschrieben und programmieren Sie dann den
Klingelknopf erneut ein.
Auf den normalen Klingelton folgen zwei Pieptöne …
¬● Dies weist auf einen niedrigen Batteriestand im Klingelknopf hin, der die Klingel aktivierte.
Legen Sie eine neue Batterie Typ CR2032 ein.
Bei Betätigen des Klingelknopfes leuchtet das orangefarbene Licht nicht oder nur kurz auf …
● Im normalen Betrieb leuchtet das orange Licht 1 Sekunde lang auf. Bei schwacher Batterie
leuchtet es kürzer. Legen Sie eine neue Batterie Typ CR2032 ein.
Störungssuche

13
Die Klingel funktioniert nicht …
● Prüfen Sie, ob Batterien des Typs LR14 ‘C’ eingelegt sind. Verwenden Sie nur Alkalibatterien.
● Vergewissern Sie sich, dass die Batterien korrekt ausgerichtet sind.
● Möglicherweise befindet sich die Klingel außerhalb der Reichweite des Klingelknopfes.
Probieren Sie die Klingel an einer anderen Position aus.
● Möglicherweise ist der Klingelknopf noch nicht in die Klingel einprogrammiert. Programmieren
Sie ihn ein.
Es ist kein Klingelton hörbar …
● Überprüfen Sie die Schalterstellung an der Klingel.
● Vergewissern Sie sich, dass die Lautstärke nicht in der niedrigsten Stellung ist.
Das Blinklicht leuchtet nicht auf …
● Überprüfen Sie die Schalterstellung an der Klingel.
Die Reichweite ist reduziert …
● Metallstrukturen und uPVC-Türrahmen können die Reichweite des Produkts verringern. Montieren Sie
Klingelknopf und Klingel möglichst nicht an oder in der Nähe von Metallteilen.
● Andere Geräte können eine Funkstörung erzeugen, welche die Funktion der Klingel beeinträchtigt.
● Wände und Decken reduzieren die Reichweite.
● Schwache Batterien reduzieren die Reichweite. Wechseln Sie die Batterien alle 12 –18 Monate aus.
Bei kaltem Wetter (unter 5ºC) müssen die Batterien möglicherweise häufiger ausgewechselt werden
Das orange Licht blinkt auf …
● Bei niedrigem Batteriestand der Klingel blinkt alle 5 Sekunden ein oranges Licht auf. Legen Sie
neue Batterien vom Tp LR14 ‘C’ in die Klingel ein. Verwenden Sie nur Alkalibatterien.
Klingel/Klingelknopf funktionieren nicht in Verbindung mit meinen älteren Libra-Geräten …
● Libra + ist nicht mit dem früheren Libra-System kompatibel.
● Verwenden Sie nur mit Libra + gekennzeichnete Zubehörteile.

Friedland, The Arnold Centre, Paycocke Road, Basildon, Essex, SS14 3EA
www.friedland.co.uk
14
Friedland gewährt eine 2-JahreGarantie ab Kaufdatum. Ein
Kaufbeleg ist erforderlich. Ihre
gesetzlichen Rechte sind hiervon
nicht betroffen. Weitere
Informationen zu unserem Produkt
erhalten Sie von der FriedlandHelpline unter +44 (0)1268 563066.
Garantie
Batterien und Elektroartikel sollten
nicht zusammen mit normalem
Hausmüll entsorgt werden. Nach
Möglichkeit sollten Sie vorhandene
Recycling-Einrichtungen nutzen.
Erkundigen Sie sich bei Ihrer
örtlichen Behörde oder Ihrem
Fachhändler nach RecyclingMöglichkeiten.
Entsorgung
Novar ED&S erklärt hiermit, dass dieses Funkklingelset den wesentlichen Anforderungen und anderen
anwendbaren Vorschriften der Richtlinie über Funkanlagen und Telekommunikationseinrichtungen (R&TTE)
1999/5/EC entspricht.
Erklärung
Spezifikationen
Spezifikationen
Betriebstemperatur
Funkfrequenz – GB/Europa
Reichweite (für Freiflächen)
Lautstärke (typische Einstellung)
HF-Leistung
Batterie
Batterielebensdauer
(5 Betätigungen pro Tag)
Maximum input voltage
(T1 - T5)
IP-Schutzklasse
Stromadapter
Klingel
0 bis 40ºC
868 MHz
200 m
90dBA @ 1m
LR14
12 Monate
-
IP3x
D935, D935E
 Loading...