

Page 1
How to use your new
Refrigerator
Model MUR4996
Page 2
Page 3
3
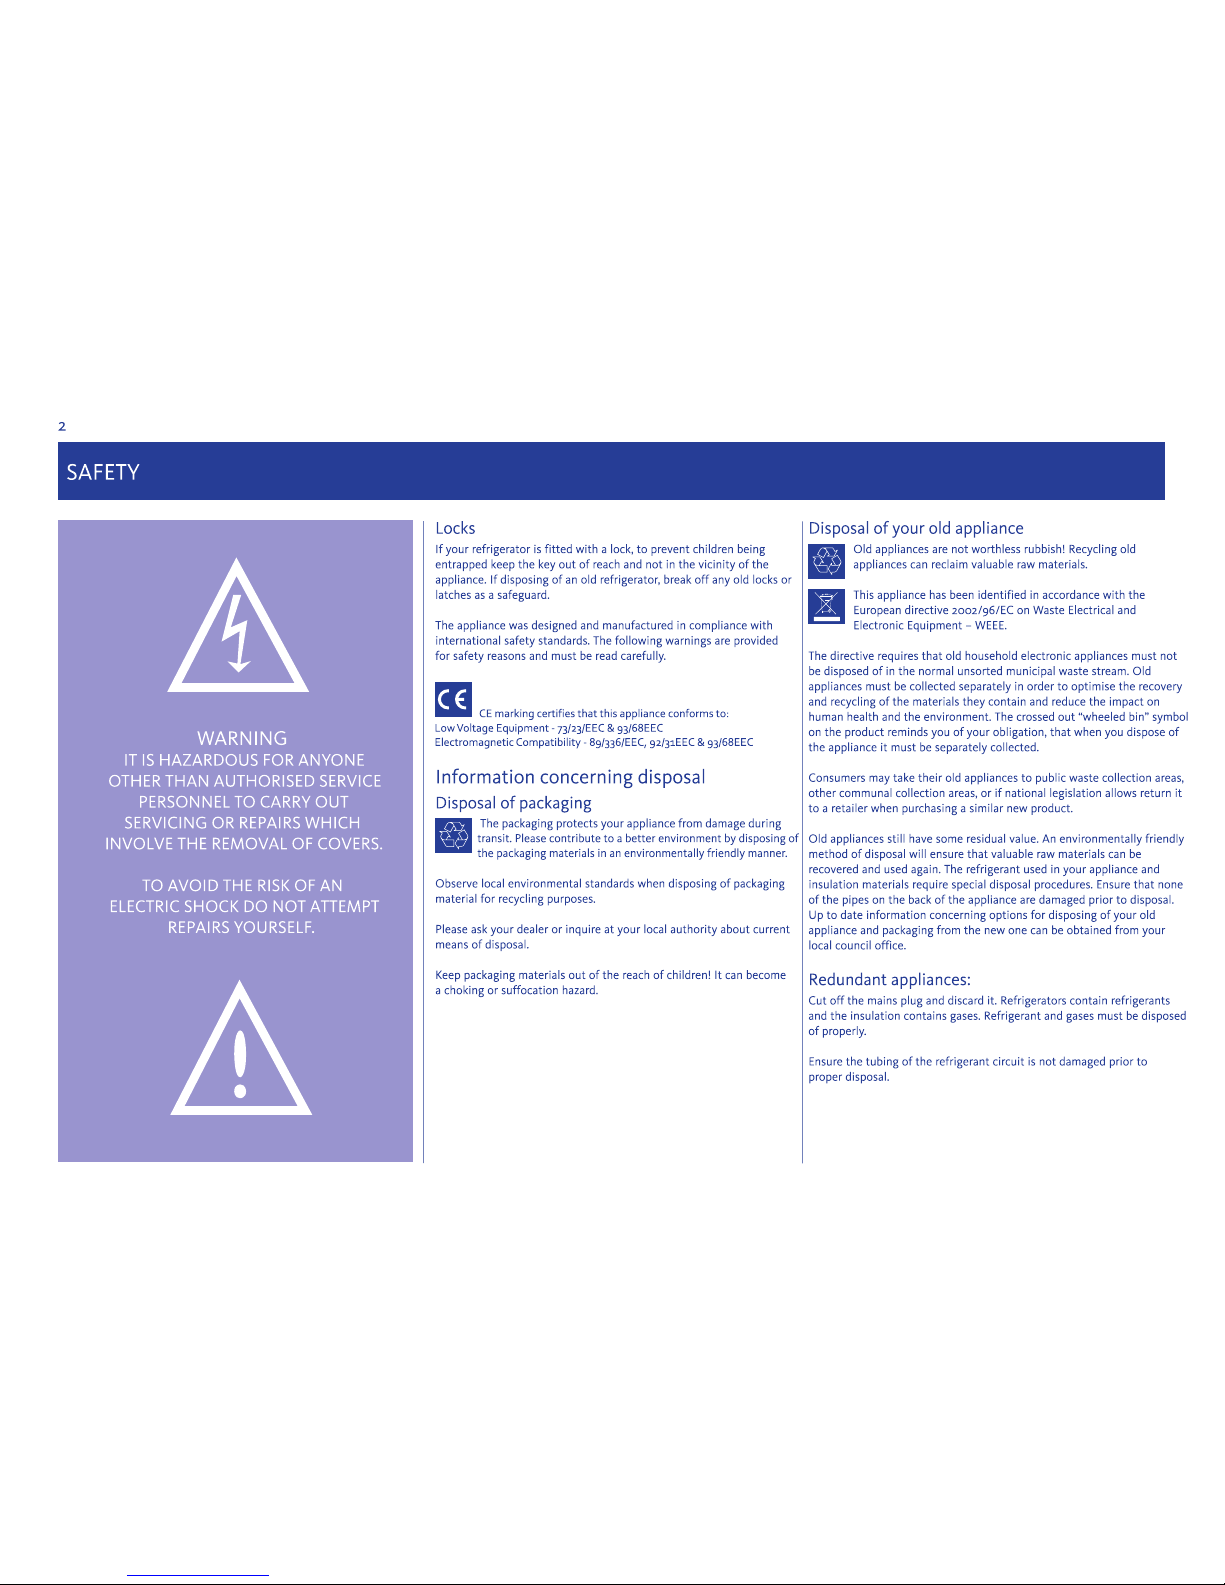
Safety and warning information
Before you switch ON the appliance
Please read the operating and installation instructions carefully. They
contain important information on how to install, use and maintain
the appliance. Keep all documentation for subsequent use or for the
next owner.
Technical safety
This appliance contains a small quantity of environmentally friendly but
flammable R600a refrigerant. Ensure that the tubing of the refrigeration
circuit is not damaged during transportation and installation. Leaking
refrigerant may ignite.
If damage has occurred
- Keep naked flames and/or ignition sources away from the appliance.
- Pull out the mains plug.
- Thoroughly ventilate the room for several minutes.
- Notify customer services.
The more refrigerant an appliance contains, the larger the room must be.
Leaking refrigerant can form a flammable gas-air mixture in rooms which
are too small. The room must be at least 1m
3
per 8 g of refrigerant.
The amount of refrigerant in your appliance is indicated on the rating label
on your appliance.
Important information when using the appliance
• This appliance is not intended for use by persons (including children)
with reduced physical, sensory or mental capabilities, or experience or
knowledge, unless they have been given supervision or instructions
concerning the use of the appliance by a person responsible for their
safety. Children should be supervised to ensure that they do not play
with the appliance.
•
If the supply cord is damaged, it must be replaced by the manufacturer,
its service agent or similarly qualified persons in order to avoid a hazard.
• Never use electrical appliances inside the refrigerator (e.g. heater,
electric ice maker, etc.). Explosion hazard!
• Never use a steam cleaner to clean the appliance. The steam may pen-
etrate electrical parts and cause a short circuit. Risk of electric shock!
• Do not store products which contain flammable propellants (e.g. spray
cans) or explosive substances in the appliances. Explosion hazard!
• Do not stand or support yourself on the base, drawers or doors, etc.
• Before defrosting and cleaning the appliance, pull out the mains plug or
switch off the fuse. Do not pull out the mains plug by tugging the cable.
• Commercially frozen pre-packed food should be stored in accordance
with the frozen food manufacturers instruction.
• Bottles containing a high percentage of alcohol must be sealed and
stored in an upright position.
• Keep plastic parts and the door seal free of oil and grease. Otherwise,
the plastic and door seal will become porous.
• Never cover or block the ventilation openings for the appliance.
• Do not store bottled or canned drinks (especially carbonated drinks)
in the ice compartment. Bottles and cans may explode!
• Never put frozen food, or ice cubes, straight from the ice compartment
into your mouth. Risk of frost burns to the lips and tongue!
• Avoid prolonged touching of frozen food, ice or the inner freezer walls
or tubing etc. Risk of frost burns to the skin.
• Do not scrape off frost or stuck frozen food with a knife or pointed
object. You could damage the refrigerant tubing. Leaking refrigerant
may ignite. Only use a plastic scraper.
• In the case of malfunction, under no circumstances should you attempt
to repair the appliance yourself. Repairs carried out by inexperienced
persons may cause injury or further malfunctioning to the appliance.
• When the appliance is unplugged please wait for 5 minutes before
plugging it in again. Otherwise, the compressor will be overloaded.
• Do not use electrical appliances such as a hairdryer or heaters
near your refrigerator.
• Do not store inflammable gases or liquids inside your refrigerator.
Children in the household
• Keep children away from the packaging and its parts. Danger of
suffocation from folding cardboard and plastic film!
• Do not allow children to tamper with the controls or play with the
appliance. It is not a toy. Under no circumstances should children
be allowed to sit on the bins or hang from the door.
• If the appliance features a lock, keep the key out of the reach
of children.
General requirements
• The appliance is designed for domestic use inside the home and is not
intended for commercial or industrial use.
• The appliance must be used to store food products by adults only and
according to the instruction manual.
• Try to avoid keeping the door open for long periods or opening the
door too frequently in order to conserve energy.
• Do not fill the appliance with too much food: cold air must circulate
freely for food to be preserved properly.
SAFETY
Page 4
4
GETTING TO KNOW YOUR REFRIGERATOR
Location
When selecting a position for your refrigerator, you should make sure the floor is flat and firm, and the room is
well ventilated with an average room temperature of between 16°C and 38°C. Avoid locating your refrigerator near
a heat source, eg. cooker, boiler or radiator. Also avoid direct sunlight.
Never place the refrigerator in a wall recess or into fitted cabinets or furniture. When your refrigerator is working,
the grille at the back may become hot and the sides warm. It must therefore be installed so that there is at least
10cm of free space at each side and above the unit and a minimum of
7.5cm from the back of the r
There is a built in flow grille at the back of the refrigerator to ensure the correct distance from the wall.
efrigerator and the wall.
lid to ensure the correct distance from the rear wall. The refrigerator door can
either open to the right or the left,
depending on the location which suits you. See page
7 if you want reverse the door swing. Do not drape the fridge
with any covering.
Levelling the refrigerator
Once the refrigerator is put in its final location, make sure it is level. To do this use the
two levelling feet at the front of the refrigerator. If the refrigerator is not level, the
doors
and magnetic seal alignments will be affected.
Cleaning before use
Wipe the inside of the refrigerator with a weak solution of bicarbonate of soda. Then rinse with warm water using
a wrung-out sponge or cloth. Wipe completely dry before replacing the shelves and baskets. You could clean the
refrigerator externally with wax polish. If you require more information, refer to CLEANIN G on page 9.
Before plugging in YOU MUST
Check that you have a socket which is compatible with the plug supplied with the refrigerator. If not, see the
section called ELECTRICAL CONNECTIONS on page 11.
Before switching on!
DO NOT SWITCH ON UNTIL TWO HOURS AFTER MOVING THE REFRIGERATOR
. The coolant fluid needs time to settle.
Before using your refrigerator
Before placing any food in your refrigerator, turn the refrigerator on and wait for 24 hours, to make sure it is
working properly and to allow the refrigerator to fall to the correct temperature.
Before use
Please read these instructions carefully before using your new Fridgemaster
refrigerator. The refrigerator is for indoor and domestic use only.
INSTALLATION
Please keep these instructions in a safe place for future reference.
Ensure that there is sufficient clear space in front of the refrigerator to allow the door to open 160º.
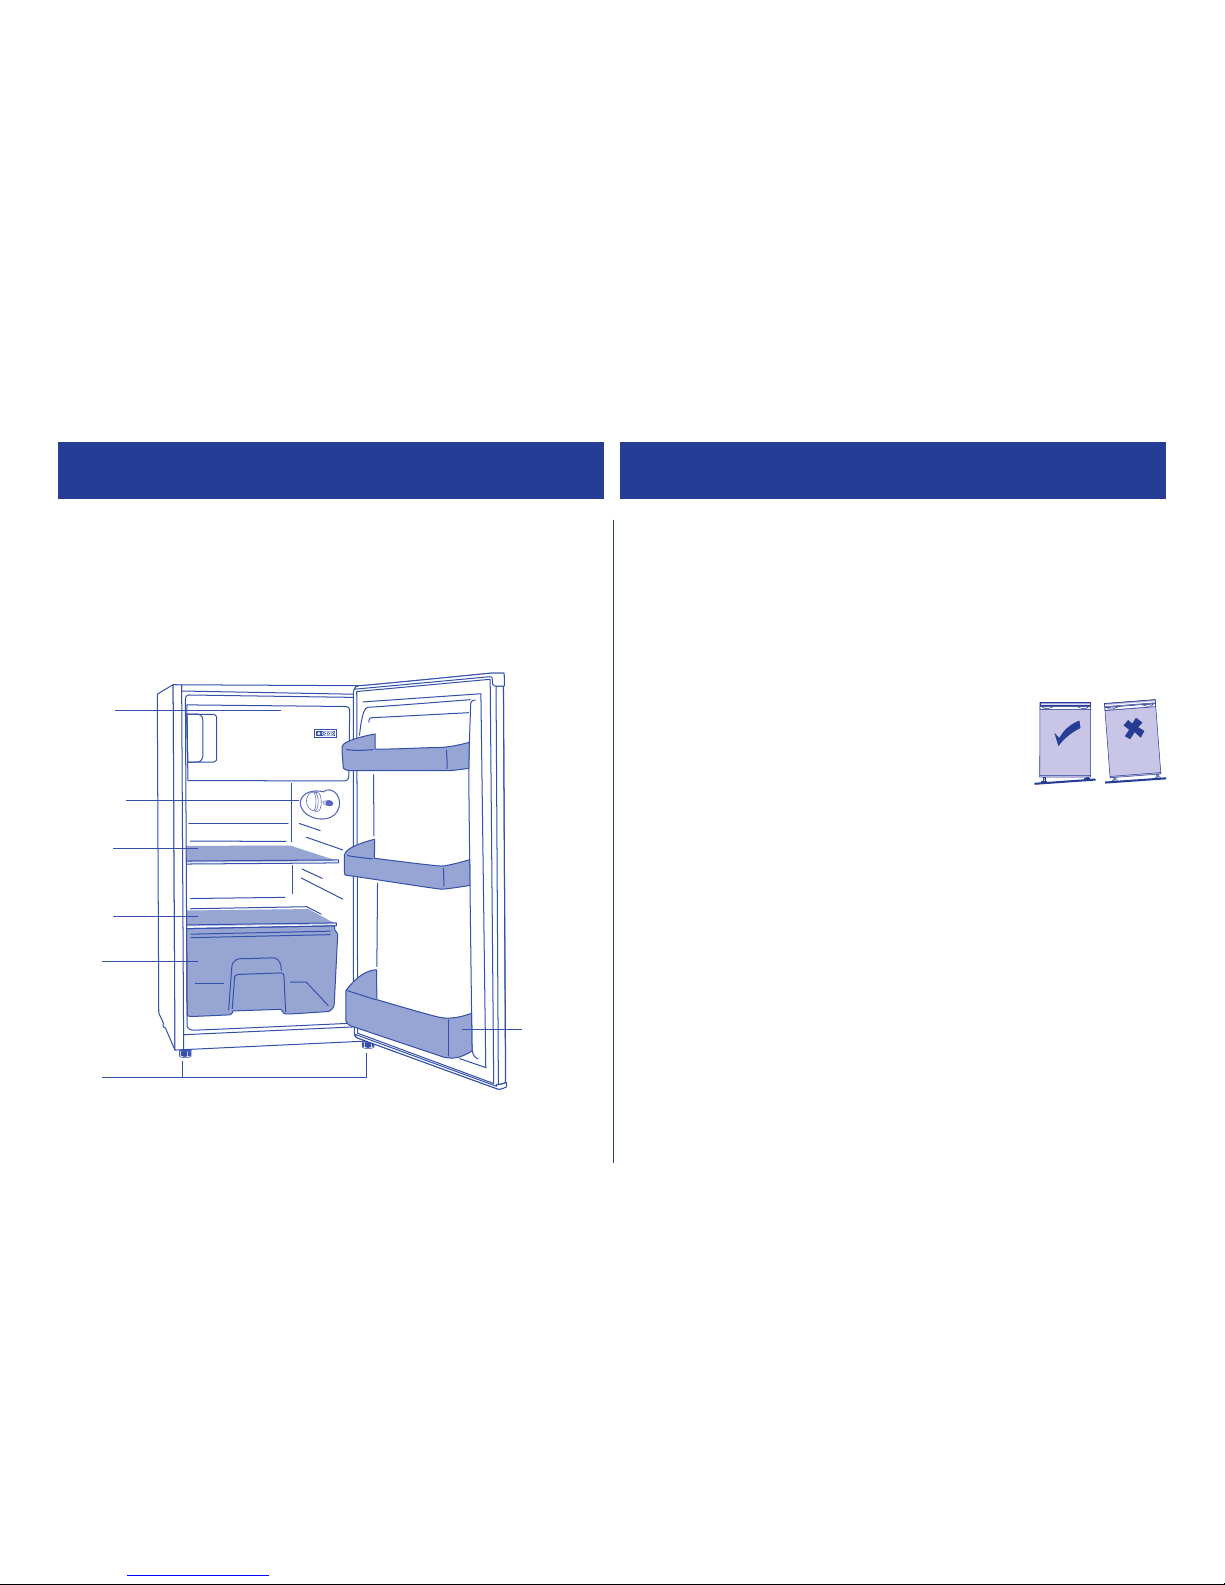
FROZEN FOOD
COMPARTMENT
INTERNAL LIGHT
AND THERMOSTAT
SHELF
GLASS SHELF
BOTTLE STORAGE
SALAD BIN
LEVELLING FEET
Page 5
USING YOUR REFRIGERATOR
5
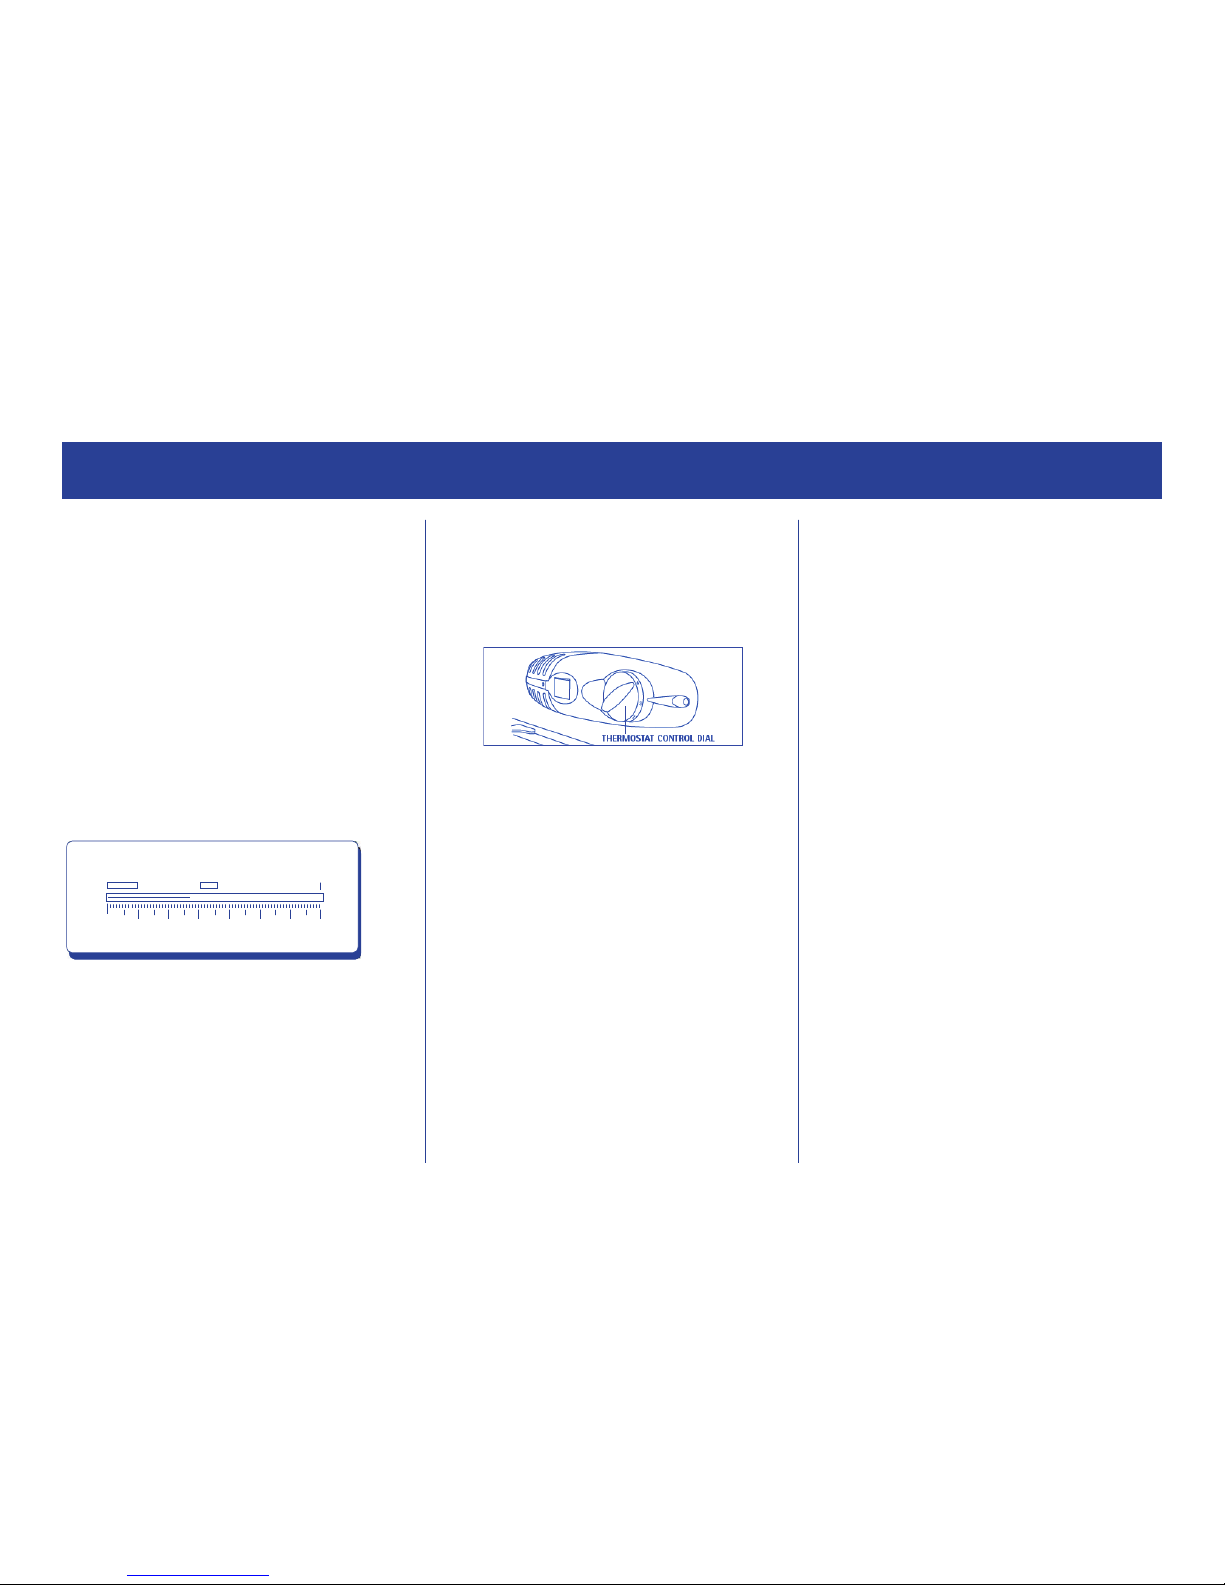
Switching on your Refrigerator
1 Before connecting the Refrigerator to the mains supply make sure
that the Thermostat Control Dial located inside the Refrigerator
compartment next to the internal light, is set between 3
to 4 but
closer to 3, which is the correct setting for use in a room of average
temperature.
2 Wait 24 hours before placing food in the cabinet to allow for the
Refrigerator to fall to the correct temperature.
Is the Refrigerator cold enough?
If you are concerned that your Refrigerator is not being kept cold
enough, and wish to check the temperature, you will need a special
fridge/freezer thermometer available from most supermarkets and
hardware shops.
Place the thermometer on the middle shelf of the Refrigerator, where it
can be read easily. Leave overnight, the temperature in the Refrigerator
should be between 1˚C and 5˚C and -11˚C or lower in the Frozen Food
Compartment.
Adjusting the temperature
The internal temperature of your Refrigerator is controlled by the
Thermostat Control Dial. There are 7 settings. Position
7 makes the
Refrigerator coldest. Position
1 makes it the warmest. To adjust the
temperature turn the Thermostat Control Dial to the preferred setting.
Noises inside the Refrigerator!
If you have not owned a Refrigerator before, you may notice that it
makes some rather unusual noises. Most of these are perfectly normal,
but you should be aware of them!
GURGLING, WHOOSHING
These noises are caused by the circulation of the refrigerant liquid in the
cooling system. It has become more pronounced since the introduction of
HUMMING, PURRING OR PULSATING
This is the compressor motor working, as it pumps the refrigerant around
the system.
Shopping for chilled foods
Don’t buy in your lunch hour!
Unless you have a Refrigerator at work to keep the food cold in the
afternoon. Leaving food in your car or at room temperature for a
prolonged period of time could raise food temperature to the level at
which harmful bacteria grow.
Keep chilled foods together
When you are going around the supermarket and when you are travelling
home. If you keep all the chilled foods together they will help to keep
each other cold.
Use a cool bag
Speci al insulate d bag s can be b ough t from mos t sup ermarke ts and
hardwa re sh ops. Thes e keep food cold f or longer, b ut are on ly for ge tting
chilled f oods hom e, not storing it.
Unwrap as soon as you get home
Always unpac k and p lace chilled foods in the Ref rigerator before st oring
Tips for keeping food perfect in the
Refrigerator
Cooked m eats should always be stored on a shelf above raw meats to
avoid b ac terial transfer. K eep raw me ats on a p late which is large e nough
Leave space around food
This will allow cold air to circulate around the Refrigerator.
Wrap up food!
packed or covered. Fruit and vegetables need not be wrapped.
Let pre-cooked food cool properly
Always let pre-cooked food cool down before you put it in the
Refrigerator. This will stop the internal temperature of the Refrigerator
from rising.
Shut the door!
To prevent cold air escaping, limit the number of times you open the
door. When returning from shopping, sort foods to be kept in your
Refrigerator while the door is closed.
Position O will turn the refrigerator off.
CFC free gases. This is not a fault and will not affect the performance of
your refrigerator.
dry food- stuffs.
Take extra care with meat and fish
To prevent the transfer of flavours and drying out, food should be separately
to collect juices and cover it with cling film or foil.
FRIDGE/FREEZER THERMOMETER ˚C
FREEZER
-30 -20 -10 +10 +20 +30 +400
FRIDGE
Page 6
Useful tips
• Re-seal packs properly after removing items. This prevents drying or
‘freezer burn’ and a build up of frost on any remaining food
NOTE:
ALWAYS WRAP AND STORE RAW MEAT, POULTRY AND FISH ON THE
LOWEST SHELF AT THE BOTTOM OF THE REFRIGERATOR.
THIS WILL STOP THEM DRIPPING ONTO, OR TOUCHING, OTHER FOODS.
DO NOT STORE INFLAMMABLE GASES OR LIQUIDS.
USING YOUR
REFRIGERATOR
DEFROSTING
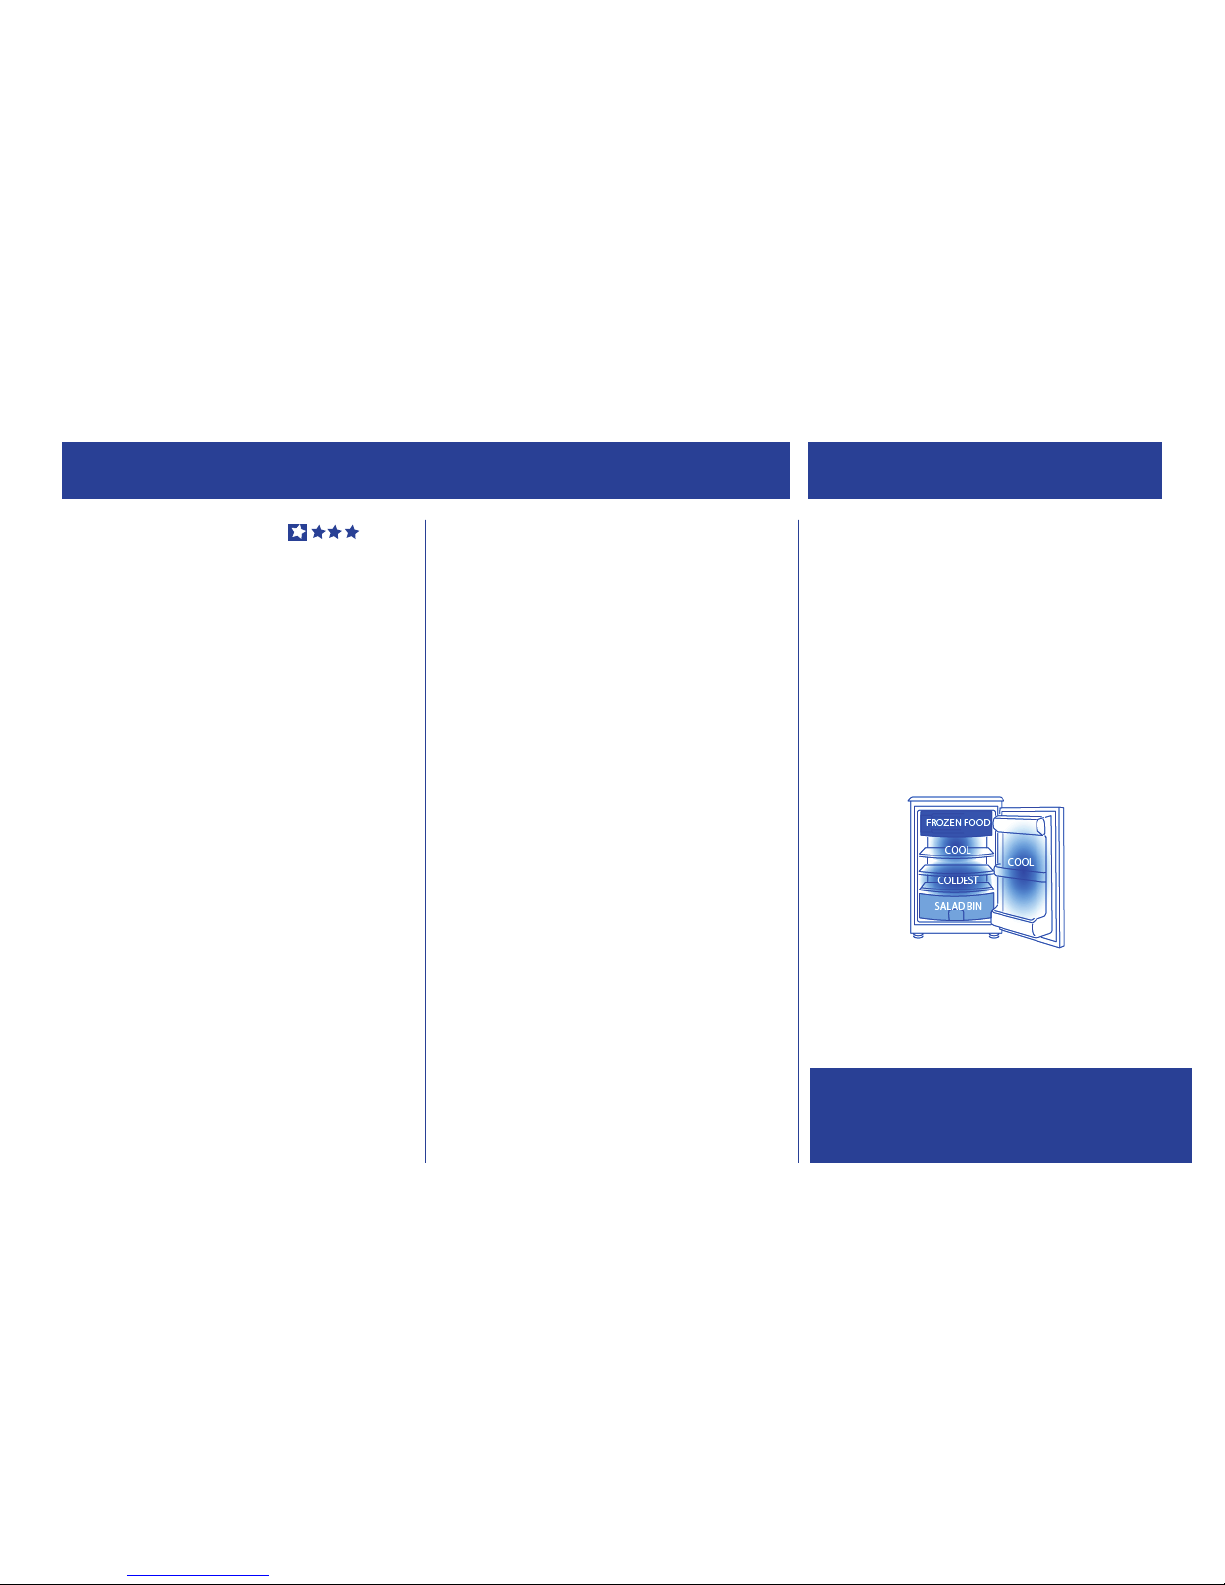
Where to store your foods in the Refrigerator
Cool area
This is where to store foods which will keep longer if they are kept cool.
Milk, yogurt, fruit juices, hard cheeses eg, cheddar. Opened jars and
bottles of salad dressings, sauces and jams. Fats, eg, butter, margarine,
low-fa t spreads, eggs, cooking fats and lard.
Coldest area: 1°C to 5°C
Th is is where foods whi ch must be cold to keep them safe should be kept.
• Raw and uncooked foods should always be wrapped.
Pre-cooked chilled foods, eg. ready meals, meat pies, soft cheeses
•
• Pre-cooked meats eg. ham.
Prepared salads (including pre-washed chopped, pre-packed mixed
•
green salads, rice, potato salad etc).
Desserts, eg. fromage frais, home-prepared food and leftovers or
•
cream cakes.
Salad bin
This is the most humid part of the Refrigerator.
Vegetables, fruit, fresh salad items eg. unwashed whole lettuce, whole
tomatoes, radishes etc.
WE RECOMMEND THAT ALL PRODUCE KEPT IN THE SALAD BIN IS WRAPPED.
To Tha w frozen foods
1 Cover food loosely.
2 Thaw at room temperature. Don’t forget that thawing in a warm area
encourages the growth of bacteria .
3 Always make sure there are no ice crystals in the food before
cooking, particularly with meat. These crystals indicate that the food
is not fully thawed. They res ult in lower temperatu res when cooking.
Lower cooking temperatures may not destroy dangerous bacteria.
4 Cook food as soon as possible after thawing.
5
Oven Thawing frozen foods
Many microwaves and ovens have thaw settings.
To avoid bacterial build up, only use these if you intend to cook the food
immediately afterwards.
Safety Tips
• Never-freeze any thing that has thawed out unless you cook it again,
6
Shopping for Frozen foods
Your Frozen Food Compartment is 4
star
When you are buying frozen food, look at the storage Guidelines on the
packaging. Y ou will be able to store each item of frozen food for the
period shown against the 4 star rating.
Check the Refrigerator temperature
Check the temperature of the frozen food Cabinet in the shop where you
buy your frozen foods It should show a temperature lower than -
11°C.
Choose packs carefully
Take a quick look at the frozen food package and make sure it is in
perfect condition.
Purchase frozen food last
Always buy frozen products last on your shopping trip or visit the
supermarket.
Keep frozen foods together
When you are going around the supermarket and when you are travelling
home, if you keep all your frozen food together they will help to keep
each other cold.
Store food straight away
Don’t buy frozen food unless you can freeze it straight away. Special
insulated bags can be bought from m ost supermarkets and hardware
shops. These keep frozen food cold for longer.
Thawing frozen food
For some foods, thawing before cooking is unnecessary. Vegetables and
pasta can been added to boiling water or steam cooked. Frozen sauces
and soups can be put into a saucepan and heated gently until thawed.
Never re-freeze thawed shellfish
•
Drain off and throw away any liquid lost during thawing
to kill off harmful bacteria
Page 7
7
REVERSING THE DOOR SWING
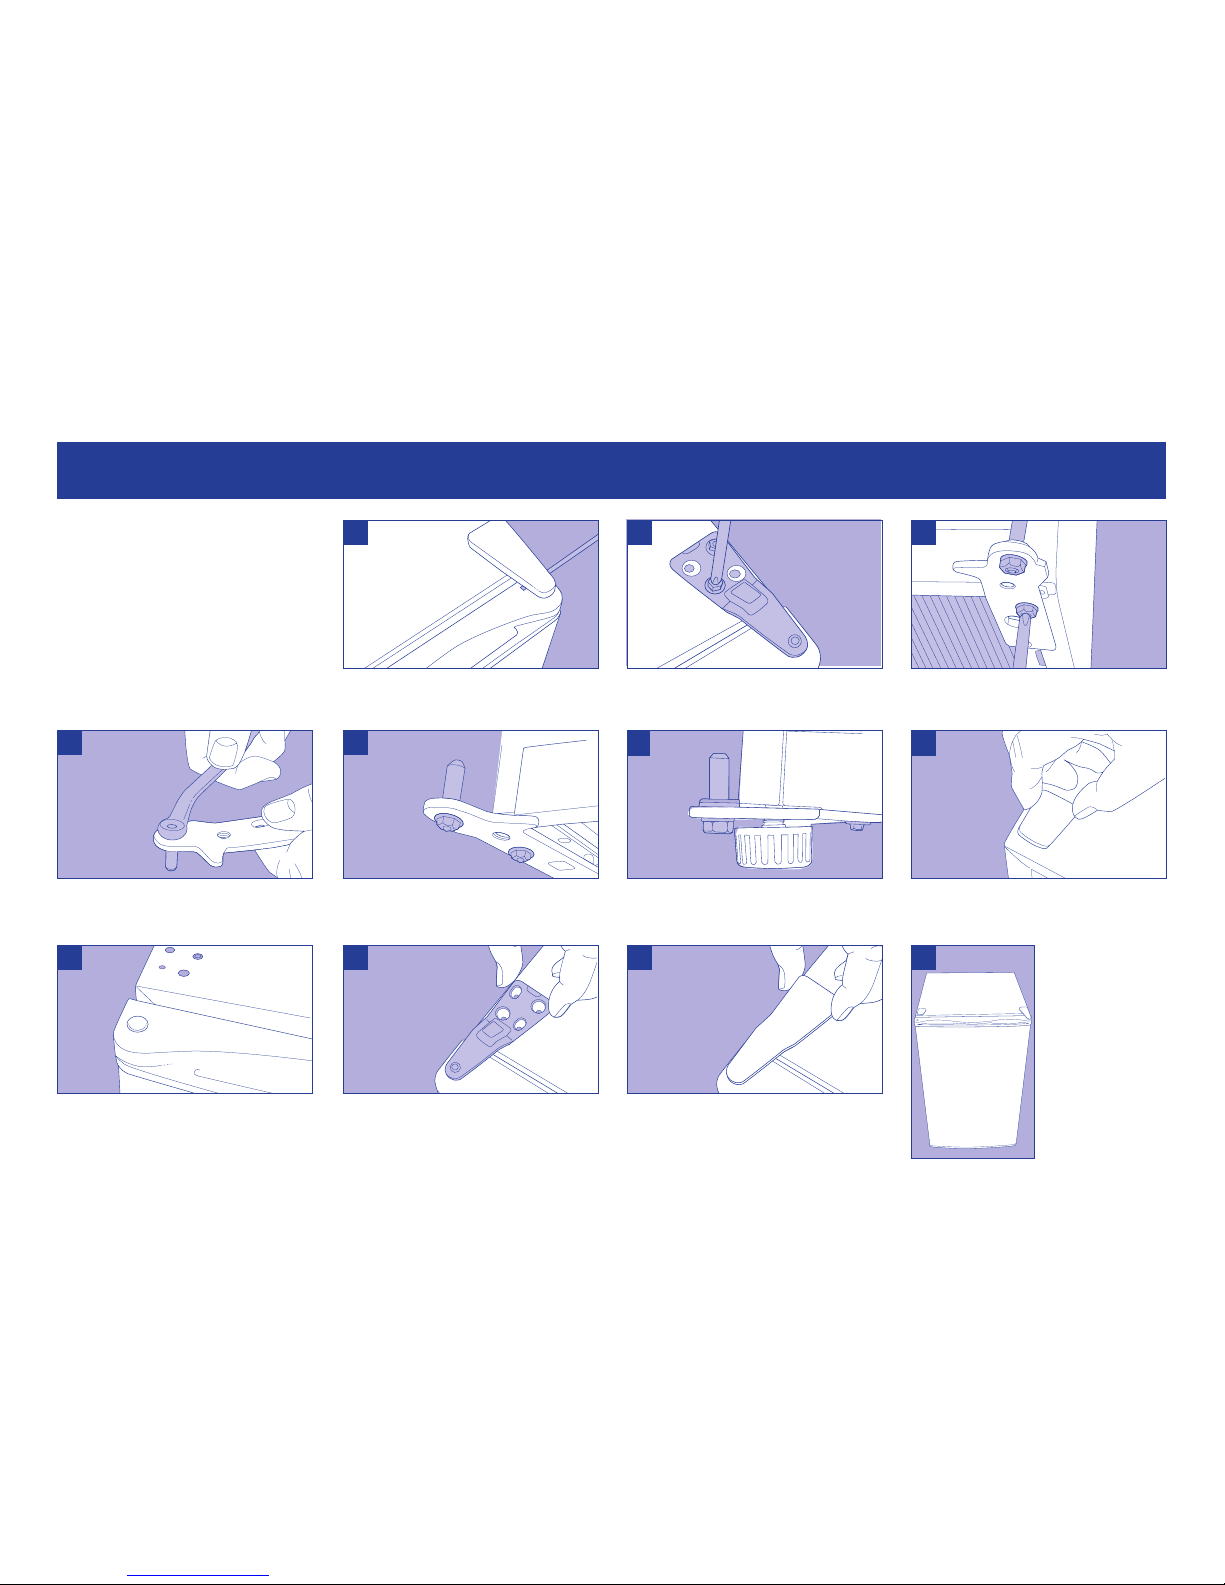
Remove the top hinge bracket cover. You may need
to carefully lever it off with a flat bladed screwdriver.
Lean the refrigerator back no more than 45º. Remove
the two adjustable feet and then use a Phillips
screwdriver to remove the bottom bracket.
Remove the pin retaining nut using a 10mm spanner.
Remove the pin, you may need to tap it to release it.
Turn the bracket over and replace it. Tighten securely.
Refit the bracket on the opposite side of the door.
Tighten securely.
Remove the blanking plate on the top of the
refrigerator and replace where the bracket was
removed. Replace the door.
Remove the blanking plate from the hinge hole and
replace it on the opposite side of the door.
Attach the top hinge bracket using the two screws.
Replace both adjustable feet.
Check the door is aligned
horizontally and vertically.
Re-adjust the levelling
feet. See ‘Levelling the
refrigerator’ on page 4.
• Ensure the refrigerator is unplugged and empty.
• We recommend you have someone to assist you.
Tools required
• Phillips style screwdriver.
• Flat bladed screwdriver.
• 8 and 10 mm spanner or socket.
Before you start lay the refrigerator on its back in
order to gain access to the base. You should rest
it on soft foam packaging or similar material to
avoid damaging the cooling pipes at the rear of
the refrigerator.
1 2 3
4 5
6 7
8 9
10
11
Replace the cover, it should be pushed into place
from the rear.
Use a Phillips screwdriver to remove the two screws
holding the bracket in place and remove. Place to
one side. Lift the door away from the refrigerator.
Page 8
REVERSING THE FROZEN FOOD COMPARTMENT DOOR DEFROSTING
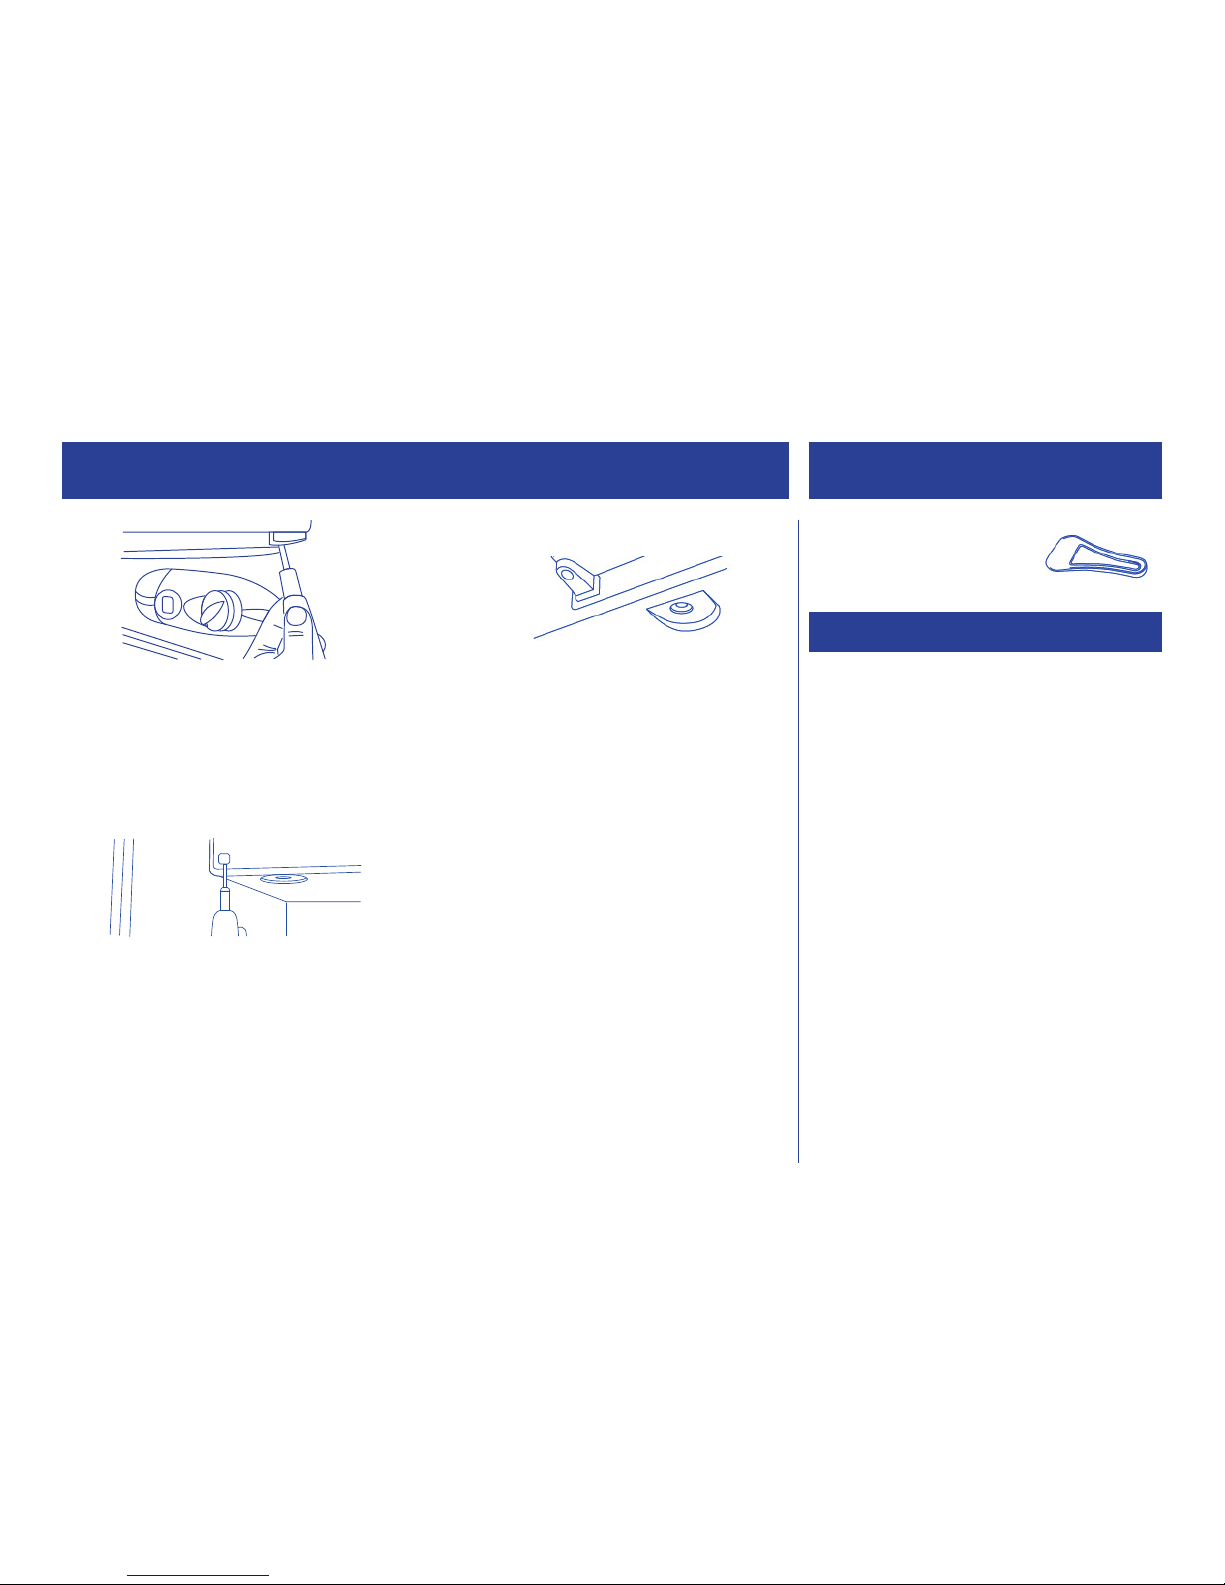
1
bottom hinge bracket of the Frozen Food Compartment door. Press
and door
towards you.
2 Pull to release the bottom hinge bracket from the underside of the
door Place in a safe place.
3
8
Defrosting
After a period of time frost will build up
in the Frozen Food Compartment. As a
temporary measure, this frost should be
scraped away using a scraper
.
NOTE Don’t use a metal or sharp instrument and do not use any
electrical appliances to aid defrosting.
Complete defrosting will however become necessary
of the Refrigerator. This should be carried out if the frost build up cannot
be scraped away, or if it beginds to interfere with the food storage.
Choose a time when the stock of frozen food is low and proceed as
follows:
1
supply and leave the door open. Ideally the frozen food should be
put in another freezer
or refrigerator. If this is not possible wrap the
thick rug or blanket and keep it in a cool place.
2 Scrape away as much frost build up as possible using a plastic scraper.
Thawing of the remainder can be speeded up by placing bowls of
hot water inside the refrigerator cabinet and closing the door. As the
solid frost loosens, prize it away with the plastic scraper and remov
.
3
.
eht no won si eldnah eht taht os nwod edispu rood eht nruT 4
door into the opening at the top of the frozen food compartment.
5 Fit the hinge bracket onto the bottom hinge pin of the door. Push
clicks into place.
When defrosting is completed, clean your refrigerator as described
on page 9
Remove and refit the blanking plate to the opposite side of
the compartment
the bracket firmly into the opening left by the blanking plate unti it
opposite side. Refit the door by inserting the top hinge pin of the
Insert a small flat bladed screwdriver into the underside of the
firmly upward to release the locking mechanism. Then pull the hinge
Take out the frozen food, turn the refrigerator off at the mains
food, firstly in several sheets of newspaper or large towels and then a
if the frost layers exceeds 6mm (¼”) to maintain the efficiency
Page 9
9
CLEANING TROUBLESHOOTING MAINTENANCE
Cleaning inside the Refrigerator
You should clean the Refrigerator internally with a weak solution of
bicarbonate of soda. Then rinse with warm wat er using a ‘wrung-out’
sponge or cloth. Wipe the Refrigerator dry before replacing the food.
Plug in and switch on the mains supply.
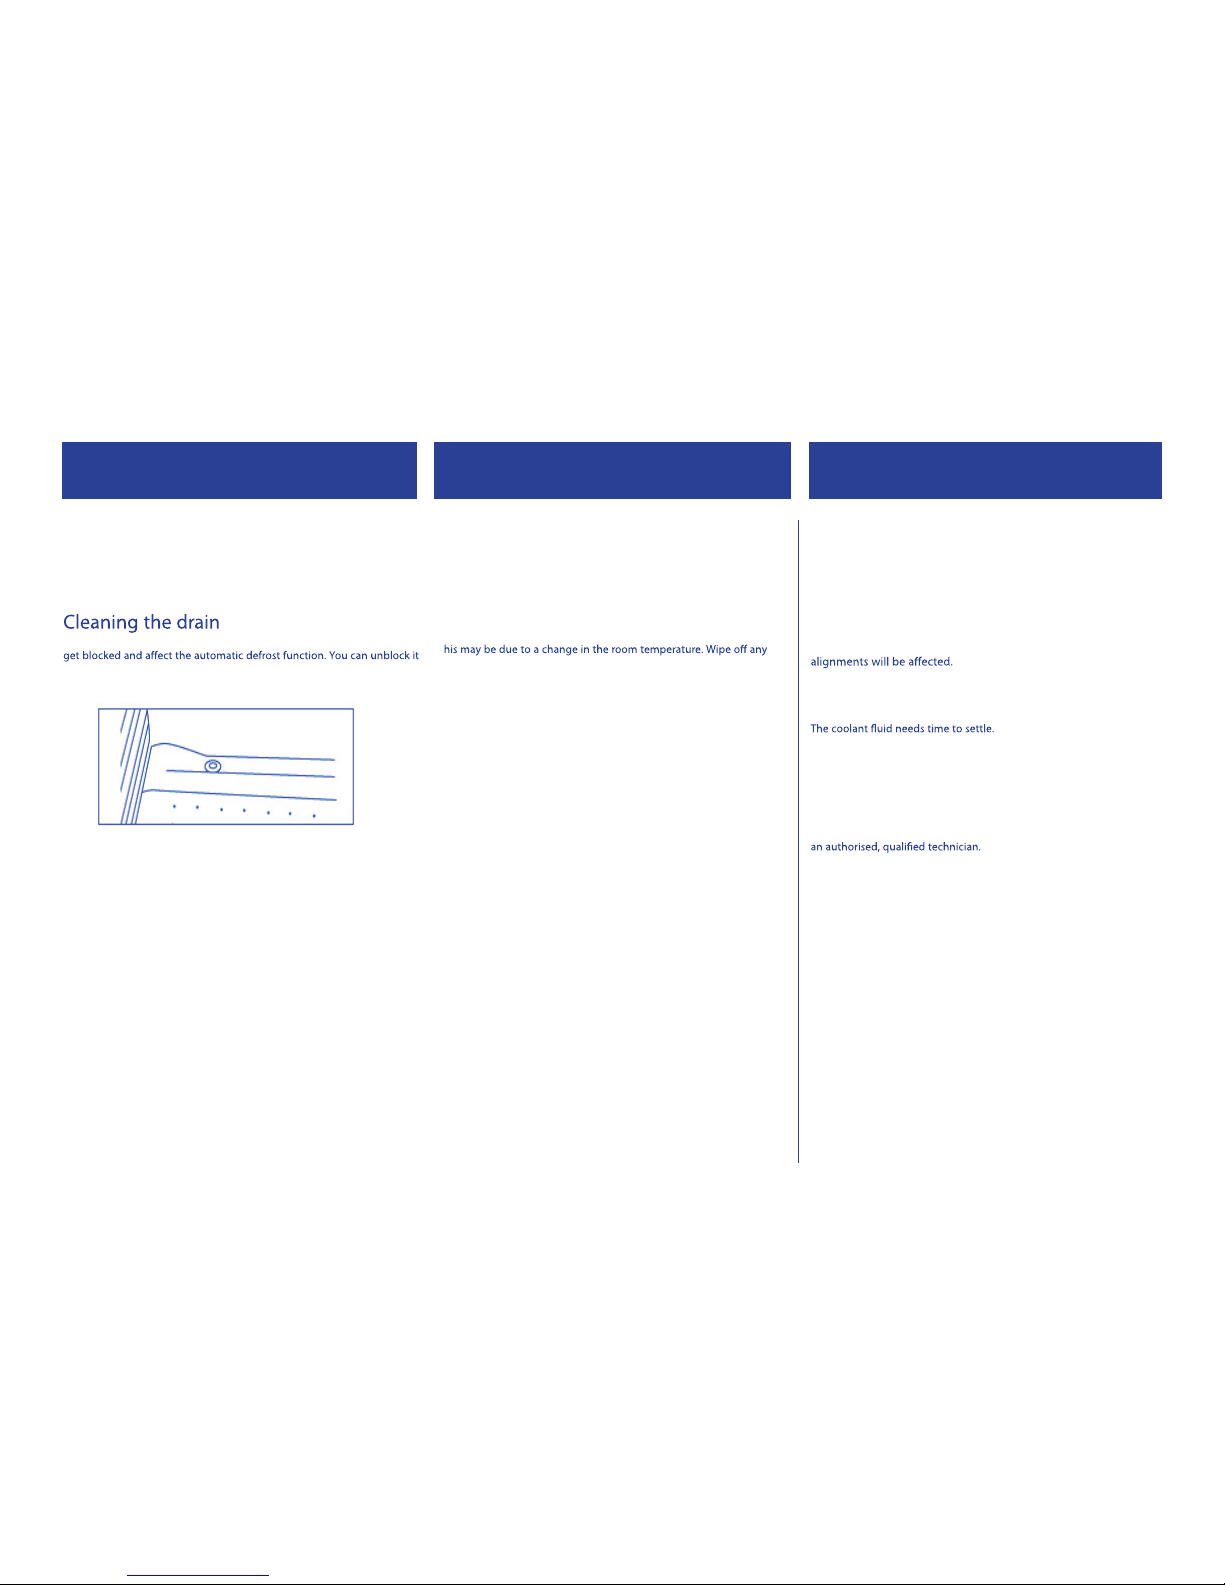
The drainage hole which is located at the bac k of the compartment can
using a cotton bud, pipe cleaner or drinking straw (don’t suck!).
Use standard furniture polish to cle an the Refrigerator exterior.
Make sure that the doors are closed, to prevent polish getting on the
magnetic door seal or inside.
The grille of the condenser at the back of the Refrigerator and the
adjacent components can be vacuumed using a soft brush attachment.
Cleaning tips
• Defrost and clean when food stocks are low.
The Refrigerator is not working
Check it is plugged in and switched on. Check that the fuse in the plug
has not blown. Plug in another appliance, such as a lamp, to see if the
socket is working.
Condensation appears on the outside of the
Refrigerator
T
residue of moisture. If the problem continues call the Customer Service
Department.
Noises
You may hear some unusual noises from time to time. See ‘Noises inside
the Refrigerator’ on page 5.
If you are not
able to identify and eliminate the faults acco rding to the
above recommendations, contact the Customer Service Department,
advising of model number of the appliance which is shown on the back
of the rating plate.
Do not attempt to repair your Refrigerator yourself as it might endanger
you and others
.
Moving your Refrigerator
Location
Do not locate your Refrigerator near a heat source, eg. cooker, boiler or
radiator. Also avoid direct sunlight
.
Levelling the Refrigerator
Make sure the Refrigerator is level. Use the rotating levelling feet at
the front. If the Refrigerator is not level, the doors and magnetic seal
Do Not Turn on the Refrigerator for 2 Hours
After the Refrigerator is in place it needs to be left for 2 hours.
Installation
Don’t cover or block the vents or grilles of your appliance.
Servicing
Repairs and maintenance of the appliance should only be performed by
Page 10
Page 11
11
THIS APPLIANCE MUST BE EARTHED.
3631 SB ot gulp nip eerht desuf a htiw dettif si ecnailppa sihT
ot stekcos htiw dettif sesuoh lla ni esu rof elbatius eb lliw hcihw
current specifications.
tuc eb dluohs ti ,steltuo tekcos ruoy rof elbatius ton si gulp dettif eht fI
off and carefully disposed of. To avoid a possible shock hazard, do not
insert the discarded plug into a socket.
Fitting a new plug
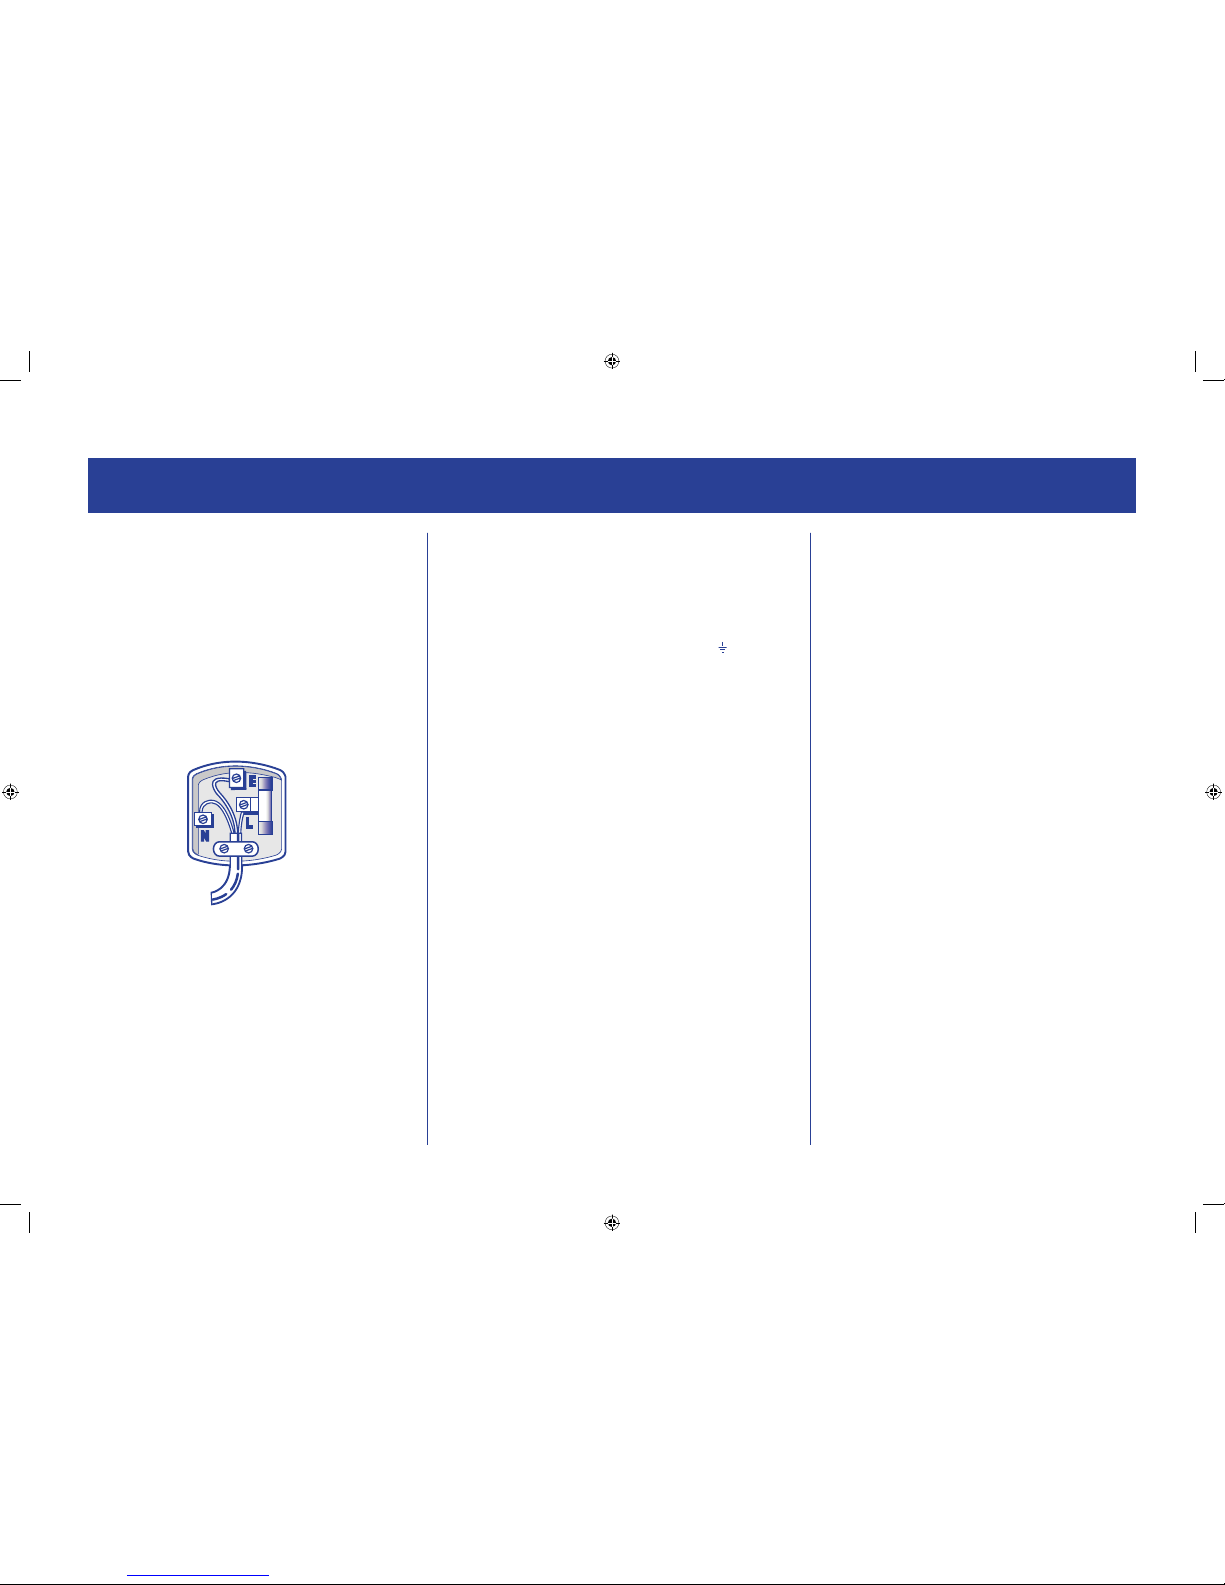
If for any reason you need to fit a new plug, the flexible mains lead must
be connected as shown here.
CONNECT GREEN
AND YELLOW TO EARTH (E)
(Note: some appliances do
not have earth wires.)
CONNECT BLUE TO
NEUTRAL (N)
MAKE SURE THE CABLE
IS HELD BY THE CLAMP
CONNECT BROWN
TO LIVE (L)
ELECTRICAL CONNECTIONS
ni deruoloc era ecnailppa siht ot dettif dael sniam eht ni seriw ehT
accordance with the following code:
If the colours of the wires in the mains lead of this appliance do not
correspond with the coloured markings identifying the terminals in your
plug, proceed as follows:
The wire which is coloured Green and Yellow MUST be connected to the
terminal which is marked with the letter E (Earth) or symbol
or coloured
Green. The wire which is colour ed Blue MUST be connected to the
terminal which is marked with the letter N or coloured Black. The wire
which is coloured Brown MUST be connected to the terminal which is
marked with the letter L or coloured Red.
Before refitting the plug cover, check that there are no cut or stray strands
of wire inside the plug.
Use a 13 Amp BS1362 fuse, only BSI or ASTA approved fuses should be
used. If you are in any way unsure which plug or fuse to use, always refer
to a qualified electrician.
Note: After replacing or changing a fuse on a moulded plug which has
a fuse cover, the cover must be refitted to the plug, the appliance must
not be used without a fuse cover. If lost, replacement fuse covers can be
obtained from an electrical shop.
This appliance complies with the following EEC Directives: 73 / 23 EEC
(Low Voltage Directive) 89 / 336 EEC (EMC Directive).
Page 12
 Loading...