

Page 1
Page 2

Brief intro d u c t i o n
Contents
Safety and warning information....................................................3
Parts and features......................................................................11
Installing your new appliance.....................................................12
Reversing the door......................................................................13
Control panel.............................................................................14
Using your appliance.................................................................14
Helpful hints and tips..................................................................16
Cleaning and care....................................................................16
Troubleshooting.........................................................................18
Disposal of the appliance ..........................................................19
2
Page 3
Safety and warning information
Brief intro d u c t i o n
Your safe ty a nd the safety of ot hers are very i mp ortant.
We have provi ded many impor ta nt s afety mess ag es in this manual and on you r
applianc e. Always read and o bey all safety messages.
This is the safety alert symbol.
This symbol al er ts you to potential hazards that can kill or hur t you
and others. All safety m es sages will fol low the sa fety alert symbol and
either the word “DANGER,” “WARNING” o r “CAUTION.”
These words mean:
DANGER
WARNING
CA
UTION
All safety messages will tell you what the pote nt ial hazard i s, tell you h ow to reduce
the chance of in ju ry, and tell you what can happ en i f the instructions are n ot
followed.
An imminen tl y ha zardous si tu at ion. You could b e ki ll ed or
seriousl y in jured if you don’t imme di ately follow instructions.
A potentially hazardous situation which, if not avoided,
could result in death or serious b od il y injury.
A potentially hazardous situation which, if not avoided,
may res ul t in moderate or minor injur y.
Safety and warning information
For your safety and correct usage, before installing and
first using the appliance, read this user manual
carefully, including its hints and warnings. To avoid
unnecessary mistakes and accidents, it is important to
make sure that all people using the appliance are
thoroughly familiar with its operation and safety
features. Save these instructions and be sure that they
remain with the appliance if it is moved or sold, so that
anyone using it throughout its life, will be properly
informed on its usage and safety notices.
For the safety of life and property, keep the precautions
of these user's instructions as the manufacturer is not
responsible for damages caused by omission.
3
Page 4
Safety for children and others who are vulnerable people
According to EN standard
•
This appliance can be used by children aged from 8
years and above and persons with reduced physical,
sensory or mental capabilities or lack of experience
and knowledge if they have been given supervision or
instruction concerning use of the appliance in a safe
way and understand the hazards involved. Children
shall not play with the appliance. Cleaning and user
maintenance shall not be made by children without
supervision. Children aged from 3 to 8 years are
allowed to load and unload refrigerating appliances.
• According to IEC standard
This appliance is not intended for use by persons
(including children) with reduced physical sensory or
mental capabilities, or lack of experience and
knowledge, unless they have been given supervision
or instruction concerning use of the appliance by a
person responsible for their safety.
• Children should be supervised to ensure that they
do not play with the appliance.
• Keep all packaging away from children as there is risk of
suffocation.
• If you are discarding the appliance, pull the plug out of
the socket, cut the connection cable (as close to the
appliance as you can) and remove the door to prevent
children playing from suffering an electric shock or from
closing themselves inside it.
• If this appliance, featuring a magnetic door seals, is
to replace an older appliance having a spring lock
(latch) on the door or lid, be sure to make the spring
lock unusable before you discard the old appliance.
This will prevent it from becoming a death trap for a
child.
4
Page 5
General safety
• This appliance is intended to be used in household
and similar applications such as:
-staff kitchen areas in shops, offices and other working
environments;
-farm houses and by clients in hotels, motels and other
residential type environments;
-bed and breakfast type environments;
-catering and similar non-retail applications.
• Do not store explosive substances such as aerosol
cans with a flammable propellant in this appliance.
• If the supply cord is damaged, it must be replaced
by the manufacturer, its service agent or similarly
qualified persons in order to avoid a hazard.
• WARNING — Keep ventilation openings, in the
appliance enclosure or in the built-in structure, clear
of obstruction.
• WARNING — Do not use mechanical devices or
other means to accelerate the defrosting process,
other than those recommended by the manufacturer.
• WARNING — Do not damage the refrigerant circuit.
• WARNING — Do not use electrical appliances inside
the food storage compar tments of the appliance,
unless they are of the type recommended by the
manufacturer.
• The refrigerant and insulation blowing gas are
flammable. When disposing of the appliance, do so
only at an authorized waste disposal center. Do not
expose to flame.
• WARNING —When positioning the appliance, ensure
the supply cord is not trapped or damaged.
5
Page 6
• WARNING— Fill with potable water only for the water
container.
• WARNING —Do not locate multiple portable socket
outlets or portable power supplies at the rear of the
appliance.
Replacing the LED Light
• WARNING—The LED Light must not be
replaced by the user! If the LED Light is damaged,
contact the customer help line for assistance.
This warning is only for refrigerators that contain
LED Light.
Refrigerant
The refrigerant isobutene (R600a) is contained within
the refrigerant circuit of the appliance, a natural gas
with a high level of environmental compatibility, which
is nevertheless flammable. During transpor tation and
installation of the appliance, ensure that none of the
components of the refrigerant circuit becomes
damaged.
• The refrigerant (R600a) is flammable.
WARNING — Refrigerators contain refrigerant and
gases in the insulation. Refrigerant and gases must be
disposed of professionally as they may cause eye
injuries or ignition. Ensure that tubing of the
refrigerant circuit is not damage prior to proper
disposal.
Warning: Risk of fire/flammable materials
If the refrigerant circuit should be damaged:
• Avoid opening flames and sources of ignition.
Thoroughly ventilate the room in which the appliance
is situated.
6
Page 7
• It is dangerous to alter the specifications or modify
this product in any way.
• Any damage to the cord may cause a short circuit,
fire, and/or electric shock.
Electrical safety
The power cord must not be lengthened.
• Make sure that the power plug is not crushed or
damaged. A crushed or damaged power plug may
overheat and cause a fire.
• Make sure that you can access the main plug of the
appliance.
• Do not pull the main cable.
• If the power plug socket is loose, do not insert the
power plug. There is a risk of electric shock or fire.
• You must not operate the appliance without the
interior lighting lamp cover.
• The fridge is only applied with power supply of
single phase alternating current of 220~240V/50Hz. If
fluctuation of voltage in the district of user is so large
that the voltage exceeds the above scope, for safety
sake, be sure to apply A.C. Automatic voltage
regulator of more than 350W to the fridge. The fridge
must employ a special power socket instead of
common one with other electric appliances. Its plug
must match the socket with ground wire.
Daily use
• Do not store flammable gases or liquids in the
appliance. There is a risk of an explosion.
• Do not operate any electrical appliances in the
appliance (e.g. electric ice cream makers, mixers etc.).
7
Page 8
• When unplugging always pull the plug from the
mains socket, do not pull on the cable.
• Do not place hot items near the plastic components
of this appliance.
• Do not place food products directly against the air
outlet on the rear wall.
• Store pre-packed frozen food in accordance with
the frozen food manufacture’s instructions.
• The appliances manufactures storage
recommendations should be strictly adhered to. Refer
to relevant instructions for storage.
• Do not place carbonated or fizzy drinks in the freeze
compartment as it creates pressure on the container,
which may cause it to explode, resulting in damage to
the appliance.
• Frozen food can cause frost burns if consumed
straight from the freezer compar tment.
• Do not place the appliance in direct sunlight.
• Keep burning candles, lamps and other items with
naked flames away from the appliance so that do not
set the appliance on fire.
• The appliance is intended for keeping food stuff
and/ or beverages in normal household as explained
in this instruction booklet The appliance is heavy. Care
should be taken when moving it.
• Do not remove nor touch items from the freezer
compartment if your hands are damp/wet,as this
could cause skin abrasions or frost/freezer burns.
• Never use the base, drawers, doors etc. to stand on
or as supports.
• Frozen food must not be refrozen once it has been
8
Page 9
thawed out.
• Do not consume ice popsicles or ice cubes straight
from the freezer as this can cause freezer burn to the
mouth and lips.
• To avoid items falling and causing injury or damage
to the appliance, do not overload the door racks or
put too much food in the crisper drawers.
• WARNING - Food needs to be packed into bags
before it is put into the refrigerator. Liquids need to be
stored in bottles or capped containers in order to
avoid a spill, as the design structure of the product is
not easy to clean.
• This refrigerating appliance is not intended to be
used as a built-in appliance.
• This refrigerating appliance is not suitable for
freezing foodstuffs.
Caution!
Care and cleaning
• Before maintenance, switch off the appliance and
disconnect the mains plug from the mains socket.
• Do not clean the appliance with metal objects,
steam cleaner, ethereal oils, organic solvents or
abrasive cleansers.
• Do not use sharp objects to remove frost from the
appliance. Use a plastic scraper.
Installation Important!
• For electrical connection carefully, follow the
instructions given in this manual.
• Unpack the appliance and check if there are
damages on it. Do not connect the appliance if it is
damaged. Report possible damages immediately to
9
Page 10
the place you bought it. In this case retain packing.
• It is advisable to wait at least four hours before
connecting the appliance to allow the oil to flow back
in the compressor.
• Adequate air circulation should be around the
appliance, lacking this leads to overheating. To
achieve sufficient ventilation, follow the instructions
relevant to installation. Wherever possible the back of
the product should not be too close to a wall to avoid
touching or catching warm parts (compressor,
condenser) to prevent the risk of a fire, follow the
instructions relevant to installation.
• The appliance must not be locate close to radiators
or cookers.
• Make sure that the mains plug is accessible after
the installation of the appliance
Service
• Any electrical work required to do the servicing of
the appliance should be carried out by qualified
electrician or competent person.
• This product must be serviced by an authorized
Service Center, and only genuine spare parts must be
used.
1. If the appliance is Frost Free.
2. If the appliance contains freezer compartment.
10
Page 11
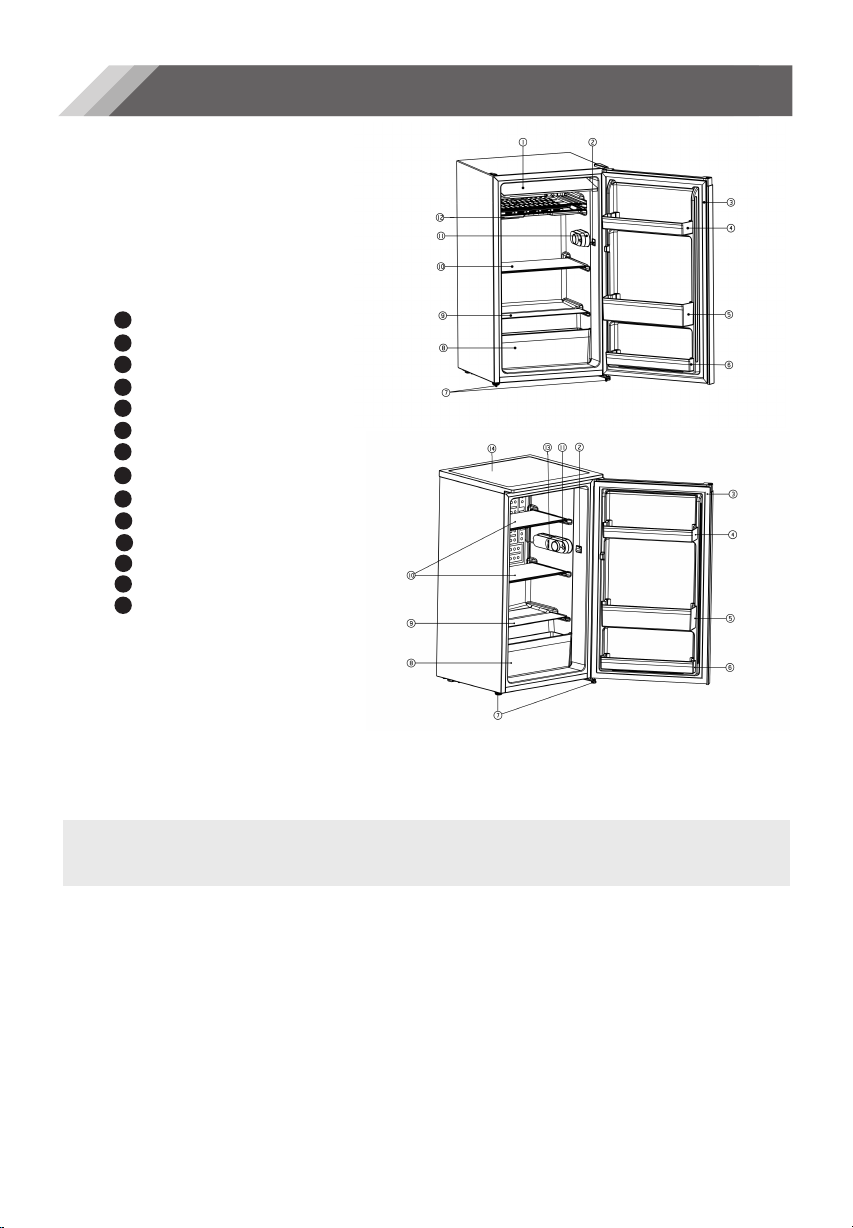
Parts and Features
Brief intro d u c t i o n
View of the appliance
1
Flip door
2
Light switch
3
Door seal
4
Upper shelf
5
Middle shelf
6
Lower shelf
7
Supporting leg
C
risper drawer
8
Crisper box cover
9
Glass shelve
10
Temperature regulator
11
E
vaporating dish
12
13
LED light
14
Cover panel
Refrigerator without LED Light
Refrigerator with LED Light
Note: Features may vary depending on model. Not all models will have features listed.
Note: To get the best energy efficiency of this product, please place all shelves, drawers on their
original position as the illustration above.
11
Page 12
Installing Your New Appliance
Brief intro d u c t i o n
Cleaning before use
• Before using the appliance for the first time,
wash the interior and all internal accessories with
lukewarm water and neutral soap in order to
remove the typical smell of a brand new product,
then dry thoroughly.
Important!
powders, as these will damage the finish.
Do not use detergents or abrasive
Installation Positioning
Warning!
Before installing, read the instruction carefully for
your safety and the correct operation of appliance.
• Position the appliance away from sources of
heat such as stoves, radiators, direct sunlight, etc.
Maximum performance and safety are
•
guaranteed by maintaining the correct indoor
temperature for the class of unit concerned, as
specified on the rating plate.
This appliance performs well from N to T.
•
The appliance may not work properly if it is left for
a longer period at a temperature above or below
the indicated range.
Climate class
SN
N
ST
T
Important! It is necessary to have good ventilation
around the fridge to allow for the dissipation of
heat, high efficiency an low sufficiently cleared
space should be available around the fridge. It is
advisable for there to be 50-70mm separating the
back of the fridge to the wall at least 100mm of
space on its two sides, a height of over 100mm
from its top and a clear space in front to allow the
doors to open 160°.
Appliances must not be exposed to rain. Sufficient
air must be allowed to circulate in the low rear
section of the appliance, as poor air circulation
can affect performance. Built-in appliances
should be positioned away from heat sources
such as heaters and direct sunlight.
Ambient temperature
+10°C to +32°C
+16°C to +32°C
+16°C to +38°C
+16°C to +43°C
Leveling
• The appliance should be level in order to
eliminate vibration. To make the appliance level, it
should be upright and both adjusters should be
in stable contact with the floor. You can also
adjust the level by unscrewing the appropriate
level adjustment in the front (use your fingers or a
suitable spanner).
Electrical connection
CAUTION
Any electrical work required to install this
appliance should be carried out by qualified
or authorized personnel.
WARNING
This appliance must be grounded. The
manufacturer declines any liability should
these safety measures not be observed.
12
Page 13
Reversing the door
Brief intro d u c t i o n
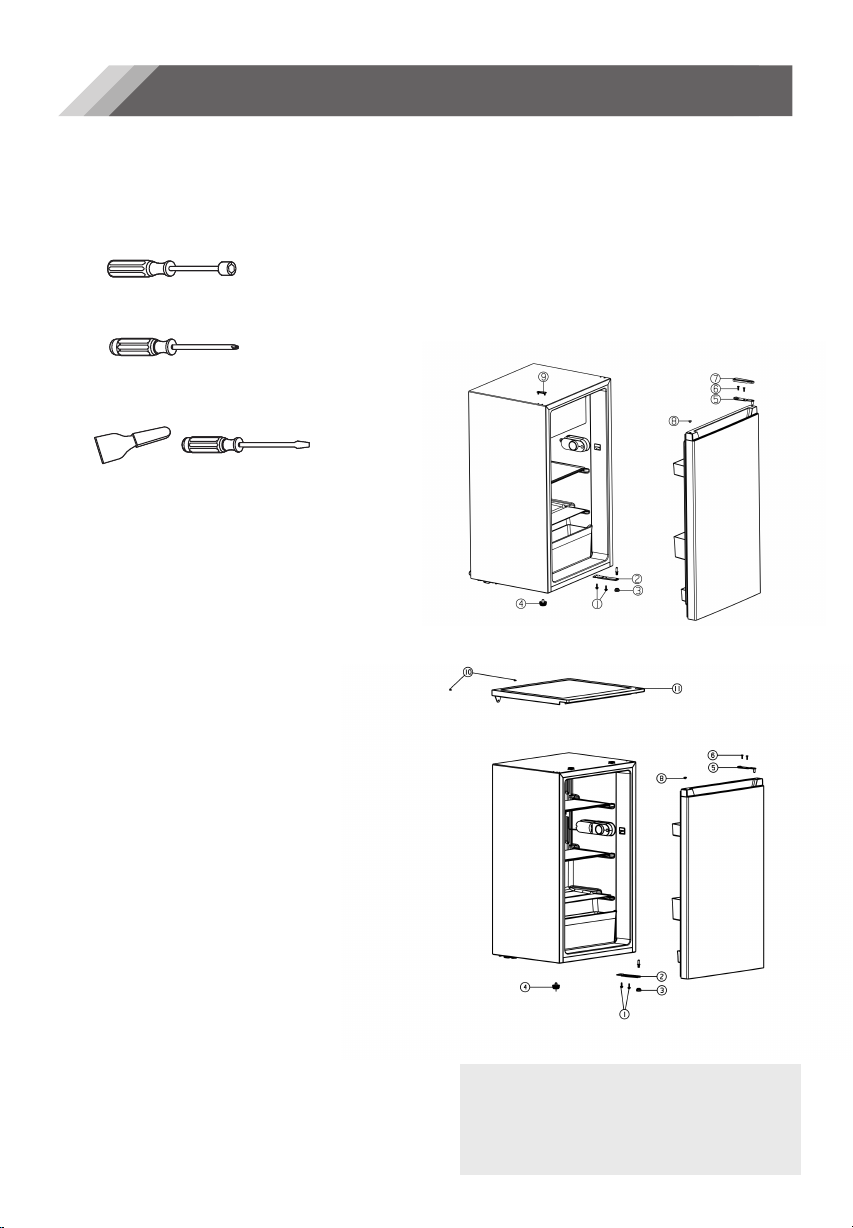
The side at which the door opens can be
changed from the right side (as supplied) to the
left side, if the installation site requires.
Tools you will need:
1. 8mm socket driver
2. Cross-shaped screwdriver
3. Putty knife or thin-blade screwdriver
Before you start lay the refrigerator on it’s back in
order to gain access to the base, you should rest
it on soft foam packaging or similar material to
avoid damaging the cooling pipes at the rear of
the refrigerator.
1. Open the appliance door and unhinge and remove all
fittings from inside the appliance.
2.
Unscrew the 2 screws (10). (Refrigerator with cover
panel)
Take off the cover panel (11) and set it down on a soft
3.
surface. (Refrigerator with cover panel)
4.
Remove the upper hinge cap (7). (Refrigerator without
cover panel)
5. Remove the two screws blot (6) that connect the upper
hinge (5) on the right side of the cabinet top.
6. Carefully lift the door and place it on a padded surface
to prevent scratching.
7.
Remove the plug (9) and transfer it to the uncovered
hole on the right side of the unit. Be sure to press the
button firmly into the hole. (Refrigerator without cover
panel)
Remove the two screws (1) that hold the lower hinge (2)
8.
on the right side of the unit.
9.
Remove the screw-type leveling front leg (4) and
transfer it to the right side as shown in the adjacent figure.
Set the door into it’s new place making sure the pin
10.
enters the bushing at the lower frame section (hole).
Secure the upper hinge (5) previously removed in step
11.
6 on the left side of the unit. Make sure the pin enters the
bushing on the upper frame section (hole).
12. Loosely secure the lower left hinge (2) and do not
tighten the bolts until the door is in the closed position
and leveled.
3
1
13. lnsert the plug (9) on the uncovered holes (right side).
(Refrigerator without cover panel)
14. Replace the upper hinge cap (7). (Refrigerator without
cover panel)
15. Turn the appliance upright again.
16. Mount the cover panel (11) at the front and lay it flat on
the rear. (Refrigerator with cover panel)
17. Apply the 2 screws (10) and tighten. (Refrigerator with
cover panel)
18. Open the appliance doors and attach all fittings.
Refrigerator without cover panel
Refrigerator with cover panel
1 Screw
2 Low Hinge
3 Adjustable Low Foot
4 Adjustable High Foot
Upper Hinge
5
6 Screw Bolt
7 Upper Hinge Cap
Shaft Sleeve
8
9 Plug
⑩ Screw
Cover panel
⑪
Page 14
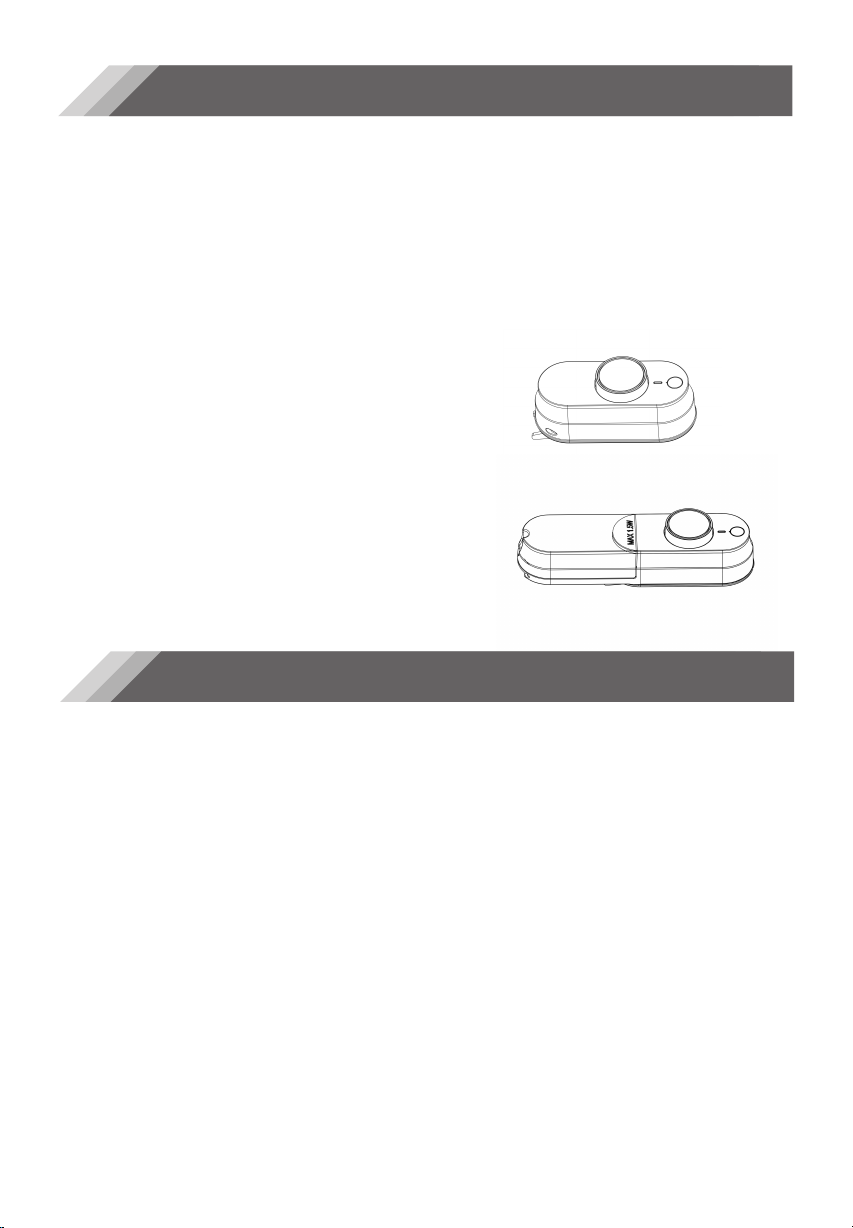
Control panel
Brief intro d u c t i o n
Starting up and temperature regulation
• Insert the plug of the connection lead into the
plug socket with a protective grounding contact.
When the refrigerator compartment door is
opened, the internal lighting is switched on.
• The temperature selector knob is located on
the RH side of the refrigerator compartment.
Setting “0” means:
Off
Clockwise rotate the knob to turn on the appliance.
Setting “1” means:
Highest temperature, warmest setting. Setting “7”
(end-stop) means: Lowest temperature, coldest
setting.
Important!
•
Normally we advise you select a setting of 4,
if you want the temperature warmer or colder
please turn the knob to lower or higher
setting accordingly. When you turn the knob to a
lo
wer setting, this can lead to more energy saving.
Otherwise, it would result high consumption of
energy.
NOTE: High temperature setting will accelerate
f
ood waste.
Using your appliance
Br
ief intro d u c t i o n
Accessories
Movable shelves/trays
• Various glass or plastic storage shelves or wire
trays are included with your appliance different
models have diff
models have different quality.
• The walls of the refrigerator are equipped with
a series of runners so that the shelves can be
positioned as desired.
Positioning the door shelves
• To permit the storage of food packages of
various sizes, the door shelves can be placed at
diff
erent heights .
• To make these adjustments proceed as follows
gradually pull the shelf in the direction of the
arrows until it comes free, then repositions as
required .
Vegetable Drawer
• The drawer is suitable for storing fruit and
vegetables.
erent combinations and different
• For optimum food preservation, a medium
setting is generally the most suitable.
Important! High ambient temperatures (e.g. on
hot summer days) and a cold setting (position 6
t
o 7) may cause the compressor to run
continuously or even non-stop.
Reason: when the ambient temperature is high,
the compressor must run continuously to maintain
the low temperature in the appliance.
To avoid contamination of food, please
respect the following instructions:
• Opening the door for long periods can cause
a significant increase of temperature in the
compartments of the appliance.
• Clean regularly surfaces that can come in
contact with food and accessible drainage
systems.
• Store raw meat and fish in suitable containers
in the refrigerator, so that it is not in contact with
or drip onto other food.
• Two-star frozen-food compartments are
suitable for storing pre-frozen food, storing or
making ice cream and making ice cubes.
• One-, two- and three-star compartments are
not suitable for the freezing of fresh food.
• If the refrigerating appliance is left empty for
long periods, switch off, defrost, clean, dry, and
leave the door open to pr
within the appliance.
Compliance is checked by inspection.
event mold developing
14
Page 15
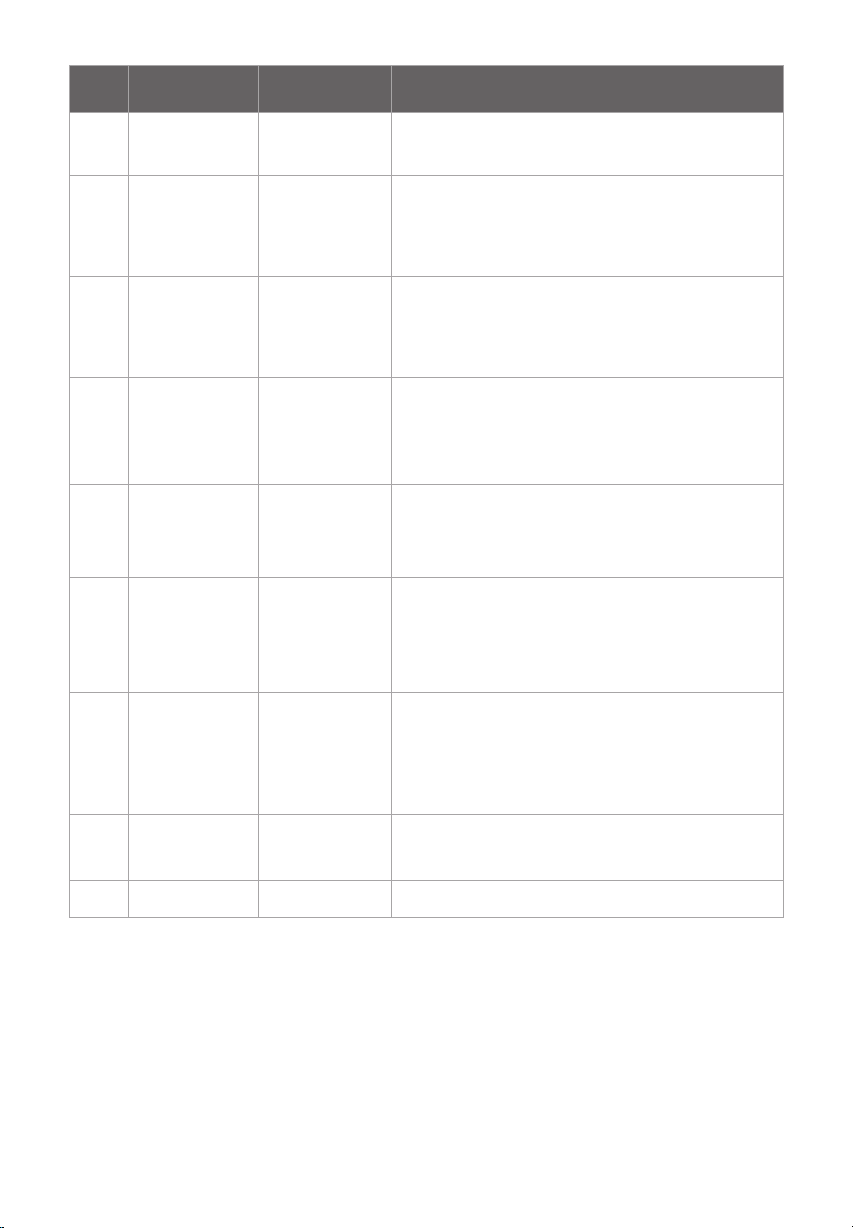
Order Compartments
Type
1
Fridge
Target storage
temp.[°C]
+2~+8
Appropriate food
Eggs, coo ked food, packaged fo od, f ru it s and
veg etables , dairy products, cakes, drin ks and other
foo ds w hich are not suitable for f ree zi ng.
2
3
4
5
6
7
8
9
(***)*-Freezer
***-Freezer
**-Freezer
0-star
Chill
Fre sh Food
Wine
≤ 18-
≤ 18-
≤ 12-
≤ 6-*-Freezer
-6~0
-2~ 3+
0~ 4+
+ +5~ 20
Seafo od (fis h,shrimp, shellfish),freshwate r aq ua tic
pro ducts and mea t pro du ct s (re commended for 3
months ,t he l on ger the storag e time,th e worse the
tas te and nu trition), su itabl e for frozen fresh food.
Seafo od (fis h, shrimp, shel lfi sh ),fre shwater aquati c
pro ducts and mea t pro du ct s (re commended for 3
months, th e longer the storage time,t he worse th e
tas te and nu trition), are not s ui tab le for frozen fresh.
Seafo od (fis h, shrimp, sh ellfi sh), fres hwater aquat ic
pro ducts and mea t pro du ct s (re commended for 2
months, th e longer the storage time,t he worse th e
tas te and nu trition), are not suitable for frozen
fre sh. foo d.
Seafo od (fis h, shrimp, sh ellfi sh), fres hwater aquat ic
pro ducts and mea t pro du ct s (re commended for 1
month,t he l on ger the storag e time, t he wors e th e
tas te and nu trition).
Fres h pork, beef, fish, chicke n, some pac kaged
proc ess ed foo ds, e tc . (Recommen de d to ea t wi thin
the same da y, p refera bly no later than 3 days) .
Par tially encapsulate d processed foods (no nfree zab le foo ds)
Fres h/f rozen pork, bee f, chicken, freshwater aquatic
prod uct s, etc .(7 days below 0° C and above 0°C is
rec ommended for consump ti on within that day,
preferably no more than 2 days).
Seafood (less than 0°C for 15 days, it is not
recommended to store above 0°C)
Fre sh pork,bee f,fish,c hi cke n, cooked foo d, etc.
(Recomm en de d to ea t wi thin the same
day,pre ferably no more than 3 da ys )
red w ine, white wine, s parkling wi ne e tc .
Note: please store different foods according to the compartments or target storage temperature of your
purchased products.
1
5
Page 16

Helpful hints and tips
Brief intro d u c t i o n
Noises during Operation
The following noises are characteristic of
refrigeration appliances:
Clicks Whenever the compressor switches on or
off, a click can be heard.
Humming As soon as the compressor is in
operation, you can hear it humming.
Bubbling When refrigerant flows into thin tubes,
you can hear bubbling or splashing noises.
Splashing Even after the compressor has been
switched off, this noise can be heard for a short
time.
Energy saving tips
• Do not install the appliance near cookers,
radiators or other sources of warmth.
• Do not open the door too often or leave the
door open any longer than necessary.
• Do not set temperature colder than necessary.
• Make sure the side plates and back plate of
the appliance are with some distance from the
wall, follow the instructions relevant to installation.
• If sketch map shows the right combination of
the drawers, crisper and shelves, do not adjust
the combination, it would result in more energyconsuming.
Hints for fresh food refrigeration
To obtain the best performances:
• Do not store warm foods or evaporating liquids
in the appliance.
• Do cover or wrap the food, particularly if it has
a strong flavor or odor.
• Position food so that air can circulate freely
around.
Hints for refrigeration
• Meat (all types): wrap in polythene bags and
place on the glass shelf above the vegetable
drawer. For safety, store in this way only one or two
days at the most.
• Cooked foods, cold dishes, etc…: these should
be covered and may be placed on any shelf.
• Fruit and vegetables: these should be
thoroughly cleaned and placed in the special
draw(s) provided.
• Butter and cheese: these should be placed in
aluminum foil or polythene bags to exclude as
much air as possible.
• Milk bottles: these should have a cap and
should be stored in the bottle rack on the door.
Cleaning and Care
Brief intro d u c t i o n
For hygienic reasons the appliance interior,
including interior accessories, should be cleaned
regularly.
The fridge should be cleaned and maintained at
least every two months.
WARNING
Electri ca l Shock H az ar d
The appliance should not be connected to
the mains during cleaning. Before cleaning
switch the appliance off and remove the
plug from the mains, or switch off or turn out
the circuit breaker or fuse.
Notice!
• Remove the food from the appliance before
cleaning. Store them in a cool place, well
covered.
• Never clean the appliance with a steam
cleaner. Moisture could accumulate in electrical
components.
• Hot vapors can lead to the damage of plastic
parts.
• Ethereal oils and organic solvents can attack
plastic parts, e.g. lemon juice or the juice from
orange peel, butyric acid, cleanser that contain
acetic acid. Do not allow such substances to
come into contact with appliance parts.
• Do not use any abrasive cleansers.
• Clean the appliance and the interior
16
Page 17

accessories with a cloth and lukewarm water.
Commercially available dish washing detergents
may also be used.
• After cleaning wipe with fresh water and clean
dish cloth.
• Accumulation of dust at the condenser
increases energy consumption, clean the
condenser at the back of the appliance once a
year with a soft brush or a vacuum cleaner.
• Check the water drain hole on the rear wall of
the refrigerator compartment.
• Clear a blocked drain hole with the aid of
something like soft green peg, be careful not to
make any damage to the cabinet by sharp
things.
•
After everything is dry place appliance back
into service.
Defrosting
Why defrosting
• Water contained in food or getting into air
inside the fridge be opening doors may form a
frost layer inside. It will weaken the refrigeration
when the frost is thick. While it is more than 10mm
thick, you should defrost.
Defrosting in fresh food storage
compartment
• It is automatically controlled by switching the
temperature regulator on or off so that there is no
need of operation of defrosting. Water from
defrosting will be drained into an drip tray
through a drain pipe at the back of the fridge
automatically.
Go out of use for a long time
• Remove all refrigerated packages.
• Switch off the appliance by turning the
temperature regulator to position “0”.
• Remove the mains plug or switch off or
disconnect the electricity supply.
• Clean thoroughly (see section: Cleaning and
Care).
• Leave the door open to avoid the build up of
odors.
lf the appliance contains freezer
Note:
compartment.
17
Page 18
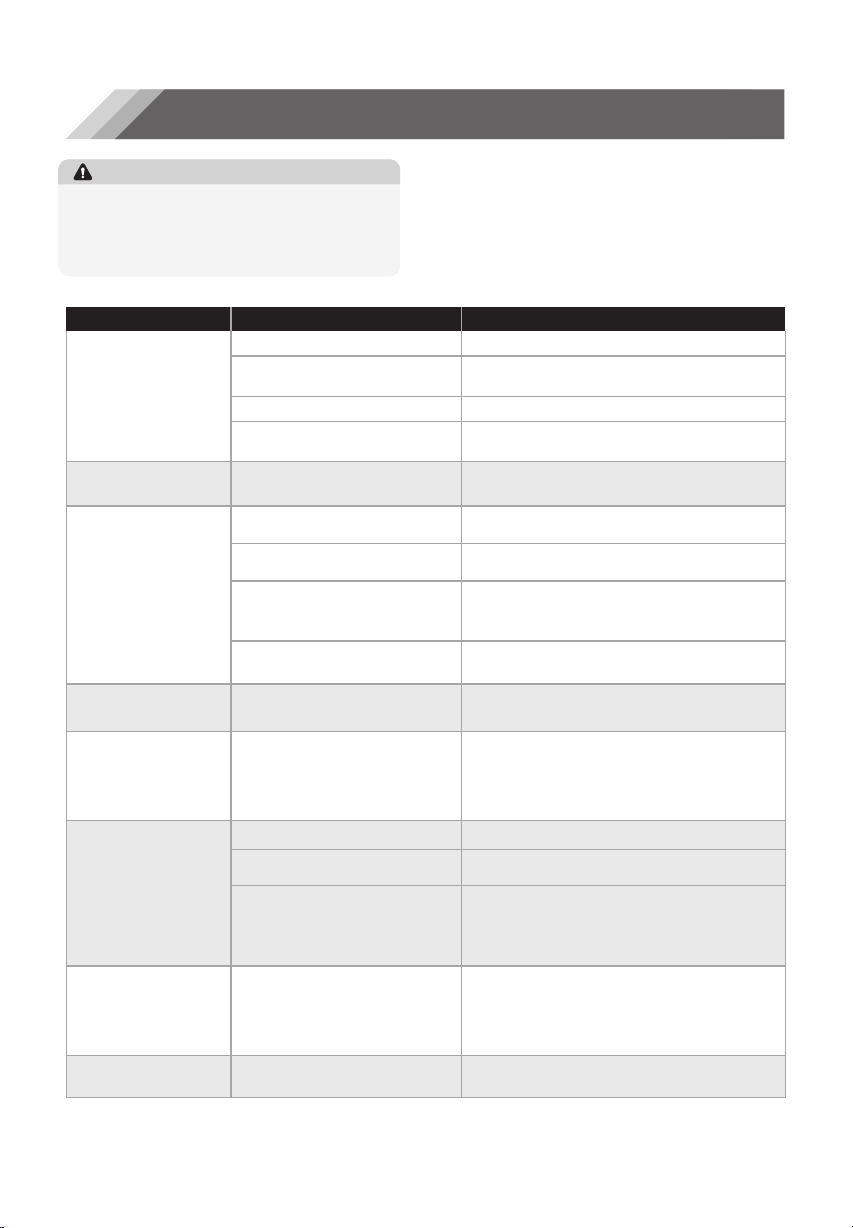
Troubleshooting
WARNING
Before trouble shooting, disconnect the power
supply. Only a qualified electrician of
competent person must carry out the trouble
shooting that is not in the manual.
PROBLEM POSSIBLE CAU SE(S) SOLUTION
Appliance is not switched on.
Appliance does
not work.
Appliance cools too
much.
The food is too
warm.
Interior LED Light
not work.
Heavy build-up of
frost, possibly also on
the door seal.
Mains plug is not plugged
in or is loose.
Fuse has blown or is defective.
Socket is defective.
Temperature is set too cold.
Temperature is not properly
adjusted.
Door was open for an
extended period.
A large quantity of warm food
was placed in the appliance
within the last 24 hours.
The appliance is near a heat
source.
does
LED Light is defective.
Door seal is not air-tight
(possibly after reversing the
door).
Important!
Repairs to refrigerators/freezers may only be
performed by competent service engineers.
Improper repairs can give rise to significant
hazards for the user. If your appliance needs
repairing, please contact your specialist
dealer or your local Service Center.
Switch on the appliance.
Insert mains plug.
Check fuse, replace if necessary.
Mains malfunctions are to be corrected
by an electrician.
Turn the temperature regulator to a warmer
setting temporarily.
Please refer to the “Control panel” section.
Open the door only as long as necessary.
Turn the temperature regulation to a colder
setting temporarily.
Please look in the “Installing your
new appliance” section.
Please look in the “cleaning and care”
section.
Carefully warm the leaking sections of the
door seal with a hair dryer (on a cool setting).
At the same time shape the warmed door
seal by hand such that it sits correctly.
Unusual noises.
The compressor does
not start immediately
after changing the
temperature setting.
Water on the floor or
storage shelves.
Appliance is not level.
The appliance is touching the
wall or other objects.
A component, e.g. a pipe, on
the rear of the appliance is
touching another part of the
appliance or the wall.
This is normal, no error has
occurred.
Water drain hole is blocked.
Readjust the feet.
Move the appliance slightly.
If necessary, carefully bend the component
out of the way.
The compressor star ts after a period of time.
See the “cleaning and care” section.
18
Page 19
Disposal of the appliance
It is prohibited to dispose of this appliance as household waste.
Packaging materials
Packaging materials with the recycle symbol are recyclable. Dispose of the packaging into a suitable waste
collection container to recycle it.
Before disposal of the appliance
1. Pull out the mains plug from the mains socket.
2. Cut off the power cord and discard with the mains plug.
WARNING
Refrige rators contain re frigerant and ga se s in t he insulati on . Refrige rant an d ga ses must be
dispose d of p rofessiona ll y as they m ay c ause eye injuries or i gn ition. Ensure that tub in g of the
ref rigerant circuit is not d am age prior to pro per disposal.
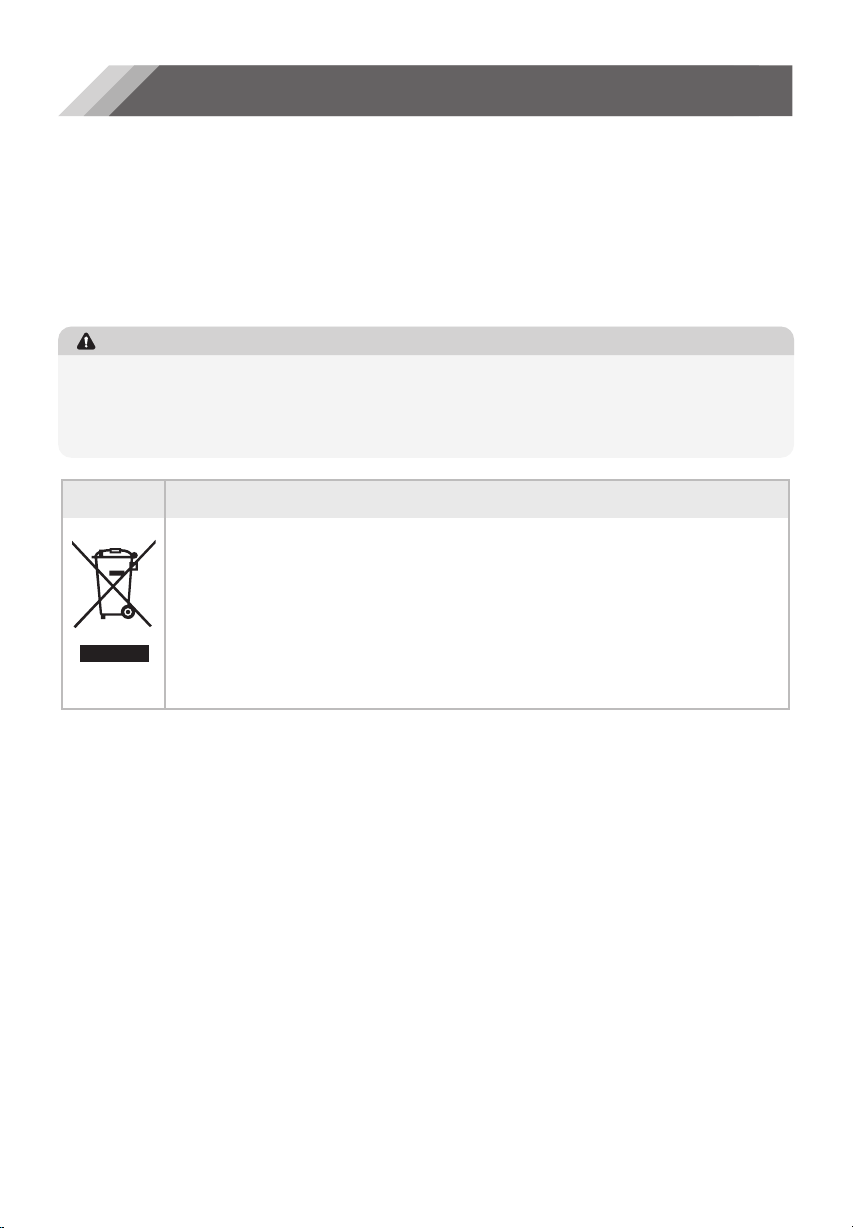
Correct Disposal of this pro du ct
This symbol on the product or in its packing indicates that this product may not be
treated as household waste. Instead, it should be taken to the appropriate waste
collection point for the recycling of electrical and electronic equipment. By ensuring
this product is disposed of correctly, you will help prevent potential negative
consequences for the environment and human health, which could otherwise be
caused by the inappropriate waste handling of this product. For more detailed
information about the recycling of this product, please contact your local council your
household waste disposal service, or the shop where you purchased the product.
19
Page 20
4204391
 Loading...