

Page 1
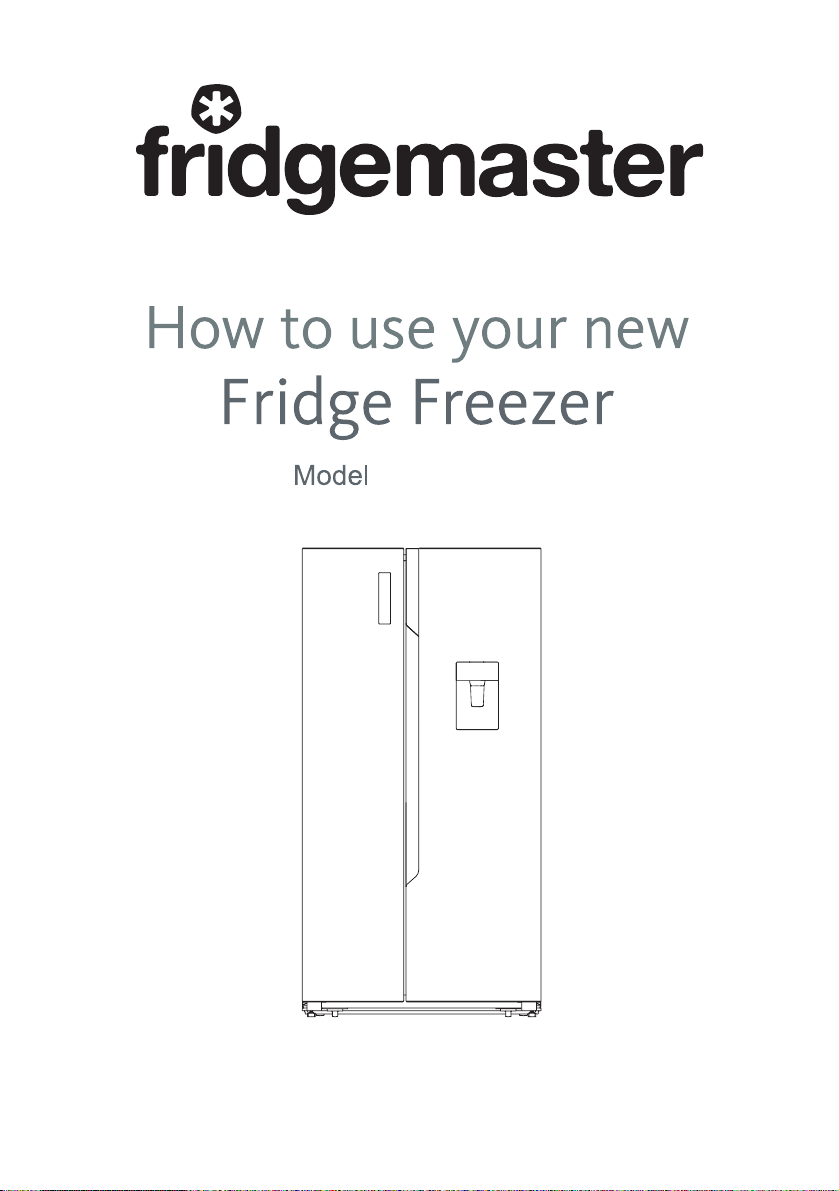
MS91515DFF
MS91515BFF
Page 2
2
2
7
9
10
This appliance is in accordance with the following EU guidelines:
and and 2009/125/EC and EC.643/2009 and 2002/96/EC
2014/30/EU
2014/35/EU
12
16
17
18
19
Save these
so that anyone using it,
throught its life, will be
properly informed on its
usage and safety notices.
Page 3
3
Page 4
Warning:Risk of fire/
flammable materials
4
Page 5
5
Page 6
compartment if your hands
6
Page 7
7
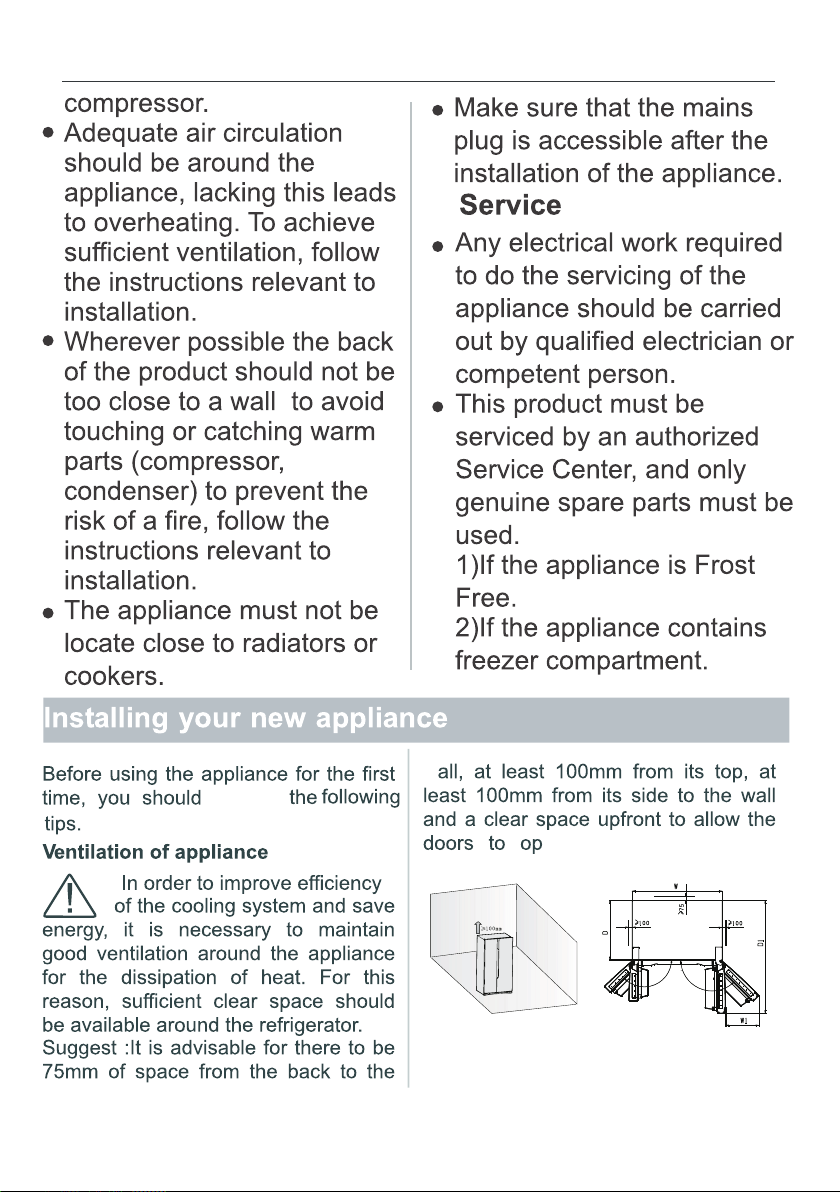
review
w
en 150 . Please see the
following diagrams.
°
。
1
0
50
5
。
1
Page 8
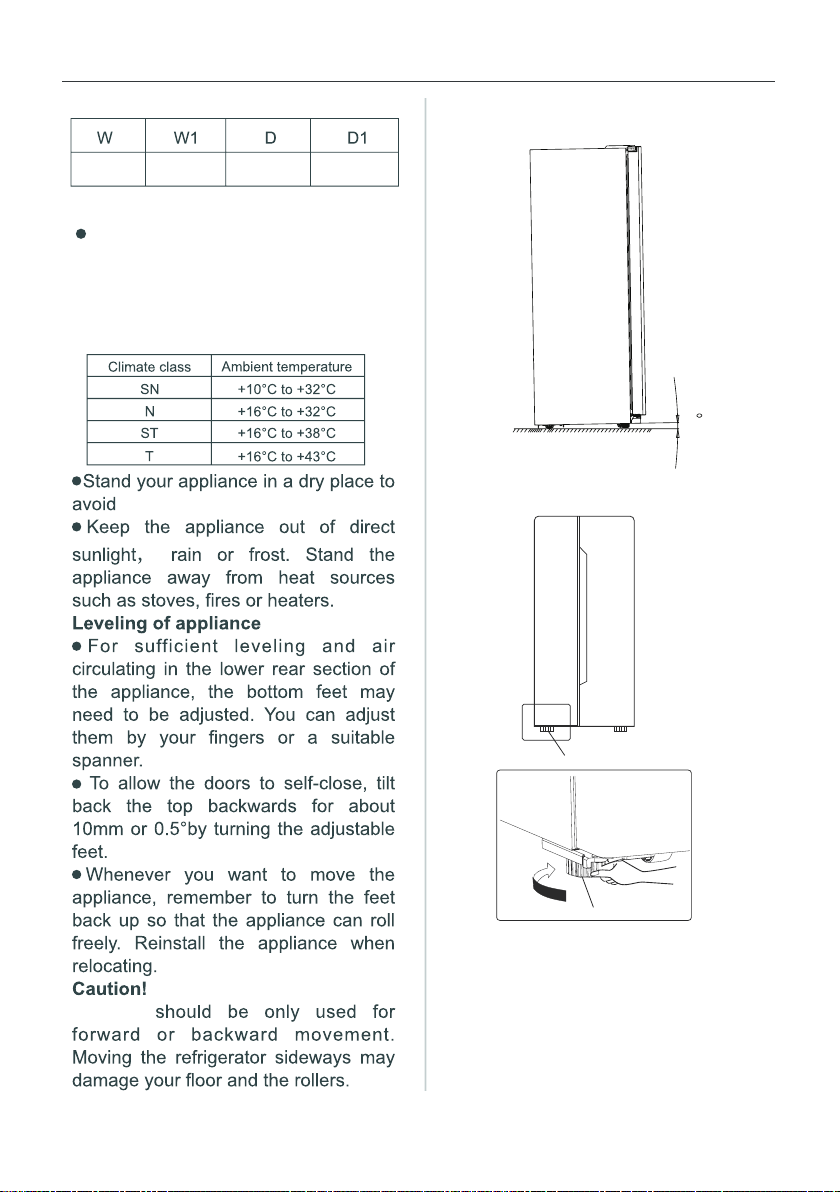
Space required (mm)
8
908
411.5
550
1096. 5
Note:
This appl iance per forms well in
the clima te class from SN to ST.It
may not wor k properl y if being left
at a temper ature abo ve or below the
indicat ed range fo r a long period.
damage moisure .
0
.
5
casters,
adjusta e bottom f etbl e
adjusta e bottom f etbl e
The rollers which are not
Page 9
9
1
2
3
4
5
6
7
8
9
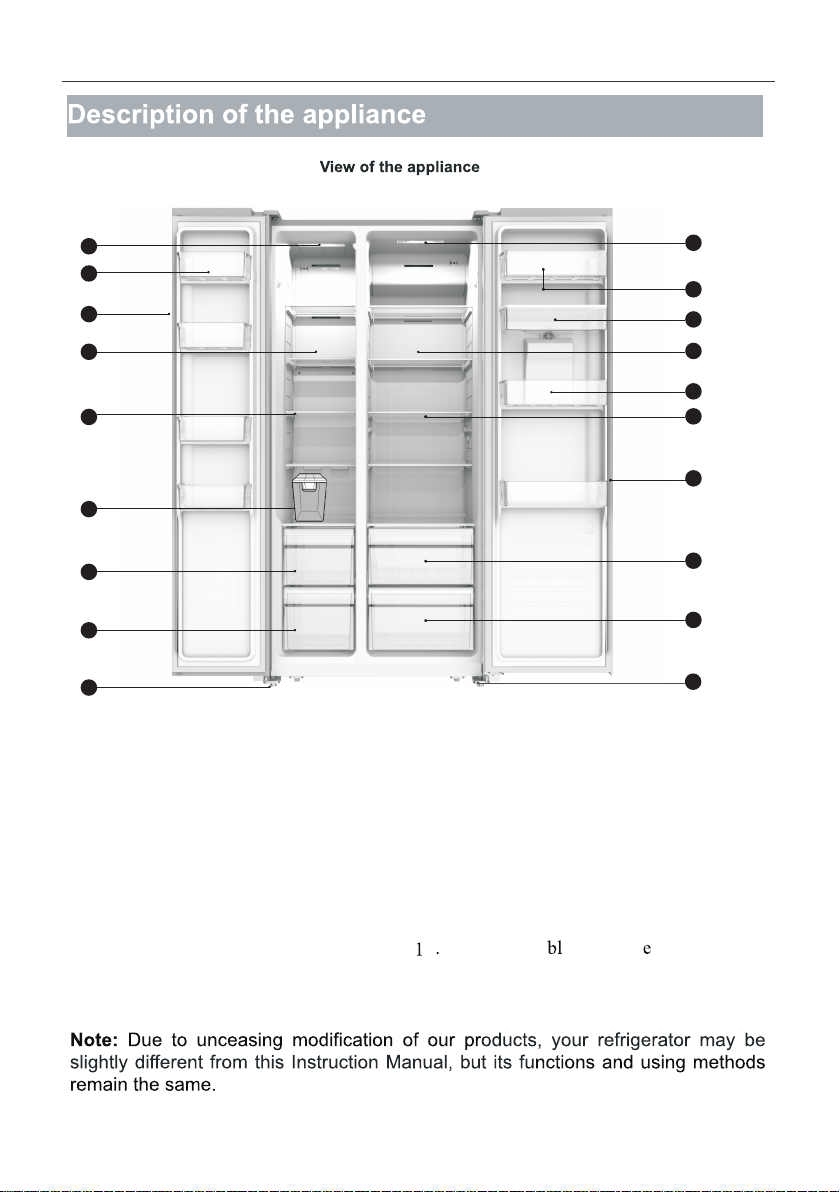
1. Freezer zone LED light
2. Freezer door Rack
3. Fre zer door s ale e
4. Wind channel cover in freezer
5. Freezer shelf
6. Ice box part
7. Freezer drawerupper
8 lower. Freezer drawer
9. Left adjustable bottom feet
1 e one LED light0. Fr sh z
1
1 . Fresh door Rac
2
1 .
Water tank
Wind cha l cove
1 . nne r in fresh
3
1 . Egg tray
4
5
1 . Fres e
h sh lf
k
(inside)
1 . Fres e6 h door s al
17. Fresh upper drawer
18 Fresh lower. drawer
Right adjusta e bottom f et
9
10
11
12
13
14
15
16
17
18
19
Page 10
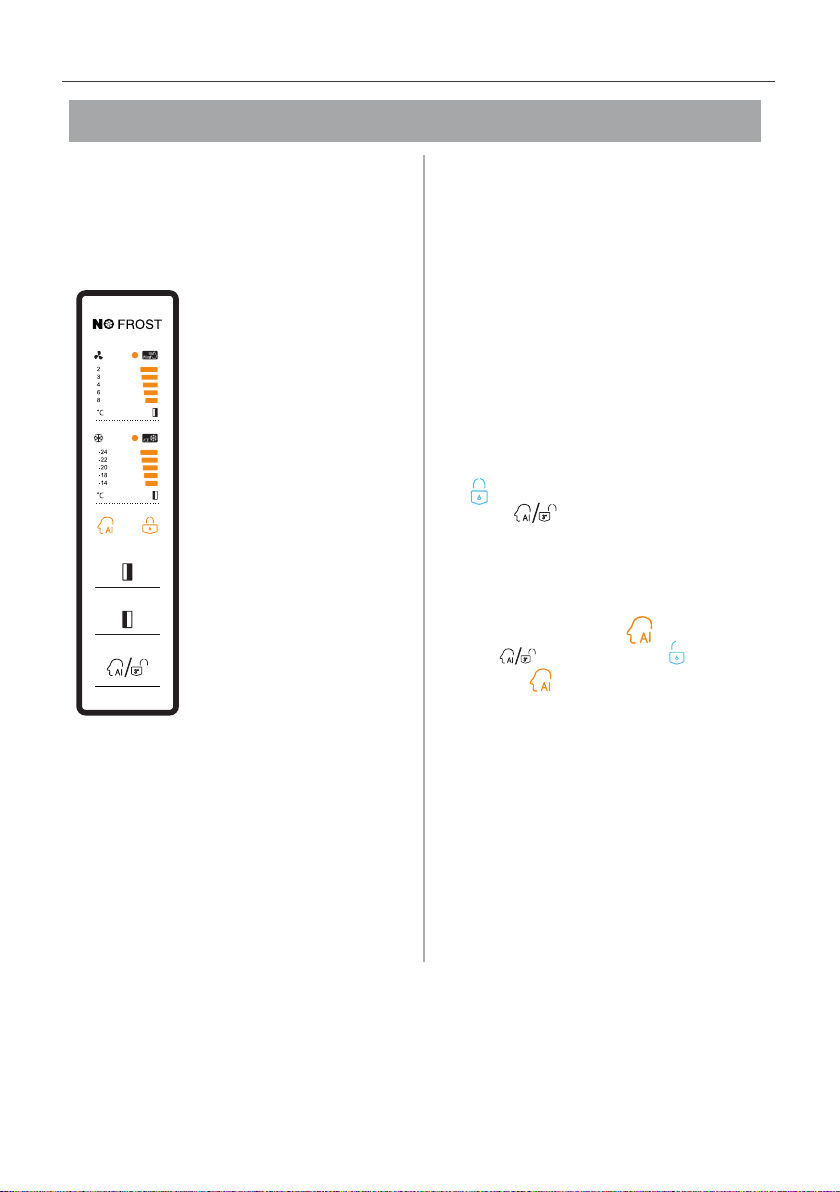
Display controls
10
Use appliance according to theyour
following your appliance
appliance has the corresponding
functions and modes as the control
panels showed in the pictures below.
guidelines ,
When the isappliance
powered for firston the
the backlighting of
time,
the
icons on display
panel
starts working. If
buttons
no have been
pressed the doorsand
are cloesed ,the
backlighting offwill turn
after 60 seconds.
T h e c o n t r o l p a n e l
consists areas
about temperature,one
area abo ut different
modes.
Controlling
temperature
We recommend that
when start youryou
refrigerator for the first
time, temperature
for the refrigerator is set
to and
-18℃. If you
to want to
change the tempe rature,
follow the
below.
of two
t h e
the
4℃ the freezer
instructions
Caution!When a temperature,you set
set an average
you temperature for the
whole refrigerator cabinet .
Temperatures inside each
compartment m ay vary f rom the
temperatures the
depending on how much food you
store and where you orplace it. High
low may alsoroom affecttemperature
the actual temperature inside the
appliance.
Unlock
All the buttons are iconlocked if the
" " illuminated, the
" " for 3button seconds to
unlock them.
no buttons are pressed within 20 seconds .
displayed on panel,
is press
The fridge will lock itself of
Mode
You can select by pressing
the button " " .
" "
When is selected, wait for
the
10 seconds.
“ ”
corresponding icon flash for
“ ”
when
Page 11
11
Super Cool
Super Cool can refrigerate your food
much faster, keeping food fresh for a
longer period .
●
Super Сool function. The light will
be illuminated.
●
For maximum tothe amount of food
be Сooled , please wait 6 h.
●
Super switches cool automatically
off after 6 hours the fridge
temperature to 2℃.
setted
about
and
Display controls
Artificia Intelligence
●
When the function
temperature is
of the appliance
automatically adjusted.
●
When the IntelligenceArtif ciali
function is activated, temperaturethe
of the automatically switchedfridge is
to and freezer to
4
℃
the
is seleced, the
-18
℃.
Super Freeze
Super Freeze will quickly lower the
temperature within sothe freezer food
freeze This can lock in
will faster. the
vitamins fresh
and nutrients of food
and keep food fresh longer.
●
Super Freeze function. The light will
be illuminated.
●
For maximum tothe amount of food
be frozen, please wait 24 h.about
●
Super switchesfreeze automatically
off after 26 hours the freezerand
temperature to -24℃.setted
Freezer
●
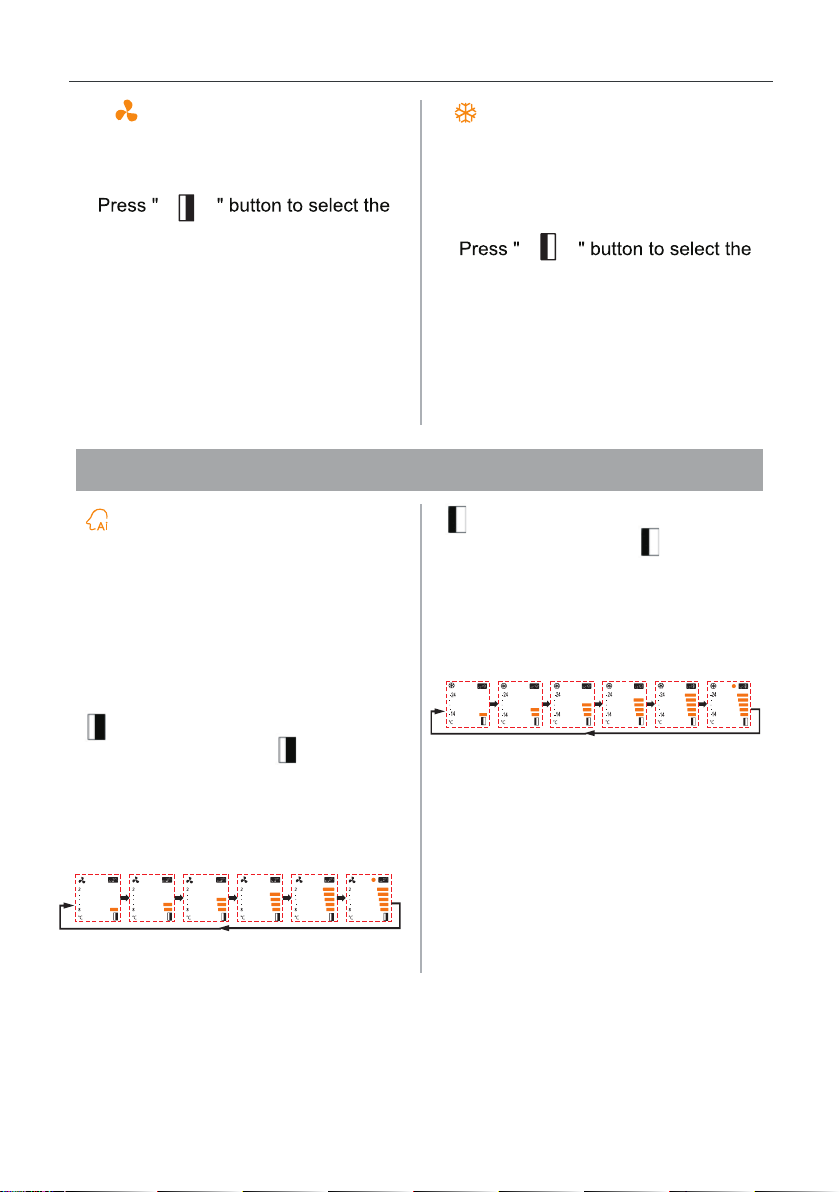
You can press the “ ” b utton
to activate to controlthe mode the
freezer temperature. When you press
t h e button t h e
c o n t i n u o u s l y,
temperature setwill be as the
following sequence.
Fridge
●
You can the " ” button
activate mode
press to
the fridgeto control the
temperature.When you press the
button continuously, the temperature
will sequence.be set the following
as
Door Alarm
●
If door of or freezer isthe fridge
open for over minutes, the door
2
alarm The buzzer willwill sound.
automatically stop alarmi ng 10
minutes later.
●
To energy,save please avoid
keeping the door open timefor a long
when using the The door
appliance.
alarm can be cleared by closing the
door.
Page 12
12
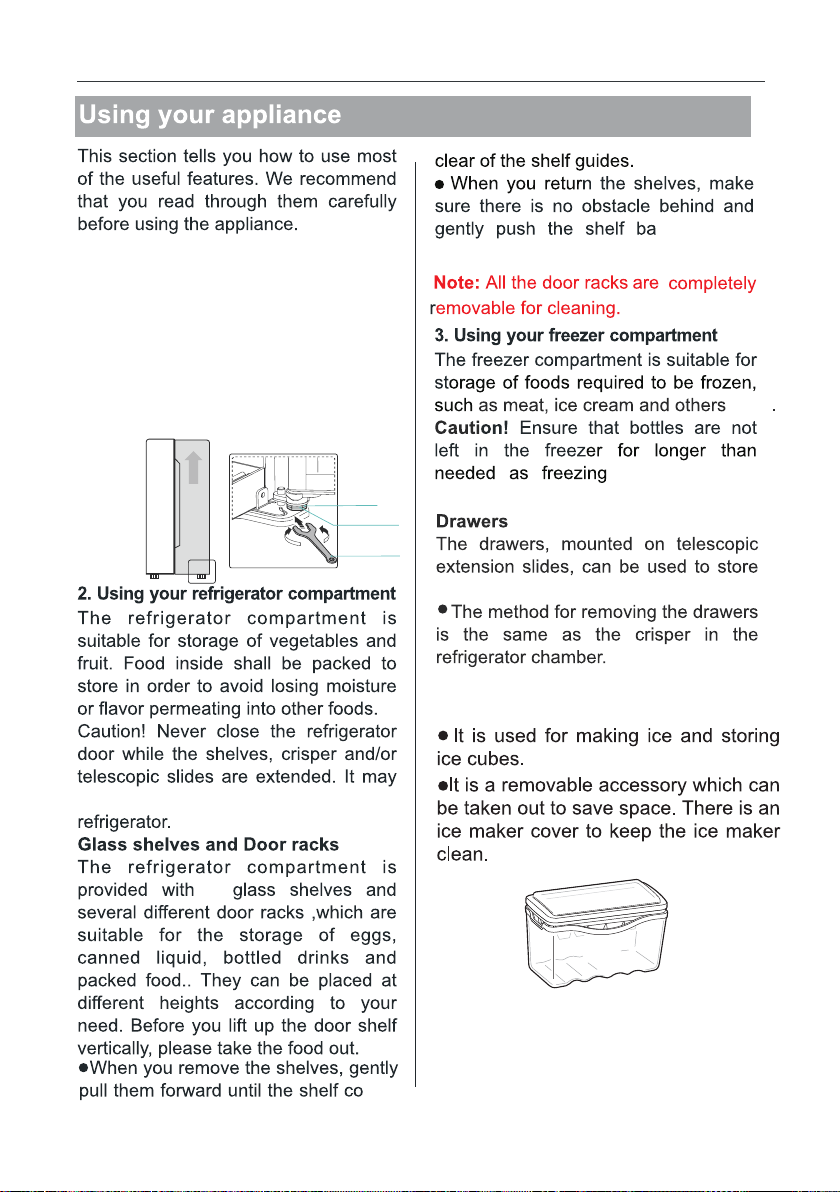
1.Adj ust the door
Whe n yo u the do ors are not at thefind
same level, yo u can use the screwdriver
to ad just the do or.
Whe n the freez er door is upper than the
ref rigerator door. First, you can use the
scr ewdr iver to turn the bolt anticl ock wi se
on the lower hinge that can make the door
go up . Th en use th e screwdr iver to lock
the nut in place.
①bolt
②nut
screwdriver
③
damage both them and the
ck into t he
position.
item
may cause the
bottles to break。
large volume of food .
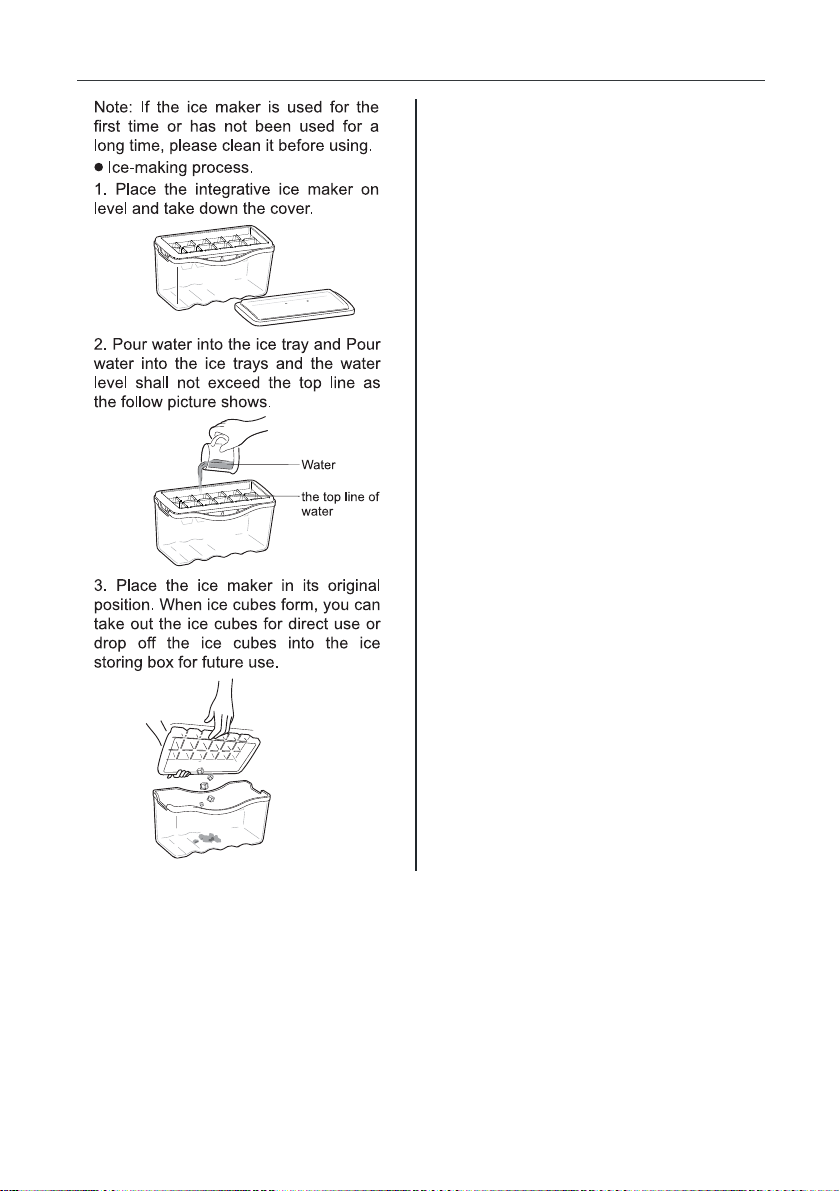
4.Using your ice b ox
4
mes
Page 13
13
Page 14
14
5.Water Dispenser
The water dispenser,
located in the fridge door, is
for storing drinking water.
With this appliance you can
obtain chilled water easily
without opening the
refrigerator. You should be
informed of following tips.
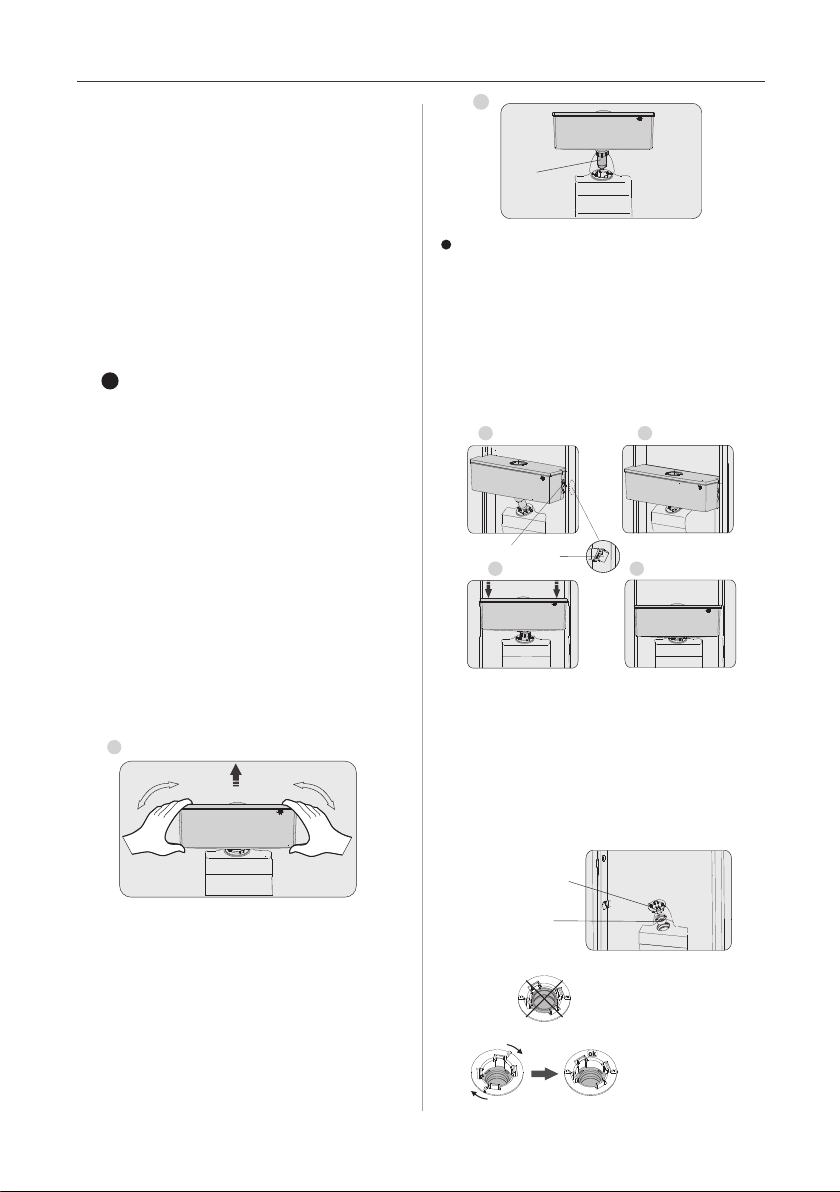
Before using
Before using this appliance
for the first time, you should
use it as follows.
1. Hold the two sides of the
water tank tightly, then pull
up the water tank by
shaking up and down
.
2. Unscrew the head, then
clean it and the inside of
water tank.
①
②
Hea d
Assem bli ng
Be fore as sembl in g, pl ease d ra in th e
water inside the ta nk, and ch eck whether
the was her i s reversed or not.
1.Ins ert t he head into the hole.
2.Fit th e ta nk a lon g th e gu ides on the
door.
3.Pre ss d own on t he t wo s ide of t he t ank.
4.Whe n y ou hear a cli ck sound, that
means t he in stallation is comp let ed.
① ②
Slo t
Gui de
③
War ning!
1.Be ca ref ul not to press on the hea d;
2.Whe n f itt ing the water tank, ensure th e
head in ser ted into the hole firs t;
3.If you foun d the washe r reve rse d o r
loose d when removin g the tank, you must
take o ff the f ixed holder b y co ntrarotating
it first, then pu t the was her to th e corr ect
posit ion , and install the fi xed ho lde r at
last.
④
fix ed ho lder
was her
wr ong po sit ion
co rrec t pos itio n
Page 15
15
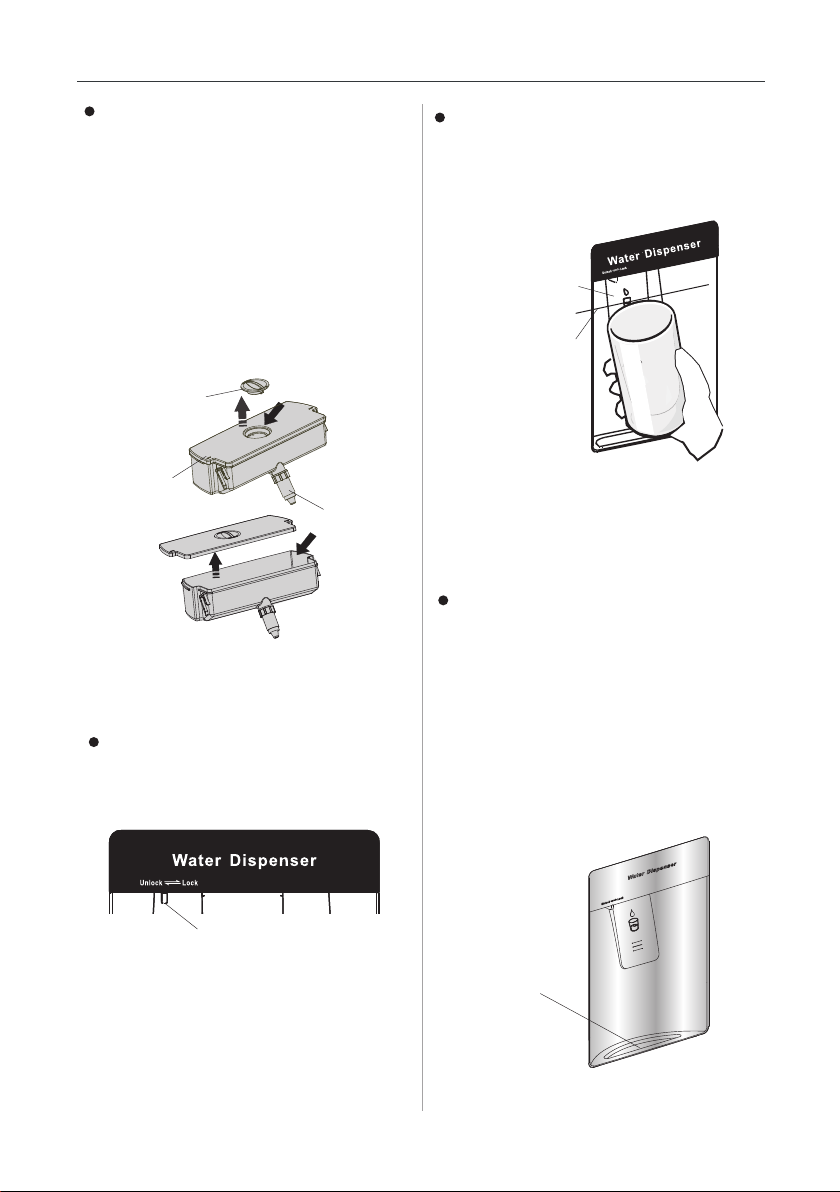
Filli ng wa ter
Befor e y ou fil l t he drinking water in to the
water tank, e nsu re that the w ate r tank i s
stead y and i n a correct position .
Cauti on!
Fill wi th wa ter up to 3L (which is
sugge ste d), and not above the le vel .
Other wis e, it may overflow whe n the l id is
close .
We re com mend tha t you fi ll the water by
the fol low ing ways.
1. R emo ve the small l id and fill wa ter f rom
the inl et of t he large lid.
2. R emo ve the co ver of the tan k, and th en
fill wa ter i nside directly.
Small li d
Large li d
Head
War ning!
Don't touch other pa rts of the applian ce
when fil lin g w ate r, i t may cau se the
water l eak age.
Dispe nsi ng water
1. Mak e su re t he cover of the wa ter tan k
is fitt ed on .
2. Close the fridge door and check the
dispe nse r.
Recei vin g Water
You shoul d use t he c orrec t cups to
rec eiv e wat er u nd er nea th the wat er
dispe nse r.
Dis pen ser le ver
Sug ges ted po siti on
War ning!
Don't p ush the d ispenser l eve r forward
witho ut cup, it ma y cause the w ater lea k
from th e dis penser.
Clean ing
1. Put the water tank out of the door
caref ull y, and t hen wash the t ank, li d, and
head li ght ly in water.
2. Af ter you have su ccessfully cl eaned
th e appl iance, you s ho uld dr y it by
natur al dr ying or using the drye r.
3.If you ha ve used the wa ter dispenser
for many ti mes, th e wa ter in the re ceiving
tank may drop on the floor, which may
make y our floor wet, and you sh ould
clean the tank wi th dry towel regularly
befor e ove rflow.
Befor e you d ispense t he wa ter, ma ke
Loc k
sure t he l ock device is on “UNLOCK”
situa tio n.
War ning!
The loc k is de fined as “child lock ”.
Don't pus h the dis penser lev er forward
st rongly, w hen the d ispense r is on
“LOCK ” situation, it may da mag e t he
mecha nis m.
Receiv ing ta nk
Page 16
fre s h
Should be wrapped in a irtight foil
or plastic film wrap .
s
16
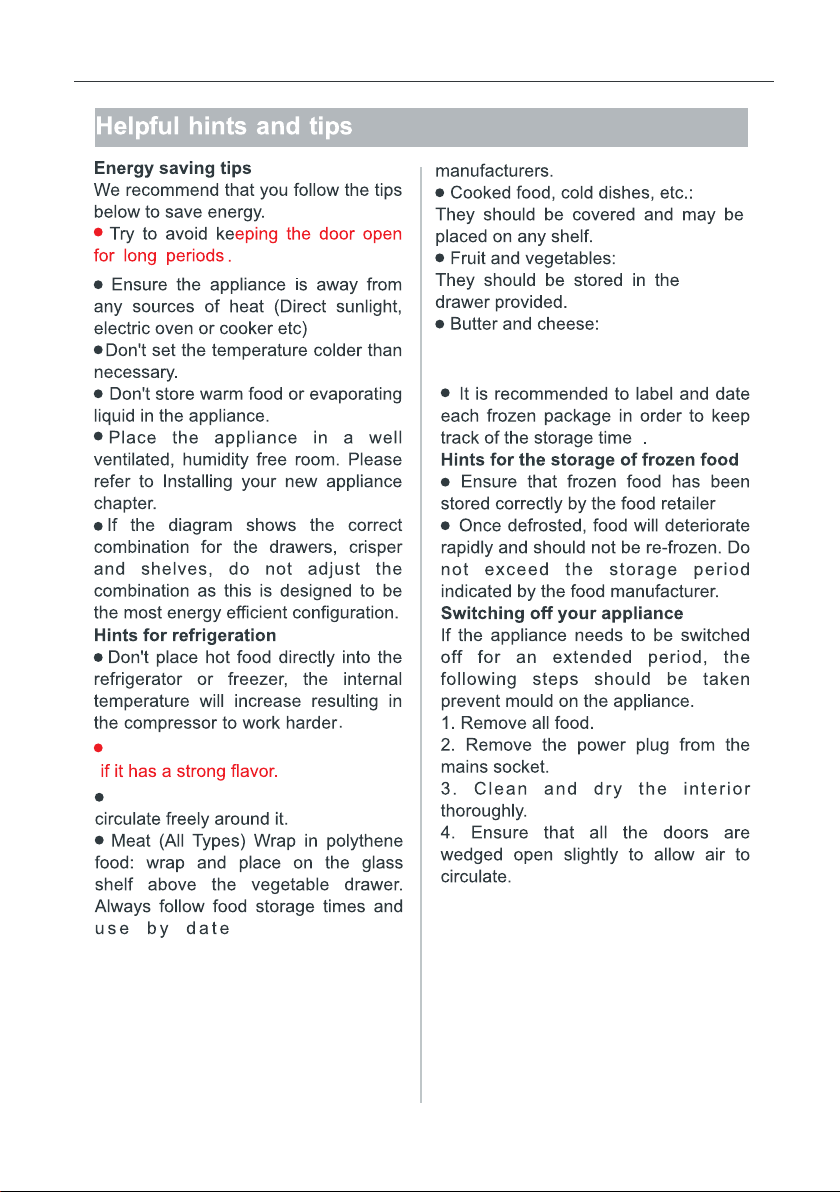
Cover or wrap food ,particulary
Place food carefully so that air can
s suggested by
Page 17
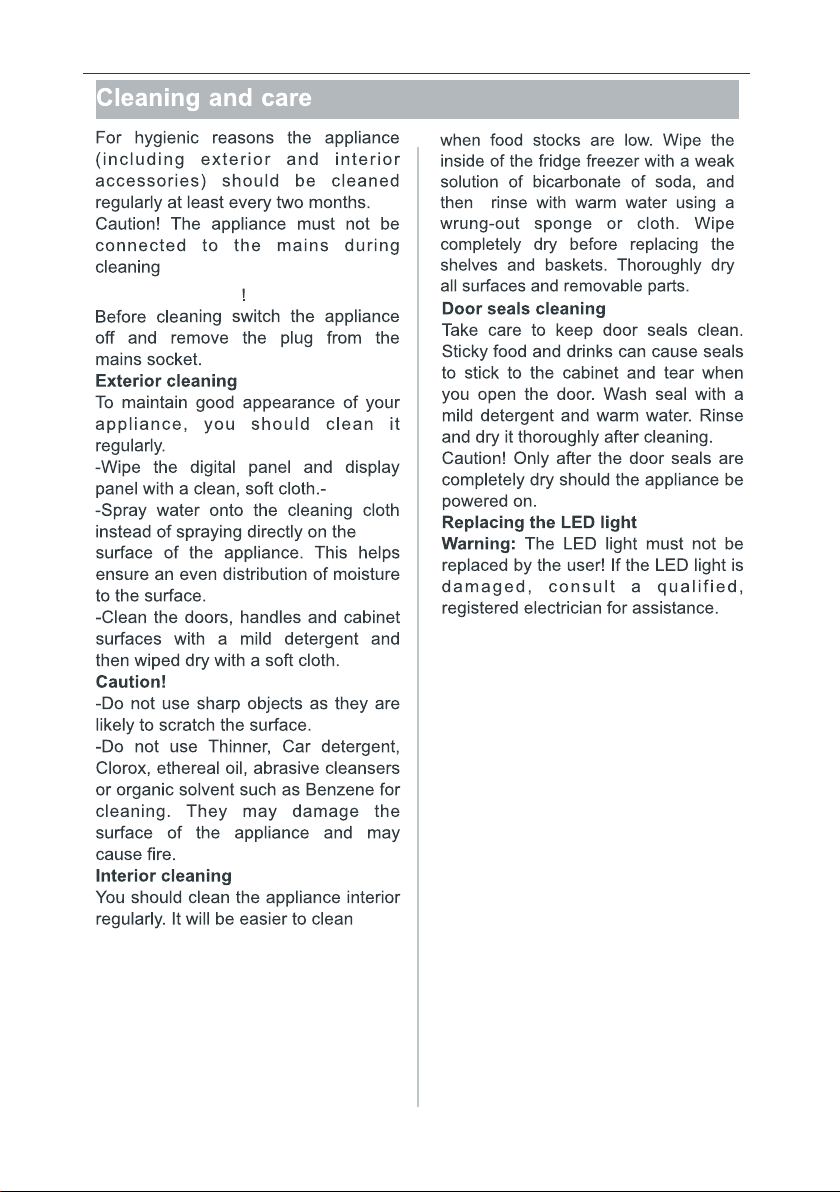
17
as there is a danger of
electrical shock
Page 18
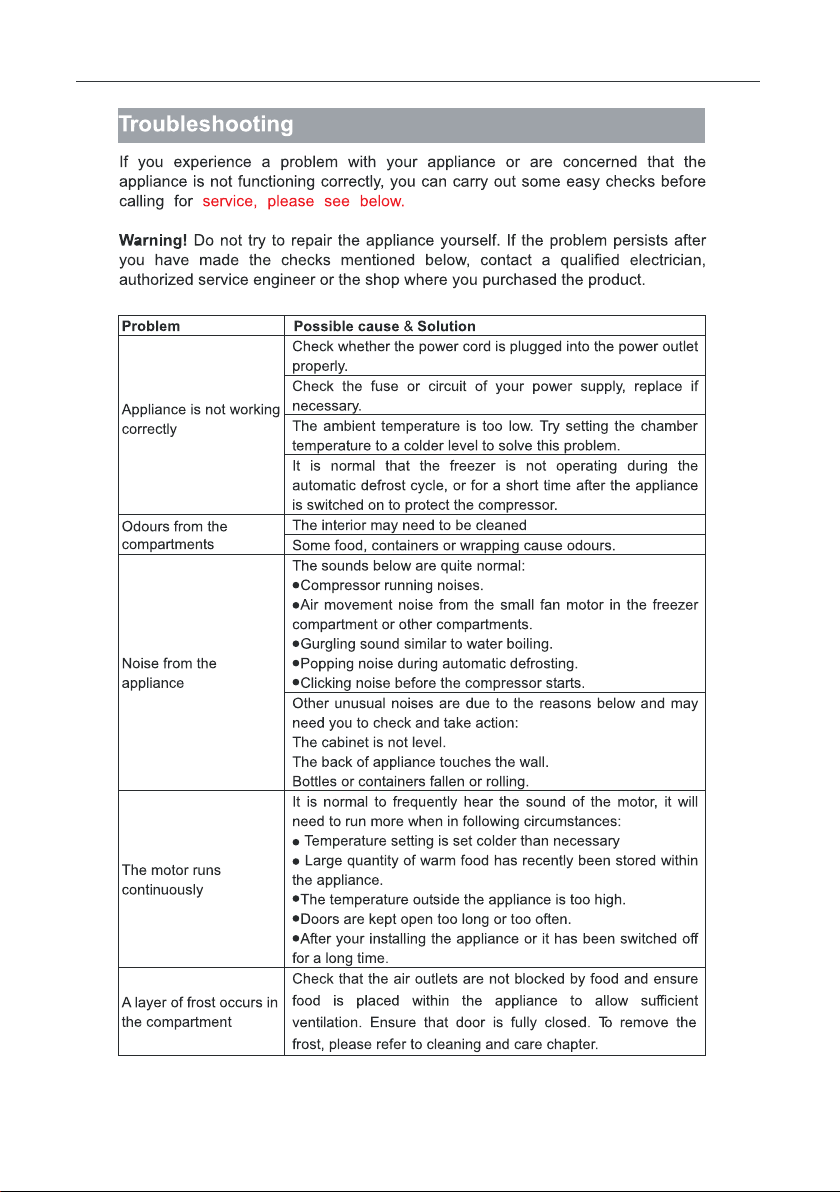
18
Page 19
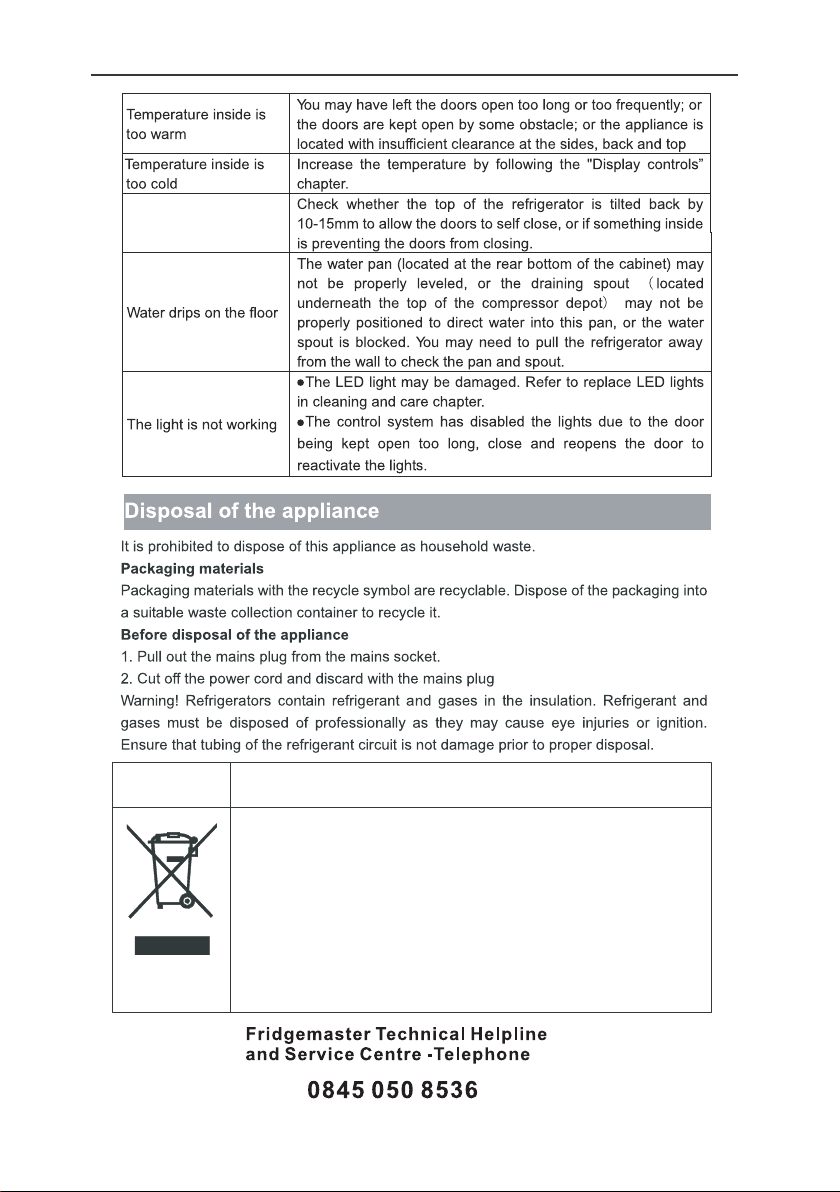
19
Door can’t be c los ed
easily
Correct Disposal of this product
This markin g ind icates that th is pr odu ct should not be d isp osed
with other ho use hold wastes th rou gho ut the EU. To pre ven t
possible ha rm to t he environme nt or h uma n health from un con trolled
waste dispo sal , recycle it res pon sib ly to promote th e sus tainable
reuse of mate ria l resources. To re turn your used d evi ce, p lease use
the return an d col lection syst ems o r con tact the retai ler w here the
product was p urc hased. Th ey ca n take this prod uct f or en vironmenta l
safe recycl ing .
Page 20
FRIDGEMASTER
Unit 2 Meadow Court
Millshaw Lane Leeds,
West Yorkshire,
LS11 8LZ,
United Kingdom
For service and repairs please contact
the Fridgemaster Technical Helpline on:
 Loading...