

Page 1
Original instructions
Thermowarm TWS
SE
NL
.... 4
.... 54
GB
FI
.... 14
....64
NO
ES
.... 24
.... 74
DE
RU
.... 34
.... 84
FR
PL
.... 44
.... 94
Page 2
TWS
333 / 453 / 753
Thermowarm TWS
Fig. 1
123
208
242 / 362 / 662
150
47
min 50
Fig. 2: Minimum distances
min 100
min 300
min 70
Accessories
TWSL
on/off
Overheat protection
TWSL12 TWS100/200
TWSL3 TWSC
reset
2
Page 3
Thermowarm TWS
Thermowarm TWS100. (IP44)
Type Output
[W]
TWSE103 300 230V~ 1,7
TWSE105 500 230V~ 2,2
TWSE110 1000 230V~ 3,2
TWSD110 1000 400V~ 3,2
Thermowarm TWS200. (IP44)
Type Output
[W]
TWSE205 500 230V~ 2,2
TWSE210 1000 230V~ 3,2
TWSD210 1000 400V~ 3,2
Thermowarm TWSC. (IP54)
Type Output
[W]
TWSC303 300 230V~ 1,7
TWSC305 500 230V~ 2,2
TWSC310 1000 230V~ 3,2
Voltage
[V]
Voltage
[V]
Voltage
[V]
Weight
[kg]
Weight
[kg]
Weight
[kg]
TWS
SENSOR
ON
OFF
LN
°C
Overheat protection
RESISTOR
3
Page 4

GB
Thermowarm TWS
Installation and operating instructions
General Instructions
Read these instructions carefully before
installation and use. Keep this manual for
future reference.
The product may only be used as set out in
the assembly and operating instructions. The
guarantee is only valid if the product is used
in the manner intended and in accordance
with the instructions.
Application
Thermowarm TWS is a series of robust
convectors with smart control designed
for industrial and public buildings, such as
changing rooms, stores and toilets. TWSC
can also be used in corrosive and aggressive
environments. TWS200 has a surface
temperature as low as 60°C, which makes it
ideal for daycare centres and bathrooms.
Enclosure class: IP44 (TWSC: IP54).
Mounting
The appliance is supplied with a pre-installed
wall bracket for attaching horizontally to the
wall using four screws. The top two holes
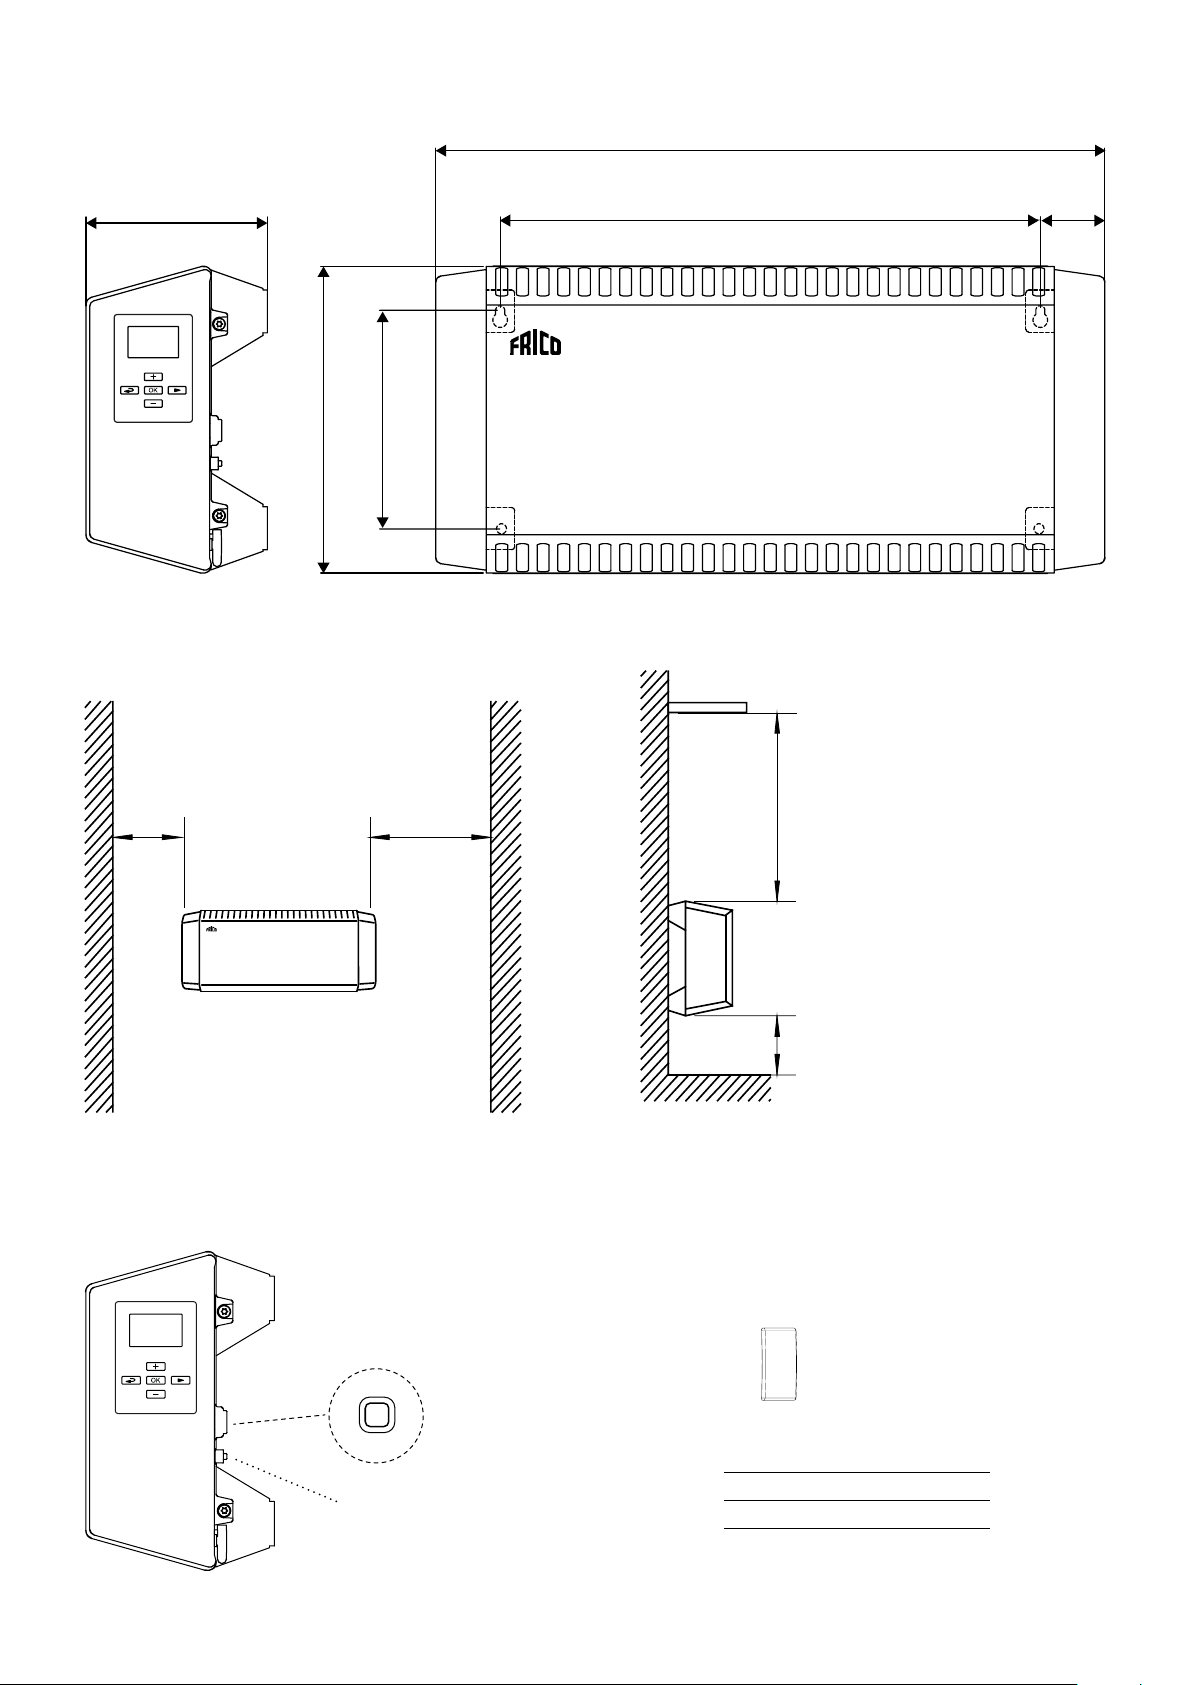
are “keyholes”. See the dimensions on the
introductory pages. For minimum distance,
see diagrams on introductory pages.
Connection
TWS is fitted with a 0.6 metre long cord
without plug and is connected to a junction
box. The convector is designed for fixed
installation.
The installation, which should be preceded by
an omnipolar switch with a contact separation
of at least 3 mm, should only be wired by a
competent electrician and in accordance with
the latest edition of IEE wiring regulations.
Thermowarm TWS is switched on using a
push-button at the rear of the right-hand
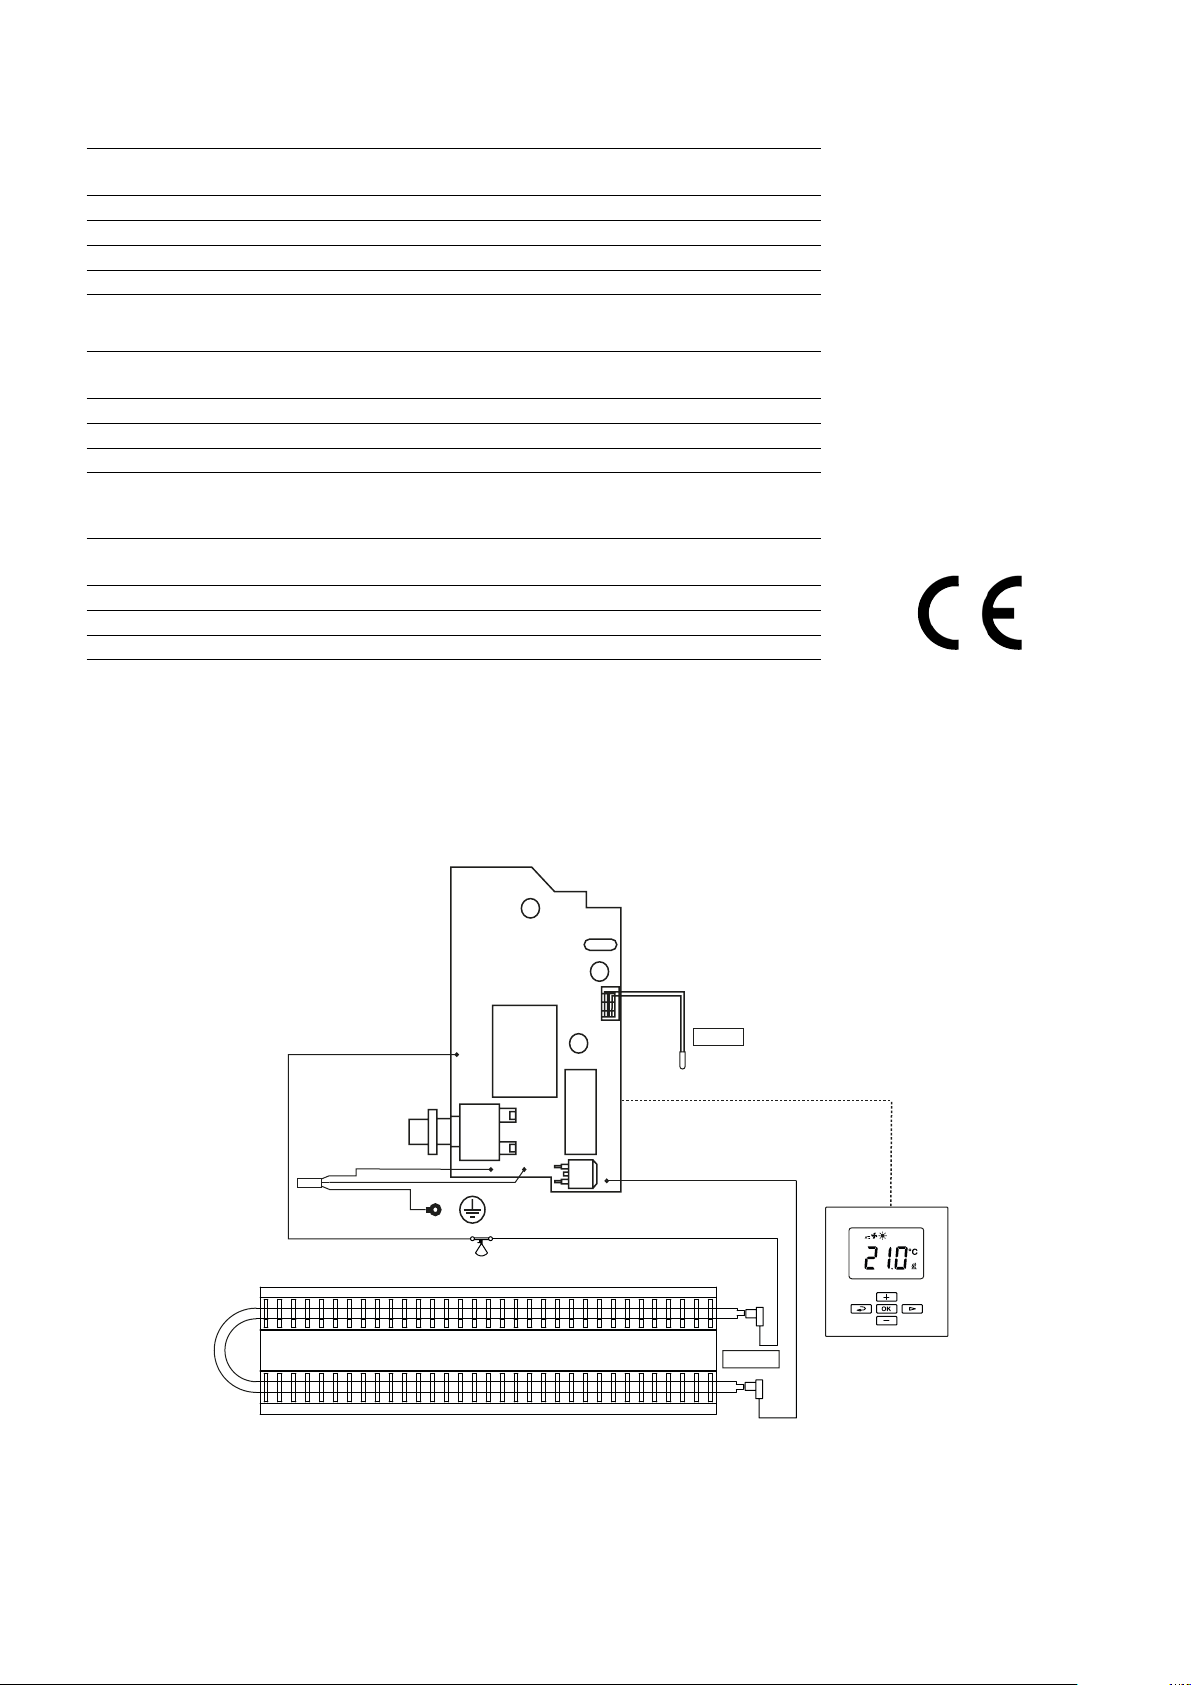
plastic side. See wiring diagrams.
Replacement of cable
If the cable is damaged the unit must be
sent to Frico for replacement. Contact Frico
Technical Support.
Start-up
When the unit is used for the first time or
after a long period of disuse, smoke or odour
may result from dust or dirt that has collected
on the element. This is completely normal
and disappears after a short time.
Service, repairs and maintenance
For all service, repair and maintenance first
carry out the following:
1. Disconnect the power supply.
2. The appliance can be demounted and
opened by four screws at the rear.
3. Reinstall.
Maintenance
In all electrical heating appliances, small
clicks can occur due to movement when the
material expands and contracts with changes
in temperature.
As the components are maintenance-free, no
maintenance other than cleaning is necessary.
The frequency of cleaning can vary depending
on local conditions, although it should be at
least twice a year. Grilles and elements can be
vacuum cleaned or wiped using a damp cloth.
Use a brush when vacuuming to prevent
damaging sensitive parts.
TWS200: The surface can be washed using a
mild soap solution or carpet foam.
Avoid strong solvents such as acetone
or similar, as well as alkaline or acidic
detergents. The plastic end covers must not
be exposed to oily substances.
Overheat protection
The convector is fitted with overheat
protection. The overheat protection is reset
by pressing the button located under a
threaded cover at the side of the heater. See
the introduction pages.
Packaging
Packaging materials are chosen with
consideration to environment and are
therefore recyclable.
14
Page 5
Thermowarm TWS
Handling of product at end of working life
This product may contain substances
necessary for functionality of product but
potentially dangerous for the environment.
The product should not be disposed
mixed with general household waste but
delivered to a designated collection point for
environmental recycling. Please contact local
authority for further details of your nearest
designated collection point.
Safety
• For all installations of electrically heated
products should a residual current circuit
breaker 300 mA for fire protection be used.
• Keep the areas around the air intake
and exhaust grilles free from possible
obstructions!
• The unit must not be fully or partially
covered as overheating can result in a fire
risk!
• This appliance can be used by children
aged from 8 years and above and persons
with reduced physical, sensory or
mental capabilities or lack of experience
and knowledge if they have been given
supervision or instruction concerning
use of the appliance in a safe way and
understand the hazards involved. Children
shall not play with the appliance. Cleaning
and user maintenance shall not be made
by children without supervision.
• Children of less than 3 years should be
kept away unless continuously supervised.
• Children aged from 3 years and less than 8
years shall only switch on/off the appliance
provided that it has been placed or
installed in its intended normal operating
position and they have been given
supervision or instruction concerning
use of the appliance in a safe way and
understand the hazards involved.
• Children aged from 3 years and less
than 8 years shall not plug in, regulate
and clean the appliance or perform user
maintenance.
GB
CAUTION — Some parts of this product can
become very hot and cause burns. Particular
attention has to be given where children and
vulnerable people are present.
15
Page 6
GB
Thermowarm TWS
Control
This product is considered a local space
heater according to Ecodesign Regulation
(EU) 2015/1188 and is equipped with smart
control which among others includes :
• Electronic room temperature control plus
week timer
• Room temperature control with open
window detection
• Adaptive start control
Start up
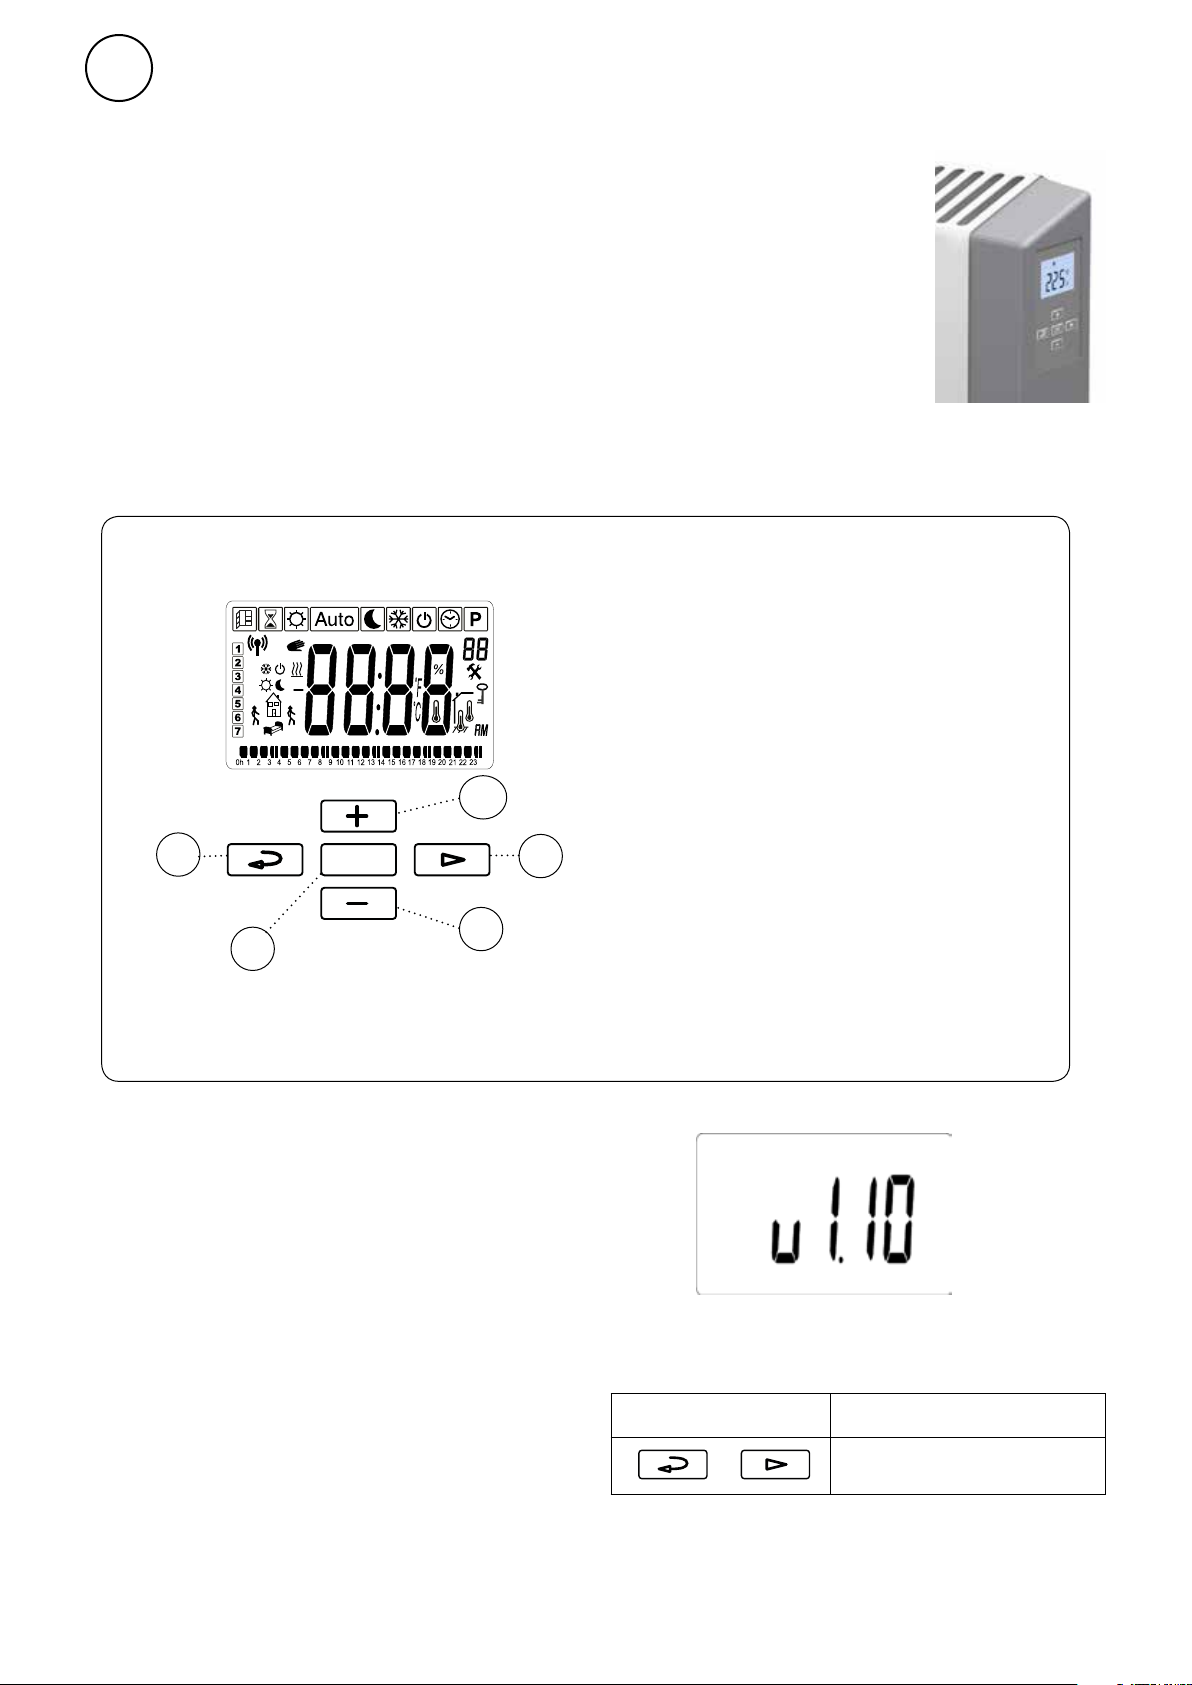
Home screen and keypad
-1
-2
The TWS convector has
a digital display where all
settings are made. The
protective display cover is
available as an option.
Keypad
1 Increase / up
2 Decrease / down
3 User menu / browse / proceed
4 Return
5 Confirm / select
1
4
OK
3
2
5
When starting up for the first time or after an
extended power failure, a test sequence is run
first, after which all the symbols are displayed
on the screen.
Beyond this, another screen is displayed
showing the software version.
At the first start-up or after a longer power
failure, the time needs to be set. If a week
program is not to be used and the time does
not need to be set, this can be overridden by
pressing the OK button repeatedly until the
home screen appears.
When the screen is inactive, it can be
activated by pressing any key.
Quick commands
Press and hold Quick command
+
Display lock on/off
16
Page 7
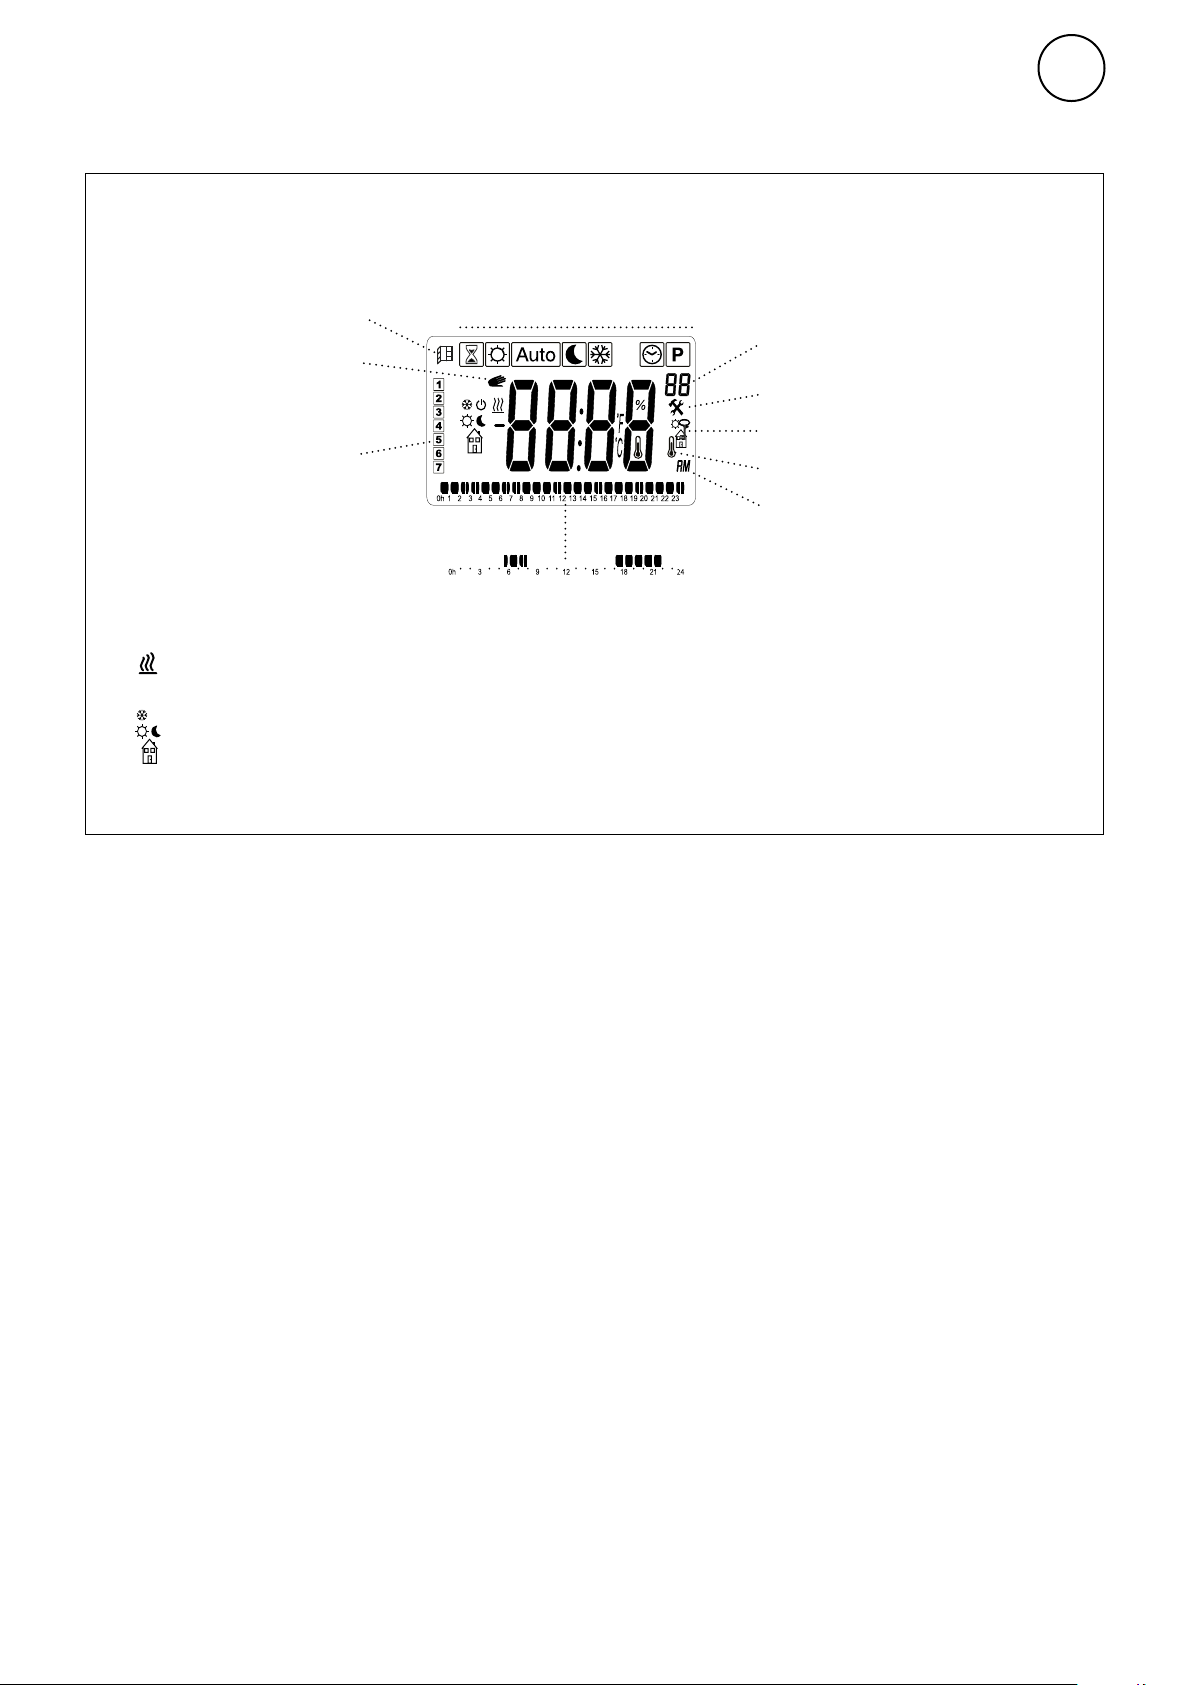
Display symbols
Open window
mode on
Function in AUTO
mode override.
Flashing: ITCS function
Current day
Heat on
Thermowarm TWS
User menu
Surrounding active frame
-1
-2
Timeline for the current week
program. Black timing marks =
comfort mode
GB
Programme number
Settings menu
Display lock on
Current room temperature (actual
value)
12H AM/PM or 24H
Symbols for
programme selection
17
Page 8
GB
Thermowarm TWS
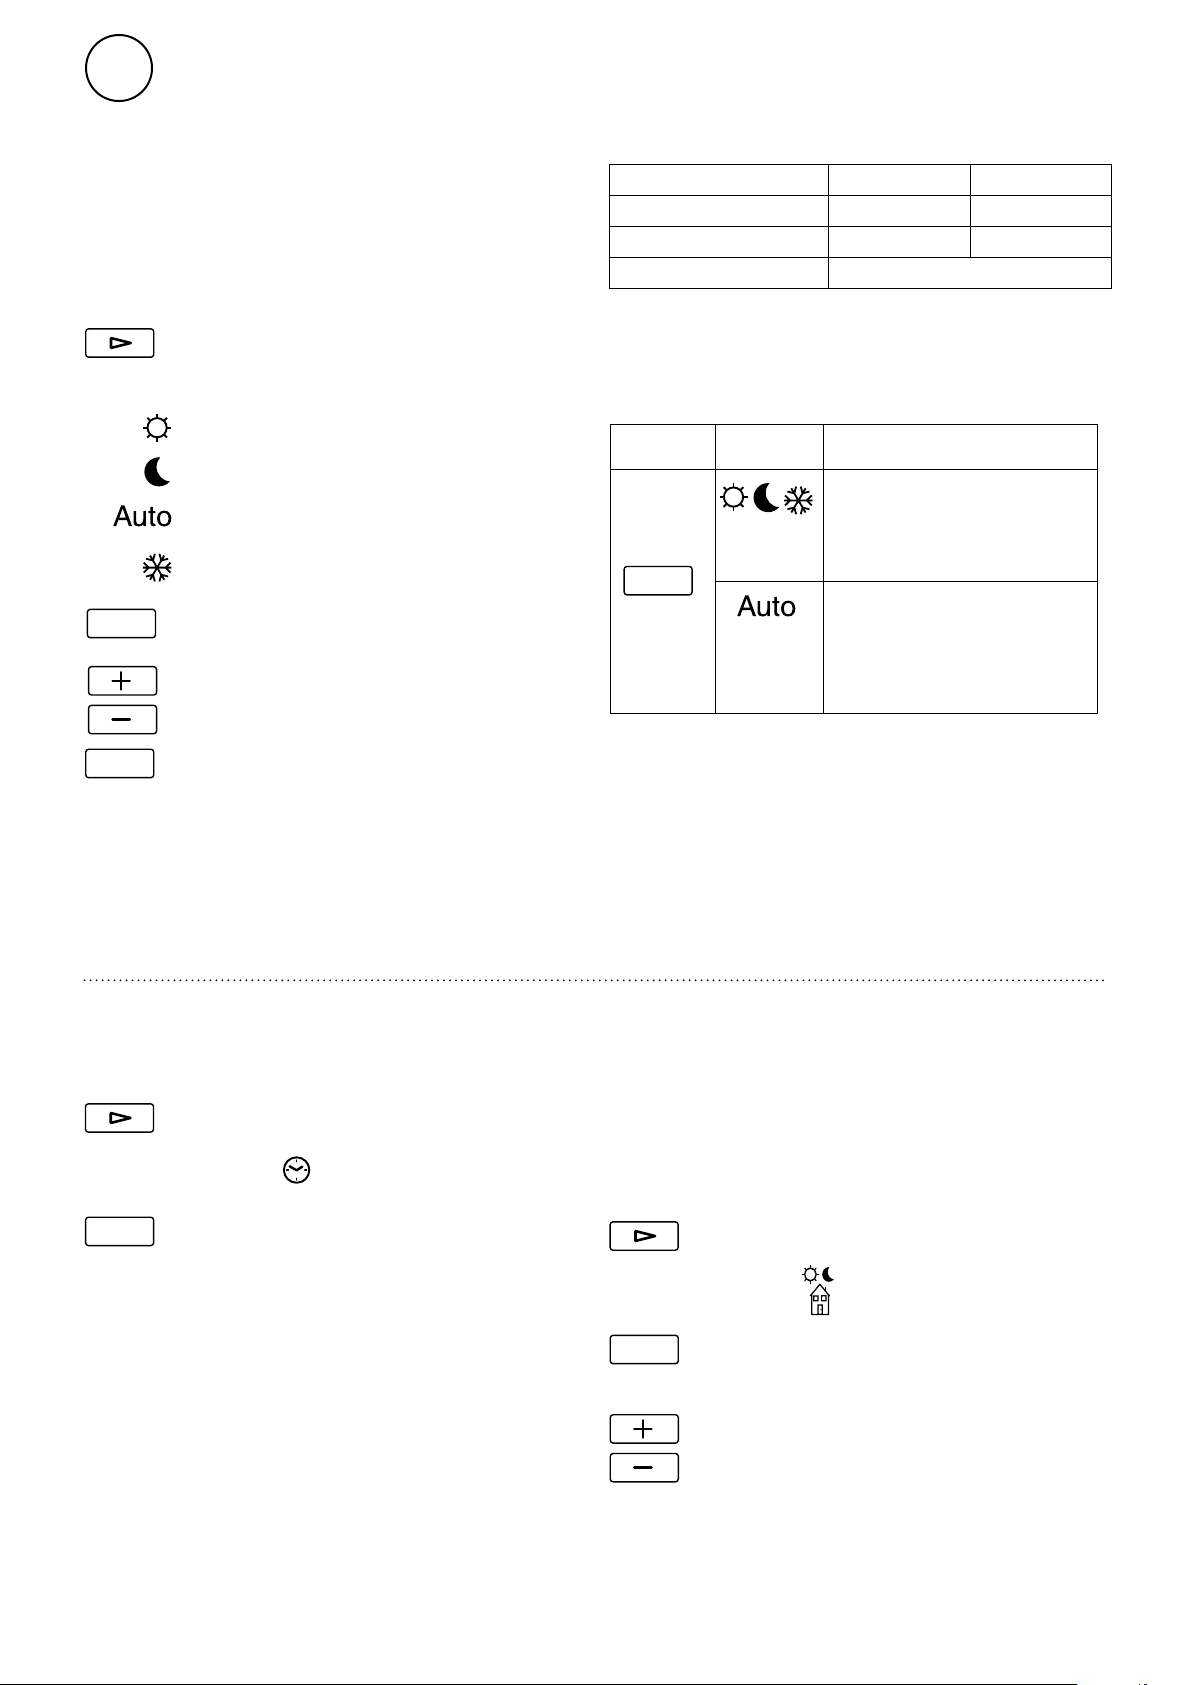
Operating modes
It is possible to choose between four modes
– comfort, reduced mode (night mode),
automatic mode or frost protection. Settings
for Comfort mode and Reduced mode are also
applied in the week program when used.
User menu
Default settings
Temperature mode Range Set point
Comfort mode
Reduced (night mode)
Frost protection
21 °C 5 - 30 °C
18 °C 5 - 30 °C
See the Settings menu.
Select mode in the user menu:
Comfort mode
Reduced (night mode)
Automatic mode – weekly programme
Frost protection
OK
OK
For setting automatic mode – weekly programme,
see the section Weekly programme.
Confirm
Set the desired room temperature – set
point value (not for Auto).
Confirm
Quick commands
Press Quick command
Switch between current
room display temperature (actual value) and set
point value.
OK
Switch between display
time, current room temperature (actual value)
and set point value.
Set time and date
For week program. Time and date.
User menu
Select
OK
Confirm
Set the following:
- hour (24 h)
- minute
- weekday: Mon=1, Sun=7
- day/month
- year
Increase/decrease using +/-.
Confirm each step with OK.
Display energy consumption
Potential to display energy consumption (kW)
for the past 24 hours / 7 days / 30 days. This
menu is only displayed when the heat output
is set (see Settings menu).
User menu
Select
OK
Confirm
Switch between viewing consumption at
the various time intervals.
18
Page 9
Thermowarm TWS
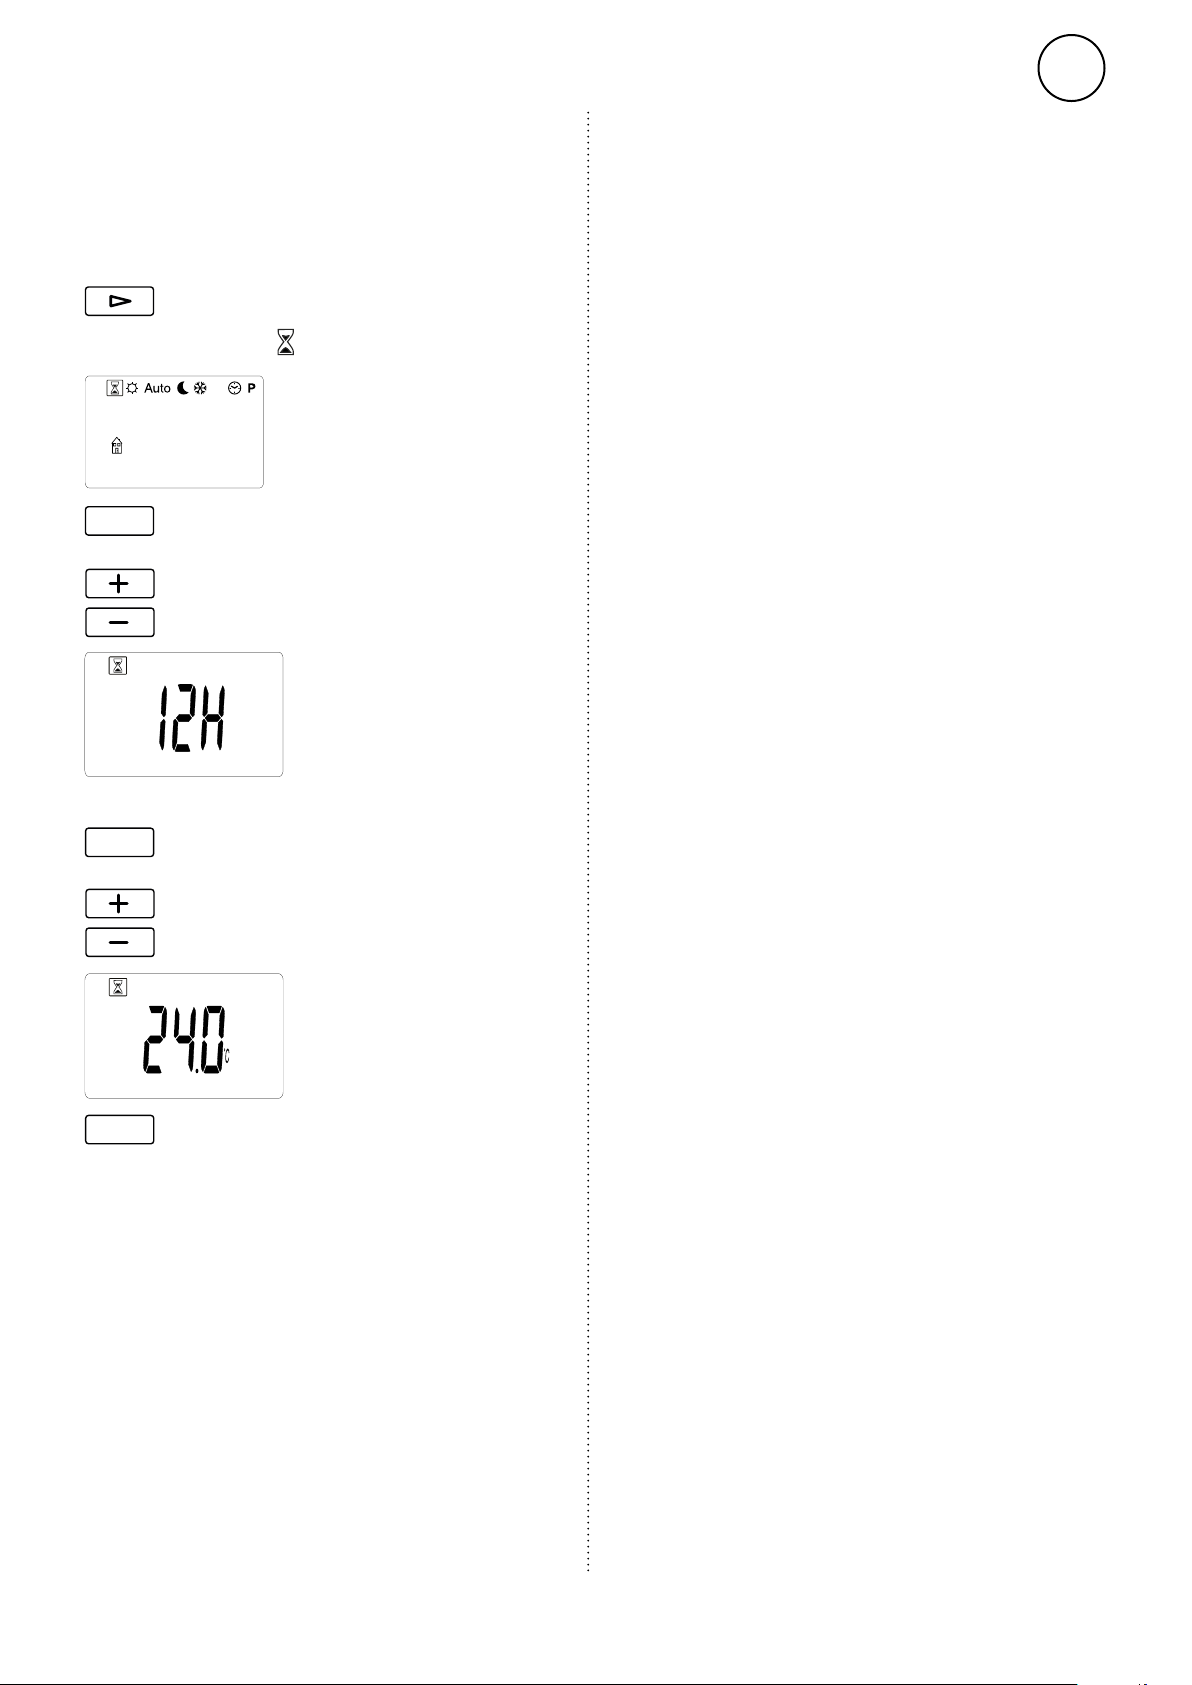
Timer
The set point value can be changed for a
limited period using the timer (15 minutes to
44 days).
User menu
Select
GB
OK
15 minutes - 44 days (’ minute, h hour, d day)
OK
Confirm
Set the desired time.
Confirm
Set the desired room temperature.
OK
Confirm
While the timer is running, its symbol
flashes and the display alternately shows the
remaining time and the set temperature.
When time is up the unit returns to previous
settings.
19
Page 10
GB
Thermowarm TWS
Week program
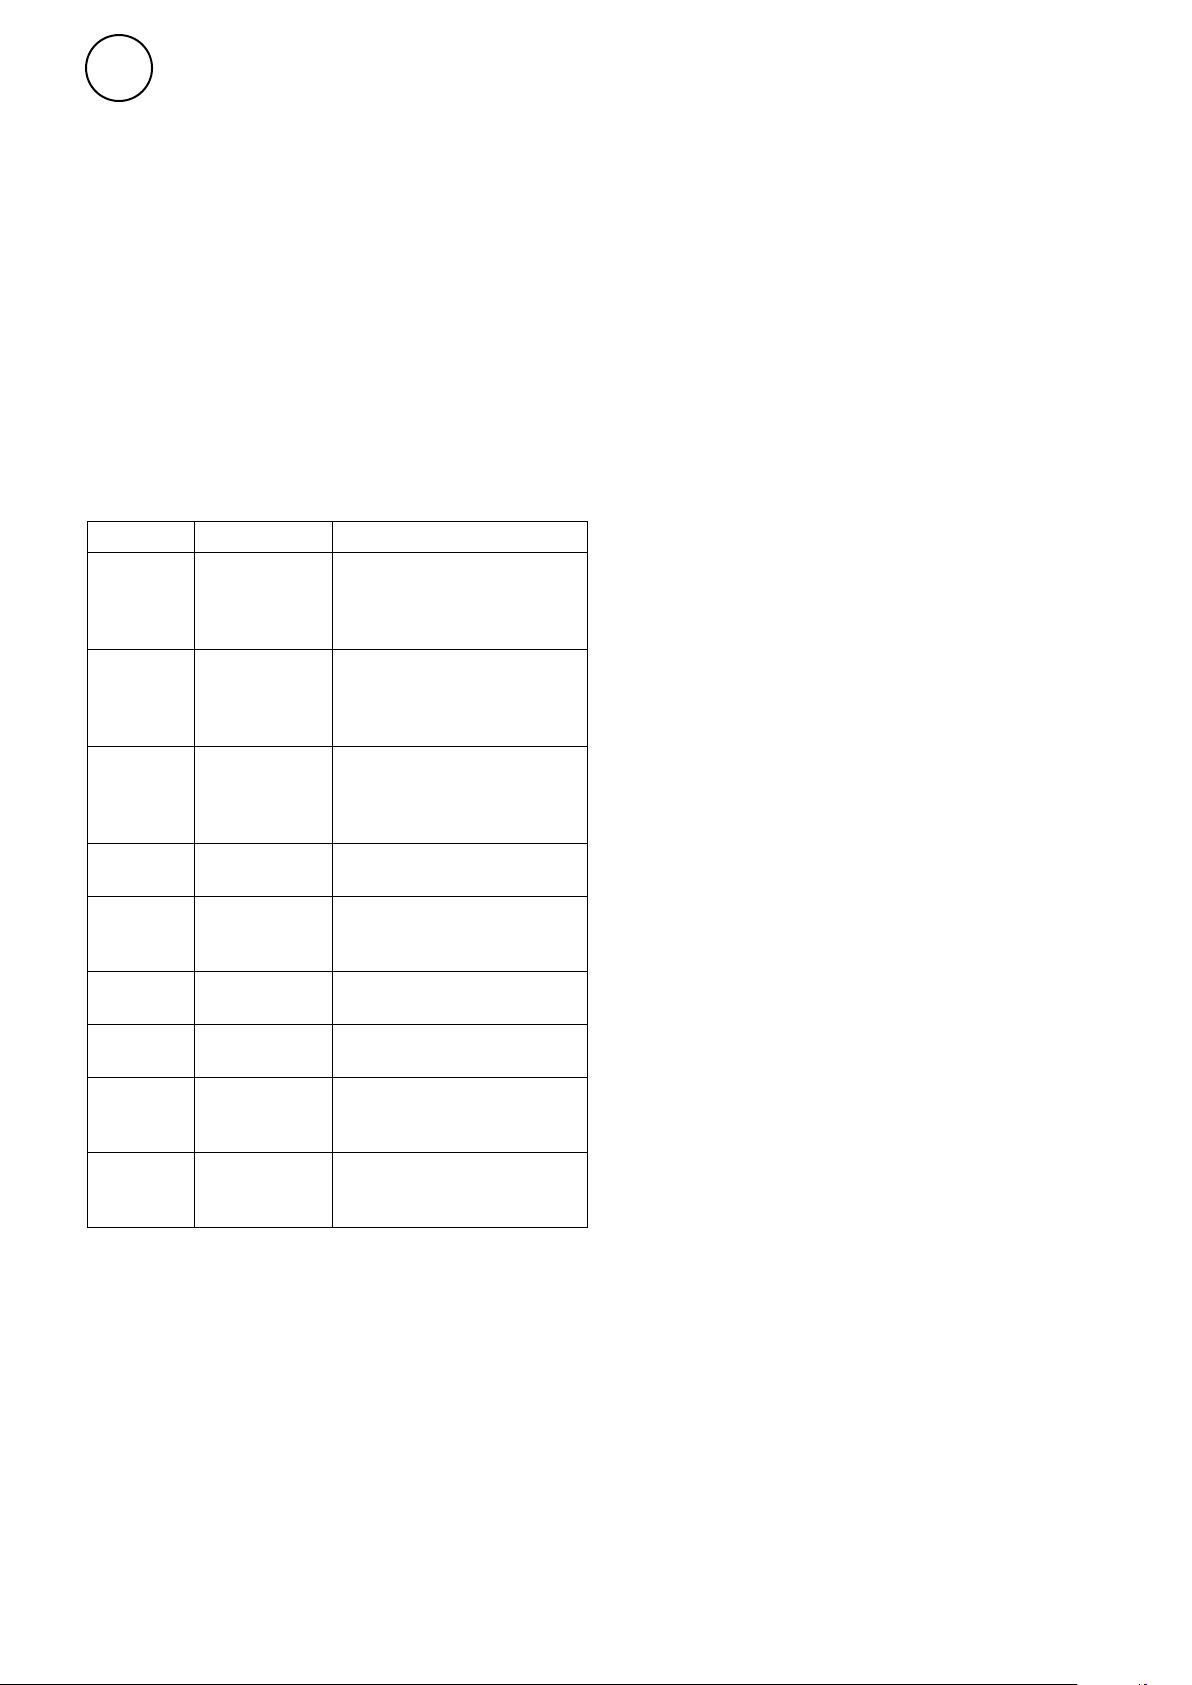
There are nine preset weekly programmes
(P1-P9) and the potential to add an additional
four (U1-U4).
The function ITCS (default) makes the
control learn when it needs to start in order
to reach a certain desired temperature at a
specific time in the environment it is used.
This function can be deactivated (see Settings
menu).
Preset programs
Comfort mode
Program
P1 05:30 - 08
Description
Residence
*
Mon-Fri:
17 - 22
Sat-Sun:
P2 06:30 - 10
P3 06 - 09
P4 06 - 22
P5 17 - 23
P6 06 - 18
P7 09 - 21
P8 09 - 22
P9 09 - 18
Residence,
late
Residence,
short
Residence,
day only
Weekend
Office
Office, late
Shop, late
Shop
Mon-Fri:
Sat-Sun:
Mon-Fri:
Sat-Sun:
Mon-Sun:
Fri:
Sat-Sun:
Mon-Fri:
Mon-Fri:
Mon-Fri:
Sat-Sun:
Mon-Fri:
Sat-Sun:
07 - 23
19 - 23:30
07:30 - 23:30
16 - 23
07 - 23
07 - 23
09 - 20
09 - 14
*) Other times: Reduced (night mode)
Read more on the following pages.
20
Page 11
Thermowarm TWS
GB
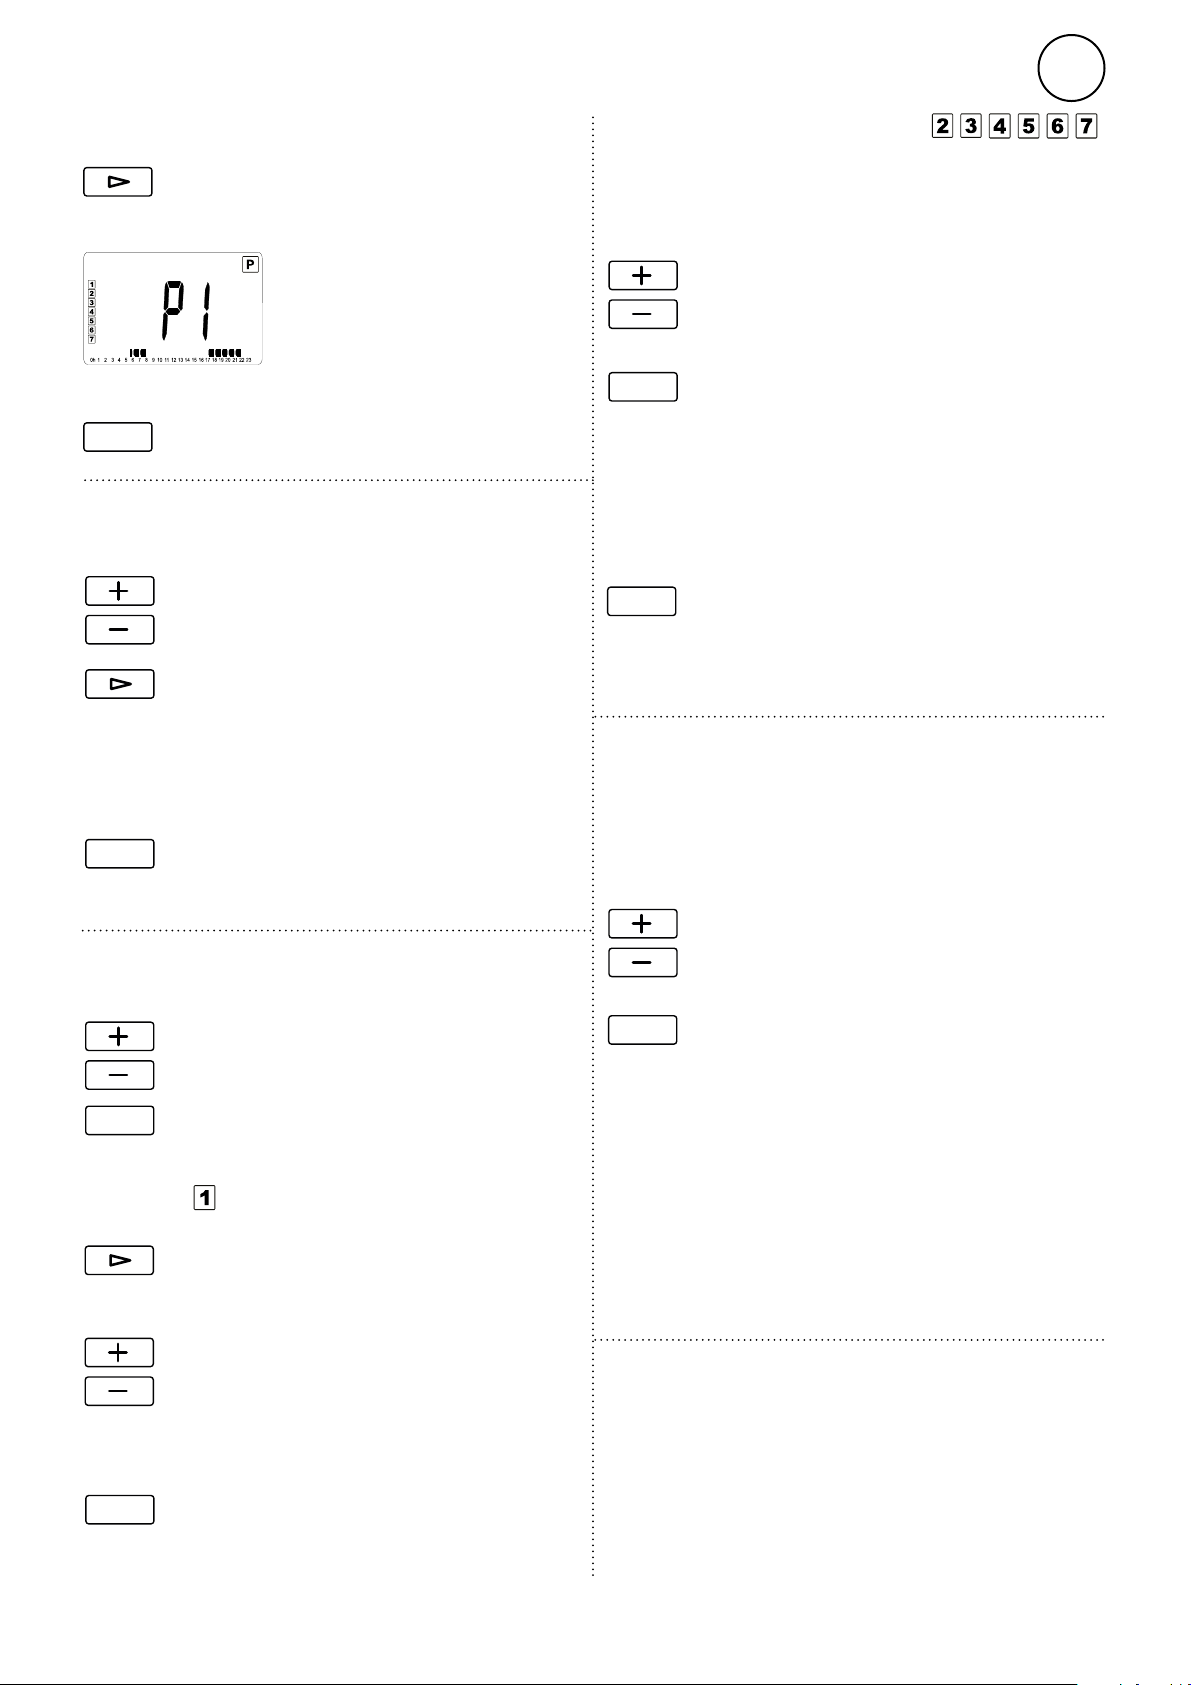
Setting week programs
User menu
Select
P1 or the recently used program is shown.
OK
Selecting a preset program P1 - P9
OK
Confirm
Select P1-P9.
Switch between days of the week with
the arrow to view times for the selected
program. 1 = Mon to 7 = Sun. The times
when Comfort mode is active can be seen
in the lower part of the display of the
selected weekday.
Confirm with ok to start the program.
P
Following days, Tue - Sun
It is now possible to copy the previous day (COPY).
Select YES to copy the previous day’s
settings or select NO.
OK
If no (no) is selected, settings are made in the same
way as for Monday 1.
Once all 7 days are complete:
OK
Confirm
Confirm with ok to start the program.
Temporarily override the weekly programme
It is easy to temporarily disregard the set
point temperature according to the weekly
programme.
Setting your own week program U1-U4
Select U1-U4.
OK
Press and hold OK for 2 s. to confirm.
Monday
Advance the time in 30-minute intervals.
Press + to activate comfort temperature
at a given time interval. Press - or
the forward arrow to select reduced
temperature.
OK
When the entire day is complete, confirm
with OK.
Select the desired temporary set point
temperature.
OK
The temporary set point temperature applies until
the next programme step, or for max. 2 hours.
The fact that the weekly programme is temporarily
being overridden is indicated by a hand symbol in
the display.
Confirm
Power failure
Note! A power loss longer than 12 hours may
require an adjustment of time and date. The
week program is affected if the clock is not
correctly set.
21
Page 12
GB
Thermowarm TWS
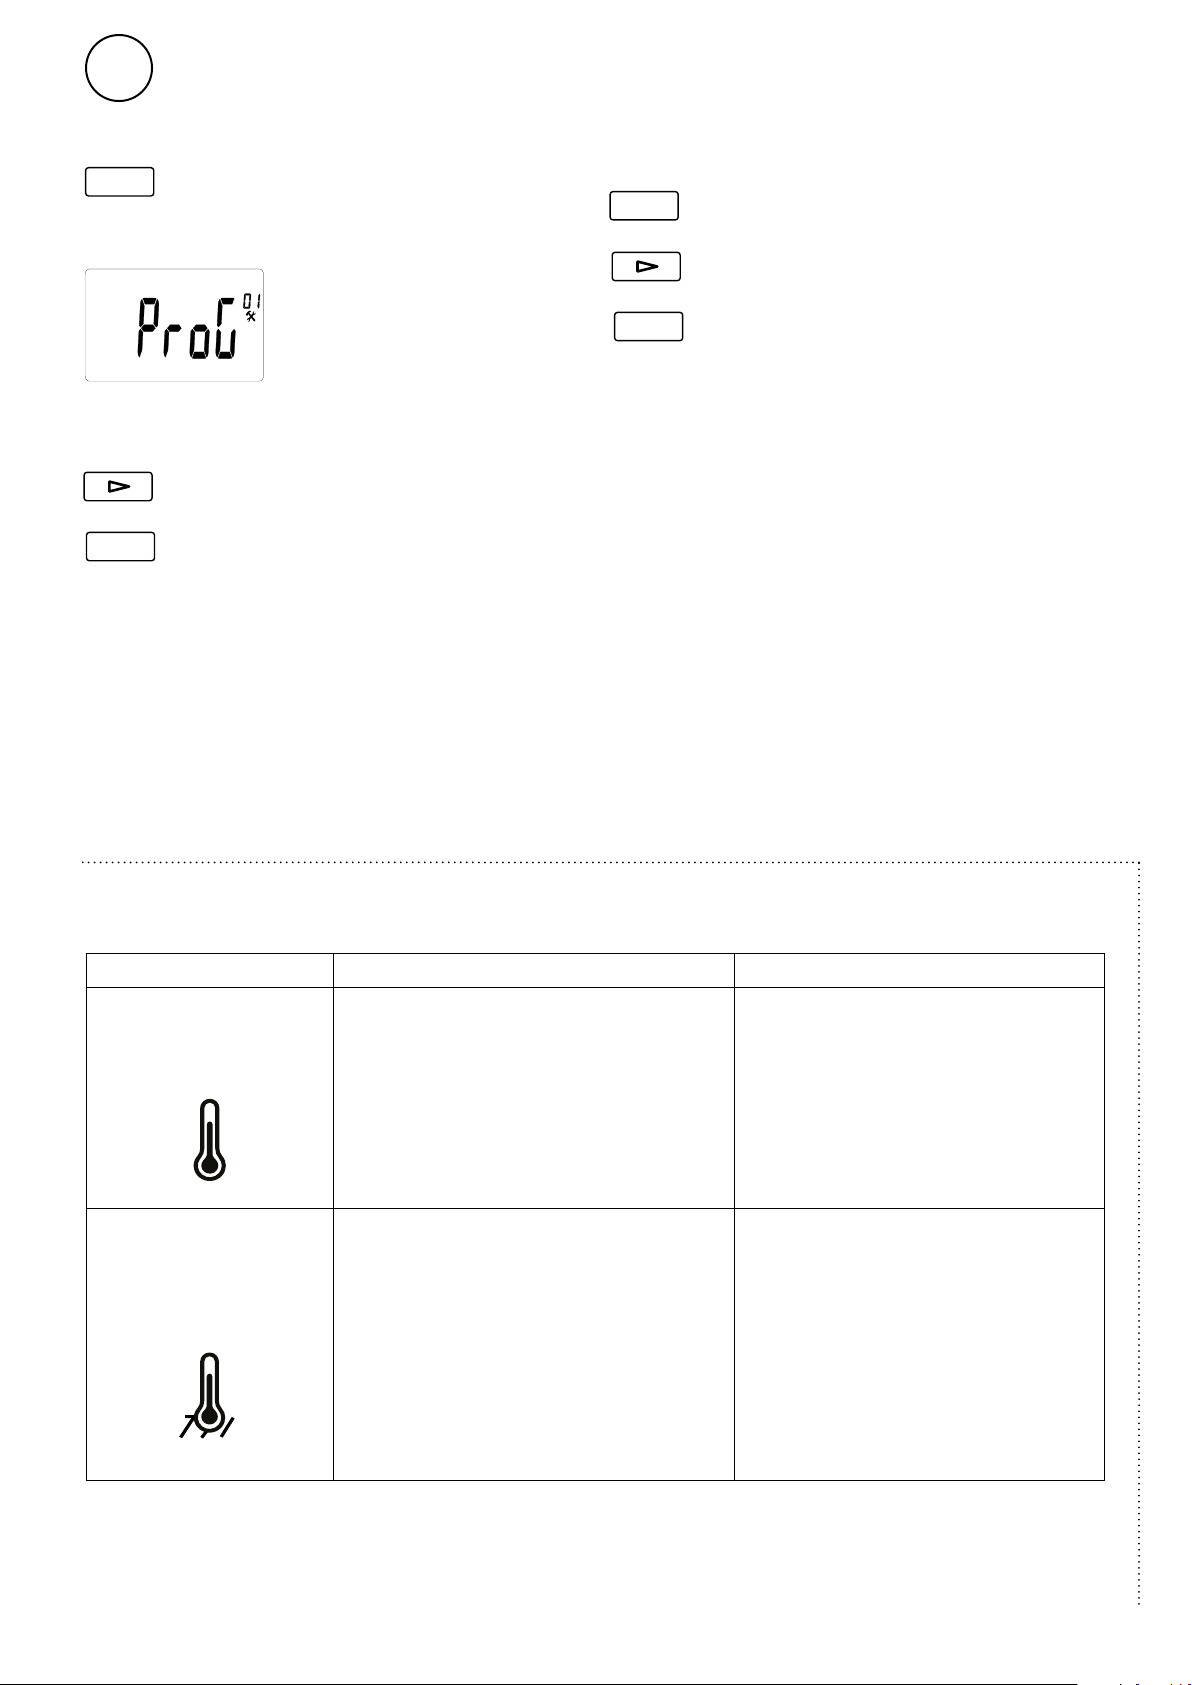
Settings menu
OK
Home screen
OK
See the table on the next page regarding settings
that can be made.
Press and hold for 5 seconds.
Browse between the menu options.
Confirm
Calibration of temperature sensor
This is done in the Settings menu.
OK
OK
Press and hold for 5 seconds.
Browse to Calibration of temperature
sensor (5).
Confirm
The first screen displays the measured
temperature. Press “OK” to view the offset
value. If “no” is displayed, the offset value
is zero and sensor calibration has not been
performed.
When calibration of the sensor is to be
performed, the set point value must have
been constant for at least 24 hours.
1. Measure the temperature in the room using
a thermometer at the same height above
the floor as the convector.
2. Enter this value in Settings menu /
Calibration of temperature sensor (5) with
+/-. Confirm with “OK”.
Trouble shooting
“Err” and this symbol
flashes:
“Err” and this symbol
flashes:
External sensor is defective or has come
loose.
Internal sensor is defective or has come
loose.
ActionSymptom Cause
Contact Frico for support.
Contact Frico for support.
22
Page 13

Thermowarm TWS
GB
Menu
options
ProG (01)
dEG (02) °C
24H (03) 24H
dSt (04)
(05)
AF (06) 10 °C
Functions
If "no" is selected, a simplified user
menu appears where it is only possible
to select between two operating modes: comfort mode and reduced mode.
Change temperature unit.
For week program. Set the time format.
For week program. Daylight saving/summer time and winter time.
Calibration of temperature sensor
Set point value for frost protection.
settings
YES (activated function)
YES (activated function)
Description Default
Switch between YES and no using
+/-.
Confirm with OK.
Switch between °C and °F using
+/-.
Confirm with OK.
Switch between 24H (24:00) and
12H (12:00 AM/PM) using +/-.
Confirm with OK.
Switch between YES and no using
+/-.
Confirm with OK.
See previous page. no (no offset)
Set the desired value between
5-10°C using +/-.
Confirm with OK.
ItcS (07)
Win (08)
Pow (09)
Chil (10) no (100%)
For week program. The control
learns when it needs to start in
order to reach a certain desired
temperature at a specific time in the
environment it is used.
Open window mode to save energy.
Should the temperature drop by
more than 3°C in 6 minutes, the control enters frost protection mode for
15 minutes (see Temperature mode).
To stop Open window mode, press
“OK”. Unless the temperature drops
further, the control returns to previous settings after 15 minutes.
Heat output. Must be set in order to enable energy consumption to be displayed.
Child protection. Set the desired output
to 0-100% of full output.
YES (activated function)
YES (activated function)
no (menu
not displayed)
Switch between YES and no using
+/-.
Confirm with OK.
Switch between YES and no using
+/-.
Confirm with OK.
Switch between no and
1000/500/300 W using +/-.
Confirm with OK.
Switch between no/100% output
(no) and 75/50/25% using +/-.
Confirm with OK.
CLr (11) -
(12) -
End (13) -
Factory reset. Resets values to factory
settings.
Software version
Leave the Settings menu. Confirm with OK.
To factory reset, choose yes by
pressing OK about 4 seconds
(countdown).
Press and hold for 5 seconds to
see the version.
23
Page 14

Main offi ce
Frico AB Tel: +46 31 336 86 00
Industrivägen 41
SE-433 61 Sävedalen [email protected]
Sweden www.frico.net
For latest updated information and information
about your local contact: www.frico.net.
Art.no 157362, 2019-04-03,HH/CH
 Loading...