

Art.nr. 173133 - 01
LAF 12
SE
BRUKSANVISNING AVFUKTARE
VIK TIG T: Läs denna anvisning innan produkten monteras och ansluts.
Spara anvisningen för framtida bruk.
...................................................................................................................................................2
GB
USER GUIDE, DEHUMIDIFIER
IMPORTANT: Read these instructions before installing and connecting the product.
Save these instructions for future reference.
..................................................................................................................................................13
DE
GEBRAUCHSANLEITUNG FÜR ENTFEUCHTER
ACHTUNG: Lesen Sie diese Anleitung vor Montage und Anschluss des Produkts.
Bewahren Sie die Anleitung für spätere Zwecke auf.
.................................................................................................................................................24
RU
ИНСТРУКЦИЯ ПО ЭКСПЛУАТАЦИИ ВОЗДУХООСУШИТЕЛЯ
ВНИМАНИЕ! Прежде чем монтировать и подсоединять воздухоосушитель
прочтите настоящую инструкцию.
Сохраните инструкцию для пользования ею в будущем.
.................................................................................................................................................35
LAF 12
13
Approvals
e dehumidifiers are tested and approved by TÜV according to:
e LVD directives: EN60335-1 and EN60335-2-40
e EMC directives: EN55014-1, EN55014-2, EN61000-3-2 and EN61000-3-3
e EMF directive: EN 62233
GB
Safety
• Always keep the dehumidifier in an upright position, also while transporting the
device.
• Place the dehumidifier in a secure location, on a flat surface to avoid the risk of it
falling over or being covered.
• Always ensure a distance of at least 0.6 m from the edge of a bathtub or shower
niche for use in a bath- or shower room.
• Device voltage: 220-240VAC. Always connect to an earthed socket.
• Never switch on or off at the mains socket.
• Keep the area around the unit clear. See page 17.
• Never obstruct the air intake or outlet.
• Never pour or spray water over the appliance.
• Always switch off and empty the water tank before moving the appliance.
• Always disconnect the power cable from the mains before cleaning or maintenance
is performed.
• Clean air filter as required. e appliance will work more efficiently if the filter is
clean.
• Never use flammable liquids for cleaning.
• If the appliance stops working, switch off and disconnect from the mains.
• A damaged power cable must always be replaced by an authorised electrician.
is appliance may be used by children aged eight years or above, people with physical and mental disabilities as well as those who lack any
experience, provided that they have received detailed instructions about
the functionality of the appliance and any risks. Children must not play
with the appliance. Cleaning and maintenance must not be performed
by children without proper supervision.
Children under three years of age should not be near the appliance
without constant supervision. Children between three and eight years
old may only turn on/shut off the appliance if it is located in a suitable
position and they have received instructions about the proper course
of action, or are being supervised. ey shall also be informed about
possible dangers. Children between three and eight years old may not
connect the device, change its settings or perform care/maintenance.

LAF 12
14
Function
A dehumidifier regulates relative humidity by passing air through the appliance,
condensing moisture in the air when the air comes into contact with the cold surface of the evaporator. e condensation runs down into a tank or via a hose to the
drain. e dehumidified air then passes through a condenser where it is heated, and
discharged back to the room with a lower level of humidity and slightly higher temperature.
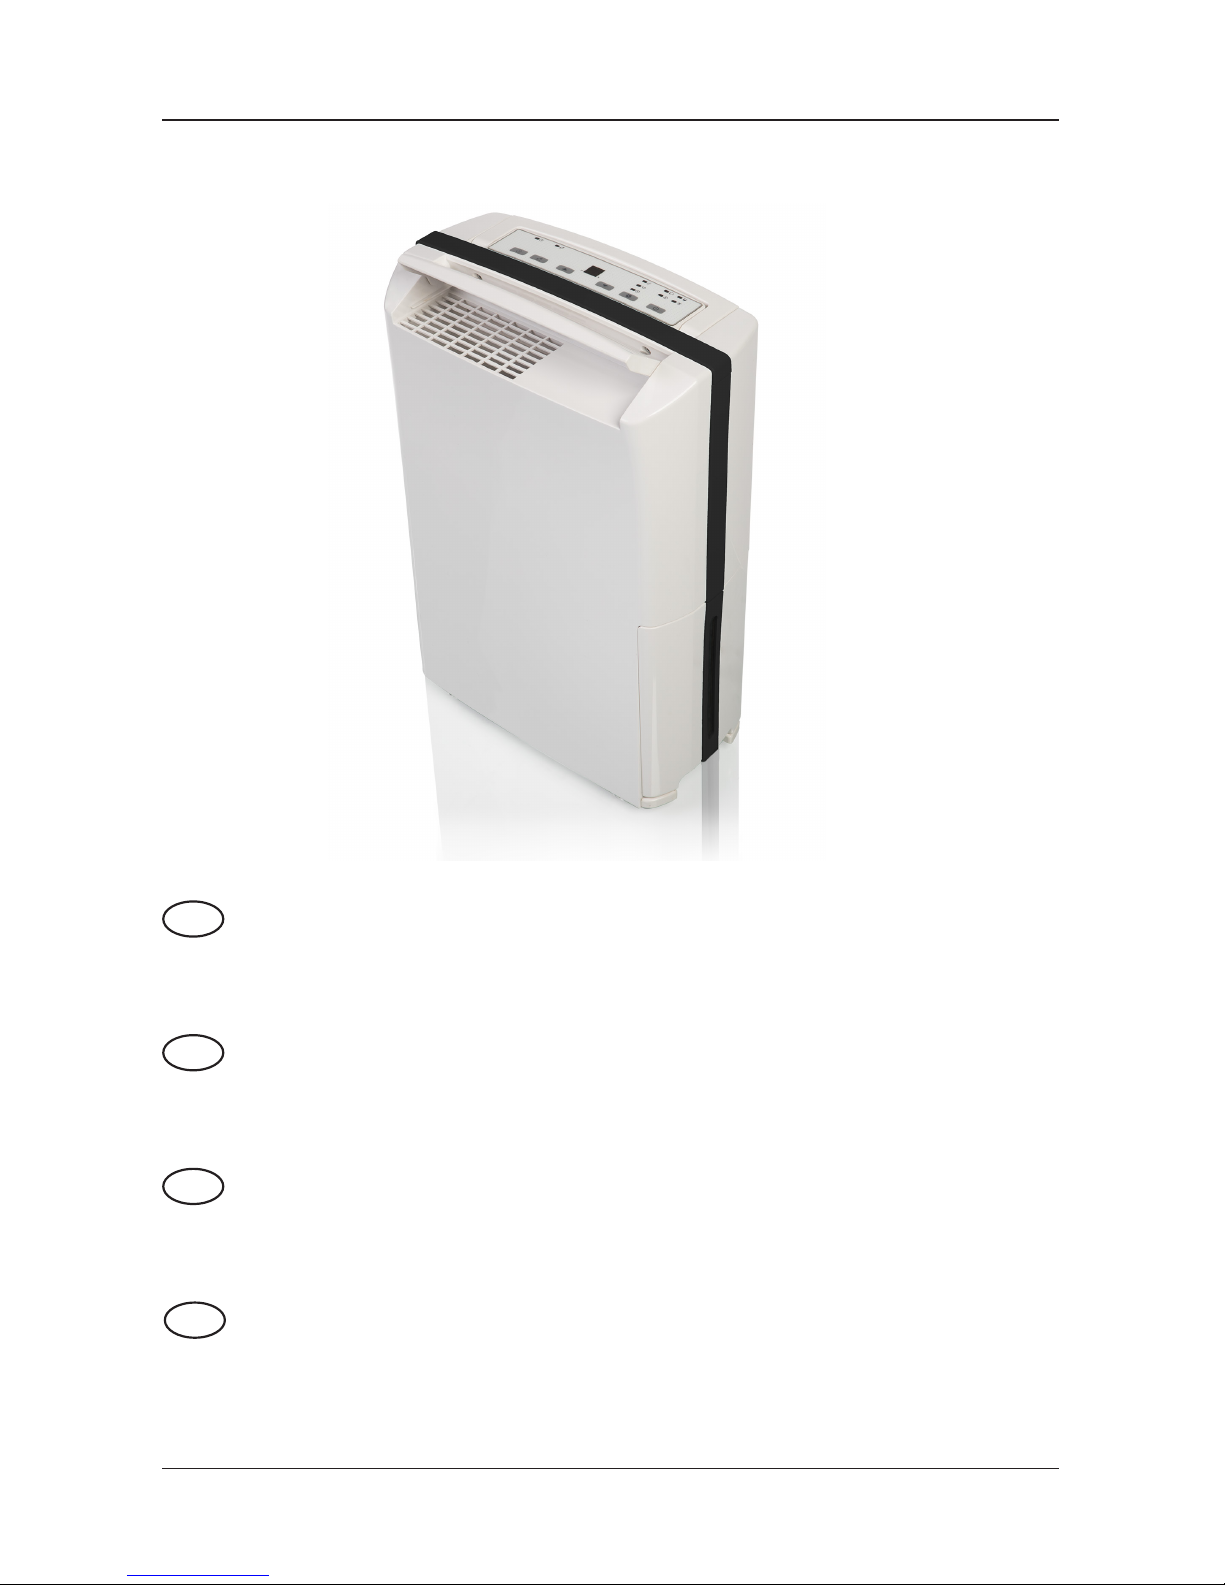
Use
e LAF 12 is designed to remove moisture from the air, creating a healthy and
comfortable indoor climate.
e dehumidifier is suitable for use in basements, storerooms, storage areas, kitchens,
libraries, galleries, server rooms, archives, living rooms and bedrooms etc.
e dehumidifier has IP21 protection and is approved for use in damp rooms such as
bathrooms, shower rooms and laundry rooms.
LAF 12
15
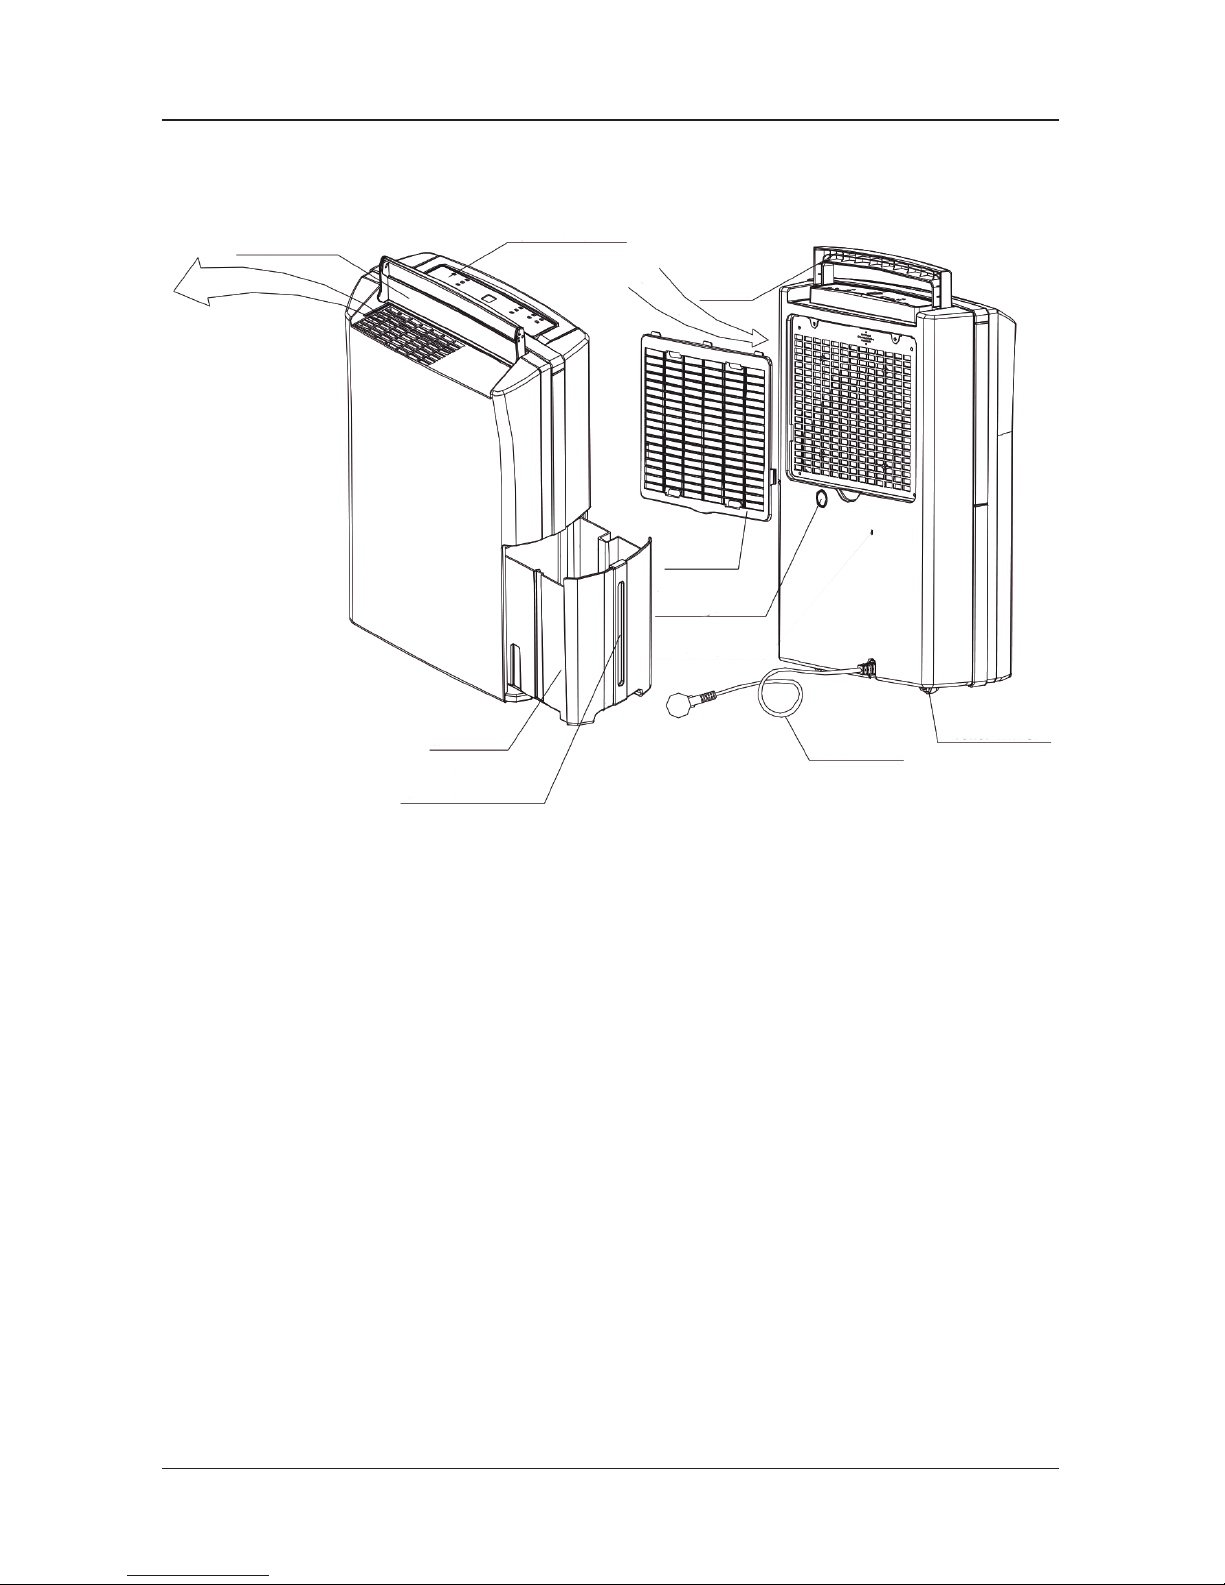
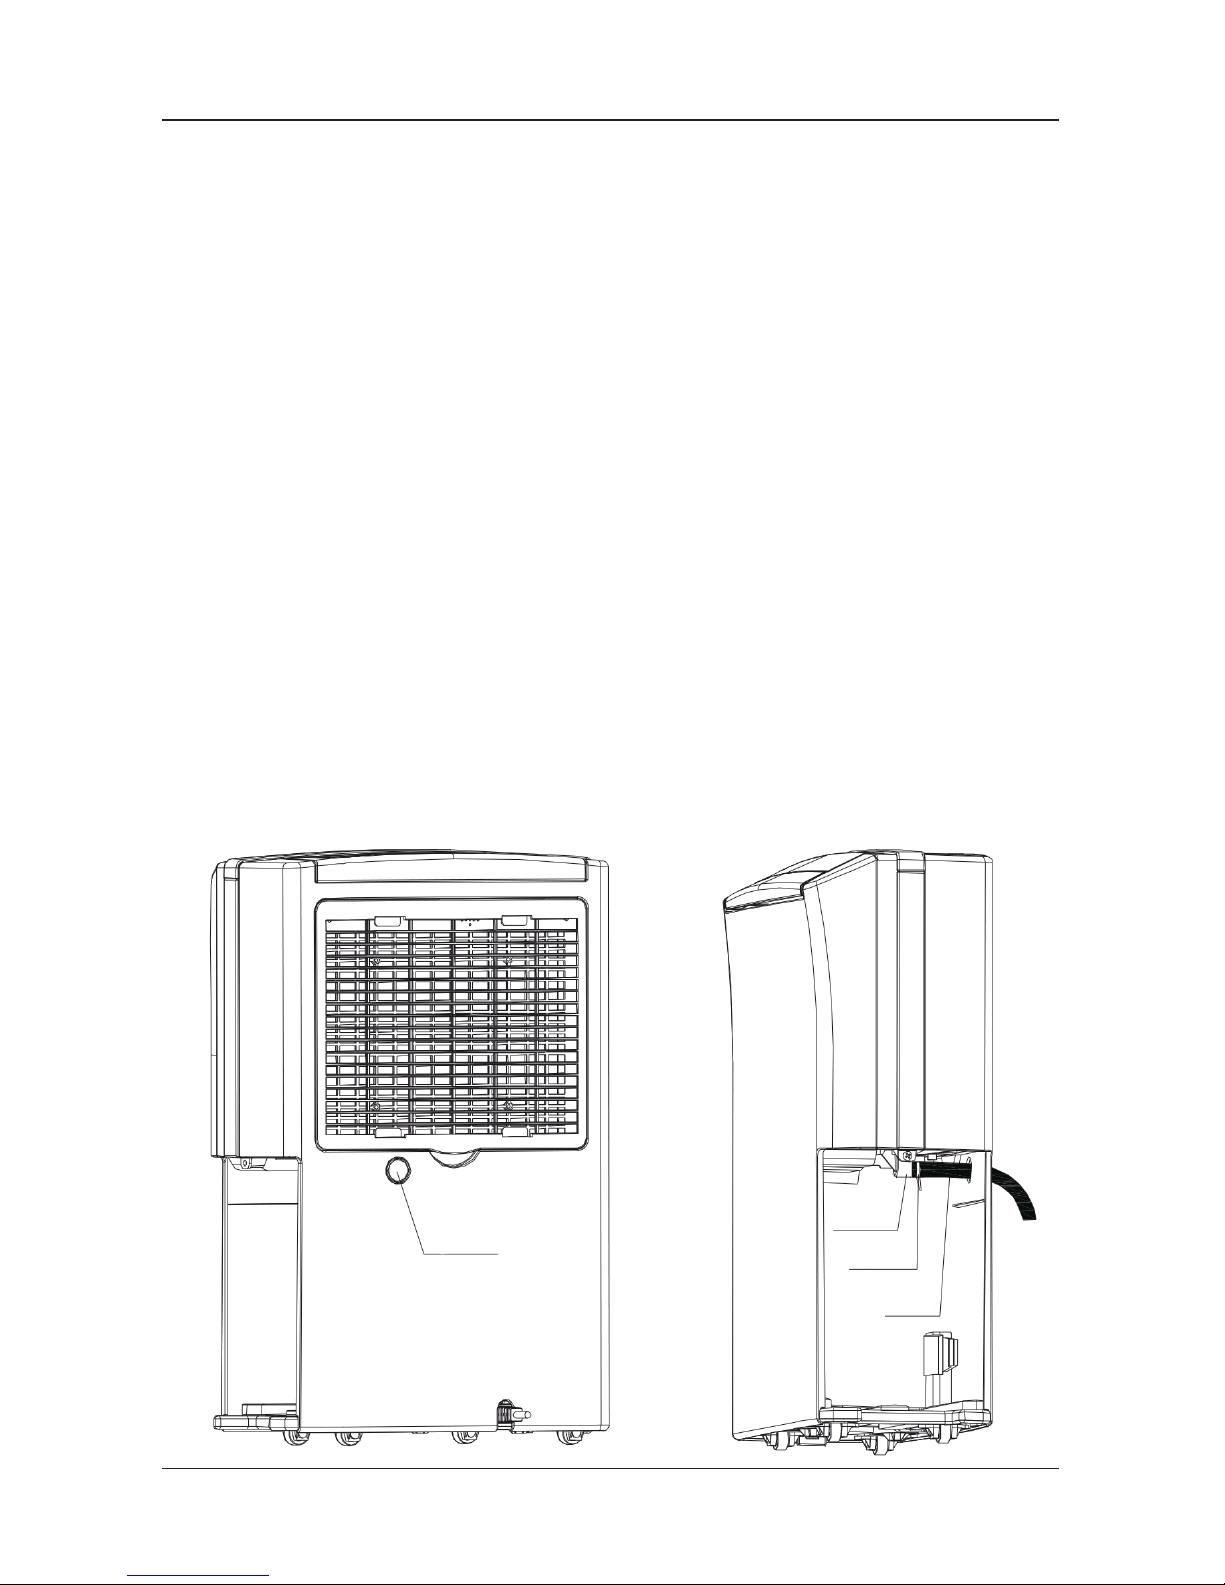
Components of the dehumidier
vent flap
air outlet
control panel
air intake
handle
filter with
container
hose
connection
water tank
water level indicator
power cable
wheels
LAF 12
16
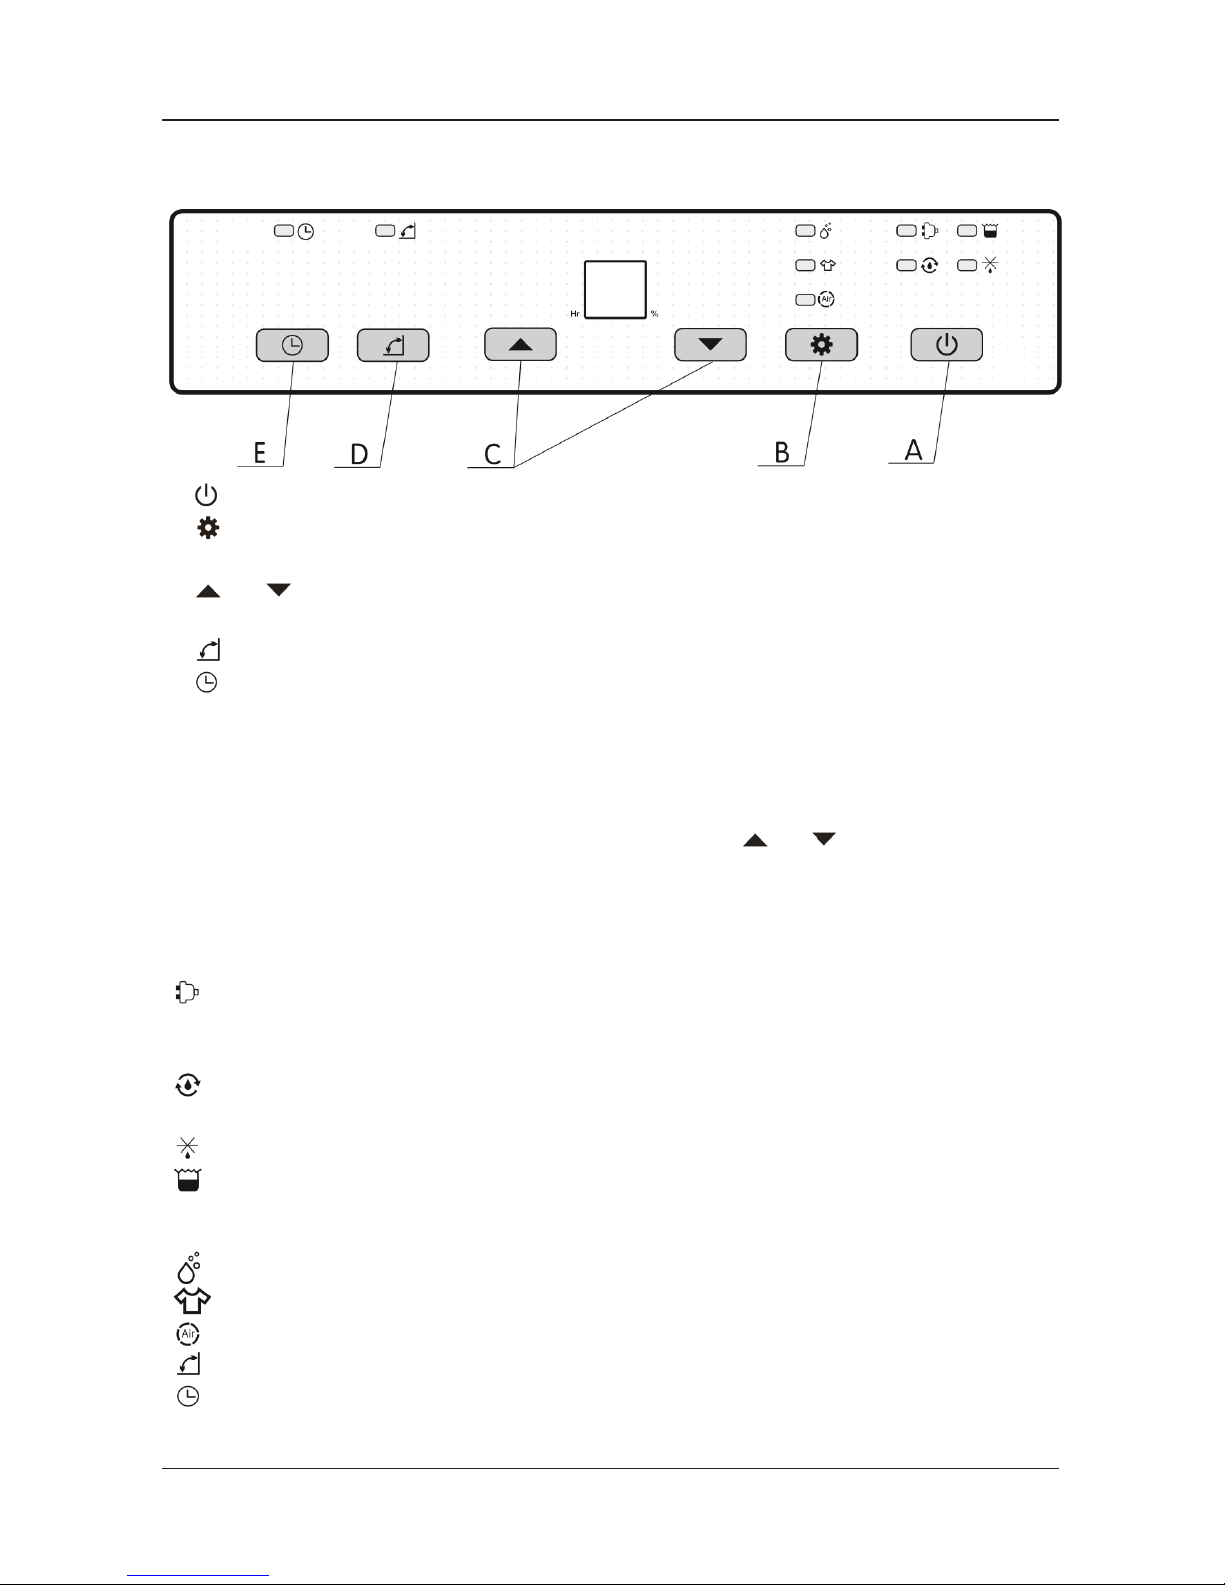
Control panel
A. -button: Press once to start or stop the appliance.
B. -button: Used to switch operating modes between dehumidifying, the drying of
laundry or as a fan for air purification only.
C. and -buttons: Used to set the desired level of humidity. e value can be raised or
lowered by 5%, each time the button is pressed.
D. -button: Used to start or stop the automatic oscillation function of the vent flap.
E. -button: Used to activate or deactivate the timer.
Regardless of which operating mode is in use on the appliance before it is switched off, it
will start in the same operating mode the next time it is started.
e appliance has a button lock system. By holding the and buttons at the same time
for two seconds, all the buttons on the control panel are locked.
To unlock them, repeat the same procedure.
LED-indicators
• -indicator: Flashes when the power cable is connected and the appliance is in stand-
by mode. Will be lit continuously after starting. e appliance will return to standby
mode after being shut down, the indicator will flash after initiation.
• -indicator: e appliance dehumidifies constantly and the hygrostat is set to CO
before it switches over to display the air humidity in its environment.
• -indicator: Lit during defrosting. Switches off when defrosting ends.
• -indicator: When the water tank is full, the unit automatically switches to standby
mode, the indicator will flash and a beeping alarm will sound five times. When the
beeping stops, the indicator will remain constantly lit.
• -indicator: While dehumidifying, the appliance uses the set hygrostat value for start/stop.
• -indicator: Drying of laundry. e appliance runs for 6 hours, or according to the set timer.
• -indicator: Purifies the air without dehumidification.
• -indicator: e oscillation function on the vent flap is activated.
• -indicator: Lights when the timer function is activated.
e timer function flashes when the button has been pressed and is constantly lit once
the setting is ready.

LAF 12
17
Positioning and hose connection
A. Position the dehumidifier correctly. To achieve the best performance, the minimum
distance should be as indicated in the diagram below. Unobstructed airflow is
important for optimum performance and energy conservation. Do not place the
appliance near heat sources, such as heating elements, stoves or hot water drains, as
they will influence the dehumidifying capacity.
LAF 12
18
B. If dehumidification is expected to run for an extended period, the hose can be
connected to a drainpipe or floor drain, avoiding having to check and empty the water
tank regularly.
1. Switch off the appliance, disconnect from the mains socket and remove the
water tank.
2. Remove the plastic plug below the filter with a knife or screwdriver, see fig. 1.
3. Connect a hose with an inner diameter of 12mm to the hose to the hose
nipple through the opening, and secure with a hose clip, see fig. 2
4. Replace the water tank in the appliance.
C. Arrange the drain hose to ensure that water can flow freely and that the hose is not
trapped, kinked or twisted.
e hose end must never be higher than the hose nipple during use.
D. Check the drain hose regularly to ensure it is not blocked.
E. NOTE! e drain hose can fit tightly to the nipple. Do not twist the drain hose
when disconnecting it. e plastic intermediate connector on the dehumidifier
can break in the process.
Use a screwdriver or similar tool to pry the hose off, or cut it with a knife.
F. Remember that the humidity level in a room can affect wooden furniture or other
woodwork. If the humidity level is too low, cracks can appear in the wood.
Figure 1 Figure 2
Remove the
plastic plug
hose
nipple
hose
clamp
hose

LAF 12
19
Use, operating modes and settings
A. Start: Press the -button once, and the appliance will start and the vent flap will
slowly rise.
Stop: Press the -button again, the appliance will switch off and the vent flap will
close automatically.
In certain instances, the compressor may have a delayed start of 3 minutes to allow
the pressure in the cooling circuit to equalise.
B. e operating mode for dehumidifying, laundry drying or air purification can be
changed by pressing the -button.
C. Humidity setting for dehumidifying:
1. e humidity level is shown in the display and can be set by pressing
the and buttons within a range from 30% to 80% RH in 5% increments.
After starting, the standard value “CO” is shown, indicating that the
appliance is dehumidifying continuously and the -indicator will be lit.
e appliance will not be affected by a change in air humidity.
Press or to change the desired humidity level. e set value will flash
for 5 seconds on the display, followed by the actual humidity level in the room,
and the -indicator will go out. If the humidity level has been set to a value
of less than 30% RH, “CO” will show in the display and the appliance will
continue to dehumidify continuously.
2. Humidity setting influences mode of operation.
If continuous dehumidification has not been selected, the humidity control
system will activate five minutes after start-up.
If the room’s humidity is the same or lower than the set value, the appliance
will shut down. If the humidity is 3% higher than the set value, the appliance
will start.
3. Laundry drying mode. e unit will shut down automatically after six
hours of continuous dehumidifying. During the time the unit is in use, the
-indicator will be lit and the appliance will not be affected by a change
of humidity level in the room. For a longer or shorter drying time, use the
timer function (see under Timer).
4. Air purification mode. In this mode, the compressor will not start and only
the fan motor will run, i.e. the appliance will purify the air of the room
without dehumidifying, and will use minimal energy.
In this mode, the timer function and vent flap can still be set, but the
humidity value cannot be changed.

LAF 12
20
D. Timer setting
e -indicator will flash when the timer button is pressed, a beep will sound and
“00” will flash on the display. e timer setting will increase by one hour before the
appliance shuts down for each press of the timer button. When the number of hours
required is reached (e.g. 06), it takes 5 seconds for the timer setting to activate.
e -indicator and display will stop flashing.
e -indicator will be continuously lit. e display will show the actual humidity
level in the room and the appliance will run for six hours before shutting down.
To change the set time, press the timer button twice. “00” will appear on the display.
Press the timer button again until the time required is set.
To cancel a set time, e.g. to allow the appliance to run continuously, press the timer
button twice. “00” will appear in the display and the timer function will deactivate
after 5 seconds. e -indicator will go out and the actual humidity level will be
shown again.
e timer can be used for all modes of operation (dehumidifying, laundry drying and
air purification).
If the operation mode is changed, the timer will become inactive and will have to be
reset.
E. Emptying the water tank
Switch off the appliance when emptying the water tank.
Remove the tank (see fig. 3) and hold it carefully until it is empty.
Take care not to damage the float arm inside.
Figure 3

LAF 12
21
Air filter
Care and maintenance
Attention: Always disconnect the appliance from the mains before power
before performing maintenance to avoid accidents.
A. Cleaning the air filter:
e air filter collects dust, which means it can easily become blocked.
Regular cleaning is required for maximum operating efficiency. In dusty conditions,
the filter should be cleaned every few days, otherwise, every 3-4 weeks. Remove the
filter container and filter. Remove the filter from its container (see fig. 4).
Use a vacuum cleaner to remove dust from the filter surface and wash in warm
water (max. temperature 40°C).
Allow the filter to dry before replacing it in the unit.
Do not dry the filter in direct sunlight.
B. Check the hose nipple:
e hose nipple must be kept free from obstruction to allow water to drain freely
into the tank or through the drain hose, and to ensure the appliance continues to
work normally. Check the hose nipple regularly.
Figure 4
LAF 12
22
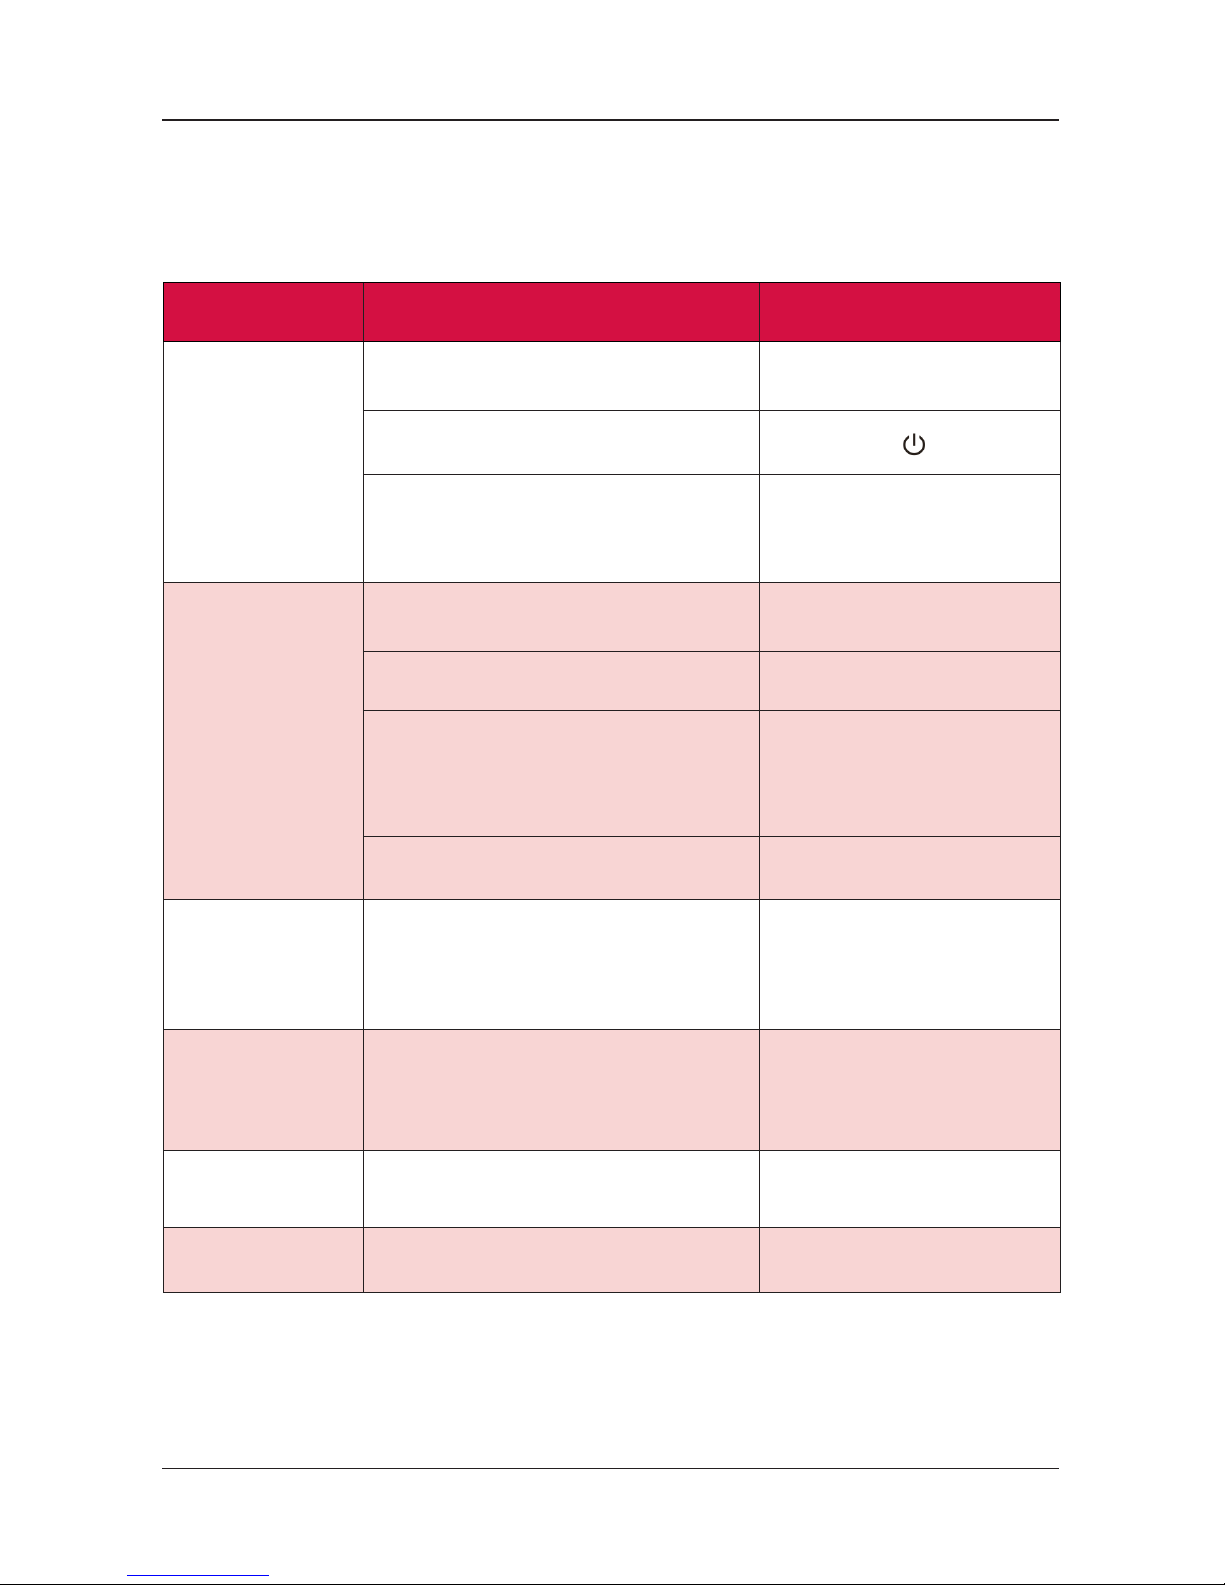
Troubleshooting
Some problems can be corrected manually without having to have the appliance
repaired. See the table below.
If the unit still fails to work normally after checking the above, please contact your
local distributor. Do not open or attempt to repair the appliance. If this is necessary,
it must be performed by a licensed professional.
Problem Possible cause Solution
Unit not working.
Power cable disconnected. Connect to earthed wall socket
Unit not switched on. Press the -button.
Full water tank indicator lit.
Water tank full. Empty tank.
Check tank is properly installed.
Dehumidifying
capacity low.
Running time too short. Wait.
Air lter dirty and/or blocked. Clean lter.
Ambient temperature or humidity too low.
The dehumidifying capacity is
normally decreased if the room
temperature is under 18°C.
Try increasing the
room temperature.
Hose nipple blocked. Check and clean hose nipple.
Relative humidity
setting not reached
after extended
running time.
Doors, windows or air vents open.
Close doors, windows
and air vents.
Water on oor.
Appliance has been moved without
emptying water tank.
Water tank removed before water from
evaporator has drained.
Empty tank before moving.
Wait approx. 5 minutes
until the water has been
allowed to drain.
Discharge air
is hot.
Heat exchange processes Normal phenomenon.
Sound of
running water.
Coolant ow in cooling circuit Normal phenomenon.

LAF 12
23
Error codes:
Please contact your local distributor if any of the error codes appear on the display.
Displayed code E1, ashes every 30 seconds E2, ashes every 30 seconds
Fault
The temperature sensor
on the coil is faulty.
The humidity sensor is faulty.
Eect on appliance
Forced defrosting and lower
dehumidifying capacity.
The display permanently shows 50% RH,
the appliance will continue to work in
the continuous dehumidifying mode.
Technical data
Model LAF 12
Power supply 220-240V/50Hz
Temperature range 8 to 35°C
Coolant R-134a
Amount of coolant 120 g
Dehumidifying capacity
3,6 litres per day at RT27°C, RH 60%.
12 litres per day at RT30°C, RH 80%.
Water tank volume 4,0 l
Power 170 W at 20°C and 60%RH
Current 0,8 A at 20°C and 60%RH
Weight 10,5 kg
Dimensions 355 x 180 x 525 mm (W x D x H)
Protection class IP21

NB: We rese rve us fr om typograph ical er rors an d the right to make cha nges and i mprovem ents to the contents of this manual wit hout pr ior notice.
46
LAF 12
 Loading...