

Page 1
.... 37
FR
.... 27
NO
.... 17
GB
.... 7
SE
.... 77
IT
.... 67
FI
.... 57
DE
.... 47
ES
.... 87
NL
Thermoplus
Original instructions
.... 97
PL
.... 107
RU
Page 2
ø22 (2x)
2
Thermoplus
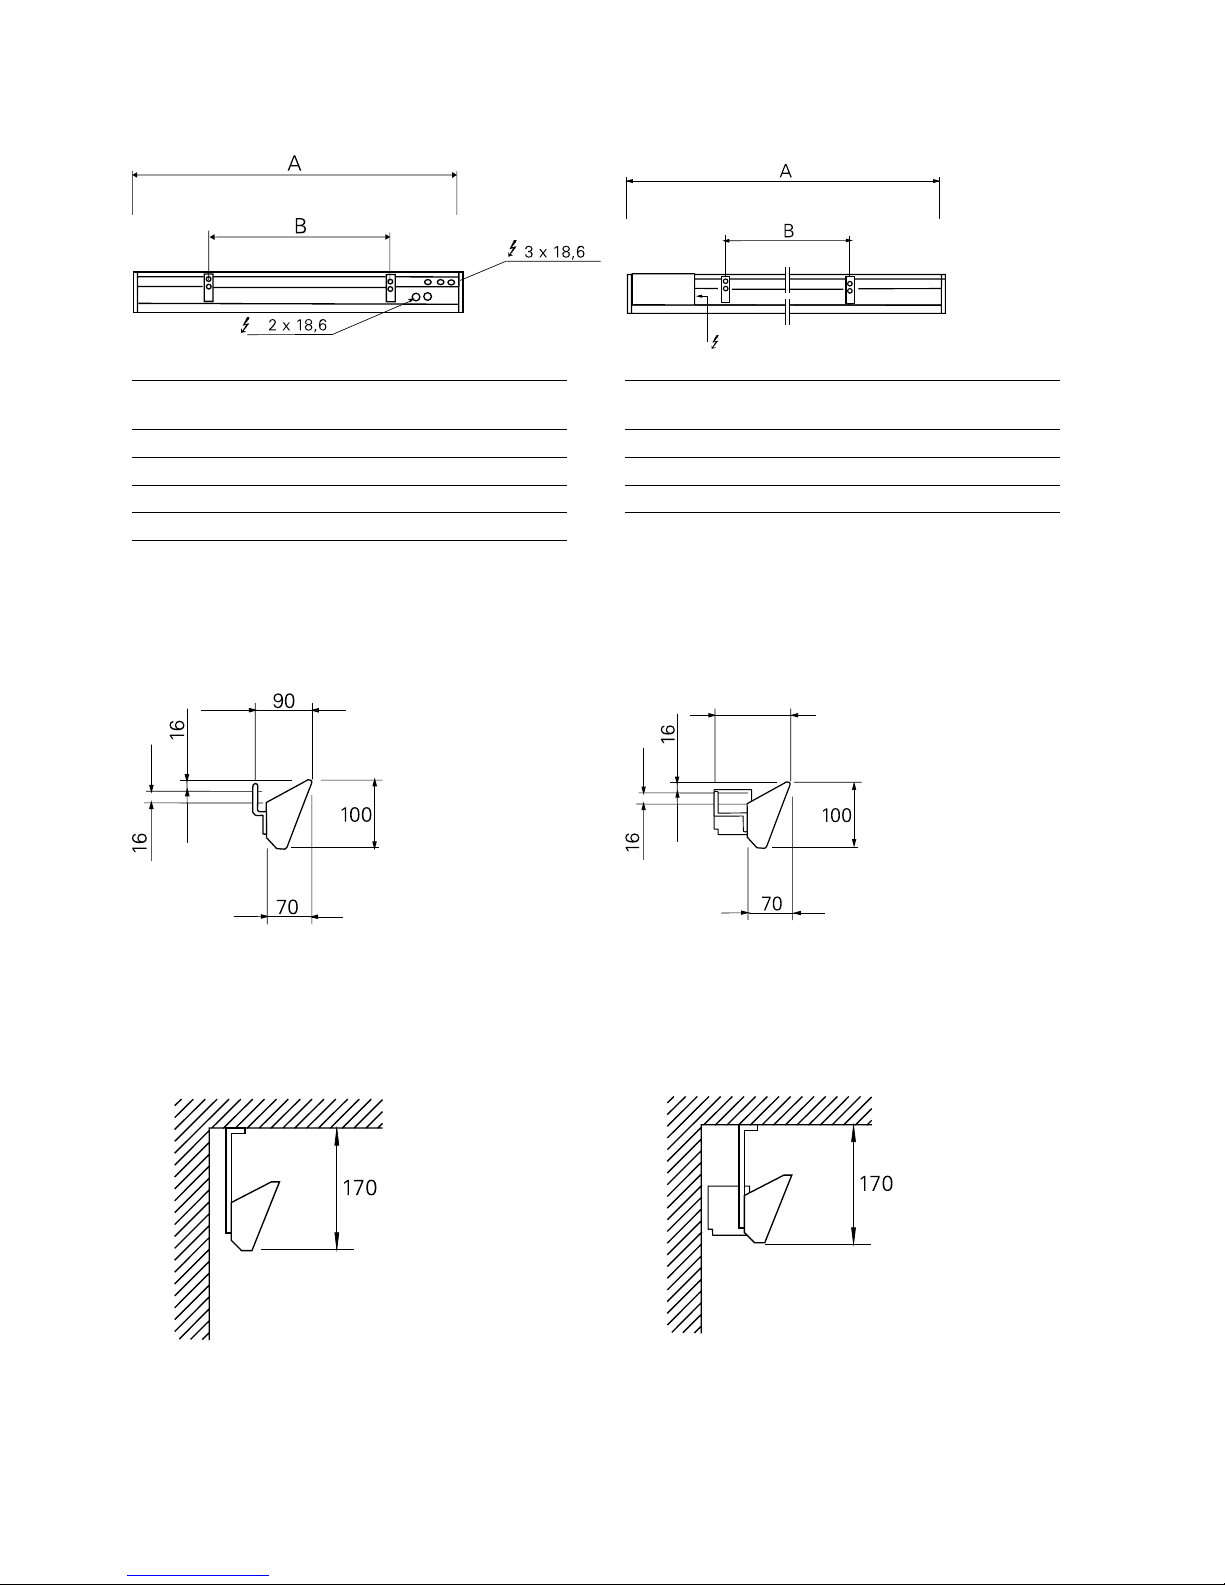
Mounting on the ceiling
Thermoplus EC
Type A
[mm]
B
[mm]
EC450 1076 600
EC600 1505 900
EC750 1810 1200
EC900 2140 1800
Thermoplus ECV/ECVTN
Type A
[mm]
B
[mm]
ECV/ECVTN300 870 400
ECV/ECVTN550 1505 900
ECV/ECVTN700 1810 1200
Ceiling fixture TF1
Mounting on the wall
135
Page 3
3
Thermoplus
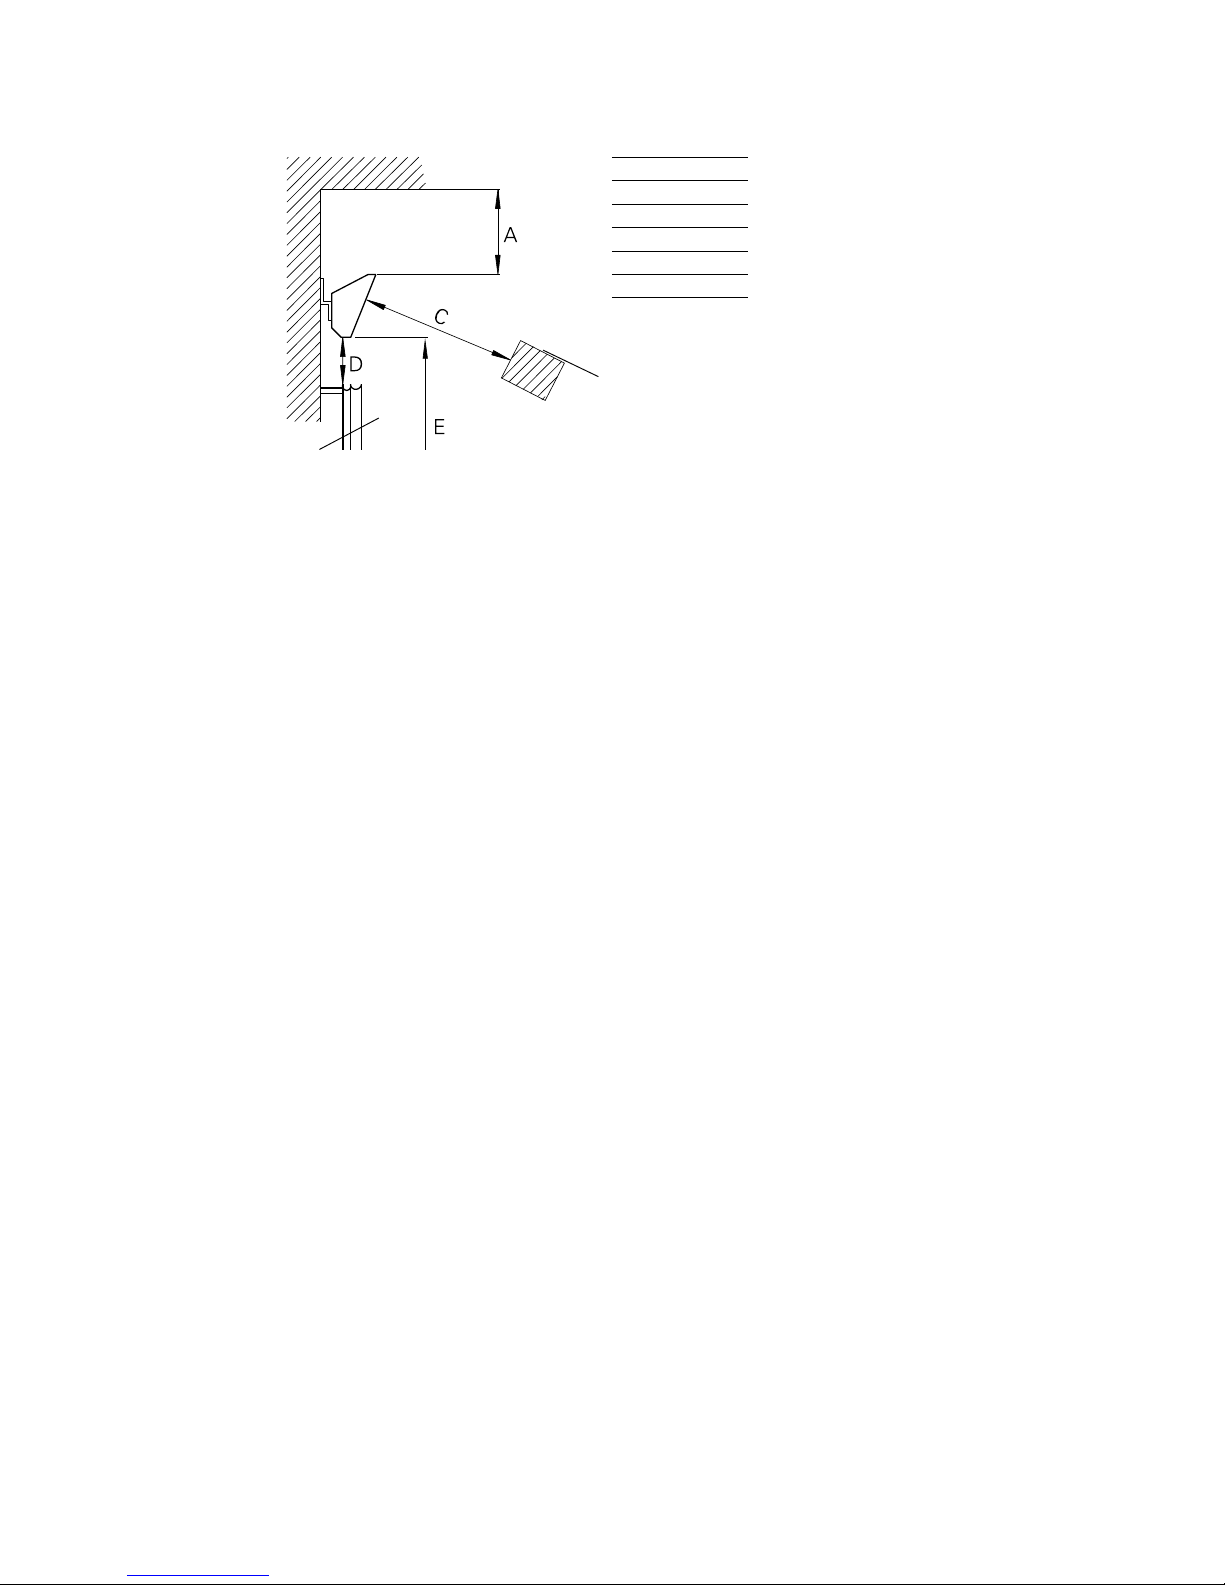
Flammable material,
e.g curtain
[mm]
A 60
B 25
C 90
D 25
E 1800
Minimum mounting distance
Flammable
material
Page 4
1
2
3
4
5
6
7
8
4
Thermoplus
Page 5

5
Thermoplus
TF1
Accessories
Type HxWxD
[mm]
TAP16R
87x87x53
TEP44
87x87x55
RB3
155x87x43
RTX54
82x88x25
TF1
TAP16R TEP44 RTX54
RB3
Technical specifications
(1)
SE: Effekt
GB: Output
NO: Effekt
FR: Puissance
DE: Heizleistung
RU: Мощность
FI: Lämmitysteho
(2)
SE: Spänning
GB: Voltage
NO: Spenning
FR: Tension
DE: Spannung
RU: Напряжение
FI: Jännite
(3)
SE: Ström
GB: Amperage
NO: Strøm
FR: Intensité
DE: Stromstärke
RU: Ток
FI: Virta
(4)
SE: Maximal yttemperatur
GB: Max. surface temperature
NO: Maksimal overflatetemp.
FR: Température de surface
DE: Max. Oberflächentemperatur
RU: Max. температура поверхности
FI: Suurin pintalämpötila
(5)
SE: Vikt
GB: Weight
NO: Vekt
FR: Poids
DE: Gewicht
RU: Вес
FI: Paino
Thermoplus EC (IP20)
Thermoplus ECV (IP44)
Thermoplus ECVTN (IP44)
Type Output (1)
[W]
Voltage (2)
[V]
Amperage (3)
[A]
Max. surface
temp. (4)
[°C]
Weight (6)
[kg]
ECVTN30021 300 230V~ 1,3 180 2,3
ECVTN55021 550 230V~ 2,4 180 4,6
ECVTN70021 700 230V~ 3,0 180 5,0
Type Output (1)
[W]
Voltage (2)
[V]
Amperage (3)
[A]
Max. surface
temp. (4)
[°C]
Weight (6)
[kg]
ECV30021 300 230V~ 1,3 180 2,3
ECV55021 550 230V~ 2,4 180 4,0
ECV55031 550 400V2~ 1,4 180 4,0
ECV70021 700 230V~ 3,0 180 4,7
ECV70031 700 400V2~ 1,8 180 4,7
Type Output (1)
[W]
Voltage (2)
[V]
Amperage (3)
[A]
Max. surface
temp. (4)
[°C]
Weight (6)
[kg]
EC45021 450 230V~ 2,0 180 2,6
EC60021 600 230V~ 2,6 180 3,7
EC75021 750 230V~ 3,3 180 4,4
EC90021 900 230V~ 3,9 180 4,8
EC90031 900 400V2~ 2,3 180 4,8
Page 6
6
Thermoplus
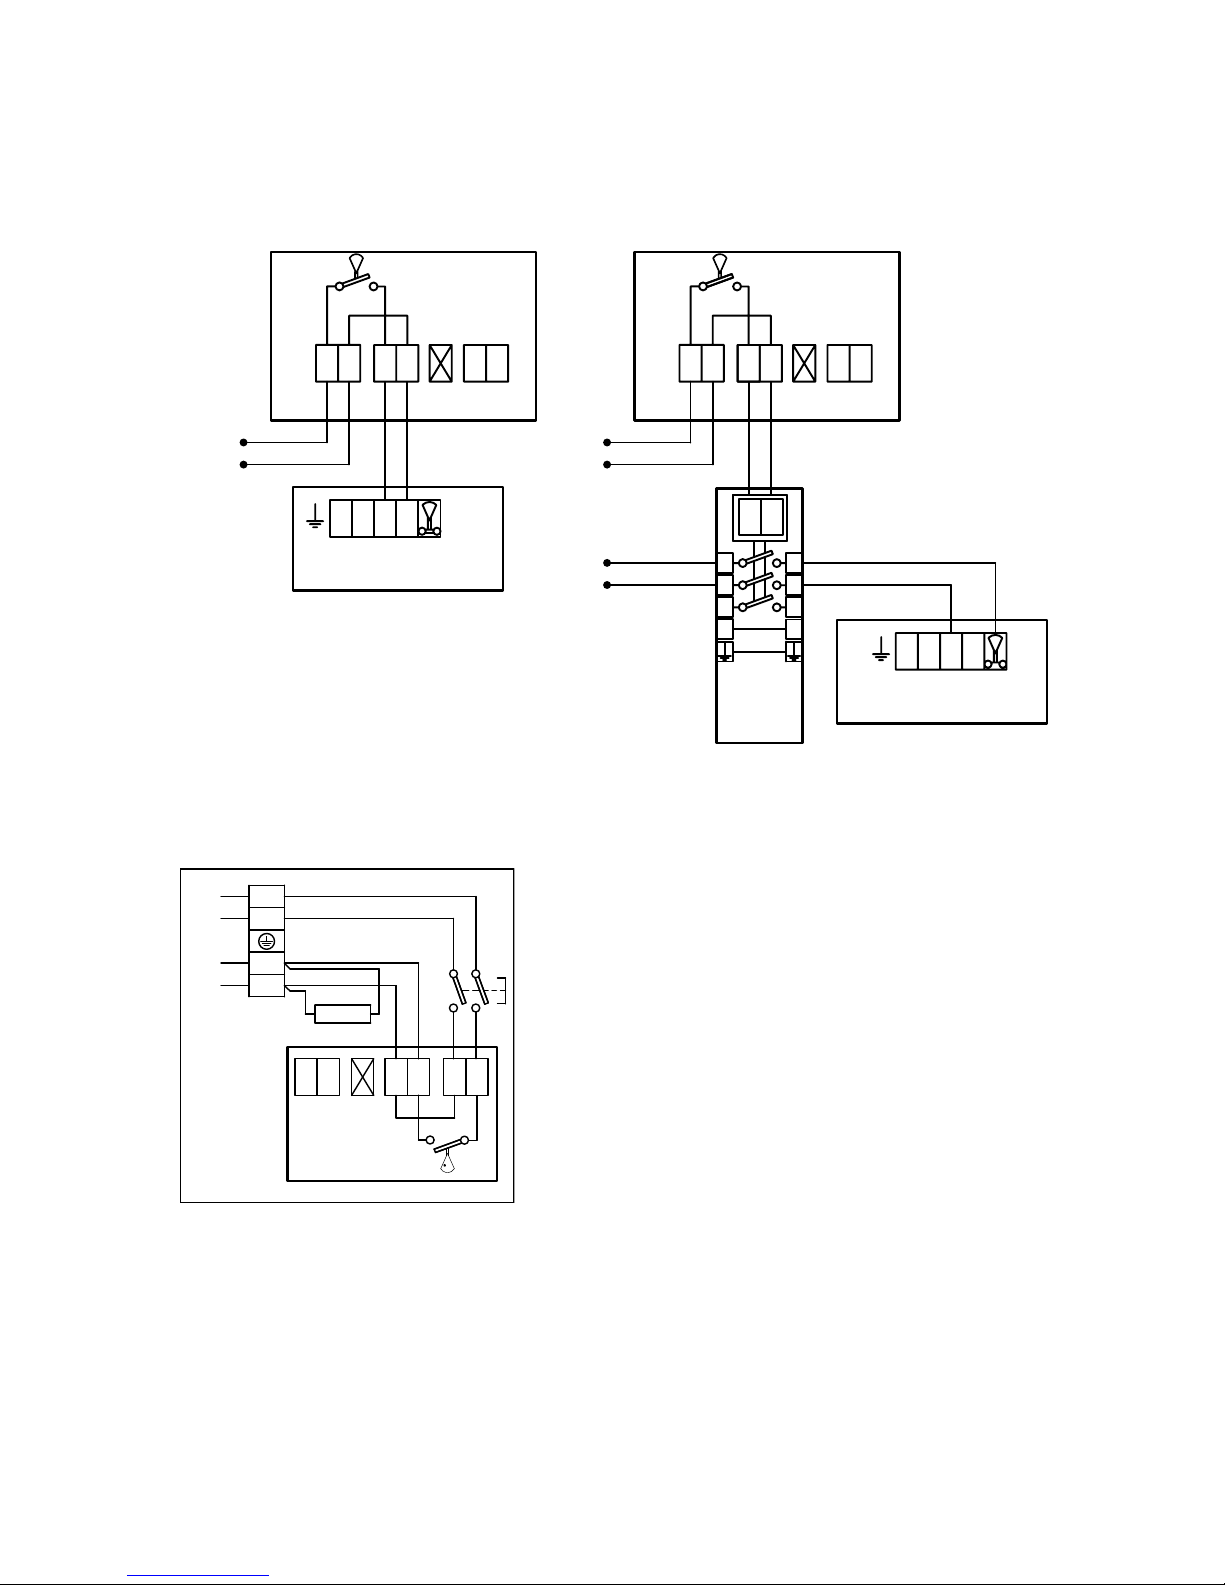
Control by thermostat
L
N
LOAD
LOAD
SENSOR
SENSOR
SENSOR
SENSOR
LOAD
LOAD
LN
°C
°C
TAP16R
TAP16R
230V~
230V~
L
12L3
N
°C
EC/ECV 230V~
EC/ECV 400V2~
RB3
A1A2
L1
L2
L1
L2
L3
L
N
N
T1
T2
T3
LL
12L3
N
°C
Wiring diagram
L
N
1
2
C
(ECV)
230 V
~
SENSOR
SENSOR
L
N
LOAD
LOAD
TAP16R
ECVTN
Control by built-in thermostat
Page 7

Thermoplus
17
GB
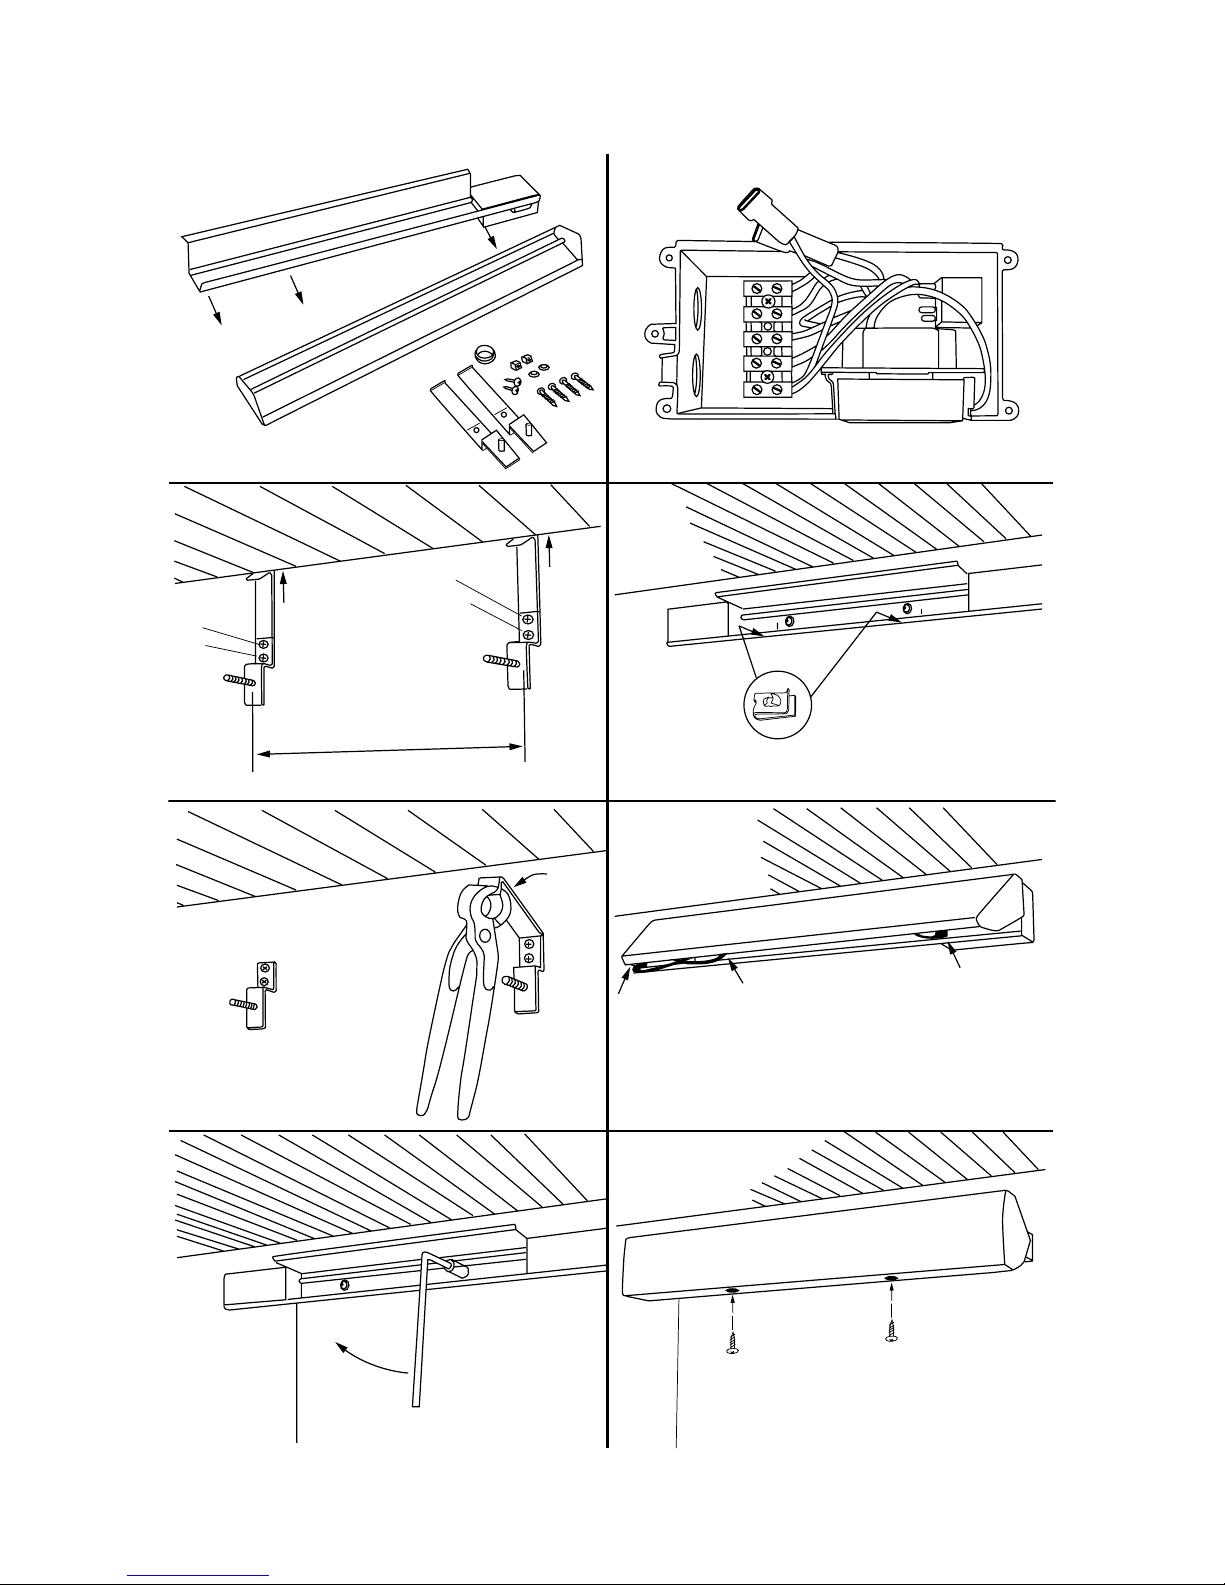
1. Remove the front plate, and detach the
electrical connections from the back plate.
2. Fit the brackets to the wall below the
coving. See Table B for distance between
brackets. Allow 15 mm for heater
expansion.
3. Break off the top spacing part of the
brackets at the break mark.
4. Fasten the back plate to the brackets.
5. In the connection box on the heater there
are additional plinths to make it possible to
further connect to a slave device (ECVTN).
6. Press the two u-nuts into place in the
bottom flange of the backplate.
7. Re-connect the wiring, be sure to place
the joints in the connections box. Hook
the front panel onto the top flange of the
backplate.
8. Lower the front plate and screw into place
via the two u-nuts.
Connection
Thermoplus is intended for permanent
installation. Thermoplus is equipped with
extra terminal board sections for further
current distribution. A junction box is
therefore not required.
Mounting
Thermoplus among other things is used to
protect against cold draughts from windows
and is mounted horizontally above the
window. Two wall mounting brackets are
included as standard. Fixtures for ceiling
mounting are extra, TF1. For minimum
mounting distance, see p.3.
Installation and operating instructions
Control
When using this product as a local space
heater according to Ecodesign Regulation
(EU) 2015/1188, it must be supplemented
with one of the following approved controls.
Please note that a relaybox RB3 is required
for 400V~ products.
• TAP16R, electronic thermostat that
includes:
- Electronic room temperature control plus
week timer
- Room temperature control with open
window detection
The product can be controlled in a different
way, e.g. by an overall control system (BMS),
but in that case the responsibility lies with
the installer to ensure that the control system
is programmed to make the installation meet
the requirements of Ecodesign Regulation
(EU) 2015/1188. For ECVTN with a builtin thermostat, see separate chapter about
control.
Start-up
When the unit is used for the first time or
after a long period of disuse, smoke or odour
may result from dust or dirt that has collected
on the element. This is completely normal
and disappears after a short time.
Maintenance
In all electrical heating appliances, small
clicks can occur due to movement when the
material expands and contracts with changes
in temperature.
General Instructions
Read these instructions carefully before
installation and use. Keep this manual for
future reference.
The product may only be used as set out in
the assembly and operating instructions. The
guarantee is only valid if the product is used
in the manner intended and in accordance
with the instructions.
Application area
Thermoplus is mounted above windows
and gives an effecient protection against
cold draught. The slim shape also makes it
suitable for heating areas with limited space,
like for example bathrooms. Thermoplus can
furthermore be a cost-effective and flexible
alternative to floor heating.
• Thermoplus is available in following
versions:
- - Type EC, for dry rooms. IP20.
- - Type ECV, for wet rooms. IP44.
- - Type ECVTN, for wet rooms. With a built-
in thermostat (+5 – +37 °C). IP44.
- Can also be connected to control over ECV,
max. total load 10A/3200W.
Page 8

Thermoplus
18
GB
Residual current circuit breaker
When the installation is protected by means
of a residual current circuit breaker, which
trips when the appliance is connected,
this may be due to moisture in the heating
element. When an appliance containing a
heater element has not been used for a long
period or stored in a damp environment,
moisture can enter the element.
This should not be seen as a fault, but is
simply rectified by connecting the appliance
to the main supply via a socket without a
safety cut-out, so that the moisture can be
eliminated from the element. The drying
time can vary from a few hours to a few days.
As a preventive measure, the unit should
occasionally be run for a short time when it is
not being used for extended periods of time.
Packaging
Packaging materials are chosen with
consideration to environment and are
therefore recyclable.
Handling of product at end of working life
This product may contain substances
necessary for functionality of product but
potentially dangerous for the environment.
The product should not be disposed
mixed with general household waste but
delivered to a designated collection point for
environmental recycling. Please contact local
authority for further details of your nearest
designated collection point. Recycling of used
products saves earth's resources and reduces
global footprint.
Safety
• For all installations of electrically heated
products should a residual current circuit
breaker 300 mA for fire protection be used.
• The unit must not be fully or partially
covered with clothing, or similar materials,
as overheating can result in a fire risk! (E)
• This appliance can be used by children
aged from 8 years and above and persons
with reduced physical, sensory or
mental capabilities or lack of experience
and knowledge if they have been given
supervision or instruction concerning
use of the appliance in a safe way and
understand the hazards involved. Children
shall not play with the appliance. Cleaning
and user maintenance shall not be made by
children without supervision.
• Children of less than 3 years should be kept
away unless continuously supervised.
• Children aged from 3 years and less than 8
years shall only switch on/off the appliance
provided that it has been placed or
installed in its intended normal operating
position and they have been given
supervision or instruction concerning
use of the appliance in a safe way and
understand the hazards involved.
• Children aged from 3 years and less
than 8 years shall not plug in, regulate
and clean the appliance or perform user
maintenance.
CAUTION — Some parts of this product can
become very hot and cause burns. Particular
attention has to be given where children and
vulnerable people are present.
Page 9

Thermoplus
19
GB
1
2
4
3
5
8
9
6
7
Control ECVTN
Thermoplus ECVTN has a digital display on
which all settings are made.
Symbols on the display
1. Day of the week
2. Time and date
3. Selected menu/Current temp (actual value) °C
4. Set temp (set point) °C
5. Control (F) = sensor selection ECVTN
6. Shows that a program is running
7. Lock symbol
8. Program
9. Event functions for personal settings
Page 10

Thermoplus
20
GB
LED
Select button
Time
Temp
Control (F)
Arrow buttons
Exit the menu*
4 secs
4 secs
Navigate
To standby*
Out of
standby
Start the
menu
Navigate
through the
options
*The heat is not being regulated. The clock is
running and the programming is saved in the
memory.
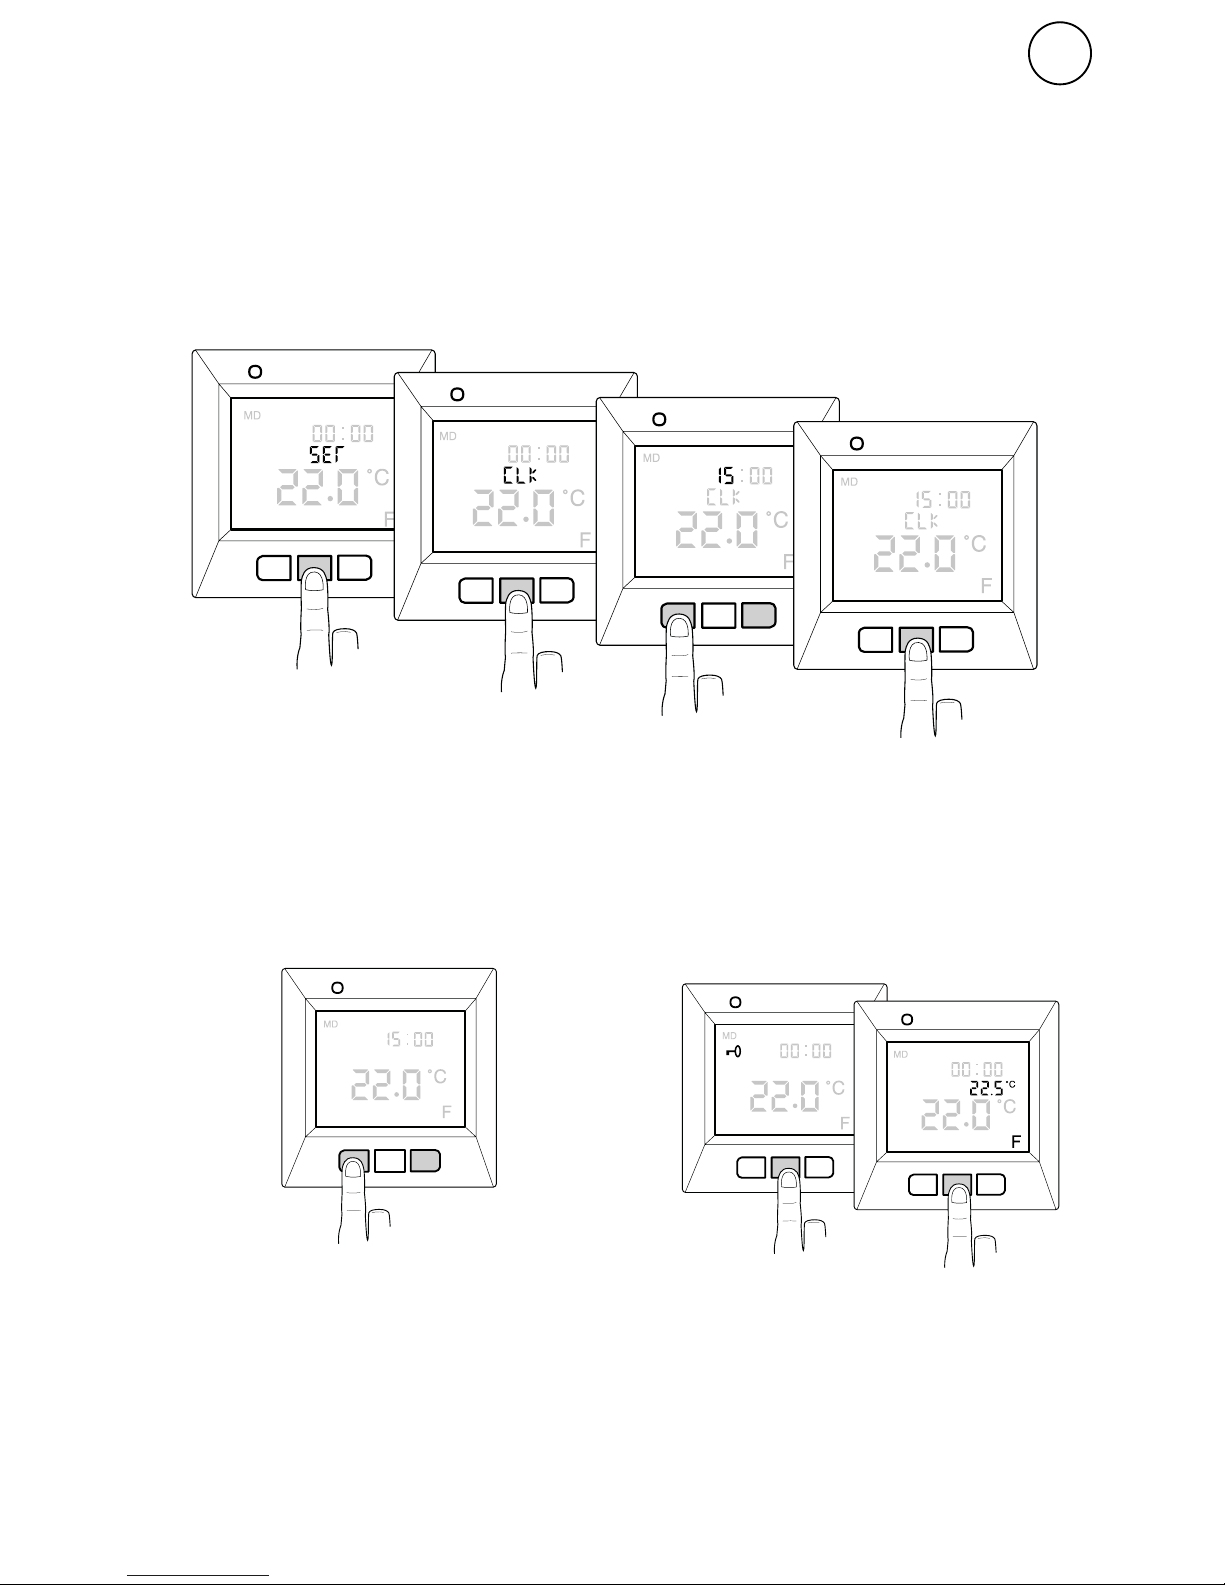
This is what the display looks like at first
start.
Lock
Unlock
*Or wait 30 secs and exit automatically.
4 secs
[
] [ ]
Start up Using the menu
Turning off and on Locking the keypad
Day
Page 11
Thermoplus
21
GB
Show actual temperature
Navigate to the correct time*
*Repeat the last two steps to set minutes, day,
month and year. The correct day of the week is
set automatically.
Desired temperature
Basic settings
Lock buttons first
The measured
temperature is
displayed.
To be able to use all the functions you need to set
the time and date first.
0,5 °C
Time and date
Page 12

Thermoplus
22
GB
Other settings
Reset
You use the Reset function to make the
thermostat revert to default factory settings.
All your personal settings will be deleted.
and navigate to SET.
Press
Select with
Navigate to RST and
select with
Set the light intensity of the LED
The display shows a number between 1 and 8
depending on the current setting. Navigate to
regulate the contrast.
and navigate to SET.
Press
Select with
Navigate to LED and
select with
Navigate between LED L (weak light) and LED
H (strong light).
Confirm with
Set display contrast
and navigate to CONT.
Press
Select with
Confirm with
Time and date
Navigate between YES/NO, then confirm with
and navigate to SET.
Press
Select with
Navigate to DISP and
select with
Navigate between 12- and 24-hour format.
Confirm with
Turn off DST
The calendar switches to DST automatically.
This function can be turned off.
and navigate to SET.
Press
Select with
Navigate to S and
select with
Navigate between ON/OFF.
Confirm with
Set time format
Light and contrast
YES deletes the settings, NO returns to the
menu.
Page 13

Thermoplus
23
GB
Adaptive function
The thermostat has a function which works
out when the heating should start to give the
correct temperature at the correct time. It is
activated on delivery, but can be turned off:
Press
and navigate to SET.
Select with
Navigate to AF,
Select with
Navigate between ON/OFF.
Confirm with
Ventilation mode
If the room temperature falls by more than
3 °C in a single minute, e.g. when airing the
room, the ventilation mode is activated.
The thermostat will then stop heating for 15
minutes before returning to normal mode.
This function is always active.
Press
to select. The display now shows the
operation time as a percentage for the last
24 hours. You can then navigate between the
operation time as a percentage for the last
7/30/365 days.
Press
and navigate to UTIL.
Delay between turning off and on
There is a built-in delay in order to avoid
unnecessary wear and tear on internal
components and to extend the life of
the thermostat. If you raise the desired
temperature so that the thermostat comes on,
and then lower it shortly afterwards, it takes
30 sec before it goes off again.
Operation time
The thermostat can display the operation
time as a percentage for the last 24 hours and
7/30/365 days.
Green light – the thermostat is on and the
heat is turned off.
Red light – the thermostat is on and the heat
is turned on.
Flashing green and red lights – error
indication. The heat is turned off. The
thermostat shows the error message until it is
turned off.
No light – the thermostat is switched off or is
not getting any power.
LED
The LED allows you to see the current status
of the thermostat.
Page 14

Thermoplus
24
GB
Confirm when
the correct icon is
flashing*
Arrow and icon
show that a
program is running
*Stop program: Confirm when no icon is flashing.
Energy saving programs
Save energy cleverly and easily! With these programs the heating is adapted to your
actual needs and the heat is turned down when it isn’t needed. There are four program
options:
Preset
for office
environments
Frost protection
for premises which
stand empty for long
periods
Preset
for home
environments
Program your own
personal settings
Tailor the heating to your own needs! You have the option of programming time and
temperature for four events every day:
Program personal settings
Choose between a
whole week or a single
day.
Navigate to the time and temp
for the event. Confirm and
repeat.
Don’t forget to start the program afterwards!
wakeup
out
home
night
Program
for office
environment
The temperature is automatically
reduced by 5 °C at all times except
for: Mon – Fri 6:00 – 18:00
Program
for home
environment
The temperature is automatically
reduced by 5 °C during the
following periods:
Mon – Fri 08:30 – 15:00
Mon – Sun 23:00 – 05:00
Page 15

Thermoplus
25
GB
Frost protection program
This program is ideal for when you want to
protect against frost damage in premises
which are standing empty or unused for
long periods, such as holiday homes and
warehouses, or when you will be away from
your main home for longer than usual. You set
a desired value (set point) and the thermostat
regulates the temperature in line with this.
The normal settings remain in the memory
and the thermostat reverts to them when
the frost protection program is deactivated.
Temperature can be set to a level between 5
°C and 15 °C, the factory setting is 10 °C.
Select with
The set temperature will flash, navigate to the
desired temperature.
Press
and navigate to SET.
Navigate to FP,
select with
Confirm with
Important
The heating system is a highvoltage system
and any faults must therefore be corrected by
an authorised electrician.
Trouble shooting
Error codes
When a fault occurs, the thermostat turns the
heating off. The LED flashes red and green
alternately. The LCD display shows a flashing
error code as follows:
Error 3: Short circuit sensor.
Error 4: Interruption sensor.
Page 16

Thermoplus
26
GB
CONT
Set the display’s contrast
1-8
SET
Various settings
CLK
Set time and date.
S
Turn off and set to automatic
change to DST.
RNF
F (sensor ECVTN)
FP
Turn off and turn on the frost
protection program.
4E
Set the personal program, time
and temperature for up to four
events per day.
DISP
Set how the time will be shown,
24- or 12-hour format.
LED
Set the strength of the display’s
backlight.
AF
Turn off and turn on the adaptive
function.
END
Exit the menu and return to
basic mode.
RST
Reverts to factory settings and
deletes all personal settings.
Sitemap of the menu
This is how the menu in the thermostat is structured. Here you can quickly see where
all the functions and settings are.
PROG
Start/stop program
UTIL
Show connected time in %
Home program
Office program
Personal program
Frost protection program
24 HR
7 D
30 D
365 D
LOCK
Locks the keypad
END
Exits the menu
Page 17

Page 18

Page 19

Page 20

Main offi ce
Frico AB Tel: +46 31 336 86 00
Box 102
SE-433 22 Partille mailbox@frico.se
Sweden www.frico.se
For latest updated information and information
about your local contact: www.frico.se
2018-11-16 HH
 Loading...