


Operating Instructions Scraper Tool
FWSG 710 L
Technical Equipment
1
1
The FWSG 710 L scraper is for use
on PE pipes with a diameter ranging from 10" IPS – 28" IPS and
10" DIP – 20" DIP. It is designed to
remove completely and effortlessly
the layer of oxide in preparation for
an electrofusion joint.
The design of the FWSG 710 L
(Picture 1) allows scraping of the
pipe surface along the entire length
of the coupler or half of it:
• Scraping the entire length of the
coupler is required when a slideover coupler is employed.
• Only half the coupler (up to where
insertion will end) needs to be
scraped when a simple fusion
process is to be applied.
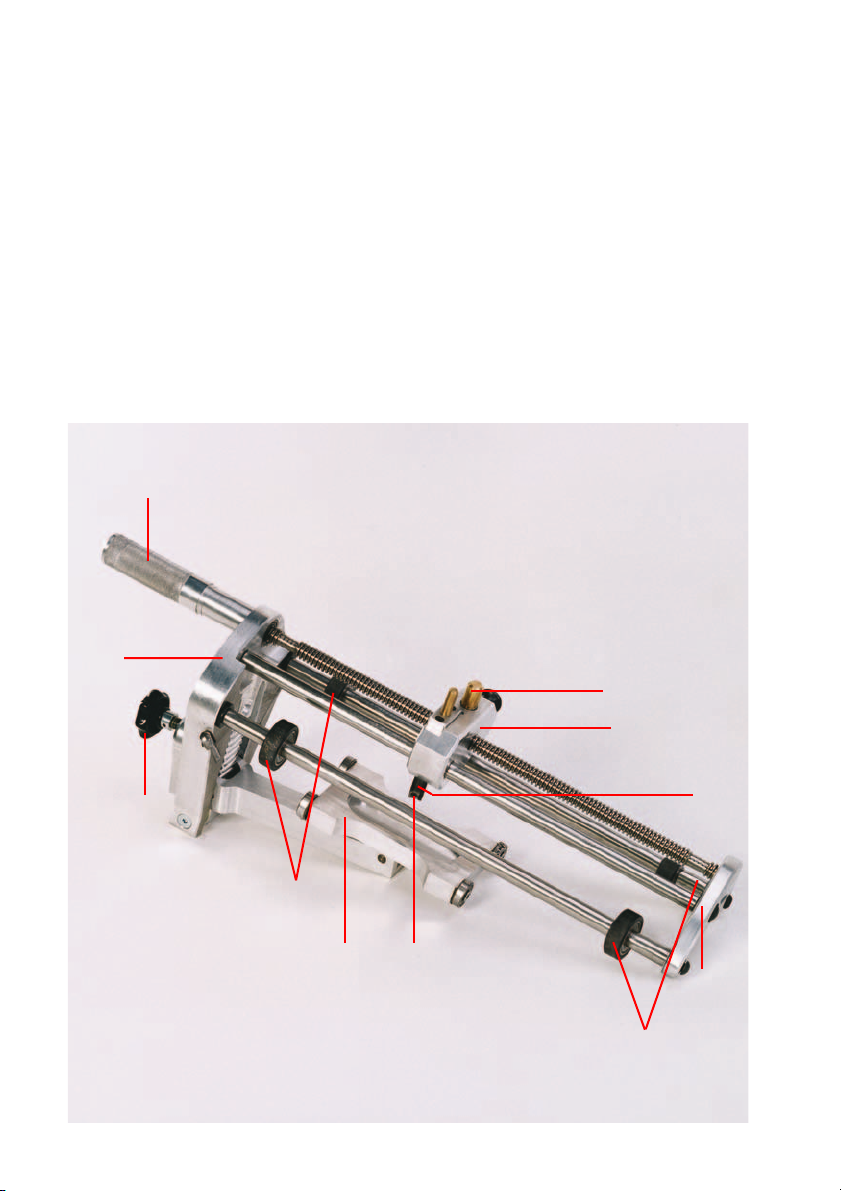
Picture 1
1
3
5
1. Roller handle
2. Scraper blade
3. Housing
4. Clamping carriage
5. Twist grip knob
6 .Guide rollers
7. Blade housing
8. Blade holder
9. Quick release button
10. End plate
FWSG 710 L
9
7
8
6
24
10
6
2
2

The appropriate dimension ranges
are marked twice along the
scraper's guide rod. The first
marking nearer the front plate
serves to set the areas to be
scraped for a simple fusion
process. The second marking
nearer the end plate refers to the
employment of slide-over couplers.
Picture 2
I. Preparation
• Remove obvious dirt particles
from the pipe surface to be
scraped (using for example a
clean, grease free piece of cloth).
• Determine length of area to be
scraped (= depth of insertion of
coupler/moulded part + 0.2")
and mark area with wavy lines
using a FRIALEN®- marker.
II. Setting the equipment
• Set blade to correct position:
-Press quick release button and
bring blade housing close to
front panel (Picture 2).
3
3

Picture 3
• Set clamping carriage in lower
position:
- Loosen twist grip knob.
- By pressing against the twist
grip knob, allows free movement
of the clamping carriage. Move
down clamping carriage
(Picture 3).
• Set blade housing to scraping
length required (single or double
scraping length).
-Press quick release button and
set blade housing roughly to
relevant dimension marking
(Picture 2). The blade housing
will end up on the left of the
marking.
- The position of the blade hous-
ing will be fine tuned by turning
the roller handle until the
marking line chosen as the
dimension range is flush with the
blade housing (Picture 4).
Picture 4
4
4
Attention!
Do not touch clamping carriage
with scraper blade!
Table for setting different pipe
dimensions: (IPS) and (DIP)
Setting
marks on the 12" 18" 28"
scraper
Pipe 14" 20"
dimensions 10" 16" 22"
12" 18" 24"
28"

Picture 5
III. Mounting of scraper
• Move scraper across pipe in such
a way that the clamping carriage
is inside the pipe and the scraper
blade is on the surface of the
pipe (Picture 5). The housing
must be flush with the front edge
of the pipe.
Attention!
Do not run the blade over the
pipe surface.
• Setting the clamping carriage.
- Move the clamping carriage
upwards until it is in contact
with the pipe wall (Picture 3).
The supporting arm of the
clamping carriage should be
roughly parallel to the pipe wall.
- Tighten twist grip knob
(Picture 6) until all four guide
rollers rest on the pipe surface.
Picture 6
Picture 7
IV. Scraping of pipe surface
•Turn equipment clockwise around
the pipe end. By turning steadily,
the pipe can be scraped up to the
pipe end (Picture 7).
Attention!
During scraping, the scraper
must be pushed against the pipe
end in order to avoid axial tilting!
5
5

V. Dismantling of the equipment
• Loosen twist grip knob and
remove scraper from pipe.
• In order to prevent injuries or
scraper damage, the blade
housing should be moved up to
the front plate on completion.
VI. Preparing the fusion process
• Remove the swarf.
• Check scraping result.
If marking has not been completely
removed, the scraping process has
to be repeated from Point III.
• Apply a chamfer (about 0.08" –
0.11") at the end of the pipe
using a hand held scraper.
• Clean the pipe before fusion
using PE cleaner with an
absorbent, non-fibrous and
undyed paper.
• Processing the FRIALEN®/
FRIAFIT® -coupler takes place
according to the installation
instructions.
Attention!
The scraper must be kept clean
and dry and always stored in its
transporting case.
6
6

VII. Replacing scraper blade
Warning!
Risk of injury on the scraper
blade.
Procedure:
• Release the TORX screw with the
TORX spanner supplied.
• Remove blade.
• Insert new blade.
• Tighten the TORX screw with the
TORX spanner.
Please note when replacing the
blade that only blades dyed blue
may be used.
Replacement Order-No.
blade set
FWSGE 5 T-613 324
Operational safety
The scraper tool FWSG 710 L is
based on quality management
according to DIN ISO 9001:2000
and was checked with operational
safety in mind before dispatch. It is
recommended to test it annually for
its operational safety. Please
contact our Service and Technical
Equipment department:
IPEX/FRIATEC
PE ELECTROFUSION SYSTEMS
426 Fairforest Way
GREENVILLE, SC 29607
PHONE: 864-234-2044 (Direct Line)
FAX.: 864-234-2060
CELL.: 864-616-5392
www.friatecusa.com
E-Mail: thoeng@ipexinc.com
Warranty
The FWSG 710 L comes with a
12 month warranty. It excludes
blade equipment or parts which
wear out prematurely due to their
environment (sand, soil etc.).
The tool must be protected from
dirt.
7
7

IPEX/FRIATEC PE ELECTROFUSION SYSTEMS
Technical Plastics Division
426 Fairforest Way · Greenville, SC 29607
Tel.: 864-286-8800 · Fax: 864-234-2060
www.friatecusa.com · E-Mail: thoeng@ipexinc.com
2062/1 USA. Stand: 17.06.04
 Loading...