

FRIATEC FRIATOOLS FWSG RA 32, FRIATOOLS FWSG RA 40, FRIATOOLS FWSG RA 50, FRIATOOLS FWSG RA 63 Operating Instructions Manual
1
2409/3 . X.10 . Stand: 04.10.2010
FRIATOOLS
®
Bedienungsanleitung
Schälgerät FWSG RA 32/40/50/63
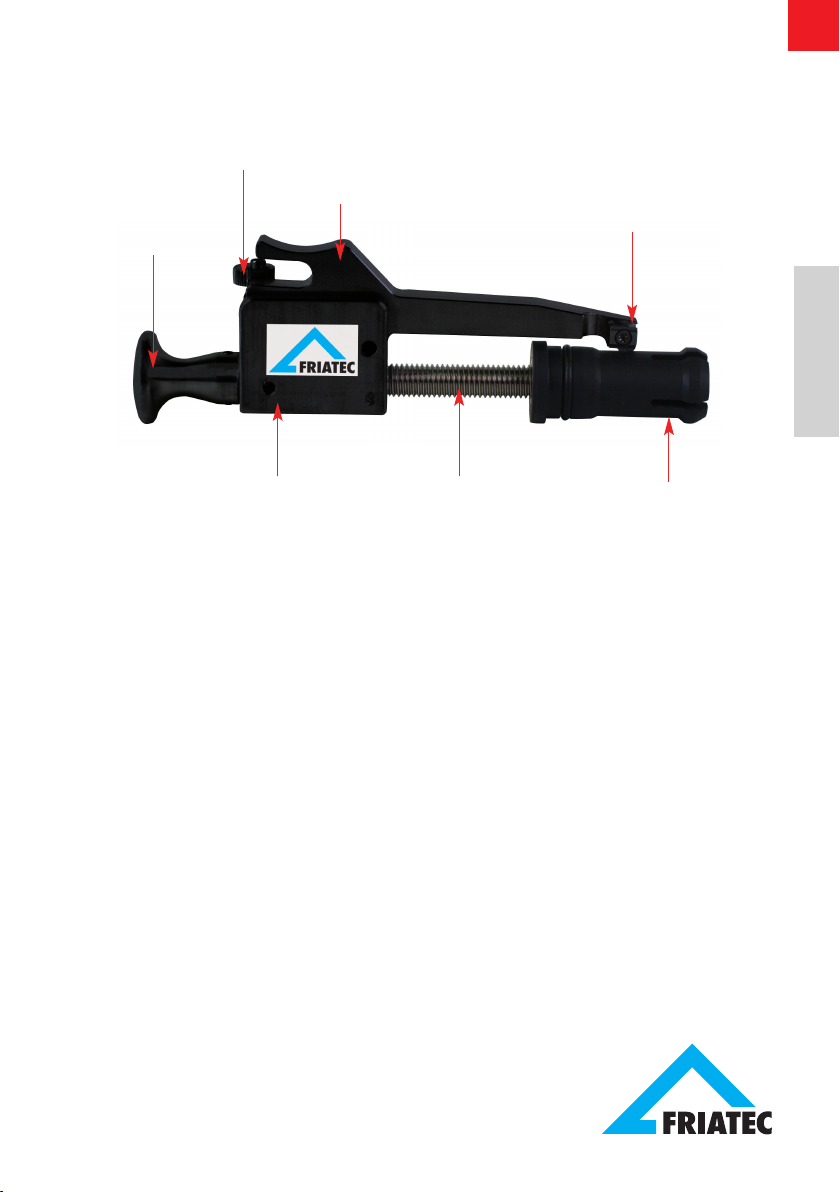
Arretierung (2)
Messerhalter (3)
Knauf mit Innen sechskant (1)
Schälmesser (4)
Inhaltsverzeichnis
Grundkörper (7) Gewindespindel (6) Dorn (5)
Deutsch
1. Vorbemerkungen 2
1.1 Sicherheitshinweise und Tipps 2
1.2 Bestimmungsgemäße Verwendung 2
2. Sicherheit 3
2.1 Funktionssicherheit 3
2.2 Verpflichtungen des Betreibers 3
2.3 Bauliche Veränderungen am Gerät 3
3. Vorbereitung der Schälung 4
4. Montage des Schälgerätes 4
5. Rohroberfläche schälen 5
5.1 Schälen im Handbetrieb 5
5.2 Schälen mit Handkurbelantrieb (Zubehör) 5
5.3 Schälen mit Akkuschrauberantrieb 5
6. Demontage des Schälgerätes 6
7. Überprüfung des Schälergebnisses 6
8. Schneide wechseln 7
9. Pflege- und Wartungshinweise 8
10. Gewährleistung 8
11. Aktualisierung dieser Bedienungsanleitung 9
2
2409/3 . X.10 . Stand: 04.10.2010
1. Vorbemerkungen
1.1 Sicherheitshinweise und Tipps
In dieser Bedienungsanleitung werden folgende Symbole mit Warnhinweisen verwendet:
GEFAHR!
Bezeichnet eine drohende Gefahr!
Das Nichtbeachten dieses Hinweises kann schwere gesundheitliche
Schäden und Sachschäden hervorrufen.
ACHTUNG!
Bezeichnet eine gefährliche Situation!
Das Nichtbeachten dieses Hinweises kann leichte Verletzungen oder
Sachschäden bewirken.
WICHTIG!
Bezeichnet Anwendungstipps und andere nützliche Informationen!
1.2 Bestimmungsgemäße Verwendung
Die Schälgeräte FWSG RA 32/40/50/63 dienen zur Entfernung der
Oxidhaut zur Vorbereitung einer Heizwendelschweißung. Sie eignen
sich optimal zum Schälen von Rohrstutzen an FRIALEN Sattelarmaturen und Sicherheitsfittings, sowie von Rohrenden. Geschält werden
können Rohre aus PE80, PE100 und PE-Xa in SDR 11. Die Schäl geräte FWSG RA sind Präzisionswerkzeuge, deren Nutzungsdauer
von der Häufigkeit des Gebrauchs und äußeren Einflüssen beim Einsatz und/oder der Lagerung bzw. dem Transport abhängig ist.
ACHTUNG!
Das Schälen vor der Schweißung ist in jedem Falle durchzuführen.
Bei nicht vollständiger Entfernung der Oxidhaut kann es zu einer
undichten Schweißverbindung kommen.
Deutsch

WICHTIG!
Bitte beachten Sie bei der Verarbeitung und Vorbereitung der
Heizwendelschweißung
• der FRIALEN Sicherheits fittings,
• der FRIALEN Sattelteile und
• des FRIALEN Geo Produktprogramms
die entsprechenden Montage anleitungen.
2. Sicherheit
2.1 Funktionssicherheit
Das Schälgerät FWSG RA unterliegt dem Qualitätsmanagement nach
DIN EN ISO 9001:2000. Es wird vor der Auslieferung auf seine Funktions sicher heit geprüft.
2.2 Verpflichtungen des Betreibers
Alle Personen, die mit der Inbetriebnahme, Bedienung, Wartung und
Instandhaltung des Schälgerätes FWSG RA zu tun haben, müssen:
• entsprechend qualifiziert sein und
• diese Bedienungsanleitung genau beachten.
Die Bedienungsanleitung ist stets am Einsatzort des Gerätes aufzubewahren (am besten in der Transportbox). Sie muss jederzeit für den
Bediener einsehbar sein.
Bei der Verwendung eines Akkuschraubers ist die Bedienungsanleitung des Herstellers zu beachten.
Beachten Sie bei der bestimmungsgemäßen Verwendung folgende
Vorgaben, insbesondere bei der Durchführung der Heizwendelschweißung sowie Arbeiten an Gasleitungen:
• das DVGW Regelwerk,
• das DVS Regelwerk,
• die UVV (insbesondere BGR 500) und/oder
• die entsprechenden Ländervorschriften.
2.3 Bauliche Veränderungen am Gerät
Ohne die Genehmigung der FRIATEC AG dürfen keine Veränderungen,
An- oder Umbauten am Gerät durchgeführt werden.
3
2409/3 . X.10 . Stand: 04.10.2010
Deutsch

4
2409/3 . X.10 . Stand: 04.10.2010
3. Vorbereitung der Schälung
ACHTUNG!
Ringbund-Rohre müssen vor dem Schälen im Arbeitsbereich des
Gerätes gerade gerichtet werden.
• Säubern Sie die zu schälende Fläche von Verunreinigungen wie
Sand und Erde (z.B. mit einem sauberen, fettfreien Lappen).
WICHTIG!
Wird die zu schälende Rohroberfläche nicht gereinigt, verschleißt
das Schälmesser vorzeitig.
• Zeichnen Sie die Einstecktiefe des Fittings am Rohrstutzen mit
einem FRIALEN-Marker an.
• Kennzeichnen Sie die zu schälende Fläche mit einem FRIALEN-
Marker mit wellenförmigen Linien in Längsrichtung. Bei Rollenware
ist insbesondere der Innenbogen zu markieren (damit Sie später
feststellen können, ob ein vollständiges Schälen des Rohres stattgefunden hat).
4. Montage des Schälgerätes
• Vor der Montage des Schälgerätes FWSG RA ist der Messer-
halter (3) zu arretieren.
• Halten Sie das Schälgerät FWSG RA in der Hand und drücken Sie
den Messerhalter (3) mit dem Daumen in Richtung Grundkörper (7).
• Der Messerhalter (3) hebt sich vom Dorn (5) ab.
• Drehen Sie die Arretierung (2), z.B. durch eine Schwenkbewegung
des Handgelenks.
• Positionieren Sie das Schälmesser (4) über
dem Bund des Dorns (5); drehen Sie ggf. den
Dorn (5) in diese Position.
• Schieben Sie den Dorn (5) so in den zu
schälenden Rohrstutzen, dass das Schälgerät
FWSG RA dort sicheren Halt hat.
• Richten Sie das Schälmesser (4) so aus, dass
die Schneide über dem Ende des Rohrstutzens sitzt.
• Betätigen Sie den Messerhalter (3) und lösen Sie die Arretierung (2),
wie zuvor beschrieben.
Deutsch
5
2409/3 . X.10 . Stand: 04.10.2010
5. Rohroberfläche schälen
5.1 Schälen im Handbetrieb
• Fassen Sie das Schälgerät FWSG RA am Grundkörper (7) und
drehen Sie das Gerät im Uhrzeigersinn um den Rohrstutzen.
• Drücken Sie dabei das Schälgerät FWSG RA axial gegen den zu
schälenden Rohrstutzen.
• Schälen Sie, bis die zuvor markierte Rohroberfläche komplett bear-
beitet ist.
• Der Span ist von Hand zu entfernen.
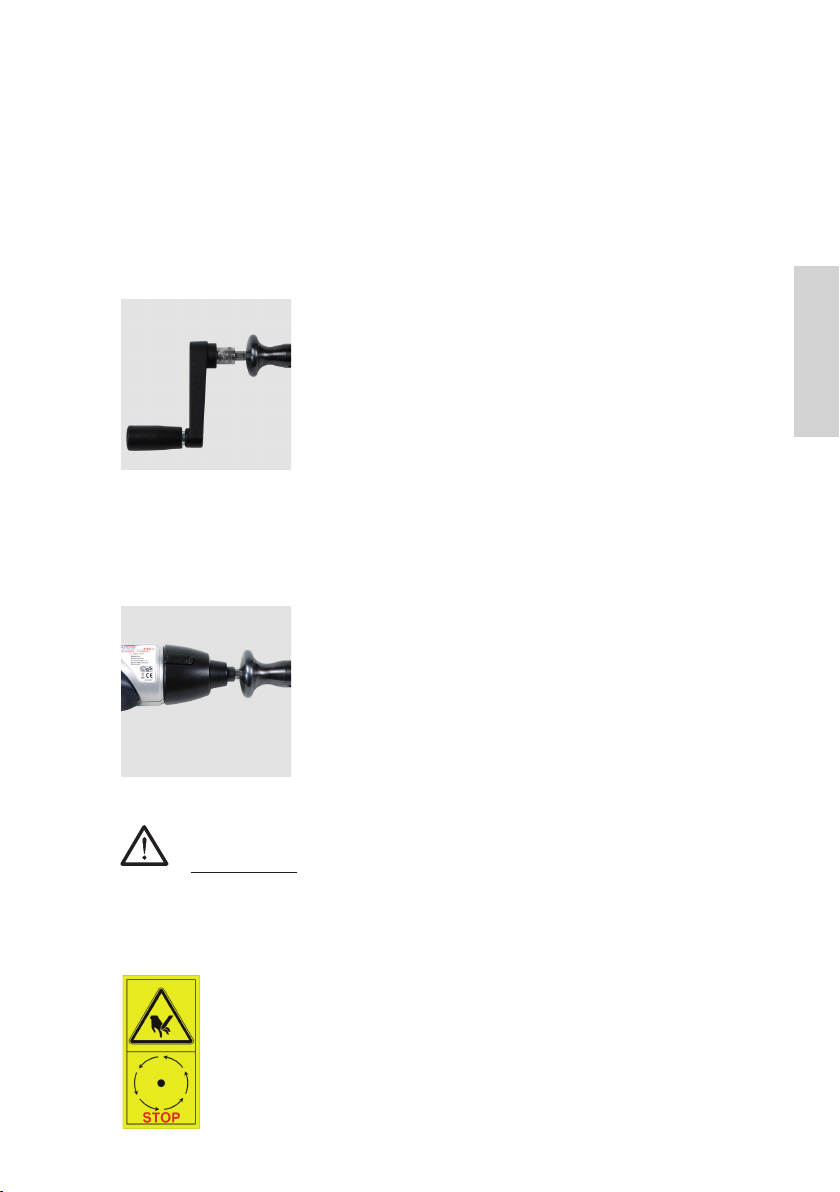
5.2 Schälen mit Handkurbelantrieb (Zubehör)
• Stecken Sie den Außensechskant der Hand-
kurbel in die Aufnahme am Knauf (1).
• Drehen Sie das Schälgerät FWSG RA gleich-
mäßig im Uhrzeigersinn um den Rohrstutzen.
• Drücken Sie dabei das Schälgerät FWSG RA
axial gegen den zu schälenden Rohrstutzen.
• Schälen Sie, bis die zuvor markierte Rohrober-
fläche komplett bearbeitet ist.
• Der Span ist von Hand zu entfernen.
5.3 Schälen mit Akkuschrauberantrieb
Es dürfen ausschließlich Akkuschrauber mit
folgenden Leistungsmerkmalen verwendet
werden:
• Maximale Drehzahl: 200 U/min
• Maximales Drehmoment: 4 Nm
• Die Schlag-Schraub-Funktion muss ausge-
schaltet sein.
ACHTUNG!
Bohrmaschinen dürfen nicht verwendet werden!
Eine zu hohe Drehzahl kann zu einem mangelhaften Schäl ergebnis
führen!
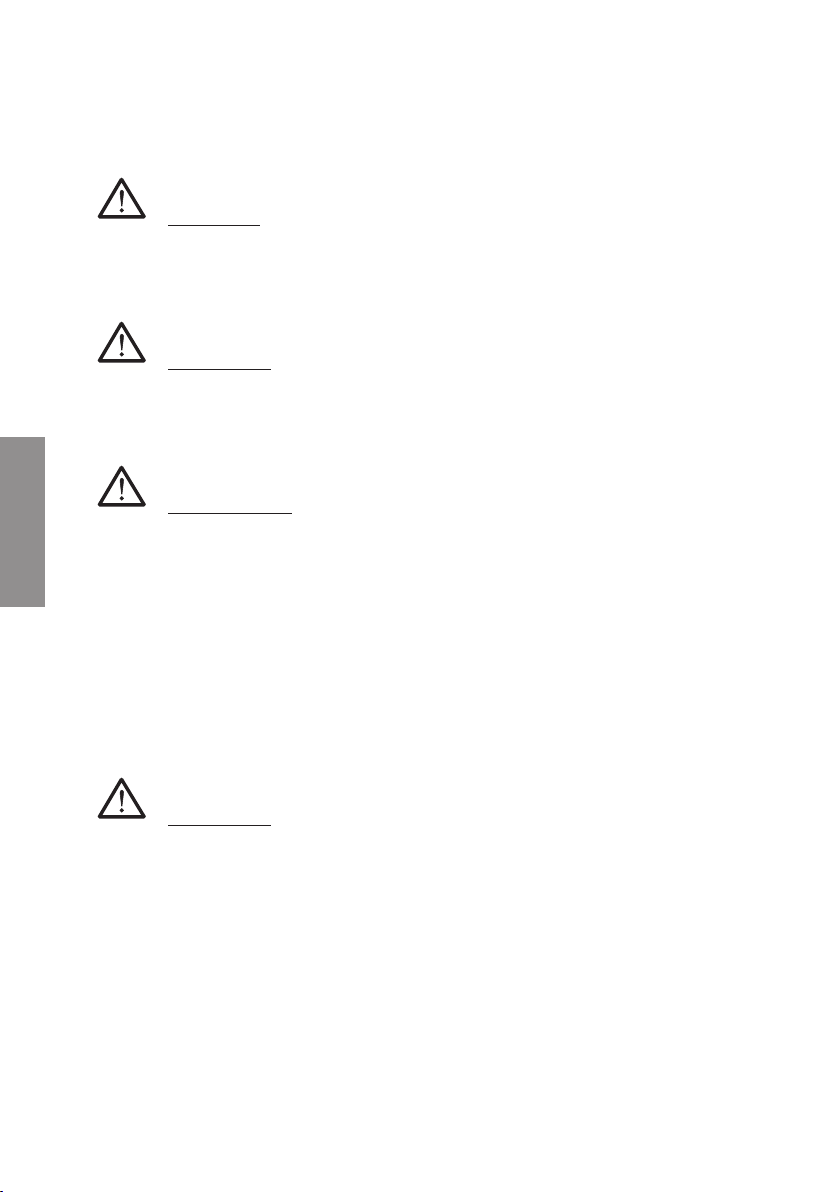
Verletzungsgefahr!
Achten Sie darauf, dass Sie nicht in den Rotations bereich des Schälgerätes FWSG RA kommen.
Deutsch

6
2409/3 . X.10 . Stand: 04.10.2010
• Montieren Sie am Akkuschrauber einen Sechskant Bit SW6.
• Stecken Sie den Sechskant Bit SW6 in die Aufnahme am Knauf (1).
• Starten Sie den Akkuschrauber und drücken Sie den Akkuschrauber beim Schälen axial gegen den zu schälende Rohrstutzen.
• Achten Sie darauf, dass die max. zulässige Drehzahl von 200 U/min
nicht überschritten wird.
• Schälen Sie, bis die zuvor markierte Rohroberfläche komplett
bearbeitet ist.
• Der Span ist von Hand zu entfernen, wenn der Akkuschrauber ausgeschaltet ist.
6. Demontage des Schälgerätes
• Zur Demontage des Schälgerätes FWSG RA ist der Messerhalter (3)
zu arretieren.
• Betätigen Sie hierzu den Messerhalter (3) und drehen Sie die
Arretierung (2), wie zuvor beschrieben.
• Ziehen Sie das Schälgerät FWSG RA vom Rohrstutzen.
7. Überprüfung des Schälergebnisses
Überprüfen Sie das Schälergebnis. Es muss ein lückenloser Span abtrag erfolgt sein und die zuvor mit dem FRIALEN-Marker aufgebrachten Markierungen müssen vollständig entfernt sein.
Kontrollieren Sie bei Ringbund-Rohren das Schälergebnis im Hinblick
auf die Spandicke und auf dem Rohr verbliebene Markierungen
besonders aufmerksam.
Das Schälmesser ist auf eine Spandicke von 0,15 - 0,25 mm eingestellt. Für die Verarbeitung von FRIALEN Sicherheitsfittings beträgt die
Verschleißgrenze max. 0,3 mm und darf nicht überschritten werden.
Beachten Sie ggf. abweichende Anforderungen anderer FormstückHersteller!
Eine Abnutzung des Schälmessers kann zu einer unzulässigen Vergrößerung der Spandicke führen. Diese Abnutzung entsteht durch vielfachen Gebrauch und äußere Einflüsse (Sand, Erde usw.) Kontrollieren
Sie daher die Spandicke regelmäßig - z.B. mit einem Messschieber.
Schälmesser sind Verschleißteile und müssen ggf. gewechselt werden
(siehe Kap. 8)
Deutsch

7
2409/3 . X.10 . Stand: 04.10.2010
ACHTUNG!
Eine lückenhafte Schälung oder abweichende Spandicke kann zu
einer undichten Schweißverbindung führen!
8. Schneide wechseln
Das Schälmesser Ihres Schälgerätes FWSG RA ist entsprechend
dem Gerätetyp an einer der Stirnseiten mit 32/40 oder 50/63
gekennzeichnet. Es besitzt zwei Schneiden. Bei der Auslieferung ist
das Schälmesser standardmäßig so eingebaut, dass die Dimensionsangabe zu sehen ist. Wenn Sie keine Kennzeichnung sehen, ist bereits
die zweite Schneide im Einsatz. Ist diese Schneide verschlissen, muss
ein neues Schälmesser eingesetzt werden.
Setzen Sie ein neues Schälmesser stets so ein, dass die Dimensionsangabe lesbar ist.
GEFAHR!
Verletzungsgefahr am Schälmesser.
• Senkschraube mit Schraubendreher TorxPlus-System IP15 lösen.
• Schälmesser 180º im Uhrzeigersinn drehen.
• Senkschraube mit Schraubendreher TorxPlus-System IP15 befesti-
gen. Maximales Drehmoment: 3 Nm.
ACHTUNG!
Beim Austausch des Schälmessers darauf achten, dass aus schließ lich ein Ersatzmesser gemäß nachfolgender Tabelle eingesetzt wird.
Ersatzschälmesser-Set Bestellnummer
FWSGE 10 für FWSG RA 32 und 40 613329
FWSGE 11 für FWSG RA 50 und 63 613330
Deutsch

8
2409/3 . X.10 . Stand: 04.10.2010
Deutsch
9. Pflege- und Wartungshinweise
WICHTIG!
Ihr Schälgerät FWSG RA ist ein Präzisionswerkzeug. Beachten Sie
deshalb die Pflege- und Wartungshinweise. Alle Bauteile sind
regelmäßig von Schmutz und Belag zu reinigen.
Das Schälgerät FWSG RA muss sauber und trocken gehalten werden. Nach dem Gebrauch ist es stets in der trockenen Transportbox
aufzubewahren.
WICHTIG!
Ihre Kosten!
Ein sorgsamer Umgang mit den Geräten verhindert unnötige Reparaturen und Ausfallzeiten. Eine regelmäßige, jährliche Überprüfung auf
Funktionssicherheit, durch den Service der FRIATEC AG, wird empfohlen.
10. Gewährleistung
Die Gewährleistung beträgt 12 Monate.
Hiervon ausgenommen sind Schälmesser und Teile, die durch viel fachen Gebrauch und äußere Einflüsse (Sand, Erde usw.) vorzeitig verschleißen.
Gewährleistungs- und Haftungsansprüche bei Personen- und Sachschäden sind ausgeschlossen, wenn sie auf eine oder mehrere folgender Ursachen zurückzuführen sind:
• nicht bestimmungsgemäße Verwendung des Gerätes,
• bauliche, von FRIATEC AG gem. Ziff. 2.3 nicht genehmigte Verän-
derungen des Gerätes,
• unsachgemäße Handhabung und unsachgemäßer Transport des
Gerätes,
• unsachgemäß ausgeführte Wartungs- und Reparaturarbeiten,
• nichtbeachten von Hinweisen dieser Bedienungsanleitung und/oder
• Einsatz von verschlissenen Funktionsteilen bzw. eines beschädig-
ten Gerätes.

9
2409/3 . X.10 . Stand: 04.10.2010
Deutsch
11. Aktualisierung dieser Bedienungsanleitung
Diese technischen Aussagen werden im Hinblick auf ihre Aktualität
regelmäßig geprüft. Das Datum der letzten Revision ist auf dem Dokument angegeben. Im Internet gelangen Sie über www.friatools.de in
den Produktbereich „FRIATOOLS
®
-Gerätetechnik“. Weiter geht es in
der Navigationsleiste zum Untermenü „Downloads“. Hier stehen Ihnen
unsere Bedienungsanleitungen als pdf zur Verfügung. Gerne senden
wir Ihnen diese auch zu.
FRIATEC Aktiengesellschaft
Division Technische Kunststoffe
Postfach 71 02 61 · 68222 Mannheim
Telefon (06 21) 4 86-15 33
Telefax (06 21) 4 86-20 30
www.friatools.de
info-friatools@friatec.de

10
2409/3 . X.10 . Stand: 04.10.2010

11
2409/3 . X.10 . Update: 04.10.2010
FRIATOOLS
®
Operating instructions
Scraper Tool FWSG RA 32/40/50/63
Contents
1. Preliminary notes 12
1.1 Safety notes and hints 12
1.2 Designated use 12
2. Safety 13
2.1 Functional safety 13
2.2 Obligations of the operator 13
2.3 Structural changes of the tool 13
3. Preparation of scraping 14
4. Assembly of the scraper tool 14
5. Scraping of pipe surface 15
5.1 Manual scraping 15
5.2 Scraping with crank handle (accessory) 15
5.3 Scraping with cordless screwdriver 15
6. Disassembly of the scraper tool 16
7. Inspection of the scraping result 16
8. Replacement of blade 17
9. Notes on care and maintenance 18
10. Warranty 18
11. Updating of operating instructions 19
English
Detent (2)
Blade holder (3)
Knob with internal hexagon (1)
Blade (4)
Base body (7) Threaded spindle (6) Mandrel (5)
12
2409/3 . X.10 . Update: 04.10.2010
1. Preliminary notes
1.1 Safety notes and hints
In these operating instructions, the following symbols with warnings
are used:
DANGER!
Characterises a threatening danger!
There is danger of serious health damages and damages to property
if these notes are disregarded.
WARNING!
Characterises a hazardous situation!
There is danger of minor injuries or damages to property if these notes
are disregarded.
IMPORTANT!
Characterises application hints and other useful information!
1.2 Designated use
The scraper tools FWSG RA 32/40/50/63 serve to remove the oxide
layer for preparing an electrofusion. They are optimally suited to scrape the outlets of FRIALEN component parts and safety fittings as well
as pipe ends. Pipes made of PE80, PE100 and PE-Xa SDR 11 can be
scraped. The scraper tools FWSG RA are precision tools. Their useful
life depends on the frequency of usage and outside influences during
usage and/or storage respectively transport.
WARNING!
Before any fusion, a scraping has to be performed in any case
because leaking fusion joints may result if the oxide layer is not
removed completely.
English

13
2409/3 . X.10 . Update: 04.10.2010
IMPORTANT!
Please observe the relevant assembly instructions before pro cessing and preparing an electrofusion
• the FRIALEN®Safety Fittings
• the FRIALEN®Saddle Components and
• the FRIALEN®Geo product range
the fusion processes.
2. Safety
2.1 Functional safety
The scraper tool FWSG RA is subject to the quality management
according to DIN EN ISO 9001:2000 and is checked for its functional
safety before any delivery.
2.2 Obligations of the operator
All persons involved in commissioning, operation, maintenance and
repair of the scraper tool must:
• be correspondingly qualified and
• strictly observe these operating instructions.
The operating instructions must always be kept at the place of use of
the tool (transport box recommended) and must be ready any time for
the operator.
When using a cordless screwdriver the assembly instruction of the
manufacturer must be adhered to.
The designated use of the scraper tool also includes observation of
the following guidelines, in particular when processing the electro fusion as well as working on gas pipelines:
• the DVGW standards,
• the DVS standards,
• the accident prevention regulations (especially BGR 500) and/or
• the relevant applicable country specific regulations.
2.3 Structural changes of the tool
No modifications, attachments or alterations in the tool may be performed without approval by FRIATEC AG.
English

3. Preparation of scraping
WARNING!
Bundled coil pipes must be re-straightened within the working
area of the scraping tool be fore scraping.
• Remove all dirt such as sand and soil from the pipe surface (e.g.
using a clean, greaseless cloth).
IMPORTANT!
If the pipe surface to be scraped has not been cleaned the blade
will wear out early.
•
If a fitting has to be fused, mark the insertion depth on the pipe end
with a FRIALEN marker pen.
• Mark the area to be scraped with a FRIALEN marker pen using wavy
lines. In case of bundled coil pipes particularly the inside curve has
to be marked (this is for you to determine whether pipe has been
scraped completely)
4. Assembly of the scraper tool
• Before the assembly of the scraper tool FWSG RA the blade
holder (3) hast to be arrested.
• Hold the scraper tool FWSG RA in the hand and press the blade
holder (3) with the thumb in direction of the base body (7).
• The blade holder (3) is lifted from the mandrel (5).
• Rotate the detent (2), e.g. by a rotational movement of the wrist.
• Position the blade above the collar of the
mandrel (5); eventually rotate the mandrel (5) in
this position.
• Insert the mandrel (5) into the pipe end to be
scraped, that the scraping tool FWSG RA has
secure grip.
• Align the blade such that the edge is po si tioned above the pipe end.
• Press the blade holder (3) and relaese the detent (2), as previously
described.
14
2409/3 . X.10 . Update: 04.10.2010
English

5. Scraping of pipe surface
5.1 Manual scraping
• Hold the scraper tool FWSG RA at the base body (7) and turn the
tool clockwise around the pipe end.
• Press the scraper tool FWSG RA axially against the pipe end to be
scraped.
• Scrape until the pre-marked surface of the pipe end is com plete ly
scraped.
• The swarf is to be removed manually.
5.2 Scraping with crank handle (accessory)
• Insert the external hexagon bolt of the crank
handle into the adapter at the knob (1).
• Turn the scraper tool FWSG RA evenly clockwise around the pipe.
•
Press the scraper tool FWSG RA axially
against the
pipe end to be scraped.
• Scrape until the pre-marked surface of the
pipe end is completely scraped.
• The swarf is to be removed manually.
5.3 Scraping with cordless screwdriver
Cordless screwdrivers with the following features may be used exclusively:
• Maximum number of revolutions per minute:
200 rpm
• Maximum torque: 4 Nm.
• The impact-screw function must be deacti vated.
WARNING!
Drilling machines may not be used!
Too many rotations per minute can lead to an inadequate scraping
result!
Danger of injury!
Ensure not to contact the rotation area of the FWSG RA.
15
2409/3 . X.10 . Update: 04.10.2010
English

• Fix a hexagonal bit SW6 at the cordless screwdriver.
• Insert the hexagonal bit SW6 into the adapter at the knob (1).
• While scraping, press the cordless screwdriver axially against the
pipe end to be scraped.
• Ensure that the maximum permissible number of rotations per
minute of 200 rpm is not exceeded.
• Scrape until the pre-marked surface of the pipe end is com plete ly
scraped.
• The swarf is to be removed manually after the cordless screwdriver
was switched off.
6. Disassembly of the scraper tool
• For disassembling of the scraping tool FWSG RA the blade holder
(3) has to be arrested.
• Press the blade holder (3) and rotate the detent (2), as previously
described.
• Remove the scraper tool FWSG RA from the pipe end.
7. Inspection of the scraping result
Inspect the scraping result, i.e. the swarf must be completely removed
and the markings applied before with the FRIALEN marker may no
longer be visible.
For bundled coil pipes control the scraping result with regard to the
swarf thickness or remained marks on the pipe very carefully.
The blade is adjusted for a swarf strength of 0,15 – 0,25mm. For the
scraping of FRIALEN safety fittings the wear limit is max. 0,3mm and
must not be exceeded. Please note differing requirements of other
fitting manufacturers.
An abrasion of the blade can enlarge the swarf thickness inadmissibly.
This abrasion occurs because of multiple usage and outside in flu ences (sand, soil etc.). Therefore the strength of the swarf must be
meas ured regularly - e.g. with a calliper gauge.
WARNING!
An incomplete scraping or a differing swarf thickness may result
in a leaking fusion joint.
16
2409/3 . X.10 . Update: 04.10.2010
English

8. Replacement of blade
The blade of your scraper tool FWSG RA is characterized according
to the type of tool to one of the front sides with 32/40 or 50/63. It
has two cutting edges. At delivery the blade is installed by default that
you can see the dimension. If no identification is visible, the second
cutting edge is already in use. Is this cutting edge worn, a new blade
must be used.
Insert a new blade always a way that the dimension is legible.
DANGER!
Risk of injury at the blade.
• Loosen the countersunk screw with a TorxPlus IP15 wrench.
• Turn the blade 180° clockwise.
• Fasten the countersunk screw with a TorxPlus IP15 wrench. Maximum torque: 3 Nm.
IMPORTANT!
Please note when replacing the blade that only a replacement
blade according to following table is used.
Replacement Blade Set Order No.
FWSGE 10 for FWSG RA 32 and 40 613329
FWSGE 11 for FWSG RA 50 and 63 613330
17
2409/3 . X.10 . Update: 04.10.2010
English

9. Notes on care and maintenance
IMPORTANT!
Your scraper tool FWSG RA is a precision tool. Please thus observe the notes on care and maintenance. All component parts are to
be regularly cleaned of dirt and deposits.
The scraper tool FWSG RA must be kept clean and dry. After use, the
tool is always to be stored in the dry transport box.
IMPORTANT!
YOUR EXPENSE!
Careful handling of the equipment will prevent unnecessary repairs
and downtimes. Regular annual safety checks by FRIATEC AG are
recommended.
10. Warranty
The warranty is granted for 12 months.
This does not include the blades and parts which prematurely wear
because of multiple use and external influences (sand, soil etc.).
Warranty and liability claims in the event of injuries to persons and
damages to property shall be excluded if they are the result of one or
several of the following causes:
• use of the tool not according to its intended use,
• structural modifications in the tool not approved by FRIATEC AG
accord. to item 2.3.,
• improper handling and improper transport of the tool,
• improperly performed maintenance and repair work,
• non-observance of notes in these operating instructions and/or
• use of worn functional parts or of a damaged tool.
18
2409/3 . X.10 . Update: 04.10.2010
English

19
2409/3 . X.10 . Update: 04.10.2010
11. Updating of operating instructions
These technical statements are checked regularly in terms of up-to
dateness. The date of the recent revision is specified on the document. On the internet, the direct link to FRIATOOLS®-Technical equipment is www.friatools.com, where you find the navigation bar with the
option “Downloads”. Here our operating instructions are available as
latest issue for you as a pdf-file. We also would be pleased to send
them to you.

20
2409/3 . X.10 . Update: 04.10.2010
FRIATEC Aktiengesellschaft
Technical Plastics Division
P.O.B. 71 02 61 · D-68222 Mannheim
Telephone +49 621 486-1533
Telefax +49 621 486-2030
www.friatools.com
info-friatools@friatec.de
 Loading...