

Kurzanleitung
FRIAMAT® Barcodescanner
®
FRIATOOLS
Deutsch
Inhaltsverzeichnis Seite
1. Verwendungszweck
2. Installation
3. Bedienung
4. Technische Daten
5. Gewährleistung
6. Aktualisierung dieser Bedienungsanleitung
2
2
3
3
4
4
2439· XII.09 · Update: 04.12.2009
1. Verwendungszweck
Der FRIAMAT Barcodescanner ist für den rauen Baustelleneinsatz konzipiert
und dient ausschließlich zum Einlesen von Strichcodes Code 2/5 interleaved
(überlappt) und Code 128. Der FRIAMAT Barcodescanner darf nur an
FRIAMAT Schweißgeräten betrieben werden.
ACHTUNG!
Beachten Sie auch die Bedienungsanleitung Ihres FRIAMAT Schweißge-
räts.
2. Installation
Deutsch
ACHTUNG!
Das FRIAMAT Schweißgerät muss ausgeschaltet sein, bevor der
FRIAMAT Barcodescanner installiert werden kann.
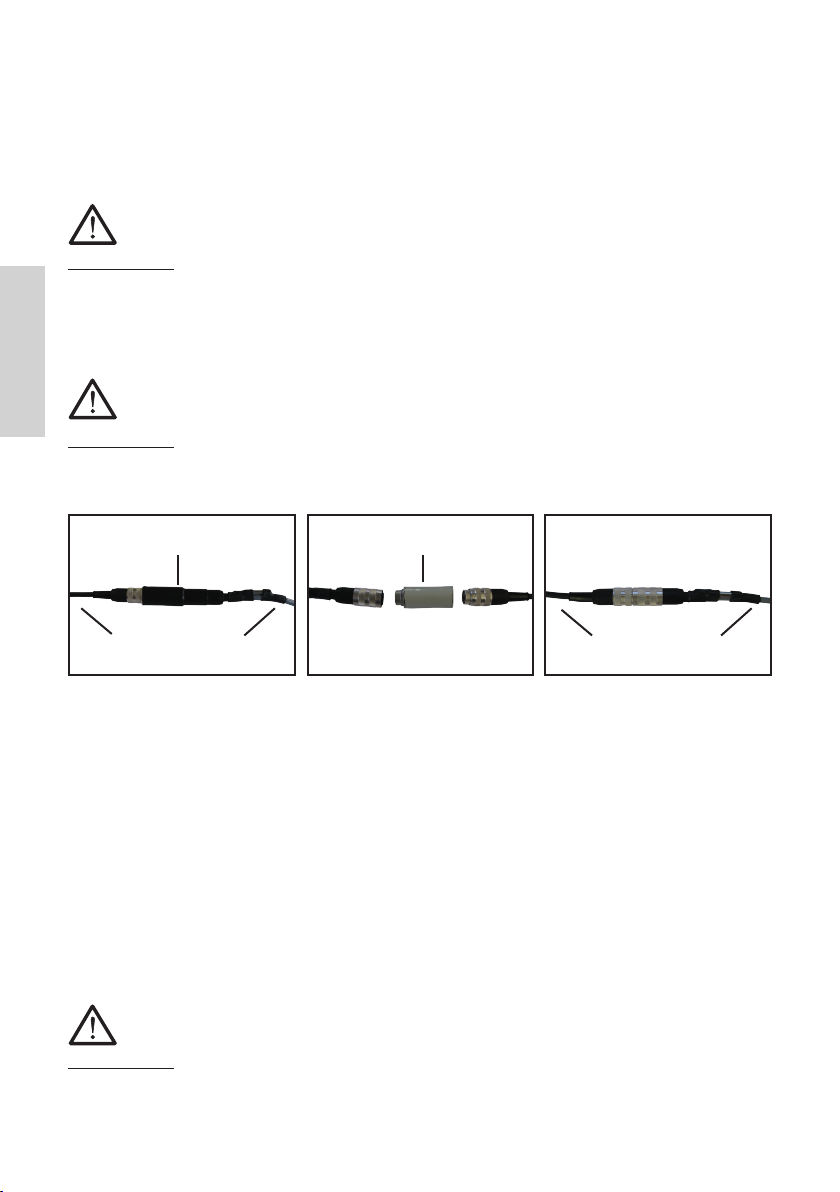
Schrumpfschlauch
Lesestift
Lesestiftadapter
ScannerFRIAMAT FRIAMAT
Abb.1 Abb.3Abb.2
Die Lesestifttasche an den Druckknöpfen öffnen und vom Kabel entfernen.
Anschließend die Scannertasche befestigen. Nach dem vorsichtigen Entfernen
des Schrumpfschlauchs (Abb. 1), welcher den Lesestiftadapter und die beiden
Steckerkupplungen (Lesestiftleitung und FRIAMAT Datenleitung) xiert, ist der
Lesestiftadapter durch Drehen gegen den Uhrzeigersinn von den Steckerkupplungen abzuschrauben (Abb. 2).
Den Stecker des FRIAMAT Barcodescanners direkt (ohne Lesestiftadapter) an
der Steckerkupplung der FRIAMAT Datenleitung anschließen (Abb. 3), indem
Sie die Verbindung ohne Werkzeug „handfest“ anziehen. Die Scannertasche
an den Druckknöpfen schließen.
ACHTUNG!
Der FRIAMAT Barcodescanner darf nicht mit Lesestiftadapter betrieben
werden.
2
2439· XII.09 · Update: 04.12.2009
Nach Einschalten des FRIAMAT Schweißgeräts ertönt das Einschaltsignal des
FRIAMAT Barcodescanners (vier kurze Signaltöne in schneller Folge). Anschließend, nach wenigen Sekunden, ertönt vom FRIAMAT Schweißgerät ein
kurzes Bestätigungssignal. Nach dem folgenden Einschaltsignal des FRIAMAT
Barcodescanners ist dieser betriebsbereit.
3. Bedienung
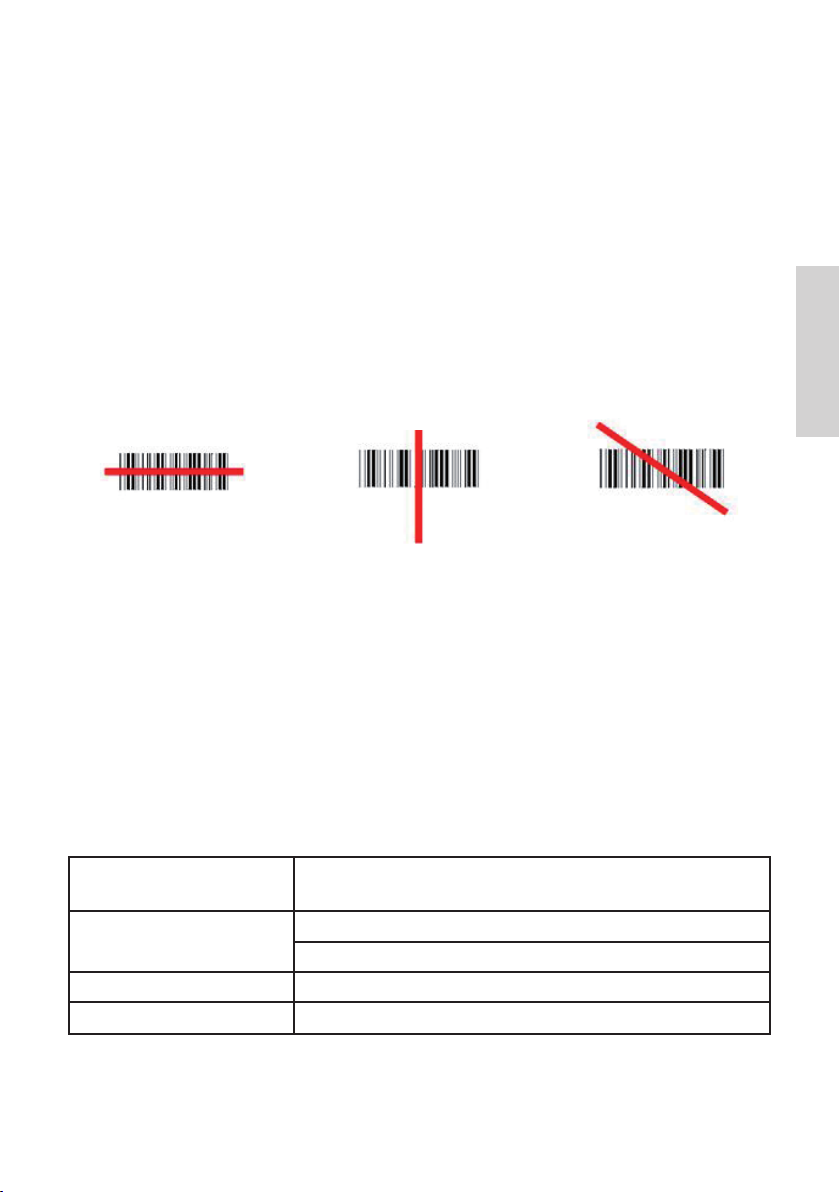
Der FRIAMAT Barcodescanner liest die Barcodes berührungslos ein. Es
genügt, auf den Barcode zu zielen und den Einleseknopf zu drücken. Der
Barcode wird mittels eines roten Lichtbandes erfasst, welches den gesamten
Barcode möglichst in der Mitte durchqueren muss. Der Barcode wird nicht
eingelesen, wenn das rote Lichtband davon abweichend auf den Barcode trifft.
Gutes Einlesen
Optimale Einleseergebnisse werden erzielt, wenn der FRIAMAT Barcodescanner in einem geringen Abstand über dem Barcode positioniert wird. Bei
schlecht gedruckten oder leicht beschädigten Barcodes kann es hilfreich sein,
den FRIAMAT Barcodescanner direkt auf den Barcode zu positionieren um
dann - mit gedrücktem Einleseknopf - vom Barcode wegzuführen. Das erfolgreiche Einlesen des Strichcodes wird durch das Ertönen eines Signaltons
und das Aueuchten eines grünen Signallichts in der Mitte des eingelesenen
Barcodes signalisiert.
Schlechtes Einlesen
Schlechtes Einlesen
Deutsch
4. Technische Daten
Kompatibilität FRIAMAT prime, FRIAMAT basic, FRIAMAT prime
eco, FRIAMAT basic eco, FRIAMAT geo print
Temperaturbereich
Gewicht ca. 390 g
Schutzart IP 65
Arbeitstemperatur: -20° C bis +50° C
Lagertemperatur: -20° C bis +70° C
3
2439· XII.09 · Update: 04.12.2009

ACHTUNG!
Das Lesefenster des FRIAMAT Barcodescanners ist vor Verschmutzung
und Zerkratzen zu schützen. Der Zustand des Lesefensters hat einen
direkten Einuss auf die Einlesegüte des FRIAMAT Barcodescanners.
5. Gewährleistung
Die Gewährleistung beträgt 12 Monate. Hiervon ausgenommen sind Verschleißteile, wie z.B. das Lesefenster.
6. Aktualisierung dieser Bedienungsanleitung
Deutsch
Diese technischen Aussagen werden im Hinblick auf ihre Aktualität regelmäßig
geprüft. Das Datum der letzten Revision ist auf dem Dokument angegeben. Im
Internet gelangen Sie über www.friatools.de in den Produktbereich
„FRIATOOLS-Gerätetechnik“. Weiter geht es in der Navigationsleiste zum
Untermenü „Downloads“. Hier stehen Ihnen unsere Bedienungsanleitungen als
pdf-Dokumente zur Verfügung. Gerne senden wir Ihnen diese auch zu.
FRIATEC Aktiengesellschaft
Division Technische Kunststoffe
Postfach 71 02 61 · 68222 Mannheim
Telefon (0621) 486-1533
Telefax (0621) 486-2030
www.friatools.de
info-friatools@friatec.de
4
2439· XII.09 · Update: 04.12.2009

Quick Reference Instructions
FRIAMAT® barcode scanner
®
FRIATOOLS
English
Table of contents Page
1. Designated use
2. Installation
3. Operation
4. Technical data
5. Warranty
6. Update of these operating instructions
6
6
7
7
8
8
5
2439· XII.09 · Update: 04.12.2009

1. Designated use
The FRIAMAT barcode scanner has been designed for the rough use on cons-
truction sites and serves exclusively for reading barcodes 2/5 interleaved and
Code 128. The FRIAMAT barcode scanner may be used on FRIAMAT fusion
units only.
WARNING!
Observe the operating instructions of your FRIAMAT fusion units.
2. Installation
English
WARNING!
The FRIAMAT fusion unit has to be switched off before installing
the FRIAMAT barcode scanner.
heat shrink tube
reader wand
reader wand adapter
scannerFRIAMAT FRIAMAT
Figure 1 Figure 3Figure 2
Open the reader wand bag at the pushbuttons. Remove the reader wand bag
und assemble the scanner bag. Carefully remove the heat shrink tube (gure 1)
from the reader wand adapter and the connectors. The reader wand adapter
has to be unscrewed from both connectors (reader wand cable and FRIAMAT
data cable) by turning counter-clockwise (gure 2).
Connect the FRIAMAT barcode scanner (without reader wand adapter) with
the connector of the FRIAMAT data cable (gure 3). Tighten the connection
“hand-tight” without tooling. Close the scanner bag at the pushbuttons.
WARNING!
Do not operate the FRIAMAT barcode scanner with reader wand adapter.
6
2439· XII.09 · Update: 04.12.2009

After switching on the FRIAMAT fusion unit the switch-on signal of the
FRIAMAT barcode scanner sounds (4 short signal tones in rapid succession),
followed by the verication tone of the FRIAMAT fusion unit. The switch-on
signal of the FRIAMAT barcode scanner indicates that the FRIAMAT barcode
scanner is ready to use.
3. Operation
FRIAMAT barcode scanner reads the barcodes contact-free. Position the
FRIAMAT barcode scanner over the barcode and push the reading button. The
barcode is recorded by a red light-band, which should be centred horizontally
over the complete barcode. The barcode will not be read if the red light-band
is in any other position.
Good Read Bad Read Bad Read
Optimal reading results can be realised when the FRIAMAT barcode scanner
is positioned in short distance above the barcode. In case of bad printed or
slightly damaged barcodes it can be helpful to position the FRIAMAT barcode
scanner close to the barcode and then – with pushed reading button – to lift
slowly from the barcode. A successful reading of the barcode is signalised
by sounding of a verication tone and lighting up of a green signal light in the
middle of the barcode.
English
4. Technical data
Compatibility FRIAMAT prime, FRIAMAT basic, FRIAMAT prime
eco, FRIAMAT basic eco, FRIAMAT geo print
Temperature range
Weight ca. 390 g
Sealant rating IP 65
Operating: -20° C to +50° C
Storage: -20° C to +70° C
7
2439· XII.09 · Update: 04.12.2009

WARNING!
The scan window of the FRIAMAT barcode scanner has to be protected
against pollution and scratching. The condition of the scan window has a
direct inuence on the reading quality of the FRIAMAT barcode scanner.
5. Warranty
The warranty is granted for 12 months. This does not include wear parts, for
example the scan window.
6. Update of these operating instructions
English
These technical statements are regularly checked for their up-todateness. The date of the last revision is stated on each page. For an
updated version of the operating instructions, please visit our website
www.friatools.com on the Internet. You will nd the “Download” page
on the navigation bar. This page contains our updated operating instructions as pdf documents. We would also be pleased to mail them to
you on request.
FRIATEC Aktiengesellschaft
Technical Plastics Division
P.O.Box 71 02 61 · D-68222 Mannheim
Phone: +49 621 486-1533
Fax: +49 621 486-2030
www.friatools.com
info-friatools@friatec.de
8
2439· XII.09 · Update: 04.12.2009
 Loading...