

Page 1

FREUND ELEKTRONIKA d.o.o International Burch University | Francuske revolucije bb | 71210 Ilidza | Bosnia and Hercegovina | www.ip-integra.ba |
[email protected] | Tel. +387 33 922 890
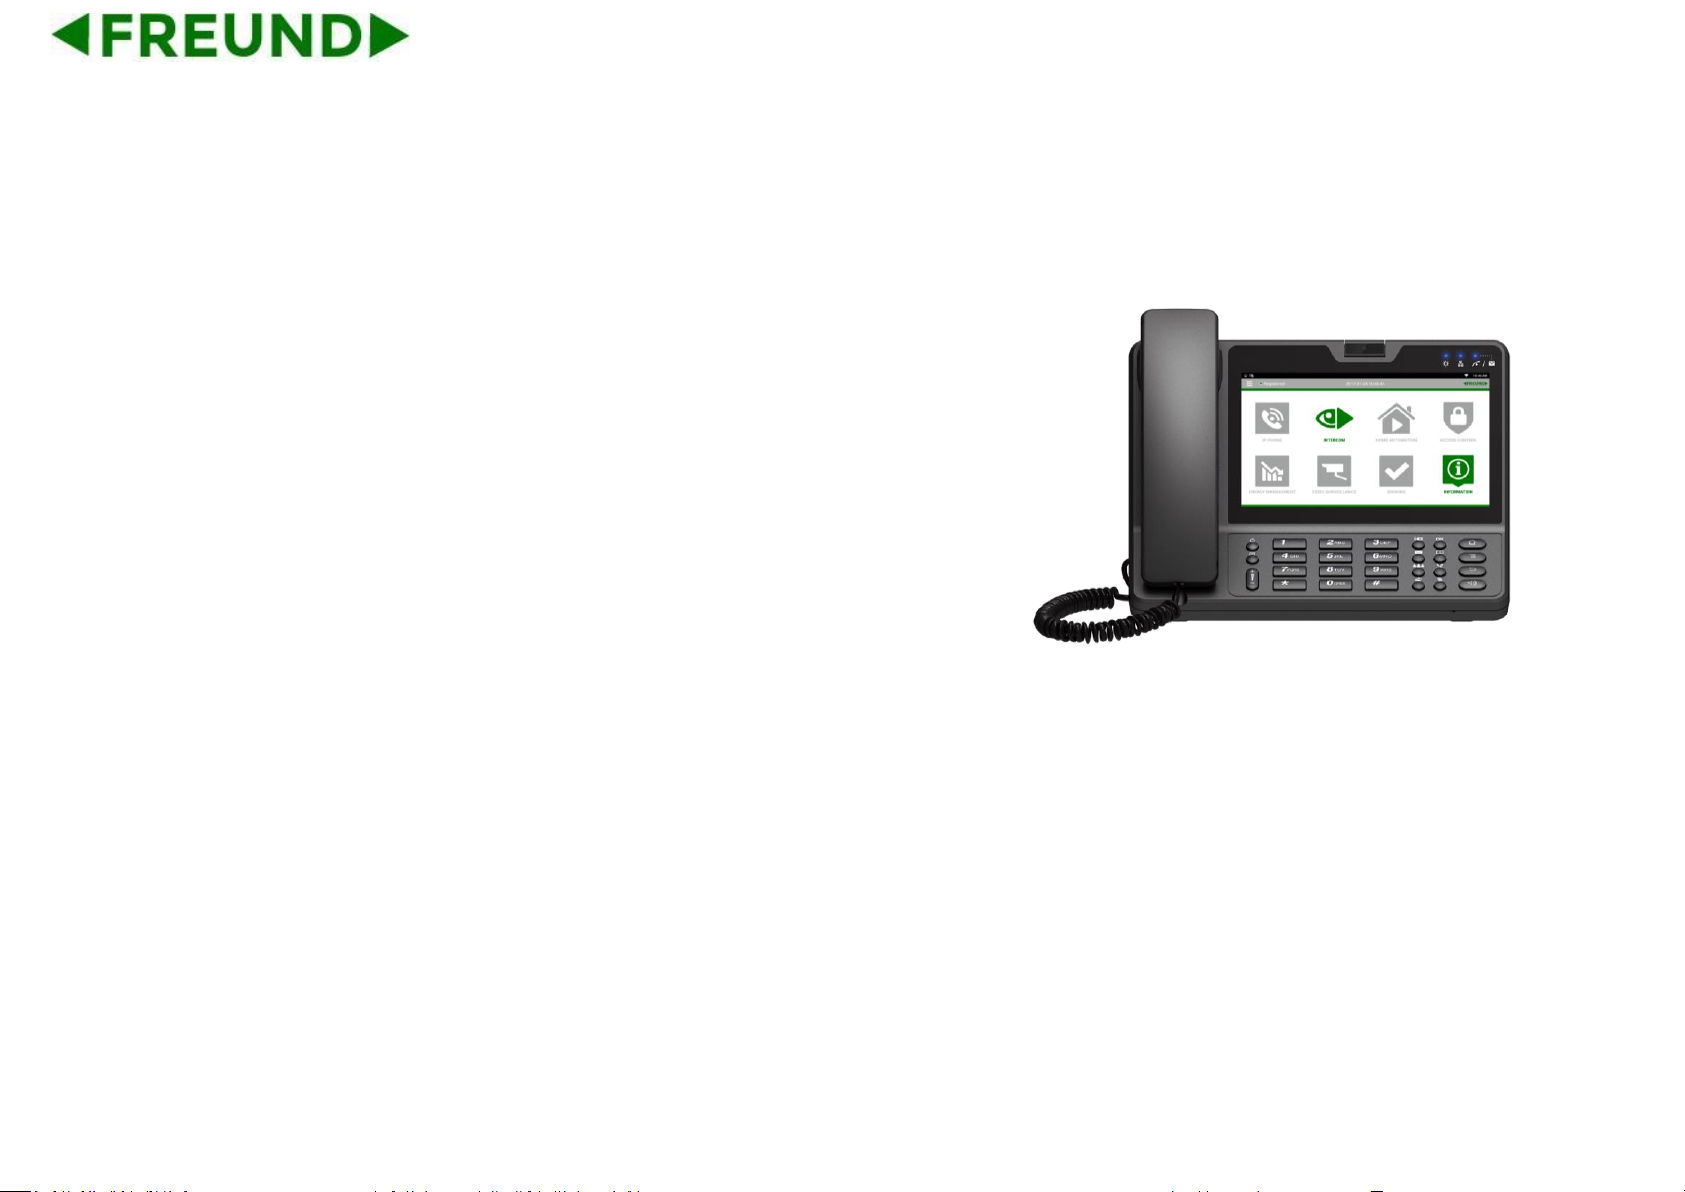
FE-TEL-48G Android Video Phone Admin Guide
Page 2

FREUND ELEKTRONIKA d.o.o International Burch University | Francuske revolucije bb | 71210 Ilidza | Bosnia and Hercegovina | www.ip-integra.ba |
[email protected] | Tel. +387 33 922 890
Content
1. Product Overview ........................................................................................................................................................................... 1
1.1. Instruction ............................................................................................................................................................................... 1
1.2. Equipment Appearance And Interface Description .................................................................................................................. 2
1.2.1. Interface Description ...................................................................................................................................................... 4
1.2.2. Keypad Description ........................................................................................................................................................ 5
1.3. Pendant(Optional) ................................................................................................................................................................... 7
1.4. Indicator .................................................................................................................................................................................. 7
1.4.1. Indicator of 48G ............................................................................................................................................................. 7
1.4.2. Indicator of Pendant ....................................................................................................................................................... 8
2. Installation .................................................................................................................................................................................... 10
2.1. Equipment Packaging ........................................................................................................................................................... 10
2.2. Connecting Video Phone ...................................................................................................................................................... 11
2.3. Installation Considerations .................................................................................................................................................... 13
3. Daily Use ....................................................................................................................................................................................... 14
3.1. Call ........................................................................................................................................................................................ 14
3.1.1. Make A Call .................................................................................................................................................................. 14
Page 3

FREUND ELEKTRONIKA d.o.o International Burch University | Francuske revolucije bb | 71210 Ilidza | Bosnia and Hercegovina | www.ip-integra.ba |
[email protected] | Tel. +387 33 922 890
3.1.2. Dial Out Directly ........................................................................................................................................................ 15
3.1.3. Dialing Out From Contact List ...................................................................................................................................... 16
3.1.4. Receive A Call .............................................................................................................................................................. 17
3.1.5. Call Options ................................................................................................................................................................. 18
3.1.6. Multiple Calls ............................................................................................................................................................... 20
4. Basic Setting ................................................................................................................................................................................ 21
4.1. Main Screen Instruction ........................................................................................................................................................ 21
4.2. Status And Notifications Instruction ....................................................................................................................................... 22
4.2.1. Using The Touchscreen ............................................................................................................................................... 24
4.2.2. Startup And Shutdown ................................................................................................................................................. 25
4.2.3. View / Turn Off Notifications ......................................................................................................................................... 26
4.3. Connecting To Network And Wi-Fi ......................................................................................................................................... 27
4.3.1. Configuring Static IP .................................................................................................................................................... 27
4.3.2. Configuring DHCP ....................................................................................................................................................... 29
4.3.3. Configuring Wi-Fi ......................................................................................................................................................... 30
4.4. SIP Account Configuration .................................................................................................................................................... 33
4.4.1. Add Account ................................................................................................................................................................. 34
Page 4

FREUND ELEKTRONIKA d.o.o International Burch University | Francuske revolucije bb | 71210 Ilidza | Bosnia and Hercegovina | www.ip-integra.ba |
[email protected] | Tel. +387 33 922 890
4.4.2. SIP Account ON/OFF ................................................................................................................................ ................... 35
4.4.3. Modify/Remove SIP Account ....................................................................................................................................... 36
4.5. Sound & notification .............................................................................................................................................................. 36
4.5.1. Volumes ....................................................................................................................................................................... 37
4.5.2. Interruptions ................................................................................................................................................................. 38
4.5.3. Phone ringtone ............................................................................................................................................................ 39
4.5.4. Default notification ringtone ......................................................................................................................................... 40
4.5.5. Other Sounds ............................................................................................................................................................... 40
4.6. Audio Settings ....................................................................................................................................................................... 41
4.7. Video Settings ....................................................................................................................................................................... 41
4.8. Call Settings .......................................................................................................................................................................... 42
4.8.1. Always forwarding & Forwarding Number .................................................................................................................... 42
4.8.2. Call forwarding busy & Forwarding Number ................................................................................................................ 42
4.8.3. No Answer Forwarding & Forwarding Number ............................................................................................................. 43
4.8.4. Time out ....................................................................................................................................................................... 44
4.8.5. Do Not Disturb ............................................................................................................................................................. 44
4.8.6. Call Waiting .................................................................................................................................................................. 45
Page 5

FREUND ELEKTRONIKA d.o.o International Burch University | Francuske revolucije bb | 71210 Ilidza | Bosnia and Hercegovina | www.ip-integra.ba |
[email protected] | Tel. +387 33 922 890
4.8.7. Playtone ....................................................................................................................................................................... 45
4.8.8. Intercom ....................................................................................................................................................................... 46
4.8.9. Hotline .......................................................................................................................................................................... 46
4.9. Dial Plan ................................................................................................................................................................................ 47
4.10. Auto Provision .................................................................................................................................................................. 48
4.11. Personalize.......................................................................................................................................................................... 48
4.11.1. Log Level ................................................................................................................................................................... 48
4.11.2. Hook Mode ................................................................................................................................................................. 48
4.12. Reboot Manager ................................................................................................................................................................. 49
4.12.1. Reboot time ............................................................................................................................................................... 49
4.12.2. Status of time ............................................................................................................................................................. 49
4.12.3. Status of active .......................................................................................................................................................... 49
4.12.4. Reboot settings .......................................................................................................................................................... 50
4.13. Date & Time ........................................................................................................................................................................ 50
4.14. Personalization Settings ...................................................................................................................................................... 53
4.14.1. Wallpaper ................................................................................................................................................................... 53
4.14.2. Widgets ...................................................................................................................................................................... 54
Page 6

FREUND ELEKTRONIKA d.o.o International Burch University | Francuske revolucije bb | 71210 Ilidza | Bosnia and Hercegovina | www.ip-integra.ba |
[email protected] | Tel. +387 33 922 890
4.14.3. Shortcuts .................................................................................................................................................................... 56
4.14.4. Ringtone .................................................................................................................................................................... 59
4.14.5. Backup & Reset ......................................................................................................................................................... 60
5. Function ........................................................................................................................................................................................ 61
5.1. Call Records ......................................................................................................................................................................... 61
5.1.1. View Call Records ................................................................................................................................................... 61
5.1.2. Call From Call Records ................................................................................................................................................ 62
5.2. Contacts ................................................................................................................................................................................ 64
5.2.1. Local Phone Book ........................................................................................................................................................ 65
5.2.2. Broadsoft Phone Book ................................................................................................................................................. 67
5.2.3. Remote Phone Book .................................................................................................................................................... 67
5.2.4. LDAP ........................................................................................................................................................................... 68
5.2.5. Group ................................................................................................ ................................................................ ........... 69
5.3. RF Number(Optional) ............................................................................................................................................................ 71
5.4. BLF ....................................................................................................................................................................................... 72
5.5. Intercom ................................................................................................................................................................................ 74
5.6. Call Return ............................................................................................................................................................................ 75
Page 7

FREUND ELEKTRONIKA d.o.o International Burch University | Francuske revolucije bb | 71210 Ilidza | Bosnia and Hercegovina | www.ip-integra.ba |
[email protected] | Tel. +387 33 922 890
5.7. BLFList .................................................................................................................................................................................. 76
5.8. Pickup & Group Pickup ......................................................................................................................................................... 76
5.9. ACD ...................................................................................................................................................................................... 77
5.10. Hot Desking ........................................................................................................................................................................ 78
5.11. Conference .......................................................................................................................................................................... 78
5.11.1. Create 3-way conference ........................................................................................................................................... 79
5.12. Transfer ............................................................................................................................................................................ 80
5.12.1. Blind Transfer ............................................................................................................................................................. 80
5.12.2. Attended Transfer ...................................................................................................................................................... 80
5.13. Keypad Input ....................................................................................................................................................................... 81
5.14. Webpage Browser ............................................................................................................................................................... 82
5.14.1. Open The Webpage ................................................................................................................................................... 82
5.14.2. Open The Webpage ................................................................................................................................................... 83
5.15. Camera ................................ ................................................................ ............................................................................... 84
5.15.1. Photograph Mode ...................................................................................................................................................... 84
5.16. Gallery ................................................................................................................................................................................. 87
5.16.1. View Photo & Picture & Video .................................................................................................................................... 87
Page 8

FREUND ELEKTRONIKA d.o.o International Burch University | Francuske revolucije bb | 71210 Ilidza | Bosnia and Hercegovina | www.ip-integra.ba |
[email protected] | Tel. +387 33 922 890
5.17. Bluetooth ............................................................................................................................................................................. 88
5.17.1. Turning Bluetooth On /Off ................................................................................................................................ .......... 89
5.17.2. Changing Bluetooth Device Name ............................................................................................................................. 90
5.17.3. Paring FE-TEL-48G With A Bluetooth Device ............................................................................................................ 91
5.17.4. Un-pairing A Bluetooth Device ................................................................................................................................... 92
5.18. USB ..................................................................................................................................................................................... 93
5.19. Calendar ............................................................................................................................................................................. 94
5.19.1. Add An Account ......................................................................................................................................................... 94
5.19.2. View Calendar............................................................................................................................................................ 95
5.19.3. New Activities ............................................................................................................................................................. 96
5.19.4. Edit Activities .............................................................................................................................................................. 96
5.19.5. Delete Activities ......................................................................................................................................................... 96
5.20. Clock ................................................................................................................................................................................... 97
5.20.1. Alarm ......................................................................................................................................................................... 97
5.20.2. Countdown Timer .................................................................................................................................................. 100
5.20.3. Stopwatch .............................................................................................................................................................. 101
5.21. Gmail ................................................................................................................................................................................. 102
Page 9

FREUND ELEKTRONIKA d.o.o International Burch University | Francuske revolucije bb | 71210 Ilidza | Bosnia and Hercegovina | www.ip-integra.ba |
[email protected] | Tel. +387 33 922 890
5.21.1. Add A New Gmail Account ....................................................................................................................................... 102
5.22. Music ................................................................................................................................................................................. 103
5.23. Explorer ............................................................................................................................................................................. 104
5.24. Video Player ...................................................................................................................................................................... 105
5.25. Others ................................................................................................................................................................ ............... 106
5.25.1. Apk Install ................................ ................................................................ ................................ ................................ 106
6. Software Upgrade ....................................................................................................................................................................... 107
6.1. Immediate Update ............................................................................................................................................................... 107
6.1.1. Select Other Upgrade Package ................................................................................................................................. 108
6.1.2. Local Update .............................................................................................................................................................. 109
6.1.3. Remote Update .......................................................................................................................................................... 110
6.2. Auto Update Period ............................................................................................................................................................. 111
6.3. Upgrade on the web ................................................................................................................................ ............................ 112
6.4. Check Update After System Power On ............................................................................................................................... 113
7. System Maintenance .................................................................................................................................................................. 114
7.1. System State Inspection ...................................................................................................................................................... 114
7.2. IP Query .............................................................................................................................................................................. 115
Page 10

FREUND ELEKTRONIKA d.o.o International Burch University | Francuske revolucije bb | 71210 Ilidza | Bosnia and Hercegovina | www.ip-integra.ba |
[email protected] | Tel. +387 33 922 890
7.3. SIP Account Registration Query .......................................................................................................................................... 116
7.4. Backup & Reset .................................................................................................................................................................. 117
7.5. Failure Process ................................................................................................................................................................... 117
8. Web Interface .............................................................................................................................................................................. 120
8.1. Web login ............................................................................................................................................................................ 120
8.2. Status->Basic ...................................................................................................................................................................... 121
8.3. Account->Basic ................................................................................................................................................................... 122
8.4. Account->Advanced ............................................................................................................................................................ 125
8.5. Network ->Basic .................................................................................................................................................................. 133
8.6. Network->Advance .............................................................................................................................................................. 133
8.7. Phone->Time ...................................................................................................................................................................... 134
8.8. Phone->Preference ............................................................................................................................................................. 135
8.9. Phone ->Call Feature .......................................................................................................................................................... 136
8.10. Phone->Audio ................................................................................................................................................................... 143
8.11. Phone->Video ................................................................................................................................................................... 145
8.12. Phone->Ext Key ................................................................................................................................................................ 147
8.13. Phone-> Tone .................................................................................................................................................................... 148
Page 11

FREUND ELEKTRONIKA d.o.o International Burch University | Francuske revolucije bb | 71210 Ilidza | Bosnia and Hercegovina | www.ip-integra.ba |
[email protected] | Tel. +387 33 922 890
8.14. Phone->Replace Rule ....................................................................................................................................................... 149
8.15. Phone->Dial Now .............................................................................................................................................................. 150
8.16. Phone->Action URL .......................................................................................................................................................... 151
8.17. Phone->Multicast .............................................................................................................................................................. 154
8.18. PhoneBook->Local Book .................................................................................................................................................. 155
8.19. PhoneBook->Remote Book............................................................................................................................................... 157
8.20. PhoneBook->Call Log ....................................................................................................................................................... 158
8.21. PhoneBook->LDAP ........................................................................................................................................................... 159
8.22. PhoneBook->Broadsoft ..................................................................................................................................................... 160
8.23. Upgrade->Basic ................................ ................................................................ ................................ ................................ 161
8.24. Upgrade->Advanced ......................................................................................................................................................... 162
8.25. Security->Basic ................................................................................................................................................................. 165
8.26. Security->Advanced .......................................................................................................................................................... 166
Page 12
1
1. Product Overview
1.1. Instruction
FE-TEL-48G is an Android-based multimedia terminal with a 7-inch
touch screen and a 1.3M CMOS sensor camera. It supports
H.264/H.263 codecs with adaptive bandwidth adjustment. The 7-inch
touch screen offers excellent user experiences such as high-quality
videophone, smooth internet surfing, various Android Apps and daily
information.
FE-TEL-48G provides 2 Ethernet ports, 1USB, 1HDMI, and one 3.5mm
headset/audio port.
Page 13
2
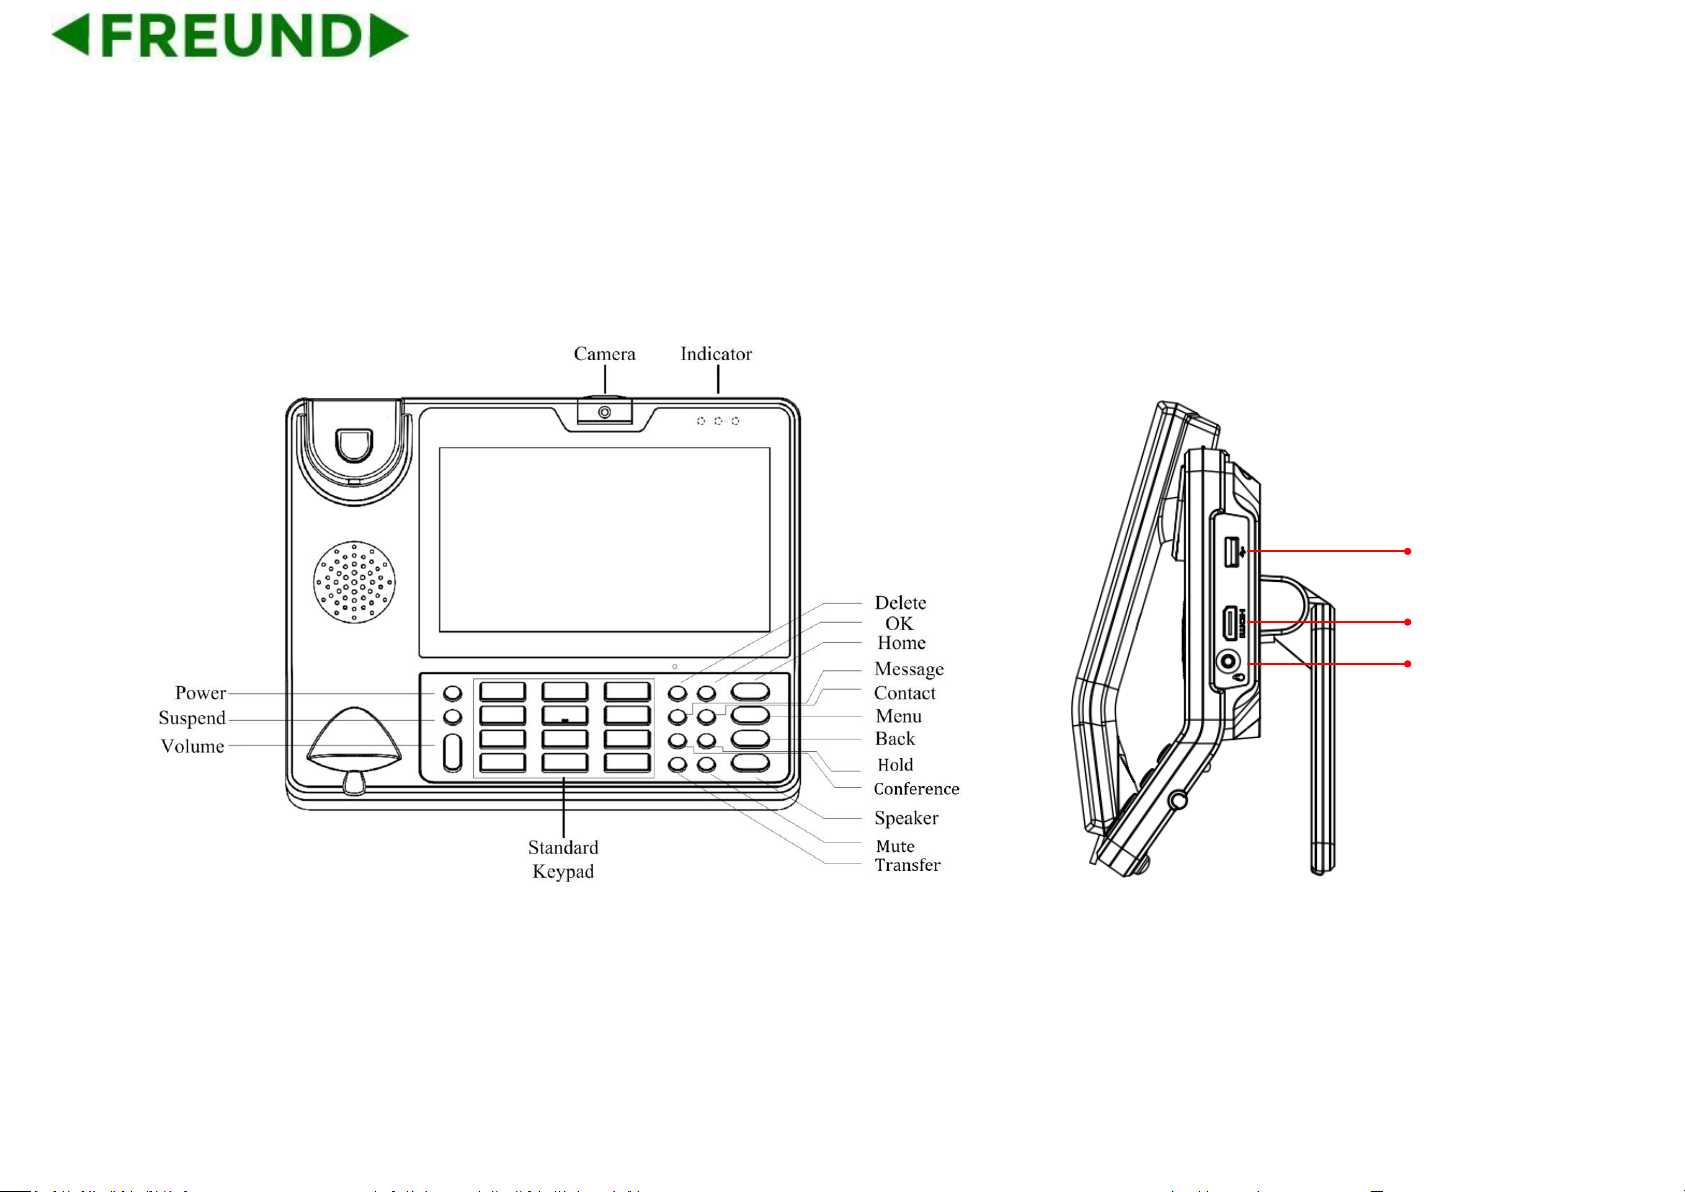
1.2. Equipment Appearance and Interface Description
USB
HDMI
Headset
Page 14
3
Page 15
4
1.2.1. Interface Description
Interface
Description
Camera
Adjustable camera shooting angle, rotate down the camera to "off" angle.
USB interface
External USB storage device
Headset
Connect to 3.5mm stereo headphone, headset device
HDMI
Use HDMI cable to output the video to a TV screen
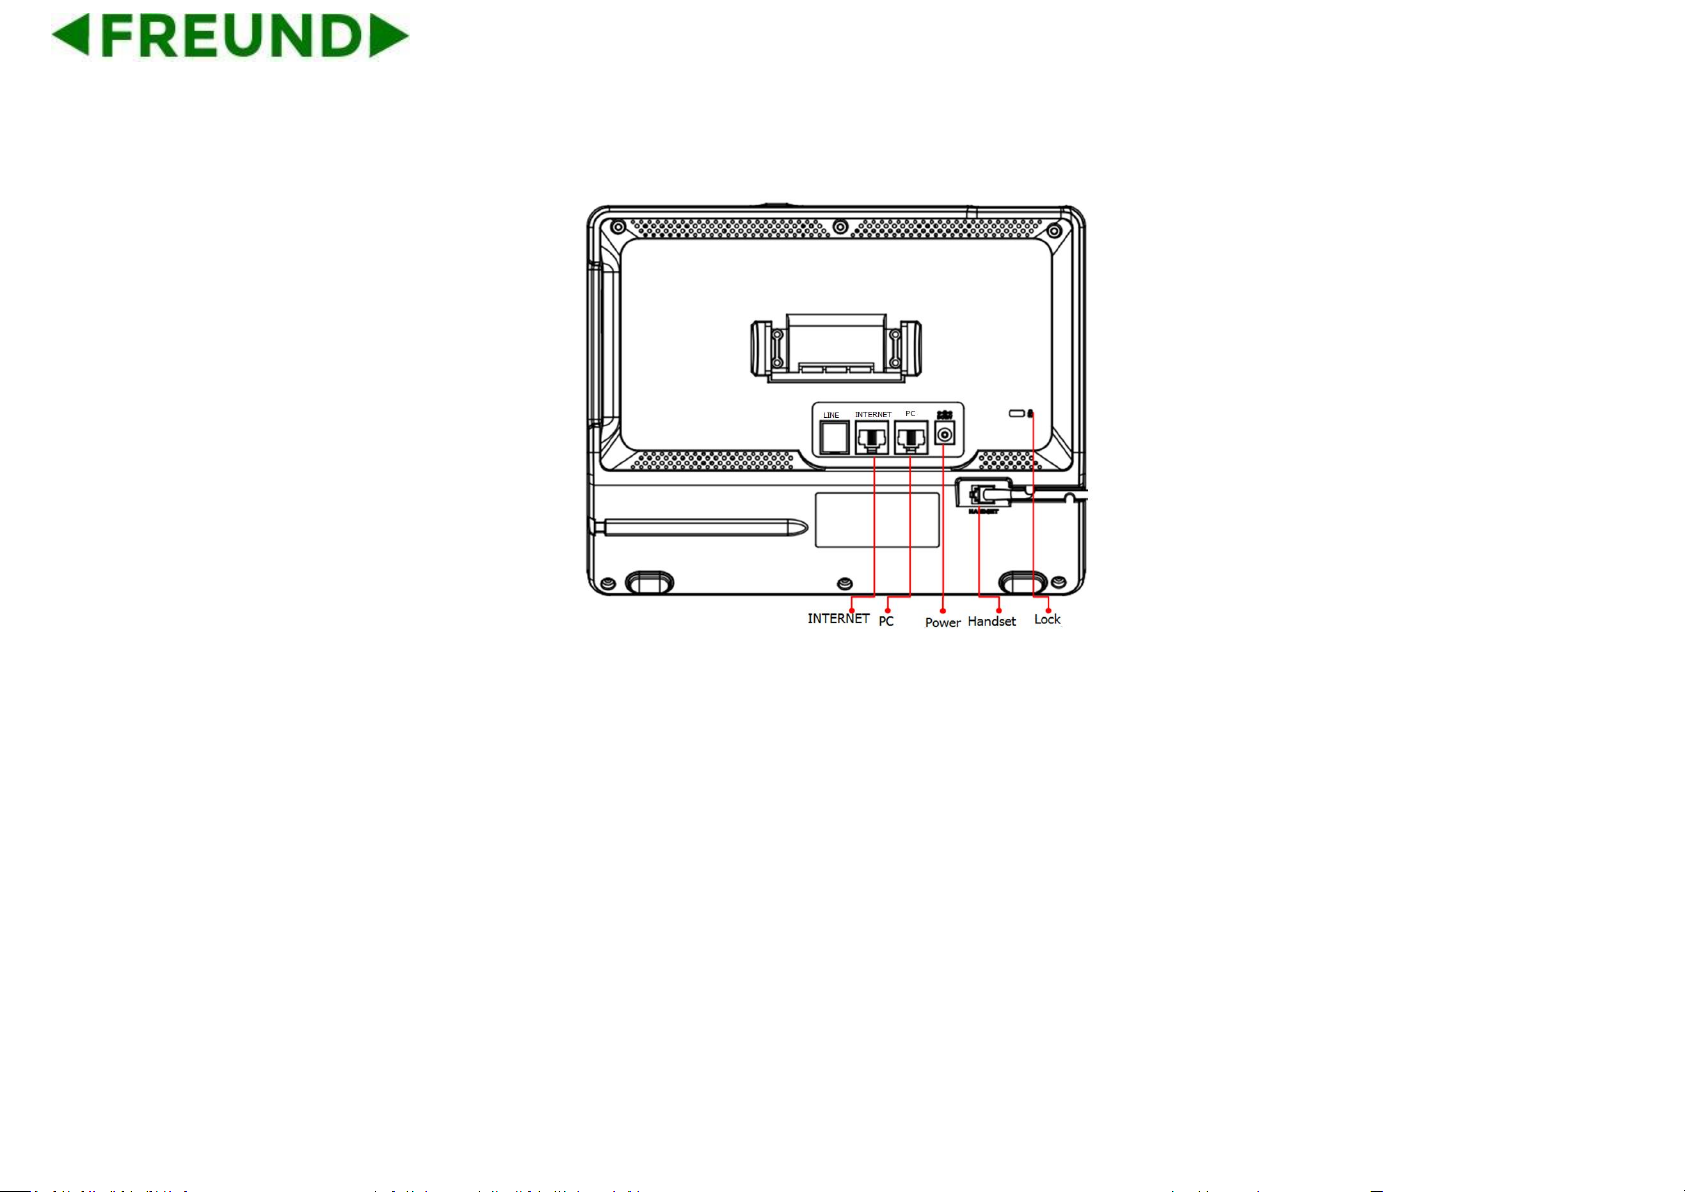
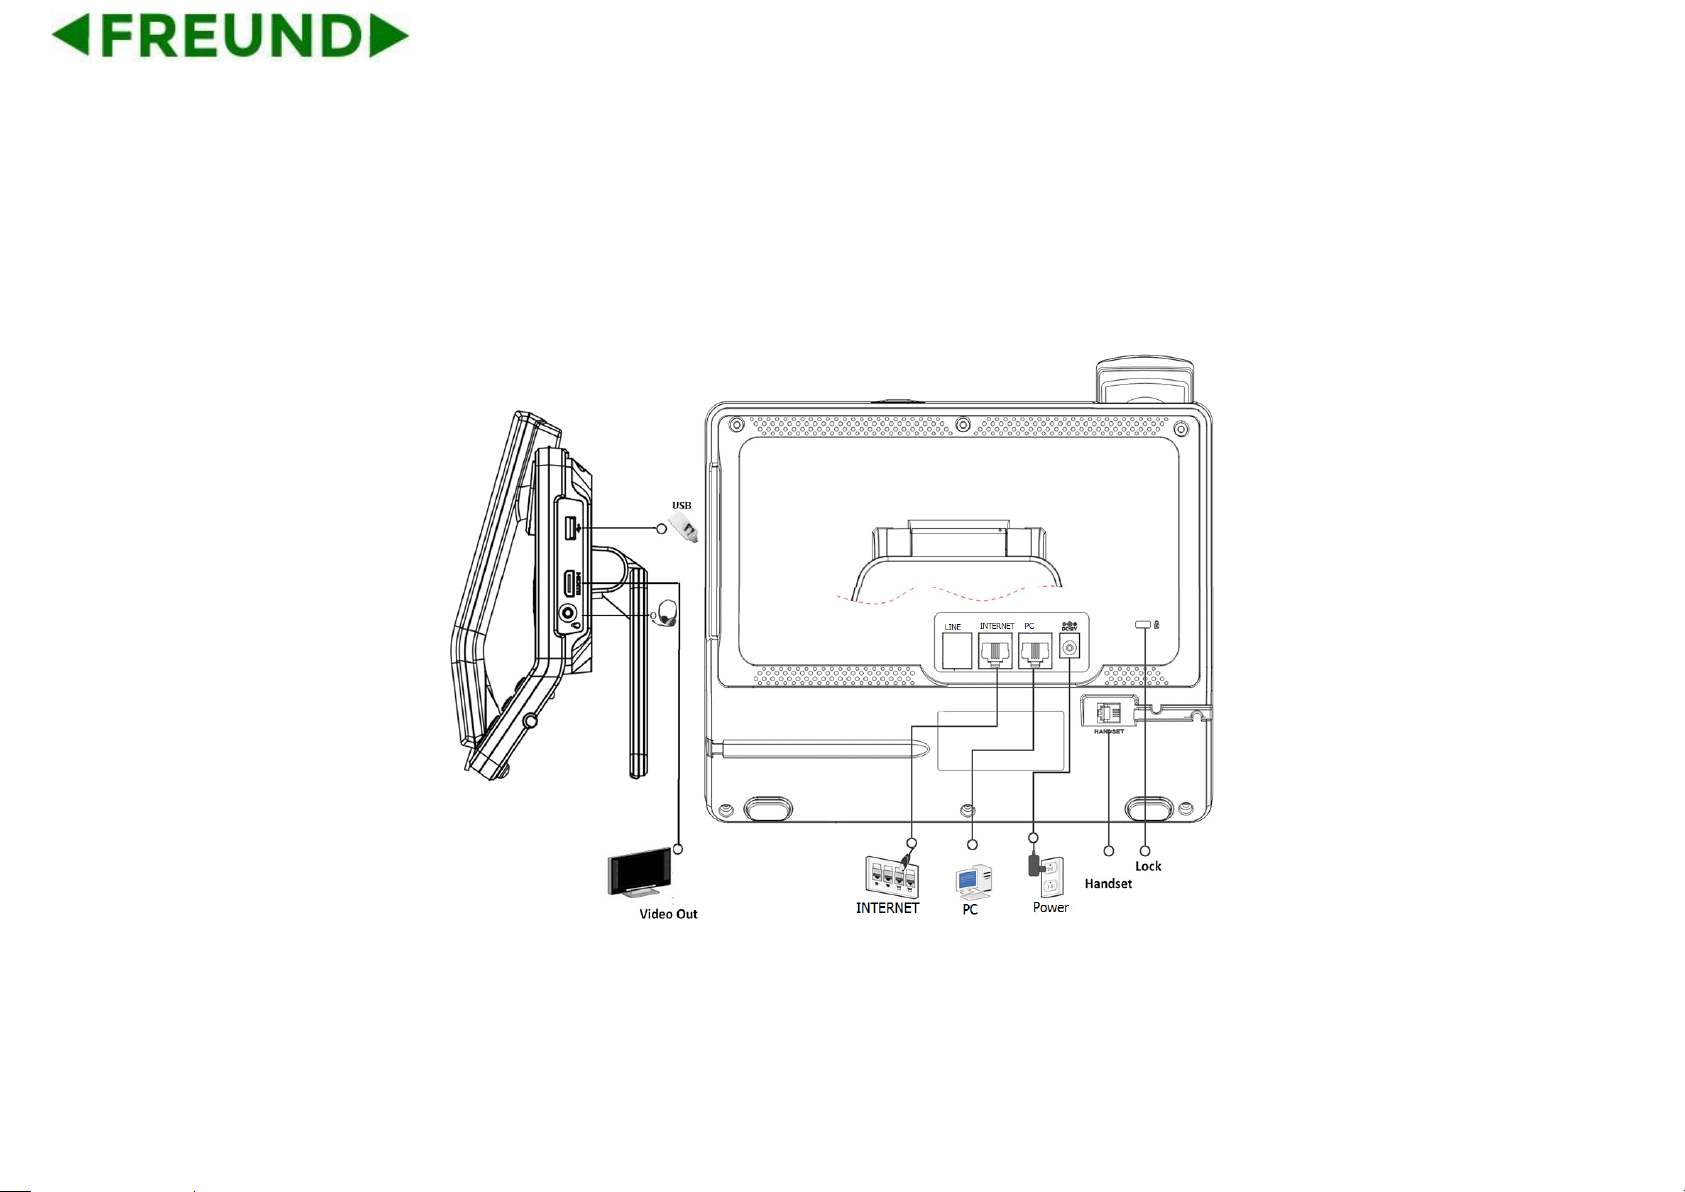
LAN
Network interface can be connected to a hub, switch or other network access device also supports
POE.
PC
Share the network access from LAN port, and for PC and other equipment connection
Power
Connect to 12V adapter, Power supply. Note: If Power over Ethernet is being used, do not plug in
the AC adapter.
Handset
Connect to handset
Lock
Lock the video phone with a Laptop lock
Page 16
5
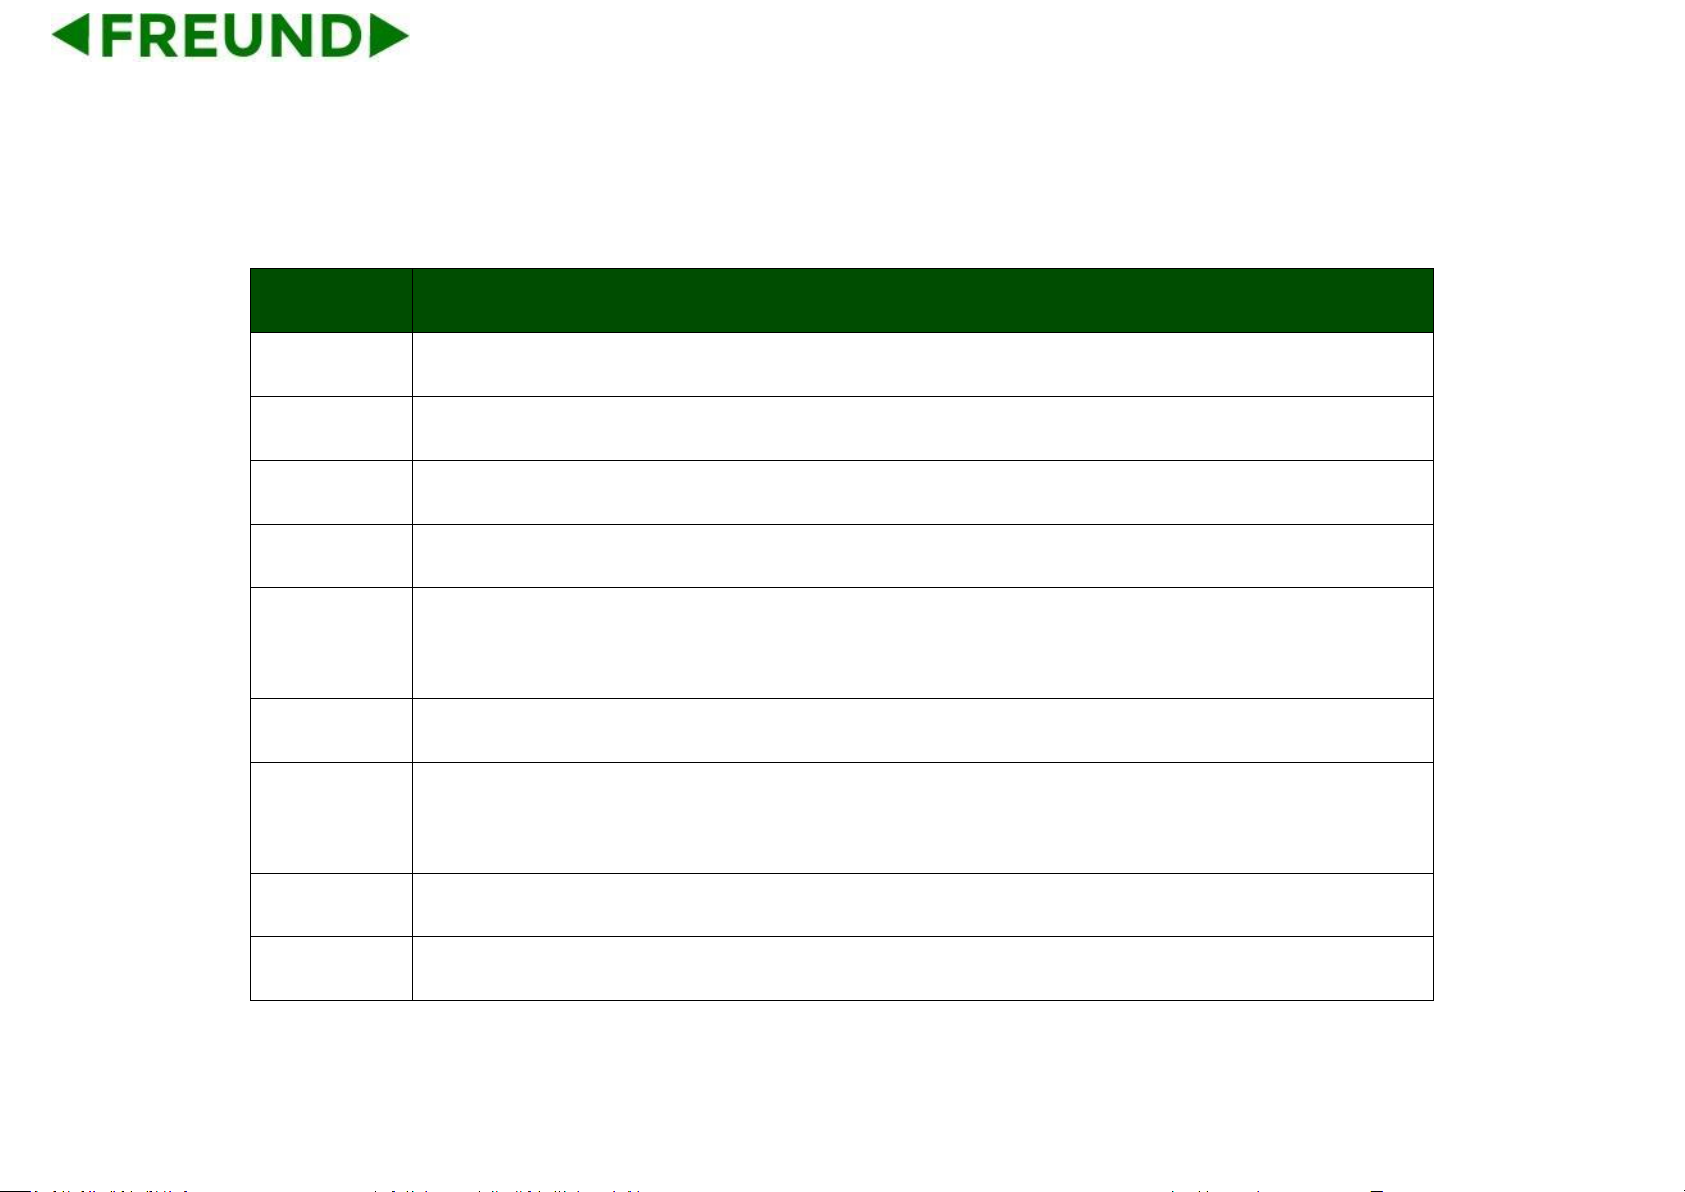
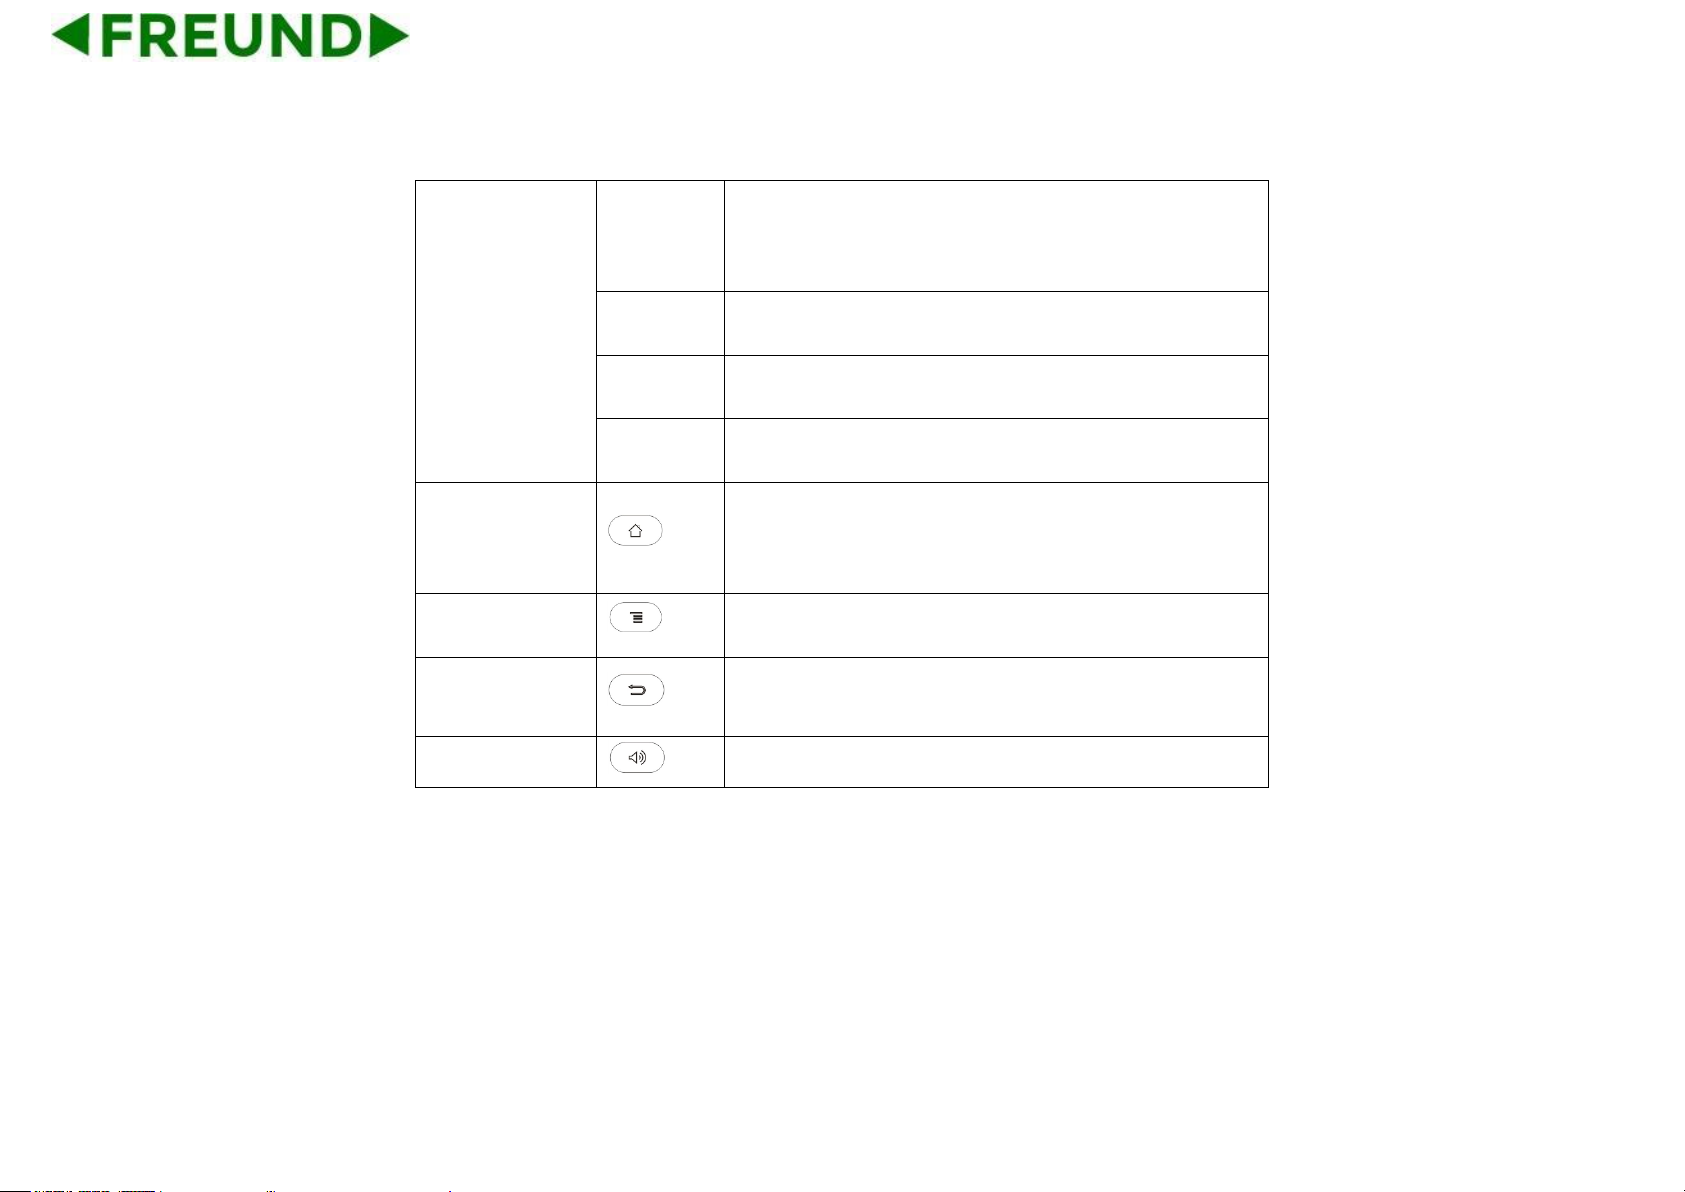
1.2.2. Keypad Description
Interface
Description
Power
Turn on/off the LCD, Reboot, Silent mode
Suspend
Turn on/off the LCD, Reboot, Silent mode
Volume
Press + or – for the phone volume adjustment
Standard
Keypad
Input the number or symbol
Function Key
Delete
Delete a character before the cursor
OK
Same function with soft keyboard "Enter" key
Message
Optional
Contact
Enter Into the contacts list, you can view the local
contact
Conferenc
The first party is held in the case, according to a
Page 17
6
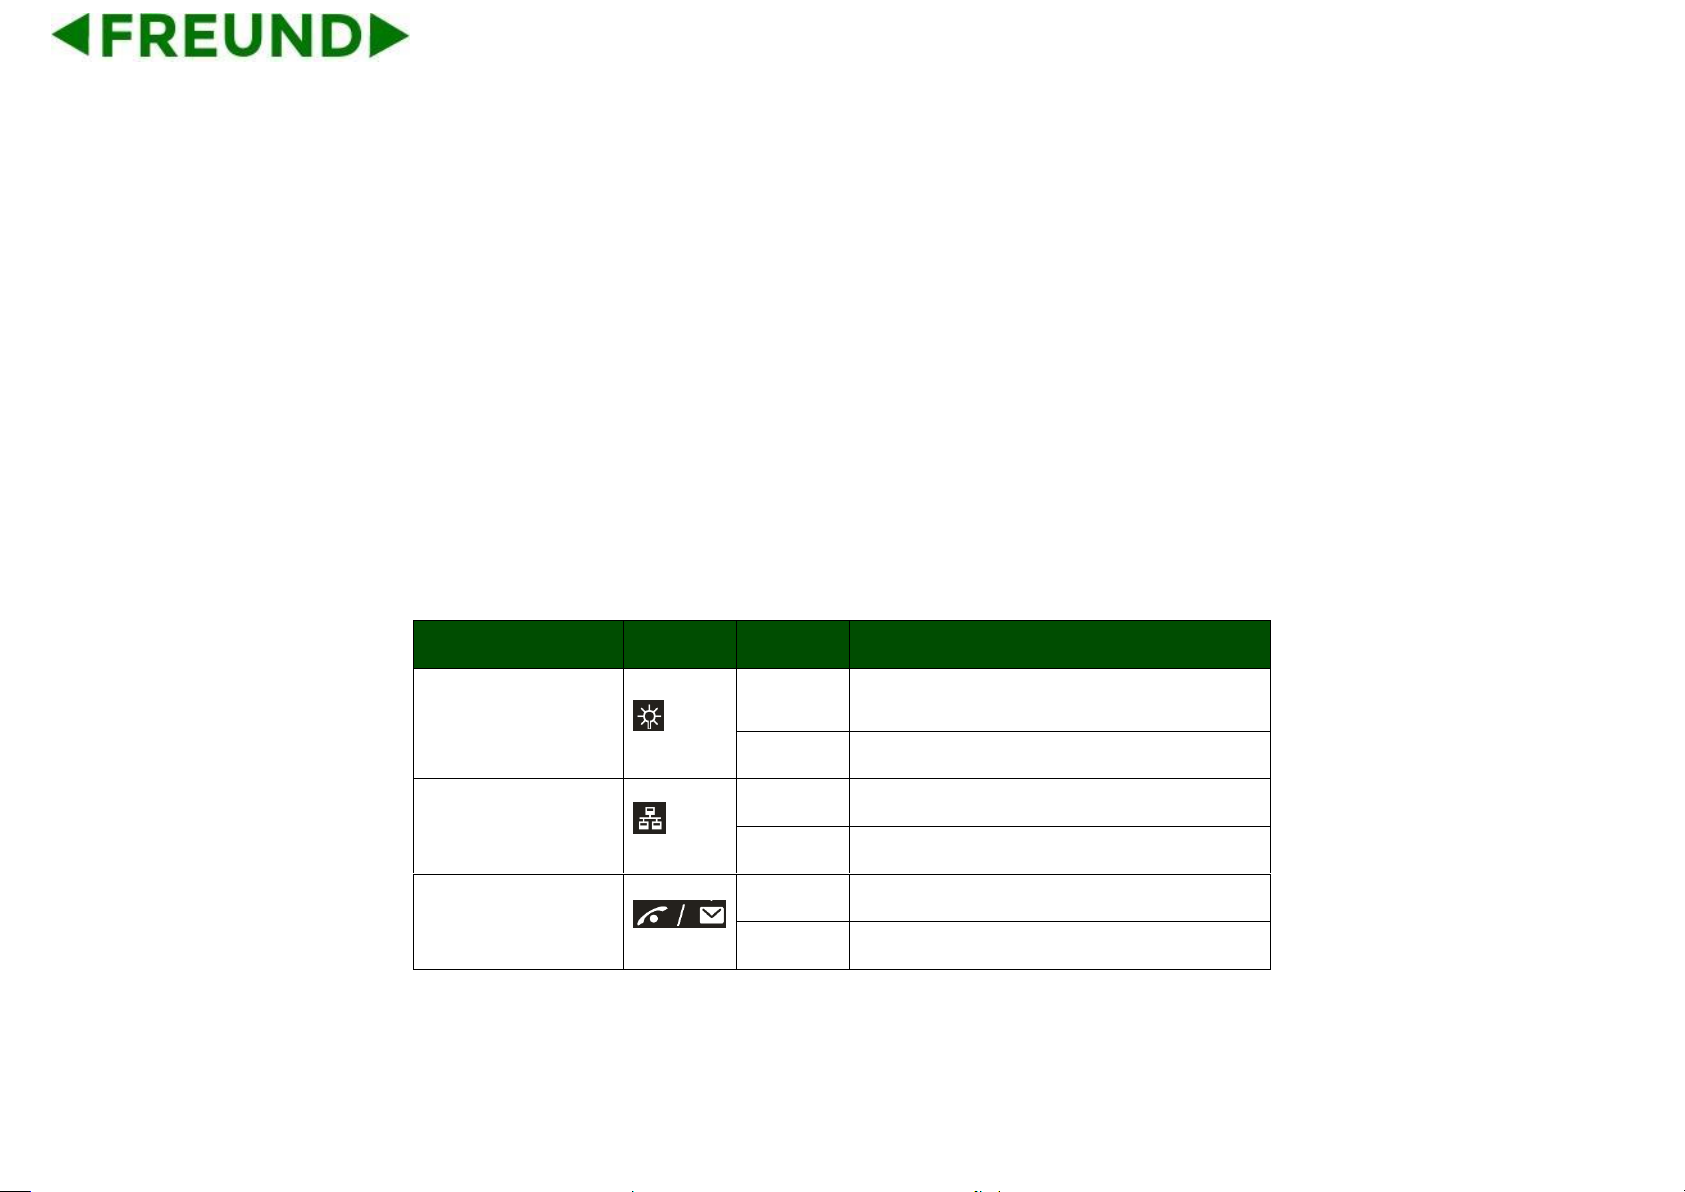
e
conference key, the first party can be combined to
achieve a tripartite meeting
Hold
To hold a call during the call
Transfer
To transfer the current call to the third party
Mute
The other party cannot hear the voice during the call
Home
Return to the main screen, and long press, it will
display recently used applications
Menu
To call up the System or program setup menu
Back
Return to the previous menu
Speaker
Speaker
Page 18
7
1.3. Pendant (Optional)
48G supports 2 frequency pendants - 433 and 869. Pendant is used to
call out the emergence number when you need help. However, users
can choose whether the pendant is needed, based on your own needs.
1.4. Indicator
1.4.1. Indicator of FE-TEL-48G
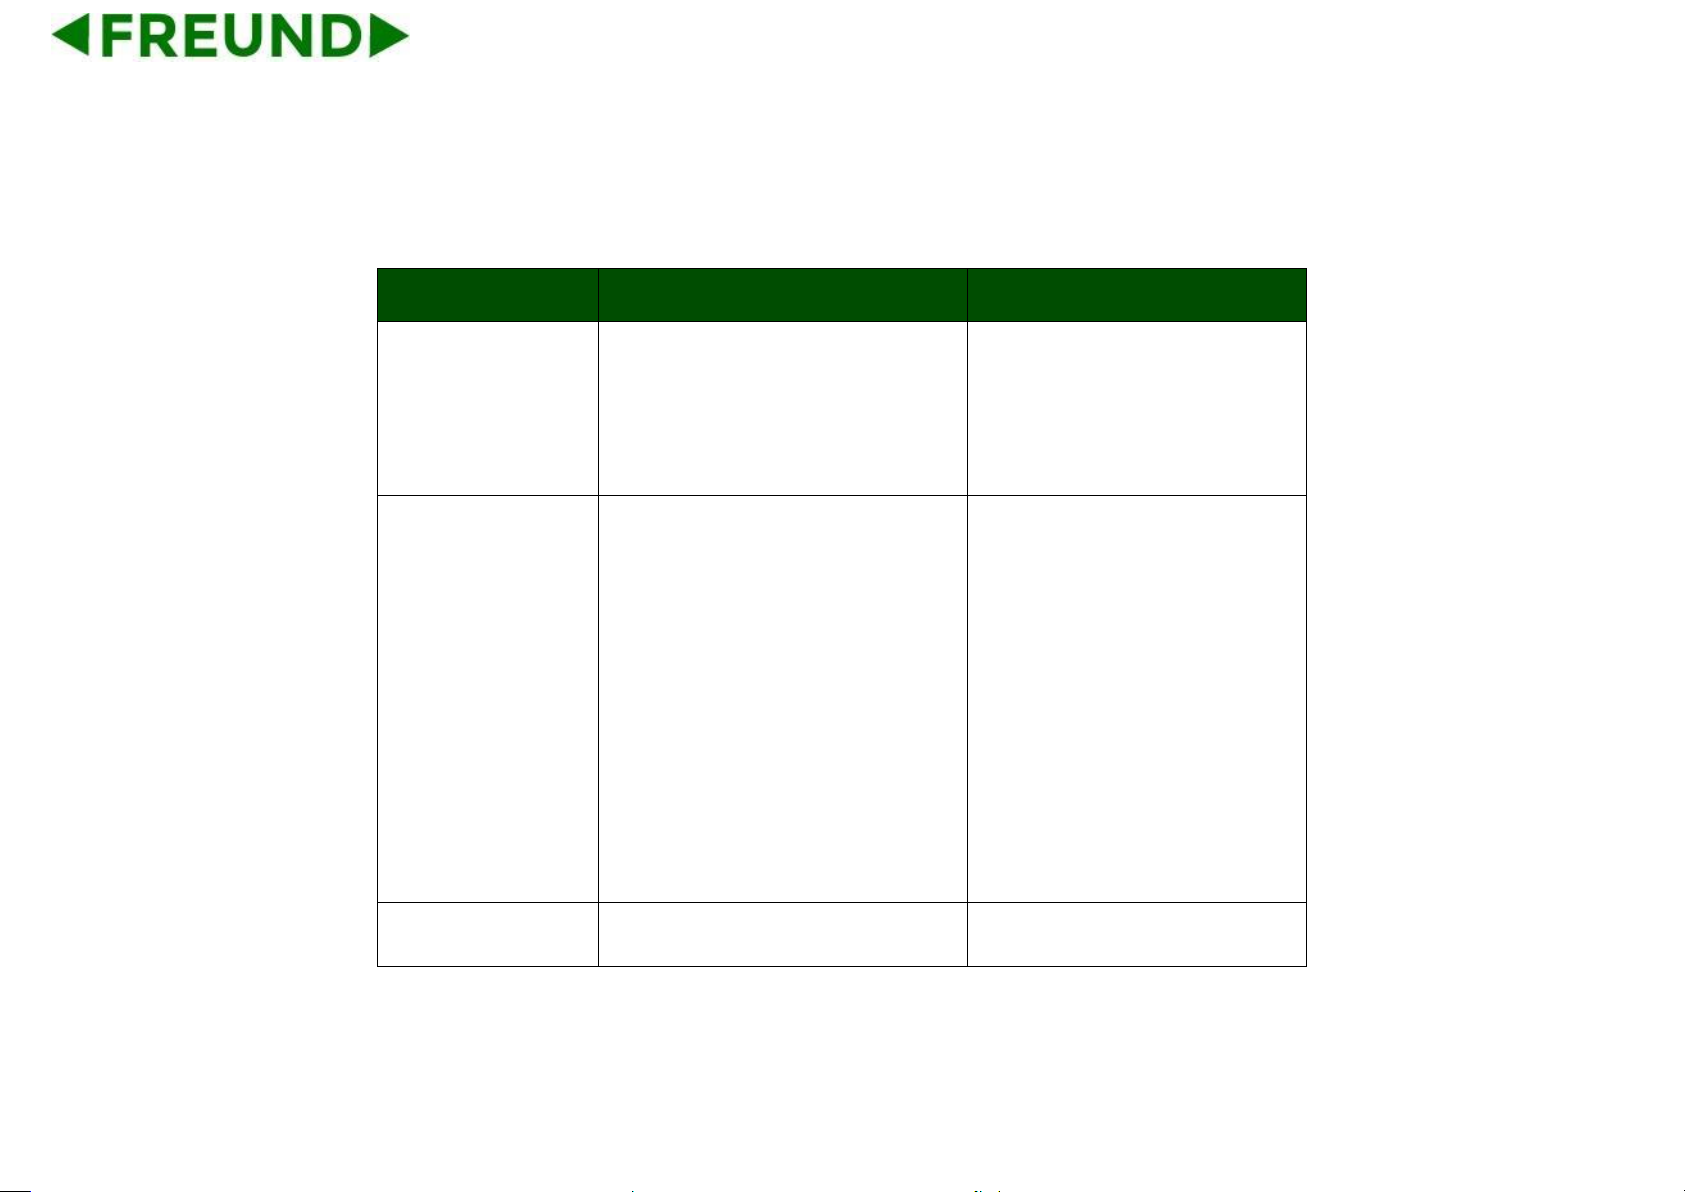
Indicator Name
Icon
Status
Description
Power
ON
System is under working
OFF
System is not working
Network
Connection
ON
Network(LAN Port)is connected
OFF
Network(LAN Port)is disconnected
Information
Flashing
Contains Miss Calls or Unread Message
OFF
Normal status
Page 19
8
1.4.2. Indicator of Pendant
Indicator Status
Description
Notes
Flashing Yellow
The pendant is in low battery power
status.
The pendant powers on again.
User need to replace the battery.
Alternate Flashing
Green and Red
(1) The pendant in factory-test
mode.
(1) If user long press the
pendant button meanwhile
install the battery, it will enter
testing mode. User need to
install the battery again and do
not press the push button during
the installation.
Before the pendant matches with
(1) User need to match the
Page 20

9
Flashing Red
the phone, press pendant button.
Press the pendant to make a call
over 200 meters after it matched
with the phone.
pendant with the phone.
(2) The maximum distance
between the matched phone
with the pendant is about 200
meters. User need to use it in
this range.
Flashing Green
(1) In the process of the RF
Learning. press the pendant button.
The phone will prompt RF Key
Learned.
(2) Press pendant button to make a
call after it matched with the phone.
Light off
The battery runs out of power.
Idle status.
(1) User need to replace a new
battery.
Page 21

10
2. Installation
2.1. Equipment Packaging
Name
Quantity
Main Case
1
Handset
1
Phone Cord
1
Power Adapter
1
Ethernet Cable
1
Quick Start Guide
1
Page 22
11
2.2. Connecting Video Phone
⚫ Connection diagram
Page 23

12
⚫ Connecting to Network
Use the matched network cable to connect the LAN Port of the video phone to the Router or Switch. Viewing the top right corner of
the screen, if the indicator light is on, network cable is connected properly.
⚫ Connecting to PC
Use the matched network cable to connect the PC Port of the video phone to the PC. The PC can access to the internet network via
PC Port of the video phone.
Page 24

13
2.3. Installation Considerations
This product is a desktop product, and here are some safety recommendations about the installation and the usage:
⚫ Do not use this product near water, such as: bath, washbasin, kitchen sink and other damp places, and so on;
⚫ Place the device in a place away from heat;
⚫ Place the device away from traffic areas to prevent collisions;
⚫ Please use the equipment with the matching power adapter or POE;
Page 25
14
3. Daily Use
3.1. Call
3.1.1. Make A Call
Users can directly dial from the keypad, select from the contact list or
from call records to call out the number. Users can choose one of the
following steps to enter into the dialing interface.
Mode 1: Directly pick up the handset.
Mode 2: Press Speaker button on the keypad.
Mode 3: In the main screen, click icon .
Mode 4: In the main screen, select icon -> tap icon .
Page 26
15
3.1.2. Dial Out Directly
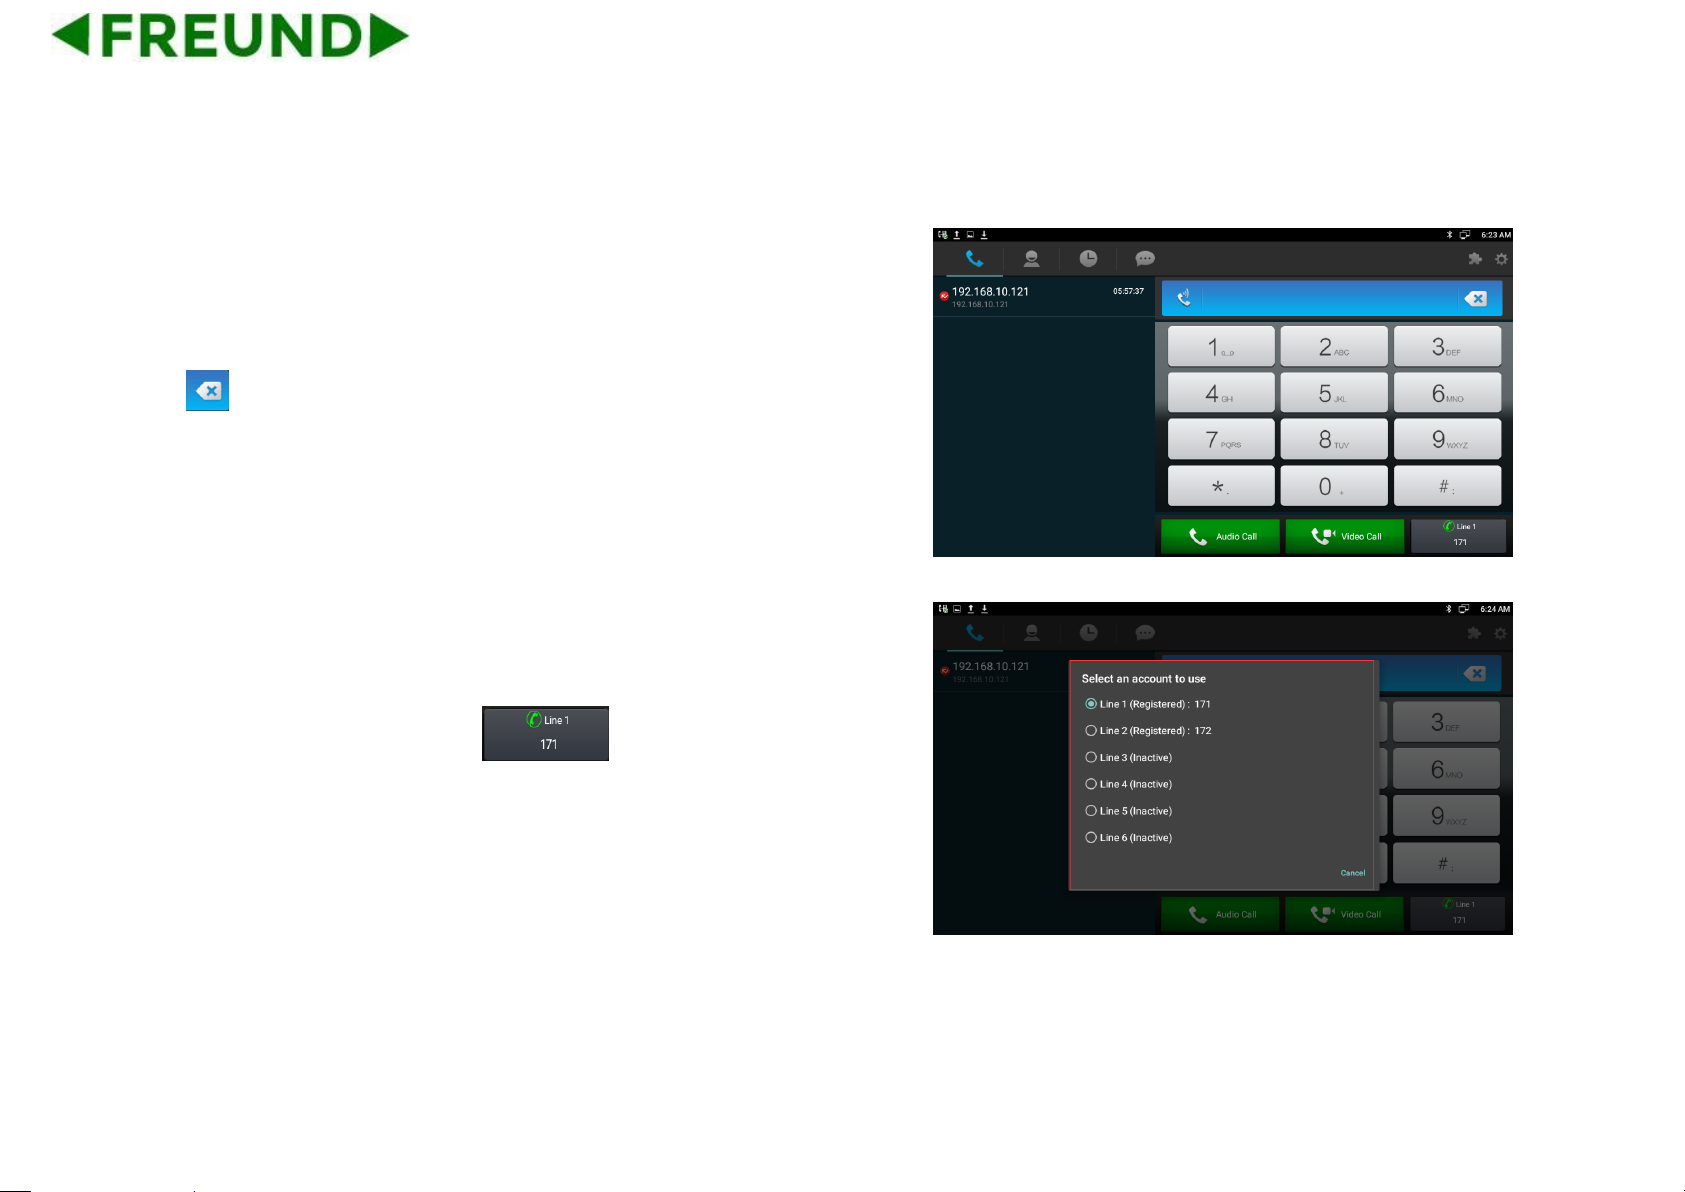
1) By pressing the number keys on the dial interface or directly
pressing the number on keypad. To delete a number, press the icon
on the dial interface, or press Delete button on the keypad.
2) If you want to make an audio call, click Audio Call label. If users want
to make a video call, click Video Call label.
3) If multiple available SIP accounts are registered, when finishing
dialing, users can click line label to choose the
outgoing account for the number, as shown below.
Page 27
16
3.1.3. Dialing Out from Contact List
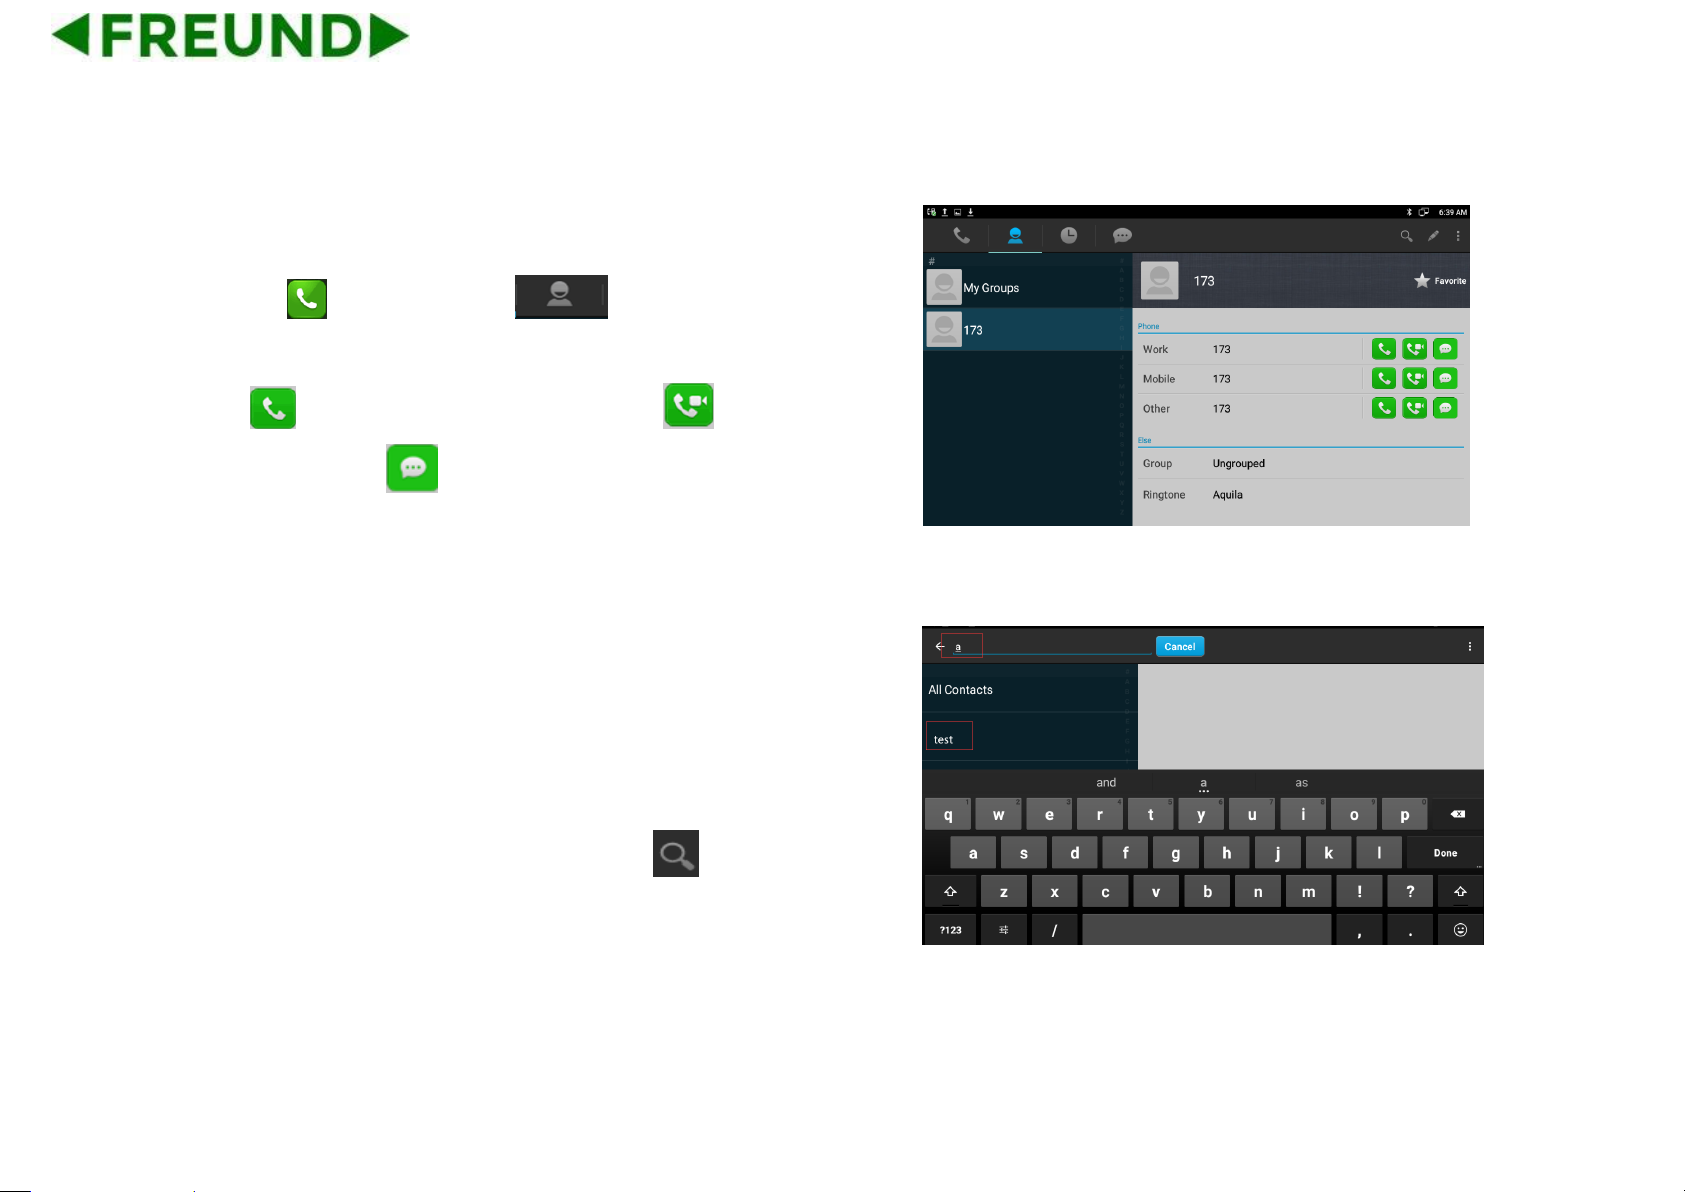
1) Tap icon ->Click the icon -> Label Phone Book->All
Contacts.
2) Click label to make an audio call, click label to make a
video call, or click label to send the message.
3.1.3.1. Contacts Fuzzy Matching Query
Phone supports contacts fuzzy matching queried, intuitive, concise
dialing interface for the intelligent input, greatly reducing the number of
buttons, achieves rapid, effective positioning search, and avoids
duplication of invalid operation, tap search icon to enter the search
interface. Enter the key symbol or number to search the contact. The
result will be displayed on the left list.
Page 28
17
3.1.4. Receive a call
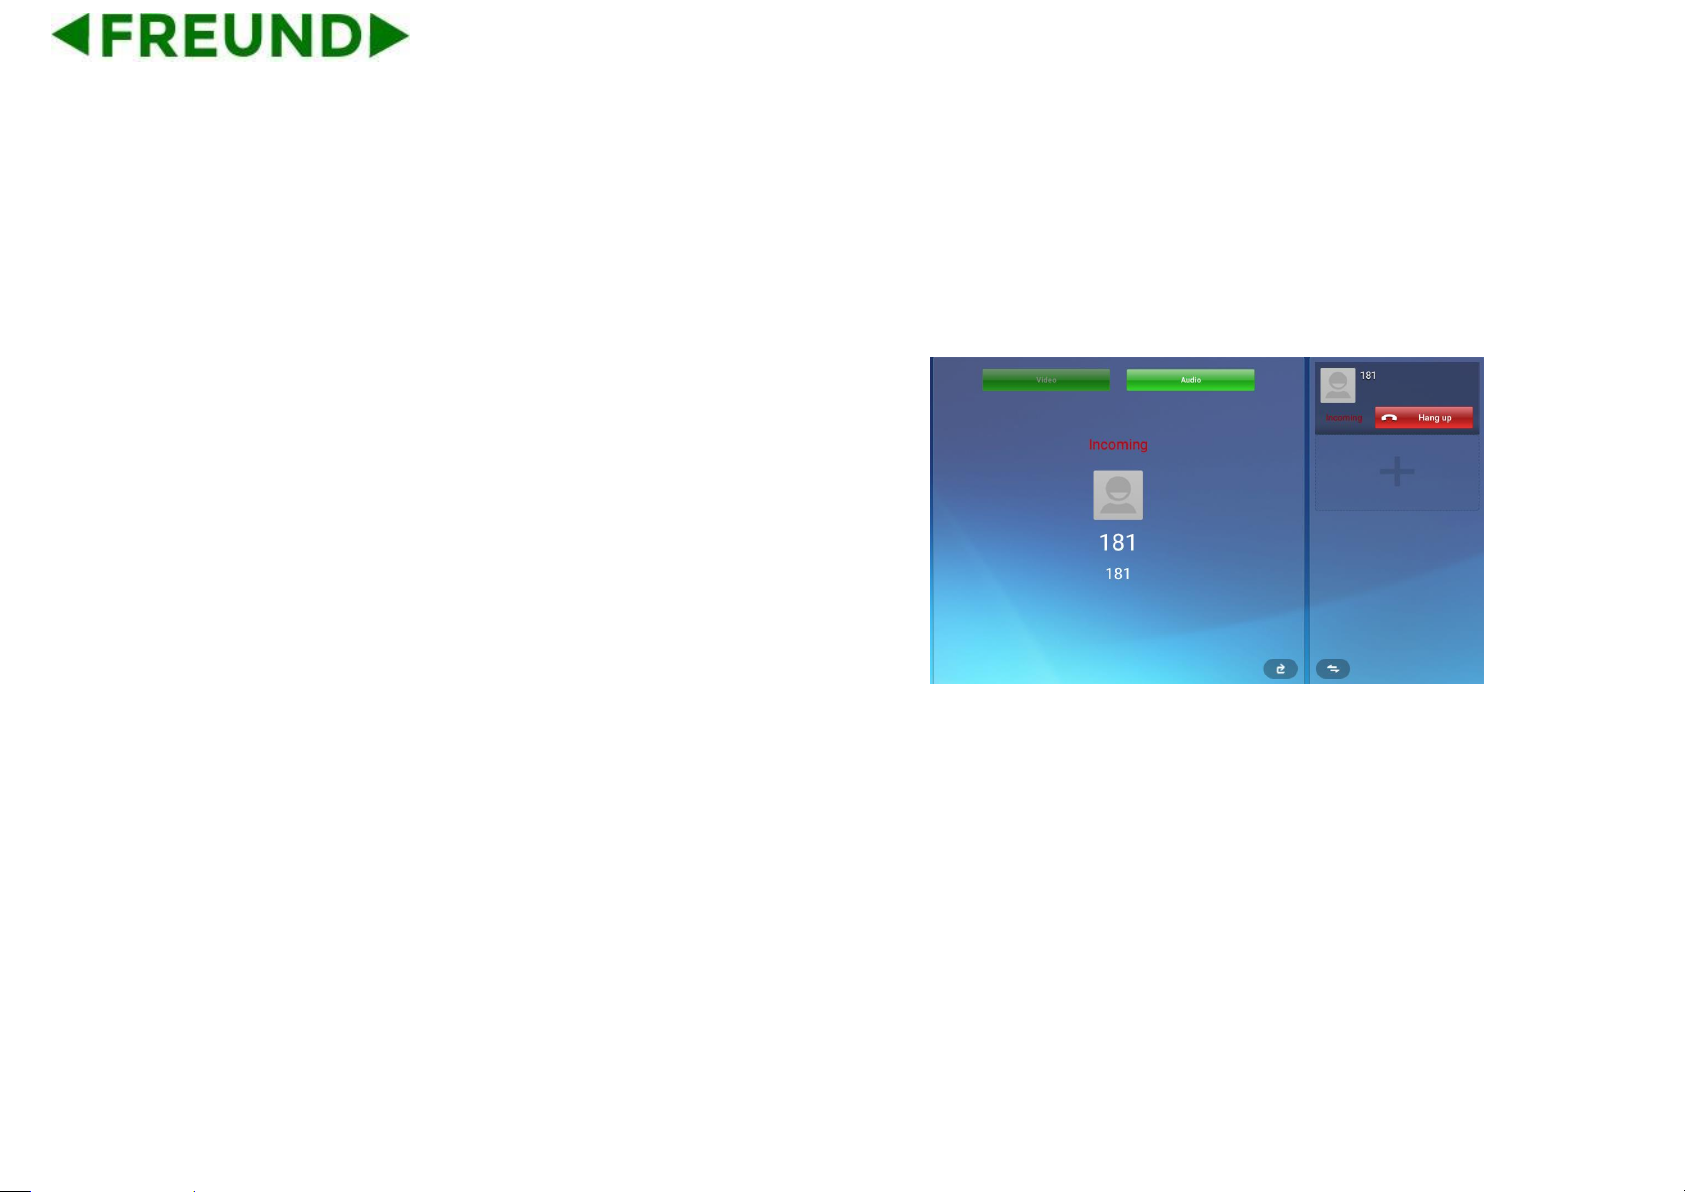
Incoming calls include audio and video calls. If the caller has been
stored in the contacts, it will show the contact name, otherwise the caller
number will be displayed.
3.1.4.1. Answer a call
1) Answer an audio call
When receiving an audio call, click Audio label or pick up the handset or
press speaker button on the keypad to answer.
2) Answer a video call
When receiving a video call, click Audio label to establish the audio call,
click Video label to establish.
Page 29
18
3.1.4.2. Reject A Call
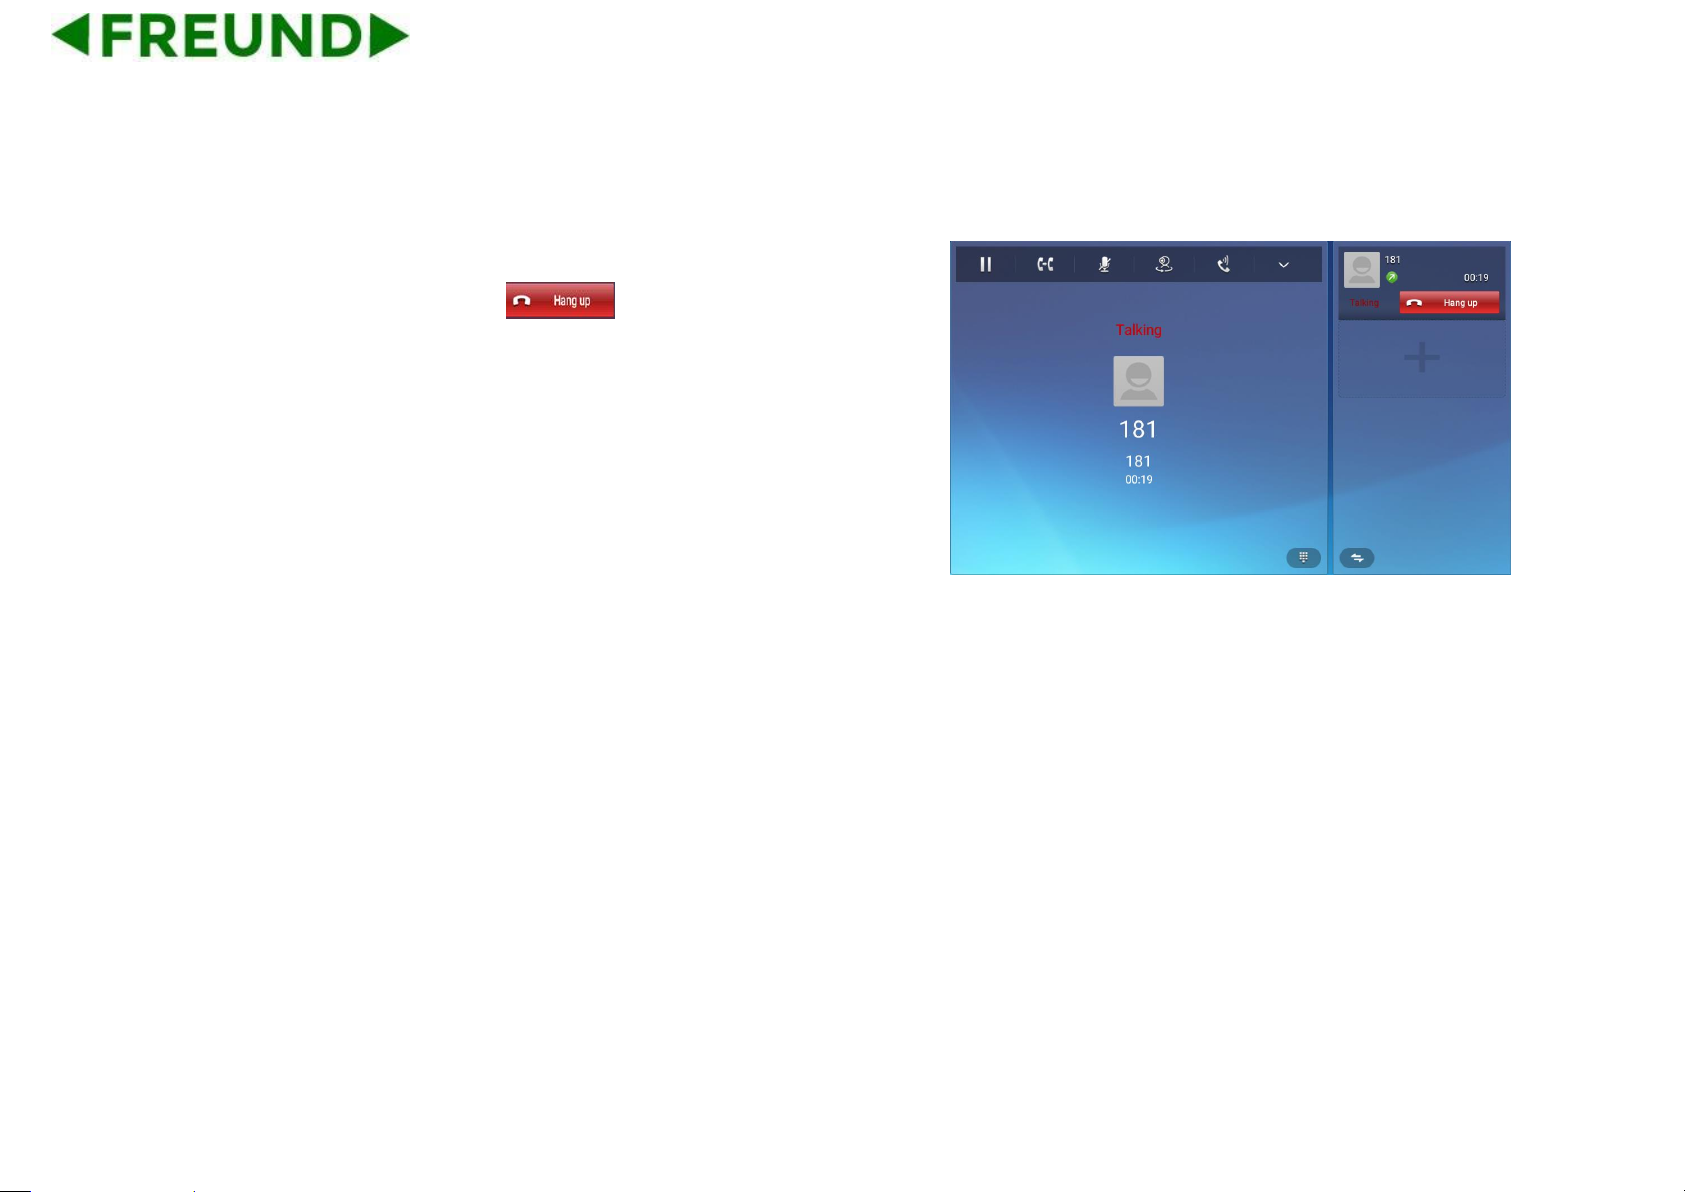
If users want to reject a call, click label in calling interface.
If users want to reject a call from a number, you can add the number to
the blacklist.
3.1.5. Call Options
During the audio conversation
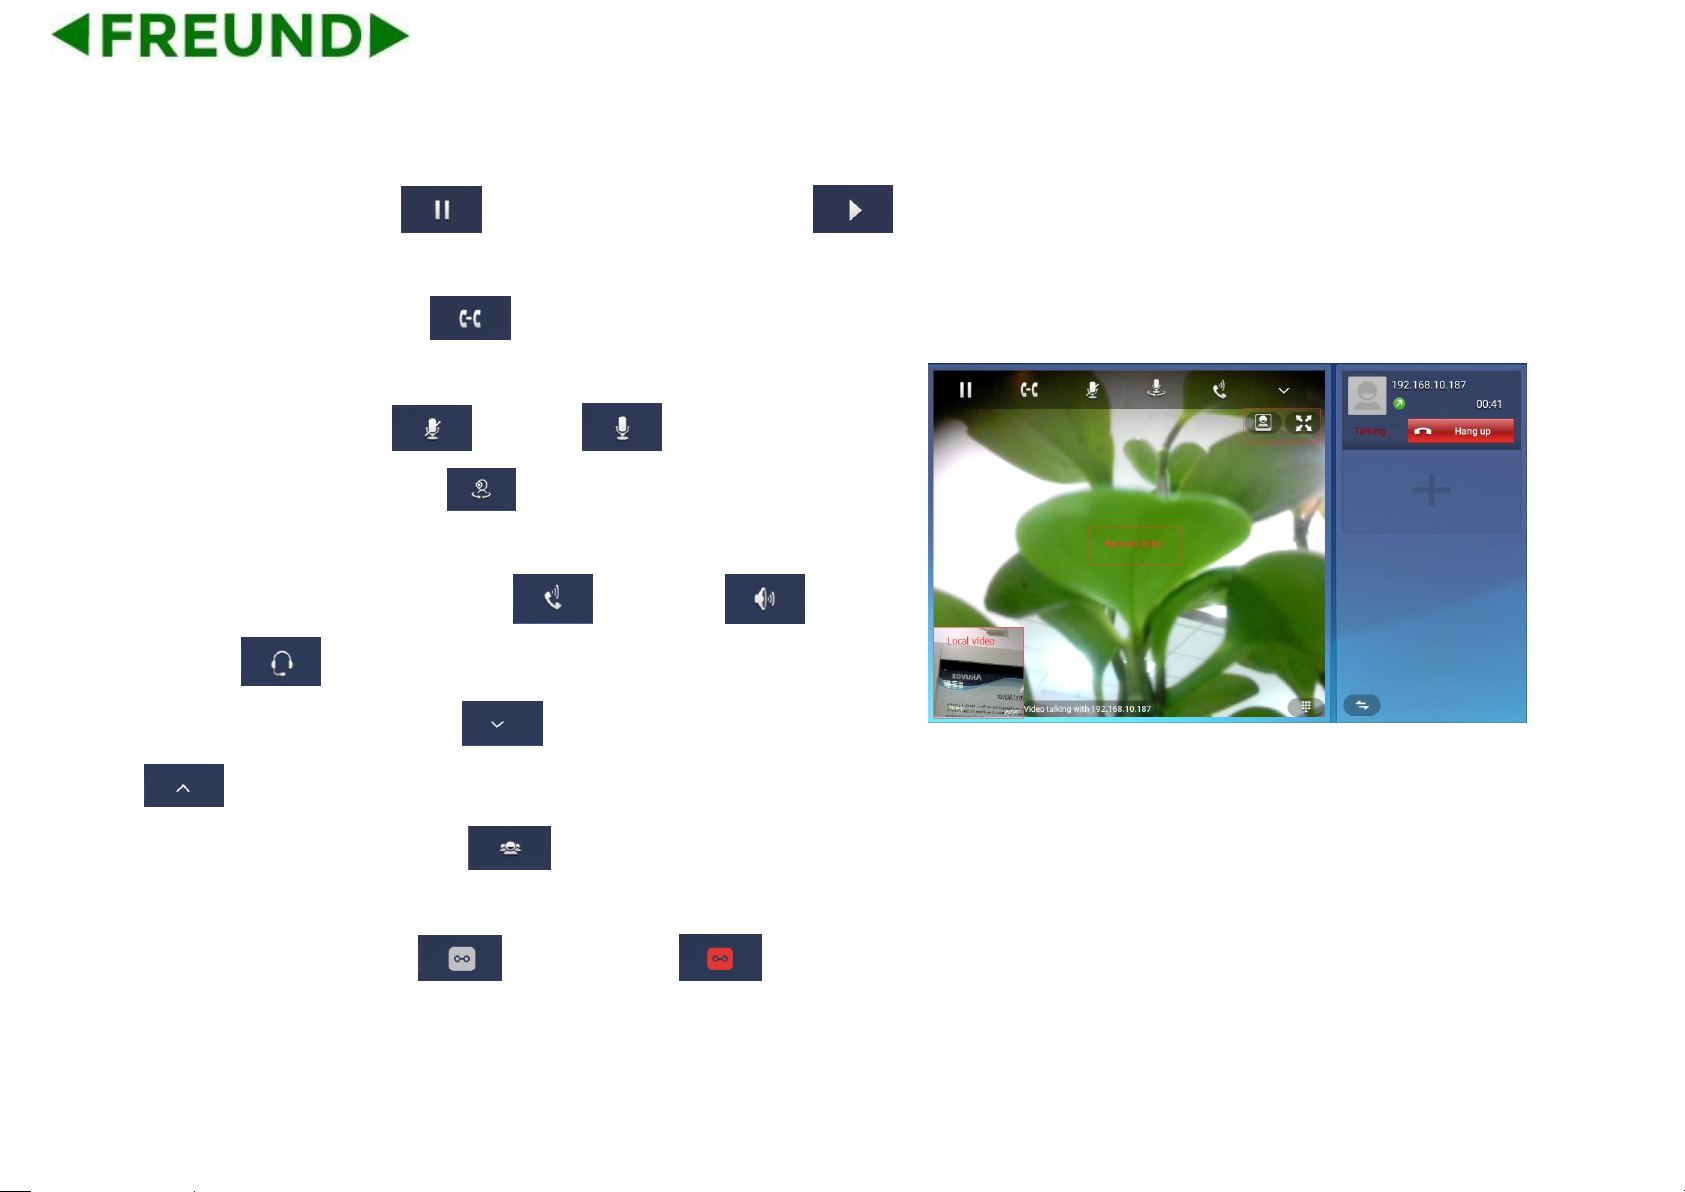
Call options are described as below.
Page 30
19
Hold: Click the button to hold the current call, press
to resume
Transfer: Click the button to enter the establish transfer
interface
Mute: Click the button to mute, to resume.
Video call: Click the button to send a video request/close the
video
Answer mode: to switch handset , handsfree or
headset mode
Extend key: Click the button to open the extended icons,
to close.
Conference: Click the button to enter the establish
conference interface
Record: Click the button to start record, to stops
Page 31
20
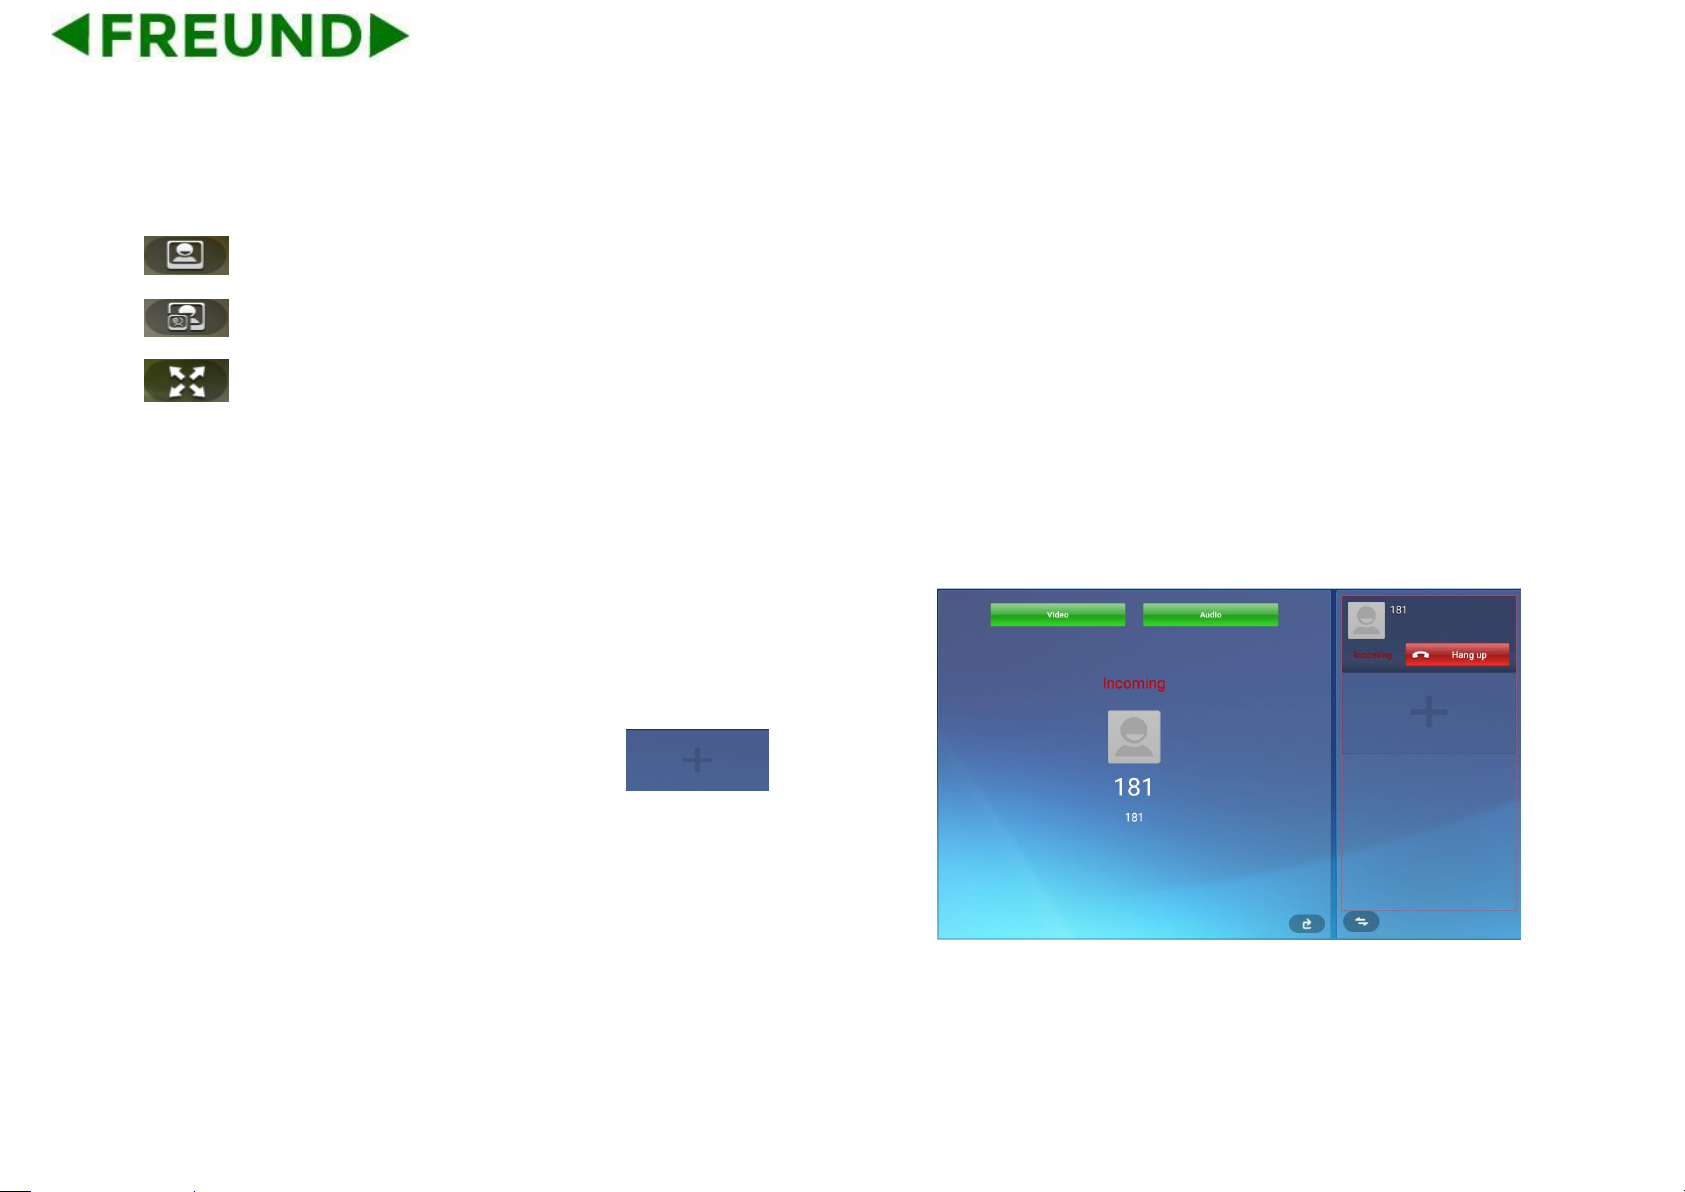
Video options are described as below.
: Support local and remote video displayed;
: Support remote video displayed;
: Click to open full screen/ exit full screen.
3.1.6. Multiple Calls
⚫ The Phone supports more than 3-line calls. The line information is
on the right side of call interface.
⚫ During a call, users can click on the icon to add a
new call. And when click on this button, the current call will be hold.
⚫ During a call, users can click on any line in the list to resume the call.
Page 32
21
4. Basic Setting
4.1. Main Screen Instruction
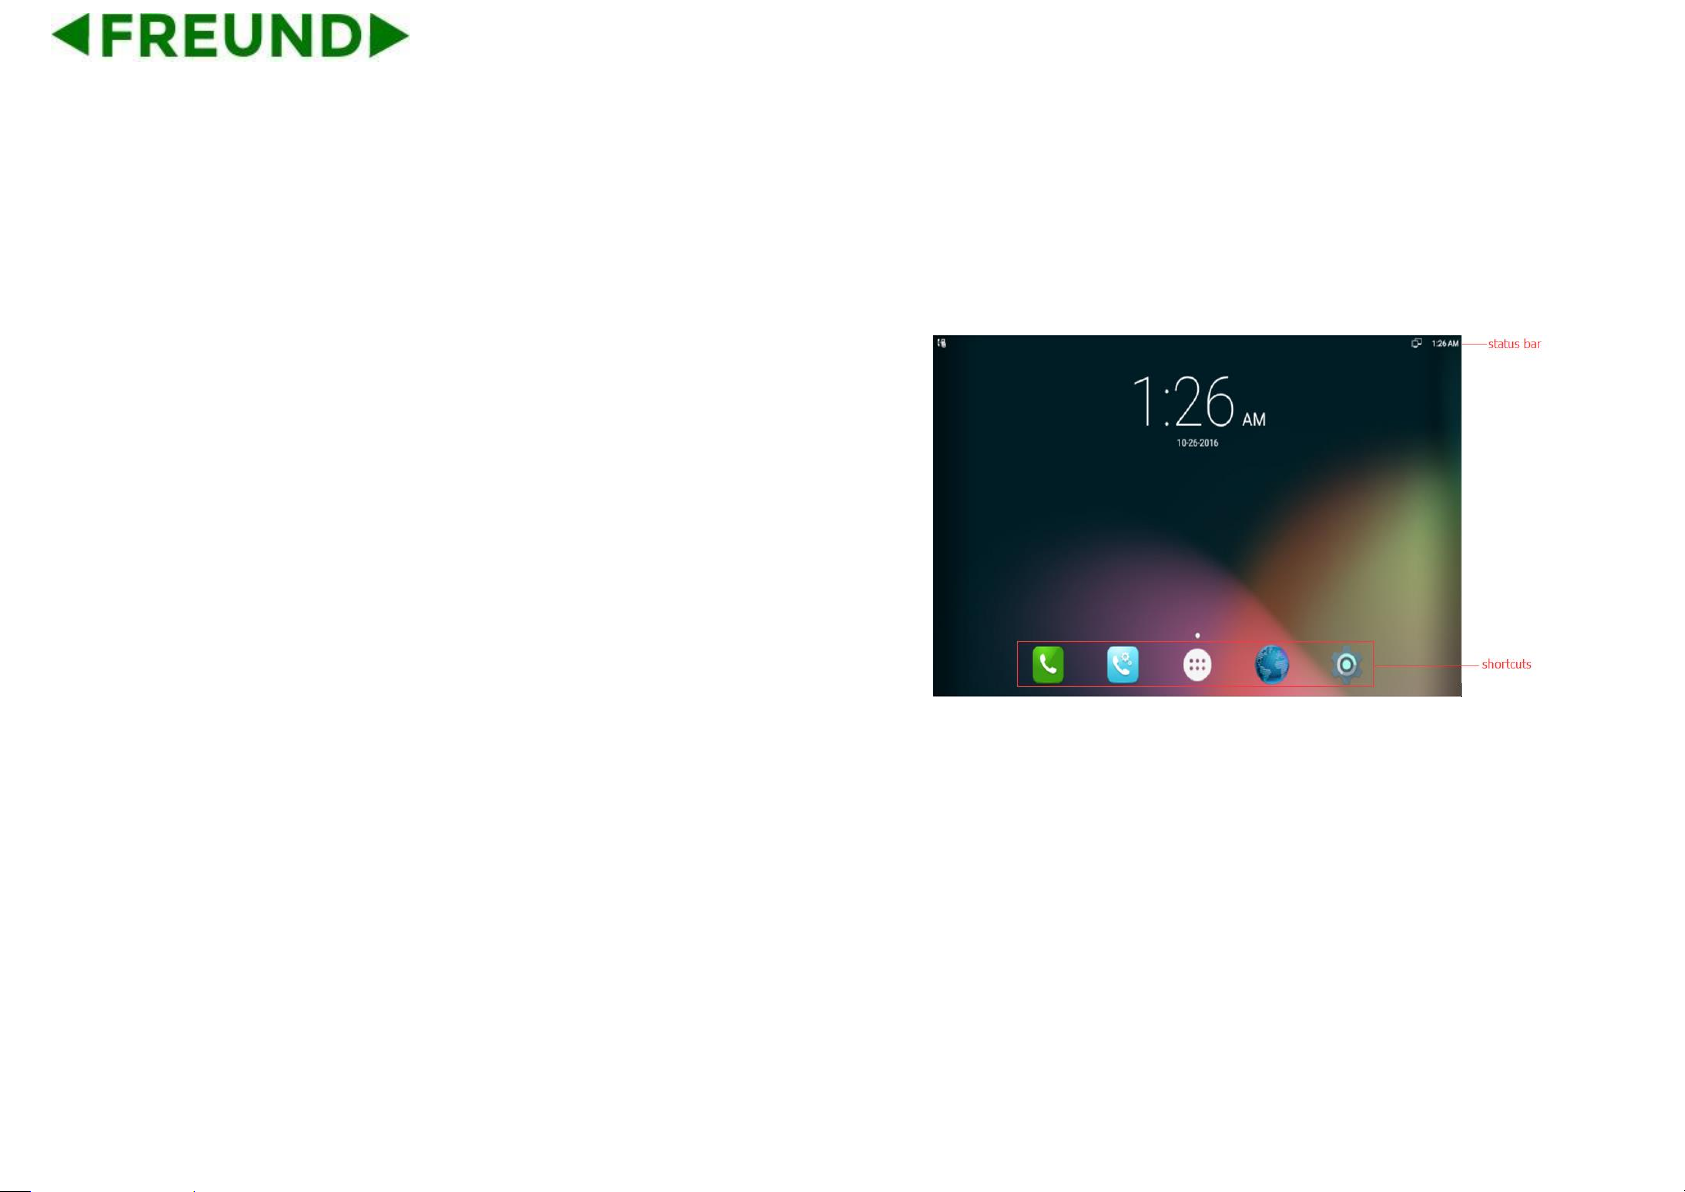
⚫ Status bar, at the top of the screen, displaying the status of system
information.
⚫ Shortcuts, at the bottom of the screen, users can drag a shortcut to
this region to achieve the replacement of the shortcut. Supports max
four shortcuts.
Page 33
22
4.2. Status and Notifications instruction
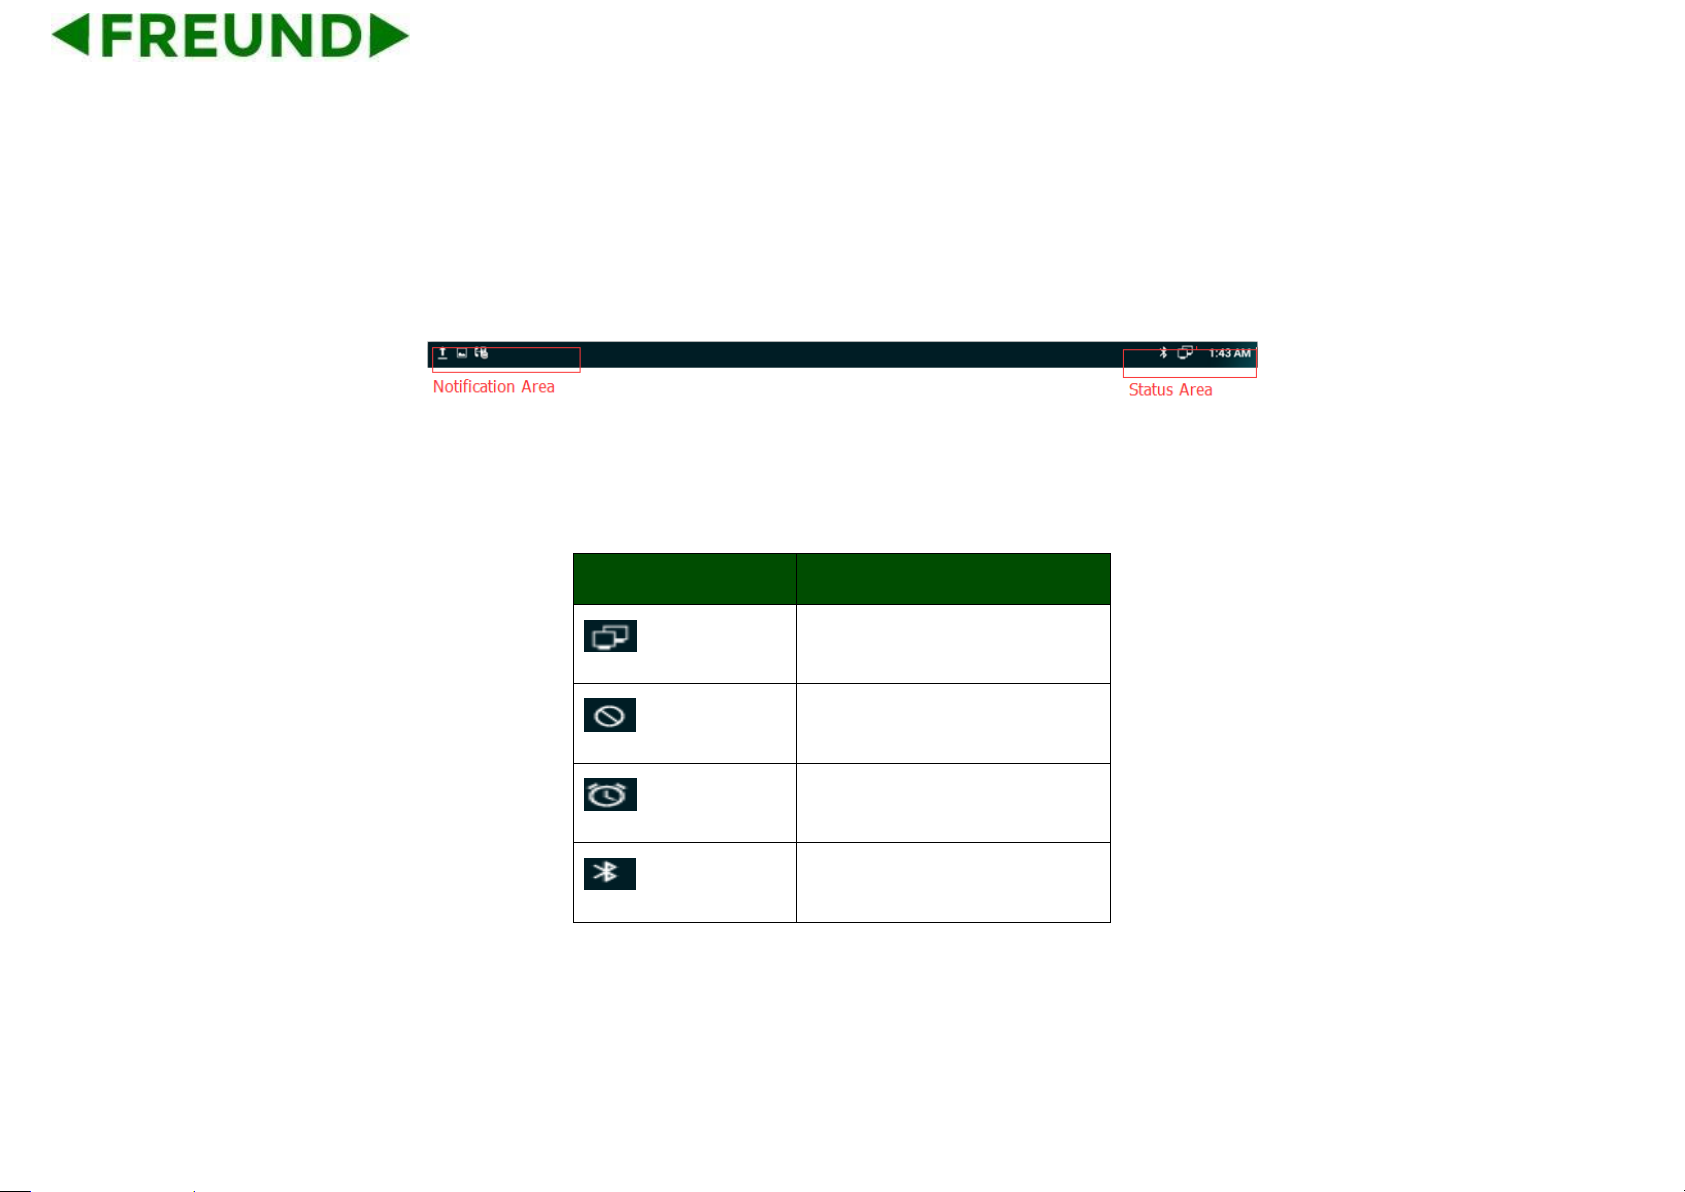
The status bar in main screen is divided into two zones, notification area and status area, as shown below:
Status Area
Icon
Description
Network is connected
Slide mode (Sound is off)
Alarm clock is set
Bluetooth active
Page 34
23
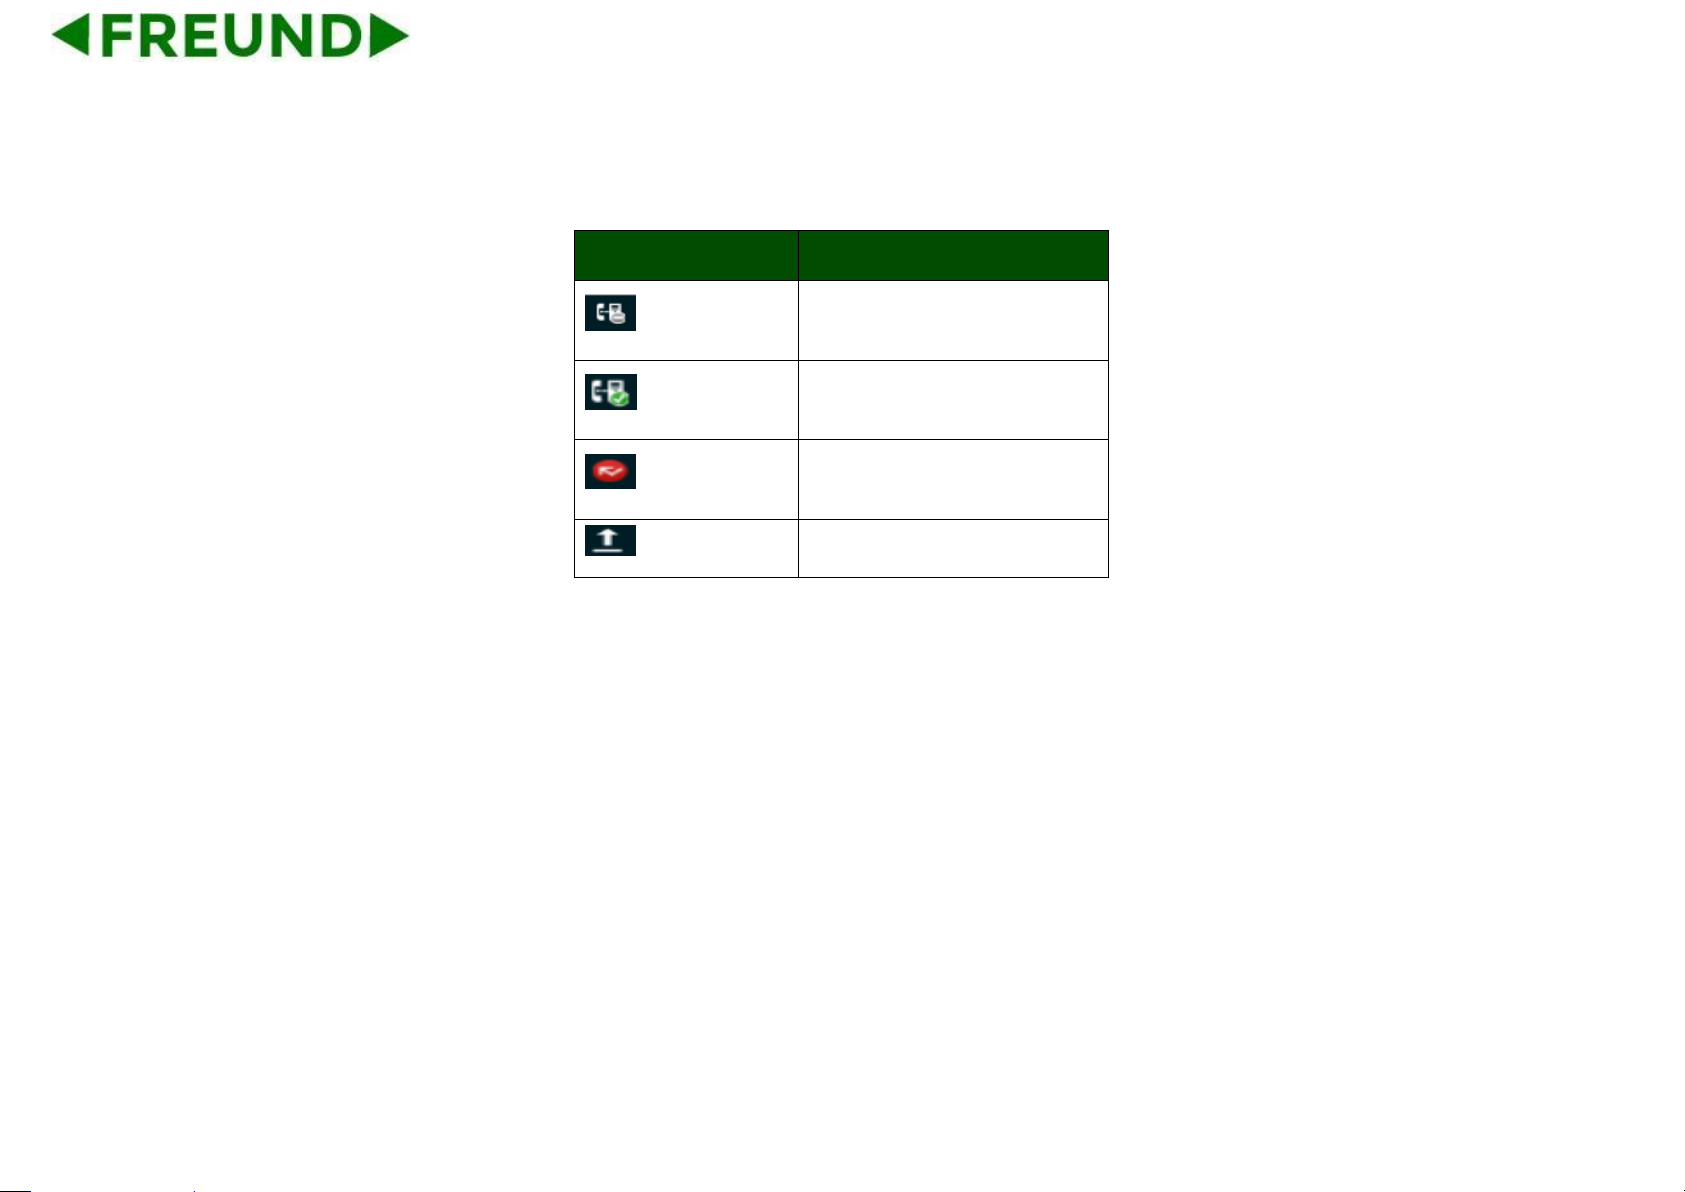
Notification Area
Icon
Description
SIP account is unregistered
SIP account is registered
Missed call
uploading
Page 35

24
4.2.1. Using the Touchscreen
⚫ Tap
To select items on the screen (e.g., setting options, apps); to press
onscreen buttons; to type letters and symbols using the onscreen
keyboard.
⚫ Touch and Hold
Touch the item on the screen and hold it without lifting your finger from
the screen till an action occurs.
For example, touch and hold on a picture to bring up operation options.
⚫ Drag
Touch and hold an item for a few seconds first. Once the item has a red
frame activated, or a move option shows up, keep your finger on the
screen and move it until the target position is reached. Then lift your
finger up to release.
⚫ Slide
Move your finger fast across the screen to slide. To view different idle
screens or menu pages, slide left or right; to view the status bar on top of
Page 36

25
the screen, place your finger on the bar and slide it down. If your finger
stays on the screen for too long, the item may be selected and sliding
won’t occur.
⚫ Double-click
Click on the screen twice in quick succession, for example, when user
surfs in browser, you can quickly click twice on the page, and then the
page can be enlarged.
⚫ Pinch
Place two fingers on the screen, then pinch them together (zoom out) or
spread them apart (zoom in). This can be used in a picture.
4.2.2. Startup and Shutdown
⚫ Startup
Connect to the power supply, the system automatically starts up.
⚫ Shutdown
If you do not use the device, you can directly remove the power supply,
to save electricity.
Page 37
26
⚫ Reboot
If you need to restart the device, according to the following steps:
1) Press and hold the "Power" button until the pop-up "Options" menu.
2) Click the "Reboot"
4.2.3. View / Turn Off Notifications
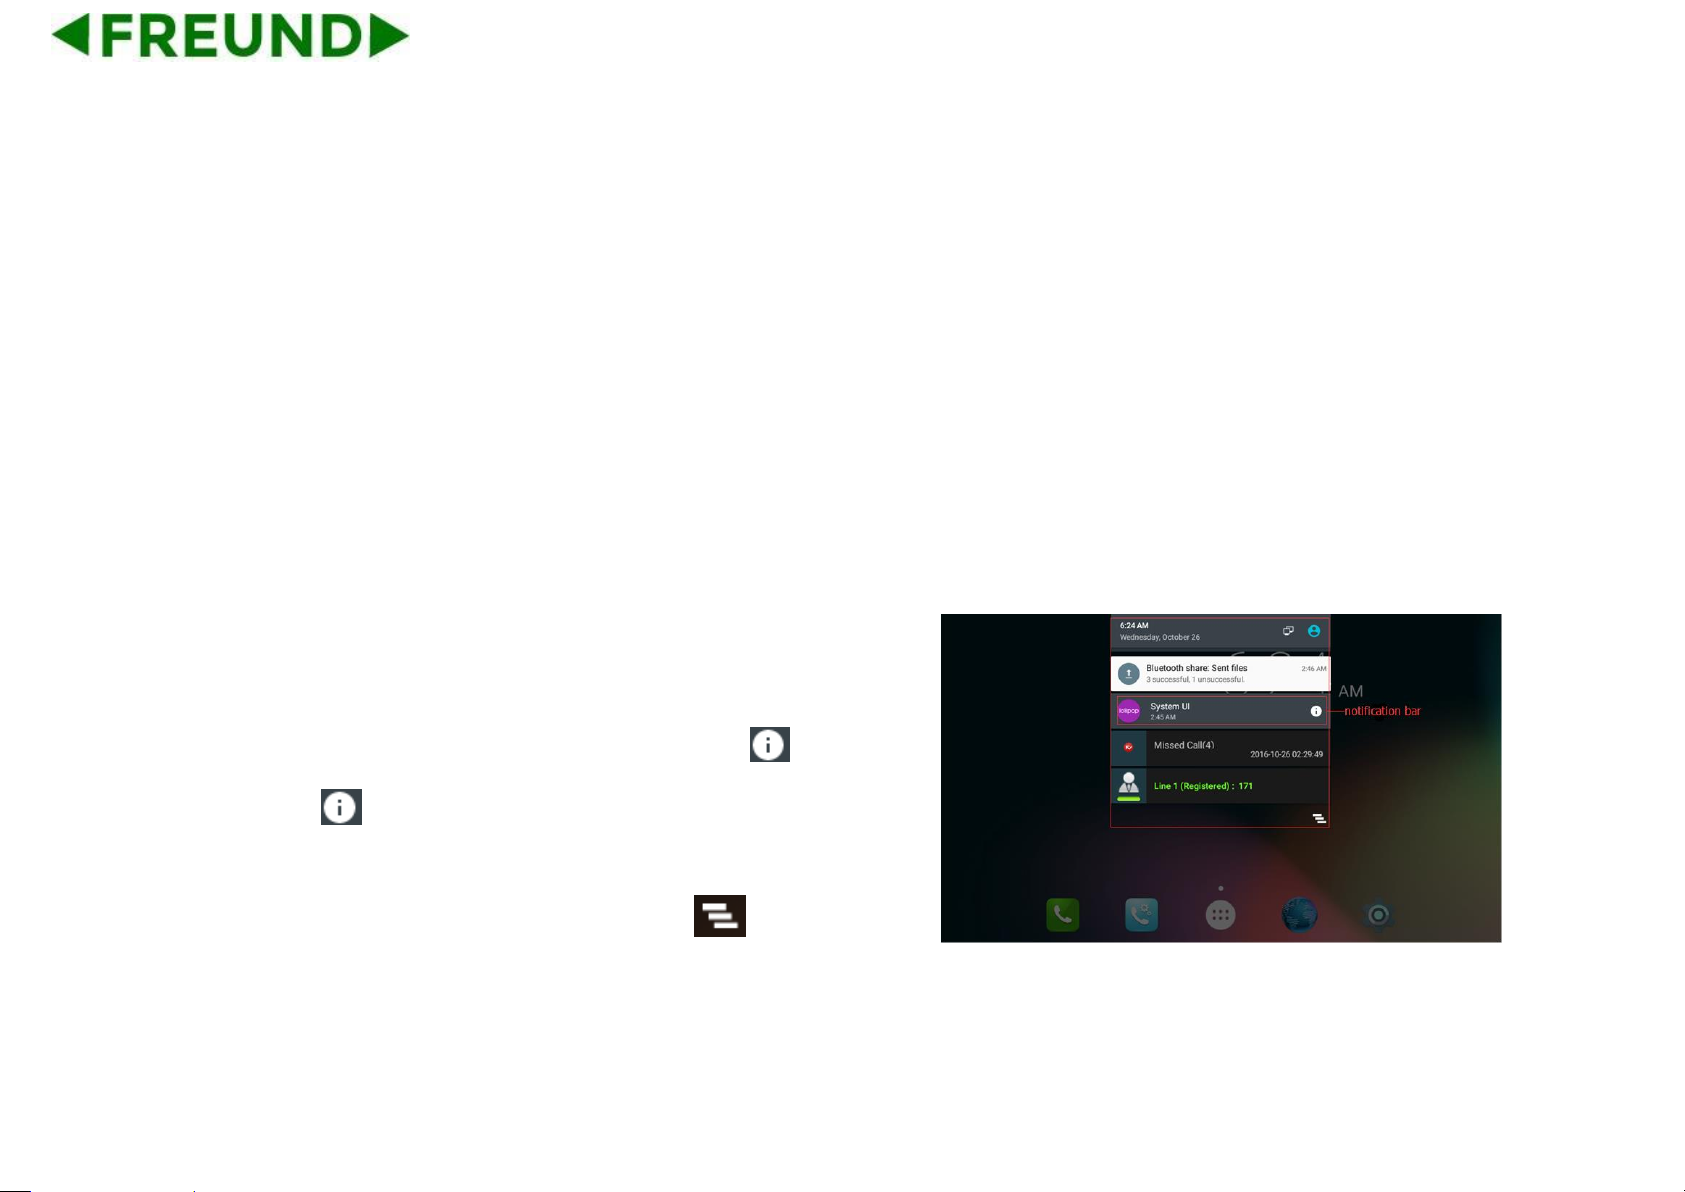
⚫ To view notifications, drag down the status bar, then click each
notification bar to view the detail notification.
⚫ Touch and hold one of notifications bar until the icon appear,
tap the icon to enter the priority setting interface.
⚫ To turn off notifications, simply drag down the middle of the idle
screen to display notifications, click on the icon to clear up the
notice.
Page 38
27
4.3. Connecting to Network and Wi-Fi
FE-TEL-48G supports a variety of network connections (Ethernet,
Wireless) and the device Network connections, including three modes,
Static IP, DHCP, Wi-Fi access. DHCP is the default configuration. The
device connections include EHS headset, USB and Bluetooth device.
4.3.1. Configuring Static IP
You can select one of the following methods to enter the static IP
configuration interface:
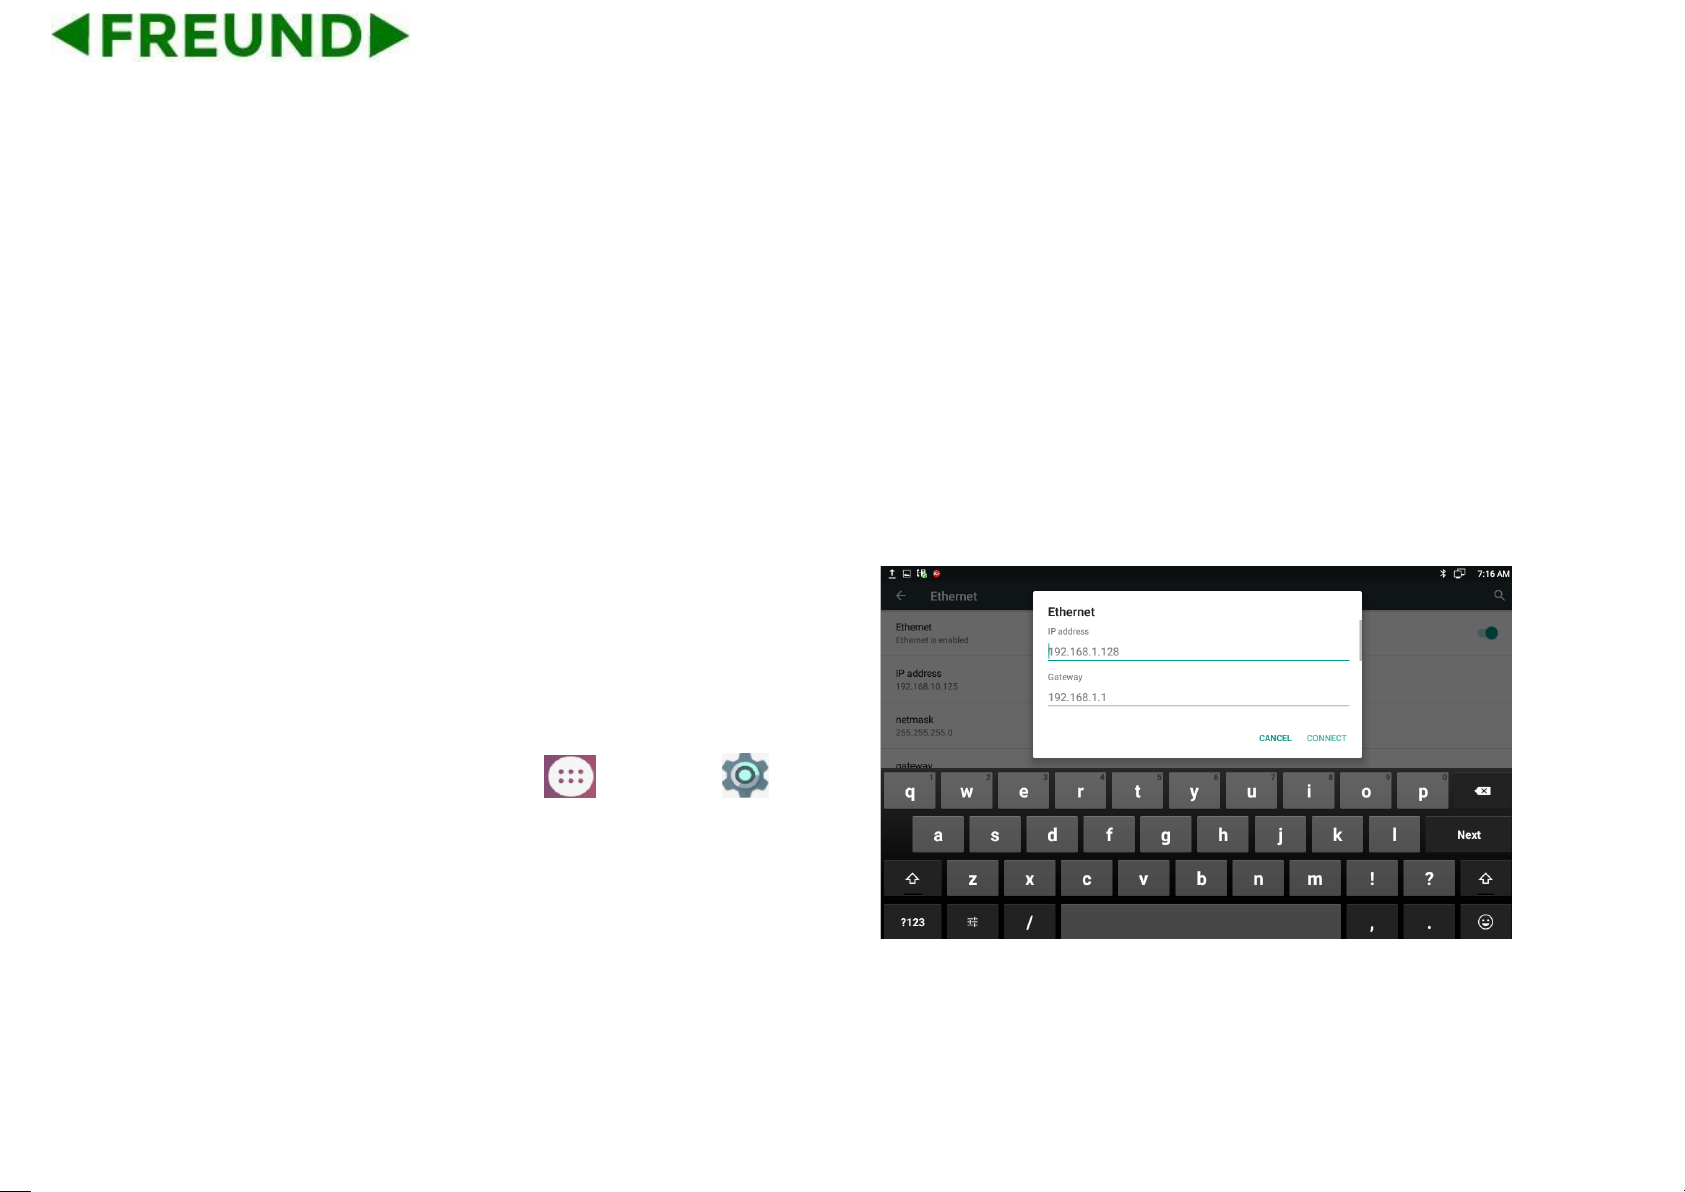
Mode 1: In the main screen, tap icon -> Settings -> Wireless
& Networks-> More-> Ethernet -> Ethernet IP mode ->check static.
Configuration page is shown as below:
Page 39
28
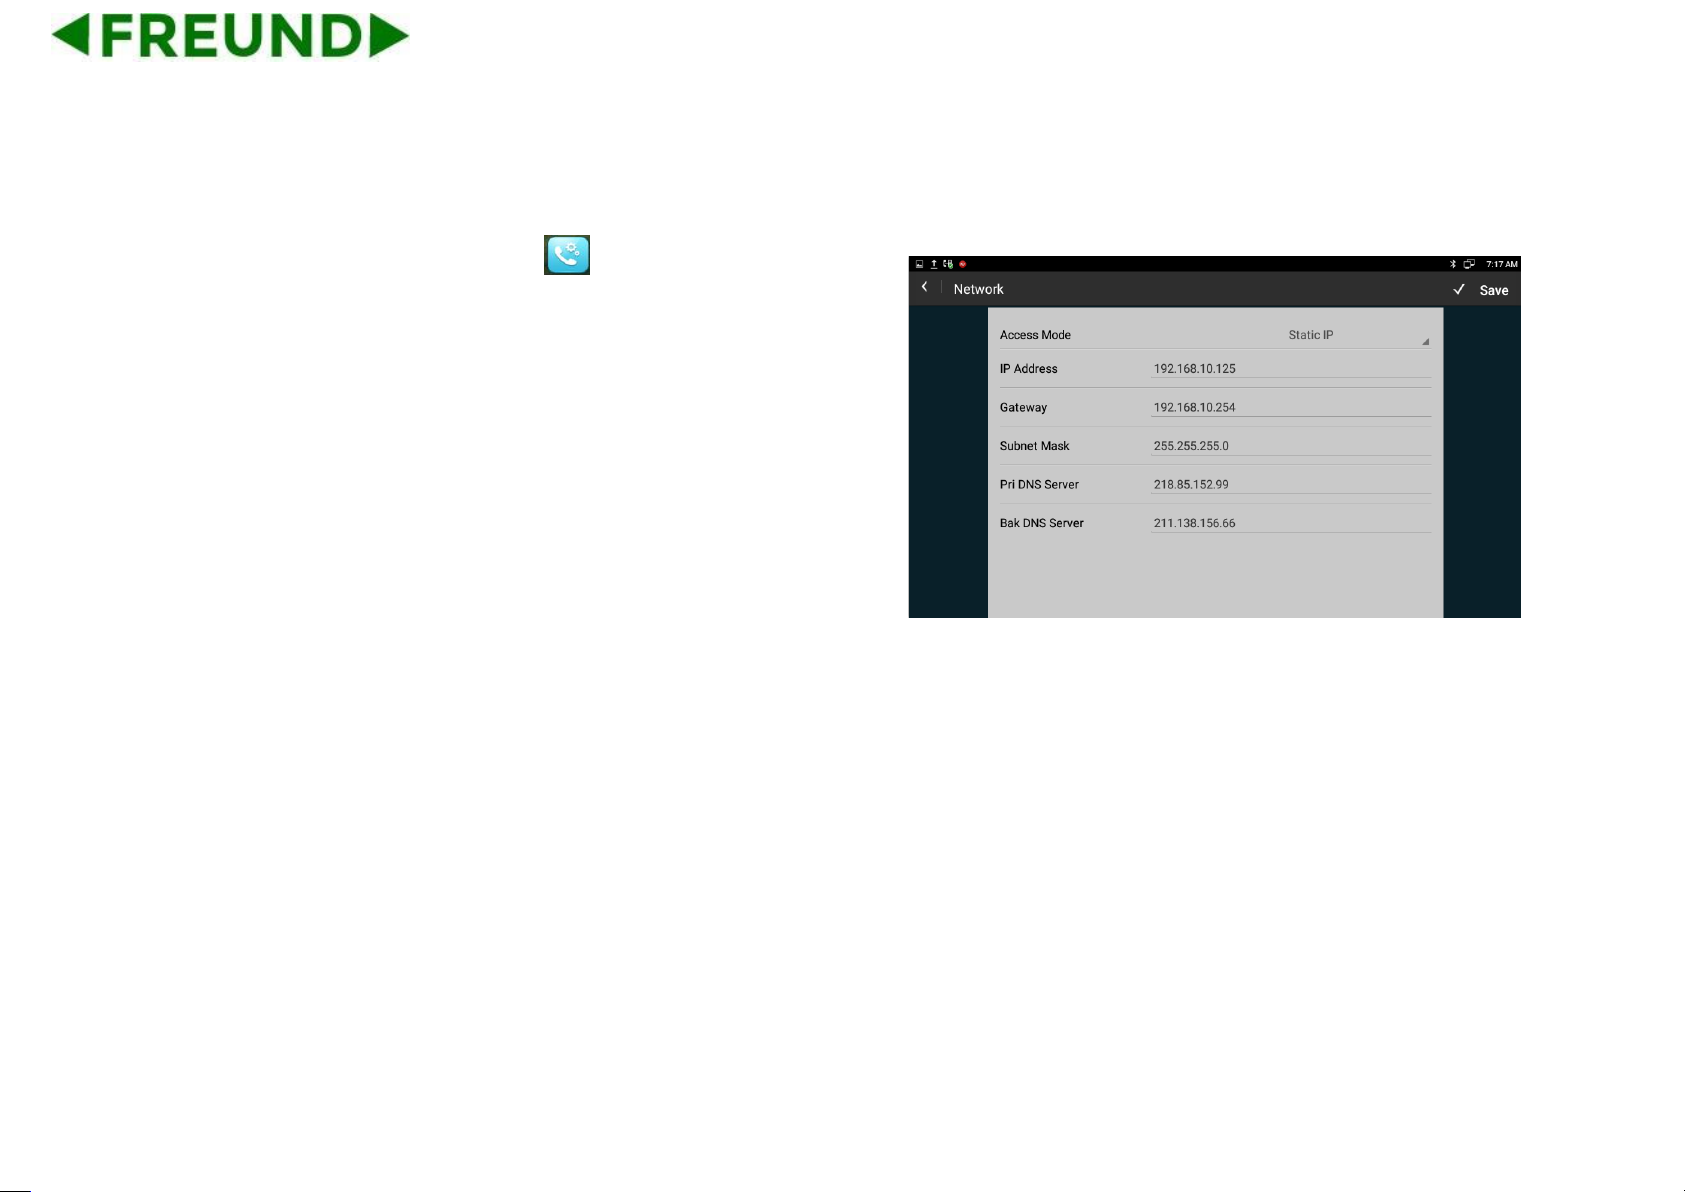
Mode 2: In the main screen, tap icon -> Network Settings -> LAN
Type->Access Mode->chose Static IP.
IP address: Set the IP address of the device
Subnet Mask: Set the subnet mask of the device
Default Gateway: Set the default gateway
DNS Server: Set the DNS address
Alternative DNS Server: Set the backup DNS address
Page 40
29
4.3.2. Configuring DHCP
The Phone will automatically get IP address once you choose DHCP
mode. You can select one of the following methods to enter the DHCP
configuration interface:
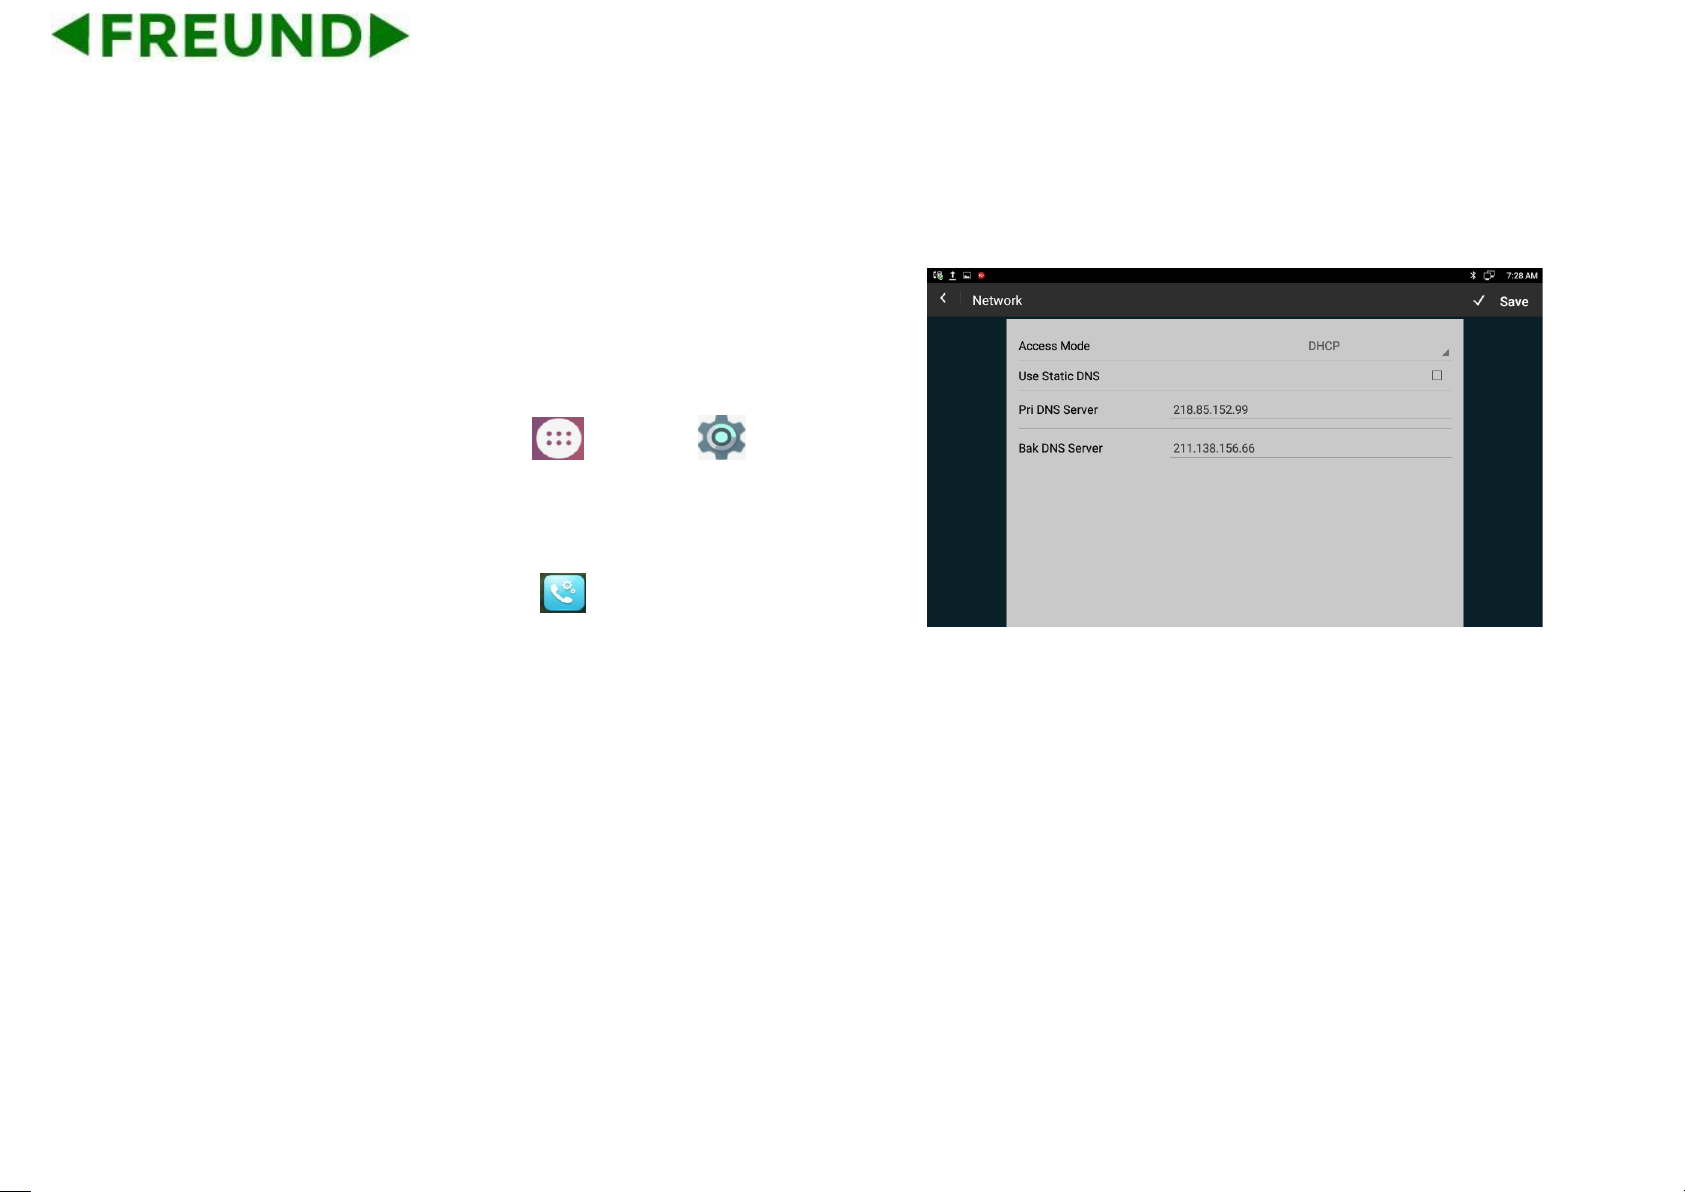
Mode 1: In the main screen, tap icon -> Settings -> Wireless &
Networks->More->Ethernet -> Ethernet Ip mode->check DHCP.
Mode 2: In the main screen, tap icon ->Network Settings->Network
Management->LAN Type->Access Mode-> choose DHCP.
Note:
There is an item of Use static DNS at the second bar, when checked,
you can modify the primary DNS address and Secondary DNS address.
If DHCP is failed, the IP address will show as: 0.0.0.0.
Page 41
30
4.3.3. Configuring Wi-Fi
You can select one of the following methods to enter the Wi-Fi
configuration:
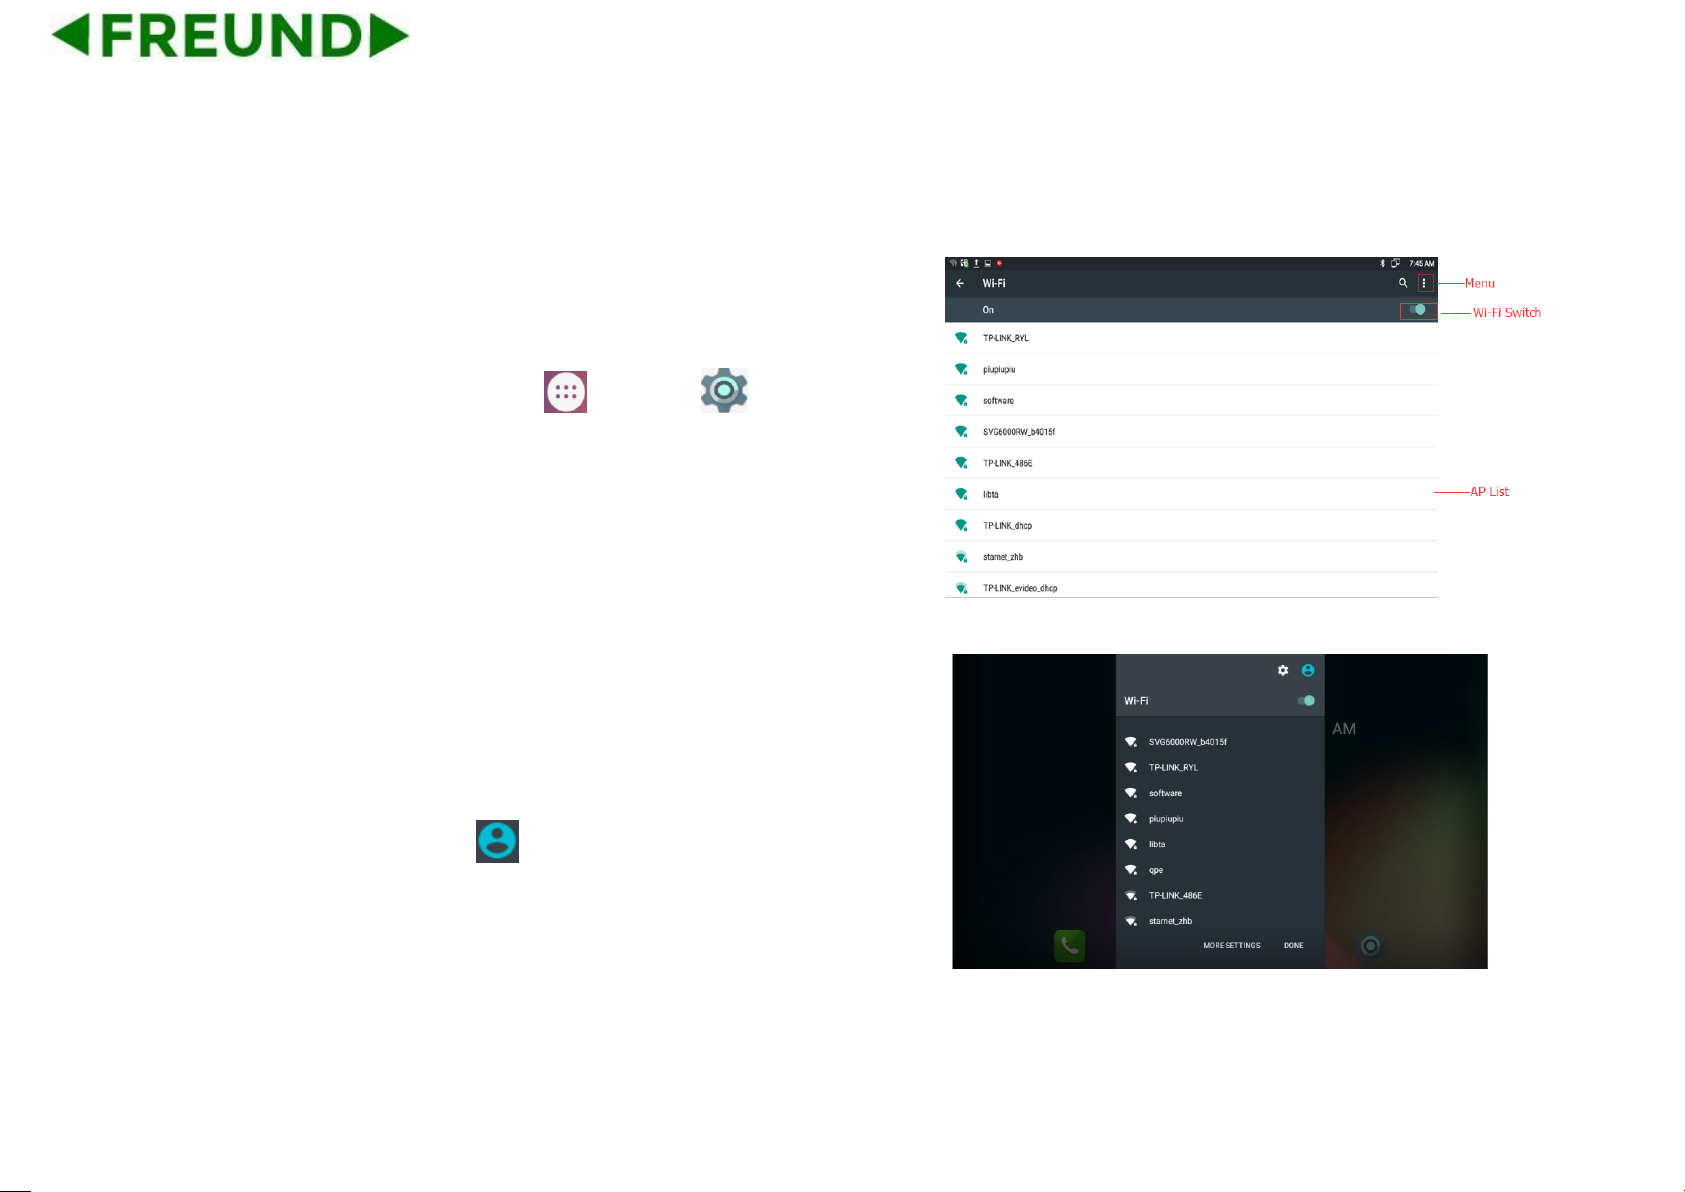
Mode 1: In the main screen, tap icon -> Settings -> Wireless &
Networks-> Wi-Fi.
Mode 2: In the main screen, drag down the middle of the idle screen to
display notifications-> tap icon -> tap Wi-Fi.
Page 42
31
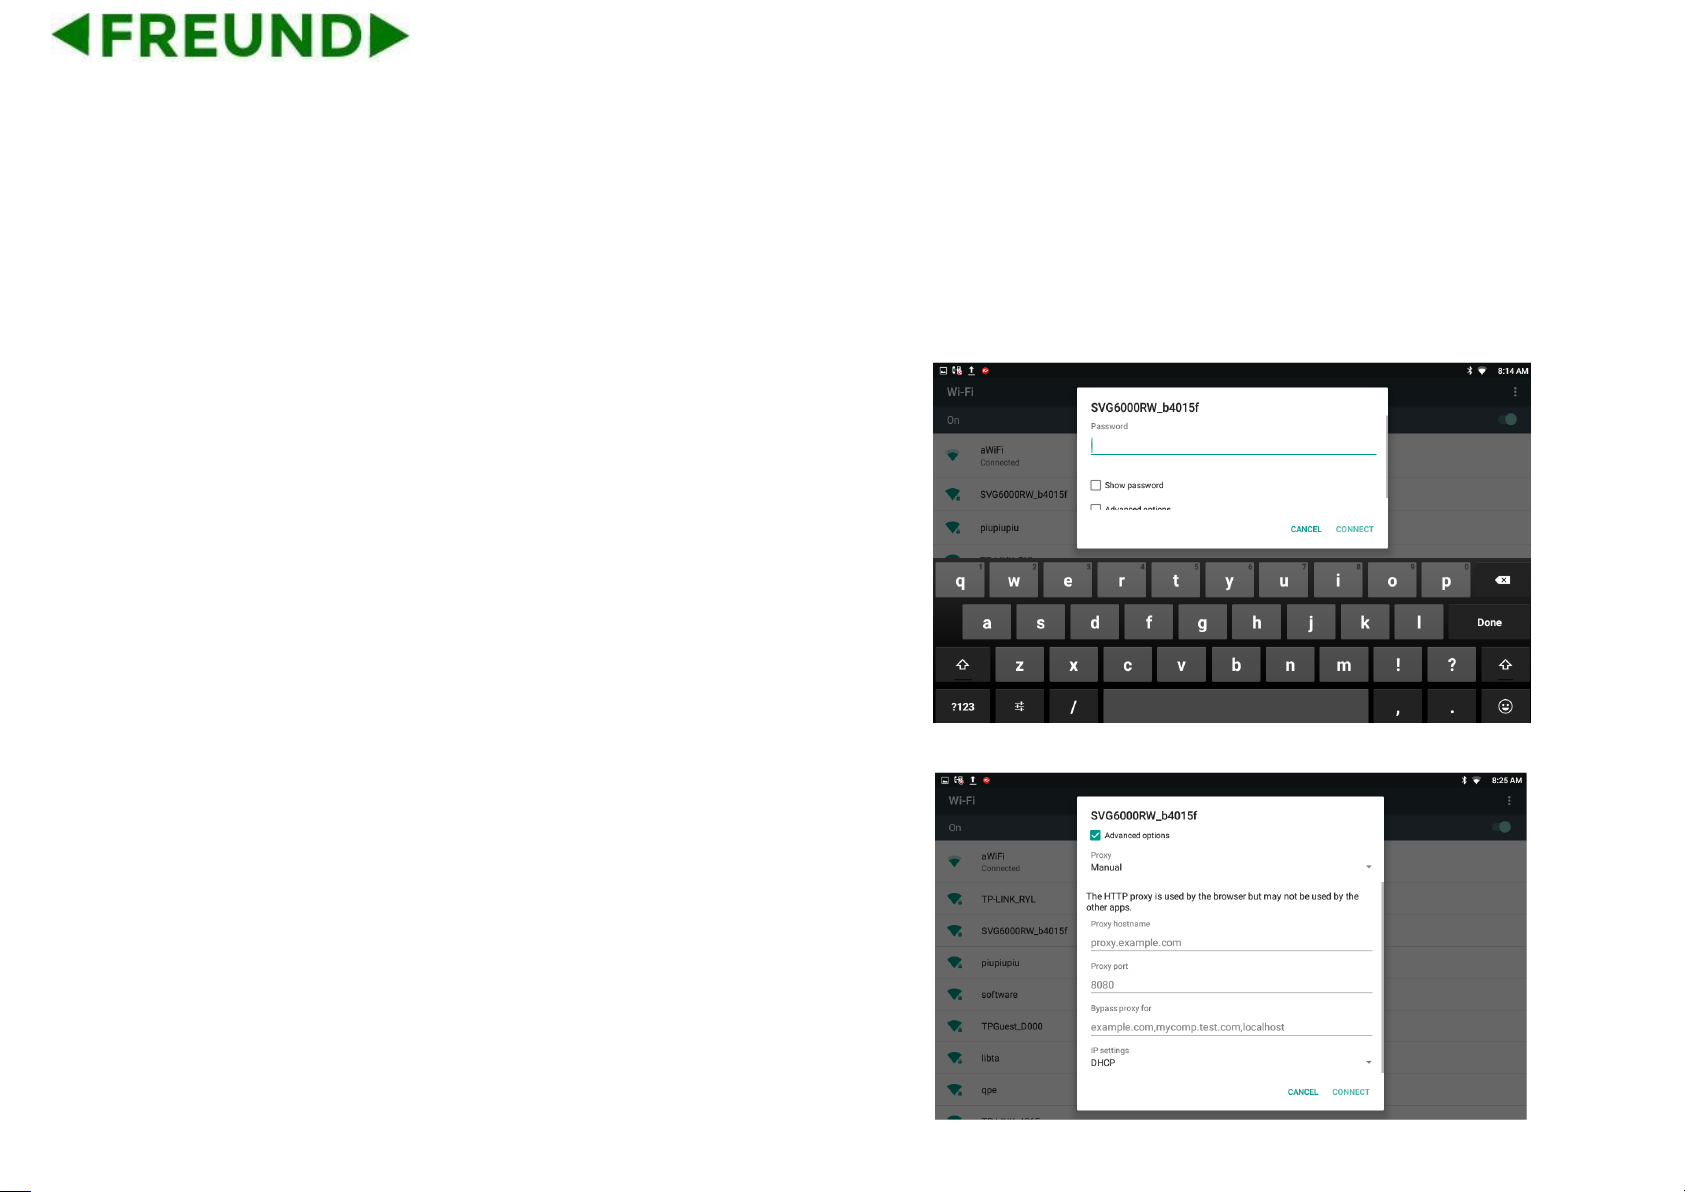
1) When the Wi-Fi switch is turned on, the video phone can list and
display all Wi-Fi AP searched in the environment.
2) When FE-TEL-48G connects to available AP in the environment, if a
Wi-Fi AP is without password protection, there is no lock icon on
Wi-Fi signal, it will automatically connect when clicked.
3) If a Wi-Fi AP is encryption, Wi-Fi signal will be added the lock icon,
and when checked, it will pop up a dialog box to enter a password. If
the password is incorrect, the connection will not be successful.
4) Check Show advanced options, drag up to the modify Proxy server
and IP mode.
Page 43
32
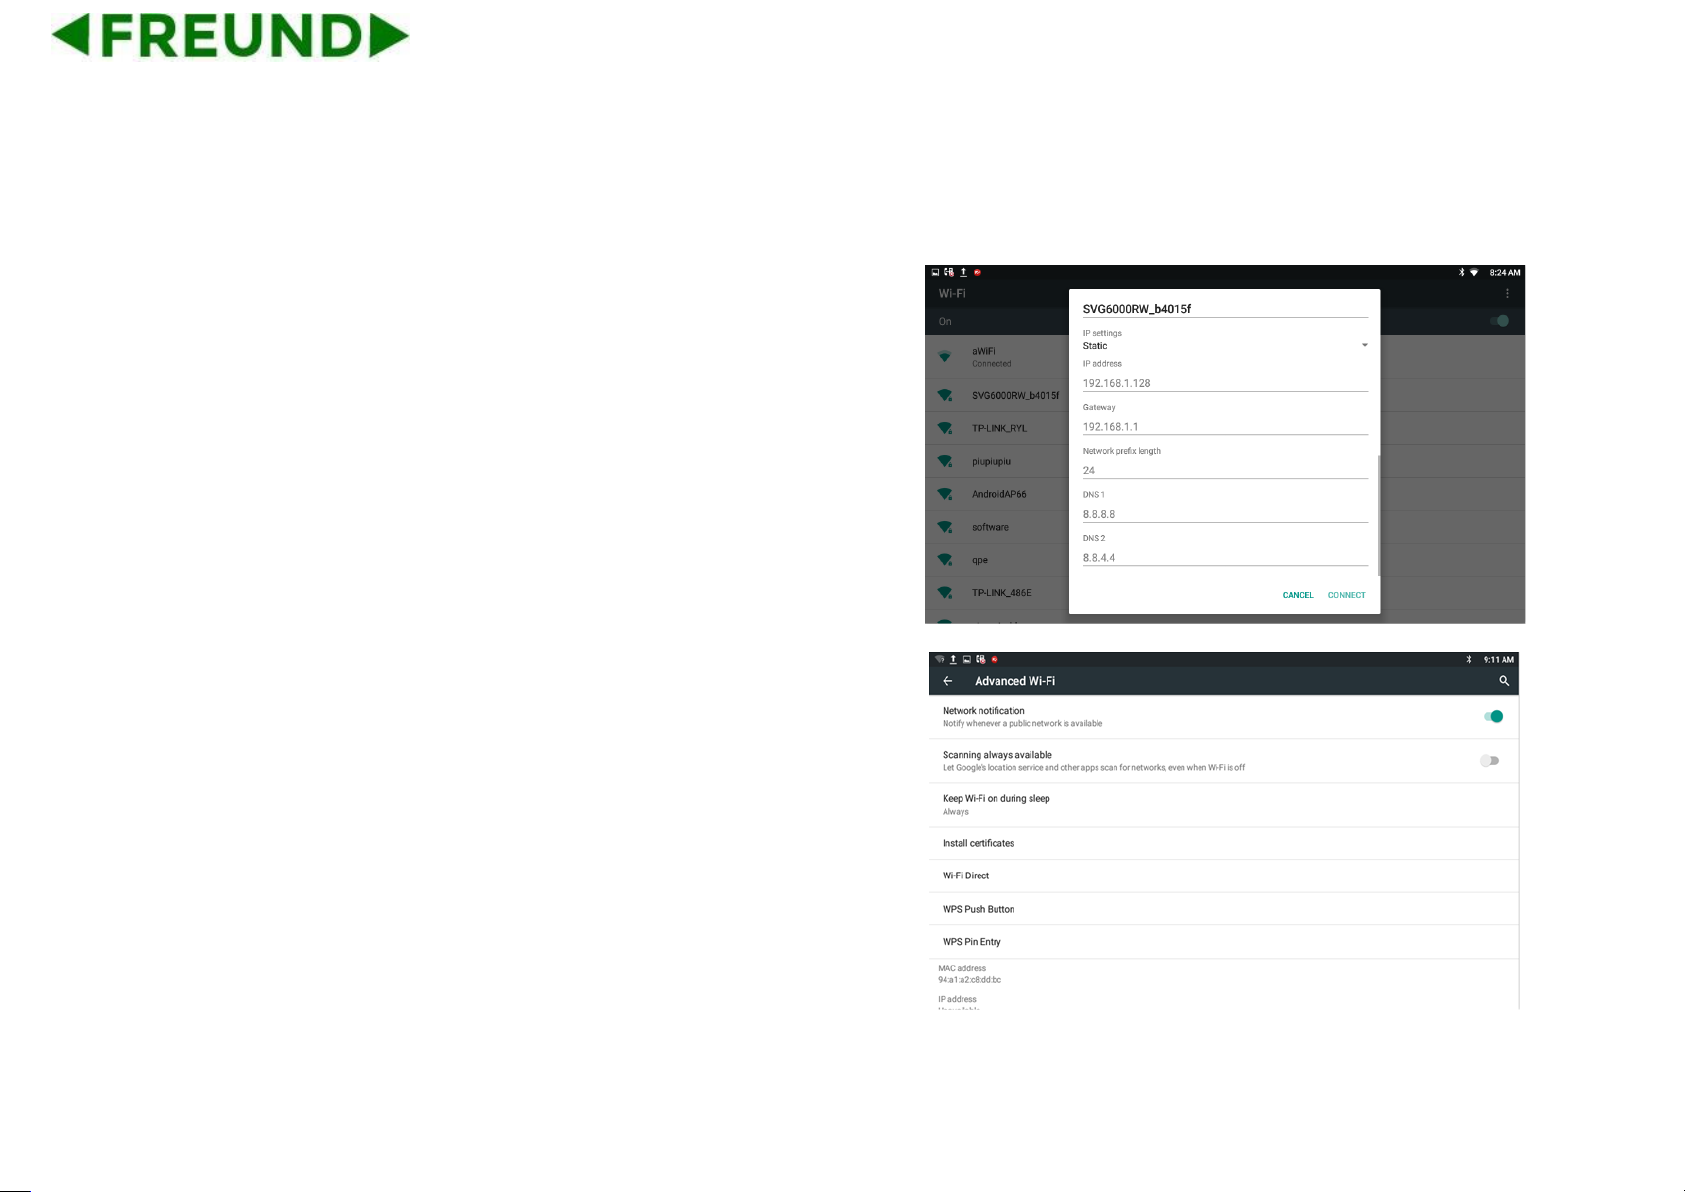
5) Tap the connected Wi-Fi AP, it will pop-up a dialog box, you can
forget the network or modify the network. Touch and hold on the
non-connected Wi-Fi AP, it will pop up a dialog box, and you can
click and connect to network.
6) Click Menu, you can do the operations, such as, adding network
setting, refreshing the Wi-Fi AP list and Advanced setting.
Advanced Wi-Fi
⚫ Check Network notification, it will notify you when an open network is
available;
⚫ Check Scanning always available, let Google’s location service and
other apps scan for networks, even when Wi-Fi is off.
⚫ View the Wi-Fi Mac address and IP address;
Page 44
33
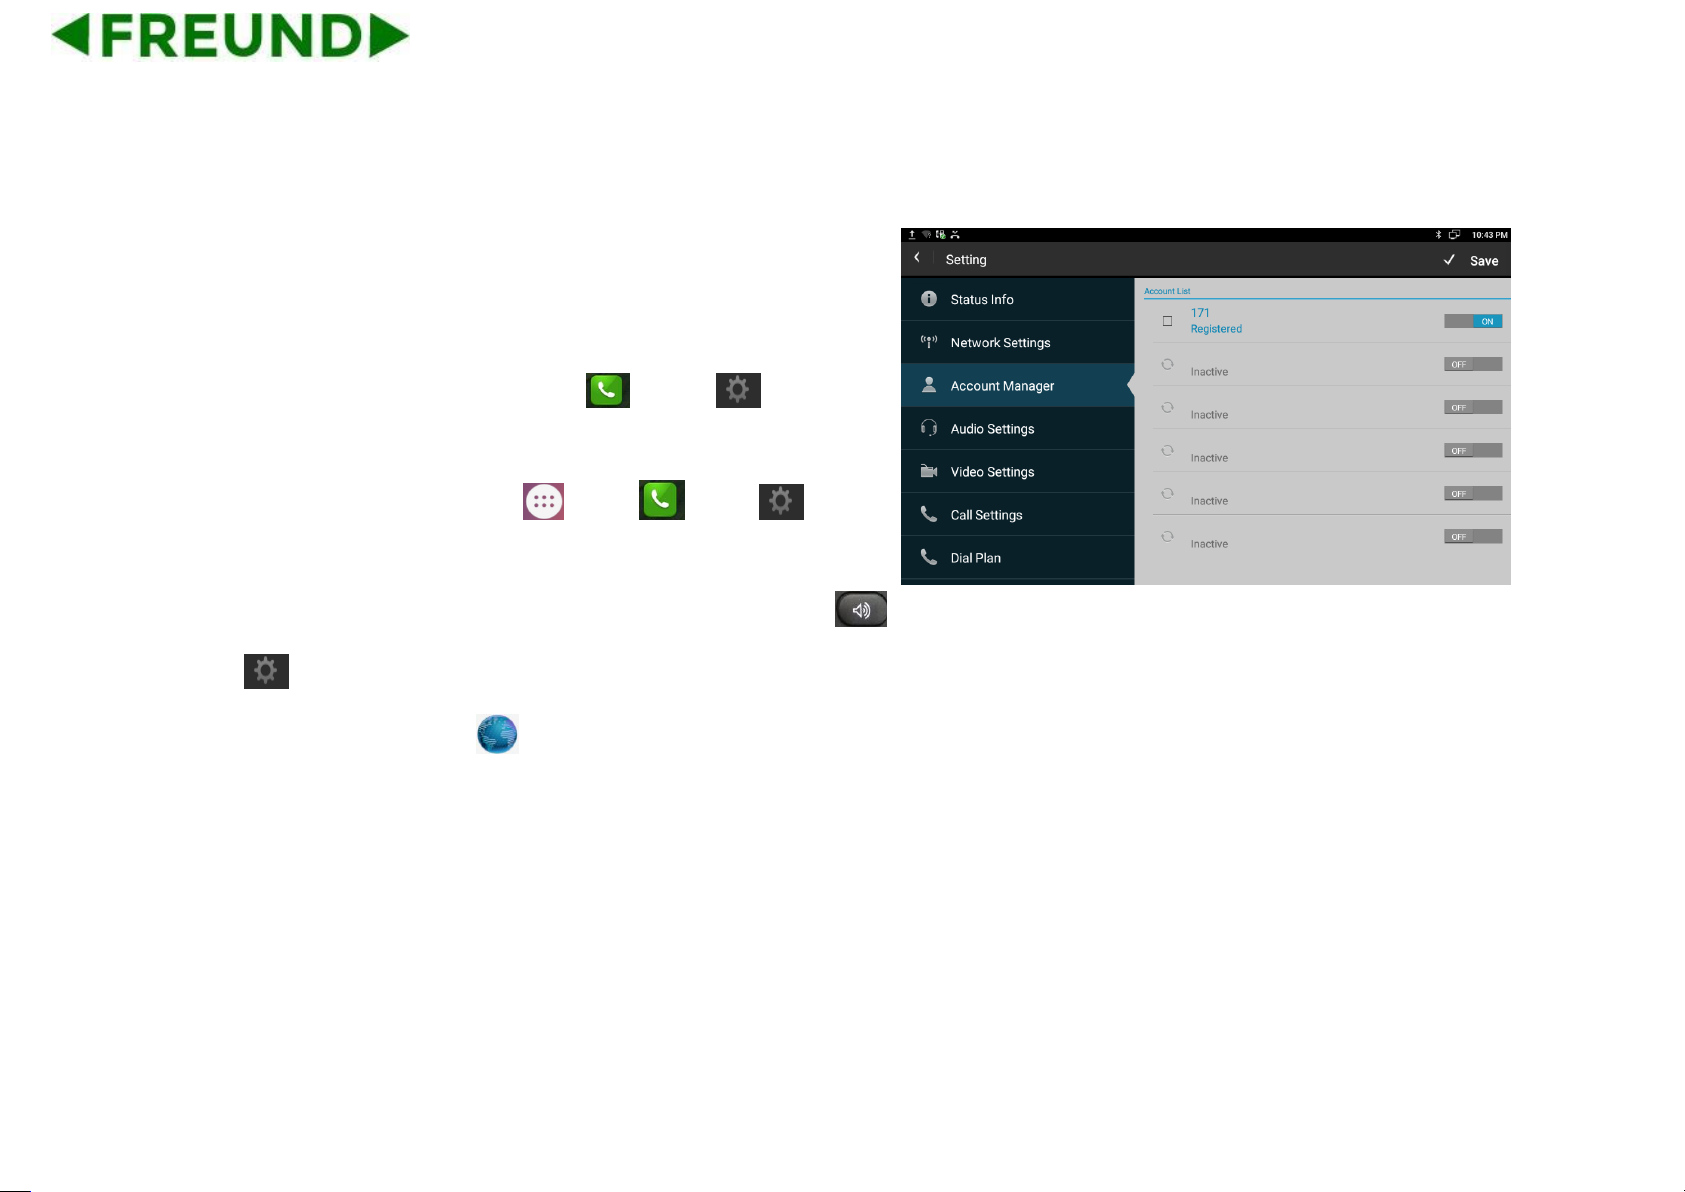
4.4. SIP Account Configuration
You can select one of the following methods to enter the SIP account
configuration:
⚫ Mode 1: In the main screen, tap icon -> click -> click
Account Manager.
⚫ Mode 2: In the main screen, tap -> click -> click -> click
Account Manager.
⚫ Mode 3: Directly pick up the handset or press Speaker button ->
click ->click Account Manager.
⚫ Mode 4: Click Browser icon , input IP address to enter login
interface. Input username and password (default: admin; admin),
click Login label. Go to the path: Account->Basic.
Page 45
34
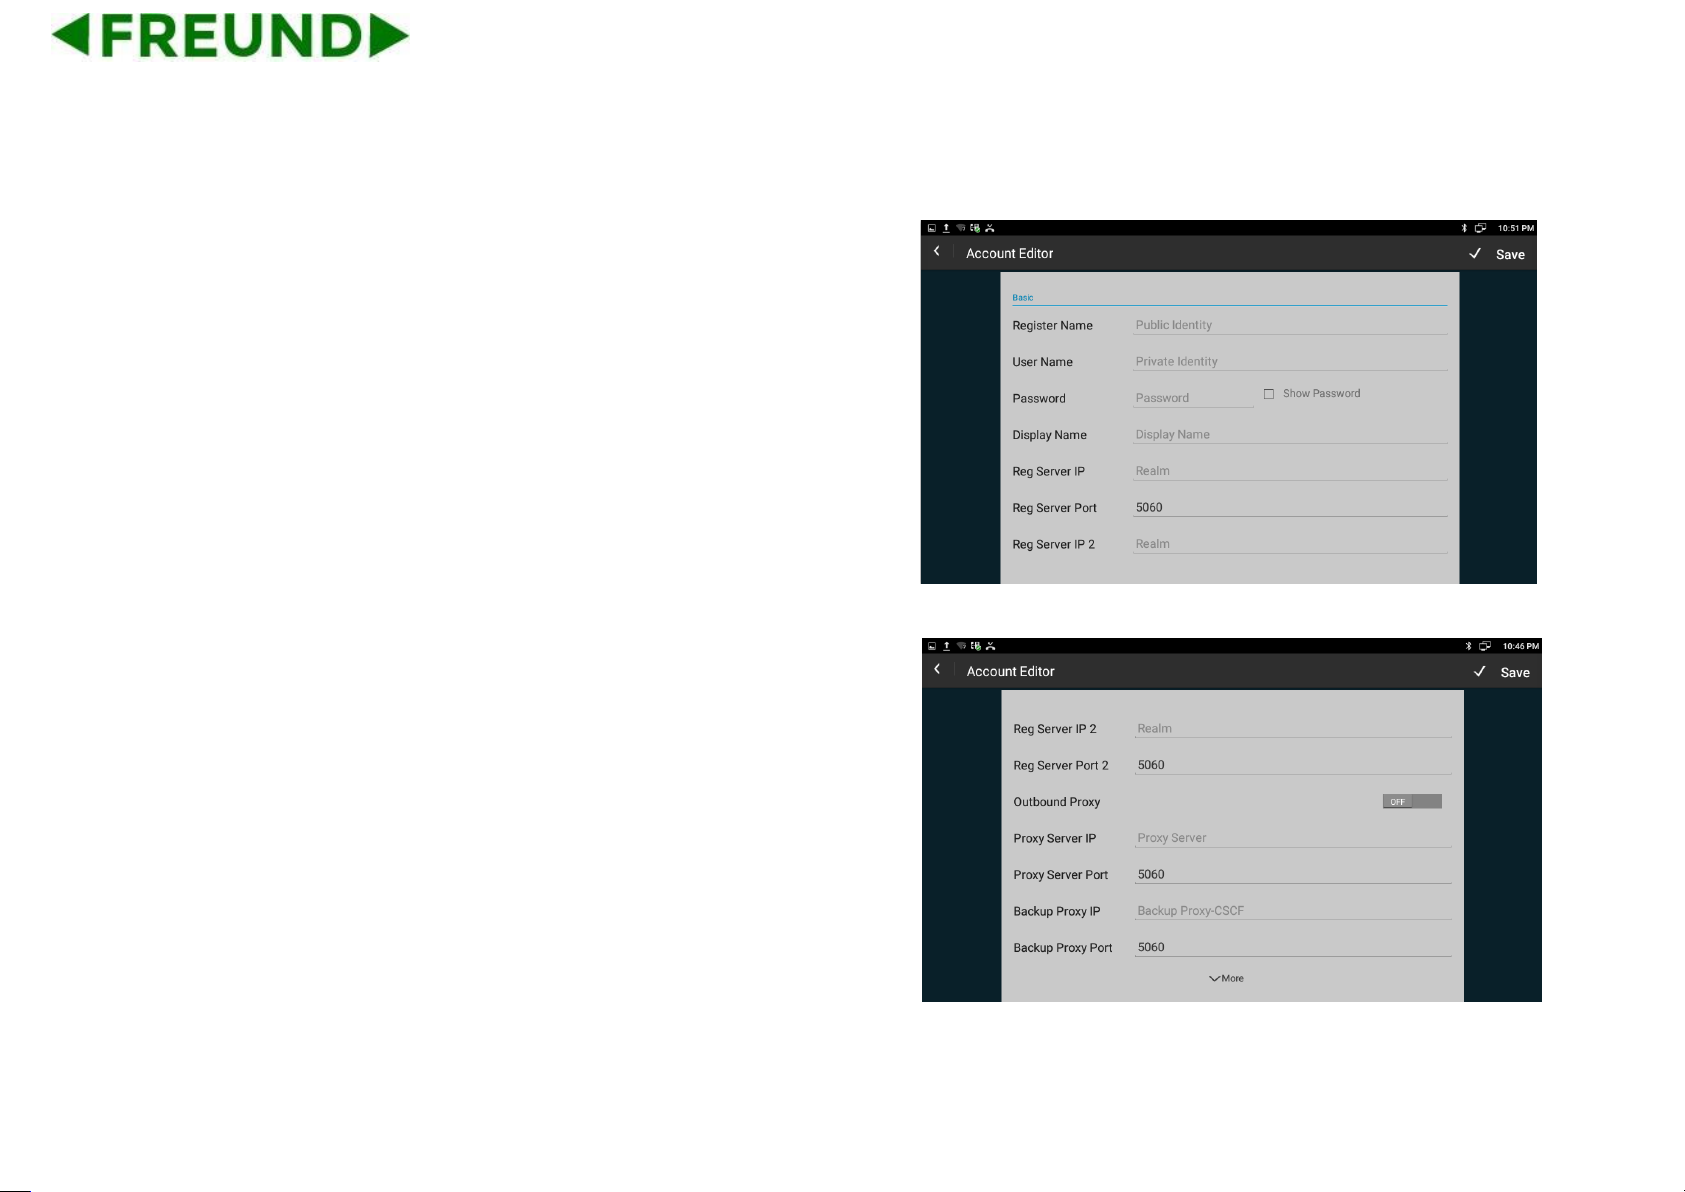
4.4.1. Add Account
Click an account to enter the interface of Account Editor.
⚫ Register Name: SIP Account ID provided by ISP
⚫ User Name: SIP User Name provided by ISP
⚫ Password: SIP Password provided by ISP
⚫ Display Name: SIP Display name
⚫ Reg Server IP: SIP Register Server, format: domain/IP, for example:
194.168.1.2
⚫ Reg Server Port: The default port is 5060.
⚫ Proxy Server IP: SIP Proxy Server, format: domain/IP, for example:
194.168.1.2
⚫ Proxy Server Port: The default port is 5060.
⚫ Backup Proxy IP: SIP Backup Proxy Server, format: domain/IP, for
example: 194.168.1.2
⚫ Backup Proxy Port: The default port is 5060.
Page 46
35
After all the parameters are configured, click "save" button to save the
configurations, then the sip account is added successfully. Then activate
the account.
4.4.2. SIP Account ON/OFF
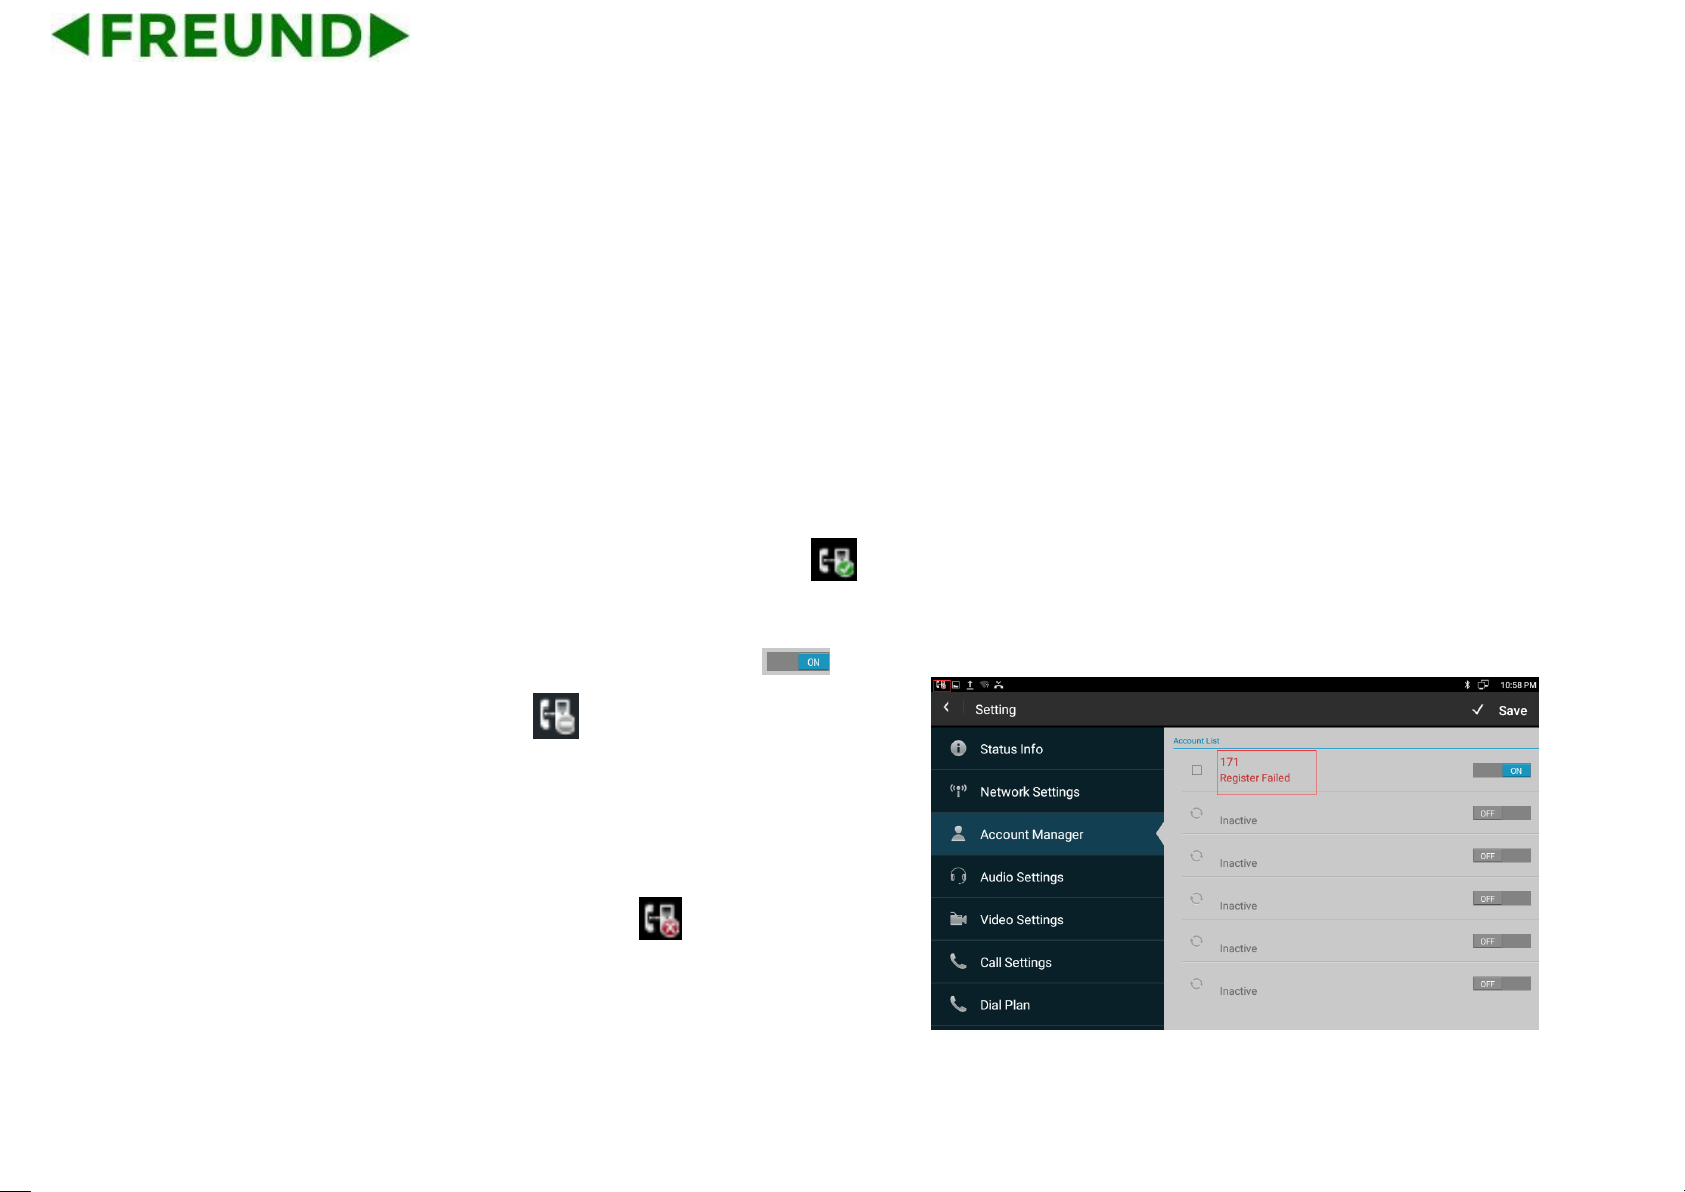
After SIP account is configured and registered successfully, it will display
the prompt “Registered” in the Account Manager, and the icon will
be displayed on the status bar.
If you want to disable the registered account, tap the icon to
change the account status, the icon will be shown on the status
bar.
If the sip account is failed to register, the failure code will be displayed
under the account, and then you can check with the account
configuration or network connection. The icon will be shown on the
status bar.
Page 47
36
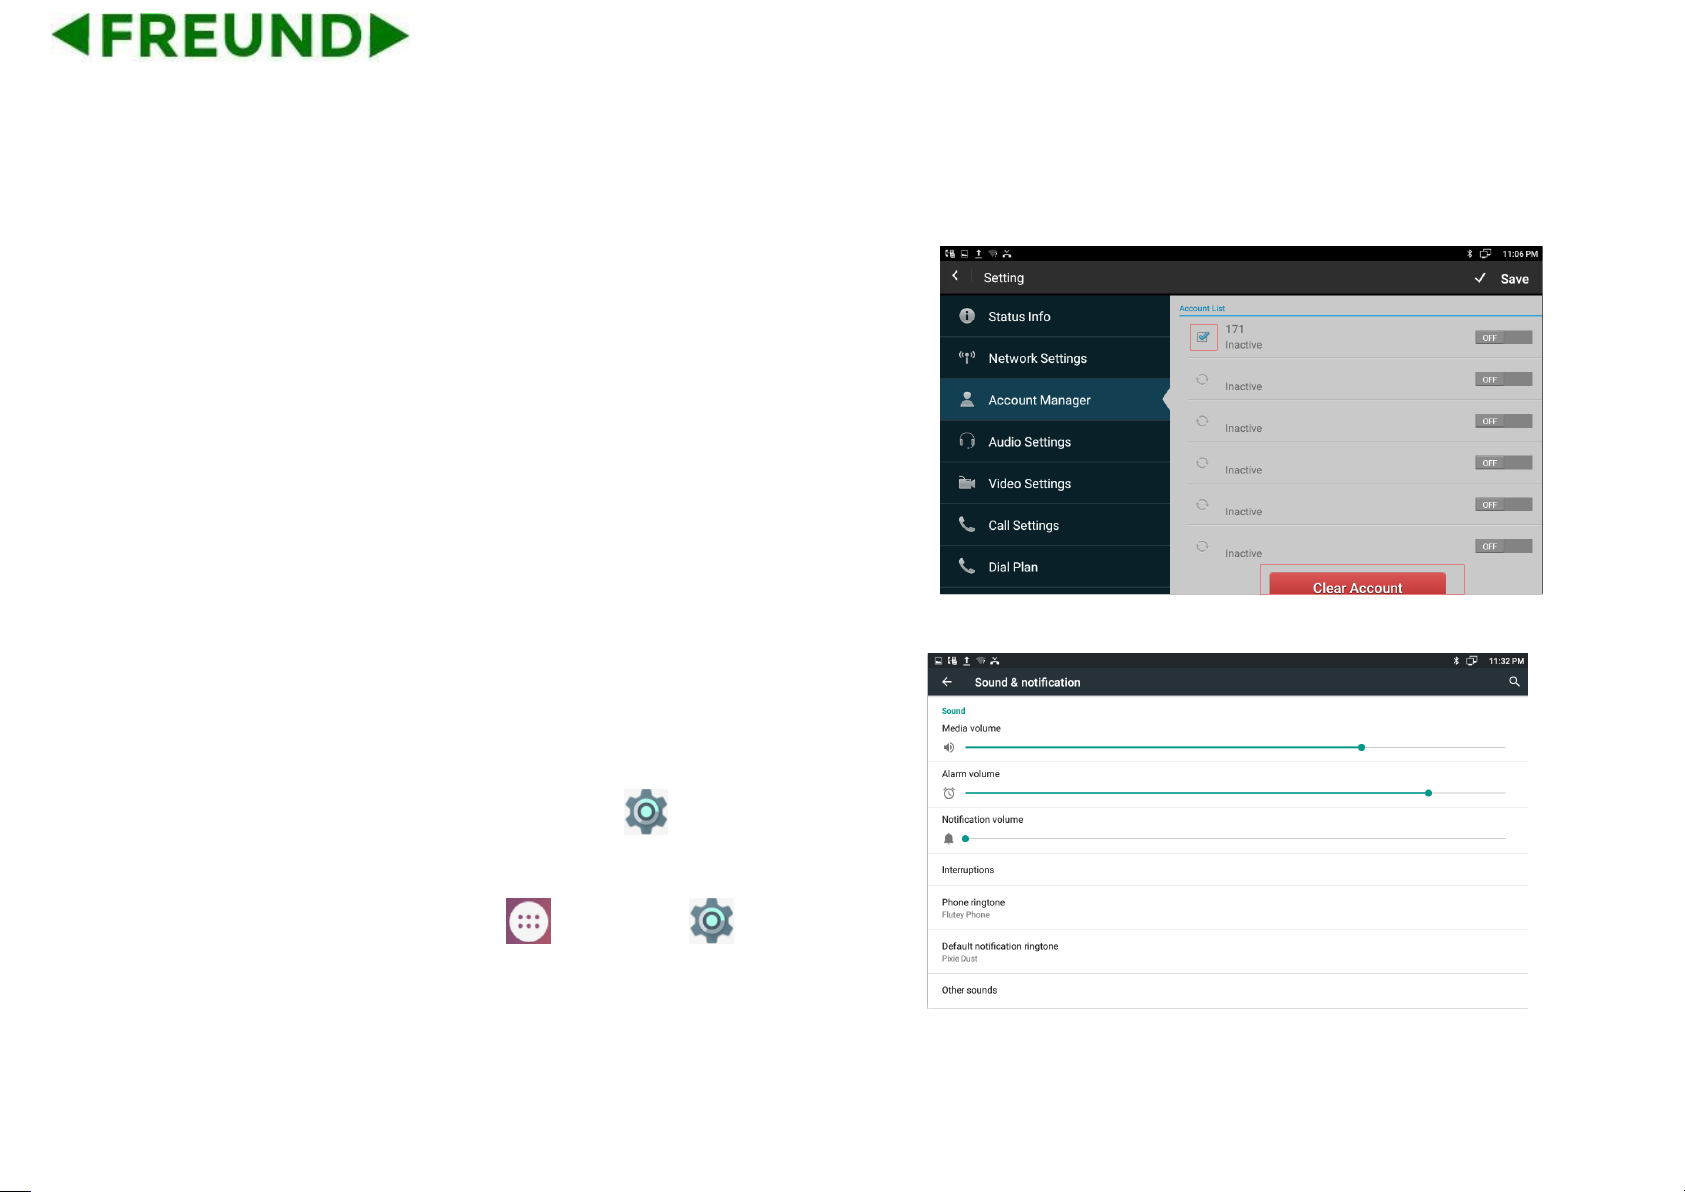
4.4.3. Modify/Remove SIP Account
Modify the sip account: Directly click the account to modify.
Remove the sip account: Click the box of the account which you want to
delete, the bottom of the account list will display the label “Clear
Account”, tap this label to remove the selected account.
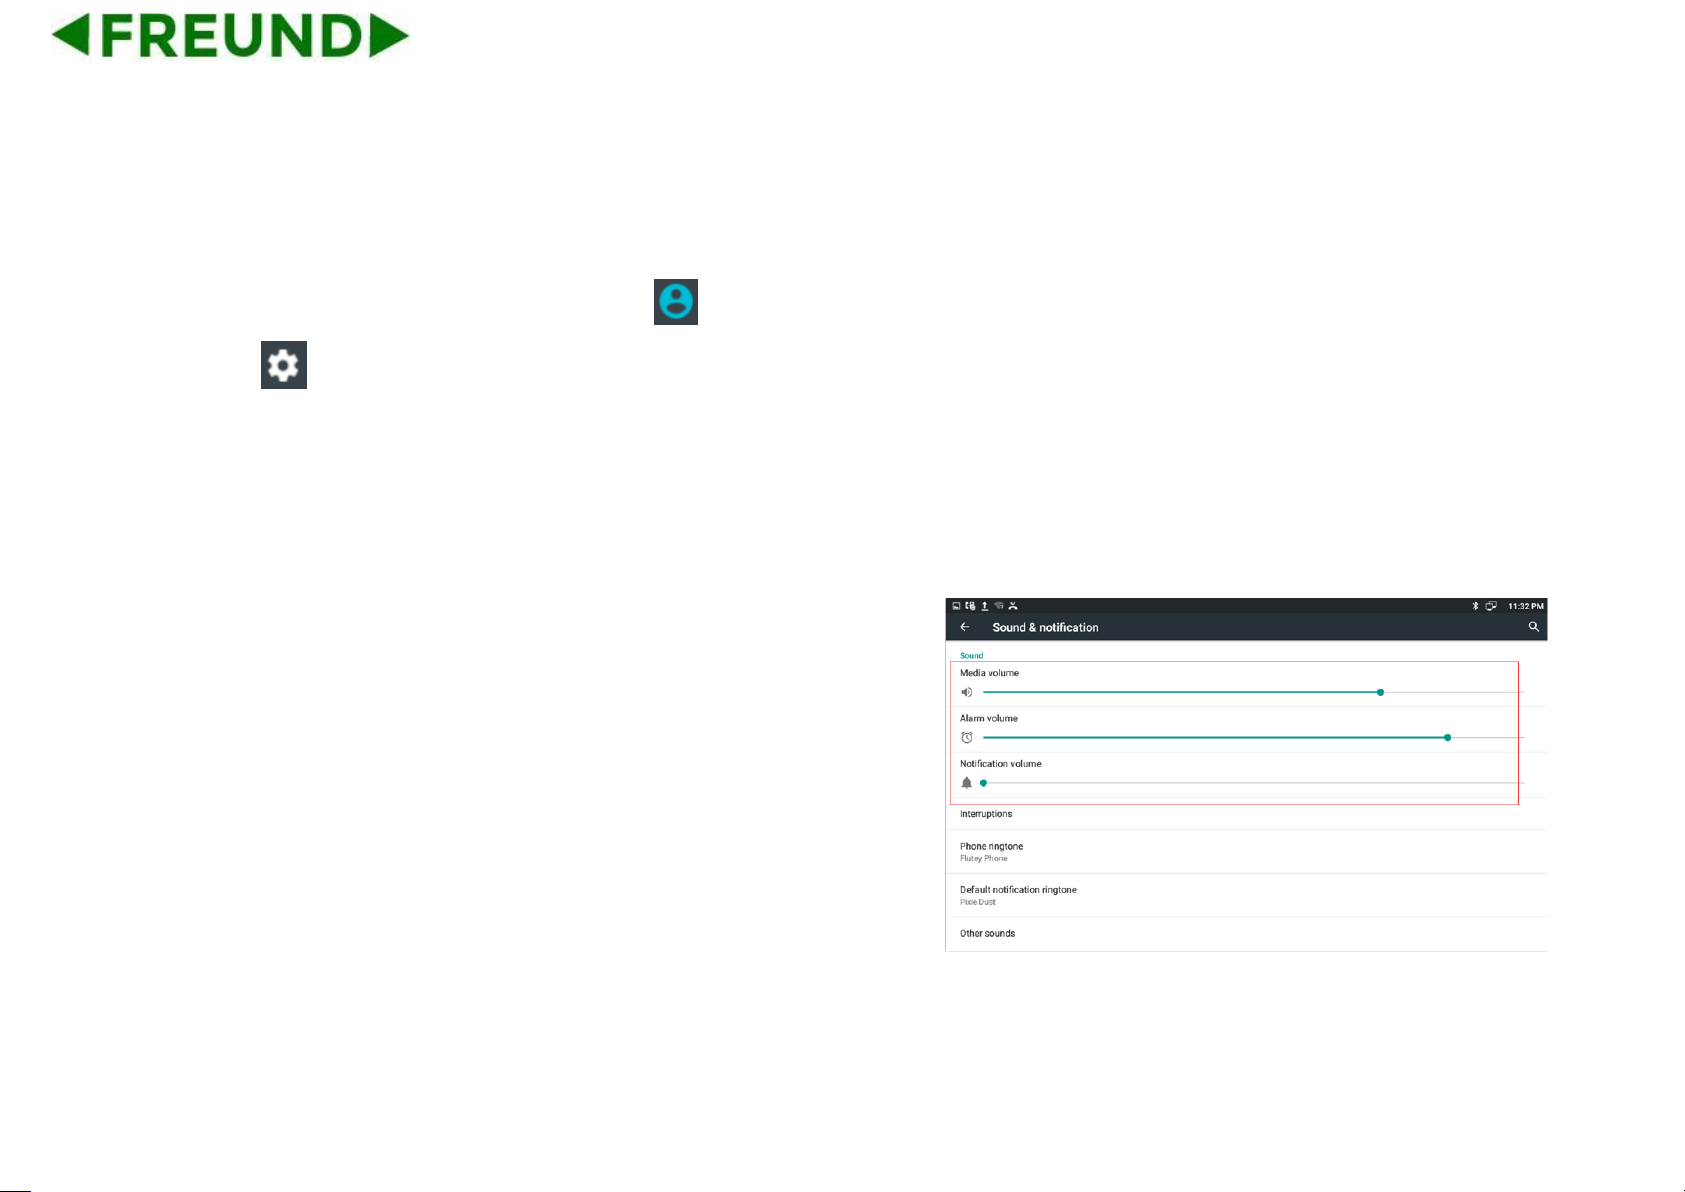
4.5. Sound & notification
You can select one of the following methods to enter the Sound
configuration:
Mode 1: In the main screen, tap shortcut icon -> Device-> Sound &
notification.
Mode 2: In the main screen, click -> Settings -> Device->
Sound & notification.
Page 48
37
Mode 3: Drag down the status bar, click the icon on the status bar
->tap icon ->Device-> Sound & notification.
Including Volume, Ringtone and Notification.
4.5.1. Volumes
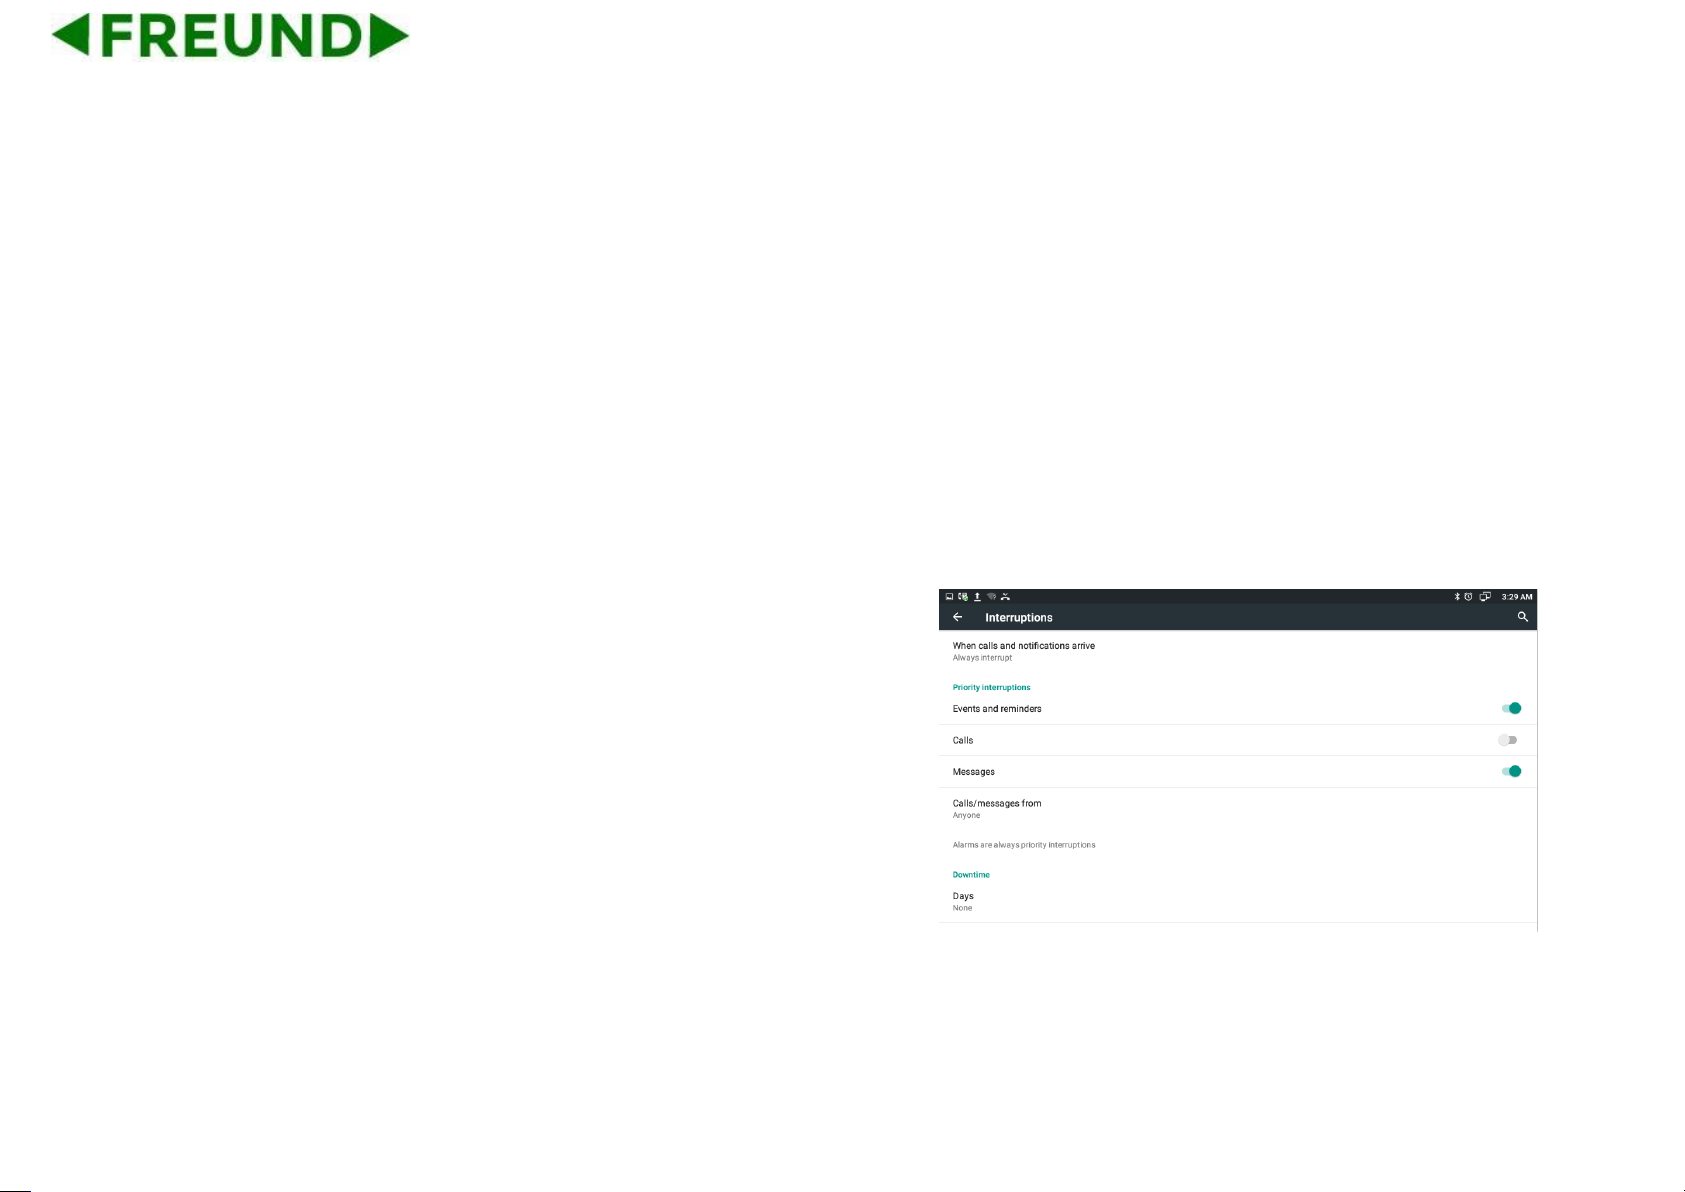
In Sound & notification page, the volume configure is shown as below:
Volume options include Media, Alarm clock, Notification.
You can directly click a volume location to adjust the volume.
The volume settings, you can also press the keyboard volume button “+
-” to increase or decrease the volume. Usually, volume button is
to adjust for ringtone or notification volume, but in
the broadcast media, pressing volume button is to adjust for media
volume.
Page 49
38
⚫ Volume options include Media, Alarm clock, Notification.
⚫ You can directly click a volume location to adjust the volume.
⚫ The volume settings, you can also press the keyboard volume
button “+ -” to increase or decrease the volume. Usually, volume
button is to adjust for ringtone or notification volume, but in
the broadcast media, pressing volume button is to adjust for media
volume.
4.5.2. Interruptions
In the Sound & notification interface, click the Interruptions bar, enter the
interruptions setting interface. If users open the Silent mode, it will enter
the interruption interface to set priority event or priority time allow
interrupt.
Page 50
39
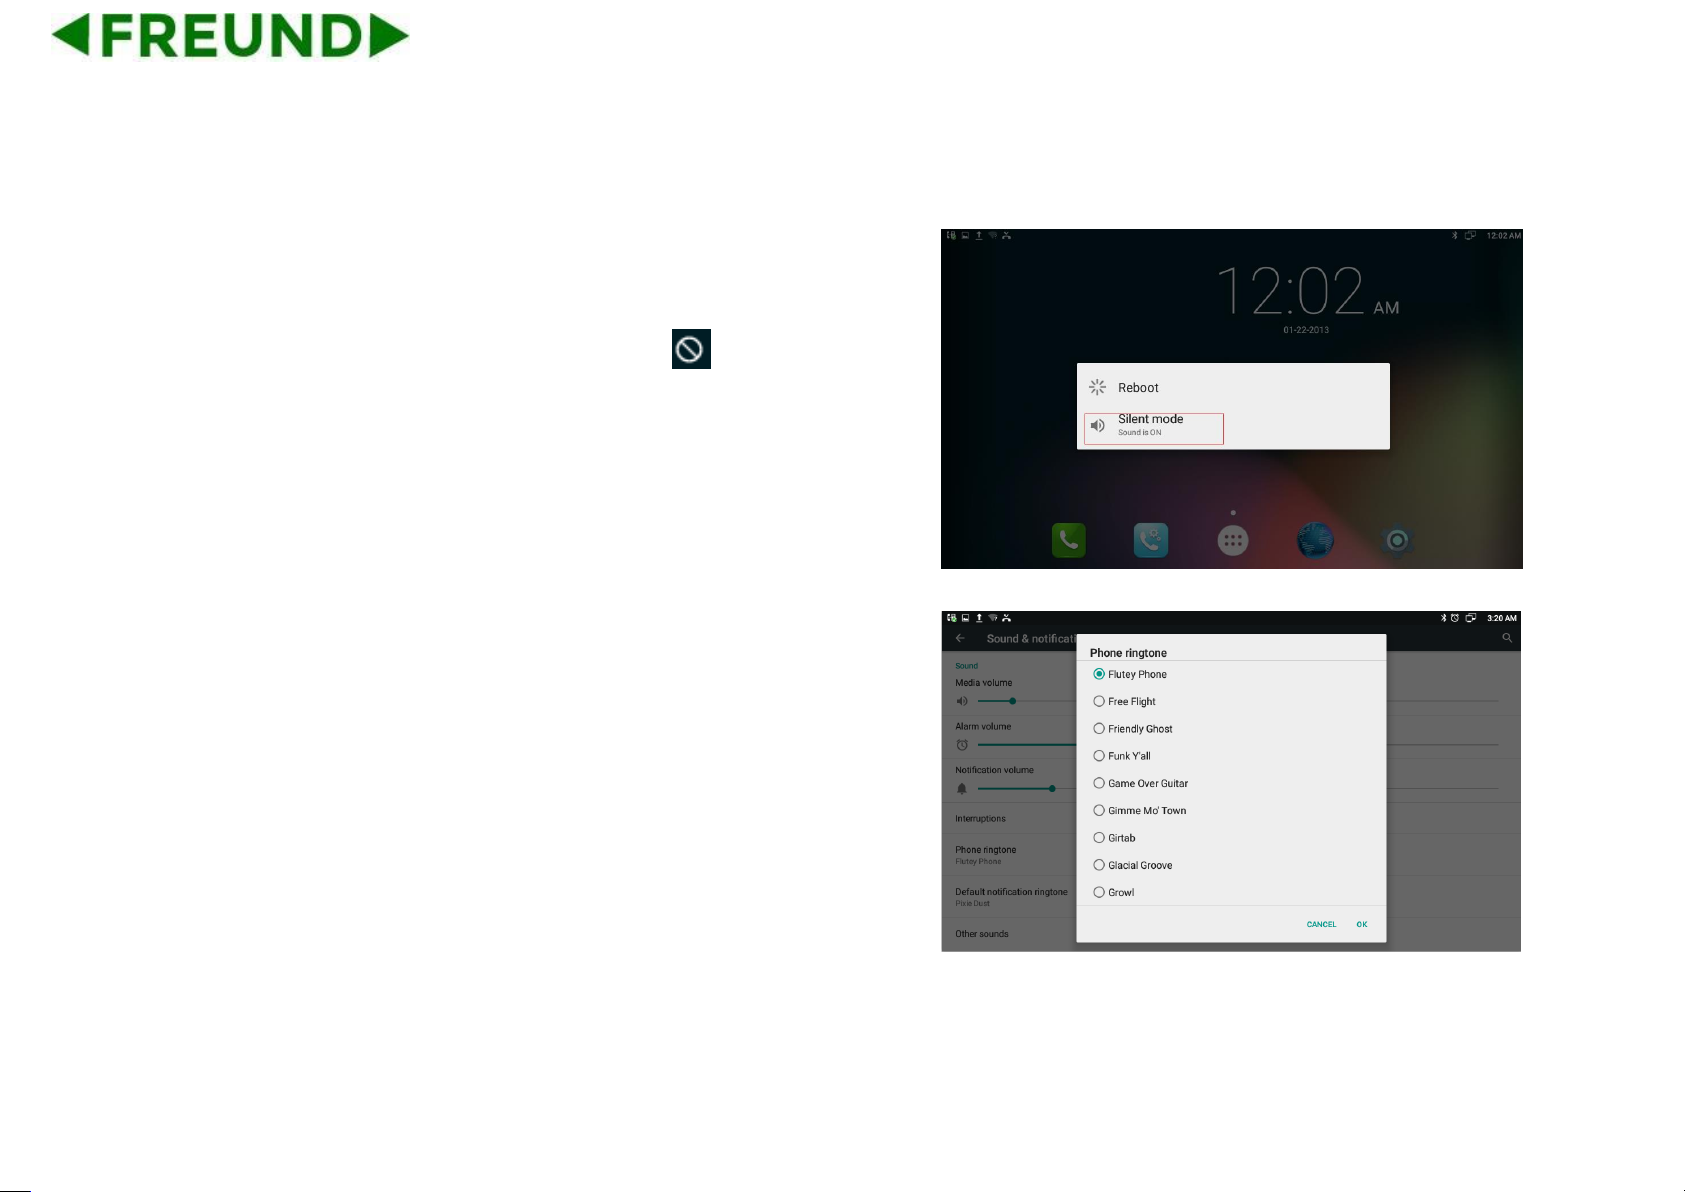
Touch and hold the Power button, tap the Silent mode bar in the pop-up
menu to change the status. The silent mode icon will be displayed
on the right side of the status bar.
4.5.3. Phone ringtone
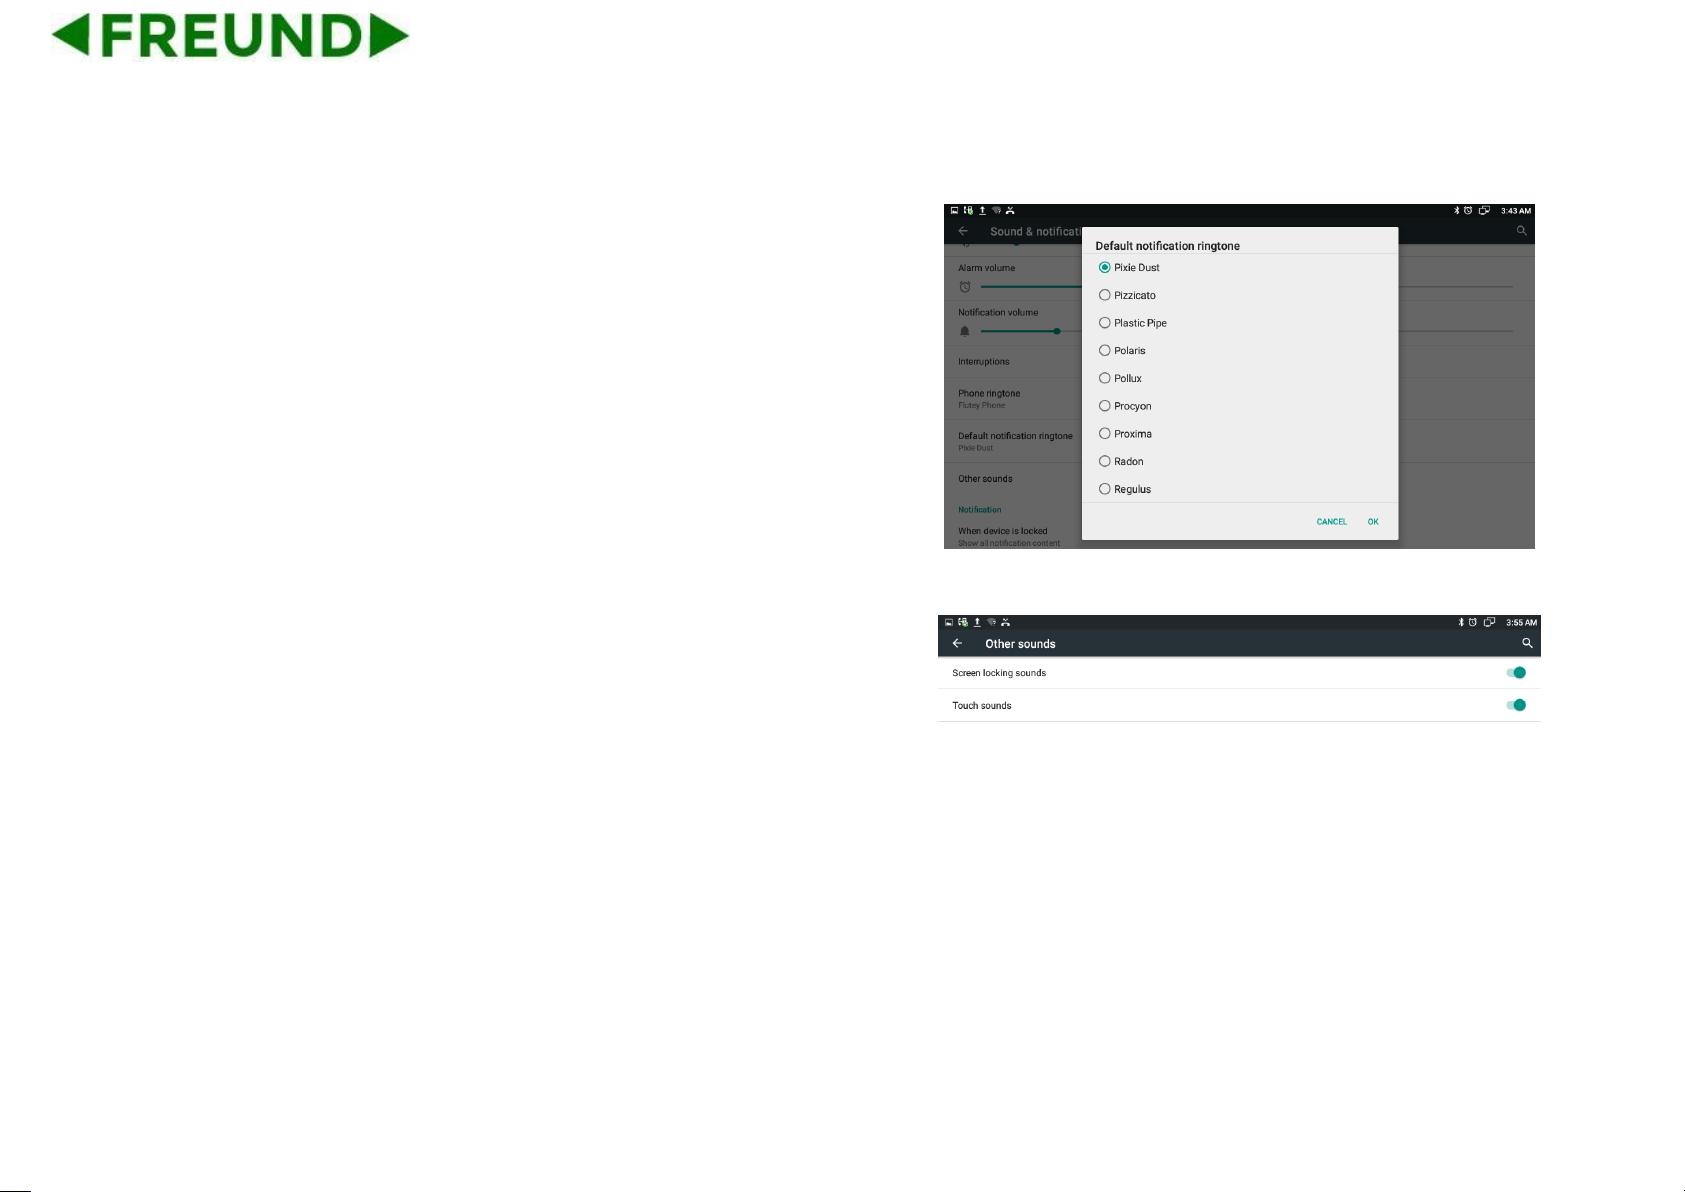
In the Sound & notification interface, click the Phone ringtone bar to pop
up default ringtone setting interface. Click the ringtone you want to set,
after the selection, it will ring a short time. Finally, click "OK".
Page 51
40
4.5.4. Default notification ringtone
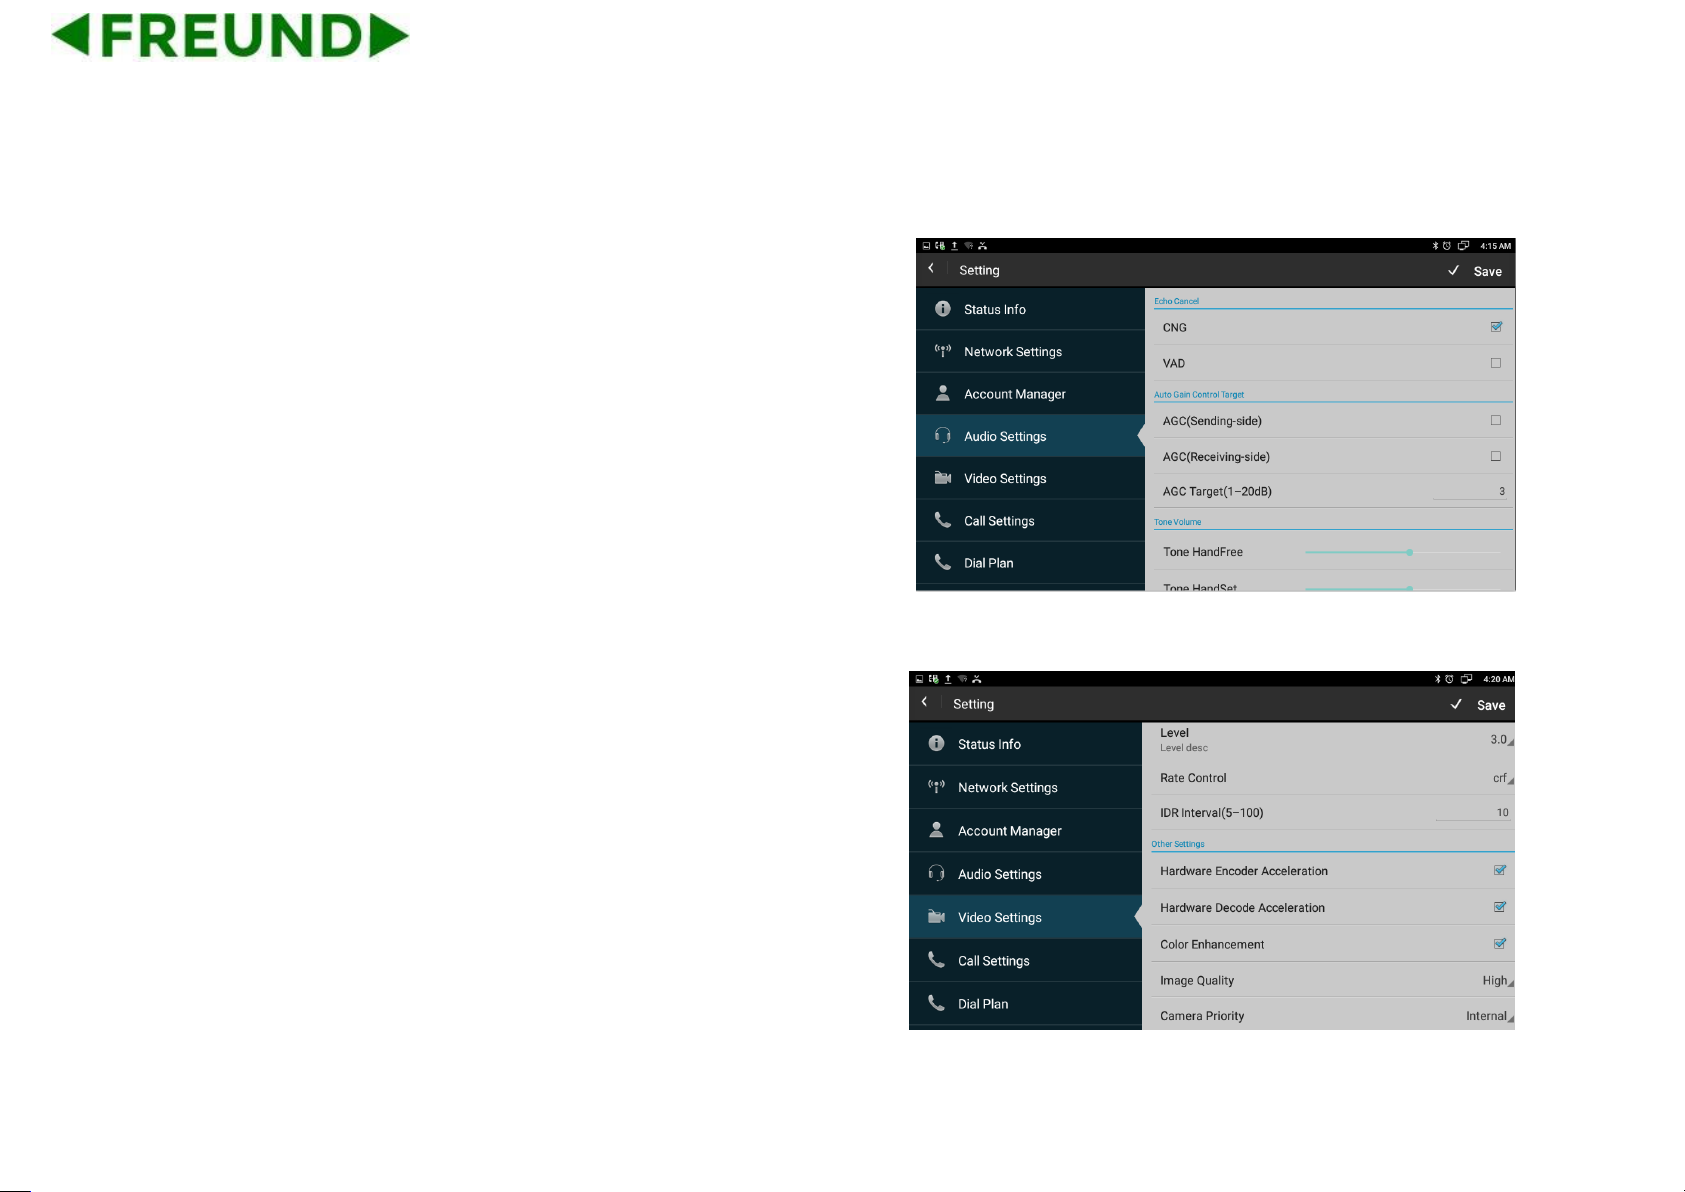
In the Sound & notification interface, click the Default notification
ringtone bar to pop up the phone default notification ringtone setting
interface. Click the ringtone you want to set, after the selection, it will ring
a short time. Finally, click "OK". Setting interface is shown as below.
4.5.5. Other Sounds
If you want to enable Screen looking sounds and Touch sounds, please
go to Other Sounds configuration page to click the correspond sound.
Screen locking sounds and Touch sounds are enabled in default
configuration.
Page 52
41
4.6. Audio Settings
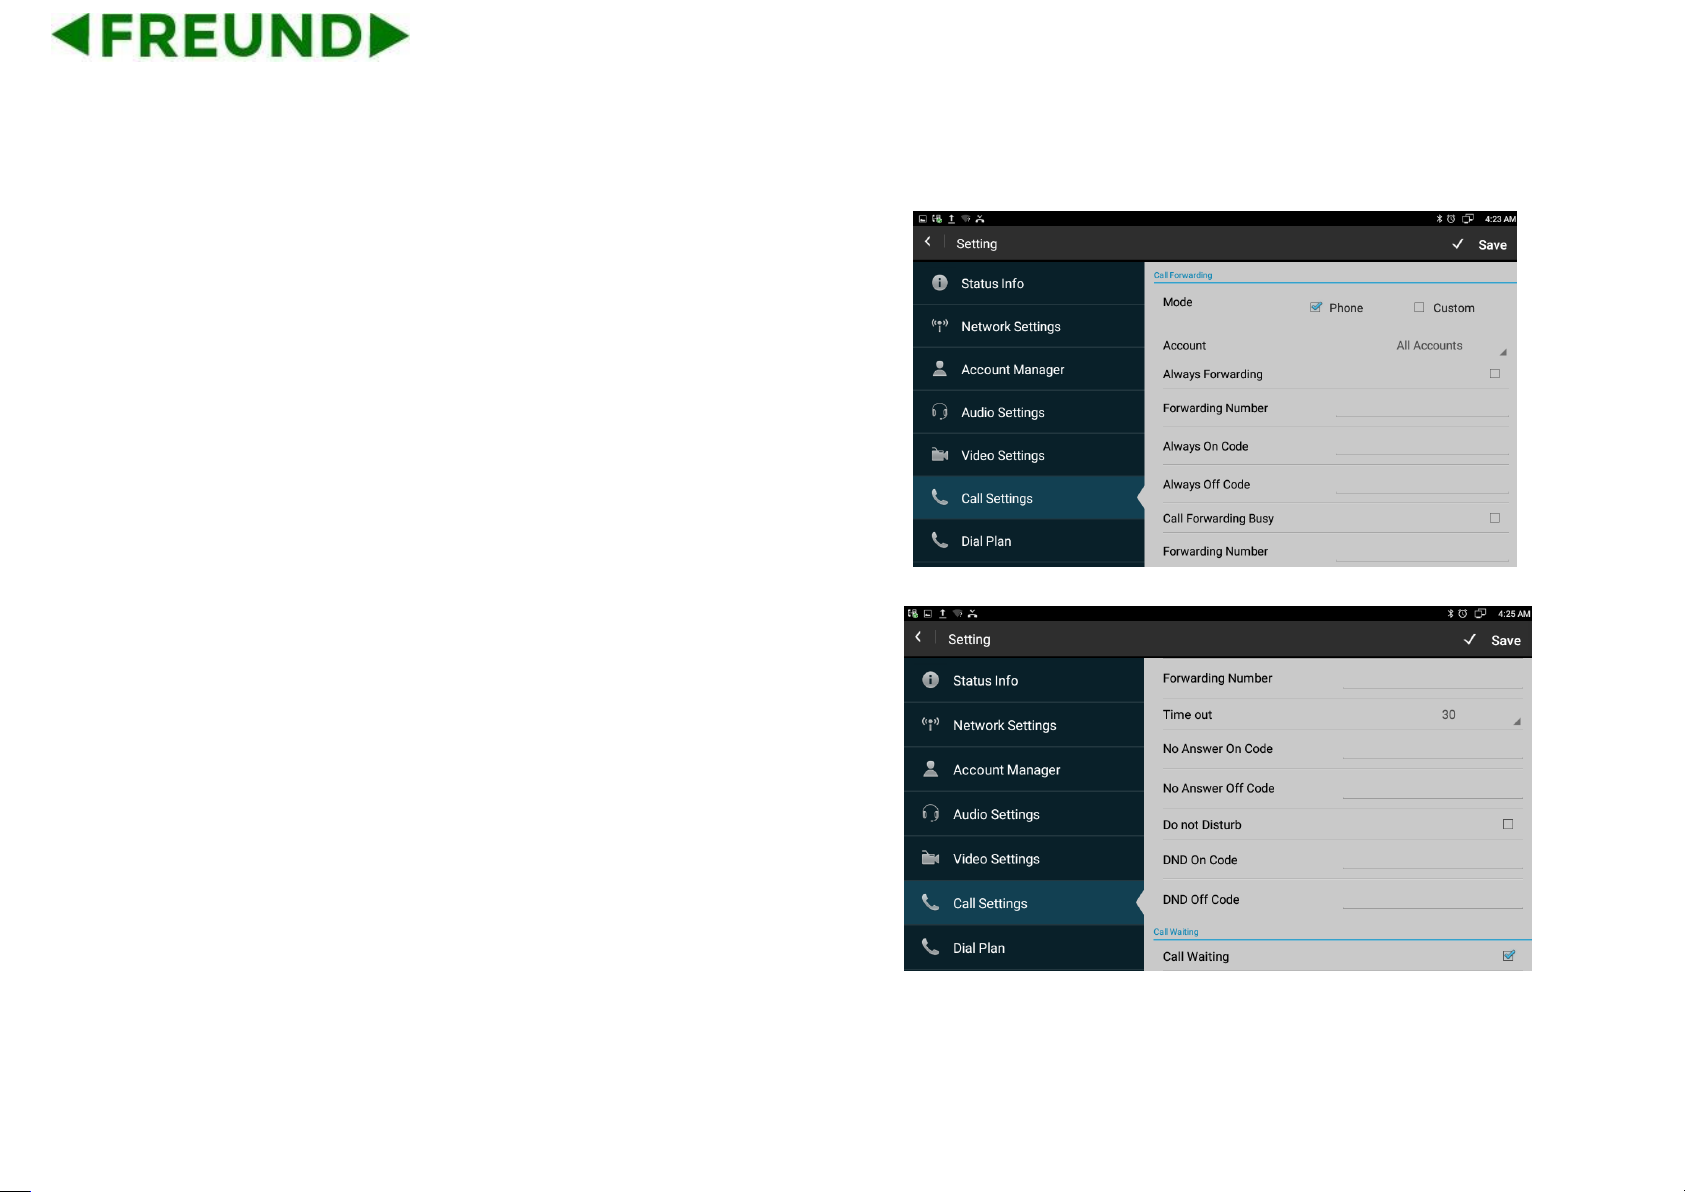
To setup the corresponding audio parameters and Volume.
Echo Canceller: To remove acoustic echo from a voice
communication in order to improve the voice quality.
Automatically Generation Control: FE-TEL-48G will auto adjust
amplification circuit gain via signal.
Volume: To configure different types volume for hands-free, handset
and headset
NetEQ: Filter forgetting factor base: Range from 0~255. 250 by default.
4.7. Video Settings
To configure the video corresponding parameters.
Page 53
42
4.8. Call Settings
4.8.1. Always forwarding & Forwarding Number
All the incoming calls will be forwarded unconditionally to specified
number.
Configuration on the phone:
Phone Settings -> Call Settings -> Call Forwarding -> Always
Forwarding
Select the desired account on the Account bar.
Check to enable Always Forwarding feature.
Input the forward number into the Forwarding Number bar.
4.8.2. Call forwarding busy & Forwarding Number
The incoming calls will be forwarded to specified number when the
phone is busy.
Page 54

43
Configuration on the phone:
1. Phone Settings->Call Settings->Call Forwarding->Call Forwarding
Busy
2. Select the desired account on the Account bar.
3. Check to enable Call Forwarding Busy feature.
4. Input the forward number into the Forwarding Number bar.
4.8.3. No Answer Forwarding & Forwarding Number
The incoming calls will be forwarded to the specified number when the
ringtone is time out without answer.
Configuration on the phone:
1. Phone Settings->Call Settings->Call Forwarding->No Answer
Forwarding.
2. Select the desired account on the Account bar.
3. Check to enable No Answer Forwarding feature.
4. Input the forward number into the Forwarding Number bar.
Page 55

44
4.8.4. Time out
Set up the no answer forwarding time. When the call is beyond the time
(the default is 30 seconds) without answering, it will forward to the target
number. The range value is 0 to 120 second.
4.8.5. Do Not Disturb
DND function is to prevent foreign phone from disturbing, if DND is open,
external phone call is unable to call in, and turned off by default.
Configuration on the phone:
1. Phone Settings-> Call Settings-> Do not Disturb
2. Select the desired account on the Account bar.
3. Check to enable Do not Disturb feature.
Page 56

45
4.8.6. Call Waiting
If call waiting feature is enabled, after establishment of a conversation,
there is a third party call in, then video phone will have a new call tips,
the incoming call will be displayed on the conversation interface, users
can choose to answer or reject the call. If the call waiting feature is
disabled, the third party will prompt a busy tone. Call waiting feature is
enabled by default.
Configuration on the phone:
1. Phone Settings->Call Settings->Call Waiting
2. Enable Call Waiting feature.
4.8.7. Play-tone
The caller will hear the tone when waiting. Different SIP servers support
different play-tones.
Page 57

46
4.8.8. Intercom
It is used to answer the incoming call automatically after users set up the
intercom function. In default situation, the phone will answer the
intercom call automatically, the speaker’s voice can be heard by
intercom originator. Users can set the phone to enable silent mode when
auto-answer the intercom call and the intercom originator will not hear
speaker’s voice.
4.8.9. Hotline
Enabling the Hotline feature allows the phone to call out a defined
number automatically, without inputting any number by manual in dial-up
interface. Hotline Delay Time is to set the call out delay value. The range
value is 0 to 5 second.
Page 58
47
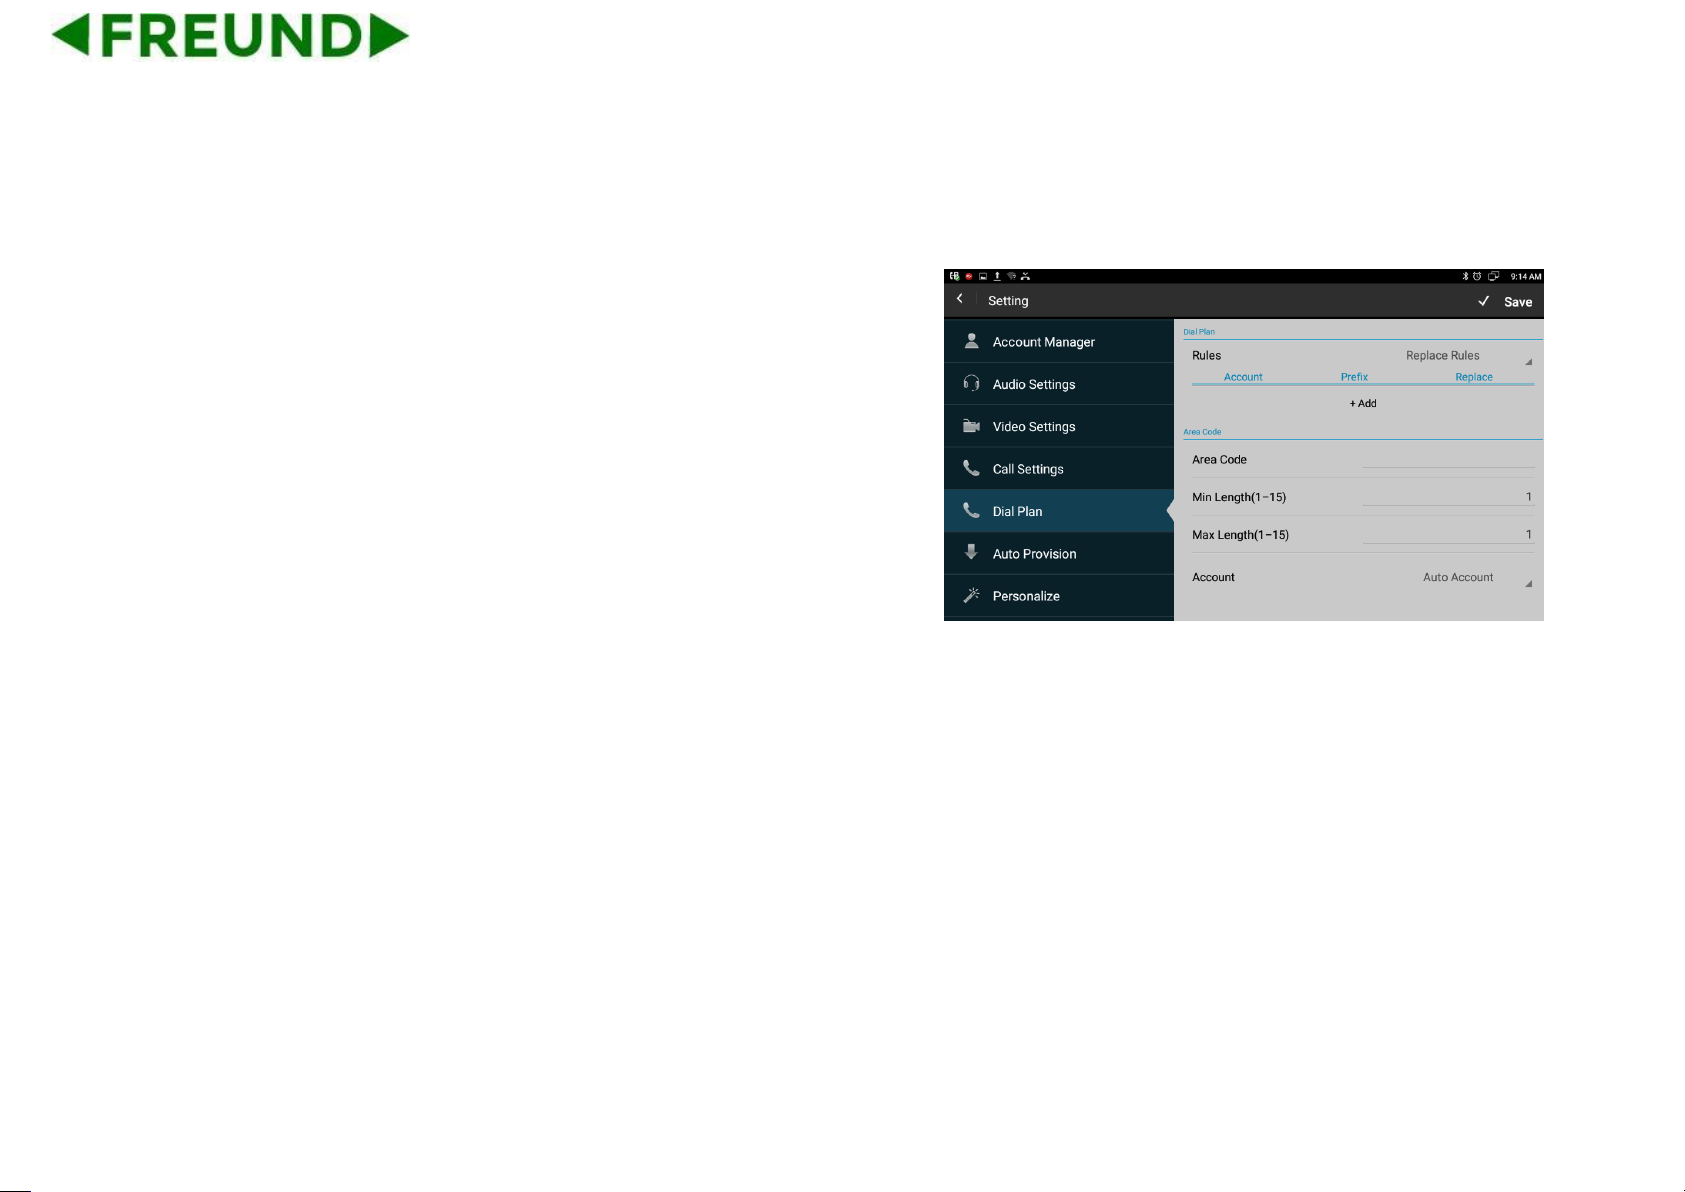
4.9. Dial Plan
Rules: Allow users to select Replace Rules or Dial Now to display or
edit.
Rules Modify: Allow users to modify selected rules information, for
replace rule, you can modify related accounts, prefix number and
replace number.
Area Code: Area codes are also known as NPAs (Numbering Plan
Areas). They usually indicate different geographical areas within one
country. If entered numbers match the predefined area code rule, the IP
phone will automatically prefix outgoing number with area code.
Note: There is only one area code rule supported.
Page 59
48
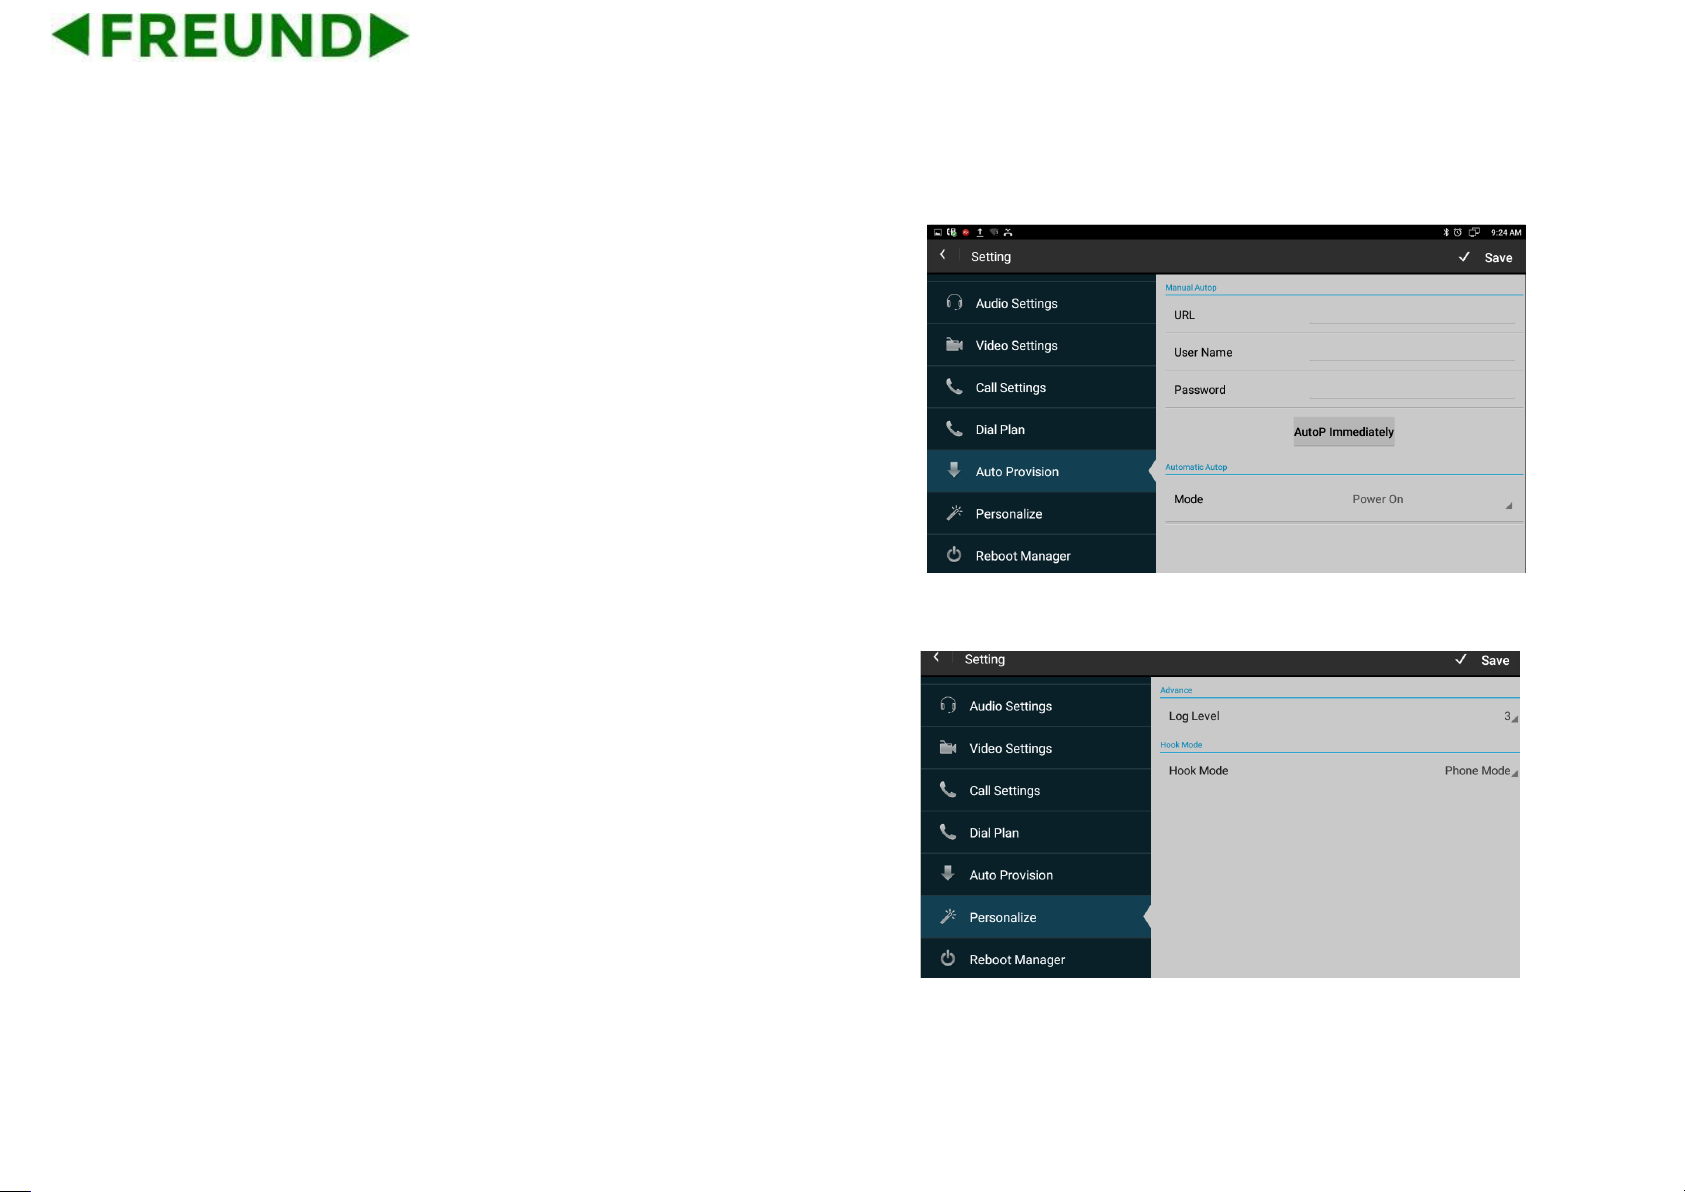
4.10. Auto Provision
Phone can be configured to resynchronize its internal configuration state
to match a remote profile periodically and on power up by contacting a
normal provisioning server (NPS) or an access control server (ACS).
4.11. Personalize
4.11.1. Log Level
The Log level is divided into seven levels: EMERG, ALERT, CRIT, ERR,
WARNING, NOTICE, INFO, DEBUG, log class, which are from low to
high. The default setting is EMERG, which is the lowest grade log.
4.11.2. Hook Mode
Hook Mode is divided into Phone Mode, Disable, App Mode, and Auto
Mode. The default mode is Phone Mode.
Page 60
49
4.12. Reboot Manager
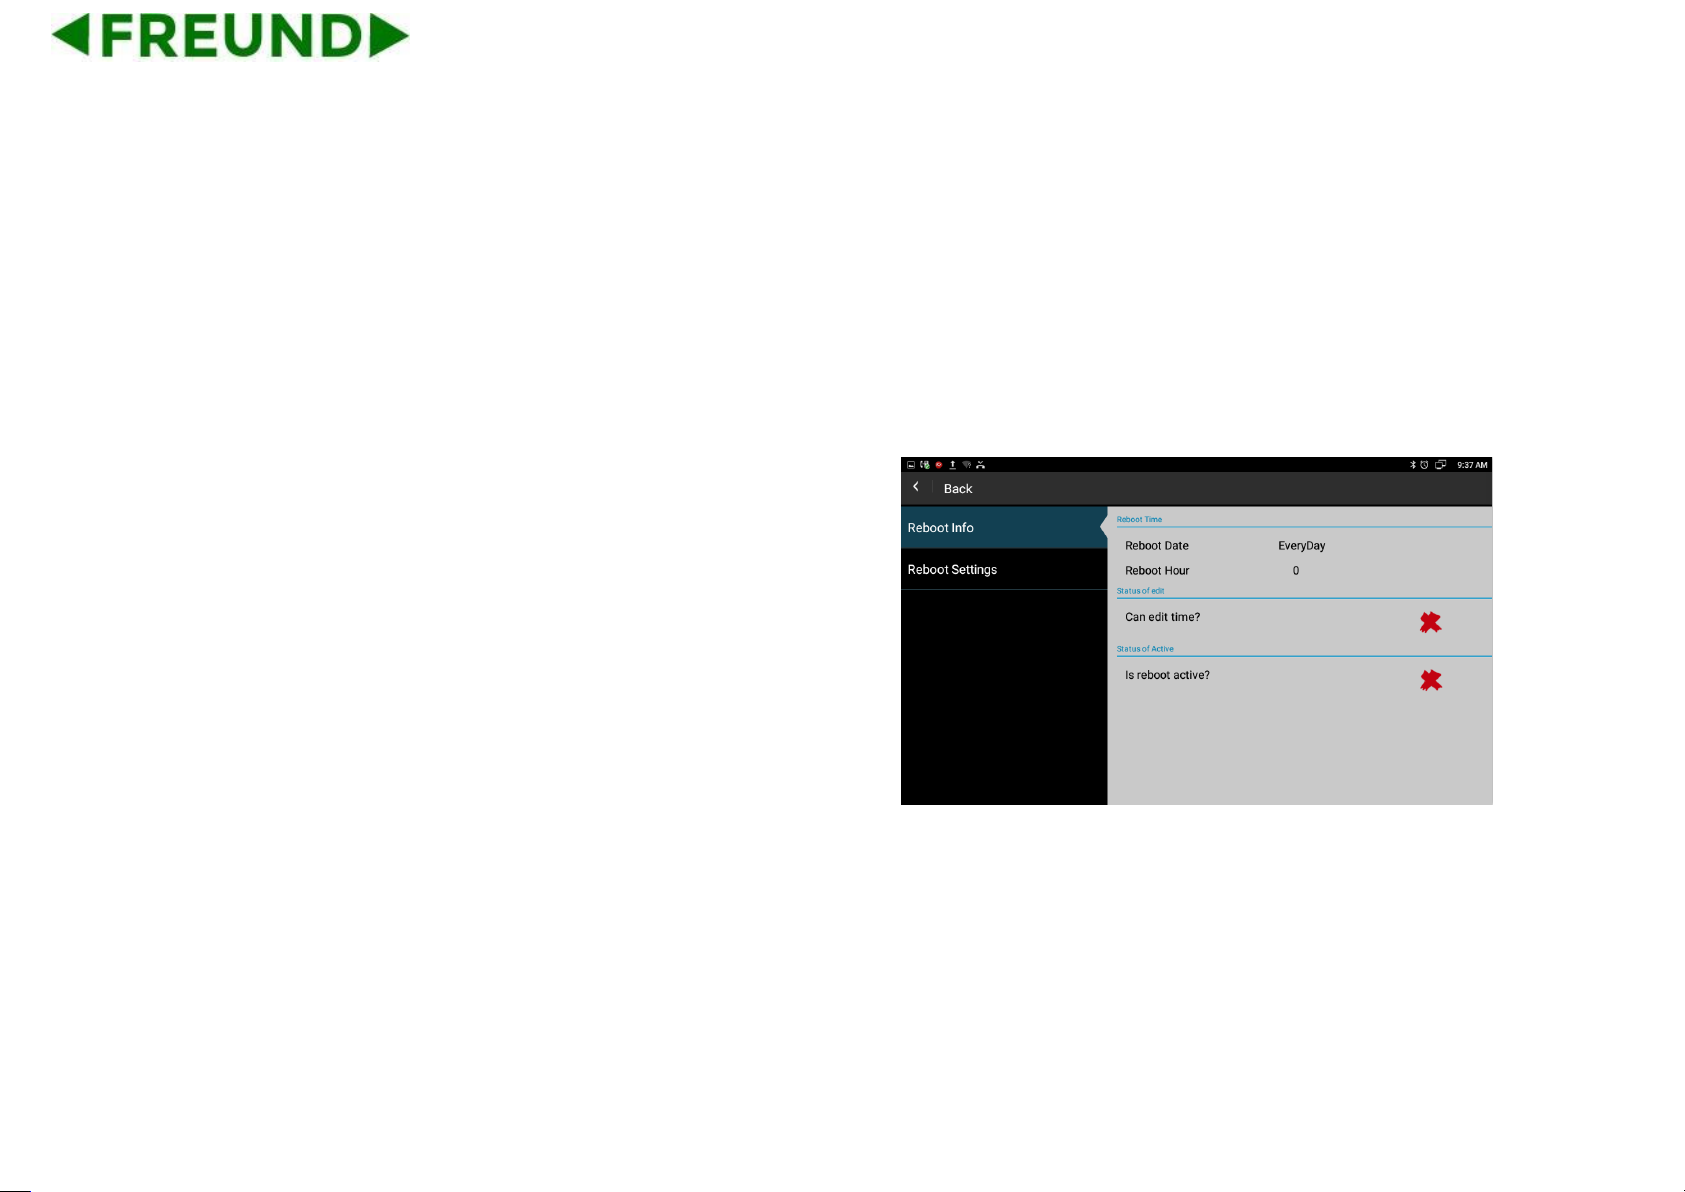
4.12.1. Reboot time
Users can setup the reboot date and hour you want.
4.12.2. Status of time
If the status is enabled, users can edit the reboot time you want.
4.12.3. Status of active
Enable/disable the reboot function.
Page 61
50
4.12.4. Reboot settings
Set the reboot time. Disable this feature by default.
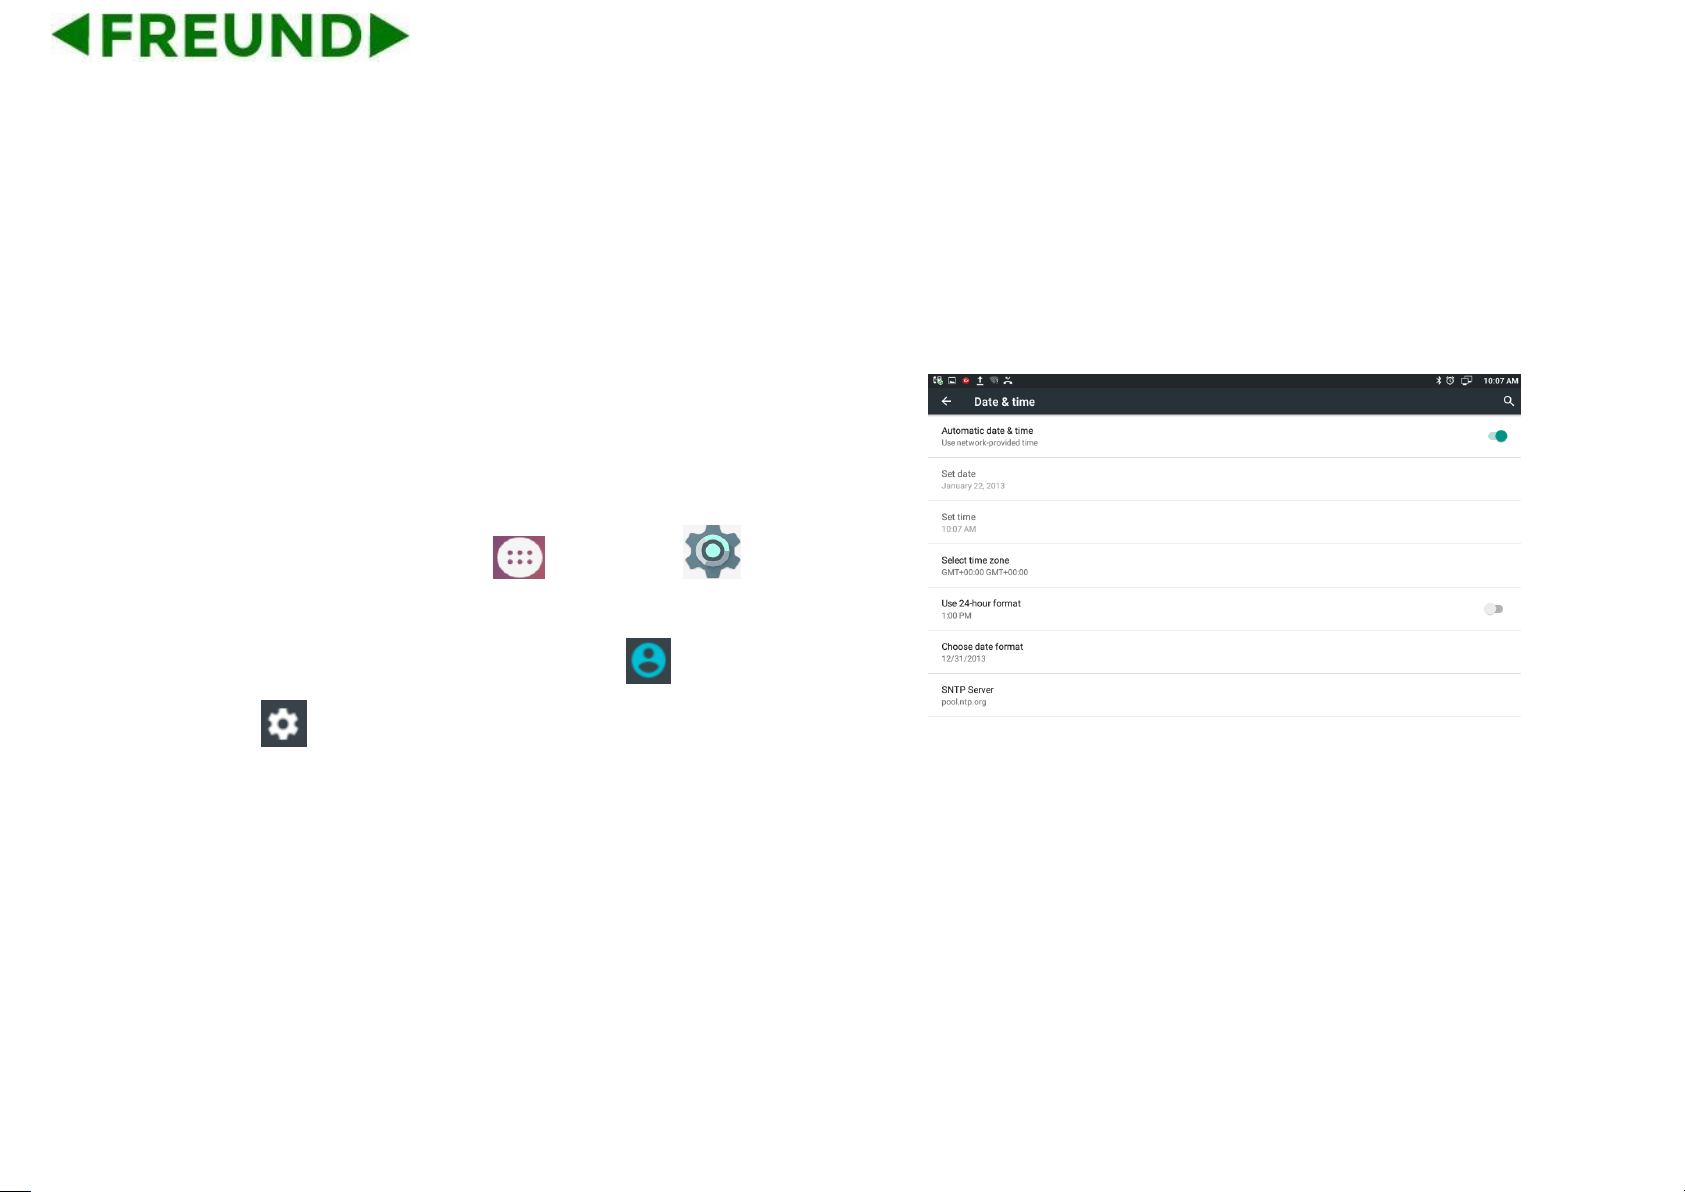
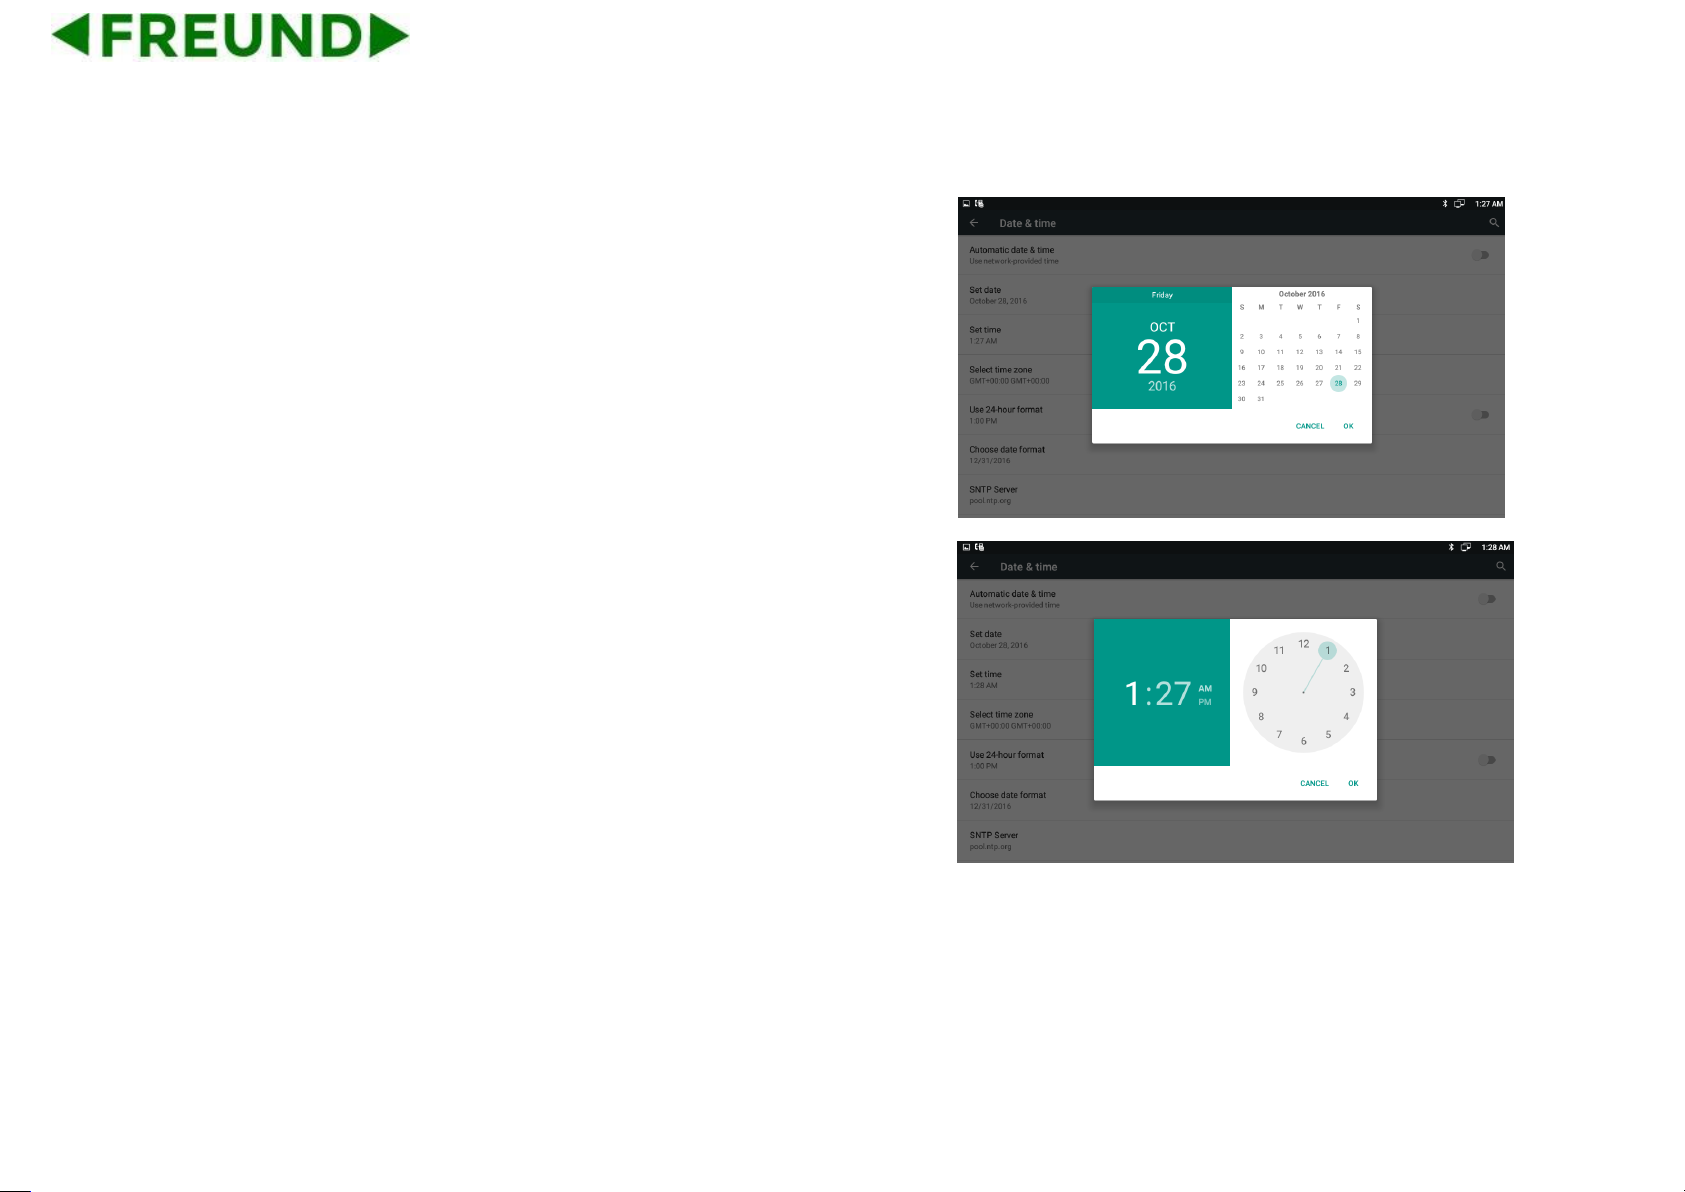
4.13. Date & Time
You can select one of the following methods to enter Date & Time
configuration:
Mode 1: In the main screen, tap -> Settings
->System->Date & time.
Mode 2: Drag down the status bar, click icon on the status bar
->tap icon ->System-> Date & time.
Page 62
51
If users want to manually set the date and time, firstly, they can tap
Automatic data & time bar to disable status, and then set the date, time,
select a time zone.
Tap Set date bar to pop-up date set interface.
Tap Set time.
Tap the Use 24-hour format bar to change the hour format displayed,
1:00 PM format by default.
Page 63
52
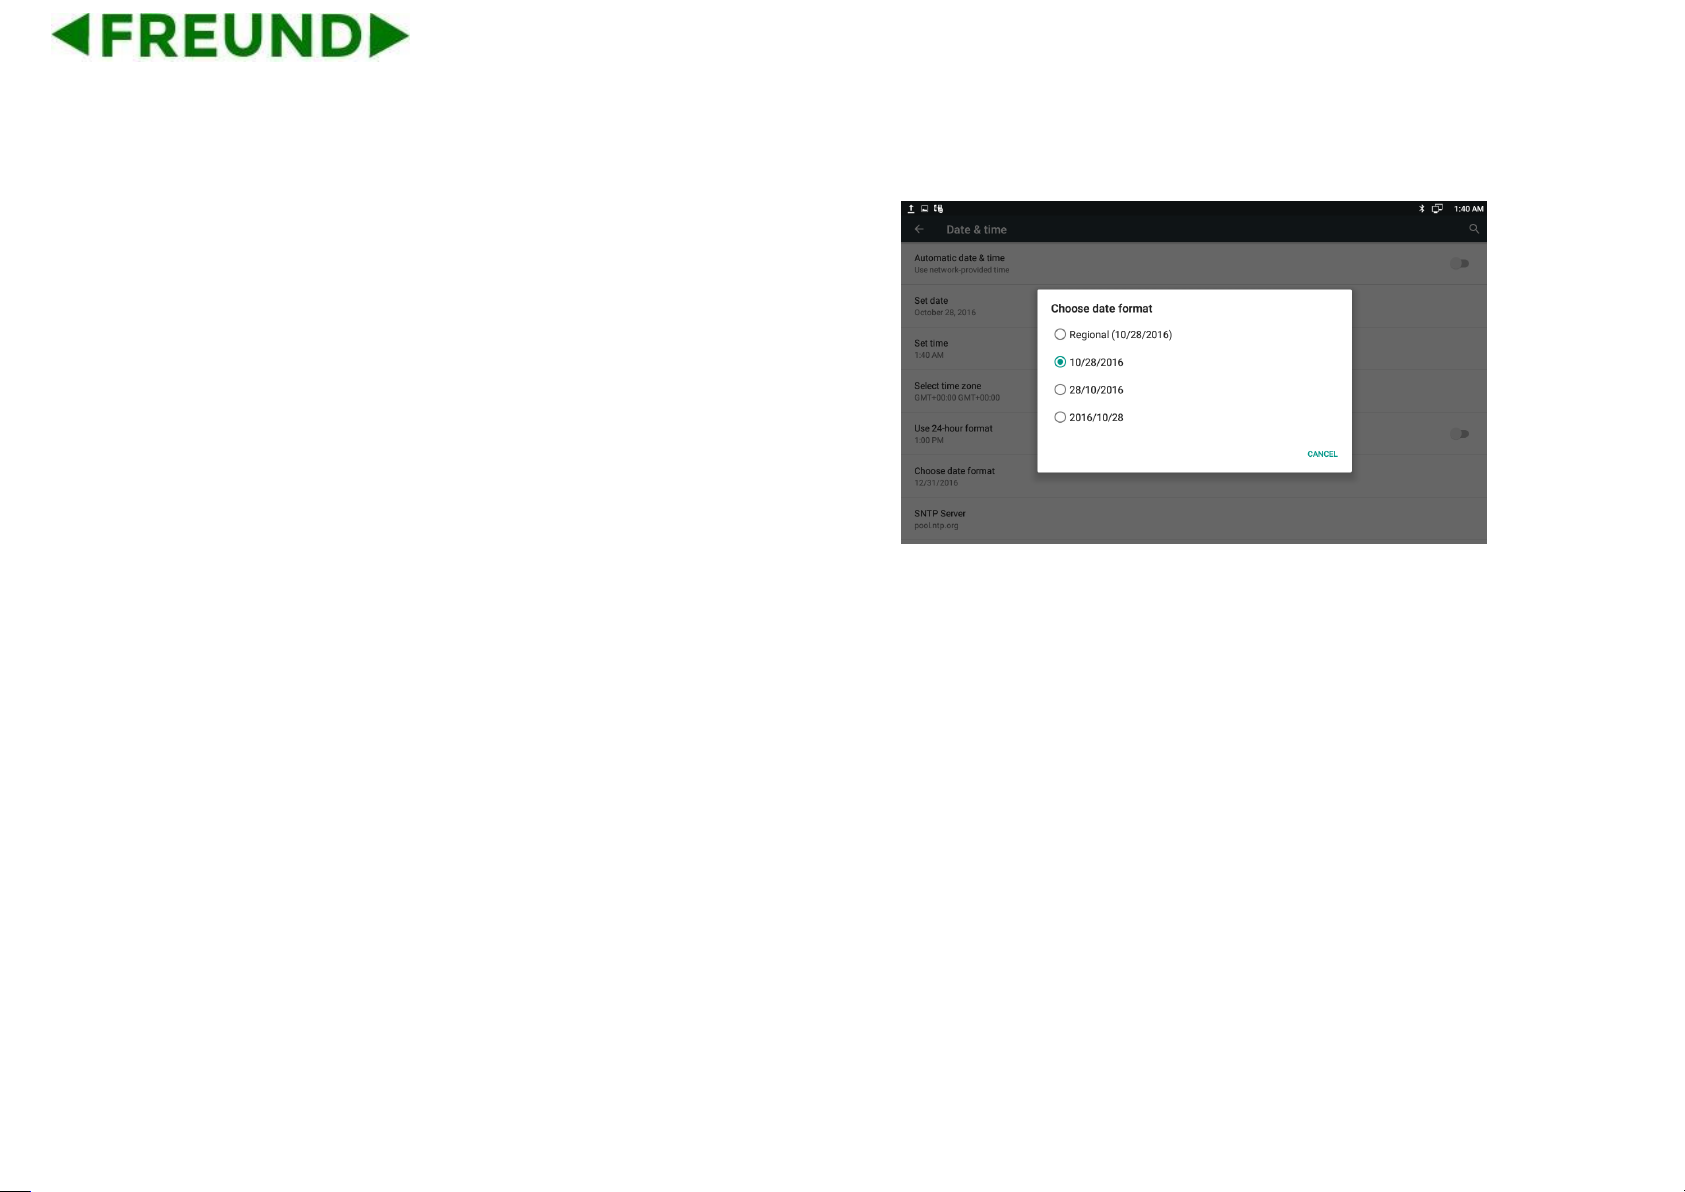
Tap the Choose date format bar to pop up the date format selection
interface. Month/Day/Year format by default.
Page 64
53
4.14. Personalization Settings
According to personalized settings, users can set the equipment more
characteristic.
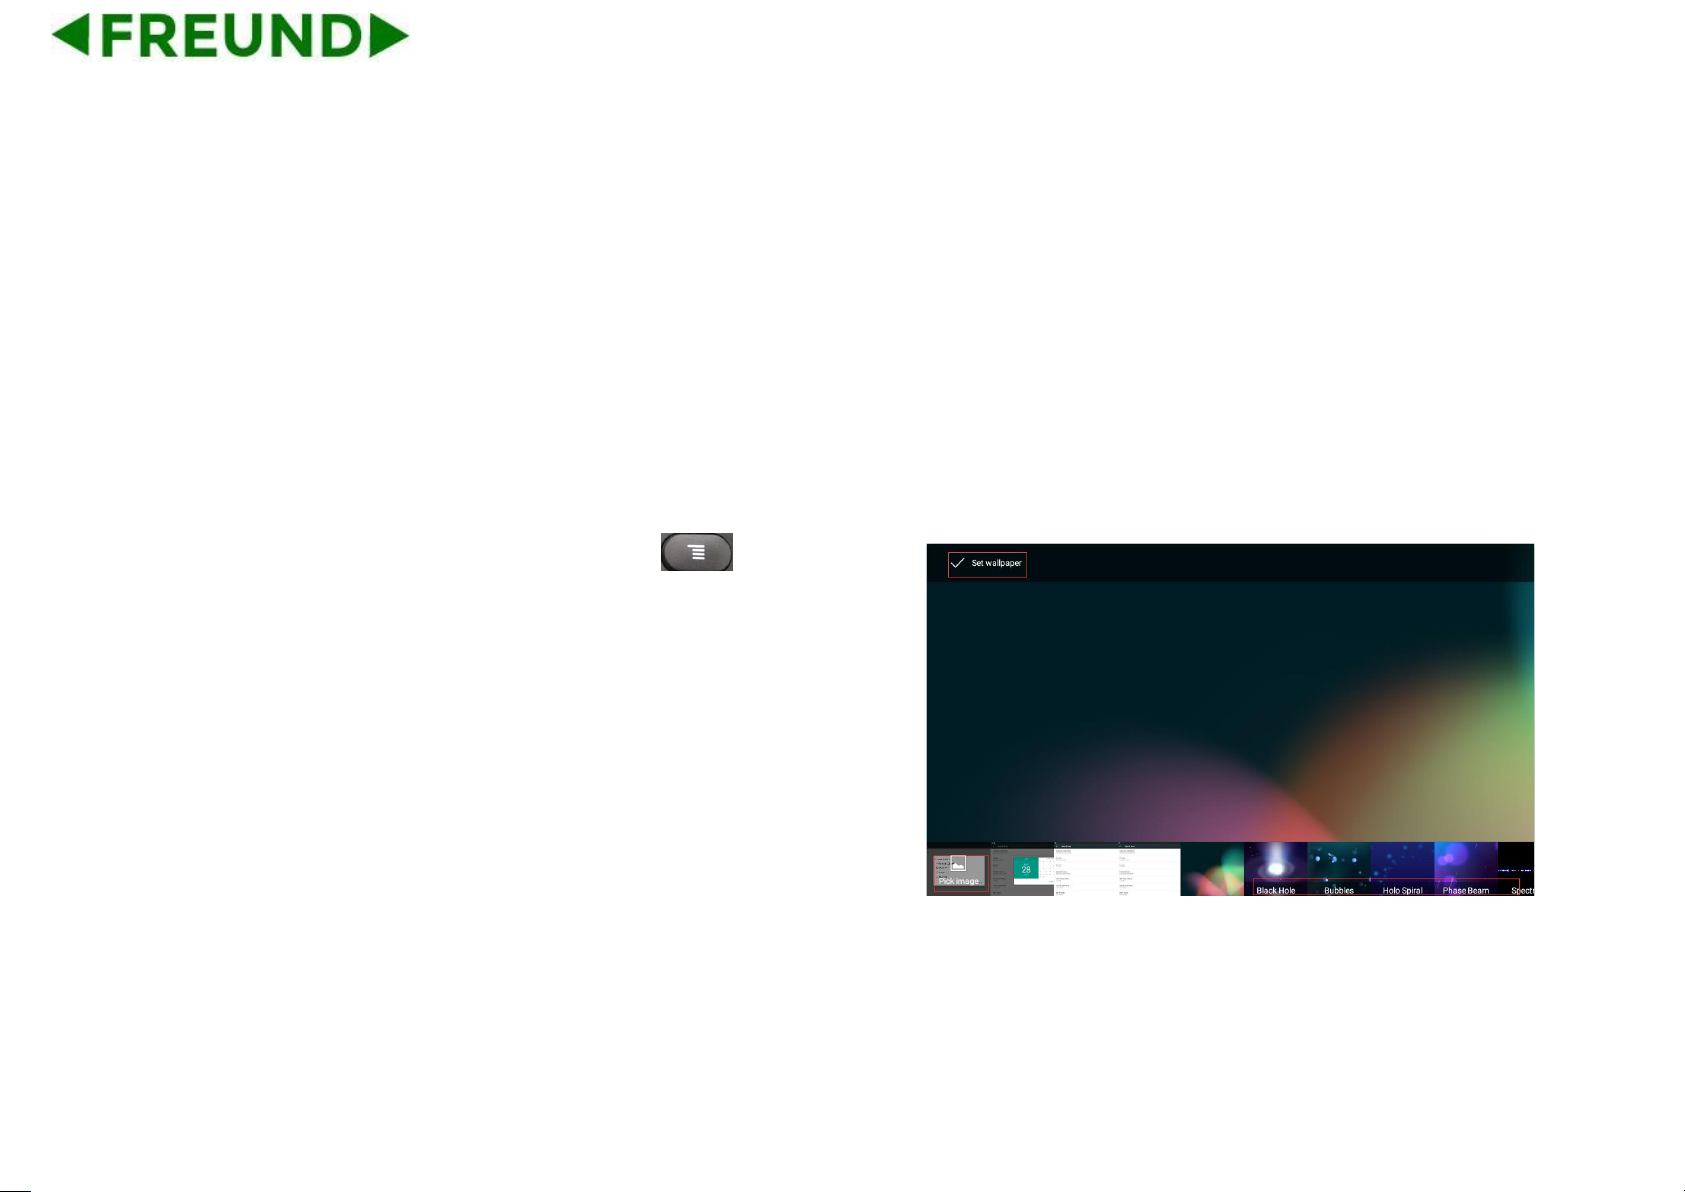
4.14.1. Wallpaper
Users can use the following ways to set the favorite wallpaper.
Mode 1: In the main screen, Press Menu button on the
keyboard-> tap WALLPAPERS icon.
Mode 2: In the main screen, touch and hold on the blank part of
desktop-> tap WALLPAPERS icon.
The bottom of the screen displays the default wallpapers, tapping Pick
image can enter the gallery to select the picture. Click the Set wallpaper
to save the change. Configuration interface is shown as below.
Page 65
54
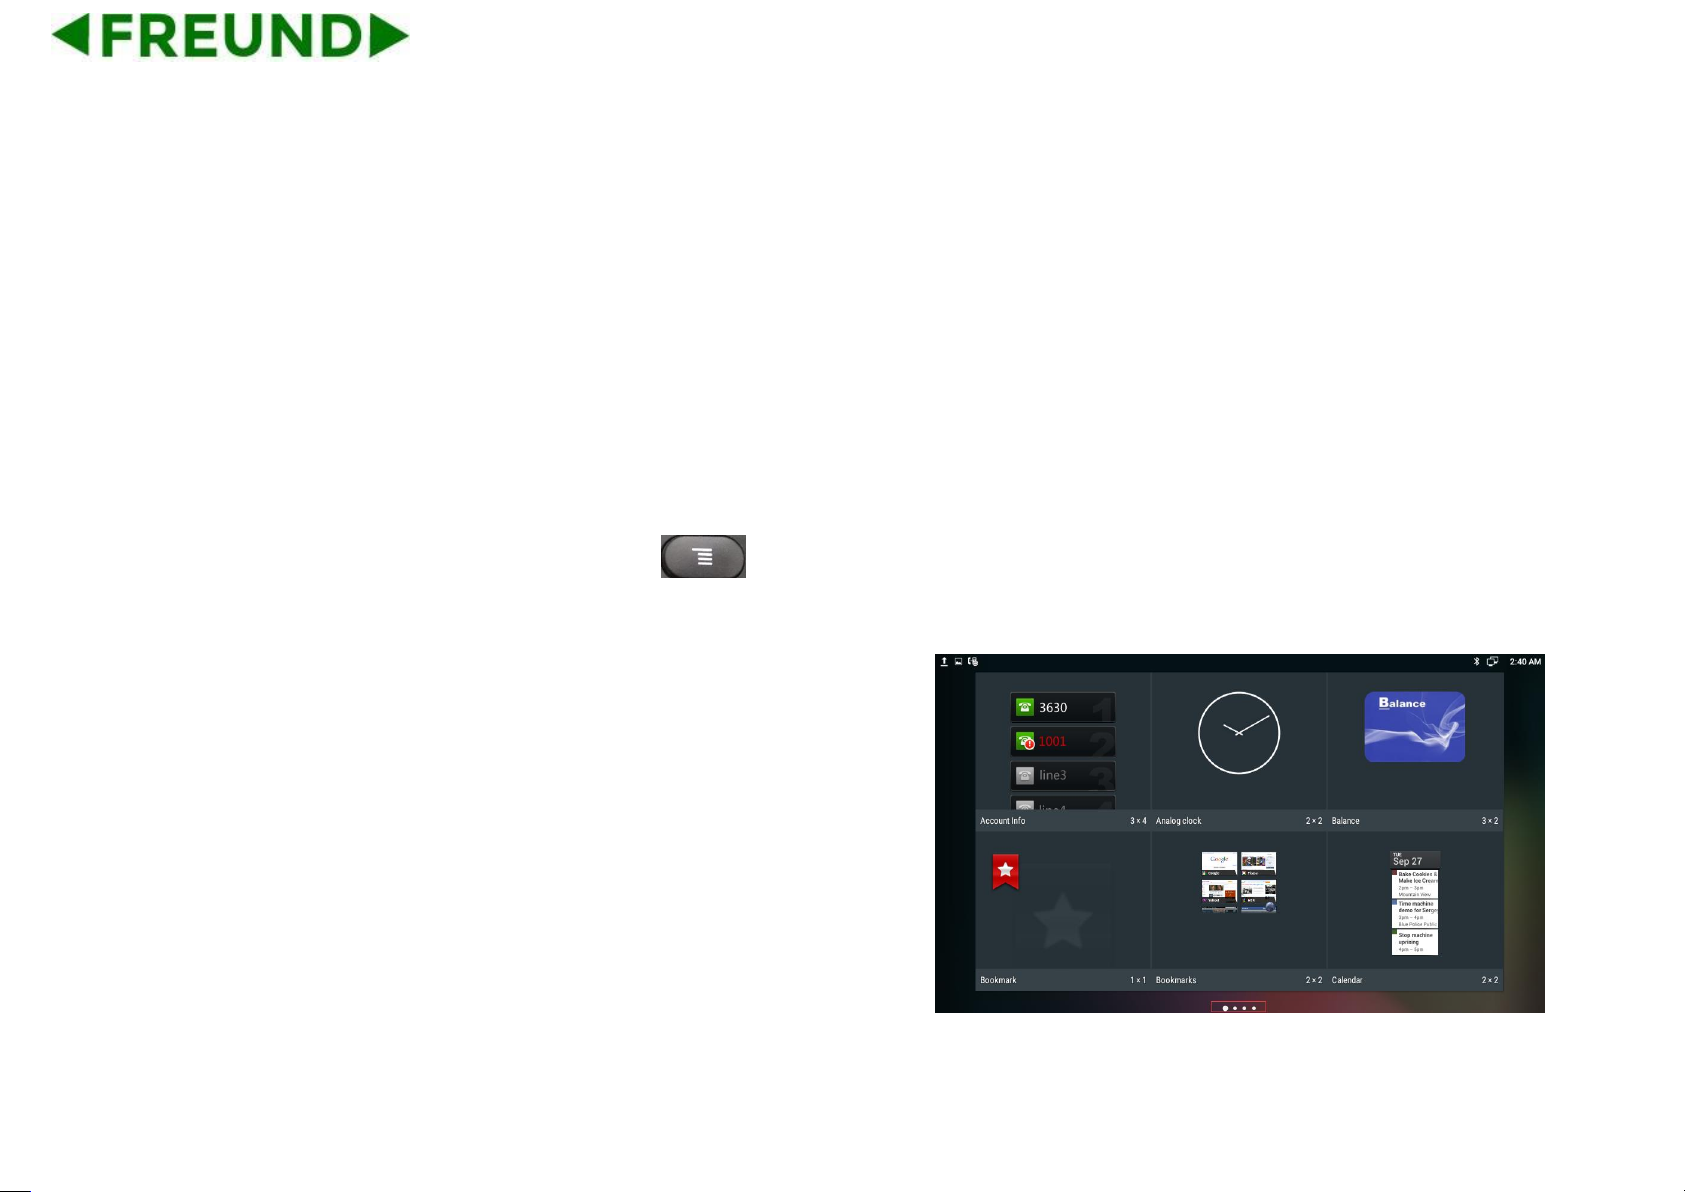
4.14.2. Widgets
Widgets can be convenient for user use, users can select from the
available options.
4.14.2.1. Add A Widget
Users can use the following ways to add the widgets.
Mode 1: In the main screen, Press Menu button on the
keyboard-> tap the WIDGETS icon.
Mode 2: In the main screen, touch and hold on the blank part of
desktop-> tap WIDGETS icon.
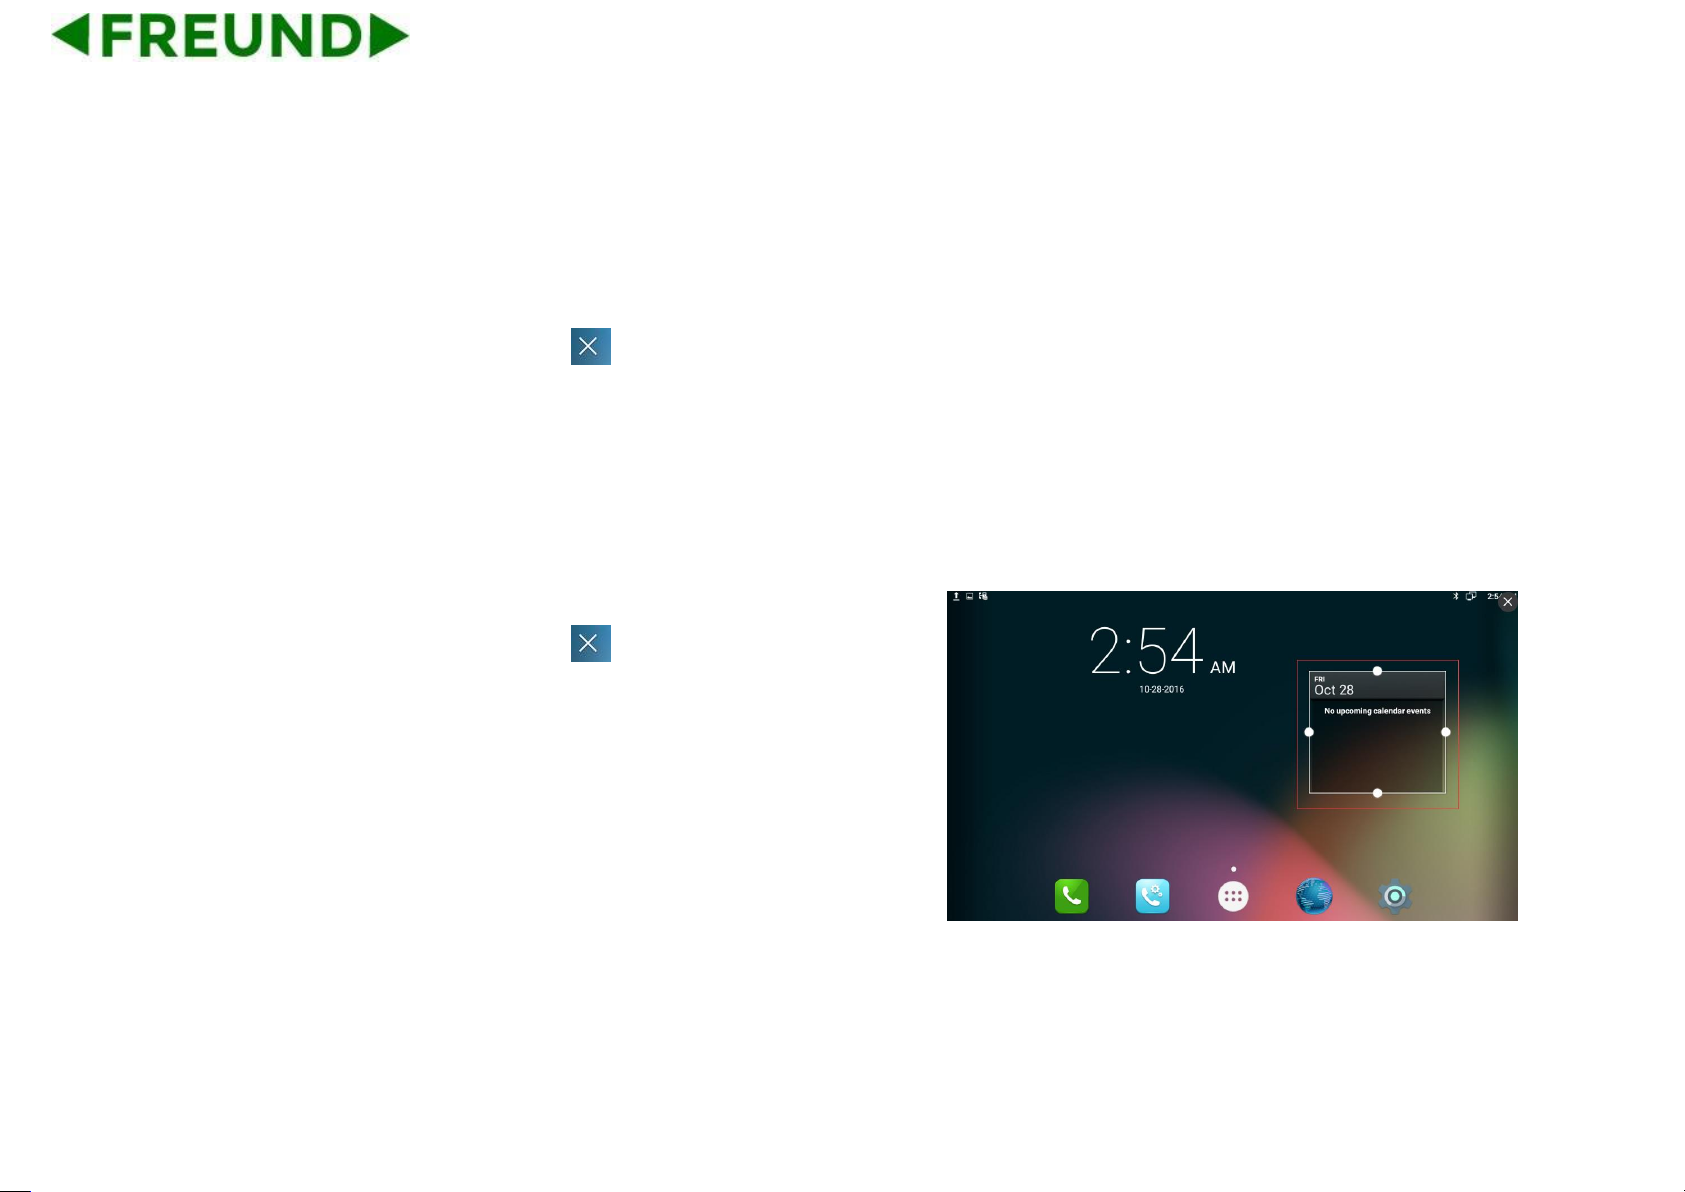
Each widget has indicated the name and the location, touch and hold to
pick up a widget, move it to the designated location on the desktop, then
move fingers away from the screen. Slide right/left to change the
extended screen. Shown as below.
Page 66
55
4.14.2.2. Modify an added Widget
If users want to modify the location of added widgets on the desktop,
touch and hold the widget until the icon appears on the upper left
corner of the screen, drag the widget to the corresponding position of the
desktop.
If users want to change the space size of added widgets on the desktop,
touch and hold the widget until the icon appears on the upper left
corner of the screen, then move fingers away from the screen, the
widget will appear frame border. Users can control the white point to
drag the border to change the size of the widget frame. And then users
only need to press Back button on the keyboard to save the change. As
shown below:
Page 67

56
4.14.2.3. Delete Widget
Touch and hold the widget until the icon appears on the upper left
corner of the screen, drag the widget to location until the widget
turn red, then move fingers away to delete the widget.
4.14.3. Shortcuts
Users can add the shortcuts such as Application, Webpage bookmarks
and the other applications to the main screen desktop.
Page 68
57
4.14.3.1. Add Shortcut
In the main screen, click icon , touch and hold a shortcut, put it to
the designated location on the desktop, then move fingers away the
main screen.
4.14.3.2. Modify Shortcut
If users want to modify the location of shortcut on the desktop, hold the
shortcut until the icon appears on the upper left corner of the screen,
you can drag the shortcut to the corresponding position of the desktop.
Page 69
58
4.14.3.3. Delete Shortcut
Touch and hold the shortcut until the icon appears on the upper left
corner of the screen, drag the shortcut to location until the shortcut
turn red, then move fingers away to delete the shortcut.
4.14.3.4. Modify Extended Bar
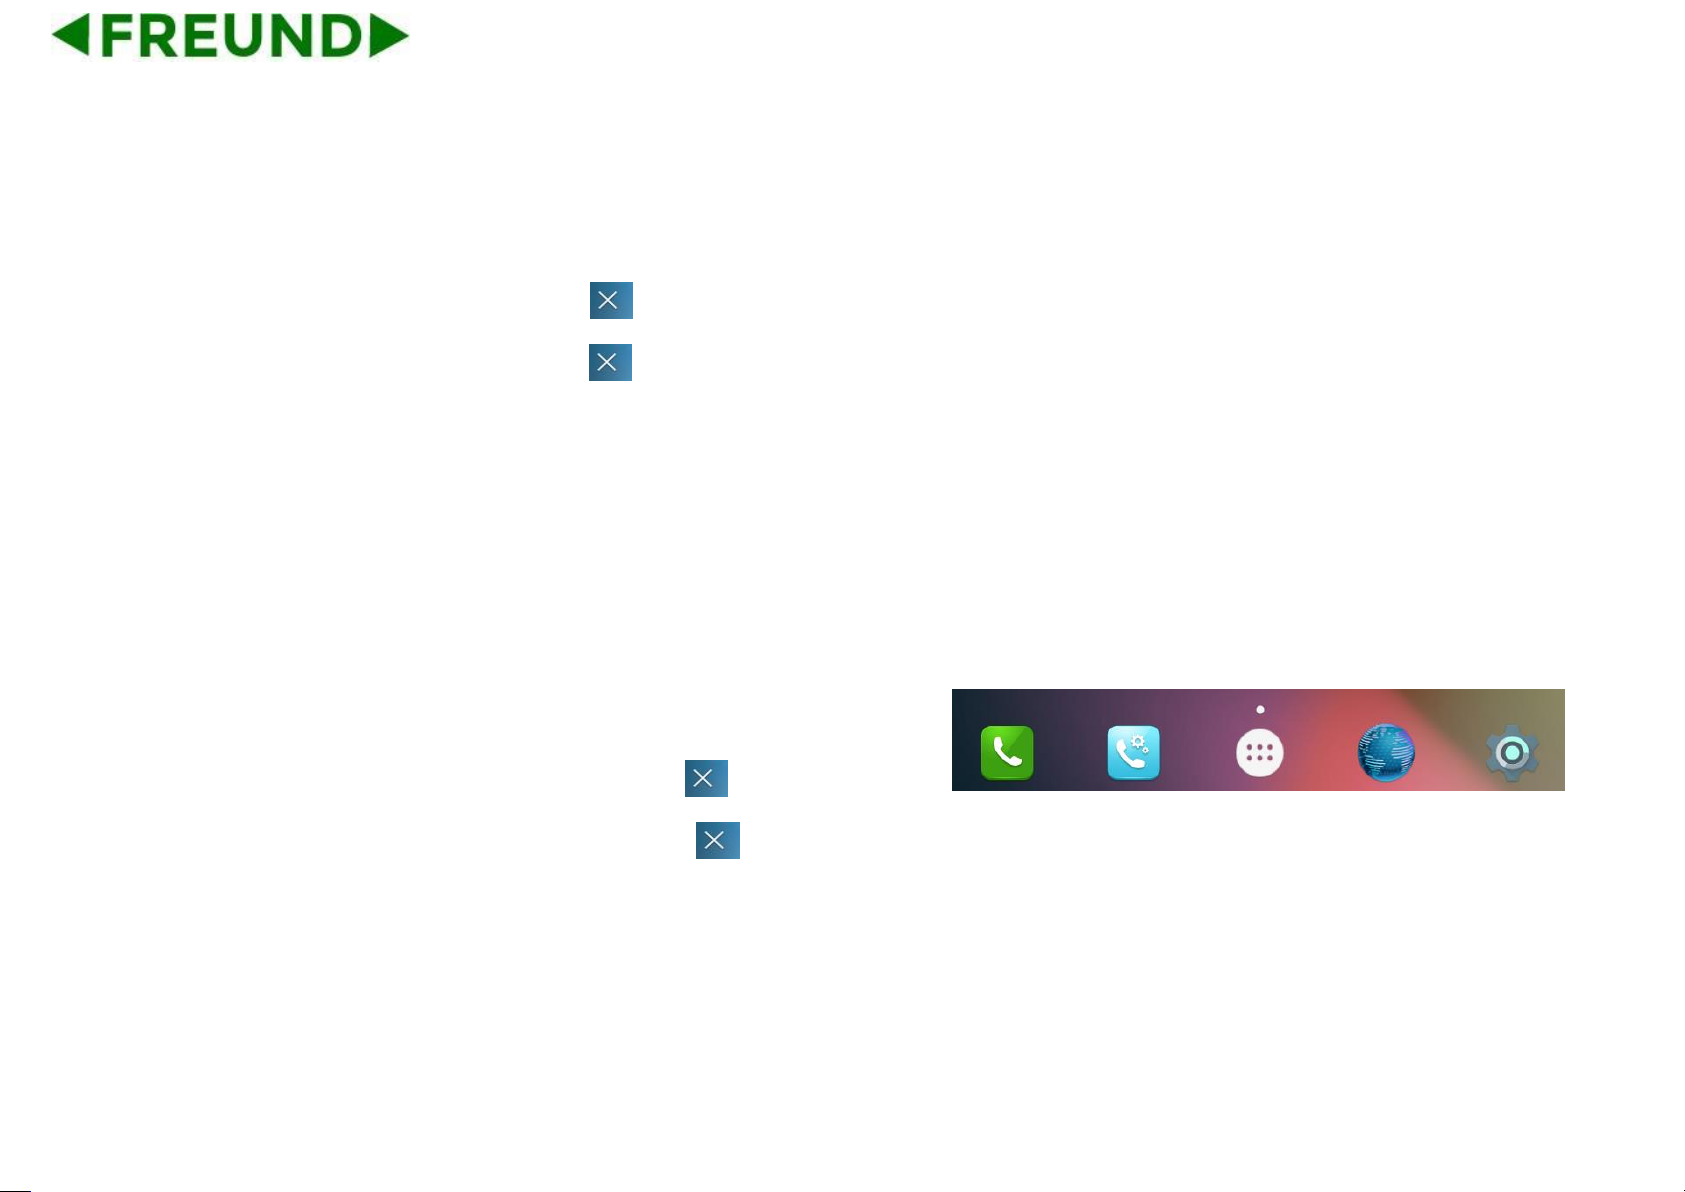
Users can modify the quick start program on the extended bar at the
bottom of the screen. The default extended bar is shown as below:
In the main screen, hold the shortcut until the icon appears on the
upper left corner of the screen, drag the shortcut to location to
delete the shortcut. Also, you can replace the default shortcut with
another shortcut.
Page 70

59
4.14.4. Ringtone
Users can select the ringtone provided by phone default, can download
music from the Internet, and then set the favorite music as a ringtone.
If users choose the ringtone provided by phone default, please refer to
Sound & notification settings.
If users choose the music downloaded from the Internet as a ringtone,
please follow the below steps:
Click -> Music icon .
View the music list in App, touch and hold a music, and then In the
pop-up menu options, click Use as phone ringtone.
Page 71

60
4.14.5. Backup & Reset
Click Setting .
Personal->Tap Backup & reset.
Personal data-> click Factory data reset.
Check Erase SD card-> click RESET DEVICE label-> tap ERASE
EVERYTHING label.
Page 72
61
5. Function
5.1. Call Records
5.1.1. View Call Records
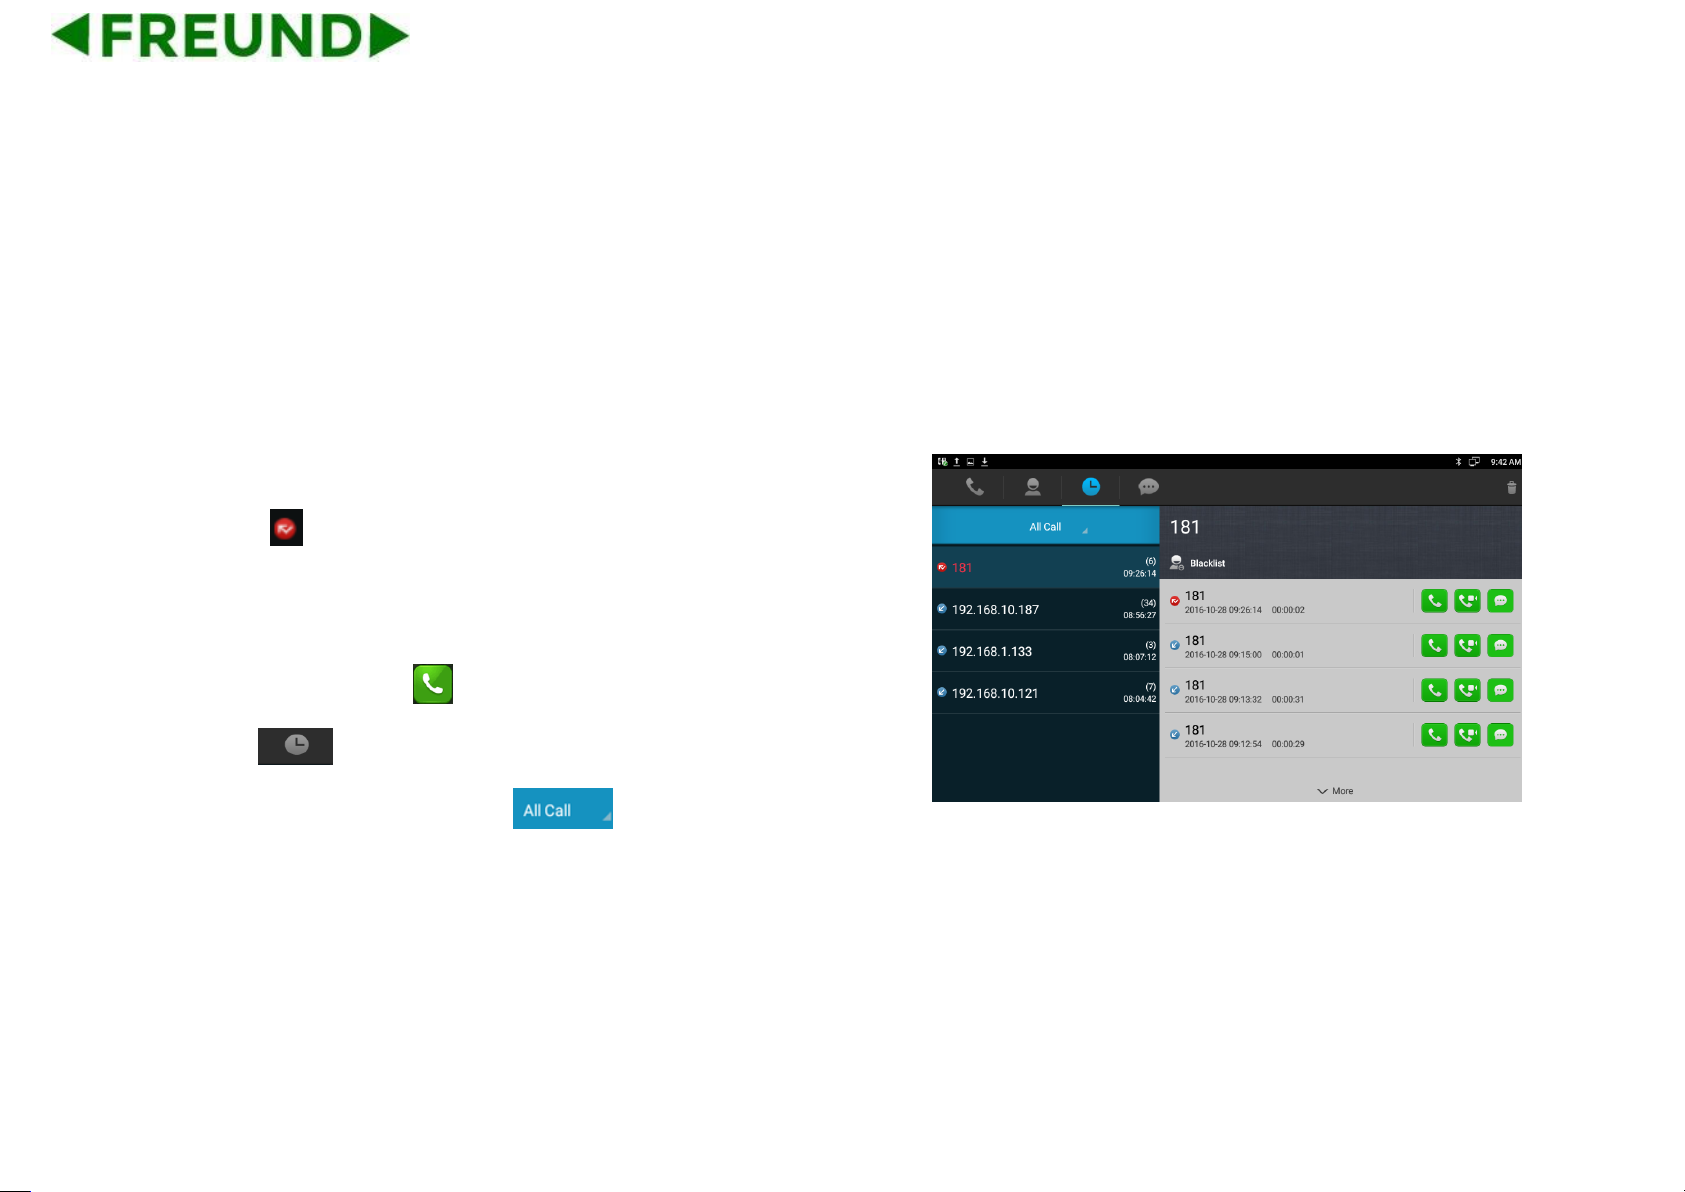
When you’ve got a missed call, the screen will display the missed call
notification in above status bar. Users can drag down to open the
notification list, then click the missed call notification to view call records.
Users can also directly through the dialing interface to view call records:
In the main screen, click
Click icon .
Users can click the drop-down list to choose the call record
types, it supports for All Call, Missed Call, Received Call, Dialed Call and
Forwarded Call, five types of call information.
Page 73
62
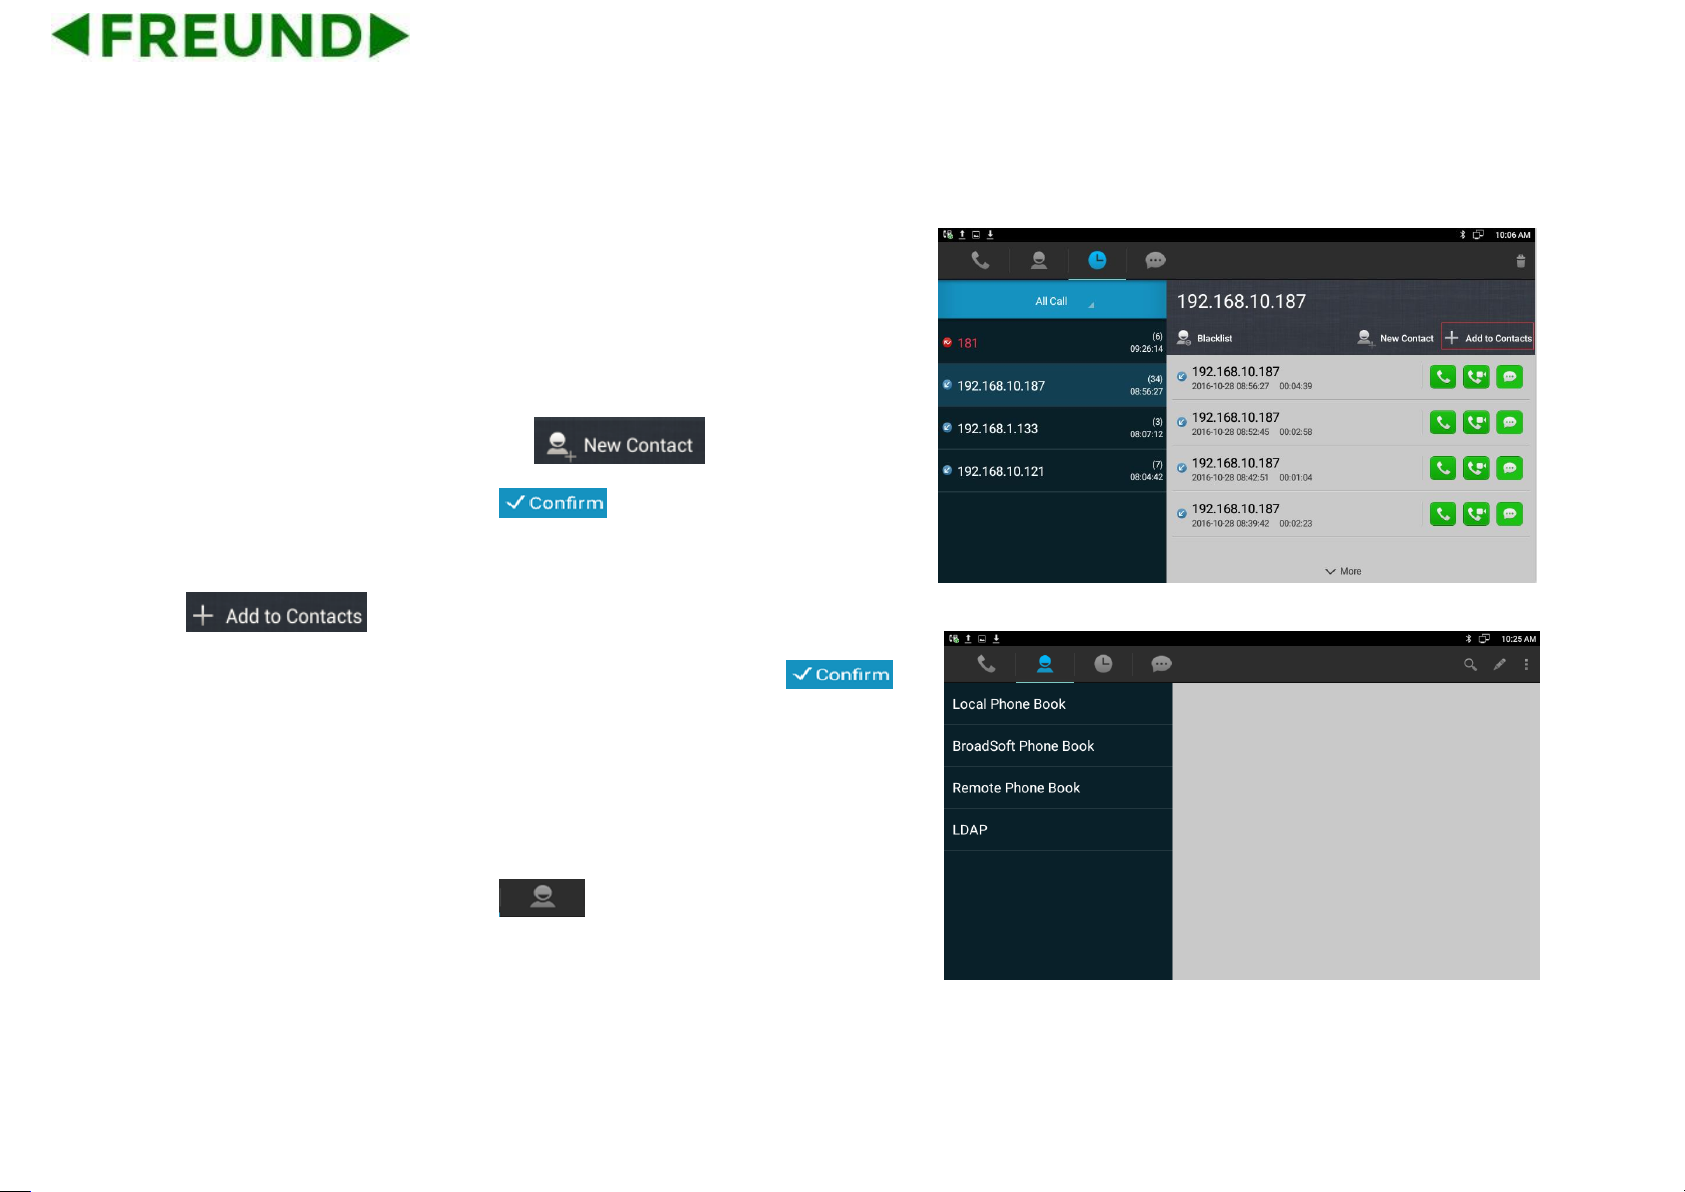
Call records are shown on the left. Click the number or contact, and
users can view all the call records details on the right.
5.1.2. Call from Call Records
In All Call, Missed Call, Received Call, Dialed Call or Forwarded Call
interface, users can follow the below steps to initiate a call.
1. Click a contact or a number on the left list.
2. If you want to initiate an audio call directly, click the icon in call
records.
3. If you want to initiate an audio call directly, click the icon in call
records.
4. If you want to send a message directly, click the icon in call
records.
Page 74

63
5.1.2.1. Delete Call Records
To delete one call record, steps as below:
1. Long press the call record you want to delete.
2. Pop-up a menu, press Confirm label to confirm the deletion.
To delete multiple call records, steps as below:
1. Press the icon on the top right corner of the screen.
2. Check the records on the left list.
3. Click icon .
To delete all call records, steps as below.
1. Press the icon on the top right corner of the screen.
2. Tap on the bottom left of the screen.
3. Click icon .
Page 75
64
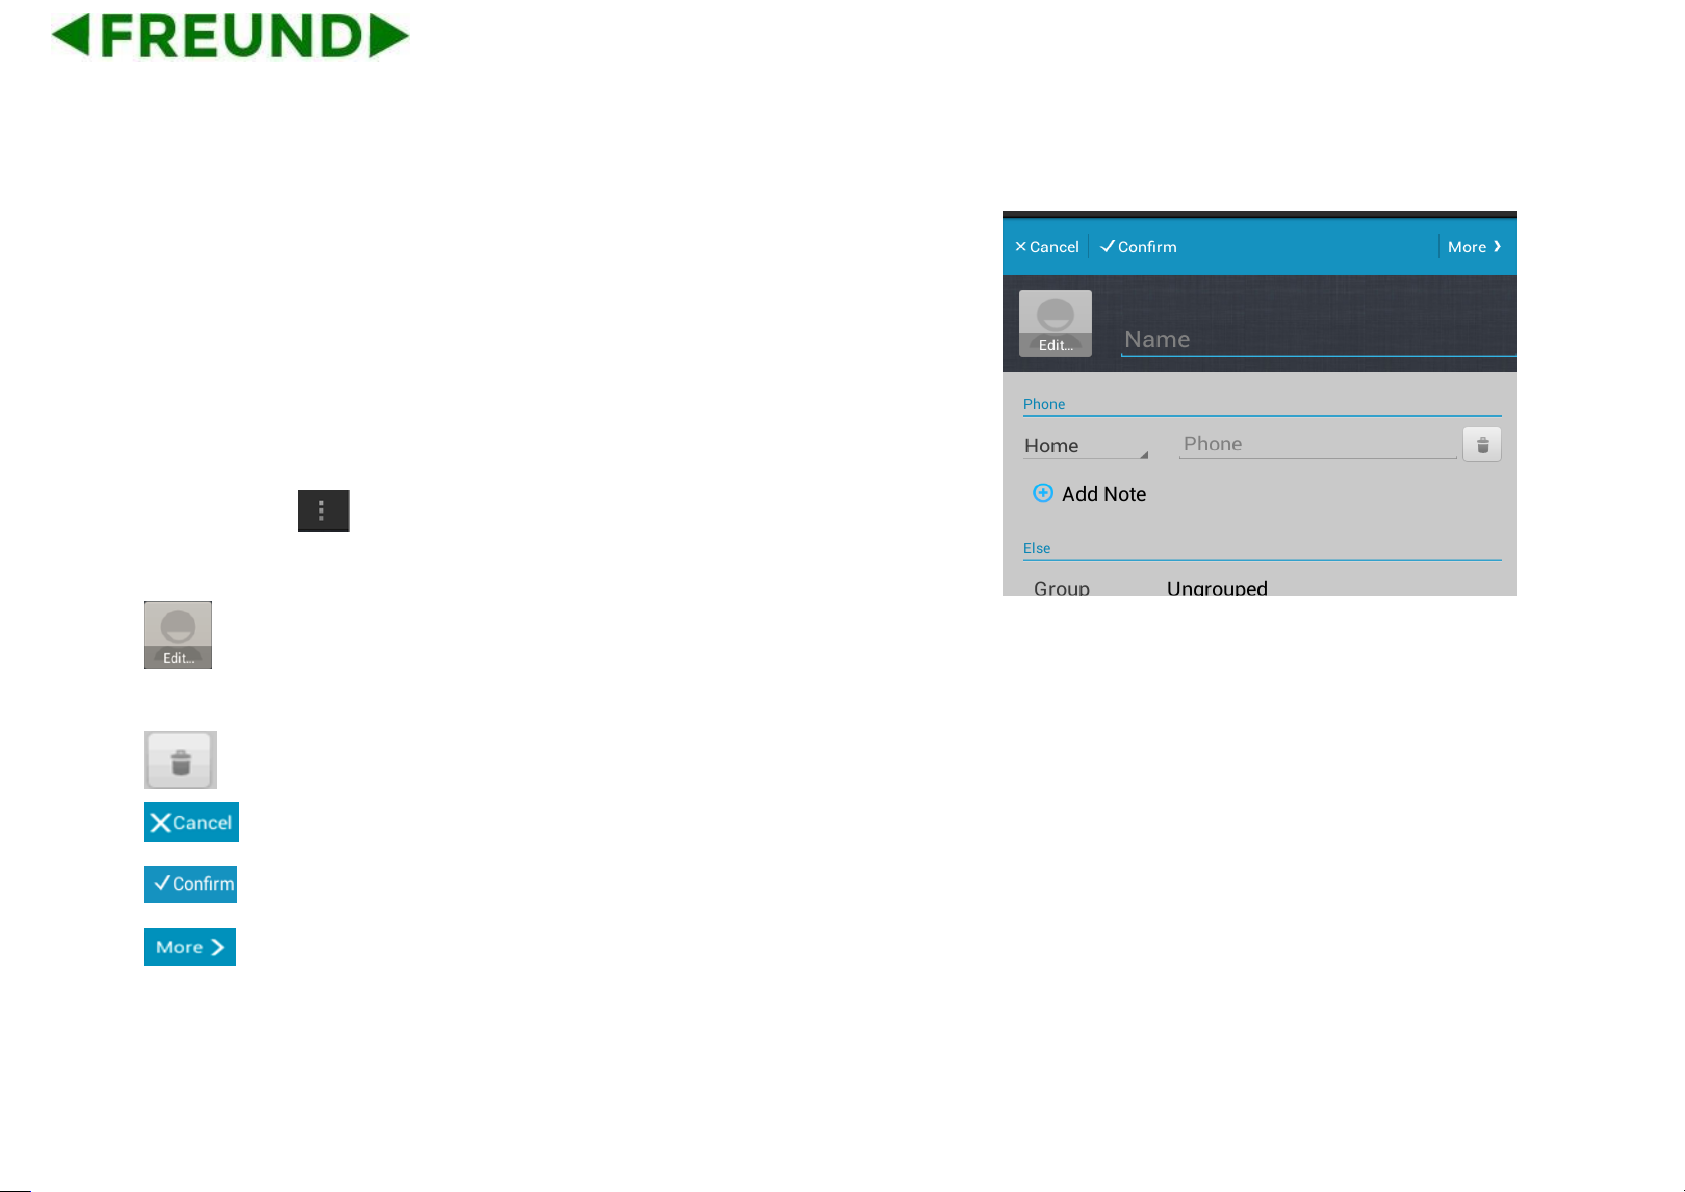
5.1.2.2. Add a Contact from Call Records
To save a number from the call records, or merge the number into
the existing contact number list. Do the following operations.
1. Click the number on the call records list.
2. To add a new contact, click icon , a new contact edit
page will pop up. Click icon .
3. To merge the number into the existing contact number list, click icon
, select the existing contact and then click Confirm
label to save. Will enter the contact edit page, click icon .
5.2. Contacts
The following method is to enter into Contacts interface. Enter the dialing
interface, and then click the icon .
Page 76
65
5.2.1. Local Phone Book
Users can view, audio call, video call, add, edit, delete the Local
contacts.
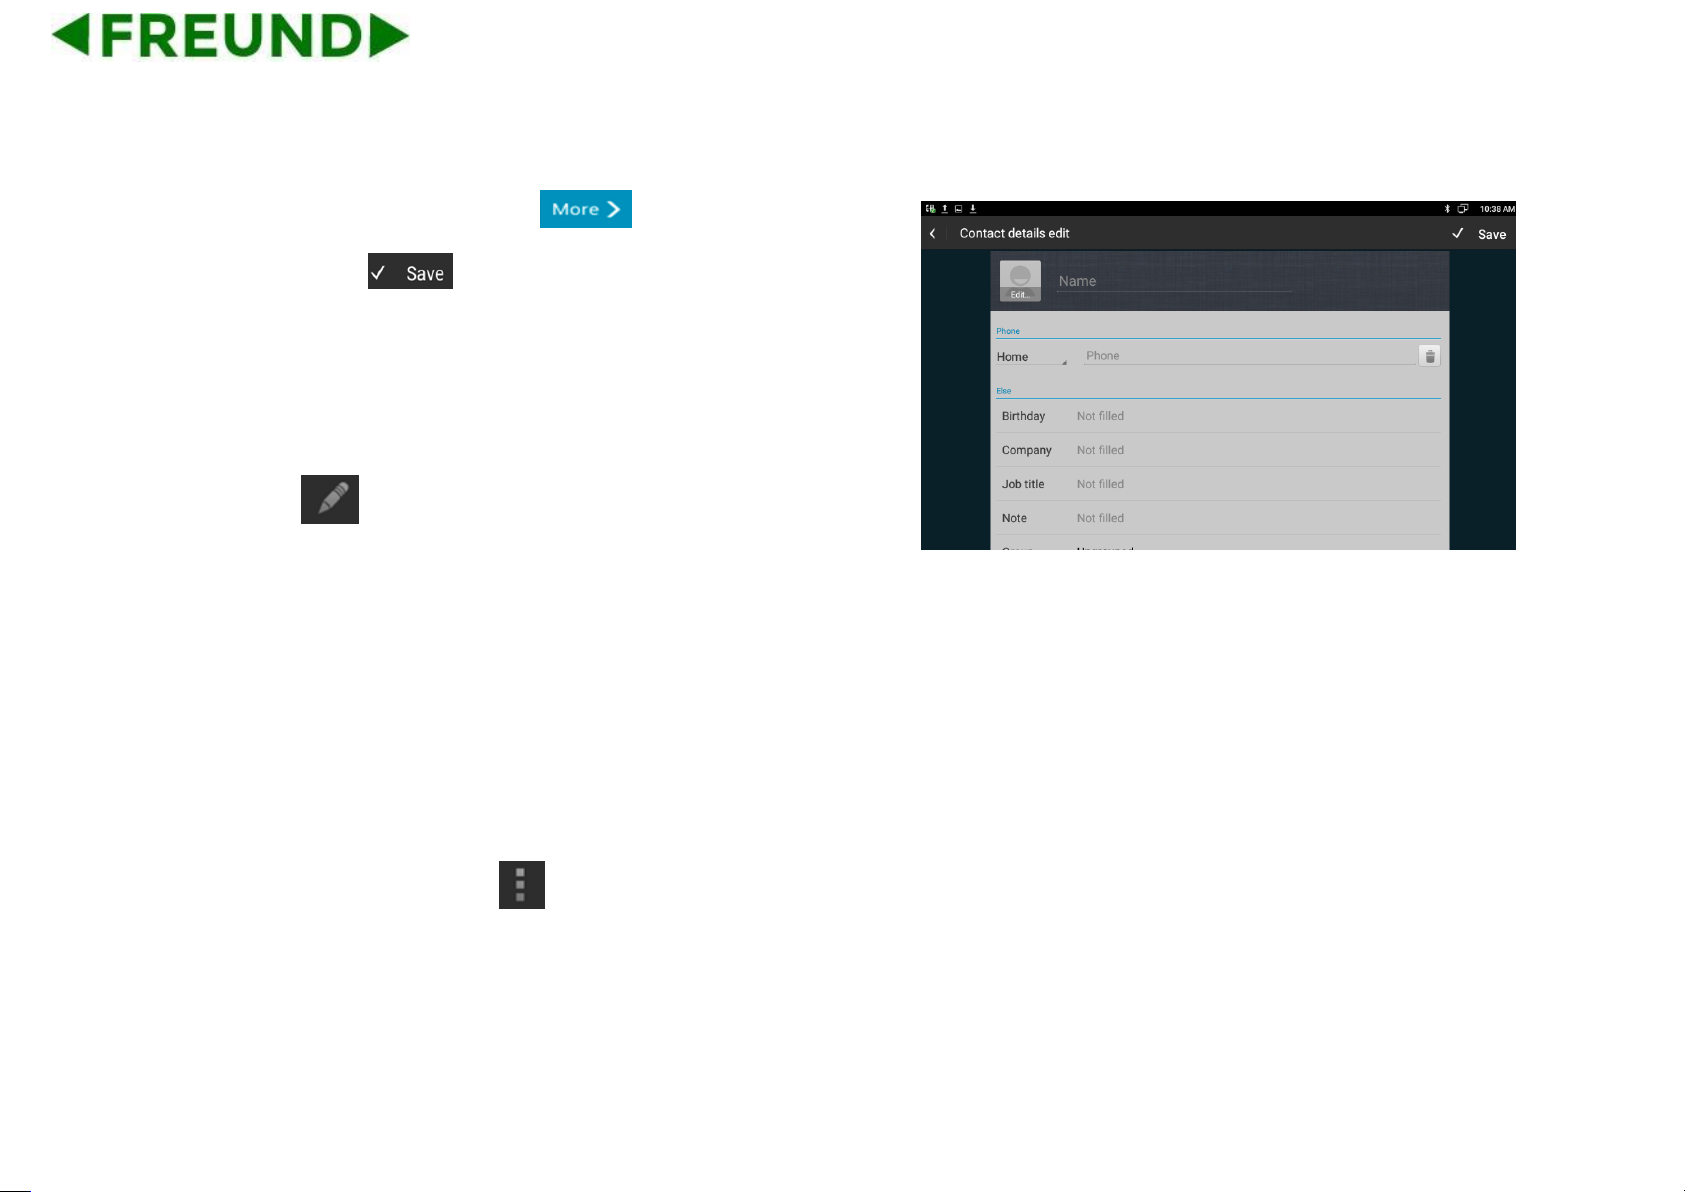
5.2.1.1. Add New Contact
Click the icon on the top right corner, and click New Contact label
in the drop-down window. The new contact interface is shown as follows:
: Edit the contact photo, Browse the image from “Take Photo”
or “Choose photo from Gallery”
: Delete the note.
: Cancel the edit.
: Save the modify.
: Click the label show more information to edit.
Page 77
66
To add some more information, click , pop up the page of
contact details, click to save.
5.2.1.2. Modify Contact
1) Select the contact need to modify in the contact list.
2) Click icon .
3) Enter into contact edit page, edit the contact information.
5.2.1.3. Delete Contact
Following methods are to delete the contacts.
⚫ Touch and hold the contact need to delete from contact list, and tap
Confirm label in the pop-up Remove Contact dialog box.
⚫ Select the contact, click icon , select Remove label, check the
contact and click Confirm label to delete.
Page 78

67
5.2.2. BroadSoft Phone Book
To setup BroadSoft contact. For BroadSoft Phonebook’s server address,
port, username and password, users need to consult the BroadSoft
service provider for further information.
5.2.3. Remote Phone Book
Access the remote phone book, add the contacts to the local phone
book from the remote phone book or make calls from the remote phone
book. 5 URLs of remote phone book is available to set.
⚫ Set the remote phone book via web interface.
1) Access Phone Book-> Remote Phone Book.
2) Input URL of phone book.
3) Input the phone book name.
4) Click the Submit key to save.
Page 79

68
Enter the remote phone book via phone interface.
1. Access contact setting interface-> click Remote phone book.
2. Select the relevant Remote Group and press the Enter softkey. The
phone will load the remote group information, and the LCD will
display the contacts of this remote group.
5.2.4. LDAP
To setup LDAP contact. It often uses OpenLDAP server to get the
contact. For setting details, please consult with your system
administrator for further information.
Page 80

69
5.2.5. Group
Group, it will be convenient for you to have contact group management.
Contacts should at least belong to a group; the default is no group.
5.2.5.1. Add A New Group
Access contact setting interface-> Local Phone Book-> tap icon on
the upper right of the screen. Select New Group label.
Input a new group name in pop-up dialog box.
Click Confirm label to save. The group will be displayed on the left list.
5.2.5.2. Rename A Group
1) Click the group want to rename-> click icon to enter edit page.
2) Input the new name directly.
3) Click Confirm label to save.
Page 81

70
5.2.5.3. Edit Group
1) Click the group to enter edit page.
2) Click Edit Member->check the member-> tap Confirm label to delete,
or touch and hold the existed member, it will pop up a prompt to
delete the member.
Page 82

71
5.3. RF Number (Optional)
This feature is specially designed for the elders. When the user needs
help, he/she can press the pendant to dial out for emergency help.
Setup RF number:
⚫ Go to the path: Phone Setting- RF Setting.
⚫ Choose one RF KEY.
⚫ Click Learn, and press the pendant at the same time.
⚫ Then the RF KEY light will be green, it means learning successfully.
⚫ Then click Edit to setup the RF number.
⚫ Click Save.
Page 83
72
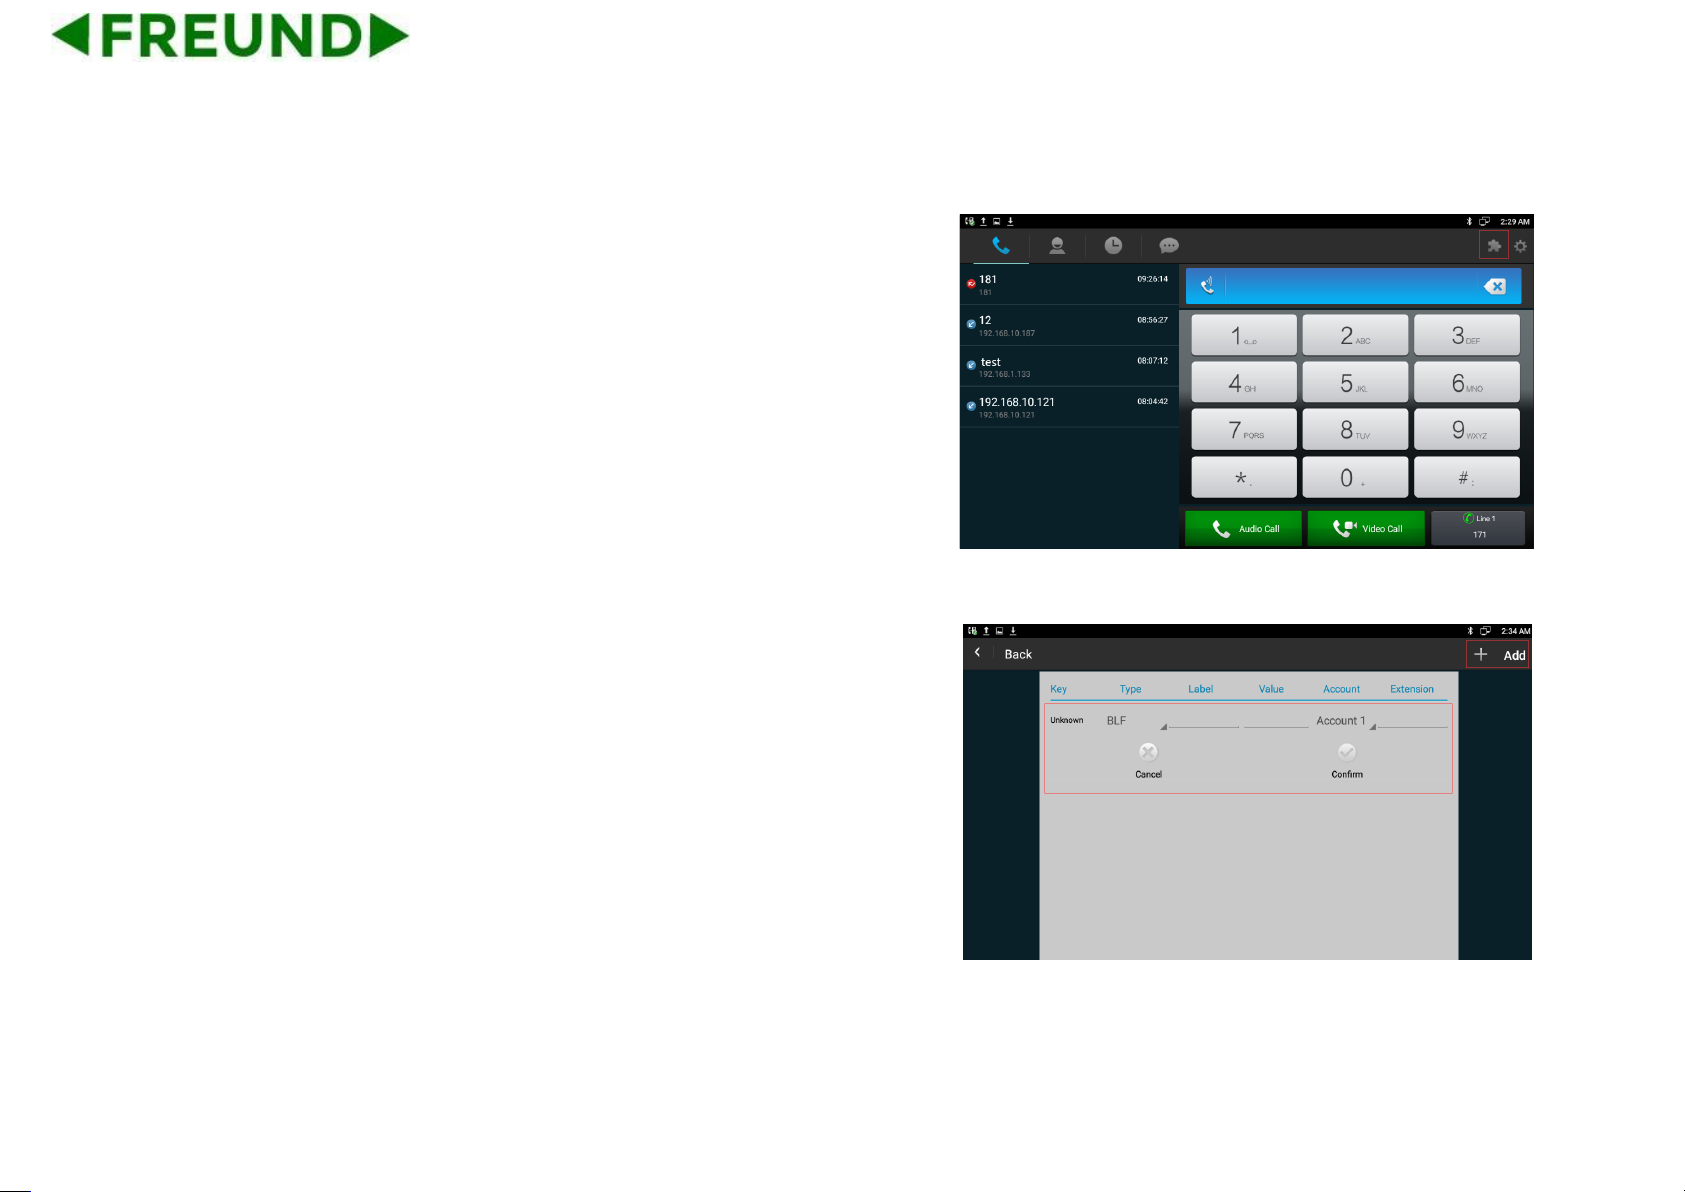
5.4. BLF
Busy Lamp Field (BLF) is used to monitor a specific user for status
changes on IP phones. For example, users can configure a BLF key on
a supervisor’s phone to monitor the phone user status (busy or idle).
When the monitored user places a call, a busy indicator on the
supervisor’s phone indicates that the user’s phone is in use.
Enter the dial interface, click BLF button.
Page 84
73
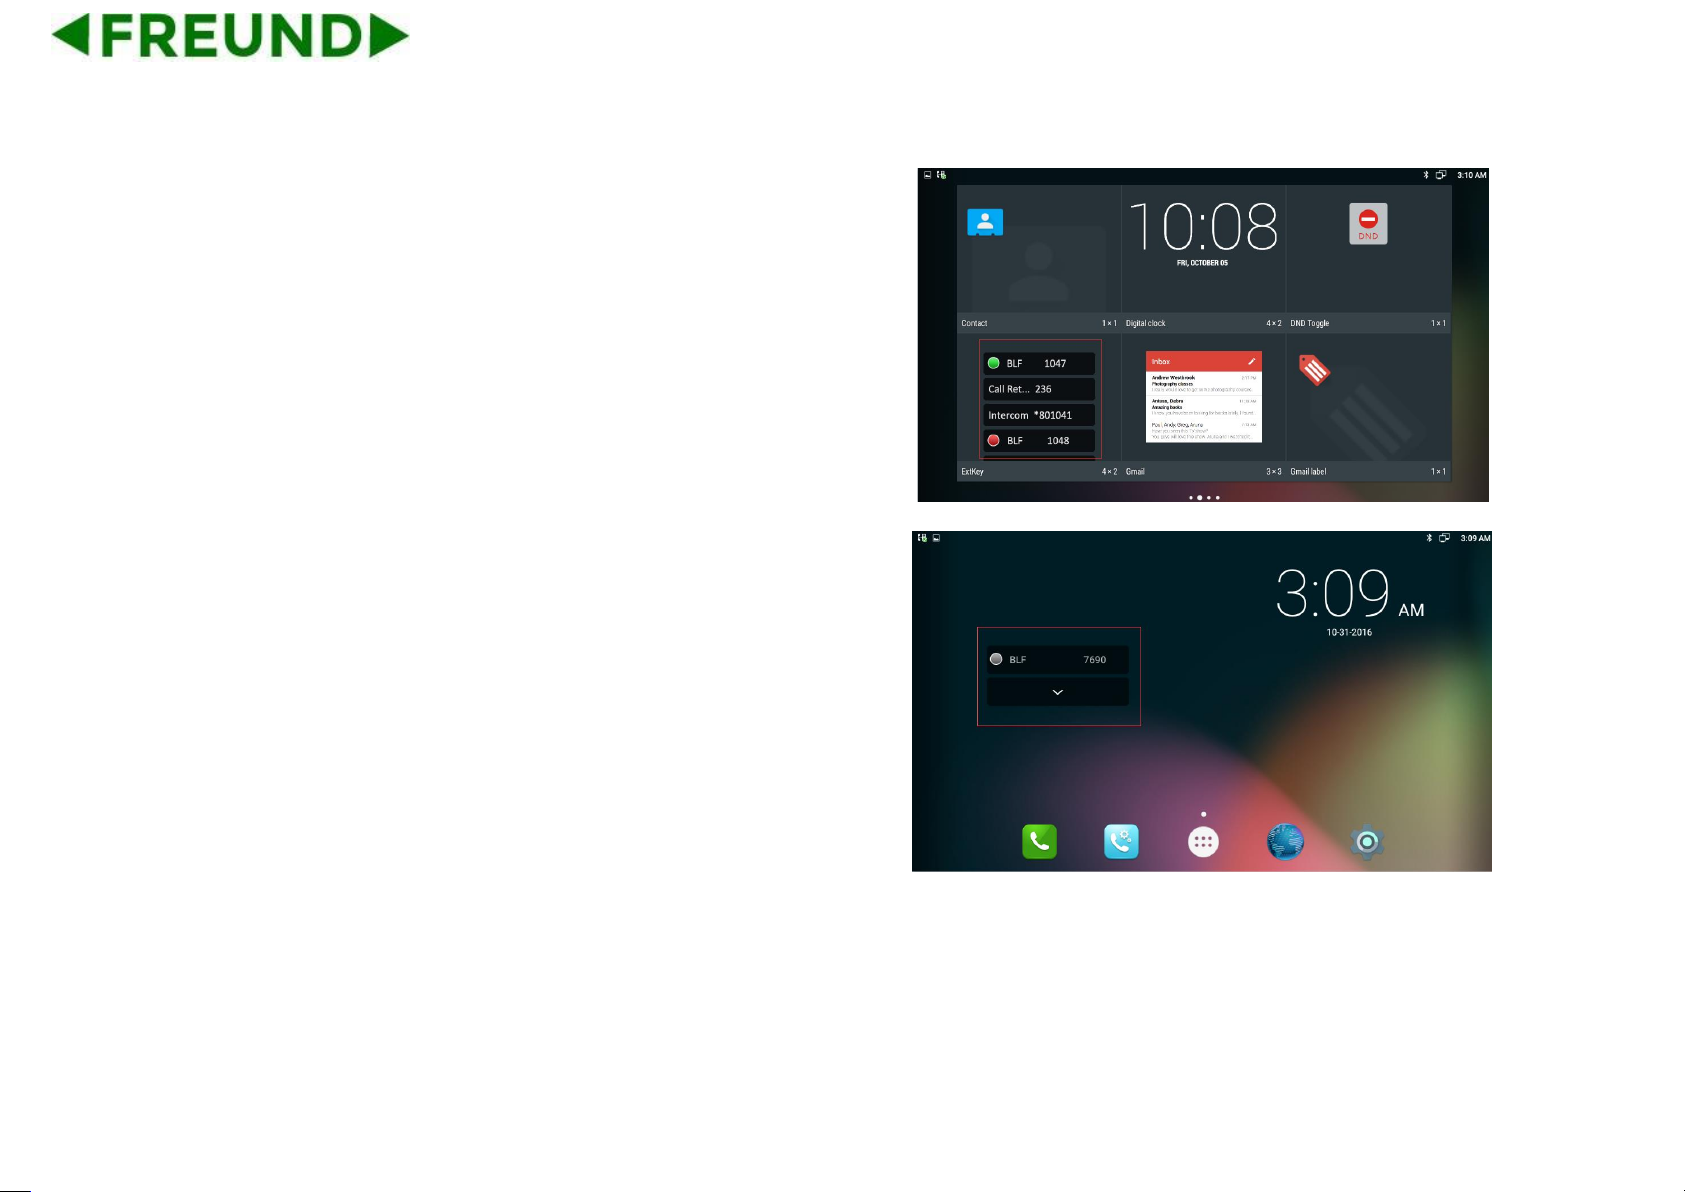
After finishing BLF Key configuration, you can drag ExtKey from the
WIDGETS to the main interface.
Page 85
74
5.5. Intercom
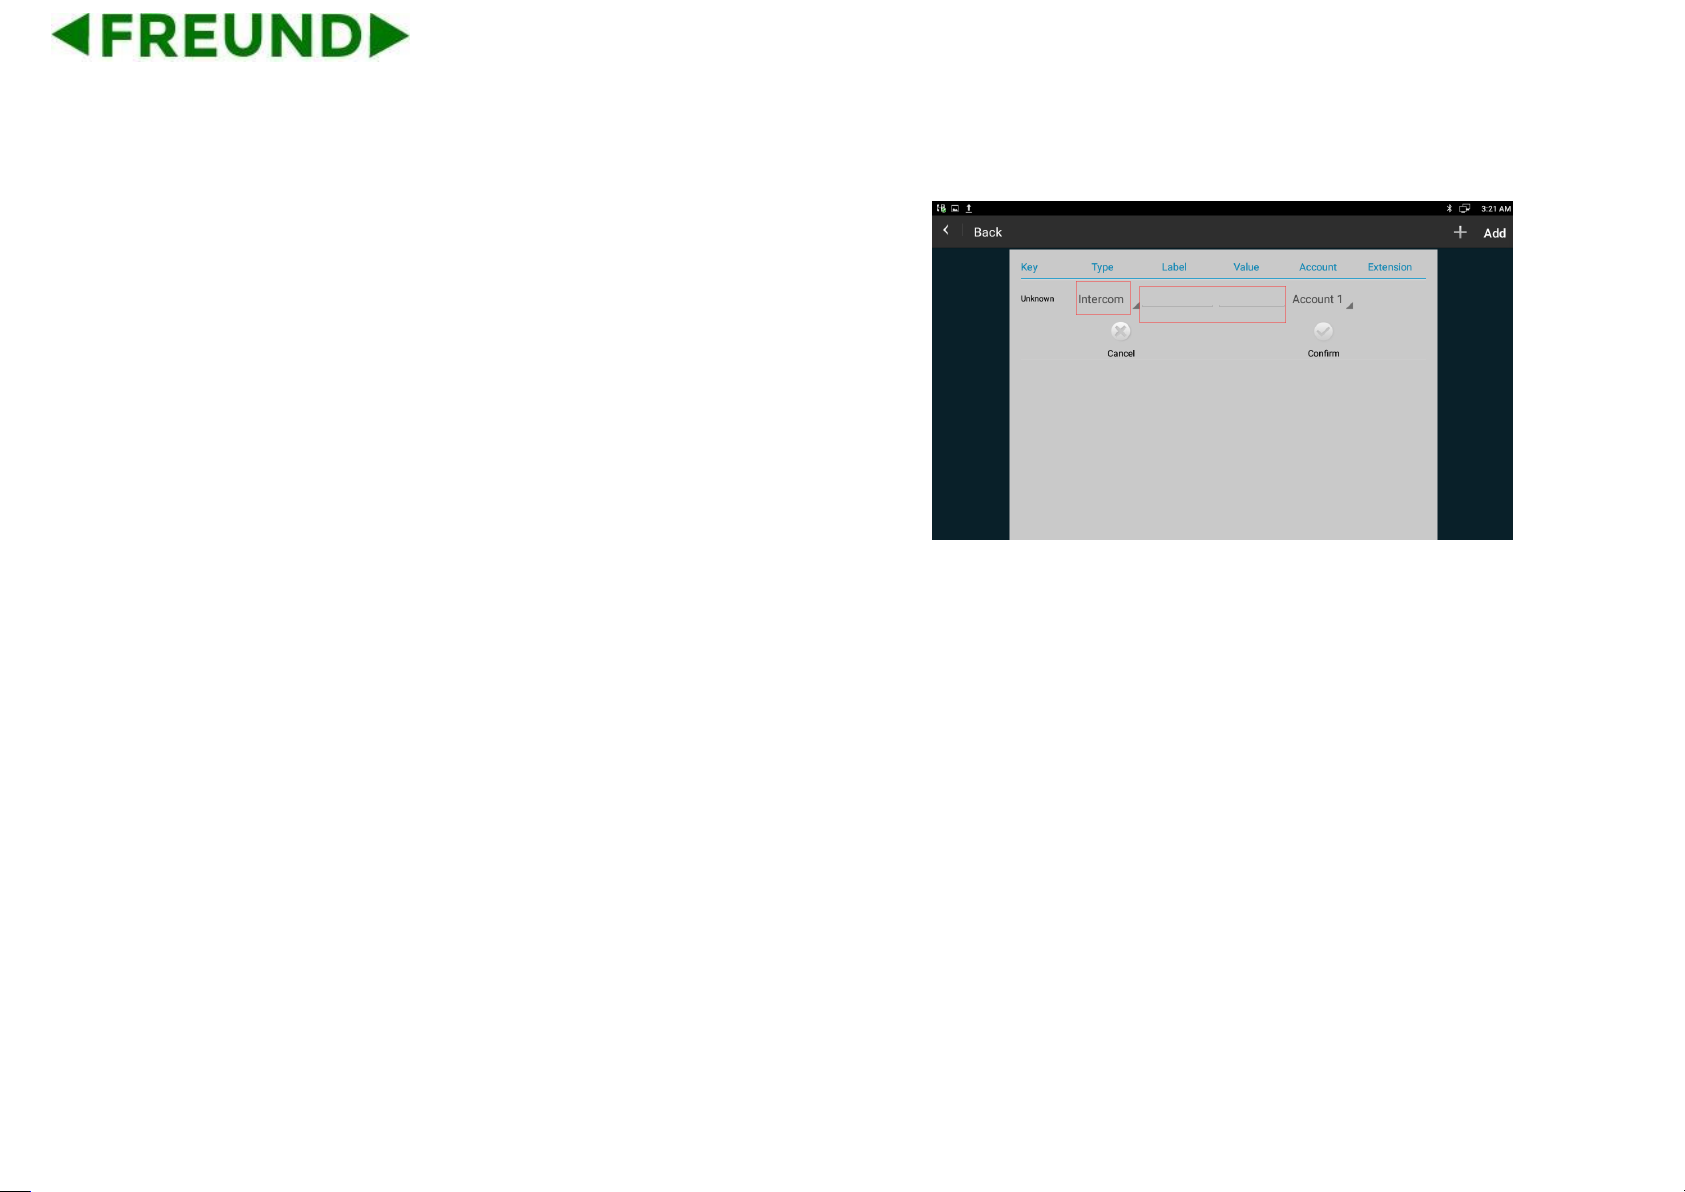
Select Type as Intercom, enter intercom code in Value. Choose the
availed account. To click Confirm to save.
Note: Different SIP servers have different codes.
1) Press the Intercom key when the phone is available. The phone will
connect the extension number of remote users automatically.
2) The phone is enabled silent mode when picking up the intercom call
so that the other will not hear you.
Page 86
75
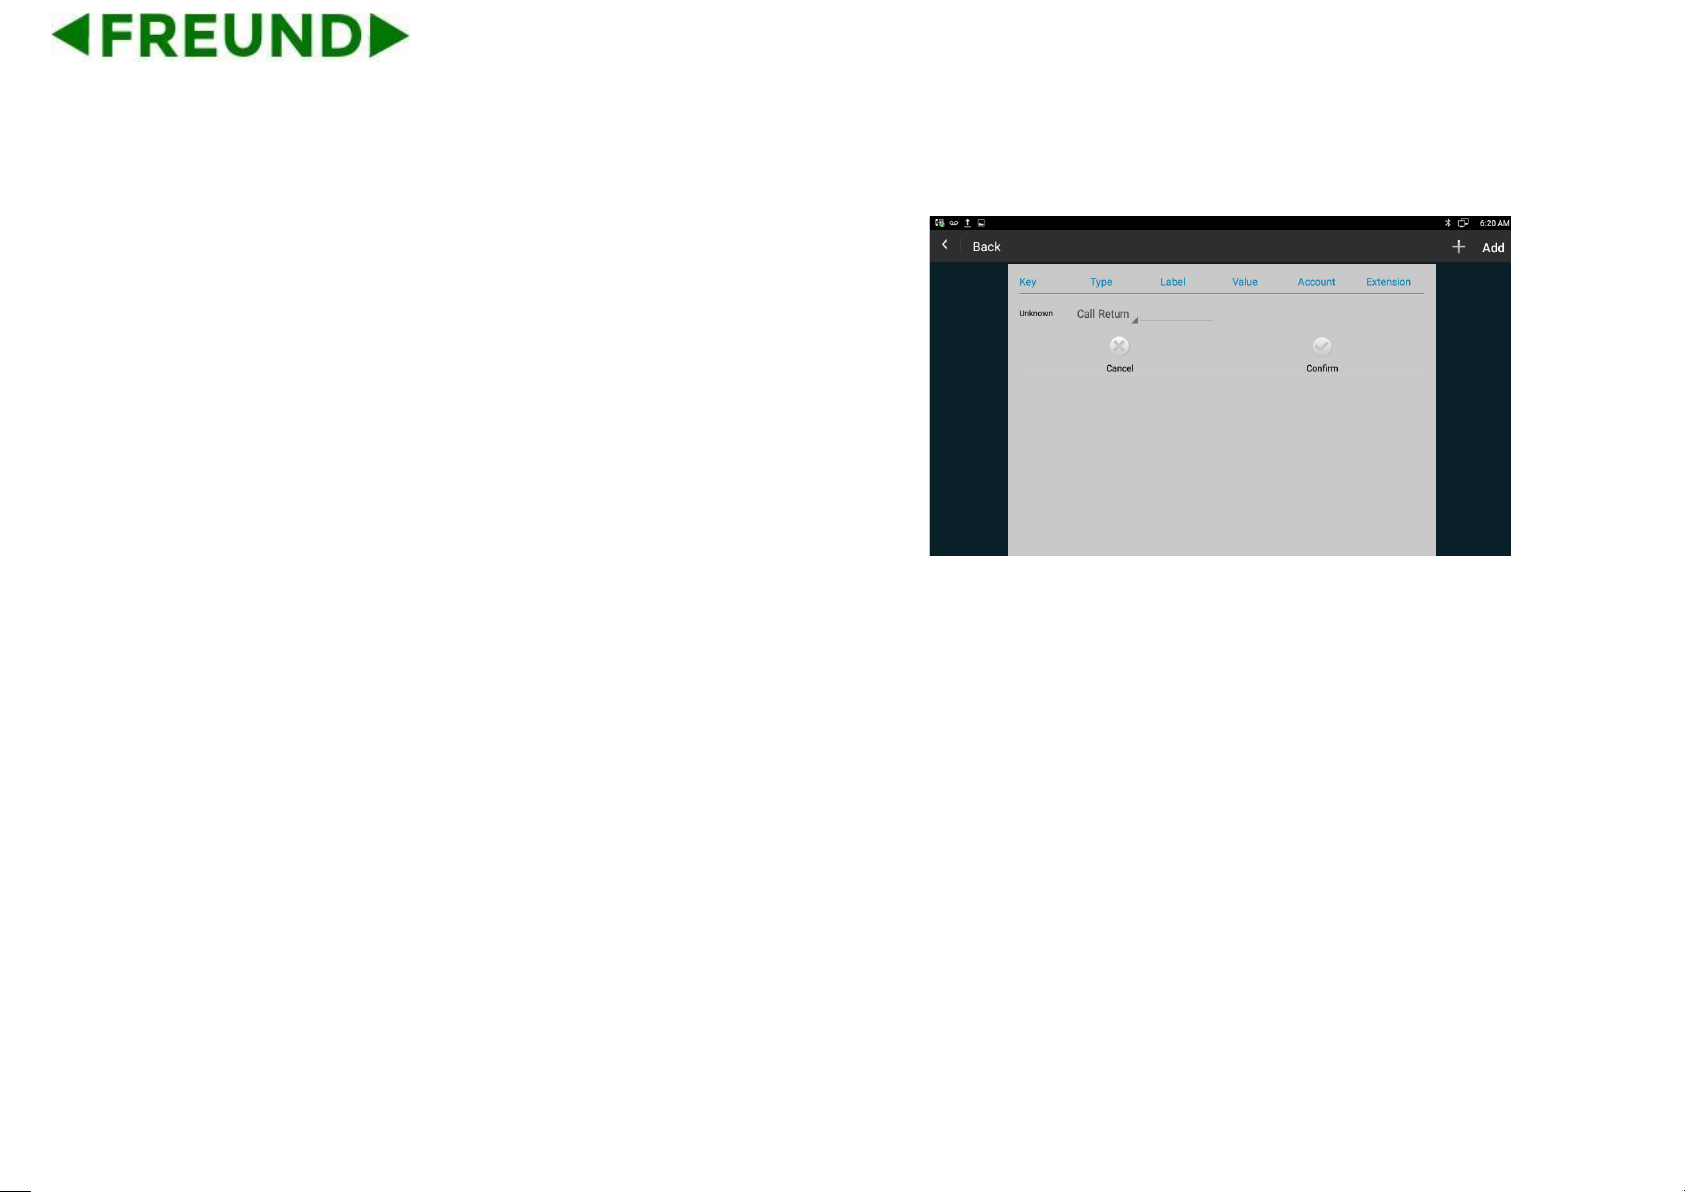
5.6. Call Return
This function can be used to call the latest dialed call record
automatically.
Page 87
76
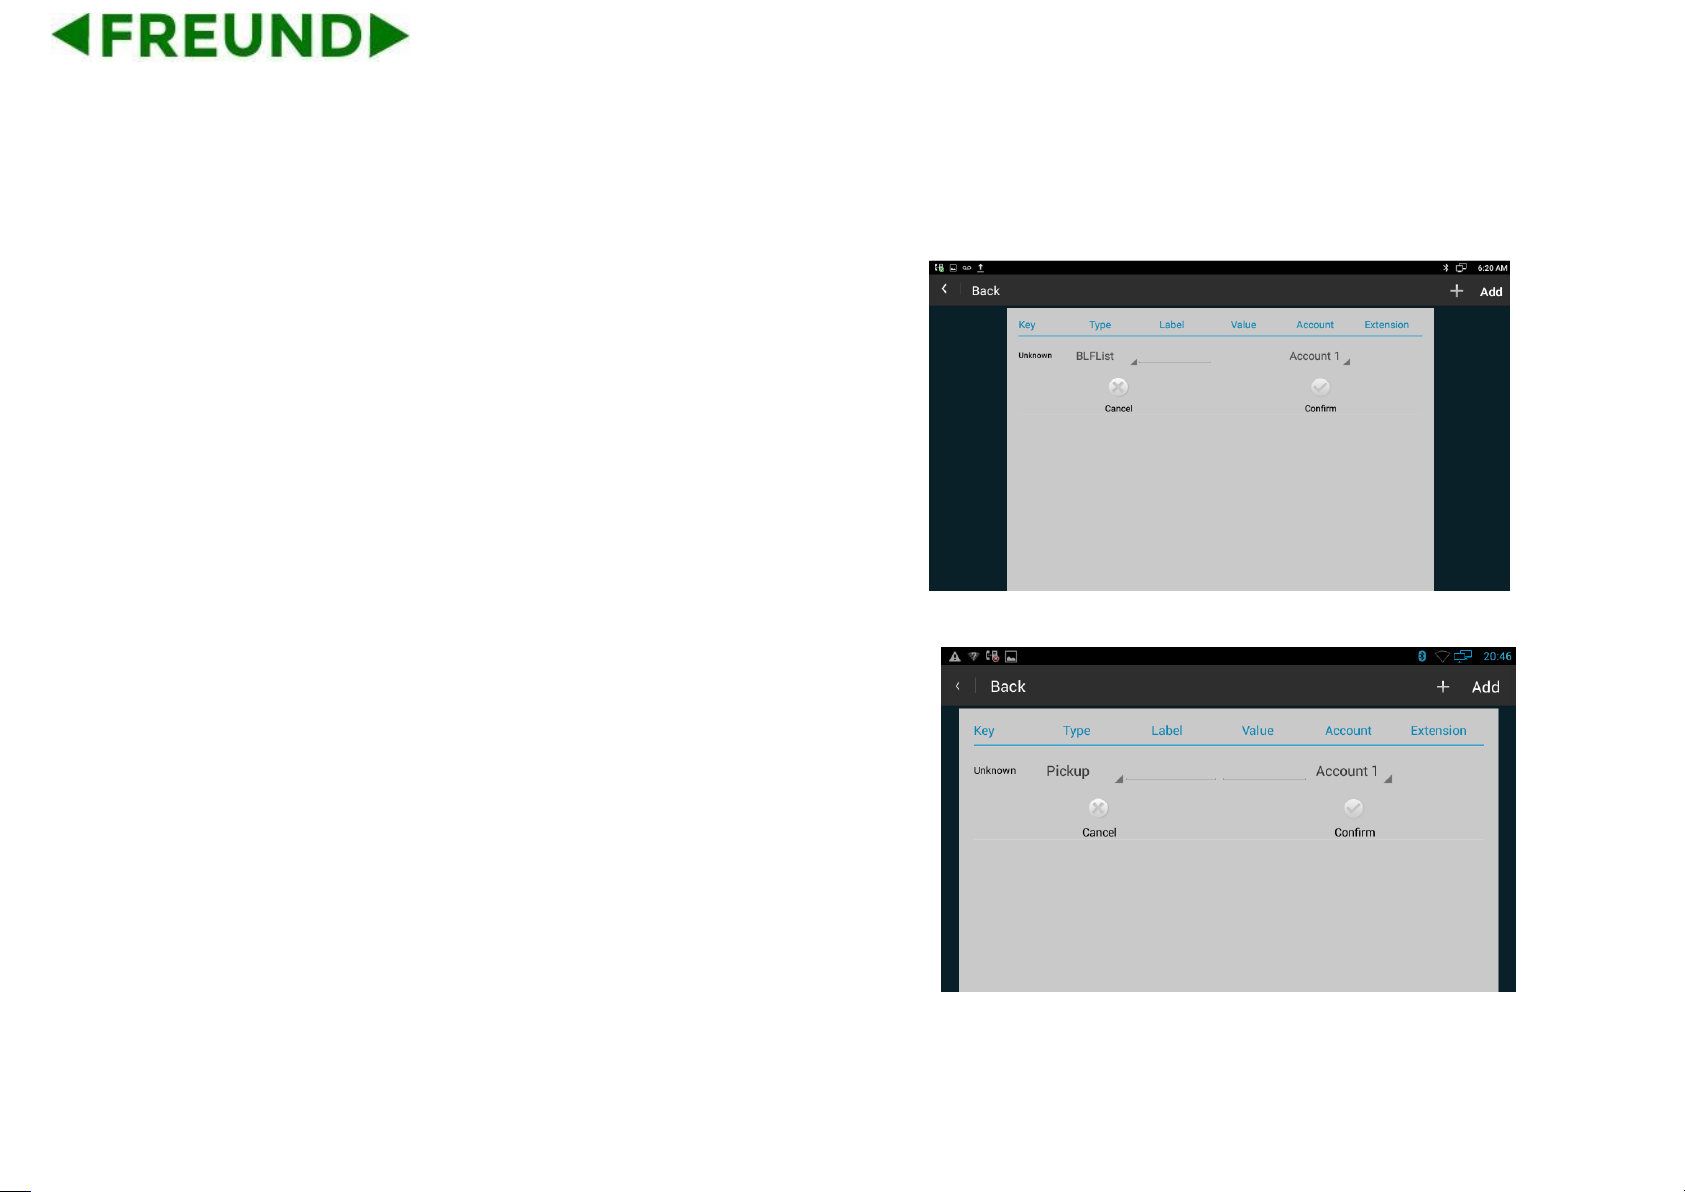
5.7. BLF List
BLF List:While using BroadSoft platform, the accounts which are
monitored by the sip phone will reply the subscribe news in the form of
xml list to improve efficiency.
BLF List Code:While using BroadSoft platform, you can configure the
BLF LIST CODE to pick up call or Barge in call.
Note: BLFListCode is supported by BroadSoft platform, please consult
your administrator further information.
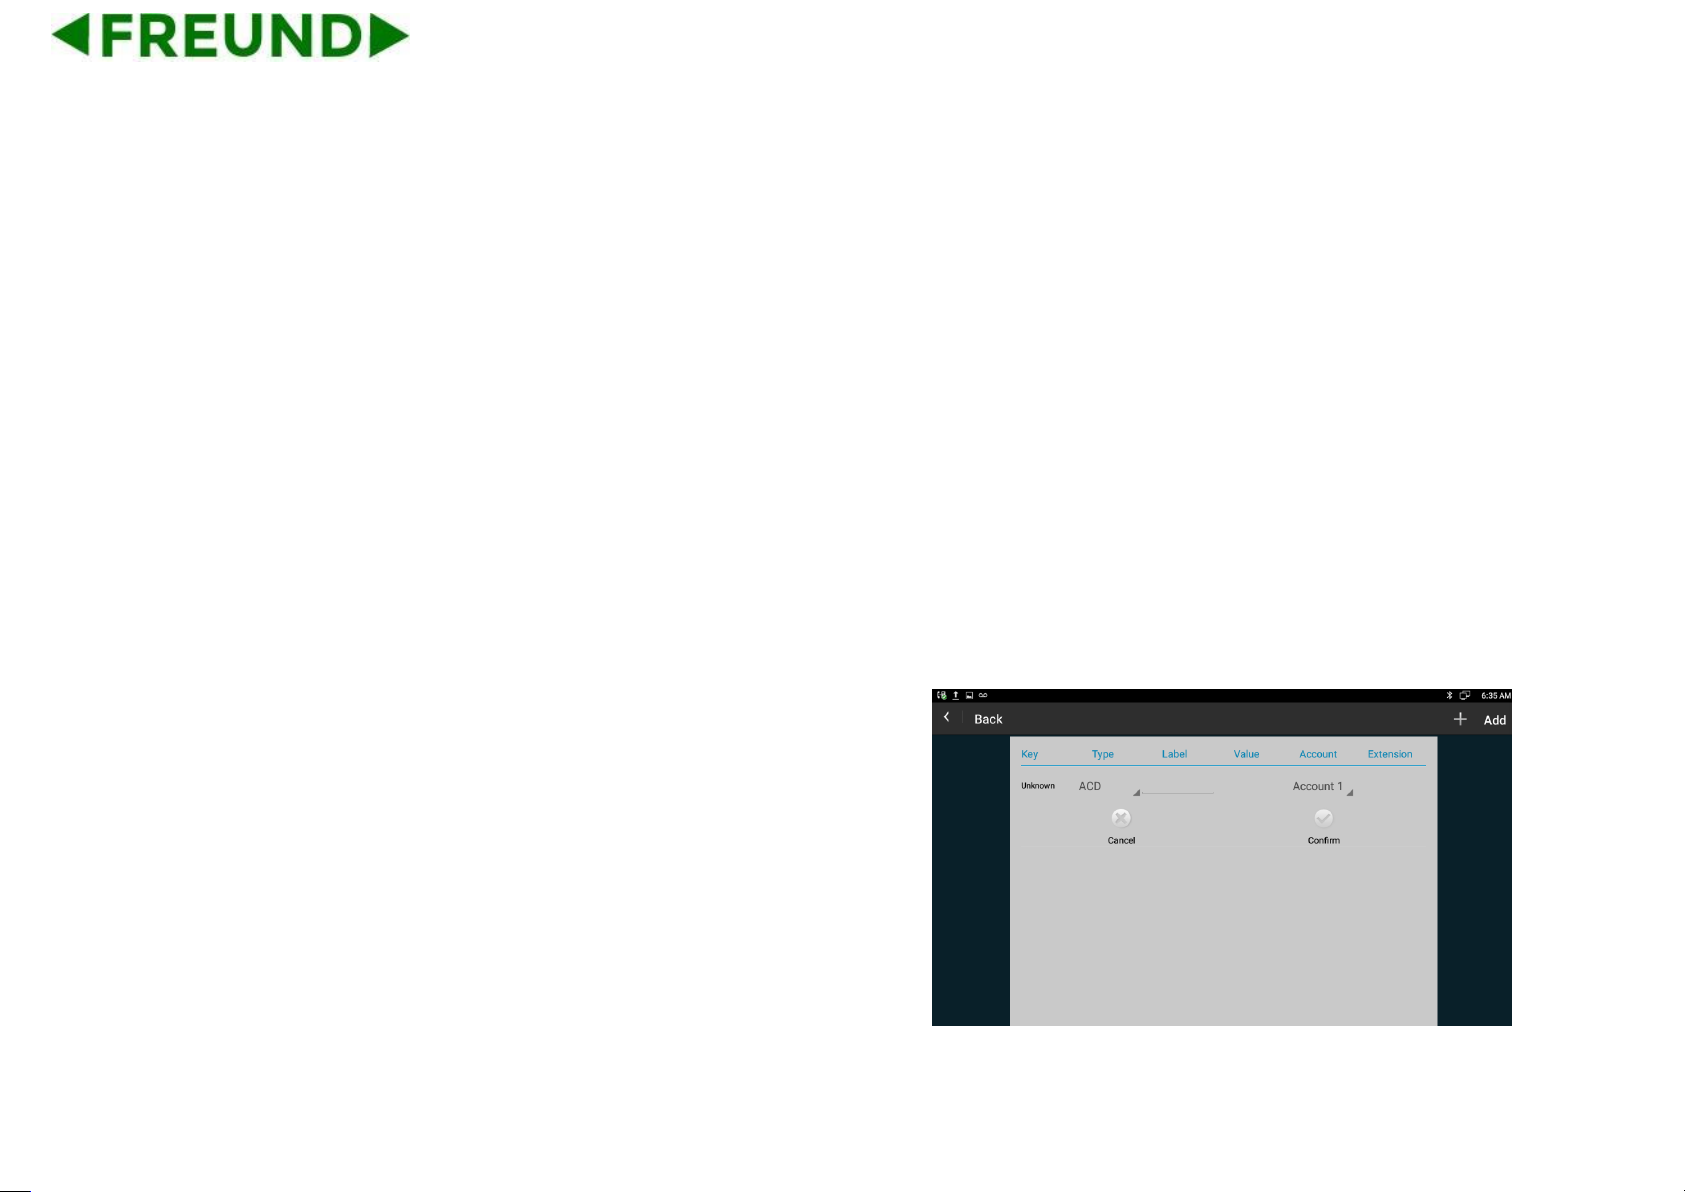
5.8. Pickup & Group Pickup
Users can use pickup to answer other users’ incoming call. The phone
Freund 48G supports specified pickup and group pickup.
⚫ Specified pickup
Page 88
77
Specified pickup can answer specified user’s incoming calls. When the
user of specified pickup number is off or busy, users can press the
pickup key to answer incoming call instead of the specified number.
⚫ Group pickup
Group pickup can answer incoming calls of group’s user. When anyone
in group receives an incoming call, users can press the group pickup key
to answer.
Note: Press the group pickup only to answer line 1 incoming call if there
are many incoming calls in group.
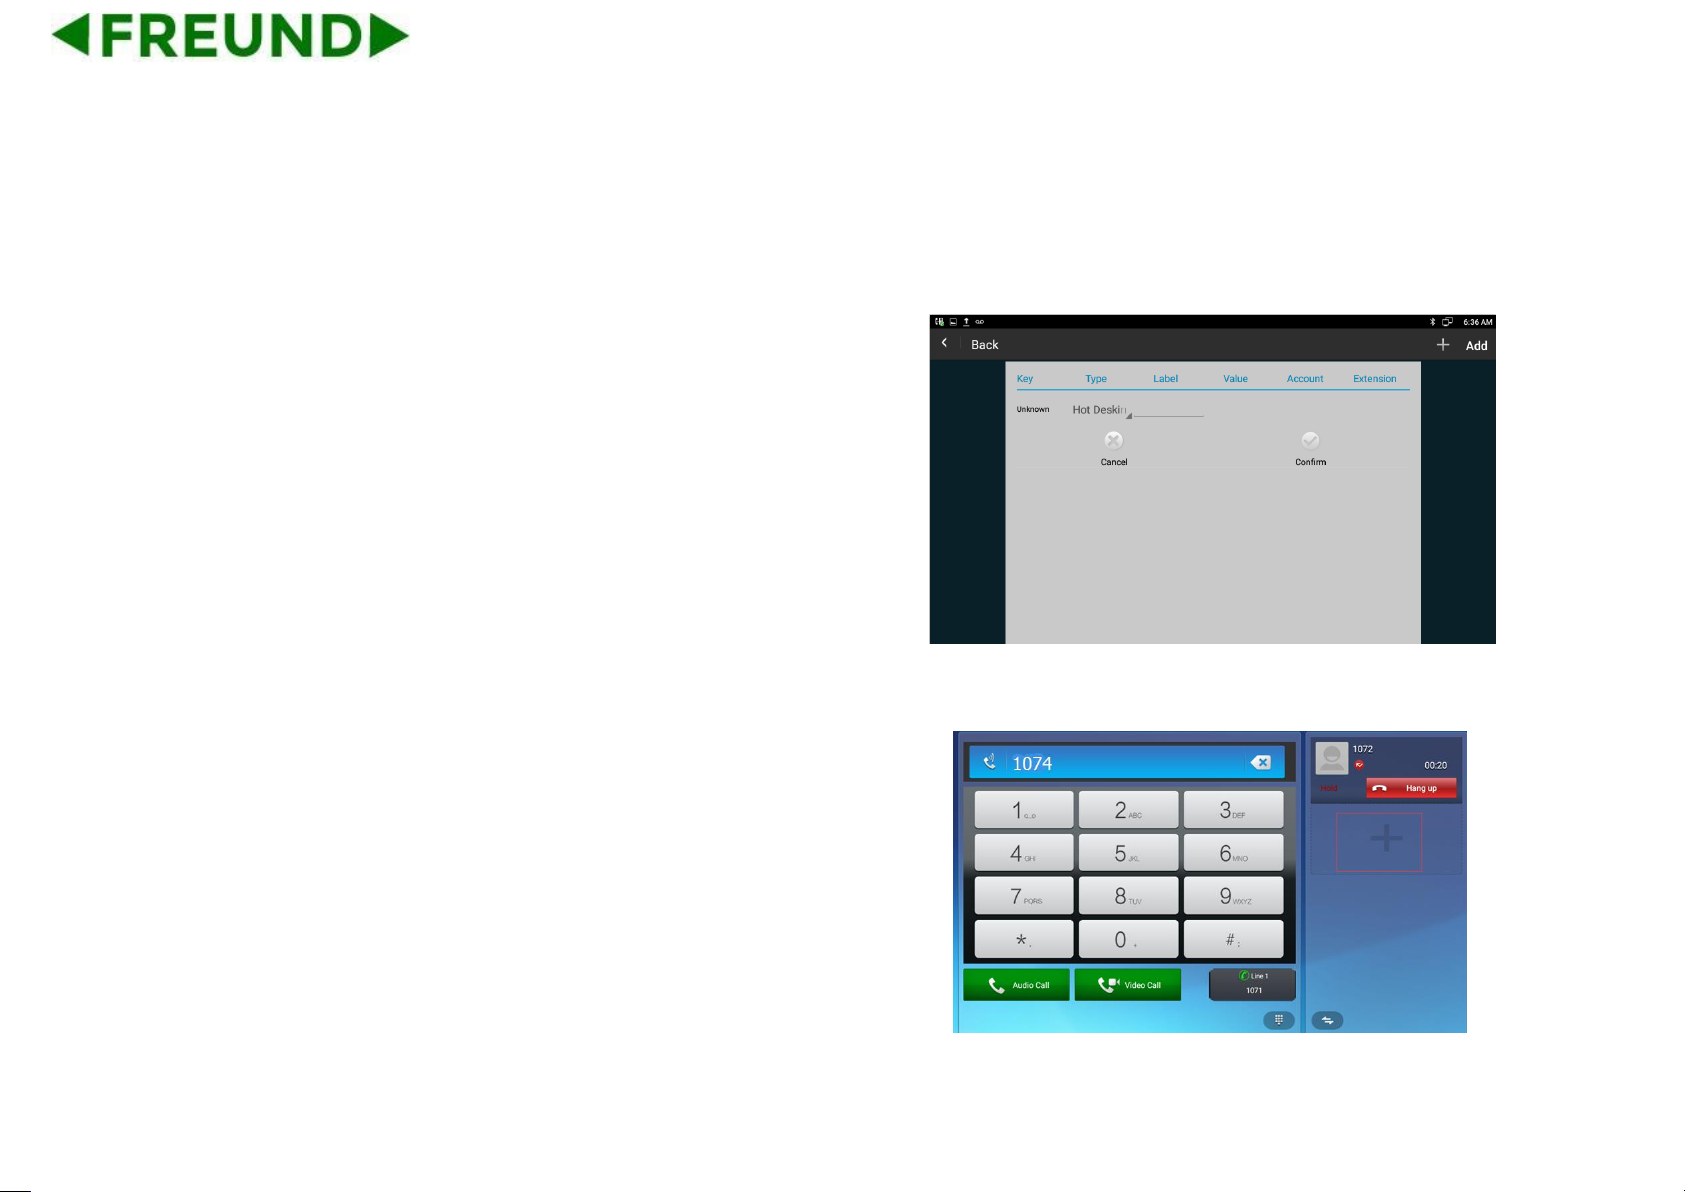
5.9. ACD
Automatic Call Distribution (ACD) enables organizations to manage a
large number of phone-calls on an individual basis. ACD enables the use
of IP phones in a call-center role by automatically distributing incoming
calls to available users, or agents. ACD depends on support from a SIP
Page 89
78
server. ACD is disabled on the phone by default. Users need to enable it
on a per-line basis before logging into the ACD system.
5.10. Hot Desking
In some working place, the people are always walking around. Hot
Desking feature will make the staffs login his account on any computer in
the company. In some public places, the working people are not fixed,
anyone can use Hot Desking for logging his account, and setting the
phones to the familiar mode, such as the remote function of the
computer.
5.11. Conference
Users can use the conference feature to hold a 3-way conference by
pressing the Conference soft key to invite the current talking and one
line talking held to attend conference.
Page 90
79
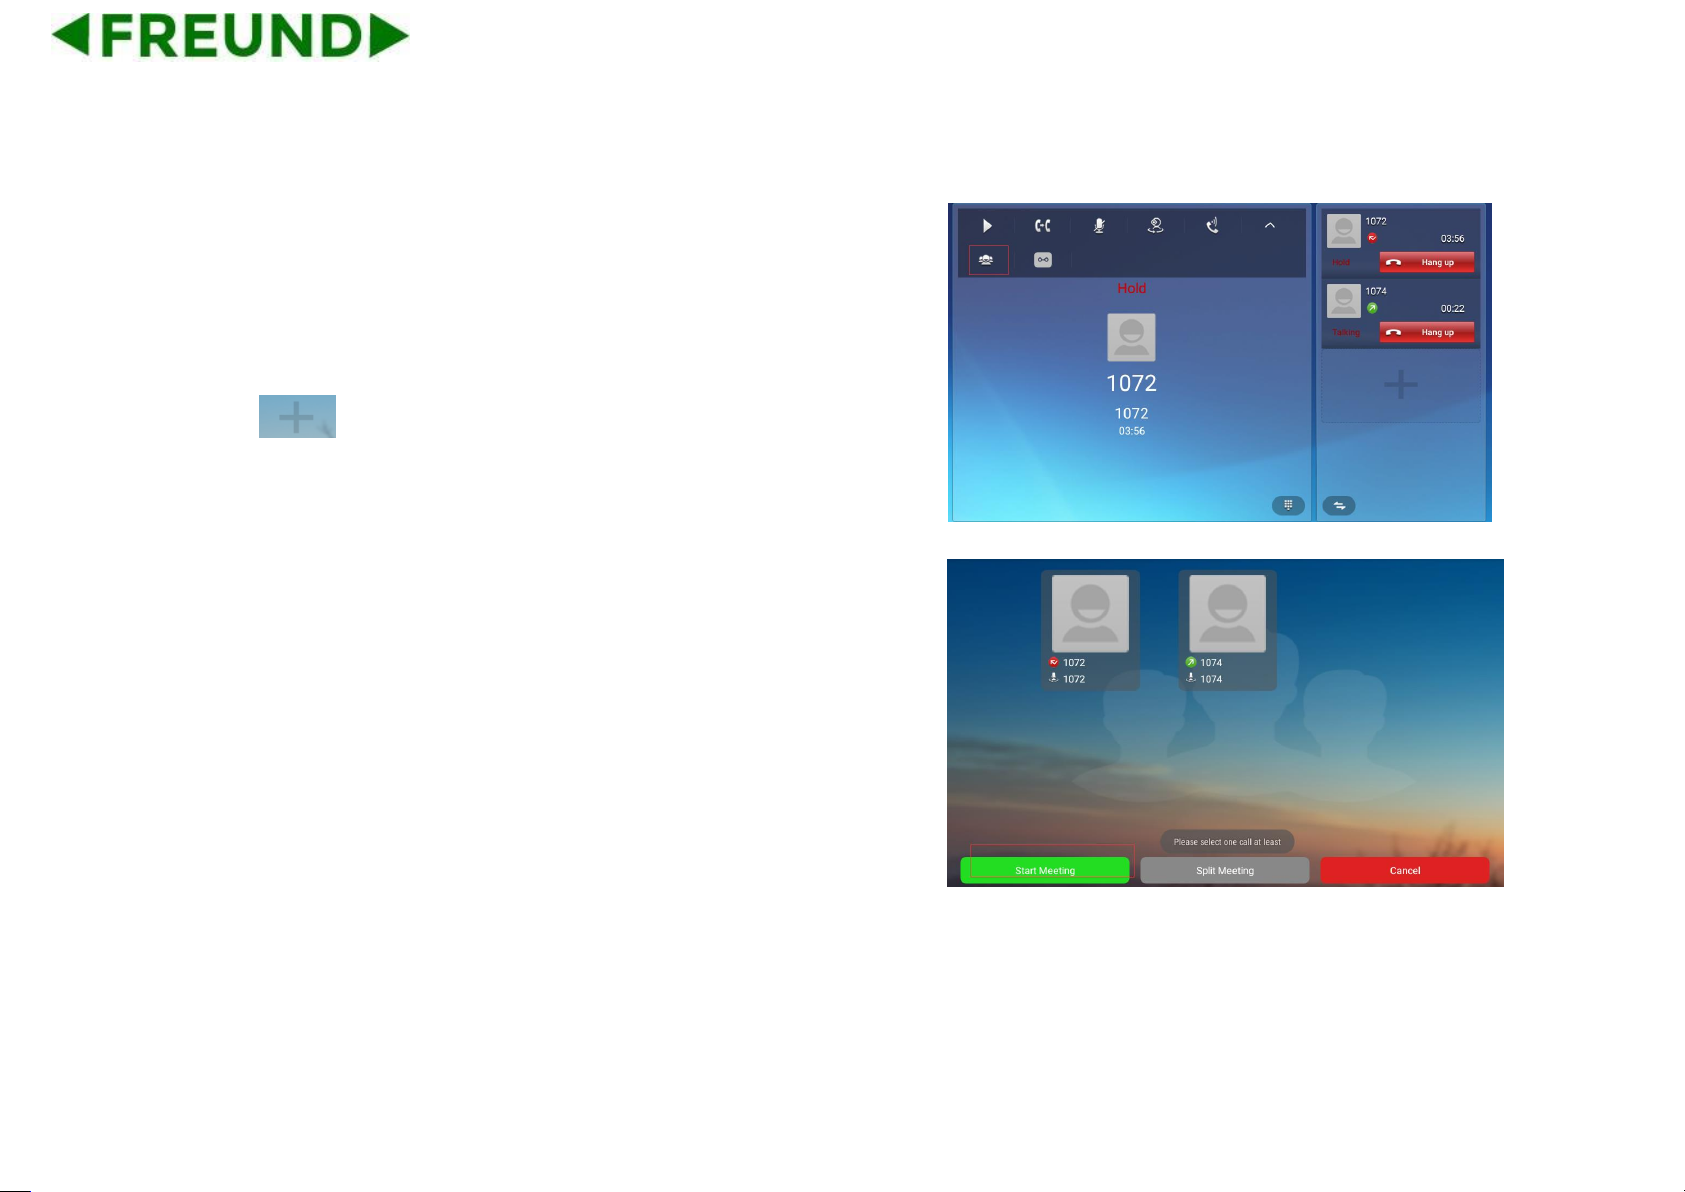
5.11.1. Create 3-way conference
1) Create talking with first party;
2) Press to create a new talking;
3) Input the number of second party and press the Video Call or Audio
Call to make a call;
4) When the second party answers the call, you can press the
Conference softkey or the Conference key on the keypad to start
3-way conference.
Page 91
80
5.12. Transfer
5.12.1. Blind Transfer
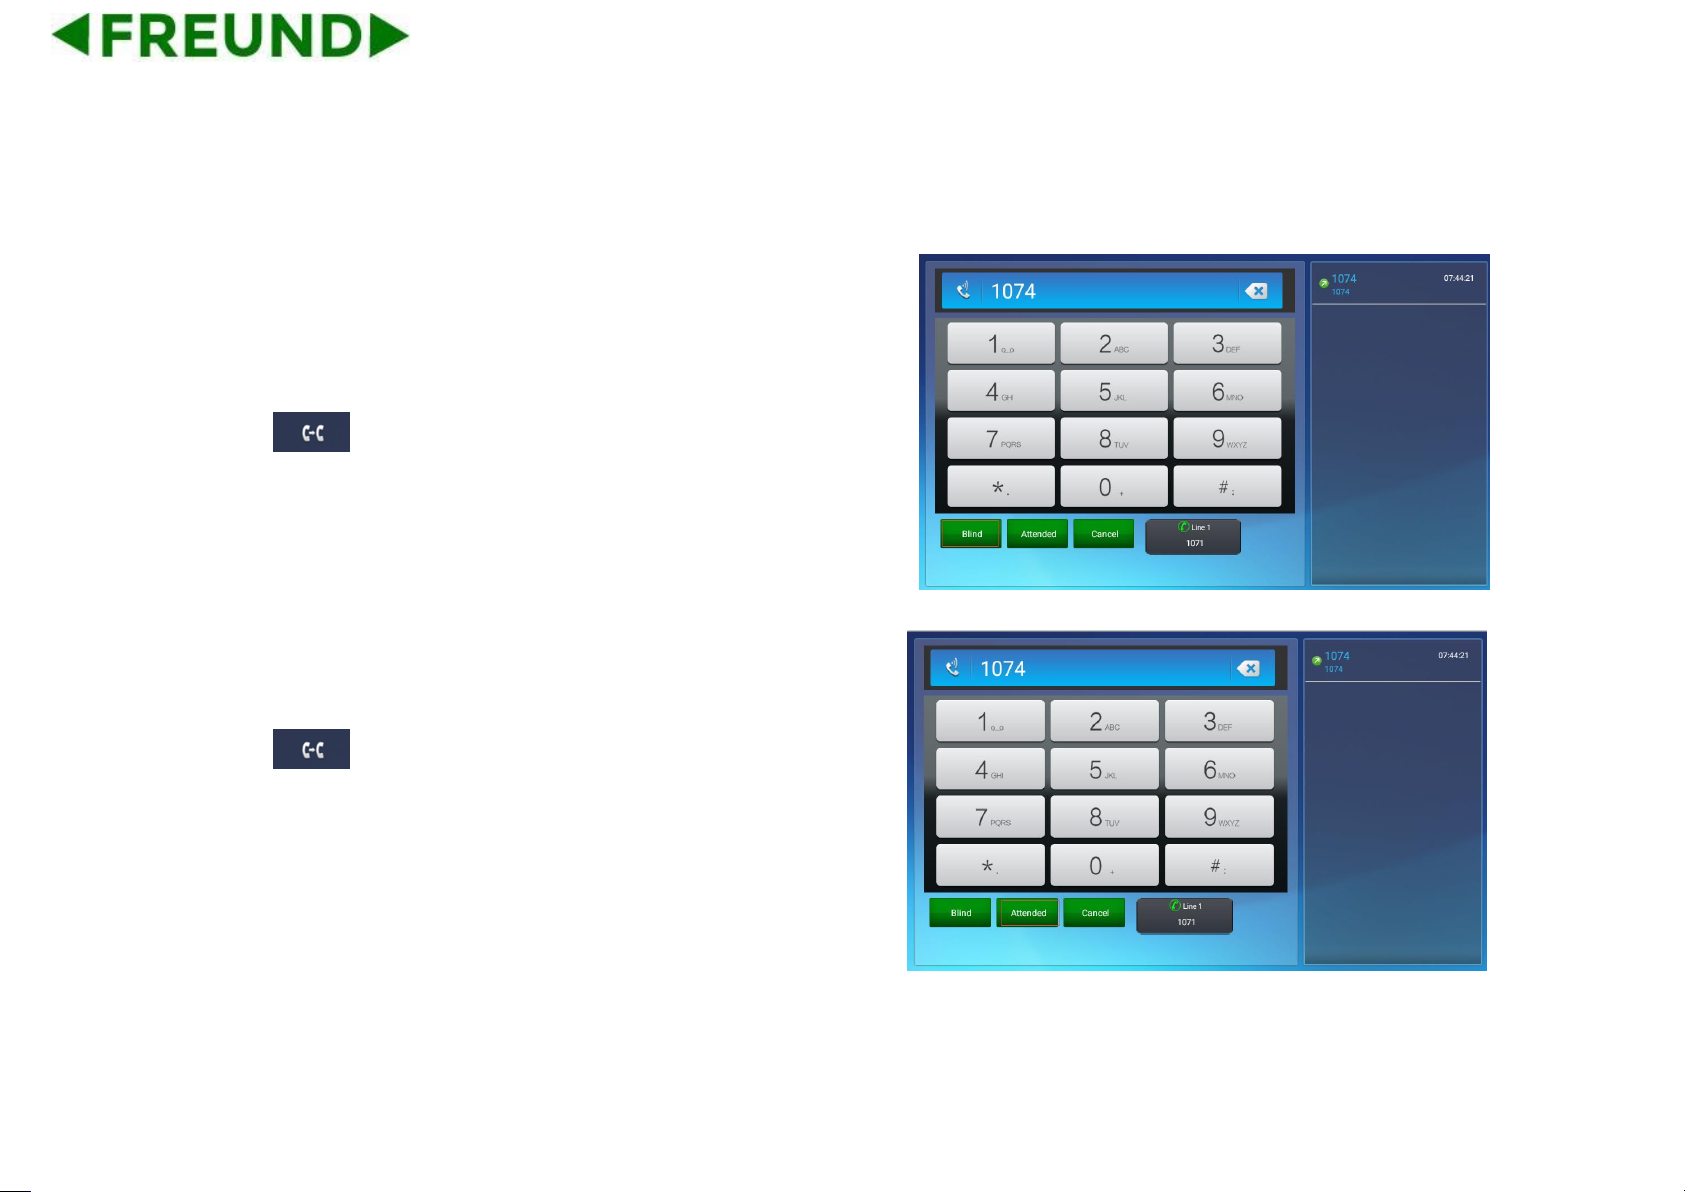
1) During the first way conversation, press transfer key on the keypad
or click to enter the configuration interface.
2) Enter the transfer number, then click Blind label to transfer the
number.
5.12.2. Attended Transfer
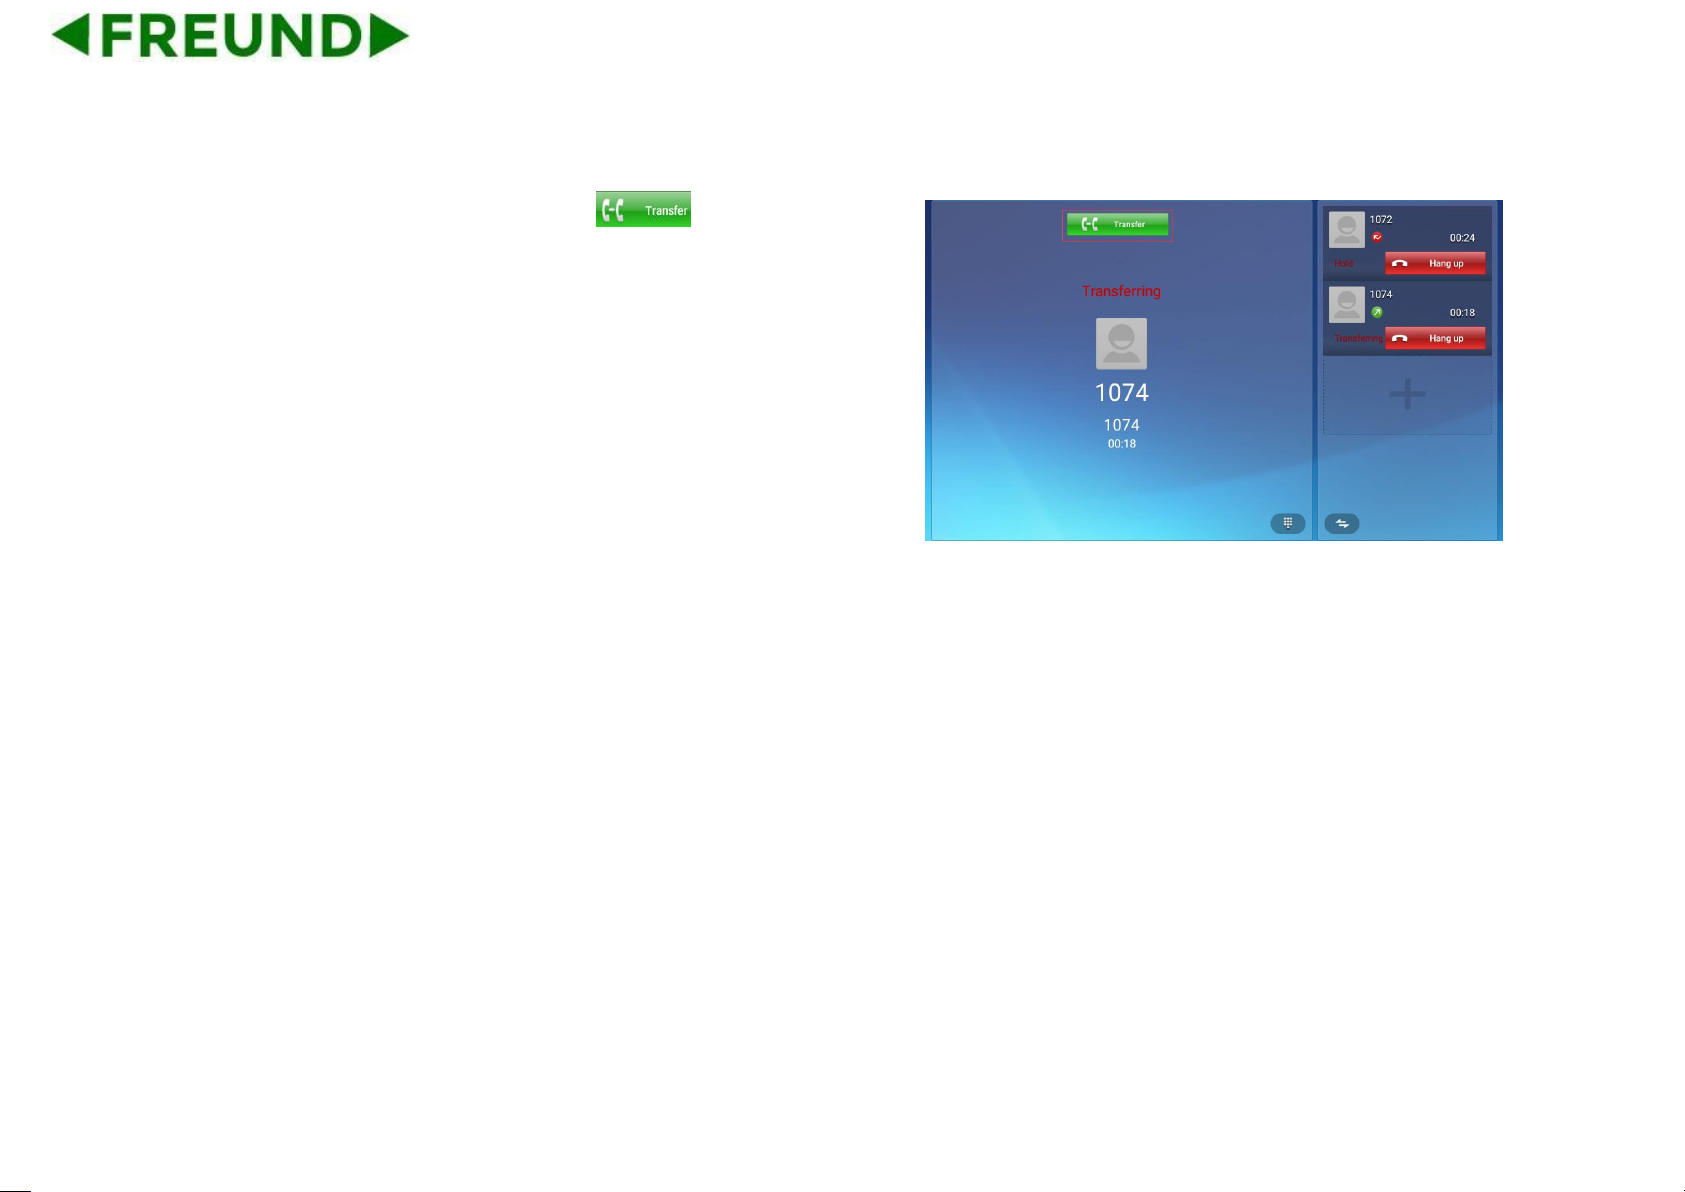
1) During the first way conversation, press transfer key on the keypad
or click enter the configuration interface.
2) Enter the transfer number, then click Attended label to transfer the
number.
Configuration interface is shown as below.
Page 92
81
3) When the third party answered, press to confirm the
transfer.
5.13. Keypad Input
Only numbers, * and # can be input by keypad. The default Input method
is Android keyboard. Users can also download the preferred input
method from the internet.
Page 93

82
5.14. Webpage Browser
This section describes the default web browser in the video phone, and
users can also download the preferred browser through the internet.
Users can use one of the following methods to run the browser:
⚫ Mode 1: In the main screen, click .
⚫ Mode 2: In the main screen, click -> .
5.14.1. Open Webpage
5.14.1.1. Browser Address Bar
Run the browser, enter the URL in the address bar or direct input the
information to search. After the input, users can click “Go” on the soft
keyboard to complete.
Page 94
83
5.14.2. Open Webpage
5.14.2.1. Browser Address Bar
Run the browser, enter the URL in the address bar or direct input the
information to search. After the input, users can click “Go” on the soft
keyboard to complete.
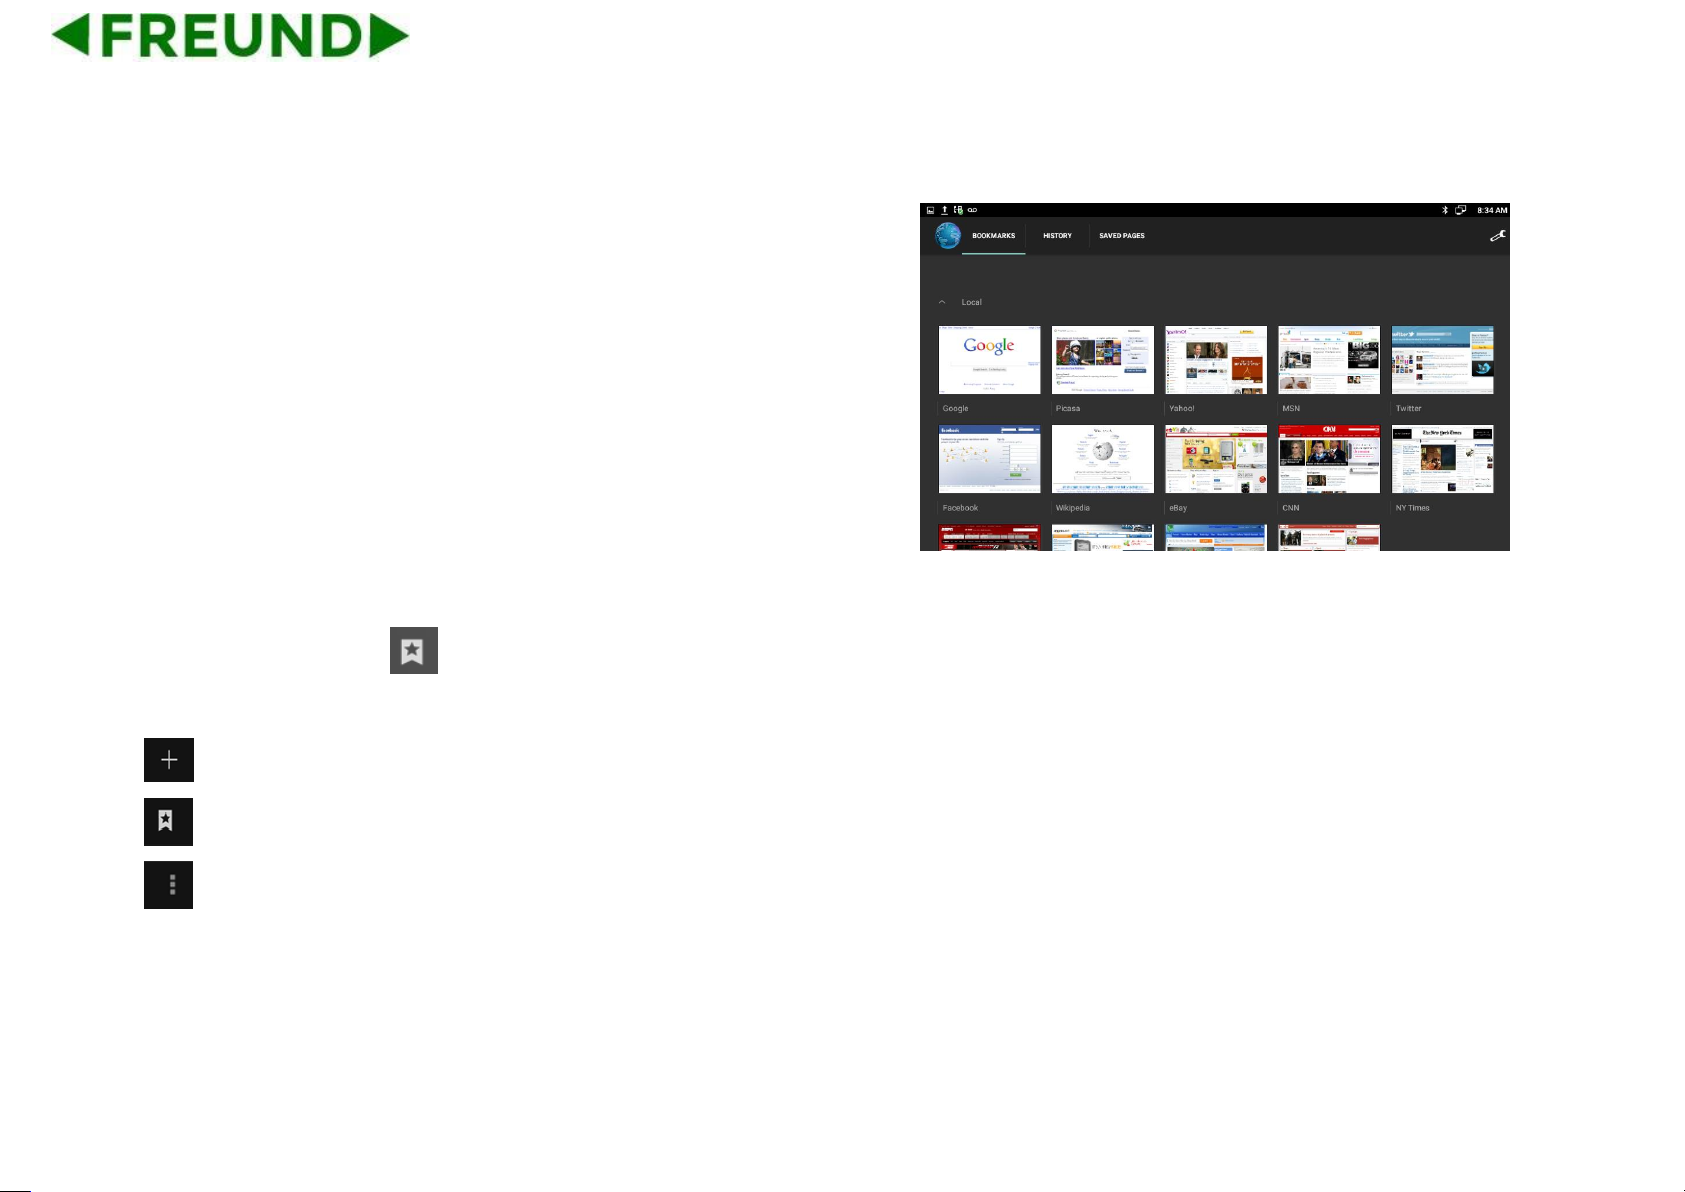
5.14.2.2. Bookmark and Browsing History
Run the browser, click to view the bookmark & history & saved
pages.
: Add a new webpage
: View the bookmark and browsing history
: Others
Page 95
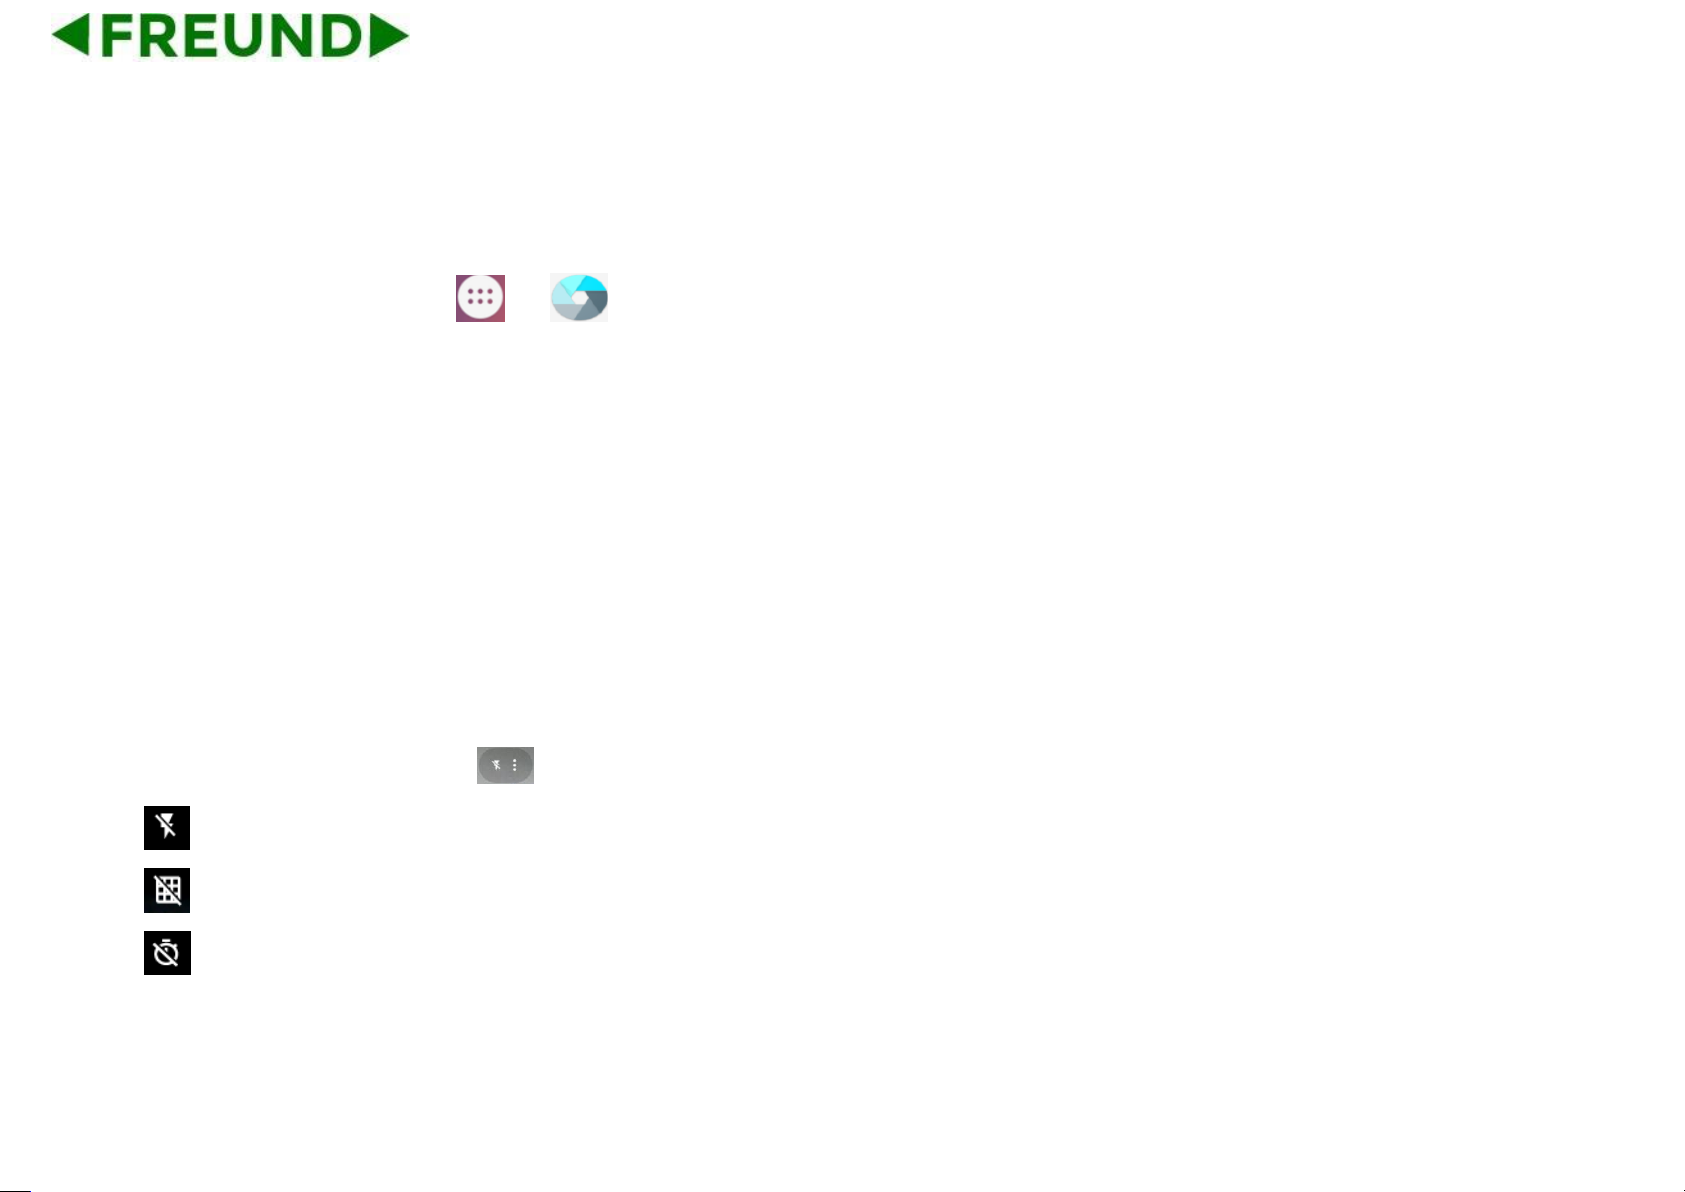
84
5.15. Camera
1. In the main screen, click -> .
2. Slide right on the screen, view the photos and videos in “Gallery”.
5.15.1. Photograph Mode
Turn on the camera, and the default mode is photograph mode.
5.15.1.1. Basic Setting
Click on the right upper corner pop up the menu on the right list.
: nonsupport
: Click to enable/disable the reference grid
: Click to set the delay shutter to take photos
Page 96
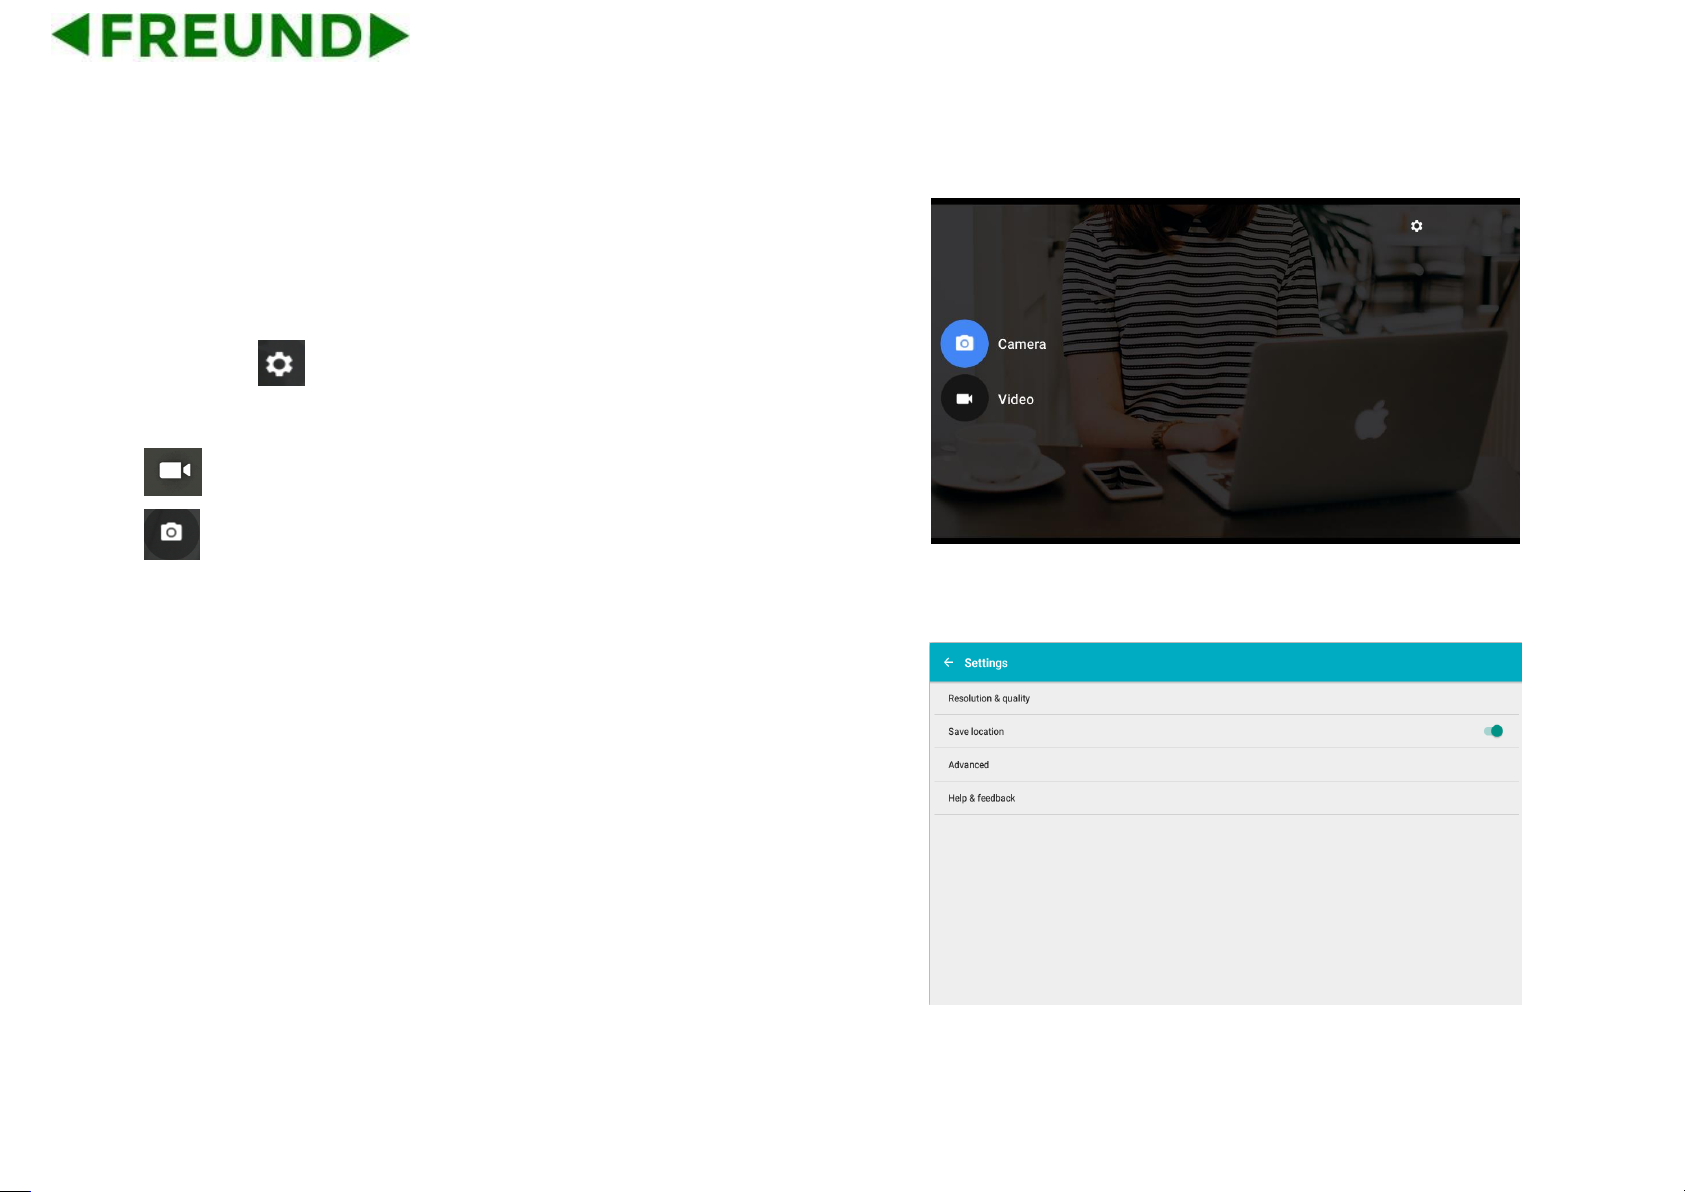
85
5.15.1.2. Mode Switch
Slide right on the screen to switch the mode.
Click icon on the right upper corner to enter the related parameters
setting interface.
: Video mode
: Photo mode
Users can enter to set the resolution & quality to set the camera & video
parameter.
Page 97
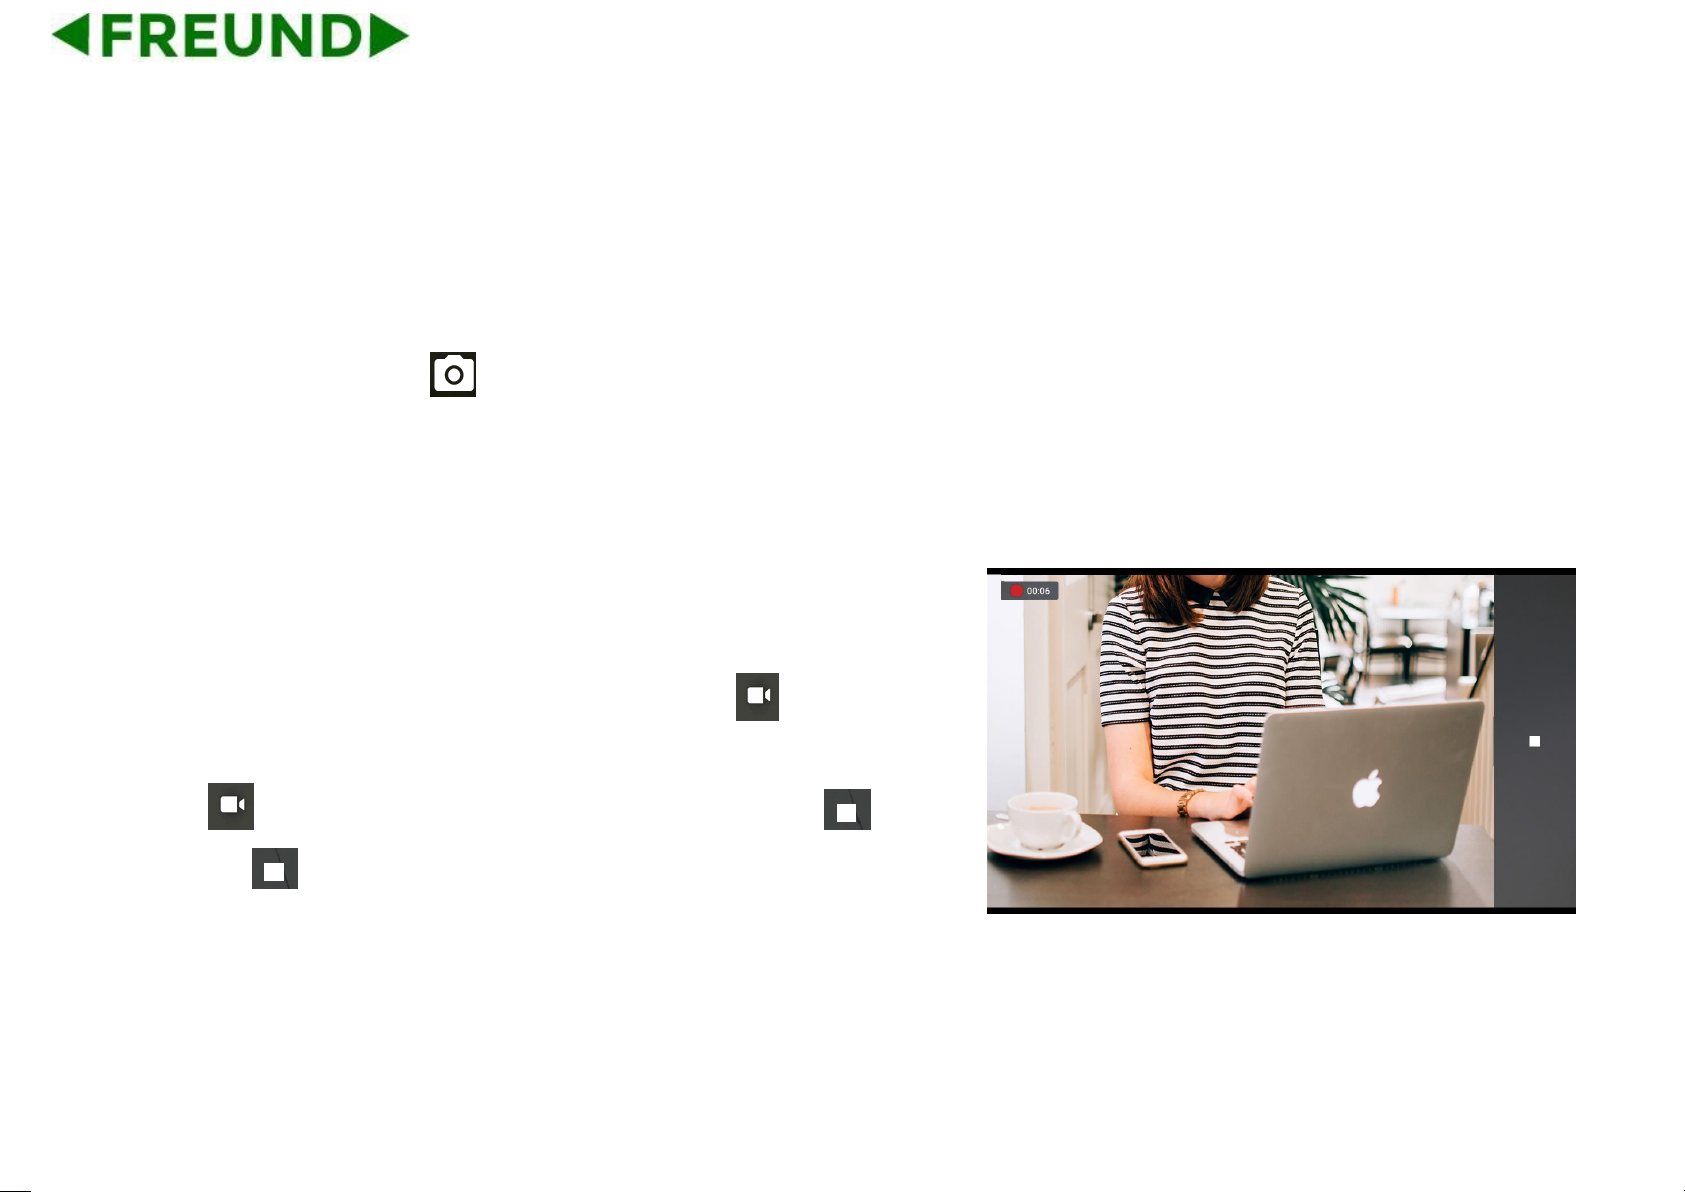
86
5.15.1.3. Take a Photo
Users can click the button on the right side to take pictures.
If users want to adjust the focal length, they can use two fingers to press
on the screen, shrinkage or expansion to adjust the focal length.
5.15.1.4. Record a Video
Slide right on the screen to switch the mode. Click icon to switch to
video mode.
Click on the right side, video starts when the icon turns to .
And click to stop the video recording and save.
Page 98
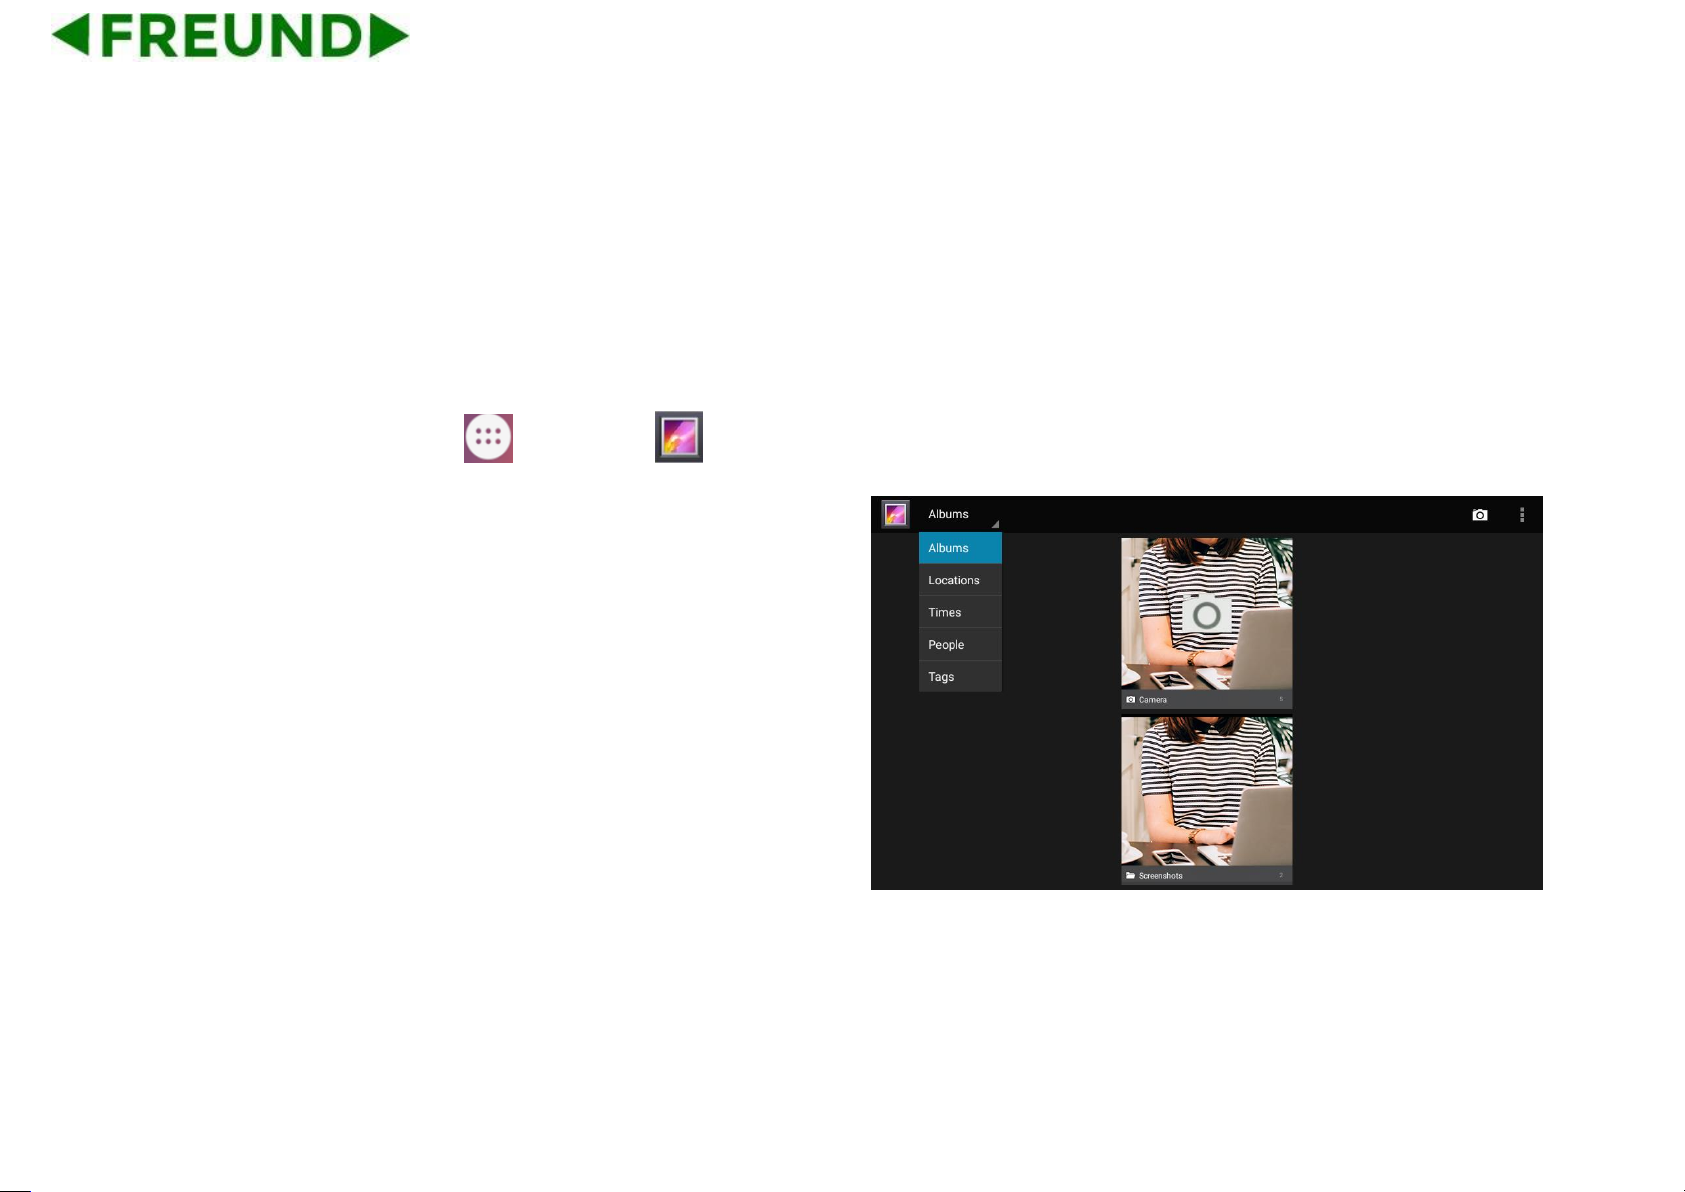
87
5.16. Gallery
Users can use Gallery to view photos or videos, and they can also view
the picture or video downloaded from the Internet. Users can edit
the photo or picture and set it as wallpaper.
In the main screen, click icon ->click icon .
5.16.1. View Photo & Picture & Video
Enter the gallery, user can view all photos, pictures in the device.
Page 99

88
Click the icon on the upper left corner, users can view photos
and videos in groups in the drop-down list. Click on the folder to view all
the photos.
While viewing photos, users can use two fingers to press on the screen,
shrinkage or expansion to shrink or enlarge the image.
5.17. Bluetooth
Bluetooth is a proprietary, open wireless technology standard for
exchanging data over short distances from fixed and mobile devices,
and creating personal area networks with high levels of security. On
FE-TEL-48G, users could use Bluetooth to transfer files, share contact
information with other Bluetooth portable devices by installing Bluetooth
Application, or use Bluetooth headset for making calls.
To connect to a Bluetooth device, turn on FE-TEL-48G’s Bluetooth radio
first. The first time when using a new Bluetooth device with the
Page 100

89
FE-TEL-48G, “pair” the device with FE-TEL-48G so that both devices
know how to connect securely to each other. After that, users could
simply connect to a pared device. Turn off Bluetooth if it’s not used.
Bluetooth related settings are under FE-TEL-48G’s Settings application
→ Wireless & networks.
5.17.1. Turning Bluetooth On /Off
⚫ Press on screen -> click icon .
⚫ Click on Wireless & Networks.
⚫ Click or untick the option for Bluetooth.
 Loading...