

Page 1

BY
EN
INDEX
iLOFT MONITOR ................................................................................................... 4
Installing the Monitor ................................................................................... 4
Available Functions: .................................................................................... 5
Wiring .......................................................................................................... 6
Programming the monitor ........................................................................... 7
- Option 1: From Panel + Monitor ....................................................... 7
- Option 2: From the Monitor ............................................................... 7
Programming: Administrator Menu ............................................................. 9
- Access the Administrator Menu ........................................................ 9
- Programming the Monitor from the monitor itself ............................. 9
- Automatic Opening (Doormatic) ..................................................... 10
- Conversation Mode Configuration .................................................. 11
- F1 auxilliary Function ...................................................................... 11
- F2 auxilliary Function ...................................................................... 12
Adjustments: Audio + Video: ..................................................................... 13
- Video: Brightness - Contrast - Colour ............................................. 13
- Audio ............................................................................................... 14
Programming: User Menu ......................................................................... 16
- Melody Selection ............................................................................ 16
* 1. Main Panel .......................................................................... 16
* 2. Secondary Panel ................................................................. 17
* 3. Doorbell ................................................................ ............... 17
- Do no disturb (Cancel Ringtones) .................................................. 17
- Automatic Opening (Doormatic) ..................................................... 17
iLOFT Monitor ........................................................................................... 19
- Buttons ........................................................................................... 19
- Operation ........................................................................................ 20
Maintenance (cleaning). ............................................................................ 22
Technical Characteristics .......................................................................... 23
Page 3
Page 2
BY
14mm
131mm
F2
F1
XXmm
MENU
197mm
1
(*) Remove the electrostatic protective tag
(*)
(*)
3
2a
Installation with a FERMAX BOX
(*) Remove the electrostatic protective tag
(*)
(*)
3
2b Installation with a UNIVERSAL BOX
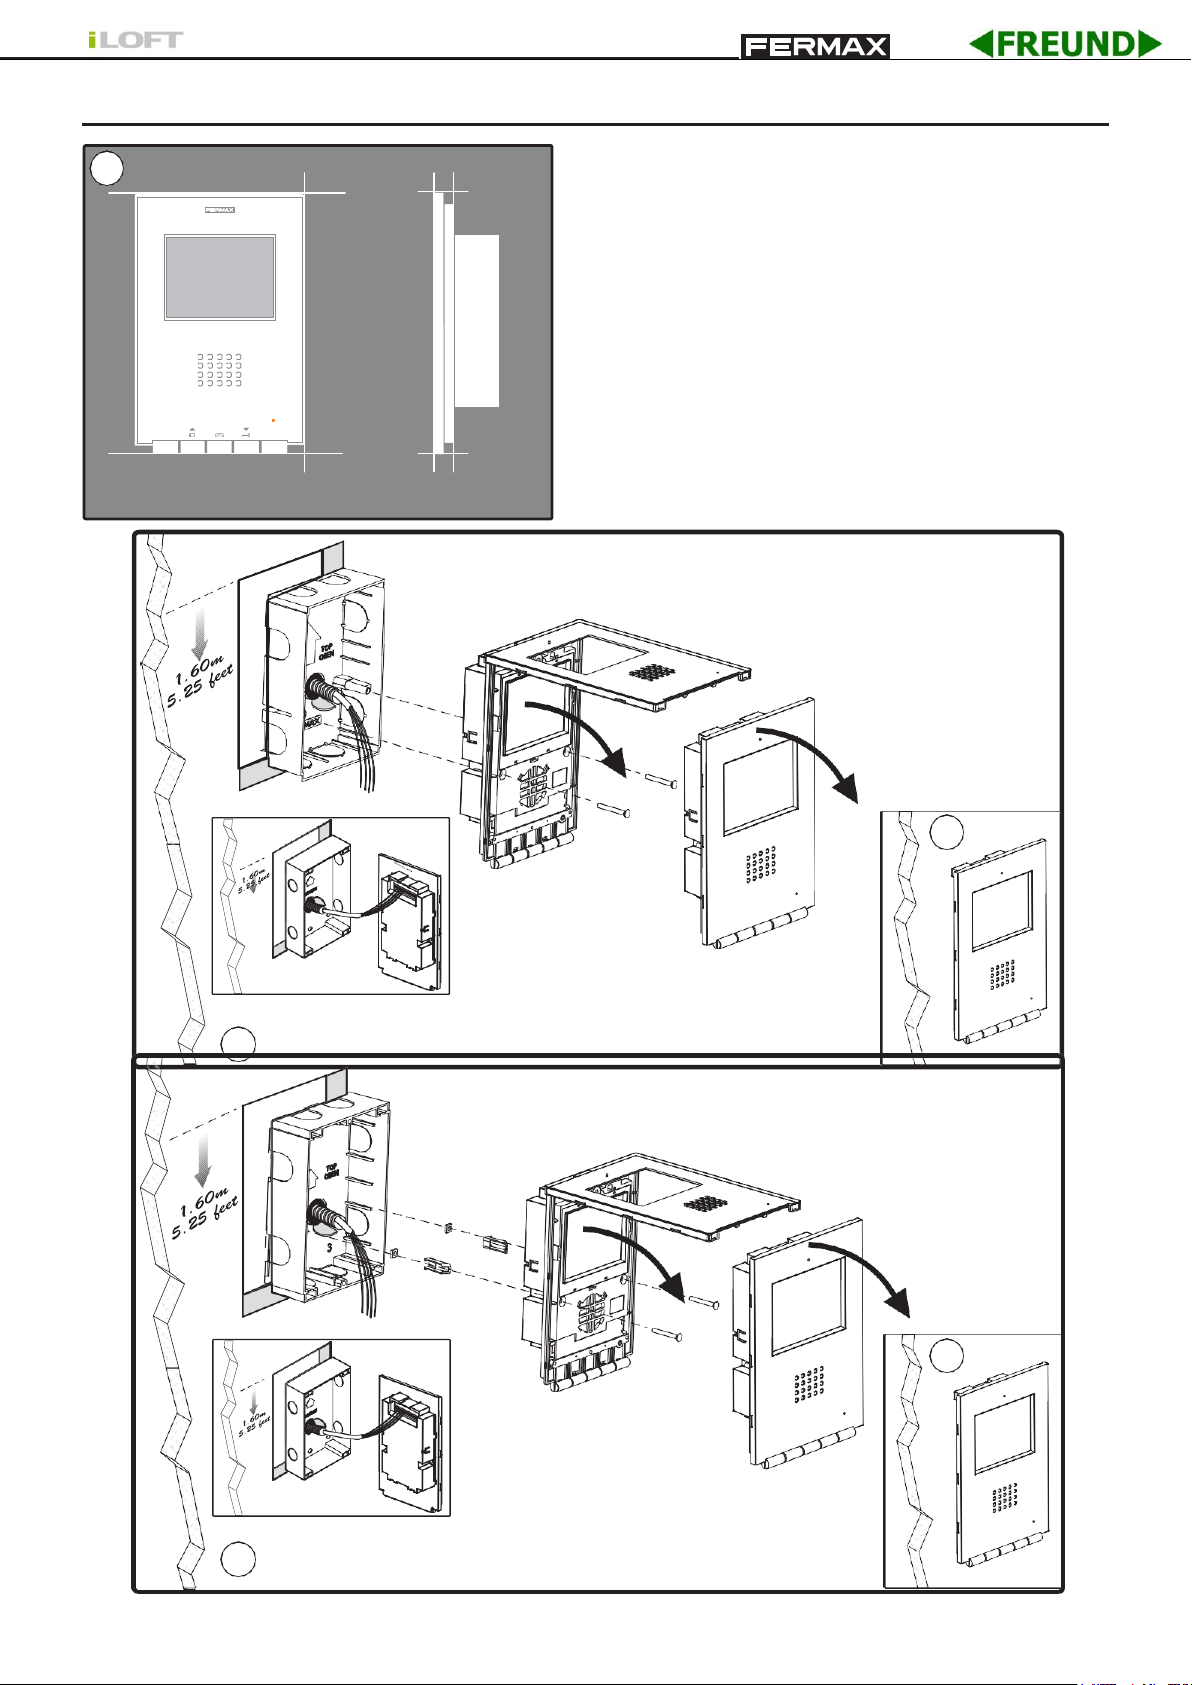
INSTALLING THE MONITOR
Monitor Dimensions (Height x Width x Depth*):
197 x 131 x 60 mm / 7.7” x 5.1” x 2.3”
Pure model Monitor Dimensions (Height x Width x Depth*):
197 x 131 x 59 mm / 7.7” x 5.1” x 2.3”
Fermax Box Dimensions (Height x Width x Depth):
158 x 108 x 45 mm / 6.2” x 4.2” x 1.7”
Universal Box Dimensions (Height x Width x Depth):
174 x 114 x 50 mm / 6.8” x 4.5” x 2”
Note:
-
this monitor can be installed in a universal box.
-
Depth *
: the Monitor depth stated here takes into
account the Fermax box
Pag 4
Page 3
BY
34,3mm
131mm
F2
F1
MENU
197mm
1
(*) Remove the electrostatic protective tag
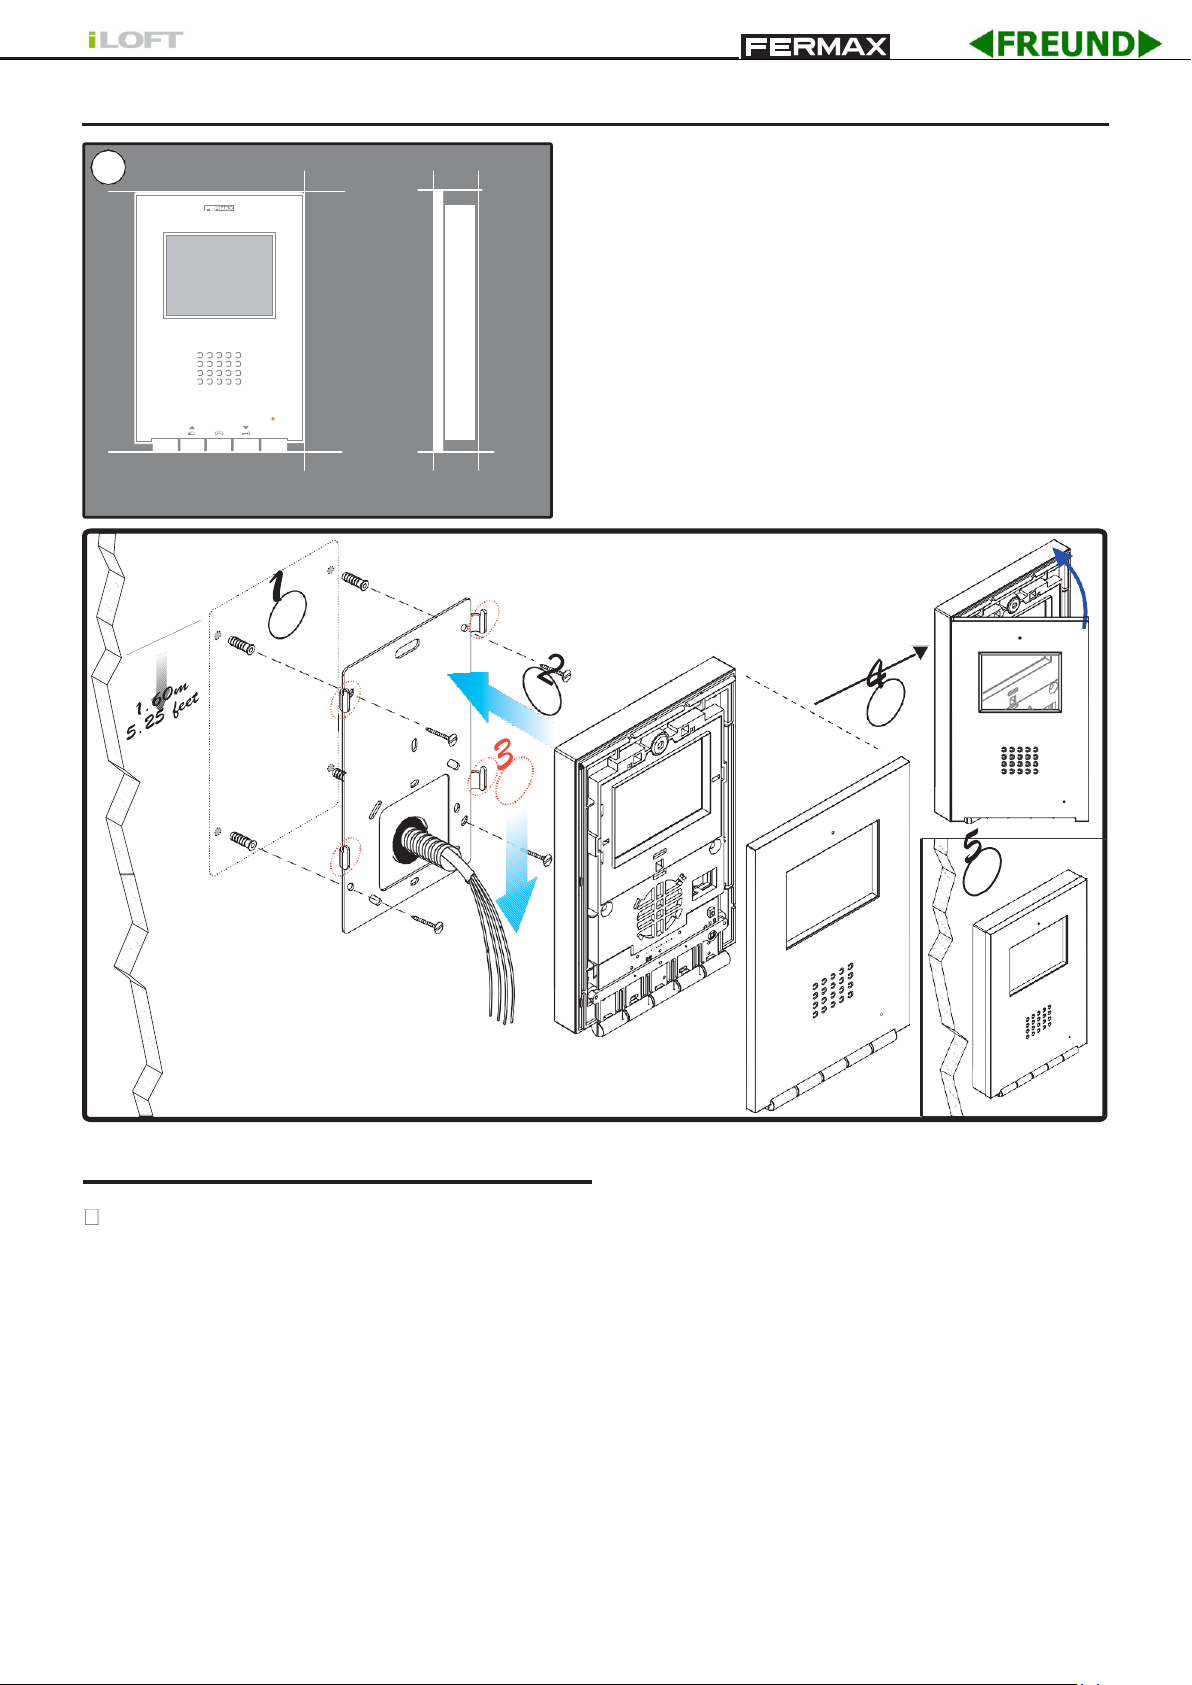
MONITOR INSTALLATION SURFACE
Monitor Dimensions (Height x Width x Depth):
197 x 131 x 34.3 mm / 7.7” x 5.1” x 1.3”
Pure model Monitor Dimensions (Height x Width x Depth):
197 x 131 x 33.3 mm / 7.7” x 5.1” x 1.3”
Available functions
The available functions on the iLoft VDS monitor are summarised in the list below:
- Command-based opening of door
- Call to guard
- Call volume regulation
- Call disconnection (Do not disturb)
- Ringtone selection (7 options)
- Doorbell
- Programming via the terminal and via the entry panel
- Input audio volume adjustment
- Configuration of parameters for the screen menu (OSD)
- Automatic door opening (DOORMATIC)
- Lift control
- Image adjustments (brightness, contrast and colour)
Page 5
Page 4

BY
-
L
2 OUTPUTS VIDEO DISTRIBUTOR
2 OUTPUTS VIDEO DISTRIBUTOR
Detail of connection of the VIDEO cables
on the monitor connector (1) when there is
another monitor connected (2)
M V V M
+
M
+
75 Ohm
F2 F1 T A Ct - L + M V V M
F2 F1 T A Ct - L + M V V M
REF.2448
DISTRIBUIDOR VIDEO 2 SALIDAS
- L + M V
+
+
75 Ohm
P1 P1
-
L
+ COAX
M V V M
Detail of connection
of the COAXIAL at the
75 Ohm
monitor connector
2
F2 F1 T A Ct - L + M V V M
1
F2 F1 T A Ct -
REF.2448
DISTRIBUIDOR VIDEO 2 SALIDAS
M
Ct:
L
+
75
L
V M V M + 18
4 3
V M V M
R1
-
75 Ohm
2 6
5
(-)
R
1
P1
75 Ohm
F2 F1 T A Ct - L + M V V M
V
P1 P1
V M V M +18
4 3
V M V M
R1
75
L
-
2 6
5
(-)
R
1
V
L + M V V M
REF.2448
Connection
Video terminals (coaxial)
V:
live
M:
mesh
Ct
: Camera Activation (11 Vdc)
F2 F1 T A
Connection terminals:
+, -
: 18 Vdc power supply
L:
data bus
F1, F2:
additional functions. See the chapter on
programming
T, -:
call button connection for residential Door (P1)
A,: c
all extension connection ref. 2040, light and bell
activator ref. 2438, etc...
L + M V V M
Ct -
P1
75 Ohm
V
M
+
-
L
R
DISTRIBUIDOR VIDEO 2 SALIDAS
2 OUTPUTS VIDEO DISTRIBUTOR
1
V M V M + 18
+
(-)
5
4 3
R1
75
2 6
V M V M
- +MV
L
75 Ohm
Detail of connection of
the video cables on the
monitor connector
M V V M
Pag 6
Page 5
BY
(*)
2
1
2 secs
MENU
1"
1
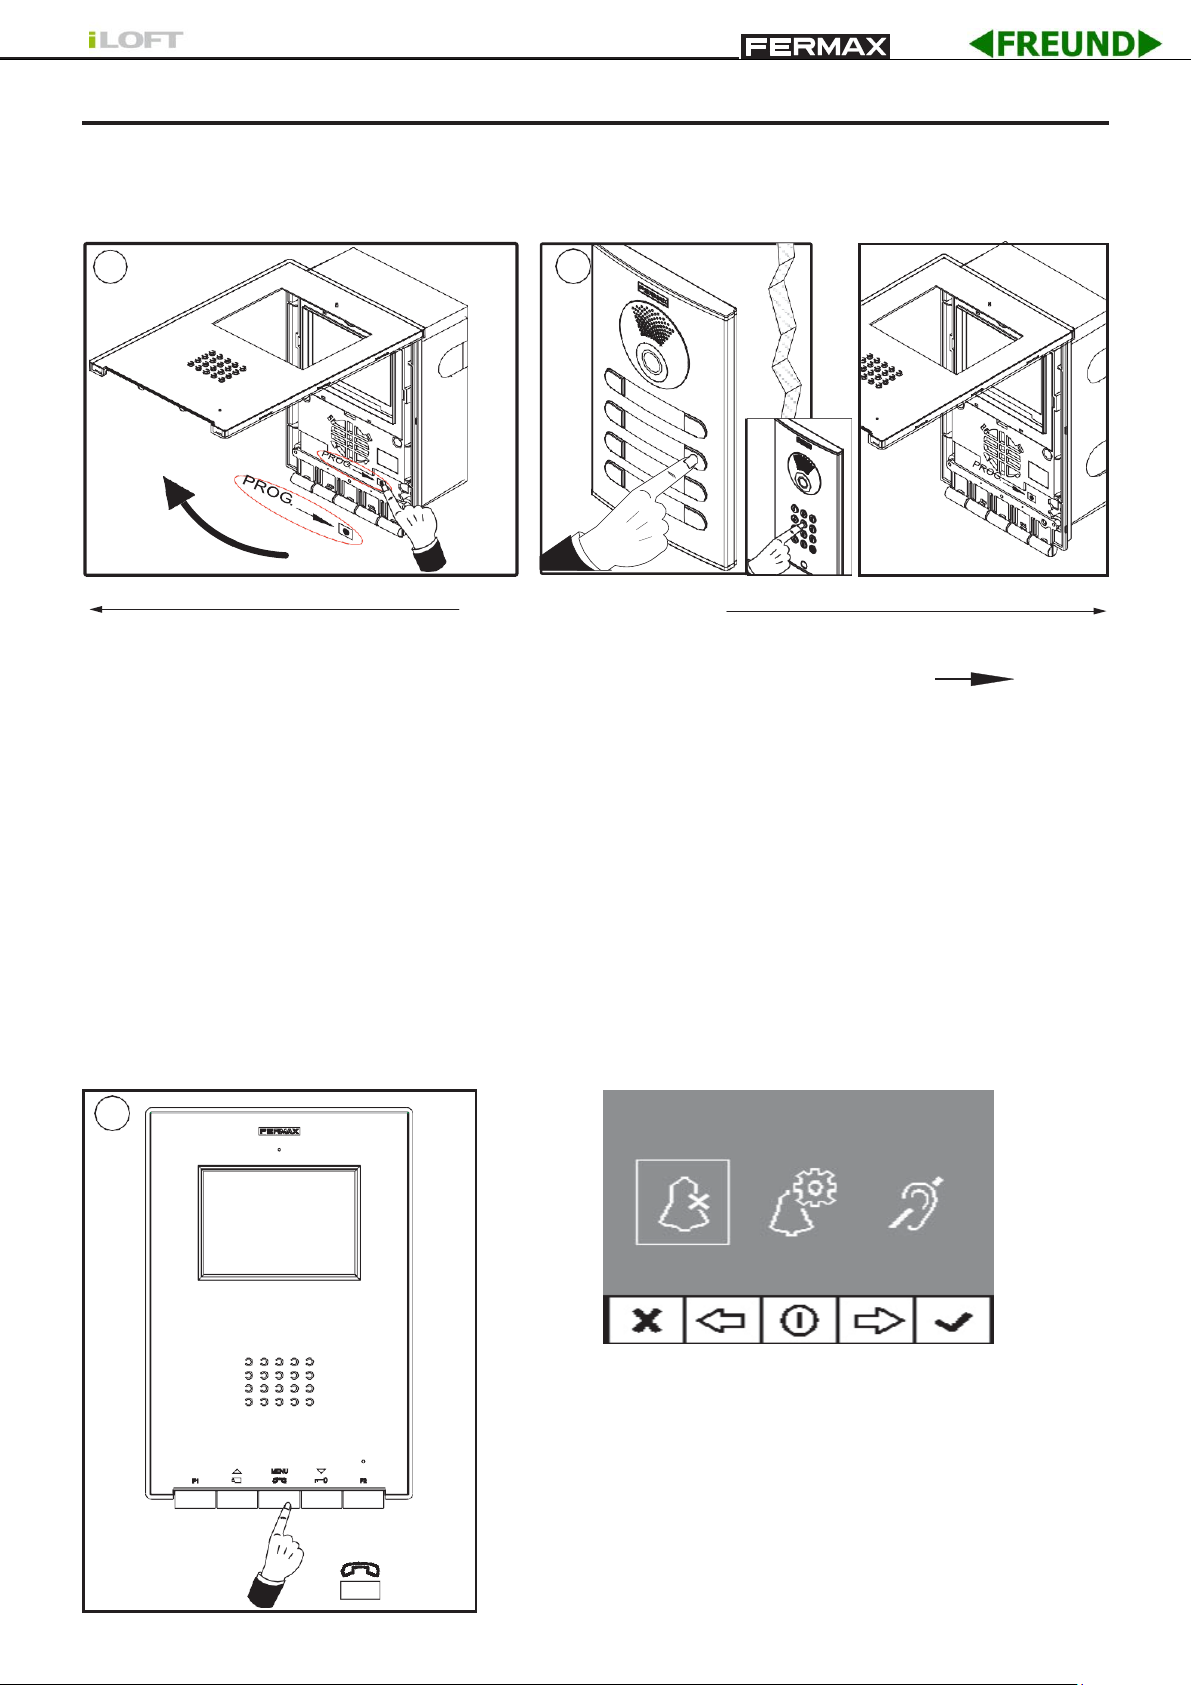
PROGRAMMING THE iLOFT MONITOR
The monitor will not function until it has been programmed.
Option 1: From Panel + Monitor
< 2 min. 30 sec.
1º. With the monitor connected, press the programming button «PROG » for 2
seconds (to access this, you must lift up the front cover). A confirmation tone will sound.
2º. Press the call-to-residence button. Again a confirmation is made with a different call tone.
Note: The time between steps 1 and 2 must be less than 2 and half minutes.
Option 2: From the Monitor You can program the monitor via the on-screen menu.
1º. Enter in the User menu. Press «Menu» 1 second.
User Menu
Note: If the monitor is not yet programmed, press
«Menu» for 1 second, and directly access the
«ADMINISTRATOR Menu», see the next page.
(*)
Function available depending on model.
Page 7
Page 6
BY
Administrator Menu
+
F1 F2
5"
2
a b c
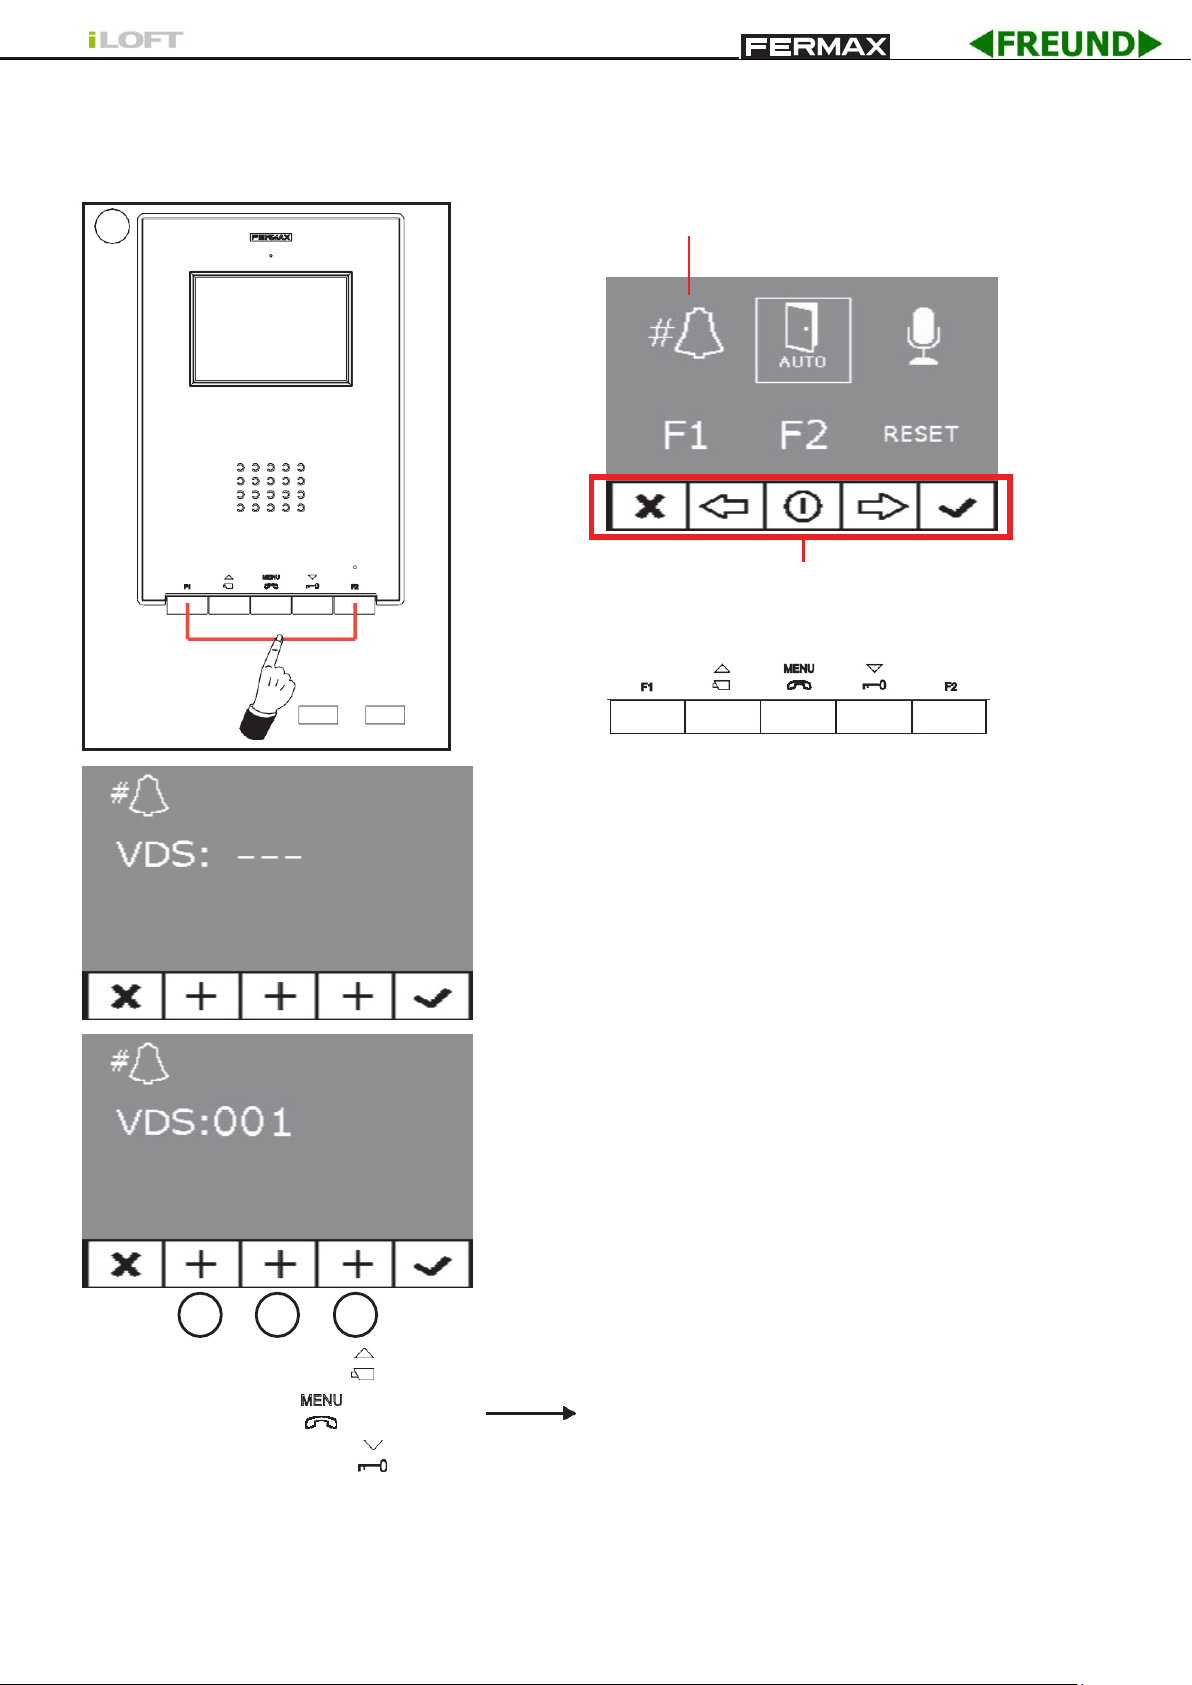
2. When in the User menu, enter in ADMINISTRATOR menu (pressing F1 + F2 simultaneously
for 5 seconds). Once in the ADMINISTRATOR menu, select the first option.
Select the first option:
The icons viewed on-screen are controlled
via the corresponding buttons on the monitor.
The first thing the monitor then does is indicate the
number of the current monitor on the SCREEN. If it is not
programmed, it will show the following: - - -
Note: When the terminal has not been programmed the
blue led will flash very slowly.
3º. Programme the call number: Each time the button
corresponding to hundreds, tens or single units is
pressed, the figure goes up that figure and is shown
on the DISPLAY.
a)
Hundreds: Press the button
b)
Tens: Press the button
c) Single unit: Press the button
Once you reach 9, if you press it again,
it returns to 0. The next time you press, it
will start at 1.
4º. Exit Programming: Press the «OK» to confirm the selected number. You return to the
previous programming menu.
Pag 8
Page 7
BY
(*)
Icons
MENU
1"
1
+
F1 F2
5"
2
PROGRAMMING: ADMINISTRATOR Menu
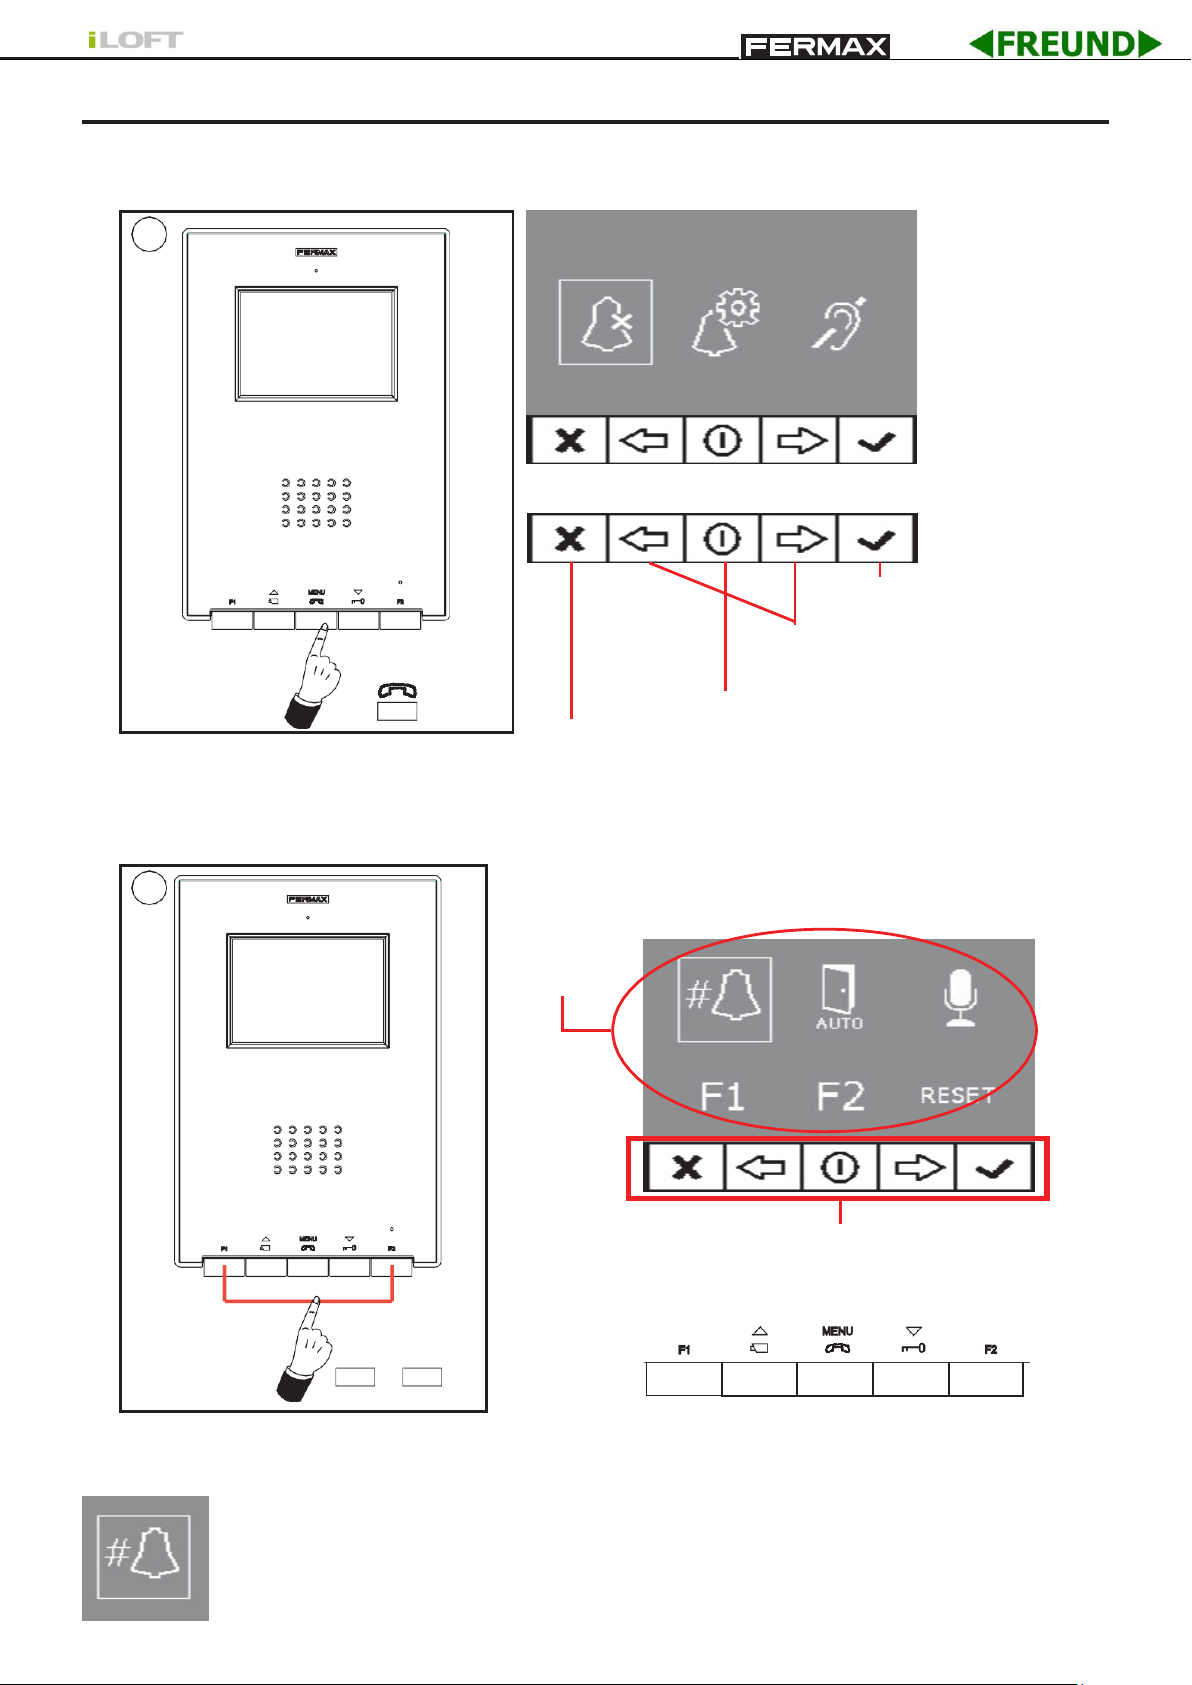
Access the Administrator Menu
1º.Enter in the User menu. Press «Menu» 1 second.
User Menu
Confirmation key
Scroll keys in the menus
Cancel key
2. When in the User menu, enter in ADMINISTRATOR menu (pressing F1 + F2 simultaneously
for 5 seconds). Once in the ADMINISTRATOR menu, select the first option.
Menu exit key
Administrator Menu
The icons viewed on-screen are controlled
via the corresponding buttons on the monitor.
From this menu you can access the different options and functions shown with the icons.
Programming the Monitor from the monitor itself
Explained on the previous page.
(*)
Function available depending on model.
Page 9
Page 8
BY
Activated
(*)
(*)
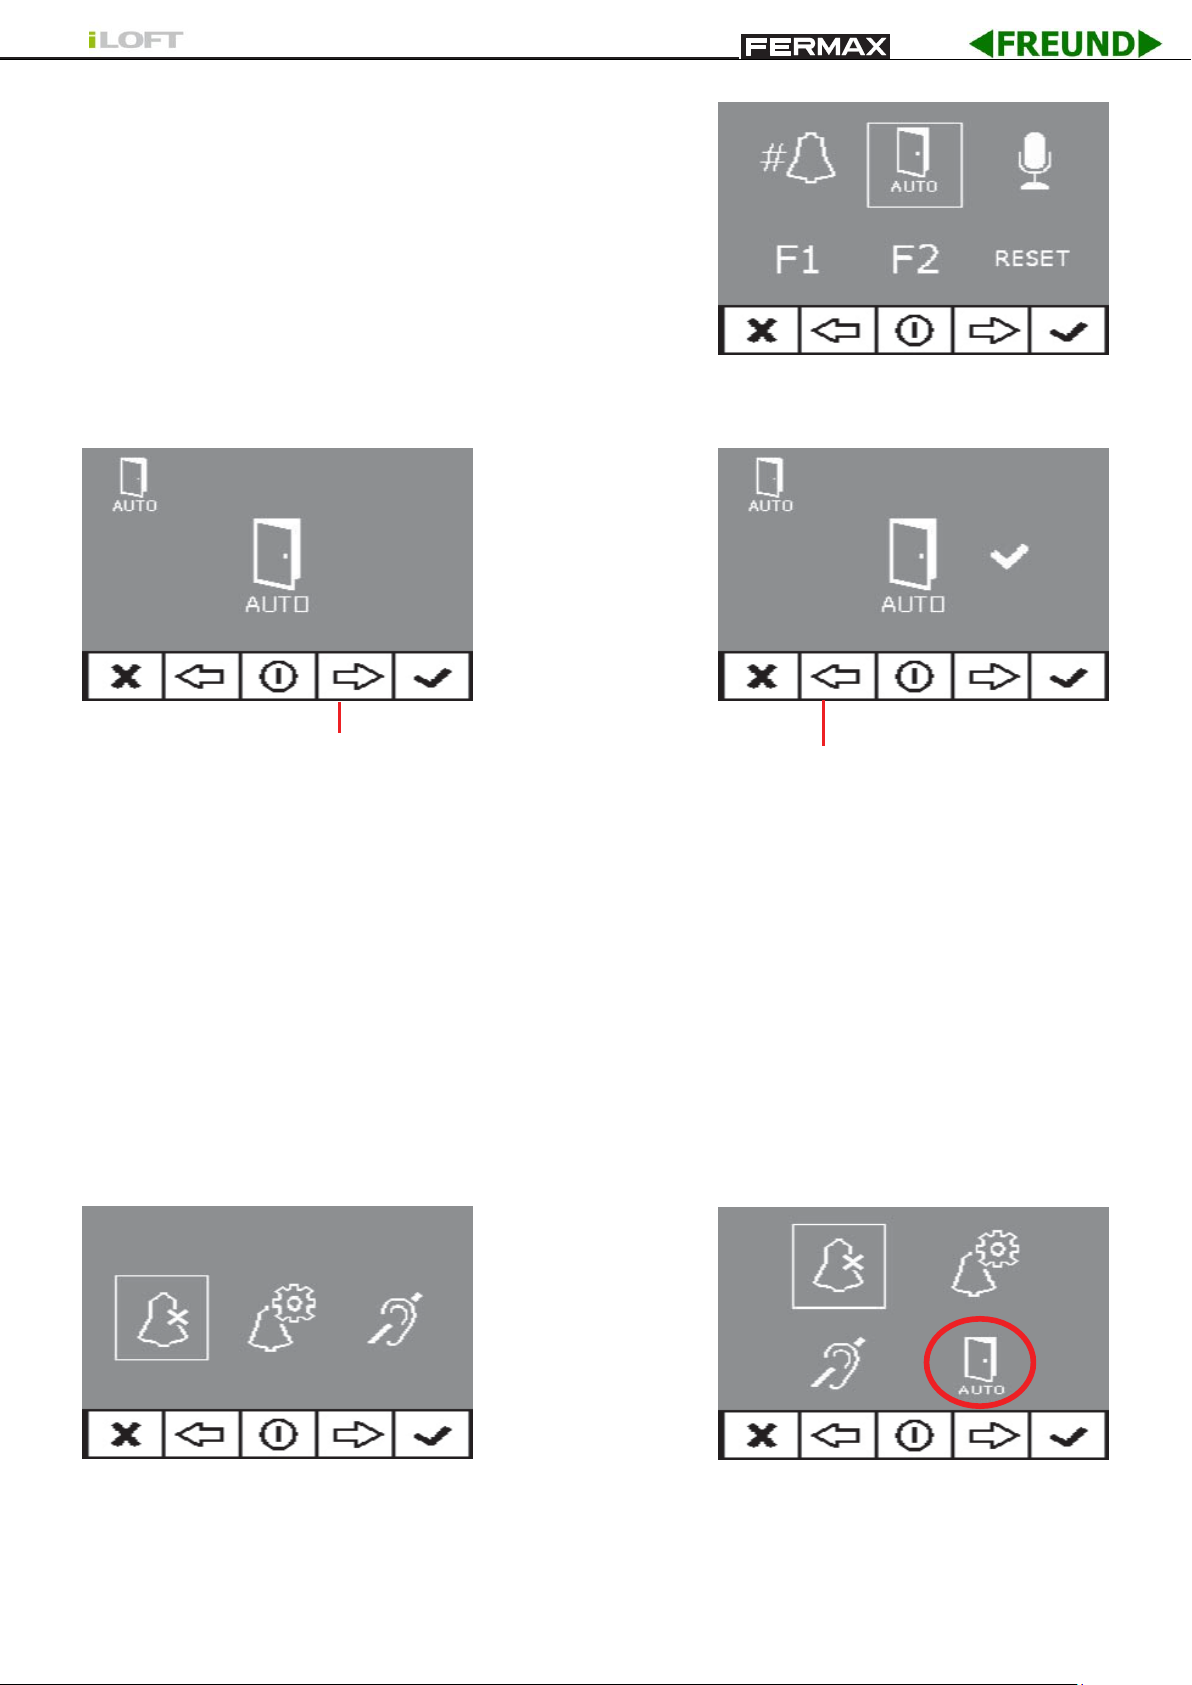
Automatic Opening (Doormatic)
The automatic open function is disabled by default (not
availble to the user) and the installer must enable it, if
desired, from the administrator menu, accessing the
specified option.
By selecting this option you can access the submenu that allows you to enable or disable
the doormatic mode.
Deactivated
you can enable the doormatic
mode by pressing the right arrow
the left arrow disables the door-
matic mode
Notes:
- If activated or not, the doormatic option is available or not available in the user menu.
- There is also an option to connect a timer to the doorbell (if this is not being used) so that
the automatic opening function is activated and deactivated each day at certain times. If
that entrance is activated for a period of greater than 30 seconds it determines that the
automatic door function should be activated. When this doorbell feature is deactivated
this function will also be deactivated.
User Menu: Doormatic function
DISABLED by the installer
Pag 10
User Menu: Doormatic function
ENABLED by the installer
(*)
Function available depending on model.
Page 9
BY
by
panic call mode
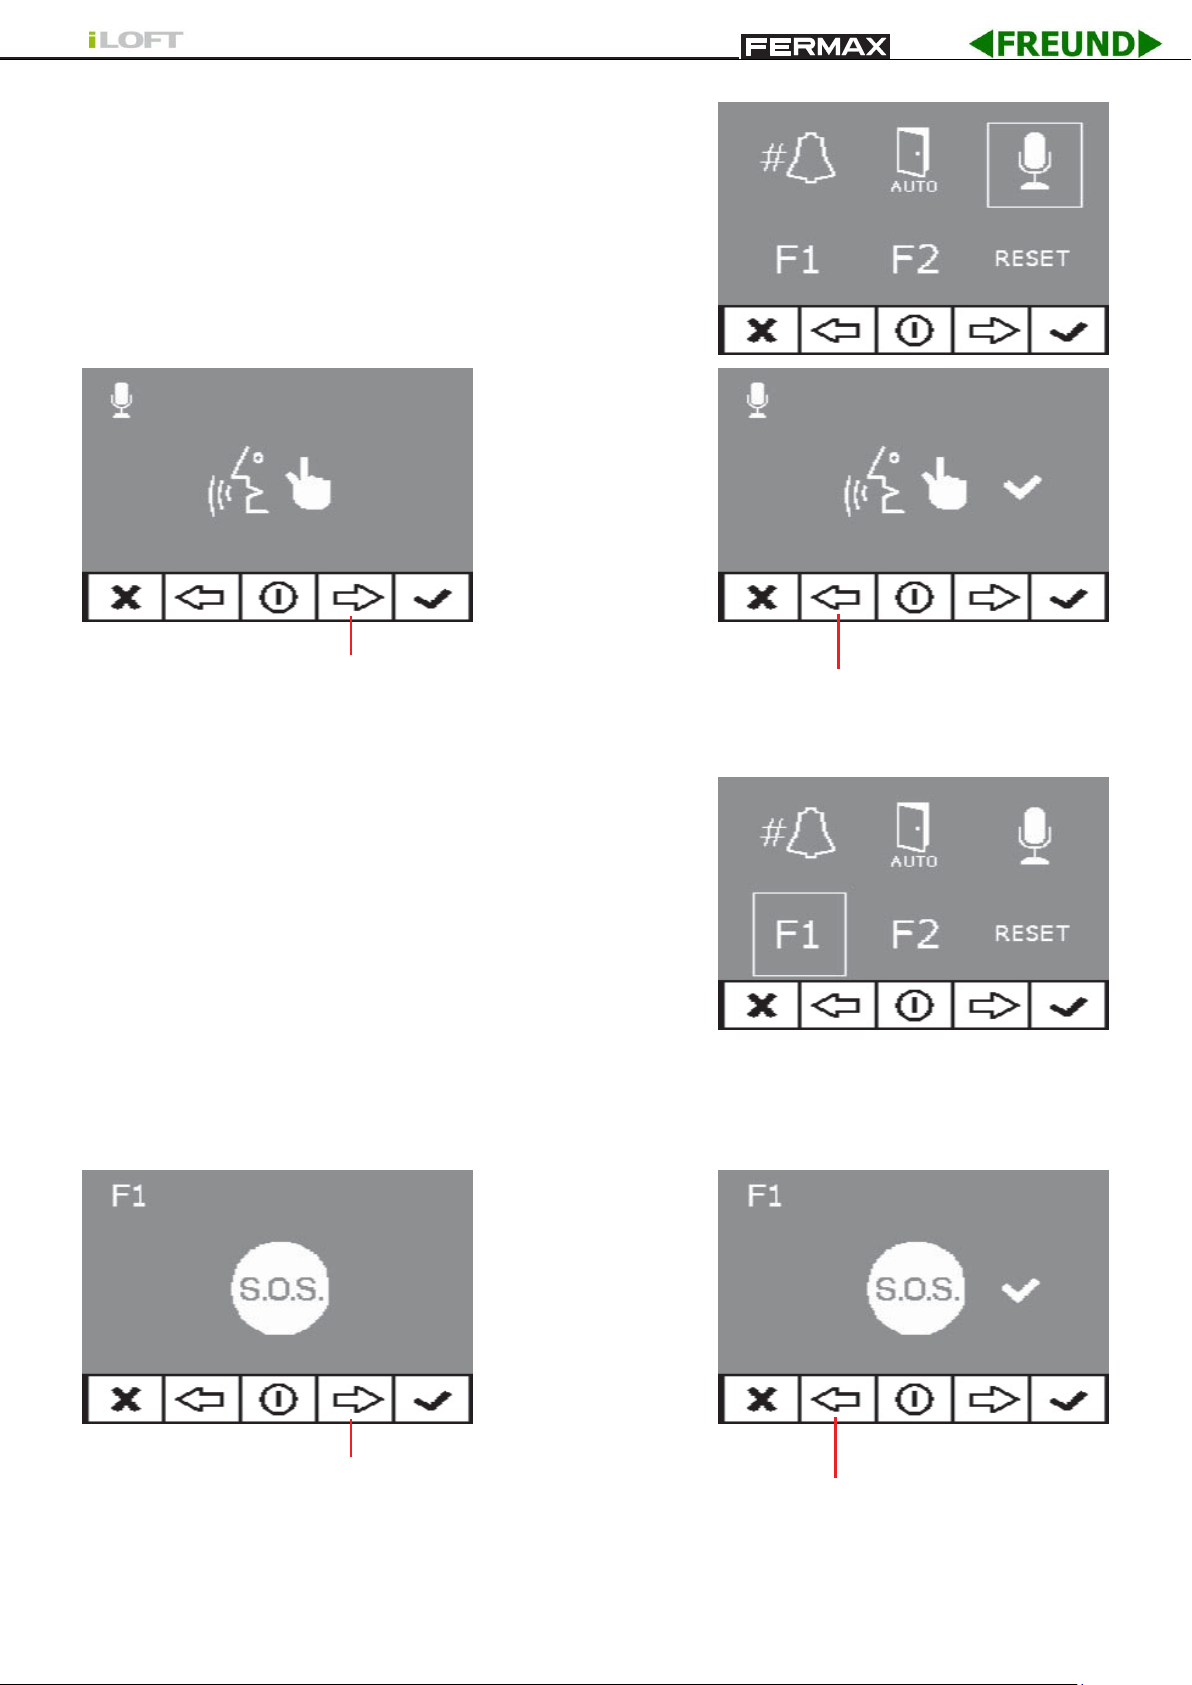
Conversation Mode Configuration
Within the conversation menu, you can select the Simplex
and Hands free mode.
The hands free mode is selected as default.
Simplex Mode: press the audio activation button to talk,
«MENU» button, and release to listen.
Hands free
you can select the simplex mode
by pressing the right arrow
Simplex mode
the left arrow disables the
simplex mode
F1 auxilliary Function
The F1 key and connection allow you to configure the
operating mode. You can select between the Negative
send mode (output) and SOS to MDS Guard unit (input).
Initially configured by default as an output, and sends
a negative.
If the other option is selected in conjunction with an MDS/
VDS decoder (version V10.26 or above) a panic alarm
can be sent to the MDS guard unit. Upon pressing F1
the corresponding command is sent by the bus. The F1 connection also acts as an input, so
when connecting a keypad to this, pressing it it also sends the panic command to the MDS
guard unit.
negative send mode
Note: If configuring the Day Panic mode on the Guard unit, it automatically configures the
Panic Call mode on the monitor/s. Upon deactivating the mode on the guard unit, it
also deactivates it on the monitors.
you can select the panic mode
pressing the right arrow
the left arrow disables the
panic call mode.
Page 11
Page 10
BY
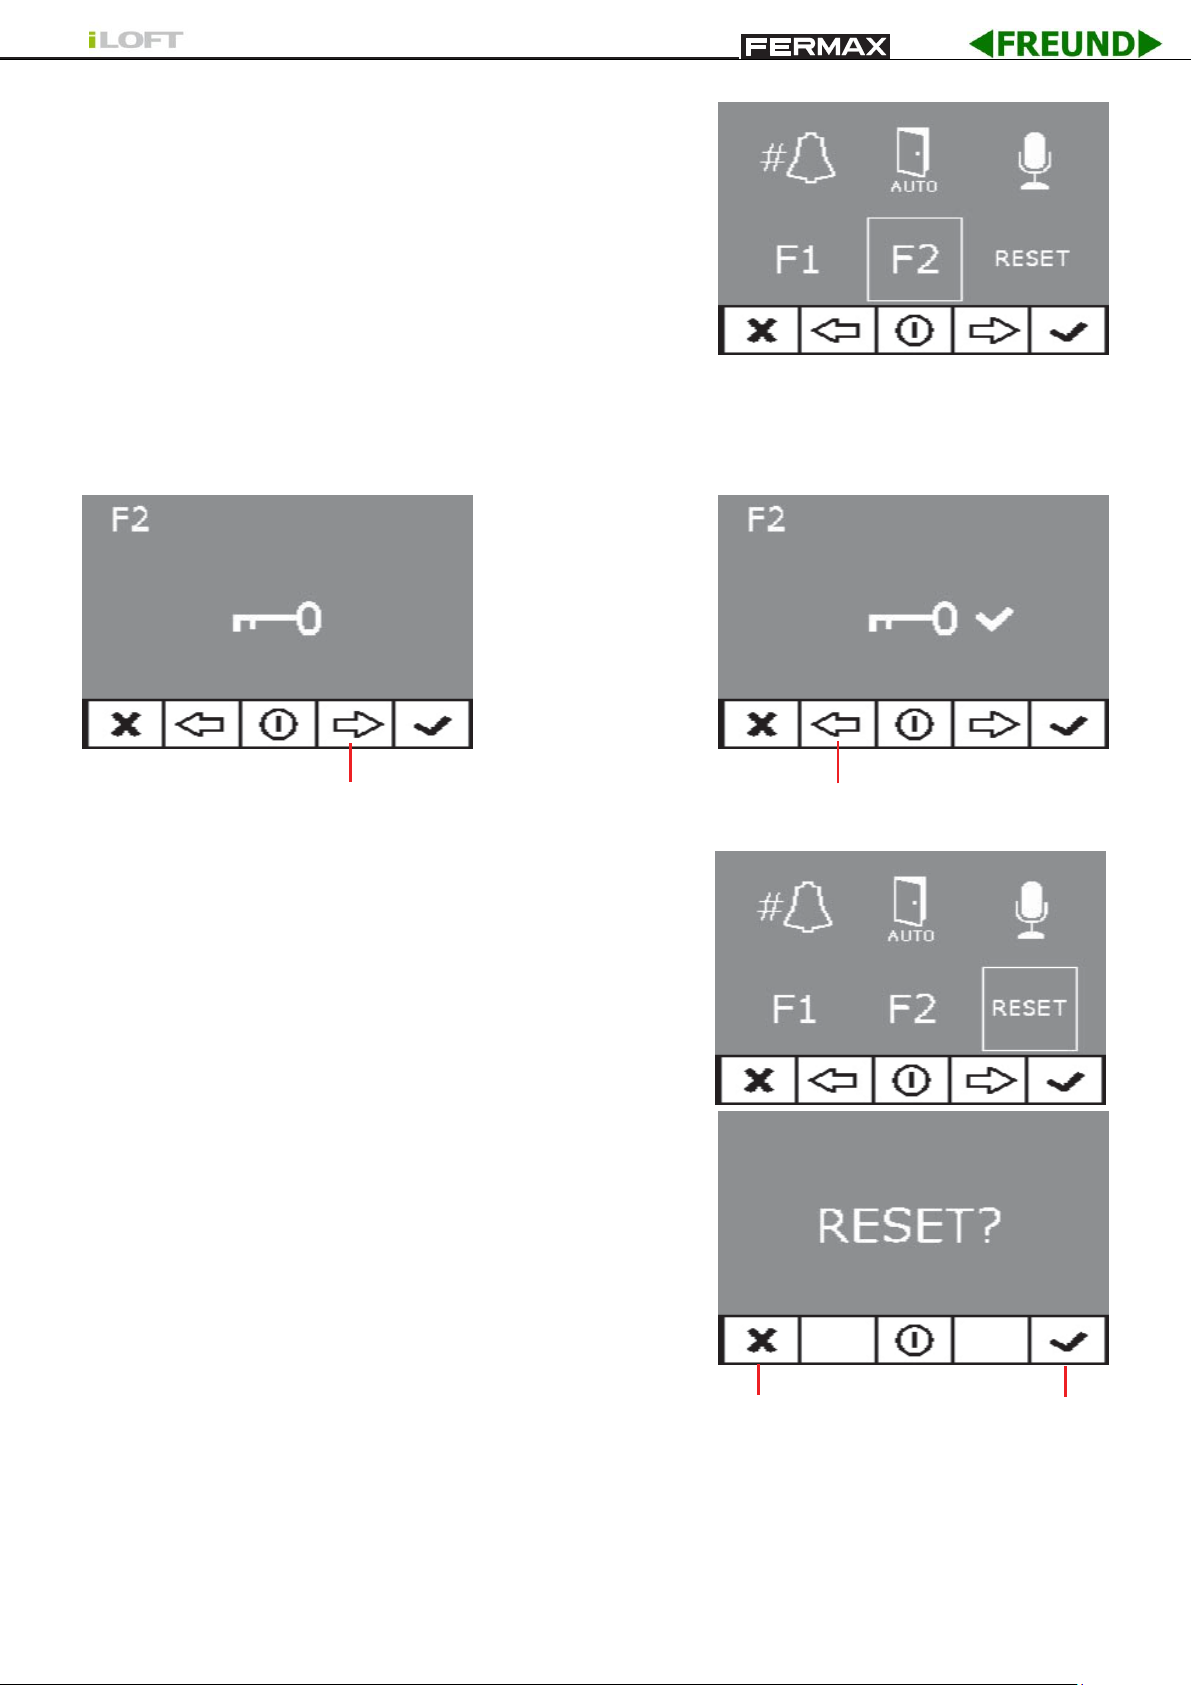
F2 auxilliary function
The F2 key and F2 connection allow you to configure
the operating mode.
Initially it is configured, by default, as an output for F2
when the F2 key is pressed.
However, you can configure the Lift Control option,
giving an output to the F2 connection when sending the
Lock-Release, either for the time the lock-release button
is being pressed in call or conversation mode or while
the doormatic automatically sends the lock-release command. If you press the F2 button,
no action occurs.
F2 output mode
Resetting the Parameters
You have the option to reset the parameters to default
values by selecting the option on the installation menu
and confirming the operation.
This reset does not change the programmed terminal´s
number.
The parameters changed are:
- Selected melody for the main panel. Ding-Dong-Dang.
- Selected melody for the secondary panel. Bitonal
Fermax.
- Selected melody for the doorbell. Ding-Dong.
- Call tone volume medium. Call volume
- Conversation volume. Medium conversation volume
- Image adjustments (brightness, contrast and colour).
Start-up adjustments.
- Do not disturb deactivated
- F1 connection operations. Panic OFF.
- F2 connection operations. Lift Control OFF.
you can select the lift control
mode by pressing the right arrow
Cancel:
lift control mode
the left arrow disables the lift
control mode
Accept
- Doormatic. Disabled.
Page 11
BY
ADJUSTMENTS: Audio + Video
Video adjustments: Brightness - Contrast - Colour
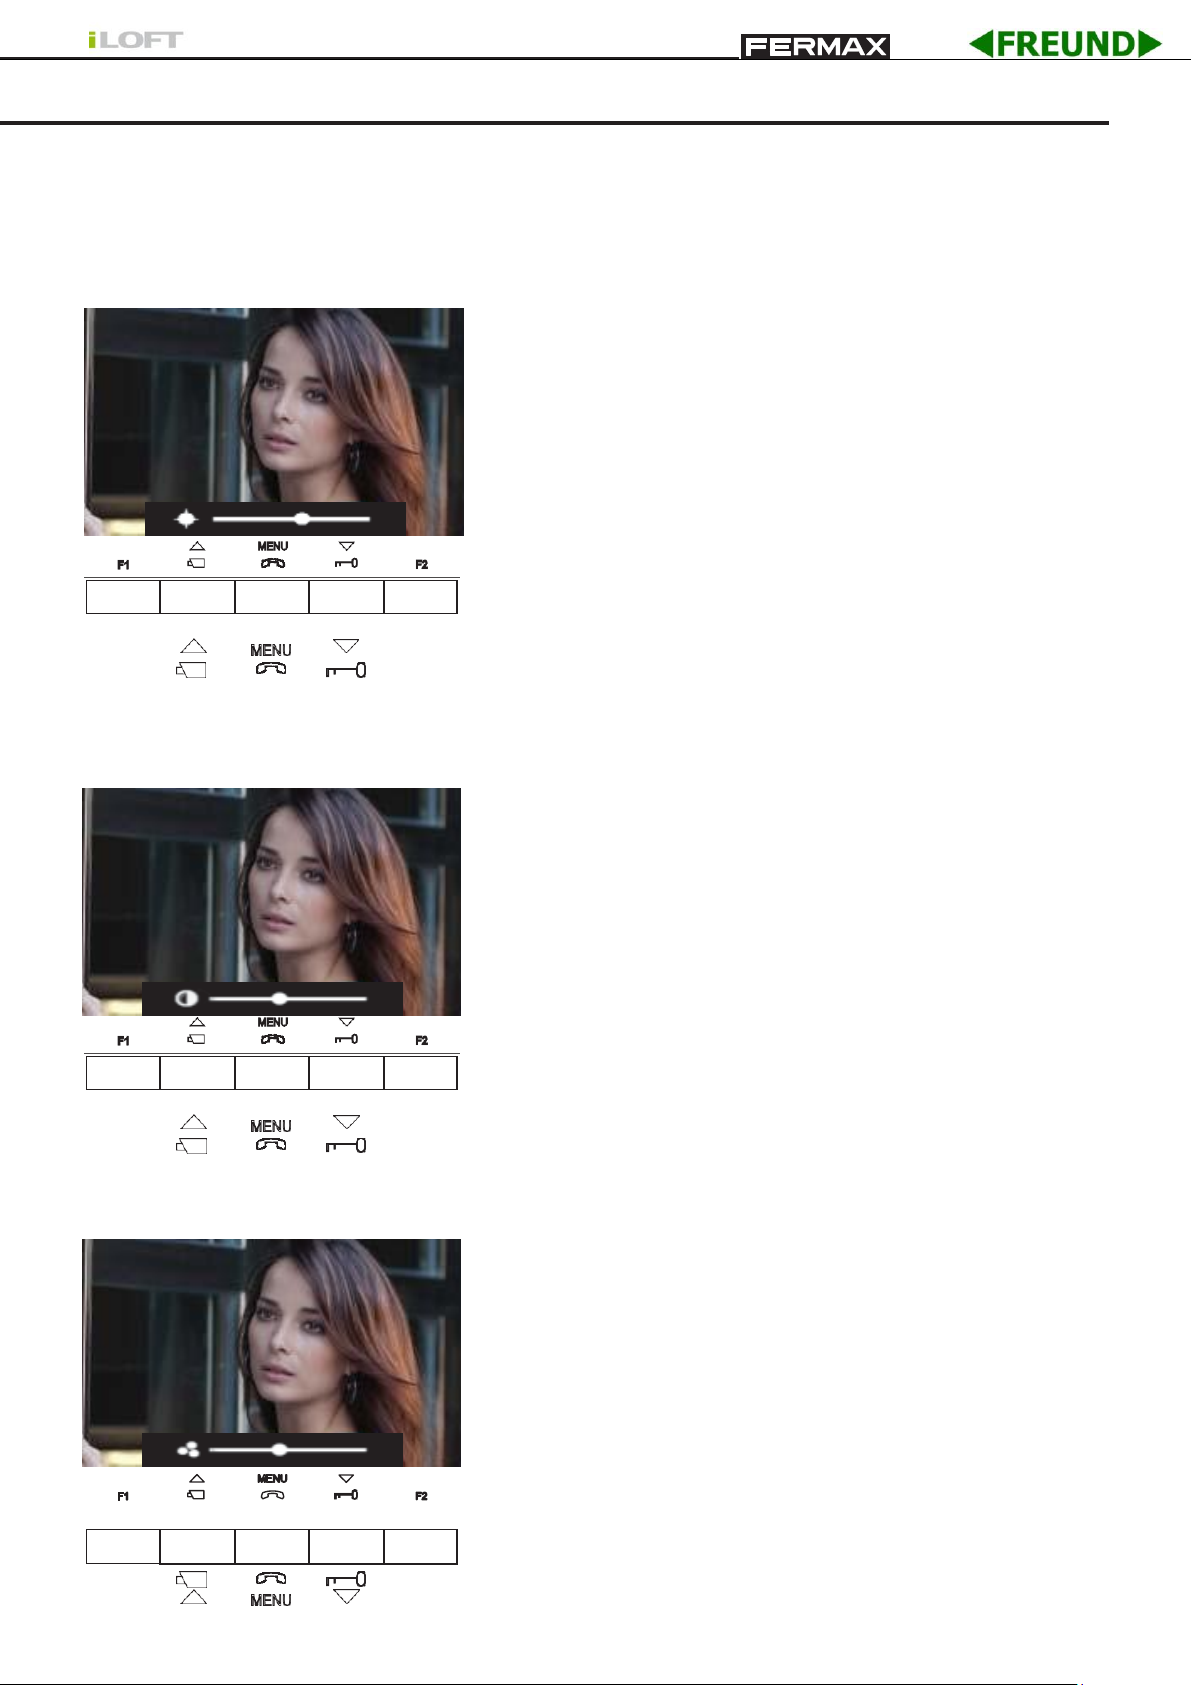
The monitor allows for the adjustments of brightness, contrast and colour while having received
a call or when an auto-start and no conversation has begun. For this, press the «MENU»
button for 5 seconds and a menu appears to adjust the image´s brightness.
«MENU» key(5 sec.): access the brightness menu
When in the brightness menu:
«LOCK-RELEASE» key: increase brightness
«CAM» key: decrease brightness
CAM MENU Lock-Releases
When in brightness, a single click on the MENU takes it to the contrast level adjustment.
Short Press on the «MENU» key: access the contrast menu
When in the contrast menu:
«LOCK-RELEASE» key: increase contrast
«CAM» key: decrease contrast
CAM
MENU Lock-Releases
When in contrast, a single click on the MENU takes it to the colour level adjustment.
Short Press on the «MENU» key: access the colour
menu
CAM MENU
Lock-Releases
When in the colour menu:
«LOCK-RELEASE» key: increase colour
«CAM» key: decrease contrast
Page 13
Page 12
BY
And by pressing the MENU, the menu disappears, leaving the video with the established values.
Audio Adjustments
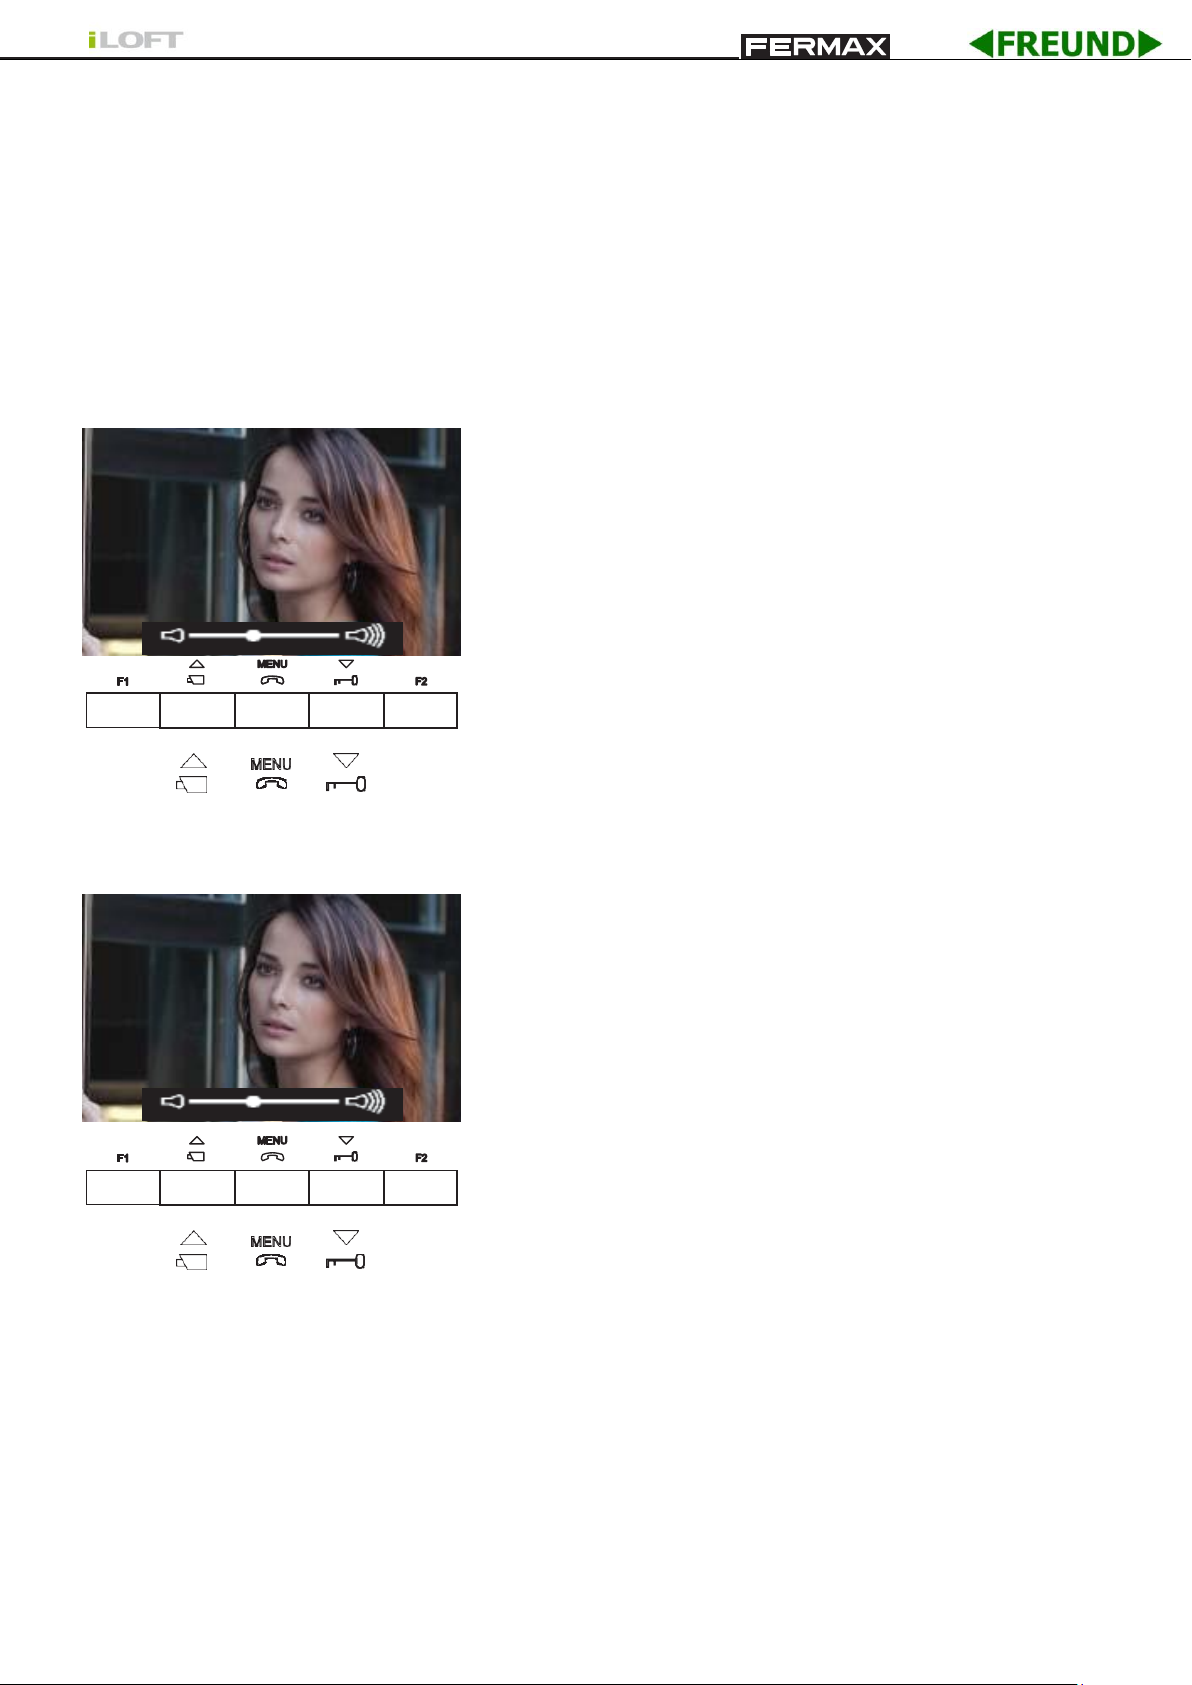
While the audio channel is open the input audio volume can be adjusted with an on-screen
menu. If we are in:
- Conversation mode «Hands free» you must press the MENU key for 5 s.
- Conversation mode «Simplex» simultaneously press the F1 + F2 buttons for 1 s.
Conversation mode «Hands free», with the audio channel
open:
«MENU» key(5 sec.): access audio settings menu
When in the audio settings menu:
«LOCK-RELEASE» key: increase volume
«CAM» key: decrease volume
CAM
MENU Lock-Releases
Conversation mode «Simplex», with the audio channel
open:
Simultaneously press the «F1 + F2» keys (1 sec.):
access audio settings menu
When in the audio settings menu:
«LOCK-RELEASE» key: increase volume
«CAM» key: decrease volume
CAM
MENU Lock-Releases
Note: While setting the audio, only the audio input is activated. Upon accessing the «audio
settings menu» the output audio is disconneced and you can only listen to the input audio,
which is what we regulate while talking from the Entry Panel.
The audio settings is completed by pressing the «MENU» key.
Pag 14
Page 13

BY
Section II - User Manual
Congratulations on purchasing this quality product!
The iLoft Video Door Entry System monitor, hands free and with a full colour screen
that allows you to communicate with the entry panel, see the caller and open the
entrance door if you wish.
With the onscreen menu you have new features to configure the monitor´s parameters
and induction loop.
We hope you enjoy its range of functions.
www.fermax.com.
Page 14
BY
(*)
MENU
1"
1
(*)
PROGRAMMING: USER Menu
Access the User Menu
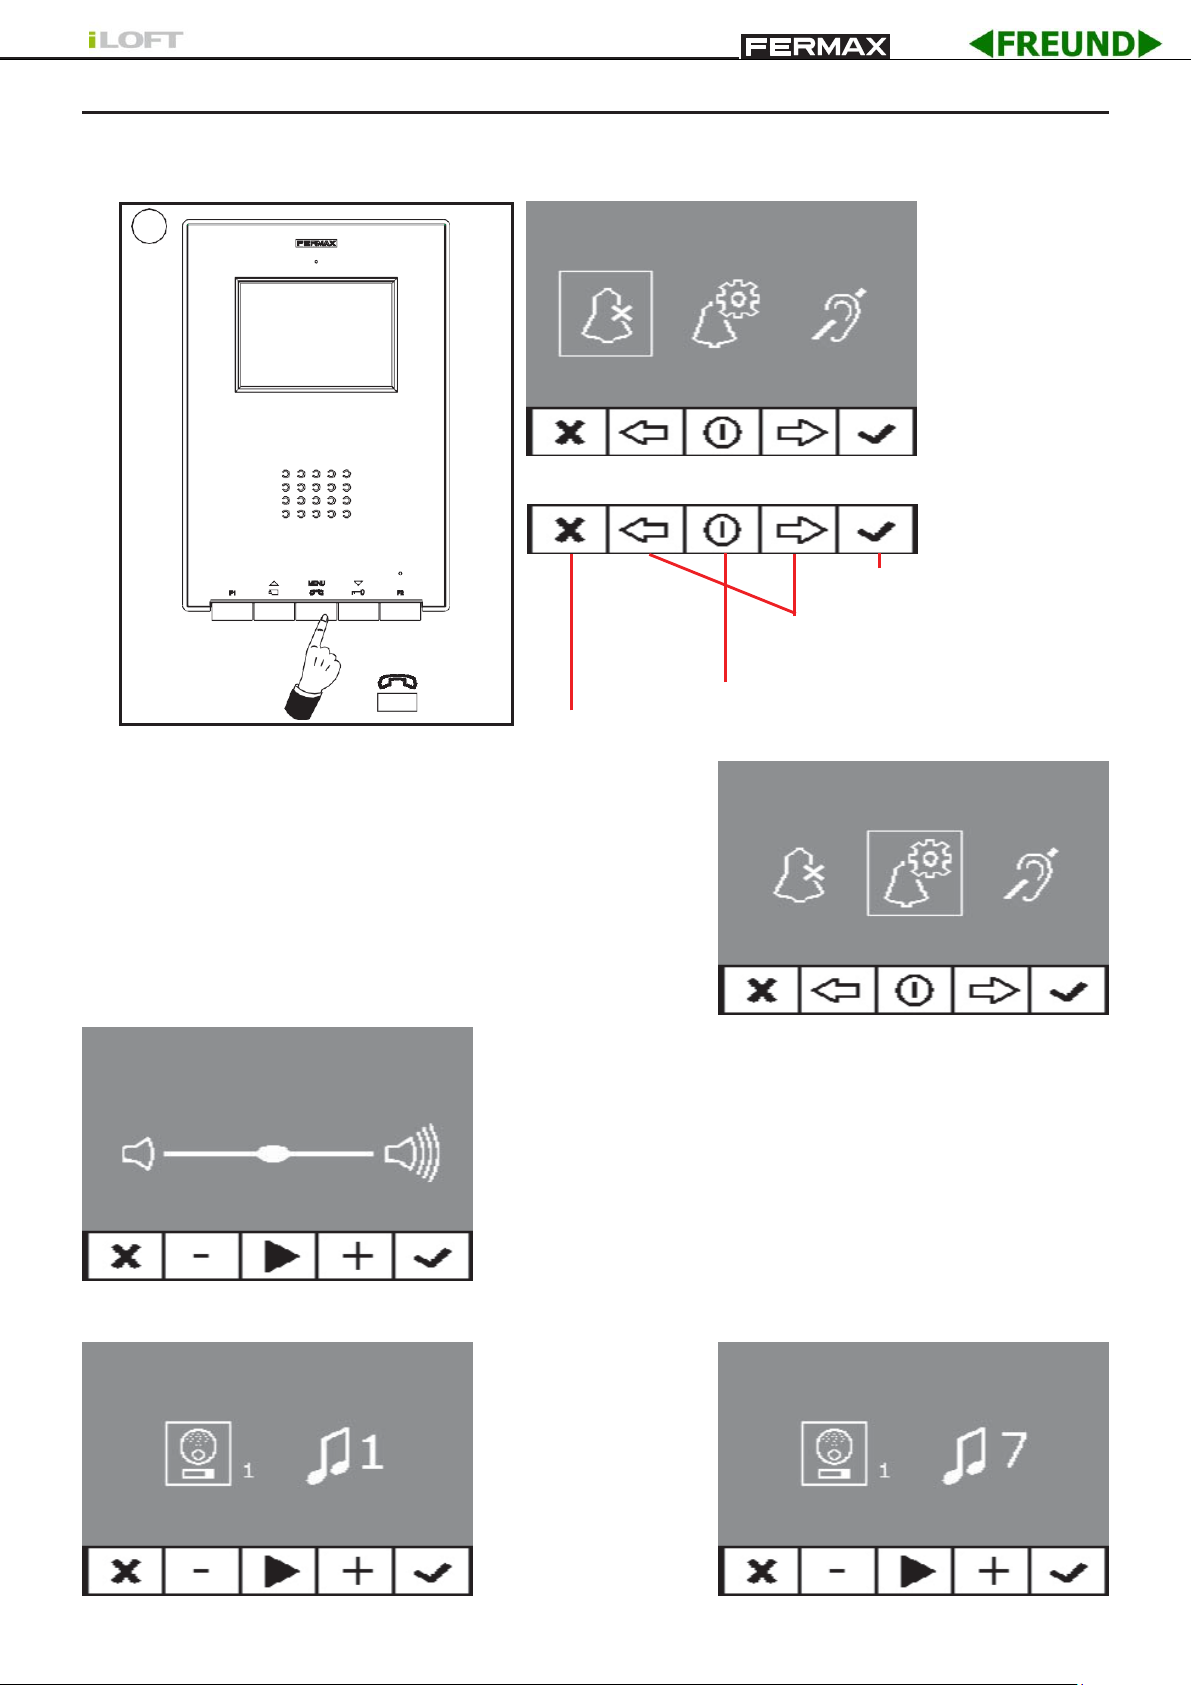
1º. To enter in the User menu press «Menu» for 1 second.
User Menu
Confirmation key
Scroll keys in the menus
Ringtone Selection
Within the user menu, the monitor allows you to select
an independent melody for the calls from:
- the entry panel
- secondary entry panel
- doorbell.
Cancel key
Programming menu exit key
First of all, the call volume appears for the selected call,
which may be changed by pressing the corresponding
keys.
Then in each option the current melody value is shown,
so that if you want to listen to the current parameters, play
it by pressing the button identified as PLAY on-screen.
1. Main Panel
Pag 16
. . . . . . . . . . . .
(*)
Function available depending on model.
Page 15
BY
(*)
activate/deactivate
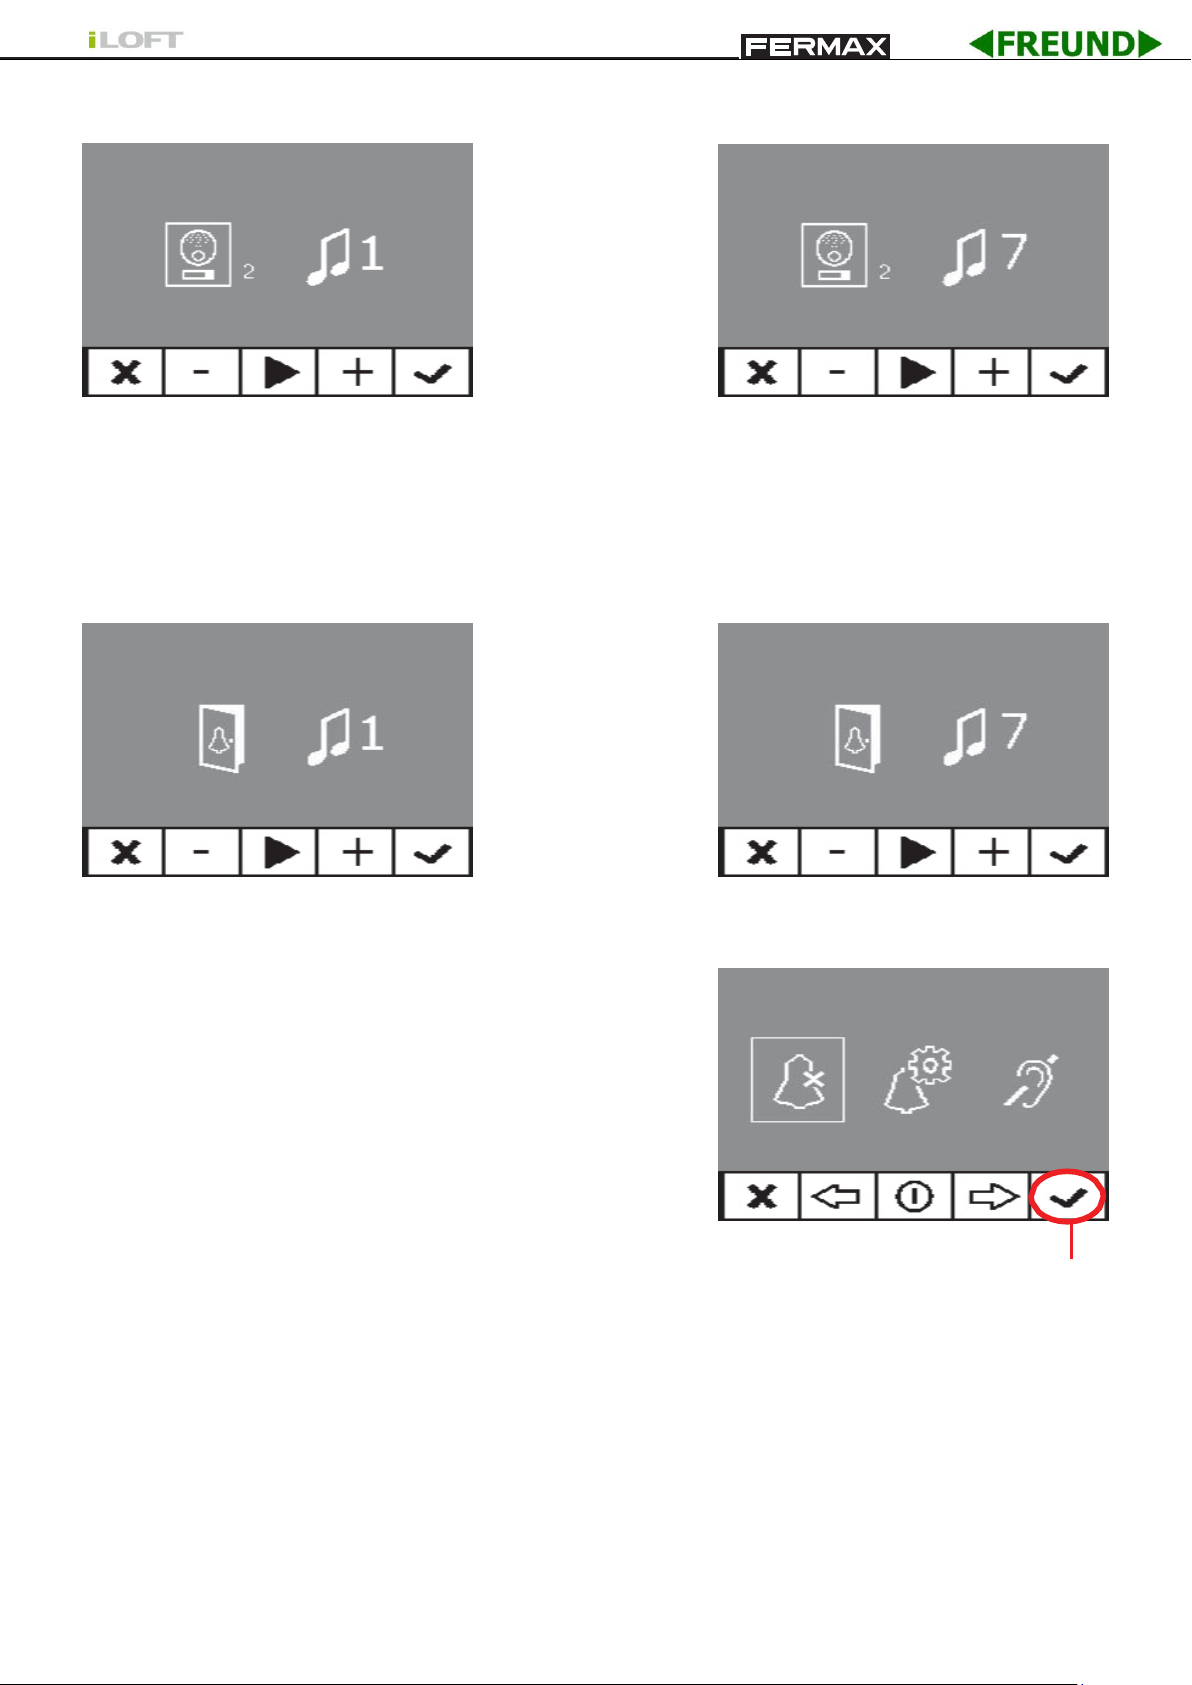
2. Secondary Panel
. . . . . . . . . . . .
3. Doorbell
The monitor has two connections (-,T) to connect an external keypad so that when a short
occurs between them an identifying call tone is generated.
Like previously stated, the doorbell melody can be configured within the melodies menu.
. . . . . . . . . . . .
Do no disturb (cancel ringtones)
Within the same user menu, you can select the Do Not
Disturb mode. For this, select the corresponding icon
and upon pressing OK you exit the screen.
The Do Not Disturb mode is indicated with the blinking of
a red led light for one second. To deactivate it, reselect
the same option and the red led light remains lit, showing
Standby mode.
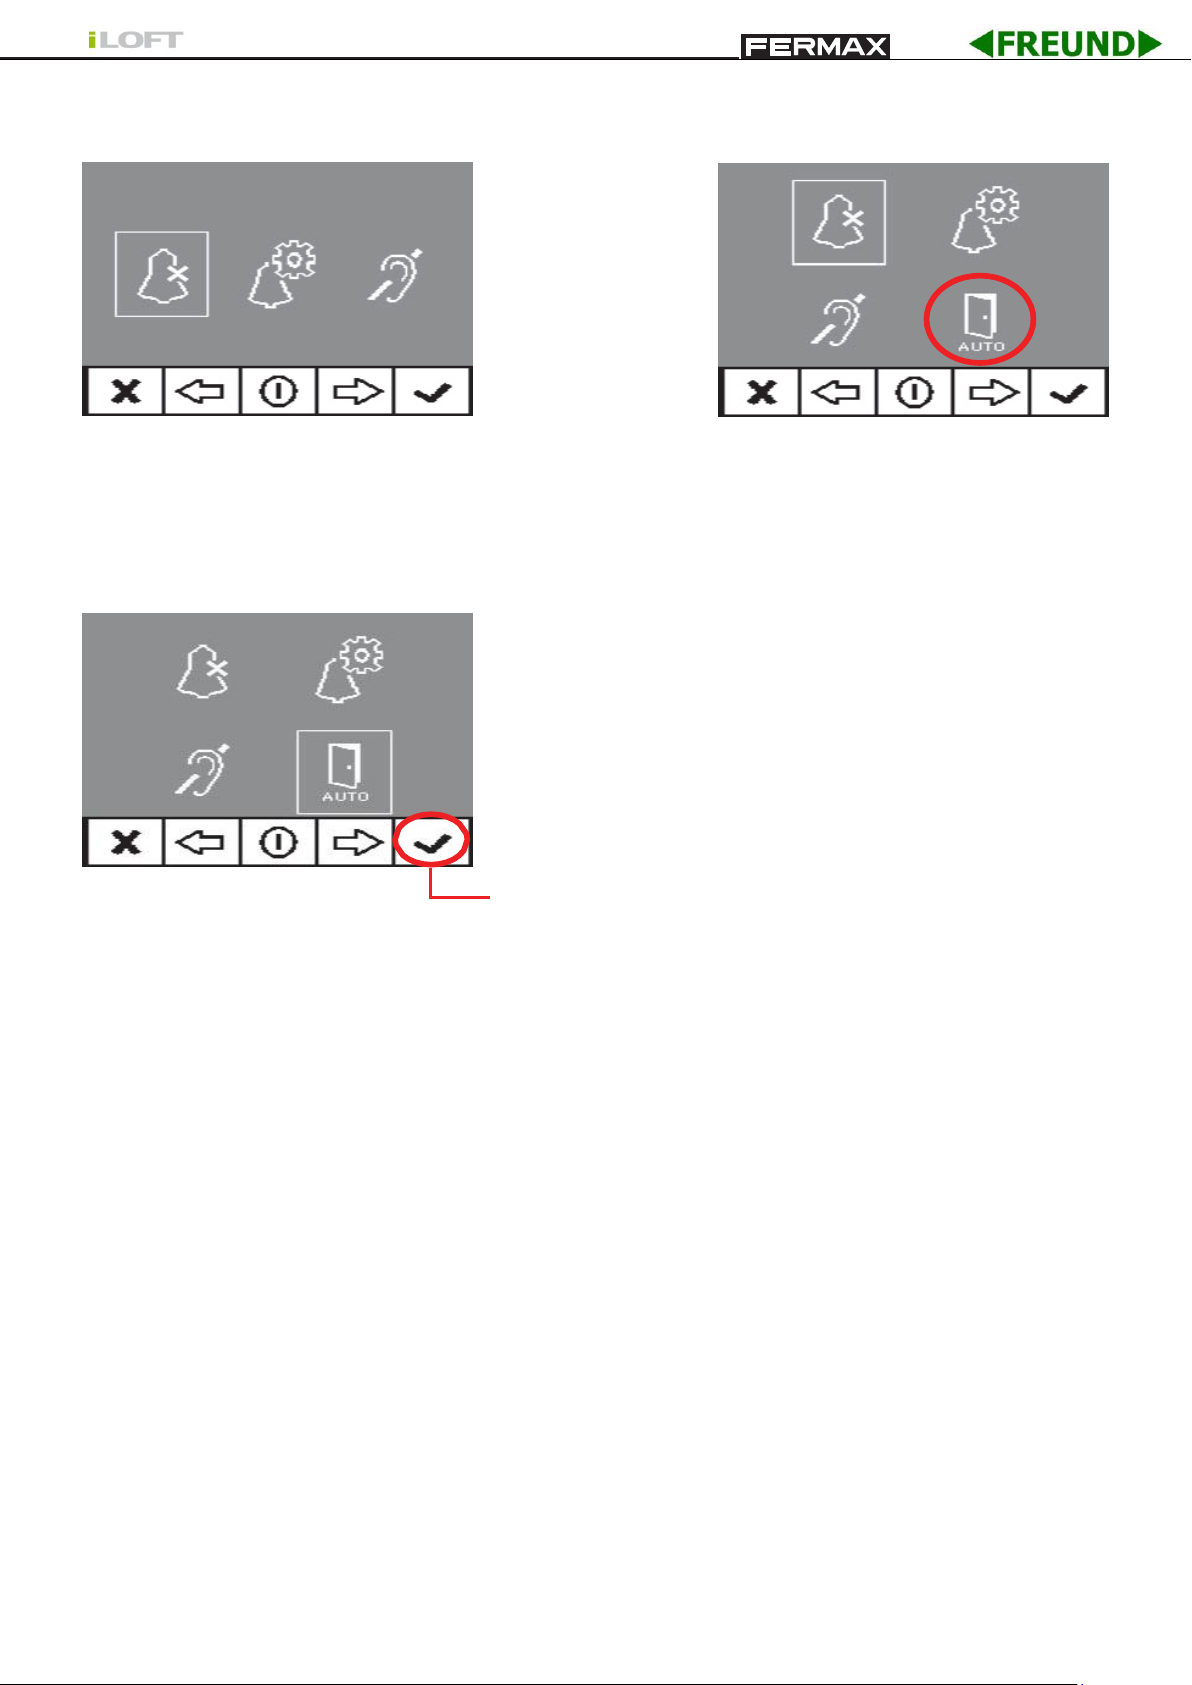
Automatic Opening (Doormatic)
With «Automatic Opening» activated, when a call is received from the entry panel, the lockrelease is activated.
The open door function is disabled by default (not available to the user. It must be pre-enabled
by the installer), to be able to be activated by the user.
(*)
Function available depending on model.
Page 16
BY
(*)
(*)
(*)
User menu: Doormatic function
DISABLED by the installer
User menu: Doormatic function
ENABLED by the installer
By selecting this option you can access the submenu that allows you to enable or disable
the doormatic.
The user may activate/disable doormatic by selecting the
doormatic option and pressing OK. Upon pressing OK
you exit the screen menu and see if the doormatic mode
is activated with the greed led light. If it is not activated,
the red led light remains lit, indicating standby mode.
activate/deactivate
There is also an option to connect a timer to the doorbell (if this is not being used) so that
the automatic opening function is activated and deactivated each day at certain times. If that
entrance is activated for a period greater than 30 seconds it determines that the automatic
door function should be activated. When this doorbell feature is deactivated this function will
also be deactivated.
(*)
Pag 18
Function available depending on model.
Page 17
BY
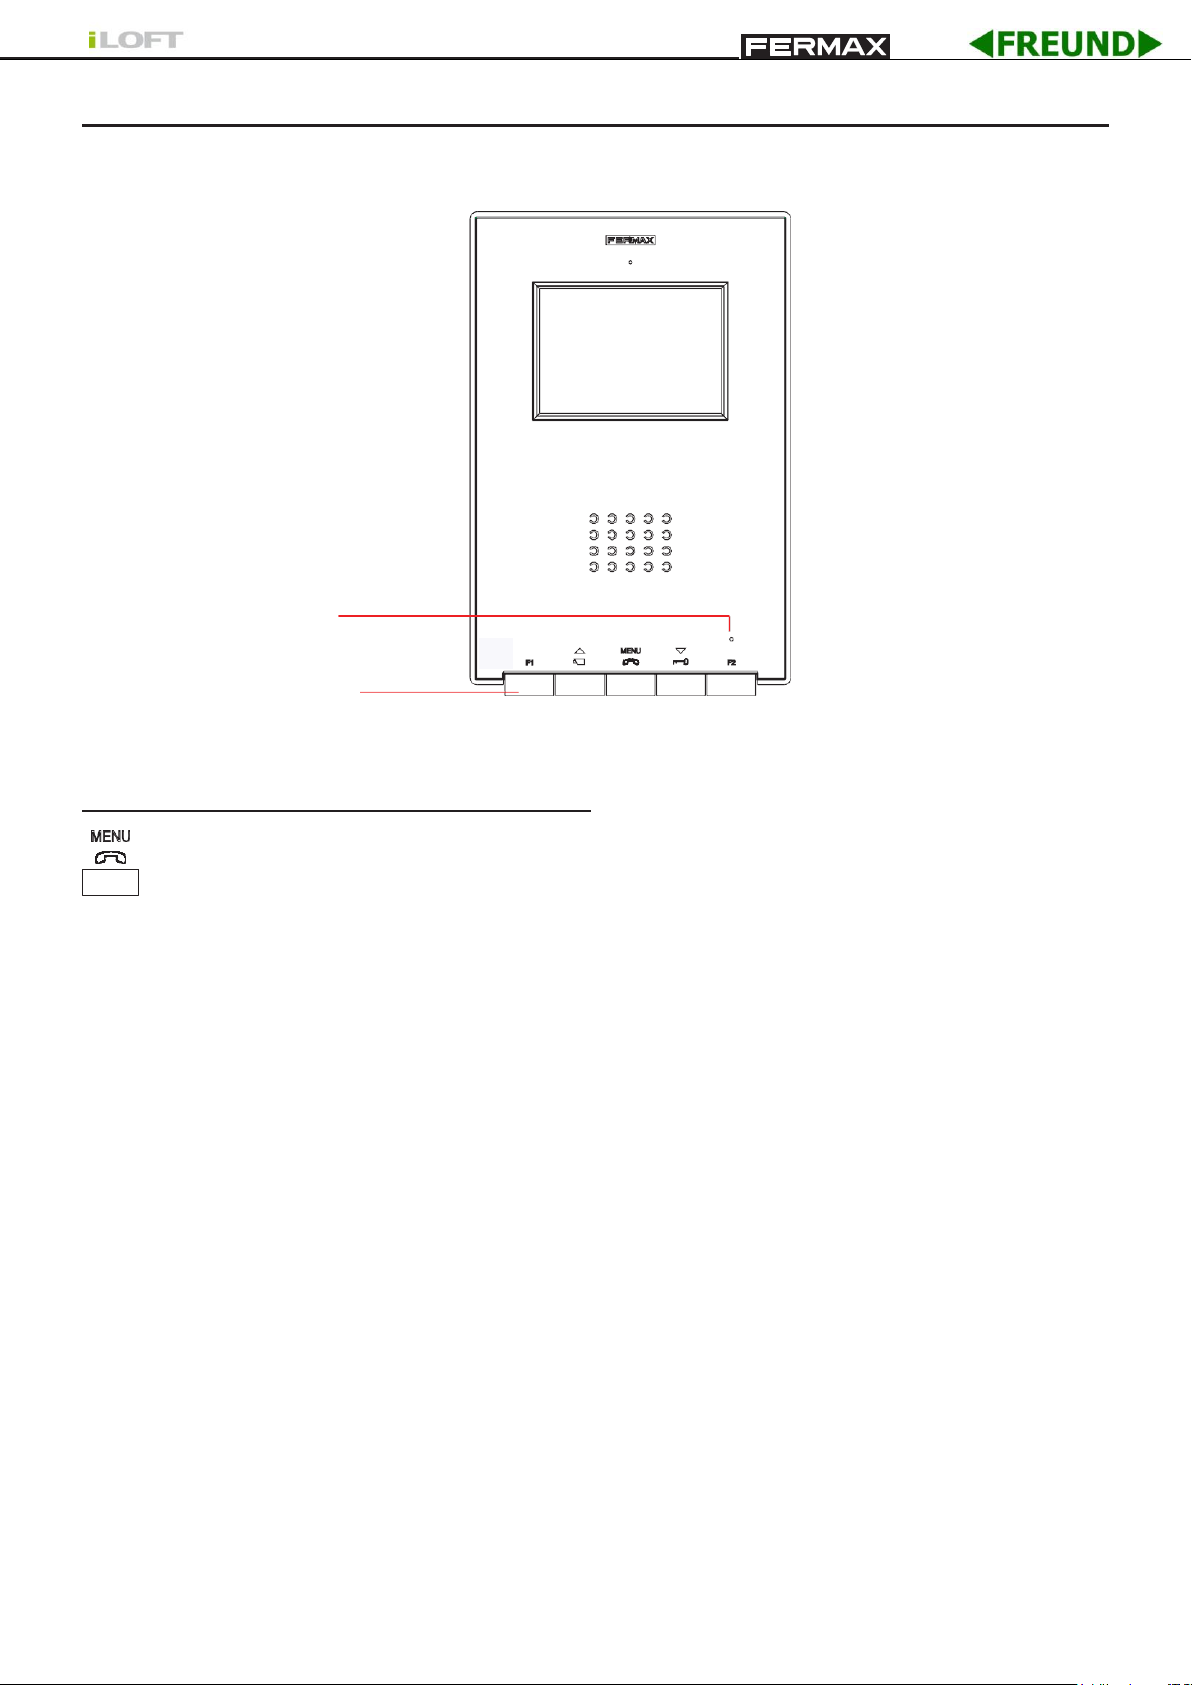
iLOFT MONITOR
Led
Buttons
Buttons
Audio Activation, Call Hang-Up and Configuration Settings Button (menu).
· Upon receiving a call, (you have 30” to respond before it returns to standby mode. During
this time the red led light will turn off, informing you that a call is pending), press this button
to talk to the visitor. The audio channel is opened from street entrance to residence,
(the blue led lights up indicating a conversation with the street entrance, and everything said
will be heard by it), this is in hands-free operating mode.
·
Press after finishing the communication,
and the red light is turned on).
Note: The default internal timer for the monitor is 90 seconds.
· With the monitor on standby, press and hold this button for 1 second to go into User
configuration mode. See the «Programming: User Menu» section
Notes:
- The conversation is private, no other terminal can hear it.
- «Hands free» mode is default mode.
- While the audio channel is open the input audio can be adjusted. See the
corresponding chapter on: «Audio Adjustments»
(when finished the blue led light again turns off
Page 19
- If the monitor is configured to «simplex mode», (press to speak and release to listen),
it is indicated with a flashing blue led light, activating the input audio channel. From
this moment on, each time you press the MENU key, the output audio channel is
activated (constant blue led light) and when releasing it it activates the input audio
channel (blue flashing led light). To end a conversation, short-press the MENU key.
Page 18
BY
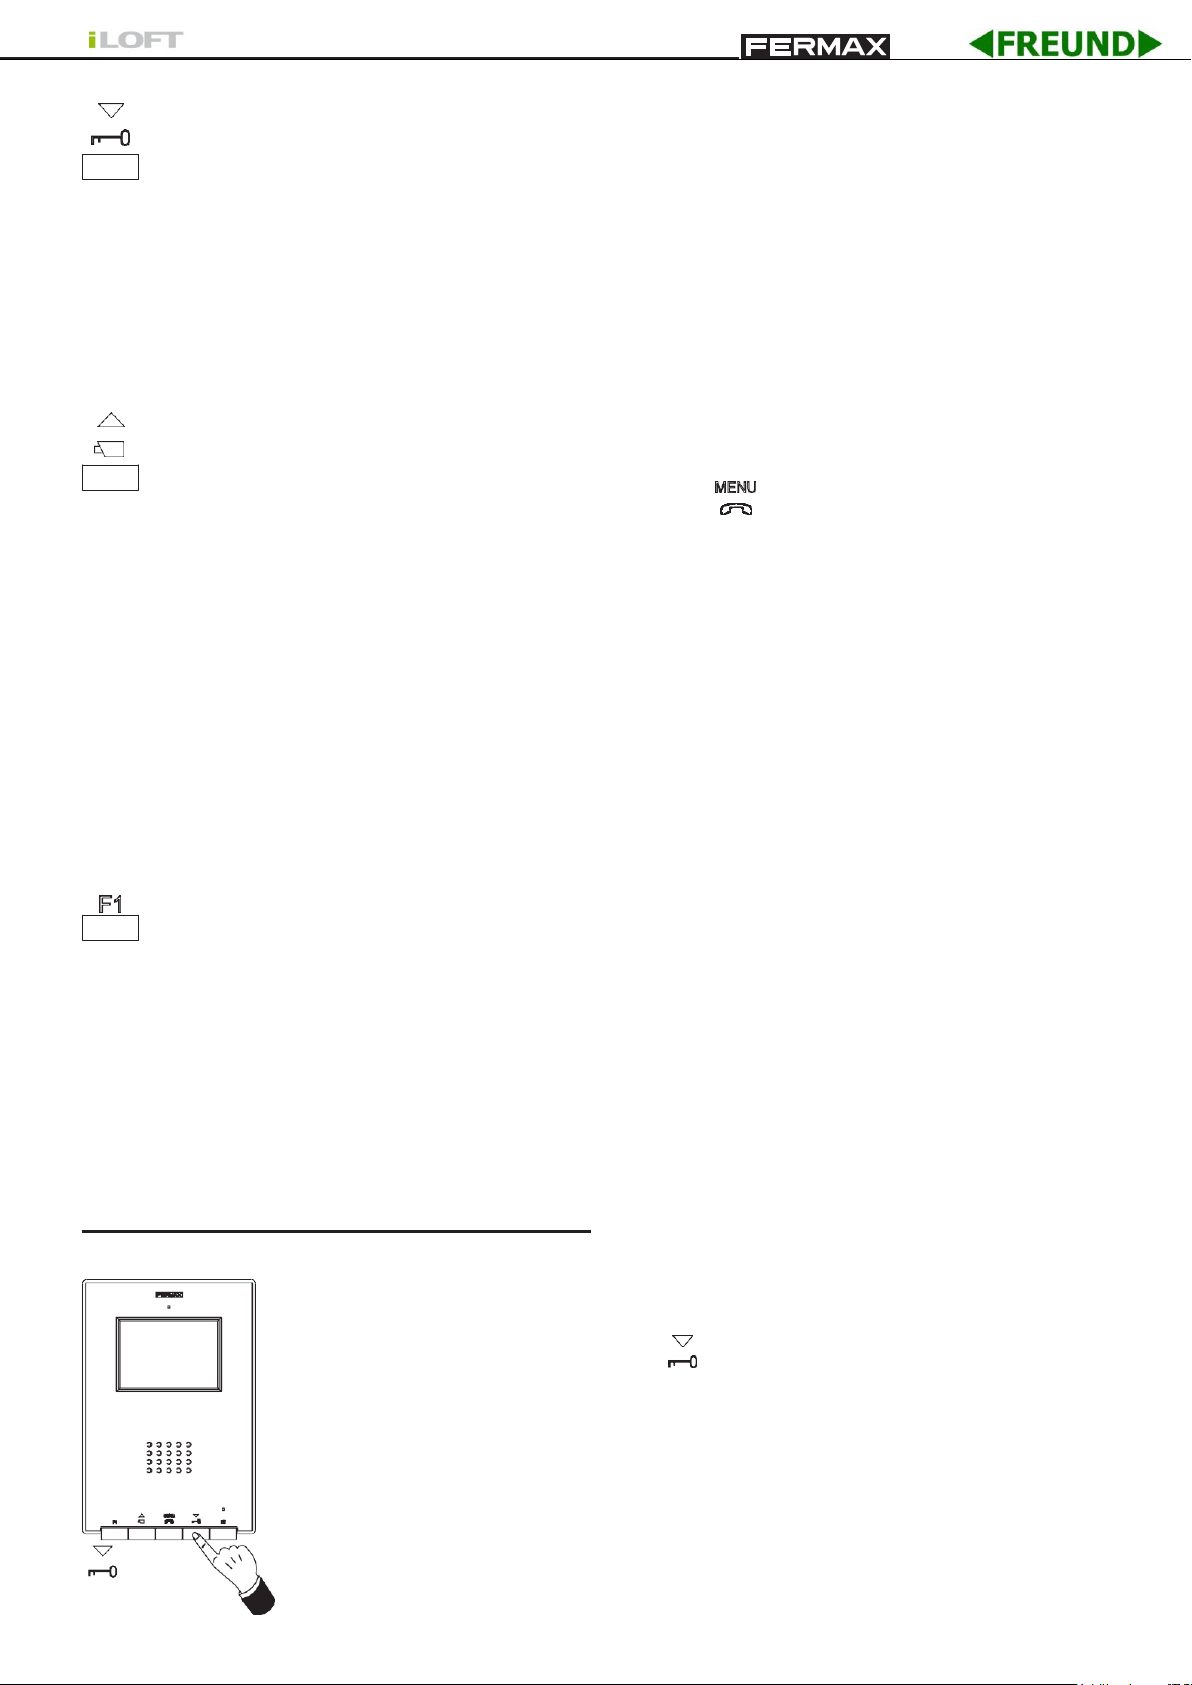
Lock Release / Call Guard Unit Button
· Pressing this button whilst communicating with the Entry Panel will activate the lock
release.
· Pressing this button whilst the monitor is on standby will result in a call being made
to the guard unit (where one exists).
Note: If the channel is busy an error tone «BEEP» will sound and auto-start will not
activate, nor will the call to the guard unit.
Auto-Start / Main-Secondary Camera Selection Button
· With the monitor on standby, press this button for 1 second to switch the monitor
on manually. To activate the audio, press the button.
· With video, hold this button down for 2 seconds to sequentially select between the
main camera and the secondary camera (if there is one).
Note:
- If the channel is busy an error tone «BEEP» will sound and auto-start will not
activate, nor will the call to the guard unit.
- The auto-start function is always used on the main panel except where a call
is received on the secondary panel. Once the conversation is over, auto-start
will activate on the secondary panel for 30 seconds. After this time it will ac-
tivate on the main panel.
F1 and F2: Buttons for Additional Functions.
(Assigned by the installer; see the corresponding chapters).
NOTE: The monitor screen goes on once the call from the panel has ended.
Operation
Opening the Door
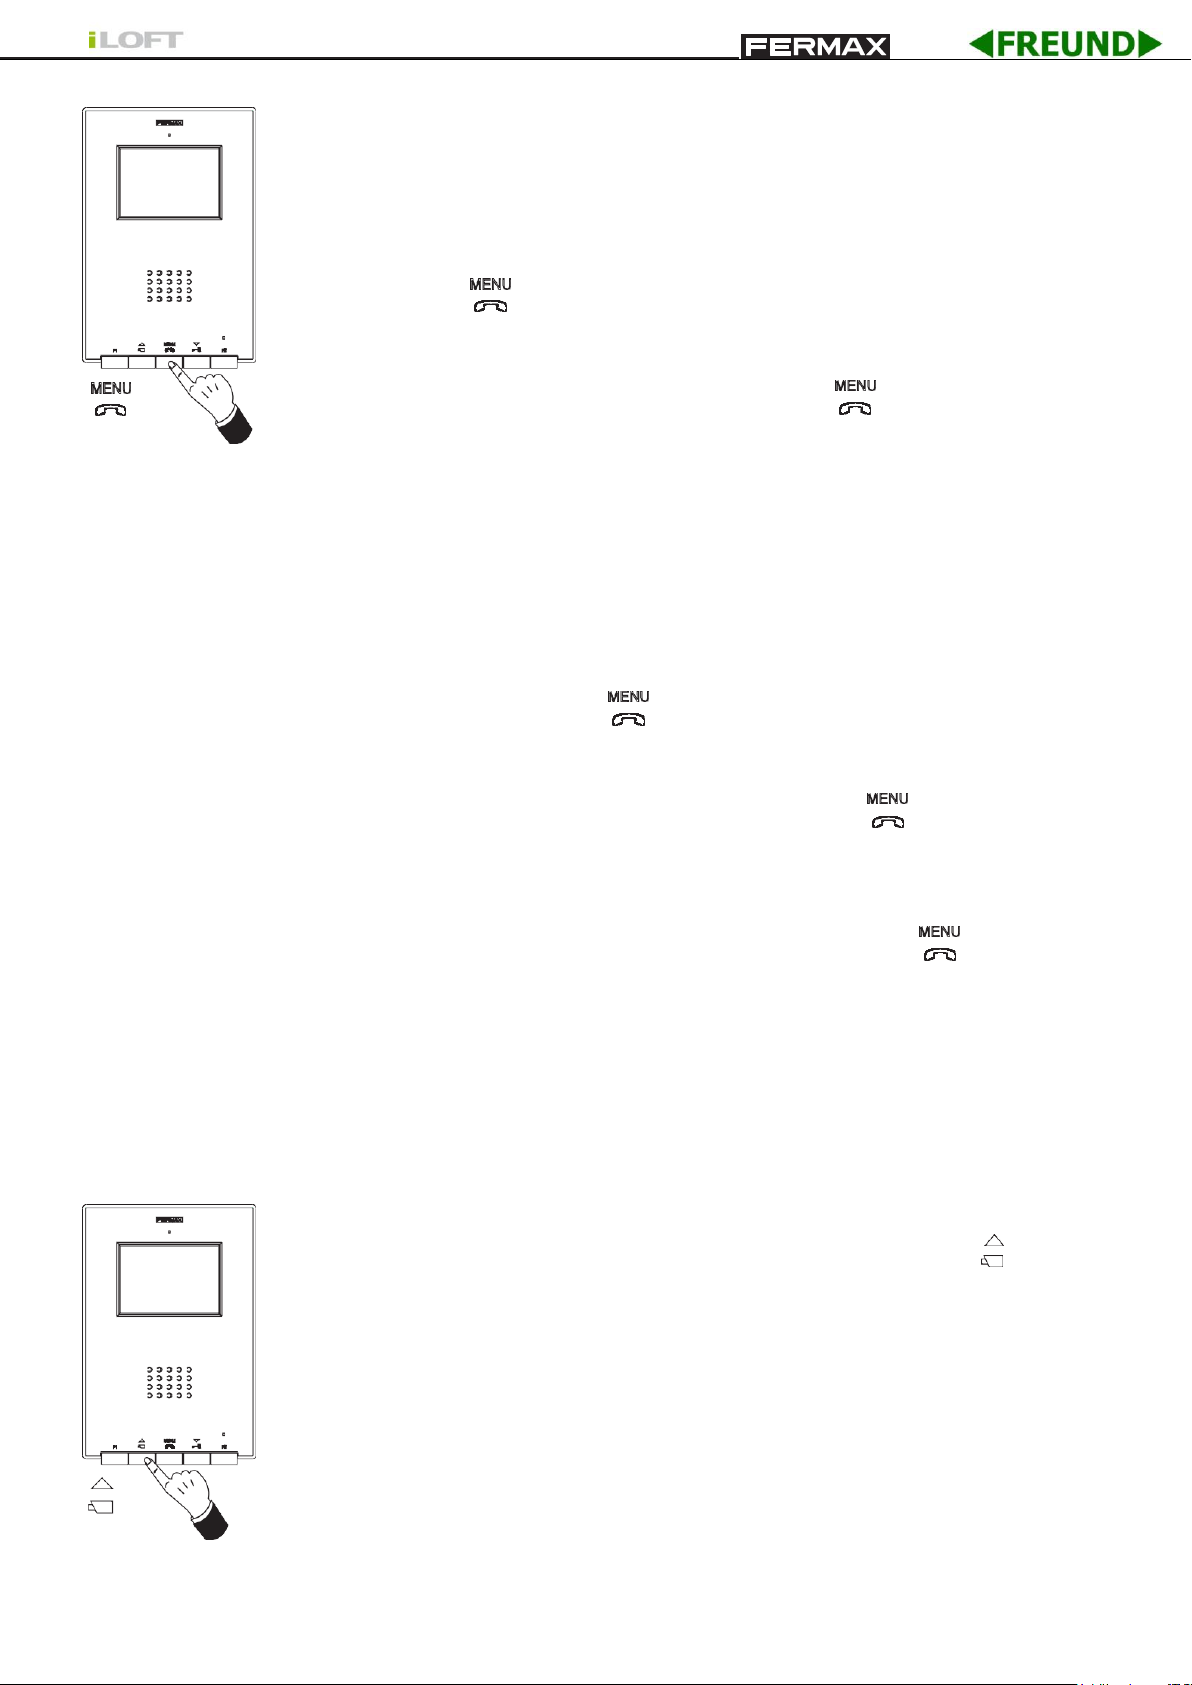
When a call is received from the entry panel, you can open the door
at any time, by pressing the button.
Page 19
BY
Answering a call
Hands free mode:
When the call button on the Entry panel is pressed a call tone is
emitted both from the panel and on the monitor, causing the screen
to start up.
Press the button to speak with the visitor. The audio channel
between the street and the home will be opened; operating in
hands-free mode. The communication will automatically end after
90 seconds, or at any time by pressing the button.
The led will remain lit (blue) for the duration of the conversation.
If communication is not established with the entry panel, the monitor
will automatically turn off after 30 seconds.
While in simplex conversation mode (press the button to speak
and release to listen).
When the call button on the Entry panel is pressed, a call tone is
emitted both from the panel and on the monitor, causing the screen
to start up. Press the button to talk to the visitor, leaving the
input audio channel activated. The simplex mode is indicated by the
flashing blue led light.
From this moment on, each time you press the button, the output
audio channel is activated (constant blue led light) and when releasing it it activates the input audio channel (blue flashing led light) the
operation is in simplex mode. The communication will automatically
end after 90 seconds, or at any time by pressing the button. Once
disconnected the blue led will turn off.
If communication is not established with the entry panel, the monitor
will automatically switch off after 30 seconds.
Manual Monitor Activation (Auto-Start)
Page 21
With the monitor on standby, press and hold this button until the
image appears (less tha 2 seconds).
If there is more than one camera in the installation, to view the second
camera’s image you must release the button and re-press it until the
second camera’s image appears.
To activate the audio and speak to the visitor or open the door, follow
the steps above.
If communication is not established with the entry panel, the monitor
will automatically switch off after 30 seconds.
NOTE: If there is more than one iLoft monitor in the system and a call is made to a monitor, the
rest of the monitors will show a blue led warning that the channel is busy.
Page 20
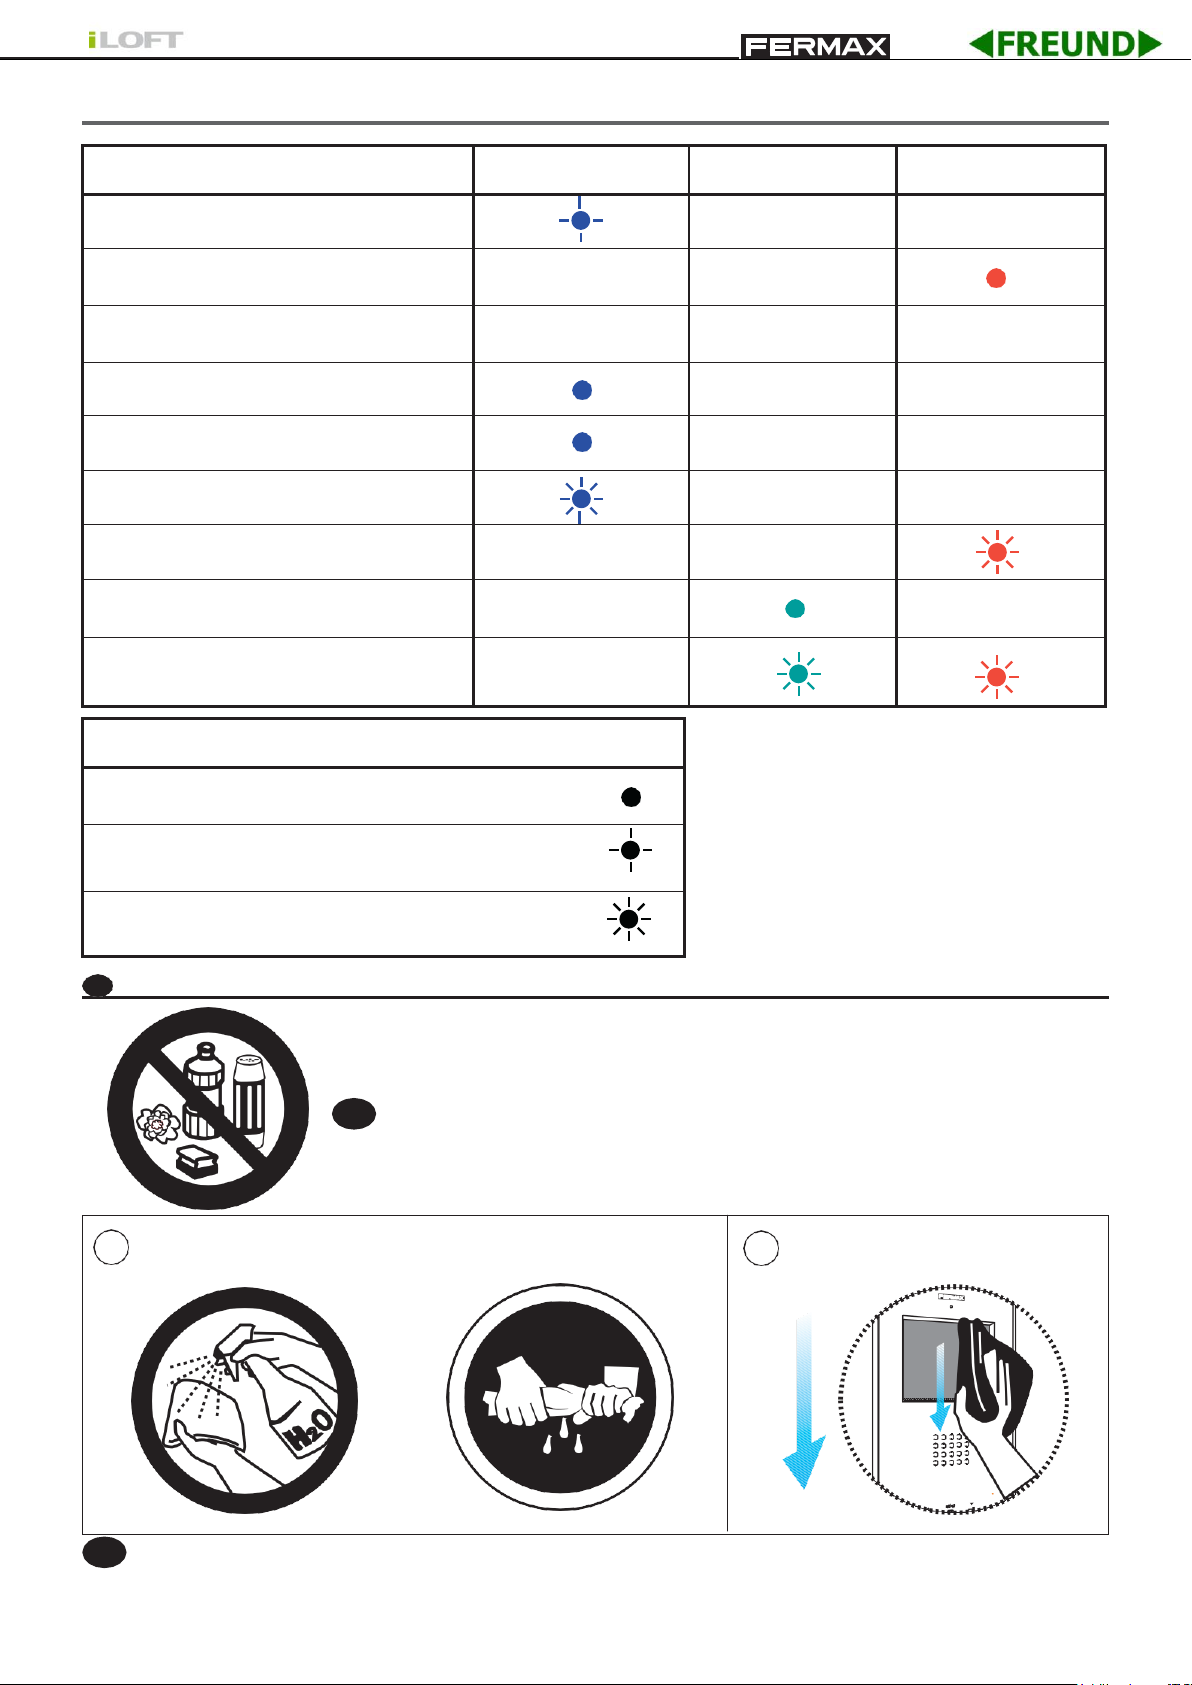
BY
STATUS
blue LED
green LED
red LED
Not programmed
Standby
Call/Called
Hands free audio
Output audio (modo simplex)
Input audio (modo simplex)
Do not disturb
Doormatic
Do not disturb + Doormatic
STATUS
LED On
Very slow flashing (0.1’’ ON - 5’’ OFF)
Slow flashing (1’’ ON - 0.5’’ OFF)
EN
MAINTENANCE (CLEANING)
1
2
EN
Quick guide: LED lights
Do not use cleaning products which contain acids, vinegar or are
abrasive in nature.
1º.
EN
Pag 22
Use a damp cloth.
2º.
Wipe it over the monitor always following the same direction.
After cleaning the monitor dry it carefully to avoid moisture damage.
Page 21
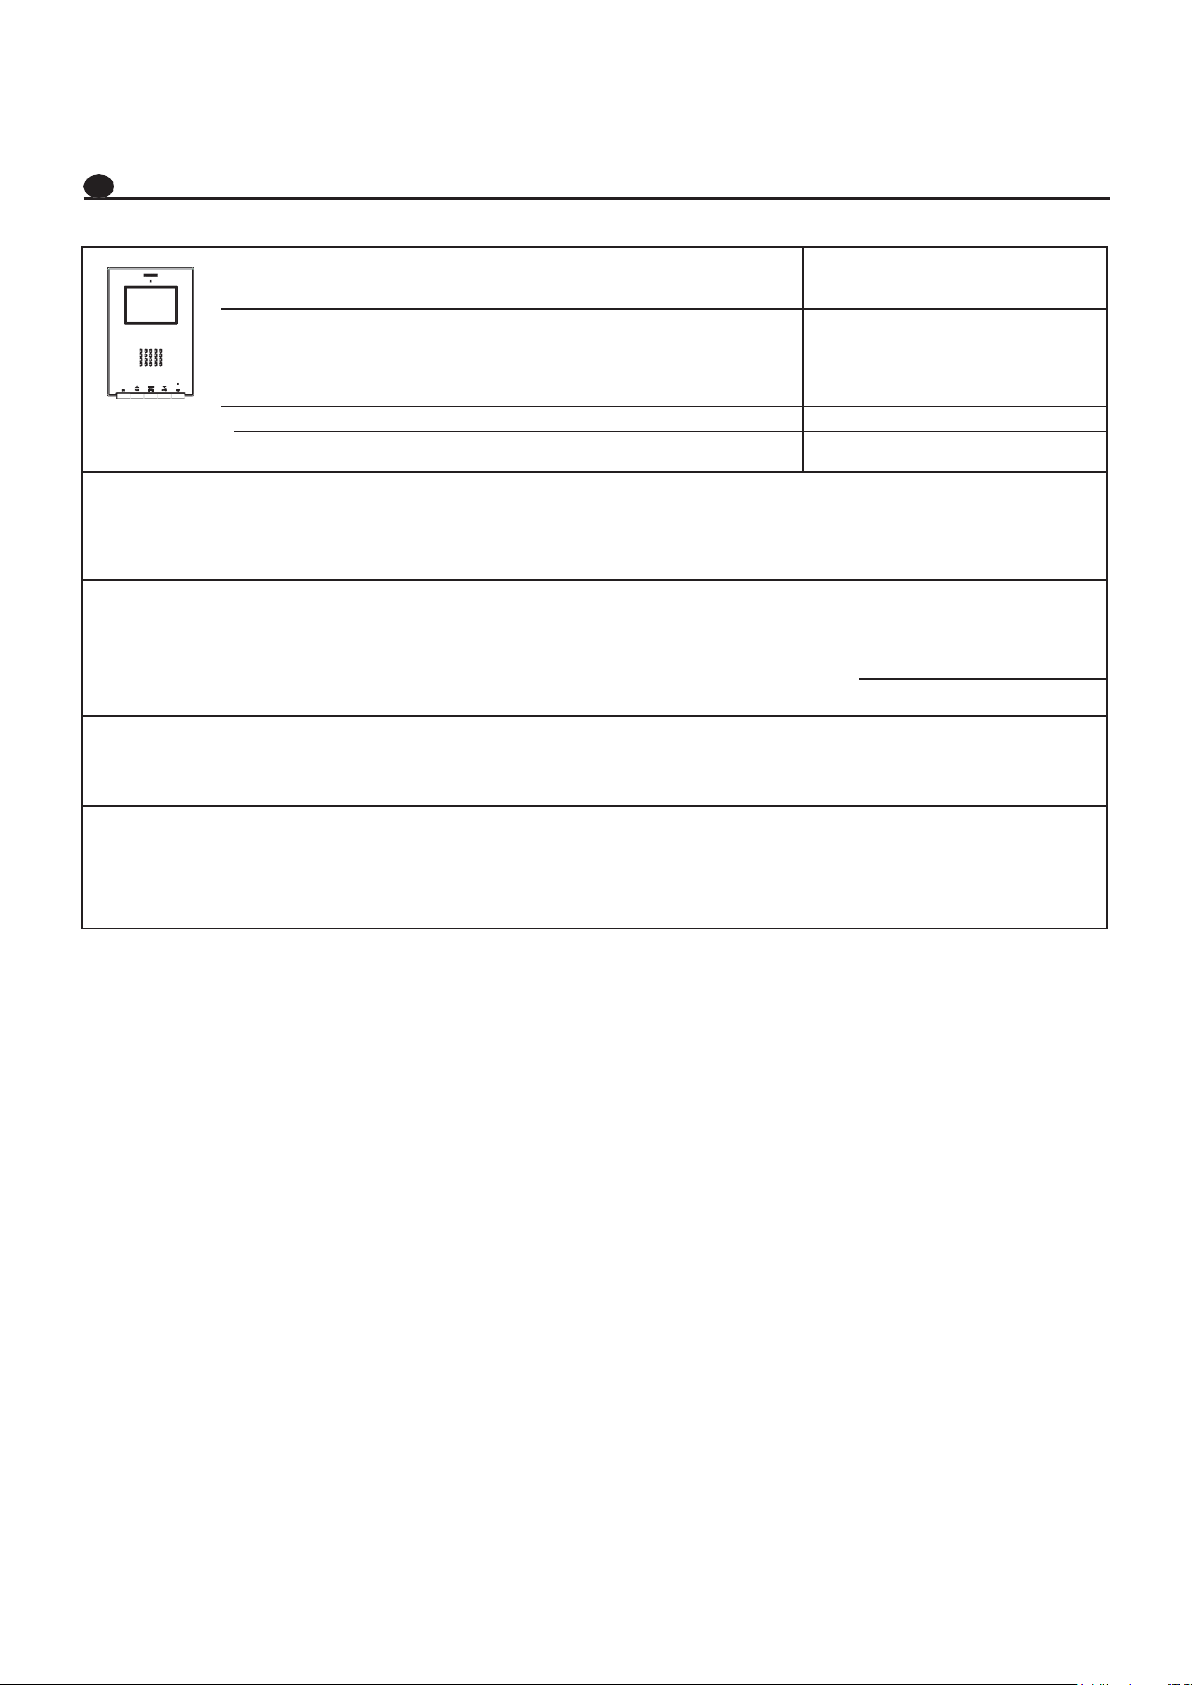
Power Supply
18 Vdc
Consumption
standby
26 mA
video
160 mA
audio + video
250 mA
Operating Temperature
[-5, +40 °C]
Humidity
[5,95%]
OSD Menu
Resolution
TFT 3.5”
Hor.: 480 Line TV
Ver.: 234 Line TV
Video signal
Composed signal 1 Vpp 75
7 Mhz.
Flush mounted Dimensions 197 x 131 x 60 mm / 7,7” x 5,1” x 2,3”
Surface Dimensions 197 x 131 x 34,3 mm / 7,7” x 5,1” x 1,3”
Alto x Ancho x Prof
EN
TECHNICAL FEATURES
 Loading...