

c
c

Please read all instructions carefully before assembly and flight!
Thank you for purchasing the F9F Panther. This model is designed for the intermediate to
advanced flyer. The model is receiver-ready and includes everything that you need to assemble
and fly your F9F Panther, except for the radio transmitter and receiver. Please read the following
instructions carefully, assembly is easy and should only take an hour or so.
Main Specifications
Wingspan: 27” (685mm)
Fuselage length: 28-3/4” (730mm)
Flight weight: 19-1/2 oz. (552g)
64mm EDF
4300KV out-runner brushless motor.
3-cell 11.1V 1600mAh 20C lipo battery
30A ESC
3pcs. 9g Servo
Optional Landing Gear (Sold Separately) w/ steerable nose wheel and servo included
Radio System with minimum 3-channel Transmitter and Receiver
Battery charger capable of charging a 3-cell Lipo battery
All of the above parameters only for the RTF with landing gear, if you purchase another version, you
could refer to the above and choose another spareparts.
Safety Statement
1. This is not a toy. It is for experienced modelers only. You are responsible for the safe
operation of this model and any damage or harm it may cause.
2. Before flying the F9F Panther for the first time please read through the instructions carefully
and make sure that your radio equipment is working properly and has been range tested
prior to flight.
3. Young people under the age of 14 should only be permitted to operate this model under the
instruction and supervision of an adult with modeling experience.
4. Please keep these instructions for future reference after completing model assembly. They
contain information critical to the safe operation of this model.
5. If you have any further questions regarding the safe operation of your RC model, please
contact your local hobby shop, flying club or Freewing Model Company
he
lp and advice.
for professional
F9F Panther
Item No.:F1701 -1-
Safety Precautions!
Please read this section and follow all recommendations!
1. Do not fly in strong wind or bad weather.
2. Never fly the model in crowded areas where there are lots of people, automobiles on the
road or power lines overhead. Do not fly near full-scale airports.
3. Make sure that you have enough open area for flying as the model can travel at a high rate
of speed and cover a lot of area quickly. Initial flights should be made in an area with a
minimum size of a football field.
4. This model is not recommended for children under the age of 14.
5. When charging the LiPo batteries, always charge them on a non-flammable surface and
monitor the charge process. Improper charging of LiPo batteries is dangerous and can lead
to a fire!
6. The F9F Panther is made from EPO foam and plastic. These materials are flammable and
can be damaged by high heat. Never leave your F9F Panther near a heat source or in an
automobile.
7. Do not attempt to catch your F9F Panther while flying.
8. Never leave your F9F Panther unattended when ready for flight.
9. When preparing for flight, always turn on your transmitter first and make sure that your
throttle is in the off position prior to plugging in the flight battery. Failure to follow this step
may lead to unintended motor start and damage to the model.
Illustration of Assembly
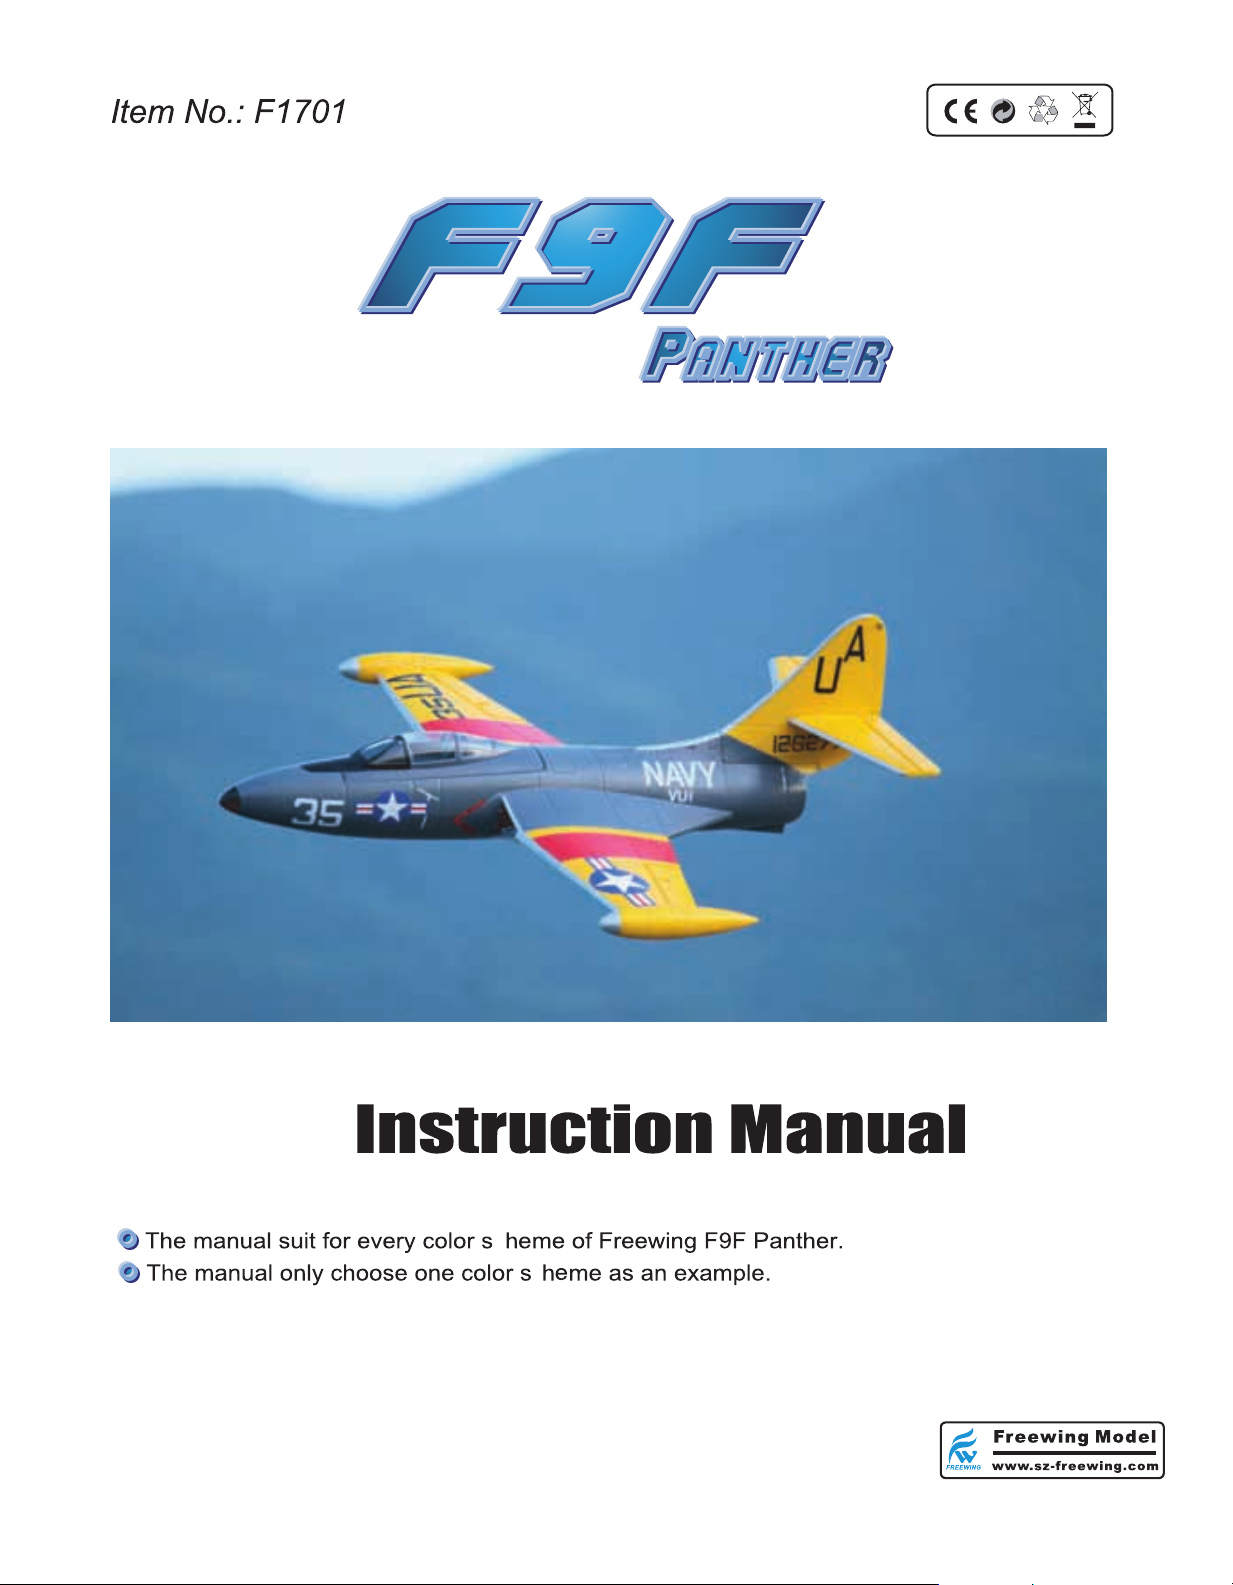
1. Open box and carefully unwrap all parts.
F9F Panther
Item No.:F1701 -2-
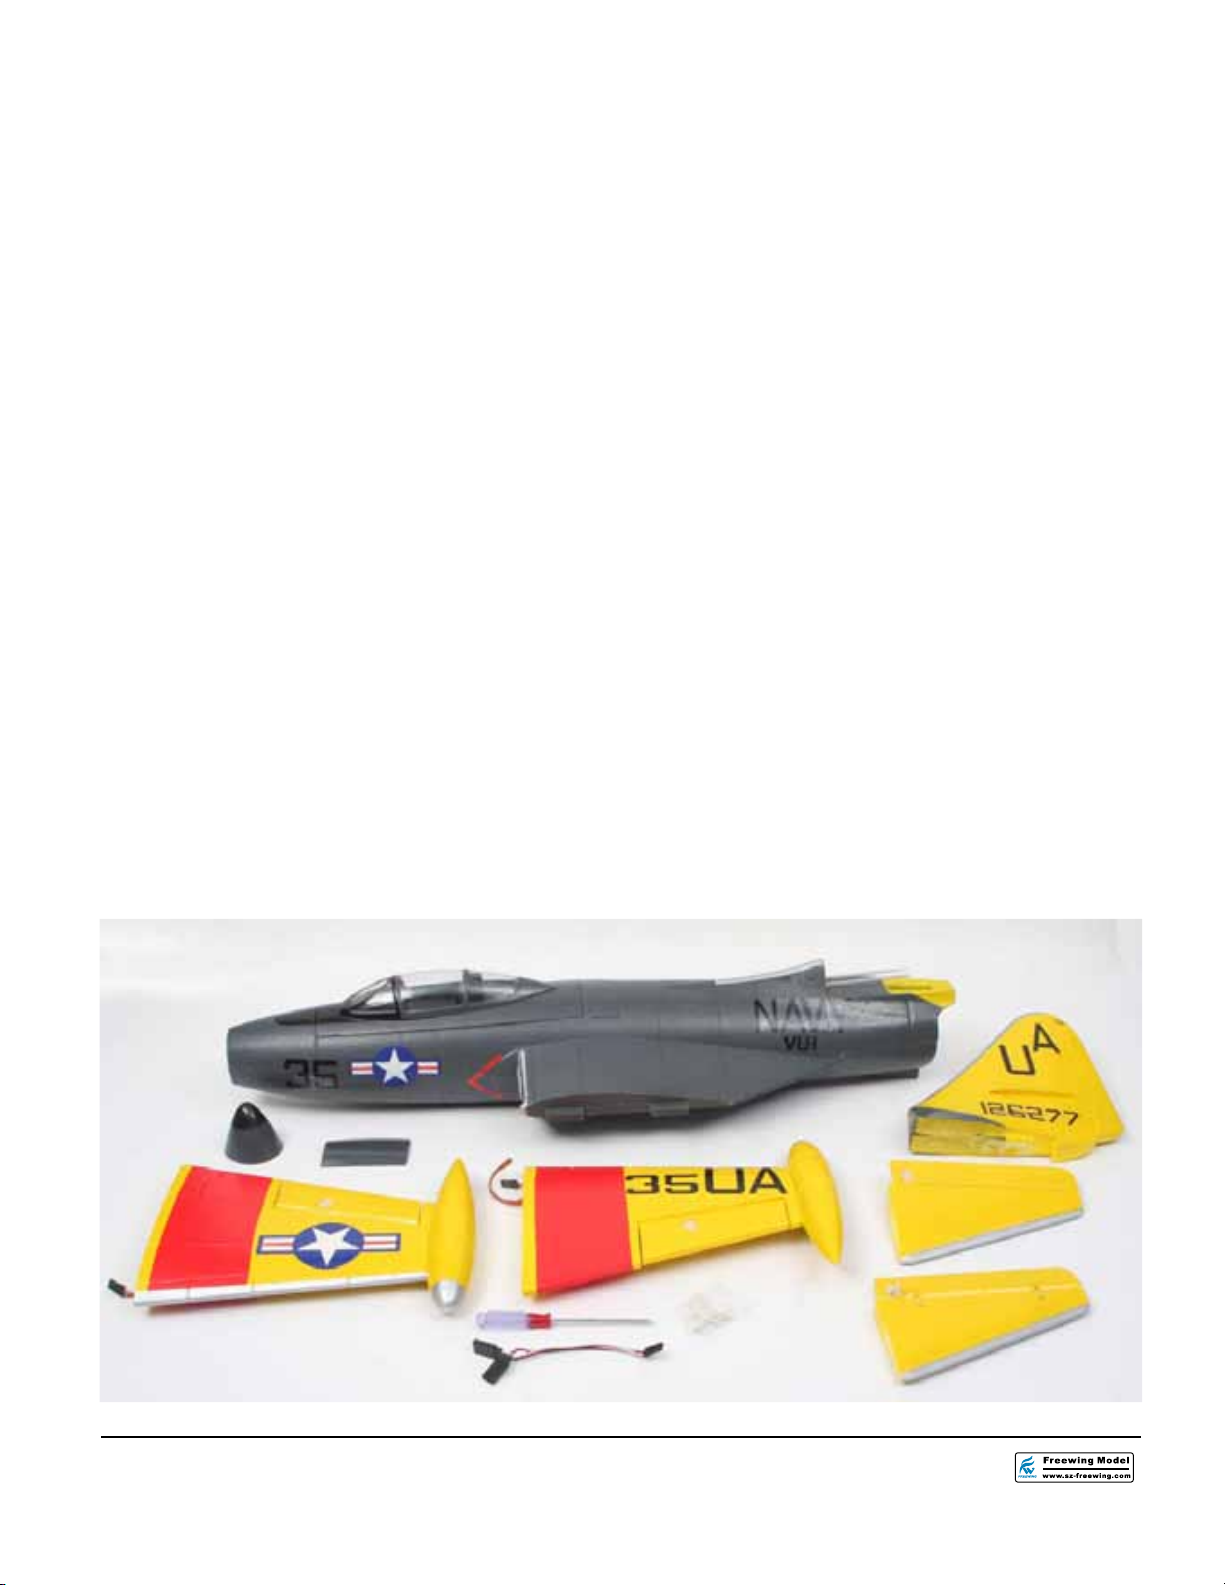
2. Apply a small amount of epoxy to one 3. Apply a small amount of epoxy to the vertical
of the horizontal stabilizers. stabilizer slot for the horizontal stabilizer
an
d glue it in place. Repeat for other side.
4. Check that horizontal stabilizers are 5. Apply 5-minute epoxy to the root of
at 90 degrees to the fin. one wing panel.
6. Apply 5-minute epoxy to the wing tabs 7. Attach and hold the wing in place until
on the fuselage. the epoxy cures. Repeat for other wing.
F9F Panther
Item No.:F1701
-3-

8. Insert the aileron servo wires into the 9. Apply 5-minute epoxy to the bottom of
ho
les in the fuselage and route to Rx. the vertical stabilizer with the foam insert
on the right side removed.
10. Carefully install the vertical stabilizer onto the fuselage, making sure the elevator tube
goes into the exit slot. Be sure not to foul the pushrod opening with glue.
11. Epoxy the area where the foam insert goes and carefully install the insert while
making sure the elevator tube goes into the exit slot.
F9F Panther
Item No.:F1701 -4-

12. Slide the elevator pushrods through the tubes and attach the plastic clevises. Center
the elevator servo and while holding the elevators in the neutral position, tighten the
connector screw on the servo horn with a screwdriver.
13. Apply 5-minute epoxy to the nose cone and attach it to the fuselage, making sure it
is aligned properly.
14. The hatch has magnets at the front and a tab at the back. Lift from the front and slide
orward to remove the hatch. Install your receiver using double sided tape or Velcro.
f
F9F Panther
Item No.:F1701 -5-

15. If not installing the optional landing gear (sold separately), glue the front plastic
nose cover on with contact adhesive or 5-minute epoxy.
16. Installing the optional landing gear (sold separately). Remove the plastic covers on the
wings. Use 5-minute epoxy to install the plastic landing gear base. Next, feed the steering
servo wire into the nose and glue the nose gear base in place. Connect the nose wheel
steering lead to the rudder channel on your receiver.
F9F Panther
Item No.:F1701 -6-

17. Install the battery pack in the nose and position to achieve proper center of gravity.
18. Aileron control throws are 3/8” Up and Down on Low Rates. They are 1/2" Up and Down
on High Rates.
19. Elevator control throws are 3/16” Up and Down on Low Rates. They are 5/16" Up and
Down on High Rates.
20. The Center of Gravity for the F9F Panther is 1-3/4” (45mm) back from the leading edge
F9F Panther
Item No.:F1701 -7-

of the wing where it meets the fuselage. Adjust the position of the battery to achieve correct
balance. Never attempt to fly a model that is not correctly balanced.
Preparation before flight
21. Set throttle to the lowest position and set transmitter trims to neutral.
22. Turn on the transmitter
23. Connect the flight battery to the ESC. After ESC initializes check that the correct channel is
controlling each control surface and that they are traveling in the correct direction when
commanded. Example: right stick moved to the right and the aileron on the right wing
moves upward while the aileron on the left wing moves downward.
24. Adjust each control surface to its neutral position by mechanically adjusting each clevis.
Recommended control throws for F9F Panther
Elevator
Low Rates 3/16” Up and Down
High Rates 5/16” Up and Down
Aileron
Low Rates 3/8” Up and Down
High Rates 1/2” Up and Down
After initial flights adjust the control throws to best suit your flying style and ability.
F9F Panther
Item No.:F1701 -8-

Check before flight
1. Make sure that your transmitter is fully charged. Conduct a range test of your radio system per the
manufacturer’s specs.
2. Check all flying surfaces for correct direction of movement, correct amount of movement and for correct
centering, adjust as required.
3. Fully charge your flight batteries prior to flying.
4. Hand launch into the wind and land into the wind.
Flight Adjustment
1. On initial flight climb to about 75-100 feet and see if any trim is required. If the model rolls to the right, apply
some left aileron trim to level the wings. If the model dives, apply some up elevator trim, ect.
2. Landing should be made into the wind, reduce the throttle to just above idle and keep the nose level or a little
high allowing the airplane to sink toward the ground. Apply a little throttle as the model reaches an altitude of
a foot or so, this will slow the descent and aid in the flare to a smooth landing.
Spare parts for F9F
F9F landing gear
Item No.: F170106
F9F Fuselage
Item No.: F170104
F9F Panther
Item No.:F1701 -9-
64mm EDF
Item No.: F90210
F9F Tail Wing Set
Item No.: F170102
2627-4300kv Brushless Motor
Item No.: F90131
F9F Main wing Set
Item No.: F170103

Have Fun!
We hope that you have many pleasant
flights with your F9F Panther
Shenzhen Freewing Model Co.,Ltd.
HK Freewing Model International Limited
Tel: +86 755 2967 1969 +86 755 3323 1841
Fax:+86 755 3323 1843
freewing@sz-freewing.com
 Loading...