

Page 1
VIDEO GUIDE DIGITAL DOWNLOAD
All brands, product names, and logos are trademarks or registered
trademarks of their respective companies. Please keep the
packaging and all relevant information for future reference.
www.freewellgear.com
care@freewellgear.com
NEO INSTALLATION
GUIDE
Page 2
ENG
01
02
ENG
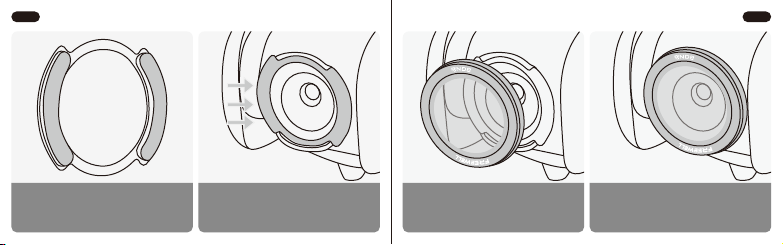
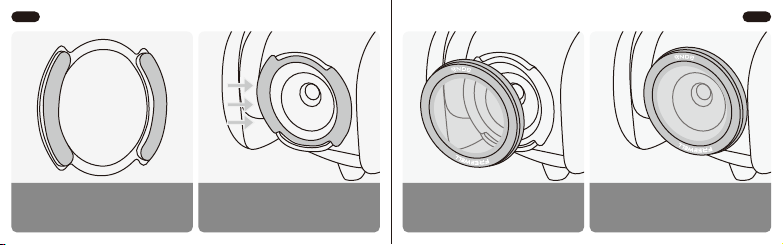
Remove the adhesive backing from both
sides of the magnetic ring to expose the
double-sided tape.
Align the magnetic ring with the drone's camera,
press firmly to center and secure it, then ensure
the tape is fully adhered by pressing both sides.
Ensure that the logo and model number face
outward. Align the magnetic ring with the
required filter type, allowing the entire filter to
rotate smoothly during use.
Once installation is complete, to replace the filter,
simply remove the current filter and attach a
new one. The magnetic ring remains in place, and
you only need to replace the filter without
removing the magnetic ring.
Page 3
DE
03
04
DE
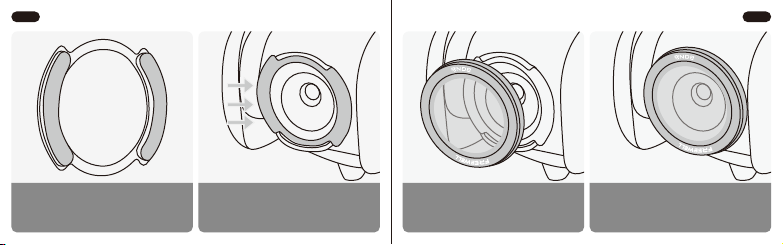
Entfernen Sie die Schutzfolie von beiden Seiten
des Magnetrings, um das doppelseitige
Klebeband freizulegen.
Richten Sie den Magnetring auf die Kamera der
Drohne aus, drücken Sie fest, um ihn zu
zentrieren und zu sichern, und stellen Sie
sicher, dass das Klebeband vollständig haftet,
indem Sie beide Seiten andrücken.
Achten Sie darauf, dass das Logo und die
Modellnummer nach außen zeigen. Richten Sie
den Magnetring auf den erforderlichen Filtertyp
aus, damit sich der gesamte Filter während des
Gebrauchs reibungslos drehen kann.
Nach der Installation können Sie den Filter
einfach austauschen, indem Sie den alten
entfernen und einen neuen anbringen, ohne den
Magnetring zu entfernen.
Page 4
IT
05
06
IT
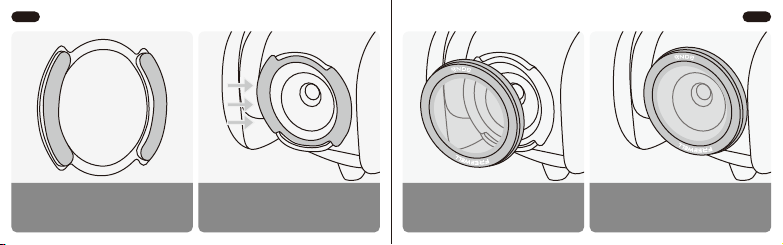
Rimuovi la pellicola protettiva da entrambi i lati
dell'anello magnetico per esporre il nastro
biadesivo.
Allinea l'anello magnetico con la fotocamera
del drone, premilo saldamente per centrarlo e
fissarlo, quindi assicurati che il nastro aderisca
completamente premendo entrambi i lati.
Assicurati che il logo e il numero di modello siano
rivolti verso l'esterno. Allinea l'anello magnetico
con il tipo di filtro richiesto, consentendo
all'intero filtro di ruotare agevolmente durante
l'uso.
Dopo l'installazione, per sostituire il filtro, basta
rimuovere quello attuale e applicarne uno nuovo.
L'anello magnetico rimane al suo posto e devi
solo sostituire il filtro senza rimuovere l'anello
magnetico.
Page 5
FR
07
08
FR
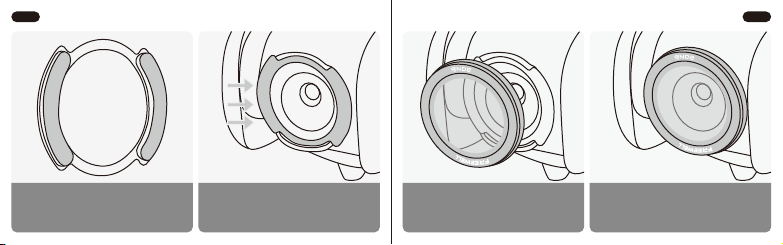
Retirez la pellicule protectrice des deux côtés
de l'anneau magnétique pour exposer le ruban
adhésif double face.
Alignez l'anneau magnétique avec la caméra du
drone, appuyez fermement pour le centrer et le
fixer, puis assurez-vous que le ruban adhère
complètement en appuyant sur les deux côtés.
Assurez-vous que le logo et le numéro de modèle
sont orientés vers l'extérieur. Alignez l'anneau
magnétique avec le type de filtre requis,
permettant ainsi au filtre de tourner librement
pendant l'utilisation.
Une fois l'installation terminée, pour remplacer le
filtre, retirez simplement le filtre actuel et
fixez-en un nouveau. L'anneau magnétique reste
en place, il suffit de changer le filtre sans retirer
l'anneau magnétique.
Page 6
ES
09
10
ES
Retira la película protectora de ambos lados del
anillo magnético para exponer la cinta adhesiva
de doble cara.
Alinea el anillo magnético con la cámara del
dron, presiona firmemente para centrarlo y
fijarlo, y asegúrate de que la cinta esté
completamente adherida presionando ambos
lados.
Asegúrate de que el logotipo y el número de
modelo estén orientados hacia afuera. Alinea el
anillo magnético con el tipo de filtro requerido,
permitiendo que el filtro gire suavemente
durante el uso.
Una vez completada la instalación, para
reemplazar el filtro, simplemente retira el filtro
actual y coloca uno nuevo. El anillo magnético
permanece en su lugar, solo necesitas cambiar el
filtro sin quitar el anillo magnético.
Page 7
POL
11
12
POL
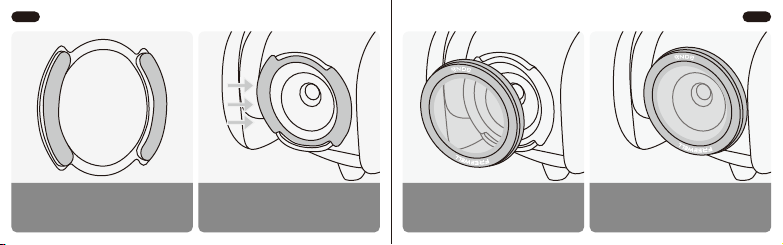
Usuń folię ochronną z obu stron pierścienia
magnetycznego, aby odsłonić taśmę
dwustronną.
Wyrównaj pierścień magnetyczny z kamerą
drona, mocno dociśnij, aby go wycentrować i
zamocować, a następnie upewnij się, że taśma
jest dobrze przyklejona, naciskając obie strony.
Upewnij się, że logo i numer modelu są
skierowane na zewnątrz. Dopasuj pierścień
magnetyczny do wymaganego rodzaju filtra,
umożliwiając płynne obracanie się filtra podczas
użytkowania.
Po zakończeniu instalacji, aby wymienić filtr, po
prostu usuń obecny filtr i zamocuj nowy.
Pierścień magnetyczny pozostaje na swoim
miejscu, więc wystarczy wymienić filtr bez
zdejmowania pierścienia magnetycznego.
Page 8
CN
13
14
CN
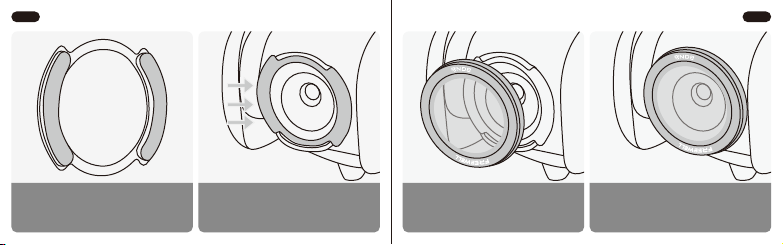
撕掉磁环两侧的胶带保护膜,露出双面胶。
将磁环与无人机的摄像头对齐,按压中心并固
定,然后按压两侧,确保双面胶完全贴合。
徽标和滤镜型号朝外。 将磁环与所需的滤镜对
齐,使整个滤镜在使用过程中可以平稳旋转。
安装完成后,如需更换滤镜,只需卸下当前滤镜
并安装新的滤镜即可。 磁环保持在原位,您只
需更换滤镜而无需卸下磁环。
 Loading...