

Page 1
ZumLink™
Covers Model: Z9-PC and Z9-PC-SR001
Firmware 1.1.0.1
User & Reference Manual
Part Number: LUM0077AA
Revision: Sep-2018
Page 2

Z9-PC / Z9-PC-SR001
User & Reference Manual
Safety Information
The products described in this manual can fail in a variety of modes due to misuse, age, or malfunction and is not
designed or intended for used in systems requiring fail-safe performance, including life safety systems. Systems
with the products must be designed to prevent personal injury and property damage during product operation
and in the event of product failure.
Warning! Verify power is OFF before connecting or disconnecting the interface or RF cables.
Warranty Information
FreeWave Technologies, Inc. warrants the FreeWave® ZumLink Z9-PC or Z9-PC-SR001 (Product) that you have
purchased against defects in materials and manufacturing for a period of two years from the date of shipment,
depending on model number. In the event of a Product failure due to materials or workmanship, FreeWave will,
at its discretion, repair or replace the Product. For evaluation of Warranty coverage, return the Product to
FreeWave upon receiving a Return Material Authorization (RMA). The replacement product will remain under
warranty for 90 days or the remainder of the original product warranty period, whichever is longer.
IN NO EVENT WILL FREEWAVE TECHNOLOGIES, INC., ITS SUPPLIERS, OR ITS LICENSORS BE LIABLE FOR ANY DAMAGES ARISING
FROM THE USE OF OR INABILITY TO USE THIS PRODUCT. THIS INCLUDES BUSINESS INTERRUPTION, LOSS OF BUSINESS
INFORMATION, INABILITY TO ACCESS OR SEND COMMUNICATION OR DATA, PERSONAL INJURY OR DAMAGE, OR OTHER LOSS
WHICH MAY ARISE FROM THE USE OF THIS PRODUCT. THE WARRANTY IS EXCLUSIVE AND ALL OTHER WARRANTIES EXPRESS
OR IMPLIED, INCLUDING BUT NOT LIMITED TO ANY WARRANTIES OF MERCHANTABILITY OR FITNESS FOR A PARTICULAR USE
ARE EXPRESSLY DISCLAIMED.
FreeWave’s Warranty does not apply in the following circumstances:
1. If Product repair, adjustments, or parts replacements are required due to accident, neglect, or undue
physical, electrical, or electromagnetic stress.
2. If Product is used outside of FreeWave specifications as stated in the Product's data sheet.
3. If Product has been modified, repaired, or altered by Customer unless FreeWave specifically authorized
such alterations in each instance in writing. Where applicable, this includes the addition of conformal
coating.
Warning! The Z9-PC / Z9-PC-SR001 are sold as a multi-board solution, assembled at the FreeWave
factory. Any alteration, including the separation of the individual boards, voids the FreeWave
warranty.
FreeWave Technologies, Inc.
5395 Pearl Parkway, Suite 100
Boulder, CO 80301
Toll Free: 1.866.923.6168
Fax: 303.786.9948
Copyright © 2018 by FreeWave Technologies, Inc.
All rights reserved.
www.freewave.com
303.381.9200
LUM0077AA Rev Sep-2018 Page 2 of 423 Copyright © 2018FreeWave
This document is subject to change without notice. This document is the property of FreeWave Technologies, Inc.
and contains proprietary information owned by FreeWave. This document cannot be reproduced in whole or in
part by any means without written permission from FreeWave Technologies, Inc.
Page 3

Z9-PC / Z9-PC-SR001
User & Reference Manual
Table of Contents
Preface 12
1. Overview 14
1.1. Communication Method 15
1.2. ZumBoost Technology 15
1.2.1. Adaptive Spectrum Learning 15
1.2.2. Forward Error Correction 15
1.2.3. Packet Aggregation 15
1.2.4. Packet Compression 16
1.3. ZumIQ Application Environment 16
2. Included & User-supplied Equipment 17
2.1. Included Equipment 17
2.2. User-supplied Equipment 17
3. Port Connections and Pinout Assignments 18
3.1. Z9-PC and Z9-PC-SR001 Port Connections 19
3.2. Z9-PC and Z9-PC-SR001 COM1 and COM2 Pinout Assignments 20
Z9-PC and Z9-PC-SR001 J4 Power / Ethernet Pinout Assignments 22
4. Installation 24
4.1. Power Setup 25
4.2. Installation 25
5. Firmware Upgrade 27
5.1. Download the Upgrade File 28
5.2. Upgrade Summary - v1.1.01 31
5.2.1. Downgrade 31
5.2.2. Upgrade 31
5.2.3. Upgrade from Firmware v1.0.7.0 32
5.2.4. Upgrade from Firmware v1.0.6.0 32
5.2.5. Upgrade from Firmware v1.0.4.3 (Z9-PC and Z9-PC-SR001) 33
5.2.6. Upgrade from Firmware v1.0.4.2 (Z9-P and Z9-PE) 33
5.3. Firmware Upgrade - Drag and Drop 34
5.4. Firmware Upgrade - Web Interface 40
5.4.1. Setup the Computer IP Address Configuration 41
5.4.2. Install the Upgrade File using the Web Interface 45
6. Configuration 51
6.1. Drag and Drop Configuration - ZumLink 52
6.2. Drag and Drop Configuration - ZumIQ 58
6.3. CLI Configuration 64
6.3.1. Connect the Z9-PC / Z9-PC-SR001 to the Computer 64
LUM0077AA Rev Sep-2018 Page 3 of 423 Copyright © 2018FreeWave
This document is subject to change without notice. This document is the property of FreeWave Technologies, Inc.
and contains proprietary information owned by FreeWave. This document cannot be reproduced in whole or in
part by any means without written permission from FreeWave Technologies, Inc.
Page 4

Z9-PC / Z9-PC-SR001
User & Reference Manual
6.3.2. Tera Term Activation and ZumLink Setup 65
6.3.3. Tera Term Activation and ZumIQ Setup 70
6.4. Web Interface Configuration 74
6.4.1. Connect the Z9-PC / Z9-PC-SR001 to the Computer 75
6.4.2. Setup the Computer IP Address Configuration 76
6.4.3. Web Interface Configuration - Z9-PC / Z9-PC-SR001 80
7. Creating a Basic ZumLink Gateway and Endpoint Network 84
8. ZumIQ Application Environment 86
8.1. Optional: Download the ZumIQ Application Environment 87
8.2. Optional: Drag and Drop - Installation of ZumIQ Application Environment 89
8.3. Optional: Web Interface - Installation of ZumIQ Application Environment 92
8.4. Activating ZumIQ 97
8.5. Verify ZumIQ Activation 99
8.6. Using ZumIQ as DEVUSER 101
9. Web Interface Administration 103
9.1. Access the Web Interface 104
9.2. Change the COM Parameters 106
9.3. Change the Data Path Parameters 110
9.4. Change the Encryption Parameters 113
9.5. Change the Local Diagnostics 116
9.6. Change the Network Parameters 119
9.7. Change the NTP Parameters 122
9.8. Change the Radio Settings Parameters - Endpoints 125
9.9. Change the Radio Settings Parameters - Endpoint-Repeaters 129
9.10. Change the Radio Settings Parameters - Gateways 133
9.11. Change the Radio Settings Parameters - Gateway-Repeaters 137
9.12. Change the Security Parameters 141
9.13. Change the Services Parameters 144
9.14. Change the SNMP Parameters 147
9.15. Change the System Info Parameters 150
9.16. Change the Terminal Server Relay Parameters 153
10. Change the Passwords 156
10.1. Change the ADMIN Password 157
10.2. Change the DEVUSER Password 157
11. IP Filtering 158
11.0.1. Example: Network Topology with Traffic at the Gateway 162
12. Repeaters 163
12.1. Repeater - Setup Table 165
12.1.1. Hopping OFF Repeater Setup 165
LUM0077AA Rev Sep-2018 Page 4 of 423 Copyright © 2018FreeWave
This document is subject to change without notice. This document is the property of FreeWave Technologies, Inc.
and contains proprietary information owned by FreeWave. This document cannot be reproduced in whole or in
part by any means without written permission from FreeWave Technologies, Inc.
Page 5

Z9-PC / Z9-PC-SR001
User & Reference Manual
12.1.2. Hopping ON Repeater Setup 166
12.2. Basic Gateway and Endpoint-Repeater Setup 168
12.2.1. Open a Terminal Emulator Application 169
12.2.2. Hopping On: Gateway and Endpoint-Repeater Setup 172
12.2.3. Hopping Off: Gateway and Endpoint-Repeater Setup 174
12.3. Repeater - Examples 176
12.3.1. Gateway-Repeater 177
12.3.2. Endpoint-Repeater 178
12.3.3. Multiple Repeaters: Gateway-Repeater and Endpoint-Repeater 179
12.3.4. Multiple Repeaters: Four Endpoint-Repeaters 180
13. Approved Antennas 181
13.0.1. Omni-Directional Antennas 181
13.0.2. Directional Antennas 181
13.0.3. Alternative Antennas 182
14. COM Parameters 183
14.1. baudrate 184
14.2. breakBeforeSendUs 184
14.3. connectionDrops 185
14.4. databits 186
14.5. delayBeforeSendMs 186
14.6. duplex 187
14.7. flowControl 188
14.8. handler 188
14.9. mode 190
14.10. parity 191
14.11. RxBytes 191
14.12. stopbits 192
14.13. TerminalServerPort 192
14.14. TerminalServerTimeOut 193
14.15. TxBytes 194
15. config Parameters 196
15.1. addTraceMask 197
15.2. factoryDefaults 197
15.3. getCurrentConfig 197
15.4. handleDragDrop 197
15.5. licenseState 197
15.6. loadConfig 198
15.7. removeTraceMask 198
15.8. reset 198
LUM0077AA Rev Sep-2018 Page 5 of 423 Copyright © 2018FreeWave
This document is subject to change without notice. This document is the property of FreeWave Technologies, Inc.
and contains proprietary information owned by FreeWave. This document cannot be reproduced in whole or in
part by any means without written permission from FreeWave Technologies, Inc.
Page 6

Z9-PC / Z9-PC-SR001
User & Reference Manual
15.9. restore 199
15.10. save 200
16. dataPath Parameters 201
16.1. aggregateEnabled 202
16.2. compressionEnabled 203
16.3. fecRate 204
16.4. MacTableEntryAgeTimeout 206
16.5. otaMaxFragmentSize 207
16.6. routeMinSignalMarginThresh 207
17. date Parameters 209
17.1. dcAppStartTime 210
17.2. dcAppUptime 210
17.3. time 211
17.4. timeString 211
17.5. upTime 212
17.6. upTimeString 212
18. encryption Parameters 214
18.1. activeKey 215
18.2. encryptionMode 215
18.3. getKey 216
18.4. remoteRestore 217
18.5. remoteSave 217
18.6. setKey 217
19. localDiagnostics Parameters 219
19.1. signalLevel 220
19.2. signalMargin 220
19.3. cntBadBCC 221
19.4. cntBadSync 221
19.5. cntETX 221
19.6. cntSTX 221
19.7. getStats 221
19.8. interfaceBytesRx 222
19.9. interfaceBytesTx 222
19.10. interfaceDataRx 222
19.11. interfaceDataTx 222
19.12. MacTableClear 223
19.13. MacTableShow 223
19.14. monitoredNode 224
19.15. noiseLevel 224
LUM0077AA Rev Sep-2018 Page 6 of 423 Copyright © 2018FreeWave
This document is subject to change without notice. This document is the property of FreeWave Technologies, Inc.
and contains proprietary information owned by FreeWave. This document cannot be reproduced in whole or in
part by any means without written permission from FreeWave Technologies, Inc.
Page 7

Z9-PC / Z9-PC-SR001
User & Reference Manual
19.16. RadioAckTx 225
19.17. RadioBadAckRx 225
19.18. RadioBadCRC 226
19.19. RadioBadSync 226
19.20. RadioContentionDrop 227
19.21. RadioLLRx 227
19.22. RadioLLTx 228
19.23. RadioNoAckTx 229
19.24. RadioReliableRx 229
19.25. RadioReliableTx 229
19.26. RadioRexmit 229
19.27. RadioRx 229
19.28. RadioSendingDrop 230
19.29. RadioTimedOut 230
19.30. RadioTooLong 230
19.31. RadioTooShort 230
19.32. RadioTx 230
19.33. resetsDetected 231
19.34. resetSent 231
19.35. resetStats 231
19.36. RxSuccess 232
19.37. showChannelDiags 232
19.38. showNodeDiags 233
19.39. timestamp 233
19.40. TxAvailability 234
19.41. TxSuccess 235
19.42. VSWR 235
20. network Parameters 237
20.1. gateway 238
20.2. ip_address 238
20.3. mac_address 239
20.4. MTU 239
20.5. nameserver_address1 240
20.6. nameserver_address2 241
20.7. netmask 241
20.8. netmaskFilterEnabled 242
20.9. stpEnabled 243
20.10. txqueuelen 244
21. networkStats Parameters 245
LUM0077AA Rev Sep-2018 Page 7 of 423 Copyright © 2018FreeWave
This document is subject to change without notice. This document is the property of FreeWave Technologies, Inc.
and contains proprietary information owned by FreeWave. This document cannot be reproduced in whole or in
part by any means without written permission from FreeWave Technologies, Inc.
Page 8

Z9-PC / Z9-PC-SR001
User & Reference Manual
21.1. rx_bytes 246
21.2. rx_dropped 246
21.3. rx_errors 247
21.4. rx_packets 247
21.5. tx_bytes 248
21.6. tx_dropped 248
21.7. tx_errors 249
21.8. tx_packets 249
22. NTP Parameters 250
22.1. ntp_address 251
22.2. ntpDate 252
22.3. ntpReference 252
22.4. ntpRestart 253
23. radioSettings Parameters 254
23.1. beaconBurstCount 255
23.2. beaconInterval 256
23.3. frequencyKey 257
23.4. frequencyMasks 259
23.5. lnaBypass 261
23.6. maxLinkDistanceinMiles 262
23.7. networkId 263
23.8. nodeId 264
23.9. radioFrequency 265
23.10. radioHoppingMode 267
23.11. radioMaxRepeaters 269
23.12. radioMode 272
23.13. radioRepeaterSlot 273
23.14. rfDataRate 274
23.15. txPower 277
24. radioSettingsHelpers Parameters 279
24.1. frequencyMasksErrors 280
24.2. rCli 280
24.3. resetRadio 280
24.4. setAllRadioSettings 280
24.5. syncSettingsFromRadio 280
25. runtimeEnvironment Parameters 281
25.1. rteInstalledByAppsVersion 282
25.2. rteReset 282
25.3. rteTemplateVersion 283
LUM0077AA Rev Sep-2018 Page 8 of 423 Copyright © 2018FreeWave
This document is subject to change without notice. This document is the property of FreeWave Technologies, Inc.
and contains proprietary information owned by FreeWave. This document cannot be reproduced in whole or in
part by any means without written permission from FreeWave Technologies, Inc.
Page 9

Z9-PC / Z9-PC-SR001
User & Reference Manual
25.4. rteVersion 284
26. security Parameters 285
26.1. enableEthernetLogin 286
26.2. enablePtpInterface 286
27. services Parameters 288
27.1. timeOutCli 289
28. SNMP Parameters 290
28.1. roCommunityName 291
28.2. rwCommunityName 291
28.3. snmpUser 292
28.4. v1Enabled 293
28.5. v2cEnabled 294
28.6. v3Enabled 294
29. system Parameters 296
29.1. dump 297
29.2. dumpFormat 297
29.3. dumpPage 298
29.4. dumpTag 299
29.5. dumpTopic 299
29.6. filter 299
29.7. help 300
29.8. login 300
29.9. logout 300
29.10. modbusLayout 301
29.11. pages 301
29.12. password 301
29.13. passwordRestoreDefaults 302
29.14. showLayout 303
29.15. tags 303
29.16. whoami 303
30. systemInfo Parameters 304
30.1. deviceConfiguration 305
30.2. deviceFirmwareVersion 305
30.3. deviceId 306
30.4. deviceModel 306
30.5. deviceName 307
30.6. hopTableVersion 307
30.7. layoutHash 308
30.8. licenses 308
LUM0077AA Rev Sep-2018 Page 9 of 423 Copyright © 2018FreeWave
This document is subject to change without notice. This document is the property of FreeWave Technologies, Inc.
and contains proprietary information owned by FreeWave. This document cannot be reproduced in whole or in
part by any means without written permission from FreeWave Technologies, Inc.
Page 10

Z9-PC / Z9-PC-SR001
User & Reference Manual
30.9. modelCode 309
30.10. radioFirmwareVersion 310
30.11. radioModel 310
30.12. radioModelCode 311
30.13. radioSerialNumber 311
30.14. resetInfo 312
30.15. rteTemplateVersion 312
30.16. rteVersion 312
30.17. serialNumber 313
31. TerminalServerRelay Parameters 314
31.1. remote_termserv_ip_address 315
31.2. termserv_relay_mapping 315
32. Examples - Terminal Server Relay 318
32.1. Connected Terminal Servers and Terminal Server Relay 319
32.2. LOCAL_BOTH_COM_TO_REMOTE_BOTH_COM 320
32.3. LOCAL_COM1_TO_REMOTE_COM1 321
32.4. LOCAL_COM2_TO_REMOTE_COM2 322
32.5. LOCAL_BOTH_COM_TO_REMOTE_COM1 323
32.6. LOCAL_BOTH_COM_TO_REMOTE_COM2 324
32.7. LOCAL_COM1_TO_REMOTE_BOTH_COM 325
32.8. LOCAL_COM2_TO_REMOTE_BOTH_COM 326
32.9. Example: Multicast 327
33. Web Interface 328
33.1. COM window 329
33.2. Config window 331
33.3. Data Path window 333
33.4. Date window 335
33.5. Encryption window 337
33.6. File Upload window 339
33.7. Help window 341
33.8. Home window 343
33.9. Local Diagnostics window 344
33.9.1. Upper Half 345
33.9.2. Lower Half 346
33.10. Network window 347
33.11. Network Diagnostics window 349
33.12. Network Stats window 351
33.13. NTP window 353
33.14. Radio Settings window 355
LUM0077AA Rev Sep-2018 Page 10 of 423 Copyright © 2018FreeWave
This document is subject to change without notice. This document is the property of FreeWave Technologies, Inc.
and contains proprietary information owned by FreeWave. This document cannot be reproduced in whole or in
part by any means without written permission from FreeWave Technologies, Inc.
Page 11

Z9-PC / Z9-PC-SR001
User & Reference Manual
33.14.1. Gateway Radio Mode 356
33.14.2. Endpoint Radio Mode 357
33.15. Radio Settings Helpers window 358
33.16. Runtime Environment window 360
33.17. Security window 361
33.18. Services window 363
33.19. SNMP window 365
33.20. System Info window 367
33.21. Terminal Server Relay window 369
33.22. User Data - Drag and Drop window 371
34. Release Notes 373
34.1. Version 1.1.01 373
34.2. Version 1.0.7.0 377
34.3. Version 1.0.4.3 (Initial Release) 380
35. Mechanical Drawing - Z9-PC 381
35.1. Z9-PC 381
35.2. Z9-PC-SR001 382
36. Hop Tables 383
36.1. Standard Hop Set - ZumLink 900MHz Channels 384
36.1.1. RF Data Rate: 115.2 kbps 384
36.1.2. RF Data Rate: 250 kbps 385
36.1.3. RF Data Rate: 500 kbps 385
36.1.4. RF Data Rate: 1 Mbps 386
36.1.5. RF Data Rate: 1.5 Mbps 386
36.1.6. RF Data Rate: 4 Mbps 387
37. ZumLink MIB 388
37.1. CPU Usage 389
37.2. Disk Usage 390
37.3. Memory Usage 392
37.4. FreeWave Technologies-MIB 394
37.5. SNMP Write Access 410
Appendix A: Technical Specifications 412
Appendix B: LEDs 416
Normal Operation 416
Z9-PC-SR001 RJ-45 Ethernet Connector LEDs 417
Appendix C: Z9-PC / Z9-PC-SR001 Files and Descriptions 418
Appendix D: FreeWave Legal Information 420
LUM0077AA Rev Sep-2018 Page 11 of 423 Copyright © 2018FreeWave
This document is subject to change without notice. This document is the property of FreeWave Technologies, Inc.
and contains proprietary information owned by FreeWave. This document cannot be reproduced in whole or in
part by any means without written permission from FreeWave Technologies, Inc.
Page 12

Z9-PC / Z9-PC-SR001
User & Reference Manual
Preface
Contact FreeWave Technical Support
For up-to-date troubleshooting information, check the Support page at www.freewave.com.
FreeWave provides technical support Monday through Friday, 8:00 AM to 5:00 PM Mountain
Time (GMT -7).
l Call toll-free at 1.866.923.6168.
l In Colorado, call 303.381.9200.
l Contact us through e-mail at moreinfo@freewave.com.
Additional Information
Note: Use the http://support.freewave.com/ website to download the latest documentation for Z9-
PC / Z9-PC-SR001.
Registration is required to use this website.
Document Styles
This document uses these styles:
l Parameter setting text appears as: [Page=radioSettings]
l File names appear as: configuration.cfg.
l File paths appear as: C:\Program Files (x86)\FreeWave Technologies.
l User-entered text appears as: xxxxxxxxx.
LUM0077AA Rev Sep-2018 Page 12 of 423 Copyright © 2018FreeWave
This document is subject to change without notice. This document is the property of FreeWave Technologies, Inc.
and contains proprietary information owned by FreeWave. This document cannot be reproduced in whole or in
part by any means without written permission from FreeWave Technologies, Inc.
Page 13
Preface
Caution: Indicates a situation that MAY cause damage to personnel, the radio, data, or
network.
Example: Provides example information of the related text.
FREEWAVE Recommends: Identifies FreeWave recommendation information.
Important!: Provides crucial information relevant to the text or procedure.
Note: Emphasis of specific information relevant to the text or procedure.
Provides time saving or informative suggestions about using the product.
Z9-PC / Z9-PC-SR001
User & Reference Manual
Warning! Indicates a situation that WILL cause damage to personnel, the radio, data, or
network.
LUM0077AA Rev Sep-2018 Page 13 of 423 Copyright © 2018FreeWave
This document is subject to change without notice. This document is the property of FreeWave Technologies, Inc.
and contains proprietary information owned by FreeWave. This document cannot be reproduced in whole or in
part by any means without written permission from FreeWave Technologies, Inc.
Page 14

Z9-PC / Z9-PC-SR001
User & Reference Manual
1. Overview
Thank you for purchasing the FreeWave Z9-PC / Z9-PC-SR001.
ZumLink is the latest generation of radios offered by FreeWave and consists of enclosed and
board level radios.
l Z9-PC is a board level 900MHz OEM Ethernet radio module.
l Z9-PC-SR001 is a board level 900MHz OEM Ethernet radio module with an RJ-45
Ethernet connector.
The Z9-PC or Z9-PC-SR001 are radio modules ideally suited for OEM applications where it will
be embedded in the OEM product. It is built with the smallest possible footprint and with minimal
industry standard physical connectivity. The intent is for the user to design their own custom
interface to the radio module.
The interface board in the Z9-PC-DEVKIT is not intended to be used in the field. Rather it is a
temporary mechanism to allow a user to evaluate the radio modules without needing to first
design their own interface. If the user desires a ZumLink Ethernet product that has industry
standard connectivity built-in, models Z9-P or Z9-PE should be considered.
The Z9-PC / Z9-PC-SR001 900MHz Series:
l Operates in the unlicensed 900MHz ISM band (902-928 MHz).
l Provides a maximum of 30dBm transmit output power.
l Is FCC compliant as both a Frequency Hopping Spread Spectrum (FHSS) and a Digital
Modulating (DM) radio.
l Provides ZumIQ, a Linux-based application environment for the deployment of applications
at the edge
l Has one Ethernet port, two serial ports, and one micro USB port.
LUM0077AA Rev Sep-2018 Page 14 of 423 Copyright © 2018FreeWave
This document is subject to change without notice. This document is the property of FreeWave Technologies, Inc.
and contains proprietary information owned by FreeWave. This document cannot be reproduced in whole or in
part by any means without written permission from FreeWave Technologies, Inc.
Page 15

1. Overview
Z9-PC / Z9-PC-SR001
User & Reference Manual
Note: The frequency hopping capability is available at all bandwidths and the single channel (DM)
operation is available for bandwidths of at least 500 kHz.
1.1. Communication Method
ZumLink uses Listen Before Talk (LBT) and Carrier Sense Multiple Access (CSMA) where there
are no assigned slots. The radios transmit when the channel is clear.
l The Gateway broadcasts packets to all Endpoints within range.
l The Endpoints unicast packets back to the Gateway.
l The Gateway acknowledges the Endpoint packets.
FreeWave’s traditional protocol has a Gateway Time Slot and an Endpoint Time Slot within a
frame.
l The Gateway transmits in its slot and listens in the Endpoint slot.
l The Endpoint transmits its slot and listens in the Gateway slot.
1.2. ZumBoost Technology
ZumLink incorporates ZumBoost technology using four performance-enhancing algorithms used
together or independently to improve throughput in the most demanding RF environments:
1.2.1. Adaptive Spectrum Learning
l Learns which RF signals are part of the ZumLink network and which are not, reducing bad
packets and retransmissions.
l Standard on all ZumLink radios, the "Listen Before Talk" algorithm provides spectrum
monitoring, delivering network intelligence and increasing throughputs in noisy
environments.
1.2.2. Forward Error Correction
l The fecRate (on page 204) increases the reliability of the data transferred over the air at the
cost of some transmission throughput.
l Improves sensitivity by 3dB to maximize range and link range in noisy environments.
l Adds redundant information to a data stream to detect packet errors and corrects them to
avoid retransmission of the packet.
1.2.3. Packet Aggregation
l The aggregateEnabled (on page 202) setting increases throughput of small packets by
combining multiple packets into a single packet minimizing the number of packets required
for transmission.
l Does NOT affect medium and large packets.
LUM0077AA Rev Sep-2018 Page 15 of 423 Copyright © 2018FreeWave
This document is subject to change without notice. This document is the property of FreeWave Technologies, Inc.
and contains proprietary information owned by FreeWave. This document cannot be reproduced in whole or in
part by any means without written permission from FreeWave Technologies, Inc.
Page 16

1. Overview
Z9-PC / Z9-PC-SR001
User & Reference Manual
1.2.4. Packet Compression
l When the compressionEnabled (on page 203) setting is enabled, the outgoing packets are
analyzed and, if the data packet can be compressed, sent compressed to transmit fewer
bits over the air.
1.3. ZumIQ Application Environment
ZumLink provides the ZumIQ Application Environment that allows for the development and
deployment of Linux-based applications onto the radio. The application has access to the same
computing resources as the radio but is in a segregated section of the Z9-PC / Z9-PC-SR001.
Note: Any application using a Linux-compatible language can be housed in ZumIQ.
LUM0077AA Rev Sep-2018 Page 16 of 423 Copyright © 2018FreeWave
This document is subject to change without notice. This document is the property of FreeWave Technologies, Inc.
and contains proprietary information owned by FreeWave. This document cannot be reproduced in whole or in
part by any means without written permission from FreeWave Technologies, Inc.
Page 17
Z9-PC / Z9-PC-SR001
Included Equipment
Qty Description
1 Z9-PC / Z9-PC-SR001 wireless device.
1 Power Cable with flying leads
1 Quick Start Guide
User & Reference Manual
2. Included & User-supplied Equipment
2.1. Included Equipment
2.2. User-supplied Equipment
l Interface / Power Cables
l USB to micro-USB cable
l FCC approved antenna **
l Computer
Note: **See Approved Antennas (on page 181) for detailed information.
Approved antennas can be purchased directly from FreeWave.
LUM0077AA Rev Sep-2018 Page 17 of 423 Copyright © 2018FreeWave
This document is subject to change without notice. This document is the property of FreeWave Technologies, Inc.
and contains proprietary information owned by FreeWave. This document cannot be reproduced in whole or in
part by any means without written permission from FreeWave Technologies, Inc.
Page 18

Z9-PC / Z9-PC-SR001
User & Reference Manual
3. Port Connections and Pinout Assignments
Port Connections
l Z9-PC and Z9-PC-SR001 Port Connections (on page 19)
Pinout Assignments
l Z9-PC and Z9-PC-SR001 COM1 and COM2 Pinout Assignments (on page 20)
l Z9-PC and Z9-PC-SR001 J4 Power / Ethernet Pinout Assignments (on page 22)
LUM0077AA Rev Sep-2018 Page 18 of 423 Copyright © 2018FreeWave
This document is subject to change without notice. This document is the property of FreeWave Technologies, Inc.
and contains proprietary information owned by FreeWave. This document cannot be reproduced in whole or in
part by any means without written permission from FreeWave Technologies, Inc.
Page 19
3. Port Connections and Pinout Assignments
User & Reference Manual
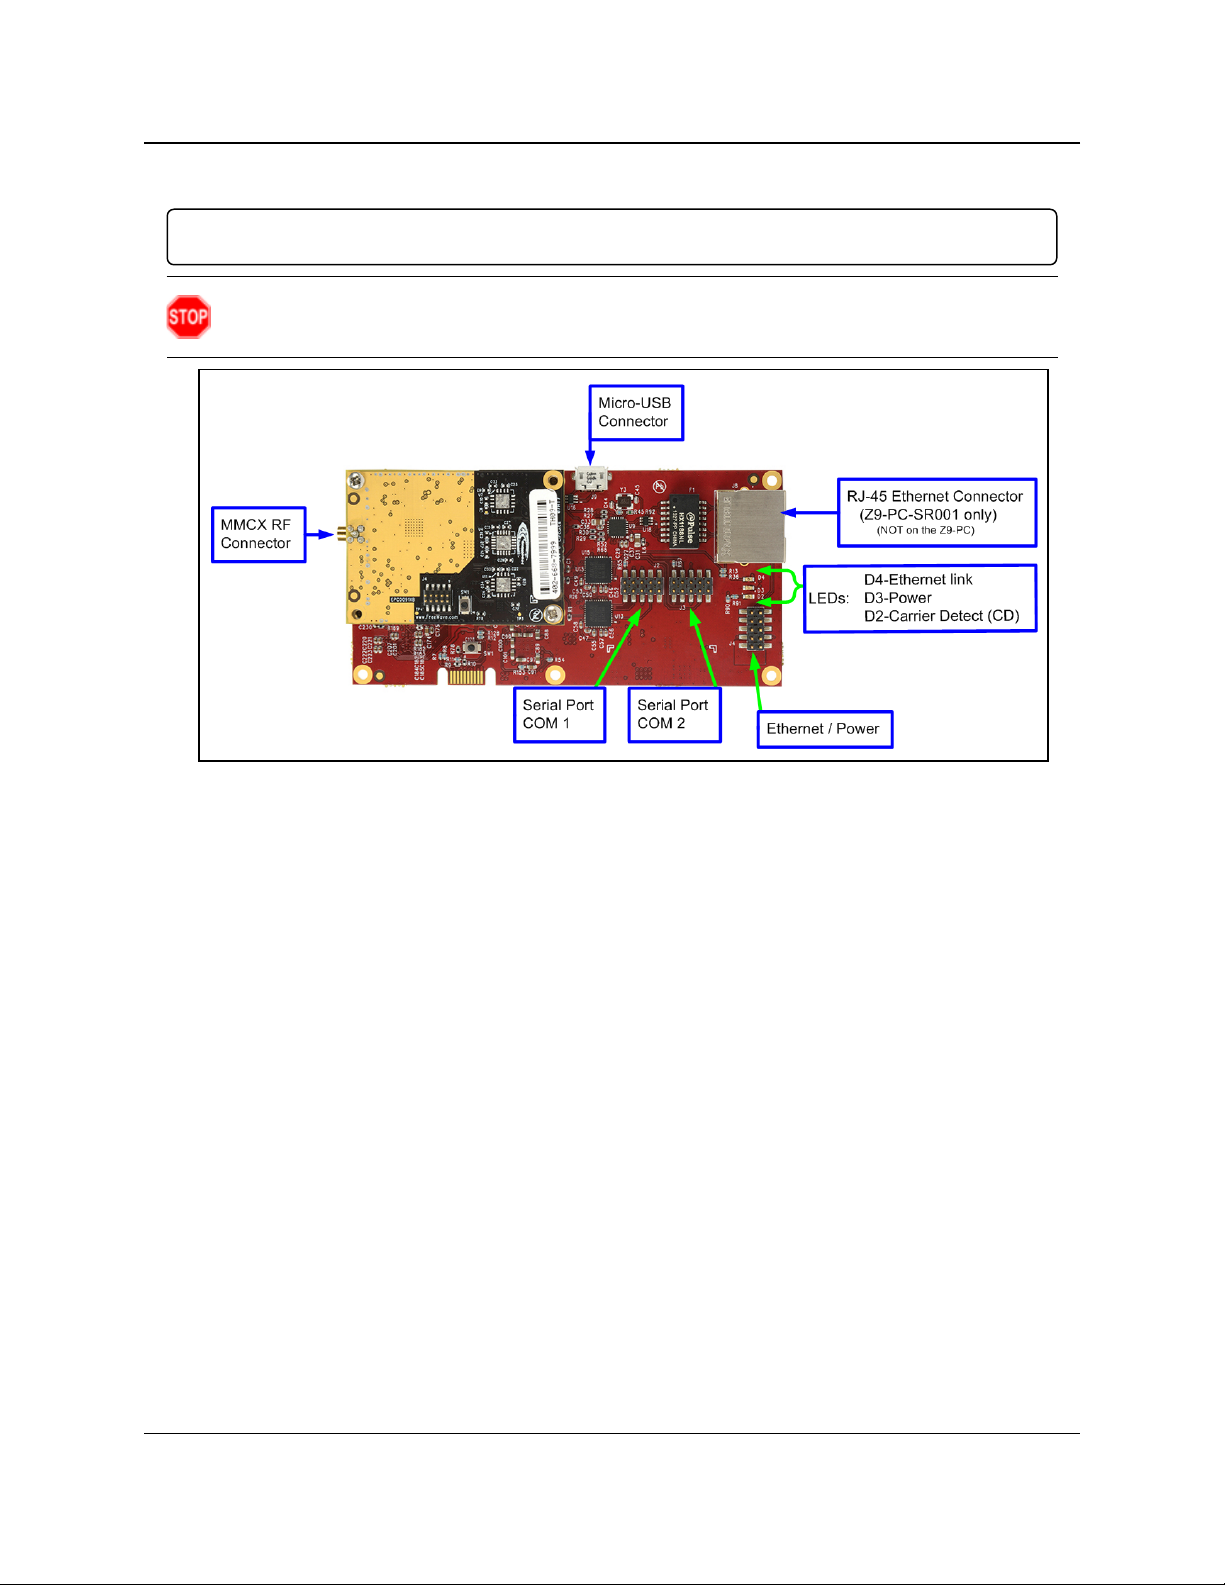
3.1. Z9-PC and Z9-PC-SR001 Port Connections
Important!: The RJ-45 connector is NOT installed on the Z9-PC.
Warning! The Micro-USB Connector shield is connected to a Common Ground NOT a
Chassis Ground.
Z9-PC / Z9-PC-SR001
Figure 1: Z9-PC / Z9-PC-SR001 Port Connections
LUM0077AA Rev Sep-2018 Page 19 of 423 Copyright © 2018FreeWave
This document is subject to change without notice. This document is the property of FreeWave Technologies, Inc.
and contains proprietary information owned by FreeWave. This document cannot be reproduced in whole or in
part by any means without written permission from FreeWave Technologies, Inc.
Page 20
3. Port Connections and Pinout Assignments
Z9-PC / Z9-PC-SR001 Serial Port Pinout Assignments
Pin Number RS232 Description
1 NC Do Not Connect
2 CD --- (O) Carrier detect output
Z9-PC / Z9-PC-SR001
User & Reference Manual
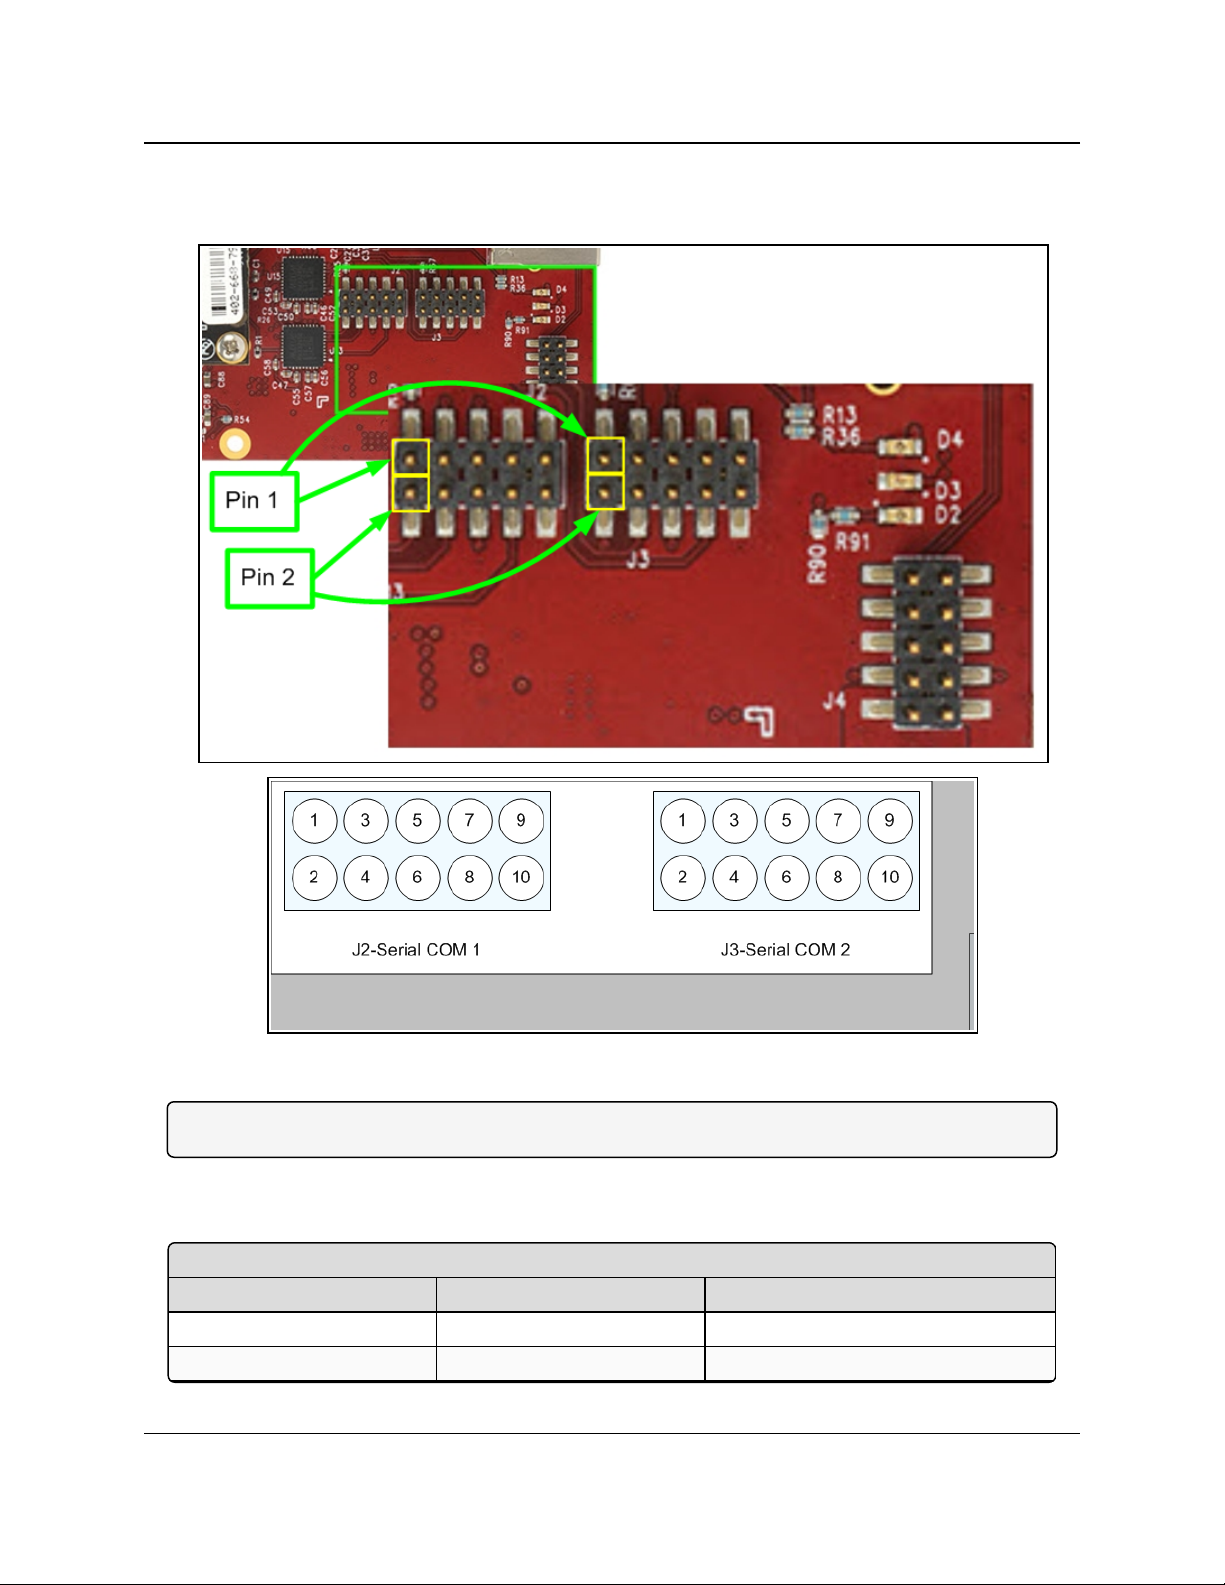
3.2. Z9-PC and Z9-PC-SR001 COM1 and COM2 Pinout Assignments
Figure 2: Z9-PC / Z9-PC-SR001Pinout Assignments
Note: The information in the table refers to the Serial Ports in Figure 2.
l (I) - Input
l (O) - Output
LUM0077AA Rev Sep-2018 Page 20 of 423 Copyright © 2018FreeWave
This document is subject to change without notice. This document is the property of FreeWave Technologies, Inc.
and contains proprietary information owned by FreeWave. This document cannot be reproduced in whole or in
part by any means without written permission from FreeWave Technologies, Inc.
Page 21

3. Port Connections and Pinout Assignments
Z9-PC / Z9-PC-SR001 Serial Port Pinout Assignments
Pin Number RS232 Description
3 RTS --- (I) Request to send input
4 TXD --- (O) Transmit data output
5 CTS --- (O) Clear to send output
6 RXD --- (I) Receive data input
7 GND Ground
8 DTR --- (I) Data terminal ready input
9 NC Do Not Connect
10 GND Ground
Z9-PC / Z9-PC-SR001
User & Reference Manual
LUM0077AA Rev Sep-2018 Page 21 of 423 Copyright © 2018FreeWave
This document is subject to change without notice. This document is the property of FreeWave Technologies, Inc.
and contains proprietary information owned by FreeWave. This document cannot be reproduced in whole or in
part by any means without written permission from FreeWave Technologies, Inc.
Page 22
3. Port Connections and Pinout Assignments
Z9-PC / Z9-PC-SR001
User & Reference Manual
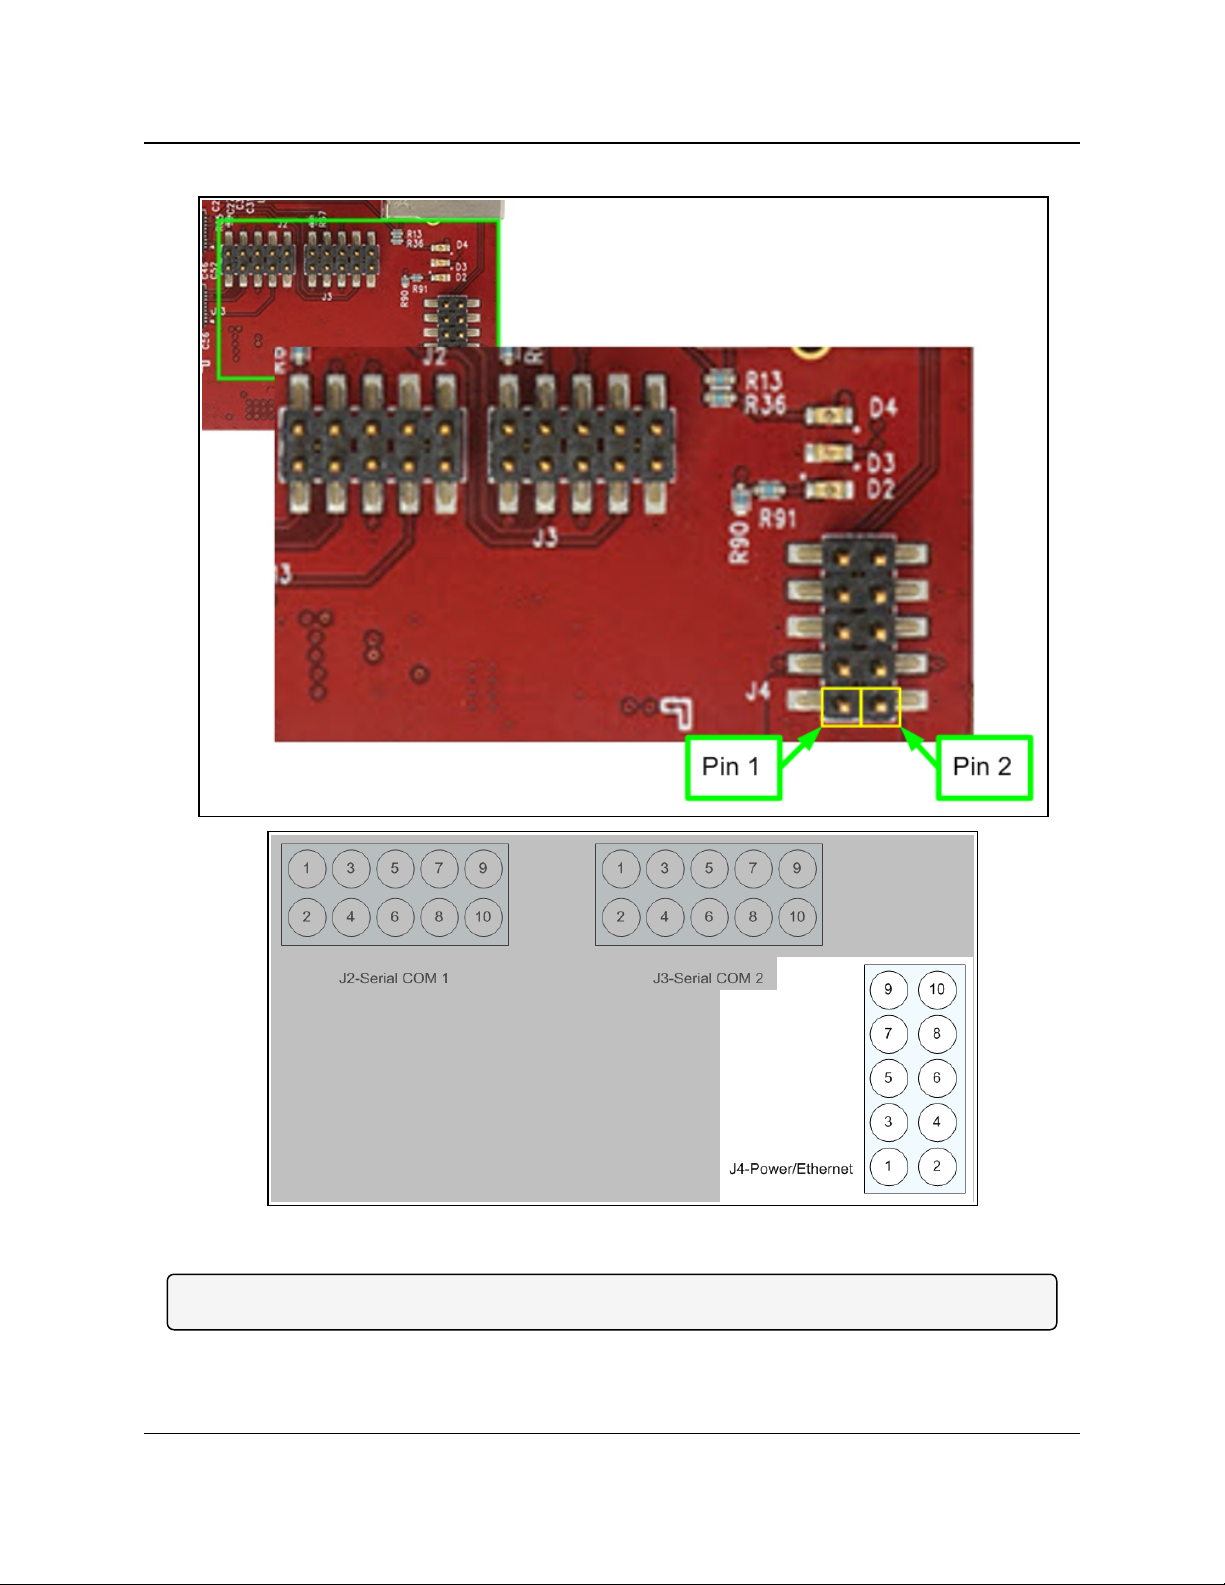
Z9-PC and Z9-PC-SR001 J4 Power / Ethernet Pinout Assignments
Figure 3: Z9-PC / Z9-PC-SR001J4-Power / EthernetPinout Assignments
Note: The information in the table refers to the Serial Ports in Figure 3.
LUM0077AA Rev Sep-2018 Page 22 of 423 Copyright © 2018FreeWave
This document is subject to change without notice. This document is the property of FreeWave Technologies, Inc.
and contains proprietary information owned by FreeWave. This document cannot be reproduced in whole or in
part by any means without written permission from FreeWave Technologies, Inc.
Page 23

3. Port Connections and Pinout Assignments
Z9-PC / Z9-PC-SR001J4-Power / EthernetPinout Assignments
Pin Number Assignment Signal Description
1 B+ (Power Input) Input +5 to +12 VDC (±10%)
2 GND GND Ground
3 NC Do Not Connect Reserved for future use.
4 NC Do Not Connect Reserved for future use.
5 GND GND Ground
6 RX- Input Receive minus line for Ethernet
7 RX+ Input Receive plus line for Ethernet
8 GND GND Ground
9 TX- Output Transmit minus line for Ethernet
10 TX+ Output Transmit plus line for Ethernet
Z9-PC / Z9-PC-SR001
User & Reference Manual
LUM0077AA Rev Sep-2018 Page 23 of 423 Copyright © 2018FreeWave
This document is subject to change without notice. This document is the property of FreeWave Technologies, Inc.
and contains proprietary information owned by FreeWave. This document cannot be reproduced in whole or in
part by any means without written permission from FreeWave Technologies, Inc.
Page 24

Z9-PC / Z9-PC-SR001
User & Reference Manual
4. Installation
l Power Setup (on page 25)
l Installation (on page 25)
LUM0077AA Rev Sep-2018 Page 24 of 423 Copyright © 2018FreeWave
This document is subject to change without notice. This document is the property of FreeWave Technologies, Inc.
and contains proprietary information owned by FreeWave. This document cannot be reproduced in whole or in
part by any means without written permission from FreeWave Technologies, Inc.
Page 25
4. Installation
Z9-PC / Z9-PC-SR001
User & Reference Manual
4.1. Power Setup
l The Z9-PC / Z9-PC-SR001 is approved to operate with an input voltage range of +5 to +12
VDC (±10%) that can supply at least 0.8 Amps.
l See the Technical Specifications (on page 412) for additional information.
FREEWAVE Recommends: All input power supply wires should be at least 20AWG wires.
A dedicated and stable power supply line is preferred.
The power supply used MUST provide more current than the amount of current drain listed in the
specifications for the product and voltage. (at least 350 mA at 12V)
Warning! Use electrostatic discharge (ESD) protectors to protect the radio from electric shock
and provide filtered conditioned power with over-voltage protection.
4.2. Installation
1. Install an FCC-approved antenna.
2. Connect the antenna feed line to the ZumLink.
Warning! Only FCC approved antennas may be used. See Approved Antennas (on
page 181).
The antenna must be professionally installed on a fixed, mounted, and permanent
outdoor structure to satisfy RF exposure requirements.
Any antenna placed outdoors must be properly grounded.
Use extreme caution when installing antennas and follow all instructions included with
the antenna.
If installing a directional antenna, preset the antenna’s direction appropriately.
3. Connect the Z9-PC / Z9-PC-SR001 to a power supply.
Note: Power is shared on the Ethernet / Power 10-pin header.
Note: The Z9-PC / Z9-PC-SR001 is approved to operate with an input voltage range of +5 to
+12 VDC (±10%) that can supply at least 0.8 Amps.
FREEWAVE Recommends: All input power supply wires should be at least 20AWG wires.
A dedicated and stable power supply line is preferred.
The power supply used MUST provide more current than the amount of current drain listed in
the specifications for the product and voltage.
The LED lights blink to show startup.
Note: See LEDs (on page 416) for more information.
LUM0077AA Rev Sep-2018 Page 25 of 423 Copyright © 2018FreeWave
This document is subject to change without notice. This document is the property of FreeWave Technologies, Inc.
and contains proprietary information owned by FreeWave. This document cannot be reproduced in whole or in
part by any means without written permission from FreeWave Technologies, Inc.
Page 26
4. Installation
Z9-PC / Z9-PC-SR001
User & Reference Manual
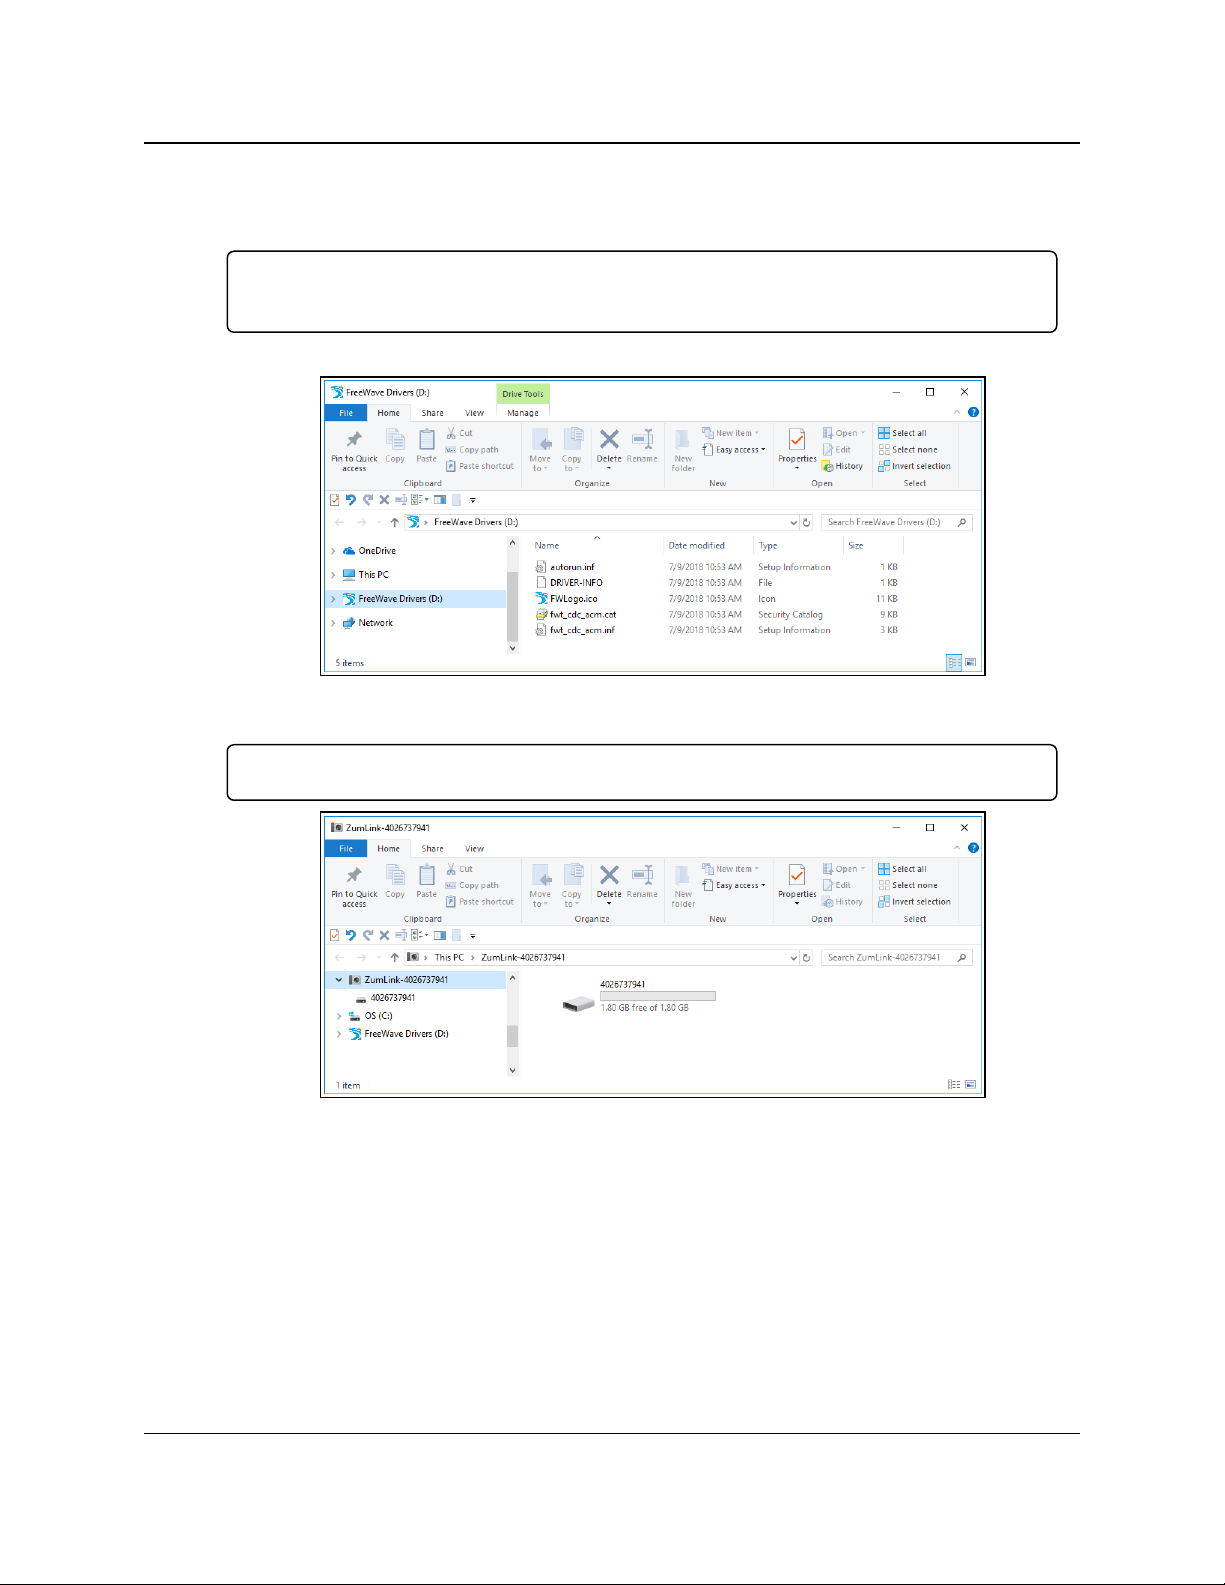
4. Connect the USB cable to the computer and the Micro USB end to the Z9-PC / Z9-PCSR001.
The FreeWave Drivers and ZumLink windows may open.
Important!: The USB does NOT power the Z9-PC / Z9-PC-SR001. It only provides a
configuration interface.
The FreeWave Drivers and ZumLink windows may open.
Figure 4: AutoPlay FreeWave Drivers window
Important!: The driver installs automatically.
Figure 5: ZumLink window
5. Optional: Use the Ethernet port for data communications.
6. Continue with:
l Firmware Upgrade (on page 27)
l Drag and Drop Configuration - ZumLink (on page 52)
l CLI Configuration (on page 64)
l Web Interface Configuration (on page 74)
LUM0077AA Rev Sep-2018 Page 26 of 423 Copyright © 2018FreeWave
This document is subject to change without notice. This document is the property of FreeWave Technologies, Inc.
and contains proprietary information owned by FreeWave. This document cannot be reproduced in whole or in
part by any means without written permission from FreeWave Technologies, Inc.
Page 27

Z9-PC / Z9-PC-SR001
User & Reference Manual
5. Firmware Upgrade
Important!: The Download procedure must be completed first.
These are the basic steps to upgrade the Z9-PC / Z9-PC-SR001 firmware:
A. Download the Upgrade File (on page 28)
B. Optional: Download the ZumIQ Application Environment (on page 87)
C. Review the Upgrade Summary - v1.1.01 (on page 31) to know which files are used to
upgrade from a previous firmware version.
D. Complete either the:
Firmware Upgrade - Drag and Drop (on page 34) or
Firmware Upgrade - Web Interface (on page 40)
LUM0077AA Rev Sep-2018 Page 27 of 423 Copyright © 2018FreeWave
This document is subject to change without notice. This document is the property of FreeWave Technologies, Inc.
and contains proprietary information owned by FreeWave. This document cannot be reproduced in whole or in
part by any means without written permission from FreeWave Technologies, Inc.
Page 28
5. Firmware Upgrade
5.1. Download the Upgrade File
Note: The images in this procedure are for Windows® 10 and/or Firefox®.
The dialog boxes and windows appear differently on each computer.
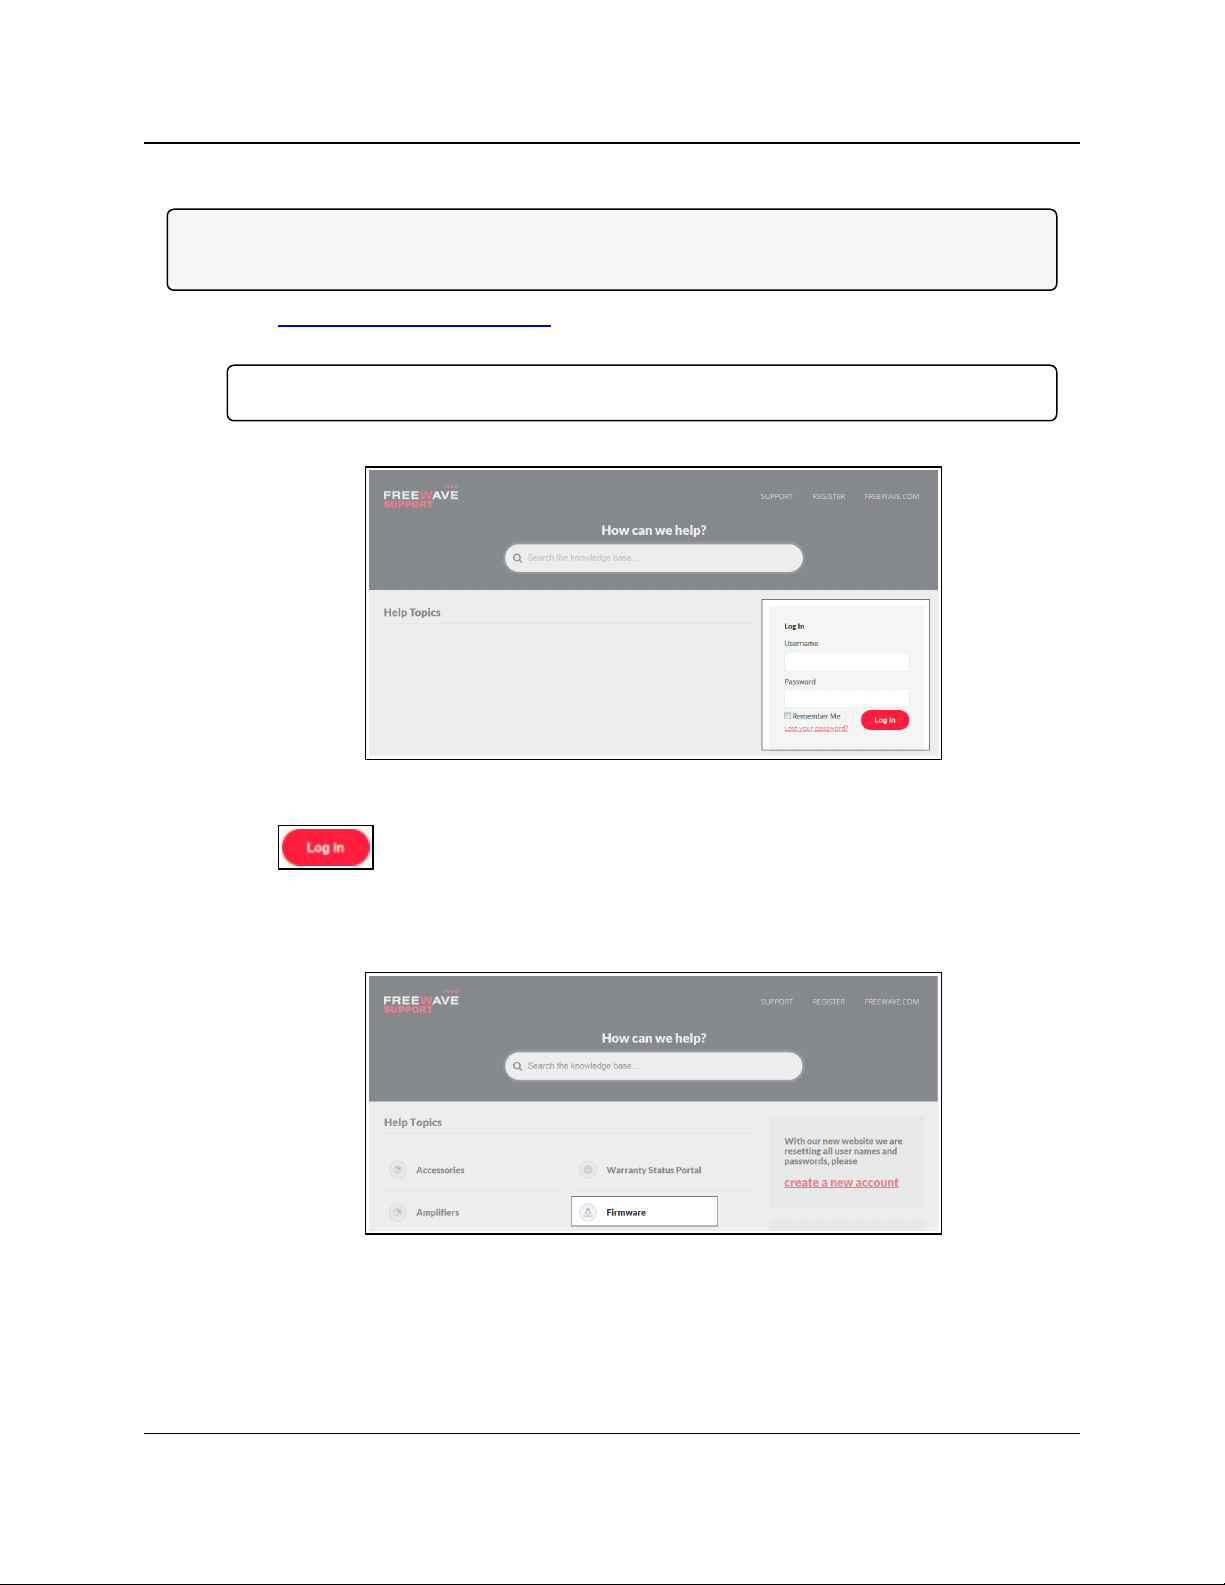
1. Click http://support.freewave.com/.
The Login window opens.
Important!: Registration is required to use this website.
2. Enter the User Name and Password.
Z9-PC / Z9-PC-SR001
User & Reference Manual
Figure 6: FreeWave Login window
3.
Click .
A successful Login message briefly appears.
The Help Topics window opens.
4. Click the Firmware link. (Figure 7)
Figure 7: Help Topics window
The Firmware window opens.
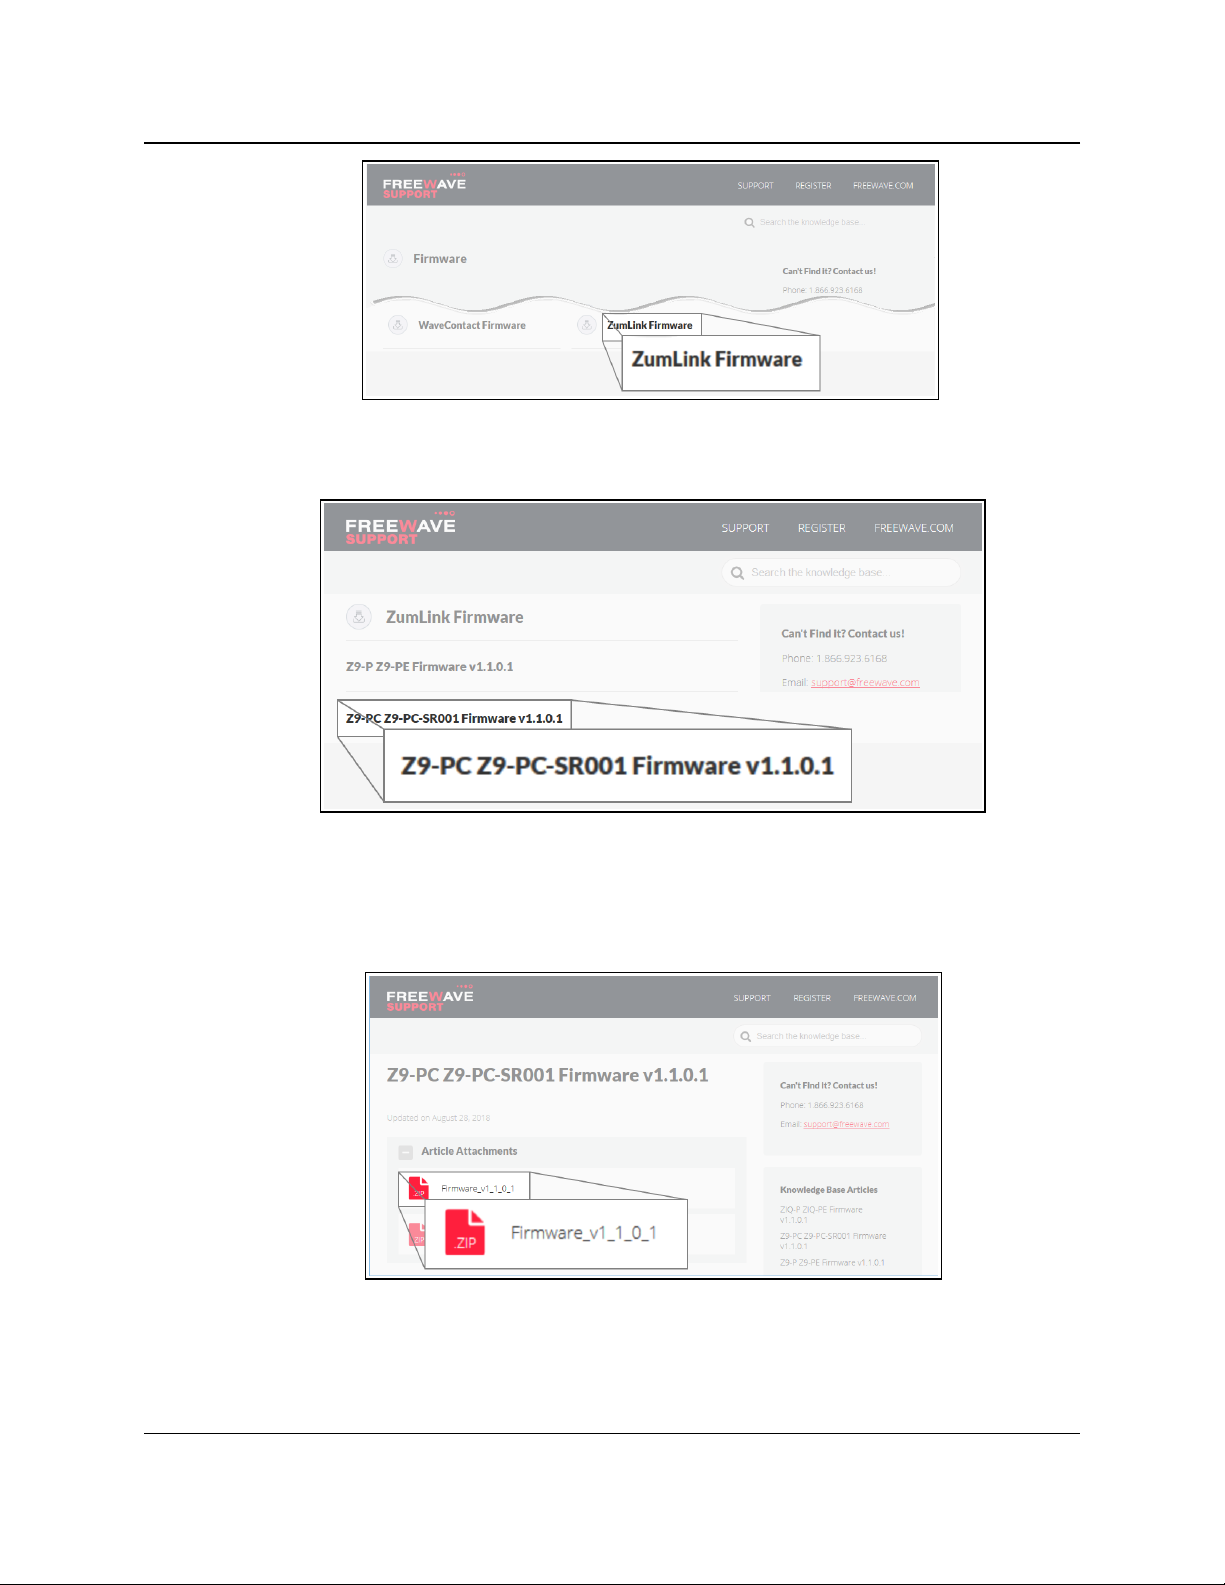
5. Click the ZumLink Firmware link. (Figure 8)
LUM0077AA Rev Sep-2018 Page 28 of 423 Copyright © 2018FreeWave
This document is subject to change without notice. This document is the property of FreeWave Technologies, Inc.
and contains proprietary information owned by FreeWave. This document cannot be reproduced in whole or in
part by any means without written permission from FreeWave Technologies, Inc.
Page 29
5. Firmware Upgrade
The available firmware/software appears in the window. (Figure 9)
Z9-PC / Z9-PC-SR001
User & Reference Manual
Figure 8: Firmware window
Figure 9: Z9-PC / Z9-PC-SR001 Firmware window
6. Click the firmware/software link.
The Firmware Upgrade window opens.
7. Select and click the Firmware_v1_1_0_1 attachment. (Figure 10)
Figure 10: Z9-PC / Z9-PC-SR001 Firmware Upgrade window with
selected Firmware v1_1_0_1 Attachment
LUM0077AA Rev Sep-2018 Page 29 of 423 Copyright © 2018FreeWave
This document is subject to change without notice. This document is the property of FreeWave Technologies, Inc.
and contains proprietary information owned by FreeWave. This document cannot be reproduced in whole or in
part by any means without written permission from FreeWave Technologies, Inc.
Page 30
5. Firmware Upgrade
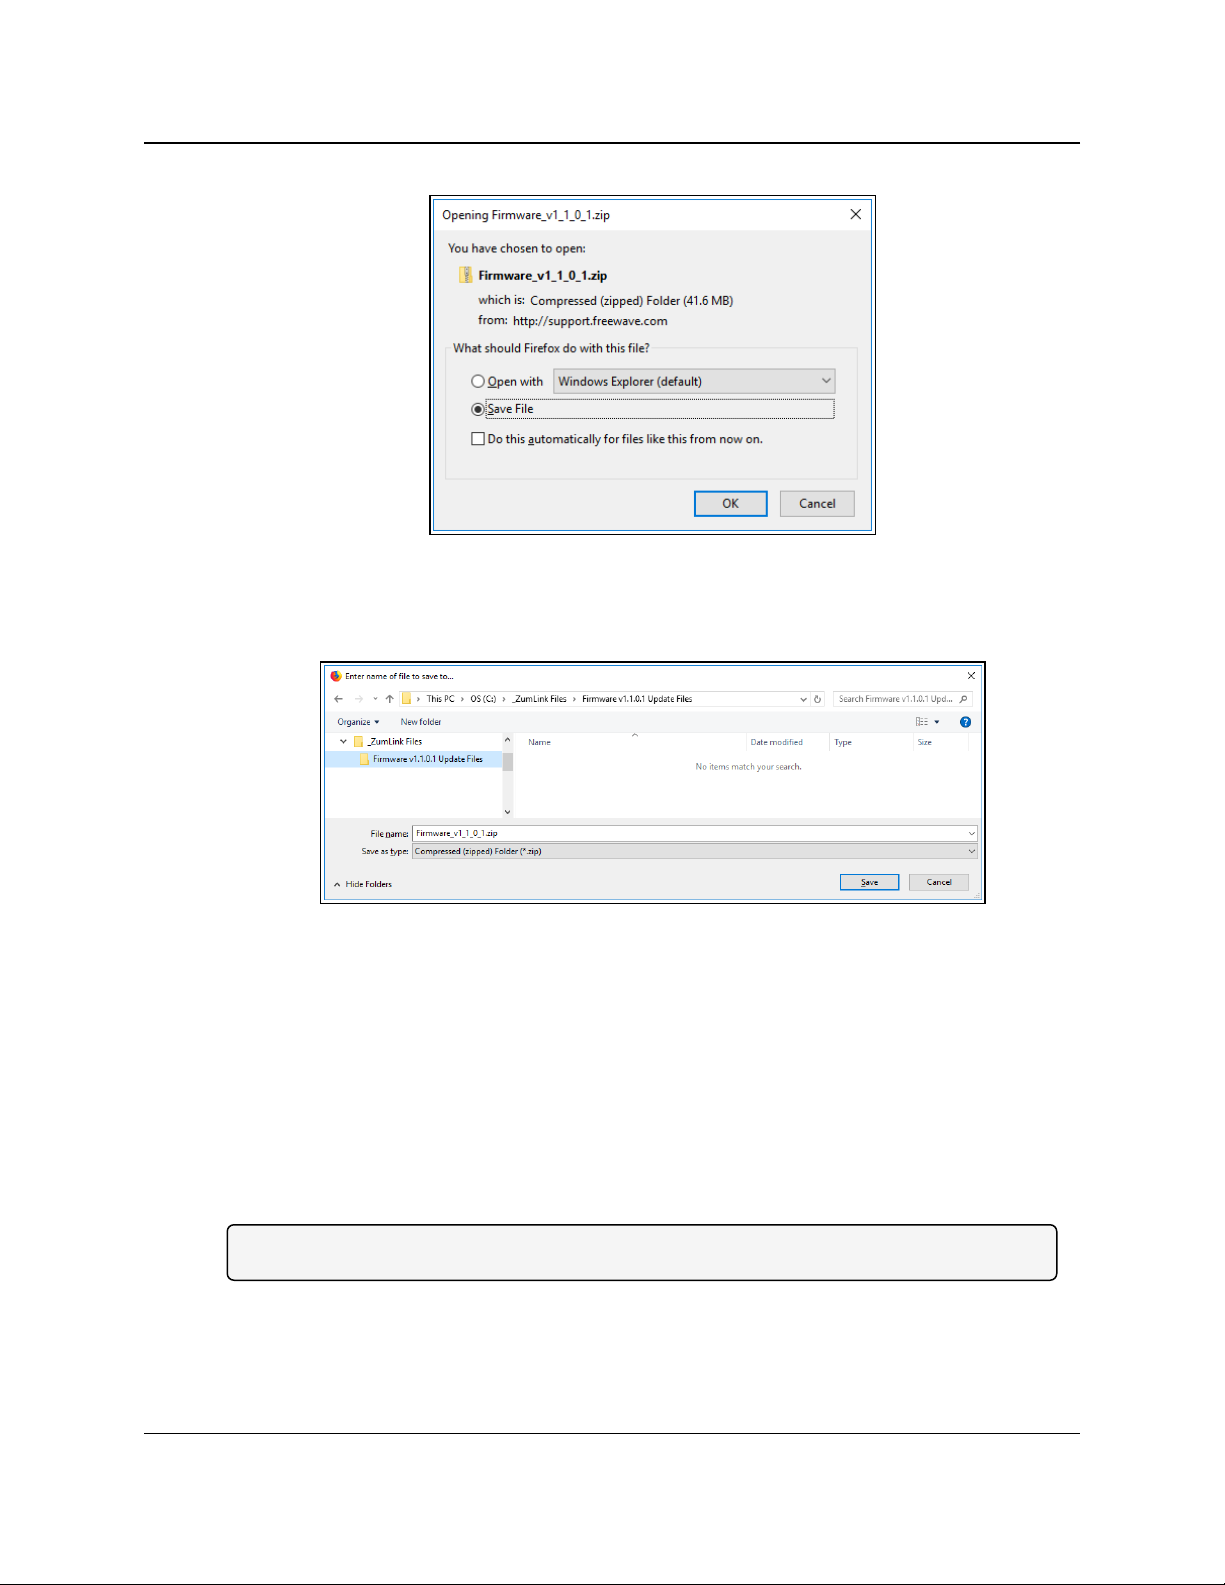
The Opening dialog box opens. (Figure 11)
8. Click OK.
The Enter name of file to save to dialog box opens. (Figure 12)
Z9-PC / Z9-PC-SR001
User & Reference Manual
Figure 11: Opening Firmware v1_1_0_1.zip dialog box
Figure 12: Enter name of file to save to dialog box
9. Search for and select a location to save the .zip file to and click Save.
The Enter name of file to save to dialog box closes.
10. Either:
a. Continue with Optional: Download the ZumIQ Application Environment (on page 87) or
b. Open a Windows® Explorer window and find the location where the Firmware v1_1_
0_1.zip file was saved.
11. Double-click the .zip file.
12. Extract the files from the .zip file into the parent location.
Note: The .zip file includes the .pkg and .fcf files used in the upgrade process.
13. Continue with Upgrade Summary - v1.1.01 (on page 31).
LUM0077AA Rev Sep-2018 Page 30 of 423 Copyright © 2018FreeWave
This document is subject to change without notice. This document is the property of FreeWave Technologies, Inc.
and contains proprietary information owned by FreeWave. This document cannot be reproduced in whole or in
part by any means without written permission from FreeWave Technologies, Inc.
Page 31

5. Firmware Upgrade
Z9-PC / Z9-PC-SR001
User & Reference Manual
5.2. Upgrade Summary - v1.1.01
5.2.1. Downgrade
Contact FreeWave Technical Support (on page 12) for firmware DOWNGRADE assistance.
5.2.2. Upgrade
Warning! The upgrade file names are numbered 1_, 2_, and 3_ and MUST BE INSTALLED
IN A SPECIFIC NUMERIC ORDER for a successful upgrade.
The UPGRADE options are:
l Upgrade from Firmware v1.0.7.0 (on page 32)
l Upgrade from Firmware v1.0.6.0 (on page 32)
l Upgrade from Firmware v1.0.4.3 (Z9-PC and Z9-PC-SR001) (on page 33)
l Upgrade from Firmware v1.0.4.2 (Z9-P and Z9-PE) (on page 33)
After deciding the files needed for the Z9-PC / Z9-PC-SR001 upgrade from its installed firmware
version, continue with either:
l Firmware Upgrade - Drag and Drop (on page 34)
l Firmware Upgrade - Web Interface (on page 40)
LUM0077AA Rev Sep-2018 Page 31 of 423 Copyright © 2018FreeWave
This document is subject to change without notice. This document is the property of FreeWave Technologies, Inc.
and contains proprietary information owned by FreeWave. This document cannot be reproduced in whole or in
part by any means without written permission from FreeWave Technologies, Inc.
Page 32

5. Firmware Upgrade
User & Reference Manual
5.2.3. Upgrade from Firmware v1.0.7.0
Required Files
1_Device_Firmware_v1_1_0_1.pkg
2_Radio_Firmware_v1_0_7_1.fcf
Optional: ZumIQ Files
3_Optional_ZumIQ_Environment_v1_1_0_0.pkg
Important!: Contact FreeWave Technical Support (on page 12) for the ZumIQ license.
5.2.4. Upgrade from Firmware v1.0.6.0
Required Files
1_Device_Firmware_v1_1_0_1.pkg
2_Radio_Firmware_v1_0_7_1.fcf
Optional: ZumIQ Files
Z9-PC / Z9-PC-SR001
3_Optional_ZumIQ_Environment_v1_1_0_0.pkg
l The ZumIQ license is preserved
Note: ZumIQ can be added anytime in future.
FREEWAVE Recommends: If currently using the v1.0.6.0 developer environment, an upgrade to
3_Optional_ZumIQ_Environment_v1_1_0_0.pkg is NOT required.
LUM0077AA Rev Sep-2018 Page 32 of 423 Copyright © 2018FreeWave
This document is subject to change without notice. This document is the property of FreeWave Technologies, Inc.
and contains proprietary information owned by FreeWave. This document cannot be reproduced in whole or in
part by any means without written permission from FreeWave Technologies, Inc.
Page 33

5. Firmware Upgrade
Z9-PC / Z9-PC-SR001
User & Reference Manual
5.2.5. Upgrade from Firmware v1.0.4.3 (Z9-PC and Z9-PC-SR001)
Required Files
1_Device_Firmware_v1_1_0_1.pkg
2_Radio_Firmware_v1_0_7_1.fcf
Optional: ZumIQ Files
3_Optional_ZumIQ_Environment_v1_1_0_0.pkg
Note: ZumIQ can be added anytime in future.
Contact FreeWave Technical Support (on page 12) for the ZumIQ license.
5.2.6. Upgrade from Firmware v1.0.4.2 (Z9-P and Z9-PE)
Required Files
1_Device_Firmware_v1_1_0_1.pkg
2_Radio_Firmware_v1_0_7_1.fcf
Optional: ZumIQ Files
3_Optional_ZumIQ_Environment_v1_1_0_0.pkg
Note: ZumIQ can be added anytime in future.
Contact FreeWave Technical Support (on page 12) for the ZumIQ license.
After deciding the files needed for the Z9-PC / Z9-PC-SR001 upgrade from its installed firmware
version, continue with either:
l Firmware Upgrade - Drag and Drop (on page 34)
l Firmware Upgrade - Web Interface (on page 40)
LUM0077AA Rev Sep-2018 Page 33 of 423 Copyright © 2018FreeWave
This document is subject to change without notice. This document is the property of FreeWave Technologies, Inc.
and contains proprietary information owned by FreeWave. This document cannot be reproduced in whole or in
part by any means without written permission from FreeWave Technologies, Inc.
Page 34

5. Firmware Upgrade
Z9-PC / Z9-PC-SR001
User & Reference Manual
5.3. Firmware Upgrade - Drag and Drop
This is the drag-and-drop procedure to upgrade the Z9-PC / Z9-PC-SR001 firmware.
Warning! The upgrade file names are numbered 1_, 2_, and 3_ and MUST BE INSTALLED
IN A SPECIFIC NUMERIC ORDER for a successful upgrade.
l Alternatively, use the Firmware Upgrade - Web Interface (on page 40) to upgrade the Z9-
PC / Z9-PC-SR001.
l The images in this procedure are for Windows® 10 and/or Firefox®.
The dialog boxes and windows appear differently on each computer.
FREEWAVE Recommends: Upgrade to v1.1.0.1 to use the enhanced features and updated
security of the Z9-PC / Z9-PC-SR001.
Prior to an upgrade or downgrade procedure, save and backup all applications.
Caution: This procedure requires the Windows® Explorer file extension to be visible.
See the Microsoft® topic Show or Hide File Name Extensions to view the extensions.
1. Verify the Download the Upgrade File (on page 28) procedure is complete.
2. Connect the USB cable to the computer and the Micro USB end to the Z9-PC Micro-USB
connection.
The FreeWave Drivers and ZumLink windows open.
Figure 13: FreeWave Drivers window
LUM0077AA Rev Sep-2018 Page 34 of 423 Copyright © 2018FreeWave
This document is subject to change without notice. This document is the property of FreeWave Technologies, Inc.
and contains proprietary information owned by FreeWave. This document cannot be reproduced in whole or in
part by any means without written permission from FreeWave Technologies, Inc.
Page 35

5. Firmware Upgrade
User & Reference Manual
Figure 14: ZumLink window
3. In the ZumLink window, double-click the connected Z9-PC / Z9-PC-SR001.
The files of the Z9-PC / Z9-PC-SR001 appear in the window. (Figure 15)
Z9-PC / Z9-PC-SR001
Figure 15: Opened ZumLink window showing the Default Files
4. Optional: Select, copy, and paste the config.txt file to a secure location.
Note: This is to backup the current config.txt before the upgrade process in case the old
config.txt file needs to be restored.
5. Locate and select the downloaded 1_Device_Firmware_v1_1_0_1.pkg upgrade file.
(Figure 16)
Caution: A .pkg or .fcf file extension is required for Windows® 7.
A .pkg.txt or .fcf.txt file extension may be required for some versions of Windows® 8,
Windows® 8.1, and Windows® 10.
Failure to save the file with the correct extension type results in the copied file NOT
integrating with the Z9-PC / Z9-PC-SR001.
6. If using some versions of Windows® 8, Windows® 8.1, or Windows® 10, change the
extension of the .pkg file to .pkg.txt and select that file.
LUM0077AA Rev Sep-2018 Page 35 of 423 Copyright © 2018FreeWave
This document is subject to change without notice. This document is the property of FreeWave Technologies, Inc.
and contains proprietary information owned by FreeWave. This document cannot be reproduced in whole or in
part by any means without written permission from FreeWave Technologies, Inc.
Page 36

5. Firmware Upgrade
User & Reference Manual
Figure 16: Selected 1_Device_Firmware_v1_1_0_1.pkg.txt File
7. Drag and drop the .pkg or .pkg.txt file on to the ZumLink window. (Figure 17)
Z9-PC / Z9-PC-SR001
Figure 17: Drag and Drop the .pkg or .pkg.txt file to the ZumLink window
LUM0077AA Rev Sep-2018 Page 36 of 423 Copyright © 2018FreeWave
This document is subject to change without notice. This document is the property of FreeWave Technologies, Inc.
and contains proprietary information owned by FreeWave. This document cannot be reproduced in whole or in
part by any means without written permission from FreeWave Technologies, Inc.
Page 37

5. Firmware Upgrade
Z9-PC / Z9-PC-SR001
User & Reference Manual
The ZumLink window is similar to Figure 18:
Figure 18: 1_Device_Firmware_v1_1_0_1.pkg.txt File Dropped in the
ZumLink window
The .pkg or .pkg.txt file will disappear after approximately 6-10 minutes.
8. WAIT a few minutes for the FreeWave Drivers and ZumLink windows to close.
The Z9-PC / Z9-PC-SR001 automatically reboots.
Warning! DO NOT remove power from the Z9-PC / Z9-PC-SR001 during the firmware
upgrade process!
If power is removed prematurely during the upgrade process, the Web Interface pages
may not be accessible.
Reinstall the .pkg file and WAIT for the file upgrade process to complete.
The LEDs (on page 416) indicated the upgrade process.
The FreeWave Drivers and ZumLink windows re-open when the .pkg or .pkg.txt
upgrade file is applied.
9. In the ZumLink window, double-click the connected Z9-PC / Z9-PC-SR001.
The files of the Z9-PC / Z9-PC-SR001 appear in the window.
10. Locate and select the downloaded 2_Radio_Firmware_v1_0_7_1.fcf upgrade file.
(Figure 19)
Caution: A .pkg or .fcf file extension is required for Windows® 7.
A .pkg.txt or .fcf.txt file extension may be required for some versions of Windows® 8,
Windows® 8.1, and Windows® 10.
Failure to save the file with the correct extension type results in the copied file NOT
integrating with the Z9-PC / Z9-PC-SR001.
11. If using some versions of Windows® 8, Windows® 8.1, or Windows® 10, change the
extension of the .fcf file to .fcf.txt and select that file.
LUM0077AA Rev Sep-2018 Page 37 of 423 Copyright © 2018FreeWave
This document is subject to change without notice. This document is the property of FreeWave Technologies, Inc.
and contains proprietary information owned by FreeWave. This document cannot be reproduced in whole or in
part by any means without written permission from FreeWave Technologies, Inc.
Page 38

5. Firmware Upgrade
Figure 19: Selected 2_Radio_Firmware_v1_0_7_1.fcf.txt File
12. Drag and drop the .fcf or .fcf.txt file on to the ZumLink window.
Z9-PC / Z9-PC-SR001
User & Reference Manual
Figure 20: Drag and Drop the .fcf or .fcf.txt file to the ZumLink window
The .fcf or .fcf.txt file will disappear.
13. Wait for the .fcf or .fcf.txt file to be applied (≈ 1-2 minutes).
The LEDs (on page 416) indicated the upgrade process.
14. Optional: Open the sys.info.txt file to verify the upgrade information. (Figure 21)
Important!: The image provides example information only.
Each Z9-PC / Z9-PC-SR001 provides its own unique information.
LUM0077AA Rev Sep-2018 Page 38 of 423 Copyright © 2018FreeWave
This document is subject to change without notice. This document is the property of FreeWave Technologies, Inc.
and contains proprietary information owned by FreeWave. This document cannot be reproduced in whole or in
part by any means without written permission from FreeWave Technologies, Inc.
Page 39

5. Firmware Upgrade
Z9-PC / Z9-PC-SR001
User & Reference Manual
Important!: For the v1.1.0.1 upgrade, these parameters should have this information:
systemInfo.radioFirmwareVersion=FWT1071TR.35.
Web Interface - Radio Firmware Version is FWT1071TR.35.
systemInfo.deviceFirmwareVersion=FWT1101TB.17
Web Interface - Device Firmware Version is FWT1101TB.17
If these versions are NOT listed in their respective parameters, repeat the upgrade procedure.
15. Continue with:
l Optional: Drag and Drop - Installation of ZumIQ Application Environment (on page 89)
l Drag and Drop Configuration - ZumLink (on page 52)
l CLI Configuration (on page 64)
Figure 21: sys.info.txt file with Updated Firmware
LUM0077AA Rev Sep-2018 Page 39 of 423 Copyright © 2018FreeWave
This document is subject to change without notice. This document is the property of FreeWave Technologies, Inc.
and contains proprietary information owned by FreeWave. This document cannot be reproduced in whole or in
part by any means without written permission from FreeWave Technologies, Inc.
Page 40

5. Firmware Upgrade
Z9-PC / Z9-PC-SR001
User & Reference Manual
5.4. Firmware Upgrade - Web Interface
This procedure uses a web browser window to upgrade the Z9-PC / Z9-PC-SR001 firmware.
Warning! The upgrade file names are numbered 1_, 2_, and 3_ and MUST BE INSTALLED
IN A SPECIFIC NUMERIC ORDER for a successful upgrade.
l Alternatively, use the Firmware Upgrade - Drag and Drop (on page 34) to upgrade the Z9-
PC / Z9-PC-SR001.
l The images in this procedure are for Windows® 10 and/or Firefox®.
The dialog boxes and windows appear differently on each computer.
FREEWAVE Recommends: Upgrade to v1.1.0.1 to use the enhanced features and updated
security of the Z9-PC / Z9-PC-SR001.
Prior to an upgrade or downgrade procedure, save and backup all applications.
Caution: This procedure requires the Windows® Explorer file extension to be visible.
See the Microsoft® topic Show or Hide File Name Extensions to view the extensions.
The Z9-PC / Z9-PC-SR001 upgrade process requires these basic steps:
A. Download the Upgrade File (on page 28)
B. Setup the Computer IP Address Configuration (on page 41)
C. Install the Upgrade File using the Web Interface (on page 45)
Note: This method is used for computers running Windows® 7 and later.
LUM0077AA Rev Sep-2018 Page 40 of 423 Copyright © 2018FreeWave
This document is subject to change without notice. This document is the property of FreeWave Technologies, Inc.
and contains proprietary information owned by FreeWave. This document cannot be reproduced in whole or in
part by any means without written permission from FreeWave Technologies, Inc.
Page 41

5. Firmware Upgrade
Z9-PC / Z9-PC-SR001
User & Reference Manual
5.4.1. Setup the Computer IP Address Configuration
Note: The images in this procedure are for Windows® 10 and/or Firefox®.
The dialog boxes and windows appear differently on each computer.
1. On the computer, click the Windows® Start button and select Control Panel.
2. View the Control Panel window by Category and click Network and Sharing Center.
(Figure 22)
Figure 22: Control Panel > Network and Sharing Center
The Network and Sharing Center window opens.
3. Click the Change Adapter Settings link. (Figure 23)
Figure 23: Change Adapter Settings Link
The Network Connections window opens. (Figure 24)
4. Double-click the Local Area Connection link or the connected Network Connection.
LUM0077AA Rev Sep-2018 Page 41 of 423 Copyright © 2018FreeWave
This document is subject to change without notice. This document is the property of FreeWave Technologies, Inc.
and contains proprietary information owned by FreeWave. This document cannot be reproduced in whole or in
part by any means without written permission from FreeWave Technologies, Inc.
Page 42

5. Firmware Upgrade
The Ethernet Status dialog box opens. (Figure 25)
5. Click the Properties button.
Z9-PC / Z9-PC-SR001
User & Reference Manual
Figure 24: Network Connections window
Figure 25: Ethernet Status dialog box
The Ethernet Properties dialog box opens.
6. Select the Internet Protocol Version 4 (TCP/IPv4) option. (Figure 26)
7. Click the Properties button.
LUM0077AA Rev Sep-2018 Page 42 of 423 Copyright © 2018FreeWave
This document is subject to change without notice. This document is the property of FreeWave Technologies, Inc.
and contains proprietary information owned by FreeWave. This document cannot be reproduced in whole or in
part by any means without written permission from FreeWave Technologies, Inc.
Page 43

5. Firmware Upgrade
Z9-PC / Z9-PC-SR001
User & Reference Manual
Figure 26: Ethernet Properties dialog box
The Internet Protocol Version 4 (TCP/IPv4) Properties dialog box opens. (Figure 27)
8. IMPORTANT: Make a note of the current settings (to reverse this procedure later).
Figure 27: Default Example of Internet Protocol Version 4 (TCP/IPv4)
Properties dialog box
9. Select the Use the following IP address option button.
LUM0077AA Rev Sep-2018 Page 43 of 423 Copyright © 2018FreeWave
This document is subject to change without notice. This document is the property of FreeWave Technologies, Inc.
and contains proprietary information owned by FreeWave. This document cannot be reproduced in whole or in
part by any means without written permission from FreeWave Technologies, Inc.
Page 44

5. Firmware Upgrade
Z9-PC / Z9-PC-SR001
User & Reference Manual
10. In the IP Address text box, enter an IP Address that is in the same subnet range but a
DIFFERENT IP Address than the Z9-PC / Z9-PC-SR001 or all other units in the network.
(Figure 28)
Example: Enter an IP Address from 192.168.111.1 to 192.168.111.254 (but NOT
192.168.111.100) and the Subnet Mask to 255.255.255.0.
Note: The default Z9-PC / Z9-PC-SR001 IP Address is 192.168.111.100.
The default subnet mask is 255.255.255.0.
Figure 28: Changed Internet Protocol Version 4 (TCP/IPv4) Properties
dialog box
Note: An IP Address is NOT required in the Default Gateway text box.
11. Click OK to save the changes and close the dialog box.
12. Click Close twice to close the Local Area Connection Properties and Local Area
Connection Status dialog boxes.
13. Continue with Install the Upgrade File using the Web Interface (on page 45).
LUM0077AA Rev Sep-2018 Page 44 of 423 Copyright © 2018FreeWave
This document is subject to change without notice. This document is the property of FreeWave Technologies, Inc.
and contains proprietary information owned by FreeWave. This document cannot be reproduced in whole or in
part by any means without written permission from FreeWave Technologies, Inc.
Page 45

5. Firmware Upgrade
Z9-PC / Z9-PC-SR001
User & Reference Manual
5.4.2. Install the Upgrade File using the Web Interface
Note: The images in this procedure are for Windows® 10 and/or Firefox®.
The dialog boxes and windows appear differently on each computer.
1. Verify the Download the Upgrade File (on page 28) procedure is complete.
2. Using a CAT5e / CAT6 Ethernet cable, connect the Z9-PC / Z9-PC-SR001 Ethernet port
to the computer's Ethernet port.
3. Open a web browser.
4. In the URL address bar, enter the IP address of the attached Z9-PC / Z9-PC-SR001.
Note: If this is the first time the Z9-PC / Z9-PC-SR001 is accessed, enter its default IP
address of 192.168.111.100.
If the IP address was changed, enter that IP Address.
5. Refresh the browser window (press <Enter> or <F5>).
The Home window (on page 343) opens.
6. On the Menu bar, click the File Upload link. (Figure 29)
Figure 29: File Upload link
The Authentication Required (Login) dialog box opens.
7. Enter admin in both the User Name and Password text boxes and click OK.
The Login dialog box closes and the File Upload window opens.
Note: If the User Name or Password were changed, enter the applicable information.
Figure 30: File Upload window
8. Click the Browse button.
The File Upload dialog box opens.
9. Locate and select the downloaded 1_Device_Firmware_v1_1_0_1.pkg upgrade file.
(Figure 31)
LUM0077AA Rev Sep-2018 Page 45 of 423 Copyright © 2018FreeWave
This document is subject to change without notice. This document is the property of FreeWave Technologies, Inc.
and contains proprietary information owned by FreeWave. This document cannot be reproduced in whole or in
part by any means without written permission from FreeWave Technologies, Inc.
Page 46

5. Firmware Upgrade
Caution: A .pkg or .fcf file extension is required for Windows® 7.
A .pkg.txt or .fcf.txt file extension may be required for some versions of Windows® 8,
Windows® 8.1, and Windows® 10.
Failure to save the file with the correct extension type results in the copied file NOT
integrating with the Z9-PC / Z9-PC-SR001.
Z9-PC / Z9-PC-SR001
User & Reference Manual
10. If using some versions of Windows® 8, Windows® 8.1, or Windows® 10, change the
extension of the .pkg file to .pkg.txt and select that file.
Figure 31: File Upload dialog box with Selected
1_Device_Firmware_v1_1_0_1.pkg.txt File
11. Click Open.
The dialog box closes and the File Upload window returns showing the selected file.
(Figure 32)
Figure 32: File Upload window with Selected
1_Device_Firmware_v1_1_0_1.pkg.txt File
LUM0077AA Rev Sep-2018 Page 46 of 423 Copyright © 2018FreeWave
This document is subject to change without notice. This document is the property of FreeWave Technologies, Inc.
and contains proprietary information owned by FreeWave. This document cannot be reproduced in whole or in
part by any means without written permission from FreeWave Technologies, Inc.
Page 47

5. Firmware Upgrade
12. Click Send.
The File Upload window changes to show the completed upload percentage to the Z9-PC
/ Z9-PC-SR001. (Figure 33)
Figure 33: File Upload window Showing Uploading Percentage
13. Wait for the .pkg or .pkg.txt file to be applied (≈ 6-10 minutes).
Z9-PC / Z9-PC-SR001
User & Reference Manual
Warning! DO NOT remove power from the Z9-PC / Z9-PC-SR001 during the firmware
upgrade process!
If power is removed prematurely during the upgrade process, the Web Interface pages
may not be accessible.
Reinstall the .pkg file and WAIT for the file upgrade process to complete.
The File Upload window refreshes and shows the completed and uploaded file applied to
the Z9-PC / Z9-PC-SR001. (Figure 34)
The LEDs (on page 416) indicated the upgrade process.
Figure 34: File Upload window Showing Completed Upload of the Selected
File
14. Click the Browse button.
The File Upload dialog box opens.
LUM0077AA Rev Sep-2018 Page 47 of 423 Copyright © 2018FreeWave
This document is subject to change without notice. This document is the property of FreeWave Technologies, Inc.
and contains proprietary information owned by FreeWave. This document cannot be reproduced in whole or in
part by any means without written permission from FreeWave Technologies, Inc.
Page 48

5. Firmware Upgrade
Z9-PC / Z9-PC-SR001
User & Reference Manual
15. Locate and select the downloaded 2_Radio_Firmware_v1_0_7_1.fcf upgrade file.
(Figure 35)
16. Optional: If using some versions of Windows® 8, Windows® 8.1, or Windows® 10, change
the extension of the .fcf file to .fcf.txt and select that file.
Figure 35: File Upload dialog box with Selected .fcf File
17. Click Open.
The dialog box closes and the File Upload window returns showing the selected file.
(Figure 36)
Figure 36: File Upload window with Selected .fcf File
18. Click Send.
The File Upload window changes to show the completed upload percentage to the Z9-PC
/ Z9-PC-SR001. (Figure 37)
Note: The .fcf file uploads very quickly (≈ 1-2 minutes).
The LEDs (on page 416) indicated the upgrade process.
LUM0077AA Rev Sep-2018 Page 48 of 423 Copyright © 2018FreeWave
This document is subject to change without notice. This document is the property of FreeWave Technologies, Inc.
and contains proprietary information owned by FreeWave. This document cannot be reproduced in whole or in
part by any means without written permission from FreeWave Technologies, Inc.
Page 49

5. Firmware Upgrade
Figure 37: File Upload window Showing Uploading Percentage
The File Upload window refreshes and shows the completed and uploaded file applied to
the Z9-PC / Z9-PC-SR001. (Figure 38)
Z9-PC / Z9-PC-SR001
User & Reference Manual
Figure 38: File Upload window Showing Completed Upload of the Selected
File
19. Click the System Info link. (Figure 39)
Figure 39: System Info link
The System Info window opens showing the updated firmware on the Z9-PC / Z9-PCSR001. (Figure 40)
Important!: The image provides example information only.
Each Z9-PC / Z9-PC-SR001 provides its own unique information.
LUM0077AA Rev Sep-2018 Page 49 of 423 Copyright © 2018FreeWave
This document is subject to change without notice. This document is the property of FreeWave Technologies, Inc.
and contains proprietary information owned by FreeWave. This document cannot be reproduced in whole or in
part by any means without written permission from FreeWave Technologies, Inc.
Page 50

5. Firmware Upgrade
Z9-PC / Z9-PC-SR001
User & Reference Manual
Important!: For the v1.1.0.1 upgrade, these parameters should have this information:
systemInfo.radioFirmwareVersion=FWT1071TR.35.
Web Interface - Radio Firmware Version is FWT1071TR.35.
systemInfo.deviceFirmwareVersion=FWT1101TB.17
Web Interface - Device Firmware Version is FWT1101TB.17
If these versions are NOT listed in their respective parameters, repeat the upgrade procedure.
20. Continue with:
l Optional: Web Interface - Installation of ZumIQ Application Environment (on page 92)
l Web Interface Configuration - Z9-PC / Z9-PC-SR001 (on page 80)
Figure 40: System Info window
LUM0077AA Rev Sep-2018 Page 50 of 423 Copyright © 2018FreeWave
This document is subject to change without notice. This document is the property of FreeWave Technologies, Inc.
and contains proprietary information owned by FreeWave. This document cannot be reproduced in whole or in
part by any means without written permission from FreeWave Technologies, Inc.
Page 51

Z9-PC / Z9-PC-SR001
User & Reference Manual
6. Configuration
l Drag and Drop Configuration - ZumLink (on page 52)
l CLI Configuration (on page 64)
l Web Interface Configuration (on page 74)
LUM0077AA Rev Sep-2018 Page 51 of 423 Copyright © 2018FreeWave
This document is subject to change without notice. This document is the property of FreeWave Technologies, Inc.
and contains proprietary information owned by FreeWave. This document cannot be reproduced in whole or in
part by any means without written permission from FreeWave Technologies, Inc.
Page 52

6. Configuration
Z9-PC / Z9-PC-SR001
User & Reference Manual
6.1. Drag and Drop Configuration - ZumLink
Caution: This procedure requires the Windows® Explorer file extension to be visible.
See the Microsoft® topic Show or Hide File Name Extensions to view the extensions.
Important!: Windows® 7 or later is required to use the USB Drag and Drop.
Note: The images in this procedure are for Windows® 7 or Windows® 10 and/or Firefox®.
The dialog boxes and windows appear differently on each computer.
Procedure
1. Connect the USB cable to the computer and the micro-USB end to the ZumLink.
The FreeWave Drivers and ZumLink windows may open.
Figure 41: AutoPlay FreeWave Drivers window
Figure 42: ZumLink window
2. In the ZumLink window (Figure 42), double-click the connected Z9-PC / Z9-PC-SR001.
The files of the Z9-PC / Z9-PC-SR001 appear in the window.
LUM0077AA Rev Sep-2018 Page 52 of 423 Copyright © 2018FreeWave
This document is subject to change without notice. This document is the property of FreeWave Technologies, Inc.
and contains proprietary information owned by FreeWave. This document cannot be reproduced in whole or in
part by any means without written permission from FreeWave Technologies, Inc.
Page 53

6. Configuration
Z9-PC / Z9-PC-SR001
User & Reference Manual
Figure 43: Opened ZumLink window showing the Default Files
3. Select the config.txt file and copy it to the clipboard (press <Ctrl+C>).
4. Leave the ZumLink window open - it is used later in the procedures.
5. Open a Windows® Explorer window and create a designated folder for changed
configuration files.
Example: C:\ZumLink Config File.
6. Paste (press <Ctrl+V>) the copied config.txt file into the designated folder.
Important!: The txt file must be copied to a separate location on the computer to edit.
The file CANNOT be changed directly in the ZumLink folder.
Figure 44: Copied config.txt file in the designated configuration folder.
7. Double-click the config.txt to open it in the default text editor.
Note: This example uses Notepad®.
8. Click the Notepad®File menu and click Save As.
LUM0077AA Rev Sep-2018 Page 53 of 423 Copyright © 2018FreeWave
This document is subject to change without notice. This document is the property of FreeWave Technologies, Inc.
and contains proprietary information owned by FreeWave. This document cannot be reproduced in whole or in
part by any means without written permission from FreeWave Technologies, Inc.
Page 54

6. Configuration
Z9-PC / Z9-PC-SR001
User & Reference Manual
Figure 45: Notepad® window - File > Save As menu.
The Save As dialog box opens.
11. In the File Name text box, enter a file name with either the .cfg or .cfg.txt extension.
Note: The file name used in this example is for illustration purposes only.
Any name can be used. NO SPACES are allowed in the file name.
Caution: A .cfg file extension is required for Windows® 7.
A .cfg.txt file extension may be required for some versions of Windows® 8 and
Windows® 10.
Failure to save the file with the correct extension type results in the file NOT being able
to integrate with the ZumLink config.txt file when copied to the ZumLink window.
12. Click the Save as type list box arrow and select All Files.
Figure 46: Save As dialog box with All Files (*.*) selected.
13.
Click .
The dialog box closes and the text editor returns with the new .cfg or .cfg.txt file open.
14. As applicable, change these general settings:
l [Page=systemInfo]
l systemInfo.deviceName
l systemInfo.deviceId
LUM0077AA Rev Sep-2018 Page 54 of 423 Copyright © 2018FreeWave
This document is subject to change without notice. This document is the property of FreeWave Technologies, Inc.
and contains proprietary information owned by FreeWave. This document cannot be reproduced in whole or in
part by any means without written permission from FreeWave Technologies, Inc.
Page 55

6. Configuration
Note: See the systemInfo Parameters (on page 304) for detailed information about the
parameters.
l [Page=radioSettings]
l radioSettings.txPower
l radioSettings.rfDataRate***
l radioSettings.radioMode
l radioSettings.networkId***
l radioSettings.nodeId**
l radioSettings.radioFrequency***
l radioSettings.radioHoppingMode***
l radioSettings.beaconInterval
Note: See radioSettings Parameters (on page 254) for detailed information about these
settings.
**Each radio with the same networkId must have a UNIQUE nodeId.
A unique nodeId is required so that only one node will unicast an acknowledgment.
Otherwise, two or more nodes will unicast an acknowledgment that may collide.
***These are the Golden Settings and they MUST match between all radios with the same
networkId.
Z9-PC / Z9-PC-SR001
User & Reference Manual
Important!: With radioHoppingMode enabled, only one radio can be designated as a
Gateway or Gateway-Repeater. All other radios MUST be designated as Endpoints or
Endpoint-Repeaters. For detailed information, see the radioSettings Parameters (on page
254).
Example: For illustration, the radioSettings.radioMode was changed from Endpoint to
Gateway.
Figure 47: Notepad® with the .cfg file open.
LUM0077AA Rev Sep-2018 Page 55 of 423 Copyright © 2018FreeWave
This document is subject to change without notice. This document is the property of FreeWave Technologies, Inc.
and contains proprietary information owned by FreeWave. This document cannot be reproduced in whole or in
part by any means without written permission from FreeWave Technologies, Inc.
Page 56

6. Configuration
Z9-PC / Z9-PC-SR001
User & Reference Manual
15. Press <Ctrl+S> or, on the File menu, click Save to save the updated file.
16. Close the text editor.
17. Locate and open the ZumLink window so it is side-by-side with the changed configuration
file window.
18. Open the Windows® Explorer designated folder for changed configuration files.
19. Select the changed .cfg or .cfg.txt file.
Figure 48: Select the changed .cfg or .cfg.txt file.
20. Drag and drop the .cfg or .cfg.txt file to the ZumLink window.
Figure 49: Drag and drop the .cfg or .cfg.txt file to the ZumLink window.
21. Wait for the .cfg or .cfg.txt file to integrate with the ZumLink config.txt file.
Note: The more changes made in the .cfg or .cfg.txt file, the longer the Z9-PC / Z9-PC-
SR001 takes to process the file and update the config.txt file.
If very few changes are made, the .cfg or .cfg.txt file does not appear in the window.
LUM0077AA Rev Sep-2018 Page 56 of 423 Copyright © 2018FreeWave
This document is subject to change without notice. This document is the property of FreeWave Technologies, Inc.
and contains proprietary information owned by FreeWave. This document cannot be reproduced in whole or in
part by any means without written permission from FreeWave Technologies, Inc.
Page 57

6. Configuration
Z9-PC / Z9-PC-SR001
User & Reference Manual
Figure 50: Changed .cfg file copied to the ZumLink window.
When the config.txt is updated, the changed .cfg or .cfg.txt file is removed from the list of
files in the ZumLink window.
22. Double-click the result.txt file to verify there are No errors Detected with the identified
changes in the file.
Figure 51: Opened result.txt file.
If an error is detected, the result.txt file will indicate that errors are present.
23. As appropriate, repeat the Drag and Drop procedure to correct any errors.
24. Optional: Double-click the config.txt file to view and verify the new Z9-PC / Z9-PC-SR001
configuration.
25. Optional: Complete the Change the Passwords (on page 156) procedure.
LUM0077AA Rev Sep-2018 Page 57 of 423 Copyright © 2018FreeWave
This document is subject to change without notice. This document is the property of FreeWave Technologies, Inc.
and contains proprietary information owned by FreeWave. This document cannot be reproduced in whole or in
part by any means without written permission from FreeWave Technologies, Inc.
Page 58

6. Configuration
Z9-PC / Z9-PC-SR001
User & Reference Manual
6.2. Drag and Drop Configuration - ZumIQ
Caution: This procedure requires the Windows® Explorer file extension to be visible.
See the Microsoft® topic Show or Hide File Name Extensions to view the extensions.
Important!: Windows® 7 or later is required to use the USB Drag and Drop.
Note: The images in this procedure are for Windows® 7 or Windows® 10 and/or Firefox®.
The dialog boxes and windows appear differently on each computer.
Procedure
1. Connect the USB cable to the computer and the micro-USB end to the ZumLink.
The FreeWave Drivers and ZumLink windows may open.
Figure 52: AutoPlay FreeWave Drivers window
Figure 53: ZumLink window
2. In the ZumLink window (Figure 53), double-click the connected Z9-PC / Z9-PC-SR001.
The files of the Z9-PC / Z9-PC-SR001 appear in the window.
LUM0077AA Rev Sep-2018 Page 58 of 423 Copyright © 2018FreeWave
This document is subject to change without notice. This document is the property of FreeWave Technologies, Inc.
and contains proprietary information owned by FreeWave. This document cannot be reproduced in whole or in
part by any means without written permission from FreeWave Technologies, Inc.
Page 59

6. Configuration
Z9-PC / Z9-PC-SR001
User & Reference Manual
Figure 54: Opened ZumLink window showing the Default Files
3. Select the config.txt file and copy it to the clipboard (press <Ctrl+C>).
4. Leave the ZumLink window open - it is used later in the procedures.
5. Open a Windows® Explorer window and create a designated folder for changed
configuration files.
Example: C:\ZumLink Config File.
6. Paste (press <Ctrl+V>) the copied config.txt file into the designated folder.
Important!: The txt file must be copied to a separate location on the computer to edit.
The file CANNOT be changed directly in the ZumLink folder.
Figure 55: Copied config.txt file in the designated configuration folder.
7. Double-click the config.txt to open it in the default text editor.
Note: This example uses Notepad®.
8. Click the Notepad®File menu and click Save As.
LUM0077AA Rev Sep-2018 Page 59 of 423 Copyright © 2018FreeWave
This document is subject to change without notice. This document is the property of FreeWave Technologies, Inc.
and contains proprietary information owned by FreeWave. This document cannot be reproduced in whole or in
part by any means without written permission from FreeWave Technologies, Inc.
Page 60

6. Configuration
Z9-PC / Z9-PC-SR001
User & Reference Manual
Figure 56: Notepad® window - File > Save As menu.
The Save As dialog box opens.
11. In the File Name text box, enter a file name with either the .cfg or .cfg.txt extension.
Note: The file name used in this example is for illustration purposes only.
Any name can be used. NO SPACES are allowed in the file name.
Caution: A .cfg file extension is required for Windows® 7.
A .cfg.txt file extension may be required for some versions of Windows® 8 and
Windows® 10.
Failure to save the file with the correct extension type results in the file NOT being able
to integrate with the ZumLink config.txt file when copied to the ZumLink window.
12. Click the Save as type list box arrow and select All Files.
Figure 57: Save As dialog box with All Files (*.*) selected.
13.
Click .
The dialog box closes and the text editor returns with the new .cfg or .cfg.txt file open.
14. As applicable, change these Network settings to meet the network architecture:
l [Page=network]
l network.ip_address=nnn.nnn.nnn.nnn
l network.netmask=nnn.nnn.nnn.nnn
l network.gateway=nnn.nnn.nnn.nnn
LUM0077AA Rev Sep-2018 Page 60 of 423 Copyright © 2018FreeWave
This document is subject to change without notice. This document is the property of FreeWave Technologies, Inc.
and contains proprietary information owned by FreeWave. This document cannot be reproduced in whole or in
part by any means without written permission from FreeWave Technologies, Inc.
Page 61

6. Configuration
Note: See the network Parameters (on page 237) for detailed information about the
parameters.
Z9-PC / Z9-PC-SR001
User & Reference Manual
Figure 58: ZIQconfig.cfg Network Page
15. Press <Ctrl+S> or, on the File menu, click Save to save the updated file.
16. Close the text editor.
17. Locate and open the ZumLink window so it is side-by-side with the changed configuration
file window.
18. Open the Windows® Explorer designated folder for changed configuration files.
19. Select the changed .cfg or .cfg.txt file.
Figure 59: Select the changed .cfg or .cfg.txt file.
20. Drag and drop the .cfg or .cfg.txt file to the ZumLink window.
LUM0077AA Rev Sep-2018 Page 61 of 423 Copyright © 2018FreeWave
This document is subject to change without notice. This document is the property of FreeWave Technologies, Inc.
and contains proprietary information owned by FreeWave. This document cannot be reproduced in whole or in
part by any means without written permission from FreeWave Technologies, Inc.
Page 62

6. Configuration
User & Reference Manual
Figure 60: Drag and drop the .cfg or .cfg.txt file to the ZumLink window.
21. Wait for the .cfg or .cfg.txt file to integrate with the ZumLink config.txt file.
Note: The more changes made in the .cfg or .cfg.txt file, the longer the Z9-PC / Z9-PC-
SR001 takes to process the file and update the config.txt file.
If very few changes are made, the .cfg or .cfg.txt file does not appear in the window.
Z9-PC / Z9-PC-SR001
Figure 61: Changed .cfg file copied to the ZumLink window.
When the config.txt is updated, the changed .cfg or .cfg.txt file is removed from the list of
files in the ZumLink window.
During the .cfg update process, the LEDs provide status and confirmation of update
results.
Note: The LEDs indicate a successful setup.
See LEDs (on page 416) for additional information.
LUM0077AA Rev Sep-2018 Page 62 of 423 Copyright © 2018FreeWave
This document is subject to change without notice. This document is the property of FreeWave Technologies, Inc.
and contains proprietary information owned by FreeWave. This document cannot be reproduced in whole or in
part by any means without written permission from FreeWave Technologies, Inc.
Page 63

6. Configuration
Z9-PC / Z9-PC-SR001
User & Reference Manual
22. Optional: Double-click the config.txt file to view and verify the new Z9-PC / Z9-PC-SR001
configuration.
23. As appropriate, repeat the Drag and Drop procedure to correct any errors.
24. Continue with ZumIQ Application Environment (on page 86).
LUM0077AA Rev Sep-2018 Page 63 of 423 Copyright © 2018FreeWave
This document is subject to change without notice. This document is the property of FreeWave Technologies, Inc.
and contains proprietary information owned by FreeWave. This document cannot be reproduced in whole or in
part by any means without written permission from FreeWave Technologies, Inc.
Page 64

6. Configuration
Z9-PC / Z9-PC-SR001
User & Reference Manual
6.3. CLI Configuration
This procedure provides a Tera Term terminal connection to the Z9-PC / Z9-PC-SR001 CLI.
Other terminal emulators (e.g., HyperTerminal, PuTTY) may be used.
The basic steps are:
A. Connect the Z9-PC / Z9-PC-SR001 to the Computer (on page 64)
B. Tera Term Activation and ZumLink Setup (on page 65)
Note: The images in this procedure are for Windows® 7 or Windows® 10 and/or Firefox®.
The dialog boxes and windows appear differently on each computer.
6.3.1. Connect the Z9-PC / Z9-PC-SR001 to the Computer
Note: This procedure is for a Z9-PC OEM module interfaced to a computer.
If interfaced to a device other than a computer, some of these procedure steps may not be used.
1. Connect the USB cable to the computer and the Micro USB end to the Z9-PC / Z9-PCSR001.
The FreeWave Drivers and ZumLink windows may open.
Figure 62: FreeWave Drivers window
Figure 63: ZumLink window
2. Continue withTera Term Activation and ZumLink Setup (on page 65).
LUM0077AA Rev Sep-2018 Page 64 of 423 Copyright © 2018FreeWave
This document is subject to change without notice. This document is the property of FreeWave Technologies, Inc.
and contains proprietary information owned by FreeWave. This document cannot be reproduced in whole or in
part by any means without written permission from FreeWave Technologies, Inc.
Page 65

6. Configuration
Z9-PC / Z9-PC-SR001
User & Reference Manual
6.3.2. Tera Term Activation and ZumLink Setup
Note: This procedure is for a Z9-PC OEM module interfaced to a computer.
If interfaced to a device other than a computer, some of these procedure steps may not be used.
Note: This procedure provides a Tera Term terminal connection to the Z9-PC / Z9-PC-SR001 CLI.
Other terminal emulators (e.g., HyperTerminal, PuTTY) may be used.
The images in this procedure are for Windows® 7 or Windows® 10 and/or Firefox®.
The dialog boxes and windows appear differently on each computer.
1. On the computer connected to the Z9-PC / Z9-PC-SR001 device, open a terminal program
(e.g., Tera Term http://ttssh2.osdn.jp/).
2. In Tera Term, click the File menu and select New Connection.
Figure 64: File menu > New Connection
The Tera Term New Connection dialog box opens.
3. Click the Port list box arrow and select the COM port the Z9-PC / Z9-PC-SR001 is
connected to.
Figure 65: Select the ZumLink COM port
Important!: The Port assignment varies from computer to computer.
LUM0077AA Rev Sep-2018 Page 65 of 423 Copyright © 2018FreeWave
This document is subject to change without notice. This document is the property of FreeWave Technologies, Inc.
and contains proprietary information owned by FreeWave. This document cannot be reproduced in whole or in
part by any means without written permission from FreeWave Technologies, Inc.
Page 66

6. Configuration
4. Click OK to save the changes and close the dialog box.
The Tera Term window shows the connected COM port and Baud rate in the title bar of the
window.
5. In the Tera Term window, click the Setup menu and select Serial Port.
Figure 66: Serial menu > Setup Port
The Tera Term: Serial Port Setup dialog box opens.
Note: The image shows the default Z9-PC / Z9-PC-SR001 settings.
Z9-PC / Z9-PC-SR001
User & Reference Manual
Figure 67: Tera Term: Serial Port Setup dialog box with Default Settings
6. Important: Verify, and change if required, the Tera Term serial port settings (except the
Port setting) of the connected Z9-PC / Z9-PC-SR001 so the settings are the same as the
defaults shown in Figure 67.
7. Verify the COM port settings are:
Baud Rate / Baudrate: 115200
Data / Databits: 8 bit
Parity: none
Stop / Stopbits: 1 bit
8. Click OK to save the changes and close the dialog box.
LUM0077AA Rev Sep-2018 Page 66 of 423 Copyright © 2018FreeWave
This document is subject to change without notice. This document is the property of FreeWave Technologies, Inc.
and contains proprietary information owned by FreeWave. This document cannot be reproduced in whole or in
part by any means without written permission from FreeWave Technologies, Inc.
Page 67

6. Configuration
9. In the Tera Term window, press <Enter>.
The Z9-PC / Z9-PC-SR001 CLI Login returns.
10. Enter admin for the Username and press <Enter>.
11. Enter admin for the Password and press <Enter>.
Note: If the User Name or Password were changed, enter the applicable information.
The password does not appear when typing - it looks blank.
The FreeWave Shell returns.
Z9-PC / Z9-PC-SR001
User & Reference Manual
Figure 68: The FreeWave Shell returns.
Note: The login times out after 3600 seconds.Repeat the login procedure if needed.
12. At the > prompt, type pages and press <Enter>.
The available Z9-PC / Z9-PC-SR001 information appears.
Figure 69: Z9-PC / Z9-PC-SR001 Pages information
LUM0077AA Rev Sep-2018 Page 67 of 423 Copyright © 2018FreeWave
This document is subject to change without notice. This document is the property of FreeWave Technologies, Inc.
and contains proprietary information owned by FreeWave. This document cannot be reproduced in whole or in
part by any means without written permission from FreeWave Technologies, Inc.
Page 68

6. Configuration
13. At the > prompt, type network and press <Enter>.
The Z9-PC / Z9-PC-SR001 network settings appear.
Figure 70: network Page window
Note: Steps 14 to 17 make the IP Address and nodeId unique to each Z9-PC / Z9-PC-SR001.
Other values may be defined as long as they are unique to each Z9-PC / Z9-PC-SR001.
Z9-PC / Z9-PC-SR001
User & Reference Manual
14. At the > prompt, type ip_address=nnn.nnn.nnn.nnn and press <Enter>.
Note: Where nnn.nnn.nnn.nnn is the IP address assigned by the IT department for the
Z9-PC / Z9-PC-SR001 network.
Note:
15. Optional: Change the gateway (on page 238) and the netmask (on page 241) addresses, if
required, to meet the Z9-PC / Z9-PC-SR001 network architecture.
16. At the > prompt, type radiosettings and press <Enter>.
The Z9-PC / Z9-PC-SR001 radioSettings appear.
Important!: Figure 71 shows ALL available settings for the page.
Only radioSettings that apply to the current radioMode, rfDataRate, and
radioHoppingMode, and are visible in the CLI and the Web Interface and can be changed.
LUM0077AA Rev Sep-2018 Page 68 of 423 Copyright © 2018FreeWave
This document is subject to change without notice. This document is the property of FreeWave Technologies, Inc.
and contains proprietary information owned by FreeWave. This document cannot be reproduced in whole or in
part by any means without written permission from FreeWave Technologies, Inc.
Page 69

6. Configuration
Z9-PC / Z9-PC-SR001
User & Reference Manual
Figure 71: radioSettings Page
17. At the > prompt, type nodeId=nnn and press <Enter>.
Note: Where nnn = a 1 to 5 digit number, unique to the connected radio.
The nodeId MUST be unique on each radio within the same networkId.
18. At the > prompt, type save and press <Enter>.
Warning! At this point, the connection to the Z9-PC / Z9-PC-SR001 is disabled.
19. Re-connect to the Z9-PC / Z9-PC-SR001 using the new IP Address entered in Step 14.
20. Optional: Complete the Change the Passwords (on page 156) procedure.
21. Optional: Upgrade to the latest firmware using the Firmware Upgrade (on page 27)
procedure.
Important!: ONLY upgrade the Z9-PC / Z9-PC-SR001 firmware if the user values the new
features and fixes within a firmware version.
LUM0077AA Rev Sep-2018 Page 69 of 423 Copyright © 2018FreeWave
This document is subject to change without notice. This document is the property of FreeWave Technologies, Inc.
and contains proprietary information owned by FreeWave. This document cannot be reproduced in whole or in
part by any means without written permission from FreeWave Technologies, Inc.
Page 70

6. Configuration
Z9-PC / Z9-PC-SR001
User & Reference Manual
6.3.3. Tera Term Activation and ZumIQ Setup
Note: This procedure provides a Tera Term terminal connection to the Z9-PC / Z9-PC-SR001 CLI.
Other terminal emulators (e.g., HyperTerminal, PuTTY) may be used.
The images in this procedure are for Windows® 7 or Windows® 10 and/or Firefox®.
The dialog boxes and windows appear differently on each computer.
1. On the computer connected to the Z9-PC / Z9-PC-SR001 device, open a terminal program
(e.g., Tera Term http://ttssh2.osdn.jp/).
2. In Tera Term, click the File menu and select New Connection.
Figure 72: File menu > New Connection
The Tera Term New Connection dialog box opens.
3. Click the Port list box arrow and select the COM port the Z9-PC / Z9-PC-SR001 is
connected to.
Figure 73: Select the ZumLink COM port
Important!: The Port assignment varies from computer to computer.
4. Click OK to save the changes and close the dialog box.
The Tera Term window shows the connected COM port and Baud rate in the title bar of the
window.
5. In the Tera Term window, click the Setup menu and select Serial Port.
LUM0077AA Rev Sep-2018 Page 70 of 423 Copyright © 2018FreeWave
This document is subject to change without notice. This document is the property of FreeWave Technologies, Inc.
and contains proprietary information owned by FreeWave. This document cannot be reproduced in whole or in
part by any means without written permission from FreeWave Technologies, Inc.
Page 71

6. Configuration
The Tera Term: Serial Port Setup dialog box opens.
Note: The image shows the default Z9-PC / Z9-PC-SR001 settings.
Z9-PC / Z9-PC-SR001
User & Reference Manual
Figure 74: Serial menu > Setup Port
Figure 75: Tera Term: Serial Port Setup dialog box with Default Settings
6. Important: Verify, and change if required, the Tera Term serial port settings (except the
Port setting) of the connected Z9-PC / Z9-PC-SR001 so the settings are the same as the
defaults shown in Figure 75.
7. Verify the COM port settings are:
Baud Rate / Baudrate: 115200
Data / Databits: 8 bit
Parity: none
Stop / Stopbits: 1 bit
8. Click OK to save the changes and close the dialog box.
9. In the Tera Term window, press <Enter>.
The Z9-PC / Z9-PC-SR001 CLI Login returns.
10. Enter admin for the Username and press <Enter>.
11. Enter admin for the Password and press <Enter>.
LUM0077AA Rev Sep-2018 Page 71 of 423 Copyright © 2018FreeWave
This document is subject to change without notice. This document is the property of FreeWave Technologies, Inc.
and contains proprietary information owned by FreeWave. This document cannot be reproduced in whole or in
part by any means without written permission from FreeWave Technologies, Inc.
Page 72

6. Configuration
Note: If the User Name or Password were changed, enter the applicable information.
The password does not appear when typing - it looks blank.
The FreeWave Shell returns.
Z9-PC / Z9-PC-SR001
User & Reference Manual
Figure 76: The FreeWave Shell returns.
Note: The login times out after 3600 seconds.
Repeat the login procedure if needed.
12. At the > prompt, type network and press <Enter>.
The Z9-PC / Z9-PC-SR001 network settings appear.
Figure 77: network Page window
Note: Steps 13 to 16 make the IP Address and nodeId unique to each Z9-PC / Z9-PC-SR001.
Other values may be defined as long as they are unique to each Z9-PC / Z9-PC-SR001.
13. At the > prompt, type ip_address=nnn.nnn.nnn.nnn and press <Enter>.
LUM0077AA Rev Sep-2018 Page 72 of 423 Copyright © 2018FreeWave
This document is subject to change without notice. This document is the property of FreeWave Technologies, Inc.
and contains proprietary information owned by FreeWave. This document cannot be reproduced in whole or in
part by any means without written permission from FreeWave Technologies, Inc.
Page 73

6. Configuration
Note: Where nnn.nnn.nnn.nnn is the IP address assigned by the IT department for the
Z9-PC / Z9-PC-SR001 network.
Z9-PC / Z9-PC-SR001
User & Reference Manual
14. Optional: Change the gateway (on page 238) and the netmask (on page 241) addresses, if
required, to meet the Z9-PC / Z9-PC-SR001 network architecture.
15. At the > prompt, type save and press <Enter>.
Warning! At this point, the connection to the Z9-PC / Z9-PC-SR001 is disabled.
16. Re-connect to the Z9-PC / Z9-PC-SR001 using the new IP Address entered in Step 13.
17. Continue with ZumIQ Application Environment (on page 86).
LUM0077AA Rev Sep-2018 Page 73 of 423 Copyright © 2018FreeWave
This document is subject to change without notice. This document is the property of FreeWave Technologies, Inc.
and contains proprietary information owned by FreeWave. This document cannot be reproduced in whole or in
part by any means without written permission from FreeWave Technologies, Inc.
Page 74

6. Configuration
Z9-PC / Z9-PC-SR001
User & Reference Manual
6.4. Web Interface Configuration
This procedure provides a Web Interface connection to the Z9-PC / Z9-PC-SR001.
The basic steps are:
A. Connect the Z9-PC / Z9-PC-SR001 to the Computer (on page 75)
B. Setup the Computer IP Address Configuration (on page 76)
C. Web Interface Configuration - Z9-PC / Z9-PC-SR001 (on page 80)
LUM0077AA Rev Sep-2018 Page 74 of 423 Copyright © 2018FreeWave
This document is subject to change without notice. This document is the property of FreeWave Technologies, Inc.
and contains proprietary information owned by FreeWave. This document cannot be reproduced in whole or in
part by any means without written permission from FreeWave Technologies, Inc.
Page 75

6. Configuration
Z9-PC / Z9-PC-SR001
User & Reference Manual
6.4.1. Connect the Z9-PC / Z9-PC-SR001 to the Computer
Note: The images in this procedure are for Windows® 7 or Windows® 10 and/or Firefox®.
The dialog boxes and windows appear differently on each computer.
Note: This procedure is for a Z9-PC OEM module interfaced to a computer.
If interfaced to a device other than a computer, some of these procedure steps may not be used.
1. Connect the USB cable to the computer and the Micro USB end to the Z9-PC / Z9-PCSR001.
The FreeWave Drivers and ZumLink windows may open.
Note: One of the Network Connections icons may change to show the connected Z9-PC /
Z9-PC-SR001.
2. Verify the ZumLink drivers are installed.
See Install the Driver.
Figure 78: FreeWave Drivers window
Figure 79: ZumLink window
3. Continue with Setup the Computer IP Address Configuration (on page 76).
LUM0077AA Rev Sep-2018 Page 75 of 423 Copyright © 2018FreeWave
This document is subject to change without notice. This document is the property of FreeWave Technologies, Inc.
and contains proprietary information owned by FreeWave. This document cannot be reproduced in whole or in
part by any means without written permission from FreeWave Technologies, Inc.
Page 76

6. Configuration
Z9-PC / Z9-PC-SR001
User & Reference Manual
6.4.2. Setup the Computer IP Address Configuration
Note: The images in this procedure are for Windows® 10 and/or Firefox®.
The dialog boxes and windows appear differently on each computer.
1. On the computer, click the Windows® Start button and select Control Panel.
2. View the Control Panel window by Category and click Network and Sharing Center.
(Figure 80)
Figure 80: Control Panel > Network and Sharing Center
The Network and Sharing Center window opens.
3. Click the Change Adapter Settings link. (Figure 81)
Figure 81: Change Adapter Settings Link
The Network Connections window opens. (Figure 82)
4. Double-click the Local Area Connection link or the connected Network Connection.
LUM0077AA Rev Sep-2018 Page 76 of 423 Copyright © 2018FreeWave
This document is subject to change without notice. This document is the property of FreeWave Technologies, Inc.
and contains proprietary information owned by FreeWave. This document cannot be reproduced in whole or in
part by any means without written permission from FreeWave Technologies, Inc.
Page 77

6. Configuration
The Ethernet Status dialog box opens. (Figure 83)
5. Click the Properties button.
Z9-PC / Z9-PC-SR001
User & Reference Manual
Figure 82: Network Connections window
Figure 83: Ethernet Status dialog box
The Ethernet Properties dialog box opens.
6. Select the Internet Protocol Version 4 (TCP/IPv4) option. (Figure 84)
7. Click the Properties button.
LUM0077AA Rev Sep-2018 Page 77 of 423 Copyright © 2018FreeWave
This document is subject to change without notice. This document is the property of FreeWave Technologies, Inc.
and contains proprietary information owned by FreeWave. This document cannot be reproduced in whole or in
part by any means without written permission from FreeWave Technologies, Inc.
Page 78

6. Configuration
Z9-PC / Z9-PC-SR001
User & Reference Manual
Figure 84: Ethernet Properties dialog box
The Internet Protocol Version 4 (TCP/IPv4) Properties dialog box opens. (Figure 85)
8. IMPORTANT: Make a note of the current settings (to reverse this procedure later).
Figure 85: Default Example of Internet Protocol Version 4 (TCP/IPv4)
Properties dialog box
9. Select the Use the following IP address option button.
LUM0077AA Rev Sep-2018 Page 78 of 423 Copyright © 2018FreeWave
This document is subject to change without notice. This document is the property of FreeWave Technologies, Inc.
and contains proprietary information owned by FreeWave. This document cannot be reproduced in whole or in
part by any means without written permission from FreeWave Technologies, Inc.
Page 79

6. Configuration
Z9-PC / Z9-PC-SR001
User & Reference Manual
10. In the IP Address text box, enter an IP Address that is in the same subnet range but a
DIFFERENT IP Address than the Z9-PC / Z9-PC-SR001 or all other units in the network.
(Figure 86)
Example: Enter an IP Address from 192.168.111.1 to 192.168.111.254 (but NOT
192.168.111.100) and the Subnet Mask to 255.255.255.0.
Note: The default Z9-PC / Z9-PC-SR001 IP Address is 192.168.111.100.
The default subnet mask is 255.255.255.0.
Figure 86: Changed Internet Protocol Version 4 (TCP/IPv4) Properties
dialog box
Note: An IP Address is NOT required in the Default Gateway text box.
11. Click OK to save the changes and close the dialog box.
12. Click Close twice to close the Local Area Connection Properties and Local Area
Connection Status dialog boxes.
13. Continue with Web Interface Configuration - Z9-PC / Z9-PC-SR001 (on page 80).
LUM0077AA Rev Sep-2018 Page 79 of 423 Copyright © 2018FreeWave
This document is subject to change without notice. This document is the property of FreeWave Technologies, Inc.
and contains proprietary information owned by FreeWave. This document cannot be reproduced in whole or in
part by any means without written permission from FreeWave Technologies, Inc.
Page 80

6. Configuration
Z9-PC / Z9-PC-SR001
User & Reference Manual
6.4.3. Web Interface Configuration - Z9-PC / Z9-PC-SR001
1. Open a web browser.
2. In the URL address bar, enter the IP address of the attached Z9-PC / Z9-PC-SR001.
Note: If this is the first time the Z9-PC / Z9-PC-SR001 is accessed, enter its default IP
address of 192.168.111.100.
If the IP address was changed, enter that IP Address.
3. Refresh the browser window (press <Enter> or <F5>).
The Home window (on page 343) opens.
Figure 87: Home window
4. On the Menu bar, click the Configuration link. (Figure 88)
Figure 88: Configuration link
The Authentication Required (Login) dialog box opens. (Figure 89)
LUM0077AA Rev Sep-2018 Page 80 of 423 Copyright © 2018FreeWave
This document is subject to change without notice. This document is the property of FreeWave Technologies, Inc.
and contains proprietary information owned by FreeWave. This document cannot be reproduced in whole or in
part by any means without written permission from FreeWave Technologies, Inc.
Page 81

6. Configuration
User & Reference Manual
Figure 89: Authentication Required (Login) dialog box
5. Enter admin in both the User Name and Password text boxes and click OK.
The Login dialog box closes and the System Info window opens.
Note: If the User Name or Password were changed, enter the applicable information.
The Config window (on page 331) opens. (Figure 90)
Z9-PC / Z9-PC-SR001
Figure 90: Configuration window
6. In the Configuration window, click the Network tab.
The Network parameters are shown in Figure 91:
LUM0077AA Rev Sep-2018 Page 81 of 423 Copyright © 2018FreeWave
This document is subject to change without notice. This document is the property of FreeWave Technologies, Inc.
and contains proprietary information owned by FreeWave. This document cannot be reproduced in whole or in
part by any means without written permission from FreeWave Technologies, Inc.
Page 82

6. Configuration
Z9-PC / Z9-PC-SR001
User & Reference Manual
Figure 91: Network window
Note: Steps 7 to 9 make the IP Address and nodeId unique to each Z9-PC / Z9-PC-SR001.
Other values may be defined as long as they are unique to each Z9-PC / Z9-PC-SR001.
7. In the IP Address text box, enter the new IP Address for the Z9-PC / Z9-PC-SR001.
Note: Where nnn.nnn.nnn.nnn is the IP address assigned by the IT department for the
Z9-PC / Z9-PC-SR001 network.
8. Optional: Change the gateway (on page 238) and the netmask (on page 241) addresses, if
required, to meet the Z9-PC / Z9-PC-SR001 network architecture.
9. Click the Update button to save the changed information.
Warning! At this point, the connection to the Z9-PC / Z9-PC-SR001 is disabled.
10. Re-connect to the Z9-PC / Z9-PC-SR001 using the new IP Address entered in Step 7.
11. In the Configuration window, click the Radio Settings tab.
The Radio Settings parameters are shown in Figure 92:
LUM0077AA Rev Sep-2018 Page 82 of 423 Copyright © 2018FreeWave
This document is subject to change without notice. This document is the property of FreeWave Technologies, Inc.
and contains proprietary information owned by FreeWave. This document cannot be reproduced in whole or in
part by any means without written permission from FreeWave Technologies, Inc.
Page 83

6. Configuration
Z9-PC / Z9-PC-SR001
User & Reference Manual
Figure 92: Radio Settings window
Important!: Only radioSettings that apply to the current radioMode, rfDataRate, and
radioHoppingMode, and are visible in the CLI and the Web Interface and can be changed.
12. In the Node ID text box, enter the same unique 3-digit number used in the last octet of
the IP Address entered in Step 7.
13. Click the Update button to save the changed information.
14. Continue with:
l Change the Passwords (on page 156)
l Firmware Upgrade (on page 27)
LUM0077AA Rev Sep-2018 Page 83 of 423 Copyright © 2018FreeWave
This document is subject to change without notice. This document is the property of FreeWave Technologies, Inc.
and contains proprietary information owned by FreeWave. This document cannot be reproduced in whole or in
part by any means without written permission from FreeWave Technologies, Inc.
Page 84

Z9-PC / Z9-PC-SR001
User & Reference Manual
7. Creating a Basic ZumLink
Gateway and Endpoint Network
Note: The basic network described in this procedure is created by using either the Drag and Drop
Configuration - ZumLink (on page 52) or the CLI Configuration (on page 64) procedure.
Important!: Figure 93 shows a basic network setup for the Z9-PC.
This network setup assumes all connections are already in place.
Figure 93: A Basic ZumLink Network
LUM0077AA Rev Sep-2018 Page 84 of 423 Copyright © 2018FreeWave
This document is subject to change without notice. This document is the property of FreeWave Technologies, Inc.
and contains proprietary information owned by FreeWave. This document cannot be reproduced in whole or in
part by any means without written permission from FreeWave Technologies, Inc.
Page 85

7. Creating a Basic ZumLink Gateway and Endpoint Network
Z9-PC / Z9-PC-SR001
User & Reference Manual
Procedure
Note: This example procedure is specific for CLI configuration.
1. Connect and apply power to the ZumLink devices in the network.
2. Optional: Upgrade the devices using the Firmware Upgrade - Drag and Drop procedure.
Caution: Firmware v1.0.7.0 is NOT a required upgrade. ONLY upgrade the Z9-PC /
Z9-PC-SR001 firmware if the user values the new features and fixes within a firmware
version.
3. Complete the procedure.
4. Select one radio and, at the > prompt, type radioSettings.radioMode=Gateway
and press <Enter>.
5. At the > prompt, type a setting between 10 and 30 for the radioSettings.txPower and
press <Enter>.
Example: txPower=30 or radioSettings.txPower=30.
Entering txpower=0 or radiosettings.txpower=0 changes the output power to the
minimum or 10 dB.
Note: See radioSettings Parameters (on page 254) for detailed information.
6. For the other radio in the network, at the > prompt, type
radioSettings.radioMode=Endpoint and press <Enter>.
7. Verify the radioSettings.networkId= setting is the same on ALL radios in the
network.
Note: For Endpoints, the radioSettings.nodeID is set automatically.
Important!: The Gateway radioSettings.nodeId defaults to 1 and CANNOT be changed.
8. At the > prompt, type save and press <Enter>.
A solid green CD LED indicates that the radios are linked.
Note: See LEDs (on page 416) for additional information.
9. Type exit and press <Enter> to exit the FreeWave Shell.
LUM0077AA Rev Sep-2018 Page 85 of 423 Copyright © 2018FreeWave
This document is subject to change without notice. This document is the property of FreeWave Technologies, Inc.
and contains proprietary information owned by FreeWave. This document cannot be reproduced in whole or in
part by any means without written permission from FreeWave Technologies, Inc.
Page 86

Z9-PC / Z9-PC-SR001
User & Reference Manual
8. ZumIQ Application Environment
The Z9-PC / Z9-PC-SR001 employs the ZumIQ Application Environment to provide application
development and deployment for intelligent monitoring and control of remote sensors and
devices.
Download and Install
l Optional: Download the ZumIQ Application Environment (on page 87)
l Optional: Drag and Drop - Installation of ZumIQ Application Environment (on page 89)
l Optional: Web Interface - Installation of ZumIQ Application Environment (on page 92)
Activation and Usage
l Activating ZumIQ (on page 97)
l Verify ZumIQ Activation (on page 99)
l Using ZumIQ as DEVUSER (on page 101)
LUM0077AA Rev Sep-2018 Page 86 of 423 Copyright © 2018FreeWave
This document is subject to change without notice. This document is the property of FreeWave Technologies, Inc.
and contains proprietary information owned by FreeWave. This document cannot be reproduced in whole or in
part by any means without written permission from FreeWave Technologies, Inc.
Page 87

8. ZumIQ Application Environment
Z9-PC / Z9-PC-SR001
User & Reference Manual
8.1. Optional: Download the ZumIQ Application Environment
Complete this procedure if installing the ZumIQ Application Environment.
Note: The images in this procedure are for Windows® 10 and/or Firefox®.
The dialog boxes and windows appear differently on each computer.
1. On the http://support.freewave.com/ web page, open the Firmware window for the Z9-PC
/ Z9-PC-SR001.
Important!: If continuing from the Download the Upgrade File (on page 28) procedure for the
Firmware v1_1_0_1.zip file, return to the Firmware window. (Figure 94)
Figure 94: Closed Article Attachments window
2. Click the Article Attachments link to re-open the attachment box.
3. Select and click the 3_Optional_ZumIQ_Environment_v1_1_0_0.pkg attachment.
(Figure 95)
Figure 95: Z9-PC / Z9-PC-SR001 Firmware Upgrade window with
3_Optional_ZumIQ_Environment_v1_1_0_0.pkg Attachment
The Opening dialog box opens. (Figure 96)
LUM0077AA Rev Sep-2018 Page 87 of 423 Copyright © 2018FreeWave
This document is subject to change without notice. This document is the property of FreeWave Technologies, Inc.
and contains proprietary information owned by FreeWave. This document cannot be reproduced in whole or in
part by any means without written permission from FreeWave Technologies, Inc.
Page 88

8. ZumIQ Application Environment
Figure 96: Opening 3_Optional_ZumIQ_Environment_v1_1_0_0.pkg.zip
4. Click OK.
The Enter name of file to save to dialog box opens. (Figure 97)
Z9-PC / Z9-PC-SR001
User & Reference Manual
dialog box
Figure 97: Enter name of file to save to dialog box
5. Search for and select a location to save the .zip file to and click Save.
The Enter name of file to save to dialog box closes.
6. Open a Windows® Explorer window and find the location where the Firmware v1_1_0_
1.zip file was saved.
7. Double-click the .zip file.
8. Extract the files from the .zip file into the parent location.
Note: The file includes the .pkg file used for the ZumIQ Application Environment installation.
9. Continue with:
l Optional: Drag and Drop - Installation of ZumIQ Application Environment (on page 89)
l Optional: Web Interface - Installation of ZumIQ Application Environment (on page 92)
LUM0077AA Rev Sep-2018 Page 88 of 423 Copyright © 2018FreeWave
This document is subject to change without notice. This document is the property of FreeWave Technologies, Inc.
and contains proprietary information owned by FreeWave. This document cannot be reproduced in whole or in
part by any means without written permission from FreeWave Technologies, Inc.
Page 89

8. ZumIQ Application Environment
Z9-PC / Z9-PC-SR001
User & Reference Manual
8.2. Optional: Drag and Drop - Installation of ZumIQ Application Environment
FREEWAVE Recommends: If currently using the v1.0.6.0 developer environment, an upgrade to
3_Optional_ZumIQ_Environment_v1_1_0_0.pkg is NOT required.
1. IMPORTANT: Install the 1_Device_Firmware_v1_1_0_1.pkg or 1_Device_Firmware_
v1_1_0_1.pkg.txt file first.
See Firmware Upgrade - Drag and Drop (on page 34).
Warning! The Z9-PC / Z9-PC-SR001 MUST BE upgraded to the Firmware v1_1_0_1
release or the ZumIQ Application Environment will NOT function.
2. Verify the Download the Upgrade File (on page 28) procedure is completed.
3. Locate and select the downloaded 3_Optional_ZumIQ_Environment_v1_1_0_0.pkg
upgrade file. (Figure 98)
Caution: A .pkg or .fcf file extension is required for Windows® 7.
A .pkg.txt or .fcf.txt file extension may be required for some versions of Windows® 8,
Windows® 8.1, and Windows® 10.
Failure to save the file with the correct extension type results in the copied file NOT
integrating with the Z9-PC / Z9-PC-SR001.
4. If using some versions of Windows® 8, Windows® 8.1, or Windows® 10, change the
extension of the .pkg file to .pkg.txt and select that file.
Figure 98: File Upload dialog box with Selected 3_Optional_ZumIQ_
Environment_v1_1_0_0.pkg.txt File
5. Drag and drop the .pkg or .pkg.txt file on to the ZumLink window. (Figure 99)
LUM0077AA Rev Sep-2018 Page 89 of 423 Copyright © 2018FreeWave
This document is subject to change without notice. This document is the property of FreeWave Technologies, Inc.
and contains proprietary information owned by FreeWave. This document cannot be reproduced in whole or in
part by any means without written permission from FreeWave Technologies, Inc.
Page 90

8. ZumIQ Application Environment
Figure 99: Drag and Drop the 3_Optional_ZumIQ_Environment_v1_1_0_
0.pkg.txt file to the ZumLink window
The ZumLink window is similar to Figure 100:
Z9-PC / Z9-PC-SR001
User & Reference Manual
Figure 100: 3_Optional_ZumIQ_Environment_v1_1_0_0.pkg.txt File
Dropped in the ZumLink window
The .pkg or .pkg.txt file will disappear after approximately 6-10 minutes.
Note: Refresh the ZumLink window If, after 10-15 minutes, the .pkg.txt file has NOT
disappeared.
Warning! DO NOT remove power from the Z9-PC / Z9-PC-SR001 during the firmware
upgrade process!
If power is removed prematurely during the upgrade process, the Web Interface pages
may not be accessible.
Reinstall the .pkg file and WAIT for the file upgrade process to complete.
6. Optional: Open the sys.info.txt file to verify the upgrade information. (Figure 101)
LUM0077AA Rev Sep-2018 Page 90 of 423 Copyright © 2018FreeWave
This document is subject to change without notice. This document is the property of FreeWave Technologies, Inc.
and contains proprietary information owned by FreeWave. This document cannot be reproduced in whole or in
part by any means without written permission from FreeWave Technologies, Inc.
Page 91

8. ZumIQ Application Environment
Important!: The image provides example information only.
Each Z9-PC / Z9-PC-SR001 provides its own unique information.
Z9-PC / Z9-PC-SR001
User & Reference Manual
Figure 101: sys.info.txt file with Updated Firmware
Important!: For the v1.1.0.1 upgrade, these settings should have this information:
systemInfo.deviceFirmwareVersion=FWT1101TB.17
Web Interface - Device Firmware Version is FWT1101TB.17
systemInfo.rteTemplateVersion=FWT1100TP.2
Web Interface - Rte Template Version is FWT1100TP.2
If neither of these are listed in their respective settings, repeat the upgrade procedure.
LUM0077AA Rev Sep-2018 Page 91 of 423 Copyright © 2018FreeWave
This document is subject to change without notice. This document is the property of FreeWave Technologies, Inc.
and contains proprietary information owned by FreeWave. This document cannot be reproduced in whole or in
part by any means without written permission from FreeWave Technologies, Inc.
Page 92

8. ZumIQ Application Environment
Z9-PC / Z9-PC-SR001
User & Reference Manual
8.3. Optional: Web Interface - Installation of ZumIQ Application Environment
FREEWAVE Recommends: If currently using the v1.0.6.0 developer environment, an upgrade to
3_Optional_ZumIQ_Environment_v1_1_0_0.pkg is NOT required.
1. IMPORTANT: Install the 1_Device_Firmware_v1_1_0_1.pkg or 1_Device_Firmware_
v1_1_0_1.pkg.txt file first.
See Firmware Upgrade - Web Interface (on page 40).
Warning! The Z9-PC / Z9-PC-SR001 MUST BE upgraded to the Firmware v1_1_0_1
release or the ZumIQ Application Environment will NOT function.
Important!: If continuing from the Firmware Upgrade - Web Interface (on page 40) procedure
for the Firmware v1_1_0_1.zip file, go to Step 7.
2. Verify the Download the Upgrade File (on page 28) procedure is completed.
3. Using a CAT5e / CAT6 Ethernet cable, connect the Z9-PC / Z9-PC-SR001 Ethernet port
to the computer's Ethernet port.
4. Open a web browser.
5. In the URL address bar, enter the IP address of the attached Z9-PC / Z9-PC-SR001.
Note: If this is the first time the Z9-PC / Z9-PC-SR001 is accessed, enter its default IP
address of 192.168.111.100.
If the IP address was changed, enter that IP Address.
6. Refresh the browser window (press <Enter> or <F5>).
The Home window (on page 343) opens.
7. On the Menu bar, click the File Upload link. (Figure 102)
Figure 102: File Upload link
The Authentication Required (Login) dialog box opens.
8. Enter admin in both the User Name and Password text boxes and click OK.
The Login dialog box closes and theFile Upload window opens. (Figure 103)
Note: If the User Name or Password were changed, enter the applicable information.
LUM0077AA Rev Sep-2018 Page 92 of 423 Copyright © 2018FreeWave
This document is subject to change without notice. This document is the property of FreeWave Technologies, Inc.
and contains proprietary information owned by FreeWave. This document cannot be reproduced in whole or in
part by any means without written permission from FreeWave Technologies, Inc.
Page 93

8. ZumIQ Application Environment
Z9-PC / Z9-PC-SR001
User & Reference Manual
Figure 103: File Upload window
9. Click the Browse button.
The File Upload dialog box opens.
10. Locate and select the downloaded 3_Optional_ZumIQ_Environment_v1_1_0_0.pkg
upgrade file. (Figure 104)
Caution: A .pkg or .fcf file extension is required for Windows® 7.
A .pkg.txt or .fcf.txt file extension may be required for some versions of Windows® 8,
Windows® 8.1, and Windows® 10.
Failure to save the file with the correct extension type results in the copied file NOT
integrating with the Z9-PC / Z9-PC-SR001.
11. If using some versions of Windows® 8, Windows® 8.1, or Windows® 10, change the
extension of the .pkg file to .pkg.txt and select that file.
Figure 104: File Upload dialog box with Selected
3_Optional_ZumIQ_Environment_v1_1_0_0.pkg.txt File
12. Click Open.
The dialog box closes and the File Upload window returns showing the selected file.
(Figure 105)
LUM0077AA Rev Sep-2018 Page 93 of 423 Copyright © 2018FreeWave
This document is subject to change without notice. This document is the property of FreeWave Technologies, Inc.
and contains proprietary information owned by FreeWave. This document cannot be reproduced in whole or in
part by any means without written permission from FreeWave Technologies, Inc.
Page 94

8. ZumIQ Application Environment
Figure 105: File Upload window with Selected .pkg.txt File
13. Click Send.
The File Upload window changes to show the completed upload percentage to the Z9-PC
/ Z9-PC-SR001. (Figure 106)
Z9-PC / Z9-PC-SR001
User & Reference Manual
Figure 106: File Upload window Showing Uploading Percentage
14. Wait for the .pkg or .pkg.txt file to be applied (≈ 6-10 minutes).
Warning! DO NOT remove power from the Z9-PC / Z9-PC-SR001 during the firmware
upgrade process!
If power is removed prematurely during the upgrade process, the Web Interface pages
may not be accessible.
Reinstall the .pkg file and WAIT for the file upgrade process to complete.
The File Upload window refreshes and shows the completed and uploaded file applied to
the Z9-PC / Z9-PC-SR001. (Figure 107)
LUM0077AA Rev Sep-2018 Page 94 of 423 Copyright © 2018FreeWave
This document is subject to change without notice. This document is the property of FreeWave Technologies, Inc.
and contains proprietary information owned by FreeWave. This document cannot be reproduced in whole or in
part by any means without written permission from FreeWave Technologies, Inc.
Page 95

8. ZumIQ Application Environment
Figure 107: File Upload window Showing Completed Upload of the
15. Click the System Info link. (Figure 108)
Z9-PC / Z9-PC-SR001
User & Reference Manual
Selected File
Figure 108: System Info link
The System Info window opens showing the updated firmware on the Z9-PC / Z9-PCSR001. (Figure 109)
Important!: The image provides example information only.
Each Z9-PC / Z9-PC-SR001 provides its own unique information.
LUM0077AA Rev Sep-2018 Page 95 of 423 Copyright © 2018FreeWave
This document is subject to change without notice. This document is the property of FreeWave Technologies, Inc.
and contains proprietary information owned by FreeWave. This document cannot be reproduced in whole or in
part by any means without written permission from FreeWave Technologies, Inc.
Page 96

8. ZumIQ Application Environment
Z9-PC / Z9-PC-SR001
User & Reference Manual
Figure 109: System Info window
Important!: For the v1.1.0.1 upgrade, these settings should have this information:
systemInfo.deviceFirmwareVersion=FWT1101TB.17
Web Interface - Device Firmware Version is FWT1101TB.17
systemInfo.rteTemplateVersion=FWT1100TP.2
Web Interface - Rte Template Version is FWT1100TP.2
If neither of these are listed in their respective settings, repeat the upgrade procedure.
LUM0077AA Rev Sep-2018 Page 96 of 423 Copyright © 2018FreeWave
This document is subject to change without notice. This document is the property of FreeWave Technologies, Inc.
and contains proprietary information owned by FreeWave. This document cannot be reproduced in whole or in
part by any means without written permission from FreeWave Technologies, Inc.
Page 97

8. ZumIQ Application Environment
Z9-PC / Z9-PC-SR001
User & Reference Manual
8.4. Activating ZumIQ
Warning! The process of activating ZumIQ will install a fresh copy of the Linux development
environment that supports ZumIQ.
If ZumIQ has already been activated, this procedure will erase any user-generated content and
settings in the existing Linux development environment.
Note: The images in this procedure are for Windows® 7 or Windows® 10 and/or Firefox®.
The dialog boxes and windows appear differently on each computer.
Procedure
1. Complete the Tera Term Activation and ZumIQ Setup (on page 70).
2. Log in to the Z9-PC / Z9-PC-SR001 CLI as admin.
3. At the > prompt, type systemInfo and press <Enter>.
The systemInfo parameters appear. (Figure 110)
Note: See the systemInfo Parameters (on page 304) for detailed information about the
parameters.
Figure 110: systemInfo Pages information
4. Verify these parameters have these values:
LUM0077AA Rev Sep-2018 Page 97 of 423 Copyright © 2018FreeWave
This document is subject to change without notice. This document is the property of FreeWave Technologies, Inc.
and contains proprietary information owned by FreeWave. This document cannot be reproduced in whole or in
part by any means without written permission from FreeWave Technologies, Inc.
Page 98

8. ZumIQ Application Environment
Verification Settings
Parameter Value
radioFirmwareVersion (on page 310) FWT1040TA.11
deviceFirmwareVersion (on page 305) FWT1060TB.68
rteVersion (on page 312) (blank)
rteTemplateVersion (on page 312) FWT1060TB.68
licenses (on page 308) Custom Apps
Z9-PC / Z9-PC-SR001
User & Reference Manual
5. At the > prompt, type rteReset=Hard and press <Enter>.
This will stage the development runtimeEnvironment to be applied on the next reboot.
6. At the > prompt, type the exact command of reset=now and press <Enter>.
This reboots the Z9-PC / Z9-PC-SR001 and copies the Linux application environment into
the runtime location.
This will take ~3-4 minutes to complete.
Warning! At this point, the connection to the Z9-PC / Z9-PC-SR001 is disabled.
7. Close the Tera Term window.
8. Disconnect and reconnect the USB cable from the computer.
The AutoPlay ZumLink and ZumLink windows open again.
9. Continue with Verify ZumIQ Activation (on page 99).
LUM0077AA Rev Sep-2018 Page 98 of 423 Copyright © 2018FreeWave
This document is subject to change without notice. This document is the property of FreeWave Technologies, Inc.
and contains proprietary information owned by FreeWave. This document cannot be reproduced in whole or in
part by any means without written permission from FreeWave Technologies, Inc.
Page 99

8. ZumIQ Application Environment
Verify Activation Parameters
Parameter Value
radioFirmwareVersion
(on page 310)
FWT1040TA.11
deviceFirmwareVersion
(on page 305)
FWT1060TB.68
Z9-PC / Z9-PC-SR001
User & Reference Manual
8.5. Verify ZumIQ Activation
Note: The images in this procedure are for Windows® 7 or Windows® 10 and/or Firefox®.
The dialog boxes and windows appear differently on each computer.
Procedure
1. Important: Verify the Activating ZumIQ (on page 97) procedure is completed.
2. Open a new Tera Term window.
3. Log in to the Z9-PC / Z9-PC-SR001 CLI as admin.
4. At the > prompt, type systemInfo and press <Enter>.
The systemInfo parameters appear. (Figure 111)
5. Verify the rteTemplateVersion and rteVersion values match these parameters:
LUM0077AA Rev Sep-2018 Page 99 of 423 Copyright © 2018FreeWave
This document is subject to change without notice. This document is the property of FreeWave Technologies, Inc.
and contains proprietary information owned by FreeWave. This document cannot be reproduced in whole or in
Figure 111: systemInfo Pages information
part by any means without written permission from FreeWave Technologies, Inc.
Page 100

8. ZumIQ Application Environment
Verify Activation Parameters
Parameter Value
rteVersion (on page
312)
FWT1060TB.68
Important!: This value is updated after ZumIQ is activated.
rteTemplateVersion (on
page 312)
FWT1060TB.68
licenses (on page 308) Custom Apps
Important!: If the rteVersion is (blank) then the ZumIQ is NOT activated.
Repeat the Activating ZumIQ (on page 97) procedure.
6. Type exit and press <Enter> to exit the FreeWave Shell.
7. Continue with Using ZumIQ as DEVUSER (on page 101).
Z9-PC / Z9-PC-SR001
User & Reference Manual
LUM0077AA Rev Sep-2018 Page 100 of 423 Copyright © 2018FreeWave
This document is subject to change without notice. This document is the property of FreeWave Technologies, Inc.
and contains proprietary information owned by FreeWave. This document cannot be reproduced in whole or in
part by any means without written permission from FreeWave Technologies, Inc.
 Loading...