

Page 1
WavePoint 10e
This Quick Start Guideprovidesinstructions for the initialsetup of a
WavePoint 10e. The procedures pr ovide basicinformation about how to
place the WavePoint 10e in a LAN and to establish a wireless link between
radios. For detailed information about allthe networking functionalityand
network deployment scenarios available, download the WavePoin t 10e User
Manual from www.freewave.com/home/WavePointLogin.
Note: The information in this Quick Start Guide is written for IPv4
addressed networ ks. If the network uses IPv6 addressing, see
the WavePoint 10e User Man ual.
Accessories
The items shipped in the box are:
l The WavePoint 10e device. l A CAT 5e Ethernet cable.
l The WavePoint 10e Quick Start
Guide.
l An AC power adapter.
These options are available and, if ordered, ar e included in the shipping box:
an RJ-45- to-DB9 serial cable and a mounting kit .
Contact a FreeWave reseller or FreeWave TechnicalSupport if the package is
missing parts or any parts were damaged during shipping.
Note: Antennas are shipped separately.
Requirements
Installation Settings
Attent ion Network Ad ministrator! Complete the information in this table.
SSID: _____________________________( 8-64 ASCII characters. The SSID field is case sensitive.)
Security M ode: Security Key: ( This field is case sensitive.)
IP Add ress: Subnet Mask:
DHCP Setup Mode: Max Range: (2x thedistance of the longest link in
Km)
Equipment and Configuration
This equipment and configurations are needed pr ior to the initialWavePoint
10e setup and installation:
l A computer or laptop with:
l Windows 7 operating system.
l A web browser to accessthe web pages for configuration.
l Supported browsers include: Microsoft Internet Explorer 9 and 10,
Firefox 27, Google Chrome, Safari, and Opera.
Note: Configuration pages are NOT optimizedfor browsers on
mobile devices (e.g., tablets, smart phones, etc.)
l A devicewith wirelesscapability to verify the wireless connection.
l A NEMA-4 rated enclosure (for outdoor installationsonly).
l A screwdriver for attaching mounting bracketsand power connector.
l FreeWave recommends a Path Study, as applicable, for the network site.
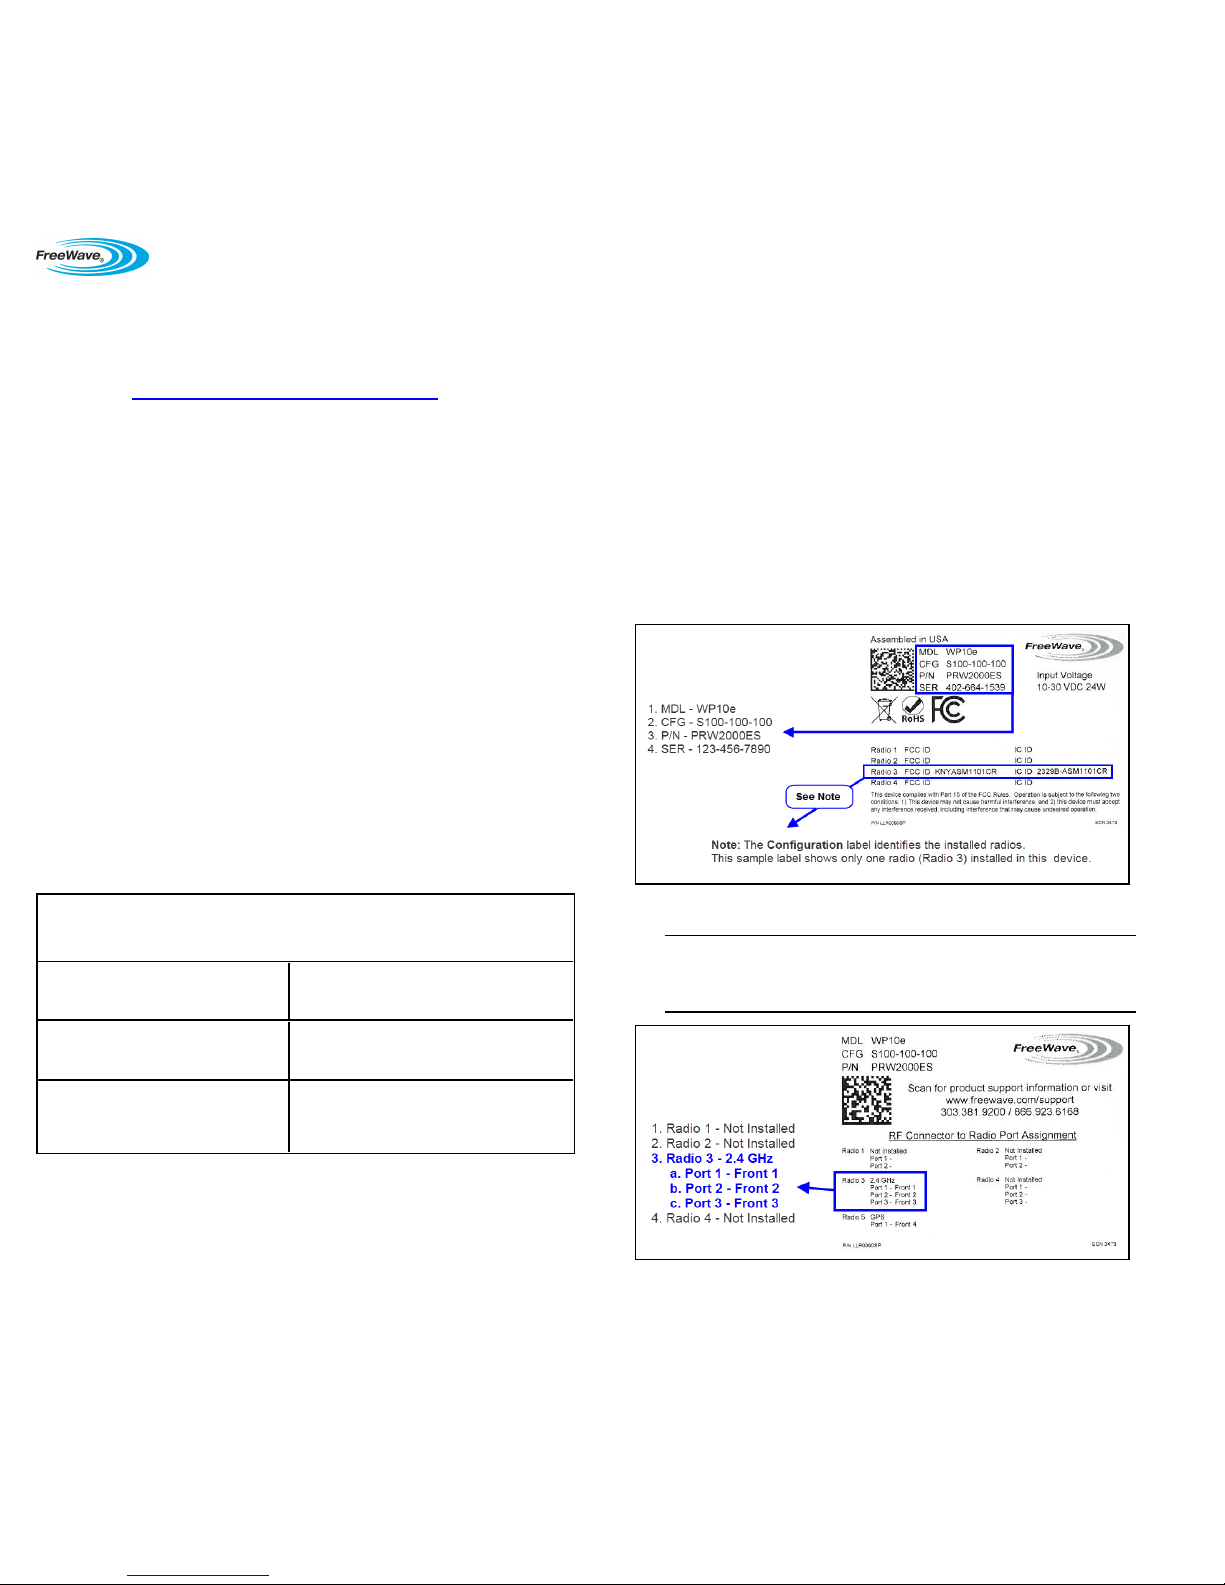
WavePoint 10e Labels
Sample: Configuration Label
Sample: Antenna Port Assignment Label
Important: The information on the Antenna Port Assignment
label is critical for corr ect antenna connections and operation of the
WavePoint™ device.
Note: The Port Assignment label designates which RF por ts (the
WavePoint™ TNC connectors) are used by which radio.
Copyright © 2014 FreeWave T echnologies, Inc.
QSG0023AARev A 04/23/2014
Page 2
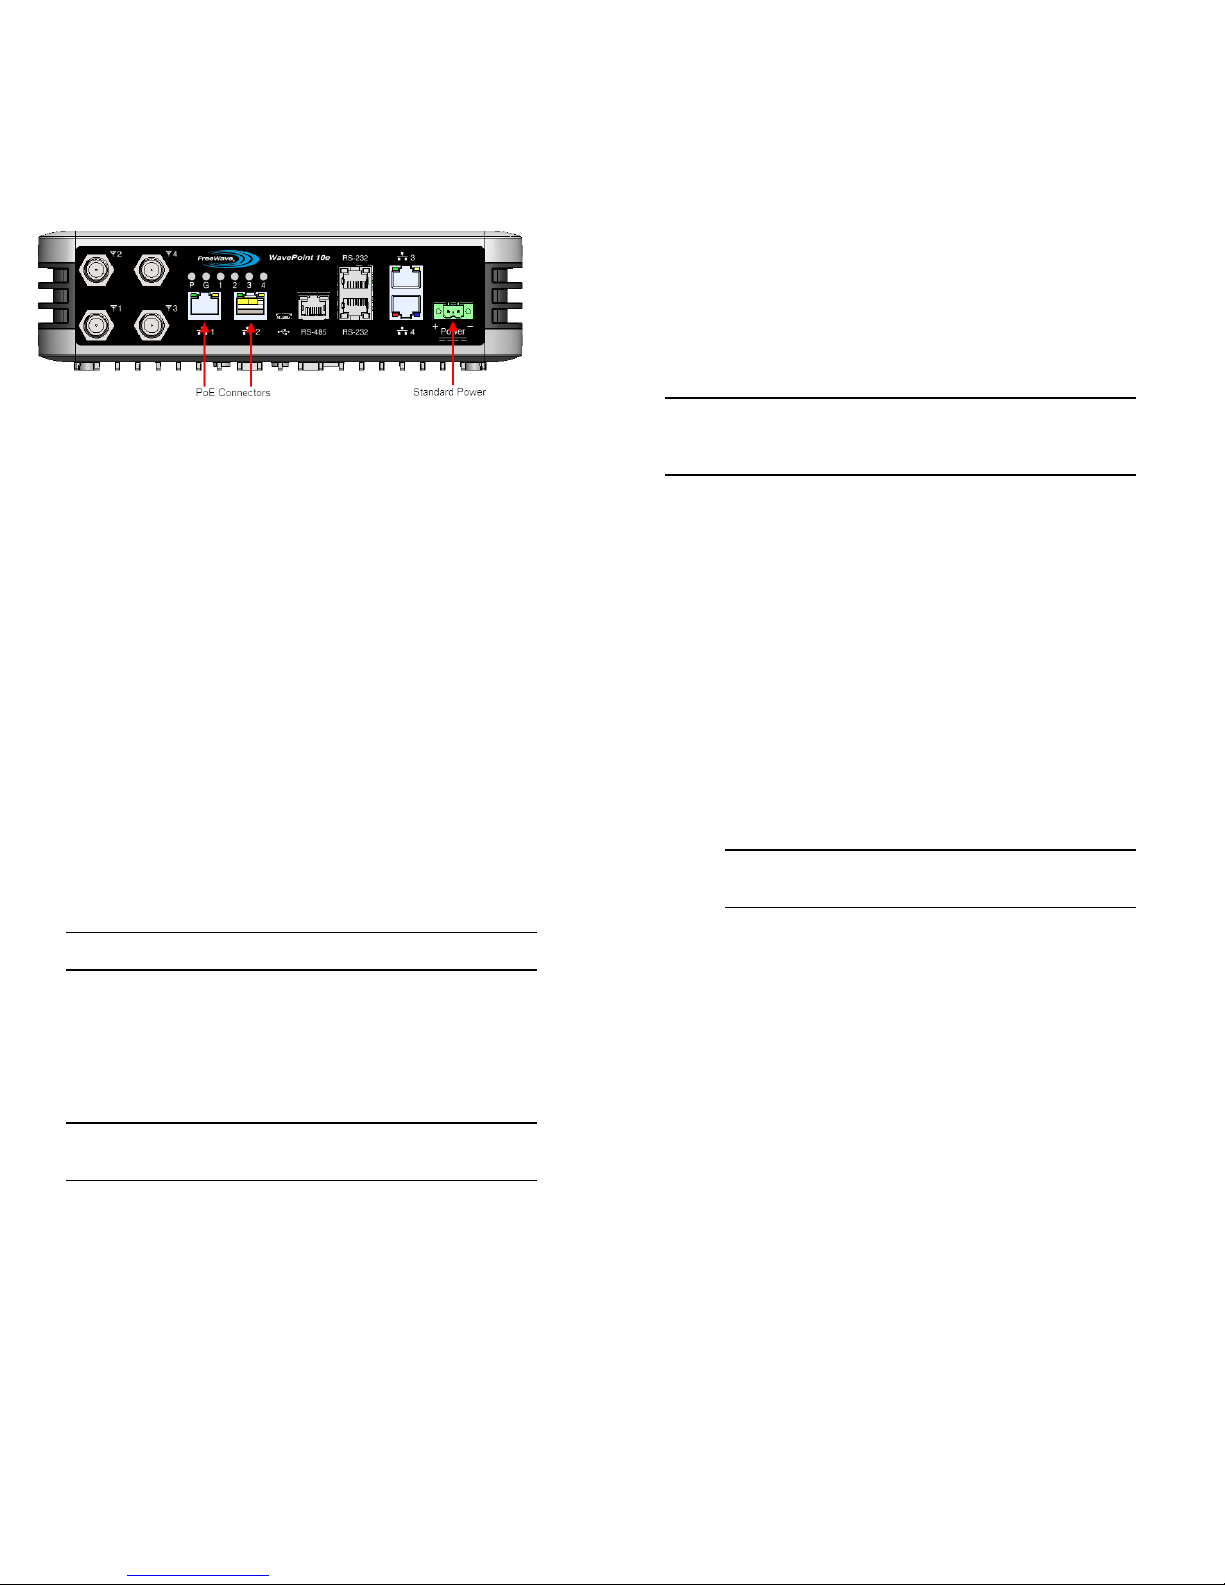
Connect Power
Use either of these options to provide the WavePoint™ power:
l Connect a CAT 5e Ether net cable from an 802.3at (PoE+) source to one
or both of the Ethernet PoE Con nector ports on the left side of the
connector panel.
Note: Depending on the number of radios installed in the WavePoint
10e model, it may require power through both ports. Power
over Ethernet is only available on some models.
l Connect a power supply to the green Standard Power port on the far
right side of the connector panel. The WavePoint 10e requires power
between +10VDC and +30VDC.
Screw Torque
For all connections, use these tightening torque minimum and maximum:
l Minimum: 0.22 Nm.
l Maximum: 0.25 Nm.
Connecting and Logging In
WavePoint 10e uses web pages for configuration.
Note: These instructions assume the computer has a static IP address
assigned. Change the computer 's IP address to be within the
same subnet as the default address of the WavePoin t 10e
(192.168.1.1).
Important: Initial setup requires a wired connection.
1. Verify the WavePoint 10e has power.
2. On the WavePoint 10e Connecto r Panel, connect a CAT 5e Ethernet
cable from Ethernet port 3 or 4 to a computer that has a web browser
installed.
Note: Use a command line to ping 192.168.1.1 to ensure the
WavePoint™ is ready for use.
Important: For 2.4 GHz WavePoint 10e devices, connect to a
wireless connection after the WLAN settings are configured.
3. On the connected computer, open a web browser.
4. In the web browser's navigation bar, enter http://192.168.1.1.
This is the WavePoint 10e factory default IP address.
5. Enter the default User Name (admin) and Password ( freewave).
User Names and Passwords are case sensitive.
6. ClickLogin to view the Configuration pages.
7. Optional: Follow the Setting the Device IP Address an d Subn et
procedure to change the subnet address.
Setting the Device IP Address and Subnet
For the WavePoint 10e to exist in the network, it must have a unique IP
address and exist in the correct subnet.
Reserved Subnets
Important: WavePoint™ has reserved subnets that cannot be
used to administrate the WavePoint™ device. These subnets are
reserved for (Virtual Access Points) VAPs.
The subnets that CANNOT be used ar e:
l 192.168.2.0/24
l 192.168.3.0/24
l 192.168.4.0/24
Procedure
1. Follow the pr ocedures for Connectin g and Logging In.
2. On the Network menu, click LAN > L AN IPv4 Setup.
3. In the IP Address Setup section, enter this information for the LAN:
a. Enter a unique IP address for the device.
The default setting is 192.168.1.1.
b. The default setting for the Subnet Mask is 255.255.255.0.
Accept the default setting unless subnetting is used.
c. The default option for the DHCP Setup Mod e is DHCP None.
If applicable,select either the DHCP Relay or DHCP Server
option when configuring the device as an Access Poin t.
Important: Write down the updated IP address to access
this device thr ough the LAN or over a wirelessconnection.
4. Click Save to save the changes or Cancel to clear any changes without
saving.
Note: When the IP address is changed and saved, the
Con fig uration page no longer responds because the IP
address is saved to the WavePoint 10e and the connection is
lost.
To reconnect, enter the new IP address in the web br owser
window, verifying the PC’s IP address is within the same subnet.
Copyright © 2014 FreeWave T echnologies, Inc.
QSG0023AARev A 04/23/2014
Page 3

Configure Basic Wireless LAN Settings
Configure basicwireless settings BEFORE installing the WavePoint 10e in a
hard to reach location.
1. On the Wireless LAN menu, clickRadios > Basic.
2. Right-clickthe radio to configure and select Edit.
Radios are labeled 1, 2, 3, and 4. The label on the back panel of each
WavePoint 10e identifieswhat type of r adio is installed and which
number corresponds to each installed radio.
3. Select the Mode.
A WavePoint 10e can be set to be an Access Point, Client, or Repeater
within the network.
See the WavePoint 10e User Manual for additional information on
using AccessPoints, Clients,and Repeaters.
Note: If the WavePoint 10e is configured as a Client, it willnot be
accessible wirelessly.A networ k requires at least one Root
Access Point for a wirelesslinkto be established.
4. In the SSID field, enter the name of the wirelessnetwork.
The SSID field is case sensitive.
5. In the Security field, select the levelof security to apply to the wireless
network.
6. In the Security Key field, enter the key required for a device to connect
to the WavePoint 10e through a wireless connection.
The Secu rity Key field is case sensitive.
Note: By default, all WavePoint 10e devicesare shipped with the
same SSID and Security Key and connect automatically. For
security, and to avoid duplication of neighboring networ k
names, it is highly recommended to change this to a unique ID.
The SSID and security settings must match between an Access
Point, Client, or Repeater to establish a wireless connection.
Additionalradio settings are available. F or detailed information see the
WavePoint 10e User Manual.
7. ClickSave to save the changes and send them to the WavePoint 10e or
click the X in the upper right corner to clear any changes without saving.
8. On the Wireless LAN menu, clickRadios > Ad vanced.
9. Right-clickthe radio to configure and select Edit.
10. Use the scroll bar on the right to scroll down to the Max Range field.
11. In the Max Range field, enter the appropriate Kilometer distance.
See the WavePoint 10e User Manual for information to establish
communication between WavePoin t 10e devicesin a Point-to-Point network
or a Point-to-Multipoint network.
Verify the Wireless Connection
While the WavePo int 10e is easilyaccessible, verify that the wireless
connection is active.
Important: This procedure is only applicable to 2.4 GHz
WavePoint™ devices.
1. Log out of the Configuration web pages.
2. Close the web browser.
3. Disconnect the Ethernet cable from the computer.
4. Using a computer with wireless capability, establish a wirelessconnection
using the SSID and Security Key defined in the Basic Radio Settin gs
page.
5. After the connection is established, open a web browser and enter the IP
address in the browser navigation bar.
The IP address was entered in the LAN Setup page.
The L og in page is shown when a successfulwireless connection has been
made. If there is no connection, see the Troublesho oting Tips.
Troubleshooting Basic Setup
I cann ot verify connectivity.
If connecting to the WavePoin t 10e through a wired Ethernet connection,
verify the WavePoint 10e has power and the Ethernet cable running from the
computer with the browser is connected to the Ethernet port on the right side
of the front panel next to the power port (Ethernet 3).
If the device is connected through a wireless connection, confirm the correct
SSID and Security Key are used to establish the wireless connection and the
unit is not configured as a Client .
I cann ot access t he configuration pages from a browser.
If you have established a wirelessconnection, verify the IP address entered in
the browser's navigation bar matches the device you are trying to connect to.
I cann ot access settings on th e Co nf iguration pages.
Many configuration settings are accessible through a r ight-clickmenu on the
Con fig uration pages.
Note: The right-click functionality is NOT available on the
Con fig uration pages when viewed through a mobile device.
Copyright © 2014 FreeWave T echnologies, Inc.
QSG0023AARev A 04/23/2014
Page 4

Certified Antennas
A WavePoint™ can have multiple radio modules installed, each potentially
operating at different frequencies. The model number reflectsthe number and
frequency of the r adios installed inside the WavePoint™ device and
determines the type of antennas that can be used.
Depending on the frequency type, a selection of Omni, Yagi, Sector Panel, and
Dish have been approved for WavePoint™ by the FCC. For a list of approved
antennas and to map the antenna ports to the installed radios, download the
WavePoint 10e User Manual from
www.freewave.com/home/WavePointLogin.
Important: The use of an antenna with a higher gain or a different
type of antenna other than those approved requires new FCC
approval and should not be used.
Antenna Installation Warning
Important: The required FCC warning information for working in
proximity of the WavePoint™ antennas is in the WavePoint™
User Manual.
Download the manual here:
www.freewave.com/home/WavePointLogin.
1. Allantenna installation and servicing must be performed by qualified
technicalpersonnel only.
a. When servicing the antenna, or working at distances closer than
those listed below, verify the transmitter has been disabled.
b. Output is measured at the antenna terminal of the transmitter.
c. The antennas used for the WavePo int ™ must be fixed-mounted on
outdoor permanent structures to pr ovide the minimum separation
distancesdescribed in this filing for satisfying RF exposure
compliance requirements.
d. When applicable, RF exposure compliance may need to be
addressed at the time of licensing, as required by the r esponsible
FCC Bureaus, including antenna co-location requirements of
§1.1307(b)(3).
2. Typically, the antenna connected to the transmitter is a directional(high
gain) antenna, fixed-mounted on the side or top of a building, or on a
tower.
a. Depending upon the application and the gain of the antenna, the total
composite power could exceed 20 watts EIRP.
b. The antenna location must only be accessible by qualified technical
personnel.
c. Under normal operating conditions, no other person can touch the
antenna or approach within 3.05 meters of the antenna.
Learn More
For additional product information about WavePoint™, visit
www.freewave.com/products/allproducts/WavePoint.aspx.
Scan the code with a smart phone Data Matrix Code Reader to accessthe
www.freewave.com/home/WavePointLogin site to download the WavePoint
10e User Manual and training information. Data Matrix readers are fr ee at
the phone's application store.
For additional assistance, contact a local reseller, or contact
FreeWave Technologies, Inc. at 303.381.9200 or
1.866.923.6168, or by emailat moreinfo@freewave.com.
FreeWave Technologies, Inc. reserves the right to make changes to this
document or the product described within it without notice. FreeWave
assumes no responsibilityor liabilityfor the use of this document or the
infringement of any copyright or other proprietary right.
WavePoint10e complies with FCC Part 15 rules. Operation is subjectto the
following two conditions:1) This device may not cause harmful interference
and 2) this device must accept any interference received, including
interference that may cause undesired operation.
WavePoint10e must be professionallyinstalled and is only approved for use
when installed in devicesproduced by F reeWave or third party OEMs with the
express written approval of FreeWave Technologies, Inc. Changes or
modifications should not be made to the device.
FreeWave Technologies, Inc.
5395 Pearl Parkway, Suite 100
Boulder CO.
www.freewave.com
Local: 303.381.9200
Toll F ree: 1.866.923.6168
Fax: 303.786.9948
Copyright © 2014 FreeWave T echnologies, Inc.
QSG0023AARev A 04/23/2014
 Loading...