

Freeware FW295 User Manual
DECT DIGITAL FW295
DIGITAL CORDLESS PHONE
GEBRUIKERSHANDLEIDING
MANUALE D'ISTRUZIONI
USER MANUAL
MODE D’EMPLOI
BEDIENUNGSANLEITUNG
MANUAL DEL USUARIO
MANUAL DE INSTRUÇÖES
O∆H∏E∑ XPH∑H∑
Installazione delle batterie / Batteries installation / Instalación de las pilas / Instalação das baterias
Installation des batteries/Installation der Akkus/Plaatsen van de batterijen /
1)Aprire il coperchio
della batteria
1)Open the battery
cover
1)БнпЯофе фп кЬлхммб
ìðбфбсйюн
Ouvrez le couvercle
1)
du compartiment à
batteries
1)Öffnen Sie das
Akkufach
1)Open het
Batterijdeksel
1) Sacar la tapa del
compartimiento de
pilas
1) Retire a porta do
compartimento
das baterias;
--
++
2)Inserire le batterie
rispettando la
polarità indicata
2)Place the batteries
controlling the
polarity indicated
2)Ôïð пиефЮуфе ôéò
ìðбфбсЯет елЭгчпнфбт
фзн ендедейгмЭнз
ðплйкьфзфб
2)Installer les
batteries en
respectant le sens
des polarité
2) Setzen Sie die
++
Akkus ein. Achten
Sie auf die Polarität
2)Installer de
Batterijen, Let
hierbij op de
--
Polariteit
2) Colocar las pilas
respetando la
polaridad indicada
2) Coloque as 2 baterias
recarregáveis que
controlam a
polaridade indicada;
ЕгкбфЬуфбуз мрбфбсйюн
3)Chiudere il
coperchio della
Batteria
3)Close the battery
cover
3)КлеЯуфе фп кЬлхммб
ìðбфбсйюн
Fermez le couvercle
3)
du compartiment à
batteries.
Schliessen Sie das
3)
Akkufach
3)Sluit het
batterijdeksel
3) Colocar la tapa
3) Feche a porta
do compartimento
das baterias.
Dettagli della base / Base details / ВбуйкЭт леðфпмЭсейет / Conexión de la Base
- Collegare qui il plug
del cavo di linea
- Connect here the plug
of line cord
-
УхндЭуфе åäþ ôï
сехмбфплЮрфз ôïõ кблщдЯпх
- Connexion de la ligne
téléphonique
- Aansluiting telefoonlijn
- Sluit hier de stekker van de draad aan
- Insertar aquí el conector del
cable telefónico
- Ligue-a à tomada da linha.
Instalação do base / Eléments du poste de base
Detailbeschreibung basisstation/Basis details
- УхндЭуфе едю фп сехмбфплЮрфз
фпх рспубсмпгЭб енблбууьменпх/
ухнечпэт сеэмбфпт (AC/DC)
- Connexion de l'adaptateur
-Sluit hier de stekker van de AC/DC
- Insertar aquí el conector del
-Instalação do adaptador de AC/DC
- Connect here the plug of
adaptador de corriente
- Collegare qui il plug
dell’alimentatore
AC/DC adaptor
- Aansluiting adaptor
adapter aan
FW295
IT
Complimenti per la scelta del nuovo cordless digitale FW295 in standard DECT (Digital European
Cordless Telephone) con profilo GAP (Generic Access Profile). Alla qualità di ascolto ed alla
sicurezza offerte dalla tecnologia digitale, affianca molteplici ed utili funzioni tra le quali un ampia
rubrica da 60 locazioni, la possibilità di riceve/inviare SMS, l’identificazione di chiamata, il vivavoce...
Tutte le funzioni sono facilmente accessibili tramite un pratico menù . Per utilizzare al meglio il vostro
nuovo cordless si raccomanda di leggere attentamente il manuale di istruzioni.
ACCESSORI
Unità Base - Unità portatile - N. 2 batterie ricaricabili AAA – Alimentatore AC/DC – Calvo di linea
telefonico – Manuale utenre – Garanzia.
Precauzioni
Prima di usare l’apparecchio leggere attentamente il manuale d’uso.
Evitare l’esposizione diretta ai raggi solari e/o fonti di calore, così come evitare l’installazione in luoghi
umidi e/o polverosi.
Non appoggiare oggetti sui cavi e/o sull’apparecchio.
Non utilizzare alimentatori e/o batterie diversi da quello specificato su questo libretto di istruzioni o
comunque da quelli in dotazione.
In caso di temporali, scollegare l’apparecchio dalle linee elettrica e telefonica.
Pulire l’apparecchio utilizzando un panno leggermente inumidito. Non usare alcool, solventi, abrasivi,
etc..
Non effettuare riparazioni da soli. Eventuali manomissioni e/o usi non in conformità con quanto
descritto sul presente libretto ne faranno decadere la garanzia.
I-TECHSWISS Group. declina ogni responsabilità in caso di usi non in conformità con quanto
descritto su questo manuale.
La presa di corrente deve essere vicino all'apparecchio e facilmente accessibile.
Basse Radiazioni: quando un solo portatile è affiliato sulla base e quando il portatile è in
carica sulla base, la potenza di trasmissione è molto ridotta per diminuire l'emissione di
radiazioni elettromagnetiche. Quando si hanno 2 o più portatili affiliati alla stessa base o il
portatile non è in posizione di ricarica sulla base, la potenza di trasmissione è la stessa
degli altri cordless DECT.
Questo apparecchio è stato progettato per essere collegato alla rete telefonica analogica (PSTN).
Questo apparecchio radio di “Classe 1” è liberamente utilizzabile in ambito UE. L’apparecchio è
costruito in conformità a quanto previsto dalla direttiva 2002/95/CE inerente la restrizione dell'uso di
determinate sostanze pericolose nelle apparecchiature elettriche ed elettroniche.
Il simbolo , riportato anche sul prodotto, indica che le apparecchiature elettriche ed elettroniche
devono essere sottoposte a raccolta separata e non possono essere smaltite come rifiuti urbani,
secondo quanto previsto dalla Direttiva 2002/96/CE. Pertanto, questa apparecchio e tutti i
componenti, i sottosistemi ed i materiali di consumo che sono parte integrante del prodotto, nel
momento in cui si assume la decisione di disfarsene, devono essere portate ai centri locali di raccolta
per gli adeguati trattamenti di smaltimento, secondo quanto previsto dalla normativa vigente. Per
conoscere dove sono situati i centri suddetti, è opportuno chiedere informazioni alle autorità locali
competenti.
Come impostare la lingua del display:
Premere il tasto funzione di sinistra, premere 3 volte il tasto
tasto funzione di sinistra, premere 6 volte il tasto quindi premere il tasto funzione di sinistra.
Utilizzare i tasti per selezionare la lingua del display, quindi premere il tasto funzione id sinistra
per confermare.
Collegamento alla rete elettrica
Collegare lo spinotto dell’alimentatore alla presa di alimentazione posta dietro la base e poi
collegare lo stesso alimentatore alla rete elettrica.
Manuale d'uso
, quindi premere nuovamente il
IT
Collegamento alla linea telefonica
Collegare il plug del cavo in dotazione alla presa di collegamento posta dietro la base e l'altra
estremità alla presa telefonica.
Installazione / Sostituzione della batteria
Rimuovere lo sportellino a scatto; inserire le due pile nello scomparto rispettando le polarità indicate,
riporre lo sportellino fino allo scatto.
IMPORTANTE: Le batterie al Nichel-Metal Idrato, una volta esaurite, vanno gettate negli appositi
contenitori per il riciclaggio.
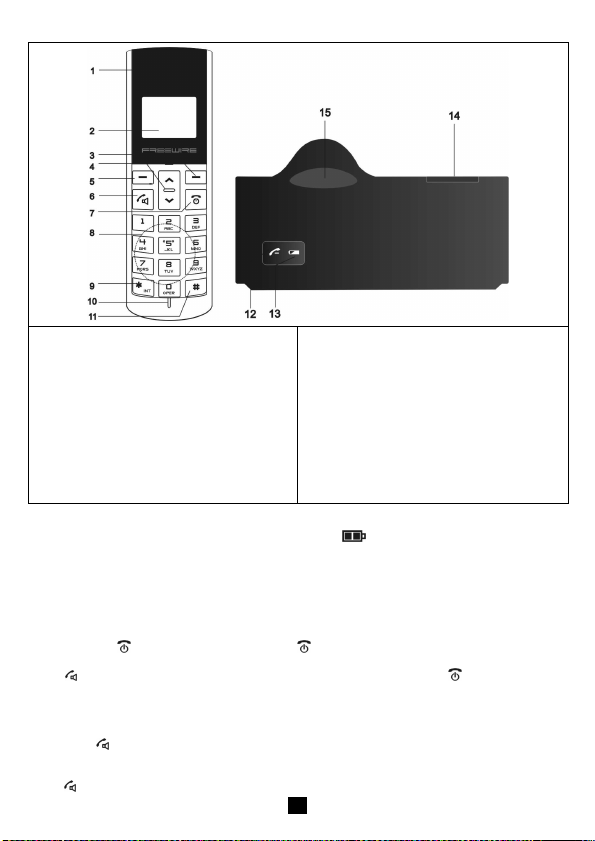
Descrizione
1: Auricolare
2: LCD;
3: Soft key, tasto funzione destro, la funzione
associata è scritta sul display;
4: Tasto navigazione su/giù; SU: per entrare
nella lista delle chiamate ricevute o per passare
all'opzione precedente in un menu; GIU: per
entrare nella rubrica/ o per passare all'opzione
successiva in un menu;
5: Soft key, tasto funzione destro, la funzione
associata è scritta sul display;
6: Tasto per prendere la linea, inoltre durante la
conversazione pressione lunga per passare in
vivavoce e viceversa, pressione lunga in standby per eseguire la chiamata d'emergenza;
Ricarica della batteria
Porre l’apparecchio in ricarica, con la tastiera rivolta in avanti, per almeno 10 ore quando la batteria è
completamente scarica. Sul display lampeggia l'icona e sulla base si accende la spia rossa. Il
cordless NON è dotato di indicatore di fine carica quindi a carica ultimata la spia rossa resta accesa e
l'icona RESTA sempre lampeggiante.
Raggio d’azione
Il raggio d’azione può variare per molteplici situazioni. L’indicazione 500mt all’aperto e 100mt in
interni è puramente teorica, cioè ottenibile solo in condizioni ottimali di propagazione del segnale.
Comunque per una maggiore copertura è consigliabile installare la base in un luogo quanto più
centrale rispetto all’edificio entro il quale si desidera utilizzare il cordless.
7:Per chiudere la linea, per spegnere/accendere
il portatile;;
8:Tastiera numerica;
9: Tasto asterisco, inoltre per eseguire chiamate
intercomunicanti;
10: Microfono;
11: Tasto cancelletto, inoltre tasto R/flash;
12: LED, se è acceso si è in linea;
13: LED, se acceso il telefono è in carica;
14: Tasto per il richiamo del portatile;
15: Vano per la ricarica.
IT

Per accendere/spegnere il portatile
Per accendereil portatile premere il tasto ; per spegnerlo tenere premuto il tasto .
Per fare una telefonata
Premere il tasto per prendere la linea telefonica (la spia verde della base si accende e sul display
appare l'icona ); comporre il numero desiderato; per concludere la comunicazione premere il tasto .
Al termine di ogni conversazione la spia della base si spegne e il display ne mostra la durata per
circa 5 secondi.
Pre-selezione
Comporre direttamente il numero da chiamare (premere il tasto corrispondente a "Canc" se si
commette un errore e sarà cancellata l’ultima cifra), premere il tasto per iniziare la conversazione.
Il numero viene chiamato automaticamente.
Per rispondere alle chiamate
All'arrivo di una chiamata esterna, squilleranno sia la Base che il Portatile (sul display lampeggerà
l'icona EXT).Per rispondere premere il tasto . ATTENZIONE: per la funzionalità dei messaggi il
cordless inizia a squillare fra il 1° e il 2° squil lo.
Vivavoce
Per utilizzare il vivavoce tenere premuto durante una conversazioni il tasto , parlare a circa 30cm
dal microfono. Durante la fase di conversazione in Vivavoce sarà possibile passare alla
conversazione tramite auricolare tenendo premuto nuovamente il tasto e viceversa. Nota: Per
impostare il volume di ascolto procedere come da par. "Regolazione del volume di ascolto".
Tasto R (Flash)
Tenendo premuto il tasto (R) durante una conversazione, si accederà ai servizi supplementari (ad
esempio l’avviso di chiamata in abbonamento col gestore della linea telefonica).
Pausa Intercifra
Immette una pausa di 3 secondi circa tra una cifra ed un’altra (utile soprattutto tra il numero di uscita
del centralino e il numero esterno per facilitare la connessione). In preselezione dopo aver digitato
almeno una cifra, premere la soft key "Pausa". La pausa è visualizzata con "-".
Utilizzo delle soft key
Sul portatile sono presenti due tasti contrassegnati dal simbolo “ — ”.La funzione di questi due tasti si
associa ogni volta a quello che appare nel rettangolo presente sul display in corrispondenza del
tasto. Per esempio in stand-by la soft-key di sinistra corrisponderà a "Menu" per accedere
all'opzione del menù, la soft key di destra corrisponderà ad "Ripeti" per vedere la lista delle chiamate
effettuate.
Utilizzo del menu
FW295 è dotato di un pratico menu a scorrimento ad albero. Per accedere al menu premere la soft
key corrispondente a "Menu" nella schermata principale. per scorrere le varie voci utilizzare i tasti ,
quindi premere la soft key "OK" per accedervi. Il menu interno è così strutturato: il titolo del menù
sopra e sotto l'opzioni selezionabile all'interno del menu. Premere i tasti per scorrere tra le varie
voci, quando la voce desiderata è visualizzata premere la soft key "OK" per accedervi. Premere la
soft key "Indiet" per tornare al menu precedente o il tasto per tornare in stand-by.
Regolazione del volume d’ascolto
Durante una conversazione telefonica tramite i tasti regolare il volume di ascolto (1=basso, 2=
medio, 3= alto).
Esclusione microfono (mute)
Durante una conversazione telefonica premere la soft key "Muto", il display mostra "In A t tesa" . Per
ripristinare la conversazione premere la soft key "Conv." .
Ricerca del portatile
Premendo il tasto PAGE
esempio, per individuare il luogo dove avete lasciato il portatile.
Indicazione di fuori campo
Se durante una conversazione vi allontanate dal raggio di copertura della base, la comunicazione
sarà difficoltosa. Se non rientrate nel raggio di copertura, la linea sarà chiusa (il display indicherà
"Fuori Campo").
, il portatile inizierà a squillare. Questa operazione può essere utile, ad
IT
Indicazione dello stato di batteria
Il display indica 3 livelli di batteria; quando la batteria è scarica porre il portatile in ricarica sulla base.
L’identificativo del chiamante (funzione attiva se abbonati col gestore)
Questo telefono visualizza il numero del chiamante. E’ anche in grado di memorizzare le ultime 20
chiamate ricevute /non risposte. Quando il portatile squilla, se il servizio di identificazione è attivo il
display visualizzerà: il nominativo associato in rubrica o il numero telefonico o la scritta "Riservato" se
il numero è nascosto; oppure la scritta "Non Dispon" se l'identificativo non è disponibile.
In caso di chiamate a cui non si è potuto rispondere il display visualizzerà il numero di nuove
chiamate non risposte; è possibile accedere direttamente alla lista di chiamate non risposte
premendo il tasto .
Lista delle chiamate ricevute/perse (funzione attiva se abbonati col gestore)
FW295 memorizza le ultime 20 chiamate ricevute/perse. Per visualizzare la lista premere il tasto ;
oppure premere la soft key "Menu", tramite i tasti visualizzare "Lista Chiam", quindi premere la soft
key di sinistra. Scorrere la lista tramite i tasti , sulle chiamate perse e non ancora visualizzate il
nome (oppure numero) è preceduto dal simbolo Ӿ. Premere il tasto per richiamare il numero
visualizzato. Premendo la soft key di sinistra "Opz." è possibile: Vedi: Per visualizzare ora e data
della chiamata (vedere Attenzione); Salva: Per salvare il numero in rubrica; Cancella: per cancellare il
numero dalla lista. Premere il tasto per uscire dalla lista. E' possibile cancellare l'intera lista
spegnendo/accendendo il portatile. ATTENZIONE: l'orario e la data sono disponibili solo su reti
analogiche PSTN e non su reti digitali ISDN NT1 PLUS.
Lista delle chiamate effettuate
FW295 memorizza le ultime 10 chiamate effettuate. Per visualizzarle premere la soft key "Ripeti", sul
display viene visualizzata l'ultima chiamata effettuata. Tramite i tasti scorrere la lista delle chiamate
effettuate. Premere il tasto per richiamare il numero visualizzato. Non è possibile cancellare un
singolo numero telefonico dalla lista, è possibile cancellare l'intera lista spegnendo/accendendo il
portatile.
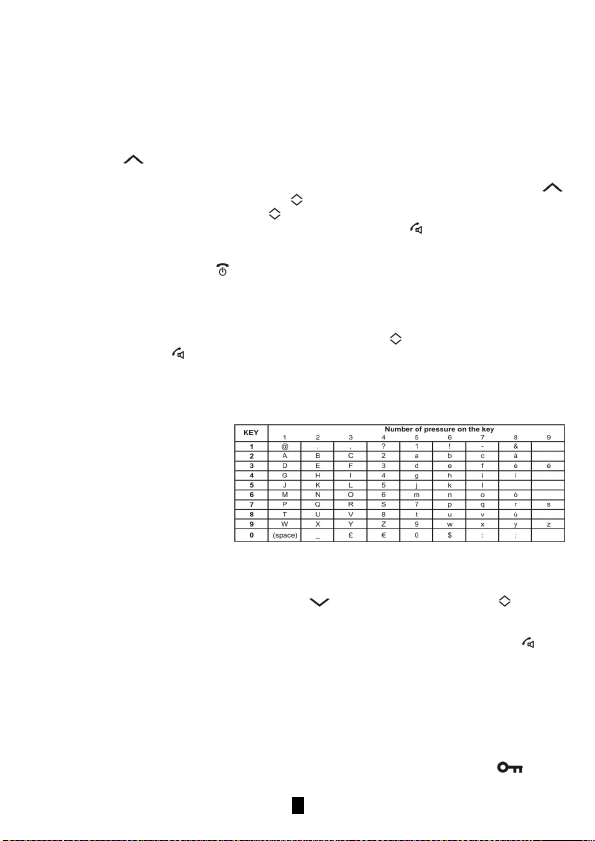
Rubrica
FW295 è dotato di una rubrica alfanumerica a 60 memorie. Per salvare un numero in rubrica con il
portatile in stand-by, premere il tasto la
soft-key "Menu", selezionare
"Rubrica", premere “OK”, "Inserisci" è
visualizzato, premere “OK”; inserire il
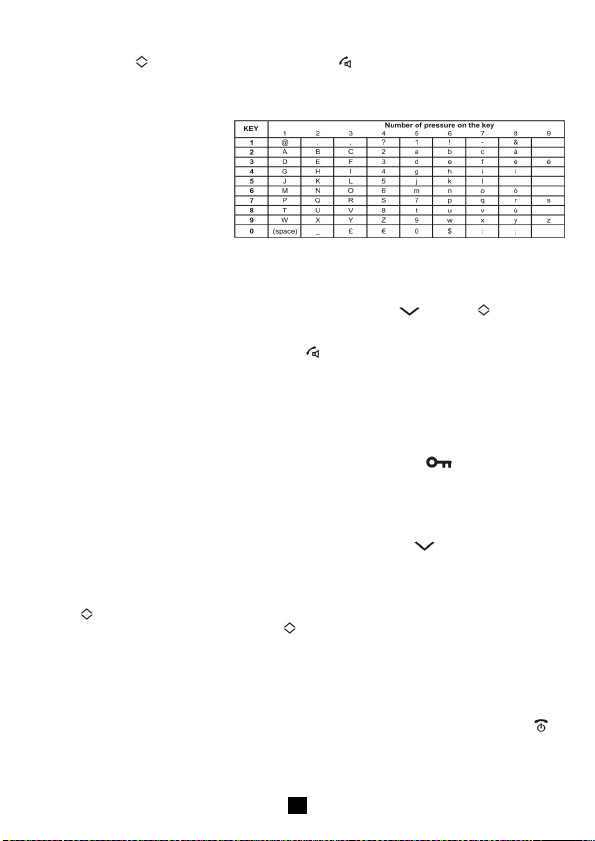
nominativo, per inserire un carattere
premere una o più volte il tasto
associato (come da tabella a lato). Se
la lettera successiva è su un'altro tasto
premerlo direttamente, se è sullo
stesso tasto attendere che il cursore
passi alla posizione successiva quindi inserirlo; premere "Canc" per cancellare un carattere; e
premere la soft key OK per confermare. Inserire il numero telefonico e premere OK per salvare.
Consultazione e chiamata di un numero in rubrica
Per richiamare un numero in rubrica premere il tasto ; scorrere la lista tramite i tasti ,
all'interno della lista premendo il tasto corrispondente alla lettera è possibile "saltare" direttamente al
primo nominativo che inizi con la lettera prescelta, esempio: premendo 3 volte (velocemente) 7 si
arriverà direttamente al primo nominativo che inizia con la R; per richiamarlo premere il tasto
quando il numero è visualizzato.
Opzioni della rubrica (modifica - cancellazione)
Con il portatile in stand-by, premere il tasto la soft-key "Menu", selezionare "Rubrica", premere “OK”,
ora è possibile scegliere tra: “Inserisci” per aggiungere un nuovo contatto, “Modica” per modificare un
nome e/o un numero, "Cancella" per cancellare un contatto, “Canc Tutti” per cancellare tutti i contatti.
Blocco tastiera
Quando è attivo non si possono effettuare chiamate in uscita ma sarà comunque possibile rispondere
alle chiamate. Ci sono due tipi di blocco tastiera, uno rapido e uno tramite codice PIN.
Blocco tastiera rapido: per attivarlo tenere premuto il tasto "0", sul display appare l'icona ; per
disattivarlo tenere premuto ancora il tasto "0". Blocco Tastiera tramite codice PIN:premere la soft key
IT

"Menu"; utilizzare i tasti per selezionare la voce "Blocco Tasti" e premere OK; digitare il pin del
portatile (0000 di default) e premere OK. Sul display, in stand-by, appare la scritta "Tasti Blocc.".
Per sbloccarli: premere la soft key "Menu", quindi premere la soft key "OK" inserire il pin del portatile
(0000) e premere "OK".
IMPOSTAZIONI DEL PORTATILE
Per cambiare le impostazioni del portatile premere la soft key di sinistra “Menu”, premere 3 volte il
tasto , “Imposta Port.” è visualizzato, premere la soft key di sinistra. Ora è possibile cambiare le
seguenti impostazioni:
“Orologio”: per aggiustare l'orario e la data, premere OK; inserire la data: 2 cifre pre il giorno e 2 cifre
per il mese e premere OK per confermare (l'orologio si auto-aggiusta anche tramite l'identificazione di
chiamata, ove disponibile e attiva);
“Suoneria Est.”: per cambiare la melodia o il volume della suoneria , premere OK, tramite i tasti
scorrere le melodie disponibili (la melodia visualizzata sarà riprodotta), selezionare "0" se si vuole
disabilitare la suoneria del portatile, quindi premere OK, tramite i tasti selezionare il volume della
suoneria desiderato e premere OK per confermare;
“Suoneria Int”: per impostare la melodia e il volume della suoneria delle chiamate interne (da altri
eventuali portatili affiliati alla base), stessa procedura della suoneria per le chiamate esterna;
“Bip Tasti”: per abilitare/disabilitare i toni della tastiera, premere la soft key “OK” e se era abilitato ora
sarà disabilitato e viceversa.
“Ch. Diretta”: se quest'opzione è attivata premendo un qualsiasi tasto si chiamerà il numero di
telefono impostato. Premere OK; digitare il numero telefonico che si vuole inserire quindi premere
OK. La chiamata diretta è ora attiva, sul display sarà visualizzato "Ch. Diretta". Per disabilitarlo
premere 2 volte velocemente il tasto . Per riattivarlo ripetere la procedura.
“Scelta Base”: vedere il capitolo configurazione multibase.
“Lingua”: per selezionare la lingua del display.
“Cambio PIN”: per cambiare il codice PIN del portatile, premere OK, inserire il codice PIN (0000 di
default), inserire il nuovo codice PIN, premere la soft key di sinistra, inserire nuovamente il nuovo PIN
e premere OK.
“Reset Portat”: per eseguire il reset del portatile. Premere OK; inserire il PIN del portatile (0000 di
default) quindi premere OK, è possibile scegliere tra "Rubrica": cancella completamente la rubrica;
"Impostazioni": le impostazioni del portatile tornano a essere quelle di fabbrica; "Portatile": esegue
tutti e due i reset insieme;selezionare il tipo di reset desiderato e premere 2 volte OK per confermare.
Babymonitor
Il BabyMonitor serve per far automaticamente chiamare o un numero telefonico esterno o
un'eventuale altro portatile affiliato sulla stessa base quando sente rumori nella stanza in cui è
posizionato. All'interno del menu "Imposta Port" selezionare la voce "BabyMonitor" e premere OK.
Scegliere tra "Ch.Interna" (per attivare la chiamata del BabyMonitor verso un'eventuale portatile
affiliato sulla stessa base) o "Ch.Esterna" (per attivare la chiamata del BabyMonitor verso un numero
telefonico), oppure selezionare “Livello” per scegliere il livello (alto, basso, medio) di rumore con cui
si attiva il babymonitor; premere quindi OK. Se si è scelto chiamate interna inserire il numero del
portatile da chiamare e premere OK; se si è scelto chiamate esterne inserire il numero telefonico e
premere OK. Se attivato in stand-by apparirà la scritta "Baby Monitor". Quando il portatile sente un
rumore attiverà la chiamate verso il portatile o il numero esterno selezionato.
Per chiudere la chiamata: se si è in modalità chiamata interna è sufficiente chiudere la linea sul
portatile dei genitori; se si è in modalità chiamata esterna dopo 2 minuti di comunicazione verrà
chiusa automaticamente la linea. Per disattivare il babymonitor, quando non è in corso una chiamata
premere la soft key di destra "Fine".
NOTA: il portatile con attivo il babymonitor non squillerà alle chiamate esterne.
Chiamata d'emergenza
Nella chiamata d'emergenza sarà possibile memorizzare 3 numeri telefonici da richiamare in caso
d'emergenza. All'interno del menu "Imposta Port" selezionare la voce "Ch. Emerg." e premere OK.
Sul display appare "Ch. Emerg.1", inserire il primo numero telefonico da chiamare in caso
d'emergenza e premere la soft key OK. Tramite i tasti
terzo numero d'emergenza: "Ch. Emerg.2", "Ch. Emerg.3". Per modificare un numero d'emergenza
ripetere la procedura e cancellare il precedente numero telefonico tramite la soft key "Canc".
è possibile impostare anche il secondo e
IT

Per iniziare una chiamata d'emergenza, con il portatile non in impegno linea, tenere premuto il tasto
, il portatile prenderà automaticamente la linea in vivavoce e chiamerà il primo numero
d'emergenza. Se l'altro utente risponde resterà in linea per 2 minuti per poi chiudere la linea e
passare a chiamare l'eventuale secondo numero d'emergenza e poi il terzo. Se un numero è
occupato il portatile chiuderà la linea per passare al successivo. La chiamate d'emergenza terminerà
dopo 3 cicli di chiamate oppure se si chiude la linea tramite il tasto sul portatile che l'ha generata.
IMPOSTAZIONI DELLA BASE
Per cambiare le impostazioni della base premere la soft key di sinistra “Menu”, premere 4 volte il
tasto , “Imposta Base” è visualizzato. Premere la soft key di sinistra , attendere qualche istante,
ora è possibile cambiare le seguenti impostazioni:
“Codice PABX”: per aggiungere automaticamente il codice PABX (centralino, solitamente 1 cifra, 0 o
9) prima della selezione di numeri richiamati dalla rubrica o dalla lista chiamate ricevute/perse.
Inoltre ogni volta che il numero digitato ha come prima cifra il codice del centralino, FW295 mette una
pausa fra il codice PABX e il numero di telefono. Premere OK; inserire il codice PABX e premere OK
per confermare.
“Melodia”: per selezionare la melodia di suoneria della base, premere OK, utilizzare i tasti per
selezionare la melodia, selezionare "0" per disabilitarla. Premere OK per confermarlo.
"Volume": per selezionare il livello del volume della suoneria, premere OK, utilizzare i tasti per
scegliere il volume quindi premere OK.
“Disattiva PT”: per disaffiliare un portatile affiliato sulla base, premere OK, inserire il PIN della base
(0000 di default) quindi premere il tasto OK; selezionare il numero del portatile da disaffiliare quindi
premere OK per confermare (non è possibile disaffiliare il portatile con cui si sta facendo la
procedura.
“Cambio PIN”: per cambiare il codice PIN della base, inserire il codice PIN precedente (0000 di
fabbrica) quindi premere OK. Inserire il nuovo codice PIN quindi premere OK, inserire nuovamente il
nuovo codice PIN e premere OK per confermare.
“Blocco Chiam.”: è possibile bloccare le chiamate verso 5 differenti prefissi (massimo 5 cifre ognuno).
Per ogni prefisso è poi possibile scegliere quale portatile bloccare. Premere OK, inserire il PIN della
base (0000 di fabbrica) quindi premere OK, inserire il primo prefisso da bloccare o passare a un'altra
posizione tramite i tasti quindi premere OK per confermare; utilizzare la tastiera numerica per
scegliere il/i portatile/i da bloccare, per esempio premere 1 per bloccare il portatile 1, premerlo
nuovamente se lo si vuole sbloccar quindi premere OK per confermare. Ripetere la procedura per
inserire altri prefissi e/o bloccare/sbloccare i portatili. Per sbloccare un prefisso completamente
ripetere la procedura e cancellare il prefisso quindi premere OK.
“Reset Base”: questa procedura permette di eseguire il reset delle impostazioni della base, premere
OK, inserire il codice PIN della base (0000 di default) e premere OK, "Reset ?" è visualizzato,
premere OK per confermare. Attendere qualche istante dopo il quale si visualizzerà "No Affiliato".
ATTENZIONE: questa procedura disaffilia tutti i portatili che erano registrati sulla base (anche quello
originale), per ripristinare la registrazione seguire la procedura "Affiliazione di un portatile opzionale”.
NOTA: Anche l'orologio è inizializzato da questa procedura.
Servizio SMS (solo se disponibile attraverso il vostro Gestore telefonico)
FW295 permette di inviare/ricevere messaggi SMS fino a una lunghezza massima di 612 caratteri.
Per poter usufruire del servizio Informarsi presso il vostro Gestore Telefonico se è disponibile
l'opzione per l'invio/ricezione di SMS, se disponibile, chiedere quali sono i numeri telefonici dei
Centri Servizio e impostarli sul telefono (vedere paragrafo successivo).
Come impostare il servizio SMS
Per impostare il servizio SMS con il portatile in stand-by premere la soft key “Menu”, selezionare la
voce "SMS" e premere OK; all'interno del menu SMS selezionare “Impostazioni” e confermare con
OK. Nel menu “Impostazioni” sono disponibili 3 opzioni: "Centro Serv.” per cambiare il centro servizi
per l'invio e/o la ricezione, "Servizio SMS" per abilitare/disabilitare il servizio SMS, "N. Terminale" per
cambiare il numero di terminale.
-Se entrate nel menu "Centro Serv.": scegliendo "Centro Serv. 1" è possibile cambiare il numero del
centro servizi per l'invio dei messaggi, premere "Canc" per cancellare il precedente numero e inserire
il nuovo numero per il centro servizi per l'invio, quindi premere OK; scegliendo "Centro Serv. 2" è
possibile cambiare il numero del centro servizi per la ricezione dei messaggi, premere "Canc" per
IT
cancellare il precedente numero e inserire il nuovo centro servizi per la ricezione, quindi premere OK;
-Se entrate nel menu "Servizio SMS" è possibile scegliere tra "Attivo", per attivare gli SMS o
"Disattivo" per disattivarli;
- Se entrate nel menu "N. terminale" è possibile cambiare il numero di terminale del vostro portatile. Il
servizio SMS su telefonia fissa permette di specificare per ogni telefono SMS che si ha
nell'abitazione, un numero di terminale differente così che si possano ricevere SMS su uno specifico
telefono. Per un corretto funzionamento un telefono DEVE essere sempre configurato come
terminale 0 dato che sia se il messaggio arriva da telefoni cellulari sia che non venga specificato il
numero di terminale questo viene inviato al numero di terminale 0. Premere OK per confermare..
Composizione di un messaggio SMS
E' possibile inviare SMS di una lunghezza massima di 612 caratteri. Con il portatile in stand-by
premere la soft key "Menu"; selezionare l'opzione "SMS" e premere OK; selezionare “Scrivi” e
premere OK. La scritta "Testo:" è visualizzata; inserire il testo del messaggio. Premere la soft key
"Opz., nel nuovo menu è possibile scegliere tra: "Invia" per inviare il messaggio, "Salva" per salvarlo
in memoria,"Canc. Testo” per cancellare l'intero testo. NOTA: se si riceve una chiamata mentre si
scrive il messaggio verrà automaticamente salvato nella lista dei messaggi “Propri”. NOTA: se si
cambia il formato del carattere (maiuscolo/minuscolo), selezionando il carattere successivo si inizierà
dall'ultima tipologia scelta).
Invio del messaggio SMS
Per inviare il messaggio dopo che lo si è scritto premere “Opz.” , selezionare “Invia” e premere OK.
Ora è possibile scegliere tra:
“Invia a uno”(per inviare il messaggio a una sola persona): premere OK, inserire il numero di telefono
o premere “Opz.” e cercarlo nella rubrica; quindi premere la soft key "Invia" per inviarlo.
“Invia molti” (per inviare il messaggio a più persone): premere OK, inserire il primo numero telefonico
o premere “Opz.” e cercarlo nella rubrica, quindi premere per inserire il secondo numero e così
via se se ne vogliono inserire altri (massimo 5 numeri telefonici). Al termine premere “Invia” per
inviare il messaggio.
“N. Terminale”: per indicare uno specifico numero di terminale a cui inviarlo.
“Notifica”: per chiedere la notifica del risultato dell'invio.
Ricezione di un messaggio SMS
Durante la ricezione di un messaggio SMS appare sul display la scritta "SMS" e la base prende la
linea per ricevere il messaggio. Se si sono ricevuti nuovi messaggi sul display in stand-by ci sarà
l'icona , se la memoria disponibile per i messaggi è piena sul display apparirà l'icona e
non si potranno ricevere altri messaggi.
Per leggere i messaggi in memoria se sono presenti nuovi messaggi è sufficiente premere la soft-key
"Vedi" e si entrerà direttamente nella lista dei messaggi ricevuti altrimenti premere la soft key “Menu”,
selezionare "SMS", premere OK, utilizzare i tasti per selezionare "Ricevuti" quindi premere OK.
Scorrere tra i messaggi tramite i tasti e premere OK sul messaggio desiderato per leggerlo.
Durante la lettura premere "Opz." per: “Cancella” per cancellarlo; “Rispondi” per rispondere; ”Inoltra”
per inoltrarlo a qualcun'altro ; “Modifica” per modificarlo ; “Dettagli” per vedere alcune informazioni sul
messaggio.
Come cancellare tutti i messaggi ricevuti
Con il portatile in stand-by premere la soft key “Menu”, selezionare "SMS" e premere la soft key OK;
selezionare "Canc. Tutti", premere OK; selezionare "Ricevuti" quindi premere la soft key OK.
Premere nuovamente OK per confermare la cancellazione o "Indiet" per non cancellarli.
Lista dei messaggi propri
Tutti i messaggi propri salvati sono memorizzati nella lista "Propri" all'interno del menu "SMS". Con il
portatile in stand-by premere la soft key Menu, selezionare "SMS" quindi premere OK; selezionare
l'opzione "Propri" quindi premere OK; sul display appare la parte iniziale dei messaggi salvati,
scorrere la lista tramite i tasti
Mentre lo si visualizza se si preme la soft key "Opz." è possibile inviarlo, modificarlo, cancellarlo e/o
visualizzarne i dettagli.
Come cancellare tutti i messaggi propri
Con il portatile in stand-by premere la soft key “Menu”, selezionare "SMS" e premere la soft key OK;
selezionare "Canc. Tutti", premere OK; selezionare "Propri" quindi premere la soft key OK.
quindi premere OK su quello che si desidera visualizzare.
IT
Premere nuovamente OK per confermare la cancellazione o "Indiet" per non cancellarli.
Capacità di memorizzazione di SMS
Il prodotto può memorizzare fino a: 18 SMS ricevuti (ognuno di 160 caratteri), 18 SMS inviati
(ognuno di 160 caratteri). Se si ricevono/salvano messaggi di più di 160 caratteri la capacità di
memoria cala. Se la memoria SMS è piena apparirà l'icona . Cancellare alcuni messaggi per
riceve o salvare nuovi SMS.
Configurazione multiportatile
Ad ogni base è possibile affiliare 5 portatili(1 già in dotazione), è sufficiente che il portatile che si
vuole affiliare sia DECT in standard GAP.
Affiliazione di un portatile opzionale
Per affiliare un'altro portatile FW295 o affiliare nuovamente il portatile originale dopo un reset della
base:
1- Tenere premuto il tasto della base per circa 10 secondi comunque fino ad udire un doppio tono a
differenti tonalità (se ottenete 2 beep ad uguale tonalità avete già 5 portatili affiliati sulla base e non è
possibile affiliarne altri. Se volete cancellare i portatili precedentemente affiliati eseguite il "Reset
della base" o la "Disattivazione di un portatile"); ATTENZIONE: da adesso avete 1 minuto per
completare la procedura;
2- Sul portatile da affiliare premere "Menu" selezionare la voce "Affiliazione.", premere OK;
3- Selezionare il numero della base, se non si vuole effettuare una "Configurazione “Multibase"
(vedere il paragrafo) premere 1 quindi premere OK;
4- Attendere alcuni istanti dopo i quali sul display apparirà un numero alfanumerico (numero RFPI per
esempio 0234H56012 ), premere OK;
5- Inserire il pin della base (0000 di default), premere OK;
6- Dopo alcuni istanti sul portatile appare il numero del portatile assegnato dalla base.
Ripetere la procedura in caso di insuccesso. Quando arriva una chiamata (esterna o dalla base) tutti i
portatili squillano contemporaneamente. Il numero del portatile viene attribuito direttamente dalla
base e corrisponde alla prima posizione libera. Nella configurazione multiportatile è possibile
eseguire chiamate intercomunicanti tra portatili, passare le chiamate da un portatile e l'altro, eseguire
conversazioni in conferenza tra due portatili e una chiamata esterna. Se un portatile è in impegno
linea sugli altri portatili apparirà l'icona EXT e non è possibile fare nel mentre chiamate esterne.
Conversazione intercomunicante
Per eseguire una conversazione intercomunicante tra i due portatili tenere premuto il tasto INT, quindi
premere il numero del portatile da chiamare, (esempio premere 2 per chiamare il portatile 2) Sul
portatile apparirà il simbolo INT e l'indicazione di quale portatile si sta chiamando (es. "2" se si
chiama il secondo portatile con il primo). Premere il tasto sull'altro portatile per rispondere.
Per terminare la comunicazione premere il tasto su tutti e due i portatili.
Segnalazione di chiamata esterna
Se durante una conversazione intercomunicante si riceve una chiamata esterna, la base incomincia
a squillare e sui portatili lampeggia l'icona EXT. Per rispondere, chiudere la chiamata
intercomunicante tramite il tasto ; attendere che inizi a squillare poi premere il tasto per
prendere la comunicazione.
Trasferimento di chiamata tra portatili
Per trasferire una chiamata esterna all'altro portatile:
1- Tenere premuto il tasto INT (l'interlocutore viene messo in attesa musicale) quindi premere il
numero riferito al portatile da chiamare (esempio premere 2 per chiamare il portatile 2);
2- Appena l'altro portatile risponde inizia una conversazione intercomunicante; per trasferire la
chiamata premere sul vostro portatile
Chiamata in conferenza
Una conversazione in corso può essere estesa a tutti e due i portatili in modo da avere una
conversazione a tre in conferenza. Al punto 2 della precedente procedura premere la soft key "Conf"
sul portatile che ha originato la conversazione intercomunicante. Per tornare alla conversazione
intercomunicante premere "FineCf". Se l'altro portatile chiude la linea si tornerà a parlare
direttamente con la chiamata esterna.
, per riprendere voi la chiamata premere INT.
IT
Configurazione Multibase
Grazie al profilo DECT in standard GAP è possibile affiliare il proprio portatile fino a 4 differenti basi
(anche di marca o modello differente) che siano DECT in standard GAP. Questo permette di creare
un'area estesa di copertura, attenzione però, le altre basi funzioneranno come cella e non come
ripetitore cioè bisognerà avere la linea telefonica su tutte le basi e il portatile quando perde il segnale
da una base si collega all'altra base. La funzione intercomunicante tra portatili funziona solo su
portatili collegati al momento alla stessa base.
Affiliazione di un portatile a una seconda base
La procedura da seguire è la stessa del paragrafo "Affiliazione di un portatile opzionale" tranne che al
punto 3 bisogna scegliere un numero di base progressivo diverso da 1. Se la base è diversa da
FW295 seguire la procedura per porre in registrazione la base di modello differente, sul portatile di
FW295 eseguire la procedura “Affiliazione di un portatile opzionale" dal punto 2 fino al termine.
Se il portatile è diverso da FW295 porre la base in modalità registrazione (punto 1 del par.
"Affiliazione di un portatile opzionale" ) e seguire la procedura di affiliazione per il portatile dell'altro
modello.
Ricerca della base su cui comunicare
Effettuata una configurazione multibase bisogna specificare la modalità di ricerca della base tramite
cui comunicare fra automatica (il portatile quando perde il campo di una base si collega
automaticamente alla base più vicina) o manuale (voi scegliete a quale base collegarvi).
Premere la soft key "Menu", selezionare "Imposta Port." quindi premere "OK"; selezionare "Scelta
Base" e premere OK; utilizzare i tasti per scegliere la base a cui collegare il portatile (selezionare
“Ӿ” per la scelta automatica) e premere OK quindi attendere alcuni istanti fino a quando "Base: X"
(dove X è il numero di base scelto) appare sul display; premere OK per confermare o "Indiet" per non
cambiare base.
NOTA: se dopo circa 5-10 secondi il portatile non trova la base desiderata; si consiglia di avvicinarsi
alla base desiderata o premere il tasto e ripetere la procedura ma scegliendo un'altra base.
ATTENZIONE: quando si passa ad un'altra base l'eventuale conversazione in corso probabilmente
cade e verrà persa. Per collegarsi a una base tramite questa procedura il portatile deve essere
comunque stato prima registrato.
Presenza di nuovi messaggi nella segreteria centralizzata
Se il vostro gestore vi fornisce il servizio di segreteria centralizzata cioè la segreteria telefonica non
fisicamente a casa vostra ma gestibile tramite numero telefonico, FW295 vi segnalerà la presenza di
nuovi messaggi tramite l'icona . Dopo che si sono ascoltati i messaggi e appena il vostro gestore
manda il messaggio di conferma l'icona si spegnerà.
Guida alla risoluzione dei problemi
Una breve guida sulle domande/problemi più comuni e loro soluzioni:
Non si riesce a prendere la linea- Quando si preme il tasto si accende la spia verde? NO: eseguire
la procedura "Affiliazione di un portatile opzionale". SI: Provare a staccare tutti gli altri apparati
telefonici sulla linea, se da solo funziona aggiungere gli altri telefoni e vedere quello che toglie la
linea ad FW295, per la soluzione vedere *.
Il portatile non suona - Probabili cause: BabyMonitor inserito - Suoneria disattivata Soluzione: Reset
del portatile a livello Sistema oppure disattivare il babymonitor e controllare che la suoneria sia attiva;
Audio a tratti o beep durante la conversazione - Probabili cause: ci si è allontanati troppo dalla base
oppure c'è un campo magnetico provocato da altri apparati elettronici vicino alla base - Soluzione:
avvicinarsi alla base o posizionare la base in posizione centrale oppure spostare la base anche di 2030cm per vedere se si ripresenta il problema;
Inserendo il cordless perdo la linea nell'altro/i telefono/i: * Se il vostro impianto ha la spina classica
tripolare: invertire la posizione dei telefoni oppure comprare una spina tripolare per l'utilizzo in
parallelo (esteriormente identica all'altra solo che internamente ha due poli cortocircuitati fra di loro) Se il vostro impianto è di tipo moderno a plug non dovrebbe presentarsi il problema essendo, se fatto
a norma, già completamente in parallelo, consiglio, se vi si presenta il problema, di rivolgervi
all'installatore dell'impianto telefonico;
La base non squilla: Probabilmente avete disattivato la suoneria della base - riattivare la suoneria;
Premendo qualunque tasto il portatile si connette alla base e appaiono dei numeri sul display:
Chiamata diretta attivata - Premere 2 volte velocemente il tasto
;
IT

Sul telefono vicino al cordless si sentono dei disturbi: Allontanare anche di 20-30cm la base del
cordless;
Ronzio durante la comunicazione: Spostare anche di 20-30cm la base del cordless;
Il portatile non si accende: Togliere le batterie e rimetterle facendo attenzione alla polarità,
UTILIZZARE SOLO PILE RICARICABILI (RECHARGEABLE) E NON PILE ALCALINE;
Audio basso, vivavoce basso: Variare il livello del volume, fare attenzione a non coprire i fori e di non
mettere adesivi sui fori;
Vivavoce a tratti: Il vivavoce è half-duplex questo significa che bisogna evitare di parlare
chiamante/chiamato insieme e si consiglia l'utilizzo in stanze con poco rumore di fondo.
Si sente la linea ma non chiama i numeri (e/o non prende la linea esterna su centralino): FW295
seleziona i numeri in multifrequenza, se la vostra linea funziona solo in decadica FW295 non può
funzionare.
Non si vedono i numeri di chi mi chiama: assicurasi che il vostro Gestore Telefonico abbia attivato
l'identificazione di chiamata; Provare a invertire la posizione di altri eventuali apparecchi telefonici.
Non riesco ad inviare SMS: Controllare che il vostro gestore telefonico abbia la possibilità di inviare
messaggi, se ha questa possibilità impostare i Centri Servizio del vostro gestore.
Non riesco a ricevere SMS: Controllare che il vostro gestore telefonico abbia la possibilità di ricevere
messaggi SMS, se ha questa possibilità impostare i Centri Servizio del vostro gestore.
Caratteristiche tecniche
- Tipo di tecnologia: Standard DECT con profilo GAP
- Canali RF: 10 Canali
- Campo di frequenze: 1.881 Ghz ~ 1.897 GHz
- Spaziatura Canali: 1.728 Mhz
- Codifica Audio: ADPCM / 32 kbit per secondo
- Tipo di modulazione: GFSK
- Potenza di trasmissione: 250mW circa
- Autonomia: 120 ore circa in stand-by; 12 ore circa in conversazione
- Raggio d’azione: 100 mt in interni; 500 mt in esterni
- Alimentazione portatile: pile ricaricabili Ni-MH (AAAx2, 2,4V, 550 mAh)
- Alimentazione base: 6V DC 200 mA;
- Tempo di ricarica: 12 ore
- Tipo di selezione: Multifrequenza
- Portatili collegabili ad una base: 5 (4 + 1 in dotazione)
- Basi collegabili ad un portatile: 4
Dichiarazione di conformità
I-TECHSWISS Group con sede in ch.des croisettes 26, 1066 Epalinges - Svizzera
<info@itechswiss.com -www.i-techswiss.com>, dichiara che questo apparecchio è conforme ai
requisiti essenziali ed alle altre disposizioni pertinenti stabilite dalla Direttiva 1999/05/CE concernente
le apparecchiature radio e le apparecchiature terminali di telecomunicazione ed il reciproco
riconoscimento della loro conformità.
La conformità a tali requisiti è espressa tramite l’apposizione del marchio .
Si dichiara in oltre che l’apparecchio è altresì conforme ad i requisiti della direttiva 73/23/CE relativa
agli aspetti di sicurezza elettrica nonché alla direttiva 89/336/CE relativa agli aspetti di compatibilità
elettromagnetica.
La dichiarazione CE di conformità in forma estesa è reperibile presso: I-TECHSWISS Group con
sede in ch.des croisettes 26, 1066 Epalinges - Svizzera.
IT
FW295
EN
Thank you for your choice of the new digital cordless phone FW295, is a DECT (Digital European
Cordless Telephone) phone with GAP (Generic Access Profile) profile. Together with the audio quality
and to the safety offered from the digital technology, offers manifold and useful features including,
the Phone Book (name/number) with 60 memories, the caller identification, the SMS, the built in
answering machine... All the features are easily accessible through a practical menu. Please read
carefully this instructions manual before using your new phone.
ACCESSORIES
Base unit - Hand unit - N. 2 rechargeable batteries AAA - AC/DC Adaptor - Tel-line cord - User’s
manual - Warranty card
Precautions
Read this manual before to use this phone.
Avoid the direct exposure to solar rays and/ or fonts of heat, as like avoid the installation in damps
places and/ or dusty.
Don't support objects on the cables and/ or on the phone.
Don't use adaptor and/ or batteries diverged from that specified on this instructions manual or
however from those in endowment.
In case of storms, disconnect the phone from power and phone lines.
Clean by using a cloth slightly dampened. Don't use alcohol, solvents, abrasives, etc.
Don't effect reparations alone. Tampering and/ or uses not in conformity with as described on the
present book will do decay the guarantee.
I-TECHSWISS Group declines any responsibility in case of improper uses or manipulations not
conform with the instructions as described on this manual.
The socket-outlet shall be close to the equipment and shall be easily accessible.
Low radiation: when only one handset is registered to the base and if the handset is put on
the base cradle to recharge, the transmission power is very reduced to decrease the
emission of electromagnetic radiations. When more than two handsets are registered to
the base or the handset is out of the base cradle, it is same as normal DECT.
This product has been developed to be connected to the analogue telephone network (PSTN). This
“Class 1” radio product can be free used in EU states.
This equipment is developed in conformity of the requirements of 2002/95/EC on the restriction of the
use of certain hazardous substances in electrical and electronic equipment.
This symbol , present also on the product, means that the electric and electronic product have
to be disposal properly and separately from normal waste as described on Directive 2002/96/CE. So,
this product and all of this components, have to be dispose at your local collection point or recycling
centre.
How to select the language of display:
Press the left soft key, press 3 times key, then press again left soft key, press 6 times the
key then press the left soft key. Use keys to select the languages of the LCD, then press left soft
key to confirm.
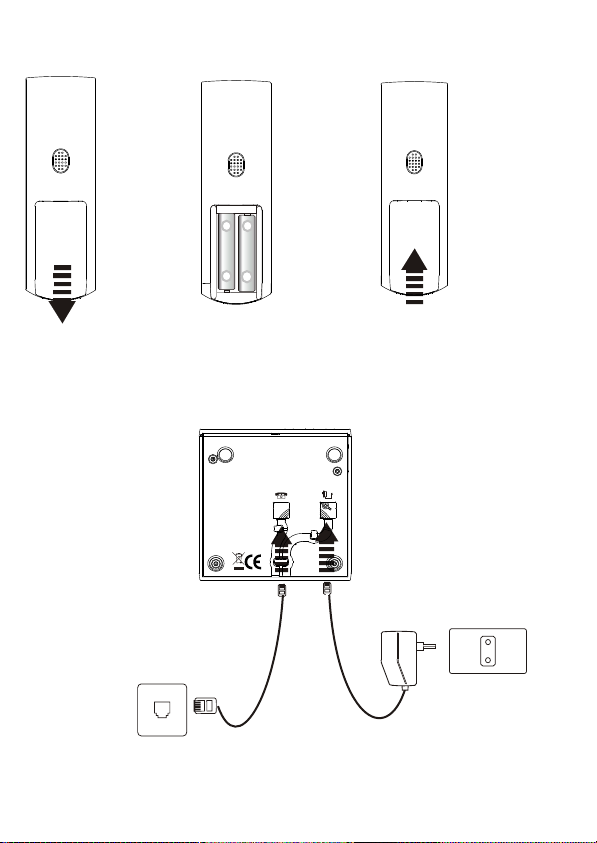
Installation of AC/DC adaptor
Connect the plug of adaptor to the jack placed on the back of base, then connect it to the 220V
socket.
Connection of phone line
Connect the plug of line cord to the jack placed on the back of base, then connect it to the line
socket.
Battery installation
Remove the battery door; place the 2 rechargeable batteries controlling the polarity indicated; close
the battery door. IMPORTANT: the Nickel - Metal Hydride battery, when exhausted, must be recycled
or disposed properly. USE ONLY RECHARGEABLE BATTERIES.
Note on the use of the product
User Manual
EN
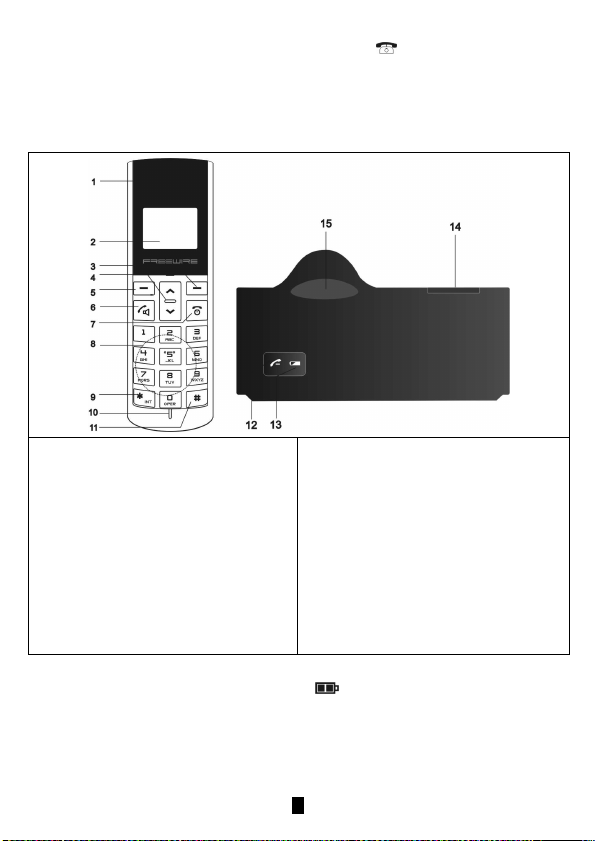
Description
1: Receiver;
2: LCD;
3: Right soft key, the function associated is
written on lcd;
4: Up/Down key, UP: To enter on received call
list and to pass to the previous option on the
menu; Down: To enter on Phone Book/to pass to
the successive option on the menu;
5: Left soft key;
6: Hook off key, long press during conversation
for Hands free, long press on stand by for care
dial;
Battery charging
Put the handset into the cradle, with the keypad in front view, for at least 10 hours when the battery is
totally discharged. The red led on the base turn on and the icon is flashing to indicate that
handset is in charging state. When charging is complete the icon continue to flashing.
Coverage range
The coverage area could be affected from manifold situations. The indication 500mt outdoor and
100mt indoor is purely theoretical, that is obtainable only in optimal conditions of propagation of the
signal. However for a better coverage is advisable to install the base set in a place as more central
position of the building within where the cordless must be used.
To turn/off the handset
To turn on press
To make a call
Press key to take phone line; dial the desired number, to end the call press key or put the
handset on charge position. At the end of each call, the green light switch off and the LCD will display
the duration time for about 3 seconds.
Pre-dial
Dial directly the number to be called (if an error is occurred, press "Delete" soft- key to delete the last
digit ); press key to send a call. The number will be called automatically.
How to answer the incoming call
When receive an incoming call, base and handset will ring and the EXT icon is flashing, to answer
press key.
key; to turn off keep pressing key.
7:Hook on key; also to turn on/off the handset;
8:Numeric keypad;
9: Star key, also to make intercom calls;
10: Microphone;
11: Pound key, also R/flash key;
12: On-line led
13: In charge led, handset is in recharge
position;
14: Page key;
15: Recharge vain.
EN

Hands free
To make a conversation on hands free, during conversation keep pressing , speak at about 30cm
from microphone. During hands free mode is possible to switch on normal conversation by press
again key and vice versa. Note: To set the speaker volume follow the procedure "Adjustment of
receiver volume".
R key (recall)
Pressing (R) key while a phone conversation, you will access to the supplementary service of the
network (example, the call waiting if subscribed with network operator) or is useful to the
supplementary service of the PABX line for example to transfer call.
Interdigit Pause
It will put a pause of about 3 seconds between two digit, this is useful if you have a PABX line
because on many PABX is necessary to put a pause between PABX code and prefix. On pre-dialing,
after you have type at least one number, press "Pause" soft key. The pause is displayed by "-".
Use of the soft key
On handset there are 2 keys with “ — ” symbol. The function of this 2 keys is, each time, the writing
that are inside the 2 rectangle on lcd. For example on stand-by the left soft key correspond to
"Menu" to enter inside the Menu, the right soft key corresponds to "Redial" to check the dialed call
list.
Use of the menu
FW295 is endowed with a practical tree menu. To enter on the menu press "Menu" soft key on standby mode, to look through the different option use keys, press left soft key to enter on the submenu. On the upper side of LCD there are the title of the menu, under there are the option. Use
keys to look through the option, then press left soft key to confirm the selected item. Press right
soft key to come back at the previous screen. Press key to come back to stand-by mode.
Adjustment of receiver volume
During a phone call use keys to choose the volume level (1= low, 2= middle, 3= high) and press
"OK" soft key to confirm.
Microphone mute
During a call, press left soft key "Mute" to mute the microphone. To enable press "Unmute" soft key.
Handset paging
Pressing the key on the base, the handset will ring. This feature can be useful, for example, to
locate the place where you left the handset.
Out of range indication
If during a phone conversation you are far from covered range of base set, the communication will be
difficult. If you don’t come back to the covered area, the line will be cut (LCD will display "Out of
range").
Battery level indication
The LCD can display 3 battery levels, when the battery icon is empty, put the handset into the cradle
for charging.
Caller Identifier (feature enable only if subscribed with Network provider)
This cordless may display the caller telephone number during ringing. It's store also the last 20 call
received /missed. When the handset ring, if the caller identifier is subscribed with network, the lcd will
show: the telephone number; or the correspondent name on Phone Book (if it's stored on Phone
Book); or "Reserved" if the number is hidden; or "Unavailable" if the caller identifier is not available.
If you doesn't answer at the calls, on stand-by is displayed how many missed call have you received,
on this screen is possible enter directly on missed call list by "View" soft key.
Received Calls list
FW295 stored on list last 20 received/missed calls (only with caller identifier subscribed)
To enter on the lists: press directly
then press "OK" soft key. Inside the list use keys to look through the number in the list, on missed
calls not previously viewed there is the symbol Ӿ , press to recall. If you press the left soft key
"Option" is possible to: ”View”, to see the hour and date of the call (see WARNING); “Save”, to save
the number on Phone Book; “Delete”, to delete from the list. To delete the whole list turn off/turn on
the handset. WARNING: hour and date are available only on PSTN and not on ISDN NT1 PLUS.
; or press left soft key, use keys to display "Call List",
EN
Dialled Call list
FW295 stored the last 10 dialled calls. To display: press right soft key, the last dialled number is
displayed, then use keys to look through the list. Press key to call the number displayed. Is not
possible to delete a single number form the list. To delete the whole list turn off/turn on the handset.
Phone Book
FW295 is endowed with an alphanumeric Phone Book with the possibility to save 60 memories. To
save a number on Phone Book with
handset on stand-by, press "Menu"
soft key, select "Phone Book", press
left soft key, "Add Entry" is displayed,
press left soft key again; enter the
name, to enter a characters press one
or more times the associated key (as
per table). Enter directly the next key if
the character is on a different key or, if
is on the same key wait until the
cursor is displayed on the next position then enter the new character, press "Delete" to delete a
characters; and press OK soft key to confirm. Enter the telephone number then press OK soft key to
save.
To recall a number from Phone Book
To recall a number from Phone Book: with handset on stand-by press key; use keys to look
through the phone book, inside the list is possible to jump at the first name of a character by pressing
the associated key (for example press 3 times faster 7 key, you will jump at the first name that start
with "R"; when the desired name is displayed press key to call.
Phone Book option (delete - edit)
with handset on stand-by press "Menu" soft key, select “Phone Book” then press left soft key, now is
possible to choose between the following option: “Add Entry” to add a new number, “Modify” to edit a
number, "Delete" to delete a number, “Delete All” to delete all the numbers.
Keypad lock
The Keypad lock features is useful to avoid fortuitous typing in the key. While is activated you can't
make call but is possible to answer the calls. Keypad Lock: with handset on stand-by keep pressing
"0" key until "Keypad Lock" is displayed, now on stand by there is the icon . To unlock keep
pressing again "0" key. Keypad Lock with PIN code: Press "Menu" soft key, select "Keypad Lock"
then press "OK" soft key; enter the handset pin code (0000 default) then press "OK". During stand-by
mode, "*Locked*" is displayed. To unlock: press "Menu" soft key then press "OK" soft key; enter the
handset pin code (0000 default) and press "OK".
HANDSET SETTING
To change the handset setting press left soft key “Menu”, press 3 times , “HS Setting” is
displayed. Press left soft key, now is possible to change the following setting:
“Clock”: to adjust the clock, press OK soft key; enter the date: two digits for day and two digits for
month then press OK; enter two digits for hour and two digits for minutes and confirm by OK;
“Ext Ring”: to adjust the melody & volume of ring tone, select "Melody" look trough the available
tones by keys (you can hear each tone), select "0" to disable the handset ring tone, select
"Volume" to change the ringtones volume, use keys to set then press OK keys to confirm.
“Int Ring”: to adjust the melody & volume of internal call ring tones, follow the same procedure of
external ring.
“Key Click”: to enable/disable the beep of the button, press “OK” soft and if was enable now is disable
and vice versa.
“Direct Call”: While this option activated when you press any keys the handset call automatically a
previous emergency phone number. Press OK; enter the direct call number then press OK. The direct
call is now active, on lcd on stand-by "Direct Call" is displayed. To disable: press 2 times faster
key. To active again repeat the procedure.
“Select Base”: see Multibase paragraph.
“Language”: to select the language of the display.
“Change PIN”: to change the handset pin code, press OK, enter the previous PIN (0000 default), now
EN

enter the new PIN, press left soft key, enter again the new PIN, press OK.
“Reset Handset”: to reset the handset, To reset the handset: press OK; enter the handset pin (0000
default setting) then press OK, is possible to select between 3 different kind of reset: "Phone Book":
to delete the whole phone book; "Settings": to reset settings at the default settings (also the
Appointment); "Handset": reset Phone book and settings; then press 2 times OK to confirm.
Babymonitor
if you have at least 2 handset subscribed on the same base (see "Multi handset configuration") is
possible active the BabyMonitor on a handset. When BabyMonitor is enabled, the handset with
babymonitor active when there is a noise/voice/cry on the place where is left, it calls automatically the
other handset selected or the external number set. Enter on handset setting then select
“Babymonitor” and press left soft key, select "Int Call" to make the Babymonitor call toward to an
handset subscribed on the same base, select "Ext Call" to make the Babymonitor call toward to an
external telephone number, or choose “Level” to select the sensibility level to start the call; then press
OK soft key. If you select "Int Call" enter the number of handset to call, if you select "Ext Call" enter
the external telephone number to call; then press OK to confirm. If is active on stand-by is displayed
the writing "Baby Monitor". When handset hear a noise/voice/crywill call the other handset selected or
the external number set then:-if the BabyMonitor is on internal call, is sufficient to close the line on
the parent handset; -if the Babymonitor is on external call, after 2 minutes of conversation the
babymonitor handset will close the line. If after that there are noise/voice/crying it will recall the
external number. To disable the Babymonitor press the soft key "End" on the Babymonitor handset
when is on-hook. WARNING: the handset with BabyMonitor activated doesn't ring at the external call.
Emergency Call (care dial)
With this procedure is possible to saved 3 telephone number to recall in case of emergency by a long
press on key. To set the number press "Menu" soft key, select "HS Setting" then press OK; select
"Care Dial" option, press OK; "Care Dial 1" is displayed, press OK soft key then enter the first number
of the list, then press OK soft key. Use keys to set the 2nd care dial number ("Care Dial 2") and
the 3rd care dial number ("Care Dial 3"). To start an emergency call, with the handset on on-hook,
keep pressing key, the handset will switch on hands free and start to call the first emergency
number. If the other party answer the handset remain on conversation for 2 minutes, after that
disengage the line and call the second emergency number ad so on. If an emergency number is
busy, it pass directly to call the next number. After 3 times that handset calls the emergency number it
will end automatically the Emergency call or press key to end the emergency call.
BASE SETTING
To change the base setting press left soft key “Menu”, press 4 times , “Base Setting” is displayed.
Press left soft key, wait a moment, now is possible to change the following setting:
“PABX code”: to automatically add the PABX exit code (1 digit usually 0 or 9) before the phone
number save on Phone Book and before to the numbers recall from Missed/Received calls list.
Moreover each time you type a number that have as initial digit the PABX exit code, FW295 add
automatically a pause between PABX code and phone number to make easier the link between
PABX and public line. Press OK; enter the PABX code and press OK to confirm.
“Ring Melody”: to select the melody of the ring tone of the base, press OK, use to select the tone
select "0" to disable the base ring. Press OK keys to confirm.
"Ring Volume": to select the desired volume of the base ring volume, press OK, use keys to choose
the volume then press left soft key to confirm.
“Desub HS”: to de-register an handset from the base, press OK, enter the base pin code (0000
default) then press OK; select the handset number to desuscribe then press OK to confirm (is not
possible to desuscribe the handset that make the procedure).
“Change PIN”: to change the PIN of the base, enter the previous pin (0000 default setting) then
press OK. Enter the desired new pin then press OK; enter again the new PIN then press OK to
confirm the modify.
“Call Barring”: it's possible to lock until 5 area codes (max. 5 digits each one). For each area code is
possible to choose which handset have to be locked. Press OK, enter the pin of the base (0000
default setting) then press OK, enter the first area code to lock or pass at the following or precedent
area code to lock by
handsets have to be locked, for example press 1 to lock the handset 1, press again to unlock, the
keys then press OK to confirm; use the numeric keypad to choose which
EN

handset, press OK to confirm. Repeat the procedure to enter other area code to block.To disable an
area code blocked repeat the procedure and delete the area code then press OK.
“Base Reset”: This procedure allow to reset the base settings, press OK, enter the previously base
PIN code (0000 default setting) and press OK, "Reset base ?" is displayed, press OK to confirm. Wait
a moment, "Not Sub" is displayed. WARNING: this procedure desuscribe all the handset from the
base also the original handset, this cause that you have to make "Handset Subscription" to use
again the cordless. NOTE: Also the clock is reset by this procedure.
SMS (only if available with your network provider)
With FW295 is possible to send/receive SMS with a maximum length of 612 characters.
WARNING: Check to your network provider if is available the SMS service, if available please ask
which are the number of the SMS service center 1 (sending) and SMS service center 2
(reception)and set the SMS with this 2 numbers as explain on next paragraph.
How to set the SMS service
To set the SMS service with the handset on stand-by press soft key "Menu" soft key; select "SMS"
and press OK; select "Settings" option and confirm by OK. A menu with 3 option will be opened:
"Service Ctr" to change the service centers number, "SMS Service" to enable/disable SMS, "Terminal
Nr." to change the terminal number of your handset.
If you enter on "Service Ctr" option: if you choose "Service Ctr 1" is possible to change the number of
the service center to send the messages, press more times Delete and enter the new number, press
OK to confirm; if you choose "Service Ctr 1" is possible to change the number of the service center to
receipt the SMS, press more times Delete and enter the new number, press OK to confirm;
-If you enter on "Terminal Nr." option is possible to change the terminal number of your handset. The
SMS on public line allows to give at each SMS telephone that are in your house, however on the
same telephone line, a terminal number so is possible to send or receive SMS on a determinate
terminal that you have on your line. For a correct working at least one telephone must be set as
terminal 0 because the SMS sent form mobile phone or SMS sent without terminal number
specification arrive only at the terminal 0. If you have more handset subscribed on the same base be
sure that all the handset have the same terminal number. But if you have more telephone SMS
telephone on the same line it must be set with different terminal number (from 0 to 9).Select the
terminal number and press OK to confirm.
How to write an SMS
Is possible to send SMS with a maximum length of 612 characters. With the handset on stand-by
press "Menu" soft key; select "SMS" option and press OK; select "Write" and press OK.
The write "Text:" is displayed; enter the text of the messages. Press "Option" soft key, a menu will be
opened where is possible to choose between: "Send" to send the messages, "Save" to save
the messages, "Delete text" to delete the whole text. NOTE: if you receive a call meanwhile
you type a messages this will be saved on Sent SMS list. NOTE: if you change the format of the
character (capital/lower case), the follow character will start form the previous format character.
Send the SMS
When you finish to write the messages press Options soft key, select “Send” and then press OK.
Now is possible to select between the following options:
“Send to one”(to send the message to one phone number): press OK, enter the telephone number or
press “Option” and found it into the phone book; after that press the soft key "Send" to send the
messages.
“Send to many” (to send the messages to many phone number):press OK, enter the first phone
number or press “Option” and found it on phonebook, then press
number and make the same procedure to enter the other number (until 5 phone numbers), to come
back on a previous locations press key. When finish to enter phone numbers press "Send" soft
key to send the message sequentially.
“Terminal Nr.”(to send to a specific terminal number)
“Notification” (to ask a notification of the result of the sending)
Receipt of an SMS message
When FW295 receive an SMS message, the write "SMS" is displayed and the base hook off the
telephone line to receive the message. If you have new messages received on display there is the
icon, if the memory is full on display there is icon and you can't receive other messages.
key to enter the 2nd phone
EN

To read the messages if you have new messages is sufficient to press the "View" soft key and you
enter directly into the received message list otherwise, with FW295 on stand-by mode, press Menu
soft key, select "SMS", press OK, use keys to select "Received SMS" then press OK soft key.
A list will be open with all the telephone number (or name if on phone book) from which you have
received the message. Look through the messages by key and press OK on desired SMS to open
and read. While reading is possible by press "Option" key to:
“Delete” to delete; “Reply” to reply ; ”Forward” to forward ; “Modify” to modify ; “Details” to see some
information regarding the message.
How to delete the whole SMS received list
When the handset is on stand-by press Menu soft key, then select the "SMS" screen and press OK
soft key; select "Delete All" then press OK soft key; select "Received SMS" then press OK soft key;
Press another time OK to confirm or "Back" to not delete.
Sent SMS list
All the SMS saved are stores on the "Sent SMS" list inside the "SMS" menu, and is possible to
visualize/delete/send/modify. When the handset is on stand by mode press Menu soft key, select
"SMS" then press OK soft key; select "Sent SMS" option then press OK; on lcd the initial side of each
SMS is visualized, by keys look through the list and press OK on desired SMS to visualize.
While the SMS is visualized if you press "Option" key is possible to send, modify, delete, visualize the
details.
How to delete the whole Sent SMS list
When the handset is on stand-by press Menu soft key, then select the "SMS" screen and press OK
soft key; select "Delete All" then press OK soft key; select "Sent SMS" then press OK soft key;press
another time OK to confirm or "Back" to not delete.
SMS memory capacity
FW295 can stored until: n. 18 SMS received (each one of 160 characters), n. 18 SMS sent (each
one of 160 characters). If you received or save message that have more than 160 characters,
memory capacity is reduced proportionally. On stand-by mode, if the memory is full, there is
icon. Delete some message to receive or save new SMS.
Multi Handset Configuration
At each base is possible to subscribe 5 handset (1 original + 4 optional), is necessary that the other
handset is DECT on standard GAP.
Handset subscription
To subscribe another FW295 handset or to subscribe the original handset after a base reset:
1- Keep pressing base key until 10 seconds however until you heard a double tone from the base
with different tonality (if you heard 2 equal tone that means that you have already 5 handset
subscribed on the base and is not possible to subscribe another one). WARNING: from now you have
1 minute to finish this procedure;
2- Press "Menu" soft key and select "Subscription" is displayed then press OK;
3- Enter the base number where subscribe the handset, if you doesn't want to make a Multi Base
configuration press 1 key;
4- Wait a moment until the RFPI (an alphanumeric number, for example "0234H56012" paragraph) is
displayed, then press OK soft key;
5- Enter the base pin code 0000, then press OK key;
6- Wait a moment, the handset is subscribed on the base.
Repeat this procedure in case of failure. When the telephone receive a call all the handset will ring.
The handset number is assigned by the Base, and correspond at the first free position.In multi
handsets configurations possible to make internal call between handset, is possible to pass a call
from an handset to the other and is possible to make conference call between 2 handset and an
external caller. During conversation between one handset and an external caller, on others handsets
EXT icon is displayed and no other external calls are possible.
Intercommunication between handset
Keep pressing INT key; press the key that correspond at the handset number to call (example press
1 key to call Handset 1); press
conversation press key on the handsets.
Signalling of incoming call
key on the other handset to answer at the internal call. To end the
EN

If during an intercommunication between handset you receive an incoming call, the base ring on
handsets the EXT icon is blinking. To answer: end the internal call by key; wait that handset ring
then press key to answer the call.
Call transfer between handset
During external conversation keep pressing INT key; press the number key that correspond at the
handset number to call (example press 1 key to call Handset 1); when the other handset answer, an
internal call start; to transfer the call press key on your handset, to not transfer the call press
again INT key.
Conference Call
An external conversation can be shared at 2 handset so you have a conference between 3 person.
At the point 4 of previous procedure ("Call transfer between handset") press "Conf" soft key on the
handset that start the internal conversation. To end the conference press "End CF".
Multi base configuration
Thanks to the GAP profile is possible subscribe your handset at 4 different base station (also of
different and/or brand), is sufficient that are DECT with GAP profile.
that allows to create a wide coverage area, note that the base station doesn't amplify the signal that
means that the other base aren't signal repeater but they working as cell so each base need the
telephone line and the handset when lost the signal will link at another base and not at the original
base through the other base. The intercommunication between handset working only if the 2 handset
are linking at the same base station.
Subscription of handset to another base
The procedure to be follow is the same of "Handset subscription", the difference are:
Handset and Base of FW295: follow "Handset subscription" procedure except that at 3 point you
need to choose a progressive number of base. If base is different from FW295:Follow the procedure
of other model to put the base on "Subscription mode" (usually keep pressing PAGE key), then follow
the procedure "Handset subscription" from point 2 to the end of procedure, at point 5 type the base
pin code of the other model.
If handset is different from FW295:Put the FW295 base on "Subscription mode" (follow point 1 of
"Handset subscription") and follow the subscription procedure of the handset of the other model
(remember to use PIN code of FW295 base, 0000 default).
Base selection
Press "Menu" soft key and select "HS Setting" then press "OK"; select "Select Base" option then
press OK; use keys to select the base that you want to link then press OK (select “Ӿ” for a
automatic choose); wait some seconds, "Base: X" (where X is the base number that you choose at
the previously point); press OK to confirm or "Back" to not change the link base station
NOTE: If after 5-10 seconds the handset doesn't found your desired base but at 6 point remain "New
Base X" (where X is the desired base number) it means that the handset doesn't found the base;
approach the desired base or press key and repeat the procedure but choose another base.
WARNING: when you pass from a base to another base if you are making a conversation probably it
will be lost.The automatic search will be activate until you make a new subscription with that handset
or until you make a manual searching of the base.
Icon of new message on centralized answer service
If your Network provider provide a centralized answer service that means not an answering machine
on your house but an answering service managed by phone line, FW295 will signal by icon
when there are new message on centralized answer service. After that you listen the new message,
the Network provider will send a message to your cordless and the icon switch off.
NOTE: this features may be not available on your country.
FAQ - Troubleshooting
I don't listen the line tone -When you press
"Handset Subscription" procedure YES: Try to use only FW295 on your telephone line, if alone
working, try to exchange the position of the telephone.
Handset doesn't ring - Solution: Handset Reset at Settings level or try to deactivate Babysit or check
that handset external ring melody is not on "0";
Lost of audio during conversation or beep during conversation - Approach to the base station or try to
position the base on a central position or also displace the base of 20-30cm. from the previously
key the green led on base switch on? NO: follow
EN

position.
Base doesn't ring: Probably base ring mode is disable, change the base ring melody;
When you press a key the cordless will connect the phone line and some numbers are displayed:
Direct (emergency) call activated - Press faster 2 times key;
On telephone near the base of the cordless I listen some noise: Displace the base away of 20-30cm.
respect the previous position;
Noise during conversation: Displace the base away of 20-30cm. respect the previous position;
Handset doesn't turn on: Remove and replace the batteries, pay attention at the polarity, USE ONLY
RECHARGEABLE BATTERIES AND NOT ALKALINE BATTERIES;
Receiver/speaker volume low: Adjust the volume level and/or pay attention to not cover or put label
on the receiver/speaker hole;
Hands free: To get a good conversation on hands free we suggest to avoid to speak caller/called all
together but one each time and use hands free mode on room with lower background noise.
R (FLASH) key doesn't transfer the call on my switchboard (PABX): Flash key of FW295 is on 100ms
may be not compatible with your switchboard.
Caller identifier doesn't work: Be sure that the caller identifier service was subscribed with your
Telephone network provider.
SMS doesn't work: Be sure that the SMS service is available from your Network provider, change the
Service Center number with the Service Center of your network provider.
Technical data
Technology: DECT Standard (Digital European Cordless Telephone) with GAP (Generic Access
Profile) profile RF Channels: 10 Channels; Frequency range: 1.881 Ghz ~ 1.897 GHz - Channel
Bandwidth: 1.728 MHz
Speech encoding: ADPCM / 32 Kbps ; Modulation type: GFSK ; Output power: 250mW max
Battery life: stand-by: about 120 hours; talk: about 12 hours
Communication range: about 500 mt in open field; about 100 mt in closed field
Power supply for handset: Ni-MH Batteries (AAAx2, 2.4V, 550 mAh)
Power supply for base set: DC6V 200mA - Recharging time: 12 hours
Dialing method: DTMF ;
Max handset to the base: 5 (4 + 1 in endowment) - Max base to the handset: 4
Declaration of Conformity
I-TECHSWISS Group addressed inch.des croisettes 26, 1066 Epalinges -CH <info@itechswiss.com -www.i-techswiss.com> declare that this product is conforms with the essential
requirements and provisions of the 1999/05/EC Directive regarding the radio equipment and
telecommunications terminal equipment and the mutual recognition of their conformity.
On the basis of this declaration, these products and the packaging will bear the
following mark: .
This equipment also complies with the essential requirements and provisions from Low Voltage
Directive 73/23/EC and EMC directive 89/336/EC, and also complies with those standards EN301406
V.1.4.1; EN301489-01 V.1.3.1; EN301489-06; EN60950:2000. The complete CE Declaration of
Conformity is available at: I-TECHSWISS Group inch.des croisettes 26, 1066 Epalinges -CH.
EN
FW295
FR
Nous vous remercions d'avoir choisi ce nouveau téléphone sans fil FW295, c’est un téléphone DECT
(Digital European Cordless Telephone) à profil GAP (Generic Access Profile).
Avec la qualité audio et la sécurité garantie par la technologie numérique, ce téléphone offre
plusieurs fonctionnalités utiles, telles que l'annuaire avec 60 positions mémoires (nom/numéro),
l'identification des appelants, le SMS...
Toutes ces fonctionnalités sont facilement accessibles au moyen de menus pratiques.
Lisez attentivement ce manuel avant l'utilisation de votre nouveau téléphone.
Accessoires
Base
Combiné
2 piles AAA rechargeables
Adaptateur CA/CC
Cordon de ligne téléphonique
Mode d’emploi
Carte de garantie
Précautions
Lisez ce guide avant d'utiliser ce téléphone.
Ne pas exposer l’appareil directement au soleil et/ou à des sources de forte chaleur, ni le placer dans
des endroits humides et/ou poussiéreux.
Ne poser aucun objet sur les câbles et/ou sur le téléphone.
Ne pas utiliser d’adaptateur et/ou des piles différentes de celles indiquées sur cette notice.
En cas d’orage, débranchez le téléphone du courant ainsi que les lignes téléphoniques.
Nettoyez avec un chiffon légèrement humide. N’utilisez ni alcools, ni solvants, ni abrasifs, etc.
Ne pas effectuer les réparations par soi-même. Tout manipulation et/ou usage non conforme à cette
notice fait perdre tout droit à la garantie.
I-TECHSWISS Group décline toute responsabilité en cas de mauvaise manipulation ou utilisation
non conforme aux indications du mode d’emploi.
Placez votre équipement près d'une prise électrique facilement accessible.
Faible rayonnement : Lorsqu’un seul combiné est enregistré dans la base et si le combiné
est placé dans le berceau de la base pour être rechargé, l’intensité de transmission est
très réduite pour réduire l’émission de radiations électromagnétiques. Si plusieurs
combinés sont enregistrés dans la base ou un combiné n’est pas dans le berceau de la
base, c’est la même chose qu’un DECT normal.
Ce produit est conçu pour être connecté à un Réseau Téléphonique Public avec Commutation
(RTPC). Cet équipement de transmission radio de la "classe 1" peut être utilisé dans les pays de
l'Union Européenne.
Cet équipement est développé conformément aux conditions de la directive 2002/95/EC sur la
restriction de l'utilisation de certaines substances dangereuses dans les équipements électriques et
électroniques.
Le symbole sur ce produit signifie que c'est un produit électrique et électronique et selon la
directive Européenne 2002/96/CE, il ne doit pas être jeté dans les ordures ménagères. Donc, ce
produit et toutes ses composantes doivent être mis au rebut dans un centre local de recyclage pour
un traitement sans risque.
Pour choisir la langue d'affichage
Appuyez sur la touche contextuelle gauche, appuyez 3 fois sur la touche
sur la touche contextuelle gauche, appuyez 6 fois sur la touche puis appuyez sur la touche
contextuelle gauche. Utilisez les touches pour choisir la langue d'affichage écran, puis appuyez
sur la touche contextuelle gauche pour confirmer.
MANUEL DE L’UTILISATEUR
, appuyez à nouveau
FR
Installation de l'adaptateur CA/DC
Branchez la sortie de l’adaptateur à la prise située au dos de la base, puis branchez l’adaptateur
à une prise secteur 220V.
Raccordement de la ligne téléphonique
Branchez une extrémité du cordon téléphonique à la prise située au dos de la base, et branchez
l'autre extrémité à la prise téléphonique murale.
Installation des piles
Retirez le couvercle des piles, placez 2 piles rechargeables en respectant les polarités puis refermez
le couvercle.
IMPORTANT Les piles étant au nickel métal hydride, une fois usées, elles doivent être recyclées ou
mises au rebut de façon adéquate. N’UTILISER QUE DES PILES RECHARGEABLES.
Remarque sur l'utilisation du produit
Description
1: Récepteur
2: LCD;
3: Touche contextuelle droite, la fonction associée à
cette touche sera inscrite sur le LCD ;
4: Touches haut/bas
HAUT : Pour ouvrir la liste des appels reçus et pour
passer à l'option précédente dans un menu ;
Bas : Pour ouvrir l'Annuaire/pour passer à l'option
suivante dans un menu ;
5: Touche contextuelle gauche ;
6: Touche fin d'appel, pression longue durant une
conversation pour passer en mode mains libres ;
pression longue en veille pour appeler un numéro
d’urgence;
Chargement des piles
Une fois les piles sont complètement déchargées, placez le combiné dans le berceau, avec les
touches en face, pendant au moins 10 heures. Le témoin rouge de la base s’allume et le symbole
clignote pour indiquer que le combiné est en charge. Une fois la charge terminée, le symbole
continue de clignoter.
7: Touche prise d'appel, mise en
marche/arrêt du combiné ;
8: Clavier numérique ;
9: Touche astérisque, aussi pour
effectuer des appels inter-combinés;
10: Microphone ;
11: Touche dièse, aussi touche R/flash ;
12: LED En ligne
13: LED en charge, le combiné est en
recharge;
14: Touche Page;
15: Connecteurs de recharge du socle;
FR
Zone de couverture
La zone de couverture dépend de plusieurs facteurs. L'indication 500 m à l'extérieur et 100 m à
l'intérieur est purement théorique, et n'est obtenue que dans des conditions optimales de propagation
du signal. Toute fois, pour une meilleure couverture, il est conseillé d'installer la base dans un endroit
central de la construction où sont utilisés les téléphones sans fil.
Pour allumer/éteindre le combiné ;
Appuyez sur pour mettre en marche l'appareil, pour l'arrêter maintenez enfoncée.
Pour faire un appel
Appuyez sur la touche pour avoir la tonalité ; composez le numéro désiré, pour mettre fin à un
appel, appuyez sur la touche ou remettez le combiné dans le berceau. A la fin de chaque appel, la
lumière verte s’éteint et la durée de la communication reste affichée sur l'écran LCD pendant près de
3 secondes.
Appel auto
Entrez directement le numéro à appeler (en cas d'erreur, utilisez la touche contextuelle “Effacer” pour
effacer le dernier chiffre) ; appuyez sur pour appeler. Le numéro sera appelé automatiquement.
Comment répondre à un appel entrant
En cas d'appel entrant, le combiné et la base vont sonner et le symbole EXT va clignoter, pour
répondre appuyez sur la touche .
Mains libres
Pour faire une conversation en mode mains libres appuyez en continu sur la touche durant la
conversation, parlez à 30 cm du microphone. On peut passer du mode mains libres en mode normal
en appuyant sur la touche et vice versa.
Remarque : Pour régler le volume du haut-parleur, suivez la procédure "Réglage du niveau de
volume du combiné".
La touche R (rappel)
En appuyant sur la touche (R) pendant une conversation, vous bénéficiez de services
supplémentaires du réseau (exemple, la mise en attente de l'appel – si l'appelant est abonné du
fournisseur de service) ou au service supplémentaire de transfert d’appel sur une ligne PABX.
Intervalle entre chiffres
Cette option permet de laisser un intervalle de 3 secondes entre deux chiffres, ceci est nécessaire
surtout lorsqu'il s'agit de ligne PABX laquelle exige un intervalle entre le code PABX et le préfixe.
Lorsque vous entrez un numéro à l'avance, une fois vous avez tapé au moins un chiffre, appuyez sur
la touche contextuelle "Pause". "-" s'affiche sur l'écran LCD.
Utilisation des touches contextuelles
Sur le combiné il y a 2 touches avec un symbole —. Leurs fonctions correspondent à ce qui est
indiqué dans leurs rectangles respectifs sur le LCD. Par exemple en veille la touche contextuelle
gauche correspond à "Menu", donc pour ouvrir un menu, la touche contextuelle droite correspond à
"Rappel", pour ouvrir la liste des appels sortants.
Utilisation du menu
Le FW295 est doté d'une arborescence de menus pratiques. Pour ouvrir un menu, appuyez sur la
touche contextuelle "Menu" en mode veille, utilisez ensuite les touches pour parcourir les
différents options, appuyez sur la touche contextuelle gauche pour accéder à un sous-menu. Le titre
du menu apparaît en haut du LCD, et en dessous du titre il y a les options. Utilisez les touches
pour parcourir les options, et appuyez sur la touche contextuelle gauche pour confirmer l'option
sélectionnée. Appuyez sur la touche contextuelle droite pour retourner à l’écran précédent. Appuyez
sur la touche
Réglage du niveau de volume du combiné
Pendant un appel téléphonique, utilisez les touches pour choisir le niveau de volume (1= bas, 2=
moyen, 3= haut) puis appuyez sur la touche "OK" pour confirmer.
Coupure micro
Pendant une conversation, appuyer sur la touche contextuelle "Muet " pour couper le son. Pour
restaurer le son, appuyer sur la touche contextuelle "Parlan ".
Recherche de combiné(s) – (Paging)
En appuyant sur la touche de la base, le combiné va sonner. Cette fonctionnalité peut servir à
localiser un combiné dont on a oublié l'endroit où on l'a laissé.
pour retourner au mode veille.
FR
Signal de limite de portée
Si au cours d'une conversation vous sortez de la zone de couverture de la base, la communication
sera difficile. Si vous ne revenez pas dans la zone de couverture, la conversation sera interrompue
("Out of range" sera affiché sur le LCD).
Indicateur de niveau des piles
Le LCD affiche 3 figures correspondantes au niveau de charge des piles, lorsque le symbole de pile
vide est affiché, mettez le combiné dans le berceau pour les recharger.
Identification de l’appelant (fonctionnalité disponible seulement pour les abonnés du Fournisseur
de service)
Ce téléphone sans fil peut afficher le numéro du téléphone appelant pendant la sonnerie. Il mémorise
également les 20 derniers appels reçus ou manqués. Lorsque le combiné sonne, et si l'appelant est
un abonné du réseau, le LCD affiche : le numéro de téléphone ; ou le nom correspondant dans
l'annuaire (s'il est dans l'annuaire du téléphone) ; ou "Reservé" si le numéro est caché ; ou
"Indisponible" si l'identification de l’appelant n'est pas disponible.
Si vous ne répondez pas aux appels, en mode veille sera affiché le nombre d'appels manqués, et il
est possible d'ouvrir la liste des appels manqués en appuyant sur a touche contextuelle "Afficher".
Liste des appels reçus
Le FW295 mémorise les 20 derniers appels reçus ou manqués (cette option ne marche qu'avec
abonnement à l'identification de l'appelant).
Pour ouvrir les listes : Appuyez directement sur ; ou utilisez la touche contextuelle gauche,
utilisez les touches pour afficher la "liste des appels", puis appuyez sur "OK". Dans la liste, utilisez
les touches pour parcourir les numéros de la liste, en face des appels manqués non encore
consultés, il y aura le symbole Ӿ, appuyez sur pour rappeler. Si vous appuyez sur la touche
contextuelle gauche "Option" un nouveau menu s’ouvre qui vous permet de :
“Affiché”, pour afficher l’heure et la date de l’appel (voir avertissement) ;
“Sauvegarder”, pour mémoriser un numéro dans l'annuaire ;
“Supprimer”, pour supprimer l'appel de la liste.
Pour effacer toute la liste, allumez/éteignez le combiné.
AVERTISSEMENT : l'heure et la date sont disponibles seulement si vous êtes connecté à un réseau
RTPC et non ISDN NT1 PLUS.
Liste des appels
Le FW295 mémorise les 10 derniers numéros appelés. Pour afficher : Appuyez sur la touche
contextuelle droite pour afficher le dernier numéro appelé, utilisez les touches pour parcourir la
liste. Appuyez sur la touche pour appeler le numéro affiché. Il n’est pas possible de supprimer un
seul numéro de la liste. Pour effacer toute la liste, allumez/éteignez le combiné.
Annuaire
Le FW295 est doté d'un annuaire alphanumérique de 60 entrées. Pour mémoriser un numéro dans
l'annuaire, avec le combiné en
mode veille, appuyez sur la
touche contextuelle "Menu",
sélectionnez "Annuaire" puis
appuyez sur la touche
contextuelle gauche, "Ajouter
Entrée" s’affiche, appuyez à
nouveau sur la touche
contextuelle gauche, entrez le
nom, pour entrer un caractère,
appuyez sur la touche
correspondante une ou plusieurs fois (selon le tableau). Appuyez directement sur une autre touche si
le caractère s’y trouve ou, s'il est sur la même touche, attendez jusqu'à ce que le curseur se place
sur la position suivante, puis entrez le caractère suivant, appuyez sur la touche "Supp." pour effacer
un caractère, puis appuyez sur OK pour confirmer. Entrez le numéro de téléphone puis appuyez sur
la touche OK pour le mémoriser.
FR
Pour rappeler un numéro de l'annuaire
Pour rappeler un numéro de l'annuaire : Avec le combiné en mode veille, appuyer sur la touche ;
utilisez ensuite les touches pour parcourir les différents numéros de l'annuaire, il est possible
d'aller directement au premier numéro dont le nom commence par un caractère donné (par exemple
si vous appuyez 3 fois sur la touche 7 vous serez positionné sur le premier nom commençant par le
caractère "R"), lorsque le nom souhaité est affiché, appuyez sur la touche pour appeler.
Options de l’Annuaire (Supprimer – modifier)
Avec le combiné en mode veille, appuyez sur la touche contextuelle "Menu", sélectionnez “Annuaire”
puis appuyez sur la touche contextuelle gauche, maintenant il vous est possible de choisir :
“ Ajouter Entrée ” pour ajouter un nouveau numéro,
“Modifier” pour modifier un numéro,
"Supprimer" pour supprimer un numéro,
“Supprim tout” pour supprimer tous les numéros.
Verrouillage clavier
La fonctionnalité 'Verrouillage clavier' est utile pour éviter de taper fortuitement sur les touches. Si le
'Verrouillage clavier' est actif, vous ne pouvez pas appeler mais vous pouvez répondre. Verrouillage
du clavier : avec le combiné en mode veille, appuyez sur la touche "0" jusqu'à ce que "Clavier
Verrouillé" s'affiche, le symbole sera affiché en mode veille. Pour déverrouiller, maintenez la
touche "0" appuyée. Verrouillage du clavier avec code PIN : Appuyez sur la touche contextuelle
"Menu", sélectionnez "Verrou Clav " puis appuyez sur la touche contextuelle "OK" ; entrez le code
PIN du combiné (0000 par défaut) puis appuyez sur "OK". ""Clavier Verrouillé" sera affiché en mode
veille. Pour déverrouiller : Appuyez sur la touche contextuelle "Menu" puis appuyez sur la touche
contextuelle "OK" ; entrez le code PIN du combiné (0000 par défaut) puis appuyez sur "OK".
CONFIGURATION DU COMBINE
Pour modifier les paramètres du combiné, appuyez sur la touche contextuelle "Menu", appuyez 3 fois
sur la touche , “Config. Comb. ” sera affiché. Appuyez sur la touche contextuelle gauche, il vous
est possible de choisir :
“Horloge”: pour régler l’horloge, appuyez sur la touche contextuelle OK ; entrez la date : deux chiffres
pour le jour et deux chiffres pour le mois puis appuyez sur OK ; entrez deux chiffres pour les heures
et deux chiffres pour les minutes puis appuyez sur OK pour confirmer ;
“Sonnerie Ext”: pour définir le niveau de volume et la tonalité de la sonnerie, sélectionnez "Mélodie",
utilisez les touches pour parcourir les mélodies disponibles (la mélodie est jouée à chaque
touche), choisissez "0" pour désactiver la sonnerie du combiné, sélectionner "Volume" pour régler le
niveau de volume de la tonalité, utilisez les touches pour régler puis appuyez sur OK pour
confirmer.
“Sonnerie Int”: pour définir le niveau de volume et la tonalité de la sonnerie de appels internes, suivez
la procédure de réglage de la sonnerie externe.
“Son touches”: pour activer/désactiver la tonalité des touches, appuyez sur la touche contextuelle
"OK", s’il est activé il sera désactivé et vice versa.
“Appel Direct”: Si cette option est activée, si vous appuyez sur n'importe quelle touche, le combiné
appelle automatiquement un le dernier numéro direct appelé. Appuyez sur "OK", entrez le numéro
direct puis appuyez sur la touche OK. L'appel direct est maintenant activé; l'indication " Appel Direct "
est affichée sur le LCD. Pour le désactiver : Appuyez deux fois sur la touche . Pour l'activer de
nouveau répétez la procédure.
“Choisir Base”: voir paragraphe Plusieurs bases.
“Langue”: pour choisir la langue d'affichage.
“Changer PIN”: Pour changer le code PIN du combiné, appuyez sur "OK", entez le code PIN actuel
de la base (par défaut 0000), entrez le nouveau code PIN, appuyez sur la touche contextuelle
gauche, rentrez le nouveau code PIN, appuyez sur OK.
“Réinit Comb”: pour réinitialiser le combiné. Pour réinitialiser le combiné : Appuyez sur OK ; entez le
code PIN actuel du combiné (par défaut 0000) puis appuyez sur OK, il est possible de choisir entre 3
différents types de réinitialisation :
"Annuaire": pour supprimer tout l'annuaire ;
"Paramètres": pour réinitialiser tous les paramètres à leurs valeurs par défaut (y compris les rendez-
FR

vous) ;
"Combiné": réinitialise l'annuaire et les paramètres ; puis appuyez deux fois sur OK pour confirmer.
Surveillance bébé
Si vous disposez de 2 combinés au moins, enregistrés sur la même base (voir "Configuration de
plusieurs combinés") il vous sera possible d'activer la surveillance bébé sur un combiné. Lorsque la
surveillance bébé est activée, le combiné avec la surveillance bébé activée appelle automatiquement
l'autre combiné ou le numéro extérieur spécifié, dès qu'un bruit/une voix/un cri est entendu. Entrez à
la configuration du combiné et sélectionnez “Surveil bébé” et appuyez sur la touche contextuelle
gauche, sélectionnez "Appel Intern" pour acheminer l'appel de Surveillance bébé vers le combiné
enregistré sur la même base, sélectionnez "Appel Extern" pour acheminer l'appel de Surveillance
bébé vers un numéro extérieur, ou sélectionnez "Niveau" pour choisir le niveau de sensibilité qui
déclenche l’appel ; puis appuyez sur OK. Si vous choisissez "Appel Intern" entrez le numéro du
combiné à appeler, si vous choisissez "Appel Extern" entrez le numéro du téléphone externe à
appeler ; puis appuyez sur OK pour confirmer. S'il est activé, l'indication "Surveil bébé" sera affichée
en mode veille. Si le combiné entend un bruit/une voix/un cri, il appelle l'autre combiné sélectionné
ou le numéro du téléphone spécifié :
- Si la Surveillance bébé est réglée sur l'appel interne, il suffit de raccrocher le combiné des parents ;
- Si la Surveillance bébé est réglée sur un numéro externe, la ligne sera raccrochée au bout de 2
minutes.
Si après cela, il y aura un bruit/une voix/un cri, c'est le numéro externe qui sera appelé. Pour
désactiver la Surveillance bébé, appuyez sur la touche "Inact." du combiné de Surveillance bébé.
AVERTISSEMENT : Le combiné avec la Surveillance bébé activé ne sonne pas lorsqu'il y a un appel
externe.
Appel d’urgence (appel direct)
Avec cette procédure il est possible de mémoriser 3 numéros de téléphone à appeler en cas
d’urgence en maintenant enfoncée la touche . Pour régler un numéro, appuyez sur la touche
contextuelle "Menu", puis appuyez sur OK ; sélectionnez l’option "Soin Cadran" et appuyez sur OK ; "
Soin Cadran 1" sera affiché, appuyez sur la touche contextuelle OK puis entrez le premier numéro de
la liste puis appuyez sur la touche contextuelle OK. Utilisez les touches pour entrer le second
numéro ("Soin Cadran 2") et le troisième ("Soin Cadran 3"). Pour lancer un appel d'urgence, avec le
combiné raccroché, maintenez appuyée la touche , le combiné passe en mode mains libres et
commence par appeler le premier numéro d’urgence. Si l'autre partie répond, le combiné reste en
conversation pendant 2 minutes, puis commence par appeler le deuxième numéro d’urgence et ainsi
de suite. Si un numéro d’urgence est occupé, il passe directement au suivant. Après 3 tentatives
d'appel d’urgence, le combiné raccroche automatiquement, ou appuyez sur pour mettre fin à
l'appel d’urgence.
REGLAGE DE LA BASE
Pour modifier les paramètres de la base, appuyez sur la touche contextuelle "Menu", appuyez 4 fois
sur la touche , “Config. base” sera affiché. Appuyez sur la touche contextuelle gauche, attendez
un moment, il vous est possible de choisir :
“Code PABX”: pour ajouter automatiquement un numéro de ligne extérieure pour un central
téléphonique (normalement un chiffre 0 ou 9) avant le numéro de téléphone se trouvant dans
l'annuaire et avant les numéros de la liste des appels manqués/reçus. De plus, à chaque fois que
vous tapez un numéro dont le premier chiffre est identique au code PABX, le FW295 ajoute
automatiquement une pause entre le code PABX et le numéro de téléphone pour faciliter l'accès au
réseau public. Appuyez sur OK ; entrez le code PABX et appuyez sur OK pour confirmer.
“Mélodie de Sonnerie”: pour sélectionner la mélodie de la sonnerie de la base, appuyer sur OK,
utilisez
pour choisir la tonalité, sélectionnez "0" pour désactiver la sonnerie de la base. Appuyez
sur la touche OK pour confirmer.
"Volume de Sonnerie": pour sélectionner le volume souhaité de la sonnerie de la base, appuyez sur
OK, utilisez pour choisir le niveau de volume puis appuyez sur la touche contextuelle gauche pour
confirmer.
“Désenrg Com”: pour désenregistrer un combiné de la base, appuyez sur OK, entrez le code PIN de
la base (par défaut 0000) puis appuyez sur OK ; sélectionnez le numéro du combiné à désenregistrer
puis appuyez sur OK pour confirmer (Il n’est pas possible de désenregistrer le combiné à partir
FR
 Loading...