


Space
Bedienungsanleitung
Manuel d’Utilisation
User Manual
1
F ED
Inhalt/sommaire/content
Deutsch 2
Français 7
English 12
Bedienungsanleitung
Erste Schritte 4
Gerät aufladen 4
Pairing des He adsets 4
Pairing eines z weiten Telefons 4
Verbindung an ein em PC oder Laptop 4
Annehmen/Beenden eines Anrufs 5
Anruf abweisen 5
Batterie- und Verbindungstatus prüfen 5
Sprachmeldungen aktivieren/deaktivieren 5
Lautstärke einstellen 5
Mikrofon stummschalten/Stummschaltung aufheben 5
Mehre
re Anrufe gleic hzeitig verwalten 5
Led Anzeige/OLI 5
Certificate 6
Notizen 17 –18
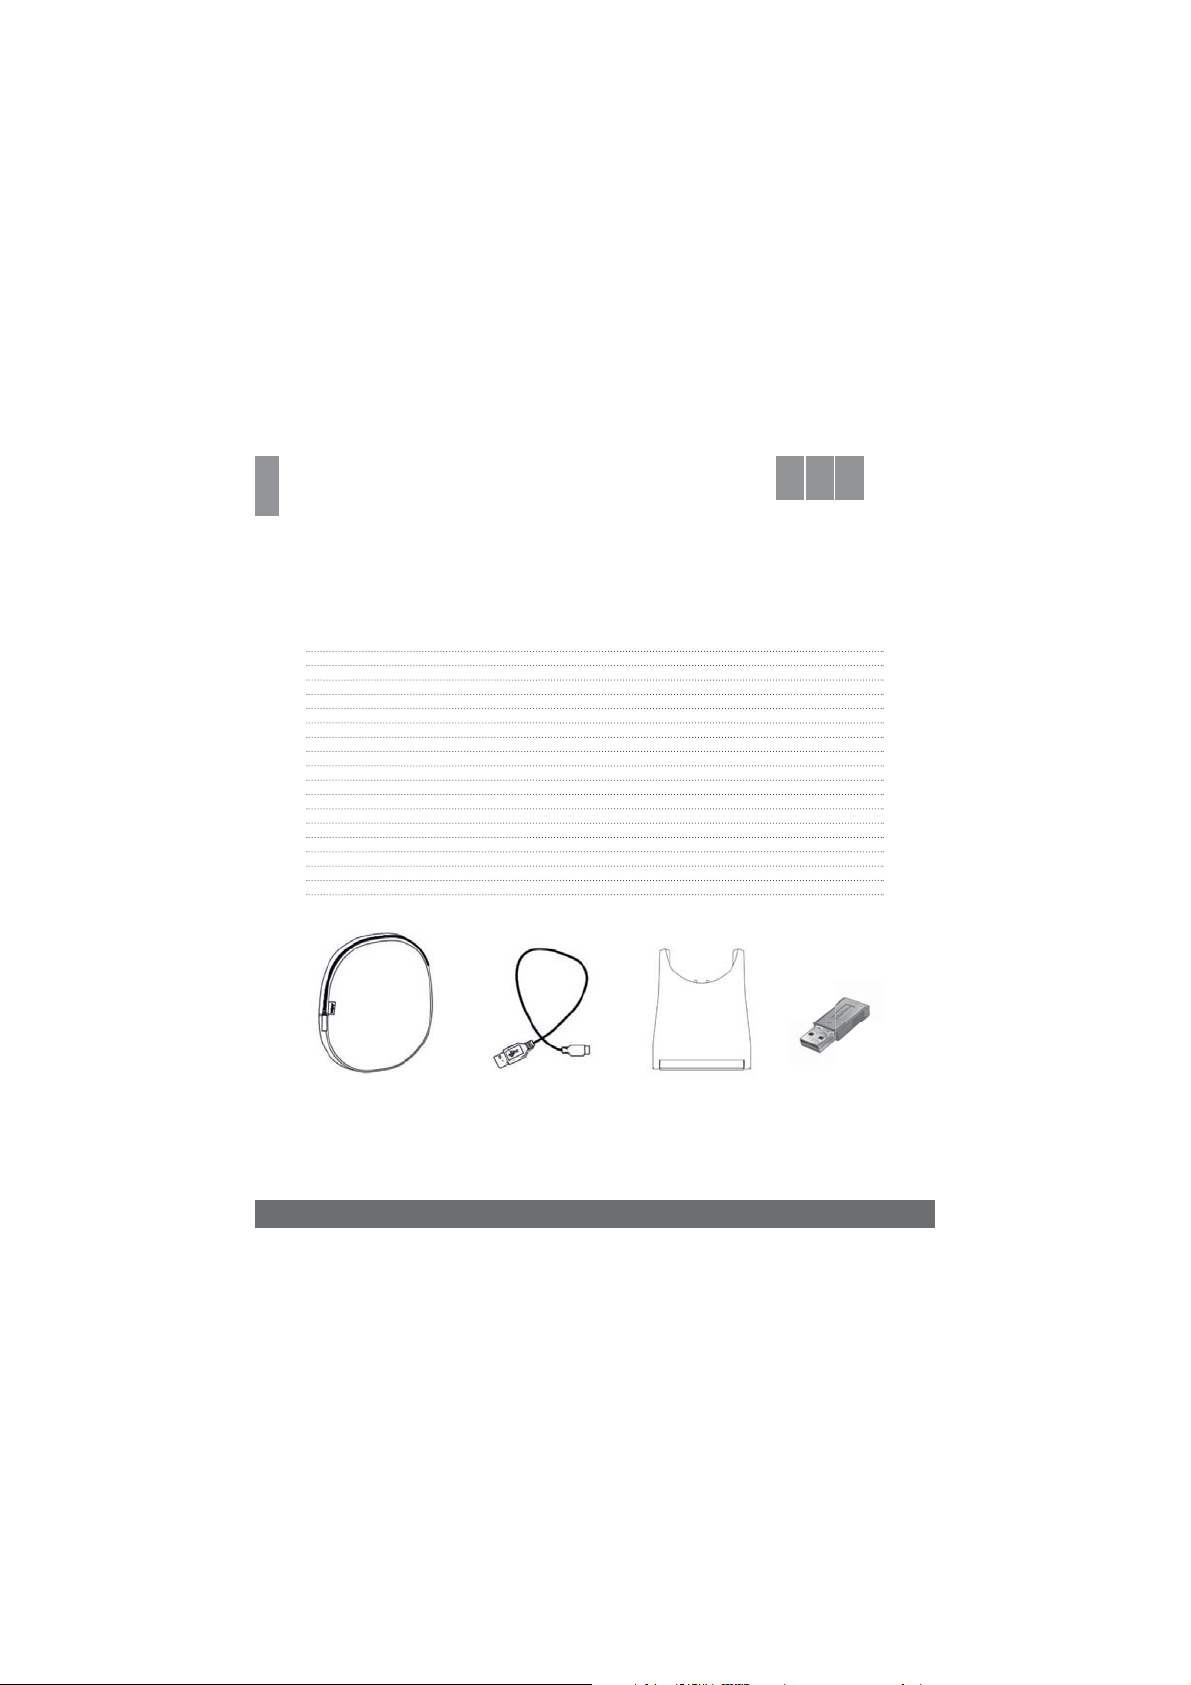
Lieferumfang
Neoprentasche USB Kabel Ladestation (optional) USB Dongle (optional)
3 kcilbrebÜ
4 netlahcsniE
4 netlahcssuA
2
D
Bedienungsanleitung
Überblick:
Vielen Dank f ür den Kauf des freeVoice Sp ace Headsets. Bit te überprüfe n Sie den Inhalt der Verpacku ng und kontrollieren Sie, ob
alle Teile darin enthalte n sind. Lesen Sie die Bedienungs anleitung vor dem erste n Gebrauch des Headse ts sorgfältig durch . Dieses
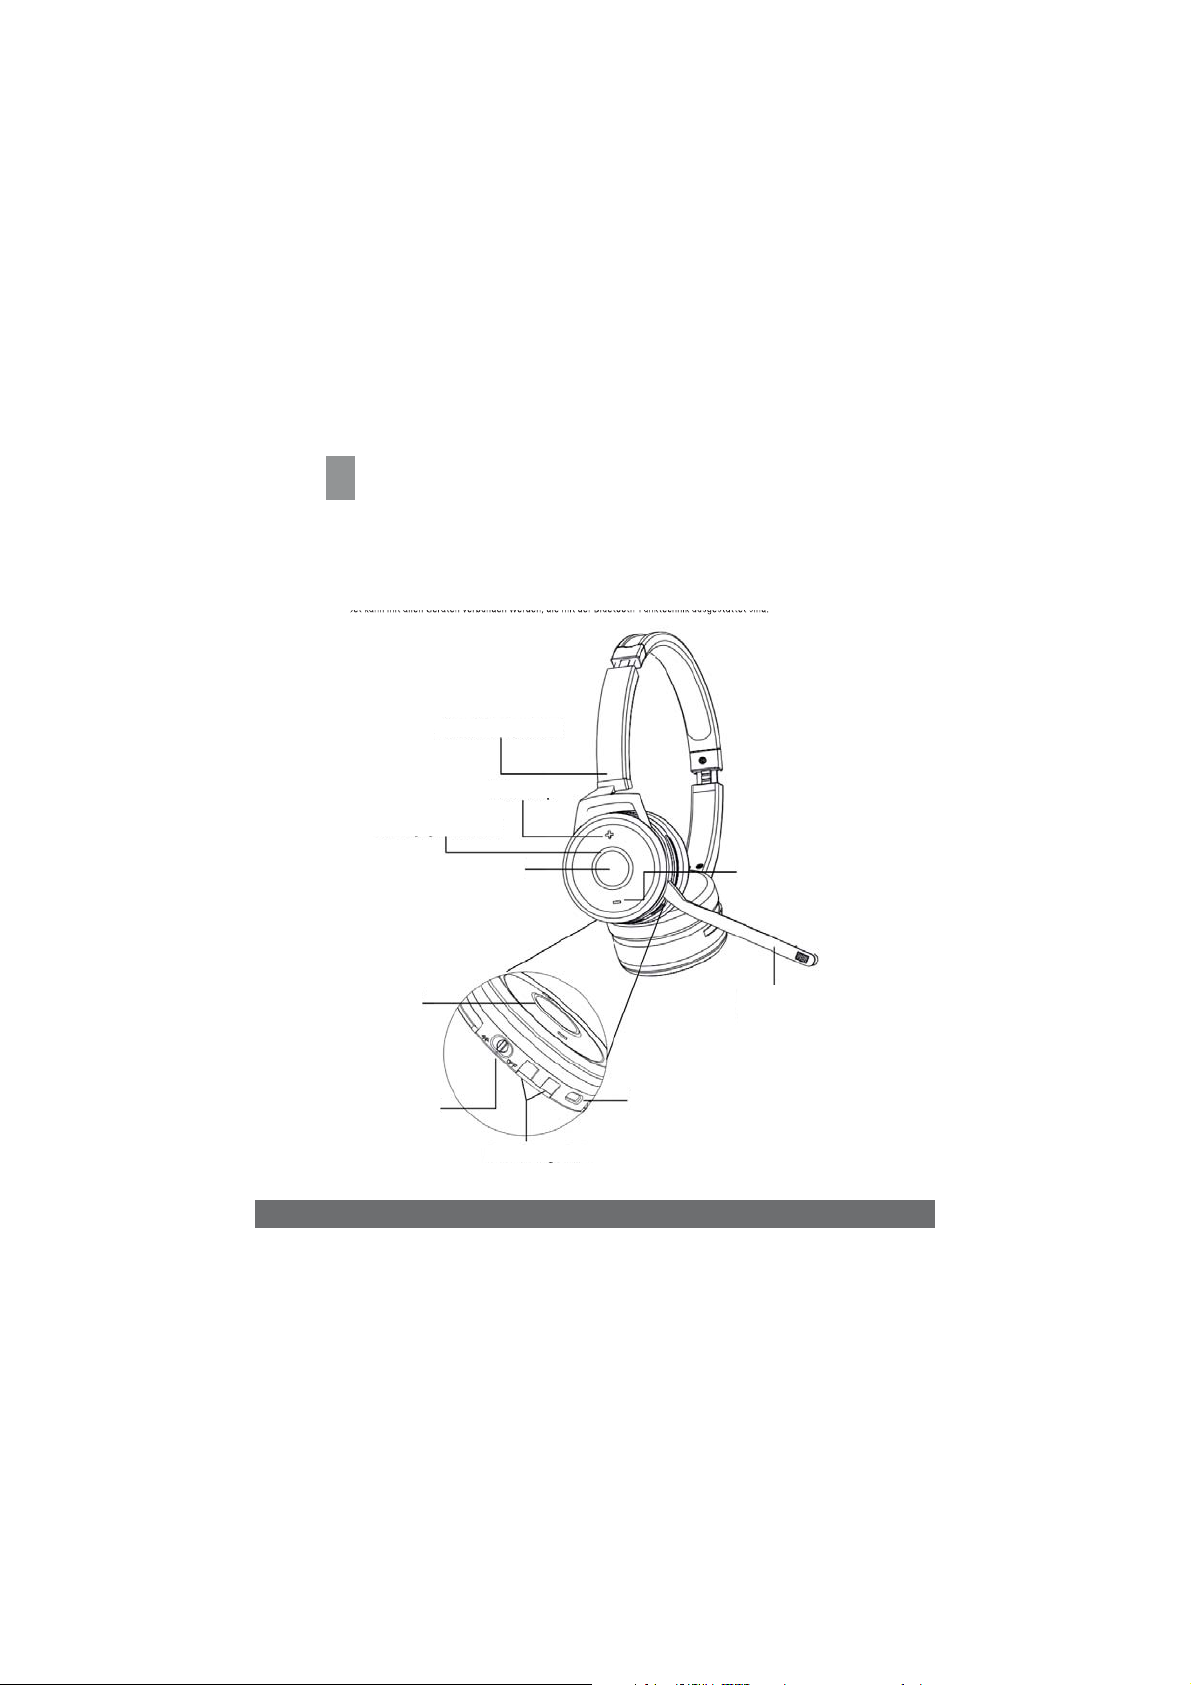
daeH
verstellbarer Überkopfbügel
Lautstärke „+“
LED-Anzeige/Online Indicator (OLI)
.dnis tettatsegsua kinhcetknuF-htooteulB red tim eid ,nedrew ned nubrev netäreG nella tim nnak tes
Bluetooth-Indikator
Ein/Aus-Schalter
3
Rufannahmetaste
Ladekontakte
Lautstärke „-“
Mikrofonarm
Micro-USB-Anschluss
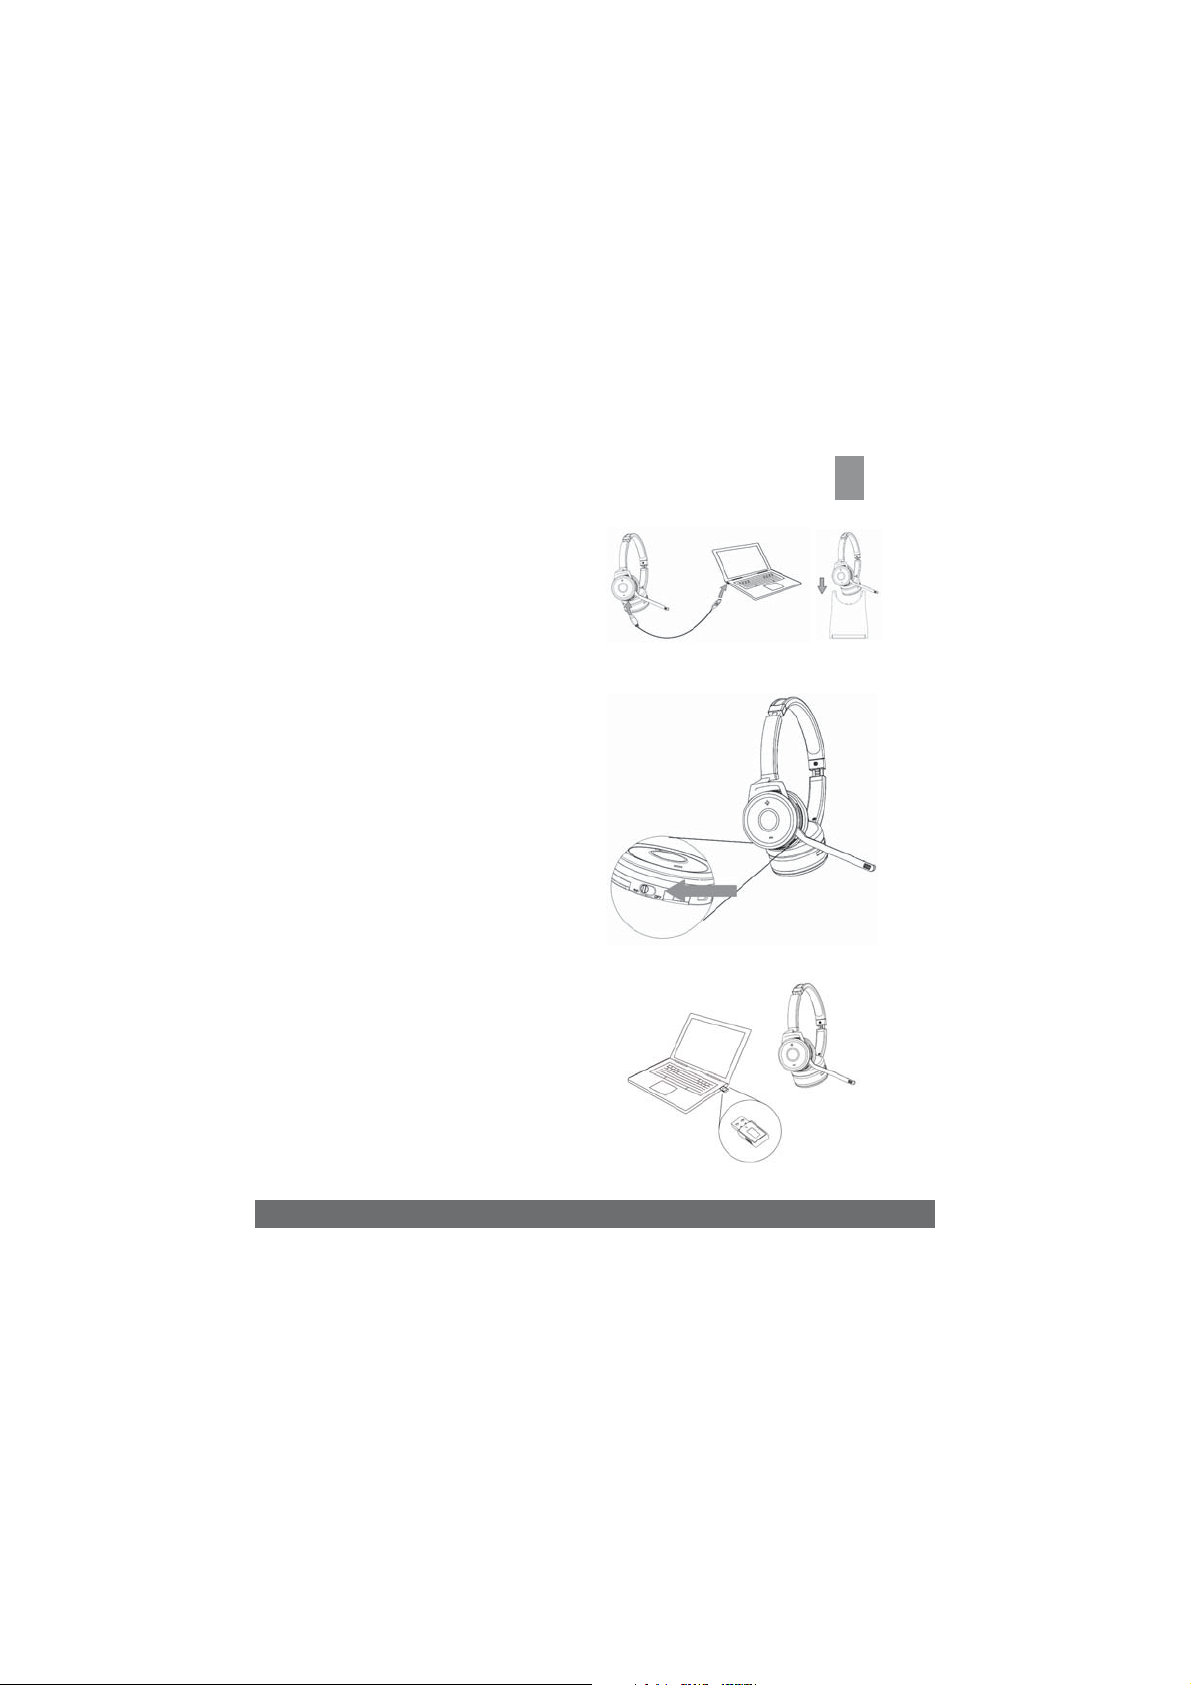
Erste Schritte:
Bitte lad en Sie das Headset nach dem Au spacken vollständig auf,
bevor Sie mit de m Verbindungsprozess b eginnen.
Gerät aufladen:
1 Stec ken Sie das USB-Ladek abel in einen aktiven USB -Anschluss.
2 Stecken Sie den Mi cro-USB in die Buchse an de r Ladestation
oder direkt in Ihr Heasdset.
Einschalten:
Schieben Sie den EI N/AUS-Schalter in die mitt lere Position.
Ausschalten:
Schieben Sie den EIN-/AUS-Schalter in die AUS-Position.
Pairing des Headsets:
«Pairing» wir d die Verbindung Ihres Hea dsets mit
Bluetooth-Technik mit einem bluetoothfähigen Gerät genannt.
Dieses Verfahren muss für jedes neue Gerät nur einmal durchgeführt
werden.
Schieben Sie den E IN-/AUS-Schalter in die «P airing-Position»
(Bluetoot h-Symbol) und halte n Sie ihn 2 Sekunden gedrüc kt bis die
LED-L euchte blau zu blinken beginn t. Öffnen Sie das Bluet ooth-Menu
Ihres Mobilt elefon und wählen Sie das Spac e aus, um es zu verbinden.
Nach erfolgreichem Pairing erlischt die blaue LED-Leuchte und blinkt
dann im Abs tand von 8 Sekunden blau .
Pairing eines zweiten Telefons:
Dieses Heads et beinhaltet eine Multipoint-F unktion zur gleichzeitigen
Verbindung v on zwei Mobiltelefon en.
Wiederh olen Sie den Vorgang wie beim Paire n des ersten
Mobiltelefones. Wenn da
müssen Sie im Blue toothmenu des erst en Mobiltelefones das
Space nochmals aktivieren.
Verbindung zu einem PC oder Laptop (Dongle FCT170)
Erwei tern Sie die funk tionen von Ihr en Headset mi t dem UC Manager
Stecken Sie de n USB-Dongle (optional) in eine n aktiven USB-A nschluss.
Installieren Sie den UC-Manager (download unter: www.freevoice.biz).
Einstellungen via Software «UC-Manager» vornehmen.
s zweite Mo biltelefon verbunden is t,
D
4

D
Annehmen/Beenden eines Anrufs:
Drücken Sie die Rufannahmetaste.
Anruf abweisen:
Drücken Sie die Ruf annahmetaste zw eimal kurz nacheinander
während eines eingehenden Anruf.
Batterie- und Verbindungstatus Prüfen:
Drücken Sie die Ru fannahmetaste, (nich t während eines Anruf ).
Sprachmeldungen aktivieren/deaktivieren:
Halten Sie die Rufannahmetaste gedrückt, während Sie das Headset einschalten.
Lautstärke einstellen:
Drücken Sie die L autstärke «+» ode r «-» Taste, um die Lautstär ke
zu regeln.
Mikrofon stummschalten/Stummschaltung
aufheben:
Halten Sie die Volume «-» Tast e für 2 Sekunden gedrü ckt.
Mehrere Anrufe gleichzeitig verwalten:
Aktiven Anruf beenden und eingehenden Anruf entgegen
nehmen:
Drücken Sie die Rufannahme-Taste.
Aktiven Anruf ins Halten nehmen und eingehenden Anruf
entgegen nehmen:
Halten Sie die Rufa nnahme-Taste 2 Sekunden gedr ückt.
Wechsel zwischen aktivem und gehaltenem Anruf:
Halten Sie die Rufa nnahme-Taste 2 Sekunden gedr ückt.
Eingehenden Anruf abweisen während einem Gespräch:
Drücken Sie die Rufannahme-Taste zweimal kurz nacheinander.
LED Anzeige/OLI:
Headse t auf der Ladest ation:
Während dem Aufladen
Headset A US Rot
Headset EI N Rotes Lich t mit blauem Blinken (8 Sek.)
Pairing Rot und b lau abwechselnd blinkend
Headset voll geladen
Headset A US Rot
Headset E IN Rotes Licht mit blauem Blin ken (8 Sek.)
Pairing Rot und B lau abwechselnd blinkend
Headse t nicht auf der Lad estation:
Standby v erbunden Blaues Blinken alle 8 Se k.
Während dem Wä hlen Rotes Blinken
Im Gespräc h Rotes Leuchten
5

Sicherheitsrichtlinen zu Akkus und Ladegeräte
– Unsachgemässe Ha ndhabung des in diesem Pr odukt verwend eten Akkus kann zu ein em
Brand oder chemischen Verbrennungen führen.
– Versuchen Sie nic ht, den Akku auszu tauschen.
– Versuchen Sie nicht, das L adegerät auseinander zubauen, da die Gefahr eines S tromschlags
besteht.
– Verwend en Sie das Ladegerät nicht im F reien oder feuchten Um gebungen.
Certificate
FBT650B
RXM190125054-RF,RXM190125054-SF,RXM190125055-RF
CS650
F
RXM190125054-SF
FCT170
RXM190125052-RF,RXM190125052-SF,RXM190125053-RF
D
6
F
Sommaire
Manuel d’Utilisation
Vue d’ensemble 8
En premier 9
Pour recharger le dispositif 9
Mise en marche 9
Pairing du micro -casque 9
Pairing d´un deuxièm e téléphone 9
Connexion à u n PC ou un ordinateur por table 9
Repondre /terminer un appel 10
Rejeter un app el 10
Vérificat ion de la batterie et l´ état de connexion 10
Active r/désact iver les messages v ocaux 10
Réglage du volume 10
Désactiver/activer le microphone 10
Gérer plusieurs a ppels en même temps 10
Affigage LED/OLI 10
Alerte d u chargeur et la batte rie 11
Certificate 11
Notes 17 –18
Contenu de la livraison
9 têrrA
Pochette néoprène Cable usb Base de chargement (option) USB Dongle (option)
7

F
Manuel d’Utilisation
Vue d’ensemble:
Merci d’avoir ac heté le casque freeVoic e Space. Veuillez vérifier le co ntenu de l’emballage pour vou s assurer d’avoir reçu tous le s éléments. A ssurez -vous de lire le manu el d´utilisation d ans son intégralité av ant d’utiliser le casque. C e casque peut être r accordé/associé
à tout disposi tif doté de la technologie sa ns fil Bluetooth.
serre-tête réglable
affichage LED/
online Indictor (OLI)
répondre/raccrocher
indicateur
Bluetooth
interrupteur
marche (ON)/
arrêt (OFF)/
touche volume „+“
touche volume „-“
bras microphone
port de charge USB
point de charge pour station
de base (option)
8

F
En premier:
Veuillez charger complètement le casque après avoir retire l’emballage
et avant de commencer de connecter votre micro-casque «Pairing».
Pour recharger le dispositif:
1 Branchez le câble de chargement USB dans un port USB actif.
2 Insér ez le micro USB dans la prise de la s tation de chargemen t
ou directement dans le micro quasque.
Mise en marche:
Faites glisser l’interrupteur ON/OFF en position centrale.
Arrêt:
Faites glisser le commutateur ON/OFF en position OFF.
Pairing du micro-casque:
«Pairing» est une Technologie Bluetooth avec laquelle vous connecter
votre appareil Bluetooth avec un autre appareil Bluetooth.
Cette p rocédure ne doit êtr e effectuée qu ›une fois pour chaque
nouveau périphérique.
Faites glisser l›interrupteur ON/OFF dans la «position pairing»
(Symbole Bluetooth) et maintenez-le pendant 2 secondes jusqu݈ ce
que le la lumière LE D bleu commence à clignoter. Ou vrez le menu
Bluetoot h de votre téléphone po rtable et sélect ionnez «Space»
pour vous co nnecter avec le micro -casque. Une fois le pair ing réussi,
le voyant bleu s’ éteint et clignote bleu à inter valles de 8 secondes.
Pairing d´un deuxième téléphone:
Ce micro- casque comprend une f onction multipoint pour l es appels
simultanés. Connexion de deux téléphones mobiles.
Répétez la même procédure que lors du Pairing du premier téléphone
portable. Quand le deu xième téléphone portable est conne cté, vous
devez réactiver «Space» dans le menu Bluetooth du premier
téléphone portable.
Connexion à un PC ou un ordinateur portable:
Étendez les fonctionnalités de votre micro-casque avec UC Manager
Branchez le dongle USB (option) dans un port USB actif.
Installez le UC Manager (à télécharg er sur: www.freevoice.biz).
Effectuez les réglages directement dans logiciel «UC-Manager».
9

F
Repondre/terminer un appel:
Appuyez sur la touche de répondre/racrocher.
Rejeter un appel:
Appuyez rapidement deux fois sur la touche répondre/racrocher
pendant un appel entrant.
Vérification de la batterie et l´état
de connexion:
Appuyez sur la touche de répondre/rachrocher
(pas pendant un appel).
Activer/désactiver les messages vocaux:
Maintenez la touche répondre/racrocher pendant que vous
allumer votre mic ro-casque.
Réglage du volume:
Appuye z sur le bouton de volume «+» o u «-» pour régler le volume.
Désactiver/activer le microphone:
Maintenez le b outon de volume «-» pend ant 2 secondes.
Gérer plusieurs appels en même temps:
Mettr e fin à un appel actif et ré pondre à un appel entr ant:
Appuyez sur le bouton répondre/racrocher.
Mettr e en pause un appel acti f et répondre à un appel en trant:
Appuyez le bouton répondre/racrocher pendant 2 secondes.
Alterna nt entre un appel act iv et un appel en atte nte:
Appuye z sur le bouton répon dre/racrocher pen dant 2 secondes.
Rejeter un ap pel entrant penda nt une conversatio n:
Appuyez rapidement deux fois sur la touche répondre/racrocher
pendant un appel entrant.
Affichage LED/OLI:
Micro-casque sur la station de charge:
Pendant le chargement
Micro-casque éteint rouge
Micro-c asque allumée rouge clignotant en ble u (8 secondes)
Pairing rouge et bleu clign otant alternativ ement
Micro-casque entièrement chargé
Micro-casque éteint rouge
Micro-c asque allumée rouge clignotant en bleu (8 s econdes)
Pairing rouge et bleu clignot ant alternativeme nt
Micro-casque n›est pas sur la station de charge:
Standby c onnecté clignota nt bleu toutes les 8 sec.
pendant la composition clignotant rouge
En conversation rouge
10

F
Alerte du chargeur et la batterie
– La batterie utilis ée dans le produit peut p résenter un risque d ´incendie ou provoq uer
des brûlures c himiques en cas de mauvaise
manipulation.
– N’essayez p as de remplacer la bat terie.
– Ne pas démon ter le chargeur au risque d e provoque un choc éle ctrque.
– N’utilisez pas le c hargeur en extérie ur ou dans des zones humides .
Certificate:
Certificate
FBT650B
RXM190125054-RF,RXM190125054-SF,RXM190125055-RF
FCS650
RXM190125054-SF
FCT170
RXM190125052-RF,RXM190125052-SF,RXM190125053-RF
11

E
Content
User Manual
Overview 13
Getting S tarted 14
To charge the device 14
Turning On 14
Turning Off 14
Pairing the He adset 14
Pairing a second device 14
Conectio n to a PC or laptop 14
Answerin g/Ending a Call 15
Reject a call 15
Batte ry and connectio n status check 15
Activate/deactivate voice messages 15
Adjust volume 15
Mute/unmute the microphone 15
Multiple call handling 15
LED display/OLI 15
Batte ry and charger warnin g 16
Certificate 16
Notes 17 –18
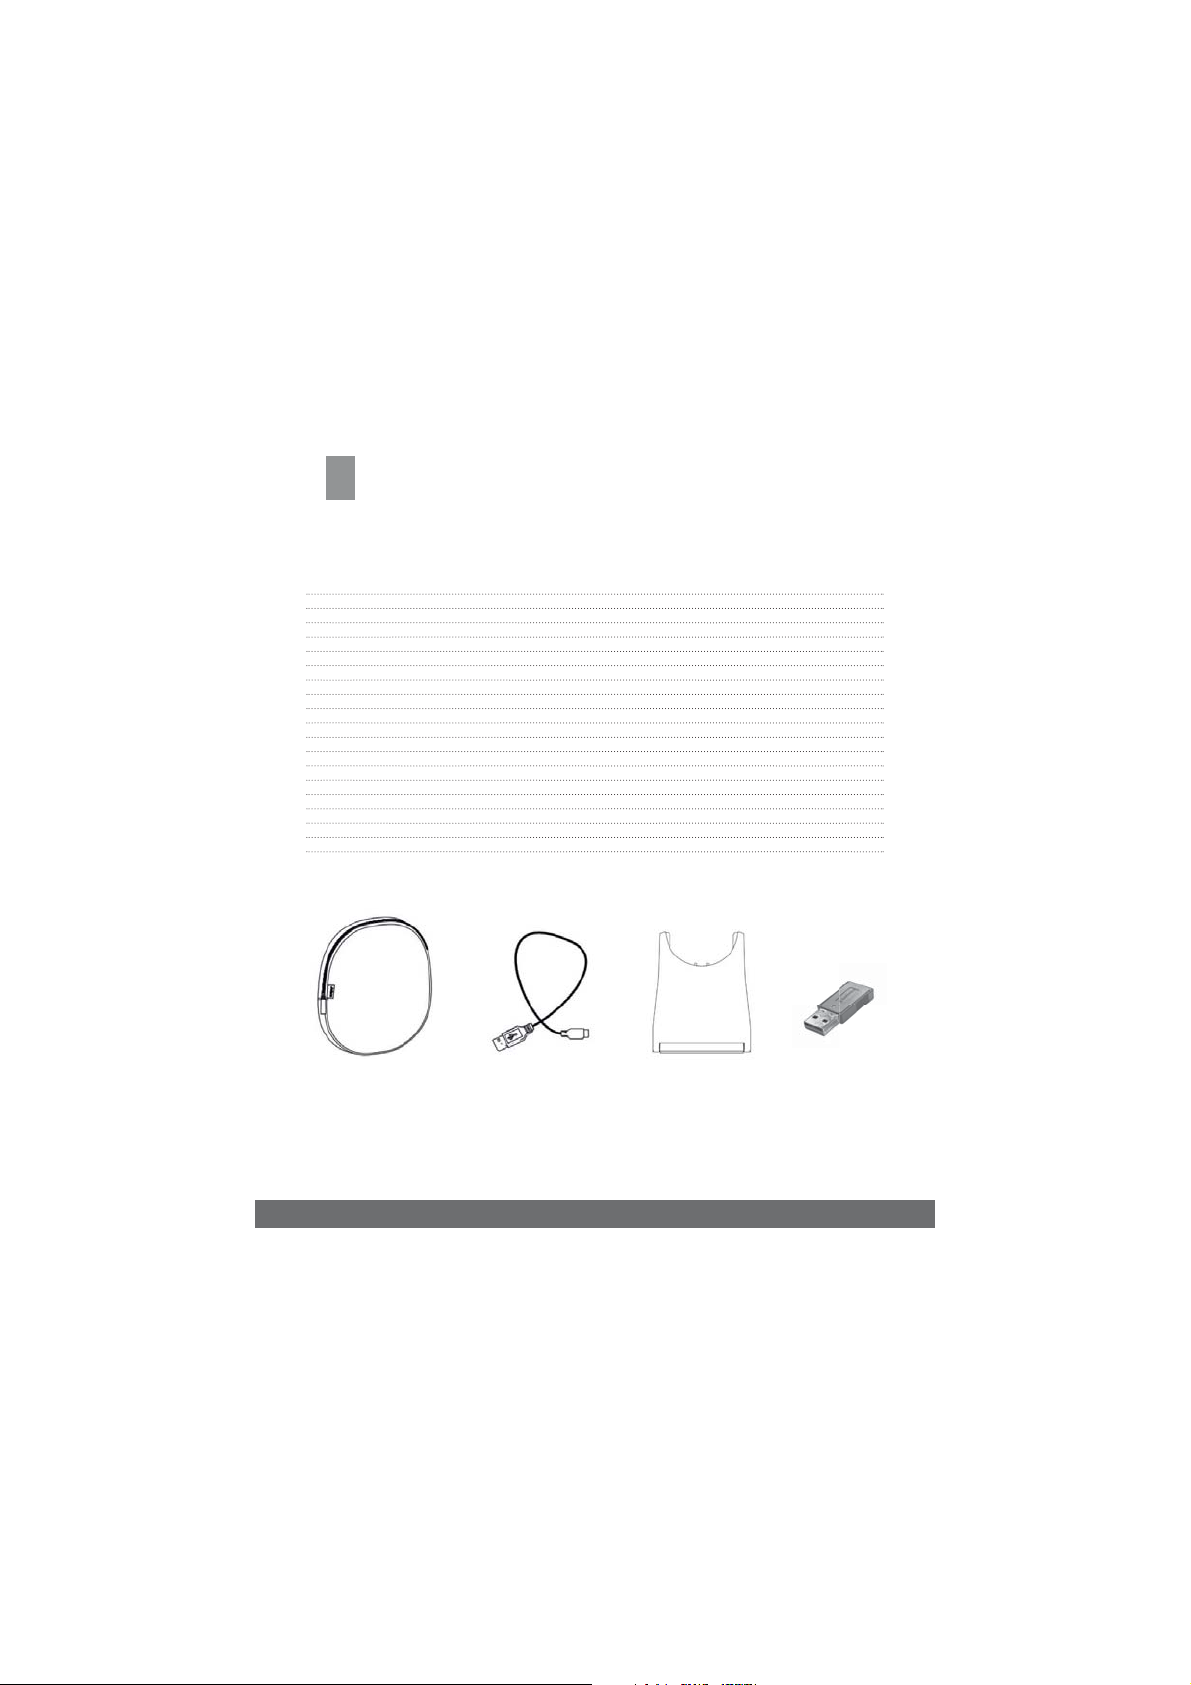
Scope of delivery
Neoprene bag USB cable Charging station (optional) USB Dongle (optional)
12

E
User Manual
Overview:
Thank you fo r purchasing this freeVoic e Space Headset. Pl ease double check the co ntents of the pack aging to verify tha t you have received all items. B e sure the completel y read the user guide befo re using the headset. T his headset can be con nected/paired w ith any device that is Bluetooth wireless technology enabled.
13

Getting Started:
Piease fully charge headset after removing it from the package before
beginning the p airing process.
To charge the device:
1 Insert t he USB charging cable into an a ctive USB port .
2 Insert t he micro USB into the socke t on the charging statio n
or directly in to your heasdset.
Turning on:
Slide the ON/O FF switch to the middle p osition.
Turning Of f:
Slide the ON/O FF switch to the OF F position.
Pairing the Headset:
«Pairing» is t he connection of your h eadset with Bluetoo th technology
with a Bluet ooth-enabled dev ice. This process mu st be executed only
once for each new device become.
Slide the ON / OF F switch to the «pair ing position» (Bluetoo th symbol)
and hold it for 2 s econds until the LE D light starts to fla sh blue. Open
the menu Blue tooth on your mobile pho ne and select «Space » to
connec t. After succes sful pairing, the blue L ED light goes out and
flashes the n blue at intervals of 8 sec onds.
Pairing a second device:
This headse t includes a multipoint functio n for simultaneous
connection of two devices.
Repeat t he same procedure as w hen pairing the firs t device.
If the second device is connected, you must re-a ctivate the spac e in
the Blueto oth menu of the first de vice.
Connection to a PC or laptop:
Extend the features of your headset with the UC Manager
Plug the USB d ongle (optional) into an acti ve USB port.
Install th e UC Manager (download a t: www.freevoic e.biz).
Make all set tings directly via sof tware «UC-M anager».
E
14

E
Answering/Ending a Call:
Press the multi-function button once.
Reject a call:
Press th e multi-function but ton twice in quick suc cession during
an incoming call..
Battery and connection status check:
Press th e multi-function bu tton (not during a call).
Activate/deactivate voice messages:
Press and h old the multi-functi on button during yo u turning on the
headset.
Adjust volume:
Press th e volume «+» or «-» butt on to adjust the volume.
Mute/unmute the microphone:
Press and h old (2 sec) the volume but ton «-».
Multiple call handling:
End acti ve call and answer incomin g call:
Press the multi-function button.
Put curr ent call on hold and answer in coming call:
Press an d hold the multi-funct ion button (2 sec)
Switch b etween the hold c all and active call:
Press an d hold the multi-funct ion button (2 sec)
Rejected in coming call when you are on a call:
Double-tap the multi-function button
LED display/OLI:
Headse t on the charging st ation:
While charging
Headset OFF red
Headset ON r ed with blue light flashing (8 s ec.)
Pairing red and blue light al ternately flashing
Headset fully charged
Headset OFF red
Headset ON red wi th blue light flashing (8 sec.)
Pairing red and blue light al ternately flashing
Headset not on the charging station:
Standby c onnected blue light b linking every 8 sec.
While dialing red light flashin g
In convers ation red lights
15

Battery and charger warning
– The bat tery used in the pr oduct may present a f ire risk or chemical burn if mis treated.
– Do not att empt to replace the b attery.
– Do not disass emble the charger as it ma y cause electrical sho ck.
– Do not use th e charger outdoor or in da mp areas.
Certificate
FBT650B
RXM190125054-RF,RXM190125054-SF,RXM190125055-RF
FCS650
RXM190125054-SF
FCT170
RXM190125052-RF,RXM190125052-SF,RXM190125053-RF
E
16

F ED
Notizen / notes / notes
17

Notizen / notes / notes
F ED
18

Garant ie / Garantie / Warrant y
Folge- und B egleitschäden, einschlie sslich, jedoch nicht besc hränkt auf Sachsc häden, sowie Schäden, die au s der Verletzung von
D
expliziten o der impliziten Garantien r esultieren, unterliege n nicht der Verantwor tlichkeit der freeVoice A G und sind innerhalb des
gesetzlich zulässigen Rahmens ausgeschlossen.
Les dommag es indirects ou for tuits, y compris, sans limi te aucune, les perte s de propriété et les dom mages résultant du
F
non-res pect de toute garan tie explicite ou implicite ne t ombent pas sous la res ponsabilité de freeVoic e AG et sont exclus dans la
mesure où ceci est autorisé par la loi.
Conseque ntial and incidental damag es, including, without limit ation, loss of proper ty, and those arising fro m breach of any
E
express o r implied warranty, are no t the responsibility of f reeVoice AG and, to the ex tent permitte d by law, are excluded.
Die Aktuellst e Version dieser Anleitung finde n Sie unter www.freevoic e.biz
La version la p lus récente de ce manuel, voir w ww.freevoice.b iz
The most r ecent version of this manu al, see www.freevoic e.biz
Benötigen Sie Hilfe?
Besoin d’aide?
Need help?
www.freevoice.biz
E-Mail: info@freevoice.biz
Fon: +4
1 44 542 4 0 30
Zertifikat / Certificate
EMC Direct ive 2014/30/EU
Certificate No.:
FBT650B
RXM190125054-RF,RXM190125054-SF,RXM190125055-RF
FCS650
RXM190125054-SF
FCT170
RXM190125052-RF,RXM190125052-SF,RXM190125053-RF
freeVoice AG
Industriestrasse 4a
CH-8 604 Volketsw il
Switzerland
UID: CHE-166.396.031 (Switzerland)

freeVoice AG
Industriestrasse 4a
CH-8604 Volketswil
Switzerland
UID: CHE-166.396.031 (Switzerland)
20

 Loading...