

Page 1
VILTA-M Pro
Stabilizer for Smartphone
User Manual
Freevision Intelligent Technology Co.,Ltd.
Page 2

Contents
Overview
Packing List
Product Overview
Installation
App Installation
Smartphone Installation and Balance
App Connection
Start Up
Control Panel Introduction
App Menu Introduction
App Operation
Specifications
Specifications Parameter
Technical Parameter
Other Specification
02
03
04
05
07
08
12
14
17
17
18
Warning
Warranty Information
19
23
0101
Page 3
| OVERVIEW |
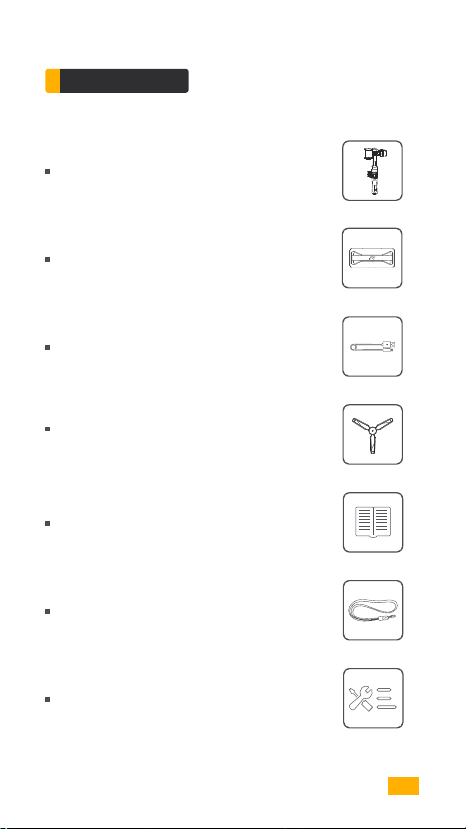
Packing List
VILTA-M pro
Portable Bag
Charging Cable
Tripod
User Manual
Lanyard
Warranty Card
0102
Page 4
| OVERVIEW |
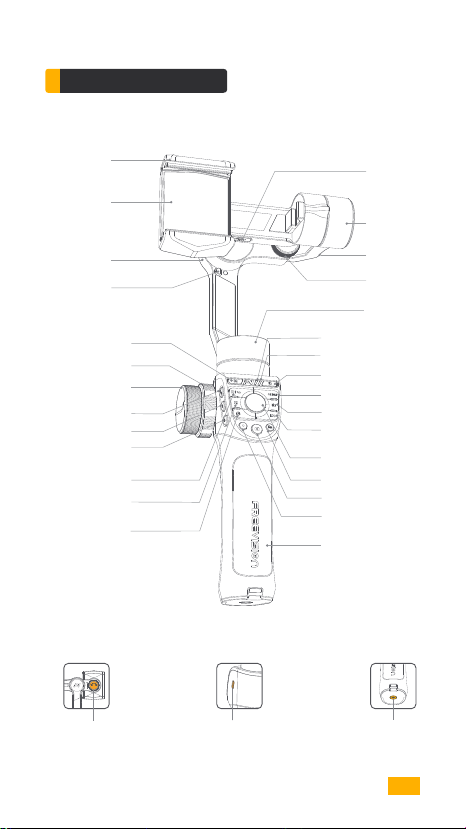
Product Overview
Smartphone
Mounting Holder
Wireless Charging
Roll Axis
Roll Axis Buckle
Scene Mode Switch
Camera Parameter
Adjustment Wheel
Focus/Zoom Wheel
Focus/Zoom Button
Mark A Button
Mark B Button
Menu/Back Button
EV Button
Shutter Button
Portrait and
Landscape Knob
USB-A
Charging Port
Tilt Axis
Adjustable Arm
Balance
Adjustment Knob
Pan Axis
Connection Indicator LED
Status Indicator LED
Power Button
OK/DISP Button
Album Mode Button
ISO Button
Joystick
Custom Mode Button
Quick Shutter Button
Record Button
Handle Grip
1/4 Inch Screw PortType-C Charging Port
03
Page 5

| Installation |
App Installation
Download FV Share App
For Android users, please search FV Share App in Google Play.
(Android 5.0 or above)
For iOS users, please search FV Share App in App Store.( iOS 9.0 or above)
Available on the
App Store
04
Page 6
| Installation |
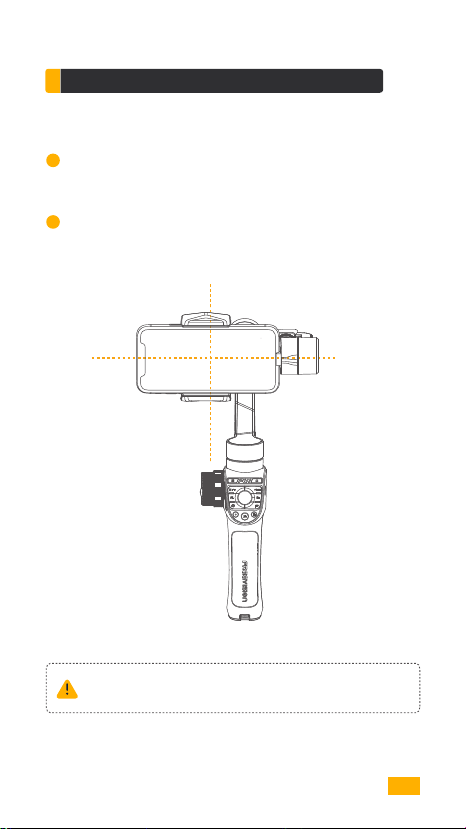
Smartphone Installation and Balance
1
Place the mobile phone in the smartphone mounting holder while pulling
the sides of the holder outwards, then release the sides of the holder. It
is recommended that you position the mobile phone close to the tilt axis.
2
Turn the mobile phone over facing downwards, adjust the position of
the phone in the holder to balance the tilt axis(refer to the picture
below) and then tight up the balance adjustment knob.
Always keep your phone mounted and well balanced in level prior
to power on.
05
Page 7
| Installation |
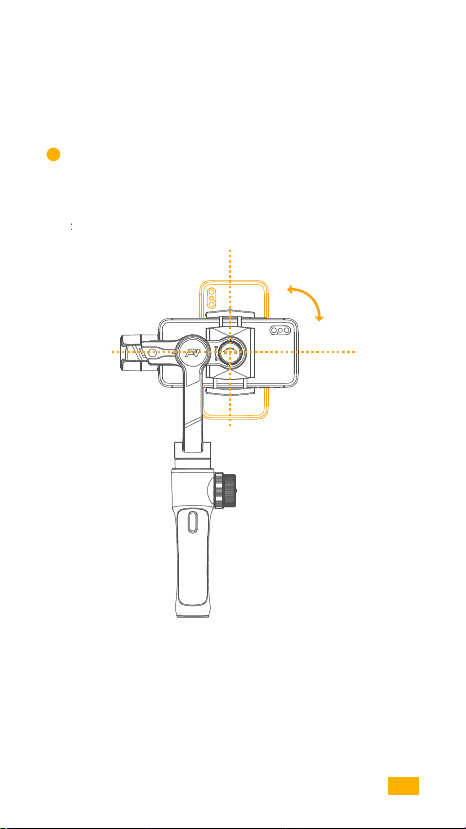
3
Manually rotate the phone holder to switch between horizontal and
vertical screens.
06
Page 8
| Installation |
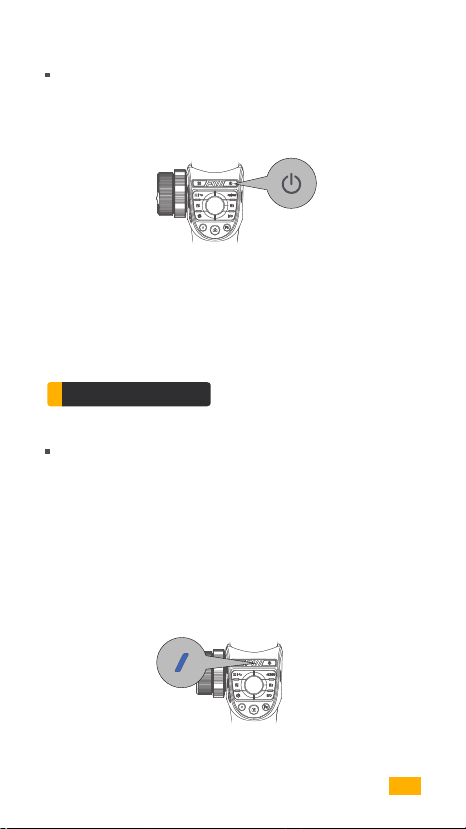
Power On/Off
Long press power button for 3 seconds to power on/off.
Power Button
App Connection
FV Share Connection
For Android users, please turn on GPS)
Power on VILTA-M Pro
Open FV Share
Tap Connect to Gimbal and choose your gimbal to connect.
After successfully connecting, the blue connection indicator LED stops
flashing and turns solid blue.
Connection
Indicator LED
07
Page 9

| Start Up |
Operating instructions
Shooting Subject Switching
1
Choose two different depth of fields of the shooting subject.
Use Focus/Zoom Wheel to choose one of your subjects. Long press the
Mark A button to confirm.
Use Focus/Zoom Wheel to choose the other subject. Long press the Mark
B button to confirm.
When recording, single tap the Mark A and B button to switch the focus
of the subject.
Mark B
Quick Zoom / Focus
2
Mark A
Single tap to zoom/focus switching button
Adjust the focus or zoom with the
Focus/Zoom wheel
3
Quick Camera Parameter Adjustment
Single tap EV button, shutter button, ISO button to turn on quickly the
manual camera parameter adjustment.
Camera Parameter Adjustment Wheel
Focus/Zoom Wheel
Camera Parameter
Adjustment Wheel
08
Page 10
| Start Up |
4
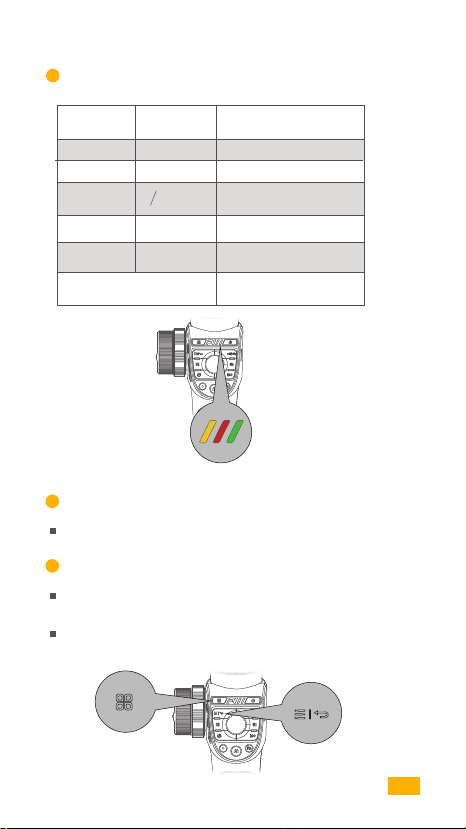
Mode indicator LED and Mode switch
Follow Mode
Button
Single tap
Double taps
Three taps
Four taps
Long press
Long press and move
the joystick
5
Scene Mode Switching
Single tap to switch between walk mode, sports mode, custom mode.
6
Menu/Return Button
In the primary level of the App interface, single tap the menu key to
switch to menu bar options.
In the secondary level of the APP interface, single tap the Back button
to return to the previous menu and long press to exit the menu.
Status
Indicator LED
Yellow
Red
Yellow light
flashes
Green
Gimbal Mode
Semi follow mode
Full follow mode
For quick positioning
of the direction
POV mode
To lock the current
camera shooting angle
To adjust the roll
axis angle
Status
Indicator LED
Scene Mode Switching
Menu/Return Button
09
Page 11
| Start Up |
7
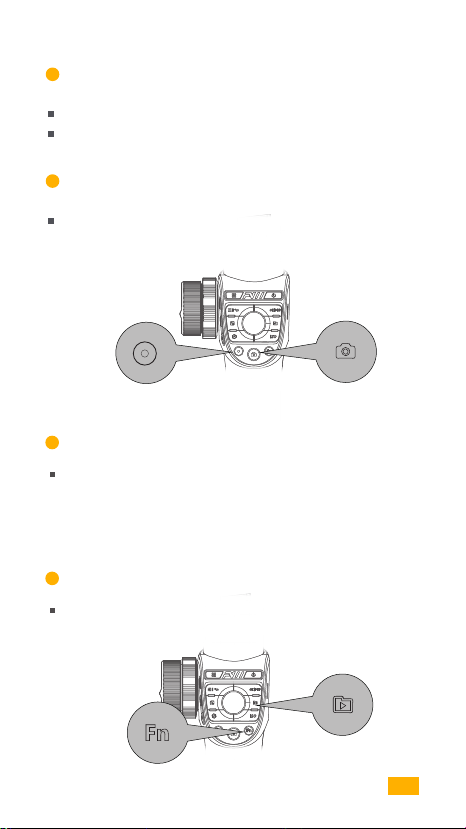
Record Button
Single tap to start/exit recording.
Double tap to switch front and rear facing camera.
8
Shutter Button
Light press Shutter Button to focus. Deep press Shutter Button to take
a photo.
Record Button Shutter Button
9
Custom mode Button
Default hand following mode, customized flash, white balance and wireless
charging power switch.
(Hand following mode: the motor responds at high speed, and follows quickly the handle
rotation to meet the fast transition effect)
10
Album Mode Button
Single tap the album mode button to view the album.
Single tap the back button to return to the previous menu.
Custom mode Button
Album Mode Button
10
Page 12
| Start Up |
11
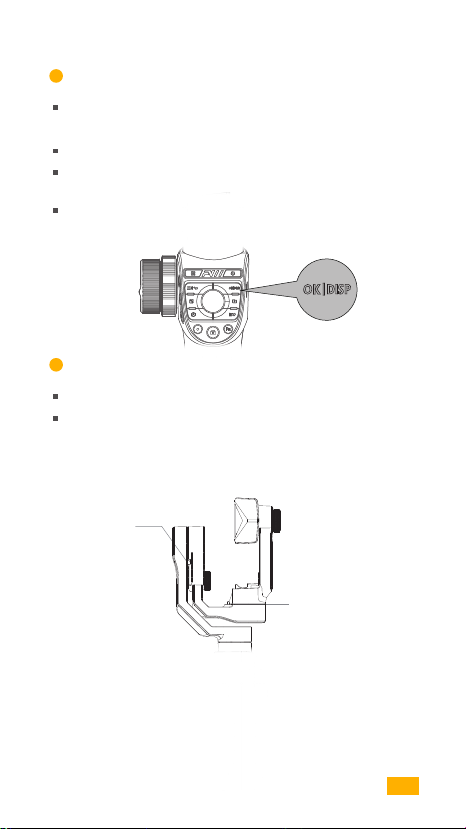
OK/DISP Button
When adjusting the camera parameters, single tap OK to confirm the
parameters.
When viewing the album, single tap OK to confirm the playback.
When the APP is on the primary interface display, single tap the DISP
button to display the current camera parameters.
When viewing photos, single tap the DISP button to display photo
information.
OK/DISP Button
12
Gimbal Sleeping mode
Single tap the power button to activate the sleeping/waking up mode .
If any buckle is locked, the gimbal will automatically sleep.
If unlock all buckles, the gimbal will resume its operation.
The gimbal will automatically power off if it sleeps for more than 15 minutes.
Buckle
Buckle
11
Page 13
| Start Up |
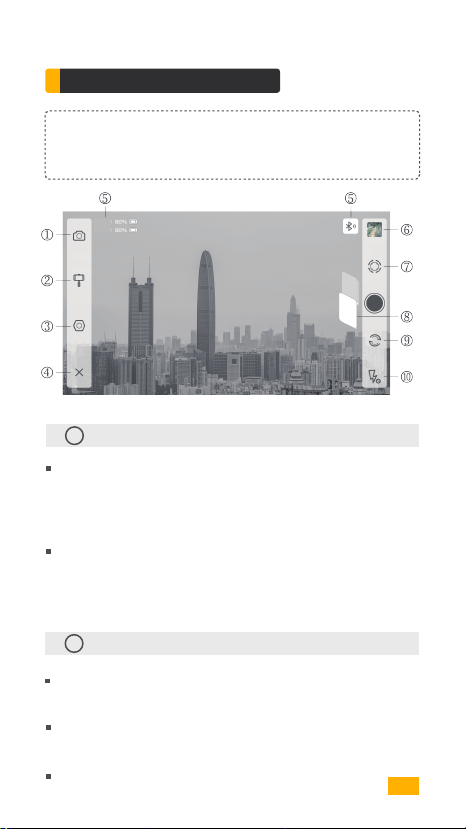
App Menu Introduction
Due to the limitations of Android phones, VILTA-M Pro Android users
will not be able to use all the functions for the time being. Thank you for
your understanding and support.
Phone
Gimbal
Video
Phone
01
Camera Settings
Camera Mode:
Time-lapse, Panorama, Long Exposure, Beautify, HDR, Filter, White
Balance, Grid, Camera Manual Mode
Video Mode:
Slow Motion, Beautify, Filters, Time Lapse, Motion Time Lapse,
Motion Lapse, White Balance, Grid,Camera Manual Mode, Hitchcock
02
Gimbal
Scene Modes:
Walk Mode, Sport Mode, Custom Mode
Follow Modes:
Follow Mode, Semi-follow Mode, Lock Mode, POV Mode
Focus wheel function
12
Page 14
| Start Up |
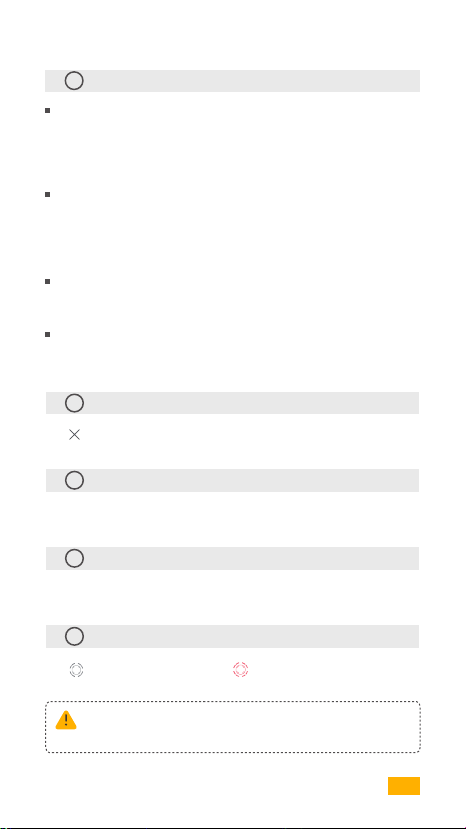
03
Advanced Settings
Camera
Camera Resolution, Video Resolution, Panorama Quality,
Panorama Saved, Photo and Video Save Address,Phone Anti-shake
Mark point switching speed
Gimbal
Roll Axis Attitude Adjustment,Scene Mode Settings, Dead Zone
Settings, Gimbal Calibration, Reset All,Custom button function
settings, Wireless charging
Joystick
Speed, Dead Zone, Direction, Smooth Degree
Information
Gimbal Battery Information, Gimbal Information, About App, Live
04
Return
Tap to return to App home page
05
Information
Gimbal Battery, Phone Battery, Bluetooth Connection Status
06
Documents
Preview and storage location of photos and videos.
07
IntelliTrace
Tap to turn on IntelliTrace. Tap to turn off IntelliTrace.
Frame the subject and VILTA-M Pro will track in real time.
Answering a phone when recording or in IntelliTrace, the
recording will be automatically stopped.
13
Page 15
| Start Up |
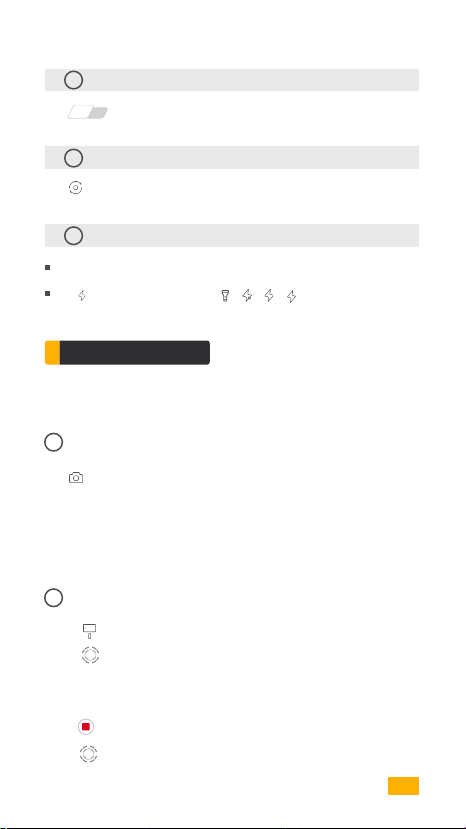
08
Photo/Video Switch
Phone
Video
Tap to switch
09
Front/Back Camera Switch
Tap to switch
10
Flashlight Status
Display current flashlight status
Tap to switch flashlight state
A
App Operation
Photo Mode
01
Panorama
Tap to enter panorama. Choose 180°, 330°, 3*3, 3*5, VILTA -M Pro
will automatically shoot and compose a panorama. It will be automatically
saved to documents.
Video Mode
02
IntelliTrace
1. Tap and choose sport mode in scene mode.
2. Tap to start IntelliTrace.
3. Tap or draw a frame of the subject on your phone screen. VILTA-M pro
will intelligently identify and automatically track subject.
4.Tap to start shooting.
5.Tap to exit IntelliTrace.
14
Page 16
| Start Up |
03
Time Lapse
1. Tap and choose time lapse.
2. Set shutter interval and time of duration. Tap Start.
3. Tap to exit shooting. Video will be automatically saved to
documents.
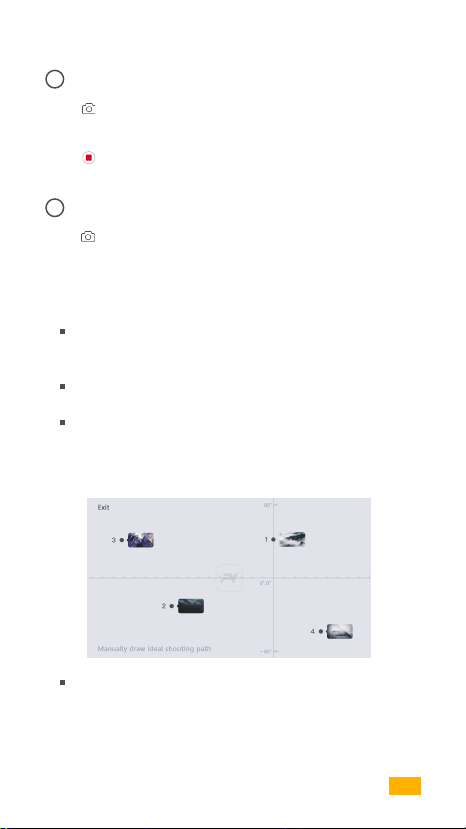
04
Motion Time Lapse
1. Tap and choose motion time lapse.
2. Set shooting points
Auto Mode
Manually adjust phone to one position. Take photo at that
position. It is shooting point A. Likewise, other shooting
points can be done in the same approach.
Shooting path will be generated according to the shooting
points.
Adjust smoothness of the shooting path.
Manual Mode
Draw shooting path at will on your phone screen.
3. Set shutter interval and time of duration. Tap Start.
15
Page 17
| Start Up |
05
Slow Motion Video
1. Tap and choose slow motion.
2. Tap to start shooting. Tap to exit shooting.
Videos will be automatically saved to documents.
06
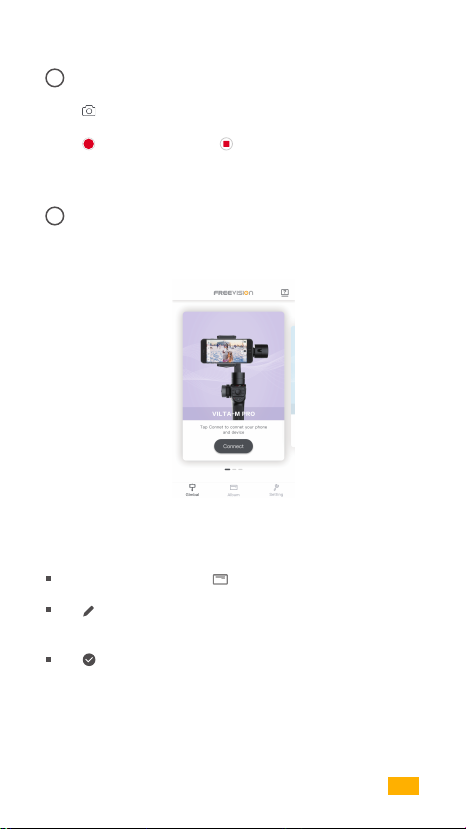
Photo/Video Editing
1. Photo Editing
Enter App home page and tap at the bottom.
Tap to choose the photo and editing ( Filter, Beautify,
Adjust, Mosaric, Crop, Paint )
Tap to confirm editing.
16
Page 18
| Start Up |
2. Video Editing
Enter App home page and tap at the bottom. Choose video.
Tap to editing (Add Video, Video Editing, Add
Music, Filter, Adjust)
Tap to confirm editing.
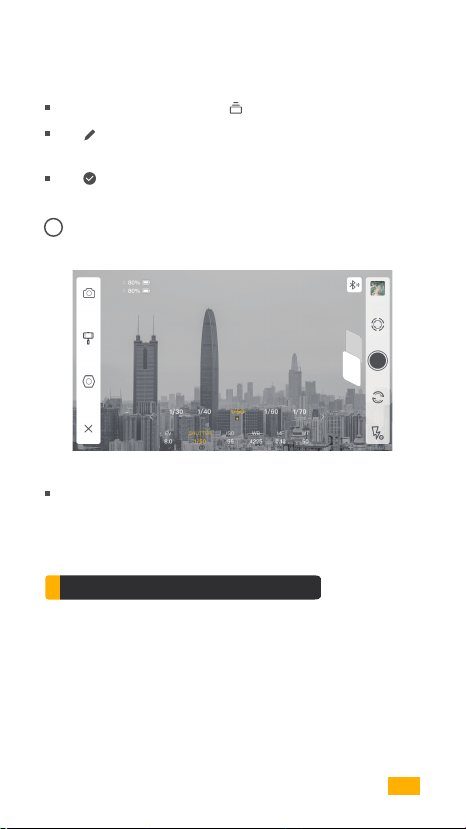
07
Camera Manual Mode
iPhone
Gimbal
Video
Phone
Adjust exposure,shutter,ISO, white balance, manual focus
and zoom of your phone camera.
Specifications Parameter
Name
Item No.
Dimensions
Weight
VILTA -M Pro
VT30
332*122*62mm (Folded)
635g
Supporting phone width 55~85mm
gimbal maximum load capacity
275g
17
Page 19

| SPECIFICATIONS |
Technical Parameter
01
Mechanical Rotation Range
Tilt
Roll
Pan
02
Maximum Control Speed
Adaptive Rotation Speed(±500°/ s )
03
Battery
Battery Type
Voltage
Working Current
Above data come from laboratory. Gimbal has been well
balanced. Wireless charging function is turned off. Data
vary according to phone models and gimbal balance status.
330°
325°
360° unlimited
Intelligent Lithium Battery
7.4V
Static: 93mA Dynamic:3.6A
2000mAHBattery Capacity
14.8WHEnergy
Static: 0.7W ynamic:26.5WConsumption
Other Specification
Operating Temperature
Bluetooth version
-10℃~40℃
Bluetooth 4.2
18
Page 20

| WARNING |
Warning
Buckles will cause slight wear and tear due to friction during use.
Do not expose to fire or high heat.
Drop and collision will break VILTA-M Pro. Please use it carefully.
Not water-proof. Keep away from liquids or do not clean with liquid detergent.
Do not disassemble, repair or modify VILTA-M Pro.
Please use charging cable complying with public safety regulation.
Do not interfere gimbal on its working operation.
Not suitable for children.
Smartphones are not included.
Web: www.fvshare.com
Tel: +86 4009970100
Email: [email protected]
@freevisiontech
19
Page 21

| WARNING |
CE Maintenance
Caution:
Use the Product in the environment with the temperature Between -10℃
and 40℃; Otherwise, it may damage your product. Products can only be
used below 2000m altitude.
For the following equipment:
Product Name: VILTA-M Pro
Model: VT30
Brand Name: FREEVISION
Hangzhou Freevision Intelligent Technology Co., Ltd.
E-mail: [email protected]
Hereby declares that this [Name: VILTA-M Pro, Model: VT30] is in compliance
with the essential requirements and other relevant provisions of Directive
2014/53/EU.
The full text of the EU declaration of conformity is available at the internet
address: www.fvshare.com
This product is intended for sale and application in a business environment.
RED Article 10 2
-This product can be used across EU member states
RED Article 10 10
-The product is class 1 product, No restrictions
Bluetooth Version: V4.2 (Only BLE)
Frequency Range: 2402-2480MHz
Max. RF Output Power: -2.01dBm (EIRP)
WPT Frequency Range: 110~205kHz (Only Power transmission)
Antenna Type: Coil Antenna
RISK OF EXPLOSION IF BATTERY IS REPLACED
DISPOSE OF USED BATTERIES ACCORDING
CAUTION
BY AN INCORRECT TYPE.
TO THE INSTRUCTIONS
20
Page 22

| WARNING |
FCC Warning
This device complies with part 15 and part 18 of the FCC Rules. Operation is
subjectto the following two conditions:
(1) This device may not cause harmful interference, and (2) this device must
accept any interference received, including interference that may cause
undesired operation.
Note 1: This equipment has been tested and found to comply with the limits
for a Class B digital device, pursuant to part 15 of the FCC Rules. These limits
are designed to provide reasonable protection against harmful interference
in a residential installation.
This equipment generates uses and can radiate radio frequency energy and,
if not installed and used in accordance with the instructions, may cause harmful interference to radio communications. However, there is no guarantee
that interference will not occur in a particular installation. If this equipment
does cause harmful interference to radio or television reception, which can
be determined by turning the equipment offand on, the user is encouraged
to try to correct the interference by one or more of the following measures:
-Reorient or relocate the receiving antenna.
-Increase the separation between the equipment and receiver.
-Connect the equipment into an outlet on a circuit different from that to
which the receiver is connected.
-Consult the dealer or an experienced radio/TV technician for help.
NOTE 2: Any changes or modifications to this unit not expressly approved
by the party responsible for compliance could void the user's authority to
operate the equipment.
21
Page 23

| WARNING |
Warranty Card
From the purchase date, you enjoy the free repair within 12 months with this
card if it occurs any quality problems.
Warranty Rules
If your VILTA meets the following requirements, you can enjoy the warranty
policy:
1) If within 7 days of purchase and it occurs manufacturing defect, the
customer can choose to have a full refund (based on the invoice price)
or exchange the product for a new one.
2) With 1 years of purchase, you can enjoy free repair if it is non man-made
problem.
3) The product has not been refitted, dissembled or modified.
4) Valid purchase proof is provided.
Non warranty rule
If your VILTA falls under one of the following situations, we will charge appr-
opriate maintenance cost:
1) A man made problem affecting the quality of product;
2) Damage caused by refitting, disassemble, or opening of the shell;
3) An uncontrollable incident( earthquake, fire, flood, war) resulting damage;
4) Damage caused by not using as stated in the user manual
Warranty Information
1) The customer is at first required to pay the product return delivery fee.
After Freevision after-sale service center receives the product, it will
undergo a test.
2) If the product does not conform to the conditions for free repair,
Freevision will assess the problem and cost of repair, the customer has
the right to repair or deliver it back.
3) When you receive the repair service, please provide valid purhase proof
and this warranty card. Please note: The warranty card only becomes
valid after sale. The card can not be altered, or it will be deemed invalid.
4) Freevision reserves the right of final interpretation.
22
Page 24

| WARRANTY INFORMATION |
From the purchase date, you enjoy free repair within 12 months with this
card if it occurs any quality problems.
Warranty Rules
If your VILTA Mobile meets the following requirements, you can enjoy the
warranty policy:
If within 7 days of purchase and it occurs manufacturing defect, the cus
tomer can choose to have a full refund(based on the invoice price) or ex
change the product for a new one;
Within 1 year of purchase, you can enjoy free repair if it is non man-ma
de problem;
The Product has not been refitted, dissembled or modified;
Valid purchase proof is provided.
Non Warranty Rules
If your VILTA Mobile falls under one of the following situations, we will ch
arge appropriate maintenance cost:
A man-made problem affecting the quality or product;
Damage caused by refitting, disassemble, or opening of the shell;
An uncontrollable incident (earthquake, fire, flood, war) resulting damage;
Damage caused by not using as stated in the user manual.
Warranty Information
The customer is at first required to pay the product return delivery free.
After Freevision after-sale service center receives the product, it will un
dergo a test.
If the product does not conform to the conditions for free repair, Freev
ision will assess the problem and cost of repair, the customer has the
right to repair or deliver it back.
When you receive the repair service, please provide valid purchase pro
of and this warranty card.Please note: the warranty card only becomes
valid after sale. The card can not be altered, or it will be deemed invalid.
Freevision reserves the right of final interpretation.
23
Page 25

| WARRANTY INFORMATION |
Customer Information
Name:
Tel:
Zip Code:
Email:
Address:
Dealer Information
Name:
Tel:
Zip Code:
Email:
Address:
Product Information
Item No.
Product Code:
Purchase Date:
24
Page 26

| WARRANTY INFORMATION |
Warranty Card
Inspection Date
Repair Date Result Technician Cause
25
Page 27

 Loading...